indie project bag pattern - art gallery fabrics€¦ · indie project bag pattern #4 diagram #4 -...
TRANSCRIPT
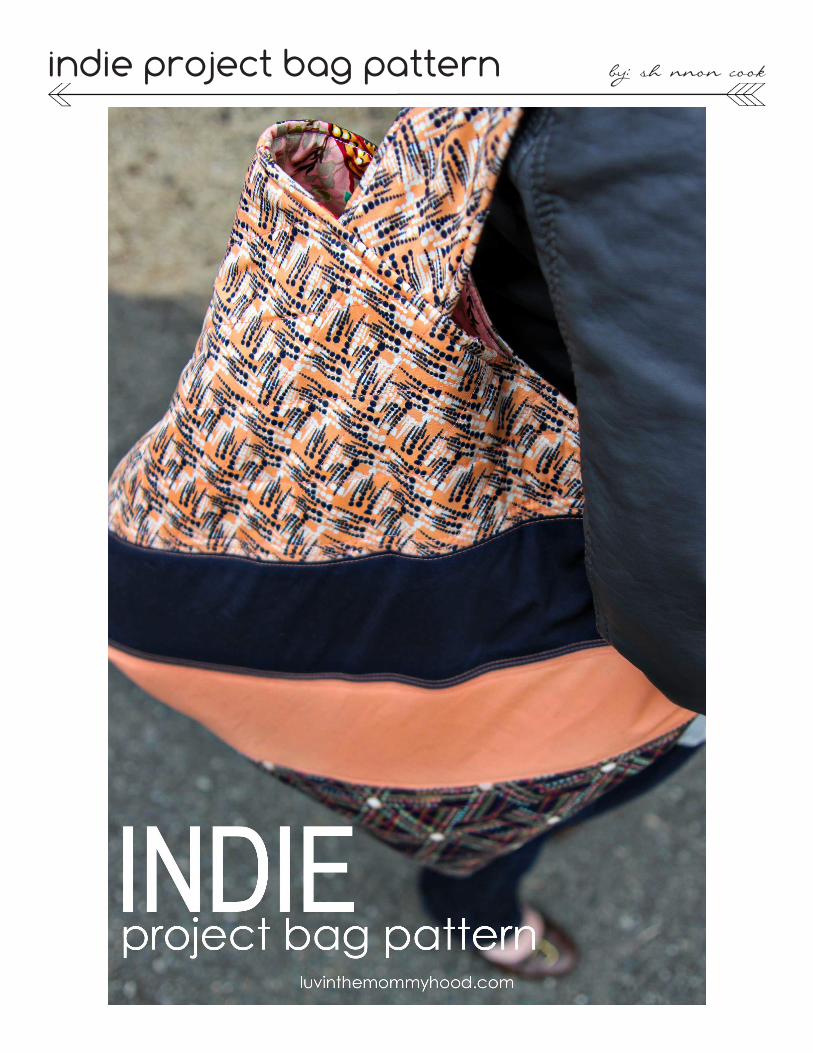
indie project bag pattern by: shannon cook


indie project bag pattern|MATERIALS |• 1 “Fat Quarter” of each of the following prints
for your outer bag: - *PE-428 Nocturnal Pure Elements - *PE-426 Apricot Crepe Pure Elements - *IN-5102 Afro Fusion Dusk
• 1/2 yard IN-5209 Tapestry Salmon (for outer bag & straps).
• 1/2 yard IN-5207 Royal Nature Nectar (for lining & pocket)
• Co-ordinating thread• (2) pieces 16 1/2“ x 16 1/2“ of batting for bag• (2) pieces 6“ x 26“of batting for strap• (1) 14mm Magnetic Snap• (2) 2” x 2” pieces of batting for snap• Quilting Pins if desired• Washable Fabric Marker• Seam Ripper• Scissors and/or rotary cutter & mat
• Page size is 8.5” x 11”.• Make sure that when printing your pattern
pieces your printer is set to “actual size” and/or you set your page scaling to “none”. Be sure nottoselect“shrinktofit”oranyotherpagescaling as this will result in your pattern pieces being the incorrect size.
• Seam allowances are already included on the pattern pieces.
1. TOPSTITCHING: A straight stitch that is sewn 1/8” along the right edge of a seam.
2. FINISH THE SEAM ALLOWANCES: You may choosetouseaserger,finishyourseamsbyrunning a zigzag stitch over the raw edge of your seam allowance or by simply sewing a straight stitch ¼” from your raw edge then trim your seam allowance with pinking shears.
3. BACKSTITCH: Sew in reverse for a few stitches at the beginning and end of your seam. This helps to prevent your stitches from coming unsewn.
|GLOSSARY |
|PRINTING|
Copyright 2012 luvinthemommyhood.com All rights reserved. For personal use only unless prior permission has been given. [email protected]
a fun, friendly neighbourhood connecting creative moms | www.luvinthemommyhood.com
*Note: A fat quarter is 18“ x 22“. I chose to do my straps in the same colorway as one of my triangle prints so I used a 1/2 yard of that particular fabric to get my strap length.
by: shannon cook
page 1

Copyright 2012 luvinthemommyhood.com All rights reserved. For personal use only unless prior permission has been given. [email protected]
a fun, friendly neighbourhood connecting creative moms | www.luvinthemommyhood.com
indie project bag pattern
|PATTERN PIECES|
x 4
x 2
x 1
x 2 x 2
Strap PiecesCut (4) @ 6”H x 26”W
from one of your outer triangle prints.
Batting for StrapsCut (2) @ 6”H x 26”W
from batting.
Pocket Cut 16 1/2“W x 11 1/4“ H
from lining fabric.
x 4
Inthispatternyouwillfind4pagesofpatternpiecestoprintout.Theseareyourpatternpiecesforthe outer portion of your bag. After your pattern pieces are printed, join your pieces together by cut-ting along the dashed lines and matching them up.
Triangle Outer Pieces
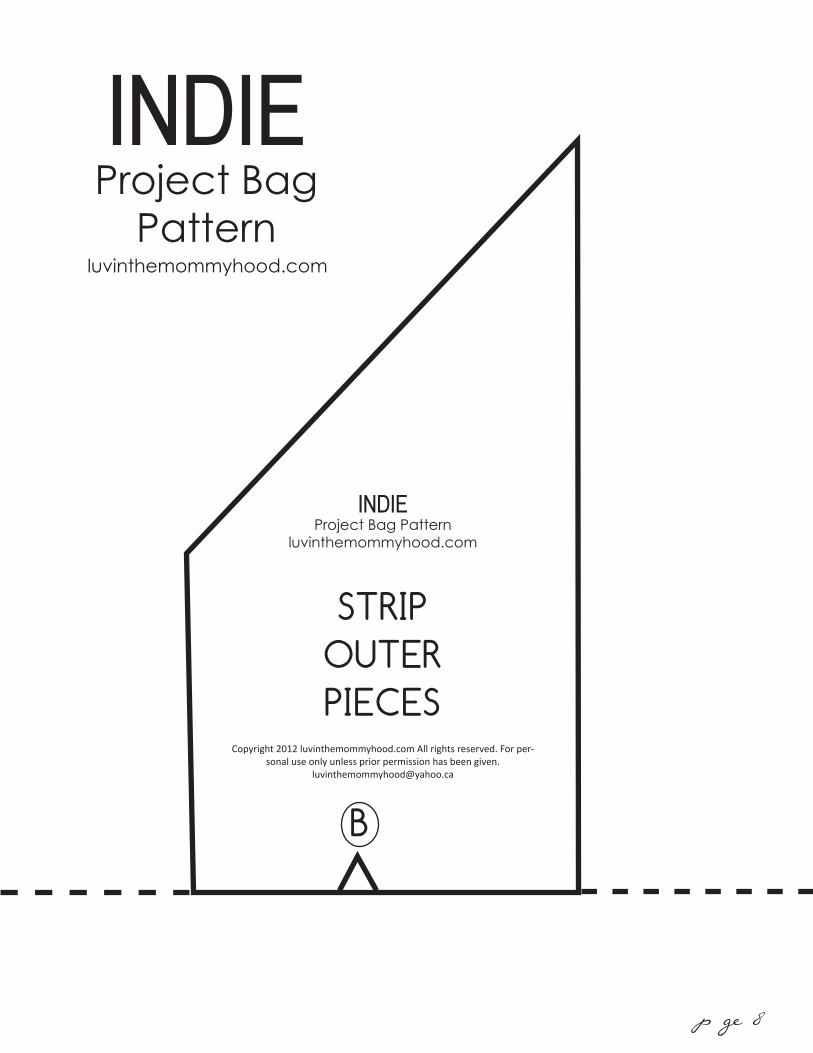
StripOuterPieces
Cut using pattern pieces.
Cut using pattern pieces. x 4
PRINTABLE PATTERN PIECES
*I cut (2) triangles out of two different prints.
*I cut (2) strips out of two different prints.
CUT THE FOLLOWING AS OUTLINED BELOW:
page 2
by: shannon cook
Batting for BagCut (2) @ 16 1/2“W x
16 1/2“ H from batting.
Lining for BagCut (2) @ 16 1/2“W x 16 1/2“ H from lining
fabric.
Finished Dimensions of bag: 15 1/2” x 15 1/2”
Copyright 2012 luvinthemommyhood.com All rights reserved. For personal use only unless prior permission has been given. [email protected]
a fun, friendly neighbourhood connecting creative moms | www.luvinthemommyhood.com
indie project bag pattern
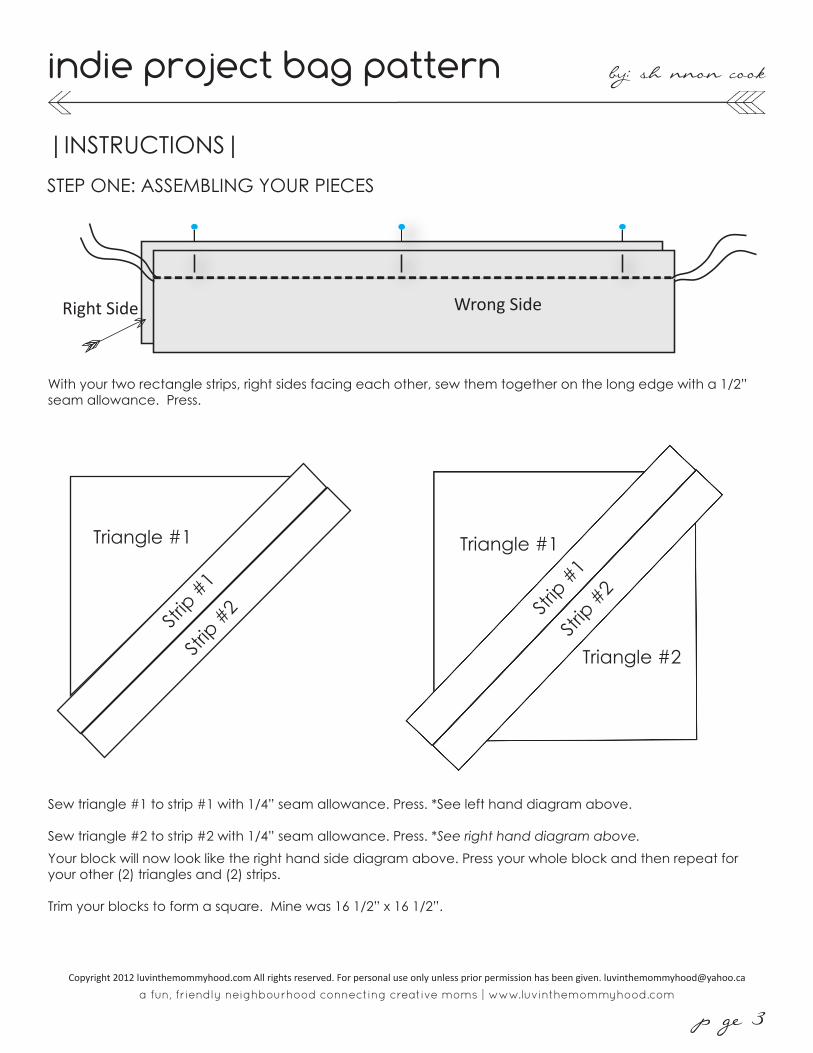
With your two rectangle strips, right sides facing each other, sew them together on the long edge with a 1/2” seam allowance. Press.
Triangle #1
Triangle #2
Strip #
1Str
ip #2
Your block will now look like the right hand side diagram above. Press your whole block and then repeat for your other (2) triangles and (2) strips.
Trim your blocks to form a square. Mine was 16 1/2” x 16 1/2”.
Wrong SideRight Side
Sew triangle #1 to strip #1 with 1/4” seam allowance. Press. *See left hand diagram above.
Sew triangle #2 to strip #2 with 1/4” seam allowance. Press. *See right hand diagram above.
|INSTRUCTIONS|STEP ONE: ASSEMBLING YOUR PIECES
Triangle #1
Strip #
1Str
ip #2
page 3
by: shannon cook
Copyright 2012 luvinthemommyhood.com All rights reserved. For personal use only unless prior permission has been given. [email protected]
a fun, friendly neighbourhood connecting creative moms | www.luvinthemommyhood.com
indie project bag pattern
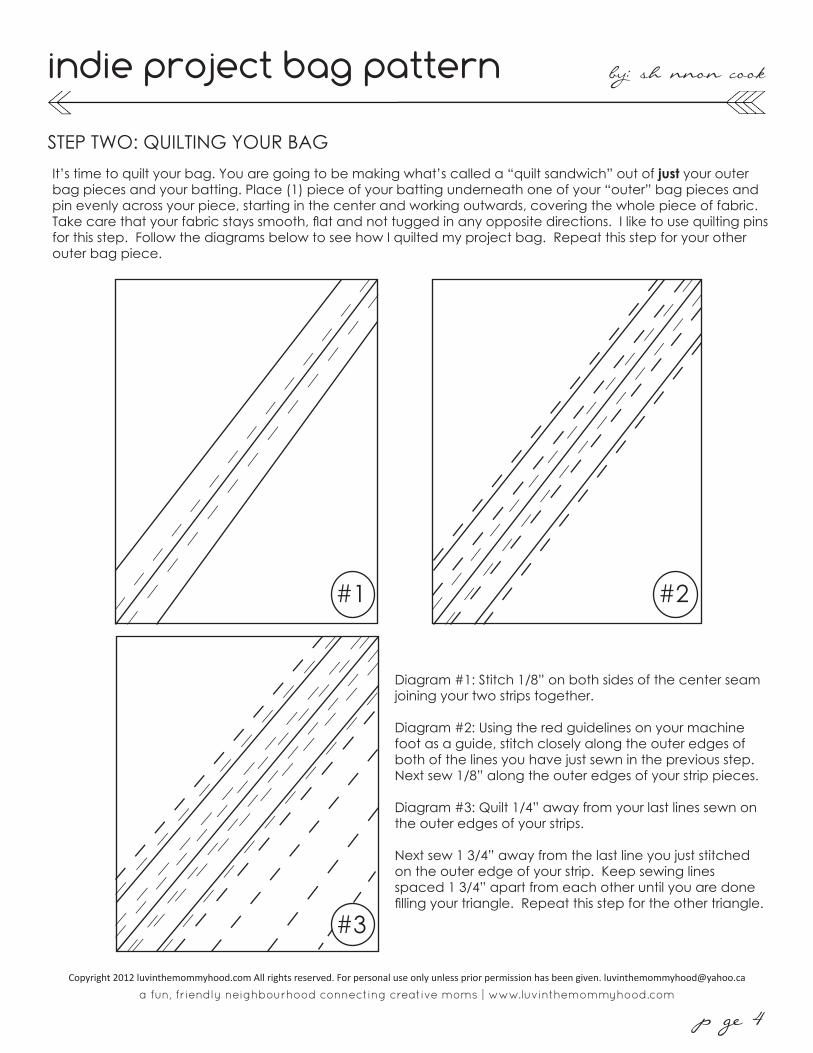
It’s time to quilt your bag. You are going to be making what’s called a “quilt sandwich” out of just your outer bag pieces and your batting. Place (1) piece of your batting underneath one of your “outer” bag pieces and pin evenly across your piece, starting in the center and working outwards, covering the whole piece of fabric. Takecarethatyourfabricstayssmooth,flatandnottuggedinanyoppositedirections.Iliketousequiltingpinsfor this step. Follow the diagrams below to see how I quilted my project bag. Repeat this step for your other outer bag piece.
#1 #2
Diagram #1: Stitch 1/8” on both sides of the center seam joining your two strips together.
Diagram #2: Using the red guidelines on your machine foot as a guide, stitch closely along the outer edges of both of the lines you have just sewn in the previous step. Next sew 1/8” along the outer edges of your strip pieces.
Diagram #3: Quilt 1/4” away from your last lines sewn on the outer edges of your strips.
Next sew 1 3/4” away from the last line you just stitched on the outer edge of your strip. Keep sewing lines spaced 1 3/4” apart from each other until you are done fillingyourtriangle.Repeatthisstepfortheothertriangle.
STEP TWO: QUILTING YOUR BAG
#3
page 4
by: shannon cook
Copyright 2012 luvinthemommyhood.com All rights reserved. For personal use only unless prior permission has been given. [email protected]
a fun, friendly neighbourhood connecting creative moms | www.luvinthemommyhood.com
indie project bag pattern
#4
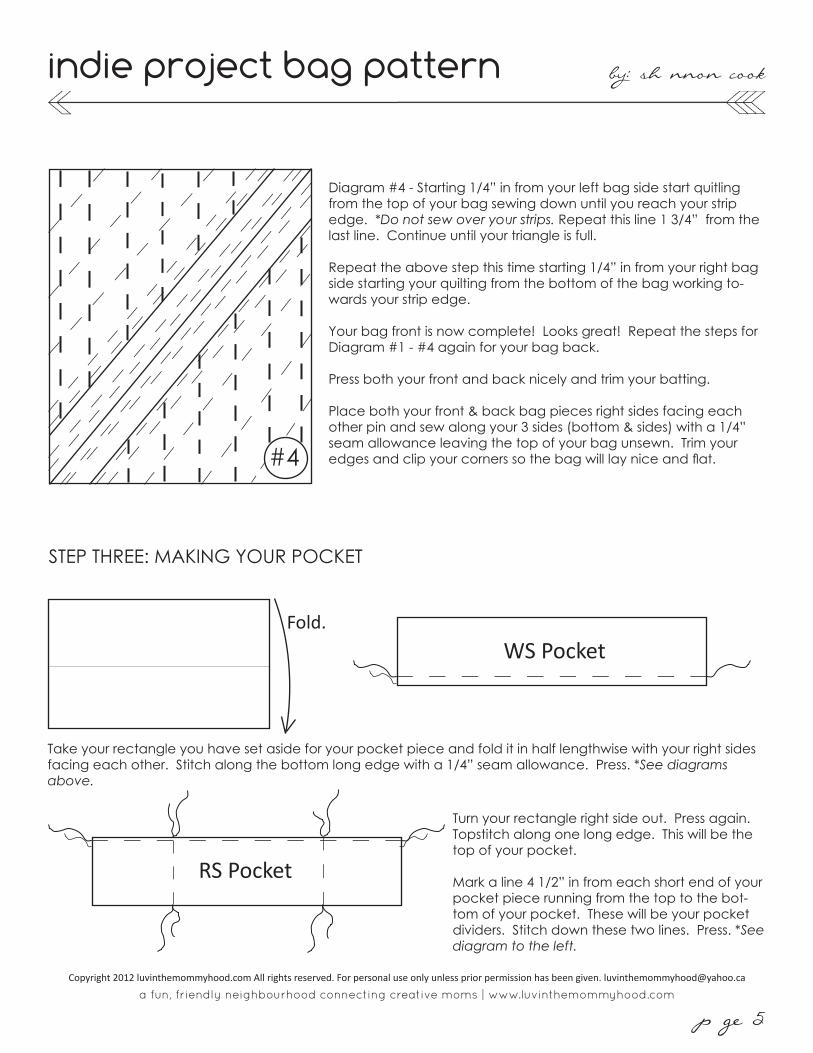
Diagram #4 - Starting 1/4” in from your left bag side start quitling from the top of your bag sewing down until you reach your strip edge. *Do not sew over your strips. Repeat this line 1 3/4” from the last line. Continue until your triangle is full.
Repeat the above step this time starting 1/4” in from your right bag side starting your quilting from the bottom of the bag working to-wards your strip edge.
Your bag front is now complete! Looks great! Repeat the steps for Diagram #1 - #4 again for your bag back.
Press both your front and back nicely and trim your batting.
Place both your front & back bag pieces right sides facing each other pin and sew along your 3 sides (bottom & sides) with a 1/4” seam allowance leaving the top of your bag unsewn. Trim your edgesandclipyourcornerssothebagwilllayniceandflat.
STEP THREE: MAKING YOUR POCKET
RS Pocket
Turn your rectangle right side out. Press again. Topstitch along one long edge. This will be the top of your pocket.
Mark a line 4 1/2” in from each short end of your pocket piece running from the top to the bot-tom of your pocket. These will be your pocket dividers. Stitch down these two lines. Press. *See diagram to the left.
Fold.WS Pocket
Take your rectangle you have set aside for your pocket piece and fold it in half lengthwise with your right sides facing each other. Stitch along the bottom long edge with a 1/4” seam allowance. Press. *See diagrams above.
page 5
by: shannon cook

Copyright 2012 luvinthemommyhood.com All rights reserved. For personal use only unless prior permission has been given. [email protected]
a fun, friendly neighbourhood connecting creative moms | www.luvinthemommyhood.com
indie project bag pattern
Grab one of your lining pieces and with it’s right side facing up mark the center of the piece 5” down from the top of your lining. Now mark the center of your pocket rectangle. Pin your pocket to your lining piece well, matching up your markings for the center 5” down from the top. Sew along the bottom of the pocket 1/8” from the bottom of your pocket. *See diagram to the left.
If you like you could also choose to baste down your pocket sides as well if you want to make sure nothing moves or get’s accidentally shift-ed/folded while you assemble your bag.
Now grab your other lining piece and place both lining pieces right sides facing each other. Pin and sew along your 3 sides (bottom & sides) with a 1/4” seam allowance leaving the top of your lining unsewn. Trim your edg-esandclipyourcornerssotheliningwilllayniceandflat.
STEP FOUR: MAKE YOUR STRAPS
Take (2) strap pieces and place RS facing each other. Grab one of your batting pieces for the straps and place it against the WS of one of your (2) straps pieces. *See diagram above.
Straps RS Facing
Sew along both of your long edges with a 1/4” seam allowance. Trim your seams.
Turn the strap right side out and press with the seam you just sewed on the side of your strap. Topstitch both sides of the long edges of your strap. Press. Repeat to make your other strap. *See diagram above.
Batting
page 6
by: shannon cook
Copyright 2012 luvinthemommyhood.com All rights reserved. For personal use only unless prior permission has been given. [email protected]
a fun, friendly neighbourhood connecting creative moms | www.luvinthemommyhood.com
indie project bag tutorial
With your seam ripper gently and carefully make a small opening no bigger than the size of the prongs of your magnetic snap. Grab your magnetic snap with the prongs and place the prongs through the openings of the RS of your lining so that the prongs will end up between your lining and your outer bag fabric.
Place your 2” piece of batting and slide it over your prongs. Next slide the other part of your magnetic snap ontotheprongssoitislayingagainsttheWSofyourlining.PresstheprongsopensotheylayflatagainsttheWSof your lining as well. I usually use my scissors to press these down.
Repeat the above steps for the other side of your bag and the other (2) pieces of your magnetic snap.
Youcannowchoosetohandsewyouropeningsclosedwithaninvisiblestitch(foraneaterfinish)oryoucansimply proceed to topstitch as close as possible around the whole edge of the top of your bag taking care to close your openings.
Great job! Fill your new bag with knitting, quilting or any other projects you may be working on!!
STEP SIX: FINISHING YOUR BAGTurn your bag right side out. Press your bag taking care to press the top edge of your bag making sure to fold under your 1/2” seam allowance for your unsewn openings.
Find the center of your bag and mark it at the top of the bag on your lining. Grab the portion of your magnet-ic snap that doesn’t have the prongs. Place it on your lining about 1” down from the top of your bag on the side with your pockets. With your fabric marker mark the openings of the magnetic snap on your lining. *See diagram below.
Mark where your openings are.
RS Lining
WS Outer
RS Lining
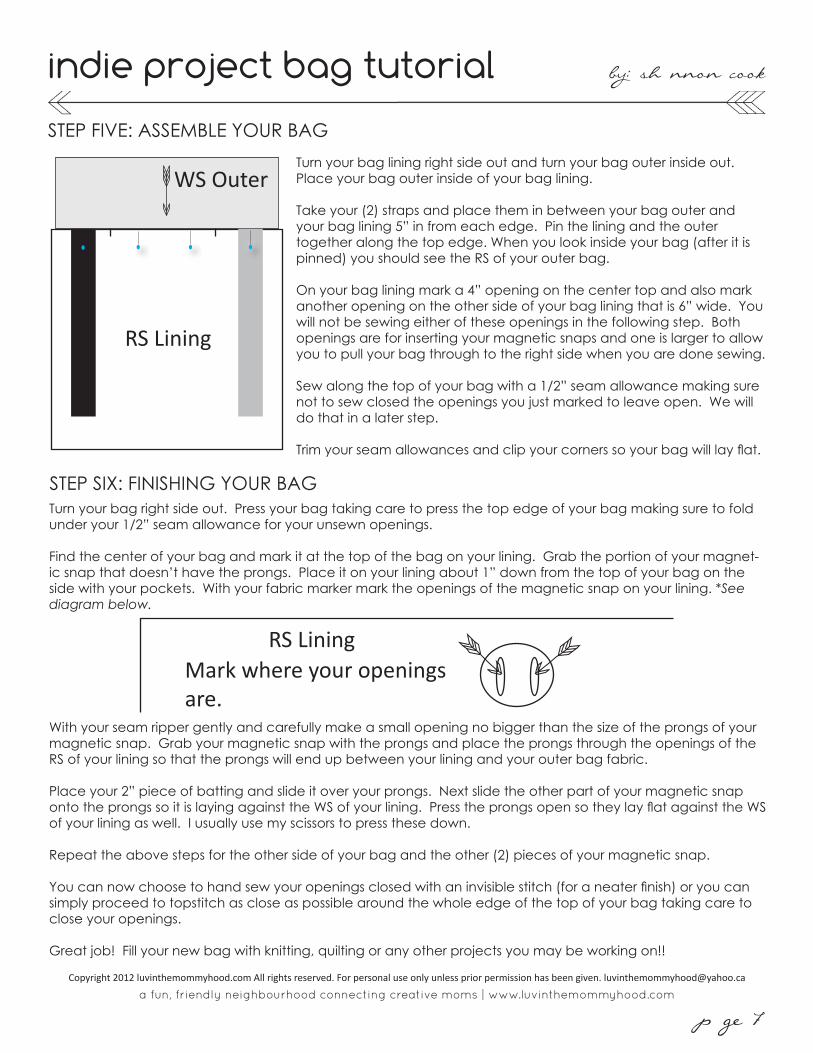
Turn your bag lining right side out and turn your bag outer inside out. Place your bag outer inside of your bag lining.
Take your (2) straps and place them in between your bag outer and your bag lining 5” in from each edge. Pin the lining and the outer together along the top edge. When you look inside your bag (after it is pinned) you should see the RS of your outer bag.
On your bag lining mark a 4” opening on the center top and also mark another opening on the other side of your bag lining that is 6” wide. You will not be sewing either of these openings in the following step. Both openings are for inserting your magnetic snaps and one is larger to allow you to pull your bag through to the right side when you are done sewing.
Sew along the top of your bag with a 1/2” seam allowance making sure not to sew closed the openings you just marked to leave open. We will do that in a later step.
Trimyourseamallowancesandclipyourcornerssoyourbagwilllayflat.
STEP FIVE: ASSEMBLE YOUR BAG
page 7
by: shannon cook
INDIEProject Bag
Patternluvinthemommyhood.com
STRIPOUTERPIECES
B
Copyright 2012 luvinthemommyhood.com All rights reserved. For per-sonal use only unless prior permission has been given.
INDIEProject Bag Pattern
luvinthemommyhood.com
page 8

Place on fold.
INDIEProject Bag
Patternluvinthemommyhood.com
B
Cut 4 -2 of each
printdesired.
Copyright 2012 luvinthemommyhood.com All rights reserved. For per-sonal use only unless prior permission has been given.
page 9

INDIEProject Bag
Patternluvinthemommyhood.com
TRIANGLEOUTERPIECES
Copyright 2012 luvinthemommyhood.com All rights reserved. For per-sonal use only unless prior permission has been given.
INDIEProject Bag Pattern
luvinthemommyhood.comPla
ce o
n fo
ld.
page 10

INDIE Project BagPattern
luvinthemommyhood.com
INDIEProject Bag Pattern
luvinthemommyhood.com
TRIANGLEOUTERPIECES Copyright 2012 luvinthemommyhood.com All rights
reserved. For personal use only unless prior permis-sion has been given.
page 11

Copyright 2012 luvinthemommyhood.com All rights reserved. For personal use only unless prior permission has been given. [email protected]
a fun, friendly neighbourhood connecting creative moms | www.luvinthemommyhood.com
indie project bag tutorial