implementing symantec ev with netapp snaplock
TRANSCRIPT

Implementing Symantec® Enterprise Vault™ with Network Appliance SnapLock®
Gangoor Sridhara, Network Appliance, Inc.
January 2007 | TR-3501
Abstract Our enterprise customer’s non-structured data is growing rapidly. This critical intellectual property includes enterprise messaging (primarily e-mail) and distributed file systems. As the volume of enterprise messaging system data and other unstructured data grows, it is clear that today’s enterprises need a structured approach to protect the data. Increased acceptance of electronic communication requires an efficient method of storing and managing the data. For legal and compliance purposes, enterprise customers require that their electronic data is archived and safely secured. Regulations require that the requested data be collected within a reasonable time. The combination of Symantec Enterprise Vault with Network Appliance storage systems provides enterprises the capability to archive and protect both business-critical e-mail and unstructured file system data in a simple-to-manage unified storage environment. This technical report discusses the procedures required to configure archiving using SnapLock with Symantec Enterprise Vault in a Network Appliance unified storage environment. Refer to the “Enterprise Vault Installation Guide for NetApp Storage System” technical report for additional details.

2

3
Table of Contents
1. Introduction 5
1.1 Background on Technical Issues 5
1.2 Purpose and Scope 5
2. Infrastructure 6
2.1 Infrastructure-Related Tasks 6
2.1.1 SnapDrive Software Installation 6
2.1.2 Microsoft Exchange Server 6
2.1.3 Domain Users Account Information 6
2.1.4 Mapping Network Share 6
2.1.5 Configuring Write Once, Read Many Storage Using SnapLock Software 7
2.2 Enterprise Vault Server Architecture 7
2.3 NetApp Storage Systems 7
3. Configuration 8
3.1 Operating System Information 8
3.2 Enterprise Vault Configuration Information 8
3.3 The Vault Service Account 8
4. Installation 8
4.1 Enterprise Vault Server 8
4.2 Post-installation Tasks 9
4.3 Enterprise Vault Configuration 9
4.3.1 Configuring Enterprise Vault for Archiving 9
4.3.2 Configuring NetApp Storage System for Archival Destination 9
4.3.3 Creating a New Vault Store 10
4.3.4 Creating a Vault Store Partition Using NetApp Storage System Destination Path 13
5. Archival Setup 17
5.1 Create an Archive Task 17
5.2 File System Archiving 17

4
6. Summary 24
7. Caveat 25
8. Appendix 25
9. References 26

5
1. Introduction
In addition to e-mail archival, file system archival (FSA) allows Enterprise Vault servers to archive and intelligently manage file system data. By taking advantage of the strengths of the NetApp storage system solution with the Enterprise Vault server, enterprise customers will be able to address information lifecycle management issues. This paper discusses the procedure for integrating the Enterprise Vault server with NetApp SnapLock solutions.
1.1 Background on Technical Issues A number of compliance regulations enacted globally require the archival content to be in its original form and that the data can be produced in a timely manner. In addition to adopting policy for compliance purposes, companies are adopting policy to protect their data. A large percentage of data belongs to file system data in the operating system. Businesses need to manage their file system data by archiving onto a central archiving system with data indexing capability. The joint NetApp storage system–Symantec Enterprise Vault solutions address this issue.
1.2 Purpose and Scope The purpose of this paper is to demonstrate the procedure for configuring Enterprise Vault and NetApp storage systems. This paper assumes that Enterprise Vault and NetApp storage systems are installed and that the reader is ready to configure the Enterprise Vault Store and Vault Store Partition. The author recommends that the reader refer to appropriate installation and configuration materials.
2. Infrastructure This section describes the necessary infrastructure in the Enterprise Vault environment. Enterprise Vault supports the Microsoft® Windows® environment. In addition to using appropriate operating systems, the solution requires a supported version of the relational database product from Microsoft and Exchange server products. Even though Enterprise Vault supports compliance, it relies on a storage system solution for retaining data. This paper describes steps for configuring the NetApp SnapLock feature to archive compliance data.
As a best practice and for support reasons, NetApp requires using either a storage-attached network using a Fibre Channel protocol or an Internet protocol (IP) based storage area network (IP-SAN) configuration for installing the SQL server and the Exchange server in addition to installing Enterprise Vault. SnapDrive® software improves the storage management. SnapManager® for SQL Server enables addressing SQL server backup and restore needs. Similarly, SnapManager for Exchange Server helps in Exchange server systems.
In our test setup, we used the following inventory:
• Windows 2003 Service Pack1 Enterprise Edition for installing Exchange Server
• Windows 2003 Service Pack1 Enterprise Edition for installing SQL Server and Enterprise Vault Server
• NetApp FAS3050C Storage System running Data ONTAP® 7.1.1 for archiving e-mail and FSA data
• NetApp FAS980 Storage System running Data ONTAP 7.1.1 for storage area network configuration
• NetApp R200 Storage System running Data ONTAP 7.1 for archiving e-mail and FSA data (and for migrating service)

6
• NetApp SnapDrive software product version 4.1 for storage management
• NetApp SAN Storage software product—Host Attach Kit 3.0
• Emulex LP9002L fabric attached adapter card and HBAnywhere software
For complete compatibility and the support matrix, refer to The Compatibility and Configuration Guide for NetApp FCP and iSCSI Products.
2.1 Infrastructure-Related Tasks To install SAN host attach kit software, follow the FCP Installation Guide on http://now.netapp.com. Additionally, SAN Manager software may also be installed. SAN Manager provides end-to-end Fibre Channel SAN management that enables NetApp customers to securely monitor and manage their enterprise storage infrastructure. To discover and monitor NetApp storage devices, SAN Manager requires a DataFabric® Manager server.
2.1.1 SnapDrive Software Installation SnapDrive supports both Fibre Channel and IP based iSCSI protocols. It offers the advantage of ease of dynamic storage management. For installing SnapDrive software, refer to SnapDrive installation and Administration Guide. This paper recommends that any NetApp storage system connected to a host reside in the same broadcast domain of that of the Windows server. To determine the feasibility of SnapDrive configurations, consult your NetApp sales team.
2.1.2 Microsoft SQL Server For a large Enterprise Vault environment, a dedicated SQL server on a separate Windows server configuration helps to address performance and data management issues. If the NetApp SAN or IP-based SAN storage configuration is used, this paper suggests using SnapDrive, a storage management utility. SnapManager for SQL Server allows easy database backup and recovery. In a production environment, several scenarios cause the Enterprise Vault Index to be corrupted. Even though this corruption is not common, the possibility exists. In case of EV Index corruption, the administrator must restore the data from the backup. Using SnapManager for SQL Server and SnapDrive, data can quickly be backed up and restored without having to restore from tapes. This could save a significant amount of time if you need to restore data from backup.
2.1.3 Domain Users Account Information An Enterprise Vault installation requires that the domain user be the EV administrator. This paper used a Windows domain called IOP and created a Windows user called ‘evadmin’ during the test setup.
2.1.4 Mapping the Network Share Enterprise Vault requires a NTFS-supported file system for the archival destination. This includes local disks and configured virtual disks with or without SnapDrive using NetApp storage systems or a network-mapped share. It is important to establish network connectivity between the Enterprise Vault server and the NetApp storage system(s). Once network connectivity is established, create a volume of the desired size. Data ONTAP 7 or later provides greater flexibility in storage configuration in defining and configuring volume sizes. SnapDrive scales the storage dynamically. It is possible to expand or shrink the storage depending on the growth of data.
In order to create a network share, a CIFS license must be enabled and the CIFS setup completed on the NetApp storage system. For our test setup, we used two storage systems, one FAS3050C system and

7
another R200 storage system. On each system, we created the necessary CIFS shares. The following figure shows the CIFS shares created on the FAS3050C system.
Figure 1) CIFS shares created on the FAS3050C storage system for EV archival.
2.1.5 Configuring Write Once, Read Many Storage Using SnapLock Software SnapLock license allows to configure the storage to retaining the contents in their read-only state for a specified time. On the NetApp storage, the system-appropriate SnapLock product license should be enabled. Currently there are two types of supported SnapLock features. The SnapLock license supports a stricter version of compliance volumes in which the file cannot be disposed of until the retention period has expired. Another version, known as SnapLock for Enterprise, gives the storage administrator control over the volume. Currently, NetApp supports both the compliance and the enterprise mode of SnapLock volumes at the same time on the same NetApp storage system. This feature requires the NetApp storage systems to be running Data ONTAP 7.1 or later releases. To create a SnapLock volume, you may follow these steps:
o Create a SnapLock-supported aggregate on the NetApp storage system (use the storage system console to create a SnapLock aggregate). An example of a command to create an aggregate is “aggr create <aggrname> -L [<compliance> or <enterprise>] -r <raidgroupsize> -t <raidgrouptype> - <number of disks>” where raidgrouptype is either raid_dp or raid4. An example of this command is console> ‘aggr create <aggrname> -L snaplock –r 16 –t raid_dp 16’ would create a compliance aggregate called ‘lock1’ with raid group size of 16 and the raid type of raid_dp.
o Create a Snaplock volume using the previously created (Snaplock) aggregate.
o Create a qtree on this volume (if needed).
o Create a CIFS share on the SnapLock volume.
o Verify that network security is enabled to run rsh from the Windows server.
2.2 Enterprise Vault Server Architecture Refer to the Implementing Symantec Enterprise Vault with Network Appliance Storage Systems technical paper for details on Enterprise Vault architecture.
2.3 NetApp Storage Systems This paper recommends completing the storage configuration requirements while deploying Enterprise Vault. Enterprise Vault requires either local disks or virtual local disks for installing the SQL Server, Enterprise Vault, and the Microsoft Exchange Server. Either SAN or IP-based SAN fulfills the requirement. The necessary software and hardware configuration topics are discussed in earlier sections. For details, refer to the NetApp Support Website. In our test setup, we used a FAS900 series storage system to configure local disks on both the Exchange server and the Enterprise Vault server. For the archival destination, we used a FAS3050 cluster configuration and a near-line storage system R200 to migrate the items after a specified period. We used the Enterprise Vault migration service to migrate the archived data from the primary to a secondary location according to a defined archival and migration policy.

8
3. Configuration The Enterprise Vault configuration requires that the storage system be presented as an NTFS file system. This includes an NTFS volume, a Network Share, and a NetApp SnapLock-enabled volume. Data may be migrated to secondary or tertiary locations. The Vault Directory Database is needed to install the Enterprise Vault components.
3.1 Operating System Information Enterprise Vault supports Windows 2003, Windows 2000 with SP3, and Windows 2000 Advanced Server with SP3 platforms. In our test setup, we used two Windows 2003 SP1 Servers, one for installing the Microsoft Exchange 2003 Server and the other one for installing Enterprise Vault Server and SQL Server 2005 products.
Enterprise Vault requires Data ONTAP 7.0 or later releases to support Enterprise Vault features such as the ability to remove the retention-expired items from the SnapLock volume. The Enterprise Vault configuration requires Microsoft Exchange 2003 or Exchange 2000 and SQL Server 2005 or SQL Server 2000. Note that earlier releases of Data ONTAP support Enterprise Vault 5.0 SP3 and later releases support compliance storage.
3.2 Enterprise Vault Configuration Information It is necessary to install and configure TCP/IP protocol support on the Windows machine. This computer should have the Internet protocol (IP) address registered with Domain Name System (DNS). For performance reasons, this paper recommends a minimum of 2GB of main memory. It is also important to have access to the SQL Server and to the Enterprise Vault server. It is also important to understand the Enterprise Vault components involved with the setup. The following components are configured after the installation:
Vault Directory database – SQL Server database
Vault Store databases – Required by SQL Server; storage space to grow dynamically
Vault Stores - Required on the storage service computer
The indexes - Required for indexing services
Shopping baskets – Required on shopping service computer
3.3 The Vault Service Account Enterprise Vault uses the Vault service account to access the Windows server operating system. Enterprise Vault services are installed as Windows services. All Enterprise Vault computers share this account. This account must be a member of an Active Directory domain if an Exchange Server is used.
The Vault Site alias is a DNS entry for the Enterprise Vault site. Each Enterprise Vault site should have a Vault Site alias. If the DNS server is running a Windows server, you may use the Administrator tool to create an alias for the computer in which Enterprise Vault is installed. Note that the DNS alias is created by entering the CNAME parameter on the DNS server.
4. Installation This section briefly covers installation of Enterprise Vault server. For the detailed procedure, refer to the “Installing Enterprise Vault on NetApp Storage System” technical report.

9
This section describes the steps involved with installing Enterprise Vault server. In the following sections, this paper describes the steps involved in our test setup. In our setup, we installed both Enterprise Vault server and SQL server on the same system.
4.1 Enterprise Vault Server The Installation Wizard will install the Administration Console on the Enterprise Vault server.
After selecting the Enterprise Vault components to install, Installation Wizard prompts you to enter the installation folder. In our test setup, we selected a SnapDrive-created virtual local drive path F:\EV for installing Enterprise Vault server. In order to use Enterprise Vault, post-installation tasks must be completed after restarting the computer. 4.2 Post-installation Tasks Preparing the system and completing the post-installation tasks are significant for configuring Enterprise Vault to work successfully. In our test setup, we observed that the installation task took significantly less time than completing the pre-installation activities. This section will list the steps involved in post-installation activities.
4.3 Enterprise Vault Configuration In order to complete the post-installation tasks, start the Enterprise Vault Configuration Wizard. This wizard allows the Administrator to create a new Vault Directory on this computer. If you have an existing Vault Directory, select that Vault Directory. In our setup, we created a new Vault Directory and provided the user authentication information for Enterprise Vault services. We provided the SQL Server that was used for the Vault Directory. In our case, the SQL Server entry was ‘IBMX335-SVL61’. The Configuration Wizard proceeded after granting the necessary Vault Service account user permissions. It set the necessary user permissions for the Vault service account. It then provided the Vault Directory database and transaction log locations. In our test setup, we provided the virtual disk path (Storage Area Network) created by the SnapDrive storage management tool as shown below. Administrators should select the locations for database and transaction logs according to their policy; they may be on a separate disk path.
Before creating a new Vault Site, verify that a DNS alias for the new Vault Site is available. On the DNS server with Administrator privilege, create a DNS alias. If the DNS server is also a Windows server use Administration, tools, and the DNS task to create a DNS alias. Giving a meaningful name to the DNS alias will help. In our test setup, we created a DNS alias ‘vaultserver’ as the Windows server was running the Enterprise Vault application. If a fully qualified name is entered instead of a DNS alias, a warning message will appear. This paper strongly suggests using a DNS alias instead of entering a fully qualified name entry. During this process, it is detected if the Enterprise Vault services are installed on the Enterprise Vault server.
This paper assumes that a Vault site was created and is available for configuring Enterprise Vault for archiving. After creating a new Vault Site, the configuration utility recognizes that the EV services installed and the default services for the computer. New services can be added using the configuration utility either at this time or later. The default indexing service is also listed for the new archives as is the shopping services location information. It is important to verify storage locations for the services added, such as Indexing and Shopping. In our test setup, we selected the SnapDrive-configured local disks. While creating the Vault Site, verify the settings for storage service on the computer. Then configure the appropriate numbers for the archive and restore process.
4.3.1 Configuring Enterprise Vault for Archiving A Vault Store is used to define the storage allocated to the partitions and archives that it contains. Each Vault Store uses its own databases to hold the details of the archives within it. To archive items, at least one partition, known as the Vault Store partition, must be available. At any time, only one Vault Store Partition should be opened for archiving. This means that if a new Vault Store Partition is created, Enterprise Vault

10
server will close any existing open Vault Store Partition. Create a new Vault Store Partition after verifying the NetApp storage system(s) configuration.
4.3.2 Configuring NetApp Storage System for Archival Destination For installing Exchange Server 2003 and SQL Server and Enterprise Vault, we used the Storage Attached Network (SAN) configuration from NetApp. Local disks were configured using NetApp SnapDrive storage management software. Then we were ready to configure the Enterprise Vault archival destination and migration location on the NetApp storage systems. In our test setup, we used a FAS3050C storage system and an R200 to configure the archive locations.
If the NetApp storage system(s) are not installed and configured already, now is the time to configure them. In our setup, we checked the NetApp storage system status and volume details and enabled the required NetApp product licenses. This may include protocol licenses such as for CIFS and FCP. Based on your company policy, prepare the storage. If CIFS protocol is used, configure the CIFS setup and have necessary CIFS shares available. If a decision is made to use block protocol or SAN storage, configure the LUNs and necessary virtual local disks available on the system. In Enterprise Vault archival scenarios, network share may offer a better solution. Complete the same setup for additional NetApp storage systems.
In our test setup, we followed these steps to create the appropriate volume size using a FlexVol® and RAID-DP™ configuration:
o Create the qtree. o Create CIFS shares. o Configure the network security. o Map the network shares on the Enterprise Vault computer. o Verify that UNC paths can be accessed from the computer—we used Computer
Management, connected to another computer, and entered the NetApp storage system name (or IP address).
4.3.3 Creating a New Vault Store In order to create a new Vault Store, it is important to configure the necessary storage systems. Use the Enterprise Vault Configuration Wizard to select the computer on which the storage service for the new Vault Store will be configured.
This paper recommends a meaningful name for the new Vault Store to identify the purpose of the archival setup. The Vault Store database requires the SQL server information; in our setup, we provided the SQL server location (IBMX335-SVL61).
Storage is allocated to Vault Store Partitions and Vault Store defines this storage information. Enter the Vault Store name and the description for the new Vault Store. Provide the SQL Server information for using the Vault Store database. The new Vault Store requires an SQL Database location for the database and transaction logs. Start a new Vault Store create wizard by right-clicking on Vault Store from the Administration Console. Then select ‘New Vault Store” as shown in the following figure.

11
Figure 2) Enterprise Vault Administration Console to create a new Vault Store.
Vault Store uses its own database to hold the meta-data of the archives within the Vault Store. New Vault Partitions created enable the data archives. Select the computer that runs the storage service while creating a new Vault Store. The New Vault Store will use this storage service for archival purposes. In our test setup, we selected the Vault Store name ‘ComplianceData’ with a description as shown below. Choose a name for the new Vault Store and a description that helps to understand the type of Vault Store configured in your environment.
Figure 3) New Vault Store.

12
Enterprise Vault uses Microsoft SQL server to store the meta-data of the data archived. Each Vault Store uses its own database. Select the Vault Store database and transaction log locations. In our system, we selected the SnapDrive-created local drive.
When an item or file is archived, Enterprise Vault retains a safety copy. There are different options for the safety copy settings, such as the ability to delete copies immediately after the backup and archival operation or retain them forever. Select the safety copy option according to your company policy. Available options for safety copy policy are shown in the following figure.
Figure 4) Retaining the safety copy configuration. . The SnapLock storage device may not allow deleting the archived items until the retention period expires. Note how SnapLock devices affect Enterprise Vault backups.
In order to provide the archival destination path, use the network share configured on the NetApp storage system. Then create a folder at the network share level. An example procedure is:
Map the network share on the computer.
Create a folder on top of that network share.
Provide the path as the location for the new Vault Store Partition.
Enterprise Vault has a feature to provide additional safety for the content. In our test setup, we chose to remove the archived items from the primary after the backup was completed. Another setting allows you to specify that the contents of the archived items from the primary never be removed. Verify the summary of the new Vault Store creation task. In our test setup, this task created a new Vault Store as shown below.

13
Figure 5) New Vault created with database name EVvaultdpr.
Figure 6) Properties of newly created Vault Store ComplianceData.

14
4.3.4 Creating a Vault Store Partition Using NetApp Storage System Destination Path As discussed in Section 4.3.3.2, verify that the NetApp storage systems are accessible from the Enterprise Vault server. Using the network share, map the appropriate NetApp storage system’s volume(s). Now start the new Vault Store Partition wizard on the Enterprise Vault Administration Console. Note that only one partition should be opened at a given time. Provide the Vault Store Partition name and description. Following is an example of a Vault Store Partition name and description.
Figure 7) New Vault Store Partition.
Continue with the creation of the new partition and then select the appropriate option for the storage system. In an NTFS system environment, the NetApp configured volume should be configured as a network share or as a virtual local disk. For compliance purposes, select the NetApp SnapLock volume. In our setup, we followed this procedure to create a new Vault Store Partition:
Create the appropriate volumes on the NetApp storage system (FAS3050C).
Create necessary qtree(s) (optional).
Create CIFS shares for the volume or the qtree.
Map the above CIFS share on the Enterprise Vault server or on the Administration Console computer.
Example for mapping the network share mapped was \\fas3050c-svl34\vs3 as vs3, the name of the CIFS share.
Create a folder at the root of the mapped drive; we created a folder called ‘store’.

15
The following three figures demonstrate the procedure involved with creating a new Vault Store Partition. It is important to note that at least one directory must be present above the CIFS share point. Creating a folder at the root of the share point will address the requirement. If you are attempting to provide the UNC path, verify that a folder exists at the share point level. In the following figure, we selected the NTFS volume for the mapped drive.
Figure 8) Vault Store Partition on NetApp storage system.
Select an NTFS storage system of the mapped drive for configuring the non-WORM data archival. For compliance data archival, select the SnapLock (WORM) storage system to create a new Vault Store Partition.
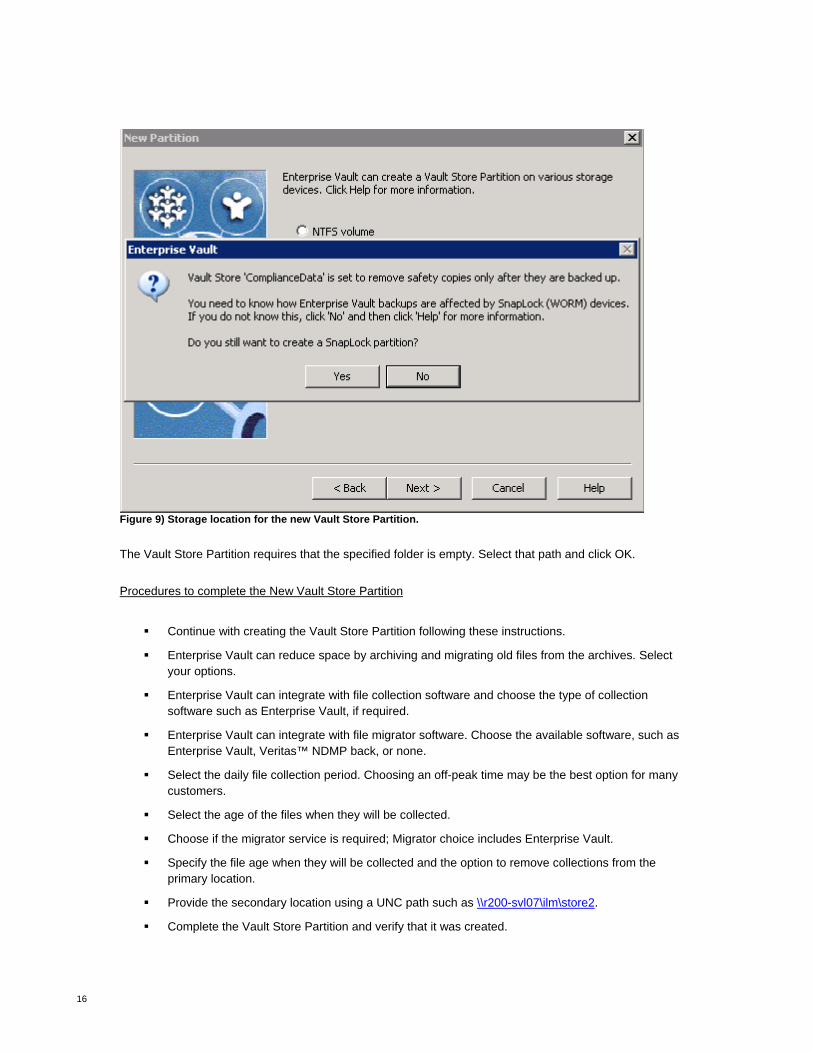
16
Figure 9) Storage location for the new Vault Store Partition.
The Vault Store Partition requires that the specified folder is empty. Select that path and click OK.
Procedures to complete the New Vault Store Partition
Continue with creating the Vault Store Partition following these instructions.
Enterprise Vault can reduce space by archiving and migrating old files from the archives. Select your options.
Enterprise Vault can integrate with file collection software and choose the type of collection software such as Enterprise Vault, if required.
Enterprise Vault can integrate with file migrator software. Choose the available software, such as Enterprise Vault, Veritas™ NDMP back, or none.
Select the daily file collection period. Choosing an off-peak time may be the best option for many customers.
Select the age of the files when they will be collected.
Choose if the migrator service is required; Migrator choice includes Enterprise Vault.
Specify the file age when they will be collected and the option to remove collections from the primary location.
Provide the secondary location using a UNC path such as \\r200-svl07\ilm\store2.
Complete the Vault Store Partition and verify that it was created.

17
Figure 10) Vault Store Partitions for Vault Store vaultdpr after creating a closed Vault Store Partition.
5. Archival Setup This section describes the procedure to set up archive items from mailboxes. By completing these tasks, Enterprise Vault will be ready for archiving the items. The previous section described the procedure to create a new Vault Store and a new Vault Store Partition. These must exist before enabling the mailboxes for archiving. A Vault Store supports multiple Vault Store Partitions. This section describes the procedure to set up the Enterprise Vault archival.
5.1 Create an Archive Task Using the Enterprise Vault Administration Console, create an archive task as described below:
Expand the Administration Console until the Enterprise Vault Servers container is visible.
Expand Enterprise Vault Servers.
Expand the name of the computer to which an archiving task is to be added.
Right-click Tasks and create a new archiving task.
Complete the New Archiving Task Wizard.
After creating the archiving task, verify the Site archiving settings using the Administration Console and by selecting the Enterprise Vault site.
Create other archive tasks such as Journal Task. Following is a screenshot of various EV tasks created in our test setup.
Figure 11) Archive tasks created.
5.2 File System Archiving The Enterprise Vault server is designed to archive items from Exchange Server mailboxes and public folders. In addition to these tasks, it supports archiving file system and Microsoft SharePoint Portal data. Enterprise Vault supports file archiving with two product offerings. The basic version simply archives the data from the file system into Enterprise Vault according to a set policy. The advanced version supports

18
indexing the content in addition to the ability to move the content into the Enterprise Vault system. An Enterprise Vault Site computer runs one or more Enterprise Vault services by sharing the same configuration.
Considering the fact that Enterprise Vault supports various configurations, various installation strategies are offered. Some of these installation strategies include:
One Enterprise Vault site for each Exchange Server site
One Enterprise Vault site for file system archival
One Enterprise Vault site for each Exchange Server site
Other configuration possibilities, such as many Enterprise Vault sites for one Exchange Server or vice versa, result in some performance issues. An example is the ability to configure Exchange Mailbox task settings. There is a limit of one Mailbox task setting per Exchange Server.
This section discusses the procedure to configure the file system archival (FSA) component of Enterprise Vault on a NetApp storage system(s). This paper suggests analyzing the file system archival requirement for the server and storage requirements. The File Placeholder Service component of Enterprise Vault supports the file system archival. Verify that the necessary network connectivity is established between the Operating System server and the NetApp storage systems. For file system archiving, network connectivity using the CIFS protocol should work fine. Archiving onto a local drive configured by the SnapDrive tool is also supported. Enterprise Vault requires the storage system to present its storage as an NTFS file system. Since the file system archival works at the file level rather than the block level, a network configuration may be an optimum solution for designing a file system archival system.
Setting up file system archiving involves the following steps:
Installation of File Placeholder service
o Select the File Placeholder Service component from the install wizard
Configure the Placeholder Service
o Verify that Enterprise Vault has the File System Archiving License enabled
o Program Files Enterprise Vault File System Archiving Configuration
o Introduction --> Vault Service Account details
o Verify that the advanced user rights are granted
o Set up File Permissions to have full control access to the network shares and files that are archived
Create a Volume Policy
Create a Folder Policy
Create New Volume on the File Server and apply volume policy
Create archive points to control archived folders
Using the above procedure, configure the file system archiving using the Enterprise Vault File Placeholder Configuration Wizard. This wizard configures the file system by setting the Vault service account to set up the log-on properties as shown in the following figure.

19
Figure 12) File Placeholder Service Configuration Wizard.
The file placeholder configuration requires Windows user authentication information to grant the necessary user permissions. Following are the required user rights that are added during the placeholder configurations.
o Log on as a Service
o Act as part of Operating System
o Debug programs
o Replace a process-level token
The file system archiving configuration requires the granting of the necessary user rights permissions. This will configure the file system archiving on the computer running the configuration. The next step is to create a File Server archiving policy. There are two possible types of archiving policies: volume archiving and folder level archiving. Create a volume archiving policy by providing the policy name and description that reflect your project. The following figure is a screenshot for creating a file server archiving policy for a volume.

20
Figure 13) Creating a new volume archiving policy. Follow through with the wizard to configure the following settings:
To enable or disable the quota management
Starting and stopping of archiving process settings
Using this configuration, the archiving process can be configured to start archiving the content based on a specified percentage of data usage. Select a retention category for the volume policy applied. Use the following information while configuring the archiving policy.
Choose whether to leave a shortcut to the archived file.
Specify the rules for archiving, such as type of file archived.
File system archiving applies to the permissions of the folder archived from the system.
Change the settings if necessary while creating the rules.

21
Figure 14) Information required to create the new archiving policy.
Figure 15) New policy for file system archiving.

22
Figure 16) New archiving policy settings.
After creating file archiving policy, it is important to add a file server using its fully qualified DNS name (FQDN) for the file server. While adding a file server, this paper recommends browsing the available file servers. Select the computer running the shopping service and continue with the configuration.
On the storage system that presents itself as the NTFS file server, the File Placeholder Service component should be installed and configured to leave Placeholder shortcuts. The Placeholder service component does not run on the NetApp storage system. Instead, it runs on the Windows server and is configured using the Enterprise Vault Administration Console. This service can run a different Windows server other than the Enterprise Vault server. A file archiving filter driver is not required on the NetApp storage system. An Archive Point in each folder is created when a new volume is created using the Administration Console. Volume can be created by expanding the Archiving Targets and File server, and then right-click the available file server.
To complete the file archiving setup, open the Enterprise Vault Administration Console, expand the file server, and select the file server as shown in the following figure. Continue with the process of creating the volume. There are two types of shares to browse while selecting a Windows share. Selecting the hidden type share displays the drive letters available for archival points. In our setup, we created a new volume under the available file servers as shown below.

23
- Figure 17) Creating a new volume for file server archiving targets.
When creating a new volume, follow these steps:
Browse the hidden type of share to display the directory path.
Select a folder-archiving target while creating a new volume.
Apply the volume policy for the archiving target.
Select the required Vault Store on the processing computer.
The following figure shows the information required to add the archiving volume in our setup.

24
Figure 18) Creating new archiving volume for file server. Continue to create the necessary archiving targets for all the folders that require file system archiving. The following figure displays the available file server archiving targets in our test setup.
Figure 19) Available archiving targets on file servers (file system archiving).
6. Summary Enterprise Vault supports archiving messages from Exchange Server. It can archive Lotus Domino server for the journaling feature in addition to being able to archive file system and SharePoint Portal data. Using NetApp storage systems, data can be archived onto a network share or as a configured local disk. Using NetApp SnapLock software, data archived by Enterprise Vault achieves the compliance goal.

25
This paper discussed the procedure to integrate Enterprise Vault with NetApp storage systems. It covered the topics to configure the storage area network as well as NTFS file systems. In our test setup, storage systems were configured as virtual local disks. To install and configure Microsoft Exchange Server, Microsoft SQL Server, and Enterprise Vault server, we used the SnapDrive configured local disks. Enterprise Vault used NetApp storage systems configured as network shares for archiving the data from the primary to the secondary.
Enterprise Vault server has several drawbacks in terms of data availability and dependability. To access the data of archived files or to access the files, SQL Server must always be up and running. In case of database corruption, data has to be recovered from a backup copy, losing all the recently archived items. Data replication could take a significant amount of time and resources. By creating an HTML file of an archived item negates the space savings achieved from archiving and compression feature. Restoring a corrupted database could be disastrous in an enterprise environment.
NetApp storage solutions effectively address the shortcomings explained previously. The Symantec Enterprise Vault and NetApp product integration offers highly available and exceptional performance at the lowest total cost of ownership in the industry.
NetApp and Symantec are committed to providing Enterprise Vault users with superior solutions designed to meet business objectives. NetApp storage system solutions ensure protection of Enterprise Vault data 24x7.
NetApp offers a complete solution for the Enterprise Vault server environment. SnapManager for Exchange is ideal for handling Exchange server data management such as backup and recovery. SnapManager for SQL allows consistent and quick backup copies. It also allows the restoration of database backup from a Snapshot™ taken with SnapManager for SQL Server. SnapDrive for Windows provides an efficient and easy way to handle data storage management on a Windows server.
In conclusion, the recommendations made in this paper are intended to be an overview of Enterprise Vault configuration procedures for most environments. This paper serves as a starting guide when designing and deploying Symantec Enterprise Vault in a NetApp storage system environment. To ensure a supported and stable environment, familiarize yourself with the products. During the design phase, involve Microsoft Exchange and SQL Server specialists along with Enterprise Vault experts and discuss your requirements and deployment plans with appropriate Symantec and NetApp professional services teams.
7. Caveat NetApp has not tested all possible combinations of hardware, storage architecture, and software solutions. If you use a different Windows Server OS or a different version of Enterprise Vault, then significant differences in your configurations could exist. These differences could alter the procedures necessary to achieve the objectives outlines in this document. If you find that any of the procedures do not work or you find any errors, I suggest contacting the author immediately. If you need additional information or have any questions about points mentioned in this paper, please contact the Network Appliance Web administrator. Do not attempt to seek help from the NetApp Global Support team for procedures listed in this document.
8. Appendix This section provides additional information that helps successful installation and configuration of the Enterprise Vault system on a Windows server.

26
References The following technical reports and system manuals were used while developing this paper. For detailed procedures, refer to the respective documents.
1. “Deployment Guide for Veritas Enterprise Vault from Symantec: NetApp Storage Solution”
2. “Integrating Veritas Enterprise Vault with NetApp Storage Solution File Archival”
3. “Enterprise Vault 6.0 SP2 Product Documentation from Symantec Manuals”
4. “Enterprise Vault Installation Guide for NetApp Storage System”
© 2007 Network Appliance, Inc. All rights reserved. Specifications subject to change without notice. NetApp, the Network Appliance logo, DataFabric, Data ONTAP, FlexVol, SnapDrive, SnapLock, and SnapManager are registered trademarks and Network Appliance, RAID-DP, and Snapshot are trademarks of Network Appliance, Inc. in the U.S. and other countries. Symantec is a registered trademark and Enterprise Vault and Veritas are trademarks of Symantec Corporation. Microsoft and Windows are registered trademarks of Microsoft Corporation. All other brands or products are trademarks or registered trademarks of their respective holders and should be treated as such.
www.netapp.com