imperial marquee contact us at - americana...
TRANSCRIPT

Before You Begin:
Consult your local building department for any required permits
You may be required to obtain a building permit for this structure. Contact your local building department
for details.
Read instructions thoroughly
Please read all instructions and notes carefully prior to assembly. Americana is not responsible for replacing
parts lost or damaged due to incorrect assembly.
A solid attachment is required for all existing structures
All points of attachment to existing structures (such as house, deck, or patio) must be into solid, structurally
sound, and secure material. Example: wood or metal studs, joists, headers, plates, or sills.
Attachment may be made to block, concrete, brick, or stone veneer with suitable anchors, purchased
separately. Note: Failure to properly fasten unit to wall, deck, porch, or patio may result in damage to the
unit, damage to the structure it is attached to, and could cause serious bodily injury.
Check for all parts
Use the Parts and Hardware List to check for any missing parts. To prevent scratching of painted materials,
place on a tarp or other protective material.
Assistance is recommended during entire assembly.
CAUTION
Proper site preparation is required.
Standard shade structure design does not include additional loads such as hanging heavy plants,
swings, or other objects.
DO NOT stand or sit on the shade structure roof.
Repair or replace broken parts immediately.
This kit contains parts with metal edges. Please be careful when handling.
Americana Building Products . 1 3/14/2013
IMPERIAL MARQUEE
INSTALLATION INSTRUCTIONS
Contact us at:
1-888-442-2928 or
www.americana.com
Options in your kit:
Flat Panel — Pg 14
V Panel — Pg 15
W Panel — Pg 16
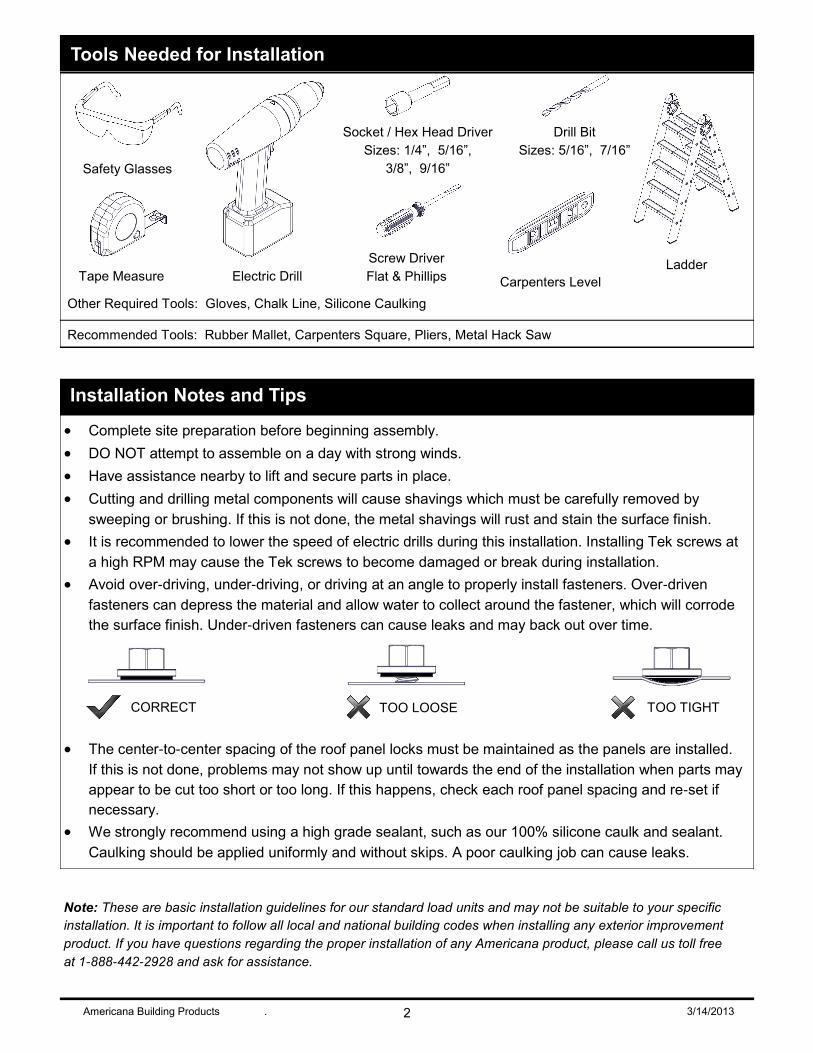
Tools Needed for Installation
Installation Notes and Tips
Complete site preparation before beginning assembly.
DO NOT attempt to assemble on a day with strong winds.
Have assistance nearby to lift and secure parts in place.
Cutting and drilling metal components will cause shavings which must be carefully removed by
sweeping or brushing. If this is not done, the metal shavings will rust and stain the surface finish.
It is recommended to lower the speed of electric drills during this installation. Installing Tek screws at
a high RPM may cause the Tek screws to become damaged or break during installation.
Avoid over-driving, under-driving, or driving at an angle to properly install fasteners. Over-driven
fasteners can depress the material and allow water to collect around the fastener, which will corrode
the surface finish. Under-driven fasteners can cause leaks and may back out over time.
The center-to-center spacing of the roof panel locks must be maintained as the panels are installed.
If this is not done, problems may not show up until towards the end of the installation when parts may
appear to be cut too short or too long. If this happens, check each roof panel spacing and re-set if
necessary.
We strongly recommend using a high grade sealant, such as our 100% silicone caulk and sealant.
Caulking should be applied uniformly and without skips. A poor caulking job can cause leaks.
Americana Building Products . 2 3/14/2013
Safety Glasses
Tape Measure Carpenters Level Electric Drill
Screw Driver
Flat & Phillips Ladder
Socket / Hex Head Driver
Sizes: 1/4”, 5/16”,
3/8”, 9/16”
Drill Bit
Sizes: 5/16”, 7/16”
Other Required Tools: Gloves, Chalk Line, Silicone Caulking
Recommended Tools: Rubber Mallet, Carpenters Square, Pliers, Metal Hack Saw
CORRECT TOO LOOSE TOO TIGHT
Note: These are basic installation guidelines for our standard load units and may not be suitable to your specific
installation. It is important to follow all local and national building codes when installing any exterior improvement
product. If you have questions regarding the proper installation of any Americana product, please call us toll free
at 1-888-442-2928 and ask for assistance.

Safety Information
Please read and understand this entire manual before attempting to assemble or install the product.
Standard design for shade structures by Americana Building Products meets 20 lbs. per square foot
live load and 90 miles per hour wind load based on the International Building Code (IBC) 2009 and
American Society of Civil Engineers (ASCE) 7-05 design code. Engineering for greater load
requirements is available; call 1-888-442-2928 for information. Local building codes should be verified
before installation.
The design of the shade structure as set forth herein pertains only to the components and assemblies
as manufactured by Americana Building Products. The design of and attachment to supporting
structural elements are outside the scope of this guide. It shall be the Owner and Installer’s
responsibility to provide sound supporting structure and attachment and to consult with qualified
individuals where the design or verification of such components is required.
It shall be the Owner and Installer’s responsibility to verify that local building code requirements are
met and the proper permits are obtained prior to the installation. Professional engineering services
may be required.
Americana Building Products . 3 3/14/2013
Care and Maintenance
Every 12 months your shade structure should be inspected and maintained by:
Tightening loose nuts and bolts at all connections.
Repairing damage to the finish to prevent corrosion.
Replacing lost or damaged fasteners, brackets, and other parts.
Replacing brittle or cracked sealer to prevent leaks.
Removing obstructions and miscellaneous build-up from gutters, eaves, and downspouts.

Americana Building Products . 4 Imperial Marquee Installation Guide
8” Flat Style Roof Panel
Part Code: 10212 A
10” V Style Roof Panel
Part Code: 10116 B
24” W Style Roof Panel
Part Code: 10307 C
Gutter Fascia
Part Code: 11143 D
2” Dia. Projection Tube
Part Code: 30300 E
1” Sq. Support Tube
Part Code: 30308 F
Mounting Bracket
Part Code: 50128 H
Slide Fitting Bracket
Part Code: 50130 I
Fascia Fitting Bracket
Part Code: 50156 G
Parts List
NOTE: Length and quantity of parts will vary based on the size of the awning.
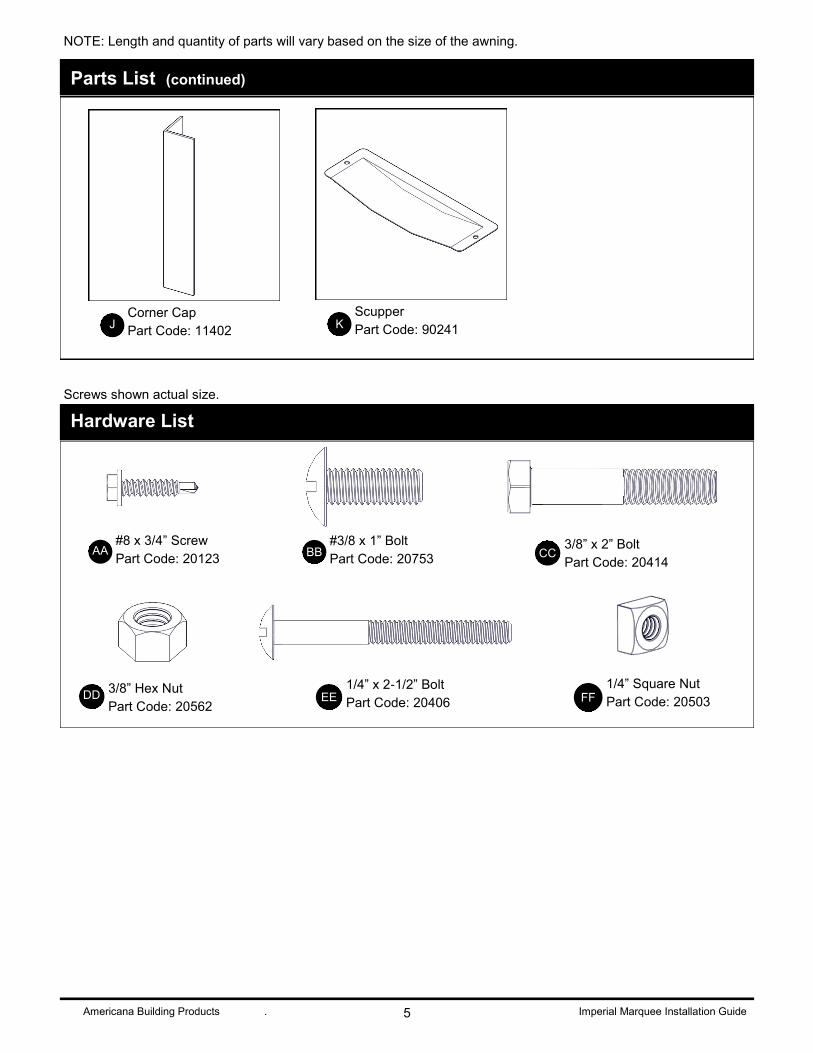
#8 x 3/4” Screw
Part Code: 20123 AA
Corner Cap
Part Code: 11402 J
Americana Building Products . 5 Imperial Marquee Installation Guide
Parts List (continued)
NOTE: Length and quantity of parts will vary based on the size of the awning.
Hardware List
Screws shown actual size.
CC #3/8 x 1” Bolt
Part Code: 20753 BB
3/8” x 2” Bolt
Part Code: 20414
DD 1/4” x 2-1/2” Bolt
Part Code: 20406 EE 3/8” Hex Nut
Part Code: 20562
1/4” Square Nut
Part Code: 20503 FF
Scupper
Part Code: 90241 K

Americana Building Products . 6 Imperial Marquee Installation Guide
Gutter Splice (Lower)
Part Code: 60668 L
#8 x 1/2” Bolt
Part Code: 20754 HH
#8 Hex Nut
Part Code: 20502
OPTIONAL Parts
NOTE: Length and quantity of parts will vary based on the size of the awning.
Gutter Splice (Upper)
Part Code: 60669 M Gutter Extension
Part Code: 11148 N
GG
Americana Building Products . 7 Imperial Marquee Installation Guide
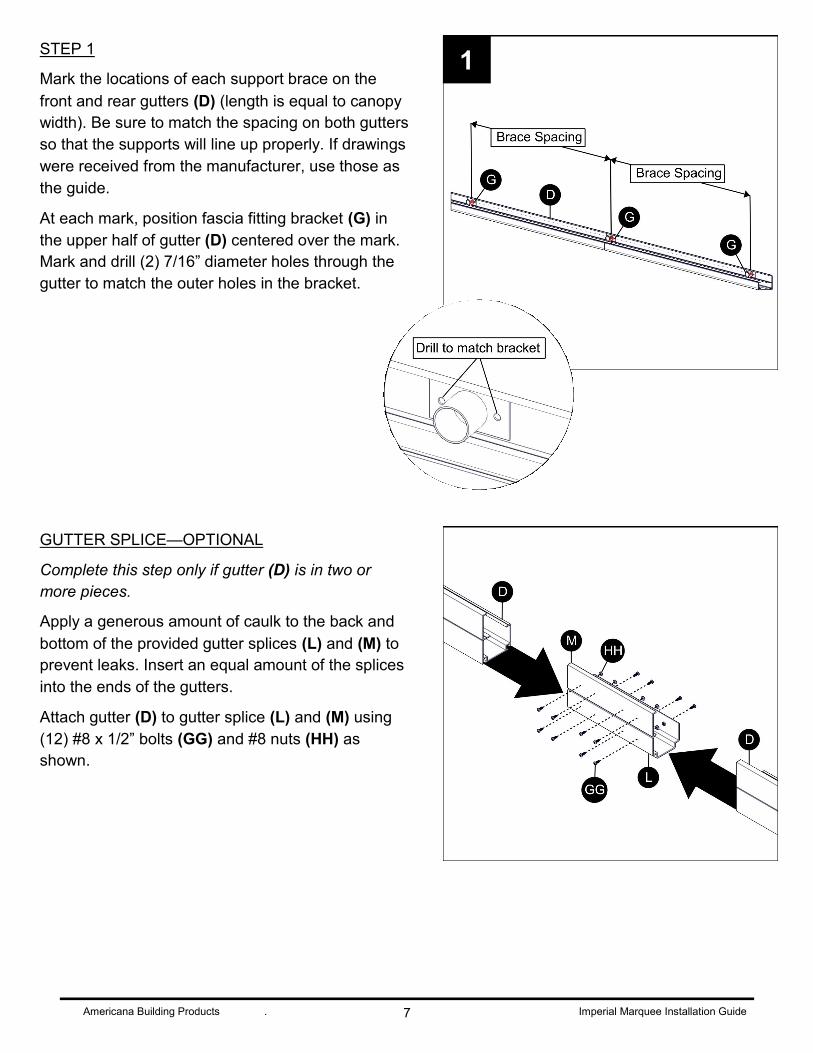
STEP 1
Mark the locations of each support brace on the
front and rear gutters (D) (length is equal to canopy
width). Be sure to match the spacing on both gutters
so that the supports will line up properly. If drawings
were received from the manufacturer, use those as
the guide.
At each mark, position fascia fitting bracket (G) in
the upper half of gutter (D) centered over the mark.
Mark and drill (2) 7/16” diameter holes through the
gutter to match the outer holes in the bracket.
GUTTER SPLICE—OPTIONAL
Complete this step only if gutter (D) is in two or
more pieces.
Apply a generous amount of caulk to the back and
bottom of the provided gutter splices (L) and (M) to
prevent leaks. Insert an equal amount of the splices
into the ends of the gutters.
Attach gutter (D) to gutter splice (L) and (M) using
(12) #8 x 1/2” bolts (GG) and #8 nuts (HH) as
shown.
1

Americana Building Products . 8 Imperial Marquee Installation Guide
GUTTER EXTENSIONS—OPTIONAL
If you received optional gutter extensions (N) with
your order, fit the tabs at the top of the extension
into the slots at the bottom of gutter (D). Slide
extension (N) until the ends are flush with the gutter.
Typically, gutter extensions (N) are only installed on
the front and both sides of the cover. Be sure to
position the extensions so that the square ends are
against the mounting surface.
FRONT VIEW

Americana Building Products . 9 Imperial Marquee Installation Guide
STEP 2
Position an outside corner cap (J) (6” long) and an
inside corner cap (J) (3” long) to both of the mitered
ends of the front and rear gutters (D) using (2) #8 x
3/4” screws (AA) per corner.
STEP 3
Mark a level line on the mounting surface at the
desired mounting height. Recommended minimum
of 8” above any out-swinging door.
Align the holes in the rear gutter (D) with the level
line and attach fascia fitting brackets (G) to the
mounting surface using appropriate anchors
purchased separately, (2) per bracket. Minimum
anchor capacity for standard load models is 800 lbs.
shear strength and 800 lbs. pull-out strength. Higher
capacity anchors may be required for higher load
models.
Attach the rear gutter (D) to the mounting
surface using appropriate anchors purchased
separately at 12” on center. Minimum anchor
capacity for standard load models is 350 lbs.
shear strength.
NOTE: Review the Safety Information on page
3 and your local building codes for anchor bolt
requirements.
2
3

Americana Building Products . 10 Imperial Marquee Installation Guide
STEP 4
Position mounting bracket (H) directly above each
fascia fitting bracket (G). To determine the
appropriate mounting height, subtract 12” from the
canopy projection.
Attach mounting bracket (H) to the mounting
surface using appropriate anchors purchased
separately, (2) per bracket. Minimum anchor
capacity for standard load models is 800 lbs. shear
strength and 800 lbs. pull-out strength. Higher
capacity anchors may be required for higher load
models.
NOTE: Review the Safety Information on page 3
and your local building codes for anchor bolt
requirements.
STEP 5
Insert 2” projection tube (E) into each fascia fitting
bracket (G). Fit slide fitting bracket (I) onto each
projection tube.
NOTE: A temporary support may be required to
support the front of projection tubes (E) until support
brace assembly is completed.
4
5

Americana Building Products . 11 Imperial Marquee Installation Guide
STEP 6
Drill a 7/16” diameter hole through both ends of
support tube (F) 1/2” from the end.
Position support tube (F) between slide fitting
bracket (I) and mounting bracket (H). Attach the
support tube to the brackets using 3/8” x 2” bolt
(CC) and 3/8” nut (DD) at both ends.
NOTE: Some applications may require cutting
support tube (F) for a proper fit.
STEP 7
Attach fascia fitting bracket (G) to front gutter (D) at
each support brace location using (2) 3/8” x 1” bolts
(BB) and 3/8” nuts (DD) per bracket.
6
7
Support Tube Hole Detail

Americana Building Products . 12 Imperial Marquee Installation Guide
STEP 8
Fit projection gutter (D) between corner caps (J) at
either end of rear gutter (D). Attach the gutter to the
corner caps using (2) #8 x 3/4” screws (AA).
Repeat for remaining projection gutter (D).
STEP 9
Raise front gutter (D) assembly and insert each
projection tube (E) into fascia fitting bracket (G). Be
sure to fit projection gutter (D) between corner caps
(J) at both ends.
With front gutter (D) assembly in the correct position,
attach projection gutter (D) to corner caps (J) using
(2) #8 x 3/4” screws (AA) at both ends.
8
9

Americana Building Products . 13 Imperial Marquee Installation Guide
STEP 10
Work slide fitting brackets (I) forward or backward to
achieve the desired pitch, depending on which
gutter is chosen for water drainage.
Once properly located, mark and drill (3) 5/16”
diameter holes through projection tube (E) to match
the hole pattern in slide fitting bracket (I).
Attach slide fitting bracket (I) to projection tube (E)
using (3) 1/4” x 2-1/2” bolts (EE) and 1/4” nuts (FF).
Choose the next step depending on which roof panel style was received with your order:
8” flat style roof panel installation: Continue on page 14
10” ‘V’ style roof panel installation: Continue on page 15
24” ‘W’ style roof panel installation: Continue on page 16
10
Americana Building Products . 14 Imperial Marquee Installation Guide
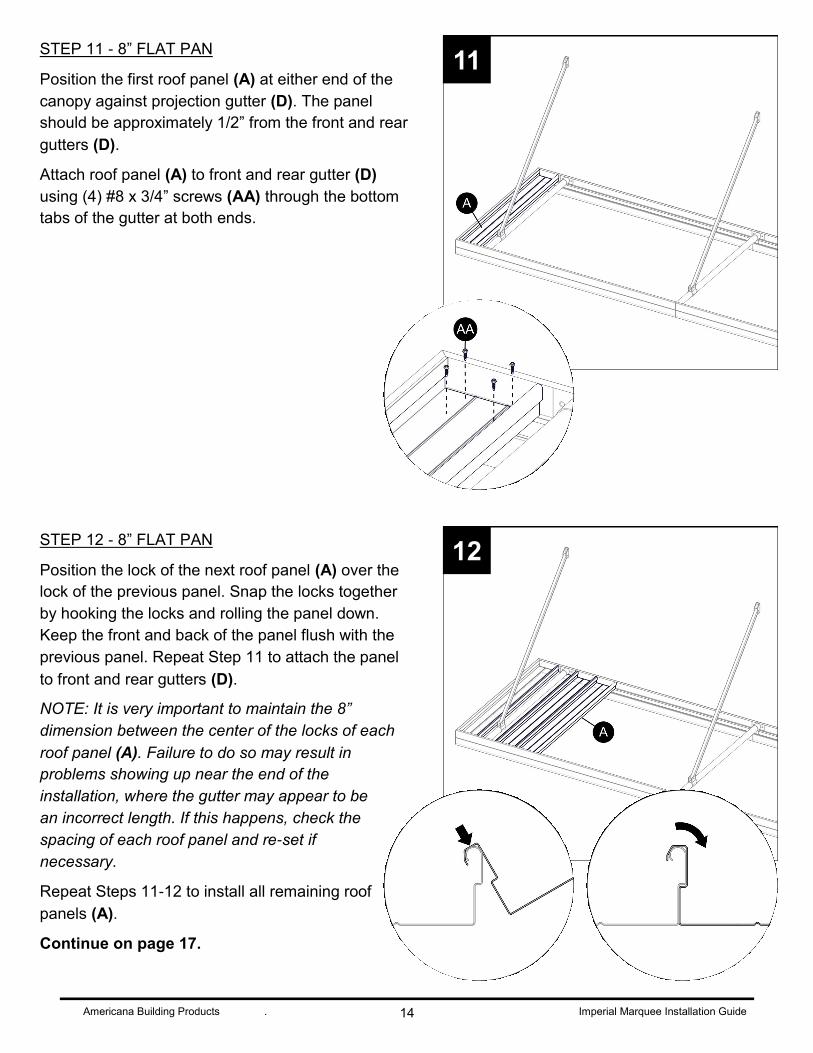
STEP 11 - 8” FLAT PAN
Position the first roof panel (A) at either end of the
canopy against projection gutter (D). The panel
should be approximately 1/2” from the front and rear
gutters (D).
Attach roof panel (A) to front and rear gutter (D)
using (4) #8 x 3/4” screws (AA) through the bottom
tabs of the gutter at both ends.
STEP 12 - 8” FLAT PAN
Position the lock of the next roof panel (A) over the
lock of the previous panel. Snap the locks together
by hooking the locks and rolling the panel down.
Keep the front and back of the panel flush with the
previous panel. Repeat Step 11 to attach the panel
to front and rear gutters (D).
NOTE: It is very important to maintain the 8”
dimension between the center of the locks of each
roof panel (A). Failure to do so may result in
problems showing up near the end of the
installation, where the gutter may appear to be
an incorrect length. If this happens, check the
spacing of each roof panel and re-set if
necessary.
Repeat Steps 11-12 to install all remaining roof
panels (A).
Continue on page 17.
11
12

Americana Building Products . 15 Imperial Marquee Installation Guide
STEP 11 - 10” ’V’ PAN
Position the first roof panel (B) at either end of the
canopy against projection gutter (D). The panel
should be approximately 1/2” from the front and rear
gutters (D).
Attach roof panel (B) to front and rear gutter (D)
using (4) #8 x 3/4” screws (AA) through the bottom
tabs of the gutter at both ends.
STEP 12 - 10” ’V’ PAN
Position the lock of the next roof panel (B) over the
lock of the previous panel. Snap the locks together
by tapping the top with a rubber mallet along the
length of the panel. Keep the front and back of the
panel flush with the previous panel. Repeat Step 11
to attach the panel to front and rear gutters (D).
NOTE: It is very important to maintain the 10”
dimension between the center of the locks of each
roof panel (B). Failure to do so may result in
problems showing up near the end of the
installation, where the gutter may appear to be
an incorrect length. If this happens, check the
spacing of each roof panel and re-set if
necessary.
Repeat Steps 11-12 to install all remaining roof
panels (B).
Continue on page 17.
11
12

Americana Building Products . 16 Imperial Marquee Installation Guide
STEP 11 - 24” ’W’ PAN
Position the first roof panel (C) at either end of the
canopy against projection gutter (D). The panel
should be approximately 1/2” from the front and rear
gutters (D).
Attach roof panel (C) to front and rear gutter (D)
using (6) #8 x 3/4” screws (AA) through the bottom
tabs of the gutter at both ends.
STEP 12 - 24” ’W’ PAN
Position the lock of the next roof panel (C) over the
lock of the previous panel. Snap the locks together
by tapping the top with a rubber mallet along the
length of the panel. Keep the front and back of the
panel flush with the previous panel. Repeat Step 11
to attach the panel to front and rear gutters (D).
NOTE: It is very important to maintain the 24”
dimension between the center of the locks of each
roof panel (C). Failure to do so may result in
problems showing up near the end of the
installation, where the gutter may appear to be
an incorrect length. If this happens, check the
spacing of each roof panel and re-set if
necessary.
Repeat Steps 11-12 to install all remaining roof
panels (C).
Continue on page 17.
11
12

Americana Building Products . 17 Imperial Marquee Installation Guide
STEP 13 - SCUPPER INSTALLATION
If optional downspout kit was received with your order,
you may not have received scupper (K). Follow the
separate downspout assembly instructions attached.
Determine the desired location to drain water from
gutter (D). Cut a hole no bigger than 2” diameter in
the bottom of the gutter. Alternatively, you may drill
several small holes in a rectangular pattern no
bigger than 2” x 3”.
Apply a generous bead of caulk around the top
flange of scupper (K). Attach the scupper to
gutter (D) using (2) #8 x 3/4” screws (AA).
Repeat for any remaining scuppers (K).
13
Assembly Completed
Remove any metal shavings from the shade structure by sweeping or brushing.
Be sure to follow the Care and Maintenance instructions shown on page 3.
Other Products Available From Americana: Fabric & Aluminum Awnings - Carports -
Patio Covers - Pergolas - Room Enclosures - Park Shelters

Warranty
What the Warranty Covers:
Americana Building Products (Americana) warrants its products that have been installed in accordance
with the installation guidelines, under normal usage conditions, and with proper maintenance as follows:
Twenty-five (25) year limited warranty on steel against material failure and defects. Ten (10) year
warranty against peeling, cracking, blistering, or crazing of the surface finish of aluminum and steel
components. One (1) year warranty against defects in materials and workmanship.
Period of Coverage:
The warranty period begins on the date of original shipment.
What Americana Will Do To Correct Problems:
If defects or damage of the kind mentioned above should occur within the warranty period, Americana will
replace the defective parts only; FOB its plant at Salem, Illinois, upon receiving the written and
documented claim of purchaser.
What the Warranty Excludes:
Because of normal aging and weathering of materials, it may not be possible to perfectly match the colors
of original parts and replacement parts. Americana will not provide or pay for the installation of such
replacement parts. Americana shall not be responsible for weather related failures, damages due to faulty
installation, misuse or abuse of the product, or for consequential damages, including personal injuries or
property damages. There are no warranties, express or implied, which extend beyond the description on
the face hereof.
How Do You Get Service:
If you believe that you have a claim under this warranty, submit a copy of your original receipt or other
reasonable evidence of the date of purchase, the identity of the product, and photos and a description of
the allegedly defective product to the address below. Please also include your name, address, and phone
number so that a customer service representative can respond to your submission. Ultimate
determination of the existence and extent of any claimed defect under this warranty shall be made by
Americana in its sole discretion.
Submit Claims To:
Americana Building Products, Inc Warranty Claim, P.O. Box 1290, Salem, IL, 62881
Effective Date: March 19, 2012
Americana Building Products . 18 Imperial Marquee Installation Guide
P.O. Box 1290 ● #2 Industrial Drive
Salem Illinois 62881
Phone: 1-888-442-2928 ● Fax: 618-548-2890
www.americana.com