impella program protocols & tools - protected pci …€¢ cardiac tamponade* ... bleeding,...
TRANSCRIPT
Impella® ProgramProtocols & Tools
Recovering hearts. Saving lives.™

Recovering hearts. Saving lives.™
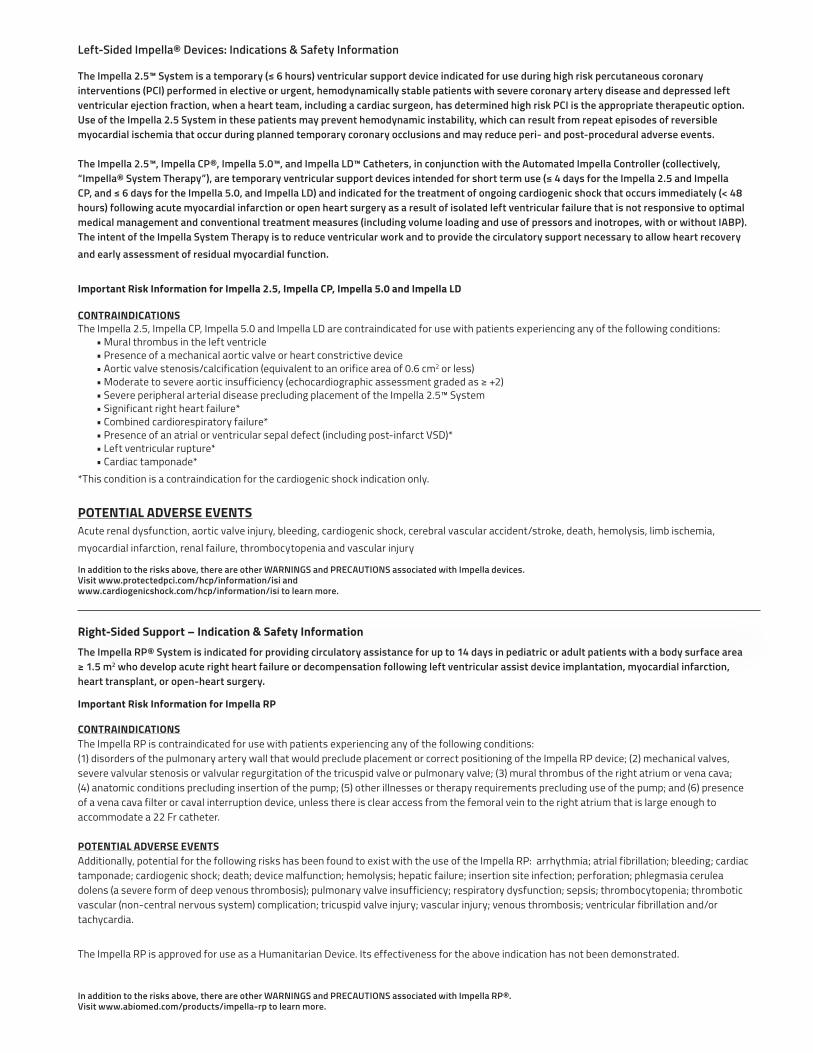
CONTRAINDICATIONS The Impella 2.5, Impella CP, Impella 5.0 and Impella LD are contraindicated for use with patients experiencing any of the following conditions: • Mural thrombus in the left ventricle • Presence of a mechanical aortic valve or heart constrictive device • Aortic valve stenosis/calcification (equivalent to an orifice area of 0.6 cm2 or less) •Moderatetosevereaorticinsufficiency(echocardiographicassessmentgradedas≥+2) • Severe peripheral arterial disease precluding placement of the Impella 2.5™ System • Significant right heart failure* • Combined cardiorespiratory failure* • Presence of an atrial or ventricular sepal defect (including post-infarct VSD)* • Left ventricular rupture* • Cardiac tamponade* *This condition is a contraindication for the cardiogenic shock indication only. POTENTIAL ADVERSE EVENTS Acute renal dysfunction, aortic valve injury, bleeding, cardiogenic shock, cerebral vascular accident/stroke, death, hemolysis, limb ischemia, myocardial infarction, renal failure, thrombocytopenia and vascular injury
The Impella 2.5™ System is a temporary (≤ 6 hours) ventricular support device indicated for use during high risk percutaneous coronary interventions (PCI) performed in elective or urgent, hemodynamically stable patients with severe coronary artery disease and depressed left ventricular ejection fraction, when a heart team, including a cardiac surgeon, has determined high risk PCI is the appropriate therapeutic option. Use of the Impella 2.5 System in these patients may prevent hemodynamic instability, which can result from repeat episodes of reversible myocardial ischemia that occur during planned temporary coronary occlusions and may reduce peri- and post-procedural adverse events. The Impella 2.5™, Impella CP®, Impella 5.0™, and Impella LD™ Catheters, in conjunction with the Automated Impella Controller (collectively, “Impella® System Therapy”), are temporary ventricular support devices intended for short term use (≤ 4 days for the Impella 2.5 and Impella CP, and ≤ 6 days for the Impella 5.0, and Impella LD) and indicated for the treatment of ongoing cardiogenic shock that occurs immediately (< 48 hours) following acute myocardial infarction or open heart surgery as a result of isolated left ventricular failure that is not responsive to optimal medical management and conventional treatment measures (including volume loading and use of pressors and inotropes, with or without IABP). The intent of the Impella System Therapy is to reduce ventricular work and to provide the circulatory support necessary to allow heart recovery and early assessment of residual myocardial function. Important Risk Information for Impella 2.5, Impella CP, Impella 5.0 and Impella LD
In addition to the risks above, there are other WARNINGS and PRECAUTIONS associated with Impella devices. Visit www.protectedpci.com/hcp/information/isi and www.cardiogenicshock.com/hcp/information/isi to learn more.
Left-Sided Impella® Devices: Indications & Safety Information
Right-Sided Support – Indication & Safety InformationThe Impella RP® System is indicated for providing circulatory assistance for up to 14 days in pediatric or adult patients with a body surface area ≥ 1.5 m2 who develop acute right heart failure or decompensation following left ventricular assist device implantation, myocardial infarction, heart transplant, or open-heart surgery.
Important Risk Information for Impella RP
CONTRAINDICATIONS The Impella RP is contraindicated for use with patients experiencing any of the following conditions: (1) disorders of the pulmonary artery wall that would preclude placement or correct positioning of the Impella RP device; (2) mechanical valves, severe valvular stenosis or valvular regurgitation of the tricuspid valve or pulmonary valve; (3) mural thrombus of the right atrium or vena cava; (4) anatomic conditions precluding insertion of the pump; (5) other illnesses or therapy requirements precluding use of the pump; and (6) presence of a vena cava filter or caval interruption device, unless there is clear access from the femoral vein to the right atrium that is large enough to accommodate a 22 Fr catheter. POTENTIAL ADVERSE EVENTS Additionally, potential for the following risks has been found to exist with the use of the Impella RP: arrhythmia; atrial fibrillation; bleeding; cardiac tamponade; cardiogenic shock; death; device malfunction; hemolysis; hepatic failure; insertion site infection; perforation; phlegmasia cerulea dolens (a severe form of deep venous thrombosis); pulmonary valve insufficiency; respiratory dysfunction; sepsis; thrombocytopenia; thrombotic vascular (non-central nervous system) complication; tricuspid valve injury; vascular injury; venous thrombosis; ventricular fibrillation and/or tachycardia. The Impella RP is approved for use as a Humanitarian Device. Its effectiveness for the above indication has not been demonstrated.
In addition to the risks above, there are other WARNINGS and PRECAUTIONS associated with Impella RP®. Visit www.abiomed.com/products/impella-rp to learn more.

ContentsSummary iIntroduction iii
Protected PCI with Impella 2.5™ ivImproving Outcomes in Cardiogenic Shock vClinical Guidelines for Impella® vi
Impella® Heart Pump Clinical Protocols 2Sample Protected PCI with Impella 2.5™ Device Clinical Decision Tree 3Sample AMI Cardiogenic Shock Algorithm 3-9Impella 2.5™ /Impella CP® Catheter Set-Up Procedures 10Impella 5.0™ /Impella LD™ Catheter Set-Up Procedures 13Impella 2.5™ /Impella CP® Catheter Insertion Procedures 16Impella 5.0™ Catheter Insertion Procedure 22Impella LD™ Catheter Insertion Procedure 28Impella 2.5™ /Impella CP® Purge System Management Procedures 31Impella 5.0™ /Impella LD™ Purge System Management Procedures 35 Transferring Impella 2.5™ /Impella CP®–Supported Patient 39Transferring Impella 5.0™ /Impella LD™ –Supported Patient 44Impella 2.5™ /Impella CP® Patient Care Procedures 47Impella 5.0™ /Impella LD™ Patient Care Procedures 52Impella 2.5™ /Impella CP® Catheter Weaning Procedures 56Impella 5.0™ /Impella LD™ Catheter Weaning Procedures 57 Impella 2.5™ /Impella CP® Catheter Explant Procedures 59Impella 5.0™ Catheter Explant Procedure 61Impella LD™ Catheter Explant Procedure 62
Impella® Program Implementation Tools 64Impella® Certification Process for Physicians 65Impella® Certification Process for Advanced Users 66
Impella® Skills Checklist/Supply Lists Impella 2.5™ or Impella CP® Tech Skills 68 Impella 2.5™ or Impella CP® Circulator Skills 69Impella 5.0™ and Impella LD™ Scrub Skills 70Impella 5.0™ and Impella LD™ Circulator or Perfusionist Skills 71Transfer of Care Impella 2.5™ /Impella CP® Skills Checklist (peel-away sheath) 72Transfer of Care Impella 2.5™ /Impella CP® Skills Checklist (non-peel-away sheath) 73Impella 2.5™ or Impella CP® ICU RN Skills 74Impella 5.0™ or Impella LD™ ICU RN Skills 75Impella 2.5™ /Impella CP® Supply List 76Impella 5.0™ /Impella LD™ Supply List 77
Appendix A: Program Resources 78References 79


i
Summary
A Protected PCI is an Impella 2.5™ device–supported heart procedure that maintains hemodynamic stability for a patient, allowing a cardiologist to do a more complete revascularization in a single session.
Impella 2.5™ is the only percutaneous hemodynamic support device proven safe and effective at reducing peri-procedural and post-procedural adverse events in elective and urgent high-risk patients.
In addition, Impella 2.5™, Impella CP®, Impella 5.0™, and Impella LD™ heart pumps are now FDA indicated to provide treatment of ongoing cardiogenic shock.

ii

iii
IntroductionEffective Impella® heart pump programs are most successful when the program has structure provided by algorithms, protocols and tools for success as well as ongoing training initiatives. The following key components are vital to the successful implementation and growth of an Impella heart pump program:
Structure and ownership
Implementation and training initiatives
Patient management and clinical protocols
Impella technology logistics
Optimized economics
Quality improvement
Marketing and public awareness
Outreach education
The purpose of the Impella® Heart Pumps Clinical Protocols and Tools is to provide your hospital with the patient management and clinical protocols that assist programs in launching and maintaining successful program practices. The programs that excel utilize standard protocols and tools while offering continuous training to all members of the multidisciplinary team that is involved in the care of Impella heart pump patients. Abiomed, Inc., the maker of the Impella® heart pumps, offers a thorough training program for both physicians and hospital staff. Training covers the full spectrum of therapy, from an overview of the technology, controller, and system set-up and insertion, through patient management topics. Abiomed offers numerous training avenues, including:
Clinical support and on-site, hands-on customer training
Print and web-based educational materials
Quick skills videos
Hands-on Automated Impella® Controller (AIC) console training
24/7 clinical and technical telephone support through the Emergency Clinical Support Hotline (1-800-422-8666)
Advanced programs for more experienced users
Physician certification
Masters Programs
Impella Clinical Expert (ICE) Programs
Mobile Learning Laboratories
iPhone Apps
Reimbursement Hotline (1-877-256-0861)
Please visit www.abiomed.com for a full listing of resources available from Abiomed, Inc.

iv
-13.1% P < .001
1 Vessel Treated
-2.7%
-14.9%
IABP
P = .007
2 Vessels Treated
-8.5%
-18.8% P = .026
3 Vessels Treated Baseline
ProtectedPCI
-7.6%ImpellaN=325
IABP Impella
83±18
Mean Arterial PressureN=543; P < .0001
101±20
22%
PreImpella
OnImpella
Protected PCI with Impella 2.5™
Clinical outcomes of the PROTECT II randomized controlled trial demonstrated a 29% reduction in MACCE at 90 days.3
Extensive revascularization was also associated with the largest reduction of adverse events.4
Mean arterial pressure1 Procedural decrease in arterial pressure from baseline2
MACCE3
Cost-effectiveness of Impella 2.5™ has been demonstrated through a randomized controlled trial, all-payer population based studies, and a systemic review of reduced length of stay. Study observations include fewer readmissions, less days in the hospital, and a better of quality of life through reduced heart failure symptoms.
Six society clinical guidelines now reference Impella, including ACC/AHA/SCAI/ISHLT/HFSA
9.0
P = .008
IABP
Median days in hospital; index stay through 90 days,
N=427, Readmissions N=208
Impella
7.0
2 daysor 22%
Total Days in Hospital
17%
45%
31%
7%
8%
18%
30%
44%
Baseline 90 daysN=223 patients from both arms of PROTECT II trial
with NYHA measurements available at baseline and 90 days
PROTECT II STUDY
P < .001
58% Reduction in
Class III, IVClass IV
NYHA Class of heart failure
Class III
Class II
Class I
Readmissions from repeat revascularization5
Reduced length of stay5
Total days in hospitalNYHA class improvement post PCI6
NYHA class improvement post procedure
12%
IABP Impella
6%
52% Reductionin repeat revascularizationN=427; P = .024
90 DAYS
On March 23, 2015, the Impella 2.5™ received PMA approval from the U.S. FDA. *
The clinical data demonstrating the safety and effectiveness of Impella 2.5 includes > 1,600 patients from an FDA-randomized, controlled trial and a U.S. multi-center registry, as well as more than 200 peer-reviewed publications in the high risk PCI setting.
Impella 2.5™ maintains patient hemodynamics during planned temporary coronary occlusions by maintaining mean arterial pressure (MAP), which may allow for a more thorough procedure and a more complete revascularization in a single session.
* The device is indicated for: The Impella 2.5™ System is a temporary (< 6 hours) ventricular support device indicated for use during high-risk percutaneous coronary interventions (PCI) performed in elective or urgent, hemodynamically stable patients with severe coronary artery disease and depressed left ventricular ejection fraction, when a heart team, including a cardiac surgeon, has determined high-risk PCI is the appropriate therapeutic option. Use of the Impella 2.5™ in these patients may prevent hemodynamic instability, which can result from repeat episodes of reversible myocardial ischemia that occur during planned temporary coronary occlusions and may reduce peri- and post-procedural adverse events.

v
Outflow(aortic root)
aortic valve
Inflow(ventricle)
Flow
Cardiac Power Output O2 Supply
Coronary Perfusion
Microvascular Resistance
O2 Demand
MAP LVEDP and LVEDV
Wall Tension Mechanical Work
Unloading to Myocardial RecoveryEnd-Organ Perfusion
Outflow(aortic root)
aortic valve
Inflow(ventricle)
Impella 2.5™, Impella CP®, Impella 5.0™, and Impella LD™ heart pumps are now FDA indicated to provide treatment of ongoing cardiogenic shock. In this setting, the Impella heart pumps have the ability to stabilize the patient’s hemodynamics, unload the left ventricle, perfuse the end organs, and allow for recovery of the native heart. Impella devices have also been proven to be cost-effective through reduction in length of hospital stay, readmissions, and overall costs compared with alternative treatment.7 The latest approval adds to the prior FDA indication of Impella 2.5™ for elective and urgent high-risk percutaneous coronary intervention (PCI), or Protected PCI.
Identify Cardiogenic Shock Early• Systolic blood pressure (SBP) <90 mmHg or on inotropes/pressors• Cold, clammy, tachycardia• Lactate elevated >2 mmoI/L
Cardiogenic Etiology Evaluation• EKG (STEMI/NSTEMI)• Echocardiography• If available, PA catheter, cardiac output, CPO, CI, PCWP, SVO2
8-10
The catheter-based VAD Registry is a worldwide, multicenter, IRB-approved, monitored clinical registry of all patients at participating sites; registry data is used for FDA PMA submissions
Early Stabilization Can Improve Outcomes in Cardiogenic Shock“Early initiation of hemodynamic support prior to PCI with Impella 2.5™ is
associated with more complete revascularization and improved survival in the setting of refractory CS complicating an AMI”.29
William W. O'Neill, MD; Theodore Schreiber, MD; David H. W. Wohns, MD; Charanjit Rihal, MD; Srihari S. Naidu, MD; Andrew B. Civitello, MD; Simon R. Dixon, MB, ChB;
Joseph M. Massaro, PhD; Brijeshwar Maini, MD; & E. Magnus Ohman, MD.
Hemodynamic Effects of Impella Support
Reverse the Cardiogenic Shock Spiral
Major society clinical guidelines now reference Impella® devices, including ACC/AHA/SCAI/ISHLT/HFSA
SURV
IVAL
RAT
E
302520151050
1.0
0.8
0.6
0.4
0.2
0
DAYS FROM INITIATION OF IMPELLA®
Log-rank, P = .004
Impella Pre-PCI
IABP/Inotropes Pre-PCI
Cardiac Output
MAP
End-OrganPerfusion
Coronary Perfusion
Progressive Myocardial Dysfunction
Ischemia
End-Organ FailureDeath Spiral of
Cardiogenic Shock
ReverseSpiral
MyocardialRecoveryPatients
30-Day Survival 29
cVAD Registry* N=154
Cardiac Power Output(MAP x CO x 0.0022)
P<0.0001
Pre-Support
OnSupport
0.48 ± 0.17
1.06 ± 0.48
120% (n=23) P<0.0001
Pre-Support
OnSupport
31.9 ± 11.1
19.2 ± 9.740% (n=25)
PCWP
Improving Outcomes in Cardiogenic Shock
MAP
P<0.0001
Pre-Support
OnSupport
62.7 ± 19.2
94.4 ± 23.1
51%
(n=143)
P<0.0001
Pre-Support
OnSupport
3.4 ± 1.3
5.3 ± 1.7
56%
(n=23)
Cardiac OutputPrinciples of Impella Design11-28 cVAD Registry™29

vi
2014 AHA/ACC Guideline for the Management of Patients with Non-ST-elevation Acute Coronary Syndromes30 Journal of the American College of Cardiology Revascularization in Heart Failure: Class I Revascularization strategy based on the degree, severity, and extent of CAD; cardiac lesions pVADS: Large amount of ischemic territory/poor LV function
2011 ACCF/AHA/SCAI Guidelines for Percutaneous Coronary Intervention31 Journal of the American College of Cardiology
High-risk patients: Class IIb Class III: HARM without hemodynamic support; for PCI at hospitals without on-site cardiac surgery
Clinical Guidelines for Impella®
Additional Guidelines
2011 ACCF/AHA/SCAI Guideline for Percutaneous Coronary Intervention Journal of the American College of Cardiology31
PCI and Cardiogenic Shock: Class I
Use of Mechanical Circulatory Support: American Heart Association (2012)32 Circulation Acutely decompensated heart failure patients: Class IIa
2013 lnt'I Society for Heart & Lung Transplantation Guidelines for Mechanical Circulatory Support33 The Journal of Heart and Lung Transplantation Temporary mechanical support for patients with multi-organ failure: Class I
2013 ACCF/AHA Guideline for the Management of Heart Failure34 Circulation
"Bridge to Recovery" or "Bridge to Decision" for patients with acute, profound hemodynamic compromise: Class IIa
2013 ACCF/AHA Guideline for the Management of ST-Elevation Myocardial Infarction35 Circulation
STEMI and Cardiogenic Shock: Class Ib STEMI and Urgent CABG: Class IIa
Protected PCI with Impella 2.5™

2
Impella® Heart Pump Clinical ProtocolsThis section includes several templates for Protected PCI with Impella® Program protocols. (For more information, contact [email protected].)
Sample Protected PCI with Impella 2.5™ Clinical Decision Tree
Sample Cardiogenic Shock Algorithm
Impella 2.5™ and Impella CP® Catheter Set-Up Procedure
Impella 5.0™ and Impella LD™ Catheter Set-Up Procedure
Impella 2.5™ and Impella CP® Catheter Insertion Procedure
Impella 5.0™ and Impella LD™ Catheter Insertion Procedure
Impella 2.5™ and Impella CP®/Impella 5.0™/Impella LD™ Device Purge System Management Procedures
Transfer of Care Impella 2.5™/Impella CP®
Transfer of Care Impella 5.0™/Impella LD™
Impella 2.5™/Impella CP® Catheter Patient Care Procedure
Impella 5.0™/Impella LD™ Catheter Patient Care Procedure
Impella 2.5™/Impella CP® Catheter Weaning Procedure
Impella 5.0™/Impella LD™ Catheter Weaning Procedure
Impella 2.5™ Catheter Explant Procedure
Impella 5.0™/Impella LD™ Catheter Explant Procedure
These protocols are a compilation of best practices. Review each protocol with your hospital’s committee and customize as needed before putting it into place, keeping in mind your particular institution's policies and procedures concerning the practice of medicine. For the latest product information, refer to the Impella® device Instructions For Use (IFU) manuals, available on the Abiomed website: www.abiomed.com.

3
Sample Protected PCI with Impella 2.5™ Device Clinical Decision Tree
YesHemodynamicsupport indicated?
Medical Management Revascularization
CABG PCI
No
Heart Team decision
Conventional PCI Protected PCIwith Impella 2.5™
Diagnosis: High-risk patient
No Yes Choice of appropriate treatment (PCI vs. CABG) by multidisciplinary “Heart team”, per Guidelines (Class I)31
Hemodynamically stable LVEF ≤35%, complex CAD with comorbidities- FDA-Approved Indication- Per Guidelines30,31
Treatment Decision
Goal: More Complete Revascularization

4
Assess for Myocardial Recovery(Weaning and Transfer Protocols)
Complete Revascularization
Stabilize Early
Identify36-38
MyocardialRecovery45-46
No RecoveryEscalate
(& Ambulate) orTransfer47
• SBP <90 mmHG or on Inotropes/Pressors• Cold, clammy, tachycardia• Lactate elevated >2 mmol/L
• Impella Support pre-PCI29,40,41
• Reduce Inotropes/Pressors42,43
• Per Guidelines35,44
• Cardiac Output• Cardiac Power Output• Urine Output• Lactate• Inotropes
• Ongoing Left Heart Failure• Assess for Right Heart Failure
• EKG (STEMI / NSTEMI)• Echocardiography39
• If available, PA Catheter, Cardiac Output, CPO, CI, PCWP, SVO2
8-10
Cardiogenic etiology evaluation
Impella® Best Practices in AMI Cardiogenic Shock
Sample AMI Cardiogenic Shock Algorithm

5
Sample Identify: Minimize Duration of Shock
6
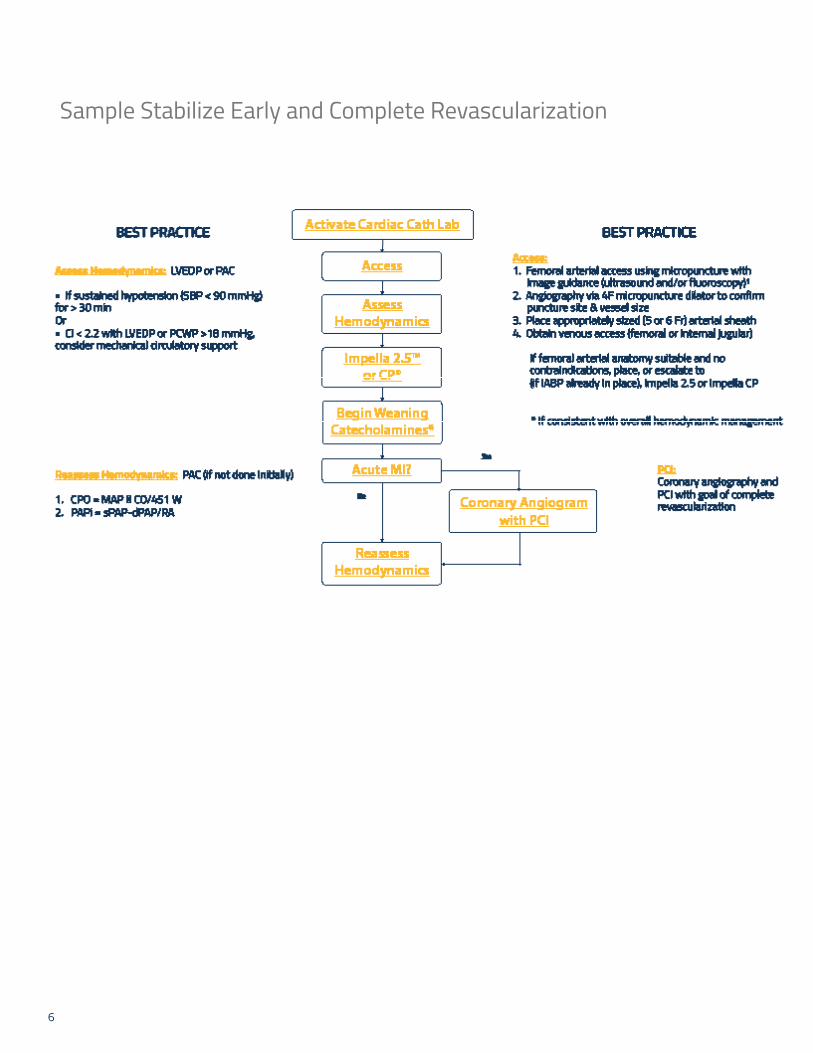
Sample Stabilize Early and Complete Revascularization
7
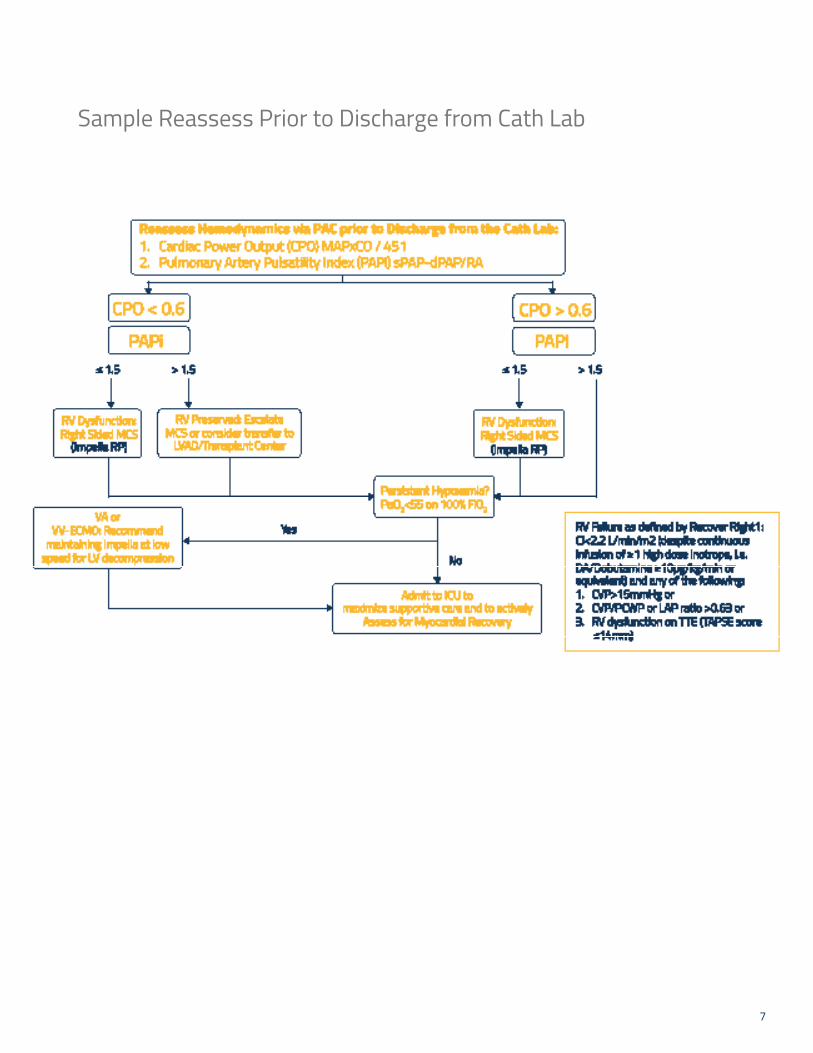
Sample Reassess Prior to Discharge from Cath Lab

8
Sample Escalation, Weaning and Transfer
9
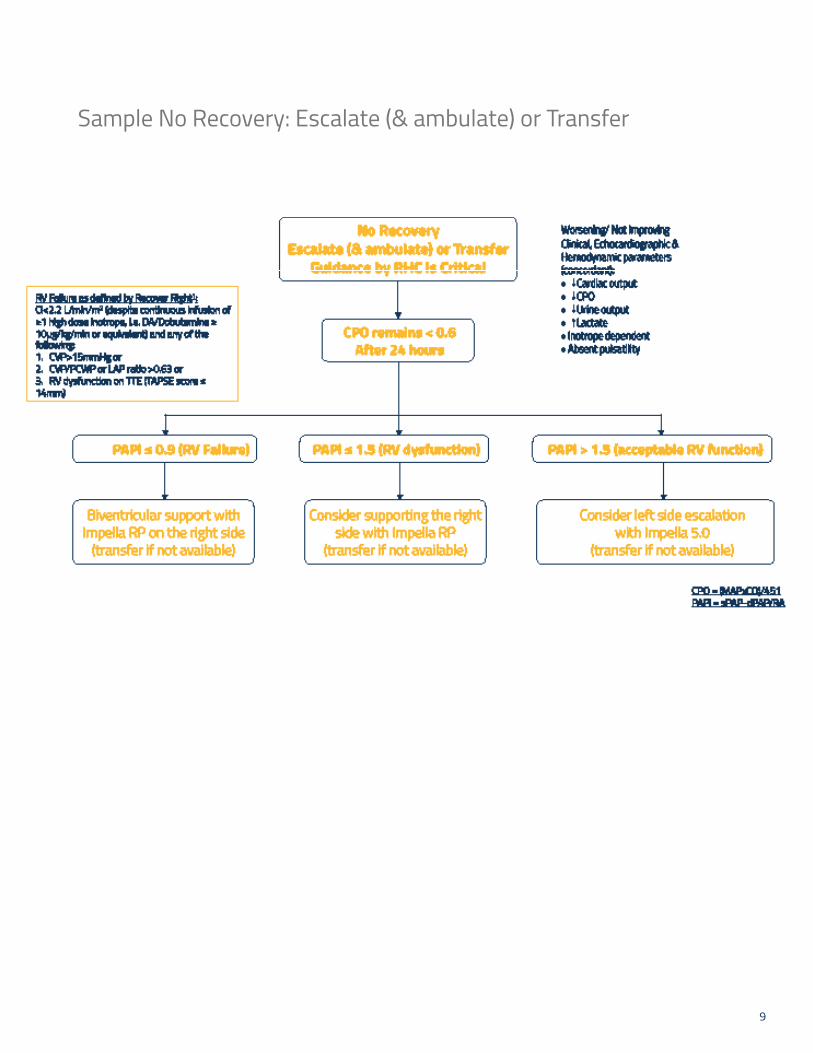
Sample No Recovery: Escalate (& ambulate) or Transfer

10
Impella 2.5™/Impella CP® Catheter Set-Up Procedures
Purpose To set up the Impella 2.5™ or Impella CP® Catheters for insertion
Audience Healthcare providers involved in setting up the Impella 2.5™ and Impella CP® Catheters prior to insertion
Desired Outcomes Impella 2.5™ or Impella CP® Catheter will be ready to insert
Equipment • Automated Impella® Controller
• Impella 2.5™ or Impella CP® Catheter Insertion kit
• Diagnostic catheter (6 Fr AL1 or MP without side holes or 5 Fr pigtail with or without side holes)
• 5-8 Fr Introducer and 10 Fr Dilator
• Standard 0.035" x 180 cm J-Tip Guidewire
• 500 mL bag of D5W (5% recommended; 5% to 40% acceptable) with 50 IU/mL Heparin (recommended)
• 500 mL bag of NaCl with pressure bag
• Back-up Automated Impella® Controller, purge cassette, connector cable, and Impella 2.5™ or Impella CP® Catheter, in the event they are needed
Preparation • Gather supplies and equipment
• The Li-ion batteries in the Automated Impella® Controller must be charged for 5 hours prior to system operation in order to ensure 1 hour of battery operation
• Dedicated AC power source
Alerts • Do NOT open the Impella 2.5™ or Impella CP® Catheter tray until you receive confirmation that the physician is proceeding with the insertion based on results of the clinical evaluation of the patient. (For more information, refer to the Pre-Support Evaluation section of the Instructions for Use Manual.)
Procedure Impella 2.5™ and Impella CP® Catheter Set-Up Procedure: CASE START
Action Notes
1. Performed at Controller:
Turn the Automated Impella® Controller on.
(Screen will advance when completed)
Press and hold the black power switch found on the right side of the controller for 3 seconds.
2. Performed at Controller:
Press "START NEW CASE" soft key.
(Screen will advance when completed)
Screen reads "Anticoagulate once sheath is in".
3. Performed in Sterile Field:
Open purge cassette in sterile field.
Pass spike and cassette off sterile field.
4. Performed at Controller:
STEP 1:
Spike Dextrose Bag
Press NEXT soft key
(Screen will advance when completed)
D5W recommended.
If D5W supplied in bottles, open the vent on the purge fluid spike and proceed.
(continued)

11
5. Performed at Controller:
STEP 2:
a) Open front purge cassette door using button on left side.
Button located on left side of controller screen.
b) Insert purge cassette and disc then close door.
(Screen will advance when completed)
Insert cassette first, then slide disc in, with flat side inward.
6. Performed in sterile field:
Open Impella Catheter and cable in sterile field.
Pass white, round end of cable off sterile field.
7. Performed simultaneously:
STEP 3: a) Connect white cable to Impella® catheter: connect grey end arrow to arrow.
b) Connect white end to Controller.
(Screen will advance when completed)
Performed in sterile field.
Performed at Controller.
8. Performed in sterile field:
STEP 4: a) Snap on purge clip.
Connects purge lines to catheter cable.
b) Connect purge tubing to Impella® catheterusing luers: Yellow to Yellow Red to Red
(Screen will advance when completed)
Luers attach purge tubing to matching side-arm ports.
9. Performed in sterile field:
STEP 5:Squeeze and hold sides of white flush valve until controller beeps.
(Screen will advance when completed)
Squeeze continuously until beep sounds.
10. Performed at Controller:
STEP 6:Confirm Purge Fluid information.
Press ACCEPT soft key if no change.
Press EDIT soft key to change information. Turn the selector knob to each individual value. Press the selector knob to open options. Scroll to desired value and press selector knob to confirm value. Continue procedure until all values are selected. Select OK by pressing selector knob.
(Screen will advance when completed)
Use selector knob to EDIT information.
"Priming Impella®" screen may appear if still priming. (Screen will advance when completed)
11. Performed at Controller:DO NOT press "START Impella" soft key until Physician confirms successful insertion, proper position and removal of guidewire from catheter.
Read alerts on controller screen.
Confirm that appropriate steps are taken, then:
Confirm anticoagulation.Confirm Purge Fluid exit.Confirm Guidewire removal.
(continued)

12
Follow-up Proceed with Impella 2.5™ or Impella CP® Catheter insertion.
References (Supportive Data)
Impella 2.5™ or Impella CP® Catheter with Automated Impella® Controller Instructions for Use Manuals
Approval
Effective Date
Revision Date(s)
13
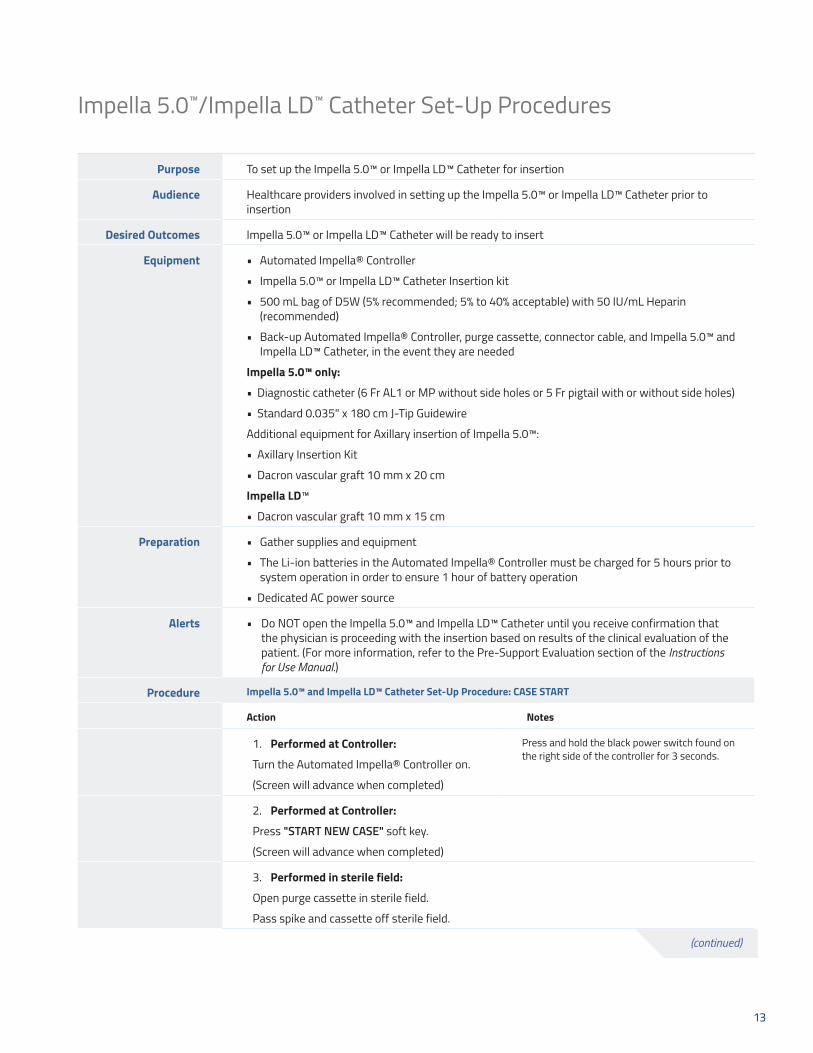
Impella 5.0™/Impella LD™ Catheter Set-Up Procedures
Purpose To set up the Impella 5.0™ or Impella LD™ Catheter for insertion
Audience Healthcare providers involved in setting up the Impella 5.0™ or Impella LD™ Catheter prior to insertion
Desired Outcomes Impella 5.0™ or Impella LD™ Catheter will be ready to insert
Equipment • Automated Impella® Controller
• Impella 5.0™ or Impella LD™ Catheter Insertion kit
• 500 mL bag of D5W (5% recommended; 5% to 40% acceptable) with 50 IU/mL Heparin (recommended)
• Back-up Automated Impella® Controller, purge cassette, connector cable, and Impella 5.0™ and Impella LD™ Catheter, in the event they are needed
Impella 5.0™ only:
• Diagnostic catheter (6 Fr AL1 or MP without side holes or 5 Fr pigtail with or without side holes)
• Standard 0.035" x 180 cm J-Tip Guidewire
Additional equipment for Axillary insertion of Impella 5.0™:
• Axillary Insertion Kit
• Dacron vascular graft 10 mm x 20 cm
Impella LD™
• Dacron vascular graft 10 mm x 15 cm
Preparation • Gather supplies and equipment
• The Li-ion batteries in the Automated Impella® Controller must be charged for 5 hours prior to system operation in order to ensure 1 hour of battery operation
• Dedicated AC power source
Alerts • Do NOT open the Impella 5.0™ and Impella LD™ Catheter until you receive confirmation that the physician is proceeding with the insertion based on results of the clinical evaluation of the patient. (For more information, refer to the Pre-Support Evaluation section of the Instructions for Use Manual.)
Procedure Impella 5.0™ and Impella LD™ Catheter Set-Up Procedure: CASE START
Action Notes
1. Performed at Controller:
Turn the Automated Impella® Controller on.
(Screen will advance when completed)
Press and hold the black power switch found on the right side of the controller for 3 seconds.
2. Performed at Controller:
Press "START NEW CASE" soft key.
(Screen will advance when completed)
3. Performed in sterile field:
Open purge cassette in sterile field.
Pass spike and cassette off sterile field.
(continued)

14
4. Performed at Controller: STEP1: Spike Dextrose bag Press "Next" soft key (Screen will advance when completed)
D5W recommended.
If D5W supplied in bottles, open the vent on purge fluid spike and proceed.
5. Performed at Controller:
STEP 2:
a) Open front purge cassette door using button on left side.
Button located on left side of controller screen.
b) Insert purge cassette and disc then close door.
(Screen will advance when completed)
Insert cassette first, then slide disc in, with flat side inward.
6. Performed in sterile field:
Open Impella Catheter and cable in sterile field. Pass white, rounded end of cable off sterile field.
7. Performed simultaneously:
STEP 3:
a) Connect white cable to Impella catheter: connect gray end arrow to arrow
Performed in sterile field.
b) Connect white end to controller
(Screen will advance when completed)
Performed at Controller.
8. Performed in sterile field:
STEP 4:a) Snap on purge clip.
b) Connect purge tubing to Impella Catheter using luer: yellow to yellow
(Remove and discard Y-Connector)
(Screen will advance when completed)
Connects purge lines to catheter cable.
Luer attaches purge tubing to matching side-arm port.
9. Performed at Controller:
STEP 5:
Confirm Purge Fluid information
Press ACCEPT soft key if no change
Press EDIT soft key to change information.
Turn the selector knob to each individual value. Press the selector knob to open options. Scroll to desired value and press selector knob to confirm value. Continue procedure until all values are selected. Select OK by pressing selector knob.
Use selector knob to EDIT information.
"Priming Impella®" screen may appear if still priming.(Screen will advance when completed)
10. Performed at Controller:
DO NOT press Flow Control soft key until physician confirms successful insertion, proper position and removal of Guidewire from Impella 5.0™ Catheter. Read alerts on controller screen. Confirm that appropriate steps are taken.
Confirm alerts associated with specific device.
(continued)

15
Follow-up Proceed with Impella 5.0™ or Impella LD™ Catheter insertion.
References (Supportive Data)
Impella 5.0™ or Impella LD™ Catheter with Automated Impella® Controller Instructions for Use Manuals
Approval
Effective Date
Revision Date(s)

16
Impella 2.5™/Impella CP® Catheter Insertion ProceduresPurpose To insert the Impella 2.5™ or Impella CP® Catheter
Audience Healthcare providers involved in the insertion of the Impella 2.5™ and Impella CP® Catheter
Desired Outcomes Impella 2.5™ or Impella CP® will be successfully inserted and provide hemodynamic support to the patient
Equipment The following equipment will be in place from the Impella 2.5™ and Impella CP® Catheter Set-Up Procedure:
• Automated Impella® Controller
• Impella 2.5™ and Impella CP® Catheter set-up and insertion kit
• Diagnostic catheter (6 Fr AL1 or MP without side holes or 5 Fr pigtail with or without side holes)
• 5-8 Fr introducer and 10 Fr Dilator
• Standard 0.035" x 180 cm J-Tip Guidewire
• 500 mL bag of NaCl with pressure bag
• 500 mL bag of D5W (5% recommended; 5% to 40% acceptable) with 50 IU/mL Heparin (recommended)
• Back-up Automated Impella® Controller, purge cassette, connector cable, and Impella 2.5™ and/or Impella CP® Catheter, in the event they are needed
Preparation • Gather supplies
• Dedicated AC power source
Alerts • Fluoroscopy is required to guide placement of the Impella 2.5™ and Impella CP® Catheter. The small placement guidewire must be reliably observed at all times.
• Remove the placement guidewire prior to turning the Impella 2.5™ and Impella CP® Catheter on.
• Avoid manual compression of the Impella 2.5™ and Impella CP® Catheter inlet or outlet areas.
• Maintain ACT at 160–180 seconds during support.
• Retrograde flow may occur across the aortic valve if the Impella 2.5™ and Impella CP® Catheter is set at a performance level below P-2.
Procedure Inserting the Impella 2.5™ or Impella CP® Catheter (Wired Insertion Technique )
Action Notes
1. Obtain access to femoral artery.
2. Insert 5–8 Fr introducer over the 0.035" guidewire.
3. Remove 5–8 Fr introducer over 0.035" guidewire. Predilate the artery with a 10 Fr dilator prior to inserting the 13 Fr or 14 Fr peel-away introducer with dilator. While inserting the introducer, hold the shaft of the introducer to slide it into the artery.
(continued)

17
4. Administer Heparin. When ACT is 250 seconds or above, remove the dilator.
5. Insert diagnostic catheter (Abiomed recommends using a 5 Fr pigtail with or without side holes or 6 Fr AL1 or MP without side holes) over a 0.035" diagnostic guidewire into the introducer and advance it into the left ventricle.
When using a pigtail with side holes, magnify the area one to two times as the guidewire begins to exit the pigtail to ensure that the guidewire exits the end of the catheter and not the side holes. To do so, magnify the area one to two times as the guidewire begins to exit the pigtail.
6. Remove the 0.035" diagnostic guidewire, leaving the diagnostic catheter in the ventricle. Form a curve or bend on the end of the 0.018 inch x 260 cm placement guidewire, following the instructions.
Bend the shaping ribbon against the tool, using minimal force. Do not use a shaping tool with a sharp tip or edge. Do not pull the shaping tool along the length of the shaping ribbon as this could strip the coil off the guidewire and cause it to unfurl and separate. Inspect the coil and guidewire for damage after shaping and before using.
7. Advance the placement guidewire into the apex of the left ventricle.
8. Remove the diagnostic catheter.
To backload the catheter using the EasyGuide lumen:
9. Insert the placement guidewire into the red EasyGuide lumen at the tip of the pigtail of the Impella 2.5™ and Impella CP® Catheter.
a) Advance the guidewire until it exits the red lumen near the label.
b) Remove the red EasyGuide Lumen by gently pulling the label in line with the catheter shaft while holding the Impella 2.5™ and Impella CP® Catheter.
c) If you suspect that a portion of the red lumen remains in the catheter, do NOT use the Impella 2.5™ and Impella CP® device Catheter. Measure red lumen length using catheter markings (intact length is between 21.5 cm and 22.5 cm).
d) Skip to step 11 if the catheter is successfully backloaded on the guidewire.
If catheter does not have a red EasyGuide lumen, follow the procedure outlined in step 10.
(continued)
18
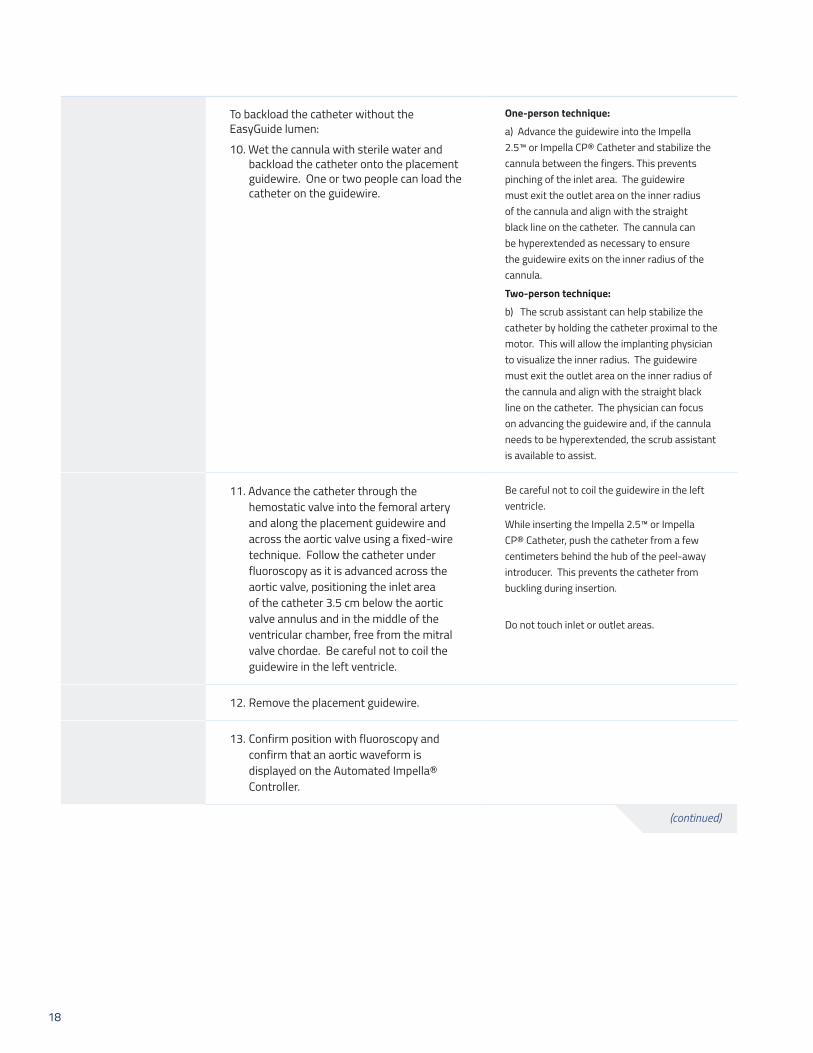
To backload the catheter without the EasyGuide lumen:
10. Wet the cannula with sterile water and backload the catheter onto the placement guidewire. One or two people can load the catheter on the guidewire.
One-person technique:
a) Advance the guidewire into the Impella 2.5™ or Impella CP® Catheter and stabilize the cannula between the fingers. This prevents pinching of the inlet area. The guidewire must exit the outlet area on the inner radius of the cannula and align with the straight black line on the catheter. The cannula can be hyperextended as necessary to ensure the guidewire exits on the inner radius of the cannula.
Two-person technique:
b) The scrub assistant can help stabilize the catheter by holding the catheter proximal to the motor. This will allow the implanting physician to visualize the inner radius. The guidewire must exit the outlet area on the inner radius of the cannula and align with the straight black line on the catheter. The physician can focus on advancing the guidewire and, if the cannula needs to be hyperextended, the scrub assistant is available to assist.
11. Advance the catheter through the hemostatic valve into the femoral artery and along the placement guidewire and across the aortic valve using a fixed-wire technique. Follow the catheter under fluoroscopy as it is advanced across the aortic valve, positioning the inlet area of the catheter 3.5 cm below the aortic valve annulus and in the middle of the ventricular chamber, free from the mitral valve chordae. Be careful not to coil the guidewire in the left ventricle.
Be careful not to coil the guidewire in the left ventricle.
While inserting the Impella 2.5™ or Impella CP® Catheter, push the catheter from a few centimeters behind the hub of the peel-away introducer. This prevents the catheter from buckling during insertion.
Do not touch inlet or outlet areas.
12. Remove the placement guidewire.
13. Confirm position with fluoroscopy and confirm that an aortic waveform is displayed on the Automated Impella® Controller.
(continued)
19
(continued)
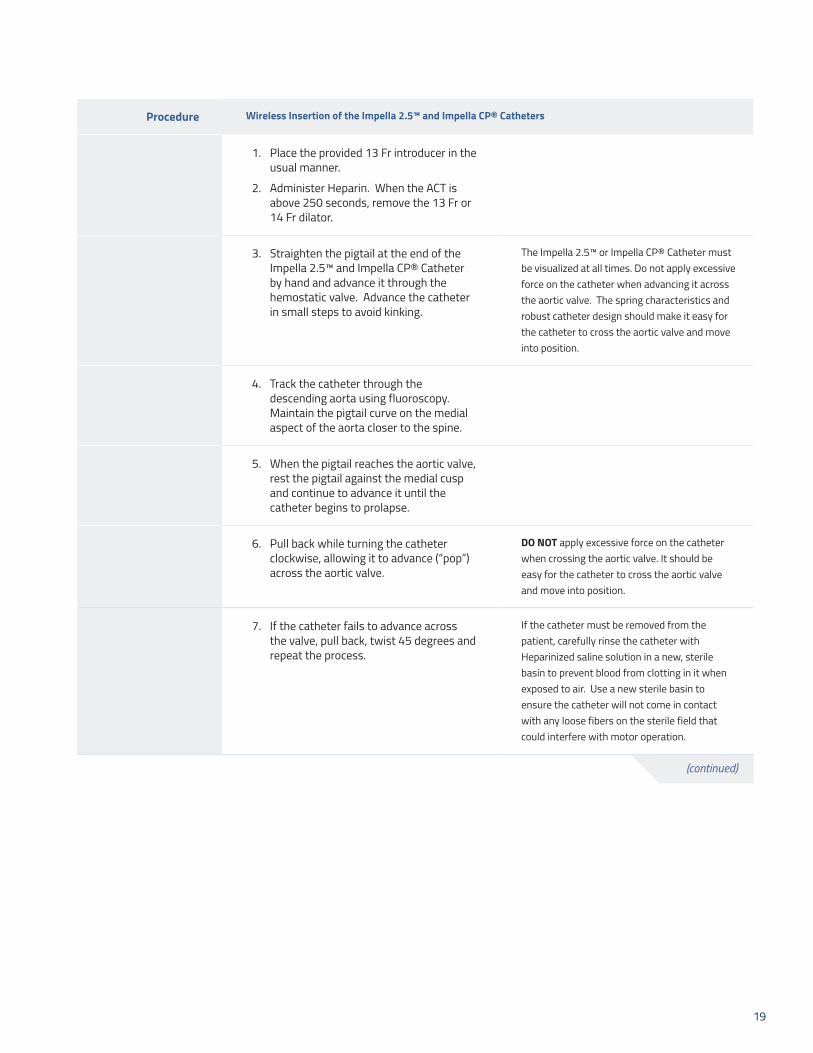
Procedure Wireless Insertion of the Impella 2.5™ and Impella CP® Catheters
1. Place the provided 13 Fr introducer in the usual manner.
2. Administer Heparin. When the ACT is above 250 seconds, remove the 13 Fr or 14 Fr dilator.
3. Straighten the pigtail at the end of the Impella 2.5™ and Impella CP® Catheter by hand and advance it through the hemostatic valve. Advance the catheter in small steps to avoid kinking.
The Impella 2.5™ or Impella CP® Catheter must be visualized at all times. Do not apply excessive force on the catheter when advancing it across the aortic valve. The spring characteristics and robust catheter design should make it easy for the catheter to cross the aortic valve and move into position.
4. Track the catheter through the descending aorta using fluoroscopy. Maintain the pigtail curve on the medial aspect of the aorta closer to the spine.
5. When the pigtail reaches the aortic valve, rest the pigtail against the medial cusp and continue to advance it until the catheter begins to prolapse.
6. Pull back while turning the catheter clockwise, allowing it to advance (“pop”) across the aortic valve.
DO NOT apply excessive force on the catheter when crossing the aortic valve. It should be easy for the catheter to cross the aortic valve and move into position.
7. If the catheter fails to advance across the valve, pull back, twist 45 degrees and repeat the process.
If the catheter must be removed from the patient, carefully rinse the catheter with Heparinized saline solution in a new, sterile basin to prevent blood from clotting in it when exposed to air. Use a new sterile basin to ensure the catheter will not come in contact with any loose fibers on the sterile field that could interfere with motor operation.

20
Procedure Positioning and Starting the Impella 2.5™ or Impella CP® Catheter
1. Place the catheter plug at the level of the patient's heart.
2. Prior to starting the pump, reconfirm that the placement guidewire has been removed. Also reconfirm that the controller displays an aortic waveform and the radiopaque marker band is located at the aortic valve annulus.
3. Press the FLOW CONTROL soft button to open the menu. Start Pump is highlighted in blue. Press the selector knob to select Start Pump and the controller starts in AUTO, which automatically increases the flow rate over 30 seconds.
AUTO increases the flow rate over a period of up to 30 seconds to the maximum possible flow without causing suction.
NOTE: BOOST maximizes the Impella 2.5™ or Impella CP® Catheter flow for 5 minutes and then returns to the AUTO setting or P-8.
4. Once the controller has begun to run in AUTO, pressing the FLOW CONTROL soft button will open other options: BOOST, P-levels ranging from P-0 to P-8.
5. Wait 30 seconds for flow to reach its maximum value, then confirm correct and stable placement. Evaluate the catheter position in the aortic arch and remove any excess slack. The catheter should align with the lesser curvature of the aorta rather than the greater curvature. Verify placement with fluoroscopy and with the placement signal screen.
6. Reposition the catheter as needed.
7. If the Impella 2.5™ or Impella CP® Catheter advances too far into the left ventricle and the controller displays a ventricular waveform rather than an aortic waveform, follow these steps to reposition the catheter:
a) With fluoroscopy guidance, pull the catheter back until an aortic waveform is present on the placement screen.
b) When the aortic waveform is present on the placement screen, you may need to pull the catheter back an additional 4 cm. (The distance between adjacent markings on the catheter is 1 cm.) The catheter should now be positioned correctly.
When the Impella 2.5™ or Impella CP® Catheter is not correctly placed, there is no effective unloading of the ventricle. The patient may not be benefiting from the flow rate shown on the controller.
(continued)

21
Procedure Handling Low Flows or Suction at Start-Up
Follow these steps if the Impella 2.5™ and Impella CP® Catheter has sudden low flows or suction at startup
1. Obtain Echo to assess for:• LV Thrombus• RV Failure• Hypovolemia
2. If above causes are eliminated, remove the catheter from the patient and ensure that ACT is 250 seconds or above.
3. Closely inspect the inlet and outlet areas and remove any thrombus or other foreign materials.
4. If materials have been removed, run the Impella 2.5™ and Impella CP® at P-8 or AUTO in a sterile basin.
5. If flows are adequate, re-insert the Impella 2.5™ and Impella CP® Catheter into the patient.
6. If no material is visible or if the flows are still low, there could be a clot inside the device. The echo assessment of the left ventricle is used to rule out left ventricular thrombus before inserting another device.
Follow-up Once the patient is on Impella 2.5™ and Impella CP® heart pump support, refer to Impella 2.5™ and Impella CP® patient support procedures.
References (Supportive Data)
Impella 2.5™ or Impella CP® Catheters with Automated Impella® Controller Instructions for Use Manuals
Approval
Effective Date
Revision Date(s)
22
Impella 5.0™ Catheter Insertion ProcedurePurpose To insert the Impella 5.0™ Catheter
Audience Healthcare providers involved in inserting the Impella 5.0™ Catheter
Desired Outcomes Impella 5.0™ will be successfully implanted and provide hemodynamic support to the patient
Equipment The following equipment will be in place from the Impella 5.0™ Catheter set-up procedure:
• Automated Impella® Controller
• Impella 5.0™ Catheter insertion kit
• 500 mL bag of D5W (5% recommended; 5% to 40% acceptable) with 50 IU/mL Heparin (recommended)
Impella 5.0™ only:
• Diagnostic catheter (6 Fr AL1 or MP without side holes or 5 Fr pigtail with or without side holes)
• Standard 0.035" x 180 cm J-Tip Guidewire
Additional equipment for Axillary insertion of Impella 5.0™
• Axillary Insertion Kit
• Dacron vascular graft 10 mm x 20 cm
• Back-up Automated Impella® Controller, purge cassette, connector cable, and Impella 5.0™ Catheter, in the event they are needed
Preparation Complete Impella 5.0™ Catheter Set-Up Procedure
Alerts • Fluoroscopy is required to guide placement of the Impella 5.0™ Catheter. The small placement guidewire must be reliably observed at all times.
• Avoid manual compression of the inlet, outlet, or sensor areas of the cannula assembly.
• Do not kink or clamp any part of the Impella 5.0™ Catheter.
• Handle with care. The Impella 5.0™ Catheter can be damaged during removal from packaging, preparation, insertion, or removal. Do not bend, pull, or place excess pressure on the Catheter or mechanical components at any time.
• Be sure to remove the placement guidewire before turning the Impella 5.0™ Catheter on.
• Maintain ACT 160-180 seconds during support.
• Retrograde flow may occur across the aortic valve, if the Impella 5.0™ Catheter is set at a P-Level below P-2.
Procedure Inserting the Impella 5.0™ Catheter (Via Femoral Artery)
Action Notes
1. Identify the femoral artery and perform a cut-down of 3-5 cm.
2. Expose the femoral artery. Wrap vessel loops, one distal and one proximal, to the subsequent point of incision, one and one-half times around the artery. Make the vessel loops as far apart as possible.
(continued)
23
3. To prepare the repositioning sheath, remove the luer plug at the end of the side-arm tube and flush the tube with 0.9% NaCl solution.
4. Make the incision as close as possible to the distal loop. Insert a 6 Fr diagnostic catheter without side holes (MP or AL1 without side holes recommended) over a diagnostic 0.035" or 0.038" guidewire into the left ventricle.
5. Remove the diagnostic guidewire, and exchange it for the supplied 0.025" placement guidewire.
6. Hold tension on the proximal loop to prevent bleeding. Straighten the blue pigtail and thread it over the 0.025" placement guidewire. Wet the cannula with sterile water and backload the catheter onto the placement guidewire. One or two people can load the catheter on the guidewire.
a) One-Person Technique:
Advance the placement guidewire into the Impella 5.0™ Catheter and stabilize the cannula between the fingers. This prevents pinching of the inlet area. The placement guidewire must exit the outlet area on the inner radius of the cannula and align with the straight black line on the catheter. The catheter can be hyperextended as necessary, to ensure the placement guidewire exits on the inner radius of the cannula.
b) Two-Person Technique:
The scrub assistant can help stabilize the catheter by holding the catheter proximal to the motor. This will allow the Implanting Physician to visualize the inner radius. The placement guidewire must exit the outlet area on the inner radius of the catheter and align with the straight black line on the catheter. The physician can focus on advancing the placement guidewire and, if the cannula needs to be hyperextended, the scrub assistant is available to assist.
7. Make a transverse incision at the guidewire for the 21 Fr catheter. Use U-Stitches instead of Purse String sutures to avoid stenosis of the vessel after explantation.
8. Administer Heparin and achieve ACT goal of at least 250 seconds.
If patient is receiving a GP IIb/IIIa inhibitor, the Impella® can be inserted when ACT is 200 or above.
9. Insert the catheter into the vessel and advance along the 0.025" placement guidewire until resistance is met at the proximal vessel loop.
10. Loosen the proximal loop and advance the catheter into the vessel. When the motor housing is entirely past the proximal vessel loop, temporarily tighten the loop to control bleeding.
(continued)

24
11. Advance the repositioning sheath, located on the catheter shaft, through the incision and into the femoral artery until bleeding is controlled. Secure the sheath outside of the vessel using the supplied suture loop.
While feeding the Impella 5.0™ Catheter through the femoral artery, hold the device at the cannula or motor housing. Do not touch the inlet area or outlet area.
12. Stabilize the guidewire and repositioning sheath and advance the catheter through the sheath. Follow the catheter, under fluoroscopy, as it is advanced into the left ventricle.
If the Impella 5.0™ Catheter is used in the OR as part of Open Heart Surgery, manipulation may be performed only through the 9 Fr steering catheter. Direct manipulation of the catheter through the aorta or ventricle may result in serious damage to the Impella 5.0™ Cathether and serious injury to the patient.
13. When the catheter is correctly positioned, slightly loosen the proximal vessel loop and remove the 0.025" guidewire. Leave at least 2 to 3 cm of the repositioning sheath inside the vessel.
14. Tighten the prepared U-Stitches to seal the sheath.
15. Loosen the distal loop. Then loosen the proximal vessel loop.
16. After the incision is closed, advance the sterile sleeve and attach to the repositioning sheath. Secure the Impella 5.0™ Catheter by tightening the Tuohy-Borst valve.
(continued)
25
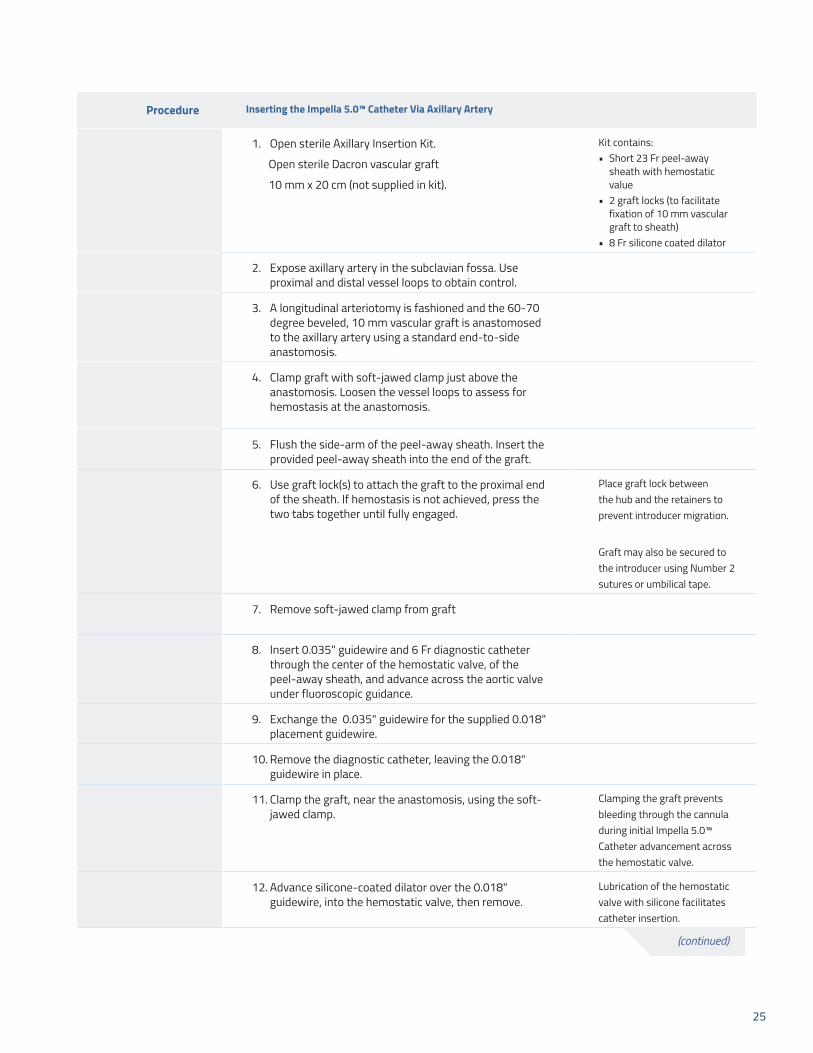
Procedure Inserting the Impella 5.0™ Catheter Via Axillary Artery
1. Open sterile Axillary Insertion Kit.
Open sterile Dacron vascular graft
10 mm x 20 cm (not supplied in kit).
Kit contains:• Short 23 Fr peel-away
sheath with hemostatic value
• 2 graft locks (to facilitate fixation of 10 mm vascular graft to sheath)
• 8 Fr silicone coated dilator
2. Expose axillary artery in the subclavian fossa. Use proximal and distal vessel loops to obtain control.
3. A longitudinal arteriotomy is fashioned and the 60-70 degree beveled, 10 mm vascular graft is anastomosed to the axillary artery using a standard end-to-side anastomosis.
4. Clamp graft with soft-jawed clamp just above the anastomosis. Loosen the vessel loops to assess for hemostasis at the anastomosis.
5. Flush the side-arm of the peel-away sheath. Insert the provided peel-away sheath into the end of the graft.
6. Use graft lock(s) to attach the graft to the proximal end of the sheath. If hemostasis is not achieved, press the two tabs together until fully engaged.
Place graft lock between the hub and the retainers to prevent introducer migration.
Graft may also be secured to the introducer using Number 2 sutures or umbilical tape.
7. Remove soft-jawed clamp from graft
8. Insert 0.035" guidewire and 6 Fr diagnostic catheter through the center of the hemostatic valve, of the peel-away sheath, and advance across the aortic valve under fluoroscopic guidance.
9. Exchange the 0.035" guidewire for the supplied 0.018" placement guidewire.
10. Remove the diagnostic catheter, leaving the 0.018" guidewire in place.
11. Clamp the graft, near the anastomosis, using the soft-jawed clamp.
Clamping the graft prevents bleeding through the cannula during initial Impella 5.0™ Catheter advancement across the hemostatic valve.
12. Advance silicone-coated dilator over the 0.018" guidewire, into the hemostatic valve, then remove.
Lubrication of the hemostatic valve with silicone facilitates catheter insertion.
(continued)

26
13. Advance Impella 5.0™ Catheter over the 0.018" guidewire into the sheath.
Ensure soft-jawed clamp is in place to prevent bleeding through the device as it passes through hemostatic valve.
14. Remove the soft-jawed clamp once the motor housing is within the graft.
15. Advance Impella 5.0™ Catheter into the left ventricle under fluoroscopic guidance.
16. Remove guidewire prior to starting Impella® support.
17. Begin Impella® support by increasing P-Level on Automated Impella® Controller.
18. Re-apply the soft-jawed clamp to graft above the anastomosis and distal to the tip of the sheath, sealing over the 9 Fr catheter shaft of the Impella 5.0™ Catheter.
Ensure a tight seal by opening the side-arm flush valve of the sheath.
19. Remove the graft locks.
20. Withdraw peel-away sheath from graft and peel away.
21. Shorten the graft as desired. Tighten vessel loops to allow removal of soft-jawed clamp
Shorten graft so that graft material will not be exposed once the incision is closed.
22. Advance the repositioning Unit into the graft and secure, using suture ties along the suture ribs on the proximal end of the Repositioning Sheath.
23. Close the subcutaneous tissue and skin. Secure blue suture wings to the skin.
24. Advance the sterile sleeve and to the repositioning sheath. Secure the Impella 5.0™ Catheter by tightening the Tuohy- Borst valve.
(continued)

27
Procedure Starting the Impella 5.0® Catheter
1. Press FLOW CONTROL soft key
2. Turn selector knob to increase the P-Level from P-0 to P-2. Press selector knob to confirm selection.
3. Confirm appropriate increase in Impella Flow.
4. Press FLOW CONTROL and turn selector knob with each P-Level increase and press selector knob to confirm selection.
5. Evaluate catheter position in the aortic arch and remove any excess slack. Verify placement with fluoroscopy and the Placement Signal Screen.
Follow-up Refer to Patient Care Procedures.
References (Supportive Data)
Impella 5.0™ or Impella LD™ Catheters with Automated Impella® Controller Instructions for Use Manuals
Approval
Effective Date
Revision Date(s)

28
Impella LD™ Catheter Insertion ProcedurePurpose To insert the Impella LD™ Catheter
Audience Healthcare providers involved in inserting the Impella LD™ Catheter
Desired Outcomes Impella LD™ will be successfully implanted and provide hemodynamic support to the patient
Equipment The following equipment will already be in place from the Impella LD™ Catheter set-up procedure:
• Automated Impella® Controller
• Impella LD™ Catheter insertion kit
• 500 cc bag of D5W (5% recommended; 5% to 40% acceptable) with 50 IU/mL Heparin (recommended)
• Dacron vascular graft 10 mm x 15 cm
• Back-up Automated Impella® Controller, purge cassette, connector cable, and Impella LD™ Catheter, in the event they are needed
Alerts • Transesophageal Echocardiography (TEE) is required for placement of the Impella LD™ Catheter.
• It is important to make the incision, in the ascending aorta, 7 cm above the aortic valve so that the Impella LD™ Catheter can be positioned properly. An incision too close to the aortic valve annulus could result in the catheter outlet area in the graft rather than the aorta.
• Theincisionmustbe≤6mminlengthtopreventthefrontsiliconeplugfromadvancinginto the aorta through the incision.
Procedure Insertion of the Impella LD™ Catheter
Action Notes
1. Using the supplied sterile incision template for positioning, place a side biter clamp on the aorta at least 7 cm above the valve plane.
2. Make an incision (or punch) no larger than 6 mm at the insertion site on the ascending aorta.
3. Attach the Dacron vascular graft (10 mm x 15 cm) to the aorta using the standard end-to-slide anastomosis.
4. Administer Heparin and achieve ACT of at least 250 seconds.
If the patient is receiving a GP IIb/lIIa inhibitor, the Impella LD™ Catheter can be inserted when ACT is 200 seconds or above.
5. When the anastomosis is complete, place a clamp at the distal end of the graft and then release the proximal clamp at the base of the graft. Examine the suture line for leaks and re-clamp the graft at the base.
6. Moisten the Impella LD™ Catheter and push both silicone plugs up against the motor housing.
(continued)

29
7. With the graft clamped at the base, place the Impella LD™ Catheter into the open end of the graft up to the level of the rear plug.
8. When the catheter is in position, secure a tourniquet around the rear silicone plug. Tighten the tourniquet sufficiently to control bleeding around the rear plug while still allowing the catheter to slide through the plug.
9. Release the clamp and advance the Impella LD™ Catheter into the aorta.
10. If the patient is on cardiopulmonary bypass (CPB), allow the heart to fill by restricting the return flow to the bypass machine and reducing CPB flow to a minimum setting, as long as acceptable physiologic systemic flow is maintained.
The aortic valve must be opening during the cardiac cycle to allow the Impella LD™ to pass.
11. As soon as the motor housing has passed into the aorta, the initial placement signal will be dampened. The inlet area of the catheter has not passed the aortic valve. Do not allow the front plug to advance beyond the base of the graft.
12. To aid in passing the catheter through the aortic valve, apply slight pressure to the posterior aspect of the aortic valve to produce temporary aortic insufficiency.
13. Gently advance the catheter forward until the tip of the inlet area of the Impella LD™ Catheter is approximately 4 cm below the aortic valve.
14. Position the front silicone plug as close as possible above the aorta. Secure the silicone plug to the graft using a penetrating suture ligature.
When securing the silicone plug to the graft, ensure that the penetrating suture does not go all the way through the silicone plug and damage the catheter.
15. After achieving correct and stable placement, clear the vascular graft of excess blood and re-secure the rear silicone plug to the end of the graft.
16. When closing the skin incision, the sternum may or may not be closed, per surgeon.
Left heart structures should not be opened when the catheter is in place in the left ventricle.
Do not cross-clamp the aorta when the Impella LD™ Catheter is in place. The catheter must be pulled back into the descending aorta prior to cross-clamp.
(continued)

30
Procedure Starting the Impella LD™ Catheter
1. Press FLOW CONTROL soft key.
2. Turn selector knob to increase the P-Level from P-0 to P-2. Press selector knob to confirm selection.
3. Confirm appropriate increase in Impella Flow.
4. Press FLOW CONTROL and turn selector knob with each P-Level increase and press selector knob to confirm selection.
5. Evaluate catheter position with Echocardiography and the Placement Signal Screen.
Follow-up Refer to Patient Care Procedures.
References (Supportive Data)
Impella 5.0™ or Impella LD™ Catheters with Automated Impella® Controller Instructions for Use Manuals
Approval
Effective Date
Revision Date(s)

31
Impella 2.5™/Impella CP® Purge System Management ProceduresPurpose To maintain the Impella 2.5™ or Impella CP® purge system
Audience Healthcare providers involved in the care of patients supported with the Impella 2.5™ or Impella CP® Catheter and Automated Impella® Controller
Desired Outcomes Maintain purge system function of the Impella 2.5™ or Impella CP® Catheter and Automated Impella® Controller
Equipment • Automated Impella® Controller
• Additional purge cassettes for the Automated Impella® Controller
• 500 mL bag of D5W (5% recommended; 5% to 40% acceptable) with 50 IU/mL Heparin (recommended)
Preparation Gather supplies prior to beginning Purge System sequence
Alerts When replacing the purge cassette, the process must be completed within 2 minutes. The Impella 2.5™ or Impella CP® Catheter may be damaged if replacement takes longer than 2 minutes.
Procedure Change Purge System (changing both purge cassette and purge fluid)
Action Notes
1. Press PURGE SYSTEM and turn the selector knob to select “Change Purge System” from the menu. Press the selector knob to confirm selection.
2. Open the new purge cassette package. If the system is in the standard configuration (connected to the 0.9% NaCl bag), disconnect the Y connector from the purge cassette tubing and discard.
3. Spike the D5W bag/bottle. If the purge solution is supplied in bottles, open the vent on the purge tubing spike and proceed.
4. Turn the Selector Knob to select OK and press selector knob to confirm a bolus to the pressure reservoir. A blue bar shows the progress of the bolus. When the bolus is delivered, the controller advances to the next screen.
5. Disconnect the yellow luer from the Impella 2.5™ or Impella CP® Catheter, then, remove the used purge cassette from the controller.
Open the front door of the controller by pressing button on left side of controller.
(continued)
32
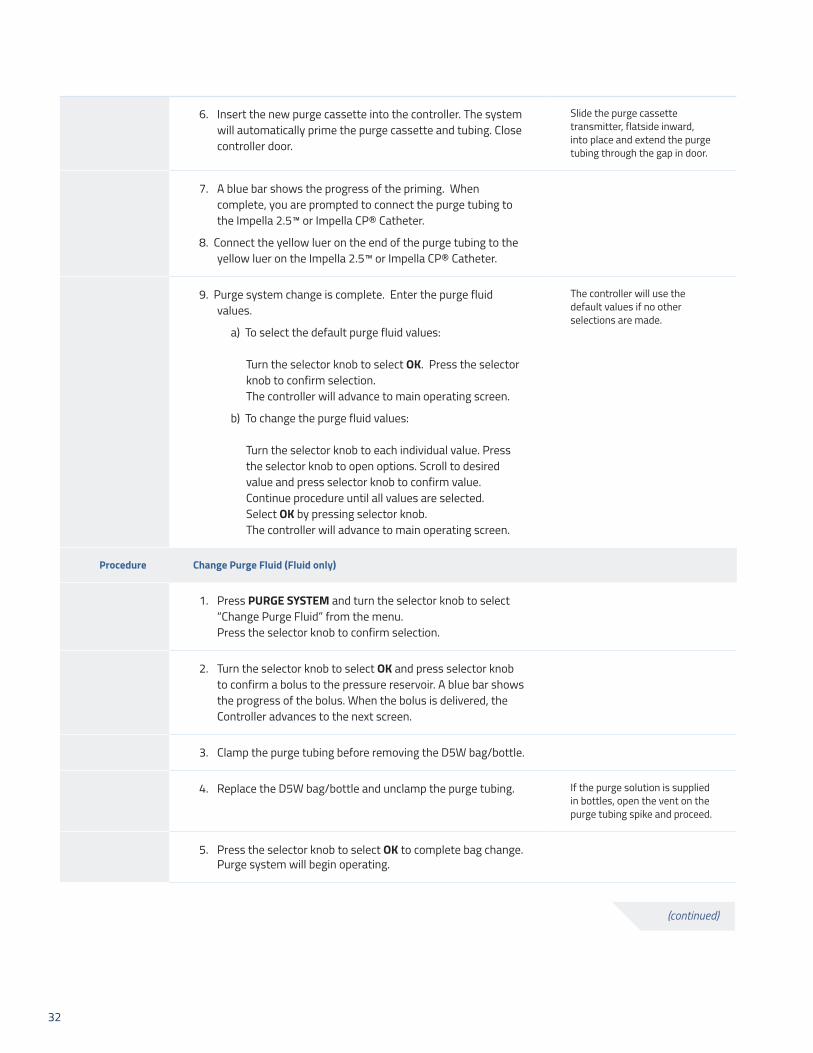
6. Insert the new purge cassette into the controller. The system will automatically prime the purge cassette and tubing. Close controller door.
Slide the purge cassette transmitter, flatside inward, into place and extend the purge tubing through the gap in door.
7. A blue bar shows the progress of the priming. When complete, you are prompted to connect the purge tubing to the Impella 2.5™ or Impella CP® Catheter.
8. Connect the yellow luer on the end of the purge tubing to the yellow luer on the Impella 2.5™ or Impella CP® Catheter.
9. Purge system change is complete. Enter the purge fluid values.
a) To select the default purge fluid values: Turn the selector knob to select OK. Press the selector knob to confirm selection. The controller will advance to main operating screen.
b) To change the purge fluid values: Turn the selector knob to each individual value. Press the selector knob to open options. Scroll to desired value and press selector knob to confirm value. Continue procedure until all values are selected. Select OK by pressing selector knob. The controller will advance to main operating screen.
The controller will use the default values if no other selections are made.
Procedure Change Purge Fluid (Fluid only)
1. Press PURGE SYSTEM and turn the selector knob to select “Change Purge Fluid” from the menu. Press the selector knob to confirm selection.
2. Turn the selector knob to select OK and press selector knob to confirm a bolus to the pressure reservoir. A blue bar shows the progress of the bolus. When the bolus is delivered, the Controller advances to the next screen.
3. Clamp the purge tubing before removing the D5W bag/bottle.
4. Replace the D5W bag/bottle and unclamp the purge tubing. If the purge solution is supplied in bottles, open the vent on the purge tubing spike and proceed.
5. Press the selector knob to select OK to complete bag change. Purge system will begin operating.
(continued)

33
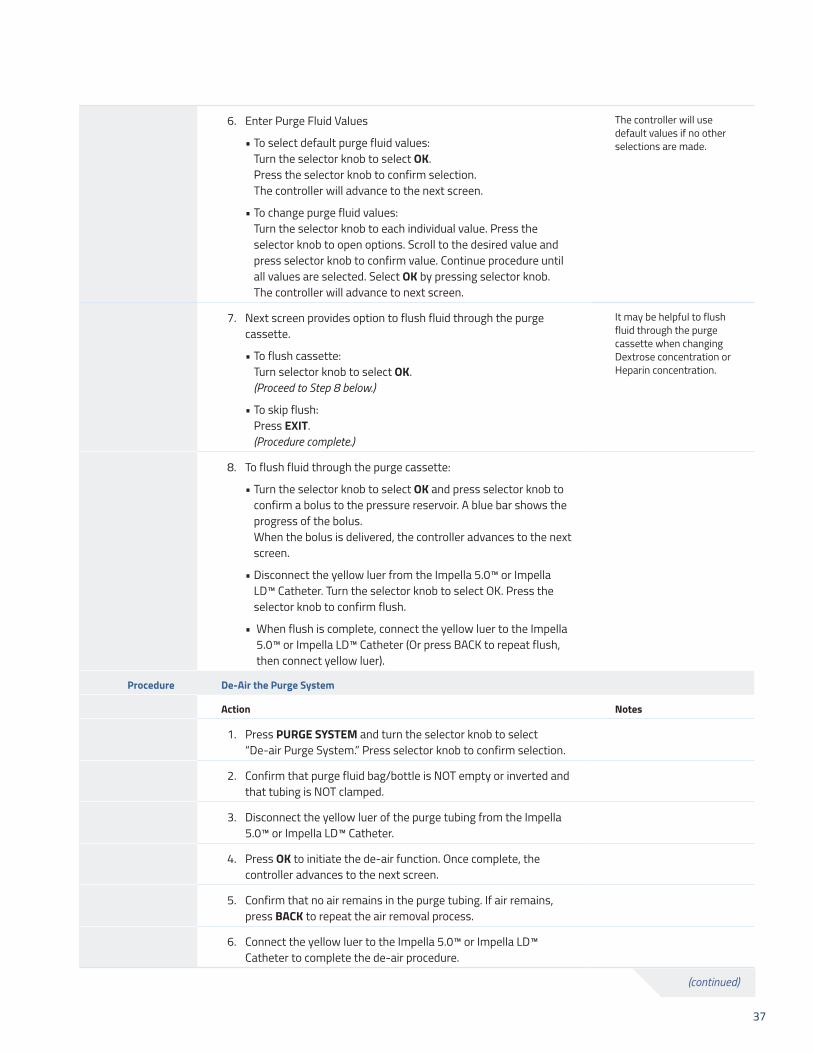
6. Enter Purge Fluid Values
• To select default purge fluid values: Turn the selector knob to select OK. Press the selector knob to confirm selection. The controller will advance to the next screen.
• To change purge fluid values: Turn the selector knob to each individual value. Press the selector knob to open options. Scroll to the desired value and press selector knob to confirm value. Continue procedure until all values are selected. Select OK by pressing selector knob. The controller will advance to next screen.
The controller will use default values if no other selections are made.
7. Next screen provides option to flush fluid through the purge cassette.
• To flush cassette: Turn selector knob to select OK. (Proceed to Step 8 below.)
• To skip flush: Press EXIT. (Procedure complete.)
It may be helpful to flush fluid through the purge cassette when changing Dextrose concentration or Heparin concentration.
8. To flush fluid through the purge cassette:
• Turn the selector knob to select OK and press selector knob to confirm a bolus to the pressure reservoir. A blue bar shows the progress of the bolus. When the bolus is delivered, the controller advances to the next screen.
• Disconnect the yellow luer from the Impella 2.5™ or Impella CP® Catheter. Turn the selector knob to select OK. Press the selector knob to confirm flush.
• When flush is complete, connect the yellow luer to the Impella 2.5™ or Impella CP® Catheter (Or press BACK to repeat flush, then connect yellow luer).
Procedure De-Air the Purge System
Action Notes
1. Press PURGE SYSTEM and turn the selector knob to select “De-air Purge System.” Press selector knob to confirm selection.
2. Confirm that purge fluid bag/bottle is NOT empty or inverted and that tubing is NOT clamped.
3. Disconnect the yellow luer of the purge tubing from the Impella 2.5™ or Impella CP® Catheter.
4. Press OK to initiate the de-air function. Once complete, the controller advances to the next screen.
5. Confirm that no air remains in the purge tubing. If air remains, press BACK to repeat the air removal process.
6. Connect the yellow luer to the Impella 2.5™ or Impella CP® Catheter to complete the de-air procedure.
(continued)
34
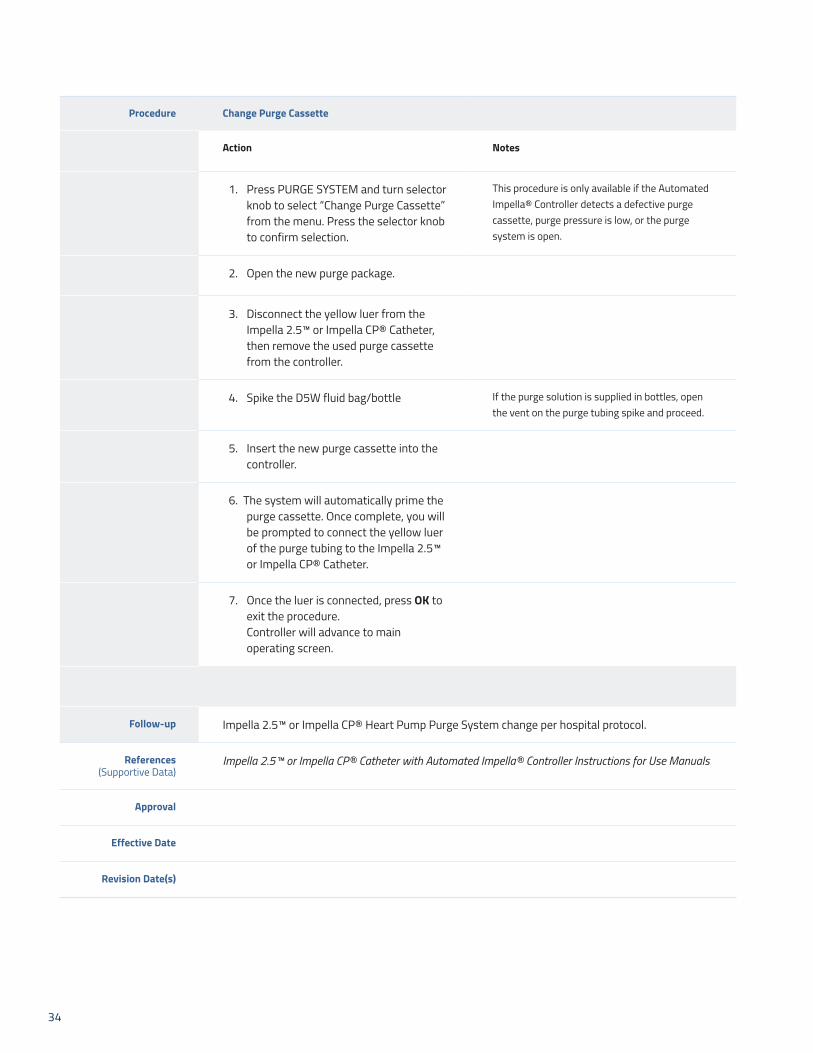
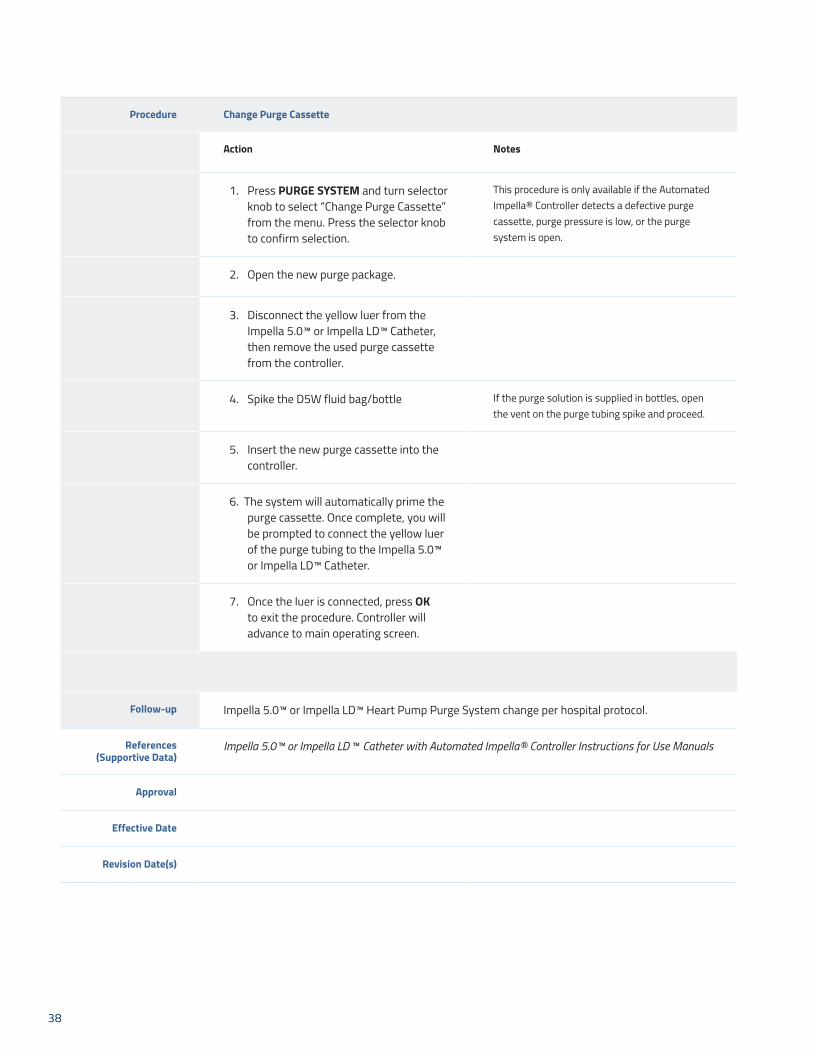
Procedure Change Purge Cassette
Action Notes
1. Press PURGE SYSTEM and turn selector knob to select “Change Purge Cassette” from the menu. Press the selector knob to confirm selection.
This procedure is only available if the Automated Impella® Controller detects a defective purge cassette, purge pressure is low, or the purge system is open.
2. Open the new purge package.
3. Disconnect the yellow luer from the Impella 2.5™ or Impella CP® Catheter, then remove the used purge cassette from the controller.
4. Spike the D5W fluid bag/bottle If the purge solution is supplied in bottles, open the vent on the purge tubing spike and proceed.
5. Insert the new purge cassette into the controller.
6. The system will automatically prime the purge cassette. Once complete, you will be prompted to connect the yellow luer of the purge tubing to the Impella 2.5™ or Impella CP® Catheter.
7. Once the luer is connected, press OK to exit the procedure. Controller will advance to main operating screen.
Follow-up Impella 2.5™ or Impella CP® Heart Pump Purge System change per hospital protocol.
References (Supportive Data)
Impella 2.5™ or Impella CP® Catheter with Automated Impella® Controller Instructions for Use Manuals
Approval
Effective Date
Revision Date(s)

35
Impella 5.0™/Impella LD™ Purge System Management ProceduresPurpose To maintain the Impella 5.0™ or Impella LD™ purge system
Audience Healthcare providers involved in the care of patients supported with the Impella 5.0™ or Impella LD™ Catheter and Automated Impella® Controller
Desired Outcomes Maintain purge system function of the Impella 5.0™ or Impella LD™ Catheter and Automated Impella® Controller
Equipment • Automated Impella® Controller
• Additional purge cassettes for the Automated Impella® Controller
• 500 cc bag of D5W (5% recommended; 5% to 40% acceptable) with 50 IU/mL Heparin (recommended)
Preparation Gather supplies prior to beginning Purge System sequence
Alerts When replacing the purge cassette, the process must be completed within 2 minutes. The Impella 5.0™ or Impella LD™ Catheter may be damaged if replacement takes longer than 2 minutes
Procedure Change Purge System (changing both purge cassette and purge fluid)
Action Notes
1. Press PURGE SYSTEM and turn the selector knob to select “Change Purge System” from the menu. Press the selector knob to confirm selection.
2. Open the new purge cassette package. Disconnect the Y-Connector from the purge cassette tubing and discard.
3. Spike the D5W bag/bottle. If the purge solution is supplied in bottles, open the vent on the purge tubing spike and proceed.
4. Turn the Selector Knob to select OK and press selector knob to confirm a bolus to the pressure reservoir. A blue bar shows the progress of the bolus. When the bolus is delivered, the controller advances to the next screen.
5. Disconnect the yellow luer from the Impella 5.0™ or Impella LD™ Catheter, then, remove the used purge cassette from the controller.
Open the front door of the controller by pressing button on left side of controller.
(continued)
36
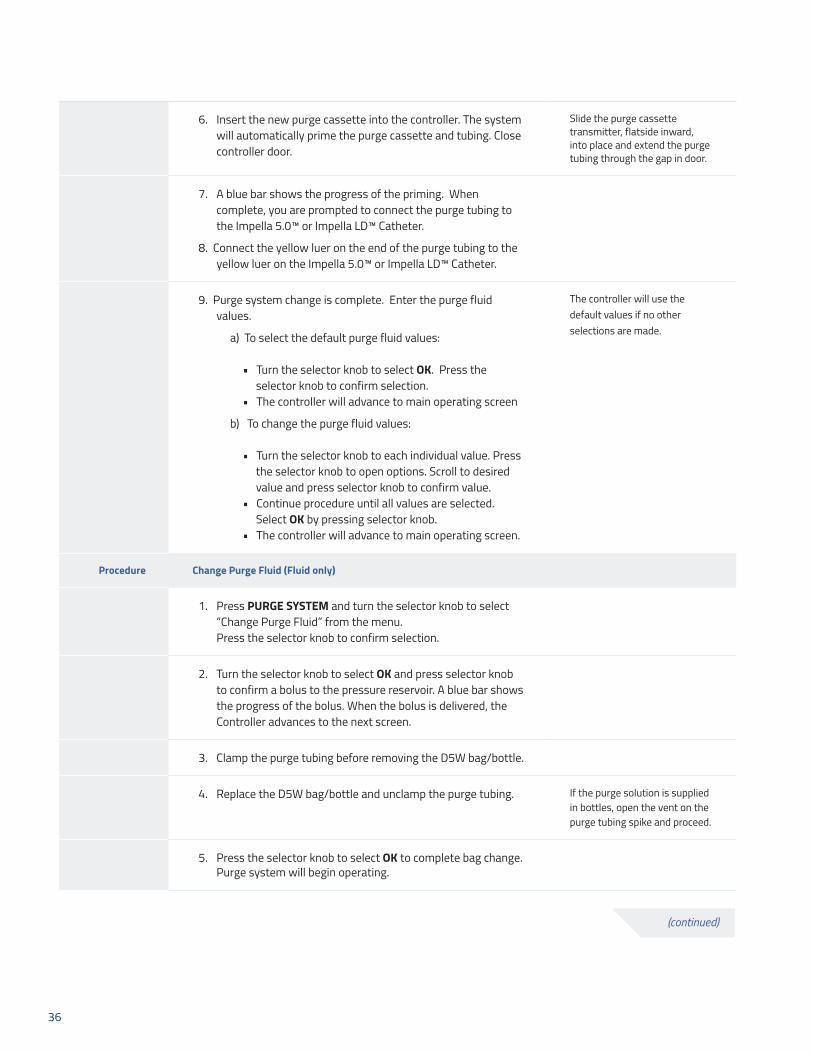
6. Insert the new purge cassette into the controller. The system will automatically prime the purge cassette and tubing. Close controller door.
Slide the purge cassette transmitter, flatside inward, into place and extend the purge tubing through the gap in door.
7. A blue bar shows the progress of the priming. When complete, you are prompted to connect the purge tubing to the Impella 5.0™ or Impella LD™ Catheter.
8. Connect the yellow luer on the end of the purge tubing to the yellow luer on the Impella 5.0™ or Impella LD™ Catheter.
9. Purge system change is complete. Enter the purge fluid values.
a) To select the default purge fluid values: • Turn the selector knob to select OK. Press the selector knob to confirm selection. • The controller will advance to main operating screen
b) To change the purge fluid values: • Turn the selector knob to each individual value. Press the selector knob to open options. Scroll to desired value and press selector knob to confirm value. • Continue procedure until all values are selected. Select OK by pressing selector knob. • The controller will advance to main operating screen.
The controller will use the default values if no other selections are made.
Procedure Change Purge Fluid (Fluid only)
1. Press PURGE SYSTEM and turn the selector knob to select “Change Purge Fluid” from the menu. Press the selector knob to confirm selection.
2. Turn the selector knob to select OK and press selector knob to confirm a bolus to the pressure reservoir. A blue bar shows the progress of the bolus. When the bolus is delivered, the Controller advances to the next screen.
3. Clamp the purge tubing before removing the D5W bag/bottle.
4. Replace the D5W bag/bottle and unclamp the purge tubing. If the purge solution is supplied in bottles, open the vent on the purge tubing spike and proceed.
5. Press the selector knob to select OK to complete bag change. Purge system will begin operating.
(continued)
37
6. Enter Purge Fluid Values
• To select default purge fluid values: Turn the selector knob to select OK. Press the selector knob to confirm selection. The controller will advance to the next screen.
• To change purge fluid values: Turn the selector knob to each individual value. Press the selector knob to open options. Scroll to the desired value and press selector knob to confirm value. Continue procedure until all values are selected. Select OK by pressing selector knob. The controller will advance to next screen.
The controller will use default values if no other selections are made.
7. Next screen provides option to flush fluid through the purge cassette.
• To flush cassette: Turn selector knob to select OK. (Proceed to Step 8 below.)
• To skip flush: Press EXIT. (Procedure complete.)
It may be helpful to flush fluid through the purge cassette when changing Dextrose concentration or Heparin concentration.
8. To flush fluid through the purge cassette:
• Turn the selector knob to select OK and press selector knob to confirm a bolus to the pressure reservoir. A blue bar shows the progress of the bolus. When the bolus is delivered, the controller advances to the next screen.
• Disconnect the yellow luer from the Impella 5.0™ or Impella LD™ Catheter. Turn the selector knob to select OK. Press the selector knob to confirm flush.
• When flush is complete, connect the yellow luer to the Impella 5.0™ or Impella LD™ Catheter (Or press BACK to repeat flush, then connect yellow luer).
Procedure De-Air the Purge System
Action Notes
1. Press PURGE SYSTEM and turn the selector knob to select “De-air Purge System.” Press selector knob to confirm selection.
2. Confirm that purge fluid bag/bottle is NOT empty or inverted and that tubing is NOT clamped.
3. Disconnect the yellow luer of the purge tubing from the Impella 5.0™ or Impella LD™ Catheter.
4. Press OK to initiate the de-air function. Once complete, the controller advances to the next screen.
5. Confirm that no air remains in the purge tubing. If air remains, press BACK to repeat the air removal process.
6. Connect the yellow luer to the Impella 5.0™ or Impella LD™ Catheter to complete the de-air procedure.
(continued)
38
Procedure Change Purge Cassette
Action Notes
1. Press PURGE SYSTEM and turn selector knob to select “Change Purge Cassette” from the menu. Press the selector knob to confirm selection.
This procedure is only available if the Automated Impella® Controller detects a defective purge cassette, purge pressure is low, or the purge system is open.
2. Open the new purge package.
3. Disconnect the yellow luer from the Impella 5.0™ or Impella LD™ Catheter, then remove the used purge cassette from the controller.
4. Spike the D5W fluid bag/bottle If the purge solution is supplied in bottles, open the vent on the purge tubing spike and proceed.
5. Insert the new purge cassette into the controller.
6. The system will automatically prime the purge cassette. Once complete, you will be prompted to connect the yellow luer of the purge tubing to the Impella 5.0™ or Impella LD™ Catheter.
7. Once the luer is connected, press OK to exit the procedure. Controller will advance to main operating screen.
Follow-up Impella 5.0™ or Impella LD™ Heart Pump Purge System change per hospital protocol.
References (Supportive Data)
Impella 5.0™ or Impella LD ™ Catheter with Automated Impella® Controller Instructions for Use Manuals
Approval
Effective Date
Revision Date(s)
39
Purpose To transfer patients supported with the Impella 2.5™ or Impella CP® catheter to care outside the cardiac cath lab
Audience Healthcare providers transitioning patients from the cardiac cath lab to care outside the cardiac cath lab
Desired Outcomes Maintain quality care for Impella 2.5™ or Impella CP® heart pump–supported patients outside the cardiac cath lab
Equipment • StatLock stabilization device (optional)
• 0.9% NaCl infusion bag with pressure bag and provided standard IV infusion set (for transfer to standard configuration)
Preparation Trained Transport Team in place
Alerts • Completely remove the peel-away introducer from the artery before peeling the wings.
• After 3 hours of operation, if you have not transferred to the standard configuration, the controller displays a message that it has automatically switched to P-level mode. The AUTO setting is no longer an option. Select OK to acknowledge.
Procedure Preparation for Moving the Patient
Action Notes
1. Verify correct Impella 2.5™ or Impella CP® Catheter position:• Verify correct placement using
echocardiography or fluoroscopy• Remove any excess slack in the catheter
to ensure that the catheter is laying along the lesser curve of the aorta
2. Identify a “landmark” on the red Impella 2.5™ or Impella CP® device plug and mark that location on the patient using a sterile marker or tape.
You will use this “landmark” to help ensure correct Impella 2.5™ or Impella CP® Catheter positioning after removal of the repositioning sheath and peel-away introducer.
3. Flush the sidearm of the repositioning sheath and replace the cap.
4. Remove the 13 Fr or 14 Fr or peel-away introducer completely from the artery over the catheter shaft and apply manual pressure above the puncture site.
(continued)
Transferring Impella 2.5™/Impella CP®–Supported PatientTransferring Impella 2.5™ or Impella CP®–supported patient to care outside the cardiac cath lab
The Impella 2.5™ or Impella CP® device product labeling acknowledges that situations may arise whereby a patient will need to be transferred from the cath lab to another location (either within the same hospital, or to another institution).
40
5. Grasp the two “wings” and bend back until the valve assembly comes apart. Continue to peel the two wings until the introducer is completely separated from the catheter shaft.
6. Slide the repositioning sheath over the catheter shaft and advance it into the artery to the blue hub.
7. Confirm that the “landmark” on the Impella 2.5™ or Impella CP® red plug is still aligned with the marking on the patient.
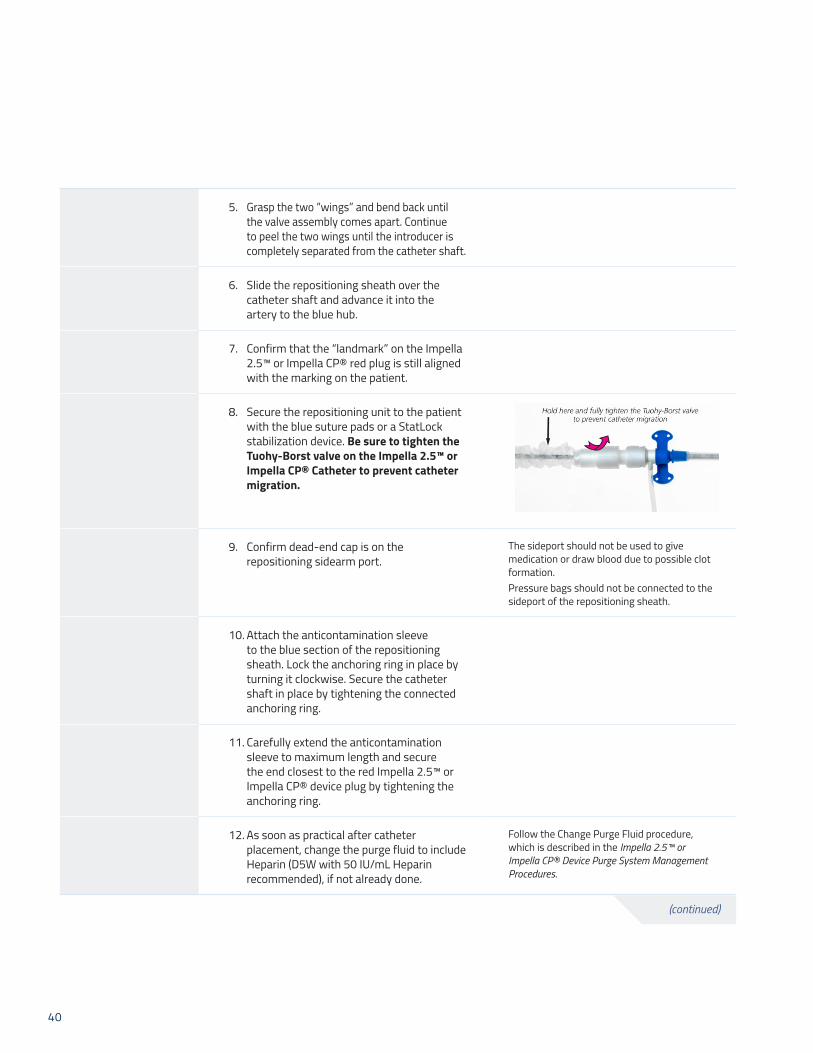
8. Secure the repositioning unit to the patient with the blue suture pads or a StatLock stabilization device. Be sure to tighten the Tuohy-Borst valve on the Impella 2.5™ or Impella CP® Catheter to prevent catheter migration.
9. Confirm dead-end cap is on the repositioning sidearm port.
The sideport should not be used to give medication or draw blood due to possible clot formation.Pressure bags should not be connected to the sideport of the repositioning sheath.
10. Attach the anticontamination sleeve to the blue section of the repositioning sheath. Lock the anchoring ring in place by turning it clockwise. Secure the catheter shaft in place by tightening the connected anchoring ring.
11. Carefully extend the anticontamination sleeve to maximum length and secure the end closest to the red Impella 2.5™ or Impella CP® device plug by tightening the anchoring ring.
12. As soon as practical after catheter placement, change the purge fluid to include Heparin (D5W with 50 IU/mL Heparin recommended), if not already done.
Follow the Change Purge Fluid procedure, which is described in the Impella 2.5™ or Impella CP® Device Purge System Management Procedures.
(continued)

41
Procedure Transfer for Standard Configuration
Upon transfer to the standard configuration, the controller will switch to P-level mode and operate at P-8 if previously running in AUTO. If the controller was already in P-level mode at the time of the transfer, it will continue operating at the P-level at which it was operating at the time of the transfer. Once the controller is operating in the standard configuration, AUTO is no longer an option on the flow menu.
Action Notes
1. Press PURGE SYSTEM and turn the selector knob to select “Transfer to Standard Configuration” from the menu. Press the selector knob to confirm selection.
Transition from the initial set-up configuration to the standard configuration (using the NaCl bag) as soon as practical.
2. Set up the sodium chloride (0.9% NaCl) infusion bag with pressure bag using straight tubing without injection ports or transducer.
Pressurize bag to 300-350 mmHg.
3. Clamp the red luer on the Y connector from the red pressure sidearm. Disconnect and end cap the red luer.
4. Create a slow drip from the NaCl pressure bag to flood the luer connector of the red pressure sidearm and make a wet-to-wet connection. Fully open the roller clamp.
The controller may alarm during this step.
5. Turn the Selector Knob to select OK to confirm the transfer. Press the selector knob to confirm selection.
You will no longer see the set-up icon on the bottom of the screen.
The advisory alarm message will be gray.
NOTE: When you transfer to the standard configuration, the purge pressure is no longer regulated at 600 mmHg. In standard configuration, purge flow can range from 2–30 mL/hr and purge pressure can range from 300–1100 mmHg.
(continued)
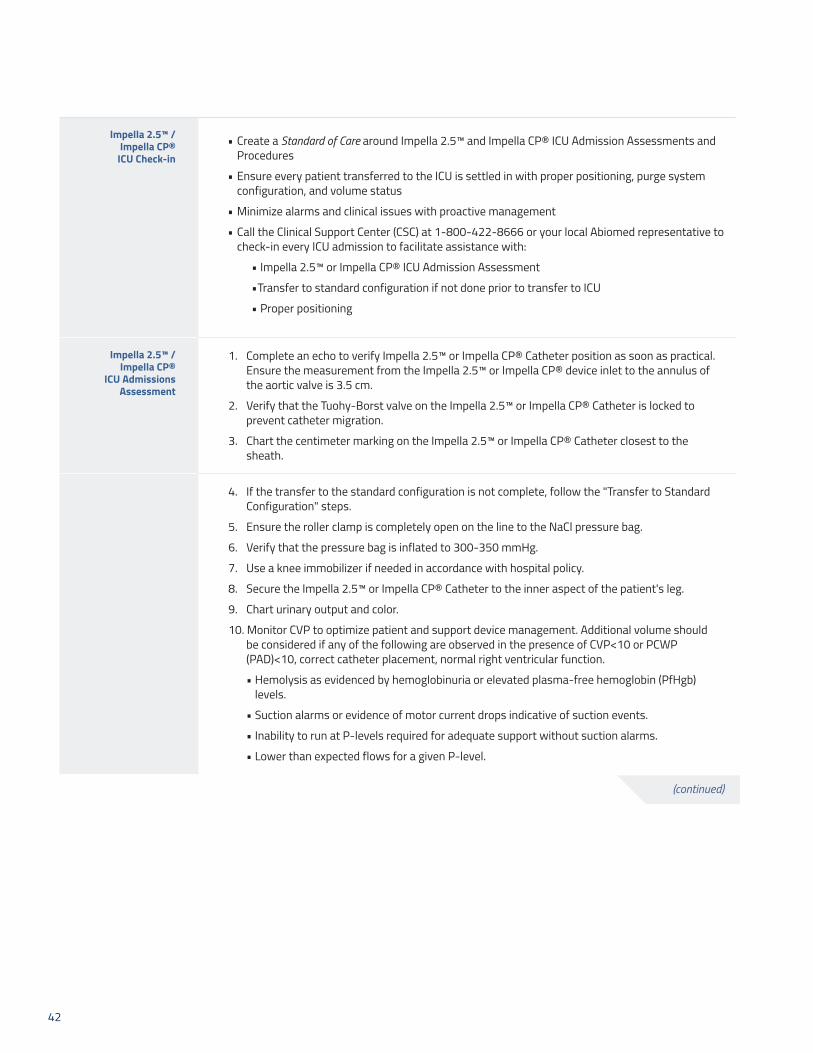
42
Impella 2.5™ / Impella CP®
ICU Check-in• Create a Standard of Care around Impella 2.5™ and Impella CP® ICU Admission Assessments and
Procedures
• Ensure every patient transferred to the ICU is settled in with proper positioning, purge system configuration, and volume status
• Minimize alarms and clinical issues with proactive management
• Call the Clinical Support Center (CSC) at 1-800-422-8666 or your local Abiomed representative to check-in every ICU admission to facilitate assistance with:
• Impella 2.5™ or Impella CP® ICU Admission Assessment
• Transfer to standard configuration if not done prior to transfer to ICU
• Proper positioning
Impella 2.5™ / Impella CP®
ICU Admissions Assessment
1. Complete an echo to verify Impella 2.5™ or Impella CP® Catheter position as soon as practical. Ensure the measurement from the Impella 2.5™ or Impella CP® device inlet to the annulus of the aortic valve is 3.5 cm.
2. Verify that the Tuohy-Borst valve on the Impella 2.5™ or Impella CP® Catheter is locked to prevent catheter migration.
3. Chart the centimeter marking on the Impella 2.5™ or Impella CP® Catheter closest to the sheath.
4. If the transfer to the standard configuration is not complete, follow the "Transfer to Standard Configuration" steps.
5. Ensure the roller clamp is completely open on the line to the NaCl pressure bag.
6. Verify that the pressure bag is inflated to 300-350 mmHg.
7. Use a knee immobilizer if needed in accordance with hospital policy.
8. Secure the Impella 2.5™ or Impella CP® Catheter to the inner aspect of the patient's leg.
9. Chart urinary output and color.
10. Monitor CVP to optimize patient and support device management. Additional volume should be considered if any of the following are observed in the presence of CVP<10 or PCWP (PAD)<10, correct catheter placement, normal right ventricular function.
• Hemolysis as evidenced by hemoglobinuria or elevated plasma-free hemoglobin (PfHgb) levels.
• Suction alarms or evidence of motor current drops indicative of suction events.
• Inability to run at P-levels required for adequate support without suction alarms.
• Lower than expected flows for a given P-level.
(continued)

43
Patient Transfer Call the Clinical Support Center (CSC) at 1-800-422-8666 or your local Abiomed representative:
• To inform Abiomed of patient transfer
• For assistance with preparing for transport
• For assistance with preparing to receive a patient on Impella 2.5™ or Impella CP® heart pump therapy
Questions Dedicated and highly skilled Clinical Team available 24 hours a day, 7 days a week to provide:
• Technical Support
• Troubleshooting
• Clinical Support
• Device and Controller overview
• Best practice consulting
Clinical Support Center phone system connects you directly to a Clinical Support Specialist, not an operator. (Call will route to an answering service if all consultant lines are busy.)
Follow-up See Impella 2.5™ or Impella CP® Patient Care Procedures for post-implant care of Impella 2.5™ or Impella CP® heart pump–supported patients.
References (Supportive Data)
Impella 2.5™ or Impella CP® Catheter with Automated Impella® Controller Instructions for Use Manuals
Approval
Effective Date
Revision Date(s)

44
Purpose To transfer patients supported with the Impella 5.0™ or Impella LD™ catheter to care outside the operating room or cardiac cath lab
Audience Healthcare providers transitioning patients from the operating room or cardiac cath lab to another care location
Desired Outcomes Maintain quality care for Impella 5.0™ or Impella LD™ heart pump–supported patients outside the operating room or cardiac cath lab
Equipment • Fully charged Automated Impella® Controller
Preparation Trained Transport Team in place
Alerts • The Automated Impella® Controller is designed to operate for 60 minutes on battery power. Transport teams should take this into consideration when planning a transport. If the total transport time is expected to include more than 60 minutes during which the system will be disconnected from AC power, make arrangements to use a vehicle with a built in DC to AC power inverter.
• The Transport Team should include person(s) fully trained in the use of the Automated Impella® Controller, Impella 5.0™ and Impella LD™.
Procedure Preparation and Transfer of the Patient
Action Notes
1. Verify correct Impella 5.0™ or Impella LD™ Catheter position: a) Verify correct position using
echocardiography or fluoroscopy. b) Remove slack from Impella 5.0™
catheter to ensure that the catheter is laying along the lesser curve of the aorta.
2. Flush the sidearm of the repositioning sheath, of the Impella 5.0™ and cap.
3. Make sure there is no bleeding at the transition from the repositioning sheath, of the Impella 5.0™ Catheter, to the femoral artery. Close and dress the wound.
4. Secure the repositioning unit by suturing it to the skin using the eyelet on the sheath.
Transferring Impella 5.0™/Impella LD™–Supported PatientTransferring Impella 5.0™ or Impella LD™–supported patient to care outside the operating room or cardiac cath labThe Impella 5.0™ or Impella LD™ device product labeling acknowledges that situations may arise whereby a patient will need to be transferred to another location (either within the same hospital, or to another institution).
(continued)

45
5. Attach the anticontamination sleeve to the repositioning sheath. Lock it in place by turning it clockwise.
6. Tighten the Tuohy-Borst valve on the Impella 5.0™ to prevent catheter migration.
7. The Impella® Automated Controller should be fully charged prior to transport.
The Automated Impella® Controller, Impella 5.0™ and Impella LD™ have been cleared by the FDA for Hospital-to-Hospital transport via ambulance, helicopter, or fixed-wing aircraft.
8. DO NOT stress the connector cable from the Controller to the Impella 5.0™/Impella LD™ Catheter.
9. Carefully monitor purge pressures during changes in altitude.
10. The Automated Impella® Controller should be positioned to allow easy access to the display screen to view alarms and make any necessary changes.
(continued)
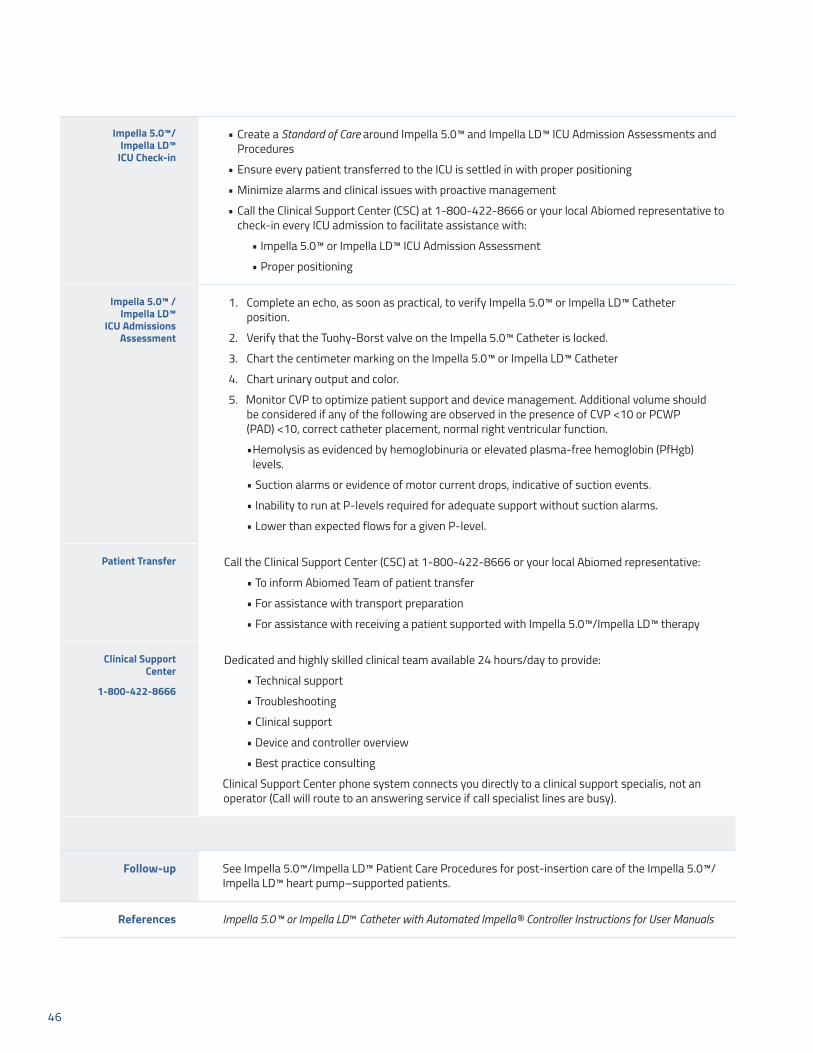
46
Impella 5.0™/ Impella LD™
ICU Check-in
• Create a Standard of Care around Impella 5.0™ and Impella LD™ ICU Admission Assessments and Procedures
• Ensure every patient transferred to the ICU is settled in with proper positioning
• Minimize alarms and clinical issues with proactive management
• Call the Clinical Support Center (CSC) at 1-800-422-8666 or your local Abiomed representative to check-in every ICU admission to facilitate assistance with:
• Impella 5.0™ or Impella LD™ ICU Admission Assessment
• Proper positioning
Impella 5.0™ / Impella LD™
ICU Admissions Assessment
1. Complete an echo, as soon as practical, to verify Impella 5.0™ or Impella LD™ Catheter position.
2. Verify that the Tuohy-Borst valve on the Impella 5.0™ Catheter is locked.
3. Chart the centimeter marking on the Impella 5.0™ or Impella LD™ Catheter
4. Chart urinary output and color.
5. Monitor CVP to optimize patient support and device management. Additional volume should be considered if any of the following are observed in the presence of CVP <10 or PCWP (PAD) <10, correct catheter placement, normal right ventricular function.
• Hemolysis as evidenced by hemoglobinuria or elevated plasma-free hemoglobin (PfHgb) levels.
• Suction alarms or evidence of motor current drops, indicative of suction events.
• Inability to run at P-levels required for adequate support without suction alarms.
• Lower than expected flows for a given P-level.
Patient Transfer Call the Clinical Support Center (CSC) at 1-800-422-8666 or your local Abiomed representative:
• To inform Abiomed Team of patient transfer
• For assistance with transport preparation
• For assistance with receiving a patient supported with Impella 5.0™/Impella LD™ therapy
Clinical Support Center
1-800-422-8666
Dedicated and highly skilled clinical team available 24 hours/day to provide:
• Technical support
• Troubleshooting
• Clinical support
• Device and controller overview
• Best practice consulting
Clinical Support Center phone system connects you directly to a clinical support specialis, not an operator (Call will route to an answering service if call specialist lines are busy).
Follow-up See Impella 5.0™/Impella LD™ Patient Care Procedures for post-insertion care of the Impella 5.0™/Impella LD™ heart pump–supported patients.
References Impella 5.0™ or Impella LD™ Catheter with Automated Impella® Controller Instructions for User Manuals
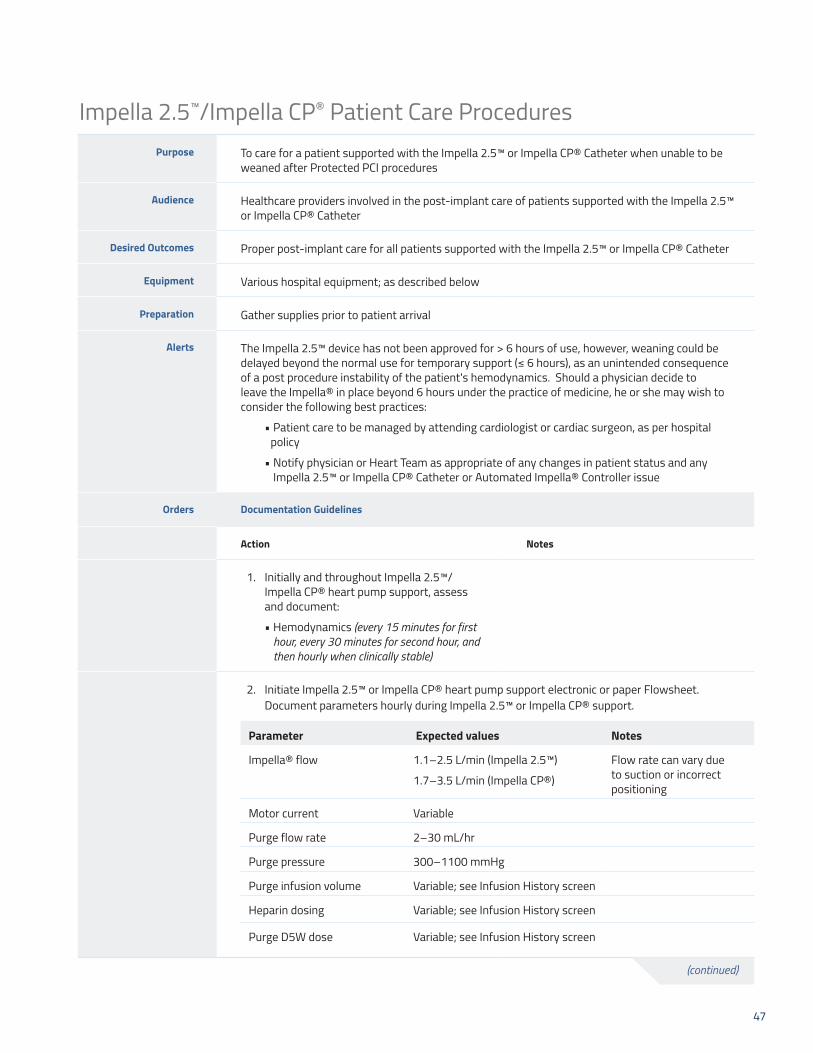
47
Purpose To care for a patient supported with the Impella 2.5™ or Impella CP® Catheter when unable to be weaned after Protected PCI procedures
Audience Healthcare providers involved in the post-implant care of patients supported with the Impella 2.5™ or Impella CP® Catheter
Desired Outcomes Proper post-implant care for all patients supported with the Impella 2.5™ or Impella CP® Catheter
Equipment Various hospital equipment; as described below
Preparation Gather supplies prior to patient arrival
Alerts The Impella 2.5™ device has not been approved for > 6 hours of use, however, weaning could be delayedbeyondthenormalusefortemporarysupport(≤6hours),asanunintendedconsequenceof a post procedure instability of the patient's hemodynamics. Should a physician decide to leave the Impella® in place beyond 6 hours under the practice of medicine, he or she may wish to consider the following best practices:
• Patient care to be managed by attending cardiologist or cardiac surgeon, as per hospital policy
• Notify physician or Heart Team as appropriate of any changes in patient status and any Impella 2.5™ or Impella CP® Catheter or Automated Impella® Controller issue
Orders Documentation Guidelines
Action Notes
1. Initially and throughout Impella 2.5™/ Impella CP® heart pump support, assess and document:
• Hemodynamics (every 15 minutes for first hour, every 30 minutes for second hour, and then hourly when clinically stable)
2. Initiate Impella 2.5™ or Impella CP® heart pump support electronic or paper Flowsheet. Document parameters hourly during Impella 2.5™ or Impella CP® support.
Parameter Expected values Notes
Impella® flow 1.1–2.5 L/min (Impella 2.5™)
1.7–3.5 L/min (Impella CP®)
Flow rate can vary due to suction or incorrect positioning
Motor current Variable
Purge flow rate 2–30 mL/hr
Purge pressure 300–1100 mmHg
Purge infusion volume Variable; see Infusion History screen
Heparin dosing Variable; see Infusion History screen
Purge D5W dose Variable; see Infusion History screen
Impella 2.5™/Impella CP® Patient Care Procedures
(continued)
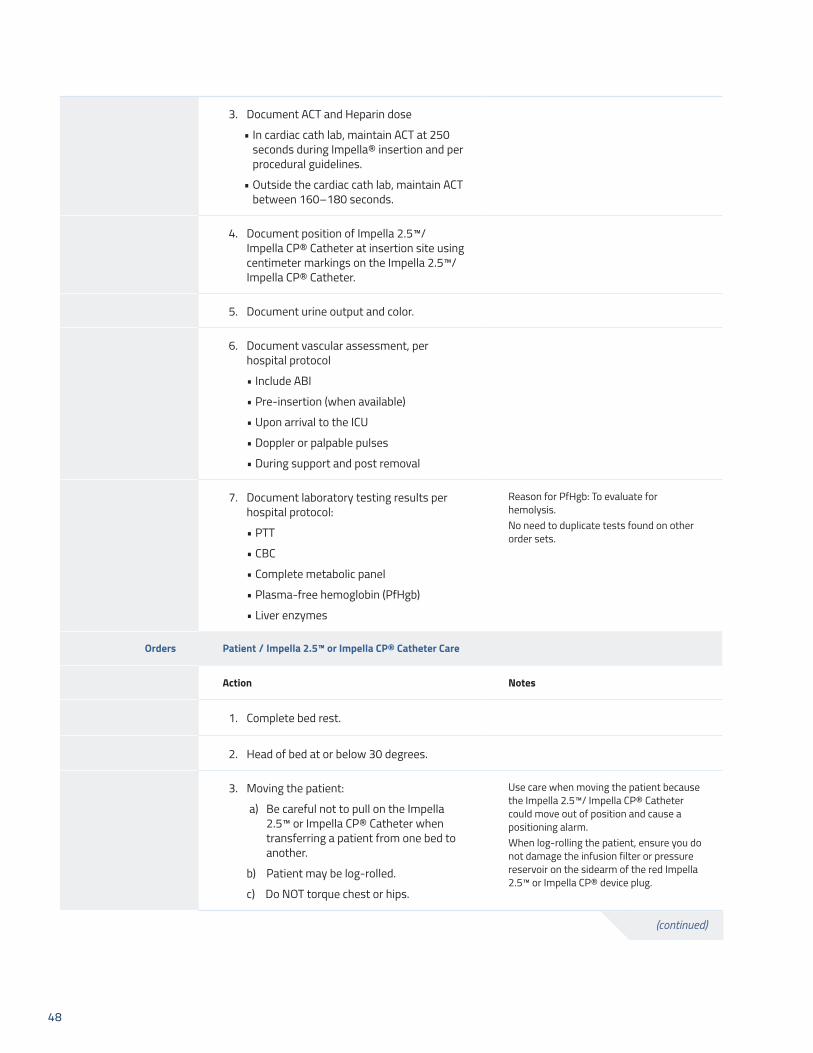
48
3. Document ACT and Heparin dose
• In cardiac cath lab, maintain ACT at 250 seconds during Impella® insertion and per procedural guidelines.
• Outside the cardiac cath lab, maintain ACT between 160–180 seconds.
4. Document position of Impella 2.5™/ Impella CP® Catheter at insertion site using centimeter markings on the Impella 2.5™/ Impella CP® Catheter.
5. Document urine output and color.
6. Document vascular assessment, per hospital protocol
• Include ABI
• Pre-insertion (when available)
• Upon arrival to the ICU
• Doppler or palpable pulses
• During support and post removal
7. Document laboratory testing results per hospital protocol:
• PTT
• CBC
• Complete metabolic panel
• Plasma-free hemoglobin (PfHgb)
• Liver enzymes
Reason for PfHgb: To evaluate for hemolysis.No need to duplicate tests found on other order sets.
Orders Patient / Impella 2.5™ or Impella CP® Catheter Care
Action Notes
1. Complete bed rest.
2. Head of bed at or below 30 degrees.
3. Moving the patient:
a) Be careful not to pull on the Impella 2.5™ or Impella CP® Catheter when transferring a patient from one bed to another.
b) Patient may be log-rolled.
c) Do NOT torque chest or hips.
Use care when moving the patient because the Impella 2.5™/ Impella CP® Catheter could move out of position and cause a positioning alarm.When log-rolling the patient, ensure you do not damage the infusion filter or pressure reservoir on the sidearm of the red Impella 2.5™ or Impella CP® device plug.
(continued)

49
4. Immobilize affected leg; use knee immobilizer if needed, per hospital protocol.
5. Bladder catheter recommended for all patients unless contraindicated.
6. For the red placement monitoring sidearm on the Impella 2.5™ or Impella CP® device:
• Maintain pressure bag at 300–350 mmHg.
• Change solution per hospital protocol.
The red sidearm of the Impella 2.5™ or Impella CP® Catheter is used to flush the line of the placement signal.
7. Do NOT use or infuse any solution into the white sidearm of the repositioning unit of the Impella 2.5™ or Impella CP® Catheter.
8. To prevent kinking in the purge tubing:
• Do NOT allow the red Impella 2.5™ or Impella CP® device plug to hang freely from the catheter.
• Do NOT bend the catheter near the red Impella 2.5™ or Impella CP® device plug.
• May attach the red Impella 2.5™ or Impella CP® device plug and catheter to a short armboard to prevent kinking near the plug.
9. Dressing change:
• Sterile dressing change of femoral insertion site per hospital protocol and if dressing integrity becomes compromised or site appears wet.
• Use chlorhexidine (no ointment) and transparent non-gauze dressing.
• Use additional staff to stabilize catheter and monitor Impella 2.5™ or Impella CP® device position throughout dressing change.
Do NOT clean the Impella 2.5™ or Impella CP® Catheter infusion filter or pressure reservoir with alcohol and AVOID exposing these components to products, such as skin preps and lotions, containing alcohol. Alcohol may cause cracks in the luer fitting connecting the clear sidearm components, resulting in leaking.
(continued)

50
Orders Impella 2.5™ or Impella CP® Positioning
Action Notes
The distal tip of the Impella 2.5™ or Impella CP® Catheter must be in the left ventricle. When the catheter is positioned correctly, the placement signal waveform will be aortic and the motor current waveform will be pulsatile (similar to image on the right).
If the distal tip of the Impella 2.5™ or Impella CP® Catheter becomes displaced:
• Reduce flow rate to P-2.
• Notify physician or Heart Team as appropriate.
• Obtain Echo STAT.
(continued)

51
Orders Automated Impella® Controller
Action Notes
Do NOT use the Automated Impella® Controller placement signal for patient management. Use the arterial line or non-invasive cuff blood pressure.
Maintain Impella 2.5™ or Impella CP® device flow to achieve target hemodynamics. Do NOT reduce flow below P-2.
P-Levels below P-2 may result in retrograde flow.
Assure that patient has adequate supply of purge cassettes for purge system changes before cardiac cath lab closes for the evening or weekend.
Refer to Impella 2.5™ or Impella CP® device Purge System Management Procedures.
Automated Impella® Controller management:
• Have back-up controller plugged in close to patient room
• Controller will operate on battery power for 60 minutes if batteries are fully charged
• Press and hold the power switch for 30 seconds for Emergency Shut Down, if necessary
Procedure Impella 2.5™/CP® Chest Compressions and Defibrillation
Action Notes
1. Chest compression and defibrillation may be administered during Impella 2.5™ or Impella CP® support when necessary.
2. Impella 2.5™ or Impella CP® Catheter or Controller do not need to be turned off (stopped at P-0) or unplugged to defibrillate the patient.
3. Reduce P-Level to P-2 prior to and during chest compressions.
4. When cardiac function has been restored, assess Impella 2.5™ or Impella CP® Catheter position using placement signal waveform on Controller or Echo, then return to previous P-Level.
Follow-up Abiomed 24-hour Clinical Support Center (CSC): 1-800-422-8666.
References (Supportive Data)
Impella 2.5™ and Impella CP® Catheter with Automated Impella® Controller Instructions for Use Manuals
Approval
Effective Date
Revision Date(s)
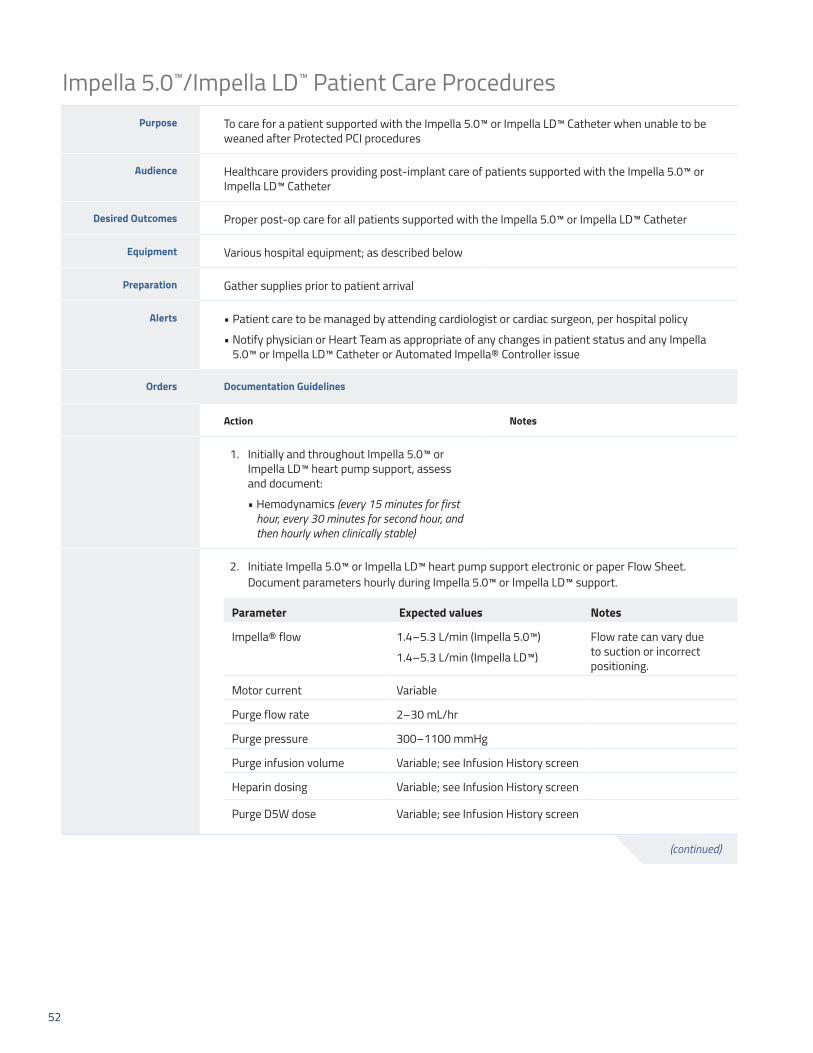
52
Purpose To care for a patient supported with the Impella 5.0™ or Impella LD™ Catheter when unable to be weaned after Protected PCI procedures
Audience Healthcare providers providing post-implant care of patients supported with the Impella 5.0™ or Impella LD™ Catheter
Desired Outcomes Proper post-op care for all patients supported with the Impella 5.0™ or Impella LD™ Catheter
Equipment Various hospital equipment; as described below
Preparation Gather supplies prior to patient arrival
Alerts • Patient care to be managed by attending cardiologist or cardiac surgeon, per hospital policy
• Notify physician or Heart Team as appropriate of any changes in patient status and any Impella 5.0™ or Impella LD™ Catheter or Automated Impella® Controller issue
Orders Documentation Guidelines
Action Notes
1. Initially and throughout Impella 5.0™ or Impella LD™ heart pump support, assess and document:
• Hemodynamics (every 15 minutes for first hour, every 30 minutes for second hour, and then hourly when clinically stable)
2. Initiate Impella 5.0™ or Impella LD™ heart pump support electronic or paper Flow Sheet. Document parameters hourly during Impella 5.0™ or Impella LD™ support.
Parameter Expected values Notes
Impella® flow 1.4–5.3 L/min (Impella 5.0™)
1.4–5.3 L/min (Impella LD™)
Flow rate can vary due to suction or incorrect positioning.
Motor current Variable
Purge flow rate 2–30 mL/hr
Purge pressure 300–1100 mmHg
Purge infusion volume Variable; see Infusion History screen
Heparin dosing Variable; see Infusion History screen
Purge D5W dose Variable; see Infusion History screen
Impella 5.0™/Impella LD™ Patient Care Procedures
(continued)
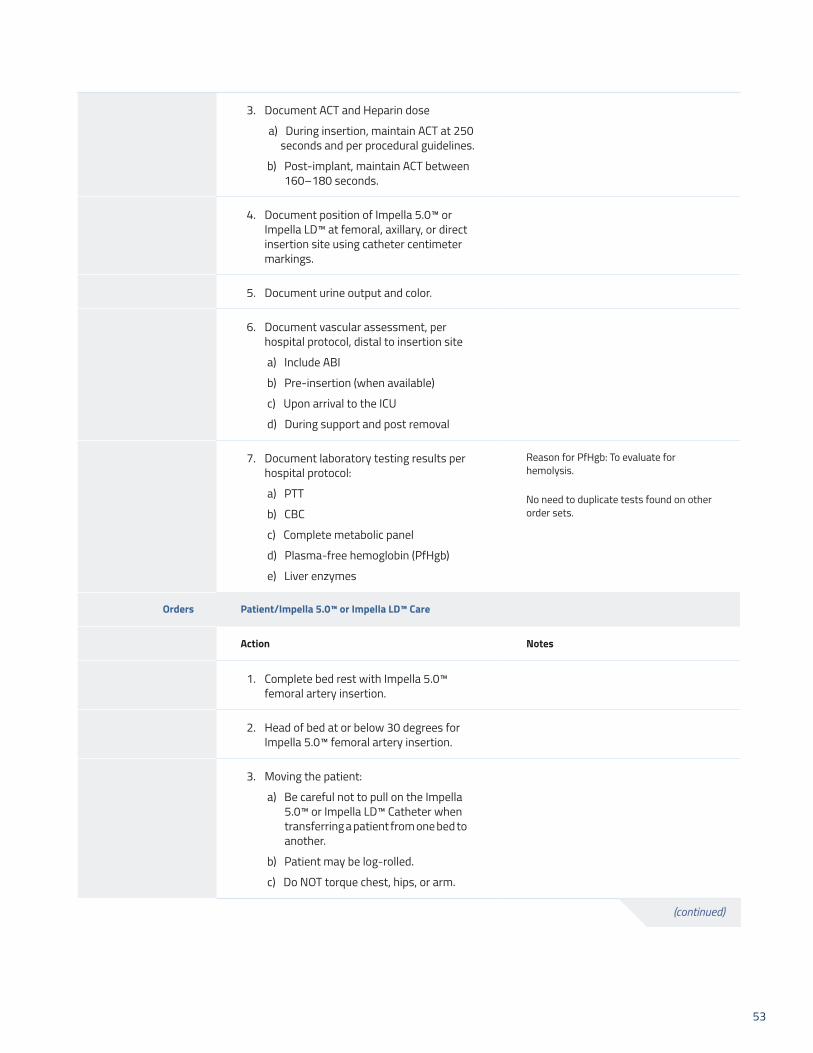
53
3. Document ACT and Heparin dose
a) During insertion, maintain ACT at 250 seconds and per procedural guidelines.
b) Post-implant, maintain ACT between 160–180 seconds.
4. Document position of Impella 5.0™ or Impella LD™ at femoral, axillary, or direct insertion site using catheter centimeter markings.
5. Document urine output and color.
6. Document vascular assessment, per hospital protocol, distal to insertion site
a) Include ABI
b) Pre-insertion (when available)
c) Upon arrival to the ICU
d) During support and post removal
7. Document laboratory testing results per hospital protocol:
a) PTT
b) CBC
c) Complete metabolic panel
d) Plasma-free hemoglobin (PfHgb)
e) Liver enzymes
Reason for PfHgb: To evaluate for hemolysis. No need to duplicate tests found on other order sets.
Orders Patient/Impella 5.0™ or Impella LD™ Care
Action Notes
1. Complete bed rest with Impella 5.0™ femoral artery insertion.
2. Head of bed at or below 30 degrees for Impella 5.0™ femoral artery insertion.
3. Moving the patient:
a) Be careful not to pull on the Impella 5.0™ or Impella LD™ Catheter when transferring a patient from one bed to another.
b) Patient may be log-rolled.
c) Do NOT torque chest, hips, or arm.
(continued)
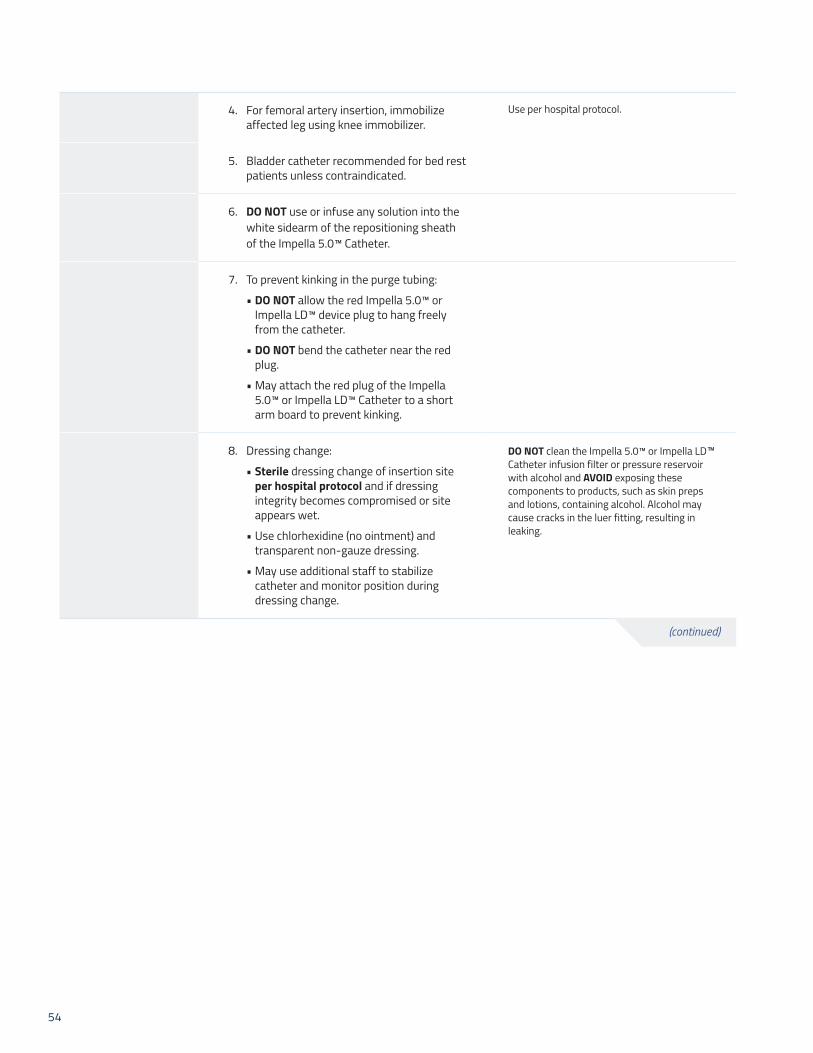
54
4. For femoral artery insertion, immobilize affected leg using knee immobilizer.
Use per hospital protocol.
5. Bladder catheter recommended for bed rest patients unless contraindicated.
6. DO NOT use or infuse any solution into the white sidearm of the repositioning sheath of the Impella 5.0™ Catheter.
7. To prevent kinking in the purge tubing:
• DO NOT allow the red Impella 5.0™ or Impella LD™ device plug to hang freely from the catheter.
• DO NOT bend the catheter near the red plug.
• May attach the red plug of the Impella 5.0™ or Impella LD™ Catheter to a short arm board to prevent kinking.
8. Dressing change:
• Sterile dressing change of insertion site per hospital protocol and if dressing integrity becomes compromised or site appears wet.
• Use chlorhexidine (no ointment) and transparent non-gauze dressing.
• May use additional staff to stabilize catheter and monitor position during dressing change.
DO NOT clean the Impella 5.0™ or Impella LD™ Catheter infusion filter or pressure reservoir with alcohol and AVOID exposing these components to products, such as skin preps and lotions, containing alcohol. Alcohol may cause cracks in the luer fitting, resulting in leaking.
(continued)

55
Orders Impella 5.0™ or Impella LD™ Positioning
Action Notes
The distal tip of the Impella 5.0™ or Impella LD™ must be in the left ventricle. When positioned correctly, the placement signal (Differential Pressure) and Motor Current Waveform will be pulsatile
If the distal tip of the Impella 5.0™ or Impella LD™ Catheter becomes displaced:
• Reduce P-Level to P-2
• Notify physician or Heart Team as appropriate STAT
• Obtain Echo STAT
Orders Automated Impella® Controller
Maintain Impella 5.0™ or Impella LD™ device flow to achieve target hemodynamics. Do not reduce P-Level to level below P-2.
P-Levels below P-2 may result in retrograde flow.
Assure that patient has adequate supply of purge cassettes for purge system changes.
Refer to Impella 5.0™ or Impella LD™ device purge system management procedures
Automated Impella® Controller management:
• Have back-up controller plugged in close to patient room
• Controller will operate on battery power for 60 minutes if batteries are fully charged
• Press and hold the power switch for 30 seconds for Emergency Shut Down, if necessary
Procedure Impella 5.0™/Impella LD® Chest Compressions and Defibrillation
Action Notes
1. Chest compression and defibrillation may be administered during Impella 5.0™ or Impella LD™ support when necessary.
2. Impella 5.0™ or Impella LD™ Catheter or Controller do not need to be turned off (stopped at P-0) or unplugged to defibrillate the patient.
3. Reduce P-Level to P-2 prior to and during chest compressions.
4. When cardiac function has been restored, assess Impella 5.0™ or Impella LD™ Catheter position using placement signal waveform on Controller or Echo, then return to previous P-Level.
Follow-up Abiomed 24-hour Clinical Support Center (CSC): 1-800-422-8666.
References (Supportive
Data)
Impella 5.0™ or Impella LD™ Catheter with Automated Impella® Controller Instructions for Use Manuals
Approval
Effective Date
Revision Date(s)

56
Impella 2.5™/Impella CP® Catheter Weaning Procedures
Purpose To wean Impella 2.5™/Impella CP®–supported patient in preparation for Impella® Catheter removal
Audience Healthcare providers involved in weaning procedure for Impella 2.5™/Impella CP® Catheter
Desired Outcomes Patient will remain hemodynamically stable throughout weaning procedure
Equipment Equipment in place
Preparation Multidisciplinary decision to proceed with weaning procedure
Alerts The following weaning instructions are provided as guidance only
Procedure Rapid Weaning
Action Notes
1. To initiate rapid weaning, press FLOW CONTROL. Turn selector knob to reduce P-level by 2-level increments over time intervals as cardiac function allows. Press selector knob to confirm selections.
2. Maintain Impella® Catheter P-level at P-2 or above until the catheter is ready to be removed from the left ventricle.
3. If the patient's hemodynamics remain stable, reduce the P-level to P-1 and pull the Impella 2.5™/Impella CP® Catheter across the aortic valve into the aorta.
4. If the patient's hemodynamics continue to remain stable, follow instructions for removing the Impella 2.5™/Impella CP® Catheter.
Follow-up Remove Impella 2.5™/Impella CP® Catheter after weaning successfully completed.
References Impella 2.5™ or Impella CP® Catheter with Automated Impella® Controller Instructions for Use Manuals
NOTE: The Impella 2.5™ Catheter is approved for use for periods of up to 6 hours in patients undergoing Protected PCI. The Impella 2.5™ and Impella CP® Catheters, in conjunction with the Automated Impella Controller, are indicated for use for periods of up to 4 days in the treatment of ongoing cardiogenic shock. However, the Instructions for Use manuals recognize that the devices might be used for longer durations at the discretion of the physician due to unforeseen circumstances.

57
Impella 5.0™/Impella LD™ Catheter Weaning Procedures
Purpose To wean patient from Impella 5.0™/Impella LD™–supported patient in preparation for Impella® Catheter removal
Audience Healthcare providers involved in weaning procedure for Impella 5.0™/LD™ Catheter
Desired Outcomes Patient will remain hemodynamically stable throughout weaning procedure
Equipment Equipment in place
Preparation Multidisciplinary decision to proceed with weaning procedure
Alerts The following weaning instructions are provided as guidance only
Procedure Rapid Weaning
Action Notes
1. To initiate weaning, press FLOW CONTROL. Turn selector knob to reduce P-level by 2-level increments over time intervals as cardiac function allows. Press selector knob to confirm selections.
DO NOT decrease P-Level to below P-2 until just before removing catheter from ventricle.
2. When the P-Level has been reduced to P-2, maintain the patient on P-2 for at least 10 minutes before discontinuing Impella 5.0™/LD™ support.
3. If the patient's hemodynamics remain stable, reduce the P-level to P-1 and pull the Impella 5.0™/LD™ Catheter across the aortic valve into the aorta.
4. If the patient's hemodynamics continue to remain stable, follow instructions for removing the Impella 5.0™/LD™ Catheter.
Refer to the Impella 5.0™ or Impella LD™ Catheter Explant Procedure.
Procedure Slow Weaning
Action Notes
1. To initiate slow weaning, press FLOW CONTROL. Turn selector knob to reduce P-Level by 1-2 level increments over slow time intervals as cardiac function allows. Press selector knob to confirm selections.
Weaning P-Level example:P-8 to P-7 to P-6 to P-5 to P-4 to P-3 to P-2.
(continued)
NOTE: The Impella 5.0™ and Impella LD™ Catheters, in conjunction with the Automated Impella Controller, are indicated for use for periods of up to 6 days in the treatment of ongoing cardiogenic shock. However, the Instructions for Use manuals recognize that the devices might be used for longer durations at the discretion of the physician due to unforeseen circumstances.

58
2. When the P-Level has been reduced to P-2, maintain the patient on P-2 until the patient's hemodynamics remain stable.
3. If the patient's hemodynamics remain stable, reduce P-Level to P-1 and pull Impella 5.0™/LD™ Catheter across the aortic valve into the aorta.
4. If the patient's hemodynamics remain stable, follow instructions for removing the Impella 5.0™/Impella LD™ Catheter.
Follow-up Remove Impella 5.0™/Impella LD™ Catheter after weaning successfully completed.
References (Supportive Data)
Impella 5.0™ or Impella LD ™ Catheter with Automated Impella® Controller Instructions for Use Manuals
Approval
Effective Date
Revision Date(s)

59
Impella 2.5™/Impella CP® Catheter Explant ProceduresPurpose To explant the Impella 2.5™ or Impella CP® Catheter
Audience Healthcare providers involved in explanting the Impella 2.5™ or Impella CP® Catheter
Desired Outcomes Patient maintains adequate hemodynamics
Equipment None for manual compression
Compression assist devices (optional)
Preparation Patient must be weaned to P-Level of P-2 prior to explanting the Impella 2.5™ or Impella CP® Catheter. (Refer to the Impella 2.5™ or Impella CP® Catheter Weaning Procedure.)
Alerts Control bleeding at arteriotomy site during the explant procedure
Procedure Removing the Impella 2.5™ or Impella CP® Catheter with the Introducer in Place
Action Notes
1. Wean the patient by following the Weaning Procedure.
2. Pull Impella® catheter across Aortic Valve at P-Level of P-1.
The controller will alarm.
3. Once the Impella 2.5™ or Impella CP® device is out of the left ventricle, reduce the P-level to P-0.
4. Remove the Impella 2.5™ or Impella CP® Catheter through the introducer.
5. Wait until ACT drops below 150 seconds.
6. When ACT is below 150 seconds, remove the introducer.
7. Disconnect the connector cable from the Automated Impella® Controller and turn the controller off.
Press the black power switch on the right side of the Automated Impella® Controller for 3 seconds to turn the controller off.
8. Apply direct pressure with fingers positioned over and proximal to the arteriotomy site, while maintaining a faint distal pulse. Duration: 40 minutes or per hospital protocol.
Maintain consistent pressure as inconsistent pressure can lead to formation of hematoma.
For patients requiring prolonged pressure, a mechanical compression device can be used per hospital protocol.
(continued)
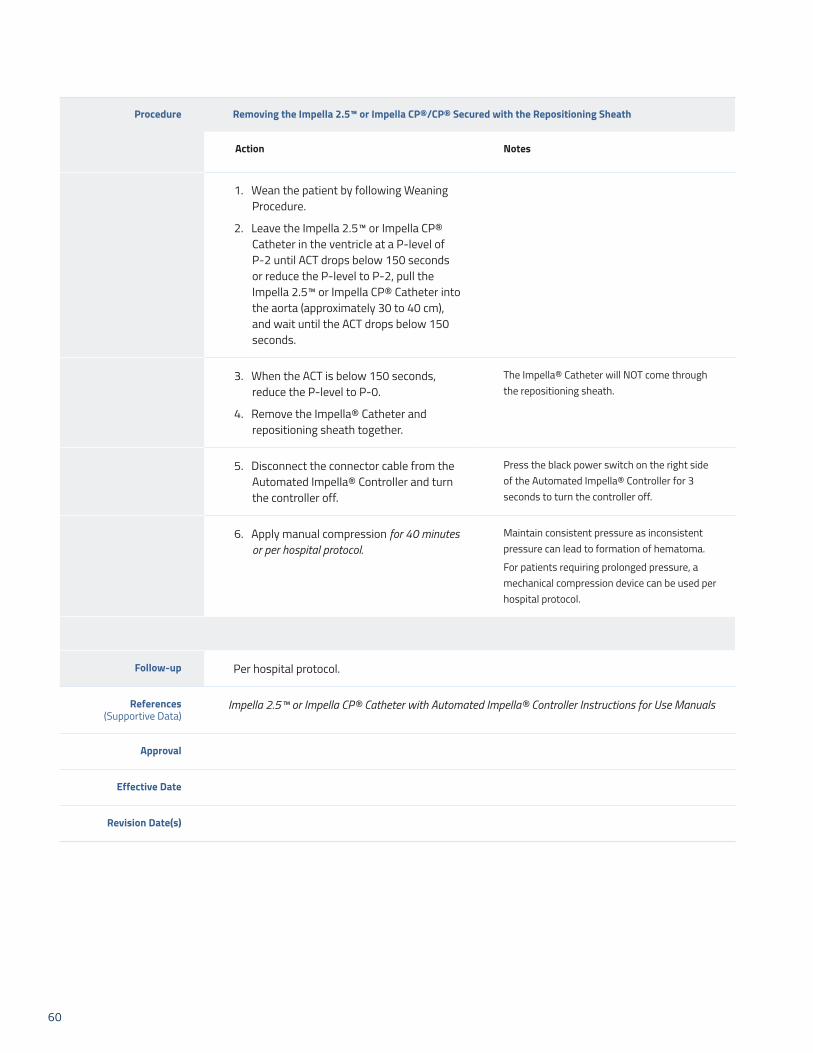
60
Procedure Removing the Impella 2.5™ or Impella CP®/CP® Secured with the Repositioning Sheath
Action Notes
1. Wean the patient by following Weaning Procedure.
2. Leave the Impella 2.5™ or Impella CP® Catheter in the ventricle at a P-level of P-2 until ACT drops below 150 seconds or reduce the P-level to P-2, pull the Impella 2.5™ or Impella CP® Catheter into the aorta (approximately 30 to 40 cm), and wait until the ACT drops below 150 seconds.
3. When the ACT is below 150 seconds, reduce the P-level to P-0.
4. Remove the Impella® Catheter and repositioning sheath together.
The Impella® Catheter will NOT come through the repositioning sheath.
5. Disconnect the connector cable from the Automated Impella® Controller and turn the controller off.
Press the black power switch on the right side of the Automated Impella® Controller for 3 seconds to turn the controller off.
6. Apply manual compression for 40 minutes or per hospital protocol.
Maintain consistent pressure as inconsistent pressure can lead to formation of hematoma.
For patients requiring prolonged pressure, a mechanical compression device can be used per hospital protocol.
Follow-up Per hospital protocol.
References (Supportive Data)
Impella 2.5™ or Impella CP® Catheter with Automated Impella® Controller Instructions for Use Manuals
Approval
Effective Date
Revision Date(s)

61
Impella 5.0™ Catheter Explant ProcedurePurpose To explant the Impella 5.0™ Catheter
Audience Healthcare providers involved in explanting the Impella 5.0™ Catheter
Desired Outcomes Patient maintains adequate hemodynamics
Equipment Institutional supplies for explant via femoral or axillary artery and graft closure procedure (Impella 5.0™)
Preparation • Transport patient to Operating Room suite
• Patient must be weaned to P-Level of P-2 prior to explanting the Impella 5.0™ Catheter
Alerts • The Impella 5.0™ Catheter should only be removed when the P-Level is set to P-0
• Perform the following steps under fluoroscopy guidance
Procedure Removing The Impella 5.0™ Catheter
Action Notes
1. Gain exposure and clear access to the femoral or axillary artery insertion site.
2. If the patient's hemodynamics remain stable, decrease the P-Level to P-1.
3. Pull the Impella 5.0™ Catheter across the aortic valve into the aorta.
4. Stop the motor by decreasing the P-Level to P-0.
5. Explant the Impella 5.0™ Catheter. Removal of the Impella 5.0™ Catheter must be completed with care to avoid damage to the Catheter assembly.
6. Follow institutional guidelines for femoral artery closure or axillary graft closure.
7. Disconnect the connector cable from the Automated Impella® Controller by pressing the black power switch on the right side for 3 seconds.
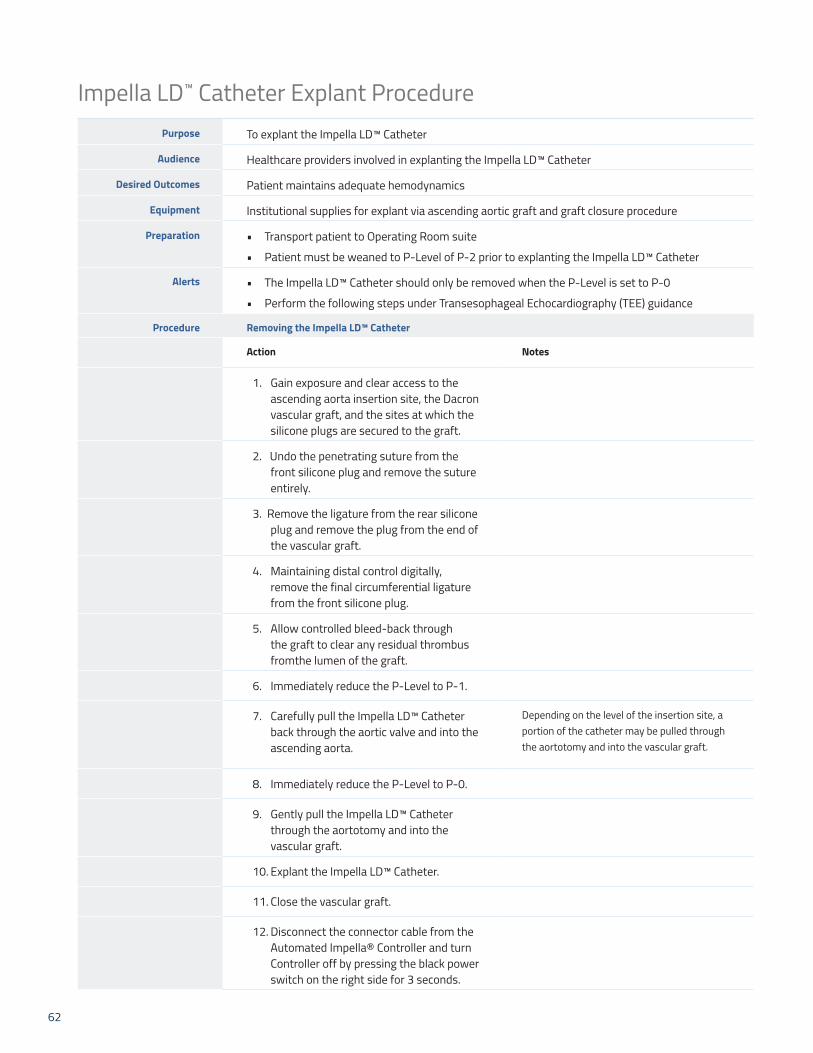
62
Impella LD™ Catheter Explant ProcedurePurpose To explant the Impella LD™ Catheter
Audience Healthcare providers involved in explanting the Impella LD™ Catheter
Desired Outcomes Patient maintains adequate hemodynamics
Equipment Institutional supplies for explant via ascending aortic graft and graft closure procedure
Preparation • Transport patient to Operating Room suite
• Patient must be weaned to P-Level of P-2 prior to explanting the Impella LD™ Catheter
Alerts • The Impella LD™ Catheter should only be removed when the P-Level is set to P-0
• Perform the following steps under Transesophageal Echocardiography (TEE) guidance
Procedure Removing the Impella LD™ Catheter
Action Notes
1. Gain exposure and clear access to the ascending aorta insertion site, the Dacron vascular graft, and the sites at which the silicone plugs are secured to the graft.
2. Undo the penetrating suture from the front silicone plug and remove the suture entirely.
3. Remove the ligature from the rear silicone plug and remove the plug from the end of the vascular graft.
4. Maintaining distal control digitally, remove the final circumferential ligature from the front silicone plug.
5. Allow controlled bleed-back through the graft to clear any residual thrombus fromthe lumen of the graft.
6. Immediately reduce the P-Level to P-1.
7. Carefully pull the Impella LD™ Catheter back through the aortic valve and into the ascending aorta.
Depending on the level of the insertion site, a portion of the catheter may be pulled through the aortotomy and into the vascular graft.
8. Immediately reduce the P-Level to P-0.
9. Gently pull the Impella LD™ Catheter through the aortotomy and into the vascular graft.
10. Explant the Impella LD™ Catheter.
11. Close the vascular graft.
12. Disconnect the connector cable from the Automated Impella® Controller and turn Controller off by pressing the black power switch on the right side for 3 seconds.

63

64
Impella® Program Implementation Tools
Impella 2.5™/Impella CP® Catheter Certification Process for Physicians
Impella 5.0™/Impella LD™ Catheter Certification Process for Physicians
Impella 2.5™/Impella CP® Catheter Certification Process for Advanced Cardiac Cath Lab and ICU Users
Impella 5.0™/Impella LD™ Catheter Certification Process for Advanced Cardiac Cath Lab and ICU Users
Impella 2.5™/Impella CP® Cardiac Cath Lab Tech Skills Checklist
Impella 2.5™/Impella CP® Cardiac Cath Lab Circulator Skills Checklist
Impella 5.0™/Impella LD™ Operating Room Scrub Skills Checklist
Impella 5.0™/Impella LD™ Circulator/Perfusionist Skills Checklist
Transfer of Care Impella 2.5™/Impella CP® Skills Checklist (peel-away sheath)
Transfer of Care Impella 2.5™/Impella CP® Skills Checklist (non-peel-away sheath)
Impella 2.5™/Impella CP® Supply List
Impella 5.0™/Impella LD™ Supply List

65
Impella® Certification Process for PhysiciansPurpose Hospital credentialing for Impella® device placement
Audience Physicians who implant Impella® devices
Desired Outcomes Physicians will be certified to implant Impella® devices
Equipment N/A
Preparation N/A
Alerts N/A
Process REQUIREMENTS FOR IMPELLA® CERTIFICATION
Requirements Additional information
1. Participate in ONE of the following Abiomed Protected PCI with Impella® Programs:
a) Attend device appropriate on-site didactic training with course slides
OR
b) Complete relevant online Protected PCI with Impella® Program at www.abiomedtraining.com.
On-site training requires documented participation by physician and Abiomed representative.
Completion of online Protected PCI with Impella® Program requires review of all materials and passing online exam.
2. Perform at least TWO successful Impella® device implants and explants in the presence of an Abiomed representative.
Abiomed representative must proctor a physician on site for a minimum of TWO live cases and complete, sign, and submit the Physician Certification Request and Sign-Off form to Abiomed.
3. Sign Physician Certification Request and Sign-Off form after completing Impella® device cases with Abiomed representative.
Abiomed representative will provide the form for the physician; physician will receive certificate of Impella® Certification from Abiomed representative after the completed form is submitted and the certificate has been processed.
Follow-up N/A
References (Supportive Data)
Adapted from Physician Certification Process and Requirements for Impella®, Abiomed, Inc., Danvers, MA
Approval
Effective Date
Revision Date(s)

66
Impella® Certification Process for Advanced UsersPurpose To fulfill hospital requirement for competency and independence in the use of Impella®
technology.
Audience Cardiac cath lab personnel and ICU/CCU nurses
Desired Outcomes Cardiac cath lab personnel and ICU/CCU nurses will be certified in use of Impella® devices
Equipment N/A
Preparation N/A
Alerts N/A
Process Requirements for Impella® Certification
Requirements Additional information
1. Complete relevant online Impella® Protected PCI with Impella® Program at www.abiomedtraining.com.
Completion of online Protected PCI with Impella® Program requires review of all materials and passing online exam.
2. Complete device appropriate on-site 1:1 didactic training with Abiomed representative using course slides AND participate in hands-on product training with Abiomed representative.
On-site training requires documented participation by advanced user and Abiomed representative.
3. Complete ONE of the following:a) Serve as the cardiac cath lab point
person for at least TWO successful Impella® device implants and explants in the presence of an Abiomed representative.
ORb) Serve as the lead ICU/CCU nurse for at least
TWO Impella® heart pump–supported patients in the presence of an Abiomed representative.
Cath lab point person must assume primary responsibility for the set-up and operation of the controller during each Impella® device case.
Lead ICU/CCU nurse must assume primary responsibility for the post-implant support of the patient and controller for each Impella® device case.
4. Sign Advanced User Certification Request and Sign-Off form after completing Impella® device cases with Abiomed representative.
Abiomed representative will provide the form; The advanced user will receive certificate of Impella® Certification from Abiomed representative after the completed form is submitted and the certificate has been processed.
Follow-up N/A
References (Supportive Data)
Adapted from Advanced User Certification Process for Impella®, Abiomed, Inc., Danvers, MA
Approval
Effective Date
Revision Date(s)

67

68
Impella 2.5™ or Impella CP® Tech Skills
Name: Date:
Trainer:
Objective Successful Unsuccessful Comments
1. Gathers and describes correct supplies for procedure.
2. Can correctly describe physician steps for vascular access.
3. States correct ACT required before removing dilator.
4. Demonstrates ability to open purge cassette and hand-off of spike and cassette to circulator.
5. Correctly demonstrates removal of end caps on yellow and red luers.
6. Correctly demonstrates tightening of solid yellow connectors at filter.
7. Correctly demonstrates opening white connector cable; hands off round, white controller end to circulator.
8. Correctly opens Impella® Catheter (after vascular access is established) and plugs in white connector cable.
9. Correctly connects luers red to red, yellow to yellow.
10. Pinches and holds white wings on placement signal/red side arm as controller instructs.
11. Can correctly identify when catheter is ready to insert.
12. Correctly describes backloading the Impella 2.5™/ Impella CP® Catheter over the wire through the RED Easy Guide Lumen.
13. Correctly describes removing the Easy Guide lumen.
14. Correctly describes advancing Impella 2.5™/ Impella CP® Catheter through the 13/14 Fr sheath to the correct location.
15. Correctly describes removing wire before instructing circulator to start Impella 2.5™/ Impella CP® Flow.
16. Able to describe correct position of catheter.

69
Impella 2.5™ or Impella CP® Circulator Skills
Name: Date:
Trainer:
Objective Successful Unsuccessful Comments
1. Gathers and describes supplies for procedure.
2. Correctly demonstrates how to turn on Automated Impella Controller.
3. Hands-up purge cassette to sterile field and correctly inserts purge cassette and positions transducer.
4. Instructs to remove red and yellow end caps on luers and tighten solid yellow connector at filter.
5. Correctly demonstrates hand-off of round, white connector cable to tech and connects to Impella controller.
6. Once vascular access is confirmed, hands-up Impella 2.5™/ Impella CP® Catheter to sterile field.
7. Instructs tech to connect luers—yellow to yellow, red to red.
8. Instructs tech to pinch and hold white wings on placement signal red sidearm as controller instructs.
9. Can correctly identify when catheter is ready to insert.
10. Inputs correct values for purge solution.
11. Ensures wire is removed before starting Impella 2.5™/ Impella CP® Flow.
12. Verifies correct placement—notes that motor current should be pulsatile.
13. Document cm markings on Impella 2.5™/ Impella CP® Catheter at sheath (prior to transfer).
14. Appropriately documents procedure and flows.
15. Demonstrates weaning and Automated Impella® Controller shutdown.

70
Impella 5.0™ and Impella LD™ Scrub Skills
Name: Date:
Trainer:
Objective Successful Unsuccessful Comments
1. Describes correct supplies needed of peripheral, axillary and direct insertion.
2. Correctly describes physician steps to gain insertion access.
3. States required ACT for insertion of Catheter.
4. Correctly opens Impella Catheter in sterile field.
5. Correctly demonstrates ability to open purge cassette and hand-off of spike and cassette to Circulator.
6. Correctly demonstrates hand-off of round, white end of connector cable.
7. Can correctly identify when catheter is ready to insert.
8. Correctly describes steps to peripheral, axillary, and direct approach.
9. Correctly describes when Impella Catheter can be turned on.

71
Impella 5.0™ and Impella LD™ Circulator or Perfusionist Skills
Name: Date:
Trainer:
Objective Successful Unsuccessful Comments
1. Describes correct supplies needed for peripheral, axillary, and direct insertion.
2. Correctly describes physician steps to gain insertion access
3. States required ACT for insertion of Catheter.
4. Correctly passes Catheter into sterile field.
5. Correctly demonstrates connecting purge system to Automated Impella Controller.
6. Correctly demonstrates inserting connector cable into controller.
7. Correctly demonstrates steps to prime purge system and Catheter.
8. Can correctly describe when Catheter is ready to insert.
9. Describes correct position of Impella 5.0 and Impella LD Catheter.
10. Correctly describes P-Level and how to change levels.
11. Correctly troubleshoots alarms.
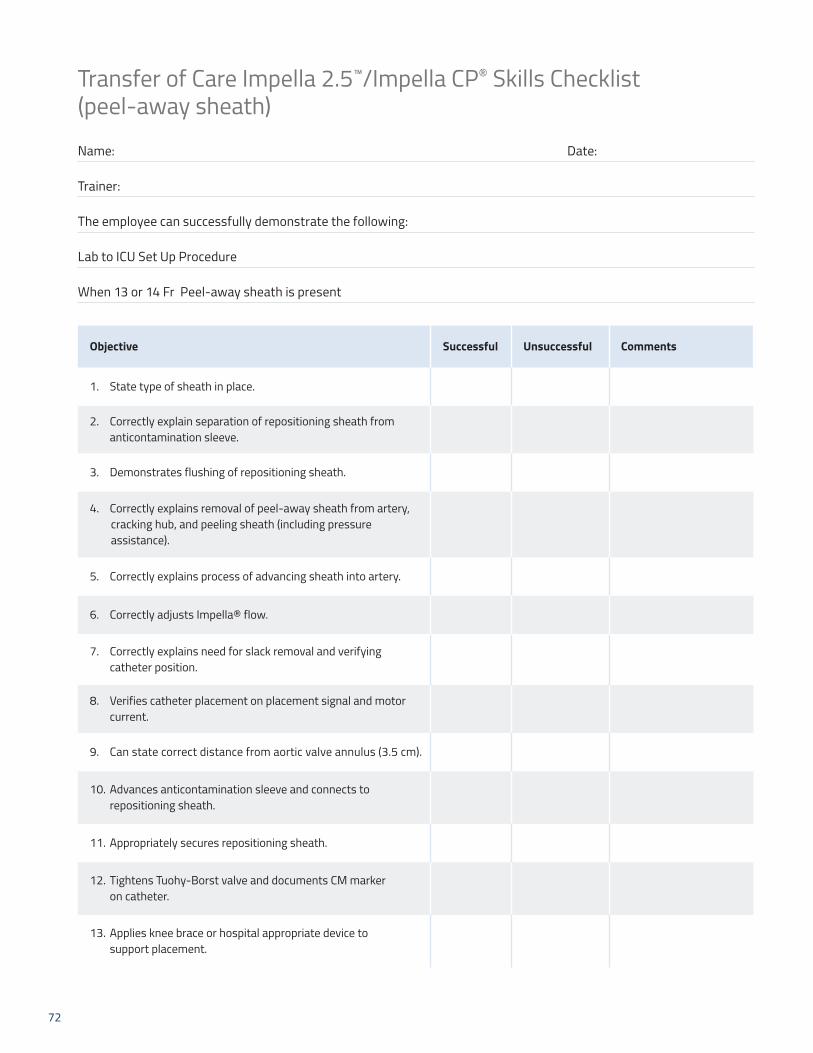
72
Transfer of Care Impella 2.5™/Impella CP® Skills Checklist (peel-away sheath)
Name: Date:
Trainer:
The employee can successfully demonstrate the following:
Lab to ICU Set Up Procedure
When 13 or 14 Fr Peel-away sheath is present
Objective Successful Unsuccessful Comments
1. State type of sheath in place.
2. Correctly explain separation of repositioning sheath from anticontamination sleeve.
3. Demonstrates flushing of repositioning sheath.
4. Correctly explains removal of peel-away sheath from artery, cracking hub, and peeling sheath (including pressure assistance).
5. Correctly explains process of advancing sheath into artery.
6. Correctly adjusts Impella® flow.
7. Correctly explains need for slack removal and verifying catheter position.
8. Verifies catheter placement on placement signal and motor current.
9. Can state correct distance from aortic valve annulus (3.5 cm).
10. Advances anticontamination sleeve and connects to repositioning sheath.
11. Appropriately secures repositioning sheath.
12. Tightens Tuohy-Borst valve and documents CM marker on catheter.
13. Applies knee brace or hospital appropriate device to support placement.
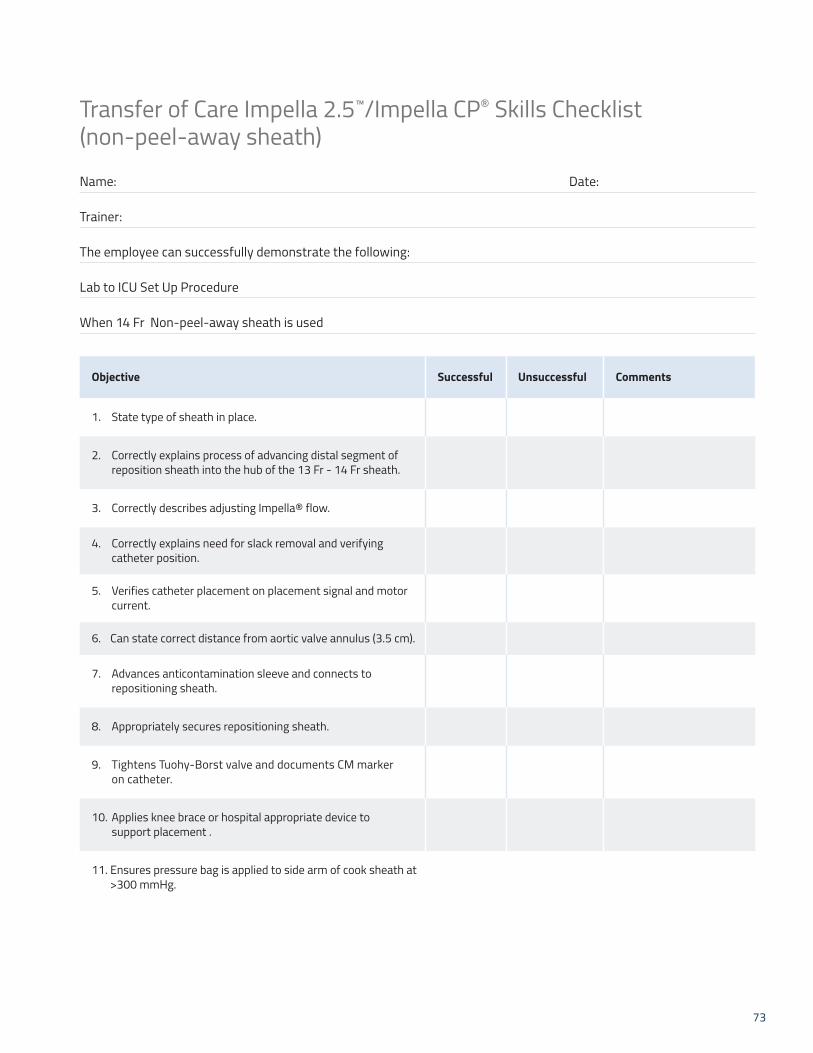
73
Transfer of Care Impella 2.5™/Impella CP® Skills Checklist (non-peel-away sheath)
Name: Date:
Trainer:
The employee can successfully demonstrate the following:
Lab to ICU Set Up Procedure
When 14 Fr Non-peel-away sheath is used
Objective Successful Unsuccessful Comments
1. State type of sheath in place.
2. Correctly explains process of advancing distal segment of reposition sheath into the hub of the 13 Fr - 14 Fr sheath.
3. Correctly describes adjusting Impella® flow.
4. Correctly explains need for slack removal and verifying catheter position.
5. Verifies catheter placement on placement signal and motor current.
6. Can state correct distance from aortic valve annulus (3.5 cm).
7. Advances anticontamination sleeve and connects to repositioning sheath.
8. Appropriately secures repositioning sheath.
9. Tightens Tuohy-Borst valve and documents CM marker on catheter.
10. Applies knee brace or hospital appropriate device to support placement .
11. Ensures pressure bag is applied to side arm of cook sheath at >300 mmHg.
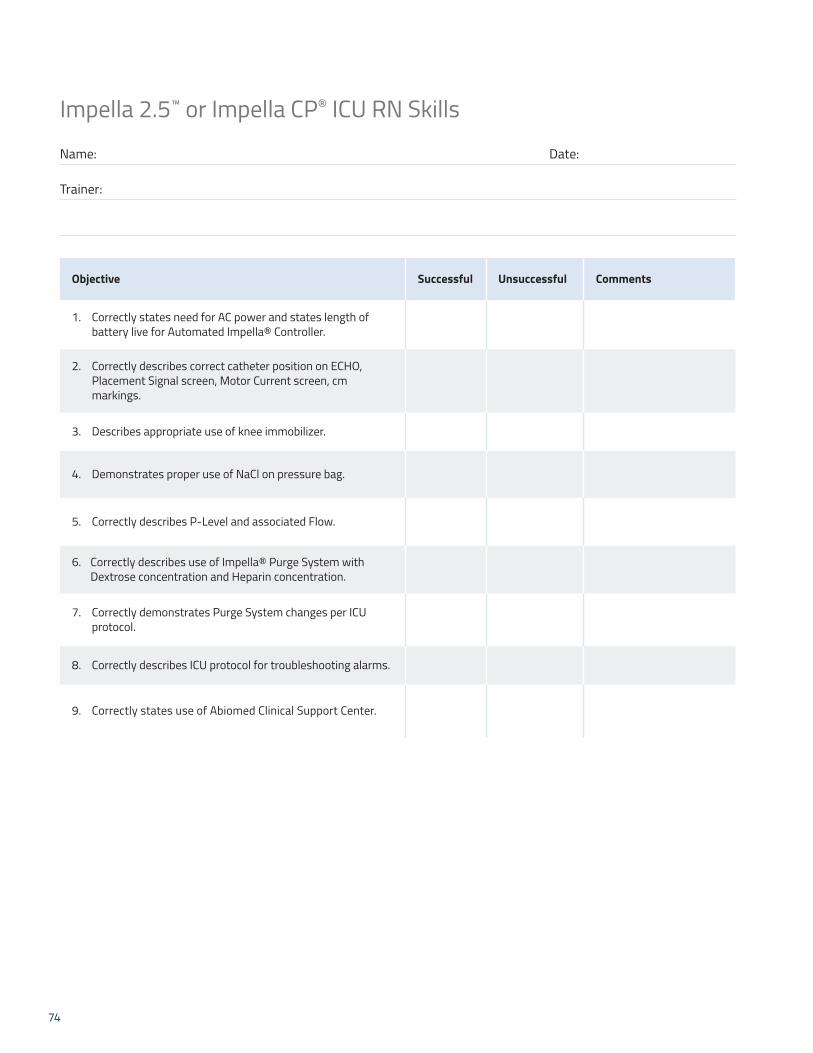
74
Impella 2.5™ or Impella CP® ICU RN Skills
Name: Date:
Trainer:
Objective Successful Unsuccessful Comments
1. Correctly states need for AC power and states length of battery live for Automated Impella® Controller.
2. Correctly describes correct catheter position on ECHO, Placement Signal screen, Motor Current screen, cm markings.
3. Describes appropriate use of knee immobilizer.
4. Demonstrates proper use of NaCl on pressure bag.
5. Correctly describes P-Level and associated Flow.
6. Correctly describes use of Impella® Purge System with Dextrose concentration and Heparin concentration.
7. Correctly demonstrates Purge System changes per ICU protocol.
8. Correctly describes ICU protocol for troubleshooting alarms.
9. Correctly states use of Abiomed Clinical Support Center.

75
Impella 5.0™ or Impella LD™ ICU RN Skills
Name: Date:
Trainer:
Objective Successful Unsuccessful Comments
1. Correctly describes implant site options for Impella 5.0™ Catheter, implant site for Impella LD™.
2. Correctly describes correct catheter position on ECHO, Placement Signal screen, Motor Current screen, cm markings.
3. Correctly describes P-Level and associated Flow.
4. Correctly describes use of Impella® Purge System with Dextrose concentration and Heparin concentration.
5. Correctly demonstrates Purge System changes per ICU protocol.
6. Correctly describes ICU protocol for troubleshooting alarms.
7. Correctly describes transport of patient to operating room for procedures.
8. Correctly states use of Abiomed® Clinical Support Center.

76
Impella 2.5™/Impella CP® Supply List
Impella 2.5™/Impella CP® Insertion Kit Contains:
• Impella® Catheter
• 0.018" x 260 cm placement guidewire
• White connector cable
• Purge cassette
• IV infusion set
• Introducer Kit
• Peel-away introducer (13 Fr Impella 2.5, 14 Fr Impella CP®)
• 18 G Seldinger needle (Impella 2.5)
• 12 mL syringe (Impella 2.5)
• 0.035" stiff access wire
• 8 Fr, 10 Fr, 12 Fr, 14 Fr dilators (Impella CP®)
Hospital supplied items:
• Automated Impella® Controller
• 500 mL bag of D5W (5% recommended; 5% - 40% acceptable) with Heparin 50 IU/mL (recommended)
• 5-8 Fr Introducer
• 8 Fr, 10 Fr, 12 Fr dilators
• 6 Fr MP, AL-1 diagnostic catheter without side holes OR 5 Fr; pigtail with or without side holes
• Standard 0.035” x 180 cm J-Tip Guidewire
Case savers/Extra items:
• 14 Fr x 13 cm Cook Check-Flo® Introducer (Impella 2.5™ only)
• 14 Fr x 30 cm Cook Check-Flo® Performer Introducer (non-peel-away)
• Boston Scientific Platinum Plus™, 0.018" guidewire
• Boston Scientific V-18 Control Wire™ 0.018" guidewire
Supplies for Transfer to Standard Configuration
• 500 mL bag of NaCl with pressure bag
• IV infusion set without transducer (90" recommended)
• 500 mL bag of D5W (5% recommended, 5% - 40% acceptable) with Heparin 50 IU/mL (recommended)
• Back-up purge cassette
77
Impella 5.0™/Impella LD™ Supply List
Impella 5.0™/Impella LD™ Insertion Kit Contains:
• Impella® Catheter
• 0.018" x 260 cm placement guidewire
• White connector cable
• Purge cassette
• Impella Axillary Insertion Kit
• 23 Fr x 6 cm peel-away introducer
• 2 Graft locks
• 8 Fr silicone-coated lubrication dilator
• 2 Silicone plugs
Impella LD™ Insertion Kit
• Impella® Catheter
• White connector cable
• Purge cassette
• Incision template
Hospital supplied items:
• Automated Impella® Controller
• 500 mL bag of D5W (5% recommended; 5% - 40% acceptable) with Heparin 50 IU/mL (recommended)
• 10 mm x 20 cm vascular graft (Impella 5.0™)
• 10 mm x 15 cm vascular graft (Impella LD™)
• 6 Fr MP, AL-1 diagnostic catheter without side holes OR 5 Fr. Pigtail with or without side holes (Impella 5.0™)
• Standard 0.035” x 180 cm J-Tip Guidewire (Impella 5.0™)

Appendix A: Program Resources Patient Education and Outreach Program
Patient EducationAbiomed has resources available to assist in education of patients and family members. Please visit our website at www.protectedpci.com.
Outreach EducationAbiomed has resources available to assist outreach educaton. Please visit our website at www.protectedpci.com for more information on outreach education.
Additional Staff Training ResourcesImpella® Quick Skills Mobile by Abiomed, Inc., puts key Impella® information at your fingertips. Instantly review set-up and insertion videos and instructions by downloading the Impella® App from the iTunes or GooglePlay directly to your smartphone or tablet.
Download The IMPELLA® APPToday
78
79
Peer-reviewed articles used in support of the safety and effectiveness of Impella®
1. Maini B, Naidu SS, Mulukutla S, et al. Real-world use of the Impella 2.5 circulatory support system in complex high risk percutaneous coronary intervention: The USpella Registry. Catheter Cardiovas Interv. 2012;80(5):717-725.
2. Kovacic JC, Kini A, Banerjee S, et al. Patients with 3-vessel coronary artery disease and impaired ventricular function undergoing PCI with Impella 2.5 hemodynamic support have improved 90-day outcomes compared to intra-aortic balloon pump: a sub-study of the PROTECT II Trial. J Interv Cardiol. 2015;28(1):32-40.
3. Dangas GD, Kini AS, Sharma SK, et al. Impact of hemodynamic support with Impella 2.5 versus intra-aortic balloon pump on prognostically important clinical outcomes in patients undergoing high-risk percutaneous coronary intervention (from the PROTECT II randomized trail). Am J Cardiol. 2014;113(2):222-228.
4. O’Neill, PROTECT II. Abstract presented at: TCT 2013 Transcatheter Cardiovascular Therapeutics. October 28, 2013-November 1, 2013; San Francisco, CA; 2013.
5. Gregory D, Scotti DJ, de Lissovoy G, eet al. A value-based analysis of hemodynamic support strategies for high-risk heart failure patients undergoing a percutaneous coronary intervention. Am Health Drug Benefits. 201;6(2):88-99.
6. O’Neill WW, Kleiman NS, Moses J, et al. A prospective randomized clinical trial of hemodynamic support with Impella 2.5 versus intra-aortic balloon pump in patients undergoing high-risk percutaneous coronary intervention: the PROTECT II study. Circulation. 2012;126(4):1717-1727.
7. Maini B, Scotti DJ, Gregory D. Health economics of percutaneous hemodynamic support in the treatment of high-risk cardiac patients: a systematic appraisal of the literature. Expert Rev Pharmacoecon Outcomes Res. 2014;14(3):403-416.
8. Cohen MG, Kelly RV, Kong DF, et al. Pulmonary artery catheterization in acute coronary syndromes: Insights from the GUSTO IIb and GUSTO III trials. Am J Med. 2005;118(5):482-488.
9. Kahwash R, Leier CV, Miller L. Role of the pulmonary artery catheter in diagnosis and management of heart failure. Cardiol Clin. 2011;29(2):281-288.
10. Chatterjee K. The Swan-Ganz catheters: past, present, and future. A viewpoint. Circulation. 2009;119(1):147-152.
11. Aqel RA, Hage FG, Iskandrian AE. Improvement of myocardial perfusion with a percutaneously inserted left ventricular assist device. J Nucl Cardiol. 2010;17(1):158-160.
12. Burkhoff D, Mirsky I, Suga H. Assessment of systolic and diastolic ventricular properties via pressure-volume analysis: a guide for clinical, translational, and basic researchers. Am J Physiol Heart Circ Physiol. 2005;289(2):H501-H512.
13. den Uil CA, Lagrand WK, van der Ent M, et al. Impaired microcirculation predicts poor outcome of patients with acute myocardial infarction complicated by cardiogenic shock. Eur Heart J. 2010;31(24):3032-3039.
14. Fincke, R, Hochman JS, Lowe AM, et al. Cardiac power is the strongest hemodynamic correlate of mortality in cardiogenic shock: a report from the SHOCK trial registry. J Am Coll Cardiol. 2004;44(2):340-348.
15. Lam K, Sjauw KD, Henriques JP, et al. Improved microcirculation in patients with an acute ST-elevation myocardial infarction treated with the Impella LP 2.5 percutaneous left ventricular assist device. Clin Res Cardiol. 2009;98(5):311-318.
16. Mendoza DD, Cooper HA, Panza JA. Cardiac power output predicts mortality across a broad spectrum of patients with acute cardiac disease. Am Heart J. 2007;155(3):366-370.
17. Meyns B, Stolinski J, Leunens V, Verbeken E, Flameng W. Left ventricular support by catheter-mounted axial flow pump reduces infarct size. J Am Coll Cardiol. 2003;41(7):1087-1095.
18. Naidu SS. Novel percutaneous cardiac assist devices: the science of and indications for hemodynamic support. Circulation. 2011;123(5):533-543.
19. Reesink KD, Dekker AL, Van Ommen V, et al. Miniature intracardiac assist device provides more effective cardiac unloading and circulatory support during severe left heart failure than intraaortic balloon pumping. Chest. 2004;126(3):896-902.
20. Remmelink M, Sjauw KD, Henriques JP, et al. Effects of left ventricular unloading by Impella recover LP2.5 on coronary hemodynamics. Catheter Cardiovasc Interv. 2007;70(4):532-537.
21. Remmelink M, Sjauw KD, Henriques JP, et al. Effects of mechanical left ventricular unloading by Impella on left ventricular dynamics in high-risk and primary percutaneous coronary intervention patients. Catheter Cardiovasc Interv. 2010;75(2):187-194.
22. Sauren LD, Accord RE, Hamzeh K, et al. Combined Impella and intra-aortic balloon pump support to improve both ventricular unloading and coronary blood flow for myocardial recovery: an experimental study. Artif Organs. 2007;31(11):839-842.
23. Suga H, Hayashi T, Shirahata M. Ventricular systolic pressure-volume area as predictor of cardiac oxygen consumption. Am J Physiol. 1981;240(1):H39-H44.
24. Suga H. Total mechanical energy of a ventricle model and cardiac oxygen consumption. Am J Physiol. 1979;236(3):H498-505.
References
80
25. Torgersen C, Schmittinger CA, Wagner S, et al. Hemodynamic variables and mortality in cardiogenic shock: a retrospective cohort study. Crit Care. 2009;13(5):R157.
26. Torre-Amione G, Milo-Cotter O, Kaluski E, et al. Early worsening heart failure in patients admitted for acute heart failure: time course, hemodynamic predictors, and outcome. J Card Fail. 2009;15(8):639-644.
27. Valgimigli M, Steendijk P, Sianos G, et al. Left ventricular unloading and concomitant total cardiac outpur increase by the use of percutaneous Impella Recover LP 2.5 assist device during high-risk coronary intervention. Catheter Cardiovasc Interv. 2005;65(2):263-267.
28. Weber DM, Raess DH, Henriques JP, et al. Principles of hemodynamics: the new science of cardiac support in the cath lab. Cardiac Interventions Today Supp. August/September 2009.
29. O’Neill WW, Schreiber T, Wohns DH, et al. The current use of Impella 2.5 in acute myocardial infarction complicated by car¬diogenic shock: results from the USpella Registry. J Intervent Cardiol. 2014;27(1):1-11.
30. Amsterdam EA, Wenger NK, Brindis RG, et al. 2014 AHA/ACC guideline for the management of patients with non-ST-elevation acute coronary syndromes: a report of the American College of Cardiology/American Heart Association Task Force on Practice Guidelines. Circulation. 2014;130(25):e344-e426.
31. Levine GN, Bates ER, Blankenship JC, et al. 2011 ACCF/AHA/SCAI Guideline for Percutaneous Coronary Intervention. A report of the American College of Cardiology Foundation/American Heart Association Task Force on Practice Guidelines and the Society for Cardiovascular Angiography and Interventions. Am Coll Cardiol. 2011;58(24):e44-e122.
32. Peura JL, Colvin-Adams M, Francis GS, et al. Recommendations for the use of mechanical circulatory support: device strategies and patient selection: a scientific statement from the American Heart Association. Circulation. 2012;126(22):2648-2667.
33. Feldman D, Pamboukian SV, Teuteberg JJ, et al. The 2013 International Society for Heart and Lung Transplantation Guidelines for mechanical circulatory support: executive summary. J Heart Lung Transplant. 201332(2):157-187.
34. Yancy CW, Jessup M, Bozkurt B, et al. 2013 ACCF/AHA guideline for the management of heart failure: a report of the American College of Cardiology Foundation/American Heart Association Task Force on practice guidelines. Circulation. 2013;128(16):e240-e327.
35. O'Gara PT, Kushner FG, Ascheim DD, et al; American College of Emergency Physicians; Society for Cardiovascular Angiography and Interventions. 2013 ACCF/AHA guideline for the management of ST-elevation myocardial infarction: a report of the American College of Cardiology Foundation/American Heart Association Task Force on Practice Guidelines. J Am Coll Cardiol. 2013;61(4):e78-e140.
36. Reyentovich A, Barghash MH, Hochman JS. Management of refractory cardiogenic shock. Nat Rev Cardiol. 2016(8):481-492.
37. Hochman JS, Sleeper LA, Webb JG, et al. Early revascularization in acute myocardial infarction complicated by cardiogenic shock. SHOCK Investigators (Should We Emergently Revascularize Occluded Coronaries for Cardiogenic Shock). N Engl J Med. 1999;341(9):625-634.
38. Rihal CS, Naidu SS, Givertz MM, et al. 2015 SCAI/ACC/HFSA/STS Clinical Expert Consensus Statement on the Use of Percutaneous Mechanical Circulatory Support Devices in Cardiovascular Care. J Am Coll Cardiol. 2015;65(19):e7-e26.
39. Picard MH, Davidoff R, Sleeper LA, et al. Echocardiographic predictors of survival and response to early revascularization in cardiogenic shock. Circulation. 2003;107(2):279-284.
40. Joseph SM, Brisco MA, Colvin M, et al. Women with cardiogenic shock derive greater benefit from early mechanical circulatory support: an update from the cVAD Registry. J Interv Cardiol. 2016;29(3):248-256.
41. Schroeter MR, Köhler H, Wachter A, et al. Use of the Impella device for acute coronary syndrome complicated by cardiogenic shock—experience from a single heart center with analysis of long-term mortality. J Invasive Cardiol. 2016 Aug 15. pii: JIC2016815-3. [Epub ahead of print]
42. Samuels LE, Kaufman MS, Thomas MP, et al. Pharmacological criteria for ventricular assist device insertion following postcardiotomy shock: experience with the Abiomed BVS system. J Card Surg. 1999;14(4):288-293.
43. De Backer D, Biston P, Devriendt J, et al. Comparison of dopamine and norepinephrine in the treatment of shock. N Engl J Med. 2010;362(9):779-789.
44. teg PG, James SK, Atar D, et al; Task Force on the management of ST-segment elevation acute myocardial infarction of the European Society of Cardiology (ESC). Eur Heart J. 2012;33(20):2569-2619.
45. Casassus F, Corre J, Leroux L, et al. The use of Impella 2.5 in severe refractory cardiogenic shock complicating an acute myocardial infarction. J Interv Cardiol. 2015;28(1):41-50.
46. Lemaire A, Anderson MB, Lee LY, et al. The Impella device for acute mechanical circulatory support in patients in cardiogenic shock. Ann Thorac Surg. 2014;97(1):133-138.
47. Anderson MB, Goldstein J, Milano C, et al. Benefits of a novel percutaneous ventricular assist device for right heart failure: the prospective RECOVER RIGHT study of the Impella RP device. J Heart Lung Transplant. 2015;34(12):1549-1560.
References (cont.)

81

IMP-1321-16 | Revised: October 2016
Clinical support 24 hours per day,
7 days a week:
1- 800- 422- 8666 (US)+49(0)18052246633(EU)
ABIOMED, Inc.22 Cherry Hill Drive, Danvers, MA 01923 USAVoice: 1-978- 777- 5410Facsimile: 1-978- 777- 8411Email: [email protected]
ABIOMED Europe GmbHNeuenhofer Weg 3, 52074 Aachen, GermanyVoice:+49(241)8860-0Facsimile:+49(241)8860-111Email: [email protected]
Reimbursement AssistanceReimbursement Hotline: 1-877-256-0861Monday through Friday, 8 am - 5 pm, CTEmail: [email protected]