iii. evidence collection a. sample collection 1. … · area to justify the effort and expense of...
TRANSCRIPT

III. EVIDENCE COLLECTION
A. Sample Collection
1. Purpose and Goals
The purpose of collecting samples is to provide physical evidence to prove violations of pesticide laws, to assess the nature and degree of exposure, and/or to guide mitigation strategies.
The goal of the sampling is to prove or disprove an element of a violation or establish the cause of a pesticide-related episode. Determine the goal of the sampling and the appropriate sampling methods to use to meet that goal. Decide what evidence the samples will provide and make a sampling plan to establish that evidence. When seeking approval from DPR for the samples, be prepared to show how the information will meet DPR’s purpose for collecting samples. The information should fall within the DPR's purpose for collecting samples.
2. Formulate a Sampling Plan
Assess the situation in the field and determine what kinds of samples will achieve your determined goal. The nature of the incident will largely determine the types of samples and the way to collect the samples. Identify the type and pattern of samples to collect, the sampling equipment required to collect the samples, and the equipment needed to store and ship the samples to a laboratory. Determine the elapsed time since the pesticide application, as pesticide degradation may limit the value of collecting samples. Collect samples as soon as possible in the investigation to provide the most meaningful results.
The sampling plan should include the number, type, and location of the samples as well as safety precautions, quality assurance requirements, chain of custody, storage, and preservation requirements for the samples. Samples must accurately represent the problem area to justify the effort and expense of analysis. Remember that simply showing the presence of a pesticide at the episode site will usually not provide you with the necessary evidence to prosecute a violation or prove the pesticide caused a pesticide-related effect. To the extent possible, the sample evidence should show how the residue got to the episode site and the source of the contamination. Additional sample evidence should also rule out any other possible sources of the contamination. Consider these when determining the number and pattern of the samples to collect.
Good sampling procedures and careful investigative techniques will enable you to report your findings with confidence.
January 6, 2006 31
3. Communication Protocol for Samples
This protocol will help avoid delays, unnecessary sampling, and improve tracking. Where possible, consult with your EBL or regional office supervisor before taking samples in order to discuss the sampling strategy to be used, and to identify any possible laboratory requirements. If prior contact is not possible, follow the protocols in this manual, noting any deviation from the protocol in the case notes. Fax a diagram of the sample sites and the Sample Analysis Reports (PR-ENF-030) to your EBL.
The EBL will consult with the CDFA laboratory staff or with WH&S staff (depending on which lab is analyzing the samples) to determine the appropriate sampling, storage, and shipping procedures. This process also alerts the chemists to any special methods or reference standards that may be required.
Contact your EBL or the EB regional office supervisor prior to shipping the samples in order to verify which laboratory will perform the analyses. Be prepared to provide the following information when you call:
a) The number and type of samples. b) The pesticides for which analyses are being requested. c) The circumstances of the investigation such as illness, injury, or damage involved or
alleged; any relevant factors; and the enforcement potential.
After receiving approval from your EBL, ship samples to the assigned laboratory (see section III (A) (10) (c), page 54 for shipping directions). The laboratory will hold samples arriving at the laboratory without prior DPR approval until the laboratory receives the appropriate approval to analyze the samples.
4. Sample Types, Sample Units, and Sampling Patterns
Before putting together the sampling equipment, determine the types and units of samples to collect and the sampling pattern to use.
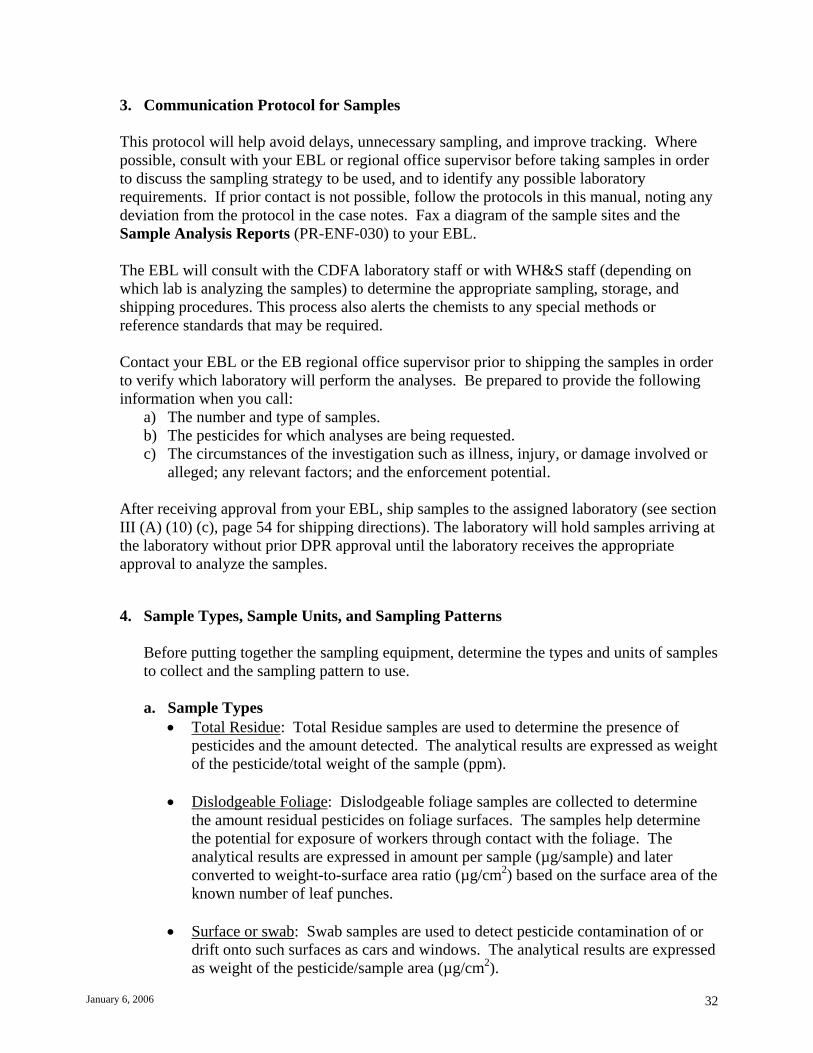
a. Sample Types Total Residue: Total Residue samples are used to determine the presence of
pesticides and the amount detected. The analytical results are expressed as weight of the pesticide/total weight of the sample (ppm).
Dislodgeable Foliage: Dislodgeable foliage samples are collected to determine the amount residual pesticides on foliage surfaces. The samples help determine the potential for exposure of workers through contact with the foliage. The analytical results are expressed in amount per sample (µg/sample) and later converted to weight-to-surface area ratio (µg/cm2) based on the surface area of the known number of leaf punches.
Surface or swab: Swab samples are used to detect pesticide contamination of or drift onto such surfaces as cars and windows. The analytical results are expressed as weight of the pesticide/sample area (µg/cm2).
January 6, 2006 32

Volume: Volume samples are used to test for pesticides in air and water. The analytical results are expressed as weight of the pesticide/volume (µg/m3 or µg/l).
b. Sample Units
There are four different kinds of sample units: single, duplicate, composite, and split.
Single sample: A single sample provides separate results for an individual sample site.
Duplicate samples: Duplicate samples are collected under identical conditions, when an affected party requests samples. Collect duplicate samples (two or more) in the same manner as a single or a composite sample from the same site.
Composite samples: Composite samples are two or more subsamples of equal size that are combined to represent a field or site. Composite samples are taken to determine whether or not an area is contaminated, to determine if other samples should be analyzed, and to identify specific chemicals in the sample. Designate the sample as a composite on the Sample Analysis Report. The most common reason for taking a composite sample is to obtain fast laboratory analysis and enable you to take crop disposition action on a field suspected of carrying an illegal residue.
Another example of when to collect a composite sample is during an investigation of a reported illegal residue and the source only tracked to a group of fields. In this case, take a composite sample from each of the suspected fields by collecting the commodity from each of the corners and from the center of each field. Once the contaminated field is identified and a cease and desist stop harvest order issued, determine the appropriate sample pattern to use in pursuit of a misuse investigation. If possible, discuss the reasons for collecting a composite sample with your EBL prior to collection.
Split samples: Created by dividing one sample into two equal and identical portions for the purpose of repeating or verifying tests. Collect twice as much material for a sample that will be split as for a single sample.
January 6, 2006 33

c. Sampling Patterns
Collect investigative samples in 5-point gradient or 9-point grid patterns. Single point samples are generally inadequate for enforcement purposes and for assessing the nature and degree of exposure. Sampling plans, other than gradient or grid, must be discussed with the EBL prior to collection.
Take precautions to prevent cross contamination. Even walking through an area could contaminate footwear or clothing, so great care should be taken not to sample from areas that have been stepped on or brushed against. When sampling, always sample the area of suspected least contamination and work towards the treatment area. Wash or change tools and gloves between samples.
i. Gradient
Gradient samples establish drift of a pesticide. If more than one source of contamination is suspected, collect gradient samples towards each suspected source or use the 9-point grid pattern. Do not composite samples.
Figure 3
Sample 5
Sample 4
Sample 3
Sample 2
Sample 1
Treated Field
Severe Effects
Minor Effects
Start here No Effects
Gradient Sampling Diagram
January 6, 2006 34

When circumstances allow, collect five samples in a gradient pattern at an approximately equal distance apart. Certain sampling situations do not allow for the collection of five samples (for example, a drift into a small residential yard, or lack of sufficient quantity of sample material). In such cases, collect a minimum of three samples: one from outside of the suspected contaminated area, one (or more) from the contaminated area, and one from the suspected source area of contamination. The gradient pattern should be in a straight line. Start collecting samples from the area that is suspected of containing the least amount of contaminant. Number the samples in the order they are taken. Document in your report the basis for any variation from the standard.
ii. Grid
Grid samples establish the distribution of a pesticide residue at the episode site. The sampling pattern should represent the entire field or site. Each point on the grid represents a single sample and should be kept separate from the others. An episode site may be partially contaminated when an applicator does not substantially confine a pesticide to the treatment site. (If pesticide drift is suspected from adjacent fields, and the source or sources of contamination are unknown, a grid pattern may be used in place of the gradient pattern. This reduces the number of samples to be taken). If misapplication to part of a field is suspected (tank contamination or partial application), but the treated area is unknown, this type of sampling pattern should be used to isolate the area.
The sampling grid pattern in the episode site should start approximately 100 feet from the edge of the field, depending on the field size. As a rule of thumb, the distance from the edges should represent approximately 10 percent of the width and length of the field or site. For example, a 46-acre site 1,000 feet wide and 2,000 feet long has a starting point 100 feet in from the length and 200 feet in from the width.
If using the grid pattern to establish drift, collect one additional sample from each of the adjacent fields that are suspected of being the source of contamination. Samples should be in line with, and at an equal distance apart from, one another in the grid pattern. Record the sample locations in your investigative notes and diagram(s).
If the field or site is suspected of being partially contaminated, start collecting samples from the area that is suspected of containing the least amount of contaminant. Number the samples in the order they are taken.
January 6, 2006 35
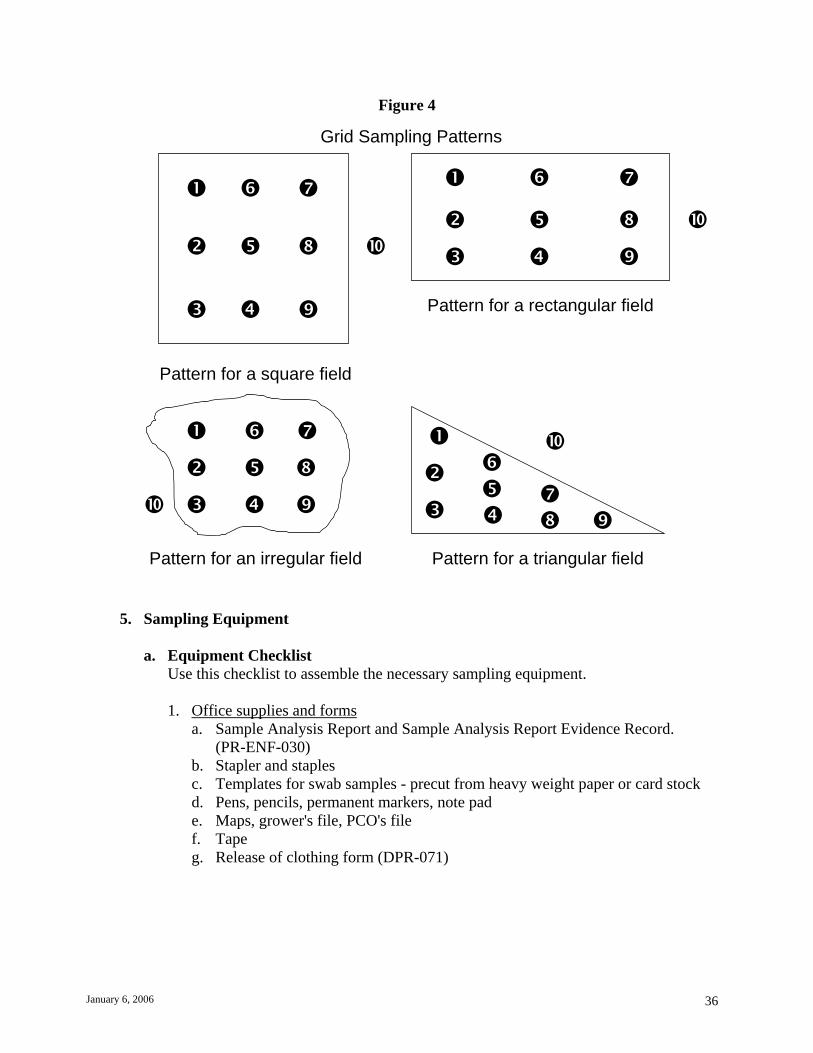
Figure 4
Grid Sampling Patterns
Pattern for a rectangular field
Pattern for a square field
Pattern for an irregular field Pattern for a triangular field
5. Sampling Equipment
a. Equipment Checklist Use this checklist to assemble the necessary sampling equipment.
1. Office supplies and forms a. Sample Analysis Report and Sample Analysis Report Evidence Record.
(PR-ENF-030) b. Stapler and staples c. Templates for swab samples - precut from heavy weight paper or card stock d. Pens, pencils, permanent markers, note pad e. Maps, grower's file, PCO's file f. Tape g. Release of clothing form (DPR-071)
January 6, 2006 36

2. Instruments and tools a. Shovel, trowel b. Soil probe, disposable core tube c. Knife d. Pruning shears e. Leaf punch f. Measuring tape, land measuring wheel g. Surveyor markers or stakes h. Scale i. Pole with grasping attachment, ladder, net, j. Siphon tubes k. Camera, film (or digital card), flash attachment, camera accessories, batteries
3. Personal Protective Equipment a. Gloves - chemical resistant and disposable (shoulder high for water samples) b. Coveralls c. Respirator d. Goggles e. Hard hat f. Rubber boots (waders for water samples) g. Soap, water and disposable towels
4. Containers a. Bags - clean, unused paper (double-strength) and plastic of various sizes b. Jars - glass, new or clean, various sizes; Teflon® lined lids and/or foil to seal
the lids c. Labels d. Ice chest
5. Collection supplies a. Isopropyl alcohol b. Distilled water c. “3-in-1 oil” d. Sterile pads, Sharkskin paper e. Blue ice f. Paper towels
b. Equipment Maintenance
To decontaminate the equipment (except leaf punches, see directions under section III (A) (8) (b) (i) (b), page 40 under dislodgeable foliage sampling), wash with soap and rinse with distilled water. The equipment should be stored in the office or car, in an uncontaminated location. For smaller equipment, an enclosed, airtight container is recommended. The larger equipment should be decontaminated after each use and prior to sampling. All tools that come into contact with vegetation should be washed, rinsed in distilled water, and rinsed with isopropyl alcohol prior to collecting each sample.
January 6, 2006 37

6. Sample Site
a. Evaluate the Site
Along with your review of interview notes and records, evaluate the episode site to provide a better picture of what happened. Get a complete view of the episode site. This will be the basis for the episode site diagram. Remember not to contaminate yourself walking through the treated area.
b. Diagrams
Record the following on the episode diagram: episode site, treatment site, landmarks such as buildings and roads, crops and their acreages, location of witnesses, sample sites and numbers, and the site and direction of photographs. Diagrams should indicate the dimensions and orientation. Other useful information is row orientation of the field, wind direction, application pattern and direction. Remember, the person reading your report may not be familiar with the situation. Diagrams and photographs are a great help in understanding local conditions.
7. Sampling Procedures
a. General Information
Different types of sample analyses (such as soil to grass) are difficult to compare. Similar materials should be used for comparison samples, such as in cases where treated and untreated areas are to be compared. In drift cases, swab samples will yield a cleaner sample than foliage samples.
Before entering a treated area, the inspector should determine what has been sprayed , whether a restricted entry interval or other reentry restriction is in effect and what PPE should be used.
Always wear new disposable gloves, the required PPE, and use uncontaminated tools for each sample. For multiple samples, wear new disposable gloves for each sample, and decontaminate the tools between sampling. Collect samples in previously unused paper bags or clean glass jars. New jars do not need to be cleaned. Sample material should never come in contact with metal or plastic. Metal lids for glass jars should be lined with aluminum foil or Teflon® .
Generally, for each sample, collect a minimum of one pound1 of material per chemical or screen for the laboratory to analyze. If samples are underweight, they may not be analyzed, or analyzed for fewer chemicals than requested. (Exceptions:
1 The laboratory needs one pound of material for a 50-gram test for the following reason: One pound or somewhat less than 500 grams (454.5 grams). The initial screening takes 50 grams. The confirmation check takes 50 more grams for a total of 100 grams. The split samples for other laboratories to check (if requested) doubles that to 200 grams. Approximately 200 additional grams are needed for the “Spiked for validation” tests. Spiking tests are a further method of assuring the validity of laboratory practices by spiking the sample with a known amount of the pesticide in question.
January 6, 2006 38

swab and dislodgeable samples). Measure the sample area and record it in your investigative notes.
Samples must be identified immediately after they are taken. Write the identification number on the paper bag or label the glass jar using a permanent marker. Samples in paper bags should be placed in a plastic bag. This should prevent moisture from coming in contact with the paper bag or label and its contents. Chill the samples as soon as possible. Be prepared by taking an ice chest with blue ice into the field for this purpose.
b. Sampling Directions
i. Foliage Samples
Foliage samples can be collected in a grid or gradient pattern. Try to collect foliage of similar type such as grasses or broad leaves throughout the sampling area if possible. It will make it easier to extrapolate the data.
a. Whole Leaf Foliage Sampling
Collect foliage from locations with a specific reference point in the field to identify the residue delineation between the sample areas, and to maintain sampling uniformity. It is important to identify the location of each sampling site within the field, because it makes the evidence more credible in an enforcement action. Collect at least one pound of plant material per sample per analysis or screen. Be sure to collect enough plant material to accommodate the chemistry laboratory if several analyses are requested. The size of the sample area will vary with the type of location. For example:
Location Sample Area Field and non-crop 25’ by 25’ Orchards and vineyards 4 mature trees or vines in a rectangle Small plants, seedlings, bud-leaf Sample a sufficient area to produce a stage or other minimal foliage 1 pound sample condition, or for multiple analysis
Select foliage from all sides of the plant/tree unless drift is suspected. In drift cases, collect the foliage from the side of the plants allegedly exposed to the drift. For most situations, collect the foliage from the outer leaves of the plant/tree. It may be necessary to uproot the whole plant if systemic pesticide absorption is suspected. Do not select foliage in contact with soil. New growth may not have been exposed to chemical applications so consider the impact new growth may have on the analytical results.
January 6, 2006 39
b. Dislodgeable Foliage Sampling
Collect dislodgeable foliage samples to determine the potential for human dermal exposure to a pesticide(s). In order to properly evaluate exposure of workers, WH&S requires data from dislodgeable foliar residue (DFR) samples, not total residue samples. Due to degradation, prompt collection of DFR samples is necessary.
If your investigation indicates that dislodgeable foliage samples may provide relevant data for determining how the worker(s) was exposed to a pesticide or evidence for an enforcement action, contact your EBL or EB regional office. Your EBL will contact WH&S and assist you in developing a sampling plan and in providing the specialized equipment needed to collect dislodgeable foliage samples. Conduct dislodgeable foliage sampling only on broadleaf trees and plants, not on grasses or other thin or small leafed trees and plants. Do not collect whole leaves for dislodgeable residue analysis. Place the DFR samples in an ice chest with ice or blue ice; do not freeze or use dry ice. Samples must be shipped for overnight direct delivery to the laboratory. Extraction of the samples should take place within 24 hours of collection.
Dislodgeable foliar residue is reported in amount per sample (µg/sample) and later converted to weight-to-surface area ratio (µg/cm2) based on the surface area of the known number of leaf punches. Dislodgeable samples are taken with a leaf punch device that deposits measured leaf punches in an attached clean jar. A sample should consist of 40 punches taken with a five-square centimeter punch or 60 punches taken with a 2.5 square centimeter punch. Clean the leaf punch equipment between each sample using water and a paper towel, then rinse clean with distilled water.
When punching the leaf, make sure the leaf surface covers the entire cylinder punch area. A partial leaf punch will give an inaccurate result because the total leaf area is less than calculated.
Select a site where people were working or are likely to come into contact with foliage, but where there has been no actual contact with people because the pesticide residues may have been dislodged. The punches should be equally divided between the north, south, east, and west sides of the plant to eliminate any effects from differential breakdown. Avoid taking punches from outside rows, as they may not represent the total area being sampled.
Punches should represent all areas of the foliage normally contacted and reachable. This could include the interior as well as the exterior of the plant. Do not sample from new growth or leaves contacting the soil unless you suspect they are the source of contamination. If they are the suspected source, be sure to keep soil-contaminated foliage separate from other foliage samples.
January 6, 2006 40
When collecting DFR samples, always collect two to four samples from each field or sample site. DFR can be quite variable throughout a field or sample site. Therefore, more than one sample from the site is required to get a good estimate of the residue. Collect the DFR samples from different areas of the sample site, noting the location of each sample on the Sample Analysis Report.
For multiple analyses, sampling should be repeated as described above for each analysis or screen requested. Because you cannot sample from the same area, collect duplicate samples adjacent to each other. The locations should always be the same size and of the same material. Use a separate jar for each duplicate sample per analysis and identify with consecutive numbers. The duplicate samples should represent one sample site. Contact your EBL to determine if duplicate samples are necessary.
ii. Surface (Swab) Samples
Conduct surface or swab sampling to establish drift, uniform or partial contamination, or the presence of a pesticide on a surface. Surface samples can be taken indoors or out and in patterns, such as a grid or gradient, or in groups to support other sample analyses. Surface sampling should not be used to determine whether or not a hazard exists.
Sample areas may vary in size depending upon the estimated concentration of the contaminant. Direct application to a surface would require a smaller sample area than drift from greater distances. As a general rule, sample a 500 cm square area (20 cm x 25 cm). Smooth “inert” surfaces, such as a windshield, are the preferred area to sample. However, follow the same methods for sampling uneven surfaces such as rugs, furniture, walls, walkways, or counters.
Prepare ahead of time several same sized disposable templates from manila folders to use to delimit the area to be sampled. In situations where a template cannot be used, string, pins, or tape can be used for outlining the sample areas.
Sample each surface area using two sterile gauze pads or sheets of sharkskin paper2
moistened with a solvent. Use gauze pads that are no larger than two inches square. Fold the sharkskin sheets into quarters. To prevent contamination of the sharkskin sheets, store two sheets in each of several sealed sandwich bags or within folded aluminum foil in your sampling equipment.
2 Sharkskin paper is used in the laboratory as filtering material during the analysis process. It can be used as an alternative to cotton gauze when sampling for residues of chlorpyrifos or other organophosphate pesticides to reduce the likelihood of false positives from residues found in the cotton itself. There are various sizes of sharkskin paper, 15 cm, 16.3 cm, and 18.5 cm. The sharkskin paper comes in boxes of 100 sheets. It can be purchased from E & K Scientific 1085 Florence Way, Campbell, CA 95008 (telephone 408-378-2013) or other laboratory supply companies.
January 6, 2006 41
Isopropyl alcohol is typically used as the solvent, however, distilled water may be used when sampling for some water-soluble pesticides such as glyphosate or paraquat. Do not contaminate the solvent by placing the gauze pad over the mouth of the solvent bottle. While wearing clean or disposable gloves, pour the solvent over the gauze/paper without touching the bottle.
A control sample must always accompany swab samples. Take the control sample before entering the episode site. For the control sample, moisten two sterile gauze pads or sharkskin sheets as above with the same solvent to be used for the actual sample and place them in a foil-sealed glass jar.
Select a sample site. Try to avoid areas known to contain waxes, as these may interfere with the analysis. Tape the template to the surface area or carefully measure and outline the area to be sampled. Record the surface area and sample location on the Sample Analysis Report, on the incident diagram, and in your investigative notes. Use a new disposable template for each sample area. If string, pins, or tape are used instead of a disposable template, they should be discarded before another use.
Use two sterile gauze pads or sheets of folded sharkskin per sample. Moisten one pad or sheet with solvent as described above. Wipe lightly horizontally across the measured area with the first pad or sheet, folding the contaminated portion , so that a clean surface of the pad or sheet is exposed to make another wipe of the area, and continuing until the whole area has been wiped horizontally. Place that pad/sheet in a glass jar. Moisten the second pad/sheet with solvent and wipe the entire area again vertically with a clean surface. Place the second pad/sheet in the same jar as the first.
If multiple analyses are required, the sampling should be repeated on samples from adjacent areas as described above for each analysis or screen requested. The locations should always be the same size and of the same surface material. Use a separate jar for each duplicate sample per analysis and identify with consecutive numbers. The duplicate samples should represent one sample site.
Store the samples in the refrigerator and ship them, including the control, on “blue ice.”
iii. Clothing Samples
Be selective when collecting clothing samples. Be sure the resulting data will be useful in the investigation or for exposure assessment purposes. Coordinate with your EBL and WH&S for clothing samples collected for exposure assessment purposes. Generally, clothing samples only tell the investigator that a pesticide exposure occurred and possibly the extent of the exposure, not whether the exposure resulted in a health hazard. Generally, foliage or other samples are collected in conjunction with clothing samples.
January 6, 2006 42

Inform the people involved that the clothing will not be returned. To show consent, have them sign a Release of Clothing form (see form DPR-071 in the Associated Forms section).
Collect clothing only from people who were allegedly contaminated. Consideration must be given to the type of incident involved. Garments, such as shoes, could be collected if an applicator was allegedly exposed to a pesticide because of failure to wear protective equipment. Shirts, scarves, or jackets could be collected if they were exposed to pesticide drift.
Clothing samples are usually collected away from the episode site. The best results are obtained when the clothing is clean at the start of the day and should be collected the day of the episode (or the next day and ensure it was not washed). Document what is known about the clothing. Do not collect the clothing if it has been washed unless special circumstances dictate sampling.
If the affected area of the clothing is known, the investigator should note that on the Sample Analysis Report.
Place each sample in a clean, unused paper bag to prevent cross-contamination, then place the bagged samples in properly sealed plastic bags for shipment. Chill the samples as they are collected. If the samples cannot be shipped immediately, store the samples in the freezer. See section page 54 for shipping directions.
iv. Soil Samples
Some pesticides are difficult to detect in the soil, and oftentimes other sample types yield more useful information. Contact your EBL regarding the appropriateness of taking soil samples. If soil samples are appropriate, usually one or two soil samples from the most affected area are sufficient, in conjunction with other sample types. Soil samples, however, may be taken in a grid or gradient pattern when other sample types are not possible or appropriate.
a. Surface Soil Sampling
Surface soil samples are best for misapplication of herbicides and soil-applied insecticides and can be used to prove an area was contaminated. For pesticides incorporated or otherwise located below the soil surface, take subsurface samples, as described later.
Use a clean spatula, trowel, or other tool to scrape the surface soil down to a depth of one-half inch. Each sample site should represent approximately a two to four-foot square (i.e., 4 to 16 ft.2 area), depending on the size of the episode site, the concentration of the pesticide residues, and the number of analyses required. Collect approximately one pound of soil per analysis or screen from the top half inch of soil and place in a clean, labeled one-quart glass jar sealed with a Teflon®
or foil-lined lid. If the episode site is large, the suspected pesticide concentration is relatively low, or if several pesticide analyses are requested, you may want to enlarge the sample area. Measure the sample area and depth and record it on the
January 6, 2006 43
Sample Analysis Report. Fill out a Chain of Custody for each sample. Chill the sample(s) and ship on blue ice.
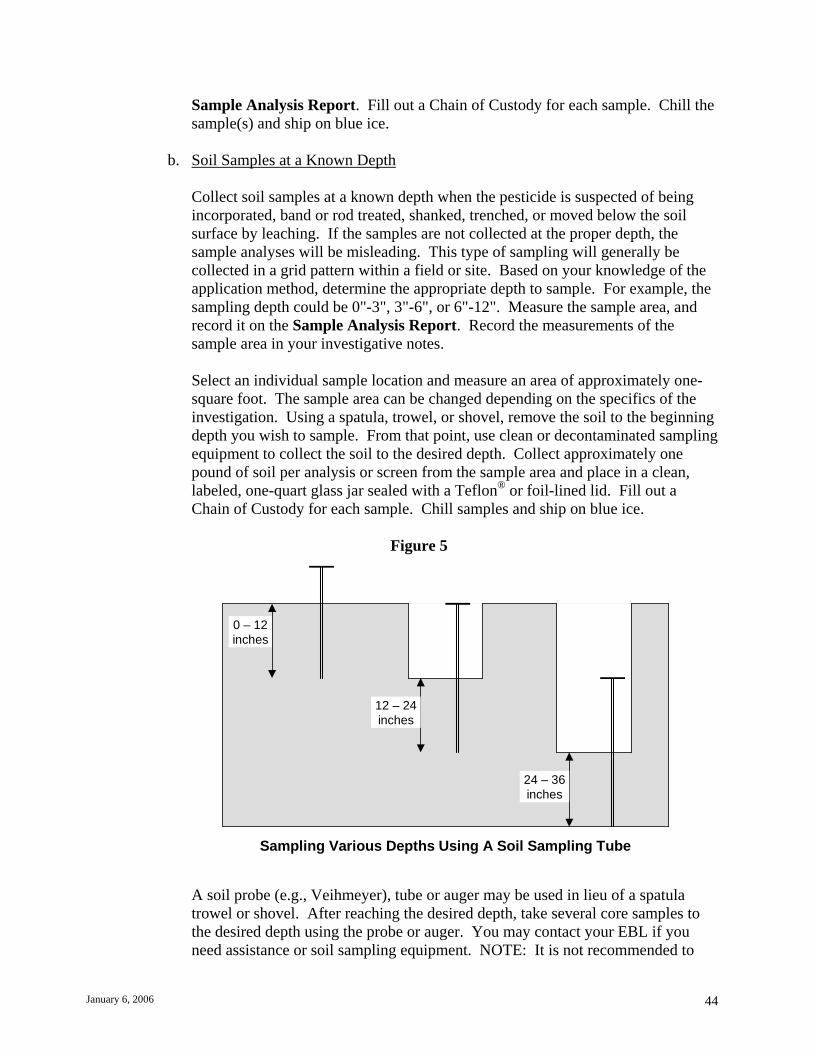
b. Soil Samples at a Known Depth
Collect soil samples at a known depth when the pesticide is suspected of being incorporated, band or rod treated, shanked, trenched, or moved below the soil surface by leaching. If the samples are not collected at the proper depth, the sample analyses will be misleading. This type of sampling will generally be collected in a grid pattern within a field or site. Based on your knowledge of the application method, determine the appropriate depth to sample. For example, the sampling depth could be 0"-3", 3"-6", or 6"-12". Measure the sample area, and record it on the Sample Analysis Report. Record the measurements of the sample area in your investigative notes.
Select an individual sample location and measure an area of approximately one-square foot. The sample area can be changed depending on the specifics of the investigation. Using a spatula, trowel, or shovel, remove the soil to the beginning depth you wish to sample. From that point, use clean or decontaminated sampling equipment to collect the soil to the desired depth. Collect approximately one pound of soil per analysis or screen from the sample area and place in a clean, labeled, one-quart glass jar sealed with a Teflon® or foil-lined lid. Fill out a Chain of Custody for each sample. Chill samples and ship on blue ice.
Figure 5
24 – 36 inches
12 – 24 inches
0 – 12 inches
Sampling Various Depths Using A Soil Sampling Tube
A soil probe (e.g., Veihmeyer), tube or auger may be used in lieu of a spatula trowel or shovel. After reaching the desired depth, take several core samples to the desired depth using the probe or auger. You may contact your EBL if you need assistance or soil sampling equipment. NOTE: It is not recommended to
January 6, 2006 44

use the probe when a band or side dress treatment was made, as it is difficult to determine where the band treatment is located. You could get misleading results.
c. Soil Sampling (Known Depth, Furrowed Field)
Chemicals may have been applied in bands or side dressed in furrowed fields. In order to sample from the appropriate area, use a shovel to cut across sections perpendicular to the direction of furrow at each sample site. For single rows, start at the center of the furrow and sample across the bed to the center of the opposite furrow. For double row beds, sample from the center of the furrow to the center of the bed.
Collect soil from an area 3 to 6 inches wide, and 12 to 14 inches deep (or less if the application depth is known to be less), as measured from the top of the bed. Place the soil in a stainless steel bucket and mix thoroughly. Collect approximately one pound of soil per analysis or screen from the mixed soil and place in a clean, labeled, one-quart glass jar sealed with a Teflon® or foil-lined lid. Clean the bucket with soapy water, rinse with distilled water, and give a final rinse with isopropyl alcohol. Fill out a Chain of Custody for each sample. Chill samples and ship on blue ice.
v. Water Samples
For collecting samples of surface water, use the following guidelines, which are designed to detect pesticide residues resulting from the misapplication of a pesticide to surface water. If you suspect pesticide contamination of ground water, contact your supervisor to determine the appropriate local, State, or federal agency for follow-up.
Wear shoulder-length gloves and clean chest-high waders whenever contact is made with potentially contaminated water. Use clean, one-gallon amber glass containers with an aluminum foil or Teflon® seal under lid. Do a native rinse of the bottle before collecting any sample. Fill bottles to the top, leaving no air space for pesticides to volatilize. Sample as close as possible to the apparent source of contamination. Avoid areas where water has been isolated from the main body of the stream, lake, or pond. In a flowing water body, sample facing upstream.
Wade out as far as possible into the body of water. Avoid sampling water that is disturbed by your movement. If the suspected pesticide is water soluble, then draw the sample from any depth below 18 inches. If the pesticide is oil-based, or if oil is a part of the tank mix and the alleged misapplication was made across the surface, then draw the sample from the surface layer. For samples below the surface of the water, lower the glass bottle to the desired depth before removing the cap. Allow the bottle to fill, replace the foil-lined cap, and lift the bottle out of the water. For surface samples, remove the cap and dip the bottle into the water surface. Allow it to fill completely, then put on the foil-lined cap. Take several samples distributed around ponds or lakes instead of only one sample. If only one sample is taken, draw several sub-samples from different locations around the body of water and combine in a
January 6, 2006 45
clean, one-gallon container. If the water is too shallow to immerse a jar, use another clean jar to fill the sample jar.
Refrigerate or place the sample on blue ice immediately. In some cases, other chemicals may be added to the water to aid in preserving the sample. Contact your EBL for instructions. Document the additives (i.e., preservatives) on the Sample Analysis Report.
vi. Sediment Samples
Pesticide residues can accumulate in the bottom sediment of lakes and streams, but generally sediment samples are of limited value and other sampling types are preferred. Check with your EBL prior to taking sediment samples to determine the appropriateness and to obtain additional equipment or assistance, if needed.
Wear shoulder-length gloves and clean chest-high waders whenever contact is made with potentially contaminated water or soil. In shallow water (< 2 feet), gently scoop the top 3 cm of sediment into a clean one-pint, wide-mouth clear glass jar using a trowel.
As equipment is lowered or retrieved through water exceeding a few feet in depth, sediment contents can be flushed or diluted. Disruption may cause mixing of surface layers with lower layers in the sample, and may lead to dilution or concentration of the contaminants of concern. Therefore a disposable tube is recommended for unconsolidated sediment. DPR’s Environmental Monitoring Branch can provide disposable tubes (36 inches long by 2 inches in diameter Teflon® clear cylindrical tube). For firm bottom deposits, a commercial sediment-collection device is recommended, however, these devices often require extensive cleaning between sampling to prevent cross-contamination. Sample with the flow for shallow, flowing streams.
Carefully lower the disposable core tube, or other sampling device through the water and into the sediment. Minimize rolling the sediment. Retain the top 3 cm from each core and take care to minimize disturbance of the top sediment layer during the sampling process. Remove rocks, leaves, and other debris from the sediment before transferring it to a wide-mouth glass jar. Repeat this process several times within the same general area until one pint (or one pound) of sediment is collected. Seal the jar with an aluminum foil or Teflon® seal under lid; chill the sample and ship on blue ice.
January 6, 2006 46

vii. Honeybee, Animal, Bird and Fish Samples
Collect samples of dead honeybees, animals, birds, and fish immediately, before decomposition, if possible. Prior to collecting dead animals, contact a governmental veterinarian for proper dissection techniques and appropriate tissue samples. If wildlife is involved, contact a Fish and Game biologist. In some situations, a governmental veterinarian or Fish and Game biologist will collect the samples. Use disposable gloves when handling animal samples because of the possibility of disease transmission.
Collect small animals and fish whole and place in plastic bags. Collect a minimum of 250 grams (about ½ lb.) of fresh dead bees or honey and a minimum of one ounce of pollen. Remember to collect enough for each analysis requested.
Chill all honeybee, animal, and fish samples immediately to prevent further degradation. If fish decomposition is evident upon collection, indicate so on the Sample Analysis Report. Freeze as soon as possible and ship all tissue samples as quickly as possible.
viii. Commodity Samples
Collect commodity samples to determine if pesticide residues are in excess of the EPA food tolerance. This information is sometimes used to prohibit the harvest of a field, or seize a packed commodity. Do not collect samples to “clear” a grower's field or for informational purposes for a grower.
Be careful to select individual fruits and vegetables that are without decay. If the commodity is not cut, refrigerate the sample using blue ice before shipping. Avoid freezing because of the problems dealing with thawed and partially thawed commodities and estimating the water weight in the samples. If the commodity is cut, freezing may be necessary to preserve the sample during a lengthy storage period.
a. Field Sampling
Collect field samples that are representative of the whole commodity. Do not remove wrapper leaves, hulls, shells, pods, etc. Do not wash or clean the commodity.
If the entire field is suspected of carrying pesticide residues in excess of the tolerance, collect samples in a grid pattern in the same manner as foliage samples.
Collect at least one pound of commodity per sample, per analysis, or screen. Place the sample in a clean, unused double-strength paper bag.
January 6, 2006 47

b. Packed Sampling
If pesticide contamination of a packed or processed commodity is suspected, contact your EBL because DPR is the lead agency for illegal residues on produce in the channels of trade. However, there are some basic points to consider when collecting this kind of sample.
Samples collected at packing sheds should be representative of the produce as shipped in the channels of trade.
Sample size is determined by the number of containers in the lot. Use the following table as a guideline for determining a “representative” sample size:
Number of Containers in the Lot
Number of Containers to Sample From
1 – 5 All 6 – 100 5
Over 101 10
NOTE: Unless otherwise instructed, the minimum sample size should be two pounds.
Do not strip outer leaves before sampling commodity from bulk lots at a packing shed, unless removal of the outer leaves is the practice at the packing shed prior to shipping. Place the sample in a clean, unused double-strength paper bag.
ix. Tank Mix Samples
Tank mixes may be highly toxic. Refer to the pesticide labels for precautionary statements. If the tank mix ingredients are unknown, assume they are highly hazardous and wear maximum PPE. Be careful when working around machinery and at busy mixing/loading sites. Be aware of hoses and fittings that may be under pressure, or show signs of leakage. Inspectors should be trained according to an Illness Injury Prevention Program including training on the symptoms of exposure, PPE to be worn and direction on how to obtain emergency medical care.
If any other samples are to be collected at the site, collect the tank mix sample last after all other work has been complete, or have a separate person collect the tank mix samples.
Laboratory analysis of tank mix samples identifies the active ingredient and any possible contaminants in the tank mixture. The Formulations Laboratory analyzes active ingredients only, not inert materials. Biological pesticides, such as Bacillus Thuringiensis, and petroleum distillates cannot be analyzed.
Thoroughly agitate the liquid in the service container or tank. If the solution is adequately mixed to ensure uniformity, collect a sample from the drain system. Use a catch basin to avoid spills onto the soil. Application rigs can sometimes be sampled at the spray nozzles. After an application, loosen a nozzle and drain the pesticide mix
January 6, 2006 48

into a glass sample jar. Be sure to tighten the nozzle after taking the sample. If the tank mix cannot be agitated, use a siphon tube and syringe to collect a composite sample from three depths: near the tank bottom, middle, and near the top of the liquid level.
Do not allow tank mix solutions to contact rubber or plastic, as these materials may affect the analytical results. If the pesticide reacts with metal, use glass jars capped with Teflon® lids, not foil-lined lids. Do not fill the jar above the bottom of the thread line to avoid spills when the sample is opened. Any contamination of the sample container should be rinsed off onto the application site. After collecting the samples, wash yourself thoroughly with soap and water.
If possible, include a copy of the pesticide label with the sample. If the label cannot be obtained, include the ingredient statement and other pertinent label information on the Sample Analysis Report. The Sample Analysis Report should also include dilution and mixing directions. Write “Formulations Laboratory only” on the Sample Analysis Report.
Chill all tank mix samples to prevent degradation. An ice chest with blue ice will maintain the samples below 40°F. Ship by the fastest means available, taking into consideration Department of Transportation (DOT) regulations. To avoid cross-contamination, do not store or ship tank mix samples with or near other sample types (foliage, soil, etc.).
8. Outsourced Sampling Techniques
a. Air Samples
Due to the knowledge and experience needed to operate air sampling equipment, contact your EBL for assistance in contacting an environmental or occupational health agency or DPR’s Environmental Monitoring staff to conduct the sampling.
Two types of air samplers are used. High Volume samplers for measuring low concentrations of pesticides over long periods of time; and Low Volume samplers for measuring higher concentrations of pesticides over shorter periods of time. Either high or low volume samplers can be used indoors or outdoors.
Indoor Air Sampling: Hi-Vol samplers must be vented out of the dwelling to ensure that air will not be recycled through the machine. Rooms with cigarette smoke or gas appliances must be avoided; any gases or suspended smoke particles in the area will contaminate the sample.
Outdoor Air Sampling: Position sampling equipment to avoid exposure to engine exhausts, running motors, cigarette smoke, or any other nontarget air contaminants. Protect sampling equipment from rain and direct sprays from application machinery. Use shelter hoods to protect the equipment in such situations.
January 6, 2006 49
b. Feed, Milk & Dairy Foods and Egg Samples
Use the sampling protocol of the United States FDA's Investigations Operations Manual (see website http://www.fda.gov/ora/inspect_ref/iom/contents/ch4_toc.html) for proper sample collection of these commodities for compliance (investigational) purposes. For suspected pesticide contamination of a feed, milk or dairy product, or egg commodity, contact your supervisor to determine which appropriate State or federal agency to contact for follow-up. For milk samples, each analysis requires one quart. Contact your EBL for guidance with procedures.
c. Pesticide Formulation Samples
Sampling pesticide formulations for investigative purposes is sometimes necessary to provide evidence of a pesticide misuse, misformulation, product composition, cross-contamination, or other problem. In order for the analytical results of these samples to substantiate a finding that a violation exists, the samples must be representative of the total amount of the material sampled. Discuss with your EBL the appropriate protocol to use for the particular situation prior to taking formulation samples. Typically, DPR staff takes these types of samples.
9. Sample Preservation, Storage, and Shipping
The proper collection, storage, and shipping of samples are all critical elements of the sampling process and can affect the analytical results. Take the necessary steps early in the sampling process to avoid anything that could compromise the integrity of the sample, such as loss, deterioration, contamination, or tampering. Any mishandling of the sample can have a negative impact on the admissibility of the sample as evidence. Ideally, a laboratory should analyze the samples as soon as possible after they are collected. However, in many situations, this may not be possible and consideration must then be given to assure the integrity of the sample by utilizing proper storage, preservation, and shipping methods.
a. Storage
Ensure that each container is clearly labeled to identify the sample number. All samples, except those in glass jars, should be placed in paper bags within a plastic bag. Glass jars shall be placed directly into a plastic bag. Do not store or submit samples in direct contact with plastic bags. Do not use tags for labeling purposes. Protect stored samples from tampering and maintain a chain of custody record.
January 6, 2006 50

b. Preservation
If samples must be stored temporarily, immediately refrigerate them to prevent deterioration of the sample and degradation of the chemical. For improved preservation, some samples may be frozen, however, if you choose to freeze samples, keep in mind they must be maintained in a frozen state during shipping. This means using dry ice. The preferred method of preservation is to ship the samples to the laboratory as soon as possible, to avoid the need to freeze samples, however, if needed, the following samples may be frozen: Whole leaf foliage Surface (swab) Clothing Soil Sediment Animals, Fish, Honeybees Air
The following samples, however, must not be frozen: Dislodgeable foliage residue (DFR) Water Commodity Tank-mix Formulations
Refer to the “Sampling Directions” section for additional information on the storage of a particular kind of sample.
c. Shipping
Packaging and shipping samples must be done properly to ensure they remain intact when they arrive at the Chemistry Laboratory. In addition, mishandling the samples can endanger the safety of persons because of loss through spills, or leaks.
1) Place properly bagged (plastic over paper) and labeled samples in a shipping container and immobilize the samples with suitable packing material such as crumpled newspaper or Styrofoam.
2) Keep all liquid sample containers separated and carefully padded to guard against breakage. Pack liquid samples in sufficient absorbent material to absorb and retain any leakage that might occur.
January 6, 2006 51
3) Samples to be analyzed for pesticide residue (i.e. those other than tank-mix and formulation) require that a temperature be maintained during shipping that will prevent deterioration. i. Cold samples should be packed in an insulated container using sufficient “blue
ice” to maintain the temperature throughout the shipping time. ii. Frozen samples should be placed in dry ice, wrapped in newspaper and placed in
an insulated container such as a Styrofoam cooler. The insulated container is then placed inside a suitable shipping carton with adequate ventilation provided.
4) Mark your cooler and “blue ice” with your address in indelible ink and they will be returned to the appropriate regional office by mail or via DPR staff.
5) Record the chain of custody and include the Sample Analysis Reports (one per sample) in a separate plastic bag. When multiple samples are sent, include a sample site diagram, whenever possible, to assist the laboratory staff in determining the order in which to analyze the samples. Do not staple the Sample Analysis Report to the bag.
6) Comply with all applicable packaging and shipping requirements of the Department of Transportation.
7) Clearly mark shipping container with handling instructions, such as “Handle with Care,” “Glass,” “This Side Up,” or other appropriate wording.
8) Seal the shipping container and ship or deliver the samples to the laboratory as soon as possible. Consult your EBL about the shipping method, but generally ship by the fastest method available, preferably overnight. Do not ship samples when they are likely to sit in transit over the weekend or other holiday periods. Only use direct delivery courier services.
Address the shipping container labels to:
Department of Food and Agriculture Center for Analytical Chemistry 3292 Meadowview Road Sacramento, CA 95832
The label should also direct the shipping container to the appropriate section of the laboratory. The labels should state either:
1) ATTN: RESIDUE; 2) ATTN: FORMULATION (Only for a tank mix or formulation samples); or 3) ATTN: WORKER SAFETY (ONLY for DFR or WHS approved clothing
samples)
January 6, 2006 52

All hand-delivered samples should arrive at the laboratory between 8:00 a.m. and 4:00 p.m. on regular workdays. The laboratory often closes for lunch during the noon hour. If the delivery person anticipates arriving between 12:00 and 1:00 p.m., please call the laboratory ahead of time to ensure someone will be available to receive the samples. The laboratory's phone number is (916) 262-1434. The delivery person should check in at the receiving office, which is located at the south end of the main Chemistry Laboratory (3292 Meadowview Road). After the appropriate laboratory section has been notified, the delivery person will be given further instructions.
Exceptions to the 8:00 a.m. - 4:00 p.m. delivery times are when pre-arrangements have been made with the appropriate laboratory section(s) and during emergencies.
10. Completing the Sample Analysis Report and Sample Analysis Report Evidence Record (Form PR-ENF-030)
Any sample may become evidence in an administrative or judicial action. For this reason, accurately complete the Sample Analysis Report and Evidence Record. Additionally, failure to complete the form may result in a delay at the Laboratory. Always use a separate form for each sample, duplicate sample, control sample, or subsample submitted. Identify each sample as accurately as possible.
a. Sample Analysis Report
1. SECTION A. Sample Analysis Requestor
Enter the name, address, and fax number of the agency submitting the sample. The form will be faxed to the number given with the analysis results.
2. SECTION B. Sample Source
Submit the name, address, Operator ID number or Restricted Materials Permit number, and telephone number.
3. SECTION C. Sample Information
Submit a separate form for each sample or subsample. The identification number on the sample must correspond to the identification number on the Sample Analysis Report. The Laboratory will assign its own identification numbers to each sample when it is received.
a) Sample consists of: Be specific when completing this box. If the sample is a commodity, give the specific name. For example: “1 pound of tomato foliage;” or “1 pound of strawberry fruit;” or “1 pound of soil taken between 2" and 6" deep.” Tank mixes: As much information as possible should be given for tank mix samples. Include the name and approximate percentages of any fertilizers, stickers, spreaders, buffers, and active ingredients in the mix.
b) Is this a control sample? c) Is this sample a composite?
January 6, 2006 53

d) Sample identification marks. Make these marks logical and consecutive, especially with samples associated with the same case. One suggested sample numbering system is: investigator's initials-date (month-day-year)-sample sequence number. For example: investigator (JW) collects a sample on November 9, 2004, the sample number would be JW-110904-1. The identification marks on the sample container must correspond to the identification marks on the Sample Analysis Report.
e) Other identification marks. f) Commodity and acres. Be as specific as possible when entering the name of the
commodity. Add the total acres of the commodity being sampled. g) Section, township, and range. Enter these if they are available. h) Sample location. A brief description of where the sample was taken should be
entered here. Distances from landmarks and field borders can be used. For example, “l/4 mile north of Wall Road and 1/2 mile south of Almond Street.”
i) Site ID number. Get this number from the R.M. Permit or Operator ID form. j) County. Use the county code; e.g. 39 = San Joaquin. k) Basis for sample. Check the appropriate box. l) Description of problem. Note here the nature of the complaint or investigation.
Tracking numbers from DPR should be entered in this box. For example, “Resident complaint of illness from application of Guthion to almonds.” If the sample has been assigned a tracking or case number, record it in this area.
m) Sample collector's signature. n) Print sample collector's name here. o) Date sample collected.
4. SECTION D. Laboratory Instructions
Report the sample priority and disposition here. Review the criteria for priority on the back of the Sample Analysis Report and check the appropriate box. Routine samples will be analyzed on a first-come, first-served basis, and in order or priority. Give the Laboratory instructions on what to do with portions of the sample that are not used or destroyed in the analyses by checking the appropriate sample disposition box.
January 6, 2006 54

5. SECTION E. Specific Analysis Requested
Under “Specific Analysis Requested,” space is given for three individual pesticides to be named, and three different screens. You will receive data from the laboratory including the amount, tolerance, minimum detectable level (MDL), and internal codes for laboratory tracking purposes.
An area in this section covers swab and dislodgeable samples. Since swab samples of spilled tank mixes or concentrates require special handling, make a note of this on the sample analysis report. The laboratory uses different analytical methods for swabs. Always list the type of solvent used when taking a swab sample. Dislodgeable samples should be given “Priority 1” and marked “Human Health Hazard.” Include the leaf punch size (diameter) and the exact number of leaf punches in the sample.
Results for total residues will be given in Parts Per Million (PPM), unless otherwise requested.
Dislodgeable results will be reported in amount per sample (μg/sample). Surface sample results will be reported in amount per sample (μg/sample). Results for tank mixes or concentrates are given in percentages, unless otherwise requested. The Laboratory Supervisor or chemist performing the analysis will sign and date the form.
b. Sample Analysis Report Evidence Record
1. Sample Information
Print the sample collector's name and sample identification marks; the laboratory will complete the laboratory number.
2. Preservation Method During Transportation
Check the appropriate box for the method of keeping the sample from deteriorating.
3. Container Description
Check the appropriate box for the primary sample container (e.g., paper bag), not the secondary container or the shipping container
4. Transportation Information
Fill out the regional office of origin, means of transportation, and destination sections. Be sure to include the date sent.
5. Signature Block
Certify the sample here.
January 6, 2006 55

6. Custody Record
The sample deliverer and receiver must sign the appropriate boxes in the presence of each other every time the sample changes hands unless the sample is being delivered to or received from CAC storage (i.e. freezer, refrigerator). Record the kind of storage delivered to or received from in the appropriate box. Note the date, time, and purpose of the change in custody. If the Record of Custody is incomplete, the Laboratory cannot legally verify the resulting analysis because of the unknown history of the sample.
If shipping the sample by UPS, FedEx, or USPS, indicate the sample was delivered to the specific carrier location on the date shipped. At a hearing you may have to testify more specifically that you properly packaged and addressed it to the lab with appropriate shipping charges or postage, and how you delivered it to the carrier. The foundation for this procedure as the routine business practice can be laid at a hearing and the carrier can be portrayed as a neutral third party who is in this business and professionally transported the evidence without any motive to tamper with it. The lab can testify (perhaps by document) they received the evidence from the carrier as a routine business practice and the package did not appear to have been tampered with. While the respondent can, and in some cases will, contest this practice and try to call the evidence into question, it will be the job of the hearing officer to consider the reasonableness of the claim. The hearings sourcebook will have further information on how to properly lay the foundation for this kind of evidence.
7. Laboratory Storage
The laboratory chemist will record laboratory storage information on the form.
B. Documentary Evidence Collection
1. Diagrams
Diagrams can provide graphic images of the episode location. Add your information to a copy of existing field maps as diagrams whenever possible as they can provide an accurate layout of the location and already include some of the necessary information.
Record all pertinent information on the diagram. Information to consider adding to the diagram are: the episode site; the pesticide application site; application pattern and direction; wind direction; landmarks such as buildings and roads; crops and their acreages; the location of witnesses; sample sites and numbers; site and direction of photographs. The diagrams should also provide an indication of dimensions and orientation (north is usually up).
January 6, 2006 56
2. Photographs
Photographs provide visual documentation of a situation or object. Photographs showing drift and crop damage are important documentation that an episode occurred. Photographs of product labels provide evidence of the product involved when a detachable label cannot be obtained. Photographs should be labeled with the date and photographer's ID. A brief description describing the photograph should be added. For photographs showing small-scale exhibits, place a scale reference such as a ruler next to the exhibit.
3. Field Notes
Field notes have great value because they were made at the time of the inquiry. They are the basis for the investigative report. The investigative report is only as good as the field notes taken during the investigation of the episode. It is best to structure your notes in chronological order. Entries should begin by identifying the subject matter, date, time, and location of the activity. Other vital information may include the names and title of the injured person, witnesses and employer or employer representative; a description of the episode site; weather conditions; and location and type of samples collected, including the chain of custody. Organized field notes will facilitate the composition of the narrative report by the investigator.
Include all information found in your field notes in the narrative report. After you complete your investigative report, compare it to your field notes. Once the agricultural commissioner accepts the final report, you may destroy your field notes if:
1) You incorporate them in your final report, 2) Destroy them in "good faith", and 3) It is consistent with county policy.
Field notes retained in the normal course of business may be considered public records. Interview questionnaires are not considered field notes as it is generally impractical to include all the information from the questionnaires in the written report. Attach the interview questionnaires to the investigative report.
January 6, 2006 57