ice•device ice management systems - webstaurantstore · 4 welcome to follett follett ice storage...
TRANSCRIPT
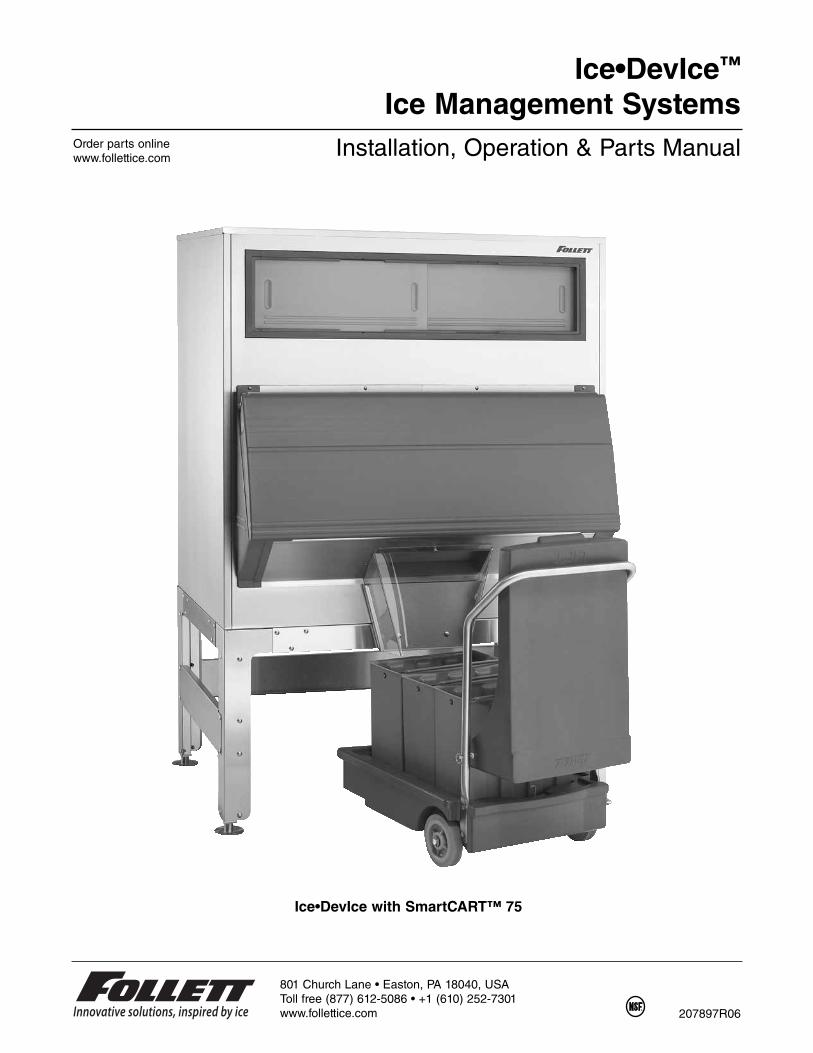
Ice•DevIce™
Ice Management Systems
207897R06
801 Church Lane • Easton, PA 18040, USA
Toll free (877) 612-5086 • +1 (610) 252-7301
www.follettice.com
Installation, Operation & Parts Manual
Ice•DevIce with SmartCART™ 75
Order parts online
www.follettice.com

2

3
Contents
Welcome to Follett. . . . . . . . . . . . . . . . . . . . . . . . . . . . . . . . . . . . . . . . . . . . . . . . . . . . . . . . . . . . . . . . . . . . . . . . . . . 4
Before you begin . . . . . . . . . . . . . . . . . . . . . . . . . . . . . . . . . . . . . . . . . . . . . . . . . . . . . . . . . . . . . . . . . . . . . . . . . 4
Product descriptions . . . . . . . . . . . . . . . . . . . . . . . . . . . . . . . . . . . . . . . . . . . . . . . . . . . . . . . . . . . . . . . . . . . . . . . . 4
Installation . . . . . . . . . . . . . . . . . . . . . . . . . . . . . . . . . . . . . . . . . . . . . . . . . . . . . . . . . . . . . . . . . . . . . . . . . . . . . . . . . 6
A. Removing lower door assembly (if needed) . . . . . . . . . . . . . . . . . . . . . . . . . . . . . . . . . . . . . . . . . . . . . . . . . . . 6
B. Reinstalling door assembly . . . . . . . . . . . . . . . . . . . . . . . . . . . . . . . . . . . . . . . . . . . . . . . . . . . . . . . . . . . . . . . 6
C. Installing base section . . . . . . . . . . . . . . . . . . . . . . . . . . . . . . . . . . . . . . . . . . . . . . . . . . . . . . . . . . . . . . . . . . . 7
D. Installing single section bin . . . . . . . . . . . . . . . . . . . . . . . . . . . . . . . . . . . . . . . . . . . . . . . . . . . . . . . . . . . . . . . 7
E. Installing two-section bins . . . . . . . . . . . . . . . . . . . . . . . . . . . . . . . . . . . . . . . . . . . . . . . . . . . . . . . . . . . . . . . . 7
F. Installing bin section . . . . . . . . . . . . . . . . . . . . . . . . . . . . . . . . . . . . . . . . . . . . . . . . . . . . . . . . . . . . . . . . . . . . . 8
G. Installing 8" (204mm) plastic chute . . . . . . . . . . . . . . . . . . . . . . . . . . . . . . . . . . . . . . . . . . . . . . . . . . . . . . . . . 9
H. Installing 4" (102mm) plastic chute . . . . . . . . . . . . . . . . . . . . . . . . . . . . . . . . . . . . . . . . . . . . . . . . . . . . . . . . . 9
I. Installing icemaker drain . . . . . . . . . . . . . . . . . . . . . . . . . . . . . . . . . . . . . . . . . . . . . . . . . . . . . . . . . . . . . . . . . . 9
J. Installing icemaker tie-downs . . . . . . . . . . . . . . . . . . . . . . . . . . . . . . . . . . . . . . . . . . . . . . . . . . . . . . . . . . . . . . 9
K. Final connections (for all models) . . . . . . . . . . . . . . . . . . . . . . . . . . . . . . . . . . . . . . . . . . . . . . . . . . . . . . . . . . 9
Bin operation . . . . . . . . . . . . . . . . . . . . . . . . . . . . . . . . . . . . . . . . . . . . . . . . . . . . . . . . . . . . . . . . . . . . . . . . . . . . . . 10
General operation of unit . . . . . . . . . . . . . . . . . . . . . . . . . . . . . . . . . . . . . . . . . . . . . . . . . . . . . . . . . . . . . . . . . . 10
Adjusting SmartGATE . . . . . . . . . . . . . . . . . . . . . . . . . . . . . . . . . . . . . . . . . . . . . . . . . . . . . . . . . . . . . . . . . . . . . 10
Using tools . . . . . . . . . . . . . . . . . . . . . . . . . . . . . . . . . . . . . . . . . . . . . . . . . . . . . . . . . . . . . . . . . . . . . . . . . . . . . 11
Cleaning Ice•DevIce . . . . . . . . . . . . . . . . . . . . . . . . . . . . . . . . . . . . . . . . . . . . . . . . . . . . . . . . . . . . . . . . . . . . . . . . 11
Exterior care . . . . . . . . . . . . . . . . . . . . . . . . . . . . . . . . . . . . . . . . . . . . . . . . . . . . . . . . . . . . . . . . . . . . . . . . . . . . 11
Interior care . . . . . . . . . . . . . . . . . . . . . . . . . . . . . . . . . . . . . . . . . . . . . . . . . . . . . . . . . . . . . . . . . . . . . . . . . . . . . 11
Technical assistance available toll free . . . . . . . . . . . . . . . . . . . . . . . . . . . . . . . . . . . . . . . . . . . . . . . . . . . . . . . . 11
Assembly, operation and cleaning of Ice•DevIce carts and accessories . . . . . . . . . . . . . . . . . . . . . . . . . . . . . 12
SmartCART 75 . . . . . . . . . . . . . . . . . . . . . . . . . . . . . . . . . . . . . . . . . . . . . . . . . . . . . . . . . . . . . . . . . . . . . . . . . . 12
SmartCART 125 . . . . . . . . . . . . . . . . . . . . . . . . . . . . . . . . . . . . . . . . . . . . . . . . . . . . . . . . . . . . . . . . . . . . . . . . . 14
Cambro ICS125L Cart . . . . . . . . . . . . . . . . . . . . . . . . . . . . . . . . . . . . . . . . . . . . . . . . . . . . . . . . . . . . . . . . . . . . 15
Bagger Accessory . . . . . . . . . . . . . . . . . . . . . . . . . . . . . . . . . . . . . . . . . . . . . . . . . . . . . . . . . . . . . . . . . . . . . . . . 16
Totes ice carrier for low-profi le Ice•DevIce unit . . . . . . . . . . . . . . . . . . . . . . . . . . . . . . . . . . . . . . . . . . . . . . . . . 17
Replacement parts . . . . . . . . . . . . . . . . . . . . . . . . . . . . . . . . . . . . . . . . . . . . . . . . . . . . . . . . . . . . . . . . . . . . . . . . . 18
Bin replacement parts . . . . . . . . . . . . . . . . . . . . . . . . . . . . . . . . . . . . . . . . . . . . . . . . . . . . . . . . . . . . . . . . . . . . 18
Bin door replacement parts . . . . . . . . . . . . . . . . . . . . . . . . . . . . . . . . . . . . . . . . . . . . . . . . . . . . . . . . . . . . . . . . 19
COR accessory package replacement parts – Ice•DevIce with elevated base for correctional facilities . . . . .20
SmartCART 75 replacement parts (stainless drain tray base) . . . . . . . . . . . . . . . . . . . . . . . . . . . . . . . . . . . . .20
New SmartCART 75 replacement parts (roto-molded drain tray base) . . . . . . . . . . . . . . . . . . . . . . . . . . . . . . .21
SmartCART 125 and Cambro ICS125 replacement parts . . . . . . . . . . . . . . . . . . . . . . . . . . . . . . . . . . . . . . . . .21
Manual bagger replacement parts . . . . . . . . . . . . . . . . . . . . . . . . . . . . . . . . . . . . . . . . . . . . . . . . . . . . . . . . . . .22

4
Welcome to FollettFollett ice storage bins enjoy a well-deserved reputation for excellent performance, long-term reliability and
outstanding labor-saving and sanitation benefi ts. To ensure that your ice management system delivers this same
degree of service, please read this manual carefully before installing or operating the system. If you have any
questions or require technical help at any point, please call our technical service group at (877) 612-5086, or
+1 (610) 252-7301.
Before you begin After uncrating, remove all packing material and inspect the ice management system and accessories for shipping
damage. If damage is found, notify the shipper immediately and contact Follett so that we can help in the fi ling of a
claim, if necessary.
DEV_ _ _ _ SG- _ _ -BG
Ice•DevIce with
bagger accessory:
• Ice storage bin
• 24" (610mm) high base
• 4" (102mm) plastic ice chute
• Bagger accessory kit
• Ice probe and rake tools
DEV_ _ _ _ SG- _ _ -LP
Low-profi le Ice•DevIce
• Ice storage bin
• 10" (254mm) legs
• 4" (102mm) plastic ice chute
• 1 Totes ice carrier
• Ice probe and rake tools
Product descriptionsCheck your paperwork and enclosed accessories to determine which ice management system you have. Follett
numbers are designed to provide information about the type and capacity of Follett products. Following is an
explanation of the different variations in the Ice•DevIce Ice Management Systems series.
DEV1010SG-48-75
Width of bin in inches
Unit equipped with inner SmartGATE™
Approximate maximum bin capacity in lbs
Designates Ice•DevIce
Cart or
accessory type: 75 = SmartCART 75 LP = Low Profi le
125 = SmartCART 125 BG = Bagger accessory
ICS125 = Cambro ICS125L Cart
Verify that all parts have been shipped. You should have received the following:
DEV_ _ _ _ SG- _ _
Ice•DevIce for correctional
facilities with accessory
#00917054
• Ice storage bin
• 37" (940mm) high base
• 8" (204mm) plastic ice chute
• Ice probe and rake tools

5
Important cautions and operating rules
Read this manual completely before assembling or operating the ice
management system and follow cautions and instructions listed below.
To avoid damage to ice management system and injury during operation: • Top is NOT fastened to bin
• Do not move ice management system once icemaker has been installed
• Anchor fl anged feet to fl oor as instructed
• Base section must be bracketed to wall
• Use only tools provided to assist ice fl ow
• Use cart only to transport ice
To avoid injury during operation of unit:• Keep entire body clear of bin when breaking up ice
• Keep head and face away from tools when breaking up ice
• Keep fl oor around bin free of ice and water
• Always operate cart at a slow, reasonable speed
For best operation and to ensure delivery of clean, sanitary ice:• Be sure bin is level in both directions to provide proper drainage
• Position cart, Totes ice carrier or bagger below chute before operating chute door
• Install a charcoal water fi lter on inlet water for icemaker
• Hang tools in supplied bracket after each use
• Keep tools clean and in good repair to avoid ice contamination
• Follow instructions in this manual for proper cleaning and maintenance
!
DEV _ _ _ _ SG-_ _-75
Ice•DevIce with
SmartCART 75:
• Ice storage bin
• 24" (610mm) high base
• 8" (203mm) plastic ice chute
• Ice cart with three Totes ice
carriers
• Ice probe and rake tools
DEV _ _ _ _ SG-_ _-125
Ice•DevIce with
SmartCART 125:
• Ice storage bin
• 24" (610mm) high base
• 4" (102mm) plastic ice chute
• Insulated plastic ice transport
cart with hinged lid
• Ice probe and rake tools
DEV _ _ _ _ SG-_ _-ICS125
Ice•DevIce with
Cambro ICS125L:
• Ice storage bin
• 24" (610mm) high base
• 4" (102mm) plastic ice chute
• Insulated plastic ice transport
cart with hinged lid
• Ice probe and rake tools

6
InstallationIf unit does not fi t through door, lower door assembly can be removed (see steps A and B below). If door removal
is not necessary, proceed to step C.
A. Removing lower door assembly (if needed)1. With lower access door closed remove Phillips head screw and washer from hinge on each side of
lower access door.
2. Insert screwdriver between door and hinge bracket on one side of door and gently push against bracket
to provide room for door stud to clear bracket.
3. Remove access door.
4. Disengage stop latch on right side of SmartGATE™ and pull up on gate to remove.
5. Remove 4 screws (3 screws for 27" (686mm) snout) on hood above door assembly.
6. Pull forward on assembly to remove.
B. Reinstalling door assembly 1. Reinstall lower door assembly in bin opening. (Do not disturb gasket around opening.)
2. Reinstall four (4) screws (3 screws for 27" (686mm) snout) in hood at top of door assembly.
3. Reinstall SmartGATE in side panel tracks and push down to seat.
4. With door closed insert one door stud through hinge bracket, install washer, screw and tighten.
Note: For proper operation the access door must be reinstalled in the closed position.
5. On other side, insert screwdriver between door and hinge bracket and gently push against bracket to
provide room for door stud to clear bracket.
6. Reinstall washer and screw in lift door and tighten.
7. Check door to ensure proper operation.
access door
SmartGATE
ice chute
ice chute gate
lower door assembly
side panel

7
C. Installing base section (Ice•DevIce models with SmartCART 75, 125, Cambro* ICS125, bagger accessory or correctional
package)
1. Remove screws holding base to skid and remove skid.
2. Position base in intended position and adjust feet to level in both directions.
3. For models with SmartCART 75: Adjust feet and level base so that there is no interference between
base and cart when cart is rolled under base with lid closed.
4. Mark position of each fl anged foot anchoring hole.
5. Move base section out of the way and install anchors for 1/4" bolts in fl oor (supplied by others).
6. Reposition unit in its intended position.
7. Anchor base unit to fl oor through fl anged feet.
8. Anchor base to wall using brackets and fasteners (supplied by others).
9. Use holes in side of base section to connect brackets.
10. Mark hole locations on wall.
11. Drill holes if needed.
12. Fasten brackets to base and wall.
D. Installing single section bin
(for Ice•DevIce models with SmartCART 75, 125, Cambro ICS125 or bagger accessory)
1. Remove all packaging material from bin.
2. Remove any accessories packed inside bin.
3. Remove top from bin.
4. Lay bin on its back being careful to protect fi nish, and remove bolts holding skid to bin.
5. Install bin section on base.
6. Place supplied 1-3/4" washers on supplied bolts and install bolts up through base and into bin at each
corner. Do not use skid bolts.
7. For model DEV2250 only, use supplied plugs to close bolt holes in bin back to prevent contamination of
insulation.
8. Remove protective covering from exterior.
9. Reinstall top onto bin.
10. Use supplied screws with power driver to install tool bracket in holes on either side of Ice•DevIce.
11. Mount icemaker(s) on top of bin section in accordance with icemaker manufacturer's instructions.
12. For models COR base must be bracketed to wall.
E. Installing two-section bins
(for Ice•DevIce models with SmartCART 75, 125, Cambro ICS125 or bagger accessory)
1. Remove all packing material from both sections
of bin.
2. Remove any accessories packed inside lower section
of bin.
3. Set lower section upright and remove bolts holding
skid to back of bin.
4. To prevent contamination of insulation, use supplied
plugs to close bolt holes in bin back.
5. Install bin on base.
6. Place supplied 1-3/4" washers on supplied bolts and
install bolts up through base and into bin at each
corner. Do not use skid bolts.
7. Remove protective covering from stainless steel
surfaces.
8. Using provided caulking gun and one of two (2) 10
oz tubes of sealant provided, run a 1/8" (3mm) bead of silastic sealant over center of each band of
gasketing on lower section, including over brackets (Fig.1).
9. Remove bolts holding skid to upper section back and close holes with supplied plugs.
10. Position upper section over lower section.
* Cambro is a registered trademark of Cambro Manufacturing Company in the United States and other countries.
lower
section
gasket
bead of sealant
gasket
Fig. 1upper
section

11. Lower upper section onto lower section, taking care not to disturb gasketing material and sealant beads.
12. Remove protective covering from stainless steel surfaces.
13. Install icemaker according to manufacturer’s instructions.
14. From inside bin (access can be gained through lower door assembly) seal entire perimeter of seam
between upper and lower sections with General Electric RTV 180 sealant provided (Figs. 2, 3).
15. Install supplied screws on side H-bracket and tighten, then seal entire perimeter of H-bracket with silastic.
16. Use supplied screws with a power driver to install tool bracket in holes on either side of Ice•DevIce.
17. Insert short side of inspection window through notch in upper and lower track and continue to rear groove.
Repeat with second window only to front groove.
18. Remove any remaining protective covering or temporary fastenings from doors and outside of bin.
F. Installing bin section(for low-profi le Ice•DevIce models only)
1. Remove all packing material from bin.
2. Remove set of four legs and any other accessories packed inside bin.
3. Remove top from bin.
4. Lay bin on its back being careful to protect fi nish and remove bolts holding skid to bin.
5. Screw legs into tapped holes in bin bottom and tighten to seat legs well against bottom.
6. Set bin upright.
7. Remove protective covering from exterior.
8. Move bin to permanent location.
9. Adjust “foot” at bottom of each leg to level bin in both directions.
10. Mark position of each fl anged foot anchoring hole.
11. Move base section out of the way and install anchors
for 1/4" bolts in fl oor (supplied by others).
12. Reposition unit in its intended position.
13. Anchor base unit to fl oor through fl anged feet.
14. Mount ice maker.
8
upper section
lower section
bin exterior bin interior
Seal entire inside
of upper and lower
section seams and
entire perimeter
of H-bracket with
silastic provided.
H-bracket
screw
bead of sealant
Completely cover gasket material with sealant. Failure to properly seal sections may
result in leakage and/or ice contamination, and will void warranty.!
Fig. 2 – Cross Section, Side View Fig. 3 – Bin Cutaway
Follow Steps 11 - 15 to anchor upper and lower sections of all two-section upright
bins. Brackets must be installed to avoid possible injury should unit move. !

G. Installing 8" (204mm) plastic chute
(for Ice•DevIce models with SmartCART 75, COR package)
1. Orient stainless chute bracket with open end of bracket tabs facing
down.
2. Insert supplied 1/2" 1/4-20 carriage head bolts through bracket and
base and hand tighten only.
3. Gently push on sides of plastic chute to fi t inside bracket, inserting
bracket tabs into slots in plastic chute.
4. Push up on plastic chute to align holes and secure with supplied
thumbscrew.
5. Tighten carriage bolts holding bracket.
H. Installing 4" (102mm) plastic chute
(for Ice•DevIce models with SmartCART 125, 240 or bagger accessory, and low-profi le units)
1. Orient stainless steel chute bracket with open end of bracket tabs facing down.
2. Loosely fasten bracket with two thumbscrews provided through holes into lower door assembly.
3. Install plastic chute into bracket, making sure screw hole is oriented at top.
4. Align hole in chute and bracket with threaded hole in lower door assembly and fasten with thumbscrew.
5. Tighten all thumbscrews.
I. Installing icemaker drain Required for some icemakers only. For these machines Follett predrills hole
and provides 3/4" straight threaded drain fi tting to be installed through hole.
To install fi tting:
1. Remove plastic nut on fi tting.
2. From inside (liner side) bin, insert threaded portion through hole
provided in side of bin.
3. Replace plastic nut on threaded portion and tighten against outside
of bin.
4. Connect supplied tubing to icemaker drain connection after
installing icemaker.
J. Installing icemaker tie-downs Required for some icemaker applications only. If this fi tting is included with
your bin, proceed as follows:
1. Align icemaker back fl ush with bin back.
2. Using center of vertical slot as template, drill through icemaker
wall with a 15/64 drill.
3. Fasten straps to icemaker and bin (bin holes are predrilled) with
#14 x 1/2 sheet metal screws and washers provided.
K. Final connections (for all models)
1. Install supplied 1" elbow into drain fi tting under bin.
2. Connect customer supplied length of vinyl tube to barb end and route to either side or rear of bin (so not
to interfere with cart movement).
3. Make fi nal connections to icemaker.
9
Avoid excessive tightening when connecting to this fi tting.!
Fig. 5
bracket
chute
Fig. 4

10
Bin operation
General operation of unit
Ice in the hopper section of the ice management system falls through the ice chute in front of the bin and into the
cart, Totes ice carrier or bag when the chute gate is pulled up. The fl ow of ice is stopped by pushing down on the
chute gate. The SmartGATE restricts the fl ow of ice into the hopper area and can be adjusted and locked at one of
several levels to accommodate the fl ow characteristics of different types of ice.
Adjusting SmartGATE
The bin is shipped with the inner SmartGATE in the full down position, the best position for slippery cubes which
fl ow well into the hopper through the cut-out in the bottom of the gate. For less slippery ices, the SmartGATE can
be raised and locked in a higher position for better fl ow or when more access is needed.
1. Use full-length handle at top of SmartGATE to pull gate up.
(Loose ice will cascade into hopper.)
2. If adequate ice has moved into hopper, push gate back down.
3. To lock gate at a higher level, pull up and hold gate at correct
level (catch will automatically release when you pull up), and
push tapered end of catch into nearest hole in gate.
4. To release catch, pull up on gate.
Note: SmartGATE and ice chute gate must both be in full
down position before access door can be closed.
lift door
inspection window
(not visible)
SmartGATE
ice chuteice chute gate
SmartGATE catch
cart drain handleTotes ice carrier
cart
lower door frame
assembly
hopper area
Pull up on SmartGATE handle to
adjust SmartGATE level

11
Using toolsTwo tools — a paddle and a rake — ship with the Ice•DevIce and should be mounted for
easy access on either side of the bin in the bracket provided.
Using paddle
If there is adequate ice in Ice•DevIce but hopper is not fi lled with ice, it may be that
ice has congealed behind SmartGATE and cannot fl ow into hopper. This can often be
remedied by simply opening and closing SmartGATE several times (see adjusting
SmartGATE, above.) If problem continues, the paddle can be inserted through rectangular
openings in SmartGATE and moved back and forth to break bridge.
Using rake
When Ice•DevIce is almost empty of ice, there will not be enough ice piled in hopper area
to allow chute to work. In this case, rake can be used to pull ice forward into hopper area.
Cleaning Ice•DevIce
Exterior careThe stainless steel exterior of the bin can be cleaned with a stainless cleaner such as 3M* Stainless Steel
Cleaner & Polish or equivalent.
Interior careThe polyethylene liner should be cleaned and sanitized periodically with any product suitable for use in a food
zone.
Technical assistance available toll freeShould you have any questions concerning the installation or maintenance of Follett ice storage bins, please call
our technical service department at (877) 612-5086 or +1 (610) 252-7301 between 8 a.m. and 5 p.m. Eastern
time.
* 3M is a trademark of 3M Company.
Interior of bin must be cleaned and sanitized prior to use. A regular schedule of cleaning
maintenance is recommended following installation to ensure cleanliness of delivered ice.!
Use tools only as described. To avoid possible injury, keep head and face clear of hopper area
and tools at all times. Do not use tools for other purposes.!
12
Assembly, operation and cleaning of Ice•DevIce carts and accessoriesThe following assembly, operation and cleaning instructions have been divided into fi ve parts. Use the section
pertaining to the carts and accessories purchased with your Ice•DevIce unit.
SmartCART 75Assembly
1. Remove installation hardware from poly bag taped to Totes ice carrier.
2. Place cart handle ends along holes at the back of cart base. Align handle end holes with small holes in
sides of cart.
3. Tighten bolts securely.
4. Position lid onto cart in between handles. From outside cart
handle, insert 1.5" pivot pins through handle and lid bushings.
5. Push down on L-shaped cart drain handle and confi rm that it seats
in hole in cart bottom.
6. Arrange plastic Totes ice carriers in cart (longer dimension parallel
with cart handle) and check that lid clears ice carriers when in
down position.
Operation
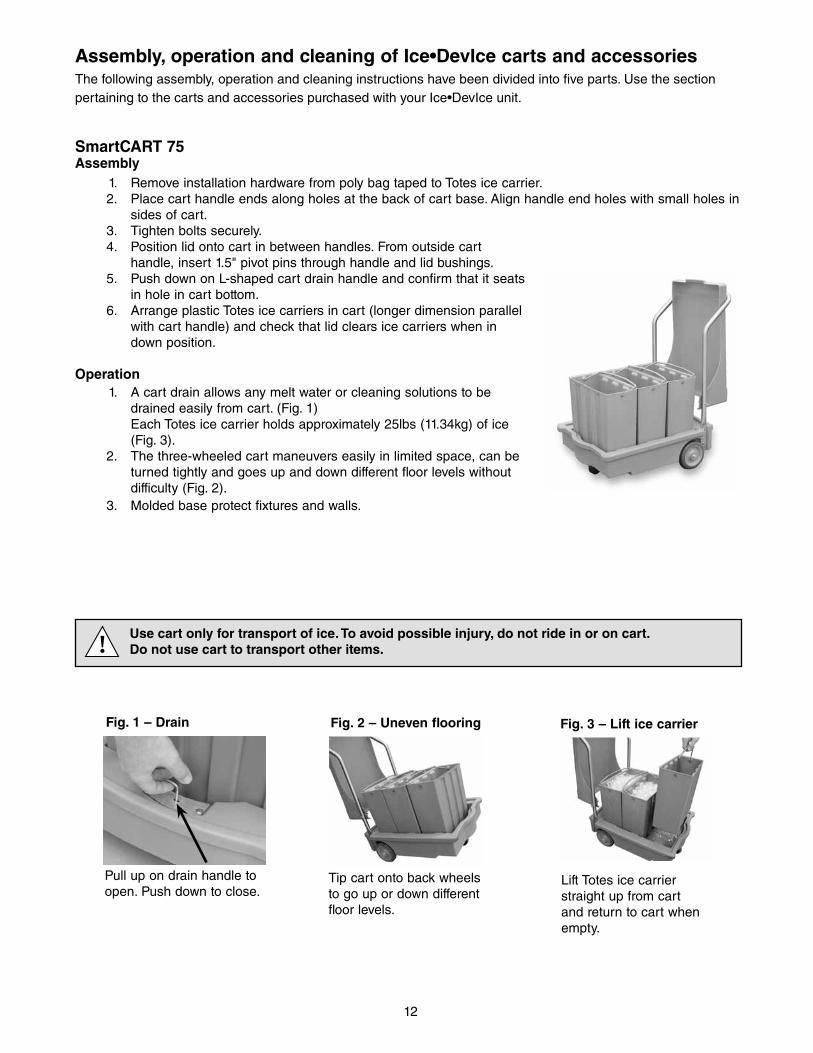
1. A cart drain allows any melt water or cleaning solutions to be
drained easily from cart. (Fig. 1)
Each Totes ice carrier holds approximately 25lbs (11.34kg) of ice
(Fig. 3).
2. The three-wheeled cart maneuvers easily in limited space, can be
turned tightly and goes up and down different fl oor levels without
difficulty (Fig. 2).
3. Molded base protect fi xtures and walls.
Use cart only for transport of ice. To avoid possible injury, do not ride in or on cart.
Do not use cart to transport other items.!
Pull up on drain handle to
open. Push down to close.Tip cart onto back wheels
to go up or down different
fl oor levels.
Lift Totes ice carrier
straight up from cart
and return to cart when
empty.
Fig. 1 – Drain Fig. 2 – Uneven fl ooring Fig. 3 – Lift ice carrier

Filling Totes ice carriers
1. Lift lid. Position ice carrier closest to cart handle under ice chute.
2. Open lift door and confi rm there is ample ice in hopper area. If not,
see previous sections on adjusting SmartGATE and using tools.)
3. Pull chute gate up to start fl ow of ice into ice carrier.
4. When ice carrier is almost full, push chute gate down to stop fl ow.
(Some ice will continue to fall as chute gate closes. Leave room in
ice carrier for this in-fl ight ice to avoid spillage.)
5. Pull cart forward until next ice carrier is under chute and repeat steps
3 and 4.
6. Check that cart drain is closed and wheel cart to usage area.
Note: For better cart stability when removing Totes ice carriers:
remove ice carrier closest to cart handle fi rst, then proceed to middle
ice carrier, ending with ice carrier farthest from cart handle.
13
The Totes ice carrier must be cleaned and sanitized prior to use. A regular schedule of
cleaning maintenance is recommended following installation to ensure cleanliness of
delivered ice. Do not run ice carrier through any dishwashing system.!
Pull up on chute gate to allow ice to
fl ow into ice carrier
Cleaning
The polyethylene Totes ice carrier should be cleaned and sanitized periodically with any product suitable for use
in a food zone.

SmartCART 125Assembly
The cart will arrive to you fully assembled. Check that the drip shelf inside
the cart is horizontal, with the hole oriented toward the front.
Operation
1. The cart is highly maneuverable with two swivel casters in front.
2. The polyethylene construction is resistant to damage
from normal use, and prevents it from marring walls and fi xtures.
3. A hand valve at the front of the cart allows melt water or cleaning
solutions to be easily drained from the cart. The valve has a
threaded fi tting, allowing a hose to be connected, if desired.
4. The cart is capable of holding approximately 125 lbs (56.7kg) of ice.
Filling cart
1. Open cart lid and position cart directly under ice chute.
2. Open lift door and confi rm that there is enough ice in hopper area. (If not, see previous sections on
“adjusting SmartGATE” and “using tools”.)
3. Pull chute gate up to start fl ow of ice into cart.
4. When cart is almost full, push gate down to stop fl ow. (Some ice will continue to fall as chute gate closes.
Leave room in cart for this in-fl ight ice to avoid spillage.)
5. Check that drain valve is closed.
6. Wheel cart to usage area. Lock caster before unloading
Cleaning
1. The cart can be cleaned using a mild detergent and a soft brush, taking care not to mark the surface.
2. If stains appear, a mild cleaning compound can be used.
3. Periodic cleaning and sanitizing should be done with any product
suitable for use in a food zone.
4. Remove and clean faucet regularly. Use a small brush to access faucet body and spout. Replace
faucet properly to avoid leaks.
14
Clean and sanitize cart interior prior to use and on regular schedule as needed thereafter
to ensure cleanliness of delivered ice.!

Cambro ICS125L CartAssembly
The cart will arrive to you fully assembled. Check that the drip shelf inside the
cart is horizontal, with the hole oriented toward the front.
Operation
1. The cart is highly maneuverable with two swivel casters in front.
2. The polyethylene construction is resistant to damage
from normal use, and prevents it from marring walls and fi xtures.
3. A hand valve at the front of the cart allows melt water or cleaning
solutions to be easily drained from the cart. The valve has a
threaded fi tting, allowing a hose to be connected, if desired.
4. The cart is capable of holding approximately 125 lbs (56.7kg) of ice.
Filling cart
1. Open cart lid and position cart directly under ice chute.
2. Open lift door and confi rm that there is enough ice in hopper area. (If not, see previous sections on
“adjusting SmartGATE” and “using tools”.)
3. Pull chute gate up to start fl ow of ice into cart.
4. When cart is almost full, push gate down to stop fl ow. (Some ice will continue to fall as chute gate closes.
Leave room in cart for this in-fl ight ice to avoid spillage.)
5. Check that drain valve is closed.
6. Wheel cart to usage area. Lock caster before unloading
Cleaning
1. The cart can be cleaned using a mild detergent and a soft brush, taking care not to mark the surface.
2. If stains appear, a mild cleaning compound can be used.
3. Periodic cleaning and sanitizing should be done with any product
suitable for use in a food zone.
4. Remove and clean faucet regularly. Use a small brush to access faucet body and spout. Replace
faucet properly to avoid leaks.
15
Clean and sanitize cart interior prior to use and on regular schedule as needed thereafter
to ensure cleanliness of delivered ice.!

16
Bagger AccessoryAssembly
1. Attach tape dispenser to left side of bagger assembly for
right-handed users using two screws provided.
For left-handed users, attach to right side.
2. Center tape roll on tape drum Fig. 7, as shown, to dispense
tape with adhesive side up.
3. Place tape drum with tape in slot Fig. 8 and pull tape lead end
forward to front edge of bag sealer.
For ease of use, the bagger assembly can be attached to the bin
using a Velcro strip that has been provided on the back of the
bagger. Clean the front of the base under the chute of all dirt and
oil, peel the backing off the Velcro strip to expose the adhesive,
and press the bagger assembly against the base.
Operation
1. The bagger accessory is used to fi ll 10 lb (4.65kg) bags of ice
easily and with minimal spillage (optional 8 lb (363kg) bags
are also available when reordering).
2. A “fl ag” type of seal, using the enclosed tape dispenser, is
formed by a single strip of pressure-sensitive tape that
encircles the neck of the bag.
Filling bags with ice and sealing:
1. Position bagger assembly in front of bin below ice chute.
2. Hang wicket with bag on bracket behind white plastic funnel of
bagger accessory.
3. Pull one bag open under white funnel.
4. Open bin door and pull up on ice chute gate to dispense ice.
5. Begin to close gate when bag is about half full.
6. To seal ice bag, twist neck of bag to be sealed and position at
90-degree angle over bag slot Fig 9., as shown.
7. Move bag neck downward to bottom of slot and pull sideways
to remove sealed bag neck from bag sealer.
Cleaning
1. The plastic funnel should be cleaned and sanitized periodically
with any product suitable for use in a food zone.
2. The aluminum stand can be cleaned with mild detergent.
Fig. 7
Fig. 8
Fig. 9
Fig. 6

17
Totes ice carrier for low-profi le Ice•DevIce unitAssembly
The Totes ice carrier requires no assembly.
Operation
1. The polyethylene construction of the ice carrier makes it light and
very resistant to damage from normal use.
2. The handle makes it convenient to transport up to 25 lbs (11.34kg)
of ice and the shape of the ice carrier makes pouring easy.
Filling Totes ice carrier
1. Position ice carrier under ice chute.
2. Open lift door and confi rm there is enough ice in hopper area.
(If not, see previous sections on “adjusting SmartGATE” and “using
tools”.)
3. Pull ice chute gate up to start fl ow of ice into ice carrier.
4. When ice carrier is almost full, push chute gate down to stop fl ow. (Some ice will continue to fall as chute
gate closes. Leave room in ice carrier for this in-fl ight ice to avoid spillage.)
5. Close lift door and carry ice carrier to usage area.
The polyethylene ice carrier should be cleaned and sanitized periodically with any product suitable for use in a
food zone. DO NOT RUN ICE CARRIER THROUGH A DISHWASHER.
Note: If you purchased a SmartCART 75 for use with your low-profi le Ice•DevIce, see pages 11 and 12 for
assembly, operation and cleaning instructions.

18
1
2
3
6
79
8
10
4
5
Part # Description Reference number
502176 Door, outer lift, 28" (686mm), (includes door hinges and hardware) 1
502177 Door, outer lift, 45" (1067mm), (includes door hinges and hardware) 1
502180 Hinges, pair (includes mounting hardware) 2
502218 Retainer, SmartGATE (includes shoulder screw) 3
502237 Inspection window 21.125" x 8.625" (537mm x 220mm) 4
502264 Inspection window 12.5" x 9" (318mm x 229mm) 4
501401 Track, inspection window (use with 502264 window) 5
501100 Thumbscrews, plastic chute 6
502373 Chute, plastic, long, 8" (204mm) 7
502554 Chute, plastic, short, 4" (102mm) Not shown
502374 Chute bracket (includes hardware), long, 8" (204mm) 8
502555 Chute bracket (includes hardware), short, 4" (102mm) Not shown
502281 Hardware, chute bracket, long, 8" (204mm) 9
502556 Hardware, chute bracket, short, 4" (102mm) Not shown
502196 Flanged foot (one) 10
502639 Probe, ice, 36" (915mm) Not shown
502952 Rake, ice, 36" (915mm) Not shown
502872 Bracket, ice rake Not shown
502557 Legs, 10" (254mm), low-profi le (set of 4) Not shown
502064 Bracket, hanging, ice probe Not shown
00109538 Elbow, bottom drain Not shown
Replacement parts
Bin replacement parts

19
Part # Description Reference number
502178 Hinge assembly, left-hand (mounts to lift door) 1
502179 Hinge assembly, right-hand (mounts to lift door) Not shown
502185 Locking catch, SmartGATE (includes shoulder screw) 2
00131649 Ice chute gate, 28" (712mm) wide door 3
00127506 Ice chute gate, 45" (1143mm) wide door 3
502367 SmartGATE, 28" (712mm) wide door 4
502363 SmartGATE, 45" (1143mm) wide door 4
502176 Lift door, 28" (712mm) wide (includes 502178 & 502179) 5
502177 Lift door, 45" (1143mm) wide (includes 502178 & 502179) 5
502371 Lower door frame assy (for use with 28" (712mm) door frame assembly) 7
502372 Lower door frame assy (for use with 45" (1143mm) door frame assembly) 7
502180 Hinges, pair (includes mounting hardware) 8
1
2
3
4
5
7
8
Bin door replacement parts

20
Part # Description Reference number
502197 Handle, cart 1
502198 Screws, cart handle mounting Not shown
502203 Lid, cart (includes mounting hardware) 2
502204 Stud, pivot (1 pair), cart lid 3
502263 Totes ice carrier, non-draining (one) 4
502097 Handle, Totes ice carrier 5
502201 Wheel, front, cart 6
502200 Wheel, rear, cart 7
502572 Drain tray 8
502199 Bumper, cart (pair) Not shown
502202 Drain assembly, cart Not shown
1
5
2
4
67
3
8
COR accessory package replacement parts – Ice•DevIce with elevated base for
correctional facilities
Part # Description Reference number
00111377 45” poly door prison package Not shown
00111385 28” poly door prison package Not shown
00111393 Door, upper lock bracket (left and right set) Not shown
00111401 End panel prison package (left and right set) Not shown
SmartCART 75 replacement parts (stainless drain tray base)

21
Part # Description Reference number
00115634 Handle with hardware 1
00115642 Lid with hardware 2
502204 Stud, pivot (1 pair), cart lid 3
00115659 Drain assembly, cart 4
00115667 Axle with cotter pins and washers 5
00115683 Plate, axle (2 required) 6
00134908 6" wheel with cotter pin and washer 7
502569 Wheel, front of cart 8
502263 Totes ice carrier, non draining (one) 9
502097 Handle, Totes ice carrier 10
SmartCART 125 and Cambro ICS125 replacement parts
For replacement parts contact Follett technical service group, (877) 612-5086 or +1 (610) 252-7301.
1
2
10
9
57
6
8
3
4
New SmartCART 75 replacement parts (roto-molded drain tray base)

Manual bagger replacement parts
For replacement parts, tape and bags contact:
The Ice Box Company at (800) 632-3039.
22

23

801 Church Lane • Easton, PA 18040, USA
Toll free (877) 612-5086 • +1 (610) 252-7301
www.follettice.com
207897R06
02/11
Ice•DevIce, SmartCART, SmartGATE, and Totes are trademarks of Follett Corporation.
Chewblet and Follett are registered trademarks of Follett Corporation, registered in US.