ibmtivoli storage manager forwindows version...
TRANSCRIPT

IBM Tivoli Storage Managerfor WindowsVersion 7.1.1
Installation Guide
���


IBM Tivoli Storage Managerfor WindowsVersion 7.1.1
Installation Guide
���

Note:Before using this information and the product it supports, read the information in “Notices” on page 233.
Second edition (September 2014)
This edition applies to version 7, release 1, modification 1 of IBM Tivoli Storage Manager (product numbers5608-E01, 5608-E02, 5608-E03), and to all subsequent releases and modifications until otherwise indicated in neweditions.
© Copyright IBM Corporation 1993, 2014.US Government Users Restricted Rights – Use, duplication or disclosure restricted by GSA ADP Schedule Contractwith IBM Corp.

Contents
About this publication . . . . . . . . viiWho should read this guide . . . . . . . . . viiInstallable components . . . . . . . . . . viiPublications . . . . . . . . . . . . . . ix
New for Tivoli Storage Manager Version7.1.1 . . . . . . . . . . . . . . . . xi
Part 1. Installing and upgrading theserver . . . . . . . . . . . . . . . 1
Chapter 1. Planning to install the TivoliStorage Manager server . . . . . . . . 3What you should know first . . . . . . . . . 3System requirements for the Tivoli Storage Managerserver. . . . . . . . . . . . . . . . . 4IBM Installation Manager . . . . . . . . . . 6Worksheets for planning details for the Tivoli StorageManager server . . . . . . . . . . . . . 7Capacity planning . . . . . . . . . . . . 8
Estimating space requirements for the database. . 8Recovery log space requirements . . . . . . 12Monitoring space utilization for the database andrecovery logs . . . . . . . . . . . . . 24
Server naming best practices. . . . . . . . . 25
Chapter 2. Installing the Tivoli StorageManager server components . . . . . 29Obtaining the Tivoli Storage Manager installationpackage . . . . . . . . . . . . . . . 29Installing Tivoli Storage Manager by using theinstallation wizard . . . . . . . . . . . . 30Installing Tivoli Storage Manager by using consolemode . . . . . . . . . . . . . . . . 32Installing Tivoli Storage Manager in silent mode . . 33Installing server language packages . . . . . . 35
Server language locales . . . . . . . . . 35Configuring a language package . . . . . . 35Updating a language package . . . . . . . 36
Chapter 3. Taking the first steps afteryou install Tivoli Storage Manager . . . 37Creating the user ID and directories for the serverinstance . . . . . . . . . . . . . . . 38Configuring Tivoli Storage Manager . . . . . . 39
Configuring Tivoli Storage Manager using theconfiguration wizard . . . . . . . . . . 40Configuring the server instance manually . . . 41
Configuring server options for server databasemaintenance . . . . . . . . . . . . . . 49Starting the server instance on Windows systems . . 50
Configuring the server to start as a Windowsservice . . . . . . . . . . . . . . . 51
Starting the server as a Windows service . . . 52Manually creating and configuring a Windowsservice . . . . . . . . . . . . . . . 53Starting the server in the foreground . . . . . 54
Stopping the server. . . . . . . . . . . . 54Registering licenses . . . . . . . . . . . . 54Specifying a device class in preparation for databasebackups . . . . . . . . . . . . . . . 55Running multiple server instances on a singlesystem . . . . . . . . . . . . . . . . 56Monitoring the server . . . . . . . . . . . 57
Chapter 4. Installing a Tivoli StorageManager server fix pack . . . . . . . 59Applying a fix pack to Tivoli Storage Manager V7 ina clustered environment . . . . . . . . . . 61
Chapter 5. Upgrading to Tivoli StorageManager Version 7.1.1 . . . . . . . . 65Upgrading from Tivoli Storage Manager V6.2 orV6.3 to V7.1.1. . . . . . . . . . . . . . 66
Planning the upgrade . . . . . . . . . . 67Preparing the system . . . . . . . . . . 68Installing the V7.1.1 server and verifying theupgrade . . . . . . . . . . . . . . 70
Upgrading from Tivoli Storage Manager V6.1 toV7.1.1 . . . . . . . . . . . . . . . . 74Upgrading Tivoli Storage Manager in a clusteredenvironment . . . . . . . . . . . . . . 74
Upgrading Tivoli Storage Manager V6.2 or V6.3to V7.1.1 in a clustered environment . . . . . 75Upgrading Tivoli Storage Manager V6.1 to V7.1.1in a clustered environment . . . . . . . . 77
Removing GSKit Version 7 after upgrading to TivoliStorage Manager Version 7.1.1 . . . . . . . . 80
Chapter 6. Reverting from Version 7.1to the previous V6 server. . . . . . . 81Steps for reverting to the previous server version. . 81Additional recovery steps if you created newstorage pools or enabled data deduplication . . . 82Reverting to the previous server version in a clusterconfiguration . . . . . . . . . . . . . . 83
Steps for reverting to the previous server version 83
Chapter 7. Reference: DB2 commandsfor Tivoli Storage Manager serverdatabases . . . . . . . . . . . . . 85
Chapter 8. Uninstalling Tivoli StorageManager . . . . . . . . . . . . . . 89Uninstalling Tivoli Storage Manager by using agraphical wizard . . . . . . . . . . . . 89
© Copyright IBM Corp. 1993, 2014 iii
|||

Uninstalling Tivoli Storage Manager in consolemode . . . . . . . . . . . . . . . . 90Uninstalling Tivoli Storage Manager in silent mode 90Uninstalling and reinstalling Tivoli Storage Manager 91
Part 2. Installing and upgradingTivoli Monitoring for Tivoli StorageManager . . . . . . . . . . . . . 93
Chapter 9. Installing Tivoli Monitoringfor Tivoli Storage Manager . . . . . . 95Planning to install . . . . . . . . . . . . 96
Installation scenarios . . . . . . . . . . 96System requirements for Tivoli Monitoring forTivoli Storage Manager . . . . . . . . . 99IBM Installation Manager . . . . . . . . 101Capacity planning . . . . . . . . . . . 102Installation worksheet . . . . . . . . . 103Installation checklist . . . . . . . . . . 104Bypassing the prerequisites . . . . . . . . 106
Windows: Installing Tivoli Monitoring for TivoliStorage Manager . . . . . . . . . . . . 107
Windows: Obtaining the Tivoli Monitoring forTivoli Storage Manager installation package . . 108Windows: Installing Tivoli Monitoring for TivoliStorage Manager by using the Install wizard . . 108Windows: Installing Tivoli Monitoring for TivoliStorage Manager by using console mode . . . 110Windows: Installing Tivoli Monitoring for TivoliStorage Manager in silent mode . . . . . . 111
Installing the monitoring agent . . . . . . . 112Installing the monitoring agent on remoteservers . . . . . . . . . . . . . . 112Windows: Installing and deploying monitoringagents in an existing Tivoli Monitoringenvironment . . . . . . . . . . . . . 114
Creating and configuring the agent instance . . . 124Creating and configuring the agent instance onWindows systems . . . . . . . . . . . 125
Installing Jazz for Service Management . . . . . 127Installing Jazz for Service Management onWindows . . . . . . . . . . . . . . 127
Configuring the WAREHOUS data source andimporting reports . . . . . . . . . . . . 129Starting the Jazz for Service Management service 130Verifying the installation . . . . . . . . . 131Taking the first steps after installation . . . . . 133Running a Cognos report . . . . . . . . . 134Configuring agents and services . . . . . . . 135
Configuring summarization and pruningsettings . . . . . . . . . . . . . . 135Manually configuring the Tivoli EnterprisePortal server. . . . . . . . . . . . . 136Manually configuring the Warehouse Proxyagent . . . . . . . . . . . . . . . 137Manually configuring the WarehouseSummarization and Pruning agent . . . . . 138
Managing secure communications . . . . . . 139
Disabling earlier Transport Layer Securityversions . . . . . . . . . . . . . . 139Configuring Secure Sockets Layercommunication . . . . . . . . . . . . 139Enabling the NIST SP800-131A security standard 143
Chapter 10. Upgrading TivoliMonitoring for Tivoli Storage Managerto Version 7.1 . . . . . . . . . . . 147Upgrade scenarios. . . . . . . . . . . . 147Upgrading Tivoli Monitoring for Tivoli StorageManager from Version 6.3 to Version 7.1 . . . . 149
Exporting IBM Tivoli Monitoring data . . . . 151Importing IBM Tivoli Monitoring data . . . . 153Saving the agent instance configurations . . . 154Importing the agent instance configuration . . 156
Windows: Upgrading Tivoli Monitoring for TivoliStorage Manager . . . . . . . . . . . . 156
Windows: Obtaining the Tivoli Monitoring forTivoli Storage Manager installation package . . 158Windows: Upgrading Tivoli Monitoring forTivoli Storage Manager by using the Upgradewizard . . . . . . . . . . . . . . 159Windows: Upgrading Tivoli Monitoring forTivoli Storage Manager by using console mode . 160Windows: Upgrading Tivoli Monitoring forTivoli Storage Manager in silent mode . . . . 161
Upgrading the monitoring agent . . . . . . . 162Upgrading the operating system . . . . . . . 163
Chapter 11. Migrating TivoliMonitoring for Tivoli Storage Managerfrom one system to another . . . . . 165Migrating Tivoli Monitoring for Tivoli StorageManager V6.3 to V7.1, or later on another system . 165Migrating Tivoli Monitoring for Tivoli StorageManager V7.1, or later to another system . . . . 166
Chapter 12. Uninstalling TivoliMonitoring for Tivoli Storage Manager 167Uninstalling Jazz for Service Management . . . . 167Uninstalling Tivoli Monitoring for Tivoli StorageManager by using IBM Installation Manager . . . 168
Uninstalling Tivoli Monitoring for Tivoli StorageManager by using the Uninstall wizard. . . . 168Uninstalling Tivoli Monitoring for Tivoli StorageManager by using console mode . . . . . . 169Uninstalling Tivoli Monitoring for Tivoli StorageManager by using silent mode . . . . . . 169
Uninstalling monitoring agents . . . . . . . 170Uninstalling monitoring agents by using IBMInstallation Manager . . . . . . . . . . 170Uninstalling monitoring agents in an existingIBM Tivoli Monitoring environment . . . . . 172
Part 3. Installing and upgradingthe Operations Center . . . . . . 173
iv IBM Tivoli Storage Manager for Windows: Installation Guide
||
|||||||||||||||||
|||
||||||||||
||
||
||||||||
|||||||||||||||||||||||||||
||
||||||||||
|||||||||||||||||||||||||
Chapter 13. Planning to install theOperations Center . . . . . . . . . 175System requirements for the Operations Center . . 175
Operations Center computer requirements. . . 176Hub and spoke server requirements . . . . . 176Operating system requirements . . . . . . 180Web browser requirements . . . . . . . . 180Language requirements . . . . . . . . . 181Requirements and limitations for Tivoli StorageManager client management services . . . . 181
Administrator IDs that the Operations Centerrequires . . . . . . . . . . . . . . . 183IBM Installation Manager . . . . . . . . . 184Installation checklist . . . . . . . . . . . 184
Chapter 14. Installing the OperationsCenter . . . . . . . . . . . . . . 189Obtaining the Operations Center installationpackage . . . . . . . . . . . . . . . 189Installing the Operations Center by using agraphical wizard . . . . . . . . . . . . 189Installing the Operations Center in console mode 190Installing the Operations Center in silent mode . . 190
Chapter 15. Upgrading the OperationsCenter . . . . . . . . . . . . . . 193
Chapter 16. Getting started with theOperations Center . . . . . . . . . 195Configuring the Operations Center . . . . . . 195
Designating the hub server . . . . . . . . 196Adding a spoke server . . . . . . . . . 196Sending email alerts to administrators . . . . 197Adding customized text to the login screen . . 200
Configuring for SSL communication . . . . . . 200Configuring for SSL communication betweenthe Operations Center and the hub server . . . 200Configuring for SSL communication betweenthe hub server and a spoke server . . . . . 203Resetting the password for the OperationsCenter truststore file . . . . . . . . . . 205Starting and stopping the web server . . . . 206
Collecting diagnostic information with TivoliStorage Manager client management services . . . 206
Installing the client management service byusing a graphical wizard . . . . . . . . 207
Installing the client management service insilent mode . . . . . . . . . . . . . 208Verifying that the client management service isinstalled correctly . . . . . . . . . . . 209Configuring the Operations Center to use theclient management service . . . . . . . . 210Starting and stopping the client managementservice. . . . . . . . . . . . . . . 211Uninstalling the client management service . . 211Configuring the client management service forcustom client installations . . . . . . . . 212
Chapter 17. Uninstalling theOperations Center . . . . . . . . . 221Uninstalling the Operations Center by using agraphical wizard . . . . . . . . . . . . 221Uninstalling the Operations Center in consolemode . . . . . . . . . . . . . . . . 221Uninstalling the Operations Center in silent mode 222
Chapter 18. Rolling back to a previousversion of the Operations Center . . . 223
Part 4. Appendixes . . . . . . . . 225
Appendix A. Installation log files . . . 227
Appendix B. Services associated withthe Tivoli Storage Manager server . . 229
Appendix C. Accessibility features forthe Tivoli Storage Manager productfamily. . . . . . . . . . . . . . . 231
Notices . . . . . . . . . . . . . . 233Trademarks . . . . . . . . . . . . . . 235Privacy policy considerations . . . . . . . . 235
Glossary . . . . . . . . . . . . . 237
Index . . . . . . . . . . . . . . . 239
Contents v
|||
||||
||||||
|||||||||||||||||

vi IBM Tivoli Storage Manager for Windows: Installation Guide

About this publication
This publication contains installation and configuration instructions for the IBM®
Tivoli® Storage Manager server, server languages, and other Tivoli StorageManager components.
Instructions for installing the Tivoli Storage Manager license, device driver, storageagent, Tivoli Monitoring for Tivoli Storage Manager, and the IBM Tivoli StorageManager Operations Center are also included in this publication.
Who should read this guideThis publication is intended for a system administrator installing and configuring aVersion 7.1.1 Tivoli Storage Manager server, Tivoli Monitoring for Tivoli StorageManager, the Operations Center, or upgrading from Tivoli Storage ManagerVersion 6.
If you are upgrading an existing 5.5.x Tivoli Storage Manager server to TivoliStorage Manager Version 7.1.1, see the Upgrade and Migration Guide for V5 Servers.
If you are upgrading a Tivoli Storage Manager Version 6.1, Version 6.2, or Version6.3 server to a newer version, see Chapter 5, “Upgrading to Tivoli Storage ManagerVersion 7.1.1,” on page 65.
If you are upgrading an existing Tivoli Storage Manager Version 7.1 server to alater level of Version 7.1, see Chapter 4, “Installing a Tivoli Storage Manager serverfix pack,” on page 59.
If you are installing Tivoli Monitoring for Tivoli Storage Manager, see Chapter 9,“Installing Tivoli Monitoring for Tivoli Storage Manager,” on page 95.
If you are upgrading Tivoli Monitoring for Tivoli Storage Manager, see Chapter 10,“Upgrading Tivoli Monitoring for Tivoli Storage Manager to Version 7.1,” on page147.
If you are installing or upgrading the Operations Center, see Part 3, “Installing andupgrading the Operations Center,” on page 173.
Installable componentsThe IBM Tivoli Storage Manager server and licenses are required components.
You can install the following components for Tivoli Storage Manager V7.1 or later.v Tivoli Storage Manager serverv Tivoli Storage Manager server languagesv Tivoli Storage Manager licensesv Tivoli Storage Manager devicesv Tivoli Storage Manager storage agentv Tivoli Storage Manager Operations Centerv Tivoli Monitoring for Tivoli Storage Manager
© Copyright IBM Corp. 1993, 2014 vii
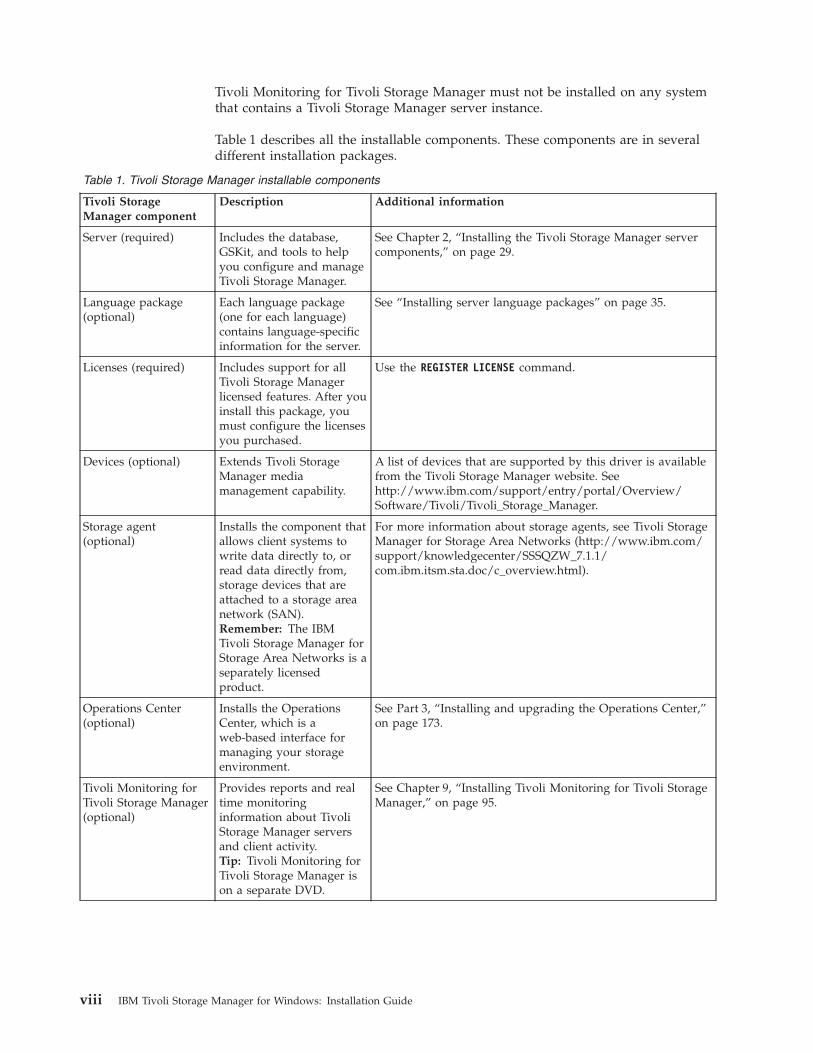
Tivoli Monitoring for Tivoli Storage Manager must not be installed on any systemthat contains a Tivoli Storage Manager server instance.
Table 1 describes all the installable components. These components are in severaldifferent installation packages.
Table 1. Tivoli Storage Manager installable components
Tivoli StorageManager component
Description Additional information
Server (required) Includes the database,GSKit, and tools to helpyou configure and manageTivoli Storage Manager.
See Chapter 2, “Installing the Tivoli Storage Manager servercomponents,” on page 29.
Language package(optional)
Each language package(one for each language)contains language-specificinformation for the server.
See “Installing server language packages” on page 35.
Licenses (required) Includes support for allTivoli Storage Managerlicensed features. After youinstall this package, youmust configure the licensesyou purchased.
Use the REGISTER LICENSE command.
Devices (optional) Extends Tivoli StorageManager mediamanagement capability.
A list of devices that are supported by this driver is availablefrom the Tivoli Storage Manager website. Seehttp://www.ibm.com/support/entry/portal/Overview/Software/Tivoli/Tivoli_Storage_Manager.
Storage agent(optional)
Installs the component thatallows client systems towrite data directly to, orread data directly from,storage devices that areattached to a storage areanetwork (SAN).Remember: The IBMTivoli Storage Manager forStorage Area Networks is aseparately licensedproduct.
For more information about storage agents, see Tivoli StorageManager for Storage Area Networks (http://www.ibm.com/support/knowledgecenter/SSSQZW_7.1.1/com.ibm.itsm.sta.doc/c_overview.html).
Operations Center(optional)
Installs the OperationsCenter, which is aweb-based interface formanaging your storageenvironment.
See Part 3, “Installing and upgrading the Operations Center,”on page 173.
Tivoli Monitoring forTivoli Storage Manager(optional)
Provides reports and realtime monitoringinformation about TivoliStorage Manager serversand client activity.Tip: Tivoli Monitoring forTivoli Storage Manager ison a separate DVD.
See Chapter 9, “Installing Tivoli Monitoring for Tivoli StorageManager,” on page 95.
viii IBM Tivoli Storage Manager for Windows: Installation Guide

PublicationsThe Tivoli Storage Manager product family includes IBM Tivoli StorageFlashCopy® Manager, IBM Tivoli Storage Manager for Space Management, IBMTivoli Storage Manager for Databases, and several other storage managementproducts from IBM Tivoli.
To view IBM product documentation, see http://www.ibm.com/support/knowledgecenter/.
About this publication ix

x IBM Tivoli Storage Manager for Windows: Installation Guide

New for Tivoli Storage Manager Version 7.1.1
Many installation-related features in IBM Tivoli Storage Manager V7.1.1 are newfor Tivoli Storage Manager users. These changes affect the Tivoli Storage Managerserver, the Operations Center, the Administration Center, Tivoli Monitoring forTivoli Storage Manager, and the upgrade to V7.1.1.
For a complete list of new V7.1.1 features, see IBM Knowledge Center.
IBM Installation ManagerIn Tivoli Storage Manager V7.1.1, the server, Operations Center, and TivoliMonitoring for Tivoli Storage Manager use IBM Installation Manager toinstall or update software. If the required version of IBM InstallationManager is not already installed, it is automatically installed or upgradedwhen you install the Tivoli Storage Manager server, Operations Center, andTivoli Monitoring for Tivoli Storage Manager. It must remain installed onthe system so that the server, Operations Center, and Tivoli Monitoring forTivoli Storage Manager can be updated or uninstalled later as needed.
Operations Center updates
Restriction: The Operations Center cannot be installed on HP-UX orOracle Solaris systems. However, you can use the Operations Center tomanage Tivoli Storage Manager V6.3.4 or later servers that run on HP-UXor Oracle Solaris systems.
You can now complete the following tasks through the Operations Center:
Navigation, customization, and reporting
v Use improved linking to navigate between pages of theOperations Center more easily
v Use advanced filters to construct custom views of table datav Bookmark and use shared links to commonly accessed web
pagesv Customize the Operations Center login page to include text that
you providev Configure daily email reports on client coverage and server
statusv If you have a Tivoli Storage Manager Suite for Unified Recovery
license, compare the amount of data you are managing withwhat your entitlement allows
Alerts
v Add an alert by specifying the message that triggers the alertv Select which administrators receive email notifications for an
alertv Change the category for an alertv Delete an alert definition for a message, so the message no
longer triggers an alert
Clients
v View client schedulesv Add client schedules
© Copyright IBM Corp. 1993, 2014 xi

v Modify client schedules
Services
v Properties of the policy domain, such as the default managementclass and the retention grace period
v The files and related objects that were examined and expiredover the previous two weeks
v The active policy set for the policy domain
ServersYou can now view maintenance schedules from the Servers page.
Storage Pools
v Manually migrate storage pool datav Manually reclaim storage pool spacev View the following storage pool details:
– Properties of the storage pool, such as the device class andutilization
– The storage pool capacity that was used over the previoustwo weeks
– Volumes that are assigned to the storage poolv Edit certain storage pool properties
Tivoli Monitoring for Tivoli Storage Manager availabilityIBM Tivoli Monitoring for Tivoli Storage Manager is delivered with V7.1.1.
You can use Tivoli Monitoring for Tivoli Storage Manager V7.1 with anyTivoli Storage Manager V7.1 or later server.
Administration Center availabilityAlthough the Tivoli Storage Manager Administration Center is notdelivered with V7.1 or later versions, you can instead use the OperationsCenter, which is a web-based interface for managing your storageenvironment.
You can use the V6.3.4 Administration Center with any Tivoli StorageManager V6.3 or later server, including to automatically updatebackup-archive clients. For more information about the Tivoli StorageManager Administration Center, see the V6.3 IBM Knowledge Center.
xii IBM Tivoli Storage Manager for Windows: Installation Guide

Part 1. Installing and upgrading the server
Install and upgrade the Tivoli Storage Manager server.
Before you begin
Taking the first stepsPlanning to install Installing components
Figure 1. As highlighted in the figure, you are in the planning to install the Tivoli Storage Manager server section.Review this section carefully to ensure that you have the system and other requirements needed to install TivoliStorage Manager.
© Copyright IBM Corp. 1993, 2014 1

2 IBM Tivoli Storage Manager for Windows: Installation Guide

Chapter 1. Planning to install the Tivoli Storage Managerserver
Install the Tivoli Storage Manager server software on the computer that managesstorage devices and install the Tivoli Storage Manager client software on everyworkstation that transfers data to Tivoli Storage Manager server-managed storage.
About this task
Tivoli Storage Manager server maintenance releases, client software, andpublications are available from the Tivoli Storage Manager website athttp://www.ibm.com/support/entry/portal/Overview/Software/Tivoli/Tivoli_Storage_Manager.
Allow approximately 15 - 30 minutes to install a Tivoli Storage Manager Version7.1.1 server, using this guide.
An upgrade from V6.1.x, V6.2.x, or V6.3.x to V7.1.1 takes approximately 20 - 50minutes. Your environment might produce different results than that obtained inthe labs.
The following figure illustrates the main parts for installing a new Tivoli StorageManager server.
What you should know firstBefore installing IBM Tivoli Storage Manager, be familiar with your operatingsystems, storage devices, communication protocols, and system configurations.
Table 2. Upgrade information
To upgrade from thisversion To this version See this information
V7.1 V7.1 fix pack or interim fix Chapter 4, “Installing a TivoliStorage Manager server fixpack,” on page 59
V6.2 or V6.3 V7.1.1 “Upgrading from TivoliStorage Manager V6.2 orV6.3 to V7.1.1” on page 66
V6.1 V7.1.1 “Upgrading from TivoliStorage Manager V6.1 toV7.1.1” on page 74
PlanningPreview and verifyserver requirements Installing
Select a method toinstall the software
Firststeps
Configure and start theserver, register licenses,prepare for backups
© Copyright IBM Corp. 1993, 2014 3

Table 2. Upgrade information (continued)
To upgrade from thisversion To this version See this information
V5 V7.1.1 Upgrade and Migration Guidefor V5 Servers
Restriction: You cannot install and run the Version 7.1.1 server on a system thatalready has DB2® installed on it, whether DB2 was installed by itself or as part ofsome other application. The Version 7.1.1 server requires the installation and use ofthe DB2 version that is packaged with the Version 7.1.1 server. No other version ofDB2 can exist on the system.
You can install the Tivoli Storage Manager server on a domain controller. TheTivoli Storage Manager server can have heavy processor usage, however, and thatmight affect and stall other applications.
Experienced DB2 administrators can choose to perform advanced SQL queries anduse DB2 tools to monitor the database. Do not, however, use DB2 tools to changeDB2 configuration settings from those that are preset by Tivoli Storage Manager, oralter the DB2 environment for Tivoli Storage Manager in other ways, such as withother products. The Tivoli Storage Manager Version 7.1.1 server has been built andtested extensively using the data definition language (DDL) and databaseconfiguration that Tivoli Storage Manager deploys.
Attention: Do not alter the DB2 software that is installed with Tivoli StorageManager installation packages and fix packs. Do not install or upgrade to adifferent version, release, or fix pack of DB2 software because doing so can damagethe database.
System requirements for the Tivoli Storage Manager serverThe Tivoli Storage Manager server can require a large amount of memory, networkbandwidth, and processor resources. In many cases, the server performs best whenother applications are not installed on the same system.
Hardware and software requirements for the Tivoli StorageManager server installation
These tables list the minimum hardware and software requirements for theinstallation of a Tivoli Storage Manager server. Use these requirements as a startingpoint. You can find the most current information about system requirements atTivoli Storage Manager Supported Operating Systems.
See IBM Tivoli Storage Manager Optimizing Performance (http://www.ibm.com/support/knowledgecenter/SSGSG7_7.1.1/com.ibm.itsm.perf.doc/c_howtouseinfo.html) for server configuration guidelines and best practices.
Hardware requirements
Table 3 on page 5 describes the minimum hardware requirements that are neededfor your Tivoli Storage Manager Windows system. The installation fails if you donot have the minimum requirements. For more details about planning disk space,see “Capacity planning” on page 8.
Installing the Tivoli Storage Manager server
4 IBM Tivoli Storage Manager for Windows: Installation Guide
||||
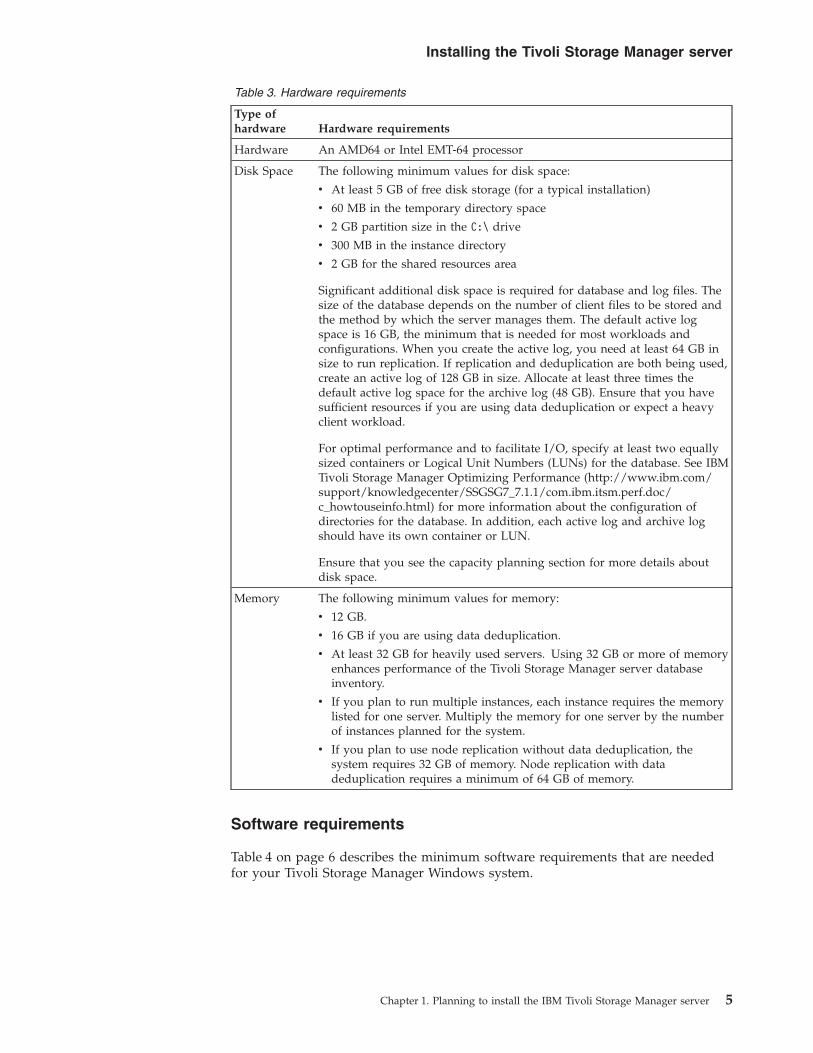
Table 3. Hardware requirements
Type ofhardware Hardware requirements
Hardware An AMD64 or Intel EMT-64 processor
Disk Space The following minimum values for disk space:
v At least 5 GB of free disk storage (for a typical installation)
v 60 MB in the temporary directory space
v 2 GB partition size in the C:\ drive
v 300 MB in the instance directory
v 2 GB for the shared resources area
Significant additional disk space is required for database and log files. Thesize of the database depends on the number of client files to be stored andthe method by which the server manages them. The default active logspace is 16 GB, the minimum that is needed for most workloads andconfigurations. When you create the active log, you need at least 64 GB insize to run replication. If replication and deduplication are both being used,create an active log of 128 GB in size. Allocate at least three times thedefault active log space for the archive log (48 GB). Ensure that you havesufficient resources if you are using data deduplication or expect a heavyclient workload.
For optimal performance and to facilitate I/O, specify at least two equallysized containers or Logical Unit Numbers (LUNs) for the database. See IBMTivoli Storage Manager Optimizing Performance (http://www.ibm.com/support/knowledgecenter/SSGSG7_7.1.1/com.ibm.itsm.perf.doc/c_howtouseinfo.html) for more information about the configuration ofdirectories for the database. In addition, each active log and archive logshould have its own container or LUN.
Ensure that you see the capacity planning section for more details aboutdisk space.
Memory The following minimum values for memory:
v 12 GB.
v 16 GB if you are using data deduplication.
v At least 32 GB for heavily used servers. Using 32 GB or more of memoryenhances performance of the Tivoli Storage Manager server databaseinventory.
v If you plan to run multiple instances, each instance requires the memorylisted for one server. Multiply the memory for one server by the numberof instances planned for the system.
v If you plan to use node replication without data deduplication, thesystem requires 32 GB of memory. Node replication with datadeduplication requires a minimum of 64 GB of memory.
Software requirements
Table 4 on page 6 describes the minimum software requirements that are neededfor your Tivoli Storage Manager Windows system.
Installing the Tivoli Storage Manager server
Chapter 1. Planning to install the IBM Tivoli Storage Manager server 5

Table 4. Software requirements
Type ofsoftware Minimum software requirements
Operatingsystem
One of the following operating systems:
v Microsoft Windows Server 2008 R2: Standard, Enterprise, or DatacenterEdition (64-bit)
v Microsoft Windows Server 2012 (64-bit)
v Microsoft Windows Server 2012 R2 (64-bit)
Communicationprotocol
At least one of the following communication protocols (installed bydefault with the current Windows operating systems):
v Named Pipes
v TCP/IP Version 4 or Version 6
Device drivers The Tivoli Storage Manager passthru device driver that is required fornon-IBM drives and tape libraries. The Windows native device driver isrecommended for tape drives and tape libraries. Otherwise, the TivoliStorage Manager kernel device driver can be used.
For the IBM 3590, 3592, or the Ultrium tape library or drives, the IBMdevice drivers are required. Install the most current device drivers. Youcan locate IBM driver packages at the Fix Central website:http://www.ibm.com/support/fixcentral/.
Configure the device drivers before you use the Tivoli Storage Managerserver with tape devices.
Other software Windows 2012 requires that .NET Framework 3.5 is installed andenabled.
The following User Account Control policies must be disabled:
v User Account Control: Admin Approval Mode for the Built-inAdministrator account
v User Account Control: Run all administrators in Admin ApprovalMode
IBM Installation ManagerTivoli Storage Manager uses IBM Installation Manager, which is an installationprogram that can use remote or local software repositories to install or updatemany IBM products.
If the required version of IBM Installation Manager is not already installed, it isautomatically installed or upgraded when you install Tivoli Storage Manager. Itmust remain installed on the system so that Tivoli Storage Manager can beupdated or uninstalled later as needed.
The following list contains explanations of some terms that are used in IBMInstallation Manager:
OfferingAn installable unit of a software product.
The Tivoli Storage Manager offering contains all of the media that IBMInstallation Manager requires to install Tivoli Storage Manager.
PackageThe group of software components that are required to install an offering.
Installing the Tivoli Storage Manager server
6 IBM Tivoli Storage Manager for Windows: Installation Guide
|

The Tivoli Storage Manager package contains the following components:v IBM Installation Manager installation programv Tivoli Storage Manager offering
Package groupA set of packages that share a common parent directory.
The default package group for the Tivoli Storage Manager package is IBMInstallation Manager.
RepositoryA remote or local storage area for data and other application resources.
The Tivoli Storage Manager package is stored in a repository on IBM FixCentral.
Shared resources directoryA directory that contains software files or plug-ins that are shared bypackages.
IBM Installation Manager stores installation-related files in the sharedresources directory, including files that are used for rolling back to aprevious version of Tivoli Storage Manager.
Worksheets for planning details for the Tivoli Storage Manager serverYou can use the worksheets to help you plan the amount and location of storageneeded for the Tivoli Storage Manager server. You can also use them to keep trackof names and user IDs.
Restriction: If you are using a File Allocation Table (FAT or FAT32) file systemformat, you cannot specify the root directory of that system as the location of adatabase directory or log directory. Instead, you must create one or moresubdirectories within the root directory. Then, create the database directories andlog directories within the subdirectories.
See IBM Tivoli Storage Manager Optimizing Performance (http://www.ibm.com/support/knowledgecenter/SSGSG7_7.1.1/com.ibm.itsm.perf.doc/c_howtouseinfo.html) for server configuration guidelines and best practices.
Item Space required Number of directories Location of directories
The database
Active log
Archive log
Optional: Log mirror forthe active log
Optional: Secondaryarchive log (failoverlocation for archive log)
Item Names and user IDs Location
The instance user ID for theserver, which is the ID you useto start and run the TivoliStorage Manager server
Installing the Tivoli Storage Manager server
Chapter 1. Planning to install the IBM Tivoli Storage Manager server 7
|||||

Item Names and user IDs Location
The home directory for the server,which is the directory thatcontains the instance user ID
The database instance name
The instance directory for theserver, which is a directory thatcontains files specifically for thisserver instance (the serveroptions file and otherserver-specific files)
Server name, use a unique namefor each server
Capacity planningCapacity planning for Tivoli Storage Manager includes managing resources such asthe database and recovery log. To maximize resources as part of capacity planning,you must estimate space requirements for the database and the recovery log.
Procedure
For information about the benefits of deduplication and guidance on how to makeeffective use of the Tivoli Storage Manager deduplication feature, see OptimizingPerformance.
Estimating space requirements for the databaseTo estimate space requirements for the database, you can use the maximumnumber of files that can be in server storage at one time or you can use storagepool capacity.
About this task
Consider using at least 25 GB for the initial database space. Provision file systemspace appropriately. A database size of 25 GB is adequate for a test environment ora library-manager-only environment. For a production server supporting clientworkloads, the database size is expected to be larger. If you use random-accessdisk (DISK) storage pools, more database and log storage space is needed than forsequential-access storage pools.
The maximum size of the Tivoli Storage Manager database is 4 TB.
For information about sizing the database in a production environment that isbased on the number of files and on storage pool size, see the following topics.
Installing the Tivoli Storage Manager server
8 IBM Tivoli Storage Manager for Windows: Installation Guide

Estimating database space requirements based on the number offilesIf you can estimate the maximum number of files that might be in server storage ata time, you can use that number to estimate space requirements for the database.
About this task
To estimate space requirements that is based on the maximum number of files inserver storage, use the following guidelines:v 600 - 1000 bytes for each stored version of a file, including image backups.
Restriction: The guideline does not include space that is used during datadeduplication.
v 100 - 200 bytes for each cached file, copy storage pool file, active-data pool file,and deduplicated file.
v Additional space is required for database optimization to support varyingdata-access patterns and to support server back-end processing of the data. Theamount of extra space is equal to 50% of the estimate for the total number ofbytes for file objects.
In the following example for a single client, the calculations are based on themaximum values in the preceding guidelines. The examples do not take intoaccount that you might use file aggregation. In general, when you aggregate smallfiles, it reduces the amount of required database space. File aggregation does notaffect space-managed files.
Procedure1. Calculate the number of file versions. Add each of the following values to
obtain the number of file versions:a. Calculate the number of backed-up files. For example, as many as 500,000
client files might be backed up at a time. In this example, storage policiesare set to keep up to three copies of backed up files:500,000 files * 3 copies = 1,500,000 files
b. Calculate the number of archive files. For example, as many as 100,000client files might be archived copies.
c. Calculate the number of space-managed files. For example, as many as200,000 client files might be migrated from client workstations.
Using 1000 bytes per file, the total amount of database space that is requiredfor the files that belong to the client is 1.8 GB:(1,500,000 + 100,000 + 200,000) * 1000 = 1.8 GB
2. Calculate the number of cached files, copy storage-pool files, active-data poolfiles, and deduplicated files:a. Calculate the number of cached copies. For example, caching is enabled in a
5 GB disk storage pool. The high migration threshold of the pool is 90%and the low migration threshold of the pool is 70%. Thus, 20% of the diskpool, or 1 GB, is occupied by cached files.If the average file size is about 10 KB, approximately 100,000 files are incache at any one time:100,000 files * 200 bytes = 19 MB
b. Calculate the number of copy storage-pool files. All primary storage poolsare backed up to the copy storage pool:(1,500,000 + 100,000 + 200,000) * 200 bytes = 343 MB
Installing the Tivoli Storage Manager server
Chapter 1. Planning to install the IBM Tivoli Storage Manager server 9
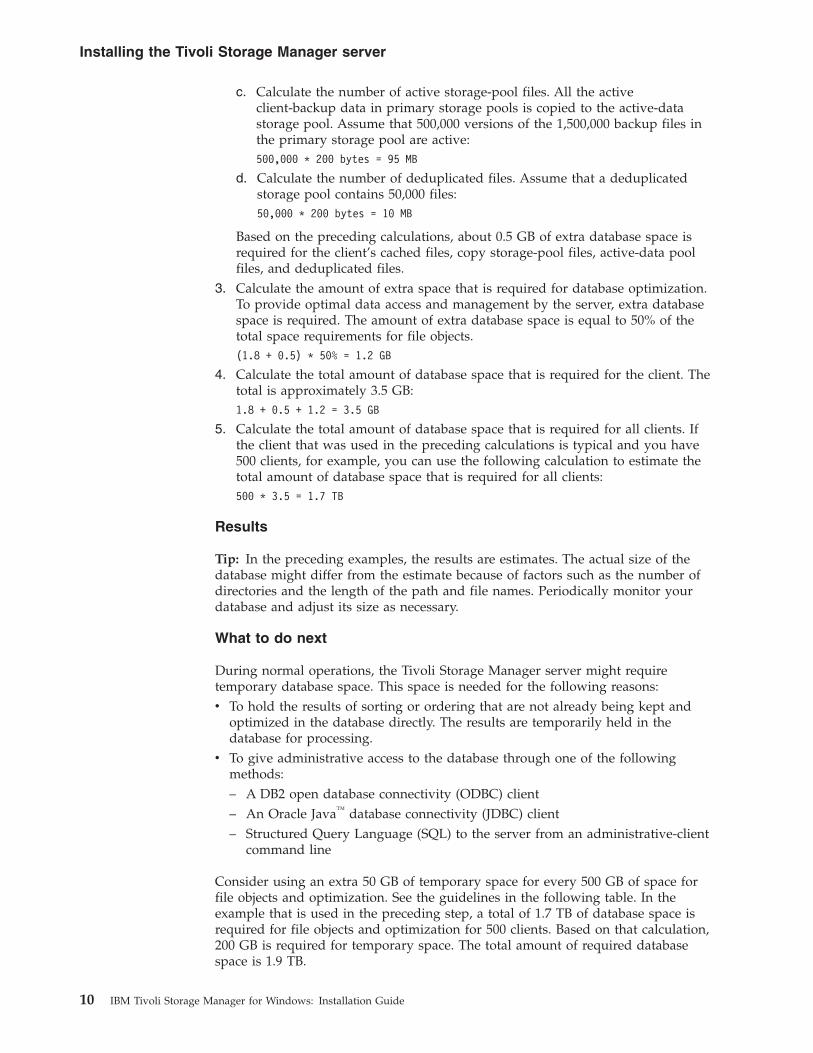
c. Calculate the number of active storage-pool files. All the activeclient-backup data in primary storage pools is copied to the active-datastorage pool. Assume that 500,000 versions of the 1,500,000 backup files inthe primary storage pool are active:500,000 * 200 bytes = 95 MB
d. Calculate the number of deduplicated files. Assume that a deduplicatedstorage pool contains 50,000 files:50,000 * 200 bytes = 10 MB
Based on the preceding calculations, about 0.5 GB of extra database space isrequired for the client’s cached files, copy storage-pool files, active-data poolfiles, and deduplicated files.
3. Calculate the amount of extra space that is required for database optimization.To provide optimal data access and management by the server, extra databasespace is required. The amount of extra database space is equal to 50% of thetotal space requirements for file objects.(1.8 + 0.5) * 50% = 1.2 GB
4. Calculate the total amount of database space that is required for the client. Thetotal is approximately 3.5 GB:1.8 + 0.5 + 1.2 = 3.5 GB
5. Calculate the total amount of database space that is required for all clients. Ifthe client that was used in the preceding calculations is typical and you have500 clients, for example, you can use the following calculation to estimate thetotal amount of database space that is required for all clients:500 * 3.5 = 1.7 TB
Results
Tip: In the preceding examples, the results are estimates. The actual size of thedatabase might differ from the estimate because of factors such as the number ofdirectories and the length of the path and file names. Periodically monitor yourdatabase and adjust its size as necessary.
What to do next
During normal operations, the Tivoli Storage Manager server might requiretemporary database space. This space is needed for the following reasons:v To hold the results of sorting or ordering that are not already being kept and
optimized in the database directly. The results are temporarily held in thedatabase for processing.
v To give administrative access to the database through one of the followingmethods:– A DB2 open database connectivity (ODBC) client– An Oracle Java™ database connectivity (JDBC) client– Structured Query Language (SQL) to the server from an administrative-client
command line
Consider using an extra 50 GB of temporary space for every 500 GB of space forfile objects and optimization. See the guidelines in the following table. In theexample that is used in the preceding step, a total of 1.7 TB of database space isrequired for file objects and optimization for 500 clients. Based on that calculation,200 GB is required for temporary space. The total amount of required databasespace is 1.9 TB.
Installing the Tivoli Storage Manager server
10 IBM Tivoli Storage Manager for Windows: Installation Guide
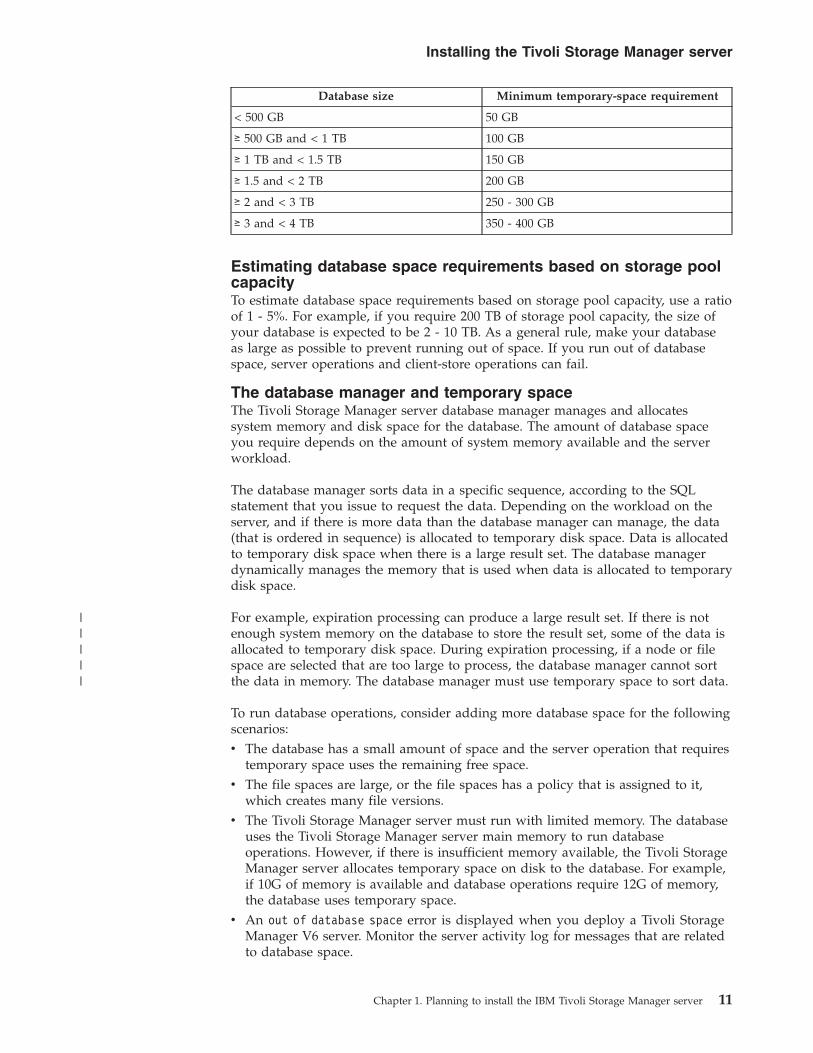
Database size Minimum temporary-space requirement
< 500 GB 50 GB
≥ 500 GB and < 1 TB 100 GB
≥ 1 TB and < 1.5 TB 150 GB
≥ 1.5 and < 2 TB 200 GB
≥ 2 and < 3 TB 250 - 300 GB
≥ 3 and < 4 TB 350 - 400 GB
Estimating database space requirements based on storage poolcapacityTo estimate database space requirements based on storage pool capacity, use a ratioof 1 - 5%. For example, if you require 200 TB of storage pool capacity, the size ofyour database is expected to be 2 - 10 TB. As a general rule, make your databaseas large as possible to prevent running out of space. If you run out of databasespace, server operations and client-store operations can fail.
The database manager and temporary spaceThe Tivoli Storage Manager server database manager manages and allocatessystem memory and disk space for the database. The amount of database spaceyou require depends on the amount of system memory available and the serverworkload.
The database manager sorts data in a specific sequence, according to the SQLstatement that you issue to request the data. Depending on the workload on theserver, and if there is more data than the database manager can manage, the data(that is ordered in sequence) is allocated to temporary disk space. Data is allocatedto temporary disk space when there is a large result set. The database managerdynamically manages the memory that is used when data is allocated to temporarydisk space.
For example, expiration processing can produce a large result set. If there is notenough system memory on the database to store the result set, some of the data isallocated to temporary disk space. During expiration processing, if a node or filespace are selected that are too large to process, the database manager cannot sortthe data in memory. The database manager must use temporary space to sort data.
To run database operations, consider adding more database space for the followingscenarios:v The database has a small amount of space and the server operation that requires
temporary space uses the remaining free space.v The file spaces are large, or the file spaces has a policy that is assigned to it,
which creates many file versions.v The Tivoli Storage Manager server must run with limited memory. The database
uses the Tivoli Storage Manager server main memory to run databaseoperations. However, if there is insufficient memory available, the Tivoli StorageManager server allocates temporary space on disk to the database. For example,if 10G of memory is available and database operations require 12G of memory,the database uses temporary space.
v An out of database space error is displayed when you deploy a Tivoli StorageManager V6 server. Monitor the server activity log for messages that are relatedto database space.
Installing the Tivoli Storage Manager server
Chapter 1. Planning to install the IBM Tivoli Storage Manager server 11
|||||

Important: Do not change the DB2 software that is installed with the TivoliStorage Manager installation packages and fix packs. Do not install or upgrade to adifferent version, release, or fix pack, of DB2 software to avoid damage to thedatabase.
Recovery log space requirementsIn Tivoli Storage Manager, the term recovery log comprises the active log, thearchive log, the active log mirror, and the archive failover log. The amount of spacethat you require for the recovery log depends on various factors, including, forexample, the amount of client activity with the server.
Active and archive log spaceWhen you estimate space requirements for active and archive logs, include someextra space for contingencies such as occasional heavy workloads and failovers.
In Tivoli Storage Manager servers V6.1 and later, the active log can be a maximumsize of 128 GB. The archive log size is limited to the size of the file system that it isinstalled on.
Use the following general guidelines when you estimate the size of the active log:v The suggested starting size for the active log is 16 GB.v Ensure that the active log is at least large enough for the amount of concurrent
activity that the server typically handles. As a precaution, try to anticipate thelargest amount of work that the server manages at one time. Provision the activelog with extra space that can be used if needed. Consider using 20% of extraspace.
v Monitor used and available active log space. Adjust the size of the active log asneeded, depending upon factors such as client activity and the level of serveroperations.
v Ensure that the directory that holds the active log is as large as, or larger than,the size of the active log. A directory that is larger than the active log canaccommodate failovers, if they occur.
v Ensure that the file system that contains the active log directory has at least 8GB of free space for temporary log movement requirements.
The suggested starting size for the archive log is 48 GB.
The archive log directory must be large enough to contain the log files that aregenerated since the previous full backup. For example, if you perform a fullbackup of the database every day, the archive log directory must be large enoughto hold the log files for all the client activity that occurs during 24 hours. Torecover space, the server deletes obsolete archive log files after a full backup of thedatabase. If the archive log directory becomes full and a directory for archivefailover logs does not exist, log files remain in the active log directory. Thiscondition can cause the active log directory to fill up and stop the server. When theserver restarts, some of the existing active-log space is released.
After the server is installed, you can monitor archive log utilization and the spacein the archive log directory. If the space in the archive log directory fills up, it cancause the following problems:v The server is unable to perform full database backups. Investigate and resolve
this problem.v Other applications write to the archive log directory, exhausting the space that is
required by the archive log. Do not share archive log space with other
Installing the Tivoli Storage Manager server
12 IBM Tivoli Storage Manager for Windows: Installation Guide

applications including other Tivoli Storage Manager servers. Ensure that eachserver has a separate storage location that is owned and managed by thatspecific server.
For guidance about the layout and tuning of the active log and archive log, seeOptimizing Performance.
Example: Estimating active and archive log sizes for basic client-storeoperations:
Basic client-store operations include backup, archive, and space management. Logspace must be sufficient to handle all store transactions that are in progress at onetime.
To determine the sizes of the active and archive logs for basic client-storeoperations, use the following calculation:number of clients x files stored during each transaction
x log space needed for each file
This calculation is used in the example in the following table.
Table 5. Basic client-store operations
ItemExample
values Description
Maximum number of client nodesthat back up, archive, or migrate filesconcurrently at any time
300 The number of client nodes that back up, archive, or migratefiles every night.
Files stored during each transaction 4096 The default value of the server option TXNGROUPMAX is 4096.
Log space that is required for eachfile
3053 bytes The value of 3053 bytes for each file in a transactionrepresents the log bytes that are needed when backing upfiles from a Windows client where the file names are 12 -120 bytes.
This value is based on the results of tests performed underlaboratory conditions. The tests consisted of backup-archiveclients performing backup operations to a random-accessdisk (DISK) storage pool. DISK pools result in more log usethan sequential-access storage pools. Consider a value largerthan 3053 bytes if the data being stored has file names thatare longer than 12 - 120 bytes.
Active log: Suggested size 19.5 GB 1 Use the following calculation to determine the size of theactive log. One GB equals 1,073,741,824 bytes.
(300 clients x 4096 files stored during eachtransaction x 3053 bytes for each file) ÷ 1,073,741,824bytes = 3.5 GB
Increase that amount by the suggested starting size of 16GB:
3.5 + 16 = 19.5 GB
Installing the Tivoli Storage Manager server
Chapter 1. Planning to install the IBM Tivoli Storage Manager server 13

Table 5. Basic client-store operations (continued)
ItemExample
values Description
Archive log: Suggested size 58.5 GB 1 Because of the requirement to be able to store archive logsacross three server database-backup cycles, multiply theestimate for the active log by 3 to estimate the total archivelog requirement.
3.5 x 3 = 10.5 GB
Increase that amount by the suggested starting size of 48GB:
10.5 + 48 = 58.5 GB1 The example values in this table are used only to illustrate how the sizes for active logs and archive logs arecalculated. In a production environment that does not use deduplication, 16 GB is the suggested minimum size foran active log. The suggested minimum size for an archive log in a production environment that does not usededuplication is 48 GB. If you substitute values from your environment and the results are larger than 16 GB and 48GB, use your results to size the active log and archive log.
Monitor your logs and adjust their size if necessary.
Example: Estimating active and archive log sizes for clients that use multiplesessions:
If the client option RESOURCEUTILIZATION is set to a value that is greater than thedefault, the concurrent workload for the server increases.
To determine the sizes of the active and archive logs when clients use multiplesessions, use the following calculation:number of clients x sessions for each client x files stored
during each transaction x log space needed for each file
This calculation is used in the example in the following table.
Table 6. Multiple client sessions
Item Example values Description
Maximum number of clientnodes that back up, archive,or migrate files concurrentlyat any time
300 1000 The number of client nodes that back up, archive, ormigrate files every night.
Possible sessions for eachclient
3 3 The setting of the client option RESOURCEUTILIZATION islarger than the default. Each client session runs a maximumof three sessions in parallel.
Files stored during eachtransaction
4096 4096 The default value of the server option TXNGROUPMAX is 4096.
Installing the Tivoli Storage Manager server
14 IBM Tivoli Storage Manager for Windows: Installation Guide

Table 6. Multiple client sessions (continued)
Item Example values Description
Log space that is required foreach file
3053 3053 The value of 3053 bytes for each file in a transactionrepresents the log bytes needed when backing up files froma Windows client where the file names are 12 - 120 bytes.
This value is based on the results of tests performed underlaboratory conditions. Tests consisted of clients performingbackup operations to a random-access disk (DISK) storagepool. DISK pools result in more log use thansequential-access storage pools. Consider a value largerthan 3053 bytes if the data being stored has file names thatare longer than 12 - 120 bytes.
Active log: Suggested size 26.5 GB 1 51 GB 1 The following calculation was used for 300 clients. One GBequals 1,073,741,824 bytes.
(300 clients x 3 sessions for each client x 4096 filesstored during each transaction x 3053 bytes for eachfile) ÷ 1,073,741,824 = 10.5 GB
Increase that amount by the suggested starting size of 16GB:
10.5 + 16 = 26.5 GB
The following calculation was used for 1000 clients. OneGB equals 1,073,741,824 bytes.
(1000 clients x 3 sessions for each client x 4096files store during each transaction x 3053 bytes foreach file) ÷ 1,073,741,824 = 35 GB
Increase that amount by the suggested starting size of 16GB:
35 + 16 = 51 GB
Archive log: Suggested size 79.5 GB 1 153 GB 1 Because of the requirement to be able to store archive logsacross three server-database backup cycles, the estimate forthe active log is multiplied by 3:
10.5 x 3 = 31.5 GB
35 x 3 = 105 GB
Increase those amounts by the suggested starting size of 48GB:
31.5 + 48 = 79.5 GB
105 + 48 = 153 GB1 The example values in this table are used only to illustrate how the sizes for active logs and archive logs arecalculated. In a production environment that does not use deduplication, 16 GB is the suggested minimum size foran active log. The suggested minimum size for an archive log in a production environment that does not usededuplication is 48 GB. If you substitute values from your environment and the results are larger than 16 GB and 48GB, use your results to size the active log and archive log.
Monitor your active log and adjust its size if necessary.
Installing the Tivoli Storage Manager server
Chapter 1. Planning to install the IBM Tivoli Storage Manager server 15
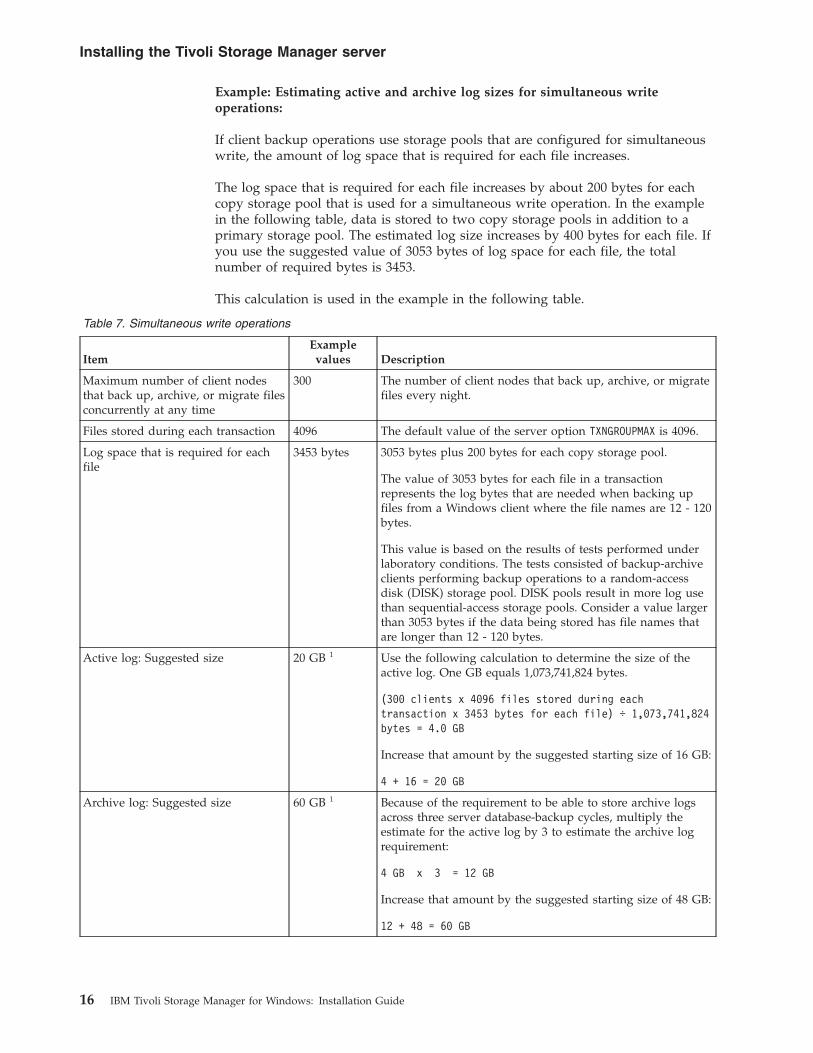
Example: Estimating active and archive log sizes for simultaneous writeoperations:
If client backup operations use storage pools that are configured for simultaneouswrite, the amount of log space that is required for each file increases.
The log space that is required for each file increases by about 200 bytes for eachcopy storage pool that is used for a simultaneous write operation. In the examplein the following table, data is stored to two copy storage pools in addition to aprimary storage pool. The estimated log size increases by 400 bytes for each file. Ifyou use the suggested value of 3053 bytes of log space for each file, the totalnumber of required bytes is 3453.
This calculation is used in the example in the following table.
Table 7. Simultaneous write operations
ItemExample
values Description
Maximum number of client nodesthat back up, archive, or migrate filesconcurrently at any time
300 The number of client nodes that back up, archive, or migratefiles every night.
Files stored during each transaction 4096 The default value of the server option TXNGROUPMAX is 4096.
Log space that is required for eachfile
3453 bytes 3053 bytes plus 200 bytes for each copy storage pool.
The value of 3053 bytes for each file in a transactionrepresents the log bytes that are needed when backing upfiles from a Windows client where the file names are 12 - 120bytes.
This value is based on the results of tests performed underlaboratory conditions. The tests consisted of backup-archiveclients performing backup operations to a random-accessdisk (DISK) storage pool. DISK pools result in more log usethan sequential-access storage pools. Consider a value largerthan 3053 bytes if the data being stored has file names thatare longer than 12 - 120 bytes.
Active log: Suggested size 20 GB 1 Use the following calculation to determine the size of theactive log. One GB equals 1,073,741,824 bytes.
(300 clients x 4096 files stored during eachtransaction x 3453 bytes for each file) ÷ 1,073,741,824bytes = 4.0 GB
Increase that amount by the suggested starting size of 16 GB:
4 + 16 = 20 GB
Archive log: Suggested size 60 GB 1 Because of the requirement to be able to store archive logsacross three server database-backup cycles, multiply theestimate for the active log by 3 to estimate the archive logrequirement:
4 GB x 3 = 12 GB
Increase that amount by the suggested starting size of 48 GB:
12 + 48 = 60 GB
Installing the Tivoli Storage Manager server
16 IBM Tivoli Storage Manager for Windows: Installation Guide

Table 7. Simultaneous write operations (continued)
ItemExample
values Description1 The example values in this table are used only to illustrate how the sizes for active logs and archive logs arecalculated. In a production environment that does not use deduplication, 16 GB is the suggested minimum size foran active log. The suggested minimum size for an archive log in a production environment that does not usededuplication is 48 GB. If you substitute values from your environment and the results are larger than 16 GB and 48GB, use your results to size the active log and archive log.
Monitor your logs and adjust their size if necessary.
Example: Estimating active and archive log sizes for basic client store operationsand server operations:
Migration of data in server storage, identification processes for data deduplication,reclamation, and expiration might run concurrently with client store operations.Administrative tasks such as administrative commands or SQL queries fromadministrative clients can also run concurrently with client store operations. Serveroperations and administrative tasks that run concurrently can increase the activelog space that is required.
For example, migration of files from the random-access (DISK) storage pool to asequential-access disk (FILE) storage pool uses approximately 110 bytes of logspace for each file that is migrated. For example, suppose that you have 300backup-archive clients and each one of them backs up 100,000 files every night.The files are initially stored on DISK and then migrated to a FILE storage pool. Toestimate the amount of active log space that is required for the data migration, usethe following calculation. The number of clients in the calculation represents themaximum number of client nodes that back up, archive, or migrate filesconcurrently at any time.300 clients x 100,000 files for each client x 110 bytes = 3.1 GB
Add this value to the estimate for the size of the active log that calculated for basicclient store operations.
Example: Estimating active and archive log sizes under conditions of extremevariation:
Problems with running out of active log space can occur if you have manytransactions that complete quickly and some transactions that take much longer tocomplete. A typical case occurs when many workstation or file-server backupsessions are active and a few very large database server-backup sessions are active.If this situation applies to your environment, you might need to increase the sizeof the active log so that the work completes successfully.
Installing the Tivoli Storage Manager server
Chapter 1. Planning to install the IBM Tivoli Storage Manager server 17

Example: Estimating archive log sizes with full database backups:
The Tivoli Storage Manager server deletes unnecessary files from the archive logonly when a full database backup occurs. Consequently, when you estimate thespace that is required for the archive log, you must also consider the frequency offull database backups.
For example, if a full database backup occurs once a week, the archive log spacemust be able to contain the information in the archive log for a full week.
The difference in archive log size for daily and full database backups is shown inthe example in the following table.
Table 8. Full database backups
ItemExample
values Description
Maximum number of client nodesthat back up, archive, or migrate filesconcurrently at any time
300 The number of client nodes that back up, archive, or migratefiles every night.
Files stored during each transaction 4096 The default value of the server option TXNGROUPMAX is 4096.
Log space that is required for eachfile
3453 bytes 3053 bytes for each file plus 200 bytes for each copy storagepool.
The value of 3053 bytes for each file in a transactionrepresents the log bytes needed when backing up files froma Windows client where the file names are 12 - 120 bytes.
This value is based on the results of tests performed underlaboratory conditions. Tests consisted of clients performingbackup operations to a random-access disk (DISK) storagepool. DISK pools result in more log use thansequential-access storage pools. Consider a value larger than3053 bytes if the data being stored has file names that arelonger than 12 - 120 bytes.
Active log: Suggested size 20 GB 1 Use the following calculation to determine the size of theactive log. One GB equals 1,073,741,824 bytes.
(300 clients x 4096 files per transaction x 3453 bytesper file) ÷ 1,073,741,824 bytes = 4.0 GB
Increase that amount by the suggested starting size of 16GB:
4 + 16 = 20 GB
Archive log: Suggested size with afull database backup every day
60 GB 1 Because of the requirement to be able to store archive logsacross three backup cycles, multiply the estimate for theactive log by 3 to estimate the total archive log requirement:
4 GB x 3 = 12 GB
Increase that amount by the suggested starting size of 48GB:
12 + 48 = 60 GB
Installing the Tivoli Storage Manager server
18 IBM Tivoli Storage Manager for Windows: Installation Guide
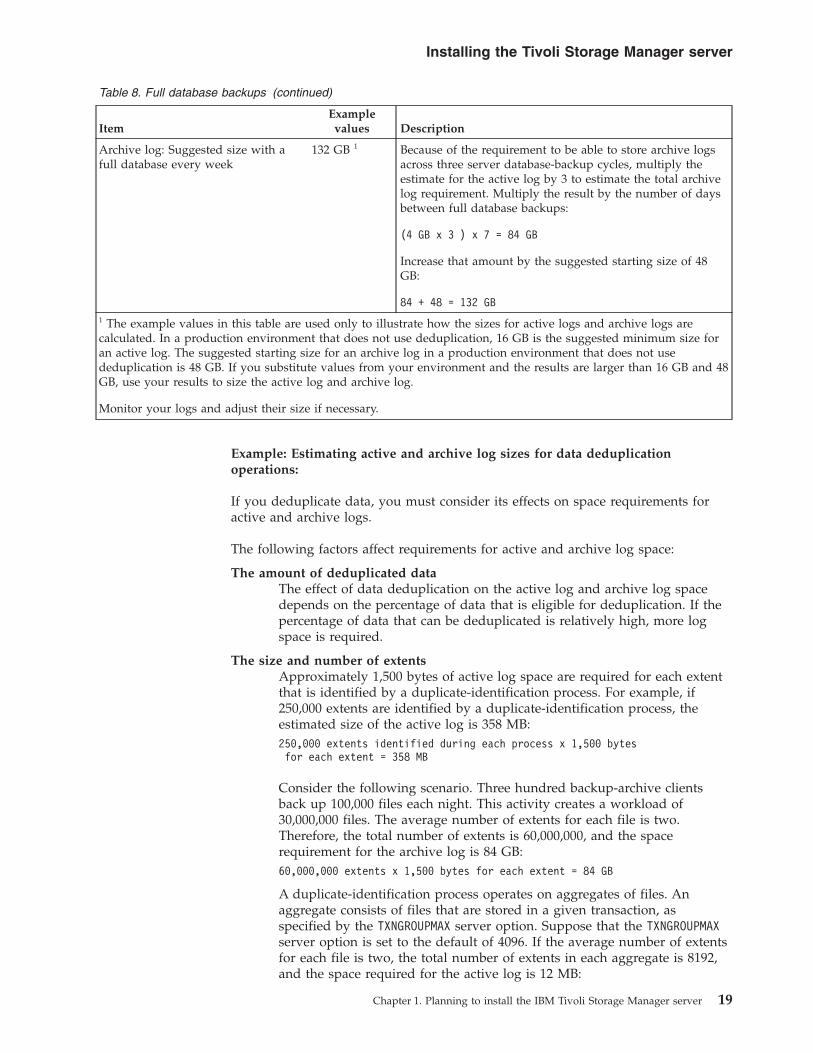
Table 8. Full database backups (continued)
ItemExample
values Description
Archive log: Suggested size with afull database every week
132 GB 1 Because of the requirement to be able to store archive logsacross three server database-backup cycles, multiply theestimate for the active log by 3 to estimate the total archivelog requirement. Multiply the result by the number of daysbetween full database backups:
(4 GB x 3 ) x 7 = 84 GB
Increase that amount by the suggested starting size of 48GB:
84 + 48 = 132 GB1 The example values in this table are used only to illustrate how the sizes for active logs and archive logs arecalculated. In a production environment that does not use deduplication, 16 GB is the suggested minimum size foran active log. The suggested starting size for an archive log in a production environment that does not usededuplication is 48 GB. If you substitute values from your environment and the results are larger than 16 GB and 48GB, use your results to size the active log and archive log.
Monitor your logs and adjust their size if necessary.
Example: Estimating active and archive log sizes for data deduplicationoperations:
If you deduplicate data, you must consider its effects on space requirements foractive and archive logs.
The following factors affect requirements for active and archive log space:
The amount of deduplicated dataThe effect of data deduplication on the active log and archive log spacedepends on the percentage of data that is eligible for deduplication. If thepercentage of data that can be deduplicated is relatively high, more logspace is required.
The size and number of extentsApproximately 1,500 bytes of active log space are required for each extentthat is identified by a duplicate-identification process. For example, if250,000 extents are identified by a duplicate-identification process, theestimated size of the active log is 358 MB:250,000 extents identified during each process x 1,500 bytesfor each extent = 358 MB
Consider the following scenario. Three hundred backup-archive clientsback up 100,000 files each night. This activity creates a workload of30,000,000 files. The average number of extents for each file is two.Therefore, the total number of extents is 60,000,000, and the spacerequirement for the archive log is 84 GB:60,000,000 extents x 1,500 bytes for each extent = 84 GB
A duplicate-identification process operates on aggregates of files. Anaggregate consists of files that are stored in a given transaction, asspecified by the TXNGROUPMAX server option. Suppose that the TXNGROUPMAXserver option is set to the default of 4096. If the average number of extentsfor each file is two, the total number of extents in each aggregate is 8192,and the space required for the active log is 12 MB:
Installing the Tivoli Storage Manager server
Chapter 1. Planning to install the IBM Tivoli Storage Manager server 19

8192 extents in each aggregate x 1500 bytes for each extent =12 MB
The timing and number of the duplicate-identification processesThe timing and number of duplicate-identification processes also affects thesize of the active log. Using the 12 MB active-log size that was calculatedin the preceding example, the concurrent load on the active log is 120 MBif 10 duplicate-identification processes are running in parallel:12 MB for each process x 10 processes = 120 MB
File sizeLarge files that are processed for duplicate identification can also affect thesize of the active log. For example, suppose that a backup-archive clientbacks up an 80 GB, file-system image. This object can have a high numberof duplicate extents if, for example, the files included in the file systemimage were backed up incrementally. For example, assume that a filesystem image has 1.2 million duplicate extents. The 1.2 million extents inthis large file represent a single transaction for a duplicate-identificationprocess. The total space in the active log that is required for this singleobject is 1.7 GB:1,200,000 extents x 1,500 bytes for each extent = 1.7 GB
If other, smaller duplicate-identification processes occur at the same time asthe duplicate-identification process for a single large object, the active logmight not have enough space. For example, suppose that a storage pool isenabled for deduplication. The storage pool has a mixture of data,including many relatively small files that range from 10 KB to severalhundred KB. The storage pool also has few large objects that have a highpercentage of duplicate extents.
To take into account not only space requirements but also the timing andduration of concurrent transactions, increase the estimated size of theactive log by a factor of two. For example, suppose that your calculationsfor space requirements are 25 GB (23.3 GB + 1.7 GB for deduplication of alarge object). If deduplication processes are running concurrently, thesuggested size of the active log is 50 GB. The suggested size of the archivelog is 150 GB.
The examples in the following tables show calculations for active andarchive logs. The example in the first table uses an average size of 700 KBfor extents. The example in the second table uses an average size of 256KB. As the examples show, the average deduplicate-extent size of 256 KBindicates a larger estimated size for the active log. To minimize or preventoperational problems for the server, use 256 KB to estimate the size of theactive log in your production environment.
Table 9. Average duplicate-extent size of 700 KB
Item Example values Description
Size of largest singleobject to deduplicate
800 GB 4 TB The granularity of processing for deduplication is at the filelevel. Therefore, the largest single file to deduplicaterepresents the largest transaction and a correspondinglylarge load on the active and archive logs.
Average size ofextents
700 KB 700 KB The deduplication algorithms use a variable block method.Not all deduplicated extents for a given file are the samesize, so this calculation assumes an average size for extents.
Installing the Tivoli Storage Manager server
20 IBM Tivoli Storage Manager for Windows: Installation Guide

Table 9. Average duplicate-extent size of 700 KB (continued)
Item Example values Description
Extents for a givenfile
1,198,372bits
6,135,667 bits Using the average extent size (700 KB), these calculationsrepresent the total number of extents for a given object.
The following calculation was used for an 800 GB object:(800 GB ÷ 700 KB) = 1,198,372 bits
The following calculation was used for a 4 TB object: (4 TB ÷700 KB) = 6,135,667 bits
Active log: Suggestedsize that is requiredfor the deduplicationof a single large objectduring a singleduplicate-identification process
1.7 GB 8.6 GB The estimated active log space that are needed for thistransaction.
Active log: Suggestedtotal size
66 GB 1 79.8 GB 1 After considering other aspects of the workload on theserver in addition to deduplication, multiply the existingestimate by a factor of two. In these examples, the active logspace required to deduplicate a single large object isconsidered along with previous estimates for the requiredactive log size.
The following calculation was used for multiple transactionsand an 800 GB object:
(23.3 GB + 1.7 GB) x 2 = 50 GB
Increase that amount by the suggested starting size of 16 GB:
50 + 16 = 66 GB
The following calculation was used for multiple transactionsand a 4 TB object:
(23.3 GB + 8.6 GB) x 2 = 63.8 GB
Increase that amount by the suggested starting size of 16 GB:
63.8 + 16 = 79.8 GB
Archive log:Suggested size
198 GB 1 239.4 GB 1 Multiply the estimated size of the active log by a factor of 3.
The following calculation was used for multiple transactionsand an 800 GB object:
50 GB x 3 = 150 GB
Increase that amount by the suggested starting size of 48 GB:
150 + 48 = 198 GB
The following calculation was used for multiple transactionsand a 4 TB object:
63.8 GB x 3 = 191.4 GB
Increase that amount by the suggested starting size of 48 GB:
191.4 + 48 = 239.4 GB
Installing the Tivoli Storage Manager server
Chapter 1. Planning to install the IBM Tivoli Storage Manager server 21

Table 9. Average duplicate-extent size of 700 KB (continued)
Item Example values Description1 The example values in this table are used only to illustrate how the sizes for active logs and archive logs arecalculated. In a production environment that uses deduplication, 32 GB is the suggested minimum size for an activelog. The suggested minimum size for an archive log in a production environment that uses deduplication is 96 GB.If you substitute values from your environment and the results are larger than 32 GB and 96 GB, use your results tosize the active log and archive log.
Monitor your logs and adjust their size if necessary.
Table 10. Average duplicate-extent size of 256 KB
Item Example values Description
Size of largest singleobject to deduplicate
800 GB 4 TB The granularity of processing for deduplication is at the filelevel. Therefore, the largest single file to deduplicaterepresents the largest transaction and a correspondinglylarge load on the active and archive logs.
Average size ofextents
256 KB 256 KB The deduplication algorithms use a variable block method.Not all deduplicated extents for a given file are the samesize, so this calculation assumes an average extent size.
Extents for a givenfile
3,276,800 bits 16,777,216bits
Using the average extent size, these calculations representthe total number of extents for a given object.
The following calculation was used for multiple transactionsand an 800 GB object:
(800 GB ÷ 256 KB) = 3,276,800 bits
The following calculation was used for multiple transactionsand a 4 TB object:
(4 TB ÷ 256 KB) = 16,777,216 bits
Active log: Suggestedsize that is requiredfor the deduplicationof a single large objectduring a singleduplicate-identification process
4.5 GB 23.4 GB The estimated size of the active log space that is required forthis transaction.
Installing the Tivoli Storage Manager server
22 IBM Tivoli Storage Manager for Windows: Installation Guide

Table 10. Average duplicate-extent size of 256 KB (continued)
Item Example values Description
Active log: Suggestedtotal size
71.6 GB 1 109.4 GB 1 After considering other aspects of the workload on theserver in addition to deduplication, multiply the existingestimate by a factor of 2. In these examples, the active logspace required to deduplicate a single large object isconsidered along with previous estimates for the requiredactive log size.
The following calculation was used for multiple transactionsand an 800 GB object:
(23.3 GB + 4.5 GB) x 2 = 55.6 GB
Increase that amount by the suggested starting size of 16 GB:
55.6 + 16 = 71.6 GB
The following calculation was used for multiple transactionsand a 4 TB object:
(23.3 GB + 23.4 GB) x 2 = 93.4 GB
Increase that amount by the suggested starting size of 16 GB:
93.4 + 16 = 109.4 GB
Archive log:Suggested size
214.8 GB 1 328.2 GB 1 The estimated size of the active log multiplied by a factor of3.
The following calculation was used for an 800 GB object:
55.6 GB x 3 = 166.8 GB
Increase that amount by the suggested starting size of 48 GB:
166.8 + 48 = 214.8 GB
The following calculation was used for a 4 TB object:
93.4 GB x 3 = 280.2 GB
Increase that amount by the suggested starting size of 48 GB:
280.2 + 48 = 328.2 GB1 The example values in this table are used only to illustrate how the sizes for active logs and archive logs arecalculated. In a production environment that uses deduplication, 32 GB is the suggested minimum size for an activelog. The suggested minimum size for an archive log in a production environment that uses deduplication is 96 GB.If you substitute values from your environment and the results are larger than 32 GB and 96 GB, use your results tosize the active log and archive log.
Monitor your logs and adjust their size if necessary.
Installing the Tivoli Storage Manager server
Chapter 1. Planning to install the IBM Tivoli Storage Manager server 23
Active-log mirror spaceThe active log can be mirrored so that the mirrored copy can be used if the activelog files cannot be read. There can be only one active log mirror.
Creating a log mirror is a suggested option. If you increase the size of the activelog, the log mirror size is increased automatically. Mirroring the log can affectperformance because of the doubled I/O activity that is required to maintain themirror. The additional space that the log mirror requires is another factor toconsider when deciding whether to create a log mirror.
If the mirror log directory becomes full, the server issues error messages to theactivity log and to the db2diag.log. Server activity continues.
Archive-failover log spaceThe archive failover log is used by the server if the archive log directory runs outof space.
Specifying an archive failover log directory can prevent problems that occur if thearchive log runs out of space. If both the archive log directory and the drive or filesystem where the archive failover log directory is located become full, the dataremains in the active log directory. This condition can cause the active log to fillup, which causes the server to halt.
Monitoring space utilization for the database and recoverylogs
To determine the amount of used and available active log space, you issue theQUERY LOG command. To monitor space utilization in the database and recoverylogs, you can also check the activity log for messages.
Active log
If the amount of available active log space is too low, the following messages aredisplayed in the activity log:
ANR4531I: IC_AUTOBACKUP_LOG_USED_SINCE_LAST_BACKUP_TRIGGERThis message is displayed when the active log space exceeds the maximumspecified size. The Tivoli Storage Manager server starts a full databasebackup.
To change the maximum log size, halt the server. Open the dsmserv.optfile, and specify a new value for the ACTIVELOGSIZE option. When you arefinished, restart the server.
ANR0297I: IC_BACKUP_NEEDED_LOG_USED_SINCE_LAST_BACKUPThis message is displayed when the active log space exceeds the maximumspecified size. You must back up the database manually.
To change the maximum log size, halt the server. Open the dsmserv.optfile, and specify a new value for the ACTIVELOGSIZE option. When you arefinished, restart the server.
ANR4529I: IC_AUTOBACKUP_LOG_UTILIZATION_TRIGGERThe ratio of used active-log space to available active-log space exceeds thelog utilization threshold. If at least one full database backup has occurred,the Tivoli Storage Manager server starts an incremental database backup.Otherwise, the server starts a full database backup.
Installing the Tivoli Storage Manager server
24 IBM Tivoli Storage Manager for Windows: Installation Guide
ANR0295I: IC_BACKUP_NEEDED_LOG_UTILIZATIONThe ratio of used active-log space to available active-log space exceeds thelog utilization threshold. You must back up the database manually.
Archive log
If the amount of available archive log space is too low, the following message isdisplayed in the activity log:
ANR0299I: IC_BACKUP_NEEDED_ARCHLOG_USEDThe ratio of used archive-log space to available archive-log space exceedsthe log utilization threshold. The Tivoli Storage Manager server starts a fullautomatic database backup.
Database
If the amount of space available for database activities is too low, the followingmessages are displayed in the activity log:
ANR2992W: IC_LOG_FILE_SYSTEM_UTILIZATION_WARNING_2The used database space exceeds the threshold for database spaceutilization. To increase the space for the database, use the EXTEND DBSPACEcommand, the EXTEND DBSPACE command, or the DSMSERV FORMATutility with the DBDIR parameter.
ANR1546W: FILESYSTEM_DBPATH_LESS_1GBThe available space in the directory where the server database files arelocated is less than 1 GB.
When a Tivoli Storage Manager server is created with the DSMSERVFORMAT utility or with the configuration wizard, a server database andrecovery log are also created. In addition, files are created to hold databaseinformation used by the database manager. The path specified in thismessage indicates the location of the database information used by thedatabase manager. If space is unavailable in the path, the server can nolonger function.
You must add space to the file system or make space available on the filesystem or disk.
Server naming best practicesUse these descriptions as a reference when you install or upgrade a Tivoli StorageManager server.
Instance user ID
The instance user ID is used as the basis for other names related to the serverinstance. The instance user ID is also called the instance owner.
For example: tsminst1
The instance user ID is the user ID that must have ownership or read/write accessauthority to all directories that you create for the database and the recovery log.The standard way to run the server is under the instance user ID. That user IDmust also have read/write access to the directories that are used for any FILEdevice classes.
Installing the Tivoli Storage Manager server
Chapter 1. Planning to install the IBM Tivoli Storage Manager server 25

Database instance name
The database instance name is the name of the server instance as it appearsin the registry.
For example: Server1
Instance directory
The instance directory is a directory that contains files specifically for a serverinstance (the server options file and other server-specific files). It can have anyname that you want. For easier identification, use a name that ties the directory tothe instance name.
You can use a name that includes the name of the server instance as itappears (or will appear) in the registry. Default server instance names havethe form Serverx.
For example: C:\tsm\server1
The instance directory stores the following files for the server instance:v The server options file, dsmserv.optv The server key database file, cert.kdb, and the .arm files (used by clients
and other servers to import the Secure Sockets Layer certificates of theserver)
v Device configuration file, if the DEVCONFIG server option does not specifya fully qualified name
v Volume history file, if the VOLUMEHISTORY server option does not specify afully qualified name
v Volumes for DEVTYPE=FILE storage pools, if the directory for thedevice class is not fully specified, or not fully qualified
v User exitsv Trace output (if not fully qualified)
Database name
The database name is always TSMDB1, for every server instance. This name cannotbe changed.
Server name
The server name is an internal name for Tivoli Storage Manager, and is used foroperations that involve communication among multiple Tivoli Storage Managerservers. Examples include server-to-server communication and library sharing.
The server name is also used when you add the server to the Operations Center sothat it can be managed using that interface. Use a unique name for each server. Foreasy identification in the Operations Center (or from a QUERY SERVER command),use a name that reflects the location or purpose of the server. Do not change thename of a Tivoli Storage Manager server after it is configured as a hub or spokeserver.
If you use the wizard, the default name that is suggested is the host name of thesystem that you are using. You can use a different name that is meaningful in yourenvironment. If you have more than one server on the system and you use thewizard, you can use the default name for only one of the servers. You must enter aunique name for each server.
Installing the Tivoli Storage Manager server
26 IBM Tivoli Storage Manager for Windows: Installation Guide

For example,TUCSON_SERVER1
TUCSON_SERVER2
Directories for database space and recovery log
The directories can be named according to local practices. For easier identification,consider using names that tie the directories to the server instance.
For example, for the archive log:f:\server1\archlog
Installing the Tivoli Storage Manager server
Chapter 1. Planning to install the IBM Tivoli Storage Manager server 27

Installing the Tivoli Storage Manager server
28 IBM Tivoli Storage Manager for Windows: Installation Guide

Chapter 2. Installing the Tivoli Storage Manager servercomponents
To install the Tivoli Storage Manager 7.1.1 server, you can use the installationwizard, the command line in console mode, or by using silent mode.
About this task
Using the Tivoli Storage Manager installation software, you can install thefollowing components:v Tivoli Storage Manager Server
Tip: The database (DB2) and the Global Security Kit (GSKit) are automaticallyinstalled when you select the server component.
v Tivoli Storage Manager Server Languagesv Tivoli Storage Manager Licensev Tivoli Storage Manager Devicesv Tivoli Storage Manager Storage Agentv Tivoli Storage Manager Operations Center
Obtaining the Tivoli Storage Manager installation packageYou can obtain the Tivoli Storage Manager installation package from a DVD or anIBM download site such as IBM Passport Advantage®.
Procedure1. Download the appropriate package file from one of the following websites, or
you can access the files from the product DVD:v For a first time installation or a new release go to Passport Advantage at:
http://www.ibm.com/software/lotus/passportadvantage/. PassportAdvantage is the only site that you can download a licensed package filefrom.
v For the latest information, updates, and maintenance fixes, go to the TivoliStorage Manager support site: http://www.ibm.com/support/entry/portal/Overview/Software/Tivoli/Tivoli_Storage_Manager.
2. If you downloaded the package from an IBM download site, complete thefollowing steps:a. Verify that you have enough space to store the installation files when they
are extracted from the product package. See the download document for thespace requirements:v Tivoli Storage Manager: http://www.ibm.com/support/
docview.wss?uid=swg24035121v Tivoli Storage Manager Extended Edition: http://www.ibm.com/
support/docview.wss?uid=swg24035636
Installing components Taking the first stepsPlanning to install
© Copyright IBM Corp. 1993, 2014 29

v System Storage® Archive Manager: http://www.ibm.com/support/docview.wss?uid=swg24035638
b. Change to the directory where you placed the executable file.
Important: In the next step, the files are extracted to the current directory.The path must contain no more than 128 characters. Be sure to extract theinstallation files to an empty directory. Do not extract to a directory thatcontains previously extracted files, or any other files.
c. Either double-click the executable file, or enter the following command onthe command line to extract the installation files. The files are extracted tothe current directory.package_name.exe
where package_name is like this example: 7.1.1.000-TIV-TSMSRV-Windows.exe3. Select one of the following methods of installing Tivoli Storage Manager:
v “Installing Tivoli Storage Manager by using the installation wizard”v “Installing Tivoli Storage Manager by using console mode” on page 32v “Installing Tivoli Storage Manager in silent mode” on page 33
4. After you install Tivoli Storage Manager, and before you customize it for youruse, go to the following website: http://www.ibm.com/support/entry/portal/Overview/Software/Tivoli/Tivoli_Storage_Manager. Click Support anddownloads and apply any applicable fixes.
Installing Tivoli Storage Manager by using the installation wizardYou can install Tivoli Storage Manager by using the IBM Installation Managergraphical wizard.
Before you begin
Take the following actions before you start the installation:v Verify that the operating system is set to the language that you require. By
default, the language of the operating system is the language of the installationwizard.
v Ensure that the user ID that you plan to use during the installation is a userwith local Administrator authority.
On test servers only: Use the following command to bypass prerequisite checkssuch as the operating system and the required memory. Do not issue thiscommand on a production server.For new installations, issue the following command:install.bat -g -vmargs "-DBYPASS_TSM_REQ_CHECKS=true"
Otherwise, update the following file to add the -DBYPASS_TSM_REQ_CHECKS=trueflag. The dash in the -DBYPASS_TSM_REQ_CHECKS=true flag is required and must beadded on a new line after the -vmargs flag...\Installation Manager\eclipse\ibmim.ini
Installing the Tivoli Storage Manager server
30 IBM Tivoli Storage Manager for Windows: Installation Guide
|
||||
|
|||
|

Procedure
Install Tivoli Storage Manager by using one of the following methods:
Option Description
Installing the software from a downloadedpackage:
1. Change to the directory where youdownloaded the package.
2. Start the installation wizard by issuingthe following command:
install.bat
Or, in the directory where the installationfiles were extracted, double-click theinstall.bat file.
Installing the software from a DVD: 1. Insert the DVD into the DVD drive.Tip: Ensure that the installation files arevisible on the DVD drive.
2. Start the installation wizard by issuingthe following command from acommand line:
install.bat
Or, in the directory where the installationfiles were extracted, double-click theinstall.bat file.
What to do nextv If errors occur during the installation process, the errors are recorded in log files
that are stored in the IBM Installation Manager logs directory.You can view installation log files by clicking File > View Log from theInstallation Manager tool. To collect these log files, click Help > Export Data forProblem Analysis from the Installation Manager tool.
v After you install Tivoli Storage Manager, and before you customize it for youruse, go to the following website: http://www.ibm.com/support/entry/portal/Overview/Software/Tivoli/Tivoli_Storage_Manager. Click Support anddownloads and apply any applicable fixes.
v After you install a new Tivoli Storage Manager server, review Taking the firststeps after you install Tivoli Storage Manager to learn about configuring yourserver.
v If a native device driver is available on Windows for the tape drives or mediumchangers that you plan to use, use the native device driver. If a native devicedriver is not available on Windows for the tape drives or medium changers thatyou plan to use, install the Tivoli Storage Manager device driver by issuing thedpinst.exe /a command. The dpinst.exe file is in the device driver directory.The default directory is C:\Program Files\Tivoli\TSM\device\drivers.
Related reference:
Drivers for non IBM devices (http://www.ibm.com/support/knowledgecenter/SSGSG7_7.1.1/com.ibm.itsm.srv.doc/r_device_drivers_nonibm_win.html)
Installing the Tivoli Storage Manager server
Chapter 2. Installing the Tivoli Storage Manager server components 31
|

Installing Tivoli Storage Manager by using console modeYou can install Tivoli Storage Manager by using the command line in consolemode.
Before you begin
Take the following actions before you start the installation:v Verify that the operating system is set to the language that you require. By
default, the language of the operating system is the language of the installationwizard.
v Ensure that the user ID that you plan to use during the installation is a userwith local Administrator authority.
On test servers only: Use the following command to bypass prerequisite checkssuch as the operating system and the required memory. Do not issue thiscommand on a production server.For new installations, issue the following command:install.bat -c -vmargs "-DBYPASS_TSM_REQ_CHECKS=true"
Otherwise, update the following file to add the -DBYPASS_TSM_REQ_CHECKS=trueflag. The dash in the -DBYPASS_TSM_REQ_CHECKS=true flag is required and must beadded on a new line after the -vmargs flag...\Installation Manager\eclipse\tools\imcl.ini
Procedure
Install Tivoli Storage Manager by using one of the following methods:
Option Description
Installing the software from a downloadedpackage:
1. Change to the directory where youdownloaded the package.
2. Start the installation wizard in consolemode by issuing the followingcommand:
install.bat -c
3.Optional: Generate a response file aspart of a console mode installation.Complete the console mode installationoptions, and in the Summary panel,specify G to generate the responses.
Installing the Tivoli Storage Manager server
32 IBM Tivoli Storage Manager for Windows: Installation Guide
|
|
|||
||
||||
|
|||
|
|

Option Description
Installing the software from a DVD: 1. Insert the DVD into the DVD drive.Tip: Ensure that the installation files arevisible on the DVD drive.
2. Start the installation wizard in consolemode by issuing the followingcommand:
install.bat -c
3.Optional: Generate a response file aspart of a console mode installation.Complete the console mode installationoptions, and in the Summary panel,specify G to generate the responses.
What to do nextv If errors occur during the installation process, the errors are recorded in log files
that are stored in the IBM Installation Manager logs directory, for example:C:\ProgramData\IBM\Installation Manager\logs
v After you install Tivoli Storage Manager, and before you customize it for youruse, go to the following website: http://www.ibm.com/support/entry/portal/Overview/Software/Tivoli/Tivoli_Storage_Manager. Click Support anddownloads and apply any applicable fixes.
v After you install a new Tivoli Storage Manager server, review the information inTaking the first steps after you install Tivoli Storage Manager to learn aboutconfiguring your server.
v If a native device driver is available on Windows for the tape drives or mediumchangers that you plan to use, use the native device driver. If a native devicedriver is not available on Windows for the tape drives or medium changers thatyou plan to use, install the Tivoli Storage Manager device driver by issuing thedpinst.exe /a command. The dpinst.exe file is in the device driver directory.The default directory is C:\Program Files\Tivoli\TSM\device\drivers.
Related reference:
Drivers for non IBM devices (http://www.ibm.com/support/knowledgecenter/SSGSG7_7.1.1/com.ibm.itsm.srv.doc/r_device_drivers_nonibm_win.html)
Installing Tivoli Storage Manager in silent modeYou can install the IBM Tivoli Storage Manager server in silent mode without anyuser interaction.
Before you begin
A silent installation can use response files for data input. The input directory,which is in the directory where the installation package was extracted, contains thefollowing sample response files to install, update, and uninstall Tivoli StorageManager:v install_response_sample.xml
v update_response_sample.xml
v uninstall_response_sample.xml
Installing the Tivoli Storage Manager server
Chapter 2. Installing the Tivoli Storage Manager server components 33
||
|
|
||||
|
|
|

You can use these sample files as they are or you can customize them to suit yourneeds. It is optimal to use the sample response files. These sample files containinstructions and default values to help you avoid any unnecessary warnings.
On test servers only: Use the following command to bypass prerequisite checkssuch as the operating system and the required memory. Do not issue thiscommand on a production server.
For new installations, issue the following command:install.bat -s -acceptLicense -vmargs "-DBYPASS_TSM_REQ_CHECKS=true"
Otherwise, update the following file to add the -DBYPASS_TSM_REQ_CHECKS=trueflag. The dash in the -DBYPASS_TSM_REQ_CHECKS=true flag is required and must beadded on a new line after the -vmargs flag...\Installation Manager\eclipse\tools\imcl.ini
Procedure1. Create a response file, or use one of the sample response files, such as
install_response_sample.xml or update_response_sample.xml.2. Start the silent installation, by issuing the following command from the
directory where the installation package is extracted:
Option Description
Installing the software froma downloaded package fileor DVD media:
To start the installation with a custom response file, issuethe following command, where response_file is the responsefile path, including the file name:
install.bat -s -input response_file -acceptLicense
What to do nextv If errors occur during the installation process, the errors are recorded in log files
that are stored in the IBM Installation Manager logs directory, for example:C:\ProgramData\IBM\Installation Manager\logs
v After you install Tivoli Storage Manager, and before you customize it for youruse, go to the following website: http://www.ibm.com/support/entry/portal/Overview/Software/Tivoli/Tivoli_Storage_Manager. Click Support anddownloads and apply any applicable fixes.
v After you install a new Tivoli Storage Manager server, review the information inTaking the first steps after you install Tivoli Storage Manager to learn aboutconfiguring your server.
v If a native device driver is available on Windows for the tape drives or mediumchangers that you plan to use, use the native device driver. If a native devicedriver is not available on Windows for the tape drives or medium changers thatyou plan to use, install the Tivoli Storage Manager device driver by issuing thedpinst.exe /a command. The dpinst.exe file is in the device driver directory.The default directory is C:\Program Files\Tivoli\TSM\device\drivers.
Related reference:
Drivers for non IBM devices (http://www.ibm.com/support/knowledgecenter/SSGSG7_7.1.1/com.ibm.itsm.srv.doc/r_device_drivers_nonibm_win.html)
Installing the Tivoli Storage Manager server
34 IBM Tivoli Storage Manager for Windows: Installation Guide
|||
|||
|
|
|||
|
||
|
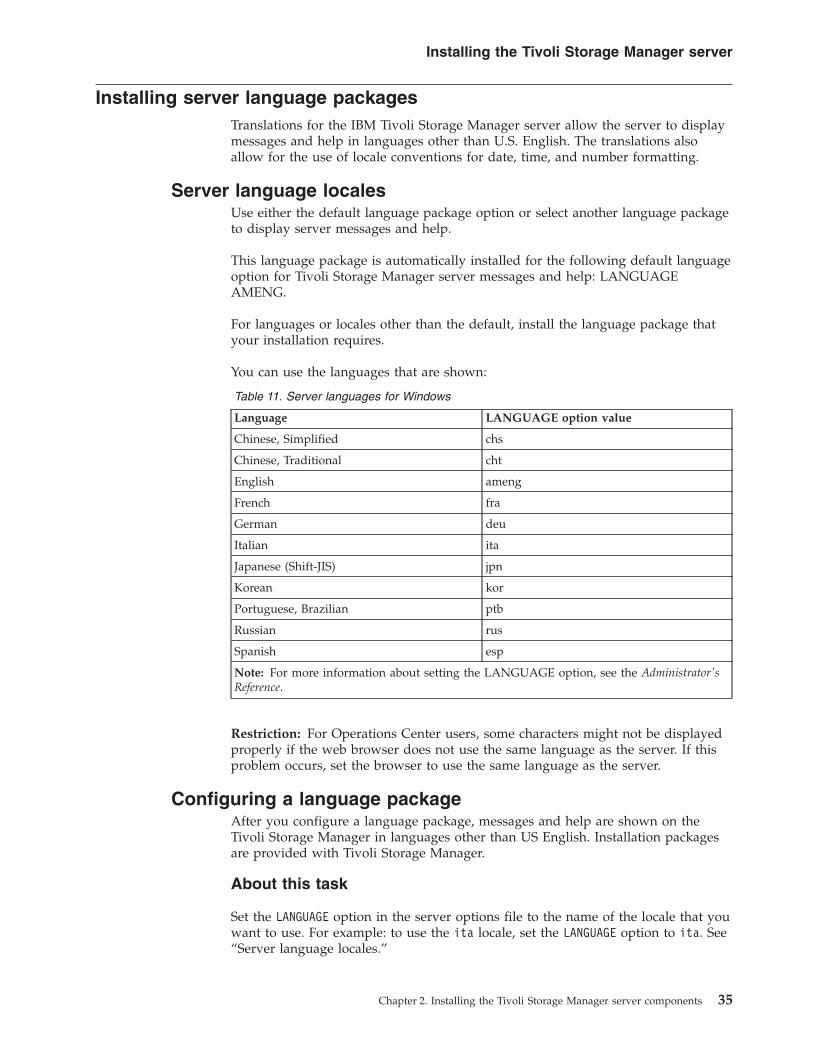
Installing server language packagesTranslations for the IBM Tivoli Storage Manager server allow the server to displaymessages and help in languages other than U.S. English. The translations alsoallow for the use of locale conventions for date, time, and number formatting.
Server language localesUse either the default language package option or select another language packageto display server messages and help.
This language package is automatically installed for the following default languageoption for Tivoli Storage Manager server messages and help: LANGUAGEAMENG.
For languages or locales other than the default, install the language package thatyour installation requires.
You can use the languages that are shown:
Table 11. Server languages for Windows
Language LANGUAGE option value
Chinese, Simplified chs
Chinese, Traditional cht
English ameng
French fra
German deu
Italian ita
Japanese (Shift-JIS) jpn
Korean kor
Portuguese, Brazilian ptb
Russian rus
Spanish esp
Note: For more information about setting the LANGUAGE option, see the Administrator'sReference.
Restriction: For Operations Center users, some characters might not be displayedproperly if the web browser does not use the same language as the server. If thisproblem occurs, set the browser to use the same language as the server.
Configuring a language packageAfter you configure a language package, messages and help are shown on theTivoli Storage Manager in languages other than US English. Installation packagesare provided with Tivoli Storage Manager.
About this task
Set the LANGUAGE option in the server options file to the name of the locale that youwant to use. For example: to use the ita locale, set the LANGUAGE option to ita. See“Server language locales.”
Installing the Tivoli Storage Manager server
Chapter 2. Installing the Tivoli Storage Manager server components 35
If the locale is successfully initialized, it formats the date, time, and number for theserver. If the locale is not successfully initialized, the server uses the US Englishmessage files and the date, time, and number format.
Updating a language packageYou can modify or update a language package by using the IBM InstallationManager.
About this task
You can install another language package within the same Tivoli Storage Managerinstance.v Use the Modify function of IBM Installation Manager to install another language
package.v Use the Update function of IBM Installation Manager to update to newer
versions of the language packages.
Tip: In IBM Installation Manager, the term update means to discover and installupdates and fixes to installed software packages. In this context, update and upgradeare synonymous.
Installing the Tivoli Storage Manager server
36 IBM Tivoli Storage Manager for Windows: Installation Guide

Chapter 3. Taking the first steps after you install TivoliStorage Manager
After you install Tivoli Storage Manager Version 7.1.1, prepare for theconfiguration. Using the configuration wizard is the preferred method ofconfiguring the Tivoli Storage Manager instance.
About this task
Configure the Tivoli Storage Manager server instance by completing the followingsteps:1. Create the directories and user ID for the server instance. See “Creating the
user ID and directories for the server instance” on page 38.2. Configure a Tivoli Storage Manager instance. Select one of the following
options:v Use the Tivoli Storage Manager configuration wizard, the preferred method.
See “Configuring Tivoli Storage Manager using the configuration wizard” onpage 40.
v Manually configure the new Tivoli Storage Manager instance. See“Configuring the server instance manually” on page 41. Complete thefollowing steps during a manual configuration.a. Set up your directories and create the Tivoli Storage Manager instance.
See “Creating the server instance” on page 41.b. Create a new server options file by copying the sample file to set up
communications between the server and clients. See “Configuring serverand client communications” on page 43.
c. Issue the DSMSERV FORMAT command to format the database. See“Formatting the database and log” on page 47.
d. Configure your system for database backup. See “Preparing the databasemanager for database backup” on page 47.
3. Configure options to control when database reorganization runs. See“Configuring server options for server database maintenance” on page 49.
4. Start the Tivoli Storage Manager server instance if it is not already started.See “Starting the server instance on Windows systems” on page 50.
5. Register your license. See “Registering licenses” on page 54.6. Prepare your system for database backups. See “Specifying a device class in
preparation for database backups” on page 55.7. Monitor the server. See “Monitoring the server” on page 57.
Taking the first stepsInstalling componentsPlanning to install
Figure 2. You are in the configuring the Tivoli Storage Manager server section.
© Copyright IBM Corp. 1993, 2014 37
Creating the user ID and directories for the server instanceCreate the user ID for the Tivoli Storage Manager server instance and create thedirectories that the Tivoli Storage Manager server instance needs for database andrecovery logs.
Before you begin
Review the information about planning space for the server before you completethis task. See “Worksheets for planning details for the Tivoli Storage Managerserver” on page 7.
Procedure1. Create the user ID that will own the server instance. You use this user ID when
you create the server instance in a later step.
Create a user ID that will be the owner of the Tivoli Storage Managerserver instance. A user ID can own more than one Tivoli StorageManager server instance. Identify the user account that will own theTivoli Storage Manager server instance.
When the server is started as a Windows service, this account is theone that the service will log on to. The user account must haveadministrative authority on the system. One user account can ownmore than one server instance.
If you have multiple servers on one system and want to run eachserver with a different user account, create a new user account in thisstep.a. Create the user ID.
Restriction: The user ID must comply with the following rule:
In the user ID, only lowercase letters (a-z), numerals (0-9), and theunderscore character ( _ ) can be used. The user ID must be 30characters or less, and cannot start with ibm, sql, sys, or a numeral.The user ID and group name cannot be user, admin, guest, public,local, or any SQL reserved word.1) Use the following operating system command to create the user
ID:net user user_ID * /add
You are prompted to create and verify a password for the newuser ID.
2) Issue the following operating system commands to add the newuser ID to the Administrators groups:net localgroup Administrators user_ID /addnet localgroup DB2ADMNS user_ID /add
2. Create directories that the server requires.
Installing the Tivoli Storage Manager server
38 IBM Tivoli Storage Manager for Windows: Installation Guide

Create empty directories for each of the items that are shown in the following table. Thedatabase, archive log, and active log must reside on different physical volumes.
ItemExample commands forcreating the directories Your directories
The instance directory forthe server, which is adirectory that willcontain files specificallyfor this server instance(the server options fileand other server-specificfiles)
mkdir d:\tsm\server1
The database directories mkdir d:\tsm\db001mkdir e:\tsm\db002mkdir f:\tsm\db003mkdir g:\tsm\db004
Active log directory mkdir h:\tsm\log
Archive log directory mkdir i:\tsm\archlog
Optional: Directory forthe log mirror for theactive log
mkdir j:\tsm\logmirror
Optional: Secondaryarchive log directory(failover location forarchive log)
mkdir k:\tsm\archlogfailover
When a server is initially created by using the DSMSERV FORMAT utility or theconfiguration wizard, a server database and recovery log are created. Inaddition, files are created to hold database information that is used by thedatabase manager.
3. Log off the new user ID.
Configuring Tivoli Storage ManagerAfter you have installed Tivoli Storage Manager Version 7.1.1 and prepared for theconfiguration, configure the Tivoli Storage Manager server instance.
About this task
Tip: The Tivoli Storage Manager Management Console, which is a MicrosoftManagement Console (MMC) snap-in, is no longer delivered with Tivoli StorageManager. The preferred method for configuring the server is to use theconfiguration wizard. You can use the wizard to complete several serverconfiguration tasks. However, you cannot use the wizard to extend the ActiveDirectory schema so that clients can automatically discover servers.
Configure a Tivoli Storage Manager server instance by selecting one of thefollowing options:v Use the Tivoli Storage Manager configuration wizard on your local system. See
“Configuring Tivoli Storage Manager using the configuration wizard” on page40.
v Manually configure the new Tivoli Storage Manager instance. See “Configuringthe server instance manually” on page 41. Complete the following steps duringa manual configuration.
Installing the Tivoli Storage Manager server
Chapter 3. Taking the first steps after you install Tivoli Storage Manager Version 7.1.1 39
||||||

1. Set up the directories and create the Tivoli Storage Manager instance. See“Creating the server instance” on page 41.
2. Create a new server options file by copying the sample file in order to set upcommunications between the Tivoli Storage Manager server and clients. See“Configuring server and client communications” on page 43.
3. Issue the DSMSERV FORMAT command to format the database. See“Formatting the database and log” on page 47.
4. Configure your system for database backup. See “Preparing the databasemanager for database backup” on page 47.
Configuring Tivoli Storage Manager using the configurationwizard
The wizard offers a guided approach to configuring a server. By using thegraphical user interface (GUI), you can avoid some configuration steps that arecomplex when done manually. Start the wizard on the system where you installedthe Tivoli Storage Manager server program.
Before you begin
Before you begin to use the configuration wizard, you must complete all precedingsteps to prepare for the configuration. These steps include installing Tivoli StorageManager, creating the database and log directories, and creating the directories anduser ID for the server instance.
About this task
Tip: The Tivoli Storage Manager Console, which is an MMC snap-in, is no longerdelivered with Tivoli Storage Manager. The preferred method for configuring theserver instance is to use the configuration wizard. You can use the wizard tocomplete several configuration tasks. However, you cannot use the wizard toextend the Active Directory schema so that clients can automatically discoverservers.
Procedure1. Ensure that the following requirements are met:
v You must disable User Account Control (at least while you are running thiswizard). See “Configuring Remote Execution Protocol on Windows” on page41 for instructions.
2. Start the local version of the wizard:Either click Start > All Programs > Tivoli Storage Manager >Configuration Wizard. Or, double-click the dsmicfgx.exe program ininstallation_directory\server. The default directory is C:\ProgramFiles\Tivoli\TSM.
Follow the instructions to complete the configuration. The wizard can bestopped and restarted, but the server is not operational until the entireconfiguration process is complete.
Installing the Tivoli Storage Manager server
40 IBM Tivoli Storage Manager for Windows: Installation Guide
||||||

Configuring Remote Execution Protocol on WindowsConfigure remote access settings by using these procedures.
Before you begin
You must configure the User Account Control feature before you run the wizard.
Tip: Ensure that the Remote Registry in Windows Services is started, and ports445, 137, and 139 are unblocked in the firewall.
Procedure
If the system is running on Windows, complete the following steps to disable UserAccount Control:1. The built-in Administrator account must be enabled. To enable the built-in
administrator account, click Control Panel > Administrative Tools > LocalSecurity Policy. Then, under Security Settings, double-click Local Policies.Double-click Security Options. Double-click the Accounts: Administratoraccount status section. Select Enable and click OK.
2. User Account Control must be disabled for all windows administrators. Todisable User Account Control for administrators, click Control Panel >Administrative Tools > Local Security Policy. Then, under Security Settings,double-click Local Policies. Double-click Security Options. Double-click theUser Account Control: Run all administrators in Admin Approval Modesection. Select Disable and click OK.
3. User Account Control must be disabled for the built-in Administrator account.To disable User Account Control for administrators, click Control Panel >Administrative Tools > Local Security Policy. Then, under Security Settings,double-click Local Policies. Double-click Security Options. Double-click theUser Account Control: Admin Appoval Mode for the Built-in AdministratorAccount section. Select Disable and click OK.
Configuring the server instance manuallyAfter installing Tivoli Storage Manager Version 7.1.1, you can configure TivoliStorage Manager manually instead of using the configuration wizard.
Creating the server instanceCreate a Tivoli Storage Manager instance by issuing the db2icrt command.
About this task
You can have one or more server instances on one workstation.
Important: Before you run the db2icrt command, ensure that the user and theinstance directory of the user exists. If there is no instance directory, you mustcreate it.
The instance directory stores the following files for the server instance:v The server options file, dsmserv.optv The server key database file, cert.kdb, and the .arm files (used by clients and
other servers to import the Secure Sockets Layer certificates of the server)v Device configuration file, if the DEVCONFIG server option does not specify a fully
qualified name
Installing the Tivoli Storage Manager server
Chapter 3. Taking the first steps after you install Tivoli Storage Manager Version 7.1.1 41

v Volume history file, if the VOLUMEHISTORY server option does not specify a fullyqualified name
v Volumes for DEVTYPE=FILE storage pools, if the directory for the device classis not fully specified, or not fully qualified
v User exitsv Trace output (if not fully qualified)1. Log in as an administrator and create a Tivoli Storage Manager instance, by
using the db2icrt command. Enter the following command on one line. Theuser account that you specify becomes the user ID that owns the Version 7.1.1server (the instance user ID).db2icrt -s ese -u user_account instance_name
For example, if the user account is tsminst1 and the server instance is Server1,enter the following command:db2icrt -s ese -u tsminst1 server1
You are prompted for the password for user ID tsminst1. Later, when you createand format the database, you use the instance name that you specified withthis command, with the -k option.
2. Change the default path for the database to be the drive where the instancedirectory for the server is located. Complete the following steps:a. Click Start > Programs > IBM DB2 > DB2TSM1 > Command Line Tools >
Command Line Processor.b. Enter quit to exit the command line processor.
A window with a command prompt should now be open, with theenvironment properly set up to successfully issue the commands in the nextsteps.
c. From the command prompt in that window, issue the following commandto set the environment variable for the server instance that you are workingwith:set db2instance=instance_name
The instance_name is the same as the instance name that you specified whenyou issued the db2icrt command. For example, to set the environmentvariable for the Server1 server instance, issue the following command:set db2instance=server1
d. Issue the command to set the default drive:db2 update dbm cfg using dftdbpath instance_location
For example, the instance directory is d:\tsm\server1 and the instancelocation is drive d:. Enter the command:db2 update dbm cfg using dftdbpath d:
3. Create a new server options file. See “Configuring server and clientcommunications” on page 43.
Installing the Tivoli Storage Manager server
42 IBM Tivoli Storage Manager for Windows: Installation Guide

Configuring server and client communicationsAfter installing Tivoli Storage Manager, you can set up client and servercommunications by specifying options in the Tivoli Storage Manager server andclient options files.
About this task
Set these server options before you start the server. When you start the server, thenew options go into effect. If you modify any server options after starting theserver, you must stop and restart the server to activate the updated options.
Review the server options file (dsmserv.opt.smp) that is located in the serverinstance directory to view and specify server communications options. By default,the server uses the TCP/IP and Named Pipes communication methods.
Tip: If you start the server console and see warning messages that a protocol couldnot be used by the server, either the protocol is not installed or the settings do notmatch the Windows protocol settings.
For a client to use a protocol that is enabled on the server, the client options filemust contain corresponding values for communication options. In the serveroptions file, you can view the values for each protocol.
For more information about server options, see the Administrator's Reference.
You can specify one or more of the following communication methods:v TCP/IP Version 4 or Version 6v Named Pipesv Shared memoryv Simple network management protocol (SNMP) DPIv Secure Sockets Layer (SSL)
Note: You can authenticate passwords with the LDAP directory server, orauthenticate passwords with the Tivoli Storage Manager server. Passwords thatare authenticated with the LDAP directory server can provide enhanced systemsecurity. For details, see the managing passwords and logon procedures sectionin the Administrator's Guide.
Setting TCP/IP options:
Select from a range of TCP/IP options for the Tivoli Storage Manager server orretain the default.
About this task
The following is an example of a list of TCP/IP options you can use to set up yoursystem.
commmethod tcpiptcpport 1500tcpwindowsize 0tcpnodelay yes
Tip: You can use TCP/IP Version 4, Version 6, or both.
Installing the Tivoli Storage Manager server
Chapter 3. Taking the first steps after you install Tivoli Storage Manager Version 7.1.1 43

TCPPORTThe server TCP/IP port address. The default value is 1500.
TCPWINDOWSIZESpecifies the size of the TCP/IP buffer that is used when sending orreceiving data. The window size that is used in a session is the smaller ofthe server and client window sizes. Larger window sizes use additionalmemory but can improve performance.
To use the default window size for the operating system, specify 0.
TCPNODELAYSpecifies whether or not the server sends small messages or lets TCP/IPbuffer the messages. Sending small messages can improve throughput butincreases the number of packets sent over the network. Specify YES tosend small messages or NO to let TCP/IP buffer them. The default is YES.
TCPADMINPORTSpecifies the port number on which the server TCP/IP communicationdriver is to wait for requests other than client sessions. The default value is1500.
SSLTCPPORT(SSL-only) Specifies the Secure Sockets Layer (SSL) port number on whichthe server TCP/IP communication driver waits for requests forSSL-enabled sessions for the command-line backup-archive client and thecommand-line administrative client.
SSLTCPADMINPORTSpecifies the port address on which the server TCP/IP communicationdriver waits for requests for SSL-enabled sessions for the command-lineadministrative client.
Setting Named Pipes options:
The Named Pipes communication method is ideal when running the server andclient on the same Windows machine. Named Pipes require no specialconfiguration.
About this task
Here is an example of a Named Pipes setting:
commmethod namedpipenamedpipename \\.\pipe\adsmpipe
COMMMETHOD can be used multiple times in the Tivoli Storage Manager serveroptions file, with a different value each time. For example, the following exampleis possible:
commmethod tcpipcommmethod namedpipe
Installing the Tivoli Storage Manager server
44 IBM Tivoli Storage Manager for Windows: Installation Guide
Setting shared memory options:
You can use shared memory communications between clients and servers on thesame system. To use shared memory, TCP/IP Version 4 must be installed on thesystem.
About this task
The following example shows a shared memory setting:
commmethod sharedmemshmport 1510
In this example, SHMPORT specifies the TCP/IP port address of a server when usingshared memory. Use the SHMPORT option to specify a different TCP/IP port. Thedefault port address is 1510.
COMMMETHOD can be used multiple times in the Tivoli Storage Manager serveroptions file, with a different value each time. For example, the following exampleis possible:
commmethod tcpipcommmethod sharedmem
Setting SNMP DPI subagent options:
Tivoli Storage Manager implements a simple network management protocol(SNMP) subagent. You can configure the SNMP subagent to send traps to anSNMP manager, such as NetView®, and to provide support for a ManagementInformation Base (MIB).
About this task
For details about configuring SNMP for use with Tivoli Storage Manager, see theAdministrator's Guide.
The subagent communicates with the snmp daemon, which in turn communicateswith a management application. The snmp daemon must support the DPI protocol.Agents are available on AIX®. The subagent process is separate from the TivoliStorage Manager server process, but the subagent gets its information from aserver options file. When the SNMP management application is enabled, it can getinformation and messages from servers.
Use the following SNMP DPI options as an example of a SNMP setting. You mustspecify the COMMMETHOD option. For details about the other options, see theAdministrator's Reference.
commmethod snmpsnmpheartbeatinterval 5snmpmessagecategory severity
Installing the Tivoli Storage Manager server
Chapter 3. Taking the first steps after you install Tivoli Storage Manager Version 7.1.1 45

Setting Secure Sockets Layer options:
You can add more protection for your data and passwords by using Secure SocketsLayer (SSL).
Before you begin
SSL is the standard technology for creating encrypted sessions between servers andclients. SSL provides a secure channel for servers and clients to communicate overopen communication paths. With SSL, the identity of the server is verified throughthe use of digital certificates.
To ensure better system performance, use SSL only for sessions when it is needed.Consider adding additional processor resources on the Tivoli Storage Managerserver to manage the increased requirements.
Refer to setting up Transport Layer Security (TLS) in the Administrator's Guide.
Installing the Tivoli Storage Manager server
46 IBM Tivoli Storage Manager for Windows: Installation Guide

Formatting the database and logUse the DSMSERV FORMAT utility to initialize a server instance. No other serveractivity is allowed while initializing the database and recovery log.
After you set up server communications, you are ready to initialize the database.Ensure that you log in by using the instance user ID. Do not place the directorieson file systems that might run out of space. If certain directories (for example, thearchive log) become unavailable or full, the server stops. See Capacity planning formore details.
For optimal performance and to facilitate I/O, specify at least two equally sizedcontainers or Logical Unit Numbers (LUNs) for the database. See IBM TivoliStorage Manager Optimizing Performance (http://www.ibm.com/support/knowledgecenter/SSGSG7_7.1.1/com.ibm.itsm.perf.doc/c_howtouseinfo.html) formore information about the configuration of directories for the database. Inaddition, each active log and archive log should have its own container or LUN.
Important: The installation program creates a set of registry keys. One of thesekeys points to the directory where a default server, named SERVER1, is created. Toinstall an additional server, create a directory and use the DSMSERV FORMAT utility,with the -k parameter, from that directory. That directory becomes the location ofthe server. The registry tracks the installed servers.
Initializing a server instance
Use the DSMSERV FORMAT utility to initialize a server instance. For example, issue thefollowing command:dsmserv -k server2 format dbdir=d:\tsm\db001 activelogsize=8192activelogdirectory=e:\tsm\activelog archlogdirectory=f:\tsm\archlogarchfailoverlogdirectory=g:\tsm\archfaillog mirrorlogdirectory=h:\tsm\mirrorlog
Related reference:
DSMSERV FORMAT (Format the database and log) (http://www.ibm.com/support/knowledgecenter/SSGSG7_7.1.1/com.ibm.itsm.srv.ref.doc/r_cmd_dsmserv_format.html)
Preparing the database manager for database backupTo back up the data in the database to Tivoli Storage Manager, you must enablethe database manager and configure the Tivoli Storage Manager applicationprogramming interface (API).
About this task
If you use the Tivoli Storage Manager configuration wizard to create a TivoliStorage Manager server instance, you do not have to complete these steps. If youare configuring an instance manually, complete the following steps before youissue either the BACKUP DB or the RESTORE DB commands.
Attention: If the database is unusable, the entire Tivoli Storage Manager server isunavailable. If a database is lost and cannot be recovered, it might be difficult orimpossible to recover data that is managed by that server. Therefore, it is criticallyimportant to back up the database.
In the following commands, the examples use server1 for the database instanceand d:\tsmserver1 for the Tivoli Storage Manager server directory. Replace thesevalues with your actual values in the commands.
Installing the Tivoli Storage Manager server
Chapter 3. Taking the first steps after you install Tivoli Storage Manager Version 7.1.1 47

1. Create a file that is called tsmdbmgr.env in the d:\tsmserver1 directory with thefollowing contents:DSMI_CONFIG=server_instance_directory\tsmdbmgr.optDSMI_LOG=server_instance_directory
2. Set the DSMI_ api environment-variable configuration for the database instance:a. Open a DB2 command window. One method is to go to the C:\Program
Files\Tivoli\TSM\db2\bin directory, or if you installed Tivoli StorageManager in a different location, go to the db2\bin subdirectory in your maininstallation directory. Then, issue this command:db2cmd
b. Issue this command:db2set -i server1 DB2_VENDOR_INI=d:\tsmserver1\tsmdbmgr.env
3. Create a file that is called tsmdbmgr.opt in the d:\tsmserver1 directory with thefollowing contents:*************************************************nodename $$_TSMDBMGR_$$commmethod tcpiptcpserveraddr localhosttcpport 1500passwordaccess generateerrorlogname d:\tsmserver1\tsmdbmgr.log
wherev nodename specifies the node name the client API uses to connect to the server
during a database backup. This value must be $$_TSMDBMGR_$$ for databasebackup to work.
v commethod specifies the client API used to contact the server for databasebackup. This value can be tcpip or sharedmem. For more information aboutshared memory, see step 4.
v tcpserveraddr specifies the server address that the client API uses to contactthe server for database backup. To ensure that the database can be backedup, this value must be localhost.
v tcpport specifies the port number that the client API uses to contact the serverfor database backup. Ensure that you enter the same tcpport value that isspecified in the dsmserv.opt server options file.
v passwordaccess is required for the backup node to connect to the server onwindows systems.
v errorlogname specifies the error log where the client API logs errors that areencountered during a database backup. This log is typically in the serverinstance directory. However, this log can be placed in any location where theinstance user ID has write-permission.
4. Optional: Configure the server to back up the database by using sharedmemory. In this way, you might be able to reduce the processor load andimprove throughput. Complete the following steps:a. Review the dsmserv.opt file. If the following lines are not in the file, add
them:commmethod sharedmemshmport port_number
where port_number specifies the port to be used for shared memory.b. In the tsmdbmgr.opt file, locate the following lines:
commmethod tcpiptcpserveraddr localhosttcpport 1500
Installing the Tivoli Storage Manager server
48 IBM Tivoli Storage Manager for Windows: Installation Guide

Replace the specified lines with the following lines:commmethod sharedmemshmport port_number
where port_number specifies the port to be used for shared memory.5. Enter the following command on one line:
"c:\programfiles\tivoli\tsm\server\dsmsutil.exe"UPDATEPW /NODE:$$_TSMDBMGR_$$ /PASSWORD:TSMDBMGR /VALIDATE:NO /OPTFILE:"d:\tsmserver1\tsmdbmgr.opt"
Configuring server options for server database maintenanceTo help avoid problems with database growth and server performance, the serverautomatically monitors its database tables and reorganizes them when needed.Before starting the server for production use, set server options to control whenreorganization runs. If you plan to use data deduplication, ensure that the optionto run index reorganization is enabled.
About this task
Table and index reorganization requires significant processor resources, active logspace, and archive log space. Because database backup takes precedence overreorganization, select the time and duration for reorganization to ensure that theprocesses do not overlap and reorganization can complete. For more informationabout scheduling reorganization, see the Administrator's Guide.
If you update these server options while the server is running, you must stop andrestart the server before the updated values take effect.
Procedure1. Modify the server options.
Edit the server options file, dsmserv.opt, in the server instance directory byusing a text editor. Follow these guidelines when you edit the server optionsfile:v To enable an option, remove the asterisk at the beginning of the line.v Enter an option on any line.v Enter only one option per line. The entire option with its value must be on
one line.v If you have multiple entries for an option in the file, the server uses the last
entry.
To view available server options, see the sample file, dsmserv.opt.smp, in thec:\Program Files\Tivoli\TSM directory.
2. If you plan to use data deduplication, enable the ALLOWREORGINDEX serveroption. Add the following option and value to the server options file:allowreorgindex yes
3. Set the REORGBEGINTIME and REORGDURATION server options to control whenreorganization starts and how long it runs. Select a time and duration so thatreorganization runs when you expect that the server is least busy. These serveroptions control both table and index reorganization processes.
Installing the Tivoli Storage Manager server
Chapter 3. Taking the first steps after you install Tivoli Storage Manager Version 7.1.1 49
|||
|
|
||
||
||
a. Set the time for reorganization to start by using the REORGBEGINTIME serveroption. Specify the time by using the 24-hour system. For example, to setthe start time for reorganization as 8:30 p.m., specify the following optionand value in the server options file:reorgbegintime 20:30
b. Set the interval during which the server can start reorganization. Forexample, to specify that the server can start reorganization for four hoursafter the time set by the REORGBEGINTIME server option, specify the followingoption and value in the server options file:reorgduration 4
4. If the server was running while you updated the server options file, stop andrestart the server.
Related tasks:
Table and index reorganization schedules (http://www.ibm.com/support/knowledgecenter/SSGSG7_7.1.1/com.ibm.itsm.srv.doc/t_db_reorg.html)Related reference:
ALLOWREORGINDEX (http://www.ibm.com/support/knowledgecenter/SSGSG7_7.1.1/com.ibm.itsm.srv.ref.doc/r_opt_server_allowreorgindex.html)
ALLOWREORGTABLE (http://www.ibm.com/support/knowledgecenter/SSGSG7_7.1.1/com.ibm.itsm.srv.ref.doc/r_opt_server_allowreorgtable.html)
REORGBEGINTIME (http://www.ibm.com/support/knowledgecenter/SSGSG7_7.1.1/com.ibm.itsm.srv.ref.doc/r_opt_server_reorgbegintime.html)
REORGDURATION (http://www.ibm.com/support/knowledgecenter/SSGSG7_7.1.1/com.ibm.itsm.srv.ref.doc/r_opt_server_reorgduration.html)
Starting the server instance on Windows systemsYou can start the Tivoli Storage Manager server as a Windows service, which is thepreferred method, or in the foreground.
Before you begin
Select one of the following methods for starting the server:
As a Windows serviceThis method is useful in a production environment. When you configurethe server to run as a service, you can specify that the server startsautomatically whenever the system is started.
In the foregroundThis method is useful when you are configuring or testing the server.When you start the server in the foreground, Tivoli Storage Managerprovides a special administrator user ID that is namedSERVER_CONSOLE. All server messages are displayed in the foreground.The messages can be useful if you must debug startup problems.
Installing the Tivoli Storage Manager server
50 IBM Tivoli Storage Manager for Windows: Installation Guide

Procedure
Follow the instructions for your selected option:
Option Description
Starting the server as a Windows service To start the server as a Windows service,take one of the following actions:
v If you configured the server by using theconfiguration wizard, or you upgradedthe server by using the upgrade wizard,complete the following steps:
1. Configure the server to start as aWindows service by following theinstructions in “Configuring the serverto start as a Windows service.”
2. Start the server by following theinstructions in “Starting the server as aWindows service” on page 52.
v If you did not use the configurationwizard or the upgrade wizard, create andconfigure the Windows service byfollowing the instructions in “Manuallycreating and configuring a Windowsservice” on page 53.
Starting the server in the foreground To start the server in the foreground, followthe instructions in “Starting the server in theforeground” on page 54.
Configuring the server to start as a Windows serviceBefore you can start the server as a Windows service, you must ensure that optionsand access rights are set correctly.
Before you begin
A Windows service must be created. If you configured the server by using theconfiguration wizard or upgraded the server by using the upgrade wizard, aWindows service was created automatically. In that case, use this procedure toconfigure the server to start as a Windows service.
If you did not use a wizard, you must create and configure the Windows servicemanually by following the steps in “Manually creating and configuring a Windowsservice” on page 53.
Procedure1. From the Windows Start menu, click Run, type services.msc, and click OK.2. In the Services window, select the server instance that you want to start as a
service, and click Properties. For example, select TSM INST1, and clickProperties.
3. To ensure that the server service starts automatically, click the General tab.From the Startup type list, select Automatic.
4. To set the user for starting the server service, click the Log On tab, and takeone of the following actions:v If you plan to run the server service under the Local System account, select
Local System account and click OK.
Installing the Tivoli Storage Manager server
Chapter 3. Taking the first steps after you install Tivoli Storage Manager Version 7.1.1 51

v If you plan to run the server service under the instance user ID, take thefollowing actions:a. Select This account, and browse for the user ID that owns the server DB2
instance and has permissions for starting the server.b. In the Select User window, in the Enter the object name to select field,
enter the user ID.c. Click Check Names.d. Click OK twice.
5. If you configured the server service to run under the Local System account,grant database access to the Local System account:a. Log on with the user ID that was used to create the Tivoli Storage Manager
server database. This user ID is the user ID that was used to run theDSMSERV FORMAT utility to initialize the server database. Alternatively, if youconfigured the server with the dsmicfgx configuration wizard, this user IDis the user ID that was used to create the instance.
b. Open a DB2 command window by taking one of the following actions:v If the Tivoli Storage Manager server is installed on Windows Server 2008
or Windows Server 2008 R2, click Start > All Programs > IBM DB2DB2TSM1 > DB2 Command Window - Administrator.
v If the Tivoli Storage Manager server is installed on Windows Server 2012,open the Start window, and click DB2 Command Window -Administrator.
c. In the DB2 command window, enter the following commands:set DB2INSTANCE=server1db2 connect to TSMDB1db2 grant dbadm with dataaccess with accessctrl on database to user systemdb2 grant secadm on database to user system
Tip: When the server service is configured to run under the Local Systemaccount, the database can be accessed by any administrator on the system.In addition, any administrator who can log on to the system can run theTivoli Storage Manager server.
What to do next
To start the service, follow the instructions in “Starting the server as a Windowsservice.”
Starting the server as a Windows serviceIf you are running Tivoli Storage Manager on a Windows operating system, youcan start the server as a service.
Before you begin
A Windows service must be created. The service was created automatically if youconfigured the server by using the configuration wizard, or upgraded the server byusing the upgrade wizard. If the service was created automatically, you mustconfigure the server to start as a service by following the steps in “Configuring theserver to start as a Windows service” on page 51. Then, use this procedure to startthe server as a service.
If you did not use the configuration wizard or the upgrade wizard to create theservice, you must create and configure the service manually. Follow the steps in
Installing the Tivoli Storage Manager server
52 IBM Tivoli Storage Manager for Windows: Installation Guide
|
||

“Manually creating and configuring a Windows service.”
Procedure
To start the server as a Windows service, complete the following steps:1. Log on to the Tivoli Storage Manager server with a user ID that is in the
Administrators group.2. From the Windows Start menu, click Run, type services.msc, and click OK.3. In the Services window, select the server instance that you want to start, and
click Start.
What to do next
Because the server service can issue requests that require action, it is important tomonitor server activity with the Operations Center or the administrative client.
To view start and stop completion messages that are logged in the Windowsapplication log, use the Event Viewer tool in the Administrative Tools folder.
Manually creating and configuring a Windows serviceIf you configured the Tivoli Storage Manager server by using the configurationwizard, or you upgraded the server by using the upgrade wizard, a Windowsservice was created automatically. If a service was not created automatically, youmust create it.
Before you begin
To complete this procedure, you must log on with a user ID that is in theAdministrators group.
Procedure
To create a Windows service and configure the startup options for the service,complete the following step:
Open a command window and enter the sc.exe create command:sc.exe create server_name binPath= "path_to_server -k instance_name"start= start_type obj= account_name password= password
where:
server_nameSpecifies the name of the server service.
path_to_serverSpecifies the path to the dsmsvc.exe executable file, including the filename. This path is the default path:
C:\Program Files\Tivoli\TSM\server
instance_nameSpecifies the name of the DB2 instance, which is also the name of theserver instance, for example, Server1.
start_typeSpecifies the method for starting the service. To automatically start theservice, enter auto. If you specify the auto option, the service starts
Installing the Tivoli Storage Manager server
Chapter 3. Taking the first steps after you install Tivoli Storage Manager Version 7.1.1 53
|
||||
|
||
|
||
|
||
|
||
|||
|
|||
|||
automatically at system startup and restarts automatically whenever thesystem is restarted. To manually start the service, enter demand.
account_nameSpecifies the user ID for the account under which the service runs. Forexample, the account name might be Administrator. This parameter isoptional. If it is not specified, the Local System account is used.
passwordSpecifies the password for the account_name user account.
Tip: When you enter the command, ensure that you enter a space after each equalsign (=).
Results
The server starts as a Windows service.
Starting the server in the foregroundTo directly interact with a Tivoli Storage Manager server, start the server in theforeground. For example, if you want to enter commands, start the server in theforeground.
Procedure1. Change to the directory where the server is installed. For example, change to
the c:\program files\tivoli\tsm\server directory.2. Enter the following command:
dsmserv -k instance_name
where instance_name specifies the Tivoli Storage Manager server instance.
Stopping the serverYou can stop the server when needed to return control to the operating system. Toavoid losing administrative and client node connections, stop the server only aftercurrent sessions are completed or canceled.
About this task
To stop the server, issue the following command from the Tivoli Storage Managercommand line:halt
The server console stops.
Registering licensesImmediately register any Tivoli Storage Manager licensed functions that youpurchase so you do not lose any data after you start server operations, such asbacking up your data.
About this task
Use the REGISTER LICENSE command for this task.
Installing the Tivoli Storage Manager server
54 IBM Tivoli Storage Manager for Windows: Installation Guide
||
||||
||
||
|
|

Example: Register a license
Register the base Tivoli Storage Manager license.register license file=tsmbasic.lic
Specifying a device class in preparation for database backupsTo prepare the system for automatic and manual database backups, you mustspecify the device class to be used.
Before you begin
Before you begin the setup, ensure that you have defined a tape or file deviceclass. See the defining device classes section of the Administrator's Guide.
About this task
To set up your system for database backups, issue the SET DBRECOVERY command tospecify a device class to be used for the backups. You can also change the deviceclass to be used for database backups with the SET DBRECOVERY command.
Perform the following setup procedure:
Procedure1. If you did not use the configuration wizard (dsmicfgx) to configure the server,
ensure that you have completed the steps to manually configure the system fordatabase backups.
2. Select the device class to be used for backups of the database. Issue thefollowing command from a IBM Tivoli Storage Manager administrativecommand line.set dbrecovery device_class_name
The device class that you specify is used by the database manager for databasebackups. If you do not specify a device class with the SET DBRECOVERYcommand, the backup fails.
Example
For example, to specify that the DBBACK device class is to be used, issue thiscommand:set dbrecovery dbback
What to do next
When you are ready to back up your database, see the BACKUP DB command in theAdministrator's Reference.
Installing the Tivoli Storage Manager server
Chapter 3. Taking the first steps after you install Tivoli Storage Manager Version 7.1.1 55
Running multiple server instances on a single systemYou can create more than one server instance on your system. Each server instancehas its own instance directory, and database and log directories.
Multiply the memory and other system requirements for one server by the numberof instances planned for the system.
The set of files for one instance of the server is stored separately from the filesused by another server instance on the same system. Use the steps in “Creating theserver instance” on page 41 for each new instance, optionally creating the newinstance user.
To manage the system memory that is used by each server, use the DBMEMPERCENTserver option to limit the percentage of system memory. If all servers are equallyimportant, use the same value for each server. If one server is a production serverand other servers are test servers, set the value for the production server to ahigher value than the test servers.
When you upgrade from Tivoli Storage Manager V6.1, you must upgrade to V6.3first, and then to V7.1.1. You can upgrade directly from either V6.2 or V6.3 to V7.1.See the upgrade section (Chapter 5, “Upgrading to Tivoli Storage Manager Version7.1.1,” on page 65) for more details. When you upgrade and have multiple serverson your system, you must run the installation wizard only once. The installationwizard collects the database and variables information for all of your originalserver instances.
If you upgrade from Tivoli Storage Manager V6.2 or V6.3 to V7.1.1 and havemultiple servers on your system, all instances that exist in DB2 V9.7 are droppedand recreated in DB2 V10.5. The wizard issues the db2 upgrade db dbnamecommand for each database. The database environment variables for each instanceon your system are also reconfigured during the upgrade process.
A typical Tivoli Storage Manager installation involves one server instance on theTivoli Storage Manager server computer. You might want to install a secondinstance if you are configuring in a clustered environment. You might also want torun more than one server on a large computer if you have multiple tape librariesor a disk-only configuration. After you install and configure the first Tivoli StorageManager server, use the Server Initialization wizard to create additional TivoliStorage Manager server instances on the same computer.
For information about the Server Initialization wizard, see the Tivoli StorageManager Administrator's Guide.
By using the Server Initialization wizard, you can install up to four Tivoli StorageManager server instances on a single system or cluster.Related tasks:
Running multiple server instances on a single system (http://www.ibm.com/support/knowledgecenter/SSGSG7_7.1.1/com.ibm.itsm.srv.doc/t_srv_mng_start_multi_unix.html)
Installing the Tivoli Storage Manager server
56 IBM Tivoli Storage Manager for Windows: Installation Guide
Monitoring the serverWhen you start using the server in production, monitor the space used by theserver to ensure that the amount of space is adequate. Make adjustments asneeded.
Procedure1. Monitor the active log, to ensure that the size is correct for the workload that is
handled by the server instance.When the server workload is up to its typical expected level, and the space thatis used by the active log is 80 - 90% of the space that is available to the activelog directory, you might need to increase the amount of space. Whether youneed to increase the space depends on the types of transactions in the server'sworkload, because transaction characteristics affect how the active log space isused.The following transaction characteristics can affect the space usage in the activelog:v The number and size of files in backup operations
– Clients such as file servers that back up large numbers of small files cancause large numbers of transactions that complete during a short period oftime. The transactions might use a large amount of space in the active log,but for a short period of time.
– Clients such as a mail server or a database server that back up largechunks of data in few transactions can cause small numbers oftransactions that take a long time to complete. The transactions might usea small amount of space in the active log, but for a long period of time.
v Network connection types– Backup operations that occur over fast network connections cause
transactions that complete more quickly. The transactions use space in theactive log for a shorter period of time.
– Backup operations that occur over relatively slower connections causetransactions that take a longer time to complete. The transactions usespace in the active log for a longer period of time.
If the server is handling transactions with a wide variety of characteristics, thespace that is used for the active log might go up and down by a large amountover time. For such a server, you might need to ensure that the active logtypically has a smaller percentage of its space used. The extra space allows theactive log to grow for transactions that take a very long time to complete, forexample.
2. Monitor the archive log to ensure that space is always available.
Remember: If the archive log becomes full, and the failover archive logbecomes full, the active log can become full and the server will stop. The goalis to make enough space available to the archive log so that it never uses all itsavailable space.You are likely to notice the following pattern:a. Initially, the archive log grows rapidly as typical client-backup operations
occur.b. Database backups occur regularly, either as scheduled or done manually.c. After at least two full database backups occur, log pruning occurs
automatically. The space used by the archive log decreases when thepruning occurs.
Installing the Tivoli Storage Manager server
Chapter 3. Taking the first steps after you install Tivoli Storage Manager Version 7.1.1 57
d. Normal client operations continue, and the archive log grows again.e. Database backups occur regularly, and log pruning occurs as often as full
database backups occur.With this pattern, the archive log grows initially, then decreases, then mightgrow again. Over a period of time, as normal operations continue, the amountof space used by the archive log should reach a relatively constant level.If the archive log continues to grow, consider taking one or both of theseactions:v Add space to the archive log. This might mean moving the archive log to a
different file system.For information about moving the archive log, see the Tivoli Storage ManagerAdministrator's Guide.
v Increase the frequency of full database backups, so that log pruning occursmore frequently.
3. If you defined a directory for the failover archive log, determine whether anylogs get stored in that directory during normal operations. If the failover logspace is being used, consider increasing the size of the archive log. The goal isthat the failover archive log is used only under unusual conditions, not innormal operation.
What to do next
For details about monitoring, see the Administrator's Guide.
Installing the Tivoli Storage Manager server
58 IBM Tivoli Storage Manager for Windows: Installation Guide

Chapter 4. Installing a Tivoli Storage Manager server fix pack
Tivoli Storage Manager maintenance updates, which are also referred to as fixpacks, bring your server up to the current maintenance level.
Before you begin
To install a fix pack or interim fix to the server, install the server at the level onwhich you want to run it. You do not have to start the server installation at thebase release level. For example, if you currently have Version 6.3.4.2 installed, youcan go directly to the latest fix pack for V7.1. You do not have to start with theV7.1.0 installation if a maintenance update is available.
You must have the Tivoli Storage Manager license package installed. The licensepackage is provided with the purchase of a base release. Alternatively, you canobtain the license package when download a fix pack from the Passport Advantagewebsite. After the fix pack or interim fix is installed, install the license for theserver. To display messages and help in a language other than US English, installthe language package of your choice.
For information about the estimated time required to install a fix pack, see Techdoc7023591.
If you upgrade the server to V7.1 or later, and then revert the server to a level thatis earlier than V7.1, you must restore the database to a point in time before theupgrade. During the upgrade process, complete the required steps to ensure thatthe database can be restored: back up the database, the volume history file, thedevice configuration file, and the server options file. For more information, seeChapter 6, “Reverting from Version 7.1 to the previous V6 server,” on page 81.
Ensure that you retain the installation media from the base release of the installedserver. If you installed Tivoli Storage Manager from a DVD, ensure that the DVD isavailable. If you installed Tivoli Storage Manager from a downloaded package,ensure that the downloaded files are available. If the upgrade fails, and the serverlicense module is uninstalled, the installation media from the server base releaseare required to reinstall the license.
Visit this website: http://www.ibm.com/support/entry/portal/Overview/Software/Tivoli/Tivoli_Storage_Manager for the following information:v A list of the latest maintenance and download fixes. Click Support and
downloads and apply any applicable fixes.v Details about obtaining a base license package. Search for Warranties and
licenses.v Supported platforms and system requirements. Click Server requirements.
© Copyright IBM Corp. 1993, 2014 59

About this task
To install a fix pack or interim fix, complete the following steps.
Attention: Do not alter the DB2 software that is installed with Tivoli StorageManager installation packages and fix packs. Do not install or upgrade to adifferent version, release, or fix pack of DB2 software because doing so can damagethe database.
Procedure1. Obtain the package file for the fix pack or interim fix that you want to install
from the http://www.ibm.com/support/entry/portal/Overview/Software/Tivoli/Tivoli_Storage_Manager site.
2. Change to the directory where you placed the executable file. Then, eitherdouble-click the following executable file or enter the following command onthe command line to extract the installation files.
Tip: The files are extracted to the current directory. Ensure that the executablefile is in the directory where you want the extracted files to be located.6.x.x.x-TIV-TSMALL-platform.exe
where: platform denotes the operating system that Tivoli Storage Manager is tobe installed on.
3. Back up the database. The preferred method is to use a snapshot backup. Asnapshot backup is a full database backup that does not interrupt anyscheduled database backups. For example, issue the following Tivoli StorageManager administrative command:backup db type=dbsnapshot devclass=tapeclass
See the Administrator's Guide for more details.4. Back up the device configuration information. Issue the following Tivoli Storage
Manager administrative command:backup devconfig filenames=file_name
where file_name specifies the name of the file in which to store deviceconfiguration information.
5. Save the volume history file to another directory or rename the file. Issue thefollowing Tivoli Storage Manager administrative command:backup volhistory filenames=file_name
where file_name specifies the name of the file in which to store the volumehistory information.
6. Save a copy of the server options file, typically named dsmserv.opt. The file isin the server instance directory.
7. Halt the server before installing a fix pack or interim fix. Use the HALTcommand.
8. Ensure that extra space is available in the installation directory. The installationof this fix pack might require additional temporary disk space in theinstallation directory of the server. The amount of additional disk space can beas much as that required for installing a new database as part of a TivoliStorage Manager installation. The Tivoli Storage Manager installation wizarddisplays the amount of space that is required for installing the fix pack and theavailable amount. If the required amount of space is greater than the available
Installing a Tivoli Storage Manager fix pack
60 IBM Tivoli Storage Manager for Windows: Installation Guide
amount, the installation stops. If the installation stops, add the required diskspace to the file system and restart the installation.
9. Select one of the following ways of installing Tivoli Storage Manager.
Important: After a fix pack is installed, it is not necessary to go through theconfiguration again. You can stop after completing the installation, fix anyerrors, then restart your servers.Install the Tivoli Storage Manager software by using one of the followingmethods:
Installation wizardFollow the instructions for your operating system:
“Installing Tivoli Storage Manager by using the installation wizard” onpage 30
Tip: After you start the wizard, in the IBM Installation Manager window, clickthe Update icon; do not click the Install or Modify icon.
Command line in console modeFollow the instructions for your operating system:
“Installing Tivoli Storage Manager by using console mode” on page 32
Silent modeFollow the instructions for your operating system:
“Installing Tivoli Storage Manager in silent mode” on page 33
Tip: If you have multiple server instances on your system, run the installationwizard only once. The installation wizard upgrades all server instances.
Results
Correct any errors that are detected during the installation process.
If you installed the server by using the installation wizard, you can viewinstallation logs by using the IBM Installation Manager tool. Click File > ViewLog. To collect log files, from the IBM Installation Manager tool, click Help >Export Data for Problem Analysis.
If you installed the server by using console mode or silent mode, you can viewerror logs in the IBM Installation Manager log directory, for example:
C:\ProgramData\IBM\Installation Manager\logs
Applying a fix pack to Tivoli Storage Manager V7 in a clusteredenvironment
To install a fix pack on a Tivoli Storage Manager V7 server in a Windows clusteredenvironment, several steps are required.
Before you begin
To install a fix pack or interim fix to the server, install the server at the level onwhich you want to run it. You do not have to start the server installation at thebase release level. For example, if you currently have Version 6.3.4.2 installed, youcan go directly to the latest fix pack for V7.1. You do not have to start with theV7.1.0 installation if a maintenance update is available.
Installing a Tivoli Storage Manager fix pack
Chapter 4. Installing a Tivoli Storage Manager fix pack 61
Procedure1. Back up the database. The preferred method is to use a snapshot backup. A
snapshot backup is a full database backup that does not interrupt anyscheduled database backups. For example, issue the following command:backup db type=dbsnapshot devclass=tapeclass
Important: If the upgrade fails, and you must revert the server to theprevious level, you will need the database backup and the configuration filesthat you save in the next steps. By using the database backup and theconfiguration files, you might be able to revert the server to the previouslevel.
2. Back up the device configuration information. Issue the following command:backup devconfig filenames=file_name
where file_name specifies the name of the file in which to store deviceconfiguration information.
3. Back up the volume history information. Issue the following command:backup volhistory filenames=file_name
where file_name specifies the name of the file in which to store the volumehistory information.
4. Save a copy of the server options file, typically named dsmserv.opt. The file isin the server instance directory.
5. Disable automatic failback.
Tip: You must disable automatic failback so that no groups automatically failback during the installation.a. In the Failover Cluster Manager window, select Services and Applications
and right-click the cluster group.b. Select Properties.c. On the Failover tab in the Properties window, select Prevent failback and
click OK.d. If multiple groups exist, repeat the preceding steps to disable automatic
failback for each group.6. Determine the first server on which to install the fix pack.7. Move the cluster groups from the node where the fix pack is to be installed.8. Stop the cluster server node. In the Component Services window, right-click
Cluster Service and click Stop.9. Install the Tivoli Storage Manager fix pack. For details, see Installing a Tivoli
Storage Manager fix pack.
Tip: Tivoli Storage Manager is still running and available on another node. Ifthe DB2 installation attempts to access an offline instance near the end of theinstallation, you might receive error message SQL5005C. This message doesnot indicate an installation failure. You can ignore the message.
10. Take the Tivoli Storage Manager server and the DB2 resources offline:a. In the Failover Cluster Manager window, select Services and Applications
and then select the cluster group. The resources for the group aredisplayed. In the Other Resources section, SERVER1 and the TivoliStorage Manager server are displayed.
Installing a Tivoli Storage Manager fix pack
62 IBM Tivoli Storage Manager for Windows: Installation Guide

b. In the Other Resources section, right-click the Tivoli Storage ManagerInstance(x) Server, where x represents the instance number. Select Takethis resource Offline. Repeat this step for SERVER1.
11. Restart the cluster service on the current node. In the Component Serviceswindow, right-click Cluster Service and click Start.
12. Move the cluster groups to the current node:a. In the Failover Cluster Manager window, click Services and Applications.b. Right-click the cluster group and select Move this service or application
to another node. The Current Owner column changes to the current node.c. Optional: If multiple groups exist, move the other cluster groups to the
current node by repeating steps 12a and 12b.13. Start the DB2 resources:
a. In the Failover Cluster Manager window, select Services and Applications,and then select the cluster group.
b. Right-click SERVER1 and select Bring this service online. Repeat this stepfor each Tivoli Storage Manager Instance (x) Server, where x representsthe instance number.
14. Stop the cluster service on the second node. In the Component Serviceswindow, right-click Cluster Service and click Stop.
15. Install the Tivoli Storage Manager fix pack. Tivoli Storage Manager is nowrunning and available on the first node. If the DB2 installation attempts toaccess an offline instance before the installation is completed, you mightreceive error message SQL5005C. This message does not indicate aninstallation failure. You can ignore the message.
16. Restart the cluster service on this node. In the Component Services window,right-click Cluster Service and click Start.
17. Move the cluster groups back to the servers that you want to use:a. In the Failover Cluster Manager window, click Services and Applications.b. Right-click the group that you want to move and select Move this service
or application to another node. The Current Owner column changes tothe selected node.
c. For any other nodes that must be moved to the owners that you want touse, repeat step 17b. This step reverts the Microsoft Cluster Serverenvironment to its initial configuration.
18. Restart automatic failback processing:a. In the Failover Cluster Manager window, right-click the cluster group.b. Select Properties.c. On the Failover tab of the Cluster Group Properties window, select Allow
failback, and click OK.
Installing a Tivoli Storage Manager fix pack
Chapter 4. Installing a Tivoli Storage Manager fix pack 63

Installing a Tivoli Storage Manager fix pack
64 IBM Tivoli Storage Manager for Windows: Installation Guide

Chapter 5. Upgrading to Tivoli Storage Manager Version 7.1.1
You can upgrade a Tivoli Storage Manager V5 or V6 server to V7.1.1. If a V5 serveris installed on an AIX, HP-UX, Solaris, or z/OS® operating system, you cancomplete a cross-platform migration to V7.1.1 on a different operating system.
About this task
To upgrade the server on the same operating system, see the upgrade instructions:
Table 12. Upgrade information
To upgrade from thisversion To this version See this information
V7.1 V7.1 fix pack or interim fix Chapter 4, “Installing a TivoliStorage Manager server fixpack,” on page 59
V6.2 or V6.3 V7.1.1 “Upgrading from TivoliStorage Manager V6.2 orV6.3 to V7.1.1” on page 66
V6.1 V7.1.1 “Upgrading from TivoliStorage Manager V6.1 toV7.1.1” on page 74
V5 V7.1.1 Upgrade and Migration Guidefor V5 Servers
For information about upgrades in a clustered environment, see “Upgrading TivoliStorage Manager in a clustered environment” on page 74.
If a Tivoli Storage Manager V5 server is installed, and you prefer to upgrade theserver to V7.1.1 on a different operating system, see the instructions for servermigration:
Table 13. Migration information
To migrate the server fromthis operating system To this operating system See this information
AIX Linux x86_64 Section about migratingTivoli Storage Manager V5servers on AIX, HP-UX, orSolaris systems to V7.1 onLinux in the Upgrade andMigration Guide for V5 Servers
HP-UX Linux x86_64 Section about migratingTivoli Storage Manager V5servers on AIX, HP-UX, orSolaris systems to V7.1 onLinux in the Upgrade andMigration Guide for V5 Servers
© Copyright IBM Corp. 1993, 2014 65

Table 13. Migration information (continued)
To migrate the server fromthis operating system To this operating system See this information
Solaris Linux x86_64 Section about migratingTivoli Storage Manager V5servers on AIX, HP-UX, orSolaris systems to V7.1 onLinux in the Upgrade andMigration Guide for V5 Servers
z/OS AIX Section about migratingTivoli Storage Manager V5servers on z/OS systems toV7 on AIX or Linux onSystem z® in the Upgrade andMigration Guide for V5 Servers
z/OS Linux on System z Section about migratingTivoli Storage Manager V5servers on z/OS systems toV7 on AIX or Linux onSystem z in the Upgrade andMigration Guide for V5 Servers
To revert to an earlier version of Tivoli Storage Manager after an upgrade ormigration, you must have a full database backup and the installation software forthe original server. You must also have key configuration files:v Volume history filev Device configuration filev Server options filev dsmserv.dsk file (for a server upgrade or migration from V5 to V7.1.1)
Upgrading from Tivoli Storage Manager V6.2 or V6.3 to V7.1.1You can upgrade the server directly from Tivoli Storage Manager V6.2 or V6.3 toV7.1.1. You do not need to uninstall V6.2 or V6.3.
Before you begin
Ensure that you retain the installation media from the V6.2 or V6.3 server baserelease that you are upgrading. If you installed Tivoli Storage Manager from aDVD, ensure that the DVD is available. If you installed Tivoli Storage Managerfrom a downloaded package, ensure that the downloaded files are available. If theupgrade fails, and the server license module is uninstalled, the installation mediafrom the server base release are required to reinstall the license.
Procedure
To upgrade the server to V7.1.1, complete the following tasks:1. “Planning the upgrade” on page 672. “Preparing the system” on page 683. “Installing the V7.1.1 server and verifying the upgrade” on page 70
Upgrading the Tivoli Storage Manager server
66 IBM Tivoli Storage Manager for Windows: Installation Guide
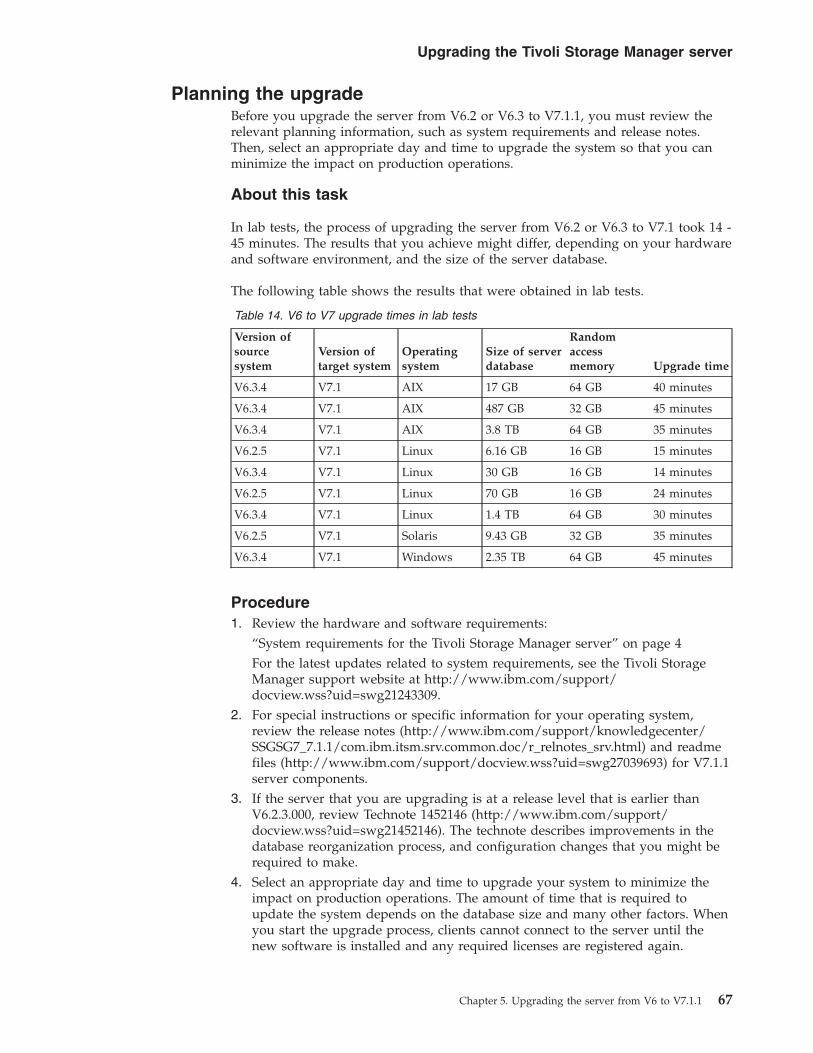
Planning the upgradeBefore you upgrade the server from V6.2 or V6.3 to V7.1.1, you must review therelevant planning information, such as system requirements and release notes.Then, select an appropriate day and time to upgrade the system so that you canminimize the impact on production operations.
About this task
In lab tests, the process of upgrading the server from V6.2 or V6.3 to V7.1 took 14 -45 minutes. The results that you achieve might differ, depending on your hardwareand software environment, and the size of the server database.
The following table shows the results that were obtained in lab tests.
Table 14. V6 to V7 upgrade times in lab tests
Version ofsourcesystem
Version oftarget system
Operatingsystem
Size of serverdatabase
Randomaccessmemory Upgrade time
V6.3.4 V7.1 AIX 17 GB 64 GB 40 minutes
V6.3.4 V7.1 AIX 487 GB 32 GB 45 minutes
V6.3.4 V7.1 AIX 3.8 TB 64 GB 35 minutes
V6.2.5 V7.1 Linux 6.16 GB 16 GB 15 minutes
V6.3.4 V7.1 Linux 30 GB 16 GB 14 minutes
V6.2.5 V7.1 Linux 70 GB 16 GB 24 minutes
V6.3.4 V7.1 Linux 1.4 TB 64 GB 30 minutes
V6.2.5 V7.1 Solaris 9.43 GB 32 GB 35 minutes
V6.3.4 V7.1 Windows 2.35 TB 64 GB 45 minutes
Procedure1. Review the hardware and software requirements:
“System requirements for the Tivoli Storage Manager server” on page 4For the latest updates related to system requirements, see the Tivoli StorageManager support website at http://www.ibm.com/support/docview.wss?uid=swg21243309.
2. For special instructions or specific information for your operating system,review the release notes (http://www.ibm.com/support/knowledgecenter/SSGSG7_7.1.1/com.ibm.itsm.srv.common.doc/r_relnotes_srv.html) and readmefiles (http://www.ibm.com/support/docview.wss?uid=swg27039693) for V7.1.1server components.
3. If the server that you are upgrading is at a release level that is earlier thanV6.2.3.000, review Technote 1452146 (http://www.ibm.com/support/docview.wss?uid=swg21452146). The technote describes improvements in thedatabase reorganization process, and configuration changes that you might berequired to make.
4. Select an appropriate day and time to upgrade your system to minimize theimpact on production operations. The amount of time that is required toupdate the system depends on the database size and many other factors. Whenyou start the upgrade process, clients cannot connect to the server until thenew software is installed and any required licenses are registered again.
Upgrading the Tivoli Storage Manager server
Chapter 5. Upgrading the server from V6 to V7.1.1 67

Preparing the systemTo prepare the system for the upgrade from V6.2 or V6.3 to V7.1.1, you mustgather information about each DB2 instance. Then, back up the server database,save key configuration files, cancel sessions, and stop the server.
Procedure1. Log on to the computer where Tivoli Storage Manager is installed.
Ensure that you are logged on with the administrative user ID that was usedto install the V6.2 or V6.3 server.
2. Obtain a list of DB2 instances. Issue the following system command:db2ilist
The output might be similar to the following example:SERVER1
Ensure that each instance corresponds to a server that is running on thesystem.
3. Gather information about each DB2 instance. Note the default database path,actual database path, database name, database alias, and any DB2 variablesthat are configured for the instance. Keep the record for future reference. Thisinformation is required to restore the V6 database.a. Open the DB2 command window by issuing the following system
command:db2cmd
b. To change the instance, issue the following system command:set DB2INSTANCE=instance
where instance specifies the DB2 instance.c. Obtain the default database path for the DB2 instance by issuing the
following system command:db2 get dbm cfg | findstr DFTDBPATH
The output might be similar to the following example:Default database path (DFTDBPATH) = D:
d. Obtain information about the DB2 instance databases by issuing thefollowing system command:db2 list database directory
The output might be similar to the following example:System Database Directory
Number of entries in the directory = 2
Database 1 entry:
Database alias = TSMAL001Database name = TSMDB1Node name = TSMNODE1Database release level = d.00Comment = TSM SERVER DATABASE VIA TCPIPDirectory entry type = RemoteCatalog database partition number = -1Alternate server hostname =Alternate server port number =
Upgrading the Tivoli Storage Manager server
68 IBM Tivoli Storage Manager for Windows: Installation Guide

Database 2 entry:
Database alias = TSMDB1Database name = TSMDB1Local database directory = D:Database release level = d.00Comment =Directory entry type = IndirectCatalog database partition number = 0Alternate server hostname =Alternate server port number =
e. Obtain the DB2 instance variables by issuing the following systemcommand:db2set -all
The output might be similar to the following example:[e] DB2CODEPAGE=1208[e] DB2PATH=D:\TSM\db2[i] DB2_PMODEL_SETTINGS=MAX_BACKGROUND_SYSAPPS:500[i] DB2_SKIPINSERTED=ON[i] DB2_KEEPTABLELOCK=OFF[i] DB2_EVALUNCOMMITTED=ON[i] DB2_VENDOR_INI=D:\Server1\tsmdbmgr.env[i] DB2_SKIPDELETED=ON[i] DB2INSTPROF=C:\ProgramData\IBM\DB2\DB2TSM1[i] DB2COMM=TCPIP[i] DB2CODEPAGE=819[i] DB2_PARALLEL_IO=*[g] DB2_EXTSECURITY=YES[g] DB2_COMMON_APP_DATA_PATH=C:\ProgramData[g] DB2SYSTEM=EVO[g] DB2PATH=D:\TSM\db2[g] DB2INSTDEF=SERVER1
4. Connect to the Tivoli Storage Manager server by using an administrative userID.
5. Back up the Tivoli Storage Manager database by using the BACKUP DBcommand. The preferred method is to create a snapshot backup, which is afull database backup that does not interrupt scheduled database backups. Forexample, you can create a snapshot backup by issuing the followingcommand:backup db type=dbsnapshot devclass=tapeclass
For more information about this command and other Tivoli Storage Manageradministrative commands, see the Administrator's Reference.
6. Back up the device configuration information to another directory by issuingthe following Tivoli Storage Manager administrative command:backup devconfig filenames=file_name
where file_name specifies the name of the file in which to store deviceconfiguration information.
Tip: If you decide to restore the V6 database, this file is required.7. Back up the volume history file to another directory. Issue the following Tivoli
Storage Manager administrative command:backup volhistory filenames=file_name
where file_name specifies the name of the file in which to store the volumehistory information.
Upgrading the Tivoli Storage Manager server
Chapter 5. Upgrading the server from V6 to V7.1.1 69
Tip: If you decide to restore the V6 database, this file is required.8. Save a copy of the server options file, which is typically named dsmserv.opt.
The file is in the server instance directory.9. Prevent activity on the server by disabling new sessions. Issue the following
Tivoli Storage Manager administrative commands:disable sessions clientdisable sessions server
10. Verify whether any sessions exist, and notify the users that the server will bestopped. To check for existing sessions, issue the following Tivoli StorageManager administrative command:query session
11. Cancel sessions by issuing the following Tivoli Storage Manageradministrative command:cancel session all
This command cancels all sessions except for your current session.12. Stop the server by issuing the following Tivoli Storage Manager
administrative command:halt
13. Verify that the server is shut down and no processes are running.Open the Windows Task Manager application and review the list of activeprocesses.
14. In the server instance directory of your installation, locate the NODELOCK fileand move it to another directory, where you are saving configuration files.The NODELOCK file contains the previous licensing information for yourinstallation. This licensing information is replaced when the upgrade iscomplete.
Installing the V7.1.1 server and verifying the upgradeTo complete the process of upgrading the server from V6.2 or V6.3 to V7.1.1, youmust install the V7.1.1 server. Then, verify that the upgrade was successful bystarting the server instance.
Before you begin
You must be logged on to the system with the administrative user ID that wasused to install the V6.2 or V6.3 server.
You can obtain the installation package from the product DVD or from an IBMdownload site.
About this task
By using the Tivoli Storage Manager installation software, you can install thefollowing components:v Tivoli Storage Manager serverv Tivoli Storage Manager server languagesv Tivoli Storage Manager licensev Tivoli Storage Manager devicesv Tivoli Storage Manager Operations Centerv Tivoli Storage Manager storage agent
Upgrading the Tivoli Storage Manager server
70 IBM Tivoli Storage Manager for Windows: Installation Guide

Tip: The database (DB2) and the Global Security Kit are automatically installedwhen you select the server component.For more information about storage agents, see Tivoli Storage Manager forStorage Area Networks (http://www.ibm.com/support/knowledgecenter/SSSQZW_7.1.1/com.ibm.itsm.sta.doc/c_overview.html).
Procedure1. If you are obtaining the package from an IBM download site, download the
appropriate package file from one of the following websites:v For a new release, go to Passport Advantage at http://www.ibm.com/
software/lotus/passportadvantage/. Passport Advantage is the only websitefrom which you can download a licensed package file.
v For a maintenance fix, go to the Tivoli Storage Manager support site athttp://www.ibm.com/support/entry/portal/Overview/Software/Tivoli/Tivoli_Storage_Manager.
2. If you are downloading the package from one of the download sites, completethe following steps:
a. Verify that you have enough space to store the installation fileswhen they are extracted from the product package. For spacerequirements, see the download document for your product:v Tivoli Storage Manager: http://www.ibm.com/support/
docview.wss?uid=swg24035121v Tivoli Storage Manager Extended Edition: http://www.ibm.com/
support/docview.wss?uid=swg24035636v System Storage Archive Manager: http://www.ibm.com/
support/docview.wss?uid=swg24035638b. Change to the directory where you placed the executable file.
Tip: In the next step, the files are extracted to the current directory.The path must contain no more than 128 characters. Be sure toextract the installation files to an empty directory. Do not extract toa directory that contains previously extracted files, or any otherfiles.
c. To extract the installation files, double-click the executable file:package_name.exe
where package_name is like this example:7.1.1.000-TIV-TSMSRV-Windows.exe
The package is large. Therefore, the extraction takes some time.3. Install the Tivoli Storage Manager software by using one of the following
methods. During the installation process, you must install the Tivoli StorageManager license.
Tip: If you have multiple server instances on your system, install the TivoliStorage Manager software only once to upgrade all server instances.
Installation wizard
To install the server by using the graphical wizard of IBM InstallationManager, follow the instructions in “Installing Tivoli Storage Managerby using the installation wizard” on page 30.
Upgrading the Tivoli Storage Manager server
Chapter 5. Upgrading the server from V6 to V7.1.1 71
||
Ensure that your system meets the prerequisites for using theinstallation wizard. Then, complete the installation procedure. In theIBM Installation Manager window, click the Install icon; do not clickthe Update or Modify icon.
Command line in console mode
To install the server by using the command line in console mode,follow the instructions in “Installing Tivoli Storage Manager by usingconsole mode” on page 32.
Review the information about installing the server in console mode andthen complete the installation procedure.
Silent mode
To install the server by using silent mode, follow the instructions in“Installing Tivoli Storage Manager in silent mode” on page 33.
Review the information about installing the server in silent mode andthen complete the installation procedure.
After you install the Tivoli Storage Manager software, you do not have toreconfigure the system.
4. Correct any errors that are detected during the installation process.If you installed the server by using the installation wizard, you can viewinstallation logs by using the IBM Installation Manager tool. Click File > ViewLog. To collect log files, from the IBM Installation Manager tool, click Help >Export Data for Problem Analysis.If you installed the server by using console mode or silent mode, you can viewerror logs in the IBM Installation Manager log directory, for example:
C:\ProgramData\IBM\Installation Manager\logs
5. Obtain any applicable fixes by going to the following website:http://www.ibm.com/support/entry/portal/Overview/Software/Tivoli/Tivoli_Storage_Manager. Click Downloads (fixes and PTFs) and apply anyapplicable fixes.
6. Verify that the upgrade was successful:a. Start the server instance. To start the server from the default directory,
C:\Program Files\Tivoli\TSM, issue the following Tivoli Storage Manageradministrative command:dsmserv -k server_instance
where server_instance is the name of your server instance. Server1 is thedefault name for the first instance of the Tivoli Storage Manager server.If you plan to run the server as a service under the Local System account,the Local System account must be explicitly granted access to the TivoliStorage Manager database. For instructions, see “Starting the server as aWindows service” on page 52.
b. Monitor the messages that the server issues as it starts. Watch for error andwarning messages, and resolve any issues.
c. Verify that you can connect to the server by using the administrative client.To start an administrative client session, issue the following Tivoli StorageManager administrative command:dsmadmc
d. To obtain information about the upgraded system, run QUERY commands.For example, to obtain consolidated information about the system, issue thefollowing Tivoli Storage Manager administrative command:
Upgrading the Tivoli Storage Manager server
72 IBM Tivoli Storage Manager for Windows: Installation Guide
||
|
||||
||
|
||||

query system
To obtain information about the database, issue the following Tivoli StorageManager administrative command:query db format=detailed
7. Register the licenses for the Tivoli Storage Manager server components that areinstalled on your system by issuing the REGISTER LICENSE command:register license file=installation_directory\server\component_name.lic
where installation_directory specifies the directory in which you installed thecomponent, and component_name specifies the abbreviation for the component.
For example, if you installed the server in the default directory, c:\ProgramFiles\Tivoli\TSM, register the license by issuing the following command:register license file=c:\Program Files\Tivoli\TSM\server\tsmbasic.lic
For example, if you installed Tivoli Storage Manager Extended Edition in thec:\Program Files\Tivoli\TSM directory, issue the following command:register license file=c:\Program Files\Tivoli\TSM\server\tsmee.lic
For example, if you installed System Storage Archive Manager in thec:\Program Files\Tivoli\TSM directory, issue the following command:register license file=c:\Program Files\Tivoli\TSM\server\dataret.lic
Restriction: You cannot use the Tivoli Storage Manager server to registerlicenses for Tivoli Storage Manager for Mail, Tivoli Storage Manager forDatabases, Tivoli Storage Manager for ERP, and Tivoli Storage Manager forSpace Management. The REGISTER LICENSE command does not apply to theselicenses. The licensing for these products is done by Tivoli Storage Managerclients.
8. Optional: To install an additional language package, use the modify function ofthe IBM Installation Manager.
9. Optional: To upgrade to a newer version of a language package, use the updatefunction of the IBM Installation Manager.
What to do next
You can authenticate passwords with the LDAP directory server, or authenticatepasswords with the Tivoli Storage Manager server. Passwords that areauthenticated with the LDAP directory server can provide enhanced systemsecurity. For instructions, see the section about managing passwords and logonprocedures in the Administrator's Guide.
If a native device driver is available on Windows for the tape drives or mediumchangers that you plan to use, use the native device driver. If a native devicedriver is not available on Windows for the tape drives or medium changers thatyou plan to use, install the Tivoli Storage Manager device driver by issuing thedpinst.exe /a command. The dpinst.exe file is in the device driver directory. Thedefault directory is C:\Program Files\Tivoli\TSM\device\drivers.
Upgrading the Tivoli Storage Manager server
Chapter 5. Upgrading the server from V6 to V7.1.1 73

Upgrading from Tivoli Storage Manager V6.1 to V7.1.1You can upgrade the Tivoli Storage Manager server from V6.1 to V6.3, and thenupgrade the server to V7.1.1. It is not possible to upgrade the server directly fromV6.1 to V7.1.1.
Before you begin
Ensure that you retain the installation media from the base release of the V6.1 andV6.3 servers. If you obtained the Tivoli Storage Manager software from a DVD,ensure that the DVD is available. If you obtained the Tivoli Storage Managersoftware from a downloaded package, ensure that the downloaded files areavailable. If the upgrade fails, and the server license module is uninstalled, theinstallation media from the server base release are required to reinstall the license.
Procedure1. Upgrade the server from V6.1 to V6.3, as described in Upgrading from Tivoli
Storage Manager Version 6.1 to 6.3 or later (http://www.ibm.com/support/knowledgecenter/SSGSG7_6.3.0/com.ibm.itsm.srv.install.doc/t_srv_upgrade61_63.html).
2. Upgrade the server from V6.3 to V7.1.1, as described in “Upgrading from TivoliStorage Manager V6.2 or V6.3 to V7.1.1” on page 66.
Upgrading Tivoli Storage Manager in a clustered environmentTo upgrade a Tivoli Storage Manager server to V7.1.1 in a clustered environment,you must complete preparation and installation tasks. The procedures vary,depending on the operating system and release.
Procedure
Follow the procedure for your operating system, source release, and target release:
Table 15. Procedures for upgrading the server in a clustered environment on a Windowsoperating system
Source release Target release Procedure
V7.1 V7.1 fix pack “Applying a fix pack toTivoli Storage Manager V7 ina clustered environment” onpage 61
V6.2 or V6.3 V7.1.1 “Upgrading Tivoli StorageManager V6.2 or V6.3 toV7.1.1 in a clusteredenvironment” on page 75
V6.1 V7.1.1 “Upgrading Tivoli StorageManager V6.1 to V7.1.1 in aclustered environment” onpage 77
V5 V7.1.1 Upgrade and Migration Guidefor V5 Servers
Upgrading the Tivoli Storage Manager server
74 IBM Tivoli Storage Manager for Windows: Installation Guide

Upgrading Tivoli Storage Manager V6.2 or V6.3 to V7.1.1 in aclustered environment
To take advantage of new product features, you can upgrade a Tivoli StorageManager server that is installed on a Windows operating system in a clusteredenvironment from V6.2 or V6.3 to V7.1.1.
Before you begin
Ensure that you retain the installation media from the V6.2 or V6.3 server baserelease that you are upgrading. If you installed Tivoli Storage Manager from aDVD, ensure that the DVD is available. If you installed Tivoli Storage Managerfrom a downloaded package, ensure that the downloaded files are available. If theupgrade fails, and the server license module is uninstalled, the installation mediafrom the server base release are required to reinstall the license.
Procedure1. If you plan to install the Tivoli Storage Manager V7.1.1 server on the
Windows Server 2012 operating system, install the failover cluster automationserver and the failover cluster command interface first. To install thesecomponents, issue the following commands from Windows 2.0 PowerShell:Install-WindowsFeature -Name RSAT-Clustering-AutomationServerInstall-WindowsFeature -Name RSAT-Clustering-CmdInterface
2. Back up the database by using the BACKUP DB command. The preferred methodis to use a snapshot backup, which provides a full database backup withoutinterrupting scheduled backups. For example, you can create a snapshotbackup by issuing the following command:backup db type=dbsnapshot devclass=tapeclass
For more information about the BACKUP DB command and other Tivoli StorageManager administrative commands, see the Administrator's Reference.
3. Back up the device configuration information to another directory. Issue thefollowing command:backup devconfig filenames=file_name
where file_name specifies the name of the file in which to store deviceconfiguration information.
4. Back up the volume history file to another directory. Issue the followingcommand:backup volhistory filenames=file_name
where file_name specifies the name of the file in which to store the volumehistory information.
5. Save a copy of the server options file, typically named dsmserv.opt. The file isin the server instance directory.
6. Ensure that the resource group is on the primary node, and that all nodes inthe cluster are running. Take the following actions on the primary node:a. In the Failover Cluster Manager window, take the Tivoli Storage Manager
server resource offline and delete it:1) Select Services and applications, and then select the cluster group. The
Tivoli Storage Manager server resource is displayed in the OtherResources section.
2) Select the Tivoli Storage Manager server resource, and click Take thisresource offline.
Upgrading the Tivoli Storage Manager server
Chapter 5. Upgrading the server from V6 to V7.1.1 75
3) To delete the Tivoli Storage Manager server resource, select it, and clickDelete.
b. In the Failover Cluster Manager window, delete the network name and IPaddress:1) In the Server name section, expand the network name to view the IP
address. Note the network name and IP address.2) Select the network name and the IP address, and click Delete.
c. In the Failover Cluster Manager window, take the DB2 server resourceoffline:1) Select Services and applications, and then select the cluster group. The
Tivoli Storage Manager server resource is displayed in the OtherResources section.
2) Select the DB2 server resource, for example, SERVER1, and click Takethis resource offline.
7. On the primary node, remove DB2 clustering from each Tivoli StorageManager instance in the cluster by issuing the following command:db2mscs -u:instancename
For example:db2mscs -u:server1
Tip: You might see an error message about a missing cluster resource. Ignorethis message.
8. On the primary node, in the Failover Cluster Manager window, review theresource group Summary section. Verify that only the shared disks and anytape resources remain in the resource group.
9. Install the Tivoli Storage Manager V7.1.1 server on each node in the cluster.For instructions, see Chapter 2, “Installing the Tivoli Storage Manager servercomponents,” on page 29. If you use the installation wizard to install theserver, in the IBM Installation Manager window, click the Install icon. Do notclick the Update or Modify icon.
10. On the primary node, start the server in the foreground to allow the databaseschema reconciliation and configuration to be completed. When the serverstarts, halt it by issuing the HALT command. If your environment has multipleserver instances, complete this step for each instance.
11. On the primary node, start the configuration wizard by clicking Start > AllPrograms > Tivoli Storage Manager > Configuration Wizard. Step throughthe configuration wizard:a. When you are prompted to enter the user ID, enter the name of the
domain account that is associated with the cluster.b. When you are prompted to enter the instance name, enter the name of the
instance that you are reclustering.c. When you are prompted to indicate whether you want to recluster, click
Yes.d. Continue stepping through the wizard until you see a message that the
configuration was successful.12. Register the licenses for the Tivoli Storage Manager server components that
are installed on your system by issuing the REGISTER LICENSE command:register license file=installation_directory\server\component_name.lic
Upgrading the Tivoli Storage Manager server
76 IBM Tivoli Storage Manager for Windows: Installation Guide

where installation_directory specifies the directory in which you installed thecomponent and component_name specifies the abbreviation for the component.
For example, if you installed the server in the default directory, c:\ProgramFiles\Tivoli\TSM, register the license by issuing the following command:register license file=c:\Program Files\Tivoli\TSM\server\tsmbasic.lic
For example, if you installed Tivoli Storage Manager Extended Edition in thec:\Program Files\Tivoli\TSM directory, issue the following command:register license file=c:\Program Files\Tivoli\TSM\server\tsmee.lic
For example, if you installed System Storage Archive Manager in thec:\Program Files\Tivoli\TSM directory, issue the following command:register license file=c:\Program Files\Tivoli\TSM\server\dataret.lic
Restriction: You cannot use the Tivoli Storage Manager server to registerlicenses for Tivoli Storage Manager for Mail, Tivoli Storage Manager forDatabases, Tivoli Storage Manager for ERP, and Tivoli Storage Manager forSpace Management. The REGISTER LICENSE command does not apply to theselicenses. The licensing for these products is done by Tivoli Storage Managerclients.
What to do next
If a native device driver is available on Windows for the tape drives or mediumchangers that you plan to use, use the native device driver. If a native devicedriver is not available, install the Tivoli Storage Manager device driver by issuingthe dpinst.exe /a command. The dpinst.exe file is in the device driver directory,and the default location is C:\Program Files\Tivoli\TSM\device\drivers.
Upgrading Tivoli Storage Manager V6.1 to V7.1.1 in a clusteredenvironment
To take advantage of new features in Tivoli Storage Manager, you can upgrade aTivoli Storage Manager server that is installed on a Windows operating system in aclustered environment from V6.1 to V7.1.1.
Before you begin
Ensure that you retain the installation media from the V6.1 and V6.3 server basereleases. If you obtained the Tivoli Storage Manager software from a DVD, ensurethat the DVD is available. If you obtained the Tivoli Storage Manager softwarefrom a downloaded package, ensure that the downloaded files are available. If theupgrade fails, and the server license module is uninstalled, the installation mediafrom the server base release are required to reinstall the license.
Procedure1. If you plan to install the Tivoli Storage Manager V7.1.1 server on the
Windows Server 2012 operating system, install the failover cluster automationserver and the failover cluster command interface first. To install thesecomponents, issue the following commands from Windows 2.0 PowerShell:Install-WindowsFeature -Name RSAT-Clustering-AutomationServerInstall-WindowsFeature -Name RSAT-Clustering-CmdInterface
2. Back up the database by using the BACKUP DB command. The preferred methodis to use a snapshot backup, which provides a full database backup without
Upgrading the Tivoli Storage Manager server
Chapter 5. Upgrading the server from V6 to V7.1.1 77
interrupting scheduled backups. For example, you can create a snapshotbackup by issuing the following command:backup db type=dbsnapshot devclass=tapeclass
For more information about the BACKUP DB command and other Tivoli StorageManager administrative commands, see the Administrator's Reference.
3. Back up the device configuration information to another directory. Issue thefollowing command:backup devconfig filenames=file_name
where file_name specifies the name of the file in which to store deviceconfiguration information.
4. Back up the volume history file to another directory. Issue the followingcommand:backup volhistory filenames=file_name
where file_name specifies the name of the file in which to store the volumehistory information.
5. Save a copy of the server options file, typically named dsmserv.opt. The file isin the server instance directory.
6. Ensure that the resource group is on the primary node, and that all nodes inthe cluster are running. Take the following actions on the primary node:a. In the Failover Cluster Manager window, take the Tivoli Storage Manager
server resource offline and delete it:1) Select Services and applications, and then select the cluster group. The
Tivoli Storage Manager server resource is displayed in the OtherResources section.
2) Select the Tivoli Storage Manager server resource, and click Take thisresource offline.
3) To delete the Tivoli Storage Manager server resource, select it, and clickDelete.
b. In the Failover Cluster Manager window, delete the network name and IPaddress:1) In the Server name section, expand the network name to view the IP
address. Note the network name and IP address.2) Select the network name and the IP address, and click Delete.
c. In the Failover Cluster Manager window, take the DB2 server resourceoffline:1) Select Services and applications, and then select the cluster group. The
Tivoli Storage Manager server resource is displayed in the OtherResources section.
2) Select the DB2 server resource, for example, SERVER1, and click Takethis resource offline.
7. On the primary node, to remove DB2 clustering from the instance, for eachTivoli Storage Manager instance in the cluster, issue the following command:db2mscs -u:instancename
For example:db2mscs -u:server1
Tip: You might see an error message about a missing cluster resource. Ignorethis message.
Upgrading the Tivoli Storage Manager server
78 IBM Tivoli Storage Manager for Windows: Installation Guide

8. On the primary node, in the Failover Cluster Manager window, in theresource group Summary section, verify that only the shared disks and anytape resources remain in the resource group.
9. On the primary node, install the Tivoli Storage Manager V6.3 server by usingthe ./install.bin command. For detailed instructions about installing theV6.3 server, see Installing the Tivoli Storage Manager server components(http://www.ibm.com/support/knowledgecenter/SSGSG7_6.3.0/com.ibm.itsm.srv.install.doc/t_srv_inst.html).
10. On the primary node, install the Tivoli Storage Manager V7.1.1 server. Forinstructions, see Chapter 2, “Installing the Tivoli Storage Manager servercomponents,” on page 29. If you use the installation wizard to install theserver, in the IBM Installation Manager window, click the Install icon. Do notclick the Update or Modify icon.
11. On each secondary node, uninstall Tivoli Storage Manager V6.1:a. Change to the following directory:
C:\Program Files\Tivoli\TSM\_uninst
b. Issue the following command:Uninstall Tivoli Storage Manager.exe
12. On the primary node, start the configuration wizard by clicking Start > AllPrograms > Tivoli Storage Manager > Configuration Wizard. Step throughthe configuration wizard:a. When you are prompted to enter the instance name, enter the name of the
instance that you are reclustering.b. When you are prompted to enter the user ID, enter the name of the
domain account that is associated with the cluster.c. When you are prompted to indicate whether you want to recluster, click
Yes.d. Continue stepping through the wizard until you see a message that the
configuration was successful.13. Register the licenses for the Tivoli Storage Manager server components that
are installed on your system by issuing the REGISTER LICENSE command:register license file=installation_directory\server\component_name.lic
where installation_directory specifies the directory in which you installed thecomponent and component_name specifies the abbreviation for the component.
For example, if you installed the server in the default directory, c:\ProgramFiles\Tivoli\TSM, register the license by issuing the following command:register license file=c:\Program Files\Tivoli\TSM\server\tsmbasic.lic
For example, if you installed Tivoli Storage Manager Extended Edition in thec:\Program Files\Tivoli\TSM directory, issue the following command:register license file=c:\Program Files\Tivoli\TSM\server\tsmee.lic
For example, if you installed System Storage Archive Manager in thec:\Program Files\Tivoli\TSM directory, issue the following command:register license file=c:\Program Files\Tivoli\TSM\server\dataret.lic
Restriction: You cannot use the Tivoli Storage Manager server to registerlicenses for Tivoli Storage Manager for Mail, Tivoli Storage Manager forDatabases, Tivoli Storage Manager for ERP, and Tivoli Storage Manager for
Upgrading the Tivoli Storage Manager server
Chapter 5. Upgrading the server from V6 to V7.1.1 79

Space Management. The REGISTER LICENSE command does not apply to theselicenses. The licensing for these products is done by Tivoli Storage Managerclients.
What to do next
If a native device driver is available on Windows for the tape drives or mediumchangers that you plan to use, use the native device driver. If a native devicedriver is not available, install the Tivoli Storage Manager device driver by issuingthe dpinst.exe /a command. The dpinst.exe file is in the device driver directory,and the default location is C:\Program Files\Tivoli\TSM\device\drivers.
Removing GSKit Version 7 after upgrading to Tivoli Storage ManagerVersion 7.1.1
The Tivoli Storage Manager installation wizard upgrades GSKit Version 8 and later.GSKit Version 7 is not removed or upgraded when you upgrade to Tivoli StorageManager Version 7.1.1, even if GSKit was installed with an earlier version of TivoliStorage Manager.
About this task
If you no longer need GSKit V7 and want to free up space on your system, youcan remove it after the upgrade to Tivoli Storage Manager V7.1.1.
Important: Removing GSKit V7 might affect other programs on your system thatrely on it.
Procedure
To remove GSKit V7, complete the following steps:1. Back up your registry.
a. Click Start, and then click Run.b. Type Regedit. Click OK.c. To save a copy of your registry, select File > Export.d. If you must later restore the registry, select File > Import.
For more information, see the Windows documentation.2. Locate the directory where the GSKit is installed. The default directory is
C:\Program Files\IBM\gsk7\.3. Remove the GSKit installation directory, gsk7, and all subfiles and directories.
Right-click the folder and click Delete.4. Remove the GSKit 7 registry key and all subkeys and values.
Important: Removing the wrong key can cause system problems such as notbeing able to restart the workstation.a. Click Start, and then click Run.b. Type Regedit. Click OK.c. The GSKit registry key is in this directory: HKEY_LOCAL_MACHINE\SOFTWARE\
IBM. Right-click the registry key, HKEY_LOCAL_MACHINE\SOFTWARE\IBM\GSK7,and click Delete.
Upgrading the Tivoli Storage Manager server
80 IBM Tivoli Storage Manager for Windows: Installation Guide

Chapter 6. Reverting from Version 7.1 to the previous V6server
If you must revert to the previous version of the server after an upgrade, you musthave a full database backup from your original version. You must also have theserver installation media for your original version and key configuration files.Carefully follow the preparation steps before you upgrade the server. By doing so,it might be possible to revert to the previous version of the Tivoli Storage Managerserver with minimal loss of data.
Before you begin
You must have the following items from the earlier version of the server:v Server database backupv Volume history filev Device configuration filev Server options file
About this task
Use the same instructions whether you are reverting within releases or to an earlierrelease, for example, from 6.2.2 to 6.2.0 or from 6.2.2 to 6.1.2. The older versionmust match the version that you used before the upgrade to 7.1.1.
Attention: Specify the REUSEDELAY parameter to help prevent backup-archiveclient data loss when you revert the server to a previous version.
Steps for reverting to the previous server versionAbout this task
Complete the following steps on the system that has the V7.1 server.
Procedure1. Halt the server to shut down all server operations by using the HALT
command.2. Remove the database from the database manager, then delete the database and
recovery log directories.a. Manually remove the database. One way to remove it is by issuing this
command:dsmserv -k instance_name removedb tsmdb1
b. If you must reuse the space that is occupied by the database and recoverylog directories, you can now delete these directories.
3. Use the uninstallation program to uninstall the V7.1.1 server. Uninstallationremoves the server and the database manager, with their directories. Fordetails, see Chapter 8, “Uninstalling Tivoli Storage Manager,” on page 89.
4. Reinstall the version of the server program that you were using before theupgrade to V7.1. This version must match the version that your server wasrunning when you created the database backup that you restore in a laterstep. For example, the server was at version 6.2.2.0 before the upgrade, and
© Copyright IBM Corp. 1993, 2014 81

you intend to use the database backup that was in use on this server. Youmust install the 6.2.2.0 fix pack to be able to restore the database backup.
5. Copy the following files to the instance directory.v Device configuration filev Volume history filev The server options file (typically dsmserv.opt)
6. Configure the new server database by using the configuration wizard. To startthe wizard, issue the following command:/dsmicfgx
7. Ensure that no servers are running in the background.8. Restore the database to a point in time before the upgrade. For more details,
see the restoring the server database to a point in time section in theAdministrator’s Guide.
9. If you enabled data deduplication for any FILE-type storage pools that existedbefore the upgrade, or if you moved data that existed before the upgrade intonew storage pools while using the V7.1 server, you must complete additionalrecovery steps. For more details, see “Additional recovery steps if you creatednew storage pools or enabled data deduplication.”
10. If the REUSEDELAY parameter setting on storage pools is less than the age of thedatabase that you restored, restore volumes on any sequential-access storagepools that were reclaimed after that database backup. Use the RESTORE VOLUMEcommand.If you do not have a backup of a storage pool, audit the reclaimed volumesby using the AUDIT VOLUME command, with the FIX=YES parameter to resolveinconsistencies. For example:audit volume volume_name fix=yes
11. If client backup or archive operations were completed using the V7.1 server,audit the storage pool volumes on which the data was stored.
Additional recovery steps if you created new storage pools or enableddata deduplication
If you created new storage pools, turned on data deduplication for any FILE-typestorage pools, or did both while your server was running as a V7.1.1 server, youmust complete more steps to return to the previous server version.
Before you begin
To complete this task, you must have a complete backup of the storage pool thatwas created before the upgrade to V7.1.1.
About this task
Use this information if you did either or both of the following actions while yourserver was running as a V7.1.1 server:v You enabled the data deduplication function for any storage pools that existed
before the upgrade to V7.1.1 program. Data deduplication applies only tostorage pools that use a FILE device type.
v You created new, primary storage pools after the upgrade, and moved data thatwas stored in other storage pools into the new storage pools.
Complete these steps after the server is again restored to V6.
Reverting to a previous Version 6 server version
82 IBM Tivoli Storage Manager for Windows: Installation Guide

Procedurev For each storage pool for which you enabled the data deduplication function,
restore the entire storage pool by using the RESTORE STGPOOL command.v For storage pools that you created after the upgrade, determine what action to
take. Data that was moved from existing, V6 storage pools into the new storagepools might be lost because the new storage pools no longer exist in yourrestored V6 server. Possible recovery depends on the type of storage pool:– If data was moved from V6 DISK-type storage pools into a new storage pool,
space that was occupied by the data that was moved was probably reused.Therefore, you must restore the original, V6 storage pools, by using thestorage pool backups that were created before the upgrade to V7.1.If no data was moved from V6 DISK-type storage pools into a new storagepool, then audit the storage pool volumes in these DISK-type storage pools.
– If data was moved from V6 sequential-access storage pools into a new storagepool, that data might still exist and be usable in storage pool volumes on therestored V6 server. The data might be usable if the REUSEDELAY parameter forthe storage pool was set to a value that prevented reclamation while theserver was running as a V7.1.1 server. If any volumes were reclaimed whilethe server was running as a V7.1.1 server, restore those volumes from storagepool backups that were created before the upgrade to V7.1.1.
Reverting to the previous server version in a cluster configurationIf you must revert to the previous version of the server after an upgrade, you musthave a full database backup from your original version. You must also have theserver installation media for your original version and key configuration files.Carefully follow the preparation steps before you upgrade the server. By doing so,it might be possible to revert to the previous version of the Tivoli Storage Managerserver with minimal loss of data.
Before you begin
You must have the following items from the earlier version of the server:v Server database backupv Volume history filev Device configuration filev Server options file
Steps for reverting to the previous server versionCarefully follow the preparation steps before you upgrade the server. By doing so,it might be possible to revert to the previous version of the Tivoli Storage Managerserver with minimal loss of data.
About this task
Complete the following steps on the system that has the Version 7.1.1 server.
Procedure1. Delete the Tivoli Storage Manager server resource and the network resource in
Microsoft Failover Cluster Manager.a. Open Failover Cluster Manager. Under Other Resources, right-click the
Tivoli Storage Manager instance resource. Select Take this resource offline.
Reverting to a previous Version 6 server version
Chapter 6. Reverting from Version 7.1 to the previous V6 server 83
b. Delete the Tivoli Storage Manager instance.c. Under Server Name, expand the network name and record the cluster
TCP/IP address.d. Delete the network name.
2. Remove the DB2 cluster from the instance by issuing the following command:DB2mscs -u:instance_name
For example, if the server instance is Server1, enter the command:db2mscs -u:Server1
Tip: You might see an error message about a missing cluster resource.Disregard this message.
3. Remove the database. One way to remove it is by issuing this command:dsmserv -k instance_name removedb tsmdb1
4. On each system in the cluster, delete the Tivoli Storage Manager Version 7.1.1tsmsvrrsc DLL files by completing the following steps:a. Stop the cluster service. One way to stop it is by using the Services
Application. Right-click Cluster Service and select Stop.b. Delete the tsmsvrrscenxX64.dll and tsmsvrrscx64.dll files from the
C:\Windows\Cluster directory.c. Start the cluster service. One way to start it is by using the Services
Application. Right-click Cluster Service and select Start.5. Use the uninstallation program to uninstall the V7.1.1 server. Uninstallation
removes the server and the database manager, with their directories. Fordetails, see Chapter 8, “Uninstalling Tivoli Storage Manager,” on page 89.
6. Reinstall the version of the server program that you were using before theupgrade to V7.1. This version must match the version that your server wasrunning when you created the database backup that you restore in a later step.For example, the server was at version 6.2.2.0 before the upgrade, and youintend to use the database backup that was in use on this server. You mustinstall the 6.2.2.0 fix pack to be able to restore the database backup.
7. Copy the following files to the instance directory.v Device configuration filev Volume history filev The server options file (typically dsmserv.opt)
8. Use the configuration wizard (dsmicfgx) to recreate the server instance.9. Restore the database to a point in time before the upgrade. For more details,
see the restoring the server database to a point in time section in theAdministrator’s Guide.
Reverting to a previous Version 6 server version
84 IBM Tivoli Storage Manager for Windows: Installation Guide

Chapter 7. Reference: DB2 commands for Tivoli StorageManager server databases
Use this list as reference when you are directed to issue DB2 commands by IBMsupport.
Purpose
After using the wizards to install and configure Tivoli Storage Manager, youseldom need to issue DB2 commands. A limited set of DB2 commands that youmight use or be asked to issue are listed in Table 16. This list is supplementalmaterial only and is not a comprehensive list. There is no implication that a TivoliStorage Manager administrator will use it on a daily or ongoing basis. Samples ofsome commands are provided. Details of output are not listed.
For a full explanation of the commands described here and of their syntax, seehttp://www.ibm.com/support/knowledgecenter/SSEPGG_10.5.0.
Table 16. DB2 commands
Command Description Example
db2cmd Opens the command line processor DB2window, and initializes the DB2command-line environment.
Open the DB2 command window:
db2cmd
db2icrt Creates DB2 instances in the homedirectory of the instance owner.Tip: The Tivoli Storage Managerconfiguration wizard creates the instanceused by the server and database. After aserver is installed and configured throughthe configuration wizard, the db2icrtcommand is generally not used.
This utility is located in the DB2PATH\bindirectory where DB2PATH is the locationwhere the DB2 copy is installed.
Manually create a Tivoli Storage Managerinstance. Enter the command on one line:
/opt/tivoli/tsm/db2/instance/db2icrt -a server -s ese -uinstance_name instance_name
db2set Displays DB2 variables. List DB2 variables:
db2set
CATALOG DATABASE Stores database location information in thesystem database directory. The databasecan be located either on the localworkstation or on a remote databasepartition server. The server configurationwizard takes care of any catalog neededfor using the server database. Run thiscommand manually, after a server isconfigured and running, only if somethingin the environment changes or isdamaged.
Catalog the database:
db2 catalog database tsmdb1
CONNECT TO DATABASE Connects to a specified database forcommand-line interface (CLI) use.
Connect to the Tivoli Storage Managerdatabase from a DB2 CLI:
db2 connect to tsmdb1
© Copyright IBM Corp. 1993, 2014 85

Table 16. DB2 commands (continued)
Command Description Example
GET DATABASE CONFIGURATION Returns the values of individual entries ina specific database configuration file.Important: This command andparameters are set and managed directlyby DB2. They are listed here forinformational purposes and a means toview the existing settings. Changing thesesettings might be advised by IBM supportor through service bulletins such asAPARs or Technical Guidance documents(technotes). Do not change these settingsmanually. Change them only at thedirection of IBM and only through the useof Tivoli Storage Manager servercommands or procedures.
Show the configuration information for adatabase alias:
db2 get db cfg for tsmdb1
Retrieve information in order to verifysettings such as database configuration,log mode, and maintenance.
db2 get db config for tsmdb1show detail
GET DATABASE MANAGER CONFIGURATION Returns the values of individual entries ina specific database configuration file.Important: This command andparameters are set and managed directlyby DB2. They are listed here forinformational purposes and a means toview the existing settings. Changing thesesettings might be advised by IBM supportor through service bulletins such asAPARs or Technical Guidance documents(technotes). Do not change these settingsmanually. Change them only at thedirection of IBM and only through the useof Tivoli Storage Manager servercommands or procedures.
Retrieve configuration information for thedatabase manager:
db2 get dbm cfg
GET HEALTH SNAPSHOT Retrieves the health status information forthe database manager and its databases.The information returned represents asnapshot of the health state at the timethe command was issued. Tivoli StorageManager monitors the state of thedatabase using the health snapshot andother mechanisms that are provided byDB2. There might be cases where thehealth snapshot or other DB2documentation indicates that an item ordatabase resource might be in an alertstate. Such a case indicates that actionmust be considered to remedy thesituation. Tivoli Storage Manager monitorsthe condition and responds appropriately.Not all declared alerts by the DB2database are acted on.
Receive a report on DB2 health monitorindicators:
db2 get health snapshot fordatabase on tsmdb1
GRANT (Database Authorities) Grants authorities that apply to the entiredatabase rather than privileges that applyto specific objects within the database.
Grant access to the user ID itmuser:
db2 GRANT CONNECT ON DATABASETO USER itmuserdb2 GRANT CREATETAB ON DATABASETO USER itmuser
Reference: DB2 commands for Tivoli Storage Manager server databases
86 IBM Tivoli Storage Manager for Windows: Installation Guide
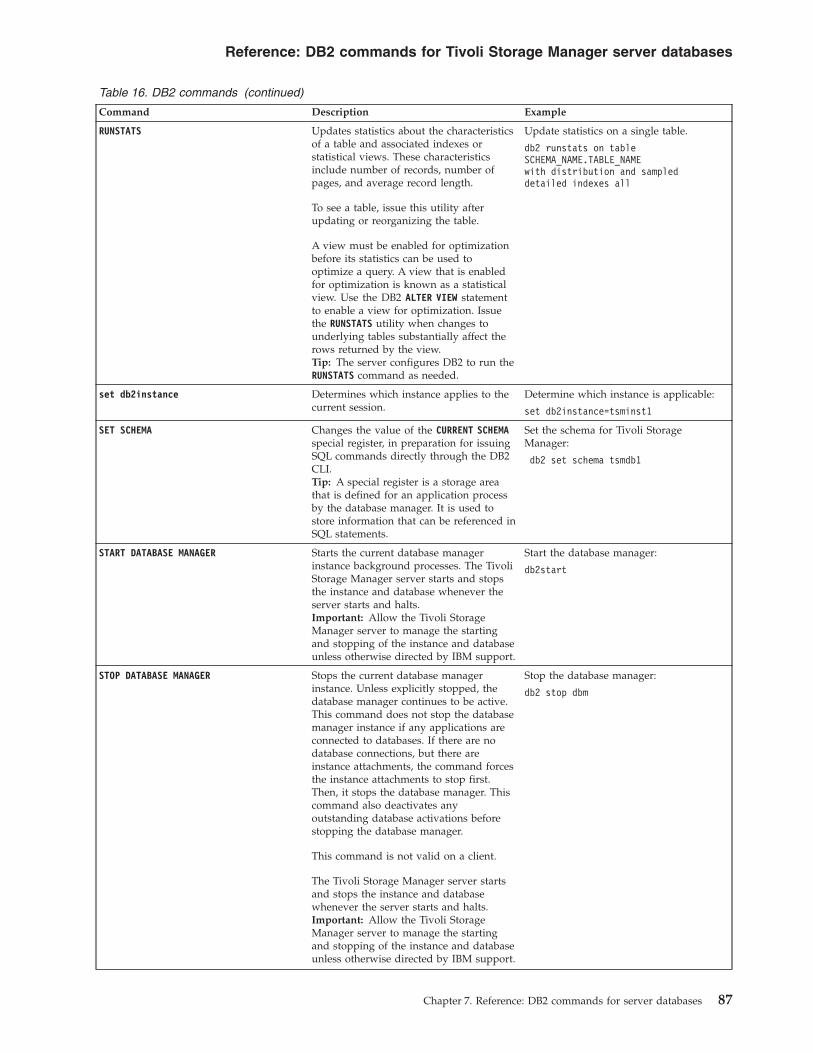
Table 16. DB2 commands (continued)
Command Description Example
RUNSTATS Updates statistics about the characteristicsof a table and associated indexes orstatistical views. These characteristicsinclude number of records, number ofpages, and average record length.
To see a table, issue this utility afterupdating or reorganizing the table.
A view must be enabled for optimizationbefore its statistics can be used tooptimize a query. A view that is enabledfor optimization is known as a statisticalview. Use the DB2 ALTER VIEW statementto enable a view for optimization. Issuethe RUNSTATS utility when changes tounderlying tables substantially affect therows returned by the view.Tip: The server configures DB2 to run theRUNSTATS command as needed.
Update statistics on a single table.
db2 runstats on tableSCHEMA_NAME.TABLE_NAMEwith distribution and sampleddetailed indexes all
set db2instance Determines which instance applies to thecurrent session.
Determine which instance is applicable:
set db2instance=tsminst1
SET SCHEMA Changes the value of the CURRENT SCHEMAspecial register, in preparation for issuingSQL commands directly through the DB2CLI.Tip: A special register is a storage areathat is defined for an application processby the database manager. It is used tostore information that can be referenced inSQL statements.
Set the schema for Tivoli StorageManager:
db2 set schema tsmdb1
START DATABASE MANAGER Starts the current database managerinstance background processes. The TivoliStorage Manager server starts and stopsthe instance and database whenever theserver starts and halts.Important: Allow the Tivoli StorageManager server to manage the startingand stopping of the instance and databaseunless otherwise directed by IBM support.
Start the database manager:
db2start
STOP DATABASE MANAGER Stops the current database managerinstance. Unless explicitly stopped, thedatabase manager continues to be active.This command does not stop the databasemanager instance if any applications areconnected to databases. If there are nodatabase connections, but there areinstance attachments, the command forcesthe instance attachments to stop first.Then, it stops the database manager. Thiscommand also deactivates anyoutstanding database activations beforestopping the database manager.
This command is not valid on a client.
The Tivoli Storage Manager server startsand stops the instance and databasewhenever the server starts and halts.Important: Allow the Tivoli StorageManager server to manage the startingand stopping of the instance and databaseunless otherwise directed by IBM support.
Stop the database manager:
db2 stop dbm
Reference: DB2 commands for Tivoli Storage Manager server databases
Chapter 7. Reference: DB2 commands for server databases 87

Reference: DB2 commands for Tivoli Storage Manager server databases
88 IBM Tivoli Storage Manager for Windows: Installation Guide

Chapter 8. Uninstalling Tivoli Storage Manager
You can use the following procedures to uninstall Tivoli Storage Manager. Beforeyou remove Tivoli Storage Manager, ensure that you do not lose your backup andarchive data.
Before you begin
Complete the following steps before you uninstall Tivoli Storage Manager:v Complete a full database backup.v Save a copy of the volume history and device configuration files.v Store the output volumes in a safe location.
If you are running on 64-bit Windows Server 2008, ensure that you have created atleast one Tivoli Storage Manager server instance before uninstalling Tivoli StorageManager, or the uninstallation of DB2 might fail. See Chapter 3, “Taking the firststeps after you install Tivoli Storage Manager,” on page 37 for details aboutcreating a server instance.
Attention: Do not use the Add/Remove Programs tool in the Windows ControlPanel to uninstall Tivoli Storage Manager. Use only the uninstallation procedurethat is described in this section.
About this task
You can uninstall Tivoli Storage Manager by using any of the following methods: agraphical wizard, the command line in console mode, or silent mode.
“Uninstalling Tivoli Storage Manager by using a graphical wizard”
“Uninstalling Tivoli Storage Manager in console mode” on page 90
“Uninstalling Tivoli Storage Manager in silent mode” on page 90
What to do next
See Chapter 2, “Installing the Tivoli Storage Manager server components,” on page29 for installation steps to reinstall the Tivoli Storage Manager components.
Uninstalling Tivoli Storage Manager by using a graphical wizardYou can uninstall Tivoli Storage Manager by using the IBM Installation Managerinstallation wizard.
Procedure1. Start the Installation Manager.
Open the Installation Manager from the Start menu.2. Click Uninstall.3. Select Tivoli Storage Manager server, and click Next.4. Click Uninstall.5. Click Finish.
© Copyright IBM Corp. 1993, 2014 89

Uninstalling Tivoli Storage Manager in console modeTo uninstall Tivoli Storage Manager by using the command line, you must run theuninstallation program of IBM Installation Manager from the command line withthe parameter for console mode.
Procedure1. In the directory where IBM Installation Manager is installed, go to the
following subdirectory:eclipse\tools
For example:C:\Program Files\IBM\Installation Manager\eclipse\tools
2. From the tools directory, issue the following command:imcl.exe -c
3. To uninstall, enter 5.4. Choose to uninstall from the IBM Tivoli Storage Manager package group.5. Enter N for Next.6. Choose to uninstall the IBM Tivoli Storage Manager server package.7. Enter N for Next.8. Enter U for Uninstall.9. Enter F for Finish.
Uninstalling Tivoli Storage Manager in silent modeTo uninstall Tivoli Storage Manager in silent mode, you must run theuninstallation program of IBM Installation Manager from the command line withthe parameters for silent mode.
Before you begin
The input directory, which is in the directory where the installation package isextracted, contains the following sample response files for installing, updating, anduninstalling the server:v install_response_sample.xml
v update_response_sample.xml
v uninstall_response_sample.xml
You can use these sample files as they are with the default values, or you cancustomize them to suit your needs.
Procedure1. In the directory where IBM Installation Manager is installed, go to the
following subdirectory:eclipse\tools
For example:C:\Program Files\IBM\Installation Manager\eclipse\tools
2. From the tools directory, issue the following command, where response_filerepresents the response file path, including the file name:imcl.exe -input response_file -silent
The following command is an example:
Uninstalling Tivoli Storage Manager
90 IBM Tivoli Storage Manager for Windows: Installation Guide
imcl.exe -input C:\tmp\input\uninstall_response.xml -silent
Uninstalling and reinstalling Tivoli Storage ManagerIf you plan to manually reinstall Tivoli Storage Manager instead of using thewizard, there are a number of steps to take to preserve your server instance namesand database directories. During an uninstallation, any server instances previouslyset up are removed, but the database catalogs for those instances still exist.
About this task
If you are using the wizard to upgrade from Tivoli Storage Manager Version 6.2 orVersion 6.3, it is not necessary to complete these steps, the wizard completes themautomatically. To manually uninstall and reinstall Tivoli Storage Manager, completethe following steps:1. Make a list of your current server instances before proceeding to the
uninstallation. Run the following command:db2ilist
2. Run the following commands for every server instance:db2 attach to server1db2 get dbm cfg show detaildb2 detach
Keep a record of the database path for each instance.3. Uninstall Tivoli Storage Manager. See Chapter 8, “Uninstalling Tivoli Storage
Manager,” on page 89.After uninstalling Tivoli Storage Manager, check the Control Panel > Add orRemove Programs to verify that Tivoli Storage Manager DB2 is uninstalled.
4. When you uninstall any version of Tivoli Storage Manager 6.1 or later,including a fix pack, an instance file is created. The instance file is created tohelp reinstall Tivoli Storage Manager. Check this file and use the informationwhen you are prompted for the instance credentials when reinstalling. In silentinstallation mode, you provide these credentials using the INSTANCE_CREDvariable.You can find the instance file in the following location:
InstanceList.dat in the Tivoli Storage Manager server installation directory5. Reinstall Tivoli Storage Manager. See Chapter 2, “Installing the Tivoli Storage
Manager server components,” on page 29.6. Recreate your server instances. See “Creating the server instance” on page 41.
Tip: The installation wizard configures the server instances but you mustverify that they exist. If they do not exist, you must manually configure them.
7. Catalog the database. Log in to each server instance as the instance user, one ata time, and issue the following commands:set db2instance=server1db2 catalog database tsmdb1db2 attach to server1db2 update dbm cfg using dftdbpath instance_drivedb2 detach
8. Verify that Tivoli Storage Manager recognizes the server instance by listingyour directories. Your home directory appears if you did not change it. Yourinstance directory does appear if you used the configuration wizard. Issue thiscommand:db2 list database directory
Uninstalling Tivoli Storage Manager
Chapter 8. Uninstalling Tivoli Storage Manager 91

If you see TSMDB1 listed, you can start the server.
Uninstalling Tivoli Storage Manager
92 IBM Tivoli Storage Manager for Windows: Installation Guide

Part 2. Installing and upgrading Tivoli Monitoring for TivoliStorage Manager
IBM Tivoli Monitoring for Tivoli Storage Manager brings together multiplecomponents to monitor Tivoli Storage Manager servers, and to produce historicalreports about server and client activities.
© Copyright IBM Corp. 1993, 2014 93

94 IBM Tivoli Storage Manager for Windows: Installation Guide

Chapter 9. Installing Tivoli Monitoring for Tivoli StorageManager
Tivoli Monitoring for Tivoli Storage Manager brings together multiple components,to provide real-time monitoring, and historical reporting for your Tivoli StorageManager servers.
About this task
Procedure
Building a system that can monitor data and produce reports includes thefollowing tasks:1. Installing Tivoli Monitoring for Tivoli Storage Manager, which includes these
components:v DB2
Tivoli Common Reporting
Tivoli Monitoring for Tivoli Storage Manager
Cognos reports
Tivoli Data Warehouse
Tivoli Enterprise Portal monitoring
Tivoli Enterprise Portal server
Tivoli Enterprise Monitoring server
Tivoli Monitoring for Tivoli Storage Manager agent instances
DB2 database
Historicalreports
Tivoli Storage Manager servers
User ID:sysadmin
User ID:
itmuser
ITMuser
User ID:smadmin
User ID:
db2inst1
db2admin
Figure 3. Tivoli Monitoring for Tivoli Storage Manager components that provide the reporting and monitoringcapabilities
© Copyright IBM Corp. 1993, 2014 95
||
|

v IBM Tivoli Monitoring, which includes:– Tivoli Enterprise Portal server– Tivoli Enterprise Monitoring server– Summarization Pruning agent– Warehouse Proxy agent– Tivoli Monitoring for Tivoli Storage Manager agent– Tivoli Data Warehouse
2. Installing Jazz for Service Management, which requires the followingcomponents:v Tivoli Common Reportingv WebSphere® Application Server
3. Creating and configuring agent instances to connect to the Tivoli StorageManager servers that you want to monitor.
Planning to installBe sure to review all applicable planning information, including systemrequirements, capacity planning, and installation scenarios, before you install thesoftware.
Before you install Tivoli Monitoring for Tivoli Storage Manager and Jazz forService Management, complete the following tasks:1. Choose an installation scenario that best suits your needs.2. Read the system requirements that are required for your operating system.3. Review the capacity planning information.4. Review the installation worksheet and note the user IDs, passwords, and other
values that are required during installation.
Restriction: Install Tivoli Monitoring for Tivoli Storage Manager on a system thatis different from where the Tivoli Storage Manager server is installed.
Installation scenariosBefore you install Tivoli Monitoring for Tivoli Storage Manager, choose thescenario that best meets the needs of your business.v Scenario 1: New installation, intending to monitor 1 - 5 Tivoli Storage Manager
servers.v Scenario 2: New installation, intending to monitor more than 5 Tivoli Storage
Manager servers.v Scenario 3: Installing in to an existing IBM Tivoli Monitoring environment,
intending to monitor 1 - 5 Tivoli Storage Manager servers.v Scenario 4: Installing in to an existing IBM Tivoli Monitoring environment,
intending to monitor more than 5 Tivoli Storage Manager servers.
Consider the following restrictions before you decide which scenario to use:v If you have a Tivoli Storage Manager server that is in a different time zone than
the system with Tivoli Monitoring for Tivoli Storage Manager, install themonitoring agent on the Tivoli Storage Manager server. See Scenario 2 to installthe agent directly on the Tivoli Storage Manager server.
Installing Tivoli Monitoring for Tivoli Storage Manager
96 IBM Tivoli Storage Manager for Windows: Installation Guide
|
|
|
|
|
|
|
||
|
|
|
||||

v If you have more than five servers, install the monitoring agent on each of theservers because it is the most efficient use of memory on both the Tivoli StorageManager server and the Tivoli Monitoring for Tivoli Storage Manager server.
v You can only install the monitoring agent on AIX®, Linux X86_64, and Windowsoperating systems.
Table 17. Installation scenarios
ScenarioNumber Description Tasks that you must complete
Scenario 1 Use this scenario for anew installation with aplan to monitor andreport on 1- 5 TivoliStorage Manager servers.
Perform all the tasks in this scenario on thesame system:
1. Install Tivoli Monitoring for Tivoli StorageManager. The approximate installationtime is 3 hours, depending on the speedof your system.
2. Create and configure the monitoringagents for the Tivoli Storage Managerservers that you want to monitor. Theapproximate configuration time is 3minutes per agent.
Restriction: You cannot install TivoliMonitoring for Tivoli Storage Manager on asystem where the Tivoli Storage Managerserver is installed. However, you can installthe monitoring agent on any supportedoperating system, including any TivoliStorage Manager servers that you want tomonitor.
Scenario 2 Use this scenario for anew installation with aplan to monitor andreport on more than 5Tivoli Storage Managerservers.
1. Install Tivoli Monitoring for Tivoli StorageManager. The approximate installationtime is 3 hours, depending on the speedof your system.
2. Install monitoring agents on eachsupported Tivoli Storage Manager serverthat you want to monitor. Theapproximate installation time is 10 - 15minutes per additional agent.
3. Create and configure the monitoringagents to connect to the Tivoli EnterpriseMonitoring server host that was installedin Step 1. The approximate configurationtime is 3 minutes per agent.
Restriction: You cannot install TivoliMonitoring for Tivoli Storage Manager on asystem where the Tivoli Storage Managerserver is installed. However, you can installthe monitoring agent on any supportedoperating system, including any TivoliStorage Manager servers that you want tomonitor.
Installing Tivoli Monitoring for Tivoli Storage Manager
Chapter 9. Installing Tivoli Monitoring for Tivoli Storage Manager 97
|||
||
||||||||
|||||
||||||||
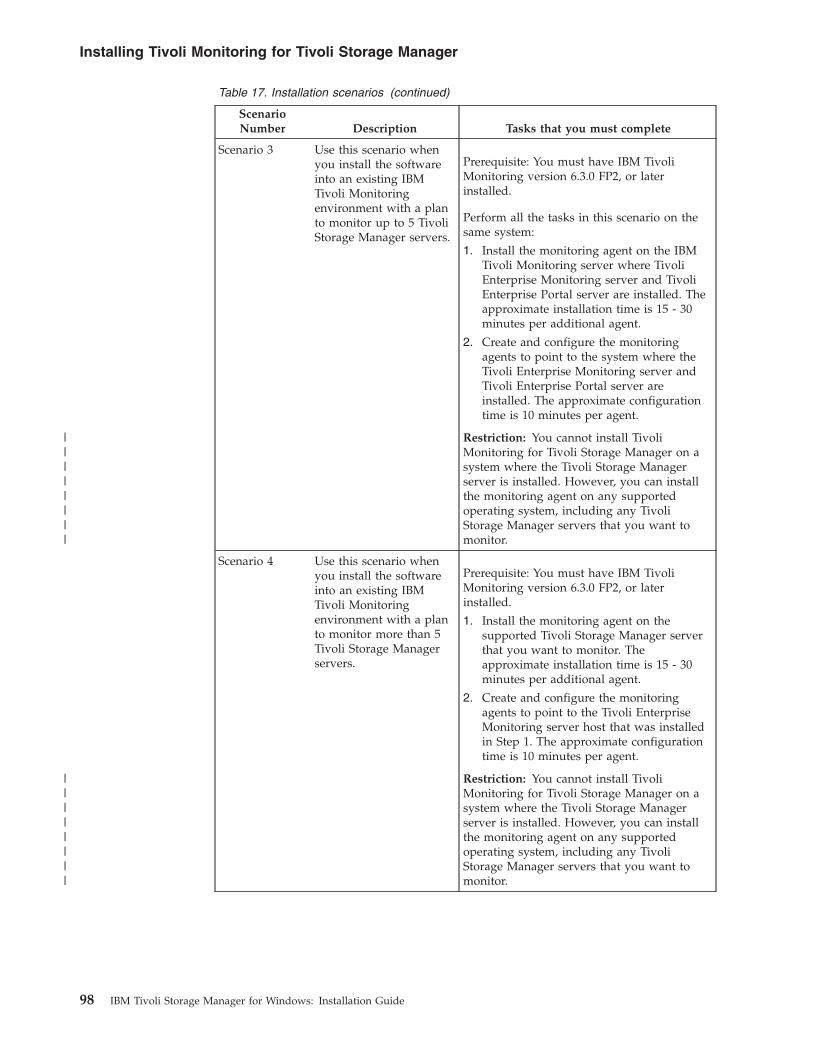
Table 17. Installation scenarios (continued)
ScenarioNumber Description Tasks that you must complete
Scenario 3 Use this scenario whenyou install the softwareinto an existing IBMTivoli Monitoringenvironment with a planto monitor up to 5 TivoliStorage Manager servers.
Prerequisite: You must have IBM TivoliMonitoring version 6.3.0 FP2, or laterinstalled.
Perform all the tasks in this scenario on thesame system:
1. Install the monitoring agent on the IBMTivoli Monitoring server where TivoliEnterprise Monitoring server and TivoliEnterprise Portal server are installed. Theapproximate installation time is 15 - 30minutes per additional agent.
2. Create and configure the monitoringagents to point to the system where theTivoli Enterprise Monitoring server andTivoli Enterprise Portal server areinstalled. The approximate configurationtime is 10 minutes per agent.
Restriction: You cannot install TivoliMonitoring for Tivoli Storage Manager on asystem where the Tivoli Storage Managerserver is installed. However, you can installthe monitoring agent on any supportedoperating system, including any TivoliStorage Manager servers that you want tomonitor.
Scenario 4 Use this scenario whenyou install the softwareinto an existing IBMTivoli Monitoringenvironment with a planto monitor more than 5Tivoli Storage Managerservers.
Prerequisite: You must have IBM TivoliMonitoring version 6.3.0 FP2, or laterinstalled.
1. Install the monitoring agent on thesupported Tivoli Storage Manager serverthat you want to monitor. Theapproximate installation time is 15 - 30minutes per additional agent.
2. Create and configure the monitoringagents to point to the Tivoli EnterpriseMonitoring server host that was installedin Step 1. The approximate configurationtime is 10 minutes per agent.
Restriction: You cannot install TivoliMonitoring for Tivoli Storage Manager on asystem where the Tivoli Storage Managerserver is installed. However, you can installthe monitoring agent on any supportedoperating system, including any TivoliStorage Manager servers that you want tomonitor.
Installing Tivoli Monitoring for Tivoli Storage Manager
98 IBM Tivoli Storage Manager for Windows: Installation Guide
||||||||
||||||||

System requirements for Tivoli Monitoring for Tivoli StorageManager
Review the hardware and software requirements that are applicable for yoursystem before you install Tivoli Monitoring for Tivoli Storage Manager and theother software.
You can install the Tivoli Monitoring for Tivoli Storage Manager, which includesthe monitoring agent to monitor the Tivoli Storage Manager servers. You can alsoinstall the monitoring agent separately on your Tivoli Storage Manager servers.You can install use the monitoring agent on the following Tivoli Storage Manageroperating systems:v AIXv Linux X86_64v Microsoft Windows
System requirementsYour system must meet the hardware and software requirements before you installTivoli Monitoring for Tivoli Storage Manager on a Windows system.
The following tables list the minimum hardware and software requirements thatare required for Tivoli Monitoring for Tivoli Storage Manager. You can find thelatest information on the IBM Support Portal at http://www.ibm.com/support/docview.wss?uid=swg21678084.
Table 18 describes the hardware requirements for the Tivoli Monitoring for TivoliStorage Manager.
Table 18. Hardware requirements
Type ofhardware Hardware requirements
Hardware v Dual core Intel® Pentium® compatible processor or multiprocessor-basedcomputer with a 2.93 GHz or greater processor
v Network interface card
v Remote registry service must be enabled.
Disk space The following space is required for the Tivoli Monitoring for Tivoli StorageManager application:
v 15 GB free disk space (minimum), 45 GB recommended as requirementsincrease as historical data is gathered and stored in the WAREHOUSdatabase
v 40 MB free space for the temp directory
v 60 MB free space for the system drive
v 2 GB free space for the IBM Jazz for Service Management installationdirectory
The following space is required for the Tivoli Storage Manager monitoringagent:
v 350 MB free disk space (minimum) in the installation directory
Installing Tivoli Monitoring for Tivoli Storage Manager
Chapter 9. Installing Tivoli Monitoring for Tivoli Storage Manager 99
|||||
|
|
|
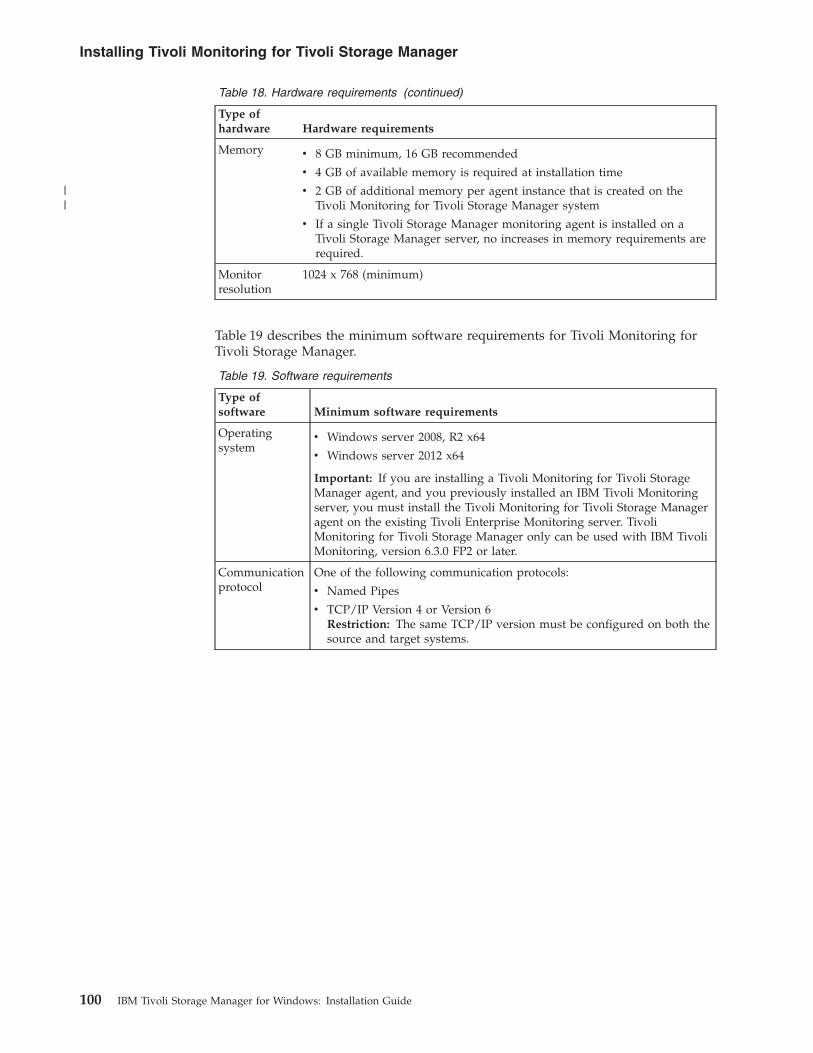
Table 18. Hardware requirements (continued)
Type ofhardware Hardware requirements
Memory v 8 GB minimum, 16 GB recommended
v 4 GB of available memory is required at installation time
v 2 GB of additional memory per agent instance that is created on theTivoli Monitoring for Tivoli Storage Manager system
v If a single Tivoli Storage Manager monitoring agent is installed on aTivoli Storage Manager server, no increases in memory requirements arerequired.
Monitorresolution
1024 x 768 (minimum)
Table 19 describes the minimum software requirements for Tivoli Monitoring forTivoli Storage Manager.
Table 19. Software requirements
Type ofsoftware Minimum software requirements
Operatingsystem
v Windows server 2008, R2 x64
v Windows server 2012 x64
Important: If you are installing a Tivoli Monitoring for Tivoli StorageManager agent, and you previously installed an IBM Tivoli Monitoringserver, you must install the Tivoli Monitoring for Tivoli Storage Manageragent on the existing Tivoli Enterprise Monitoring server. TivoliMonitoring for Tivoli Storage Manager only can be used with IBM TivoliMonitoring, version 6.3.0 FP2 or later.
Communicationprotocol
One of the following communication protocols:
v Named Pipes
v TCP/IP Version 4 or Version 6Restriction: The same TCP/IP version must be configured on both thesource and target systems.
Installing Tivoli Monitoring for Tivoli Storage Manager
100 IBM Tivoli Storage Manager for Windows: Installation Guide
||
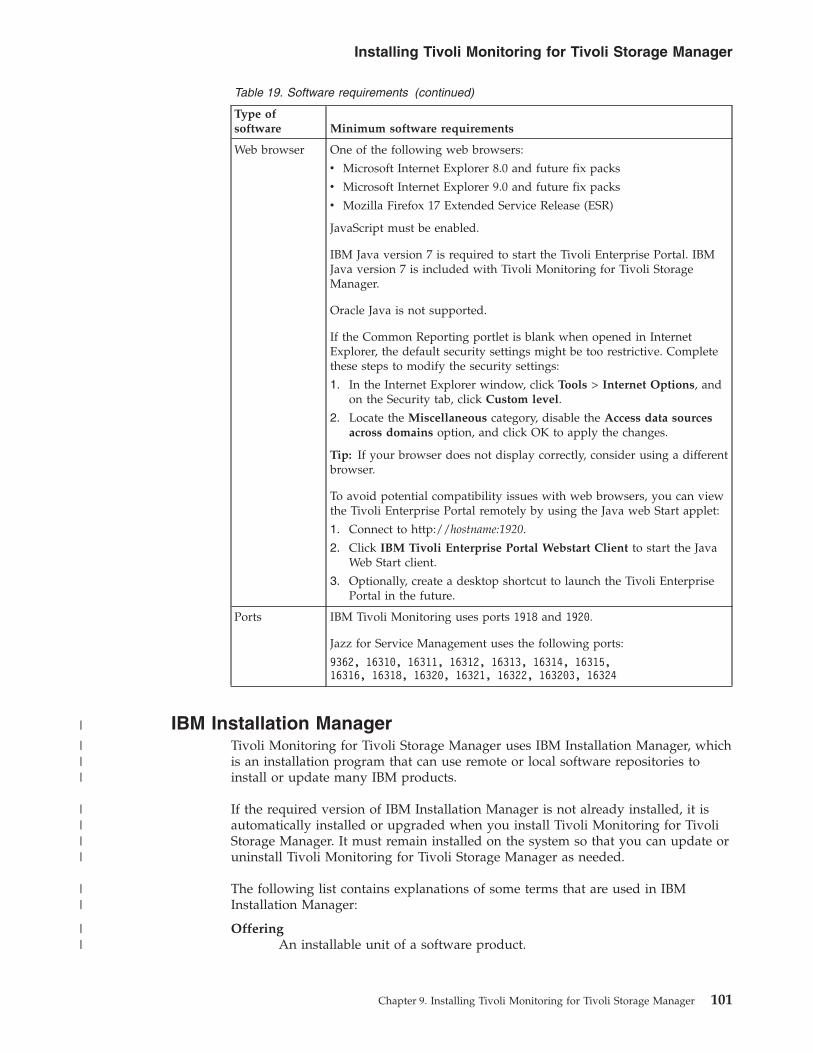
Table 19. Software requirements (continued)
Type ofsoftware Minimum software requirements
Web browser One of the following web browsers:
v Microsoft Internet Explorer 8.0 and future fix packs
v Microsoft Internet Explorer 9.0 and future fix packs
v Mozilla Firefox 17 Extended Service Release (ESR)
JavaScript must be enabled.
IBM Java version 7 is required to start the Tivoli Enterprise Portal. IBMJava version 7 is included with Tivoli Monitoring for Tivoli StorageManager.
Oracle Java is not supported.
If the Common Reporting portlet is blank when opened in InternetExplorer, the default security settings might be too restrictive. Completethese steps to modify the security settings:
1. In the Internet Explorer window, click Tools > Internet Options, andon the Security tab, click Custom level.
2. Locate the Miscellaneous category, disable the Access data sourcesacross domains option, and click OK to apply the changes.
Tip: If your browser does not display correctly, consider using a differentbrowser.
To avoid potential compatibility issues with web browsers, you can viewthe Tivoli Enterprise Portal remotely by using the Java web Start applet:
1. Connect to http://hostname:1920.
2. Click IBM Tivoli Enterprise Portal Webstart Client to start the JavaWeb Start client.
3. Optionally, create a desktop shortcut to launch the Tivoli EnterprisePortal in the future.
Ports IBM Tivoli Monitoring uses ports 1918 and 1920.
Jazz for Service Management uses the following ports:
9362, 16310, 16311, 16312, 16313, 16314, 16315,16316, 16318, 16320, 16321, 16322, 163203, 16324
IBM Installation ManagerTivoli Monitoring for Tivoli Storage Manager uses IBM Installation Manager, whichis an installation program that can use remote or local software repositories toinstall or update many IBM products.
If the required version of IBM Installation Manager is not already installed, it isautomatically installed or upgraded when you install Tivoli Monitoring for TivoliStorage Manager. It must remain installed on the system so that you can update oruninstall Tivoli Monitoring for Tivoli Storage Manager as needed.
The following list contains explanations of some terms that are used in IBMInstallation Manager:
OfferingAn installable unit of a software product.
Installing Tivoli Monitoring for Tivoli Storage Manager
Chapter 9. Installing Tivoli Monitoring for Tivoli Storage Manager 101
|
|||
||||
||
||
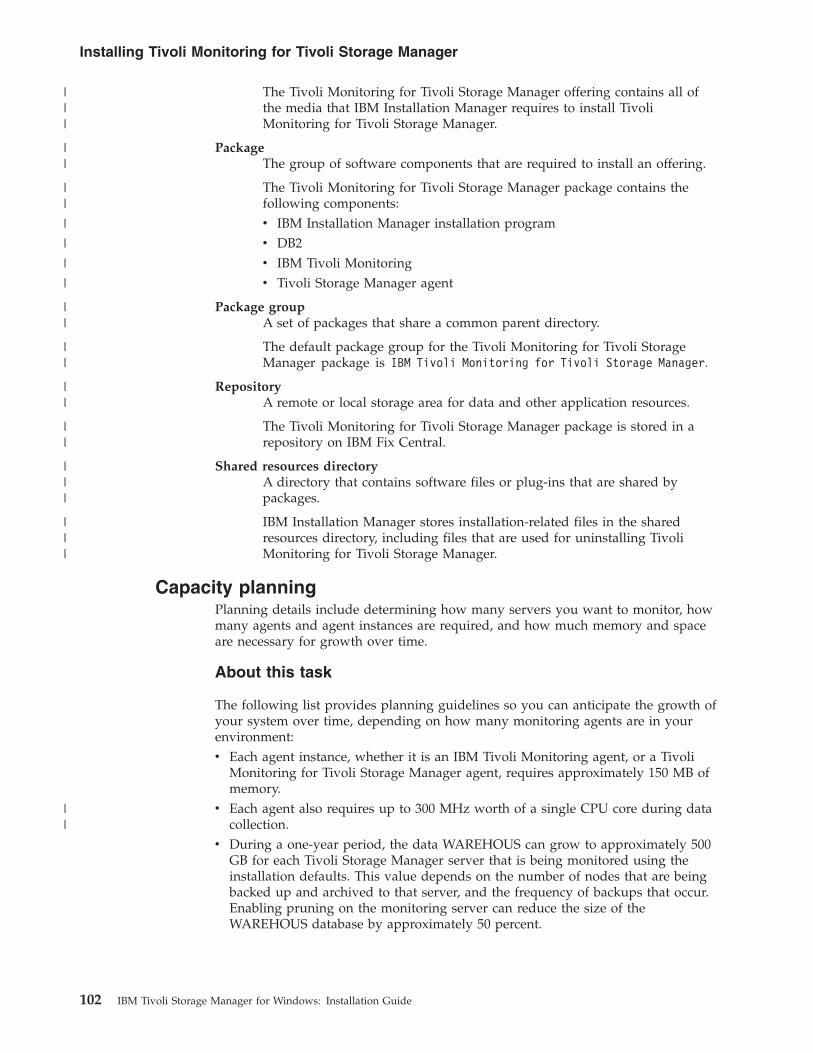
The Tivoli Monitoring for Tivoli Storage Manager offering contains all ofthe media that IBM Installation Manager requires to install TivoliMonitoring for Tivoli Storage Manager.
PackageThe group of software components that are required to install an offering.
The Tivoli Monitoring for Tivoli Storage Manager package contains thefollowing components:v IBM Installation Manager installation programv DB2v IBM Tivoli Monitoringv Tivoli Storage Manager agent
Package groupA set of packages that share a common parent directory.
The default package group for the Tivoli Monitoring for Tivoli StorageManager package is IBM Tivoli Monitoring for Tivoli Storage Manager.
RepositoryA remote or local storage area for data and other application resources.
The Tivoli Monitoring for Tivoli Storage Manager package is stored in arepository on IBM Fix Central.
Shared resources directoryA directory that contains software files or plug-ins that are shared bypackages.
IBM Installation Manager stores installation-related files in the sharedresources directory, including files that are used for uninstalling TivoliMonitoring for Tivoli Storage Manager.
Capacity planningPlanning details include determining how many servers you want to monitor, howmany agents and agent instances are required, and how much memory and spaceare necessary for growth over time.
About this task
The following list provides planning guidelines so you can anticipate the growth ofyour system over time, depending on how many monitoring agents are in yourenvironment:v Each agent instance, whether it is an IBM Tivoli Monitoring agent, or a Tivoli
Monitoring for Tivoli Storage Manager agent, requires approximately 150 MB ofmemory.
v Each agent also requires up to 300 MHz worth of a single CPU core during datacollection.
v During a one-year period, the data WAREHOUS can grow to approximately 500GB for each Tivoli Storage Manager server that is being monitored using theinstallation defaults. This value depends on the number of nodes that are beingbacked up and archived to that server, and the frequency of backups that occur.Enabling pruning on the monitoring server can reduce the size of theWAREHOUS database by approximately 50 percent.
Installing Tivoli Monitoring for Tivoli Storage Manager
102 IBM Tivoli Storage Manager for Windows: Installation Guide
|||
||
||
|
|
|
|
||
||
||
||
|||
|||
||

Installation worksheetUse this worksheet to record information that you need when you install andadminister Tivoli Monitoring for Tivoli Storage Manager. The worksheet includesseveral passwords for user accounts that are created during the installation. Theworksheet is intended to help you remember the values that you specified after theinstallation.
Table 20. Tivoli Monitoring for Tivoli Storage Manager installation worksheet
Item Description Default value* Your value
db2adminDatabase administrator
This is the Tivoli Data Warehouse username and password.
This user has permission to complete allthe administrative tasks in DB2.
User name: db2adminPassword:
The password must meet the passwordcomplexity requirements of the operatingsystem security policy.
DB2 port Default port number The default port number is the first freeport starting with 50000.
Valid port numbers are 1024 - 65535.
db2grp1 This is the group that the DB2 instanceuser ID belongs to.
encryption key A default encryption key is provided andthe fields are prefilled with the defaultkey. You can specify a different key,however, it is not necessary. Theencryption key is used to establish asecure connection (using SSL protocol)between the Hub TEMS and the othercomponents of the IBM Tivoli Monitoringenvironment.
The encryption key must be the same forall of the agents that access the TivoliEnterprise Monitoring server.
IBMTivoliMonitoringEncryptionKey
Must be exactly 32 characters in length.Valid characters are A-Z, a-z, 0-9, @, !, and#.
sysadmin Tivoli Enterprise Portal user name andpassword.
This ID is automatically created duringthe installation and a password isrequired.
User name: sysadminPassword:
The password must meet the passwordcomplexity requirements of the operatingsystem security policy.
Service managementadministrator ID
The administrator that is used to log onto IBM Dashboard Application ServicesHub. You can access the Tivoli CommonReporting reports in the dashboard.
The user ID is created during theinstallation of Jazz for ServiceManagement.
User name: smadminPassword:
Restriction: The password must be atleast 8 characters.
ITMUser Tivoli Data Warehouse user name andpassword.
This user has access to read theinformation from the WAREHOUSdatabase.
User name: ITMuserPassword:
The password must meet the passwordcomplexity requirements of the operatingsystem security policy.
DB2 home directory Note: The DB2 home directory is notrequested during installation. The DB2directory is in the installation directory.
Installing Tivoli Monitoring for Tivoli Storage Manager
Chapter 9. Installing Tivoli Monitoring for Tivoli Storage Manager 103
|
||
|
|
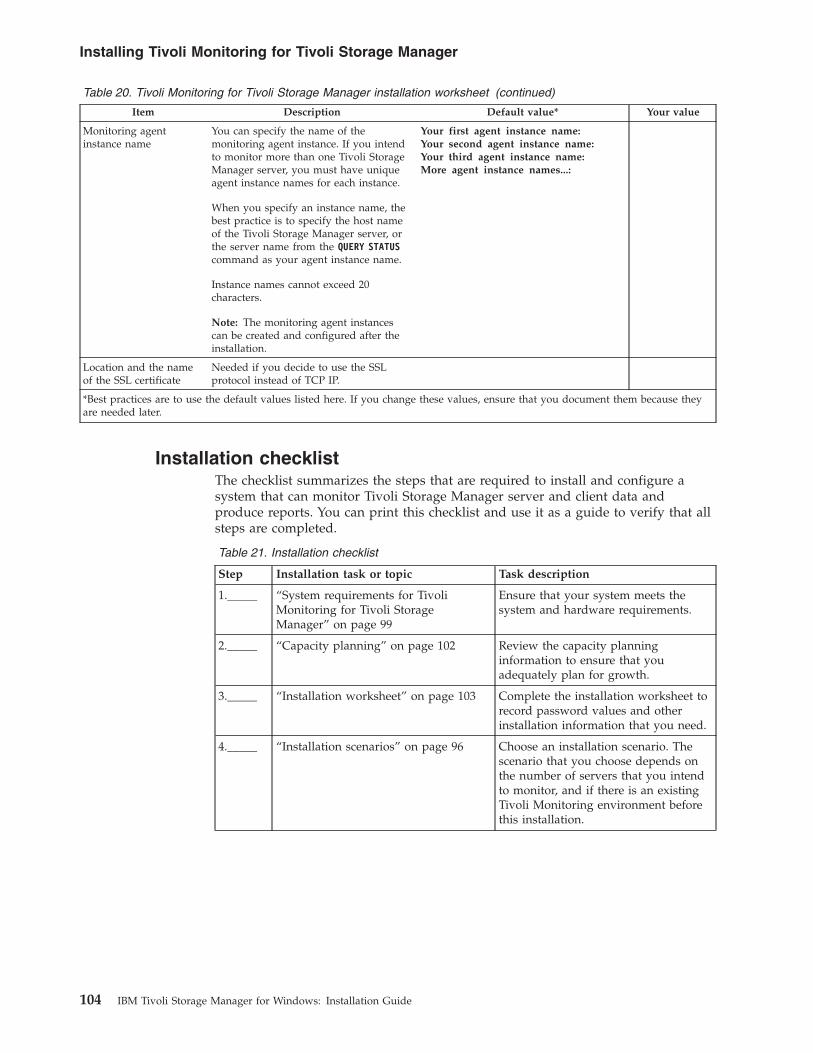
Table 20. Tivoli Monitoring for Tivoli Storage Manager installation worksheet (continued)
Item Description Default value* Your value
Monitoring agentinstance name
You can specify the name of themonitoring agent instance. If you intendto monitor more than one Tivoli StorageManager server, you must have uniqueagent instance names for each instance.
When you specify an instance name, thebest practice is to specify the host nameof the Tivoli Storage Manager server, orthe server name from the QUERY STATUScommand as your agent instance name.
Instance names cannot exceed 20characters.
Note: The monitoring agent instancescan be created and configured after theinstallation.
Your first agent instance name:Your second agent instance name:Your third agent instance name:More agent instance names...:
Location and the nameof the SSL certificate
Needed if you decide to use the SSLprotocol instead of TCP IP.
*Best practices are to use the default values listed here. If you change these values, ensure that you document them because theyare needed later.
Installation checklistThe checklist summarizes the steps that are required to install and configure asystem that can monitor Tivoli Storage Manager server and client data andproduce reports. You can print this checklist and use it as a guide to verify that allsteps are completed.
Table 21. Installation checklist
Step Installation task or topic Task description
1._____ “System requirements for TivoliMonitoring for Tivoli StorageManager” on page 99
Ensure that your system meets thesystem and hardware requirements.
2._____ “Capacity planning” on page 102 Review the capacity planninginformation to ensure that youadequately plan for growth.
3._____ “Installation worksheet” on page 103 Complete the installation worksheet torecord password values and otherinstallation information that you need.
4._____ “Installation scenarios” on page 96 Choose an installation scenario. Thescenario that you choose depends onthe number of servers that you intendto monitor, and if there is an existingTivoli Monitoring environment beforethis installation.
Installing Tivoli Monitoring for Tivoli Storage Manager
104 IBM Tivoli Storage Manager for Windows: Installation Guide

Table 21. Installation checklist (continued)
Step Installation task or topic Task description
5._____ Installing Tivoli Monitoring for TivoliStorage Manager on Windows systemsTip: If there is an existing TivoliMonitoring environment, install onlythe monitoring agent.
Installing the agent in an existingTivoli Monitoring environment onWindows
Run the Tivoli Monitoring for TivoliStorage Manager installer.
The following components areinstalled:
v Tivoli Monitoring, which includesthe following components:
– Tivoli Enterprise Portal server
– Tivoli Data Warehouse
– Tivoli Enterprise Monitoringserver
– Summarization pruning agent
– Warehouse proxy agent
v Tivoli Monitoring for Tivoli StorageManager agent
Remember: IBM Installation Manageris also installed.
6._____“Installing the monitoring agent” onpage 112
“Creating and configuring the agentinstance” on page 124
Install or configure the monitoringagents to connect to the Tivoli StorageManager server.
If you plan to monitor five or lessTivoli Storage Manager servers,configure the monitoring agent thatwas installed on this system.
Otherwise, install and configure onlythe monitoring agent on each TivoliStorage Manager server to bemonitored.Tip: Create 1 agent per Tivoli StorageManager server instance.
7._____ “Installing Jazz for ServiceManagement” on page 127
Install Jazz for Service Management toget access to the Tivoli CommonReporting feature so that you can viewCognos® reports.
8._____ “Configuring the WAREHOUS datasource and importing reports” on page129
Run the script to import the Cognosreports and to connect Tivoli CommonReporting to the WAREHOUS databaseto generate reports.
9._____ “Verifying the installation” on page 131 Verify that the installation wascomplete and successful.
Tips:
1. To view real-time Tivoli Storage Manager server activity, use the Tivoli EnterprisePortal.
2. To view historical reports, use Tivoli Common Reporting.
3. For additional help, see Tivoli Monitoring for Tivoli Storage Manager troubleshootingtopics.
Installing Tivoli Monitoring for Tivoli Storage Manager
Chapter 9. Installing Tivoli Monitoring for Tivoli Storage Manager 105

Bypassing the prerequisitesYou can bypass the Tivoli Monitoring for Tivoli Storage Manager prerequisites onyour test systems during the installation, such as the operating system and therequired memory. Do not bypass the prerequisites on production systems.
Bypassing the prerequisites by using the wizardYou can bypass the prerequisites on a test system when you install or upgradeTivoli Monitoring for Tivoli Storage Manager by using the wizard.
Choose one of the following methods to bypass prerequisite checks:v If you are installing Tivoli Monitoring for Tivoli Storage Manager, issue the
following command:install.bat -g -vmargs "-DBYPASS_TSM_REQ_CHECKS=true"
v If you are upgrading Tivoli Monitoring for Tivoli Storage Manager, update thefollowing file to add the -DBYPASS_TSM_REQ_CHECKS=true statement. The dash inthe -DBYPASS_TSM_REQ_CHECKS option is required and must be added on a newline after the -vmargs option...\Installation Manager\eclipse\ibmim.ini
Bypassing the prerequisites in console modeYou can bypass the prerequisites on a test system when you install or upgradeTivoli Monitoring for Tivoli Storage Manager in console mode.
Choose one of the following methods to bypass prerequisite checks:v If you are installing Tivoli Monitoring for Tivoli Storage Manager, issue the
following command:install.bat -c -acceptLicense -vmargs "-DBYPASS_TSM_REQ_CHECKS=true"
v If you are upgrading Tivoli Monitoring for Tivoli Storage Manager, update thefollowing file to add the -DBYPASS_TSM_REQ_CHECKS=true statement. The dash inthe -DBYPASS_TSM_REQ_CHECKS option is required and must be added on a newline after the -vmargs option...\Installation Manager\eclipse\tools\imcl.ini
Bypassing the prerequisites in silent modeYou can bypass the prerequisites on a test system when you install or upgradeTivoli Monitoring for Tivoli Storage Manager in silent mode.
Choose one of the following methods to bypass prerequisite checks:v If you are installing Tivoli Monitoring for Tivoli Storage Manager, issue the
following command:install.bat -s -acceptLicense -vmargs "-DBYPASS_TSM_REQ_CHECKS=true"
v If you are upgrading Tivoli Monitoring for Tivoli Storage Manager, update thefollowing file to add the -DBYPASS_TSM_REQ_CHECKS=true statement. The dash inthe -DBYPASS_TSM_REQ_CHECKS option is required and must be added on a newline after the -vmargs option...\Installation Manager\eclipse\tools\imcl.ini
Installing Tivoli Monitoring for Tivoli Storage Manager
106 IBM Tivoli Storage Manager for Windows: Installation Guide
|
|||
|||
|
||
|
||||
|
|||
|
||
|
||||
|
|||
|
||
|
||||
|
|

Windows: Installing Tivoli Monitoring for Tivoli Storage ManagerTo install or upgrade Tivoli Monitoring for Tivoli Storage Manager, you can use thewizard, the command line in console mode, or by using silent mode.
Before you begin
Before you install Tivoli Monitoring for Tivoli Storage Manager, verify that thefollowing requirements are met:v Ensure that your system meets the software and hardware requirements. For
more information about the system requirements, see “System requirements forTivoli Monitoring for Tivoli Storage Manager” on page 99.
v Do not install Tivoli Monitoring for Tivoli Storage Manager on a system that hasa Tivoli Storage Manager server installed.
v Do not use a domain ID to install. The Windows user ID that you use when youinstall must be a local ID with administrator privileges, and cannot be a domainID.
v Verify that you have the required access privileges, including user IDs andpasswords.
v Ensure that there are no spaces and no non-ASCII characters in the installationpackage name or in the path to the package.
v Use short path names for the extract directory to avoid problems with the255-character path limit. For example, you can specify the C:\tsm_imagesdirectory.
v If you are installing the Tivoli Monitoring for Tivoli Storage Manager monitoringagent in to an existing Tivoli Monitoring environment, specify the existing TivoliMonitoring installation directory. The default directory is C:\IBM\ITM.
Attention: Do not alter the DB2 software that is installed with Tivoli Monitoringfor Tivoli Storage Manager installation packages and fix packs. Do not install orupgrade to a different version, release, or fix pack of DB2 application becausedoing so can damage the database. Tivoli Monitoring for Tivoli Storage Managercan use only components and versions that are installed as part of the TivoliMonitoring for Tivoli Storage Manager installation.
About this task
The Tivoli Monitoring for Tivoli Storage Manager software provides monitoringand reporting features for the Tivoli Storage Manager servers in the environment.You can install or upgrade the Tivoli Monitoring for Tivoli Storage Manager andthe monitoring agents on the Tivoli Storage Manager servers.
With the Tivoli Monitoring for Tivoli Storage Manager installation package, youcan install or upgrade the following software:v Tivoli Monitoring for Tivoli Storage Managerv Tivoli Monitoring for Tivoli Storage Manager agent only
To determine when and where you would install only the agent package, reviewthe installation scenarios. To install the agent on a remote server, see “Installing themonitoring agent” on page 112.
Restriction: You cannot install the Tivoli Monitoring for Tivoli Storage Managerpackage and the agent only package on the same system.
Installing Tivoli Monitoring for Tivoli Storage Manager
Chapter 9. Installing Tivoli Monitoring for Tivoli Storage Manager 107
|
||
|
||
|||
||
|||
||
||
|||
|||
||||||
|
||||
||
|
|
|||
|||
Windows: Obtaining the Tivoli Monitoring for Tivoli StorageManager installation package
You can obtain the Tivoli Monitoring for Tivoli Storage Manager installationpackage from a DVD or an IBM download site such as IBM Passport Advantage.
Procedure1. Download the two installation packages from one of the following websites, or
you can access the files from the product DVD:v Go to Passport Advantage site at http://www.ibm.com/software/lotus/
passportadvantage/.v Go to the Tivoli Storage Manager support site at http://www.ibm.com/
support/entry/portal/Overview/Software/Tivoli/Tivoli_Storage_Managerfor maintenance fixes, and updates.
2. Depending on whether you have the DVD disks or installation packages,complete one of the following methods to extract the files to the file system:
Product DVD disks
a. Create a directory on the file system.b. For each DVD disk, copy the contents of the disk in to the directory
that you created.
Tip: You can delete the files after you install Tivoli Monitoring forTivoli Storage Manager to free up space on the file system.
Installation packages
a. Create a directory and move the two packages that youdownloaded in to the directory.
b. Either double-click each executable file, or enter the followingcommand on the command line to extract the installation files. Thefiles are extracted to the current directory.package_name.exe
where package_name is the name of the file that you downloaded, forexample:TSMRPT-Full-Installer-1of2-Windows-7.1.0.000.exe
Restriction: The path must contain no more than 128 characters. Donot extract the packages to a directory that contains previouslyextracted files, or any other files.
Windows: Installing Tivoli Monitoring for Tivoli StorageManager by using the Install wizard
You can install Tivoli Monitoring for Tivoli Storage Manager by using the Installwizard of IBM Installation Manager.
Before you begin
Take the following actions before you start the installation:v Verify that you copied the DVD files to the local system, or that you
downloaded and extracted the packages for Tivoli Monitoring for Tivoli StorageManager.
Installing Tivoli Monitoring for Tivoli Storage Manager
108 IBM Tivoli Storage Manager for Windows: Installation Guide
|
|
||
|
||
||
|||
||
|
|
||
||
|
||
|||
|
||
|
|||
|
|
||
|
|
|||

v Verify that the operating system is set to the language that you require. Bydefault, the language of the operating system is the language that is used duringthe installation.
v Ensure that the user ID that you plan to use during installation is a user withlocal administrator authority.
About this task
With the Tivoli Monitoring for Tivoli Storage Manager installation package, youcan install or upgrade the following software:v Tivoli Monitoring for Tivoli Storage Managerv Tivoli Monitoring for Tivoli Storage Manager agent only
To determine when and where you would install only the agent package, reviewthe installation scenarios. To install the agent on a remote server, see “Installing themonitoring agent” on page 112.
Restriction: You cannot install the Tivoli Monitoring for Tivoli Storage Managerpackage and the agent only package on the same system.
Procedure
To install Tivoli Monitoring for Tivoli Storage Manager, complete the followingsteps:1. Change to the directory where you extracted the installation files.2. Start the wizard by issuing the following command:
install.bat
Results
If errors occur during the installation process, the errors are recorded in log filesthat are stored in the IBM Installation Manager logs directory. You can viewinstallation log files by clicking File > View Log from the IBM InstallationManager tool.
What to do next
Install Jazz for Service Management to view historical reports. Follow the steps in“Installing Jazz for Service Management” on page 127.
Tip: Review the checklist to ensure that you complete all of the steps to install andconfigure Tivoli Monitoring for Tivoli Storage Manager.Related concepts:
Resolving Tivoli Monitoring for Tivoli Storage Manager problems(http://www.ibm.com/support/knowledgecenter/SSGSG7_7.1.1/com.ibm.itsm.tshoot.doc/c_pdg_reportprobs.html)
Installing Tivoli Monitoring for Tivoli Storage Manager
Chapter 9. Installing Tivoli Monitoring for Tivoli Storage Manager 109
|||
||
|
||
|
|
|||
||
|
||
|
|
|
|
||||
|
||
||
|
|||
|

Windows: Installing Tivoli Monitoring for Tivoli StorageManager by using console mode
You can install Tivoli Monitoring for Tivoli Storage Manager by using thecommand line in console mode.
Before you begin
Take the following actions before you start the installation:v Verify that you copied the DVD files to the local system, or that you
downloaded and extracted the packages for Tivoli Monitoring for Tivoli StorageManager.
v Verify that the operating system is set to the language that you require. Bydefault, the language of the operating system is the language that is used duringthe installation.
v Ensure that the user ID that you plan to use during installation is a user withlocal administrator authority.
About this task
With the Tivoli Monitoring for Tivoli Storage Manager installation package, youcan install or upgrade the following software:v Tivoli Monitoring for Tivoli Storage Managerv Tivoli Monitoring for Tivoli Storage Manager agent only
To determine when and where you would install only the agent package, reviewthe installation scenarios. To install the agent on a remote server, see “Installing themonitoring agent” on page 112.
Restriction: You cannot install the Tivoli Monitoring for Tivoli Storage Managerpackage and the agent only package on the same system.
Procedure
To install Tivoli Monitoring for Tivoli Storage Manager, complete the followingsteps:1. Change to the directory where you extracted the installation files.2. Start the wizard in console mode by issuing the following command from a
command line:install.bat -c
3. Optional: Generate a response file as part of a console mode installation.Complete the console mode installation options, and in the Summary pane,specify G to generate the responses.
Results
If errors occur during the installation process, the errors are recorded in log filesthat are stored in the IBM Installation Manager logs directory, for example:
C:\ProgramData\IBM\Installation Manager\logs
What to do next
Install Jazz for Service Management to view historical reports. Follow the steps in“Installing Jazz for Service Management” on page 127.
Installing Tivoli Monitoring for Tivoli Storage Manager
110 IBM Tivoli Storage Manager for Windows: Installation Guide
|
|
||
|
|
|||
|||
||
|
||
|
|
|||
||
|
||
|
||
|
|||
|
||
|
|
||

Tip: Review the checklist to ensure that you complete all of the steps to install andconfigure Tivoli Monitoring for Tivoli Storage Manager.Related concepts:
Resolving Tivoli Monitoring for Tivoli Storage Manager problems(http://www.ibm.com/support/knowledgecenter/SSGSG7_7.1.1/com.ibm.itsm.tshoot.doc/c_pdg_reportprobs.html)
Windows: Installing Tivoli Monitoring for Tivoli StorageManager in silent mode
You can install the Tivoli Monitoring for Tivoli Storage Manager in silent mode byspecifying a response file.
Before you begin
The input directory, which is in the directory where the installation files wereextracted, contains the following sample response files to install, update, anduninstall Tivoli Monitoring for Tivoli Storage Manager:v install_response_sample.xml
v update_response_sample.xml
v uninstall_response_sample.xml
You must edit the sample files before you use them.
About this task
With the Tivoli Monitoring for Tivoli Storage Manager installation package, youcan install or upgrade the following software:v Tivoli Monitoring for Tivoli Storage Managerv Tivoli Monitoring for Tivoli Storage Manager agent only
To determine when and where you would install only the agent package, reviewthe installation scenarios. To install the agent on a remote server, see “Installing themonitoring agent” on page 112.
Restriction: You cannot install the Tivoli Monitoring for Tivoli Storage Managerpackage and the agent only package on the same system.
Procedure1. Create a response file, or use one of the sample response files, such as
install_response_sample.xml or update_response_sample.xml.2. Edit the response file and specify a DB2 administrator password and the
sysadmin user ID. You can also change other defaults if you need.3. Start the silent installation by issuing the following command from the
directory where the installation files were extracted:install.bat -s -input response_file -acceptLicense
where response_file is the response file path, including the file name.
Results
If errors occur during the installation process, the errors are recorded in log filesthat are stored in the IBM Installation Manager logs directory, for example:
C:\ProgramData\IBM\Installation Manager\logs
Installing Tivoli Monitoring for Tivoli Storage Manager
Chapter 9. Installing Tivoli Monitoring for Tivoli Storage Manager 111
||
|
|||
|
|
||
|
|||
|
|
|
|
|
||
|
|
|||
||
|
||
||
||
|
|
|
||
|

What to do next
Install Jazz for Service Management to view historical reports. Follow the steps in“Installing Jazz for Service Management” on page 127.
Create and configure an agent instance to start collecting data. Follow the steps in“Creating and configuring the agent instance” on page 124.
Tip: Review the checklist to ensure that you complete all of the steps to install andconfigure Tivoli Monitoring for Tivoli Storage Manager.Related concepts:
Resolving Tivoli Monitoring for Tivoli Storage Manager problems(http://www.ibm.com/support/knowledgecenter/SSGSG7_7.1.1/com.ibm.itsm.tshoot.doc/c_pdg_reportprobs.html)
Installing the monitoring agentYou can install monitoring agents on any remote server that you want to monitor,or you can install the agent in to an existing IBM Tivoli Monitoring system.
About this task
The Tivoli Monitoring for Tivoli Storage Manager agent gathers data from eachTivoli Storage Manager server, and sends it to the IBM Tivoli Monitoring server.
Restrictions:
1. To use the agent on an existing IBM Tivoli Monitoring environment, you mustinstall the agent on the existing Tivoli Enterprise Monitoring server.
2. If you plan to monitor a Tivoli Storage Manager server in a different time zonethan the monitoring server, install the monitoring agent on the Tivoli StorageManager server.
3. The monitoring agent is only supported on AIX, Linux X86_64, and Windows.
Installing the monitoring agent on remote serversYou can install a Tivoli Monitoring for Tivoli Storage Manager monitoring agent onany supported server that you want to monitor. To install or upgrade themonitoring agent, you can use the installation wizard, the command line in consolemode, or by using silent mode.
Before you begin
Before you decide whether you must install the monitoring agent directly on yourTivoli Storage Manager server, consider the following items:v The monitoring server can handle up to five monitoring agents. For more
agents, you must install the monitoring agent directly on each of the TivoliStorage Manager servers that you want to monitor. Alternatively, you can installthe monitoring agent on any supported operating system and configure an agentinstance to connect to the Tivoli Storage Manager server that you want tomonitor.
v If you create and configure an agent instance on the Tivoli Storage Managerserver, instead of the monitoring server, you can help avoid an increase inmemory requirements on the IBM Tivoli Monitoring server.
Installing Tivoli Monitoring for Tivoli Storage Manager
112 IBM Tivoli Storage Manager for Windows: Installation Guide
|
||
||
||
|
|||
|
|
||||
|
||
||||||
|||

v Review the requirements for the operating systems that the monitoring agent issupported on. See “System requirements for Tivoli Monitoring for Tivoli StorageManager” on page 99.
Installing the monitoring agent by using the Install wizardYou can install the monitoring agent by using the Install wizard.
Before you begin
Take the following actions before you start the installation:v Verify that you copied the DVD files to the local system, or that you
downloaded and extracted the packages for Tivoli Monitoring for Tivoli StorageManager.
v Ensure that the user ID that you plan to use during installation is a user withlocal administrator authority.
v Verify that the operating system is set to the language that you require. Bydefault, the language of the operating system is the language that is used duringthe installation.
Procedure
To install Tivoli Monitoring for Tivoli Storage Manager, complete the followingsteps:1. Change to the directory where you extracted the installation files.2. Start the wizard by issuing the following command:
install.bat
What to do next
Create and configure an agent instance to start collecting data. Follow the steps in“Creating and configuring the agent instance” on page 124.
If errors occur during the installation process, the errors are recorded in log filesthat are stored in the IBM Installation Manager logs directory. You can viewinstallation log files by clicking File > View Log from the IBM InstallationManager tool.
Installing the monitoring agent in console modeYou can install the monitoring agent by using the command line in console mode.
About this task
Take the following actions before you start the installation:v Verify that you copied the DVD files to the local system, or that you
downloaded and extracted the packages for Tivoli Monitoring for Tivoli StorageManager.
v Verify that the operating system is set to the language that you require. Bydefault, the language of the operating system is the language that is used duringthe installation.
v Ensure that the user ID that you plan to use during installation is a user withlocal administrator authority.
Installing Tivoli Monitoring for Tivoli Storage Manager
Chapter 9. Installing Tivoli Monitoring for Tivoli Storage Manager 113
|||
||
|
|
|||
||
|||
|
||
|
|
|
|
||
||||
||
|
|
|||
|||
||

Procedure
To install Tivoli Monitoring for Tivoli Storage Manager, complete the followingsteps:1. Change to the directory where you extracted the installation files.2. Start the wizard in console mode by issuing the following command from a
command line:install.bat -c
3. Optional: Generate a response file as part of a console mode installation.Complete the console mode installation options, and in the Summary pane,specify G to generate the responses.
What to do next
Create and configure an agent instance to start collecting data. Follow the steps in“Creating and configuring the agent instance” on page 124.
Installing the monitoring agent in silent modeYou can install the monitoring agent in silent mode by specifying a response file.
Before you begin
The input directory, which is in the directory where the installation files wereextracted, contains the following sample response files to install, update, anduninstall the Tivoli Monitoring for Tivoli Storage Manager monitoring agent:v install_agent_only_sample.xml
v update_agent_only_sample.xml
v uninstall_agent_only_sample
Procedure1. Create a response file, or use one of the sample response files, such as
install_agent_only_sample.xml or update_agent_only_sample.xml.2. Start the silent installation by issuing the following command from the
directory where the installation files were extracted:install.bat -s -input response_file -acceptLicense
where response_file is the response file path, including the file name.
What to do next
Create and configure an agent instance to start collecting data. Follow the steps in“Creating and configuring the agent instance” on page 124.
Windows: Installing and deploying monitoring agents in anexisting Tivoli Monitoring environment
Remotely deploying monitoring agents is intended only for users who purchasedIBM Tivoli Monitoring separately from Tivoli Storage Manager, and who arealready running an IBM Tivoli Monitoring server. By remotely deployingmonitoring agents, you can monitor Tivoli Storage Manager servers with theexisting IBM Tivoli Monitoring server.
Installing Tivoli Monitoring for Tivoli Storage Manager
114 IBM Tivoli Storage Manager for Windows: Installation Guide
|
||
|
||
|
|||
|
||
||
|
|||
|
|
|
|
||
||
|
|
|
||

About this task
The operating system agent that is required for remote deployment is not includedin the version of IBM Tivoli Monitoring that is embedded in Tivoli Monitoring forTivoli Storage Manager. Therefore, you cannot use remote deployment withoutpurchasing IBM Tivoli Monitoring.
Windows: Installing monitoring agents or application supportfiles on an existing IBM Tivoli Monitoring environment on aWindows systemIf you have an existing IBM Tivoli Monitoring system that does not have TivoliMonitoring for Tivoli Storage Manager installed, you can run the native IBM TivoliMonitoring installation wizard to install more monitoring agents. If you do notwant to install an agent, you can install only the application support files. Thesefiles are required by the Tivoli Enterprise Monitoring server and Tivoli EnterprisePortal server to monitor Tivoli Storage Manager servers.
Before you begin
Restrictions to know before you begin:
v These procedures are for experienced IBM Tivoli Monitoring users only, and are notintended for novice Tivoli Monitoring for Tivoli Storage Manager users.
v Do not install this option if you previously installed Tivoli Monitoring for Tivoli StorageManager. Doing so can interfere with future uninstallations or upgrades of TivoliMonitoring for Tivoli Storage Manager.
v Do not use a domain ID to install or configure agents. The Windows user ID that youuse during installation must be a local ID with Administrator privileges, and cannot be adomain ID.
v You must use Tivoli Monitoring for Tivoli Storage Manager only with IBM TivoliMonitoring, version 6.3.0 FP2 or later. See the system requirements for your operatingsystem for more requirements.
v Ensure that you meet all system requirements.
About this task
To install the monitoring agent on to an existing IBM Tivoli Monitoring server,complete the following steps:
Procedure1. Download the package from one of the following websites:
v Go to Passport Advantage site at http://www.ibm.com/software/lotus/passportadvantage/.
v Go to the Tivoli Storage Manager support site at http://www.ibm.com/support/entry/portal/Overview/Software/Tivoli/Tivoli_Storage_Managerfor maintenance fixes, and updates.
The file name for installing only the monitoring agent, or only the applicationsupport files, can be recognized by the word AGENT in capital letters, forexample:7.1.0.000-TIV-TSMRPT-AGENT-Windows.exe
2. Stop all of the agents and services that are running on the system. From theManage Tivoli Enterprise Monitoring Services application, select all of thefollowing services and select Stop:
Installing Tivoli Monitoring for Tivoli Storage Manager
Chapter 9. Installing Tivoli Monitoring for Tivoli Storage Manager 115

v Tivoli Monitoring for Tivoli Storage Manager. If there are multiple agents,stop them all.
v Tivoli Enterprise Monitoring serverv Tivoli Enterprise Portal serverv Warehouse summarization and pruning agentv Warehouse proxy agentv IBM Eclipse help server
3. Choose whether you want to install from the DVD media, or a package filethat is downloaded:
Installing from DVD media: Installing from downloaded package file:
Insert the DVD, go to the top-level directory,and double-click the following command tostart the installation:
setup.bat
Go to the \WINDOWS subdirectory, anddouble-click the setup.exe file to start theinstallation.
4. Click Next on the welcome page.5. Accept the license agreement and click Next.6. Follow the wizard instructions to accept the installation location and
encryption key.7. Choose whether to install the monitoring agent or only the application
support files:v To install the monitoring agent, expand all of the collapsed sections, ensure
that all check boxes are selected, and click Next.v To install only the application support files, expand all of the collapsed
sections and ensure that only the following items are selected:– Tivoli Enterprise Monitoring server - TEMS
- Monitoring Agent for Tivoli Storage Manager– Tivoli Enterprise Portal server - TEPS
- Monitoring Agent for Tivoli Storage Manager– Tivoli Storage Manager
- Monitoring Agent for Tivoli Storage Manager8. Accept the defaults to complete the installation and click Finish.9. After the installation is complete, the Manage Tivoli Enterprise Monitoring
Services window opens. To ensure that the new settings are applied, selectTivoli Enterprise Portal server, right-click, and select Reconfigure. Follow thewizard prompts and accept all defaults.
10. Right-click Tivoli Enterprise Portal server, and click Start.
What to do next
After you complete the installation, must configure Tivoli Enterprise Portal tocollect and retain historical data for reports. Follow the steps in Windows:Installing monitoring agents or application support files on an existing IBM TivoliMonitoring environment on a Windows system.
You can also create and configure the agent instance if needed. Complete the stepsin “Creating and configuring the agent instance” on page 124.
Installing Tivoli Monitoring for Tivoli Storage Manager
116 IBM Tivoli Storage Manager for Windows: Installation Guide

Windows: Remotely deploying monitoring agentsRemote deployment provides the ability to add the monitoring agent installationpackages to a central location called an agent depot. From this central location, thepackages can then be pushed out to remote locations and installed silently byusing the IBM Tivoli Monitoring operating system agent. Remote deployment isuseful for larger-scale deployments such as deploying five or more monitoringagents.
About this task
Remote deployment can be used to deploy monitoring agents to systems thatalready have the IBM Tivoli Monitoring operating system agent that is installed onthem. Remote deployment can be used for new installations or to upgrade existingmonitoring agents to new versions.
There are multiple tasks that must be completed to use remote deployment. Thesetasks include the following items:v Add the agents that you want to deploy to the agent depot on the Tivoli
Enterprise Monitoring server hub.
Requirement: The IBM Tivoli Monitoring operating system agents on thesystems that you want to deploy to must be configured to use this TivoliEnterprise Monitoring server hub.
v Start the remote deployment.v Configure historical data collection.
Windows: Remote deployment preinstallation requirements:
Before you begin any remote deployment tasks, ensure that you meet thepreinstallation requirements for your system.
Remote deployment prerequisites include the following tasks:1. Install IBM Tivoli Monitoring and configure the Tivoli Enterprise Monitoring
server hub.2. Install the IBM Tivoli Monitoring 6.3.0 operating system agent on each system
that you want to remotely deploy a monitoring agent to, and configure it topoint to the Tivoli Enterprise Monitoring server.
3. You must also install the IBM Tivoli Monitoring application support files andconfigure the Tivoli Enterprise Monitoring server hub. These steps can becompleted before or after any remote deployment tasks, but are required toview data in historical reports.
You can verify whether these prerequisites are met by logging in to TivoliEnterprise Portal, selecting the systems that you want to deploy to, and verifyingthat the operating system agent is displaying information. For example, select theMemory workspace in Tivoli Enterprise Portal, and verify that data is displayed.
If you must install the IBM Tivoli Monitoring operating system agent to the agentdepot, the easiest method is to copy the agent to the agent depot by issuing thetacmd addbundles command, and then install it by issuing the tacmd createNodecommand, for example:v Extract the Tivoli Monitoring 6.3.0 operating system agent, then copy the
operating system agent to the depot by issuing the following command:tacmd addbundles -i \path_to_agent\WINDOWS\Deploy
Installing Tivoli Monitoring for Tivoli Storage Manager
Chapter 9. Installing Tivoli Monitoring for Tivoli Storage Manager 117
|||
v Deploy the operating system agent by issuing the following command:tacmd createNode -h host_name -u user_name -w password
If you are installing the monitoring agent to a 64-bit Windows system, the IBMTivoli Monitoring 32-bit and 64-bit compatibility package from the base IBM TivoliMonitoring 6.3.0 FP2, or later is required.
Windows: Populating the agent depot on Windows systems:
Before you can remotely deploy a monitoring agent, you must first populate theagent depot. The agent depot is an installation directory on the monitoring serverwhere you must copy the agent to before you can deploy it to remote systems.
Before you begin
Before you begin, ensure that your system meets all of the remote deploymentpreinstallation requirements.
Procedure
To populate the agent depot for remote deployment, complete the following steps:1. Copy and extract the agent installation package to a directory that is accessible
by the Tivoli Enterprise Monitoring server hub. For example, you can copy thepackage to the following directory:C:\tmp\tsmrptagent
Tip: Ensure that you select the appropriate executable file from the PassportAdvantage, FTP download site, or from the DVD media. The file name forinstalling only the monitoring agent, or the application support files can beidentified by the word AGENT, in capital letters. For example:7.1.0.000-TIV-TSMRPT-AGENT-Windows.exe
2. Optional: Modify the silent response file that will be used during the agentinstallation to specify items such as the installation directory and theencryption key that is required to communicate with the Tivoli EnterpriseMonitoring server hub.
Tips:
a. The default encryption key value is IBMTivoliMonitoringEncryptionKey
b. The silent response directory and file name is WINDOWS\Deploy\SK_Silent_Install.txt
3. Add the agent to the agent depot. This process copies the files from theinstallation media to a directory on the Tivoli Enterprise Monitoring server hub.This can be accomplished by using one of the following methods:
Installing Tivoli Monitoring for Tivoli Storage Manager
118 IBM Tivoli Storage Manager for Windows: Installation Guide

Table 22. Populating the agent depot methods
GUI installation method CLI installation method
You can use the GUIinstallation method by usingthe following steps:
1. Double-click thesetup.exe file in the\WINDOWS\subdirectory to start theinstallation wizard.
2. In the panel where youselect the agents toconfigure for remotedeployment, select theMonitoring Agent forTivoli Storage Managercheckbox.
You can use the tacmd addBundles command by using thefollowing steps:
1. Change directories to the location where the tacmndcommand is located. For example, the default is:
C:\IBM\ITM\BIN
2. Log on to Tivoli Enterprise Monitoring server by issuingthe following command:
tacmd login -s host_name -u sysadmin -p password
3. Add the agent to the agent depot by issuing thefollowing command.
tacmd addbundles -p WINNT -i C:\path_to_agent\WINDOWS\Deploy
If the command was successful, a message similar to thefollowing message is displayed:
KUICAB022I: The following bundles were successfullyadded to the C:\IBM\ITM\CMS\depot\ depot:
Product Code : SKDeployable : TrueVersion : 063300000Description : Monitoring Agent for Tivoli Storage
ManagerHost Type : WINNTHost Version : WINNTPrerequisites:
Tip: For usage information about the addbundlescommand you can issue the following command: tacmdhelp addBundles
4. Verify that the bundles exist in the agent depot by going to theC:\IBM\ITM\CMS\depot directory. Look for Monitoring Agent for Tivoli StorageManager, or issue the following command:tacmd viewdepot -t sk
Tip: You can limit the output to only the Tivoli Monitoring for Tivoli StorageManager monitoring agent by using the SK product code.For example:
Product Code : SKVersion : 063300000Description : Monitoring Agent for Tivoli Storage ManagerHost Type : WINNTHost Version : WINNTPrerequisites:
Tip: You can remove older bundles if they are no longer needed by issuing thetacmd removebundles command. For example:tacmd removebundles -t sk -i C:\TSM\WINDOWS\Deploy
What to do next
After you have populated the agent depot with the monitoring agent, you candeploy the agent to remote sites from this central location. For detailed procedures
Installing Tivoli Monitoring for Tivoli Storage Manager
Chapter 9. Installing Tivoli Monitoring for Tivoli Storage Manager 119

see Remotely deploying monitoring agents.
Windows: Remotely deploying monitoring agents on Windows systems:
After you populated the agent depot, you can deploy the monitoring agent toremote systems.
Before you begin
Before you begin, ensure that your system meets all of the remote deploymentpreinstallation requirements, and that the operating system agent on the remotesystem is started and has Administrator access.
Procedure
To install the monitoring agent, and initiate the deployment, complete thefollowing steps:1. Go to where the tacmd command is located. For example, the default directory
is:C:\IBM\ITM\BIN
2. Log on to the remote system by using the sysadmin user ID and password:tacmd login -s host_name -u sysadmin -p password
3. Locate the nodes that you want to deploy the monitoring agent to, by issuingthe following command:tacmd listSystems -t NT
4. Deploy the monitoring agent by issuing the following command:tacmd addSystem -t sk -n Primary:yourhost:NT -p INSTANCE=yourhostTSM_AUTHENTICATION_INFORMATION.KSK_SERVER_ADDR=yourhost.yourcompany.comTSM_AUTHENTICATION_INFORMATION.KSK_PORT_NUMBER=1500TSM_AUTHENTICATION_INFORMATION.KSK_USER=tsmusernameTSM_AUTHENTICATION_INFORMATION.KSK_PASSWORD=tsmpassword
where:v TSM_AUTHENTICATION_INFORMATION.KSK_SERVER_ADDR indicates the server IP
address of the Tivoli Storage Manager server.v TSM_AUTHENTICATION_INFORMATION.KSK_PORT_NUMBER indicates the port that is
required to access the Tivoli Storage Manager server.v TSM_AUTHENTICATION_INFORMATION.KSK_USER indicates the user ID that is used
to access the Tivoli Storage Manager server.v TSM_AUTHENTICATION_INFORMATION.KSK_PASSWORD indicates the password for
the user ID that is used to access the Tivoli Storage Manager server.v TSM_AUTHENTICATION_INFORMATION.KSK_KEYSTORE indicates the file system
location if the agent will be communicating with the Tivoli Storage Managerserver through an SSL connection. Leave this blank to use the defaultnon-SSL authentication method.
v
If your agent will be communicating with server through an SSL connection,specify a value by using the TSM_AUTHENTICATION_INFORMATION.KSK_KEYSTOREoption.
Tip: When specifying a monitoring agent instance name, as a best practice, youcan specify the name of the Tivoli(r) Storage Manager server, or the host nameof the server as your instance name.For example:
Installing Tivoli Monitoring for Tivoli Storage Manager
120 IBM Tivoli Storage Manager for Windows: Installation Guide
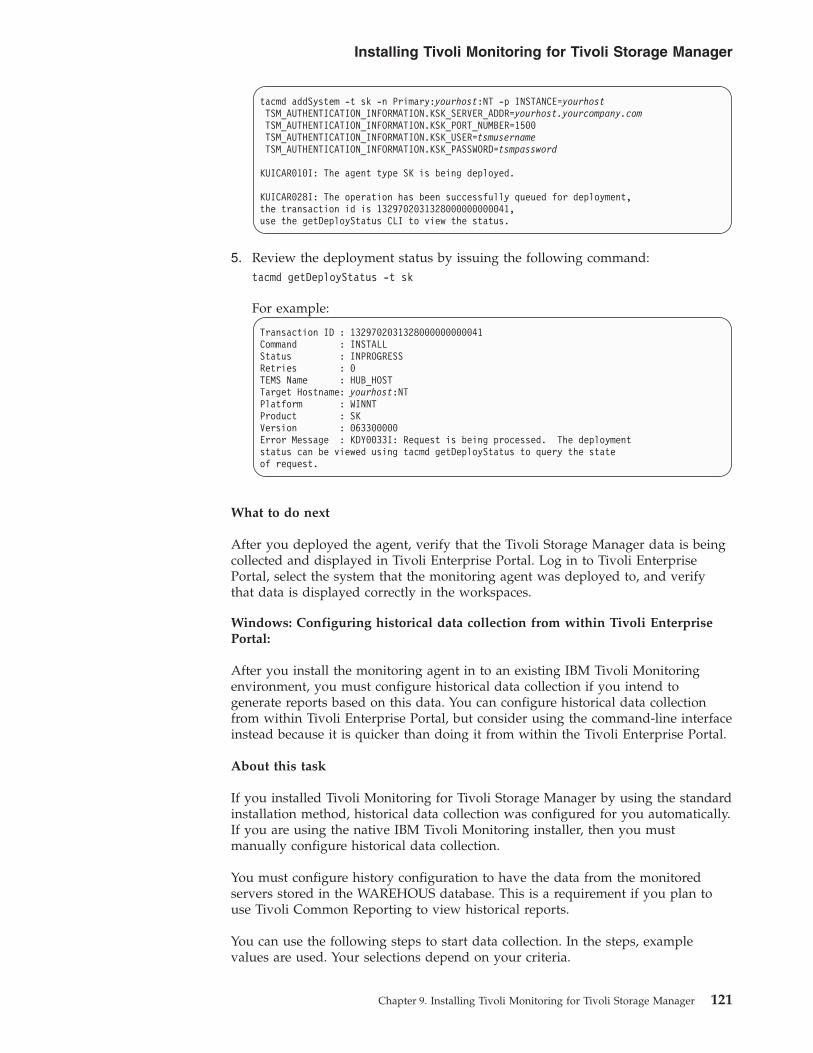
tacmd addSystem -t sk -n Primary:yourhost:NT -p INSTANCE=yourhostTSM_AUTHENTICATION_INFORMATION.KSK_SERVER_ADDR=yourhost.yourcompany.comTSM_AUTHENTICATION_INFORMATION.KSK_PORT_NUMBER=1500TSM_AUTHENTICATION_INFORMATION.KSK_USER=tsmusernameTSM_AUTHENTICATION_INFORMATION.KSK_PASSWORD=tsmpassword
KUICAR010I: The agent type SK is being deployed.
KUICAR028I: The operation has been successfully queued for deployment,the transaction id is 1329702031328000000000041,use the getDeployStatus CLI to view the status.
5. Review the deployment status by issuing the following command:tacmd getDeployStatus -t sk
For example:
Transaction ID : 1329702031328000000000041Command : INSTALLStatus : INPROGRESSRetries : 0TEMS Name : HUB_HOSTTarget Hostname: yourhost:NTPlatform : WINNTProduct : SKVersion : 063300000Error Message : KDY0033I: Request is being processed. The deploymentstatus can be viewed using tacmd getDeployStatus to query the stateof request.
What to do next
After you deployed the agent, verify that the Tivoli Storage Manager data is beingcollected and displayed in Tivoli Enterprise Portal. Log in to Tivoli EnterprisePortal, select the system that the monitoring agent was deployed to, and verifythat data is displayed correctly in the workspaces.
Windows: Configuring historical data collection from within Tivoli EnterprisePortal:
After you install the monitoring agent in to an existing IBM Tivoli Monitoringenvironment, you must configure historical data collection if you intend togenerate reports based on this data. You can configure historical data collectionfrom within Tivoli Enterprise Portal, but consider using the command-line interfaceinstead because it is quicker than doing it from within the Tivoli Enterprise Portal.
About this task
If you installed Tivoli Monitoring for Tivoli Storage Manager by using the standardinstallation method, historical data collection was configured for you automatically.If you are using the native IBM Tivoli Monitoring installer, then you mustmanually configure historical data collection.
You must configure history configuration to have the data from the monitoredservers stored in the WAREHOUS database. This is a requirement if you plan touse Tivoli Common Reporting to view historical reports.
You can use the following steps to start data collection. In the steps, examplevalues are used. Your selections depend on your criteria.
Installing Tivoli Monitoring for Tivoli Storage Manager
Chapter 9. Installing Tivoli Monitoring for Tivoli Storage Manager 121

Procedure
1. Start the Tivoli Enterprise Portal:a. Click Start > Programs > IBM Tivoli Monitoring > Tivoli Enterprise
Portal. Alternatively, click the Tivoli Enterprise Portal icon on the desktop.2. Log on to the Tivoli Enterprise Portal by using the sysadmin user ID, and the
password that was specified during installation.3. From the Tivoli Enterprise Portal menu, click Edit > History Configuration.4. Specify collection settings by completing the following steps for each of the
following attribute groups:v KSK CLIENT NODE STORAGEv KSK CLIENT MISSED FILESv KSK CLIENT NODE STATUSv KSK DATABASEv KSK SCHEDULEv KSK STORAGE POOLv KSK TAPE USAGEv KSK TAPE VOLUMEv KSK NODE ACTIVITYv KSK SERVERv KSK STORAGE DEVICEv KSK ACTIVITY LOGv KSK OCCUPANCYv KSK REPLSTATUS (Listed as Replication Status)v KSK REPLDETAILS (Listed as Replication Details)v KSK ACTIVITY SUMMARY
Tip: KSK denotes the Tivoli Monitoring for Tivoli Storage Manager productcode.a. Right-click Tivoli Storage Manager, and select Create new collection setting.b. Select an attribute group from the menu.c. Specify a name for the new collection setting, and optionally provide a
description. As a best practice, include the attribute group in the name.d. In the Collection interval field, set the value to 1 hour. This value specifies
how often the data is retrieved from the monitoring agent.e. In the Collection location field, select Tivoli Enterprise Monitoring server,
TEMA. This server is where the historical data files are stored.f. In the Warehouse interval field, select 1 day for how often you want the
warehouse data to store data. If you select 1 day, you cannot view reportsfor at least a day.
Note: These settings are examples. Your selections depend on how often, andhow much data you want to collect. To test the data that is collected, start witha short interval such as 1 hour. After you are sure that the data is beingcollected correctly, you can adjust the collection interval to every 12 or 24hours.
To verify that historical collection is activated, you can look for the History
Configuration icon next to each attribute group.
Installing Tivoli Monitoring for Tivoli Storage Manager
122 IBM Tivoli Storage Manager for Windows: Installation Guide

5. After the historical data collection settings are configured, complete thefollowing steps to configure summarization and pruning of the data in theTivoli Data Warehouse.
Tip: Summarization combines multiple data points into a single data pointacross a date range such as a monthly or quarterly. Pruning removes older datathat is no longer needed to save database space.a. Left-click on Tivoli Storage Manager to open the summarization and
pruning settings window.b. Select all of the attributes that are configured for historical data collection. A
blue icon next to the attribute group indicates that data collection isrunning.
c. In the summarization settings, enable summarization for Yearly, Quarterly,Monthly, Weekly, Daily, and Hourly.
d. In the Pruning section, you can also optionally enable pruning. By defaultno pruning is enabled. If your Tivoli Data Warehouse database size isgrowing too large, pruning older data can be enabled here for each attributegroup.
Note: Pruning too vigorously can result in no data, or not enough data beingdisplayed in the Tivoli Common Reporting reports.
Windows: Configuring historical data collection by using the command-lineinterface on Windows systems:
After you install the monitoring agents in an existing IBM Tivoli Monitoringenvironment, you must configure historical data collection if you intend togenerate reports based on this data.
About this task
If you installed Tivoli Monitoring for Tivoli Storage Manager by using the standardinstallation method, historical data collection was configured for you automatically.If you are using the native IBM Tivoli Monitoring installer, then you mustmanually configure historical data collection.
You can also configure historical data collection from within the Tivoli EnterprisePortal. However, it is much quicker using the command-line interface becausethere are many attribute groups that must be configured.
Historical data is collected in the Tivoli Enterprise Portal, and is eventuallydisplayed in historical reports. You must configure history configuration to havethe data from the monitored servers stored in the WAREHOUS database. This is arequirement if you plan to use Tivoli Common Reporting to view historical reports.
The following commands can be copied and pasted into a command prompt onWindows. Modify any of the variables such as the password, to match yourinstallation environment before you paste them.
Procedure
1. Specify the sysadmin ID and password by issuing the following command in acommand prompt window:SET admin=sysadminSET password=your_passwordSET CANDLE_HOME=C:\Program Files\Tivoli\TSM\reporting\ITM
Installing Tivoli Monitoring for Tivoli Storage Manager
Chapter 9. Installing Tivoli Monitoring for Tivoli Storage Manager 123
||
|||

2. Paste the following text in the same command prompt window.
Tip: Remember to change the user ID and password variables to match thevalues you specified during installation.SET warehouseinterval=1hSET collectioninterval=1hSET summarizationdetails=HDWMQYSET type=KSKcd %CANDLE_HOME%\bintacmd.exe histconfiguregroups -u %admin% -w %password% -t %type% -o "KSK CLIENT NODE STORAGE"
-i %warehouseinterval% -c %collectioninterval% -d %summarizationdetails%tacmd.exe histconfiguregroups -u %admin% -w %password% -t %type% -o "KSK CLIENT MISSED FILES"
-i %warehouseinterval% -c %collectioninterval% -d %summarizationdetails%tacmd.exe histconfiguregroups -u %admin% -w %password% -t %type% -o "KSK CLIENT NODE STATUS"
-i %warehouseinterval% -c %collectioninterval% -d %summarizationdetails%tacmd.exe histconfiguregroups -u %admin% -w %password% -t %type% -o "KSK DATABASE"
-i %warehouseinterval% -c %collectioninterval% -d %summarizationdetails%tacmd.exe histconfiguregroups -u %admin% -w %password% -t %type% -o "KSK SCHEDULE"
-i %warehouseinterval% -c %collectioninterval% -d %summarizationdetails%tacmd.exe histconfiguregroups -u %admin% -w %password% -t %type% -o "KSK STORAGE POOL"
-i %warehouseinterval% -c %collectioninterval% -d %summarizationdetails%tacmd.exe histconfiguregroups -u %admin% -w %password% -t %type% -o "KSK TAPE USAGE"
-i %warehouseinterval% -c %collectioninterval% -d %summarizationdetails%tacmd.exe histconfiguregroups -u %admin% -w %password% -t %type% -o "KSK TAPE VOLUME"
-i %warehouseinterval% -c %collectioninterval% -d %summarizationdetails%tacmd.exe histconfiguregroups -u %admin% -w %password% -t %type% -o "KSK NODE ACTIVITY"
-i %warehouseinterval% -c %collectioninterval% -d %summarizationdetails%tacmd.exe histconfiguregroups -u %admin% -w %password% -t %type% -o "KSK SERVER"
-i %warehouseinterval% -c %collectioninterval% -d %summarizationdetails%tacmd.exe histconfiguregroups -u %admin% -w %password% -t %type% -o "KSK STORAGE DEVICE"
-i %warehouseinterval% -c %collectioninterval% -d %summarizationdetails%tacmd.exe histconfiguregroups -u %admin% -w %password% -t %type% -o "KSK ACTIVITY LOG"
-i %warehouseinterval% -c %collectioninterval% -d %summarizationdetails%tacmd.exe histconfiguregroups -u %admin% -w %password% -t %type% -o "KSK OCCUPANCY"
-i %warehouseinterval% -c %collectioninterval% -d %summarizationdetails%tacmd.exe histconfiguregroups -u %admin% -w %password% -t %type% -o "KSK REPLSTATUS"
-i %warehouseinterval% -c %collectioninterval% -d %summarizationdetails%tacmd.exe histconfiguregroups -u %admin% -w %password% -t %type% -o "KSK REPLDETAILS"
-i %warehouseinterval% -c %collectioninterval% -d %summarizationdetails%tacmd.exe histconfiguregroups -u %admin% -w %password% -t %type% -o "KSK ACTIVITY SUMMARY"
-i %warehouseinterval% -c %collectioninterval% -d %summarizationdetails%
3. Start collecting data by issuing the following commands:tacmd.exe histstartcollection -u %admin% -w %password% -t %type% -o "KSK CLIENT NODE STORAGE"tacmd.exe histstartcollection -u %admin% -w %password% -t %type% -o "KSK CLIENT MISSED FILES"tacmd.exe histstartcollection -u %admin% -w %password% -t %type% -o "KSK CLIENT NODE STORAGE"tacmd.exe histstartcollection -u %admin% -w %password% -t %type% -o "KSK DATABASE"tacmd.exe histstartcollection -u %admin% -w %password% -t %type% -o "KSK SCHEDULE"tacmd.exe histstartcollection -u %admin% -w %password% -t %type% -o "KSK STORAGE POOL"tacmd.exe histstartcollection -u %admin% -w %password% -t %type% -o "KSK TAPE USAGE"tacmd.exe histstartcollection -u %admin% -w %password% -t %type% -o "KSK TAPE VOLUME"tacmd.exe histstartcollection -u %admin% -w %password% -t %type% -o "KSK NODE ACTIVITY"tacmd.exe histstartcollection -u %admin% -w %password% -t %type% -o "KSK SERVER"tacmd.exe histstartcollection -u %admin% -w %password% -t %type% -o "KSK STORAGE DEVICE"tacmd.exe histstartcollection -u %admin% -w %password% -t %type% -o "KSK ACTIVITY LOG"tacmd.exe histstartcollection -u %admin% -w %password% -t %type% -o "KSK OCCUPANCY"tacmd.exe histstartcollection -u %admin% -w %password% -t %type% -o "KSK REPLSTATUS"tacmd.exe histstartcollection -u %admin% -w %password% -t %type% -o "KSK REPLDETAILS"tacmd.exe histstartcollection -u %admin% -w %password% -t %type% -o "KSK ACTIVITY SUMMARY"
Creating and configuring the agent instanceAfter you install Tivoli Monitoring for Tivoli Storage Manager, you must createand configure the monitoring agent instance to begin collecting data.
About this task
If you plan to monitor less than 5 Tivoli Storage Manager servers, you can use themonitoring agent template that was installed as part of the Tivoli Monitoring forTivoli Storage Manager installation to create and configure the agent instances.
If you plan to monitor more than 5 Tivoli Storage Manager servers, you mustinstall additional monitoring agents on each Tivoli Storage Manager server thatyou want to monitor. Alternatively, you can install the agent on any supportedoperating system and configure the agent instances to connect to the Tivoli StorageManager servers that you want to monitor. For example, you cannot install theTivoli Monitoring for Tivoli Storage Manager monitoring agent directly on HP-UX,Solaris, or zLinux operating systems. To collect data for Tivoli Storage Manager
Installing Tivoli Monitoring for Tivoli Storage Manager
124 IBM Tivoli Storage Manager for Windows: Installation Guide
|||||||

servers on these operating systems, you must create a monitoring agent instanceon the IBM Tivoli Monitoring server or on another supported operating system.
This configuration provides the most efficient use of memory on both the TivoliStorage Manager server, and the IBM Tivoli Monitoring server.
Install and configure an agent instance by completing the steps in “Creating andconfiguring the agent instance on Windows systems.”
Creating and configuring the agent instance on Windowssystems
After you install the agent, you must create and configure an agent instance foreach Tivoli Storage Manager server that you intend to monitor.
About this task
You must create and configure an agent instance for each server that you want tomonitor. You can monitor up to 5 Tivoli Storage Manager servers from the sameIBM Tivoli Monitoring server. If you plan to monitor more than 5 servers, youshould install additional monitoring agents on each of your Tivoli Storage Managerservers. Alternatively, you can install the agent on any supported operating systemand configure the agent instances to connect to the Tivoli Storage Manager serversthat you want to monitor.
Procedure
To configure the Tivoli Monitoring for Tivoli Storage Manager agent instance,complete the following steps:1. Click Start > All Programs > IBM Tivoli Monitoring > Manage Tivoli
Monitoring Services.2. In the Manage Tivoli Enterprise Monitoring Services window, double-click
Monitoring Agent for Tivoli Storage Manager template.3. Specify the instance name, for example, SERVER1, and click OK.
Tip: When you specify an instance name, the best practice is to include thehost name of the Tivoli Storage Manager server. You can find the server nameby issuing the QUERY STATUS command. Instance names must be unique, andcannot exceed 20 characters.
4. To allow the Tivoli Storage Manager server to be monitored, complete thefollowing fields:a. In the Server Address field, specify the server address for the Tivoli Storage
Manager server.b. In the Port Number field, specify the port number that is used to
communicate with the Tivoli Storage Manager server.
Tip: For normal TCP/IP traffic, you can determine the port number byissuing one of the following commands:QUERY OPT TCPPORT
QUERY OPT TCPADMINPORT
For SSL encrypted TCP/IP traffic, you can determine the port number byissuing one of the following commands:QUERY OPT SSLTCPPORT
Installing Tivoli Monitoring for Tivoli Storage Manager
Chapter 9. Installing Tivoli Monitoring for Tivoli Storage Manager 125
||

QUERY OPT SSLTCPADMINPORT
c. In the TSM Administrator field, specify the Tivoli Storage Manageradministrator ID that is used to access the Tivoli Storage Manager server.
Note: The Tivoli Monitoring for Tivoli Storage Manager agent runs onlyqueries on the Tivoli Storage Manager server and does not change anything.The administrator that you choose to run the queries can be anadministrator ID without the following privileges:v System Privilegesv Policy Privilegesv Storage Privilegesv Operator Privilegesv Client Access Privilegesv Client Owner Privileges
d. In the TSM Administrator Password field, enter the password twice for theTivoli Storage Manager system administrator ID.
e. In the File/Location of SSL Certificate store field, either browse to thelocation where the SSL certificates are located, or leave the field blank if youdo not intend to use SSL.
Notes: If you intend to use SSL to encrypt network traffic, ensure that yourTivoli Storage Manager server is enabled for this type of securecommunication and that you specified the correct port number. For moreinformation, see Configuring Tivoli Storage Manager client/servercommunication with Secure Sockets Layer (http://www.ibm.com/support/knowledgecenter/SSGSG7_7.1.1/com.ibm.itsm.client.doc/t_cfg_ssl.html).
f. Click OK to save the settings.The Manage Tivoli Enterprise Monitoring Services window displays the newTivoli Monitoring for Tivoli Storage Manager agent instance.
5. To start the monitoring agent instance, right-click the monitoring agent instancein the list, and click Start.
Tip: If the agent was installed separately on an existing IBM Tivoli Monitoringserver, you might need to restart the Tivoli Enterprise Portal server to allow itto pick up and apply the new agent configuration settings. From the ManageTivoli Monitoring Services window, right-click the Tivoli Enterprise Portalserver, and click Recycle.
Results
After you start the agent, it starts to collected data. You can view real-time data byusing the workspaces in the Tivoli Enterprise Portal, or you can view historicaldata by using Cognos reports.
Installing Tivoli Monitoring for Tivoli Storage Manager
126 IBM Tivoli Storage Manager for Windows: Installation Guide

Installing Jazz for Service ManagementWhen you install Jazz for Service Management, you must include the TivoliCommon Reporting and WebSphere Application Server components. Thecomponents provide the interface to view historical data of the Tivoli StorageManager servers by using IBM Cognos reports.
Installing Jazz for Service Management on WindowsAfter you install Tivoli Monitoring for Tivoli Storage Manager, you must installJazz for Service Management.
Obtaining the Jazz for Service Management packagesYou can download the installation package from IBM Passport Advantage andextract them to the local system.
About this task
Along with Jazz for Service Management, you must download the followingadditional components:v WebSphere Application Serverv Tivoli Common Reporting
Procedure1. Go to the IBM Passport Advantage at http://www.ibm.com/software/lotus/
passportadvantage/.
Tip: An IBM Customer ID is required to log in.2. Select the Find by part number search option under Download finder options.3. Search for each of the following downloadable packages by part number:
Table 23. Part numbers for each package
Package name Part number
Jazz for Service Management 1.1.0.3CIXA4ML
WebSphere Application Server 8.5.0.1CIFS5ML
Tivoli Common Reporting 3.1.0.1CIN3KML
Tivoli Common Reporting fix pack 3.1.0.2CIXA8ML
4. Select and download the packages for your operating system.5. Create a directory and extract the contents of each package to the root of that
directory.
Installing Tivoli Monitoring for Tivoli Storage Manager
Chapter 9. Installing Tivoli Monitoring for Tivoli Storage Manager 127
|
||||
|
||
|||
|
||
|
|
|
||
|
|
|
||
||
||
||
||
|||
|
||
|
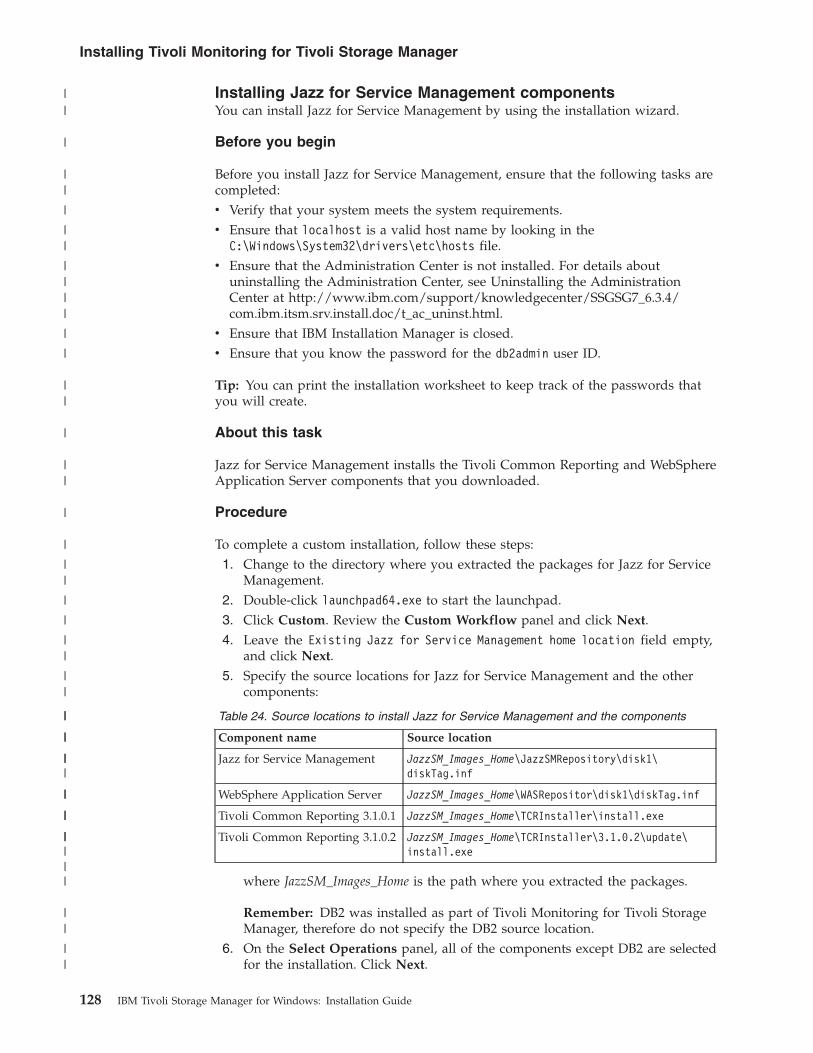
Installing Jazz for Service Management componentsYou can install Jazz for Service Management by using the installation wizard.
Before you begin
Before you install Jazz for Service Management, ensure that the following tasks arecompleted:v Verify that your system meets the system requirements.v Ensure that localhost is a valid host name by looking in the
C:\Windows\System32\drivers\etc\hosts file.v Ensure that the Administration Center is not installed. For details about
uninstalling the Administration Center, see Uninstalling the AdministrationCenter at http://www.ibm.com/support/knowledgecenter/SSGSG7_6.3.4/com.ibm.itsm.srv.install.doc/t_ac_uninst.html.
v Ensure that IBM Installation Manager is closed.v Ensure that you know the password for the db2admin user ID.
Tip: You can print the installation worksheet to keep track of the passwords thatyou will create.
About this task
Jazz for Service Management installs the Tivoli Common Reporting and WebSphereApplication Server components that you downloaded.
Procedure
To complete a custom installation, follow these steps:1. Change to the directory where you extracted the packages for Jazz for Service
Management.2. Double-click launchpad64.exe to start the launchpad.3. Click Custom. Review the Custom Workflow panel and click Next.4. Leave the Existing Jazz for Service Management home location field empty,
and click Next.5. Specify the source locations for Jazz for Service Management and the other
components:
Table 24. Source locations to install Jazz for Service Management and the components
Component name Source location
Jazz for Service Management JazzSM_Images_Home\JazzSMRepository\disk1\diskTag.inf
WebSphere Application Server JazzSM_Images_Home\WASRepositor\disk1\diskTag.inf
Tivoli Common Reporting 3.1.0.1 JazzSM_Images_Home\TCRInstaller\install.exe
Tivoli Common Reporting 3.1.0.2 JazzSM_Images_Home\TCRInstaller\3.1.0.2\update\install.exe
where JazzSM_Images_Home is the path where you extracted the packages.
Remember: DB2 was installed as part of Tivoli Monitoring for Tivoli StorageManager, therefore do not specify the DB2 source location.
6. On the Select Operations panel, all of the components except DB2 are selectedfor the installation. Click Next.
Installing Tivoli Monitoring for Tivoli Storage Manager
128 IBM Tivoli Storage Manager for Windows: Installation Guide
||
|
||
|
||
||||
|
|
||
|
||
|
|
||
|
|
||
||
||
||
|||
||
||
|||||
||
||

7. Review and accept the software license agreements in the Software LicenseAgreement panel. Click Next.
8. Accept the default locations for Jazz for Service Management and WebSphereApplication Server, or create and specify the installation directories. ClickNext.
9. Specify the credentials for the WebSphere Application Server profile and DB2.a. Create the user name and password for the WebSphere Application Server
profile. This user name and password is used to log in to the DashboardApplication Services Hub to access Tivoli Common Reporting. The defaultuser name is smadmin.
Restriction: The password must be at least 8 characters.b. Specify the DB2 user name and password that you created when you
installed Tivoli Monitoring for Tivoli Storage Manager. The default username is:
db2admin
Important: Ensure that DB2 is started.c. Click Next to create the user name and password and to verify the DB2
credentials.10. Click Run to install the components. You can monitor the results of each
component in the Review Results panel.11. When the components are successfully installed, click Exit.
What to do next
Before you can run Cognos reports, you must configure the WAREHOUS datasource. For more information about configuring the data source, see “Configuringthe WAREHOUS data source and importing reports.”
Optionally, you can configure the Jazz for Service Management service to startautomatically by completing the steps in “Starting the Jazz for ServiceManagement service” on page 130.
Tip: Review the installation checklist to ensure that you complete all the tasks toset up Tivoli Monitoring for Tivoli Storage Manager.
Configuring the WAREHOUS data source and importing reportsConfigure the WAREHOUS data source to connect Tivoli Common Reporting tothe WAREHOUS database and import the Cognos reports.
Before you begin
Before you run the data source script, ensure that the following tasks arecompleted:v Tivoli Monitoring for Tivoli Storage Manager is installed.v Jazz for Service Management, which includes Tivoli Common Reporting and
WebSphere Application Server, is installed.
You must know the following values:v The password for itmuser.
Installing Tivoli Monitoring for Tivoli Storage Manager
Chapter 9. Installing Tivoli Monitoring for Tivoli Storage Manager 129
||
|||
|
||||
|
|||
|
|
||
||
|
|
|||
|||
||
||
||
|
||
|
||
|
|
v The user name and password for the services management administrator. Thedefault is smadmin.
v The installation location of Tivoli Monitoring for Tivoli Storage Manager.v The installation location of Jazz for Service Management.
About this task
The data source script imports the Cognos reports and connects Tivoli CommonReporting to the WAREHOUS database. The data source script and theTSM_Cognos.zip files are in the tools directory of the installation directory.
Procedure1. Open a command line and change to the following directory:
install_dir\tools
where install_dir is the Tivoli Monitoring for Tivoli Storage Manager installationlocation.
2. From a command line, issue the following command:datasource.bat -j jazzsm_location -u jazzsm_user -p jazzsm_password-i itmuser_password
where:jazzsm_location is the installation location for Jazz for Service Managementjazzsm_user is the service management administrator ID that was createdduring the installation of Jazz for Service Managementjazzsm_password is the password for jazzsm_user
itmuser_password is the password for itmuser
Tip: If you want to import Cognos reports from a previous setup, use the -roption and specify the location of the compressed reports file.
What to do next
You can run Cognos reports to see historical data from the Tivoli Storage Managerservers that you are monitoring. Go to “Running a Cognos report” on page 134.
For a list of Cognos reports that are available, see Cognos status and trend reports(http://www.ibm.com/support/knowledgecenter/SSGSG7_7.1.1/com.ibm.itsm.srv.doc/r_rpt_cognos_rpts.html).
Starting the Jazz for Service Management serviceBy default, the Jazz for Service Management service does not restart after thesystem restarts. You must start Jazz for Service Management manually or you canconfigure it restart automatically.
About this task
If you want to access the Dashboard Application Services Hub or view Cognosreports, Jazz for Service Management must be running.
Procedure
To start Jazz for Service Management, complete one of the following actions:
Installing Tivoli Monitoring for Tivoli Storage Manager
130 IBM Tivoli Storage Manager for Windows: Installation Guide
||
|
|
|
|||
|
|
|
||
|
||
|
|
||
|
|
||
|
||
|||
|
|||
|
||
|
|

v To start Jazz for Service Management manually, issue the following commandsfrom the command line:cd jazzsm_install_dir\profile\binstartServer.bat server1
where jazzsm_install_dir is the Jazz for Service Management installation directory.By default, the installation directory is in the following location:
C:\Program Files\IBM\JazzSM
v To ensure that Jazz for Service Management starts automatically when thesystem restarts, issue the following commands from the command line:cd installation_dir\toolsautostartWin.bat -j "jazzsm_install_dir"
where:– installation_dir is the Tivoli Monitoring for Tivoli Storage Manager installation
directory. By default, the installation directory is in the following location:C:\Program Files\Tivoli\TSM\reporting
– jazzsm_install_dir is the Jazz for Service Management installation directory. Bydefault, the installation directory is in the following location:
C:\Program Files\IBM\JazzSM
Verifying the installationAfter you install Tivoli Monitoring for Tivoli Storage Manager and Jazz for ServiceManagement, verify that all of the components are installed and configuredcorrectly.
Procedure
To verify that the installation was successful, complete these steps:1. Verify that the Tivoli Enterprise Portal server version is 06.30.02.00:
a. Open the Manage Tivoli Enterprise Management Services application:v Click Start > All Programs > IBM Tivoli Monitoring > Manage Tivoli
Monitoring Services.b. Verify that the version of Tivoli Enterprise Portal server is 06.30.02.00 in the
Version column.2. In Manage Tivoli Enterprise Management Services, verify that the Monitoring
Agent for Tivoli Storage Manager template version is correct. For example, forversion 7.1.0, the version is 07.10.00.00.
3. Verify database connectivity:a. Log on to the Tivoli Enterprise Portal with your sysadmin user ID and
password by using one of the following methods:v Click Start > All Programs > IBM Tivoli Monitoring > Manage Tivoli
Monitoring Services and select Tivoli Enterprise Portal underService/Application. You can also double-click the Tivoli EnterprisePortal icon on your desktop.
v Open a web browser and specify the address of the server where theTivoli Enterprise Portal was installed, similar to the following example:http://hostname:1920///cnp/kdh/lib/cnp.html
where hostname is the server name and 1920///cnp/kdh/lib/cnp.html isthe port and location of the Java Tivoli Enterprise Portal web Client.
Tip: Always use this port number and location.
Installing Tivoli Monitoring for Tivoli Storage Manager
Chapter 9. Installing Tivoli Monitoring for Tivoli Storage Manager 131
||
||
||
|
||
||
|
||
|
||
|
|
b. Click the Warehouse Proxy node to highlight it in the Navigator pane.
Note: The Warehouse Proxy node can be found in the following location:
Enterprise > Windows System > hostname > Warehouse Proxy
c. In the Database Information table, verify that the DB Connectivity has avalue of YES and that the DB Version has a value of 10.05.
d. Click the Summarization and Pruning Agent node to highlight it in theNavigator pane.
e. In the Connectivity table, verify that the TEPS Connectivity value and theDB Connectivity values are YES.
4. Verify that the history configuration is configured:a. Log on to the Tivoli Enterprise Portal by following the steps in Step 3.a.b. Click Edit > History Configuration.c. Verify that there are several KSK_* attribute groups under the Tivoli
Storage Manager node in the navigation pane.d. Click to highlight Tivoli Storage Manager in the content pane. Under the
Group column, verify that there are several groups with the icon thatprecedes the name. The icon indicates that the attribute is running tosummarize and store data.
5. If you completed a new installation, verify that pruning is configured:a. Log on to the Tivoli Enterprise Portal by following the steps in Step 3.a.b. Click Edit > History Configuration.c. Click the Tivoli Storage Manager node to highlight it.
d. Click any of the attribute groups with the icon, and view the Pruningsection in the window. If configured, all the check boxes are selected andthere are numerical values in the fields. For more information, see“Configuring summarization and pruning settings” on page 135.
6. Optional: If you configured the monitoring agent, installed Jazz for ServiceManagement, and ran the data source script, you can verify the configurationand begin working with the reports.a. Log on to the Tivoli Enterprise Portal by following the steps in Step 3.a
with the sysadmin user ID and password and review the workspaces toverify that data is being collected.
Note: The workspaces can be found in the Navigator pane under thefollowing node:
Enterprise > Windows System > hostname > Tivoli Storage Manager
If you created multiple instances of the agent, click each agent instance thatis listed under the Tivoli Storage Manager branch in the Navigator pane.Each agent instance has its own list of workspaces. Review a fewworkspaces to verify that data is coming in from the Tivoli Storage Managerserver.You can also navigate to the Agent Log workspace and look for messagessuch as TSM login succeeded. If you see a message that indicates that thelogin failed, you probably specified an incorrect ID or password when youconfigured the agent instance. If data is not being collected, see ResolvingTivoli Monitoring for Tivoli Storage Manager problems
Installing Tivoli Monitoring for Tivoli Storage Manager
132 IBM Tivoli Storage Manager for Windows: Installation Guide
(http://www.ibm.com/support/knowledgecenter/SSGSG7_7.1.1/com.ibm.itsm.tshoot.doc/c_pdg_reportprobs.html).
b. Log on to the IBM Dashboard Application Services Hub with the Jazz forService Management administrator ID and password:1) Open a web browser and enter the following address:
https://hostname:port/ibm/console
where port is the port number that is specified when you installed Jazzfor Service Management. The default port is 16311. The hostname is thehost name of the system where Jazz for Service Management is installed.
c. Click the Reporting icon in the side navigation menu and click CommonReporting. You can view Cognos reports by selecting IBM Tivoli StorageManager Cognos Reports.
Tip: You might need to wait 1 or 2 hours after configuration before you cansee historical data in the Cognos reports.
What to do next
If you experience issues with your installation such as data not displaying in yourreports, or other issues, see Resolving Tivoli Monitoring for Tivoli Storage Managerproblems (http://www.ibm.com/support/knowledgecenter/SSGSG7_7.1.1/com.ibm.itsm.tshoot.doc/c_pdg_reportprobs.html).
For more information about reports, see Reporting and monitoring with TivoliMonitoring for Tivoli Storage Manager (http://www.ibm.com/support/knowledgecenter/SSGSG7_7.1.1/com.ibm.itsm.srv.doc/c_rpt_adm_ovr.html).
Taking the first steps after installationAfter you install Tivoli Monitoring for Tivoli Storage Manager, you must completeadditional tasks to finish your setup. Then you can start real-time monitoring ofyour Tivoli Storage Manager servers and start collecting historical data so you canrun Tivoli Common Reporting reports.
Procedure
Complete the following steps after the installation:1. Configure the WAREHOUS data source to connect Tivoli Common Reporting to
the WAREHOUS database. Complete the steps in “Configuring theWAREHOUS data source and importing reports” on page 129.
2. Create an agent instance for each Tivoli Storage Manager server that you wantto monitor.You must create and configure a monitoring agent instance for each TivoliStorage Manager server that you want to monitor. You can create up to 5 agentinstances on the monitoring server. If you intend to monitor more than 5 TivoliStorage Manager servers, you must use the installer to install only themonitoring agent directly on the Tivoli Storage Manager servers you want tomonitor. Alternatively, you can install the agent on a supported operatingsystem and configure the agent instance to connect to the Tivoli StorageManager server.v See “Creating and configuring the agent instance on Windows systems” on
page 125.
Installing Tivoli Monitoring for Tivoli Storage Manager
Chapter 9. Installing Tivoli Monitoring for Tivoli Storage Manager 133
||
|
|
|||
|||
||||||||
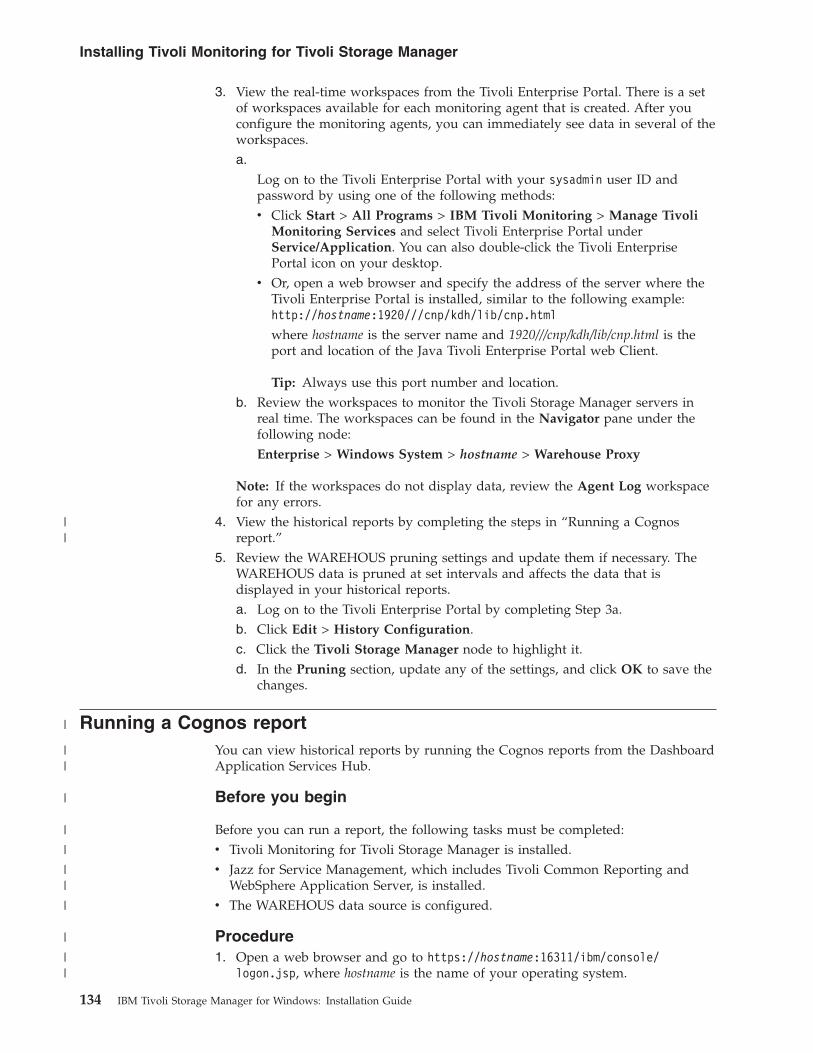
3. View the real-time workspaces from the Tivoli Enterprise Portal. There is a setof workspaces available for each monitoring agent that is created. After youconfigure the monitoring agents, you can immediately see data in several of theworkspaces.a.
Log on to the Tivoli Enterprise Portal with your sysadmin user ID andpassword by using one of the following methods:v Click Start > All Programs > IBM Tivoli Monitoring > Manage Tivoli
Monitoring Services and select Tivoli Enterprise Portal underService/Application. You can also double-click the Tivoli EnterprisePortal icon on your desktop.
v Or, open a web browser and specify the address of the server where theTivoli Enterprise Portal is installed, similar to the following example:http://hostname:1920///cnp/kdh/lib/cnp.html
where hostname is the server name and 1920///cnp/kdh/lib/cnp.html is theport and location of the Java Tivoli Enterprise Portal web Client.
Tip: Always use this port number and location.b. Review the workspaces to monitor the Tivoli Storage Manager servers in
real time. The workspaces can be found in the Navigator pane under thefollowing node:Enterprise > Windows System > hostname > Warehouse Proxy
Note: If the workspaces do not display data, review the Agent Log workspacefor any errors.
4. View the historical reports by completing the steps in “Running a Cognosreport.”
5. Review the WAREHOUS pruning settings and update them if necessary. TheWAREHOUS data is pruned at set intervals and affects the data that isdisplayed in your historical reports.a. Log on to the Tivoli Enterprise Portal by completing Step 3a.b. Click Edit > History Configuration.c. Click the Tivoli Storage Manager node to highlight it.d. In the Pruning section, update any of the settings, and click OK to save the
changes.
Running a Cognos reportYou can view historical reports by running the Cognos reports from the DashboardApplication Services Hub.
Before you begin
Before you can run a report, the following tasks must be completed:v Tivoli Monitoring for Tivoli Storage Manager is installed.v Jazz for Service Management, which includes Tivoli Common Reporting and
WebSphere Application Server, is installed.v The WAREHOUS data source is configured.
Procedure1. Open a web browser and go to https://hostname:16311/ibm/console/
logon.jsp, where hostname is the name of your operating system.
Installing Tivoli Monitoring for Tivoli Storage Manager
134 IBM Tivoli Storage Manager for Windows: Installation Guide
||
|
||
|
|
|
||
|
|
||

2. Log on to the Dashboard Application Services Hub with the servicemanagement administrator ID and password. The default user name is smadmin.
3. Click the Reporting icon in the navigation menu and click Common Reportingto access the list of Cognos reports.
4. Click a report to run it.
Configuring agents and servicesAfter you install Tivoli Monitoring for Tivoli Storage Manager, you can manuallyconfigure the IBM Tivoli Monitoring agents.
Configuring summarization and pruning settingsAfter you install Tivoli Monitoring for Tivoli Storage Manager, you can configuresummarization and pruning settings for the WAREHOUS database.
Before you begin
The summarization and pruning settings control how often data is collected andpruned from the WAREHOUS database. The values are set independently for eachattribute group. The attribute groups correspond to workspaces in the TivoliEnterprise Portal. The summarized data is stored in the WAREHOUS database andis used to populate the Cognos reports. When the summarized data is periodicallypruned, the data is removed from the WAREHOUS database.
About this task
Summarization and pruning values are automatically configured duringinstallation. Pruning can help reduce the amount of data that is stored in thedatabase, in some cases by as much as 50%. Pruning can also help withperformance issues if the database becomes too large. You can adjust the values sothat they are appropriate for your organization.
Note: DB2 allocates space for the database size to increase. Pruning reduces theamount of data that is stored in the database. To reduce the size of the database,go to the DB2 Knowledge Center: http://www.ibm.com/support/knowledgecenter/SSEPGG_10.5.0 and search for reducing databases.
Procedure
To configure summarization and pruning settings, complete the following steps:1. Log on to the Tivoli Enterprise Portal by using the sysadmin ID and password.2. From the main menu, click Edit > History Configuration and click Tivoli
Storage Manager to highlight it.3. In the Select Attribute Groups pane, highlight the rows that contain the groups
that you want to modify. The summarization and pruning fields become active.4. Select the summarization and pruning values that you want to modify, specify
how long you want to keep the data, and click OK.The following table shows one example of a modified pruning setup. Yoursettings can vary depending on the data that you collect, how often you collectit, how long you keep it, and how often you prune it.
Installing Tivoli Monitoring for Tivoli Storage Manager
Chapter 9. Installing Tivoli Monitoring for Tivoli Storage Manager 135
||
||
|
|
||

Table 25. Default pruning setup
Summarizationvalue Pruning value Numeric value Time units
Yearly Yearly 7 Years
Quarterly Quarterly 2 Years
Monthly Monthly 2 Years
Weekly Weekly 6 Months
Daily Daily 2 Months
Hourly Hourly 14 Days
Detailed data 3 Months
As a best practice, start with the default settings, and test your system toensure that data is being collected. When you are satisfied that the data isbeing collected correctly, you can adjust the collection interval and pruningvalues to suit the needs of your organization. Be sure to allow sufficient time toelapse before you expect data to display in reports. Data is displayed in thereports that are based on the summarization intervals that you choose.You cannot run a report on data that was removed through pruning.
Manually configuring the Tivoli Enterprise Portal serverWhen Tivoli Monitoring for Tivoli Storage Manager is installed, a script is run toconfigure the Tivoli Enterprise Portal server. You can verify that the server isconfigured correctly, or you can manually reconfigure this server if necessary.
Procedure1. Start the Manage Tivoli Enterprise Monitoring Services application:
v Click Start > All Programs > IBM Tivoli Monitoring > Manage TivoliMonitoring Services.
2. From the Manage Tivoli Enterprise Monitoring Services window, select TivoliEnterprise Portal Server, right-click, and select Reconfigure.
3. Verify that the host name and port numbers specify where the TivoliEnterprise Monitoring server is located, and click OK. Click OK again.
4. Click Yes to reconfigure the warehouse connection information for the TivoliEnterprise Portal Server.
5. Click OK in the Warehouse Proxy Database Selection window to accept DB2as the default database type.
Restriction: There are other choices that are listed, but DB2 is the databasethat is required for Tivoli Monitoring for Tivoli Storage Manager.
6. Verify that the following fields are correct:v Data Source Name: ITM Warehouse
v Database User ID: ITMUser
v Database Name: Warehous
v DB Admin User ID: db2admin
7. Remove, and retype the password in the Database Password field and the DBAdmin Password field.
8. Click OK.
Installing Tivoli Monitoring for Tivoli Storage Manager
136 IBM Tivoli Storage Manager for Windows: Installation Guide
|

Note: The message Successfully configured warehouse data sourcedisplays. If you do not receive this message, there is at least one empty fieldor an error in configuring the service.
Tip: There is no check for valid passwords, therefore it is important to retypethe passwords correctly.
9. Click OK to complete the configuration process.10. Click OK in the Common Event Console Configuration window.11. From the Manage Tivoli Enterprise Monitoring Services window, right-click
Tivoli Enterprise Portal Server, and click Start.
Manually configuring the Warehouse Proxy agentWhen Tivoli Monitoring for Tivoli Storage Manager is installed, a script is run toconfigure the Warehouse Proxy agent. Sometimes you might need to verify that theagent is configured correctly, or manually reconfigure the agent if necessary.
Procedure1. Start the Manage Tivoli Enterprise Monitoring Services application:
v Click Start > All Programs > IBM Tivoli Monitoring > Manage TivoliMonitoring Services.
2. From the Manage Tivoli Enterprise Monitoring Services window, right-clickWarehouse Proxy, and click Reconfigure.
3. Click OK to the message that says When configuring the Warehouse Proxy,remember that it must connect to a HUB TEMS (not a remote TEMS).
4. Ensure that the Primary TEMS connection field indicates IP.PIPE, or IP.SPIPEif you are using the SSL protocol.
5. Verify that the host name and port numbers specify where the TivoliEnterprise Monitoring server is located, and click OK.
6. Verify that DB2 is selected as the database and click Next to continue.
Restriction: There are other choices that are listed, but DB2 is the databasethat is required for Tivoli Monitoring for Tivoli Storage Manager.
7. Verify that the following fields are correct:v ODBC DSN: ITM Warehouse
v Username: ITMUser
8. Verify that the following options are selected:v Use Batch
v Warehouse Compression for Distributed Sources
9. Remove, and retype the password in the Password field and the ConfirmPassword field.
10. Click Test connection to verify that connection to the database is successful.11. Click OK to complete the configuration process.12. From the Manage Tivoli Enterprise Monitoring Services window, right-click
Warehouse Proxy, and click Start.
Installing Tivoli Monitoring for Tivoli Storage Manager
Chapter 9. Installing Tivoli Monitoring for Tivoli Storage Manager 137
|
||
||
||
||
||
|
||
|
|
|
|
|
|
||
|
|
||

Manually configuring the Warehouse Summarization andPruning agent
When Tivoli Monitoring for Tivoli Storage Manager is installed, a script is run toconfigure the Warehouse Summarization and Pruning agent. Sometimes you mightneed to verify that the agent is configured correctly, or manually reconfigure thisagent if necessary.
Procedure1. Start the Manage Tivoli Enterprise Monitoring Services application:
v Click Start > All Programs > IBM Tivoli Monitoring > Manage TivoliMonitoring Services.
2. From the Manage Tivoli Enterprise Monitoring Services window, right-clickWarehouse Summarization and Pruning Agent, and click Reconfigure.
Tip: If Reconfigure is not available, double-click Warehouse Summarizationand Pruning Agent in the Manage Tivoli Monitoring Services application, tostart the initial configuration wizard.
3. Ensure that the Primary TEMS connection field indicates IP.PIPE, or IP.SPIPEif you are using the SSL protocol.
4. Verify that the host name and port numbers specify where the Tivoli EnterpriseMonitoring server is located, and click OK.
5. Verify that DB2 is selected as the database and click Next to continue.6. Verify that the following information is specified:
v In the JDBC JARS section, verify that the following jar files are specified:C:\Program Files\Tivoli\TSM\reporting\db2\java\db2jcc.jarC:\Program Files\Tivoli\TSM\reporting\db2\java\db2jcc_license_cu.jar
v JDBC URL: jdbc:db2://myserver:50000/WAREHOUS– where myserver can be the IP address or host name of the system. You can
also use localhost.– The default DB2 port number is 50000.– Ensure that the default Tivoli Warehouse database name WAREHOUS is
appended to the end of the URL.v JDBC Driver: com.ibm.db2.jcc.DB2Driver
v The Warehouse User is the IBM Tivoli Monitoring user ID. The default userID is:
ITMUser
v The default value for TEP Server Host is localhost.v The default value for TEP Server Port is 1920.
7. Click Test connection to verify that the connection to the database is successful.8. Click OK to complete the configuration process.9. From the Manage Tivoli Enterprise Monitoring Services window, right-click
Warehouse Summarization and Pruning Agent, and click Start.
Installing Tivoli Monitoring for Tivoli Storage Manager
138 IBM Tivoli Storage Manager for Windows: Installation Guide

Managing secure communicationsYou can add more protection for your data and passwords by using the SecureSockets Layer (SSL) protocol and ensuring that the system complies with the NISTSPS800-131A security standard.
Disabling earlier Transport Layer Security versionsYou can use the Transport Layer Security (TLS) 1.2 protocol for communicationsbetween a monitoring agent and a Tivoli Storage Manager server. TLS 1.2 isdesigned to provide a higher level of security than TLS 1.1.
About this task
TLS is a cryptographic protocol that provides communication security. The highestversion of the protocol is selected. To increase security, you can disable TLSversions earlier than 1.2. The monitoring agent uses TLS 1.2. You can use the TLS1.2 protocol by editing the environment file of the monitoring agent to make earlierversions of the TLS protocol unavailable.
Procedure
To disable TLS 1.1 and earlier, complete the following steps:1. Open the environment file of the monitoring agent instance.
The environment file is named KSKENV_xxx, where xxx is the instance nameof the monitoring agent. The file is in the IBM Tivoli Monitoring installationdirectory, for example, C:\Program Files\Tivoli\TSM\reporting\ITM\TMAITM6.
2. Add the following line to the environment file:KSK_SSL_DISABLE_LEGACY_TLS=1
3. Restart the monitoring agent:a. Click Start > All Programs > IBM Tivoli Monitoring > Manage Tivoli
Monitoring Services.b. Right-click the monitoring agent and click Recycle.
Configuring Secure Sockets Layer communicationYou can use the Secure Sockets Layer (SSL) protocol to encrypt communicationsbetween a monitoring agent and a Tivoli Storage Manager server.
About this task
To secure communications by using the SSL protocol, you must obtain an SSLcertificate from the Tivoli Storage Manager server. You must place the certificate ina local truststore file that is accessible by the monitoring agent.
Setting up communications with SSL, involves the following tasks:v You must obtain the SSL certificate.v You must create the local truststore file.v For each monitoring agent instance, you must add the Tivoli Storage Manager
server certificate to the truststore file, and configure the monitoring agent to useSSL.
Installing Tivoli Monitoring for Tivoli Storage Manager
Chapter 9. Installing Tivoli Monitoring for Tivoli Storage Manager 139
|
|||
|
|||
|
|||||
|
|
|
||||
|
|
|
||
|
|
||
|
|||
|
|
|
|||
|

Configuring the server to use the cert256.arm certificateTo use the SSL protocol with the TLS 1.2 protocol for communications between aserver and a monitoring agent, you must specify the cert256.arm certificate as thedefault certificate on the Tivoli Storage Manager server.
Before you begin
Determine whether the Tivoli Storage Manager server is using the cert256.armcertificate by default by issuing the following command:gsk8capicmd_64 -cert -list -db cert.kdb -stashed
Review the output to determine whether the TSM Server SelfSigned SHA Key labelis set as the default certificate. If it is not the default, complete the steps in theprocedure.
Procedure
To specify the cert256.arm certificate as the default, complete the following stepsfrom the Tivoli Storage Manager server:1. Issue the following command from the Tivoli Storage Manager server instance
directory:gsk8capicmd_64 -cert -setdefault -db cert.kdb -stashed-label "TSM Server SelfSigned SHA Key"
2. Restart the Tivoli Storage Manager server so that it can receive the changes tothe key database file.
3. Optional: To verify that the TSM Server SelfSigned SHA Key label is set as thedefault, issue the following command.gsk8capicmd_64 -cert -list -db cert.kdb -stashed
Creating the truststore fileIf you plan to secure communications between monitoring agents and the TivoliStorage Manager server by using the SSL protocol, you must create a localtruststore file.
About this task
The local truststore file is used to store trusted certificates. On each system whereyou installed the monitoring agent software, you must create one truststore file.
Procedure
To create the local truststore file, complete the following steps from the systemwhere you installed and configured the monitoring agent:1. Start IBM Key Management by opening a command line and issuing the
ikeyman command:install_dir\ITM\java\java70_x64\jre\bin\ikeyman.exe
wherev install_dir is the directory where the monitoring agent is installed.The default installation path is C:\Program Files\Tivoli\TSM\reporting.
2. Create a database file by clicking Key Database File > New.3. In the Key database type field, select JKS.4. Specify the file name and the location for the truststore file. The default file
name is key.jks. Click OK.
Installing Tivoli Monitoring for Tivoli Storage Manager
140 IBM Tivoli Storage Manager for Windows: Installation Guide
||||
|
||
|
|||
|
||
||
||
||
||
|
||||
|
||
|
||
||
|
|
|
|
|
|
||
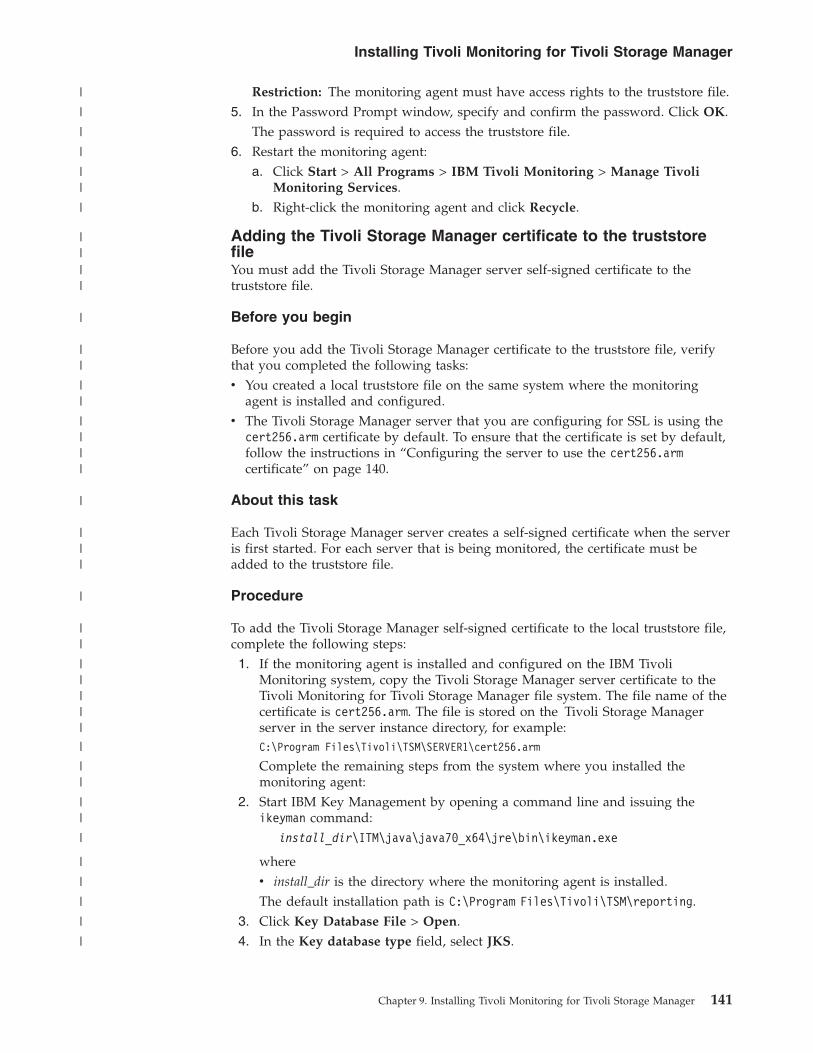
Restriction: The monitoring agent must have access rights to the truststore file.5. In the Password Prompt window, specify and confirm the password. Click OK.
The password is required to access the truststore file.6. Restart the monitoring agent:
a. Click Start > All Programs > IBM Tivoli Monitoring > Manage TivoliMonitoring Services.
b. Right-click the monitoring agent and click Recycle.
Adding the Tivoli Storage Manager certificate to the truststorefileYou must add the Tivoli Storage Manager server self-signed certificate to thetruststore file.
Before you begin
Before you add the Tivoli Storage Manager certificate to the truststore file, verifythat you completed the following tasks:v You created a local truststore file on the same system where the monitoring
agent is installed and configured.v The Tivoli Storage Manager server that you are configuring for SSL is using the
cert256.arm certificate by default. To ensure that the certificate is set by default,follow the instructions in “Configuring the server to use the cert256.armcertificate” on page 140.
About this task
Each Tivoli Storage Manager server creates a self-signed certificate when the serveris first started. For each server that is being monitored, the certificate must beadded to the truststore file.
Procedure
To add the Tivoli Storage Manager self-signed certificate to the local truststore file,complete the following steps:1. If the monitoring agent is installed and configured on the IBM Tivoli
Monitoring system, copy the Tivoli Storage Manager server certificate to theTivoli Monitoring for Tivoli Storage Manager file system. The file name of thecertificate is cert256.arm. The file is stored on the Tivoli Storage Managerserver in the server instance directory, for example:C:\Program Files\Tivoli\TSM\SERVER1\cert256.arm
Complete the remaining steps from the system where you installed themonitoring agent:
2. Start IBM Key Management by opening a command line and issuing theikeyman command:
install_dir\ITM\java\java70_x64\jre\bin\ikeyman.exe
wherev install_dir is the directory where the monitoring agent is installed.The default installation path is C:\Program Files\Tivoli\TSM\reporting.
3. Click Key Database File > Open.4. In the Key database type field, select JKS.
Installing Tivoli Monitoring for Tivoli Storage Manager
Chapter 9. Installing Tivoli Monitoring for Tivoli Storage Manager 141
|
|
|
|
||
|
||||
|
||
||
||||
|
|||
|
||
|||||
|
||
||
|
|
|
|
|
|

5. In the Open window, click Browse, and go to the directory where you createdthe truststore file, key.jks. Click Open, and click OK.
6. In the Password Prompt window, specify the password for the truststore file,and click OK.
7. In the IBM Key Management window, in the Key database content area,select Signer Certificates from the list, and click Add.
8. In the Open window, click Browse, and go to the directory where you placedthe Tivoli Storage Manager server certificate file, cert256.arm. Click Open,and click OK.
9. Specify a label for the certificate and click OK. For example, you can specifythe name of the Tivoli Storage Manager server along with the name of thecertificate: server1.cert256.arm. The certificate is stored in the truststore file.
10. Close the IBM Key Management window.11. Restart the monitoring agent:
a. Click Start > All Programs > IBM Tivoli Monitoring > Manage TivoliMonitoring Services.
b. Right-click the monitoring agent and click Recycle.
Configuring the monitoring agent to use Secure Sockets LayerBefore you can secure communications by using the SSL protocol, you mustreconfigure the monitoring agent instances to use the SSL protocol.
Before you begin
Ensure that you created a local truststore file on the system where the monitoringagent is installed and that you added the Tivoli Storage Manager certificate to thetruststore file. Ensure that all the monitoring agents are configured this way.
Procedure
To configure a monitoring agent instance to use the SSL protocol, complete thefollowing steps:1. Open the Manage Tivoli Enterprise Management Services application:
v Click Start > All Programs > IBM Tivoli Monitoring > Manage TivoliMonitoring Services.
2. Right-click the Tivoli Storage Manager monitoring agent instance and clickReconfigure.
3. In the Port Number (TCP/IP or SSL) field, specify the port number:v If the dsmserv.opt file specifies the ADMINONCLIENT NO option, use the port
number that is specified by SSLTCPADMINPort.v If the dsmserv.opt file does not specify the ADMINONCLIENT NO option, use the
port number that is specified by SSLTCPPort.4. In the File/Location of SSL Certificate store field, specify the location of the
local truststore file that you created. The default file name is key.jks. Click OKto finish the configuration.
What to do next
If you want to disable earlier TLS connection protocols to increase security, followthe instructions in “Disabling earlier Transport Layer Security versions” on page139.
Installing Tivoli Monitoring for Tivoli Storage Manager
142 IBM Tivoli Storage Manager for Windows: Installation Guide
||
||
||
|||
|||
|
|
||
|
|||
|
|||
|
||
|
||
||
|
||
||
|||
|
|||

To enhance system security, you can enable the NIST SP800-131A securitystandard. To configure the components in your environment to comply with theNIST SP800-131A standard, follow the instructions in “Enabling the NISTSP800-131A security standard.”
Enabling the NIST SP800-131A security standardThe National Institute of Standards and Technology (NIST) Special Publications(SP) 800-131A standard strengthens algorithms and increases key lengths toimprove security. To enable the NIST SP800-131A security standard, you mustconfigure Tivoli Monitoring for Tivoli Storage Manager components individually.
Configuring the monitoring agent for compliance with the NISTSP800-131A standardTo enhance communication security, you can configure a Tivoli Monitoring forTivoli Storage Manager monitoring agent to comply with the NIST SP800-131Astandard.
Before you begin
Before you configure the monitoring agent to comply with the NIST SP800-131Astandard, ensure that the following requirements are met:v You must have at least one monitoring agent instance. To create a monitoring
agent instance, follow the instructions in “Creating and configuring the agentinstance” on page 124.
v The monitoring agent is configured to use SSL protocol. For more informationabout setting up SSL communication, see “Configuring Secure Sockets Layercommunication” on page 139.
v The Tivoli Storage Manager server is using the cert256.arm certificate bydefault. For more information about setting the default certificate, see“Configuring the server to use the cert256.arm certificate” on page 140.
v The Tivoli Storage Manager server is configured to comply with the NISTSP800-131A security standard. For more information about configuring theserver to comply with the security standard, see “Configuring the Tivoli StorageManager server for compliance with the NIST SP800-131A standard” on page146.
About this task
To enable the monitoring agent to be in compliance with the NIST SP800-131Astandard, you must configure the following communication paths:v From the monitoring agent to the Tivoli Storage Manager serverv From the monitoring agent to the Tivoli Enterprise Monitoring server hub
Procedure1. Open the Manage Tivoli Enterprise Management Services application:
v Click Start > All Programs > IBM Tivoli Monitoring > Manage TivoliMonitoring Services.
2. Secure the communication path from the monitoring agent to the TivoliEnterprise Monitoring server hub:a. Right-click the monitoring agent and click Reconfigure.b. In the Primary TEMS Connection area of the window, set Protocol 1 to
IP.SPIPE.
Installing Tivoli Monitoring for Tivoli Storage Manager
Chapter 9. Installing Tivoli Monitoring for Tivoli Storage Manager 143
||||
|
||||
|||||
|
||
|||
|||
|||
|||||
|
||
|
|
|
|
||
||
|
||
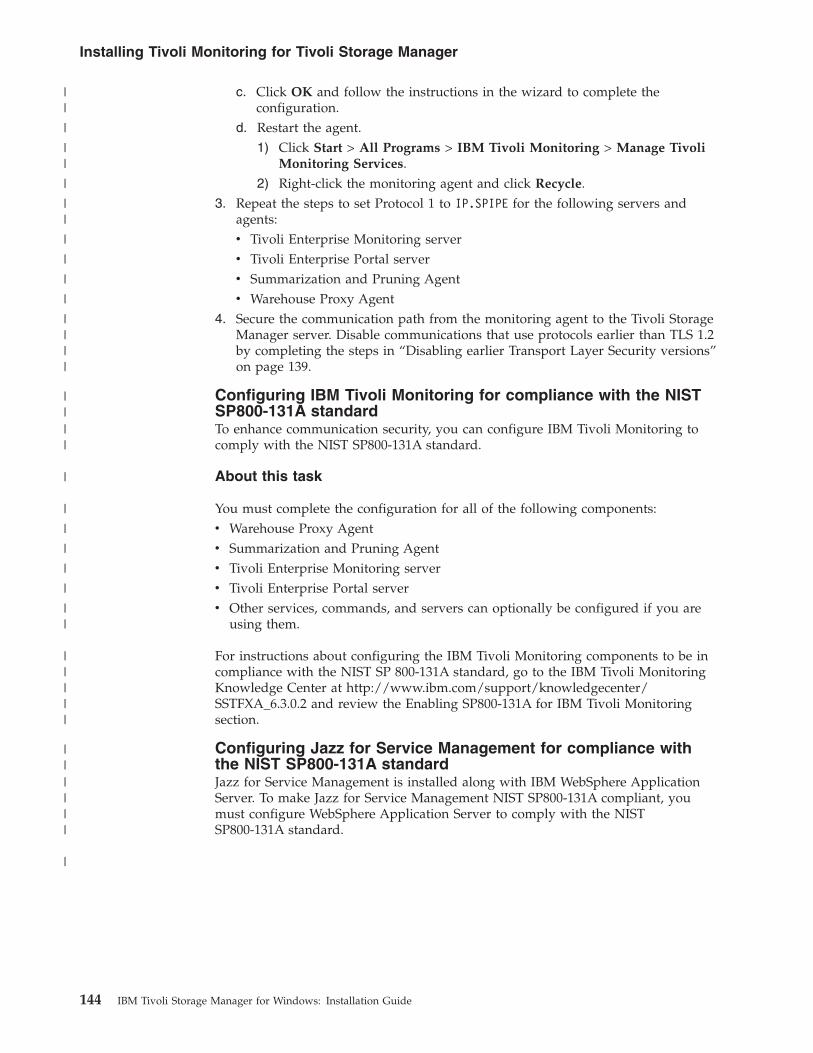
c. Click OK and follow the instructions in the wizard to complete theconfiguration.
d. Restart the agent.1) Click Start > All Programs > IBM Tivoli Monitoring > Manage Tivoli
Monitoring Services.2) Right-click the monitoring agent and click Recycle.
3. Repeat the steps to set Protocol 1 to IP.SPIPE for the following servers andagents:v Tivoli Enterprise Monitoring serverv Tivoli Enterprise Portal serverv Summarization and Pruning Agentv Warehouse Proxy Agent
4. Secure the communication path from the monitoring agent to the Tivoli StorageManager server. Disable communications that use protocols earlier than TLS 1.2by completing the steps in “Disabling earlier Transport Layer Security versions”on page 139.
Configuring IBM Tivoli Monitoring for compliance with the NISTSP800-131A standardTo enhance communication security, you can configure IBM Tivoli Monitoring tocomply with the NIST SP800-131A standard.
About this task
You must complete the configuration for all of the following components:v Warehouse Proxy Agentv Summarization and Pruning Agentv Tivoli Enterprise Monitoring serverv Tivoli Enterprise Portal serverv Other services, commands, and servers can optionally be configured if you are
using them.
For instructions about configuring the IBM Tivoli Monitoring components to be incompliance with the NIST SP 800-131A standard, go to the IBM Tivoli MonitoringKnowledge Center at http://www.ibm.com/support/knowledgecenter/SSTFXA_6.3.0.2 and review the Enabling SP800-131A for IBM Tivoli Monitoringsection.
Configuring Jazz for Service Management for compliance withthe NIST SP800-131A standardJazz for Service Management is installed along with IBM WebSphere ApplicationServer. To make Jazz for Service Management NIST SP800-131A compliant, youmust configure WebSphere Application Server to comply with the NISTSP800-131A standard.
Installing Tivoli Monitoring for Tivoli Storage Manager
144 IBM Tivoli Storage Manager for Windows: Installation Guide
||
|
||
|
||
|
|
|
|
||||
||||
|
|
|
|
|
|
||
|||||
||||||
|
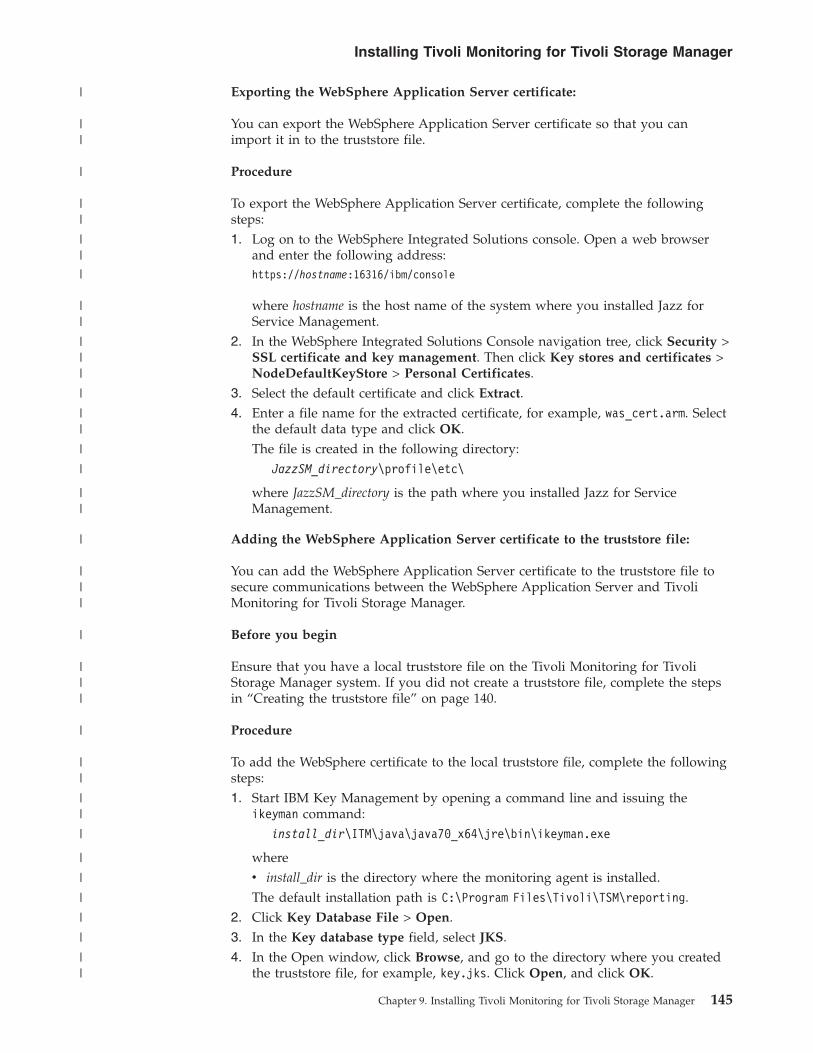
Exporting the WebSphere Application Server certificate:
You can export the WebSphere Application Server certificate so that you canimport it in to the truststore file.
Procedure
To export the WebSphere Application Server certificate, complete the followingsteps:1. Log on to the WebSphere Integrated Solutions console. Open a web browser
and enter the following address:https://hostname:16316/ibm/console
where hostname is the host name of the system where you installed Jazz forService Management.
2. In the WebSphere Integrated Solutions Console navigation tree, click Security >SSL certificate and key management. Then click Key stores and certificates >NodeDefaultKeyStore > Personal Certificates.
3. Select the default certificate and click Extract.4. Enter a file name for the extracted certificate, for example, was_cert.arm. Select
the default data type and click OK.The file is created in the following directory:
JazzSM_directory\profile\etc\
where JazzSM_directory is the path where you installed Jazz for ServiceManagement.
Adding the WebSphere Application Server certificate to the truststore file:
You can add the WebSphere Application Server certificate to the truststore file tosecure communications between the WebSphere Application Server and TivoliMonitoring for Tivoli Storage Manager.
Before you begin
Ensure that you have a local truststore file on the Tivoli Monitoring for TivoliStorage Manager system. If you did not create a truststore file, complete the stepsin “Creating the truststore file” on page 140.
Procedure
To add the WebSphere certificate to the local truststore file, complete the followingsteps:1. Start IBM Key Management by opening a command line and issuing the
ikeyman command:install_dir\ITM\java\java70_x64\jre\bin\ikeyman.exe
wherev install_dir is the directory where the monitoring agent is installed.The default installation path is C:\Program Files\Tivoli\TSM\reporting.
2. Click Key Database File > Open.3. In the Key database type field, select JKS.4. In the Open window, click Browse, and go to the directory where you created
the truststore file, for example, key.jks. Click Open, and click OK.
Installing Tivoli Monitoring for Tivoli Storage Manager
Chapter 9. Installing Tivoli Monitoring for Tivoli Storage Manager 145
|
||
|
||
||
|
||
|||
|
||
|
|
||
|
|||
|
|||
|
||
||
|
|
|
|
|
|
||

5. In the Password Prompt window, specify the password for the truststore file,and click OK.
6. In the IBM Key Management window, from the list in the Key databasecontent area, select Signer Certificates, and click Add.
7. In the Open window, click Browse, and go to the directory where you placedthe WebSphere Application Server certificate file. Click Open, and click OK.
8. Specify a label for the certificate and click OK. The certificate is stored in thetruststore file.
9. Close the IBM Key Management window.
Configuring the Tivoli Storage Manager server for compliancewith the NIST SP800-131A standardTo enhance communication security, you can configure the Tivoli Storage Managerserver to be in compliance with the NIST SP800-131A standard.
About this task
The Tivoli Storage Manager server must be configured to secure thecommunications from the monitoring agent to the Tivoli Storage Manager server.
Procedure
To configure the Tivoli Storage Manager server to be in compliance with the NISTSP800-131A standard, complete the following tasks:1. Set up the SSL and TLS protocols by following the instructions in Setting up
Secure Sockets Layer and Transport Layer Security (http://www.ibm.com/support/knowledgecenter/SSGSG7_7.1.1/com.ibm.itsm.srv.doc/t_mngdata_setupssl.html).
2. Specify communication ports for TLS by following the instructions inSpecifying communication ports (http://www.ibm.com/support/knowledgecenter/SSGSG7_7.1.1/com.ibm.itsm.srv.doc/r_mngdata_specommports.html).
3. Replace certificates in the key database file for the Tivoli Storage Managerserver by following the instructions in Adding a certificate to the key database(http://www.ibm.com/support/knowledgecenter/SSGSG7_7.1.1/com.ibm.itsm.srv.doc/r_mngdata_sslkeyring.html).
Installing Tivoli Monitoring for Tivoli Storage Manager
146 IBM Tivoli Storage Manager for Windows: Installation Guide
||
||
||
||
|
||||
|
||
|
||
||||
||||
||||

Chapter 10. Upgrading Tivoli Monitoring for Tivoli StorageManager to Version 7.1
You can upgrade Tivoli Monitoring for Tivoli Storage Manager to V7.1. Themonitoring agents that are installed on any of your Tivoli Monitoring for TivoliStorage Manager servers must be upgraded to the same level.
Upgrade scenariosBefore you upgrade Tivoli Monitoring for Tivoli Storage Manager, choose thescenario that best meets the needs of your company.v Scenario 1: Your environment is monitoring 1-5 Tivoli Storage Manager servers.v Scenario 2: Your environment is monitoring more than 5 Tivoli Storage Manager
servers.v Scenario 3: You have an existing IBM Tivoli Monitoring environment that was
not installed as part of Tivoli Monitoring for Tivoli Storage Manager.
Consider the following restrictions before you decide which scenario to use:v If you have a Tivoli Storage Manager server that is in a different time zone than
the system with Tivoli Monitoring for Tivoli Storage Manager, install themonitoring agent on the Tivoli Storage Manager server. See Scenario 2 to installthe agent directly on the Tivoli Storage Manager server.
v If you have more than five servers, install the monitoring agent on each of theservers because it is the most efficient use of memory on both the Tivoli StorageManager server and the Tivoli Monitoring for Tivoli Storage Manager server.
v You can only install the monitoring agent on AIX®, Linux X86_64, and Windowsoperating systems.
Table 26. Upgrade scenarios
Upgradescenario Description Tasks that you must complete
Scenario 1 Use this scenario for anupgraded installation,with a plan to monitorand report on 1-5 TivoliStorage Manager servers.
Complete all of the tasks in this scenario onthe same system:
1. Upgrade Tivoli Monitoring for TivoliStorage Manager. The approximateinstallation time is 45 - 90 minutes,depending on the speed of your system.
Restriction: You cannot install TivoliMonitoring for Tivoli Storage Manager on asystem where the Tivoli Storage Managerserver is installed. However, you can installthe monitoring agent on any supportedoperating system, including any TivoliStorage Manager servers that you want tomonitor.
© Copyright IBM Corp. 1993, 2014 147
|
|
||||
|||
||
||||||||

Table 26. Upgrade scenarios (continued)
Upgradescenario Description Tasks that you must complete
Scenario 2 Use this scenario for anupgraded installation,with a plan to monitorand report on more than5 Tivoli Storage Managerservers.
1. Upgrade Tivoli Monitoring for TivoliStorage Manager. The approximateinstallation time is 45 - 90 minutes.
2. Upgrade the monitoring agents that areinstalled on any of your Tivoli StorageManager servers. Optionally, install andconfigure additional agents on any TivoliStorage Manager servers that you want tomonitor. The approximate upgrade timefor the agent is 15 - 30 minutes, and anadditional 10 minutes, per agent, tomanually configure each agent.
Restriction: You cannot install TivoliMonitoring for Tivoli Storage Manager on asystem where the Tivoli Storage Managerserver is installed. However, you can installthe monitoring agent on any supportedoperating system, including any TivoliStorage Manager servers that you want tomonitor.
Scenario 3 Use this scenario forupgrading an existingIBM Tivoli Monitoringenvironment.
Prerequisite: You must have IBM TivoliMonitoring version 6.3.0 FP2, or laterinstalled.
1. Upgrade the monitoring agent on the IBMTivoli Monitoring server where TivoliEnterprise Monitoring server and TivoliEnterprise Portal server are installed.During the agent upgrade, you mustspecify the same directory as you didwhen you installed IBM TivoliMonitoring.
2. Upgrade any monitoring agents that areinstalled on any of your Tivoli StorageManager servers. Optionally, install andconfigure additional agents on any TivoliStorage Manager servers that you want tomonitor. The approximate upgrade timefor the agent is 15 - 30 minutes, and anadditional 10 minutes, per agent, tomanually configure each agent.
Restriction: You cannot install TivoliMonitoring for Tivoli Storage Manager on asystem where the Tivoli Storage Managerserver is installed. However, you can installthe monitoring agent on any supportedoperating system, including any TivoliStorage Manager servers that you want tomonitor.
Upgrading Tivoli Monitoring for Tivoli Storage Manager
148 IBM Tivoli Storage Manager for Windows: Installation Guide
|||||||||
||||||||
||||||||

Upgrading Tivoli Monitoring for Tivoli Storage Manager from Version6.3 to Version 7.1
You can upgrade Tivoli Monitoring for Tivoli Storage Manager from V6.3 to V7.1.
Before you begin
Before you upgrade to Tivoli Monitoring for Tivoli Storage Manager V7.1, ensurethat the following tasks are completed:v You have Tivoli Monitoring for Tivoli Storage Manager V6.3 installed. If not, you
must upgrade to version 6.3 before you can upgrade Tivoli Monitoring for TivoliStorage Manager to version 7.1.
v Review the planning information such as system requirements and release notes.v You have the required access privileges, including the user IDs and passwords.
You can use the installation worksheet to record the information.v Review the upgrade scenarios, and choose the one that best suits your needs.v You know the DB2 database instance user ID password that was created during
the V6.3 installation.v Optional: Back up the WAREHOUS database to ensure that you have a copy
that you can restore if needed. To back up the V6.3 WAREHOUS database, seeBacking up the DB2 WAREHOUS V6.3 database (http://www.ibm.com/support/knowledgecenter/SSGSG7_7.1.1/com.ibm.itsm.srv.doc/t_rpt_bkup_warehous_634.html).
v Do not use a domain ID to install. The Windows user ID that you use when youinstall the software must be a local ID with administrator privileges, and cannotbe a domain ID.
Attention: Do not alter the DB2 software that is installed with Tivoli Monitoringfor Tivoli Storage Manager installation packages and fix packs. Do not install orupgrade to a different version, release, or fix pack of DB2 application becausedoing so can damage the database. Tivoli Monitoring for Tivoli Storage Managercan use only components and versions that are installed as part of the TivoliMonitoring for Tivoli Storage Manager installation.
The upgrade procedure must be done on the same system. To upgrade TivoliMonitoring for Tivoli Storage Manager to V7.1 on a different system, seeChapter 11, “Migrating Tivoli Monitoring for Tivoli Storage Manager from onesystem to another,” on page 165.
About this task
Restriction: If you created your own BIRT reports, they cannot be imported in toTivoli Common Reporting. All of the packaged BIRT reports are available asCognos reports in Tivoli Monitoring for Tivoli Storage Manager V7.1.
Procedure
To upgrade Tivoli Monitoring for Tivoli Storage Manager from V6.3 to V7.1,complete the following steps:1. Log on to the system where Tivoli Monitoring for Tivoli Storage Manager is
installed.Log on with the administrative user ID that was used to install TivoliMonitoring for Tivoli Storage Manager V6.3.
Upgrading Tivoli Monitoring for Tivoli Storage Manager
Chapter 10. Upgrading Tivoli Monitoring for Tivoli Storage Manager to V7.1 149
|
|
|
|
||
|||
|
||
|
||
|||||
|||
||||||
||||
|
|||
|
||
||
||
2. Change the password for the sysadmin, itmuser, and TEPS user IDs so that thepasswords are the same. Follow the steps in Resetting passwords for TivoliMonitoring for Tivoli Storage Manager (http://www.ibm.com/support/knowledgecenter/SSGSG7_7.1.1/com.ibm.itsm.tshoot.doc/ts_pdg_update_services_win.html).
3. Optional: Export the Cognos reports, if you customized any reports or createdyour own:a. Create the upgradeData.zip file by issuing the following command:
TCR_install_dir\profiles\TIPProfile\upgrade\bin\preupgrade.batTCR_install_dir --username username --password password --productId TCR
wherev username and password is the user name and password for the tipadmin
user IDv TCR_install_dir is the Tivoli Common Reporting installation directory.
The default directory is:C:\IBM\tivoli\tipv2
The compressed file is created in the following location:TCR_install_dir\profiles\TIPProfile\upgrade\data\upgradeData.zip.
b. Move the upgradeData.zip file out of the Administration Centerinstallation directory so that the file is not deleted when you uninstall theAdministration Center.
4. Optional: Export the IBM Tivoli Monitoring situations, workspaces, andhistorical data: “Exporting IBM Tivoli Monitoring data” on page 151
5. Optional: Save the agent instance configuration files to avoid manuallyre-creating them: “Saving the agent instance configurations” on page 154
6. Uninstall Tivoli Monitoring for Tivoli Storage Manager V6.3:
Restriction: During the V6.3 uninstallation, do not delete the historical datafrom the WAREHOUS database. The WAREHOUS database will be used afteryou install 7.1.a. Completing steps 1-3 in http://www.ibm.com/support/knowledgecenter/
SSGSG7_6.3.4/com.ibm.itsm.srv.install.doc/t_rpt_inst_uninstall_win.html.Attention: Do not delete the installation directory.
7. Uninstall the Administration Center:a. Complete steps in http://www.ibm.com/support/knowledgecenter/
SSGSG7_6.3.4/com.ibm.itsm.srv.install.doc/t_ac_uninst.html.b. Restart the operating system.
8. Download and install Tivoli Monitoring for Tivoli Storage Manager V7.1. Thefull installation also installs the monitoring agent on the system. Complete thesteps in the following section:
Restriction: If you saved your agent instance configurations, you must installTivoli Monitoring for Tivoli Storage Manager to the same installation directorythat was used for Tivoli Monitoring for Tivoli Storage Manager V6.3.
Upgrading Tivoli Monitoring for Tivoli Storage Manager9. Recreate or import your agent instances. If you saved your agent instance
configuration files, you can import them by completing the steps in“Importing the agent instance configuration” on page 156. Otherwise, recreateand configure your agent instances by completing the steps in “Creating andconfiguring the agent instance” on page 124.
Upgrading Tivoli Monitoring for Tivoli Storage Manager
150 IBM Tivoli Storage Manager for Windows: Installation Guide
|||||
||
|
||
|
||
||
|
||
|||
||
||
|
|||
||
|
|
||
|
|||
|||
|
|||||
10. Install Jazz for Service Management: “Installing Jazz for Service Management”on page 127
11. Configure the data source: “Configuring the WAREHOUS data source andimporting reports” on page 129The data source script configures the data source and imports the Cognosreports that you exported. When you run the script, specify the -r option forTCR cognos report import zip file, and specify the path to the compressedCognos file that you exported, for example:datasource.bat -j jazzsm_location -u jazzsm_user -pjazzsm_password -i itmuser_password -r upgradeData.zip
12. Optional: Import the IBM Tivoli Monitoring data if you exported anysituations or workspaces: “Importing IBM Tivoli Monitoring data” on page153
13. Optional: Configure the historical settings. You can use the historical settingsfile that you exported as a reference. Complete the steps in “Configuringsummarization and pruning settings” on page 135.
What to do next
If you installed the monitoring agent on a remote server, for instance a TivoliStorage Manager server, you must upgrade the monitoring agent. Follow the stepsin “Upgrading the monitoring agent” on page 162.Related tasks:“Taking the first steps after installation” on page 133
Exporting IBM Tivoli Monitoring dataYou can export data that you created or customized on Tivoli Monitoring for TivoliStorage Manager Version 6.3 so that you can import them after you upgrade.
About this task
Before you upgrade Tivoli Monitoring for Tivoli Storage Manager from V6.3 toV7.1, or later, you can export situations and workspaces that you either customizedor created, and you can export the historical settings.
Procedure1. From a command line, go to the following directory:
installation_dir\ITM\bin
where installation_dir is the Tivoli Monitoring for Tivoli Storage Managerinstallation directory. The default is:
C:\Program Files\Tivoli\TSM\reporting
2. Log on using the sysadmin user ID by issuing the following command:tacmd.exe login -s hostname -u sysadmin -p pswd
where hostname is the name of the system.3. Export the IBM Tivoli Monitoring situations if you created your own. Issue the
following command:tacmd.exe bulkExportSit -t sk -d -f -p my_sitation_dir
Upgrading Tivoli Monitoring for Tivoli Storage Manager
Chapter 10. Upgrading Tivoli Monitoring for Tivoli Storage Manager to V7.1 151
||
||
||||
||
|||
|||
|
|||
|
|
|
||
|
|||
|
|
|
||
|
|
|
|
||
|

where my_sitation_dir is the path to the directory where you want to save theexported situations. The situations are exported to the Bulk\SITUATION directoryin the path that you specified in the command.
Restriction: The directory must not exist in the Tivoli Monitoring for TivoliStorage Manager installation directory.
4. Export the workspaces that you customized:a. Verify that your ID has workspace administration-mode authority:
1) Start Tivoli Enterprise Portal.2) Click Edit > Administer Users.3) Select your ID, for example SYSADMIN.4) In the Authorities section, select Workspace Administration.5) Ensure that Workspace Administration Mode is selected, and click OK.
b. Increase the maximum heap size to ensure that JVM has sufficient space byissuing the following commands:set TACMD_JVM_MAX_MEMORY=2048
c. Export the workspaces by issuing the following command for eachworkspace that you customized:tacmd.exe exportWorkspaces -s hostname -w workspace_name -u sysadmin -p pswd-x workspace_dir\workspace_name.xml
where workspace_dir is the directory path where you want to save theexported workspace.
Restriction: The directory must not exist in the Tivoli Monitoring for TivoliStorage Manager installation directory.
5. Export the historical data to record the settings:Issue the following commands from a command prompt. Ensure that youupdate the pswd, INSTALL_DIR, and hostname variables.SET admin=sysadminSET pswd=sysadmin_passwordSET hostname=your_hostnameSET INSTALL_DIR=C:\IBM\ITMSET type="Tivoli Storage Manager"
cd %INSTALL_DIR%\bintacmd.exe histViewAttributeGroup -t "%type%" -o "KSK ACTIVITY LOG"-s %hostname% -u %admin% -w %pswd% >> \temp_dir\collection_settings.txttacmd.exe histViewAttributeGroup -t "%type%" -o "KSK ACTIVITY SUMMARY"-s %hostname% -u %admin% -w %pswd% >> \temp_dir\collection_settings.txttacmd.exe histViewAttributeGroup -t "%type%" -o "KSK CLIENT MISSED FILES"-s %hostname% -u %admin% -w %pswd% >> \temp_dir\collection_settings.txttacmd.exe histViewAttributeGroup -t "%type%" -o "KSK CLIENT NODE STATUS"-s %hostname% -u %admin% -w %pswd% >> \temp_dir\collection_settings.txttacmd.exe histViewAttributeGroup -t "%type%" -o "KSK CLIENT NODE STORAGE"-s %hostname% -u %admin% -w %pswd% >> \temp_dir\collection_settings.txttacmd.exe histViewAttributeGroup -t "%type%" -o "KSK NODE ACTIVITY"-s %hostname% -u %admin% -w %pswd% >> \temp_dir\collection_settings.txttacmd.exe histViewAttributeGroup -t "%type%" -o "KSK REPLDETAILS"-s %hostname% -u %admin% -w %pswd% >> \temp_dir\collection_settings.txttacmd.exe histViewAttributeGroup -t "%type%" -o "KSK REPLSTATUS"-s %hostname% -u %admin% -w %pswd% >> \temp_dir\collection_settings.txttacmd.exe histViewAttributeGroup -t "%type%" -o "KSK SCHEDULE"-s %hostname% -u %admin% -w %pswd% >> \temp_dir\collection_settings.txttacmd.exe histViewAttributeGroup -t "%type%" -o "KSK STORAGE DEVICE"-s %hostname% -u %admin% -w %pswd% >> \temp_dir\collection_settings.txttacmd.exe histViewAttributeGroup -t "%type%" -o "KSK STORAGE POOL"-s %hostname% -u %admin% -w %pswd% >> \temp_dir\collection_settings.txt
Upgrading Tivoli Monitoring for Tivoli Storage Manager
152 IBM Tivoli Storage Manager for Windows: Installation Guide
|||
||
|
|
|
|
|
|
|
||
|
||
||
||
||
|
||
|||||
|||||||||||||||||||||||
tacmd.exe histViewAttributeGroup -t "%type%" -o "KSK TAPE USAGE"-s %hostname% -u %admin% -w %pswd% >> \temp_dir\collection_settings.txttacmd.exe histViewAttributeGroup -t "%type%" -o "KSK TAPE VOLUME"-s %hostname% -u %admin% -w %pswd% >> \temp_dir\collection_settings.txt
6. Verify that the historical data was successfully exported by reviewing thecollections_settings.txt file. For each workspace, you might see text similarto the following example:KUIHVA001I Validating user credentials...Attribute Group Name : KSK ACTIVITY LOGStatus : ConfiguredCollections : KSK_KSKACTVLOGSummarization :Yearly : OnQuarterly : OnMonthly : OnWeekly : OnDaily : OnHourly : OnPruning :Yearly : 7 YearsQuarterly : 2 YearsMonthly : 2 YearsWeekly : 6 MonthsDaily : 2 MonthsHourly : 14 DaysDetailed Data : 3 MonthsAvailable TEMS : TEMS_TCR
Importing IBM Tivoli Monitoring dataYou can import the data from IBM Tivoli Monitoring Version 6.3 to TivoliMonitoring for Tivoli Storage Manager Version 7.1, or later.
Before you begin
Before you can import the IBM Tivoli Monitoring data, you must have thesituations and workspaces files that you exported.
About this task
After you upgrade Tivoli Monitoring for Tivoli Storage Manager from V6.3 to V7.1,or later, you can import situations and workspaces.
Procedure1. From a command line, go to the following directory:
installation_dir\ITM\BIN
where installation_dir is the Tivoli Monitoring for Tivoli Storage Managerinstallation directory. The default is:
C:\Program Files\Tivoli\TSM\reporting
2. Log in as sysadmin by issuing the following command:tacmd.exe login -s hostname -u sysadmin -p pswd
where hostname is the name of the system.3. Import the IBM Tivoli Monitoring situations that you exported. Issue the
following command:tacmd.exe bulkImportSit -p my_situations_dir
Upgrading Tivoli Monitoring for Tivoli Storage Manager
Chapter 10. Upgrading Tivoli Monitoring for Tivoli Storage Manager to V7.1 153
||||
|||
||||||||||||||||||||
|
||
|
||
|
||
|
|
|
||
|
|
|
|
||
|

where my_situations_dir is the path to the directory where you exported thesituations.
4. Assign the situations to managed systems where the situations will run andthen start the situations:a. Start Tivoli Enterprise Portal.b. Click Edit > Situation Editor
c. For each situation, select it, click the Distribution tab, assign it to amanaged system, and then right-click the situation and click Start.
d. If the imported situation was associated with a navigator item, recreate theassociation.
5. Import the workspaces that you customized or created:a. Verify that your ID has workspace administration-mode authority:
1) Start Tivoli Enterprise Portal.2) Click Edit > Administer Users.3) Select your ID, for example SYSADMIN.4) In the Authorities section, select Workspace Administration.5) Ensure that Workspace Administration Mode is selected, and click OK.
b. Increase the maximum heap size to ensure that JVM has sufficient space byissuing the following commands:set TACMD_JVM_MAX_MEMORY=2048
c. Import the workspaces that you exported. Issuing the following commandfor each workspace that you exported:tacmd.exe importWorkspaces -s hostname -u sysadmin -p pswd-x /workspace_dir/workspace_name.xml
where:v workspace_dir is the path to where you extracted the workspacesv workspace_name is the name of the workspace that you exported
d. Optional: If you changed the workspace administration mode for the TivoliEnterprise Portal user ID, you can change it back to the original setting. SeeStep 5a.
What to do next
Configure the historical settings, if you do not want to use the default settings. Youcan refer to the historical settings output if you exported the settings. Complete thesteps in “Configuring the WAREHOUS data source and importing reports” onpage 129.
Saving the agent instance configurationsYou can save the monitoring agent instance configurations before you upgradeTivoli Monitoring for Tivoli Storage Manager. Therefore, after you upgrade, you donot need to manually re-create the agent instances.
Before you begin
Before you can save the agent instance configuration, you must have TivoliMonitoring for Tivoli Storage Manager V6.3 installed.
Upgrading Tivoli Monitoring for Tivoli Storage Manager
154 IBM Tivoli Storage Manager for Windows: Installation Guide
||
||
|
|
||
||
|
|
|
|
|
|
|
||
|
||
||
|
|
|
|||
|
||||
|
|||
|
||

About this task
Tivoli Monitoring for Tivoli Storage Manager V6.3 is installed with a large amountof custom configuration that can make it complex to re-create after an upgrade. Ifyour agent instance configurations are complex, you can save them before youupgrade Tivoli Monitoring for Tivoli Storage Manager to V7.1, or later.
If the agent configuration is not complex, re-create the agent after you upgradeTivoli Monitoring for Tivoli Storage Manager.
Procedure
To save the agent instances, complete the following steps:1. From Manage Tivoli Enterprise Monitoring Services, stop all agents and
services.2. Download and install the agent package V7.1, or later:
Installing monitoring agents on Windows
Tip: Install the agent in to the same directory where the V6.3 agent is installed.The default directory is:
C:\IBM\itm3. Go to the following directory:
installation_dir\itm\TMAITM6
4. Back up or move the configuration files to a temporary location.For example, for each agent instance, backup or move the following files:v KSKENV_instance_name
v kskcma_instance_name.iniv host_sk_instance_name.cfgv KSKAGENT_instance_name.exev kskagent_instance_name.ras
where instance_name is the name of the agent instance, and host is the hostname of the system.
5. Export the registry keys for the agent.a. Start regedit from a command line by issuing the following command:
regedit
b. Go to HKEY_LOCAL_MACHINE\SOFTWARE\Wow6432Node\Candle\Install\Servicesand export the Services key as ksk_services.reg.
c. Go to HKEY_LOCAL_MACHINE\SOFTWARE\Wow6432Node\Candle\KBB_ENVPATH andexport the KBB_ENVPATH key as kbb_envpath.reg.
d. Go to HKEY_LOCAL_MACHINE\SOFTWARE\Candle\KBB_ENVPATH and export theKBB_ENVPATH key as kbb_envpath32.reg.
e. Go to HKEY_LOCAL_MACHINE\SYSTEM\CurrentControlSet\services. For eachagent instance, right-click the registry key named KSKCMA_instance_name,and export the key as instance_name_service.reg, where instance_name isthe name of the agent instance.
f. Back up or save all of the .reg files to a temporary location.
Remember: On 32-bit Windows systems, remove the Wow6432Node from theregistry path.
Upgrading Tivoli Monitoring for Tivoli Storage Manager
Chapter 10. Upgrading Tivoli Monitoring for Tivoli Storage Manager to V7.1 155
|
||||
||
|
|
||
|
|
||
|
|
|
|
|
|
|
|
|
|
||
|
|
|
||
||
||
||||
|
||
|

Importing the agent instance configurationIf you saved the configuration files for the monitoring agents, you can import theagents in to Tivoli Monitoring for Tivoli Storage Manager V7.1, or later.
Before you begin
Before you can import the agent instances in to Tivoli Monitoring for Tivoli StorageManager V7.1, or later, ensure that the following tasks are complete:v You saved the configuration files for the Tivoli Monitoring for Tivoli Storage
Manager V6.3 agent instances by completing the steps from “Saving the agentinstance configurations” on page 154.
v You installed Tivoli Monitoring for Tivoli Storage Manager V7.1, or later to thesame installation directory that Tivoli Monitoring for Tivoli Storage ManagerV6.3 was installed to.
Remember: You must restart the system after you import the agent instances.
Procedure
To import the agent instances, complete the following steps:1. Go to the following directory:
installation_dir\itm\TMAITM6
2. Restore, or move the configuration files that you saved in to the directory:v KSKENV_instance_name
v kskcma_instance_name.iniv host_sk_instance_name.cfgv KSKAGENT_instance_name.exev kskagent_instance_name.ras
where instance_name is the name of the agent instance, and host is the hostname of the system.
3. Import the registry keys that you exported by double-clicking each .reg file:v ksk_services.reg
v kbb_envpath.reg
v kbb_envpath32.reg
v instance_name_service.reg, where instance_name is the name of the agentinstance.
4. Restart the system.
What to do next
You can start the agent instances to start collecting data.
Windows: Upgrading Tivoli Monitoring for Tivoli Storage ManagerTo upgrade Tivoli Monitoring for Tivoli Storage Manager, you can use thegraphical installation wizard, the command line in console mode, or silent mode.
Before you begin
Before you install Tivoli Monitoring for Tivoli Storage Manager, verify that thefollowing requirements are met:
Upgrading Tivoli Monitoring for Tivoli Storage Manager
156 IBM Tivoli Storage Manager for Windows: Installation Guide
|
||
|
||
|||
|||
|
|
|
|
|
|
|
|
|
|
|
||
|
|
|
|
||
|
|
|
|
||
|
||
v Ensure that your system meets the software and hardware requirements. Formore information about the system requirements, see “System requirements forTivoli Monitoring for Tivoli Storage Manager” on page 99.
v Do not install Tivoli Monitoring for Tivoli Storage Manager on a system that hasa Tivoli Storage Manager server installed.
v Do not use a domain ID to install. The Windows user ID that you use when youinstall must be a local ID with administrator privileges, and cannot be a domainID.
v Verify that you have the required access privileges, including user IDs andpasswords.
v Ensure that there are no spaces and no non-ASCII characters in the installationpackage name or in the path to the package.
v Use short path names for the extract directory to avoid problems with the255-character path limit. For example, you can specify the C:\tsm_imagesdirectory.
v If you are installing the Tivoli Monitoring for Tivoli Storage Manager monitoringagent in to an existing Tivoli Monitoring environment, specify the existing TivoliMonitoring installation directory. The default directory is C:\IBM\ITM.
If you are upgrading from Tivoli Monitoring for Tivoli Storage Manager V6, see“Upgrading Tivoli Monitoring for Tivoli Storage Manager from Version 6.3 toVersion 7.1” on page 149.
Attention: Do not alter the DB2 software that is installed with Tivoli Monitoringfor Tivoli Storage Manager installation packages and fix packs. Do not install orupgrade to a different version, release, or fix pack of DB2 application becausedoing so can damage the database. Tivoli Monitoring for Tivoli Storage Managercan use only components and versions that are installed as part of the TivoliMonitoring for Tivoli Storage Manager installation.
About this task
With the Tivoli Monitoring for Tivoli Storage Manager installation package, youcan install or upgrade the following software:v Tivoli Monitoring for Tivoli Storage Managerv Tivoli Monitoring for Tivoli Storage Manager agent only
To determine when and where you would install only the agent package, reviewthe installation scenarios. To install the agent on a remote server, see “Installing themonitoring agent” on page 112.
Restriction: You cannot install the Tivoli Monitoring for Tivoli Storage Managerpackage and the agent only package on the same system.
Upgrading Tivoli Monitoring for Tivoli Storage Manager
Chapter 10. Upgrading Tivoli Monitoring for Tivoli Storage Manager to V7.1 157
|||
||
|||
||
||
|||
|||
|||
||||||
|
||
|
|
|||
|||

Windows: Obtaining the Tivoli Monitoring for Tivoli StorageManager installation package
You can obtain the Tivoli Monitoring for Tivoli Storage Manager installationpackage from a DVD or an IBM download site such as IBM Passport Advantage.
About this task
Verify that you have enough space to store the installation files when they areextracted from the product package.
Procedure1. Download the two installation packages from one of the following websites, or
you can access the files from the product DVD:v Go to Passport Advantage site at http://www.ibm.com/software/lotus/
passportadvantage/.v Go to the Tivoli Storage Manager support site at http://www.ibm.com/
support/entry/portal/Overview/Software/Tivoli/Tivoli_Storage_Managerfor maintenance fixes, and updates.
2. Depending on whether you have the DVD disks or installation packages,complete one of the following methods to extract the files to the file system:
Product DVD disks
a. Create a directory on the file system.b. For each DVD disk, copy the contents of the disk in to the directory
that you created.
Tip: You can delete the files after you install Tivoli Monitoring forTivoli Storage Manager to free up space on the file system.
Installation packages
a. Create a directory and move the two packages that youdownloaded in to the directory.
b. Either double-click each executable file, or enter the followingcommand on the command line to extract the installation files. Thefiles are extracted to the current directory.package_name.exe
where package_name is the name of the file that you downloaded, forexample:TSMRPT-Full-Installer-1of2-Windows-7.1.0.000.exe
Restriction: The path must contain no more than 128 characters. Donot extract the packages to a directory that contains previouslyextracted files, or any other files.
Upgrading Tivoli Monitoring for Tivoli Storage Manager
158 IBM Tivoli Storage Manager for Windows: Installation Guide
|
|
||
|
||
|
||
||
|||
||
|
|
||
||
|
||
|||
|
||
|
|||
|

Windows: Upgrading Tivoli Monitoring for Tivoli StorageManager by using the Upgrade wizard
You can upgrade Tivoli Monitoring for Tivoli Storage Manager by using theUpgrade wizard of IBM Installation Manager.
Before you begin
Take the following actions before you start the installation:v Verify that you copied the DVD files to the local system, or that you
downloaded and extracted the packages for Tivoli Monitoring for Tivoli StorageManager.
v Verify that the operating system is set to the language that you require. Bydefault, the language of the operating system is the language that is used duringthe installation.
v Ensure that the user ID that you plan to use during installation is a user withlocal administrator authority.
About this task
With the Tivoli Monitoring for Tivoli Storage Manager installation package, youcan install or upgrade the following software:v Tivoli Monitoring for Tivoli Storage Managerv Tivoli Monitoring for Tivoli Storage Manager agent only
To determine when and where you would install only the agent package, reviewthe installation scenarios. To install the agent on a remote server, see “Installing themonitoring agent” on page 112.
Restriction: You cannot install the Tivoli Monitoring for Tivoli Storage Managerpackage and the agent only package on the same system.
Procedure
To install Tivoli Monitoring for Tivoli Storage Manager, complete the followingsteps:1. Change to the directory where you extracted the installation files.2. Start the wizard by issuing the following command:
install.bat
Results
If errors occur during the installation process, the errors are recorded in log filesthat are stored in the IBM Installation Manager logs directory. You can viewinstallation log files by clicking File > View Log from the IBM InstallationManager tool.
What to do next
If you already have Jazz for Service Management installed, reconfigure theWAREHOUS data source to reconnect Tivoli Common Reporting to theWAREHOUS database. Follow the steps in “Configuring the WAREHOUS datasource and importing reports” on page 129. Otherwise, install Jazz for ServiceManagementso that you can view historical reports. Go to “Installing Jazz forService Management” on page 127.
Upgrading Tivoli Monitoring for Tivoli Storage Manager
Chapter 10. Upgrading Tivoli Monitoring for Tivoli Storage Manager to V7.1 159
|
|
||
|
|
|||
|||
||
|
||
|
|
|||
||
|
||
|
|
|
|
||||
|
||||||

After you upgrade Tivoli Monitoring for Tivoli Storage Manager, see “Taking thefirst steps after installation” on page 133.
Windows: Upgrading Tivoli Monitoring for Tivoli StorageManager by using console mode
You can upgrade Tivoli Monitoring for Tivoli Storage Manager by using thecommand line. You must run the installation program of IBM Installation Managerfrom the command line with the parameter for console mode.
Before you begin
Take the following actions before you start the installation:v Verify that the operating system is set to the language that you require. By
default, the language of the operating system is the language that is used duringthe installation.
v Ensure that the user ID that you plan to use during installation is a user withlocal administrator authority.
About this task
With the Tivoli Monitoring for Tivoli Storage Manager installation package, youcan install or upgrade the following software:v Tivoli Monitoring for Tivoli Storage Managerv Tivoli Monitoring for Tivoli Storage Manager agent only
To determine when and where you would install only the agent package, reviewthe installation scenarios. To install the agent on a remote server, see “Installing themonitoring agent” on page 112.
Restriction: You cannot install the Tivoli Monitoring for Tivoli Storage Managerpackage and the agent only package on the same system.
Procedure
To install Tivoli Monitoring for Tivoli Storage Manager, complete the followingsteps:1. Change to the directory where you extracted the installation files.2. Start the wizard in console mode by issuing the following command from a
command line:install.bat -c
3. Optional: Generate a response file as part of a console mode installation.Complete the console mode installation options, and in the Summary pane,specify G to generate the responses.
Results
If errors occur during the installation process, the errors are recorded in log filesthat are stored in the IBM Installation Manager logs directory, for example:
C:\ProgramData\IBM\Installation Manager\logs
Upgrading Tivoli Monitoring for Tivoli Storage Manager
160 IBM Tivoli Storage Manager for Windows: Installation Guide
||
|
|
|||
|
|
|||
||
|
||
|
|
|||
||
|
||
|
||
|
|||
|
||
|

What to do next
If you already have Jazz for Service Management installed, reconfigure theWAREHOUS data source to reconnect Tivoli Common Reporting to theWAREHOUS database. Follow the steps in “Configuring the WAREHOUS datasource and importing reports” on page 129. Otherwise, install Jazz for ServiceManagementso that you can view historical reports. Go to “Installing Jazz forService Management” on page 127.
After you upgrade Tivoli Monitoring for Tivoli Storage Manager, see “Taking thefirst steps after installation” on page 133.
Windows: Upgrading Tivoli Monitoring for Tivoli StorageManager in silent mode
You can upgrade the Tivoli Monitoring for Tivoli Storage Manager in silent modewithout any user interaction by specifying a response file. You must run theinstallation program of IBM Installation Manager from the command line with theparameters for silent mode.
Before you begin
The input directory, which is in the directory where the installation files wereextracted, contains the following sample response files to install, update, anduninstall Tivoli Monitoring for Tivoli Storage Manager:v install_response_sample.xml
v update_response_sample.xml
v uninstall_response_sample.xml
You must edit the sample files before you use them.
About this task
With the Tivoli Monitoring for Tivoli Storage Manager installation package, youcan install or upgrade the following software:v Tivoli Monitoring for Tivoli Storage Managerv Tivoli Monitoring for Tivoli Storage Manager agent only
To determine when and where you would install only the agent package, reviewthe installation scenarios. To install the agent on a remote server, see “Installing themonitoring agent” on page 112.
Restriction: You cannot install the Tivoli Monitoring for Tivoli Storage Managerpackage and the agent only package on the same system.
Procedure1. Create a response file, or use one of the sample response files, such as
install_response_sample.xml or update_response_sample.xml.2. Edit the response file and specify a DB2 administrator password and the
sysadmin user ID. You can also change other defaults if you need.3. Start the silent installation by issuing the following command from the
directory where the installation files were extracted:install.bat -s -input response_file -acceptLicense
where response_file is the response file path, including the file name.
Upgrading Tivoli Monitoring for Tivoli Storage Manager
Chapter 10. Upgrading Tivoli Monitoring for Tivoli Storage Manager to V7.1 161
|
||||||
||
|
|
||||
|
|||
|
|
|
|
|
||
|
|
|||
||
|
||
||
||
|
|
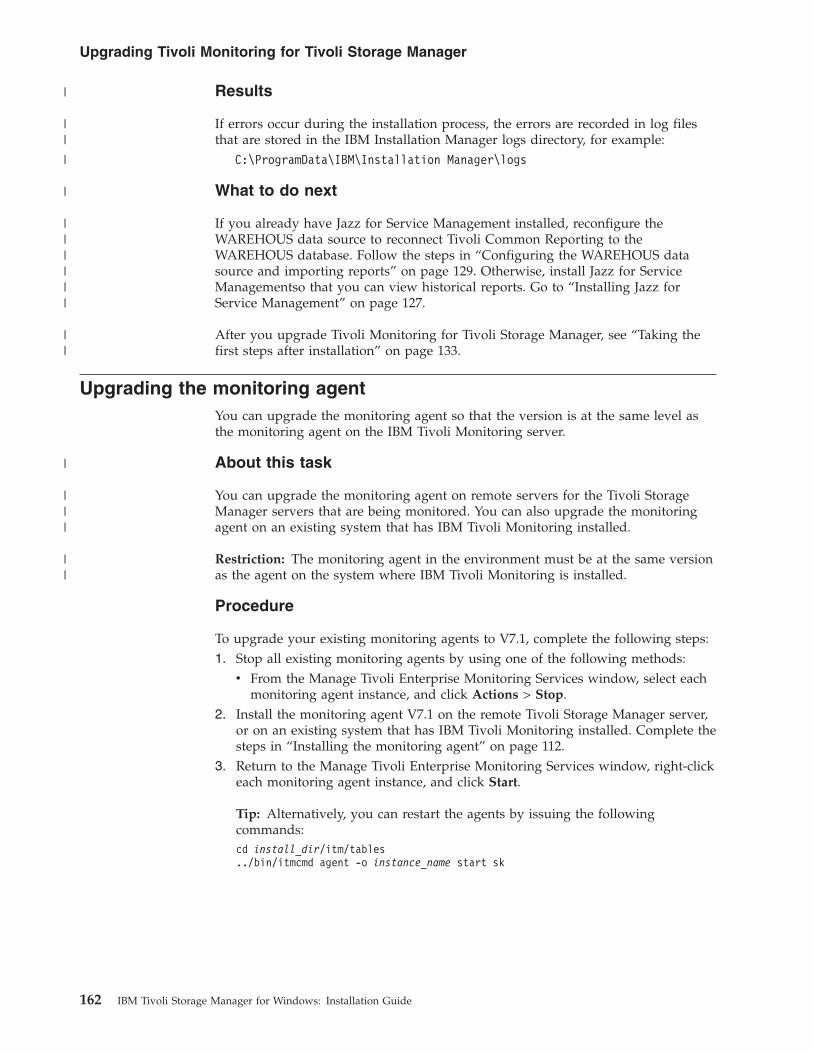
Results
If errors occur during the installation process, the errors are recorded in log filesthat are stored in the IBM Installation Manager logs directory, for example:
C:\ProgramData\IBM\Installation Manager\logs
What to do next
If you already have Jazz for Service Management installed, reconfigure theWAREHOUS data source to reconnect Tivoli Common Reporting to theWAREHOUS database. Follow the steps in “Configuring the WAREHOUS datasource and importing reports” on page 129. Otherwise, install Jazz for ServiceManagementso that you can view historical reports. Go to “Installing Jazz forService Management” on page 127.
After you upgrade Tivoli Monitoring for Tivoli Storage Manager, see “Taking thefirst steps after installation” on page 133.
Upgrading the monitoring agentYou can upgrade the monitoring agent so that the version is at the same level asthe monitoring agent on the IBM Tivoli Monitoring server.
About this task
You can upgrade the monitoring agent on remote servers for the Tivoli StorageManager servers that are being monitored. You can also upgrade the monitoringagent on an existing system that has IBM Tivoli Monitoring installed.
Restriction: The monitoring agent in the environment must be at the same versionas the agent on the system where IBM Tivoli Monitoring is installed.
Procedure
To upgrade your existing monitoring agents to V7.1, complete the following steps:1. Stop all existing monitoring agents by using one of the following methods:
v From the Manage Tivoli Enterprise Monitoring Services window, select eachmonitoring agent instance, and click Actions > Stop.
2. Install the monitoring agent V7.1 on the remote Tivoli Storage Manager server,or on an existing system that has IBM Tivoli Monitoring installed. Complete thesteps in “Installing the monitoring agent” on page 112.
3. Return to the Manage Tivoli Enterprise Monitoring Services window, right-clickeach monitoring agent instance, and click Start.
Tip: Alternatively, you can restart the agents by issuing the followingcommands:cd install_dir/itm/tables../bin/itmcmd agent -o instance_name start sk
Upgrading Tivoli Monitoring for Tivoli Storage Manager
162 IBM Tivoli Storage Manager for Windows: Installation Guide
|
||
|
|
||||||
||
|
|||
||

Upgrading the operating systemYou can upgrade the operating system so that it meets the Tivoli Monitoring forTivoli Storage Manager V7.1 system requirements.
About this task
When you decide to upgrade Tivoli Monitoring for Tivoli Storage Manager to V7.1,you might find that the operating system no longer meets the minimum systemrequirements. You can either upgrade the operating system, or migrate TivoliMonitoring for Tivoli Storage Manager to another system. For more informationabout migrating the system, see Chapter 11, “Migrating Tivoli Monitoring for TivoliStorage Manager from one system to another,” on page 165.
Procedure
To upgrade the operating system and upgrade Tivoli Monitoring for Tivoli StorageManager, complete the following steps:1. Back up the Tivoli Monitoring for Tivoli Storage Manager environment: Backing
up Tivoli Monitoring for Tivoli Storage Manager (http://www.ibm.com/support/knowledgecenter/SSGSG7_7.1.1/com.ibm.itsm.srv.doc/t_rpt_bkup_itm4tsm.html)
2. Optional: Export the IBM Tivoli Monitoring historical settings and situationsthat you created or customized. Ensure that you use the backup-archive clientto back up the exported data. Complete the steps in “Exporting IBM TivoliMonitoring data” on page 151.
3. Optional: Save the agent instance configuration files to avoid manuallyre-creating them: “Saving the agent instance configurations” on page 154
4. Upgrade your operating system so that the system meets the minimum systemrequirements.
5. On the new system, download and install Tivoli Monitoring for Tivoli StorageManager V7.1, or later. The full installation also installs the monitoring agenton the system. Complete the steps in Chapter 9, “Installing Tivoli Monitoringfor Tivoli Storage Manager,” on page 95.
Restriction: To avoid overwriting data, do not start any monitoring agentsuntil after you restore the WAREHOUS database.
6. On the new system, restore the Tivoli Monitoring for Tivoli Storage ManagerV6.3 data that you backed up, such as the WAREHOUS database, workspaces,and Cognos reports: Restoring Tivoli Monitoring for Tivoli Storage Manager(http://www.ibm.com/support/knowledgecenter/SSGSG7_7.1.1/com.ibm.itsm.srv.doc/t_rpt_restore_itm4tsm.html).
7. Recreate or import your agent instances. If you saved your agent instanceconfiguration files, you can import them by completing the steps in “Importingthe agent instance configuration” on page 156. Otherwise, recreate andconfigure your agent instances by completing the steps in “Creating andconfiguring the agent instance” on page 124.
What to do next
After you move Tivoli Monitoring for Tivoli Storage Manager to the new system,you can configure the historical settings and the data source:
Upgrading Tivoli Monitoring for Tivoli Storage Manager
Chapter 10. Upgrading Tivoli Monitoring for Tivoli Storage Manager to V7.1 163
|
||
|
||||||
|
||
||||
||||
||
||
||||
||
|||||
|||||
|
||

v You can configure the historical settings if you do not want to use the defaultsettings. You can use the historical settings file that you exported as a reference.Follow the steps in “Configuring summarization and pruning settings” on page135.
v Configure the data source by following the steps in “Configuring theWAREHOUS data source and importing reports” on page 129.
Upgrading Tivoli Monitoring for Tivoli Storage Manager
164 IBM Tivoli Storage Manager for Windows: Installation Guide
||||
||
|

Chapter 11. Migrating Tivoli Monitoring for Tivoli StorageManager from one system to another
You can move the Tivoli Monitoring for Tivoli Storage Manager environment to anew system, with your configuration settings and data.
About this task
You might have to migrate Tivoli Monitoring for Tivoli Storage Manager to anothersystem for any of the following reasons:v The operating system does not meet the system requirements for Tivoli
Monitoring for Tivoli Storage Manager V7.1, or later.v The system that you are using will no longer be available to host Tivoli
Monitoring for Tivoli Storage Manager.v You want to move Tivoli Monitoring for Tivoli Storage Manager to newer or
faster hardware.
Restriction: A database backup from one platform family can only be restored onany system within the same platform family. Migration is only supported fromTivoli Monitoring for Tivoli Storage Manager V6.3 to V7.1, or later. You mustupgrade Tivoli Monitoring for Tivoli Storage Manager V6.1 or V6.2 to V6.3 beforeyou move to V7.1, or later. You can upgrade Tivoli Monitoring for Tivoli StorageManager from a Windows 32-bit system to a Windows 64-bit system. Similarly, youcan upgrade Tivoli Monitoring for Tivoli Storage Manager on any Linux 32-bitsystem to any Linux 64-bit system.
Migrating Tivoli Monitoring for Tivoli Storage Manager V6.3 to V7.1, orlater on another system
You can move the Tivoli Monitoring for Tivoli Storage Manager environment to anew system and upgrade it at the same time.
Procedure1. Back up the Tivoli Monitoring for Tivoli Storage Manager environment: Backing
up Tivoli Monitoring for Tivoli Storage Manager (http://www.ibm.com/support/knowledgecenter/SSGSG7_7.1.1/com.ibm.itsm.srv.doc/t_rpt_bkup_itm4tsm.html)
2. Optional: Export the IBM Tivoli Monitoring historical settings and situationsthat you created or customized. Ensure that you use the backup-archive clientto back up the exported data. Complete the steps in “Exporting IBM TivoliMonitoring data” on page 151.
3. On the new system, download and install Tivoli Monitoring for Tivoli StorageManager V7.1, or later. The full installation also installs the monitoring agenton the system. Complete the steps in Chapter 9, “Installing Tivoli Monitoringfor Tivoli Storage Manager,” on page 95.
Restriction: To avoid overwriting data, do not start any monitoring agentsuntil after you restore the WAREHOUS database.
4. On the new system, restore the Tivoli Monitoring for Tivoli Storage ManagerV6.3 data that you backed up, such as the WAREHOUS database, workspaces,
© Copyright IBM Corp. 1993, 2014 165
|
|
|
||
|
||
||
||
||
||||||||
||
|
||
|
||||
||||
||||
||
||

and Cognos reports: Restoring Tivoli Monitoring for Tivoli Storage Manager(http://www.ibm.com/support/knowledgecenter/SSGSG7_7.1.1/com.ibm.itsm.srv.doc/t_rpt_restore_itm4tsm.html).
What to do next
After you move Tivoli Monitoring for Tivoli Storage Manager to the new system,you can configure the historical settings and the data source:v You can configure the historical settings if you do not want to use the default
settings. You can use the historical settings file that you exported as a reference.Follow the steps in “Configuring summarization and pruning settings” on page135.
v Configure the data source by following the steps in “Configuring theWAREHOUS data source and importing reports” on page 129.
Migrating Tivoli Monitoring for Tivoli Storage Manager V7.1, or later toanother system
You can move Tivoli Monitoring for Tivoli Storage Manager V7.1, or later to a newsystem.
Procedure1. Back up the Tivoli Monitoring for Tivoli Storage Manager environment: Backing
up Tivoli Monitoring for Tivoli Storage Manager (http://www.ibm.com/support/knowledgecenter/SSGSG7_7.1.1/com.ibm.itsm.srv.doc/t_rpt_bkup_itm4tsm.html)
2. On the new system, download and install Tivoli Monitoring for Tivoli StorageManager V7.1, or later. The full installation also installs the monitoring agenton the system. Complete the steps in Chapter 9, “Installing Tivoli Monitoringfor Tivoli Storage Manager,” on page 95.
Restriction: To avoid overwriting data, do not start any monitoring agentsuntil after you restore the WAREHOUS database.
3. On the new system, restore the Tivoli Monitoring for Tivoli Storage ManagerV6.3 data that you backed up, such as the WAREHOUS database, workspaces,and Cognos reports: Restoring Tivoli Monitoring for Tivoli Storage Manager(http://www.ibm.com/support/knowledgecenter/SSGSG7_7.1.1/com.ibm.itsm.srv.doc/t_rpt_restore_itm4tsm.html).
4. Reconfigure the monitoring agents by completing the steps in “Creating andconfiguring the agent instance” on page 124.
What to do next
After you move Tivoli Monitoring for Tivoli Storage Manager to the new system,you can configure the historical settings and the data source:v You can configure the historical settings if you do not want to use the default
settings. You can use the historical settings file that you exported as a reference.Follow the steps in “Configuring summarization and pruning settings” on page135.
v Configure the data source by following the steps in “Configuring theWAREHOUS data source and importing reports” on page 129.
166 IBM Tivoli Storage Manager for Windows: Installation Guide
|||
|
||
||||
||
||
|
||
|
||||
||||
||
|||||
||
|
||
||||
||
|

Chapter 12. Uninstalling Tivoli Monitoring for Tivoli StorageManager
You can uninstall Tivoli Monitoring for Tivoli Storage Manager and the monitoringagents in your environment if you no longer need them.
About this task
Use IBM Installation Manager to uninstall Tivoli Monitoring for Tivoli StorageManager or the monitoring agent. However, If you installed the monitoring agenton an existing IBM Tivoli Monitoring server, complete the steps in “Uninstallingmonitoring agents in an existing IBM Tivoli Monitoring environment” on page 172.
Tip: When you uninstall Tivoli Monitoring for Tivoli Storage Manager, themonitoring agent on the system is also uninstalled. Therefore, you do not have touninstall the monitoring agent on the system after you uninstall Tivoli Monitoringfor Tivoli Storage Manager.
Uninstalling Jazz for Service ManagementYou can uninstall Jazz for Service Management if you no longer need it.
About this task
Before you uninstall Jazz for Service Management, you must uninstall TivoliCommon Reporting.
Tip: The Cognos reports are removed from the system when you uninstall TivoliCommon Reporting. If you must retain the reports, you can export them.
Procedure1. Uninstall Tivoli Common Reporting by completing the steps in
http://www.ibm.com/support/knowledgecenter/SSEKCU_1.1.0/com.ibm.psc.doc_1.1.0/tcr_original/ttcr_uninstall.html.
2. Uninstall Jazz for Service Management by completing the steps inhttp://www.ibm.com/support/knowledgecenter/SSEKCU_1.1.0/com.ibm.psc.doc_1.1.0/install/psc_t_install_uninstall_adv_oview.html.
3. Remove the Deployment Engine entries for Tivoli Common Reporting bycompleting the following steps:a. Open a command line and go to the following directory:
C:\Program Files\IBM\Common\acsi\bin
b. Issue the following command:de_lsrootiu.cmd > de_lsrootiu.txt
c. Review de_lsrootiu.txt and collect the UUID and discriminant values forthe following identityNames:v TCRCorev TCREmbeddedv TCRStandalonev Install IU
d. Delete the entry for each identityName by issuing the following command:
© Copyright IBM Corp. 1993, 2014 167
|
|
|
||
|
||||
||||
||
|
|
||
||
|
|||
|||
||
|
|
|
|
||
|
|
|
|
|

deleteRootIU.cmd UUID discriminant
where UUID and discriminant are the values from the de_lsrootiu.txtoutput.For example, to delete the TCRCore identityName, issue the followingcommand:DelRootIUnRelationships 3DD9564D2E7442788584C1F35B07F2A2"C:\Program Files\IBM\JazzSM\reporting"
Uninstalling Tivoli Monitoring for Tivoli Storage Manager by using IBMInstallation Manager
To uninstall Tivoli Monitoring for Tivoli Storage Manager, you can use the wizard,the command line in console mode, or silent mode.
Uninstalling Tivoli Monitoring for Tivoli Storage Manager byusing the Uninstall wizard
You can uninstall Tivoli Monitoring for Tivoli Storage Manager by using theUninstall wizard of IBM Installation Manager.
Before you begin
Before you uninstall Tivoli Monitoring for Tivoli Storage Manager, you must knowthe DB2 administrator password.
Restriction: You must uninstall Jazz for Service Management before you uninstallTivoli Monitoring for Tivoli Storage Manager. To uninstall Jazz for ServiceManagement, see “Uninstalling Jazz for Service Management” on page 167.
Procedure1. Open IBM Installation Manager by issuing the following command from a
command line:cd installation_manager\eclipseIBMIM.exe
where installation_manager is the IBM Installation Manager installation directory.The default installation directory is:C:\Program Files\IBM\Installation Manager
Tip: You can open IBM Installation Manager from the Start menu.2. Click Uninstall.3. Select IBM Tivoli Monitoring for Tivoli Storage Manager, and click Next.4. Enter the DB2 administrator password, and click Next.5. Enter a selection depending on whether you want to delete or keep the
historical data, and click Next.You can delete the historical data if you no longer need the data in theWAREHOUS database.
6. Click Uninstall and click Finish.
Uninstalling Tivoli Monitoring for Tivoli Storage Manager
168 IBM Tivoli Storage Manager for Windows: Installation Guide
|
||
||
||
||
|
||
|
|
||
|
||
|||
|
||
||
||
|
|
|
|
|
||
||
|
|

Uninstalling Tivoli Monitoring for Tivoli Storage Manager byusing console mode
You can uninstall Tivoli Monitoring for Tivoli Storage Manager by using thecommand line in console mode. You must run the uninstallation program of IBMInstallation Manager from the command line.
Before you begin
Before you uninstall Tivoli Monitoring for Tivoli Storage Manager, you must knowthe DB2 administrator password.
Restriction: You must uninstall Jazz for Service Management before you uninstallTivoli Monitoring for Tivoli Storage Manager. To uninstall Jazz for ServiceManagement, see “Uninstalling Jazz for Service Management” on page 167.
Procedure1. From a command line, go to the following directory:
installation_manager\eclipse\tools
where installation_manager is the IBM Installation Manager installationdirectory, for example:
C:\Program Files\IBM\Installation Manager\eclipse\tools
2. Start the uninstallation process by issuing the following command:imcl.exe -c
3. Enter 5 to remove the installed software packages.4. Enter N to accept the IBM Tivoli Monitoring for Tivoli Storage Manager
package group.5. Enter the item number to select the IBM Tivoli Monitoring for Tivoli Storage
Manager installed package, and enter N for Next.6. Enter 1 for DB2 configuration.7. Enter 1 to type the DB2 administrators password, and enter the DB2
administrator password, and enter N for Next.8. Enter a selection depending on whether you want to delete or keep the
historical data.You can delete the historical data if you no longer need the data in theWAREHOUS database.
9. Enter N for Next.10. Enter U for Uninstall, and enter F for Finish.
Uninstalling Tivoli Monitoring for Tivoli Storage Manager byusing silent mode
You can uninstall Tivoli Monitoring for Tivoli Storage Manager in silent mode. Youmust run the uninstallation program of IBM Installation Manager from thecommand line.
Before you begin
Before you uninstall Tivoli Monitoring for Tivoli Storage Manager, you must knowthe DB2 administrator password.
Uninstalling Tivoli Monitoring for Tivoli Storage Manager
Chapter 12. Uninstalling Tivoli Monitoring for Tivoli Storage Manager 169
|
|
|||
|
||
|||
|
|
|
||
|
|
|
|
||
||
|
||
||
||
|
|
|
|
|||
|
||
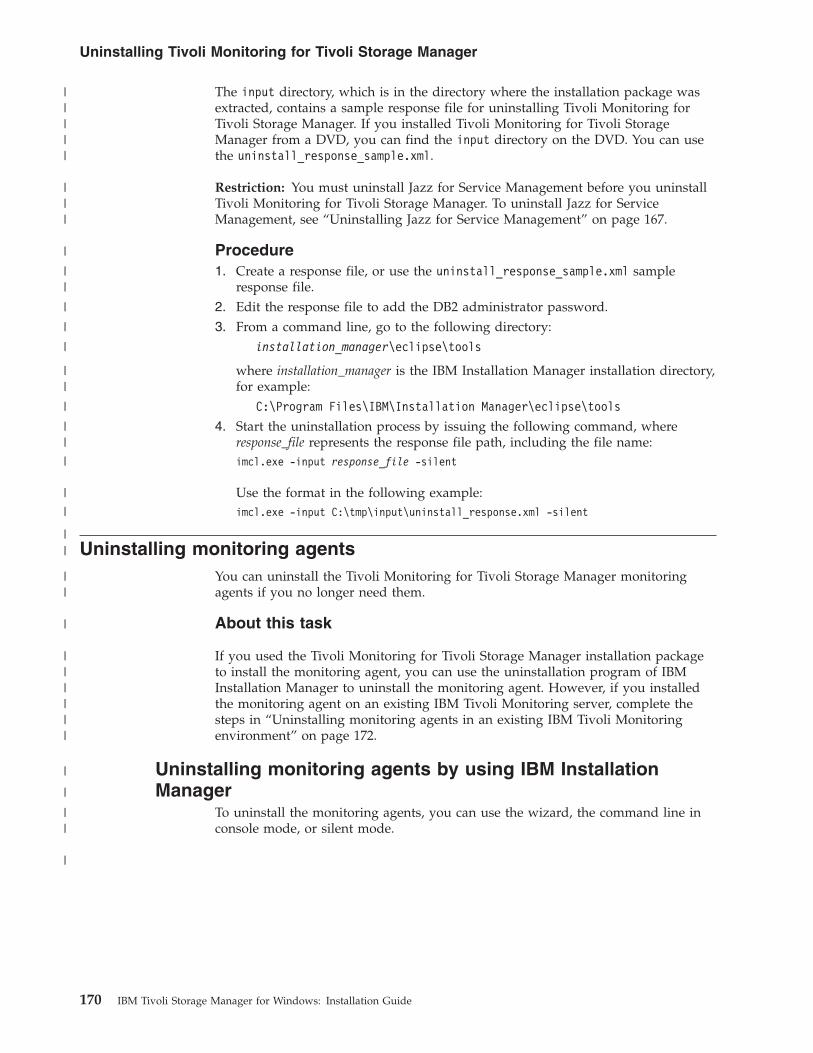
The input directory, which is in the directory where the installation package wasextracted, contains a sample response file for uninstalling Tivoli Monitoring forTivoli Storage Manager. If you installed Tivoli Monitoring for Tivoli StorageManager from a DVD, you can find the input directory on the DVD. You can usethe uninstall_response_sample.xml.
Restriction: You must uninstall Jazz for Service Management before you uninstallTivoli Monitoring for Tivoli Storage Manager. To uninstall Jazz for ServiceManagement, see “Uninstalling Jazz for Service Management” on page 167.
Procedure1. Create a response file, or use the uninstall_response_sample.xml sample
response file.2. Edit the response file to add the DB2 administrator password.3. From a command line, go to the following directory:
installation_manager\eclipse\tools
where installation_manager is the IBM Installation Manager installation directory,for example:
C:\Program Files\IBM\Installation Manager\eclipse\tools
4. Start the uninstallation process by issuing the following command, whereresponse_file represents the response file path, including the file name:imcl.exe -input response_file -silent
Use the format in the following example:imcl.exe -input C:\tmp\input\uninstall_response.xml -silent
Uninstalling monitoring agentsYou can uninstall the Tivoli Monitoring for Tivoli Storage Manager monitoringagents if you no longer need them.
About this task
If you used the Tivoli Monitoring for Tivoli Storage Manager installation packageto install the monitoring agent, you can use the uninstallation program of IBMInstallation Manager to uninstall the monitoring agent. However, if you installedthe monitoring agent on an existing IBM Tivoli Monitoring server, complete thesteps in “Uninstalling monitoring agents in an existing IBM Tivoli Monitoringenvironment” on page 172.
Uninstalling monitoring agents by using IBM InstallationManager
To uninstall the monitoring agents, you can use the wizard, the command line inconsole mode, or silent mode.
Uninstalling Tivoli Monitoring for Tivoli Storage Manager
170 IBM Tivoli Storage Manager for Windows: Installation Guide
|||||
|||
|
||
|
|
|
||
|
||
|
|
|
||
||
|
||||||
|
|
||
|

Uninstalling the monitoring agent by using the wizardYou can uninstall the monitoring agent by using the IBM Installation Managerwizard.
Procedure1. Open IBM Installation Manager by issuing the following command from a
command line:cd installation_manager\eclipseIBMIM.exe
where installation_manager is the IBM Installation Manager installation directory.The default installation directory is:C:\Program Files\IBM\Installation Manager
Tip: You can open IBM Installation Manager from the Start menu.2. Click Uninstall.3. Select IBM Tivoli Monitoring for Tivoli Storage Manager agent only, and
click Next.4. Click Uninstall and click Finish.
Uninstalling the monitoring agent by using the consoleYou can uninstall the monitoring agent by using the command line. You must runthe uninstallation program of IBM Installation Manager from the command line.
Procedure1. From a command line, go to the following directory:
installation_manager\eclipse\tools
where installation_manager is the IBM Installation Manager installation directory,for example:
C:\Program Files\IBM\Installation Manager\eclipse\tools
2. Start the uninstallation process by issuing the following command:imcl.exe -c
3. Enter 5 to remove the installed software packages.4. Enter N to accept the IBM Tivoli Monitoring for Tivoli Storage Manager package
group.5. Enter 1 for IBM Tivoli Monitoring for Tivoli Storage Manager agent only, and
enter N for Next.6. Enter N for Next.7. Enter U for Uninstall, and enter F for Finish.
Uninstalling the monitoring agent by using silent modeYou can uninstall the monitoring agent in silent mode. You must run theuninstallation program of IBM Installation Manager from the command line.
Before you begin
The input directory, which is in the directory where the installation package wasextracted, contains a sample response file for uninstalling the monitoring agent. Ifyou installed Tivoli Monitoring for Tivoli Storage Manager from a DVD, you canfind the input directory on the DVD. You can use theuninstall_agent_only_sample.xml file.
Uninstalling Tivoli Monitoring for Tivoli Storage Manager
Chapter 12. Uninstalling Tivoli Monitoring for Tivoli Storage Manager 171
|||
|
||
||
||
|
|
|
||
|
|||
|
|
|
||
|
|
|
|
||
||
|
|
|||
|
|||||

Procedure1. Create a response file, or use the uninstall_agent_only_sample.xml sample
response file.2. From a command line, go to the following directory:
installation_manager\eclipse\tools
where installation_manager is the IBM Installation Manager installation directory,for example:
C:\Program Files\IBM\Installation Manager\eclipse\tools
3. Start the uninstallation process by issuing the following command, whereresponse_file represents the response file path, including the file name:imcl.exe -input response_file -silent
Use the format in the following example:imcl.exe -input C:\tmp\input\uninstall_response.xml -silent
Uninstalling monitoring agents in an existing IBM TivoliMonitoring environment
You can uninstall the monitoring agents on existing IBM Tivoli Monitoring serversif you no longer need them.
Uninstalling monitoring agents in an IBM Tivoli Monitoringenvironment on Windows systemsIf you installed Tivoli Monitoring for Tivoli Storage Manager agents by using theIBM Tivoli Monitoring installer, you can uninstall the agents by using a graphicaluser interface.
Before you begin
Before you uninstall the monitoring agent, ensure that the monitoring agent isstopped.
Procedure
To uninstall monitoring agents, complete the following steps:1. Click Start > Control Panel > Programs and Features.2. Select IBM Tivoli Monitoring and click Uninstall.3. In the Welcome panel, click Modify, and click Next.4. When a message indicates that cleared items will be uninstalled, click OK.5. In the Add or Remove Features panel, expand the list of features. Clear all
Monitoring Agent for Tivoli Storage Manager check boxes. Click Next.6. In the Start Copying Files panel, review the settings. Verify that the features
that must remain installed are listed, and that the Monitoring Agent for TivoliStorage Manager feature is not listed. Click Next.
7. Continue to step through the wizard panels to ensure that all required featuresare uninstalled.
8. In the Maintenance Complete panel, click Finish.9. Restart the system.
Uninstalling Tivoli Monitoring for Tivoli Storage Manager
172 IBM Tivoli Storage Manager for Windows: Installation Guide
|
||
|
|
||
|
||
|
|
|
|
|
||
|||||
|
||
|
|
|
|
|
|
||
|||
||
|
|
|

Part 3. Installing and upgrading the Operations Center
The IBM Tivoli Storage Manager Operations Center is the web-based interface formanaging your storage environment.
Before you begin
Before you install and configure the Operations Center, review the followinginformation:v “System requirements for the Operations Center” on page 175
– “Operations Center computer requirements” on page 176– “Hub and spoke server requirements” on page 176– “Operating system requirements” on page 180– “Web browser requirements” on page 180– “Language requirements” on page 181– “Requirements and limitations for Tivoli Storage Manager client management
services” on page 181v “Administrator IDs that the Operations Center requires” on page 183v “IBM Installation Manager” on page 184v “Installation checklist” on page 184v “Obtaining the Operations Center installation package” on page 189
About this task
Table 27 lists the methods for installing or uninstalling the Operations Center andindicates where to find the associated instructions.
For information about upgrading the Operations Center, see Chapter 15,“Upgrading the Operations Center,” on page 193.
Table 27. Methods for installing or uninstalling the Operations Center
Method Instructions
Graphical wizard v “Installing the Operations Center by using a graphicalwizard” on page 189
v “Uninstalling the Operations Center by using a graphicalwizard” on page 221
Console mode v “Installing the Operations Center in console mode” on page190
v “Uninstalling the Operations Center in console mode” onpage 221
Silent mode v “Installing the Operations Center in silent mode” on page 190
v “Uninstalling the Operations Center in silent mode” on page222
© Copyright IBM Corp. 1993, 2014 173
||

174 IBM Tivoli Storage Manager for Windows: Installation Guide

Chapter 13. Planning to install the Operations Center
Before you install the Operations Center, you must understand the systemrequirements, the administrator IDs that the Operations Center requires, and theinformation that you must provide to the installation program.
About this task
From the Operations Center, you can manage the following primary aspects of thestorage environment:v Tivoli Storage Manager servers and clientsv Services such as backup and restore, archive and retrieve, and migrate and recallv Storage pools and storage devices
The Operations Center includes the following features:
User interface for multiple serversYou can use the Operations Center to manage one or more Tivoli StorageManager servers.
In an environment with multiple Tivoli Storage Manager servers, you candesignate one Tivoli Storage Manager server as a hub server and the othersas spoke servers. The hub server can receive alerts and status informationfrom the spoke servers and present the information in a consolidated viewin the Operations Center.
Alert monitoring
An alert is a notification of a relevant problem on the Tivoli StorageManager server and is triggered by a Tivoli Storage Manager servermessage. You can define which server messages trigger alerts, and onlythose messages are reported as alerts in the Operations Center or in anemail.
This alert monitoring can help you identify and track relevant problems onthe Tivoli Storage Manager server.
Convenient command-line interfaceThe Operations Center includes a command-line interface for advancedfeatures and configuration.
System requirements for the Operations CenterBefore you install the Operations Center, ensure that your system meets theminimum requirements.
Use the Operations Center System Requirements Calculator to estimate the systemrequirements for running the Operations Center and the hub and spoke serversthat are monitored by the Operations Center.
Requirements that are verified during the installation
Table 28 on page 176 lists the prerequisite requirements that are verified during theinstallation and indicates where to find more information about theserequirements.
© Copyright IBM Corp. 1993, 2014 175

Table 28. Requirements that are verified during the installation
Requirement Details
Minimum memory requirement “Operations Center computer requirements”
Operating system requirement “Operating system requirements” on page180
Host name for the computer where theOperations Center will be installed
“Installation checklist” on page 184
Requirements for the Operations Centerinstallation directory
“Installation checklist” on page 184
Operations Center computer requirementsYou can install the Operations Center on the same computer as a Tivoli StorageManager server or on a different computer. If you install the Operations Center onthe same computer as a Tivoli Storage Manager server, that computer must meetthe system requirements for both the Operations Center and the Tivoli StorageManager server.
Resource requirements
The following resources are required to run the Operations Center:v One processor corev 4 GB of memoryv 1 GB of disk space
The hub and spoke servers that are monitored by the Operations Center requireadditional resources, as described in “Hub and spoke server requirements.”
Hub and spoke server requirementsWhen you open the Operations Center for the first time, you must associate theOperations Center with a Tivoli Storage Manager server that is designated as thehub server. In a multiple-server environment, you can connect the other servers,called spoke servers, to the hub server.
The spoke servers send alerts and status information to the hub server. TheOperations Center shows you a consolidated view of alerts and status informationfor the hub server and any spoke servers.
If only one Tivoli Storage Manager server is monitored by the Operations Center,that server is still called a hub server, even though no spoke servers are connectedto it.
Table 29 on page 177 indicates the version of Tivoli Storage Manager server thatmust be installed on the hub server and on each spoke server that is managed bythe Operations Center.
Planning to install the Operations Center
176 IBM Tivoli Storage Manager for Windows: Installation Guide

Table 29. Tivoli Storage Manager server version requirements for hub and spoke servers
Operations CenterTivoli Storage Manager on thehub server
Tivoli Storage Manager oneach spoke server
V7.1.1 V7.1.1 or later V6.3.4 or later
Tip: Some Operations Centerfunction is not available forservers that use a versionearlier than V7.1.1
Number of spoke servers that a hub server can support
The number of spoke servers that a hub server can support depends on theconfiguration and on the version of Tivoli Storage Manager on each spoke server.However, a general guideline is that a hub server can support 10 - 20 V6.3.4 spokeservers but can support more V7.1 spoke servers.
Tips for designing the hub and spoke server configurationIn designing the hub and spoke configuration, especially consider the resourcerequirements for status monitoring. Also, consider how you want to group huband spoke servers and whether you want to use multiple hub servers.
Use the Operations Center System Requirements Calculator to estimate the systemrequirements for running the Operations Center and the hub and spoke serversthat are monitored by the Operations Center.
Primary factors that affect performance
The following factors have the most significant impact on the performance of theOperations Center:v The processor and memory on the computer where the Operations Center is
installedv The system resources of the hub and spoke servers, including the disk system
that is in use for the hub server databasev The number of Tivoli Storage Manager client nodes and virtual machine file
spaces that are managed by the hub and spoke serversv The frequency at which data is refreshed in the Operations Center
For information about optimizing performance, see the information about tuningthe Operations Center in Tivoli Storage Manager Optimizing Performance.
How to group hub and spoke servers
Consider grouping hub and spoke servers by geographic location. For example,managing the servers within the same data center can help prevent issues that arecaused by firewalls or by inadequate network bandwidth between differentlocations. If necessary, you can further divide servers according to one or more ofthe following characteristics:v The administrator who manages the serversv The organizational entity that funds the serversv Server operating systemv The language in which the servers run
Planning to install the Operations Center
Chapter 13. Planning to install the Operations Center 177
|||
||||
Tip: If the hub and spoke servers are not running in the same language, youmight see corrupted text in the Operations Center.
How to group hub and spoke servers in an enterprise configuration
In an enterprise configuration, a network of Tivoli Storage Manager servers aremanaged as a group. Changes that are made on the configuration manager can bedistributed automatically to one or more managed servers in the network.
The Operations Center normally registers and maintains a dedicated administratorID on the hub and spoke servers. This monitoring administrator must always havethe same password on all the servers.
If you use an enterprise configuration, you can improve the process by which theadministrator credentials are synchronized on spoke servers. To improve theperformance and efficiency of maintaining the monitoring administrator ID,complete the following steps:1. Designate the configuration manager server as the Operations Center hub
server. During the hub server configuration, a monitoring administrator IDnamed IBM-OC-hub_server_name is registered.
2. On the hub server, add the monitoring administrator ID to a new or existingenterprise configuration profile. Issue the NOTIFY SUBSCRIBERS command todistribute the profile to the managed servers.
3. Add one or more of the managed servers as Operations Center spoke servers.
The Operations Center detects this configuration and allows the configurationmanager to distribute and update the monitoring administrator ID on the spokeservers.
When to use multiple hub servers
If you have more than 10 - 20 V6.3.4 spoke servers, or if resource limitationsrequire the environment to be partitioned, you can configure multiple hub servers,and connect a subset of the spoke servers to each hub server.
Restrictions:
v A single server cannot be both a hub server and a spoke server.v Each spoke server can be assigned to only one hub server.v Each hub server requires a separate instance of the Operations Center, each of
which has a separate web address.
Tips for choosing a hub serverFor the hub server, you must choose a Tivoli Storage Manager server that hasadequate resources and is located for minimal roundtrip network latency.
For more information about server resource usage and about the effect of thenetwork on performance, see the information about tuning Operations Centerperformance in Tivoli Storage Manager Optimizing Performance.
Attention: Do not use the same Tivoli Storage Manager server as the hub serverfor multiple Operations Centers.
Use the following guidelines in deciding which server to designate as the hubserver:
Planning to install the Operations Center
178 IBM Tivoli Storage Manager for Windows: Installation Guide
|
|||
|||
||||
|||
|||
|
|||

Choose a lightly loaded serverConsider a Tivoli Storage Manager server that has a light load for TivoliStorage Manager operations such as client backup and archive. A lightlyloaded server is also a good choice as the host system for the OperationsCenter.
Ensure that the server has the resources to handle both its typical TivoliStorage Manager server workload and the estimated workload for acting asthe hub server.
Locate the server for minimal roundtrip network latencyLocate the hub server so that the network connection between the hubserver and the spoke servers has a roundtrip latency that is no greater than5 ms. This latency can typically be achieved when the servers are on thesame local area network (LAN).
Networks that are poorly tuned, are heavily used by other applications, orhave roundtrip latency much higher than 5 ms can degradecommunications between the hub and spoke servers. For example,roundtrip latencies of 50 ms or higher can result in communicationtimeouts that cause spoke servers to disconnect or reconnect to theOperations Center. Such high latencies might be experienced inlong-distance, wide area network (WAN) communications.
If spoke servers are a long distance from the hub server and experiencefrequent disconnects in the Operations Center, you can increase the valueof the ADMINCOMMTIMEOUT option on each server to reduce the problem.
Verify that the hub server meets the resource requirements for status monitoringStatus monitoring requires extra resources on each server on which it isenabled. The resources that are required depend primarily on the numberof clients that are managed by the hub and spoke servers. Fewer resourcesare used on a hub server with a V7.1 spoke server than on a hub serverwith a V6.3.4 spoke server.
Verify that the hub server meets the resource requirements for processorusage, database space, archive log space, and I/O operations per second(IOPS) capacity.
A hub server with high IOPS capacity can handle a larger amount ofincoming status data from spoke servers. Use of the following storagedevices for the hub server database can help meet this capacity:v An enterprise-level solid-state drive (SSD)v An external SAN disk storage device with multiple volumes or multiple
spindles under each volume
In an environment with fewer than 1000 clients, consider establishing abaseline capacity of 1000 IOPS for the hub server database if the hubserver manages any spoke servers.
Determine whether your environment requires multiple hub serversIf more than 10,000 - 20,000 client nodes and virtual machine file spacesare managed by one set of hub and spoke servers, the resourcerequirements might exceed what the hub server has available, especially ifthe spoke servers are Tivoli Storage Manager V6.3.4 servers. Considerdesignating a second server as a hub server and moving spoke servers tothe new hub server to balance the load.
Planning to install the Operations Center
Chapter 13. Planning to install the Operations Center 179

Operating system requirementsThe Operations Center is available for AIX, Linux, and Windows systems.
You can run the Operations Center on the following systems:v Windows systems:
– Microsoft Windows Server 2008 R2: Standard, Enterprise, or DatacenterEdition (64-bit)
– Microsoft Windows Server 2012 (64-bit)– Microsoft Windows Server 2012 R2 (64-bit)
You cannot run the Operations Center on HP-UX or Oracle Solaris systems.However, you can use the Operations Center to manage Tivoli Storage ManagerV6.3.4 or later servers that run on any supported server operating system.
The operating systems on which the server can run are not limited to the operatingsystems on which the Operations Center can run.
For the most up-to-date requirements information, see Tivoli Storage ManagerOperations Center Software and Hardware Requirements.
Web browser requirementsThe Operations Center can run in Apple, Google, Microsoft, and Mozilla webbrowsers.
For optimal viewing of the Operations Center in the web browser, ensure that thescreen resolution for the system is set to a minimum of 1024 X 768 pixels.
For optimal performance, use a web browser that has good JavaScriptperformance, and enable browser caching.
The Operations Center can run in the following web browsers:v Apple Safari on the iPadv Google Chromev Microsoft Internet Explorer 10 and 11v Mozilla Firefox ESR 17 or later
To run the Operations Center in compliance with the National Institute ofStandards and Technology (NIST) Special Publications (SP) 800-131Arecommendation, communication between the Operations Center and the webbrowser must be secured by using the Transport Layer Security (TLS) 1.2 protocol.During installation, you specify whether SP 800-131A compliance is required andthe level of compliance. If strict SP 800-131A compliance is specified duringinstallation, the web browser must support TLS 1.2, and TLS 1.2 must be enabled.
The following web browser versions are the earliest versions that support TLS 1.2:v Apple Safari on the iPad running iOS 5v Google Chrome 30v Microsoft Internet Explorer 10v Mozilla Firefox ESR 24
Because the web browser might support multiple versions of TLS, make sure TLS1.2 is enabled.
Planning to install the Operations Center
180 IBM Tivoli Storage Manager for Windows: Installation Guide
||
|
|
|
|
|||||||
|
|
|
|
|
||

The web browser displays an SSL error if strict SP 800-131A compliance is specifiedduring installation, and the web browser does not meet the precedingrequirements.
Language requirementsBy default, the Operations Center uses the language that the web browser uses.However, the installation process uses the language that the operating system uses.Verify that the web browser and the operating system are set to the language thatyou require.
Table 30. Operations Center language values that you can use on Windows systems
Language Language option value
Chinese, Simplified chs
Chinese, Traditional cht
English ameng
French fra
German deu
Italian ita
Japanese (Shift-JIS) jpn
Korean kor
Portuguese, Brazilian ptb
Russian rus
Spanish esp
Requirements and limitations for Tivoli Storage Manager clientmanagement services
Tivoli Storage Manager client management services is a component that you installon Tivoli Storage Manager backup-archive clients to collect diagnostic informationsuch as client log files. Before you install the client management service on yoursystem, you must understand the requirements and limitations.
In the documentation for the client management service, client system is the systemwhere the backup-archive client is installed.
Requirements for the client management service
Verify the following requirements before you install the client management service:v To remotely access the client, the Operations Center administrator must have
system authority or one of the following client authority levels:– Policy authority– Client owner authority– Client node access authority
v Ensure that the client system meets the following requirements:– The backup-archive client must be at Tivoli Storage Manager Version 6 or
Version 7.– The client management service can be installed only on client systems that
run on Linux or Windows operating systems:
Planning to install the Operations Center
Chapter 13. Planning to install the Operations Center 181
|||
|
|
||||
||
|
|
||
|
|
|
|
||
||

- Linux x86 64-bit operating systems that are supported for thebackup-archive client
- Windows 32-bit and 64-bit operating systems that are supported for thebackup-archive client
– The SSL security protocol is required for transmission of data between theclient management service and Operations Center. Basic authentication isprovided and data and authentication information are encrypted through theSSL channel. SSL is automatically installed along with the necessary SSLcertificates when you install the client management service.
v On Linux client systems, you must have root user authority to install the clientmanagement service.
v For client systems that can have multiple client nodes, such as Linux clientsystems, ensure that each node name is unique on the client system.
Tip: After you install the client management service, you do not have to installit again because the service can discover multiple client options files.
For the most up-to-date system requirements for the client management service,see http://www.ibm.com/support/docview.wss?uid=swg21243309.
Limitations of the client management service
The client management service provides basic services for collecting diagnosticinformation from backup-archive clients. The following limitations exist for theclient management service:v You can install the client management service only on backup-archive clients,
and not on other Tivoli Storage Manager client components and products.v If the backup-archive clients are protected by a firewall, ensure that there is
firewall connectivity between the Operations Center and the backup-archiveclient through the configured port for the client management service. The defaultport is 9028, but it can be changed.
v The client management service scans all client log files to locate entries for theprevious 72-hour period.
v The Diagnosis page in the Operations Center provides basic troubleshootinginformation for backup-archive clients. However, for some backup issues, youmight have to access the client system and obtain further diagnostic information.
v If the combined size of the client error log files and schedule log files on a clientsystem is more than 500 MB, delays can occur in sending log records to theOperations Center. You can control the size of the log files by enabling log filepruning or wrapping by specifying the errorlogretention or errorlogmax clientoption.
v If you use the same client node name to connect to multiple Tivoli StorageManager servers that are installed on the same server hardware, you can viewlog files for only one of the client nodes.
Planning to install the Operations Center
182 IBM Tivoli Storage Manager for Windows: Installation Guide
||
||
|||||
||
||
||
||
|
|||
||
||||
||
|||
|||||
|||
|

Administrator IDs that the Operations Center requiresAn administrator must have a valid ID and password on the hub server to log into the Operations Center. An administrator ID is also assigned to the OperationsCenter so that the Operations Center can monitor servers.
The Operations Center requires the following Tivoli Storage Manager administratorIDs:
Administrator IDs that are registered on the hub serverAny administrator ID that is registered on the hub server can be used tolog in to the Operations Center. The authority level of the ID determineswhich tasks can be completed. You can create new administrator IDs byusing the REGISTER ADMIN command.
Restriction: To use an administrator ID in a multiple-server configuration,the ID must be registered on the hub and spoke servers with the samepassword and authority level.
To manage authentication for these servers, consider using one of thefollowing methods:v A Lightweight Directory Access Protocol (LDAP) serverv The Tivoli Storage Manager enterprise configuration functions to
automatically distribute changes to the administrator definitions.For more information about the enterprise configuration functions, seethe information about managing a network of Tivoli Storage Managerservers in the Administrator's Guide.
Monitoring administrator IDWhen you initially configure the hub server, an administrator ID namedIBM-OC-server_name is registered with system authority on the hub serverand is associated with the initial password that you specify. This ID, whichis sometimes called the monitoring administrator, is intended for use only bythe Operations Center.
Do not delete, lock, or modify this ID. The same administrator ID with thesame password is registered on the spoke servers that you add. Thepassword is automatically changed on the hub and spoke servers every 90days. You do not need to use or manage this password.
Restriction: The Operations Center maintains the monitoringadministrator ID and password on spoke servers unless you use anenterprise configuration to manage these credentials. For more informationabout using an enterprise configuration to manage the credentials, see“Tips for designing the hub and spoke server configuration” on page 177.
Planning to install the Operations Center
Chapter 13. Planning to install the Operations Center 183
|||||
IBM Installation ManagerThe Operations Center uses IBM Installation Manager, which is an installationprogram that can use remote or local software repositories to install or updatemany IBM products.
If the required version of IBM Installation Manager is not already installed, it isautomatically installed or upgraded when you install the Operations Center. Itmust remain installed on the system so that the Operations Center can be updatedor uninstalled later as needed.
The following list contains explanations of some terms that are used in IBMInstallation Manager:
OfferingAn installable unit of a software product.
The Operations Center offering contains all of the media that IBMInstallation Manager requires to install the Operations Center.
PackageThe group of software components that are required to install an offering.
The Operations Center package contains the following components:v IBM Installation Manager installation programv Operations Center offering
Package groupA set of packages that share a common parent directory.
The default package group for the Operations Center package is IBMTivoli Storage Manager.
RepositoryA remote or local storage area for data and other application resources.
The Operations Center package is stored in a repository on IBM FixCentral.
Shared resources directoryA directory that contains software files or plug-ins that are shared bypackages.
IBM Installation Manager stores installation-related files in the sharedresources directory, including files that are used for rolling back to aprevious version of the Operations Center.
Installation checklistBefore you install the Operations Center, you must verify certain information, suchas the installation credentials, and you must determine the input to provide to IBMInstallation Manager for the installation.
The following checklist highlights the information that you must verify ordetermine before you install the Operations Center, and Table 31 on page 185describes the details of this information:__ Verify the host name for the computer where the Operations Center will be
installed.__ Verify the installation credentials.
Planning to install the Operations Center
184 IBM Tivoli Storage Manager for Windows: Installation Guide

__ Determine the Operations Center installation directory, if you do not want toaccept the default path.
__ Determine the IBM Installation Manager installation directory, if you do notwant to accept the default path.
__ Determine the port number to be used by the Operations Center web server,if you do not want to accept the default port number.
__ Determine the password for secure communications.__ Determine whether secure communications must comply with the National
Institute of Standards and Technology (NIST) Special Publications (SP)800-131A recommendation.
Table 31. Information to verify or determine before you install the Operations Center
Information Details
Host name for the computerwhere the Operations Centerwill be installed
The host name must meet the following criteria:
v It must not contain double-byte character set (DBCS) characters or the underscorecharacter (_).
v Although the host name can contain the hyphen character (-), it cannot have ahyphen as the last character in the name.
Installation credentials To install the Operations Center, you must use the following user account:
v Administrator
Operations Center installationdirectory
The Operations Center is installed in the ui subdirectory of the installation directory.
The following path is the default path for the Operations Center installationdirectory:
v c:\Program Files\Tivoli\TSM
For example, if you use this default path, the Operations Center is installed in thefollowing directory:
c:\Program Files\Tivoli\TSM\ui
The installation directory path must meet the following criteria:
v The path must contain no more than 128 characters.
v The path must include only ASCII characters.
v The path cannot include non-displayable control characters.
v The path cannot include any of the following characters:
% | < > ’ " $ & ; *
IBM Installation Managerinstallation directory
The following path is the default path for the IBM Installation Manager installationdirectory:
v C:\Program Files\IBM\Installation Manager
Port number that is used bythe Operations Center webserver
The value for the secure (https) port number must meet the following criteria:
v The number must be an integer in the range 1024 - 65535.
v The number cannot be in use or allocated to other programs.
If you do not specify a port number, the default value is 11090.
Tip: If you later do not remember the port number that you specified, refer to thefollowing file, where installation_dir represents the directory where theOperations Center is installed:
v installation_dir\ui\Liberty\usr\servers\guiServer\bootstrap.properties
The bootstrap.properties file contains the Tivoli Storage Manager server connectioninformation.
Planning to install the Operations Center
Chapter 13. Planning to install the Operations Center 185
|||

Table 31. Information to verify or determine before you install the Operations Center (continued)
Information Details
Password for securecommunications
The Operations Center uses Hypertext Transfer Protocol Secure (HTTPS) tocommunicate with web browsers. You can optionally use the Secure Sockets Layer(SSL) protocol to secure communications between the Operations Center and the hubserver, and between Tivoli Storage Manager servers.
The truststore file of the Operations Center contains the SSL certificate that theOperations Center uses for HTTPS communication with web browsers. Duringinstallation of the Operations Center, you create a password for the truststore file.
Tip: If you later choose to set up SSL communication between the OperationsCenter and the hub server, you must use the same password to add the SSLcertificate of the hub server to the truststore file.
The password for the truststore file must meet the following criteria:
v The password must contain a minimum of 6 characters and a maximum of 64characters.
v The password must contain at least the following characters:
– One uppercase letter (A – Z)
– One lowercase letter (a – z)
– One digit (0 – 9)
– Two of the following non-alphanumeric characters:
~ ! @ # $ % ^ & * _ - + = ` |
( ) { } [ ] : ; < > , . ? /
Planning to install the Operations Center
186 IBM Tivoli Storage Manager for Windows: Installation Guide

Table 31. Information to verify or determine before you install the Operations Center (continued)
Information Details
NIST SP800-131A compliancemode
When you install the Operations Center, you can specify whether NIST SP800-131Acompliance is required, and the level of compliance. Before you install theOperations Center, determine if you want strict SP800-131A compliance, transitionalSP800-131A compliance, or if you do not need to comply with the recommendation.
If you enable SP800-131A compliance, stronger cryptographic keys and algorithmsare used for HTTPS communication between the Operations Center and the webbrowsers. There are two compliance modes: transition and strict. Both modes enablethe web server to secure HTTPS communication by using the Transport LayerSecurity (TLS) 1.2 protocol. In transition mode, however, TLS 1.0 or TLS 1.1 areallowed if the web browser is not enabled for TLS 1.2. In strict mode, fullSP800-131A compliance is enforced, and the web browser must have TLS 1.2 enabledto run the Operations Center.
If you do not enable SP800-131A compliance, HTTPS communication is secured byless-complex cryptography. However, processor usage and network latency might bereduced.
Requirement: If you specify strict SP800-131A compliance, the web browser mustsupport TLS 1.2, and TLS 1.2 must be enabled.
Restrictions:
v You cannot change the SP800-131A compliance mode after installation. To changethis setting you must uninstall and reinstall the Operations Center.
v This installation option is available only when you use the Install function of theIBM Installation Manager. This option is not available when you use the Updatefunction. If you have an earlier version of the Operations Center installed and youwant to enable SP800-131A compliance, you must uninstall and reinstall theOperations Center.
Remember: The SP800-131A compliance option applies only to the OperationsCenter communication with web browsers. To fully enable SP800-131A compliance,you must configure Tivoli Storage Manager components in your environmentindividually. To secure communications between the Operations Center and the hubserver, you can add the SSL certificate of the hub server to the truststore file of theOperations Center. For SP800-131A compliance, the cert256.arm certificate must bethe default certificate on the hub server, you must copy this certificate to thetruststore file of the Operations Center.
Related tasks:“Configuring for SSL communication” on page 200“Resetting the password for the Operations Center truststore file” on page 205
Planning to install the Operations Center
Chapter 13. Planning to install the Operations Center 187
||||||
||||||||
|||
||
|
||
|||||
||||||||

Planning to install the Operations Center
188 IBM Tivoli Storage Manager for Windows: Installation Guide
Chapter 14. Installing the Operations Center
You can install the Operations Center by using any of the following methods: agraphical wizard, the command line in console mode, or silent mode.
Before you begin
You cannot configure the Operations Center until you install, configure, and startthe Tivoli Storage Manager server. Therefore, before you install the OperationsCenter, install the appropriate Tivoli Storage Manager server package, according tothe server version requirements in “Hub and spoke server requirements” on page176.
You can install the Operations Center on a computer with the Tivoli StorageManager server or on a separate computer.
Obtaining the Operations Center installation packageYou can obtain the installation package from the product DVD or from an IBMdownload site such as IBM Passport Advantage or IBM Fix Central.
About this task
If you obtain the package from the product DVD, ensure that the installation filesare visible on the DVD drive.
If you obtain the package from an IBM download site, you must extract theinstallation files.
Procedure
Use the following procedure to extract the Operations Center installation files:v On Windows systems:
1. Download the following package file to the directory of your choice:7.1.1.000-TIV-TSMOC-Windows.exe
2. In Windows Explorer, double-click the file name to extract the installationfiles.The self-extracting package file is extracted to the directory.
Installing the Operations Center by using a graphical wizardYou can install or update the Operations Center by using the graphical wizard ofIBM Installation Manager.
Procedure1. From the directory where the Operations Center installation package file is
extracted, issue the following command:install.bat
2. Follow the wizard instructions to install the IBM Installation Manager andOperations Center packages.
© Copyright IBM Corp. 1993, 2014 189

What to do next
See “Configuring the Operations Center” on page 195.
Installing the Operations Center in console modeYou can install or update the Operations Center by using the command line inconsole mode.
Procedure1. From the directory where the installation package file is extracted, run the
following program:install.bat -c
2. Follow the console instructions to install the Installation Manager andOperations Center packages.
What to do next
See “Configuring the Operations Center” on page 195.
Installing the Operations Center in silent modeYou can install or update the Operations Center in silent mode. In silent mode, theinstallation does not send messages to a console but instead stores messages anderrors in log files. A silent installation can use response files for data input.
Before you begin
The input directory, which is in the directory where the installation package isextracted, contains the following sample response files for installing, updating, anduninstalling the Operations Center:v install_response_sample.xml
v update_response_sample.xml
v uninstall_response_sample.xml
You can use these sample files as they are, with the default values, or you cancustomize them.
Procedure1. Create a response file, or use one of the following default response files:
v install_response_sample.xml
v update_response_sample.xml
If you use a default response file, update the following line of the file to createa password for the truststore file of the Operations Center, where mypasswordrepresents the password:<data key=’user.SSL_PASSWORD’ value=’mypassword’/>
For more information about this password, see Installation checklist.To generate a response file as part of a console-mode installation, complete theselection of the console-mode installation options. Then, in the Summary panel,enter G to generate the response file according to the previously selectedoptions.
Installing the Operations Center
190 IBM Tivoli Storage Manager for Windows: Installation Guide

2. From the directory where the installation package file is extracted, issue thefollowing command, where response_file represents the response file path,including the file name:v install.bat -s -input response_file -acceptLicense
What to do next
See “Configuring the Operations Center” on page 195.
Installing the Operations Center
Chapter 14. Installing the Operations Center 191

192 IBM Tivoli Storage Manager for Windows: Installation Guide

Chapter 15. Upgrading the Operations Center
You can upgrade the Operations Center by using any of the following methods: agraphical wizard, the command line in console mode, or silent mode.
Before you begin
Before you upgrade the Operations Center, review the system requirements andthe installation checklist. The new version of the Operations Center might havemore or different requirements and considerations than the version you arecurrently using.
Restriction: During installation of the Operations Center, you can specify whetherNIST SP800-131A compliance is required. This installation option is not availableduring a regular upgrade. If you want to use the TLS 1.2 protocol to securecommunication between the Operations Center and web browsers, you mustuninstall and then reinstall the Operations Center.
About this task
The instructions for upgrading the Operations Center are the same as theinstructions for installing the Operations Center, with the following exceptions:v You use the Update function of IBM Installation Manager rather than the Install
function.
Tip: In IBM Installation Manager, the term update means to discover and installupdates and fixes to installed software packages. In this context, update andupgrade are synonymous.
v If you are upgrading the Operations Center in silent mode, you can skip thestep of creating a password for the truststore file.
© Copyright IBM Corp. 1993, 2014 193

Upgrading the Operations Center
194 IBM Tivoli Storage Manager for Windows: Installation Guide

Chapter 16. Getting started with the Operations Center
Before you can use the Operations Center to manage your storage environment,you must configure it.
About this task
After you install the Operations Center, complete the following basic configurationsteps:1. Designate the hub server.2. Add any spoke servers.3. Optionally, configure email alerts on the hub and spoke servers.
Figure 4 illustrates an Operations Center configuration.
Configuring the Operations CenterWhen you open the Operations Center for the first time, you must configure it tomanage your storage environment. You must associate the Operations Center witha Tivoli Storage Manager server that is designated as the hub server. You can thenconnect additional Tivoli Storage Manager servers as spoke servers.
Spoke server
Spoke server
Spoke server
Spoke serverHub server
Operations Center(on hub server computer
or separate computer)
Figure 4. Example of an Operations Center configuration with the hub and spoke servers
© Copyright IBM Corp. 1993, 2014 195

Designating the hub serverWhen you connect to the Operations Center for the first time, you must designatewhich Tivoli Storage Manager server is the hub server.
Procedure
In a web browser, enter the following address, where hostname represents the nameof the computer where the Operations Center is installed, and secure_portrepresents the port number that the Operations Center uses for HTTPScommunication on that computer:https://hostname:secure_port/oc
Tips:
v The URL is case-sensitive. For example, ensure that you type “oc” in lowercaseas indicated.
v For more information about the port number, see the Installation checklist.v If you are connecting to the Operations Center for the first time, you must
provide the following information:– Connection information for the Tivoli Storage Manager server that you want
to designate as a hub server– Login credentials for an administrator ID that is defined for that Tivoli
Storage Manager serverv If the event-record retention period of the Tivoli Storage Manager server is less
than 14 days, the period is automatically reset to 14 days if you configure theserver as a hub server.
What to do next
If you have multiple Tivoli Storage Manager servers in your environment, add theother Tivoli Storage Manager servers as spoke servers to the hub server.
Attention: Do not change the name of a Tivoli Storage Manager server after it isconfigured as a hub or spoke server.Related concepts:“Hub and spoke server requirements” on page 176“Administrator IDs that the Operations Center requires” on page 183
Adding a spoke serverAfter you configure the hub server for the Operations Center, you can add one ormore spoke servers to the hub server.
Procedure1. In the Operations Center menu bar, click Servers. The Servers page opens.
In the table on the Servers page, a server might have a status of“Unmonitored.” This status means that although an administrator defined thisserver to the hub server by using the DEFINE SERVER command, the server isnot yet configured as a spoke server.
2. Complete one of the following steps:v Click the server to highlight it, and in the table menu bar, click Monitor
Spoke.
Getting started with the Operations Center
196 IBM Tivoli Storage Manager for Windows: Installation Guide
||
|
||
||
||
|||
v If the server that you want to add is not shown in the table, click + Spoke inthe table menu bar.
3. Provide the necessary information, and complete the steps in the spokeconfiguration wizard.
Tip: If the event-record retention period of the Tivoli Storage Manager server isless than 14 days, the period is automatically reset to 14 days if you configurethe server as a spoke server.
Sending email alerts to administratorsAn alert is a notification of a relevant problem on the Tivoli Storage Managerserver and is triggered by a Tivoli Storage Manager server message. Alerts can beshown in the Operations Center and can be sent from the server to administratorsby email.
Before you begin
Before you configure email notification for administrators about alerts, ensure thatthe following requirements are met:v An SMTP server is required to send and receive alerts by email, and the Tivoli
Storage Manager server that sends the alerts by email must have access to theSMTP server.
Tip: If the Operations Center is installed on a separate computer, that computerdoes not need access to the SMTP server.
v An administrator must have system privilege to configure email notification.
About this task
An email notification is sent only for the first occurrence of an alert. Also, if analert is generated before you configure email notification, no email notification issent for that alert.
You can configure email notification in the following ways:v Send notification for individual alertsv Send alert summaries
An alert summary contains information about current alerts. The summaryincludes the total number of alerts, the total number of active and inactive alerts,the oldest alert, the newest alert, and the most frequently occurring alert.
You can specify a maximum of three administrators to receive alert summaries byemail. Alert summaries are sent approximately every hour.
Procedure
To configure email notification for administrators about alerts, complete thefollowing steps on each hub and spoke server from which you want to receiveemail alerts:1. To verify that alert monitoring is turned on, issue the following command:
QUERY MONITORSETTINGS
2. If the command output indicates that alert monitoring is turned off, issue thefollowing command. Otherwise, proceed to the next step.
Getting started with the Operations Center
Chapter 16. Getting started with the Operations Center 197
|
||||
|
||
|||
||
|
|
|||
|
|
|
|||
||
|
|||
|
|
||

SET ALERTMONITOR ON
3. To enable the sending of email notification, issue the following command:SET ALERTEMAIL ON
4. To define the SMTP server that is used to send email notification, issue thefollowing command:SET ALERTEMAILSMTPHOST host_name
5. To specify the port number for the SMTP server, issue the following command:SET ALERTEMAILSMTPPORT port_number
The default port number is 25.6. To specify the email address of the sender of the alerts, issue the following
command:SET ALERTEMAILFROMADDR email_address
7. For each administrator ID that must receive email notification, issue one of thefollowing commands to activate email notification and to specify the emailaddress:REGISTER ADMIN admin_name ALERT=YES EMAILADDRESS=email_address
UPDATE ADMIN admin_name ALERT=YES EMAILADDRESS=email_address
8. Choose either, or both, of the following options, and specify the administratorIDs to receive email notification:v Send notification for individual alerts
To specify or update the administrator IDs to receive email notification for anindividual alert, issue one of the following commands:DEFINE ALERTTRIGGER message_number ADmin=admin_name1,admin_name2
UPDATE ALERTTRIGGER message_number ADDadmin=admin_name3 DELadmin=admin_name1
Tip: From the Configure Alerts page of the Operations Center, you can selectthe administrators who will receive email notification.
v Send alert summariesTo specify or update the administrator IDs to receive alert summaries byemail, issue the following command:SET ALERTSUMMARYTOADMINS admin_name1,admin_name2,admin_name3
If you want to receive alert summaries but do not want to receive notificationabout individual alerts, complete the following steps:a. Suspend notification about individual alerts, as described in “Suspending
email alerts temporarily” on page 199.b. Ensure that the respective administrator ID is listed in the following
command:SET ALERTSUMMARYTOADMINS admin_name1,admin_name2,admin_name3
Sending email alerts to multiple administrators
The following example illustrates the commands that cause any alerts for messageANR1075E to be sent in an email to the administrators myadmin, djadmin, andcsadmin:SET ALERTMONITOR ONSET ALERTEMAIL ONSET ALERTEMAILSMTPHOST mymailserver.domain.comSET ALERTEMAILSMTPPORT 450SET ALERTEMAILFROMADDR [email protected] ADMIN myadmin ALERT=YES [email protected]
Getting started with the Operations Center
198 IBM Tivoli Storage Manager for Windows: Installation Guide
|
|
|
||
|
|
|
|
||
|
|||
|
|
||
|
||||
||
|
||
|
||
||
||
|
|
|||
||||||

UPDATE ADMIN djadmin ALERT=YES [email protected] ADMIN csadmin ALERT=YES [email protected] ALERTTRIGGER anr0175e ADMIN=myadmin,djadmin,csadmin
Suspending email alerts temporarilyIn certain situations, you might want to suspend email alerts temporarily. Forexample, you might want to receive alert summaries but suspend notificationabout individual alerts, or you might want to suspend email alerts when anadministrator is on vacation.
Before you begin
Configure email notification for administrators, as described in “Sending emailalerts to administrators” on page 197.
Procedure
Suspend email notification for individual alerts or for alert summaries.v Suspend notification about individual alerts
Use either of the following methods:
UPDATE ADMIN commandTo turn off email notification for the administrator, issue the followingcommand:UPDATE ADMIN admin_name ALERT=NO
To turn on email notification again later, issue the following command:UPDATE ADMIN admin_name ALERT=YES
UPDATE ALERTTRIGGER commandTo prevent a specific alert from being sent to an administrator, issue thefollowing command:UPDATE ALERTTRIGGER message_number DELADMIN=admin_name
To start sending that alert to the administrator again, issue the followingcommand:UPDATE ALERTTRIGGER message_number ADDADMIN=admin_name
v Suspend notification about alert summariesTo prevent alert summaries from being sent to an administrator, remove theadministrator ID from the list in the following command:SET ALERTSUMMARYTOADMINS admin_name1,admin_name2,admin_name3
If an administrator ID is listed in the preceding command, the administratorreceives alert summaries by email, even if notification about individual alerts issuspended for the respective administrator ID.
Getting started with the Operations Center
Chapter 16. Getting started with the Operations Center 199
|||
|||||
|
||
|
|
|
|
|||
|
|
|
|||
|
||
|
|
||
|
|||
|

Adding customized text to the login screenYou can add customized text, such as your organization's Terms of Use of thesoftware, to the login screen of the Operations Center so that users of theOperations Center see the text before they enter their user name and password.
Procedure
To add customized text to the login screen, complete the following steps:1. On the computer where the Operations Center is installed, go to the following
directory, where installation_dir represents the directory in which theOperations Center is installed:installation_dir\ui\Liberty\usr\servers\guiServer
2. In the directory, create a file that is named loginText.html that contains thetext that you want to add to the login screen. Any special, non-ASCII text mustbe UTF-8 encoded.
Tip: You can format the text by adding HTML tags.3. Review the added text on the login screen of the Operations Center.
To open the Operations Center, enter the following address in a web browser,where hostname represents the name of the computer where the OperationsCenter is installed, and secure_port represents the port number that theOperations Center uses for HTTPS communication on that computer:https://hostname:secure_port/oc
Configuring for SSL communicationThe Operations Center uses Hypertext Transfer Protocol Secure (HTTPS) tocommunicate with web browsers. You can optionally use the Secure Sockets Layer(SSL) protocol to secure communications between the Operations Center and thehub server, and between the hub server and associated spoke servers.
Configuring for SSL communication between the OperationsCenter and the hub server
To use the Secure Sockets Layer (SSL) protocol to secure communications betweenthe Operations Center and the hub server, you must add the SSL certificate of thehub server to the truststore file of the Operations Center.
Before you begin
The truststore file of the Operations Center is a container for SSL certificates thatthe Operations Center can access. The truststore file contains the SSL certificate thatthe Operations Center uses for HTTPS communication with web browsers.
During the installation of the Operations Center, you create a password for thetruststore file. To set up SSL communication between the Operations Center andthe hub server, you must use the same password to add the SSL certificate of thehub server to the truststore file. If you do not remember this password, you canreset it. See “Resetting the password for the Operations Center truststore file” onpage 205.
Procedure1. To ensure that SSL ports are set on the hub server, complete the following
steps:
Getting started with the Operations Center
200 IBM Tivoli Storage Manager for Windows: Installation Guide
|
|||
|
|
|||
|
|||
|
|
||||
|
|

a. From a Tivoli Storage Manager command line, issue the followingcommand to the hub server:QUERY OPTION SSL*
The results include four server options, as shown in the followingexample:
Server Option Option Setting------------------------------SSLTCPPort 3700SSLTCPADMINPort 3800SSLTLS12 YesSSLFIPSMODE No
b. Ensure that the SSLTCPPORT option has a value in the Option Settingcolumn. Also, ensure that the SSLTLS12 option is set to YES so that theTransport Layer Security (TLS) protocol version 1.2 is used forcommunication. To update the values of these options, edit thedsmserv.opt file of the hub server, and restart the hub server.
2. Specify the cert256.arm certificate as the default certificate in the key databasefile of the hub server.The cert256.arm certificate must be used for SSL connections to the hubserver if the SSLTLS12 option is set to YES. To specify cert256.arm as thedefault certificate, complete the following steps:a. Issue the following command from the hub server instance directory:
gsk8capicmd_64 -cert -setdefault -db cert.kdb -stashed-label "TSM Server SelfSigned SHA Key"
b. Restart the hub server so that it can receive the changes to the keydatabase file.
3. To verify that the cert256.arm certificate is set as the default certificate in thekey database file of the hub server, issue the following command:gsk8capicmd_64 -cert -list -db cert.kdb -stashed
4. Stop the Operations Center web server.5. Go to the command line of the operating system on which the Operations
Center is installed.6. Go to the following directory, where installation_dir represents the
directory in which the Operations Center is installed:v installation_dir\ui\jre\bin
7. Open the IBM Key Management window by issuing the following command:ikeyman
8. Click Key Database File > Open.9. In the Open window, click Browse, and go to the following directory, where
installation_dir represents the directory in which the Operations Center isinstalled:v installation_dir\ui\Liberty\usr\servers\guiServer
10. In the guiServer directory, select the gui-truststore.jks file.11. Click Open, and click OK.12. Enter the password for the truststore file, and click OK.13. In the Key database content area of the IBM Key Management window, click
the arrow, and select Signer Certificates from the list.14. Click Add.15. In the Open window, click Browse, and go to the hub server instance
directory, as shown in the following example:
Getting started with the Operations Center
Chapter 16. Getting started with the Operations Center 201
||
|||
|
||
||
||
|
||

v c:\Program Files\Tivoli\TSM\server1
The directory contains the following SSL certificates:v cert.arm
v cert256.arm
If you cannot access the hub server instance directory from the Open window,complete the following steps:a. Use FTP or another file-transfer method to copy the cert256.arm files from
the hub server to the following directory on the computer where theOperations Center is installed:v installation_dir\ui\Liberty\usr\servers\guiServer
b. In the Open window, go to the guiServer directory.16. Because the SSLTLS12 server option is set to YES, select the cert256.arm
certificate as the SSL certificate.
Tip: The certificate that you choose must be set as the default certificate in thekey database file of the hub server. For more information, see step 2 on page201 and 3 on page 201.
17. Click Open, and click OK.18. Enter a label for the certificate. For example, enter the name of the hub server.19. Click OK. The SSL certificate of the hub server is added to the truststore file,
and the label is displayed in the Key database content area of the IBM KeyManagement window.
20. Close the IBM Key Management window.21. Start the Operations Center web server.22. To configure the Operations Center, complete the following steps in the login
window of the configuration wizard:a. In the Connect to field, enter the value of one of the following server
options as the port number:v SSLTCPPORT
v SSLTCPADMINPORT
Tip: If the SSLTCPADMINPORT option has a value, use that value. Otherwise,use the value of the SSLTCPPORT option.
b. Select the Use SSL option.If the Operations Center was previously configured, you can review thecontents of the serverConnection.properties file to verify the connectioninformation. The serverConnection.properties file is in the followingdirectory on the computer where the Operations Center is installed:v installation_dir\ui\Liberty\usr\servers\guiServer
What to do next
To set up SSL communication between the hub server and a spoke server, see“Configuring for SSL communication between the hub server and a spoke server”on page 203.
Getting started with the Operations Center
202 IBM Tivoli Storage Manager for Windows: Installation Guide
|
|
|
|
||
|||
|
|
||
|||

Configuring for SSL communication between the hub serverand a spoke server
To use the Secure Sockets Layer (SSL) protocol to secure communications betweenthe hub server and a spoke server, you must define the SSL certificate of the spokeserver to the hub server. You must also configure the Operations Center to monitorthe spoke server.
Before you begin
Ensure that the Operations Center is configured to use the SSL protocol forcommunication between the Operations Center and the hub server.
Procedure1. To ensure that SSL ports are correctly set on the hub server and each spoke
server, complete the following steps:a. From a Tivoli Storage Manager command line, issue the following
command to each server:QUERY OPTION SSL*
The results include four server options, as shown in the followingexample:
Server Option Option Setting------------------------------SSLTCPPort 3700SSLTCPADMINPort 3800SSLTLS12 YesSSLFIPSMODE No
b. Ensure that the SSLTCPPORT and SSLTCPADMINPORT options have values inthe Option Setting column. Also, ensure that the SSLTLS12 option is set toYES so that the Transport Layer Security (TLS) protocol version 1.2 is usedfor communication. To update the values of these options, edit thedsmserv.opt file of the respective server, and restart that server.The SSLTCPPORT, SSLTCPADMINPORT, and SSLTLS12 options are required forall Tivoli Storage Manager servers that use SSL. The SSLTCPPORT optiontriggers the generation of the following files in the server instancedirectory:v cert.arm (SSL certificate)v cert256.arm (SSL certificate)v cert.kdb (key database file)
Restriction: Because server-to-server connections are not supported by thecert.arm certificate, you must use the cert256.arm certificate.
2. On the spoke server, change to the directory of the spoke server instance.3. To specify the required cert256.arm certificate as the default certificate in the
key database file of the spoke server, issue the following command:gsk8capicmd_64 -cert -setdefault -db cert.kdb -stashed-label "TSM Server SelfSigned SHA Key"
4. To verify the certificates in the key database file of the spoke server, issue thefollowing command:gsk8capicmd_64 -cert -list -db cert.kdb -stashed
The following output is an example of the command output:
Getting started with the Operations Center
Chapter 16. Getting started with the Operations Center 203
||
||
|
||
||||||||
|||||
||||
|
|
|
||
|

Certificates found* default, - personal, ! trusted! Entrust.net Secure Server Certification Authority! Entrust.net Certification Authority (2048)! Entrust.net Client Certification Authority! Entrust.net Global Client Certification Authority! Entrust.net Global Secure Server Certification Authority! VeriSign Class 1 Public Primary Certification Authority! VeriSign Class 2 Public Primary Certification Authority! VeriSign Class 3 Public Primary Certification Authority! VeriSign Class 1 Public Primary Certification Authority - G2! VeriSign Class 2 Public Primary Certification Authority - G2! VeriSign Class 3 Public Primary Certification Authority - G2! VeriSign Class 4 Public Primary Certification Authority - G2! VeriSign Class 1 Public Primary Certification Authority - G3! VeriSign Class 2 Public Primary Certification Authority - G3! VeriSign Class 3 Public Primary Certification Authority - G3! VeriSign Class 3 Public Primary Certification Authority - G5! VeriSign Class 4 Public Primary Certification Authority - G3! VeriSign Class 3 Secure Server CA! Thawte Primary Root CA! Thawte Primary Root CA - G2 ECC! Thawte Server CA! Thawte Premium Server CA! Thawte Personal Basic CA! Thawte Personal Freemail CA! Thawte Personal Premium CA- TSM Server SelfSigned Key*- TSM Server SelfSigned SHA Key
5. Securely transfer the cert256.arm file of the spoke server to the hub server.6. On the hub server, change to the directory of the hub server instance.7. To define the spoke server SSL certificate to the hub server, issue the following
command from the hub server instance directory, where spoke_servername isthe name of the spoke server, and spoke_cert256.arm is the file name of thespoke server SSL certificate:gsk8capicmd_64 -cert -add -db cert.kdb -stashed -format ascii-label spoke_servername -file spoke_cert256.arm
The spoke server does not require the hub server SSL certificate forhub-to-spoke communication. However, other Tivoli Storage Manager serverconfigurations that require cross-defined servers do require the spoke serverto have the hub server SSL certificate.
Tip: From each server, you can view the certificates in the key database fileby issuing the following command:gsk8capicmd_64 -cert -list -db cert.kdb -stashed
8. Restart the hub server and the spoke server.9. For the hub server, issue the DEFINE SERVER command, according to the
following example:DEFINE SERVER spoke_servername HLA=spoke_addressLLA=spoke_SSLTCPADMINPort SERVERPA=spoke_serverpassword SSL=YES
10. In the Operations Center menu bar, click Servers.In the table on the Servers page, the spoke server that you defined in step 9should have a status of “Unmonitored.” However, depending on the settingfor the status refresh interval, you might not see the spoke server immediately.
11. Click the spoke server to highlight it, and in the table menu bar, click MonitorSpoke.
Getting started with the Operations Center
204 IBM Tivoli Storage Manager for Windows: Installation Guide

Resetting the password for the Operations Center truststorefile
To set up SSL communication between the Operations Center and the hub server,you must know the password for the truststore file of the Operations Center. Youcreate this password during the installation of the Operations Center. If you do notknow the password, you can reset it.
About this task
To reset the password, you must create a new password, delete the truststore fileof the Operations Center, and restart the Operations Center web server.
Procedure1. Stop the Operations Center web server.2. Go to the following directory, where installation_dir represents the directory
in which the Operations Center is installed:installation_dir\ui\Liberty\usr\servers\guiServer
3. Open the bootstrap.properties file, which contains the password for thetruststore file. If the password is unencrypted, you can use it to open thetruststore file without having to reset it.The following examples indicate the difference between an encrypted and anunencrypted password:
Encrypted password exampleEncrypted passwords begin with the text string {xor}.
The following example shows the encrypted password as the value ofthe tsm.truststore.pswd parameter:tsm.truststore.pswd={xor}MiYPPiwsKDAtOw==
Unencrypted password exampleThe following example shows the unencrypted password as the valueof the tsm.truststore.pswd parameter:tsm.truststore.pswd=J8b%^B
4. Reset the password by replacing the password in the bootstrap.properties filewith a new password. You can replace the password with an encrypted orunencrypted password. Remember the unencrypted password for future use.To create an encrypted password, complete the following steps:a. Create an unencrypted password.
The password for the truststore file must meet the following criteria:v The password must contain a minimum of 6 characters and a maximum
of 64 characters.v The password must contain at least the following characters:
– One uppercase letter (A – Z)– One lowercase letter (a – z)– One digit (0 – 9)– Two of the following non-alphanumeric characters:
~ ! @ # $ % ^ & * _ - + = ` |
( ) { } [ ] : ; < > , . ? /
b. From the command line of the operating system, go to the followingdirectory:
installation_dir\ui\Liberty\bin
Getting started with the Operations Center
Chapter 16. Getting started with the Operations Center 205

c. To encrypt the password, issue the following command, where myPasswordrepresents the unencrypted password:
securityUtility.bat encode myPassword
The following message might be shown:! "java"’ is not recognized as an internal or external command,operable program or batch file.
If this message is shown, complete the following steps:1) Issue the following command, where installation_dir represents the
directory where the Operations Center is installed:set JAVA_HOME="installation_dir\ui\jre"
2) Reissue the following command to encrypt the password:securityUtility.bat encode myPassword
5. Close the bootstrap.properties file.6. Go to the following directory:
installation_dir\ui\Liberty\usr\servers\guiServer
7. Delete the gui-truststore.jks file, which is the truststore file of the OperationsCenter.
8. Start the Operations Center web server.
Results
A new truststore file is automatically created for the Operations Center, and theSSL certificate of the Operations Center is automatically included in the truststorefile.
Starting and stopping the web serverThe web server of the Operations Center runs as a service and starts automatically.You might need to stop and start the web server, for example, to makeconfiguration changes.
Procedure
Stop and start the web server.v From the Services window, stop or start the Tivoli Storage Manager Operations
Center service.
Collecting diagnostic information with Tivoli Storage Manager clientmanagement services
Tivoli Storage Manager client management services collects diagnostic informationabout Tivoli Storage Manager backup-archive clients and makes the informationavailable to the Operations Center for basic monitoring capability.
About this task
After you install the client management service, you can view the Diagnosis pagein the Operations Center to obtain troubleshooting information for backup-archiveclients.
Getting started with the Operations Center
206 IBM Tivoli Storage Manager for Windows: Installation Guide
|
|
|||
|
|||

Installing the client management service by using a graphicalwizard
To collect diagnostic information about backup-archive clients such as client logfiles, you must install the client management service on the client systems that youmanage.
Before you begin
Review “Requirements and limitations for Tivoli Storage Manager clientmanagement services” on page 181.
About this task
You must install the client management service on the same computer as thebackup-archive client.
Procedure1. Obtain the installation package for the client management service. The
installation package is included in the Operations Center installation package,which is on the product DVD. Alternatively, you can download the installationpackage for the client management service from an IBM download site such asIBM Passport Advantage or IBM Fix Central.The following table shows the names of the installation packages.
Client operating system Installation package name
Linux x86 64-bit 7.1.1.000-TIV-TSMCMS-Linuxx64.bin
Windows 32-bit 7.1.1.000-TIV-TSMCMS-Windows32.exe
Windows 64-bit 7.1.1.000-TIV-TSMCMS-Windows64.exe
2. Create a directory on the client system that you want to manage, and copy theinstallation package there.
3. Extract the contents of the installation package file.v On Linux client systems, complete the following steps:
a. Change the file to an executable file by issuing the following command:chmod +x 7.1.1.000-TIV-TSMCMS-Linuxx64.bin
b. Issue the following command:./7.1.1.000-TIV-TSMCMS-Linuxx64.bin
v On Windows client systems, double-click the installation package name inWindows Explorer.
Tip: If you previously installed and uninstalled the package, select All whenprompted to replace the existing installation files.
4. Run the installation batch file from the directory where you extracted theinstallation files and associated files. This is the directory that you created instep 2.v On Linux client systems, issue the following command:
./install.sh
v On Windows client systems, double-click install.bat.5. To install the client management service, follow the instructions in the IBM
Installation Manager wizard.
Getting started with the Operations Center
Chapter 16. Getting started with the Operations Center 207
|
|
|||
|
||
|
||
|
|||||
|
|||
||
||
|||
||
|
|
|
|
|
|
||
||
|||
|
|
|
||
If IBM Installation Manager is not already installed on the client system, youmust select both IBM Installation Manager and IBM Tivoli Storage ManagerClient Management Services.
Tip: You can accept the default locations for the shared resources directory andthe installation directory for IBM Installation Manager.
What to do next
Follow the instructions in “Verifying that the client management service is installedcorrectly” on page 209.
Installing the client management service in silent modeYou can install the client management service in silent mode. When you use silentmode, you provide the installation values in a response file and then run aninstallation command.
Before you begin
Review “Requirements and limitations for Tivoli Storage Manager clientmanagement services” on page 181.
Extract the installation package by following the instructions in “Installing theclient management service by using a graphical wizard” on page 207.
About this task
You must install the client management service on the same computer as thebackup-archive client.
The input directory, which is in the directory where the installation package isextracted, contains the following sample response file:
install_response_sample.xml
You can use the sample file with the default values, or you can customize it.
Tip: If you want to customize the sample file, create a copy of the sample file,rename it, and edit the copy.
Procedure1. Create a response file based on the sample file, or use the sample file,
install_response_sample.xml.In either case, ensure that the response file specifies the port number for theclient management service. The default port is 9028. For example:<variable name='port' value='9028'/>
2. Run the command to install the client management service and accept thelicense. From the directory where the installation package file is extracted, issuethe following command, where response_file represents the response file path,including the file name:On a Linux client system:./install.sh -s -input response_file -acceptLicense
For example:./install.sh -s -input /cms_install/input/install_response.xml -acceptLicense
Getting started with the Operations Center
208 IBM Tivoli Storage Manager for Windows: Installation Guide
|||
||
|
||
|
|||
|
||
||
|
||
||
|
|
||
|
||
||
|
||||
|
|
|
|

On a Windows client system:install.bat -s -input response_file -acceptLicense
For example:install.bat -s -input c:\cms_install\input\install_response.xml -acceptLicense
What to do next
Follow the instructions in “Verifying that the client management service is installedcorrectly.”
Verifying that the client management service is installedcorrectly
Before you use the client management service to collect diagnostic informationabout a backup-archive client, you can verify that the client management service iscorrectly installed and configured.
Procedure
On the client system, at the command line, run the following commands to viewthe configuration of the client management service:v On Linux client systems, issue the following command:
client_install_dir/cms/bin/CmsConfig.sh list
where client_install_dir is the directory where the backup-archive client isinstalled. For example, with the default client installation, issue the followingcommand:/opt/tivoli/tsm/cms/bin/CmsConfig.sh list
The output is similar to the following text:List:server1.example.com:1500 HOSTNAME
/opt/tivoli/tsm/client/ba/bin/dsmerror.logen_US MM/dd/yyyy HH:mm:ss UTF-8
v On Windows client systems, issue the following command:client_install_dir\cms\bin\CmsConfig.bat list
where client_install_dir is the directory where the backup-archive client isinstalled. For example, with the default client installation, issue the followingcommand:C:\"Program Files"\Tivoli\TSM\cms\bin\CmsConfig.bat list
The output is similar to the following text:List:server1.example.com:1500 HOSTNAME
C:/Program Files/Tivoli/TSM/baclient/dsmerror.logen_US MM/dd/yyyy HH:mm:ss Windows-1252
If the client management service is correctly installed and configured, the outputdisplays the location of the error log file.The output text is extracted from the following configuration file:v On Linux client systems:
client_install_dir/cms/Liberty/usr/servers/cmsServer/client-configuration.xml
v On Windows client systems:client_install_dir\cms\Liberty\usr\servers\cmsServer\client-configuration.xml
Getting started with the Operations Center
Chapter 16. Getting started with the Operations Center 209
|
|
|
|
|
||
|
|
|||
|
||
|
|
|||
|
|
||||
|
|
|||
|
|
||||
|||
|
|
|
|

If the output does not contain any entries, you must configure theclient-configuration.xml file. For instructions about how to configure this file,see “Configuring the client management service for custom client installations” onpage 212.
Configuring the Operations Center to use the clientmanagement service
If you did not use the default configuration for the client management service, youmust configure the Operations Center to access the client management service.
Before you begin
Ensure that the client management service is installed and started on the clientsystem.
Verify whether the default configuration is used. The default configuration is notused if either of the following conditions is met:v The client management service does not use the default port number, 9028.v The backup-archive client is not accessed by the same IP address as the client
system where the backup-archive client is installed. For example, a different IPaddress might be used in the following situations:– The computer system has two network cards. The backup-archive client is
configured to communicate on one network, while the client managementservice communicates on the other network.
– The client system is configured with the Dynamic Host ConfigurationProtocol (DHCP). As a result, the client system is dynamically assigned an IPaddress, which is saved on the Tivoli Storage Manager server during theprevious backup-archive client operation. When the client system is restarted,the client system might be assigned a different IP address. To ensure that theOperations Center can always find the client system, you specify a fullyqualified domain name.
Procedure
To configure the Operations Center to use the client management service, completethe following steps:1. On the Clients page of the Operations Center, select the client.2. Click Details.3. Click the Properties tab.4. In the Remote diagnostics URL field in the General section, specify the URL
for the client management service on the client system.The address must start with https. The following table shows examples of theremote diagnostics URL.
Type of URL Example
With DNS host name and default port, 9028 https://server.example.com
With DNS host name and non-default port https://server.example.com:1599
With IP address and non-default port https://192.0.2.0:1599
5. Click Save.
Getting started with the Operations Center
210 IBM Tivoli Storage Manager for Windows: Installation Guide
||||
|
|
||
|
||
||
|
|||
|||
|||||||
|
||
|
|
|
||
||
|||
||
||
|||
|

What to do next
You can access client diagnostic information such as client log files from theDiagnosis tab in the Operations Center.
Starting and stopping the client management service
The client management service is automatically started after it is installed on theclient system. You might need to stop and start the service in certain situations.
Procedurev To stop, start, or restart the client management service on Linux client systems,
issue the following commands:– To stop the service:
service cms.rc stop
– To start the service:service cms.rc start
– To restart the service:service cms.rc restart
v On Windows client systems, open the Services window, and stop, start, or restartthe Tivoli Storage Manager Client Management Services service.
Uninstalling the client management serviceIf you no longer have to collect client diagnostic information, you can uninstall theclient management service from the client system.
About this task
You must use IBM Installation Manager to uninstall the client management service.If you no longer plan to use IBM Installation Manager, you can also uninstall it.
Procedure1. Uninstall the client management service from the client system:
a. Open IBM Installation Manager:v On the Linux client system, in the directory where IBM Installation
Manager is installed, go to the eclipse subdirectory (for example,/opt/IBM/InstallationManager/eclipse), and issue the followingcommand:./IBMIM
v On the Windows client system, open IBM Installation Manager from theStart menu.
b. Click Uninstall.c. Select IBM Tivoli Storage Manager Client Management Services, and click
Next.d. Click Uninstall, and then click Finish.e. Close the IBM Installation Manager window.
2. If you no longer require IBM Installation Manager, uninstall it from the clientsystem:a. Open the IBM Installation Manager uninstall wizard:
Getting started with the Operations Center
Chapter 16. Getting started with the Operations Center 211
|
||
|
||
|
||
|
|
|
|
|
|
||
|
||
|
||
|
|
|
||||
|
||
|
||
|
|
||
|

v On the Linux client system, change to the IBM Installation Manageruninstallation directory (for example, /var/ibm/InstallationManager/uninstall), and issue the following command:./uninstall
v On the Windows client system, click Start > Control Panel. Then, clickUninstall a program > IBM Installation Manager > Uninstall.
b. In the IBM Installation Manager window, select IBM Installation Managerif it is not already selected, and click Next.
c. Click Uninstall, and click Finish.
Configuring the client management service for custom clientinstallations
The client management service uses information in the client configuration file(client-configuration.xml) to discover diagnostic information. If the clientmanagement service is unable to discover the location of log files, you must runthe CmsConfig utility to add the location of the log files to the client-configuration.xml file.
The CmsConfig utilityIf you are not using the default configuration, you can run the CmsConfig utility onthe client system to discover and add the location of the client log files to theclient-configuration.xml file. After you complete the configuration, the clientmanagement service can access the client log files and make them available fordiagnosis in the Operations Center.
You can also use the CmsConfig utility to show the configuration of the clientmanagement service and to remove a node name from the client-configuration.xml file.
The client-configuration.xml file is in the following directory:v On Linux client systems:
client_install_dir/cms/Liberty/usr/servers/cmsServer
v On Windows client systems:client_install_dir\cms\Liberty\usr\servers\cmsServer
where client_install_dir is the directory where the backup-archive client is installed.
The CmsConfig utility is available in the following locations.
Client operating system Utility location and name
Linux client_install_dir/cms/bin/CmsConfig.sh
Windows client_install_dir\cms\bin\CmsConfig.bat
To use the CmsConfig utility, issue any command that is included in the utility.Ensure that you enter each command on a single line.
Use the commands to complete the following tasks.
Getting started with the Operations Center
212 IBM Tivoli Storage Manager for Windows: Installation Guide
|||
|
||
||
|
|
|
|||||
||||||
|||
|
|
|
|
|
|
|
|||
||
|||
||
|
Task Command
Discover the location of log files andautomatically add them to theclient-configuration.xml file.
Run this command only if you are not usingthe default configuration, or you changedthe backup-archive client, the serverconfiguration, or the location of the log files.
“CmsConfig discover command”
Manually add the location of log files to theclient-configuration.xml file.
Run this command only if client log files arestored in a non-default location on the clientsystem.
“CmsConfig add command” on page 214
Show the configuration of the clientmanagement service.
Run this command only if you want toverify the configuration.
“CmsConfig list command” on page 218
Remove a node name from theclient-configuration.xml file.
Run this command only if the node nolonger exists, or you do not want to obtaindiagnostic information about the node.
“CmsConfig remove command” on page 219
CmsConfig discover command:
You can use the CmsConfig discover command to discover options files and logfiles, and add them to the client configuration file, client-configuration.xml. Inthis way, you can help to ensure that the client management service can access theclient log files and make them available for diagnosis in the Operations Center.
Typically, the client management service installer runs the CmsConfig discovercommand automatically. However, you must run this command manually if youchanged the backup-archive client, such as added a client, or changed the serverconfiguration or location of log files.
For the client management service to create a log definition in theclient-configuration.xml file, the Tivoli Storage Manager server address, serverport, and client node name must be obtained. If the node name is not defined inthe client options file (typically, dsm.sys on Linux client systems and dsm.opt onWindows client systems), the host name of the client system is used.
To update the client configuration file, the client management service must accessone or more log files, such as dsmerror.log and dsmsched.log. For best results, runthe CmsConfig discover command in the same directory and by using the sameenvironment variables as you would for the backup-archive client command, dsmc.In this way, you can improve the chances of finding the correct log files.
Syntax
�� CmsConfig discover ��
Getting started with the Operations Center
Chapter 16. Getting started with the Operations Center 213
|||
|||
||||
|
||
|||
|
||
||
|
||
|||
|
|
|
||||
||||
|||||
|||||
|
||||||||
Example for a Linux client system
For a Linux client system, discover the client log files and automatically add thelog definitions to the client-configuration.xml file.
Command:/opt/tivoli/tsm/cms/bin/CmsConfig.sh discover
Output:Discover:
server.example.com:1500 SUSAN/opt/tivoli/tsm/client/ba/bin/dsmerror.log
Example for a Windows client system
For a Windows client system, discover the client log files and automatically addthe log definitions to the client-configuration.xml file.
Command:C:\"Program Files"\Tivoli\TSM\cms\bin\cmsconfig discover
Output:Discover:
server.example.com:1500 SUSANC:\Program Files\Tivoli\TSM\baclient\dsmerror.log
CmsConfig add command:
Use the CmsConfig add command to manually add the location of client log files tothe client-configuration.xml configuration file. Use this command only if theclient log files are stored in a non-default location on the client system.
Syntax
�� CmsConfig add nodeName serverIP serverPort serverProtocol logPath �
�language dateFormat timeFormat encoding
��
Parameters
nodeNameThe client node name that is associated with the log files. For most clientsystems, only one node name is registered to the Tivoli Storage Managerserver. However, on systems with multiple users, such as Linux client systems,there can be more than one client node name. This parameter is required.
serverIPThe TCP/IP address of the Tivoli Storage Manager server that the clientmanagement service authenticates to. This parameter is required.
You can specify a 1 - 64 character TCP/IP address for the server. The serveraddress can be a TCP/IP domain name or a numeric IP address. The numericIP address can be either a TCP/IP v4 or TCP/IP v6 address. You can use IPv6addresses only if the commmethod V6Tcpip option is specified for the clientsystem.
Examples:v server.example.com
v 192.0.2.0
Getting started with the Operations Center
214 IBM Tivoli Storage Manager for Windows: Installation Guide
|
||
||
||||
|
||
||
||||
|
|||
|
||||||||||||||||
|||||||||||||||||||
|
|
|||||
|||
|||||
|
|
|
v 2001:0DB8:0:0:0:0:0:0
serverPortThe TCP/IP port number that is used to communicate with the Tivoli StorageManager server. You can specify a value in the range 1 - 32767. This parameteris required.
Example: 1500
serverProtocolThe protocol that is used for communication between the client managementservice and the Tivoli Storage Manager server. This parameter is required.
You can specify one of the following values.
Value Meaning
NO_SSL The SSL security protocol is not used.
SSL The SSL security protocol is used.
FIPS The TLS 1.2 protocol is used in FederalInformation Processing Standard (FIPS)mode.Tip: Alternatively, you can enter TLS_1.2 tospecify that the TLS 1.2 protocol is used inFIPS mode.
logPathThe fully qualified path of the log files. This parameter is required.
Windows client system example: C:\backup tools\Tivoli\TSM\baclient\dsmerror.log
Linux client system example: /opt/backup_tools/tivoli/tsm/baclient/dsmerror.log
languageThe language locale of the log file. This parameter is optional. However, if youspecify this parameter, you must also specify the dateFormat, timeFormat, andencoding parameters. You must specify the locale for the following languages.
Language Locale
Brazilian Portuguese pt_BR
Chinese, Simplified zh_CN
Chinese, Traditional zh_TW
Czech cs_CZ
English en_US
French fr_FR
German de_DE
Hungarian hu_HU
Italian it_IT
Japanese ja_JP
Korean ko_KR
Polish pl_PL
Russian ru_RU
Spanish es_ES
Getting started with the Operations Center
Chapter 16. Getting started with the Operations Center 215
|
||||
|
|||
|
|||
||
||
||||||||
||
||
||
||||
|||
||
||
||
||
||
||
||
||
||
||
||
||
||
||

dateFormatThe date format of the time stamp entries in the client log file. This parameteris optional. However, if you specify this parameter, you must also specify thelanguage, timeFormat, and encoding parameters.
The following table shows the date formats for the languages.
Tip: Instead of using one of the date formats that are listed in the table, youcan specify a date format by using the backup-archive client dateformatoption.
Language Date format
Chinese, Simplified yyyy-MM-dd
Chinese, Traditional yyyy/MM/dd
Czech dd.MM.yyyy
English MM/dd/yyyy
French dd/MM/yyyy
German dd.MM.yyyy
Hungarian yyyy.MM.dd
Italian dd/MM/yyyy
Japanese yyyy-MM-dd
Korean yyyy/MM/dd
Polish yyyy-MM-dd
Portuguese, Brazilian dd/MM/yyyy
Russian dd.MM.yyyy
Spanish dd.MM.yyyy
timeFormatThe time format of the time stamp entries in the client log file. This parameteris optional. However, if you specify this parameter, you must also specify thelanguage, dateFormat, and encoding parameters.
The following table shows examples of default time formats that you canspecify and client operating systems.
Tip: Instead of using one of the time formats that are listed in the table, youcan specify a time format by using the backup-archive client timeformatoption.
LanguageTime format for Linux clientsystems
Time format for Windowsclient systems
Chinese, Simplified HH:mm:ss HH:mm:ss
Chinese, Traditional HH:mm:ss ahh:mm:ss
Czech HH:mm:ss HH:mm:ss
English HH:mm:ss HH:mm:ss
French HH:mm:ss HH:mm:ss
German HH:mm:ss HH:mm:ss
Hungarian HH.mm.ss HH:mm:ss
Getting started with the Operations Center
216 IBM Tivoli Storage Manager for Windows: Installation Guide
|
||||
|
|||
|||
||
||
||
||
||
||
||
||
||
||
||
||
||
|||
||||
||
|||
||||||
|||
|||
|||
|||
|||
|||
|||

LanguageTime format for Linux clientsystems
Time format for Windowsclient systems
Italian HH:mm:ss HH:mm:ss
Japanese HH:mm:ss HH:mm:ss
Korean HH:mm:ss HH:mm:ss
Polish HH:mm:ss HH:mm:ss
Portuguese, Brazilian HH:mm:ss HH:mm:ss
Russian HH:mm:ss HH:mm:ss
Spanish HH:mm:ss HH:mm:ss
encodingThe character encoding of the entries in the client log files. This parameter isoptional. However, if you specify this parameter, you must also specify thelanguage, dateFormat, and timeFormat parameters.
For Linux client systems, the typical character encoding is UTF-8. For Windowsclient systems, the default encoding values are shown in the following table. Ifyour client system is customized differently, use the encoding parameter tospecify a value other than the default.
Language Encoding
Chinese, Simplified CP936
Chinese, Traditional CP950
Czech Windows-1250
English Windows-1252
French Windows-1252
German Windows-1252
Hungarian Windows-1250
Italian Windows-1252
Japanese CP932
Korean CP949
Polish Windows-1250
Portuguese, Brazilian Windows-1252
Russian Windows-1251
Spanish Windows-1252
Example for a Linux client system
For a Linux client system, add the client log file location to theclient-configuration.xml file. Also, add the language specification, time format,and date format. Then, verify the output to ensure that you entered the commandcorrectly.
Command:/opt/tivoli/tsm/cms/bin/CmsConfig.sh add SUSAN server.example.com1500 /usr/work/logs/dsmerror.log fr_FR yyyy/MM/dd HH:MM:ss UTF-8
Getting started with the Operations Center
Chapter 16. Getting started with the Operations Center 217
|||||
|||
|||
|||
|||
|||
|||
||||
||||
||||
|||
||
||
||
||
||
||
||
||
||
||
||
||
||
|||
|
||||
|||

Output:Add: SUSAN server.example.com:1500 /usr/work/logs/dsmerror.log fr_FRyyyy/MM/dd HH:MM:ss UTF-8
Example for a Windows client system
For a Windows client system, add the client log file location to theclient-configuration.xml. Also, add the language specification, date format, andtime format. Then, verify the output to ensure that you entered the commandcorrectly.
Command:C:\"Program Files"\Tivoli\TSM\cms\bin\cmsconfig add SUSANserver.example.com 1500 c:\work\logs\dsmerror.logfr_FR yyyy/MM/ddHH:MM:ss UTF-8
Output:Add: SUSAN server.example.com:1500 c:\work\logs\dsmerror.log fr_FRyyyy/MM/dd HH:MM:ss UTF-8
CmsConfig list command:
Use the CmsConfig list command to show the client management serviceconfiguration.
Syntax
�� CmsConfig list ��
Example for a Linux client system
For a Linux client system, show the configuration of the client managementservice. Then, view the output to ensure that you entered the command correctly.
Command:/opt/tivoli/tsm/cms/bin/CmsConfig.sh list
Output:List:server.example.com:1500 SUSAN
/opt/tivoli/tsm/client/ba/bin/dsmerror.logen_US MM/dd/yyyy HH:mm:ss Windows-1252
Example for a Windows client system
For a Windows client system, show the configuration of the client managementservice. Then, view the output to ensure that you entered the command correctly.
Command:C:\"Program Files"\Tivoli\TSM\cms\bin\cmsconfig list
Output:List:server.example.com:1500 SUSAN
C:/Program Files/Tivoli/TSM/baclient/dsmerror.logen_US MM/dd/yyyy HH:mm:ss Windows-1252
Getting started with the Operations Center
218 IBM Tivoli Storage Manager for Windows: Installation Guide
|||
|
||||
||||
|||
|
||
|
||||||||
|
||
||
|||||
|
||
||
|||||
|

CmsConfig remove command:
Use the CmsConfig remove command to remove a client node name from the clientconfiguration file, client-configuration.xml. All log files that are associated withthe client node name are also removed.
Syntax
�� CmsConfig remove nodeName ��
Parameters
nodeNameThe client node name that is associated with the log files. For most clientsystems, only one node name is registered to the Tivoli Storage Managerserver. However, on systems with multiple users, such as Linux client systems,more than one client node name can be used. This parameter is required.
Example for a Linux client system
For a Linux client system, remove the node name SUSAN from theclient-configuration.xml file. Then, verify the output to ensure that you enteredthe command correctly.
Command:/opt/tivoli/tsm/cms/bin/CmsConfig.sh remove SUSAN
Output:Remove: SUSAN
Example for a Windows client system
For a Windows client system, remove the node name SUSAN from theclient-configuration.xml file. Then, verify the output to ensure that you enteredthe command correctly.
Commands:C:\"Program Files"\Tivoli\TSM\cms\bin\CmsConfig remove SUSAN
Output:Remove: SUSAN
Getting started with the Operations Center
Chapter 16. Getting started with the Operations Center 219
|
|||
|
||||||||||
|
|||||
|
|||
||
||
|
|||
||
||

Getting started with the Operations Center
220 IBM Tivoli Storage Manager for Windows: Installation Guide

Chapter 17. Uninstalling the Operations Center
You can uninstall the Operations Center by using any of the following methods: agraphical wizard, the command line in console mode, or silent mode.
Uninstalling the Operations Center by using a graphical wizardYou can uninstall the Operations Center by using the graphical wizard of IBMInstallation Manager.
Procedure1. Open IBM Installation Manager.
Open IBM Installation Manager from the Start menu.2. Click Uninstall.3. Select IBM Tivoli Storage Manager Operations Center, and click Next.4. Click Uninstall.5. Click Finish.
Uninstalling the Operations Center in console modeTo uninstall the Operations Center by using the command line, you must run theuninstallation program of IBM Installation Manager from the command line withthe parameter for console mode.
Procedure1. In the directory where IBM Installation Manager is installed, go to the
following subdirectory:eclipse\tools
For example:C:\Program Files\IBM\Installation Manager\eclipse\tools
2. From the tools directory, issue the following command:imcl.exe -c
3. To uninstall, enter 5.4. Choose to uninstall from the IBM Tivoli Storage Manager package group.5. Enter N for Next.6. Choose to uninstall the IBM Tivoli Storage Manager Operations Center
package.7. Enter N for Next.8. Enter U for Uninstall.9. Enter F for Finish.
© Copyright IBM Corp. 1993, 2014 221
|

Uninstalling the Operations Center in silent modeTo uninstall the Operations Center in silent mode, you must run the uninstallationprogram of IBM Installation Manager from the command line with the parametersfor silent mode.
Before you begin
The input directory, which is in the directory where the installation package isextracted, contains the following sample response files for installing, updating, anduninstalling the Operations Center:v install_response_sample.xml
v update_response_sample.xml
v uninstall_response_sample.xml
You can use these sample files as they are, with the default values, or you cancustomize them.
Procedure1. In the directory where IBM Installation Manager is installed, go to the
following subdirectory:eclipse\tools
For example:C:\Program Files\IBM\Installation Manager\eclipse\tools
2. From the tools directory, issue the following command, where response_filerepresents the response file path, including the file name:
imcl.exe -input response_file -silent
The following command is an example:imcl.exe -input C:\tmp\input\uninstall_response.xml -silent
Uninstalling the Operations Center
222 IBM Tivoli Storage Manager for Windows: Installation Guide
Chapter 18. Rolling back to a previous version of theOperations Center
By default, IBM Installation Manager saves earlier versions of a package to rollback to if you experience a problem with later versions of updates, fixes, orpackages.
Before you begin
The rollback function is available only after the Operations Center is updated.
About this task
When IBM Installation Manager rolls back a package to a previous version, thecurrent version of the package files is uninstalled, and an earlier version isreinstalled.
To roll back to a previous version, IBM Installation Manager must access files forthat version. By default, these files are saved during each successive installation.Because the number of saved files increases with each installed version, you mightwant to delete these files from your system on a regular schedule. However, if youdelete the files, you cannot roll back to a previous version.
To delete saved files or to update your preference for saving these files in futureinstallations, complete the following steps:1. In IBM Installation Manager, click File > Preferences.2. On the Preferences page, click Files for Rollback, and specify your preference.
Procedure
To roll back to a previous version of the Operations Center, use the Roll Backfunction of IBM Installation Manager.
© Copyright IBM Corp. 1993, 2014 223

224 IBM Tivoli Storage Manager for Windows: Installation Guide

Part 4. Appendixes
© Copyright IBM Corp. 1993, 2014 225

226 IBM Tivoli Storage Manager for Windows: Installation Guide

Appendix A. Installation log files
If you experience errors during installation, these errors are recorded in log filesthat are stored in the IBM Installation Manager logs directory.
You can view installation log files by clicking File > View Log from the InstallationManager tool. To collect these log files, click Help > Export Data for ProblemAnalysis from the Installation Manager tool.
© Copyright IBM Corp. 1993, 2014 227

228 IBM Tivoli Storage Manager for Windows: Installation Guide

Appendix B. Services associated with the Tivoli StorageManager server
When you start the Tivoli Storage Manager server as a service, other servicesautomatically start. These services are associated with the database manager, DB2.
The following services are associated with the Tivoli Storage Manager server.
Service name Purpose Comments
TSM Server_instance The service for the Tivoli StorageManager server instance that isnamed Server_instance.
For example: TSM Server1
Set the start and stop options for thisservice to start and stop the serverinstance automatically.
Each server instance runs as aseparate service.
DB2 - DB2TSM1 - SERVER_INSTANCE The DB2 service for the serverinstance that is namedServer_instance.
For example: DB2 - DB2TSM1 -SERVER1
This service is automatically startedwhen the service for the TivoliStorage Manager server instance isstarted. The DB2 service is notstopped automatically when you stopthe service for the server.
The system has one of these servicesfor each server-instance service that isstarted on the system.
DB2 Governor (DB2TSM1) A DB2 service that is created atinstallation time, and is required forall server instances.
Do not change the options for thisservice.
DB2 License Server (DB2TSM1) A DB2 service that is created atinstallation time, and is required forall server instances.
Do not change the options for thisservice.
DB2 Management Server (DB2TSM1) A DB2 service that is created atinstallation time, and is required forall server instances.
Do not change the options for thisservice.
DB2 Remote Command Server(DB2TSM1)
A DB2 service that is created atinstallation time, and is required forall server instances.
Do not change the options for thisservice.
Servers upgraded from V6.1.0 or V6.1.1: On a system that is running the TivoliStorage Manager V6.1.0 or V6.1.1 server program, an additional service named DB2- DB2TSM1 - DB2TSM-0 is displayed in the list of services. When the V6.1.0 or V6.1.1server program is upgraded to a later version, that service is renamed to DB2 -DB2TSM1 - DB2TSM. This service does not affect the operation of the Tivoli StorageManager server instances that you configure. DB2TSM is a nonfunctional DB2instance.
© Copyright IBM Corp. 1993, 2014 229

230 IBM Tivoli Storage Manager for Windows: Installation Guide
Appendix C. Accessibility features for the Tivoli StorageManager product family
Accessibility features help users who have a disability, such as restricted mobilityor limited vision to use information technology products successfully.
Accessibility features
The IBM Tivoli Storage Manager family of products includes the followingaccessibility features:v Keyboard-only operation using standard operating-system conventionsv Interfaces that support assistive technology such as screen readers
The command-line interfaces of all products in the product family are accessible.
Tivoli Storage Manager Operations Center provides the following additionalaccessibility features when you use it with a Mozilla Firefox browser on aMicrosoft Windows system:v Screen magnifiers and content zoomingv High contrast mode
The Operations Center and the Tivoli Storage Manager Server can be installed inconsole mode, which is accessible.
The Operations Center help system is enabled for accessibility. For moreinformation, click the question mark icon on the help system menu bar.
Vendor software
The Tivoli Storage Manager product family includes certain vendor software that isnot covered under the IBM license agreement. IBM makes no representation aboutthe accessibility features of these products. Contact the vendor for the accessibilityinformation about its products.
IBM and accessibility
See the IBM Human Ability and Accessibility Center (http://www.ibm.com/able)for information about the commitment that IBM has to accessibility.
© Copyright IBM Corp. 1993, 2014 231

232 IBM Tivoli Storage Manager for Windows: Installation Guide
Notices
This information was developed for products and services offered in the U.S.A.
IBM may not offer the products, services, or features discussed in this document inother countries. Consult your local IBM representative for information on theproducts and services currently available in your area. Any reference to an IBMproduct, program, or service is not intended to state or imply that only that IBMproduct, program, or service may be used. Any functionally equivalent product,program, or service that does not infringe any IBM intellectual property right maybe used instead. However, it is the user's responsibility to evaluate and verify theoperation of any non-IBM product, program, or service.
IBM may have patents or pending patent applications covering subject matterdescribed in this document. The furnishing of this document does not grant youany license to these patents. You can send license inquiries, in writing, to:
IBM Director of LicensingIBM CorporationNorth Castle DriveArmonk, NY 10504-1785U.S.A.
For license inquiries regarding double-byte character set (DBCS) information,contact the IBM Intellectual Property Department in your country or sendinquiries, in writing, to:
Intellectual Property LicensingLegal and Intellectual Property LawIBM Japan Ltd19-21, Nihonbashi-Hakozakicho, Chuo-kuTokyo 103-8510, Japan
The following paragraph does not apply to the United Kingdom or any othercountry where such provisions are inconsistent with local law:INTERNATIONAL BUSINESS MACHINES CORPORATION PROVIDES THISPUBLICATION “AS IS” WITHOUT WARRANTY OF ANY KIND, EITHEREXPRESS OR IMPLIED, INCLUDING, BUT NOT LIMITED TO, THE IMPLIEDWARRANTIES OF NON-INFRINGEMENT, MERCHANTABILITY OR FITNESSFOR A PARTICULAR PURPOSE. Some states do not allow disclaimer of express orimplied warranties in certain transactions, therefore, this statement may not applyto you.
This information could include technical inaccuracies or typographical errors.Changes are periodically made to the information herein; these changes will beincorporated in new editions of the publication. IBM may make improvementsand/or changes in the product(s) and/or the program(s) described in thispublication at any time without notice.
Any references in this information to non-IBM websites are provided forconvenience only and do not in any manner serve as an endorsement of thosewebsites. The materials at those websites are not part of the materials for this IBMproduct and use of those websites is at your own risk.
© Copyright IBM Corp. 1993, 2014 233
IBM may use or distribute any of the information you supply in any way itbelieves appropriate without incurring any obligation to you.
Licensees of this program who want to have information about it for the purposeof enabling: (i) the exchange of information between independently createdprograms and other programs (including this one) and (ii) the mutual use of theinformation which has been exchanged, should contact:
IBM Corporation2Z4A/10111400 Burnet RoadAustin, TX 78758U.S.A.
Such information may be available, subject to appropriate terms and conditions,including in some cases, payment of a fee.
The licensed program described in this information and all licensed materialavailable for it are provided by IBM under terms of the IBM Customer Agreement,IBM International Program License Agreement, or any equivalent agreementbetween us.
Any performance data contained herein was determined in a controlledenvironment. Therefore, the results obtained in other operating environments mayvary significantly. Some measurements may have been made on development-levelsystems and there is no guarantee that these measurements will be the same ongenerally available systems. Furthermore, some measurements may have beenestimated through extrapolation. Actual results may vary. Users of this documentshould verify the applicable data for their specific environment.
Information concerning non-IBM products was obtained from the suppliers ofthose products, their published announcements or other publicly available sources.IBM has not tested those products and cannot confirm the accuracy ofperformance, compatibility or any other claims related to non-IBM products.Questions on the capabilities of non-IBM products should be addressed to thesuppliers of those products.
This information contains examples of data and reports used in daily businessoperations. To illustrate them as completely as possible, the examples include thenames of individuals, companies, brands, and products. All of these names arefictitious and any similarity to the names and addresses used by an actual businessenterprise is entirely coincidental.
COPYRIGHT LICENSE:
This information contains sample application programs in source language, whichillustrate programming techniques on various operating platforms. You may copy,modify, and distribute these sample programs in any form without payment toIBM, for the purposes of developing, using, marketing or distributing applicationprograms conforming to the application programming interface for the operatingplatform for which the sample programs are written. These examples have notbeen thoroughly tested under all conditions. IBM, therefore, cannot guarantee orimply reliability, serviceability, or function of these programs. The sampleprograms are provided "AS IS", without warranty of any kind. IBM shall not beliable for any damages arising out of your use of the sample programs.
234 IBM Tivoli Storage Manager for Windows: Installation Guide

Each copy or any portion of these sample programs or any derivative work, mustinclude a copyright notice as follows:© (your company name) (year). Portions of this code are derived from IBM Corp.Sample Programs. © Copyright IBM Corp. _enter the year or years_.
If you are viewing this information in softcopy, the photographs and colorillustrations may not appear.
TrademarksIBM, the IBM logo, and ibm.com are trademarks or registered trademarks ofInternational Business Machines Corp., registered in many jurisdictions worldwide.Other product and service names might be trademarks of IBM or other companies.A current list of IBM trademarks is available on the Web at "Copyright andtrademark information" at http://www.ibm.com/legal/copytrade.shtml.
Intel and Itanium are trademarks or registered trademarks of Intel Corporation orits subsidiaries in the United States and other countries.
Linux is a registered trademark of Linus Torvalds in the United States, othercountries, or both.
Microsoft and Windows are trademarks of Microsoft Corporation in the UnitedStates, other countries, or both.
Java and all Java-based trademarks and logos are trademarks or registeredtrademarks of Oracle and/or its affiliates.
UNIX is a registered trademark of The Open Group in the United States and othercountries.
Privacy policy considerationsIBM Software products, including software as a service solutions, (“SoftwareOfferings”) may use cookies or other technologies to collect product usageinformation, to help improve the end user experience, to tailor interactions withthe end user, or for other purposes. In many cases no personally identifiableinformation is collected by the Software Offerings. Some of our Software Offeringscan help enable you to collect personally identifiable information. If this SoftwareOffering uses cookies to collect personally identifiable information, specificinformation about this offering’s use of cookies is set forth below.
This Software Offering does not use cookies or other technologies to collectpersonally identifiable information.
If the configurations deployed for this Software Offering provide you as customerthe ability to collect personally identifiable information from end users via cookies
Notices 235

and other technologies, you should seek your own legal advice about any lawsapplicable to such data collection, including any requirements for notice andconsent.
For more information about the use of various technologies, including cookies, forthese purposes, see IBM’s Privacy Policy at http://www.ibm.com/privacy andIBM’s Online Privacy Statement at http://www.ibm.com/privacy/details in thesection entitled “Cookies, Web Beacons and Other Technologies,” and the “IBMSoftware Products and Software-as-a-Service Privacy Statement” athttp://www.ibm.com/software/info/product-privacy.
236 IBM Tivoli Storage Manager for Windows: Installation Guide
Glossary
A glossary is available with terms and definitions for the IBM Tivoli Storage Manager family of products.
See Tivoli Storage Manager glossary (http://www.ibm.com/support/knowledgecenter/SSGSG7_7.1.1/com.ibm.itsm.ic.doc/glossary.html).
To view glossaries for other IBM products, see http://www.ibm.com/software/globalization/terminology/.
© Copyright IBM Corp. 1993, 2014 237

238 IBM Tivoli Storage Manager for Windows: Installation Guide

Index
Special characters(TLS) Transport Layer Security 46
Aaccessibility features 231activating
serverWindows 50
activating server options 43active log
space requirements 12adding the agent to the agent depot 118Administration Center xiadministrative commands
HALT 54REGISTER LICENSE 54
administrator ID 183administrator password 183agent
Tivoli Monitoring for Tivoli Storage Manager, installing onexisting server 115
alertssending by email 197
API 47API configuration 47archive failover log space
description 24archive log
space requirements 12archive log directory 38
BBACKUP DB command 47backups
database 55
Ccapacity planning
database space requirementsestimates based on number of files 9estimates based storage pool capacity 11starting size 8
recovery log space requirementsactive and archive logs 12active log mirror 24
Tivoli Monitoring for Tivoli Storage Manager 102certificates
adding the Jazz for Service Management certificate 145cert256.arm 140exporting the Jazz for Service Management certificate 145Tivoli Storage Manager server
adding to truststore file 141client management service
add log file location 214CmsConfig add 214CmsConfig list 218
client management service (continued)CmsConfig remove 219CmsConfig utility 212collecting diagnostic information 206configuring for custom client installation 212configuring the Operations Center 210discover 213installing 207
in silent mode 208Operations Center
view client log files 206remove node name 219requirements and limitations 181show configuration 218starting and stopping 211uninstalling 211verifying installation 209
client nodesreverting to previous server version
data affected 81client options
for shared memory communications 45client-configuration.xml file 209, 212cluster configuration 83cluster environment
DB2 83clustered environment
applying a fix pack to a V7 server 61upgrading server on Windows
V6.1 to V7.1.1 77V6.2 to V7.1.1 75V6.3 to V7.1.1 75
upgrading the server to V7.1.1 74CmsConfig utility
add 214client management service 212discover 213list 218remove 219
commandsadministrative, SET DBRECOVERY 55DSMSERV FORMAT 47ikeyman 140, 141, 145
commands, administrativeHALT 54REGISTER LICENSE 54
communication methodsNamed Pipes 44setting 43Shared Memory 45SNMP 45TCP/IP 43
componentsinstallable vii
configurationOperations Center 176
configuring 37, 39, 41, 123communication protocols 43historical data collection 121hub server 196Operations Center 195
© Copyright IBM Corp. 1993, 2014 239

configuring (continued)spoke server 196
configuring agents 135configuring services 135configuring the Operations Center
for client management service 210configuring, manually 39, 41configuring, server instance 39configuring, wizard 39, 40Console language support 35console mode 32, 113create server instance 37, 39creating and configuring the monitoring agent instance 124custom configuration
client management service 212
Ddata deduplication
effects when reverting to previous server version 81data source 129database
backups 55installing 47name 25
database directories 38database manager 11, 47database manager (DB2TSM1) 229DB2 commands 85db2icrt command 41deploying monitoring agents 117device driver, Tivoli Storage Manager viiidirectories
naming for server 25directories, instance 38disability 231disk space 4DSMSERV FORMAT command 47dsmserv.v6lock 54
Eemail alerts 197
suspending temporarily 199enabling client/server communications 43Exporting IBM Tivoli Monitoring data 151
Ffirst steps 37fix packs 59fixes 29
Ggroup 38GSKit
removing Version 7 80Version 7 80Version 8 80
HHALT command 54halting the server 54
hardware requirementsTivoli Monitoring for Tivoli Storage Manager 99Tivoli Storage Manager 4
historical data collection 123configuring 123
home directory 41HTTPS 200, 203
password for truststore file 184, 205hub server 176
configuring 196
IIBM Installation Manager xi, 6, 101, 184IBM Knowledge Center ixIBM Tivoli Monitoring
exporting data 151installing an agent on an existing server 115
IBM Tivoli Storage Manageruninstalling 89
in silent mode 90using a graphical installation wizard 89using command line in console mode 90
IBM Tivoli Storage Manager Operations Center xiikeyman command 140, 141, 145importing
IBM Tivoli Monitoring data 153Install wizard 113installable components viiiinstallation
work sheet for Tivoli Monitoring for Tivoli StorageManager 103
installation checklist 104installation directories
Operations CenterInstallation Manager 184
installation log 30, 32, 113Installation Manager xi, 6, 184
logs directory 227installation packages 29, 108, 127, 158
Operations Center 189installation wizard 30installing 113
client management service 207database 47device support 29fix packs 59graphical user interface
using 30minimum requirements for 4monitoring agents
using silent mode 114Operations Center 189recovery log 47server 3, 29Tivoli Monitoring for Tivoli Storage Manager 96, 107
using console mode 110using silent mode 111using the wizard 108
Tivoli Storage Manager reporting and monitoring 96using command line in console mode
using 32what to know before 3
installing overview 95, 127installing the Tivoli Storage Manager server 33
silently 33installingOperations Center 173
240 IBM Tivoli Storage Manager for Windows: Installation Guide

instance directories 38instance user ID 25interim fix 59
JJazz for Service Management 127
installation 128installation packages 127start service 130
Kkeyboard 231KILL command 54Knowledge Center ix
LLANGUAGE option 35language package 36language packages 35language support 35languages
set 35license, Tivoli Storage Manager 54licenses
installable package viiilimitations
client management service 181Local System account 51log files
installation 227login screen text
Operations Center 200
Mmaintenance updates 59memory requirements 4, 99Migrating
Tivoli Monitoring for Tivoli Storage Manager 165migrating V7.1 to a new system 166V6.3 to V7.1 165
monitoringlogs 57
monitoring administrator 183monitoring agent
installation 113monitoring agents 120
installing and deploying 112Tivoli Monitoring for Tivoli Storage Manager,
installing 112multiple servers
upgradingmultiple servers 56
NNamed Pipes 44names, best practices
database name 25directories for server 25instance user ID 25server instance 25
names, best practices (continued)server name 25
new features xiNIST SP800-131A standard 143
IBM Tivoli Monitoring 144Jazz for Service Management 144monitoring agents 143Tivoli Storage Manager server 146
Ooffering 6, 101, 184operating system requirements
Operations Center 180Operations Center vii
administrator IDs 183Chrome 180computer requirements 176configuring 195credentials for installing 184Firefox 180hub server 176IE 180installation directory 184installation packages 189installing 173, 189
in silent mode 190using a graphical wizard 189using command line in console mode 190
Internet Explorer 180language requirements 181login screen text 200opening 196operating system requirements 180overview 175password for secure communications 184, 205port number 184prerequisite checks 175rolling back to a previous version 223Safari 180spoke server 176, 196SSL 200, 203system requirements 175uninstalling 221
in silent mode 222using a graphical wizard 221using command line in console mode 221
upgrading 173, 193web browser requirements 180web server 206
optionscommunications 43starting the server 50
options, clientSSLTCPADMINPORT 44SSLTCPPORT 44TCPADMINPORT 44TCPPORT 44TCPWINDOWSIZE 44
overviewOperations Center 173, 175
Ppackage 6, 101, 184package group 6, 101, 184
Index 241

Passport Advantage 29password
Operations Center truststore file 184, 205password for secure communications 184performance
Operations Center 176planning
installing Tivoli Monitoring for Tivoli Storage Manager 96installing Tivoli Storage Manager reporting and
monitoring 96Tivoli Monitoring for Tivoli Storage Manager
upgrade scenarios 147planning, capacity
database space requirementsestimates based on number of files 9estimates based storage pool capacity 11starting size 8
recovery log space requirementsactive log mirror 24
recovery log space requirementsv 12port number
Operations Center 184prerequisite checks
Operations Center 175publications ix
Rrecovery log
archive failover log space 24installing 47
reference, DB2 commands 85REGISTER LICENSE command 54remote deployment
monitoring agents 117remote deployment requirements
Tivoli Monitoring for Tivoli Storage Manager 117Remote Execution Protocol 41remotely deploying 120repository 6, 101, 184requirements
client management service 181requirements for installation 4resource requirements
Operations Center 176reverting
Windows cluster 83reverting to previous server version 81REXEC 41rollback
Operations Center 223
Ssecure communications 200, 203Secure Sockets Layer 200, 203
between a monitoring agent and a Tivoli Storage Managerserver 139
monitoring agents 142Secure Sockets Layer (SSL)
communication using 46Transport Layer Security (TLS) 46
security standardsIBM Tivoli Monitoring 144Jazz for Service Management 144monitoring agents 143
security standards (continued)Tivoli Storage Manager server 146
serverafter upgrade
reverting to previous server version 81before upgrade
importance of preparation steps 81naming best practices 25starting as a service
configuration 51procedure 52
stopping 54upgrading
V6 to V7.1 65V6.1 to V7.1.1 74V6.2 to V7.1.1 66V6.3 to V7.1.1 66
server databasereorganization options 49
server instance 39, 41server instance, creating 41server instances
naming 25naming best practices 25
server license 54server, Tivoli Storage Manager
activating 50halting 54options 43setting up 50starting 50
servicestarting the server as a Windows service
configuration 51procedure 52
services on Windows systemsdatabase manager (DB2TSM1) 229DB2 229server 229
SET DBRECOVERY 55setting server options 43shared memory client options 45shared memory communications method 45shared resources directory 6, 101, 184silent installation
Tivoli Storage Manager 33SNMP communication method 45software requirements
Tivoli Monitoring for Tivoli Storage Manager 99Tivoli Storage Manager 4
spoke server 176adding 196
SSL 200, 203password for truststore file 184, 205
SSL (Secure Sockets Layer)(TLS) Transport Layer Security 46communication using 46
SSLTCPADMINPORT option 44SSLTCPPORT option 44starting
client management service 211server 50
status monitoring 176stopping
client management service 211server 54
242 IBM Tivoli Storage Manager for Windows: Installation Guide

storage poolsreverting to previous server version 81
summary of amendmentsVersion 7.1.1 xi
system requirementsOperations Center 175, 176, 180, 181
TTCP/IP
setting options 43Version 4 43Version 6 43
TCPNODELAY option 44TCPPORT option 44TCPWINDOWSIZE option 44technical changes xitemporary disk space 11temporary space 11time
server upgrade 67Tivoli Monitoring for Tivoli Storage Manager xi, 104
agent instancesexporting instances 154importing instances 156
bypass prerequisites 106using the installation wizard 106
data source 129installation packages 108, 158installing
using console mode 110using silent mode 111, 114using the wizard 108
uninstalling 167, 168monitoring agents 170using console mode 169using silent mode 169using the wizard 168
uninstalling monitoring agentson existing IBM Tivoli Monitoring servers 172using console mode 171using silent mode 171using the wizard 171
upgrade scenarios 147upgrading 156
in console mode 160in silent mode 161monitoring agents 162using the wizard 159
upgrading from V6.3 to V7.1 149what to configure after installing 133
Tivoli Storage Managerinstallation 30, 32installation packages 29server changes xiuninstalling 89
in silent mode 90using a graphical installation wizard 89using command line in console mode 90
upgradingV6 to V7.1 65V6.1 to V7.1.1 74V6.2 to V7.1.1 66V6.3 to V7.1.1 66
Version 7.1.1 xiTivoli Storage Manager device driver, installable package viiiTivoli Storage Manager fix packs 59
Tivoli Storage Manager support site 29Tivoli Storage Manager, setting up 50TLS 200, 203translation features 35translations 35Transport Layer Security
disabling TLS 1.1 and earlier 139Transport Layer Security (TLS) 46Transport Layer Security protocol 200, 203truststore file 200, 203
monitoring agents 140Operations Center 184resetting password 205Tivoli Storage Manager server 141
tuningOperations Center 176
Uuninstalling 91
client management service 211monitoring agents 170Tivoli Monitoring for Tivoli Storage Manager 167, 168
monitoring agents 170using console mode 169using silent mode 169using the wizard 168
uninstalling and reinstalling 91uninstalling monitoring agents
on existing IBM Tivoli Monitoring servers 172using console mode 171using silent mode 171using the wizard 171
updating 36, 193upgrade
serverestimated time 67V6 to V7.1 65V6.1 to V7.1.1 74V6.2 to V7.1.1 66V6.3 to V7.1.1 66
upgradingTivoli Monitoring for Tivoli Storage Manager 147, 156
in console mode 160in silent mode 161monitoring agents 162operating system 163upgrade scenarios 147upgrading from V6.3 to V7.1 149using the wizard 159
upgrading Operations Center 173US English 35User Account Control 41user ID 38
Vverifying installation
client management service 209Version 7.1.1 xi
Wweb server
starting 206stopping 206
Index 243

Windowscluster reverting 83creating and configuring the Tivoli Monitoring for Tivoli
Storage Manager monitoring agent instance 125system requirements 4
Windows clustered environmentapplying a fix pack to a V7 server 61
Windows Server 41Windows service
creatingmanually 53
starting the serverconfiguration 51procedure 52
Windows servicesTivoli Storage Manager server 229
wizard 37worksheet
server space planning 7
244 IBM Tivoli Storage Manager for Windows: Installation Guide


����
Product Number: 5608-E015608-E025608-E03
Printed in USA