ibm web sphere mq installation oracle flexcube … party...fcc – fc ssi mh integration -...
TRANSCRIPT

IBM Web Sphere MQ Installation
Oracle FLEXCUBE Universal Banking
Release 12.3.0.0.0
[December] [2016]

FCC – FC SSI MH Integration - Installation Document Page 2 of 25
Table of Contents 1. CONFIGURING IBM WEBSPHERE MQ .............................................................................................................. 3
1.1 PREREQUISITE ....................................................................................................................................................... 3 1.2 BINDING THE QUEUE WITH THE JNDI PROVIDER ...................................................................................................... 4 1.2.1 BINDING OF THE QUEUES MANAGERS AND QUEUES................................................................................................ 5
2. CREATING AND MAPPING JMS RESOURCES IN WEBSPHERE APPLICATION SERVER ................... 8
2.1 CREATION OF WEBSPHERE MQ QUEUE CONNECTION FACTORIES ........................................................................ 8 2.2 CREATION OF MESSAGE LISTENER PORTS........................................................................................................... 15
3. APPENDIX ............................................................................................................................................................... 24
3.1 KERNEL INSTALLATION DOCUMENTS ................................................................................................................. 24
FCC – FC SSI MH Integration - Installation Document Page 3 of 25
1. Configuring IBM WebSphere MQ
1.1 Prerequisite
Make sure that WebSphere MQ 6.0 (with JMS Bindings) is installed. If it is not installed then
please contact WebSphere MQ Administrator for getting it installed on your machine.
X-Windows for using WebSphere MQ Explorer on UNIX machines.
FCC – FC SSI MH Integration - Installation Document Page 4 of 25
1.2 Binding the Queue with the JNDI provider
IBM provides a tool called JmsAdmin tool for binding (JNDI) the queue managers and queues with the
JNDI providers. Right now the most popular JNDI provider is file system JNDI provider. This document
lists steps for JNDI binding of the queue managers and queues with the file system JNDI provider.
Follow the steps given in this section to install and configure the OC4J JMS Resource Adapter
for WebSphere MQ only i.e. if the application server is Oracle 10g AS and the JMS Provider is
IBM WebSphere MQ.
JmsAdmin tool can be found under,
<WEBSPHERE_MQ_HOME>\java\bin (On Windows as well as on UNIX)
where,
WEBPSHERE_MQ_HOME is the directory where IBM WebSphere MQ is installed.

FCC – FC SSI MH Integration - Installation Document Page 5 of 25
1.2.1 Binding of the Queues Managers and Queues
1. Make sure that you have also installed WebSphere MQ client on the server. This can be confirmed by
the presence of folder <WEBPSHERE _HOME>\java\bin.
2. Make sure that all the jar files inside the folder <WEBPSHERE _HOME>\java\lib are included in the
classpath.
3. Go to the folder <WEBPSHERE _HOME>\java\bin
4. Open file JMSAdmin.config
5. Now modify the parameter “INITIAL_CONTEXT_FACTORY”. This parameter should be equal to the
value com.sun.jndi.fscontext.RefFSContextFactory.
e.g.:
INITIAL_CONTEXT_FACTORY=com.sun.jndi.fscontext.RefFSContextFactory
For Commenting any line use the symbol #
e.g.:
#INITIAL_CONTEXT_FACTORY=com.sun.jndi.fscontext.RefFSContextFactory is the commented line.
6. Now modify the parameter called "PROVIDER_URL" in this file to the required value.
e.g.: PROVIDER_URL=file:/D:/bindings (Windows)
PROVIDER_URL=file:/home/KERNEL/ bindings (UNIX)
This parameter indicates a directory on the local disc where the JMS binding file is to be created.This
should be an existing directory on the machine.
7. After saving the changes open a new command prompt
8. Go to <WEBPSHERE _HOME>\java\bin
9. Type “jmsadmin” on the prompt and press enter
FCC – FC SSI MH Integration - Installation Document Page 6 of 25
e.g. <WEBPSHERE _HOME>\java\bin>jmsadmin (windows)
<WEBPSHERE _HOME>/java/bin $ jmsadmin (UNIX)
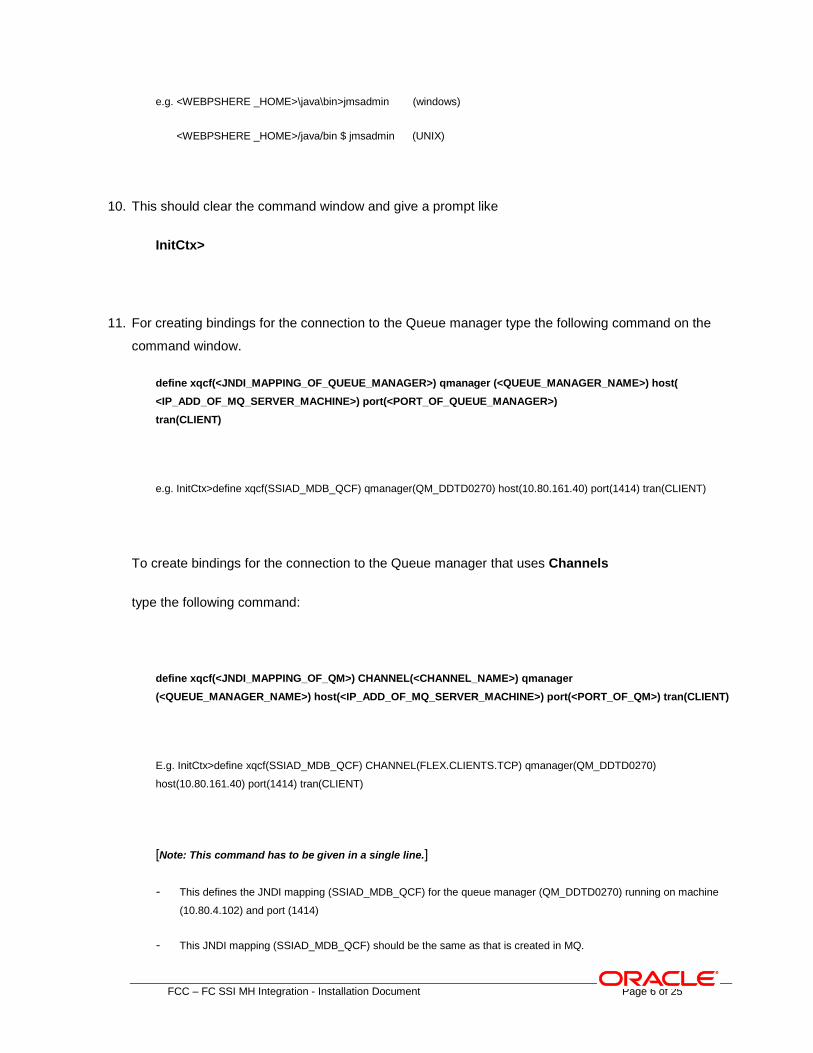
10. This should clear the command window and give a prompt like
InitCtx>
11. For creating bindings for the connection to the Queue manager type the following command on the
command window.
define xqcf(<JNDI_MAPPING_OF_QUEUE_MANAGER>) qmanager (<QUEUE_MANAGER_NAME>) host(
<IP_ADD_OF_MQ_SERVER_MACHINE>) port(<PORT_OF_QUEUE_MANAGER>)
tran(CLIENT)
e.g. InitCtx>define xqcf(SSIAD_MDB_QCF) qmanager(QM_DDTD0270) host(10.80.161.40) port(1414) tran(CLIENT)
To create bindings for the connection to the Queue manager that uses Channels
type the following command:
define xqcf(<JNDI_MAPPING_OF_QM>) CHANNEL(<CHANNEL_NAME>) qmanager
(<QUEUE_MANAGER_NAME>) host(<IP_ADD_OF_MQ_SERVER_MACHINE>) port(<PORT_OF_QM>) tran(CLIENT)
E.g. InitCtx>define xqcf(SSIAD_MDB_QCF) CHANNEL(FLEX.CLIENTS.TCP) qmanager(QM_DDTD0270)
host(10.80.161.40) port(1414) tran(CLIENT)
[Note: This command has to be given in a single line.]
- This defines the JNDI mapping (SSIAD_MDB_QCF) for the queue manager (QM_DDTD0270) running on machine
(10.80.4.102) and port (1414)
- This JNDI mapping (SSIAD_MDB_QCF) should be the same as that is created in MQ.

FCC – FC SSI MH Integration - Installation Document Page 7 of 25
12. For creating bindings for the queues type the following command on the command window.
DEFINE Q(<QUEUE_NAME>) QUEUE(<QUEUE_NAME>) qmanager (<QUEUE_MANAGER_NAME>)
[Note: This command has to be given in a single line.]
e.g.: InitCtx> DEFINE Q(NOTIFY_DEST_QUEUE) QUEUE(NOTIFY_DEST_QUEUE) qmanager (QM_DDTD0270)
- This will bind the queue called " NOTIFY_DEST_QUEUE " by the binding name " NOTIFY_DEST_QUEUE " to the
queue manager "QM_DDTD0270". Normally the binding name and the queue name should be the same as shown in
this example.

FCC – FC SSI MH Integration - Installation Document Page 8 of 25
2. Creating and Mapping JMS Resources in WebSphere Application Server
2.1 Creation of WebSphere MQ Queue Connection Factories
1. On the Left Hand Side of the WebSphere Application Server Admin Console, click on Resources and
Expand the JMS Providers.
2. Now click on WebSphere MQ option.
3. Following screen will be displayed. Select the Node Option and then press Apply.
4. Now Click on WebSphere MQ Queue connection factories listed under Additional Properties
FCC – FC SSI MH Integration - Installation Document Page 9 of 25
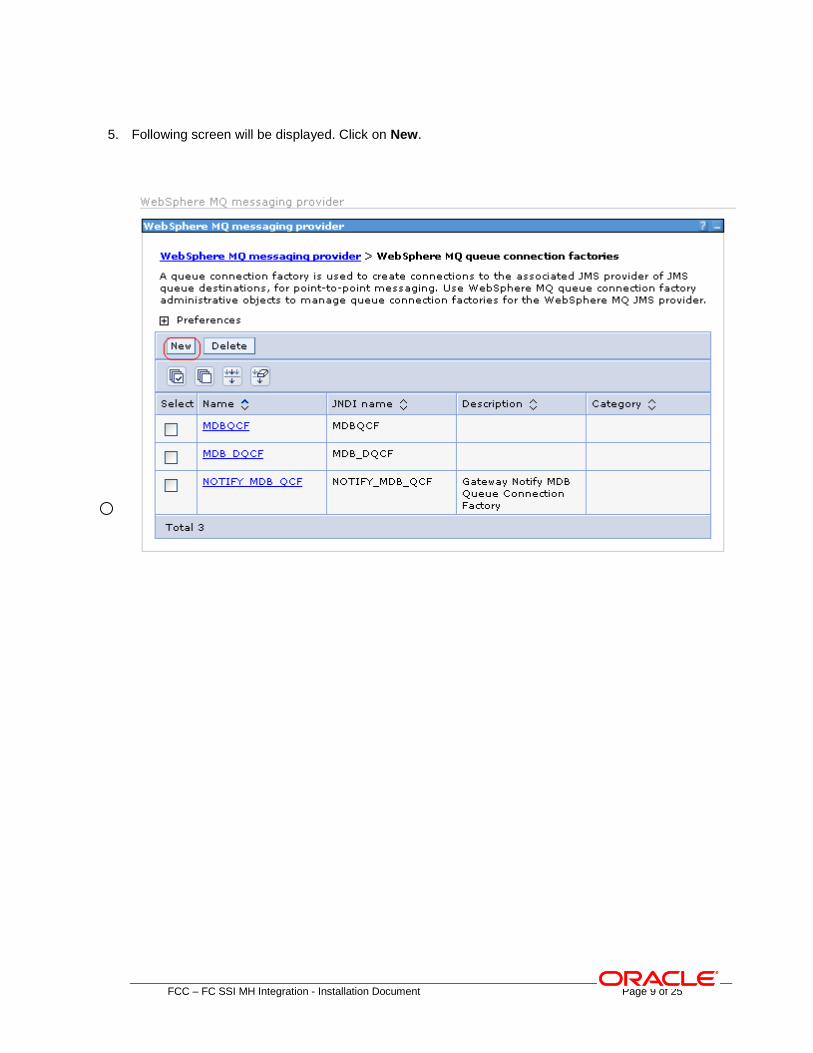
5. Following screen will be displayed. Click on New.
FCC – FC SSI MH Integration - Installation Document Page 10 of 25
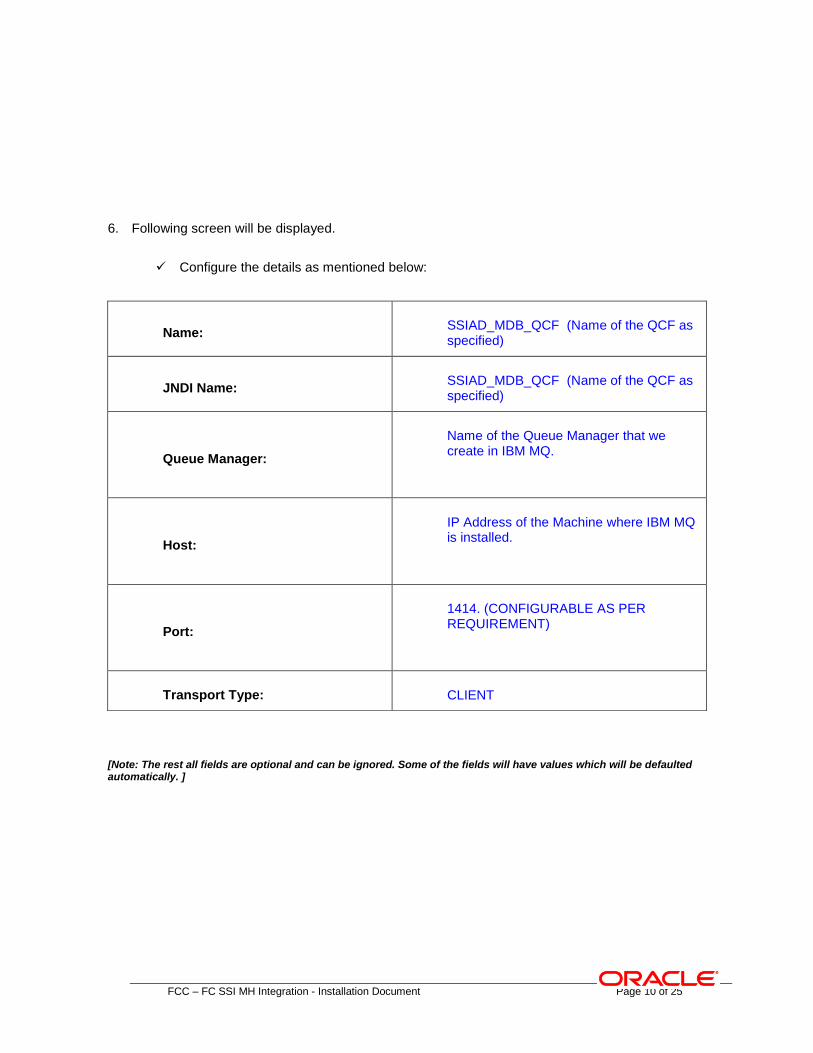
6. Following screen will be displayed.
Configure the details as mentioned below:
[Note: The rest all fields are optional and can be ignored. Some of the fields will have values which will be defaulted automatically. ]
Name: SSIAD_MDB_QCF (Name of the QCF as specified)
JNDI Name: SSIAD_MDB_QCF (Name of the QCF as specified)
Queue Manager:
Name of the Queue Manager that we create in IBM MQ.
Host:
IP Address of the Machine where IBM MQ is installed.
Port:
1414. (CONFIGURABLE AS PER REQUIREMENT)
Transport Type: CLIENT

FCC – FC SSI MH Integration - Installation Document Page 11 of 25
FCC – FC SSI MH Integration - Installation Document Page 12 of 25
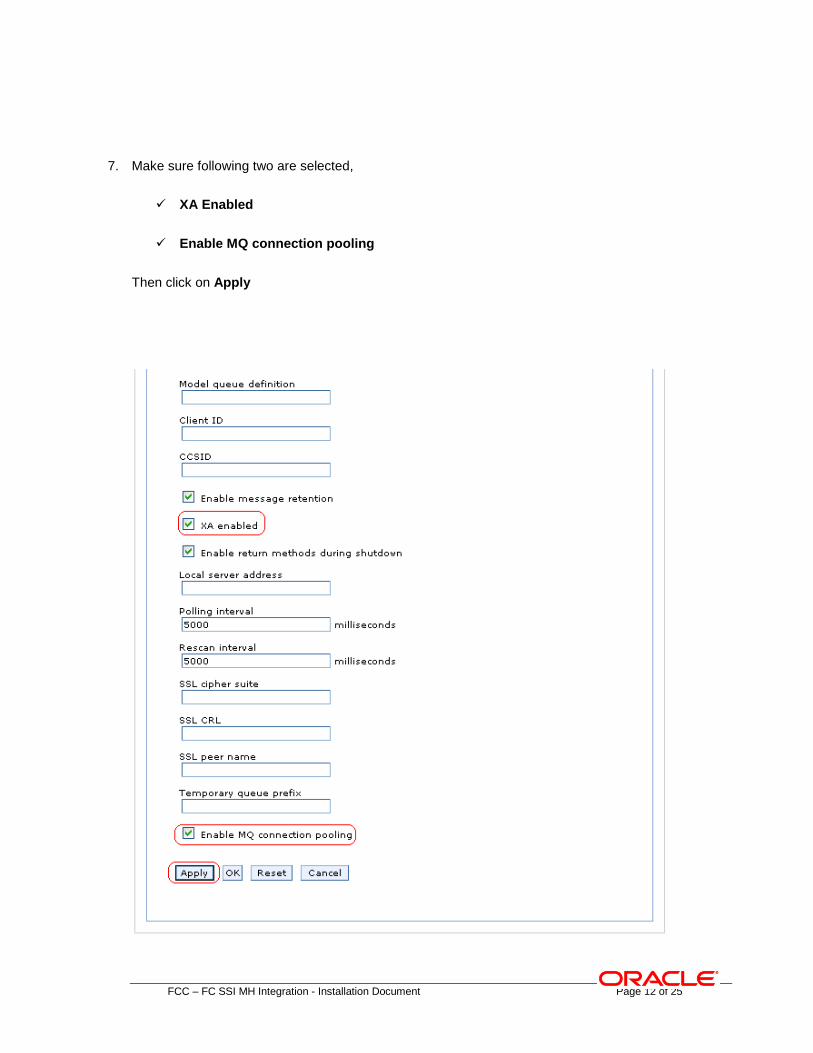
7. Make sure following two are selected,
XA Enabled
Enable MQ connection pooling
Then click on Apply
FCC – FC SSI MH Integration - Installation Document Page 13 of 25
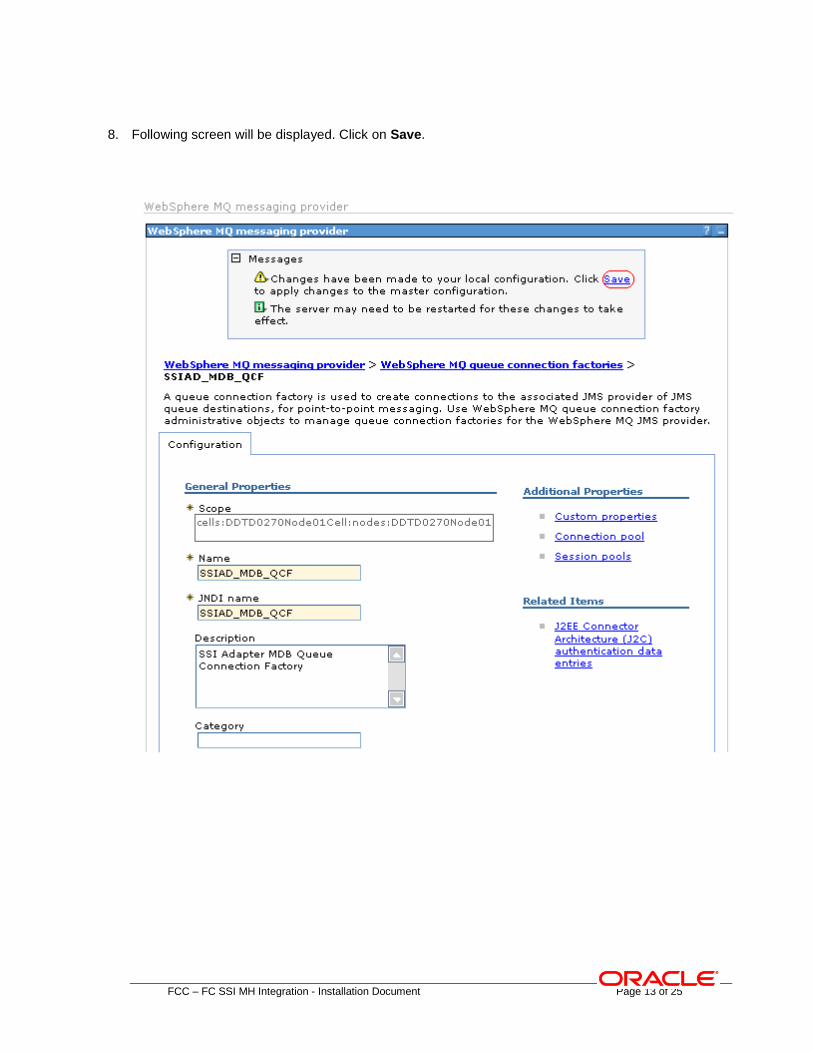
8. Following screen will be displayed. Click on Save.

FCC – FC SSI MH Integration - Installation Document Page 14 of 25
9. Following screen will be displayed. Click on Save.

FCC – FC SSI MH Integration - Installation Document Page 15 of 25
10. Following screen will be displayed.
It should show the Queue Connection Factory that has been created in the above steps as shown
bellow.
2.2 Creation of Message Listener Ports
FCC – FC SSI MH Integration - Installation Document Page 16 of 25
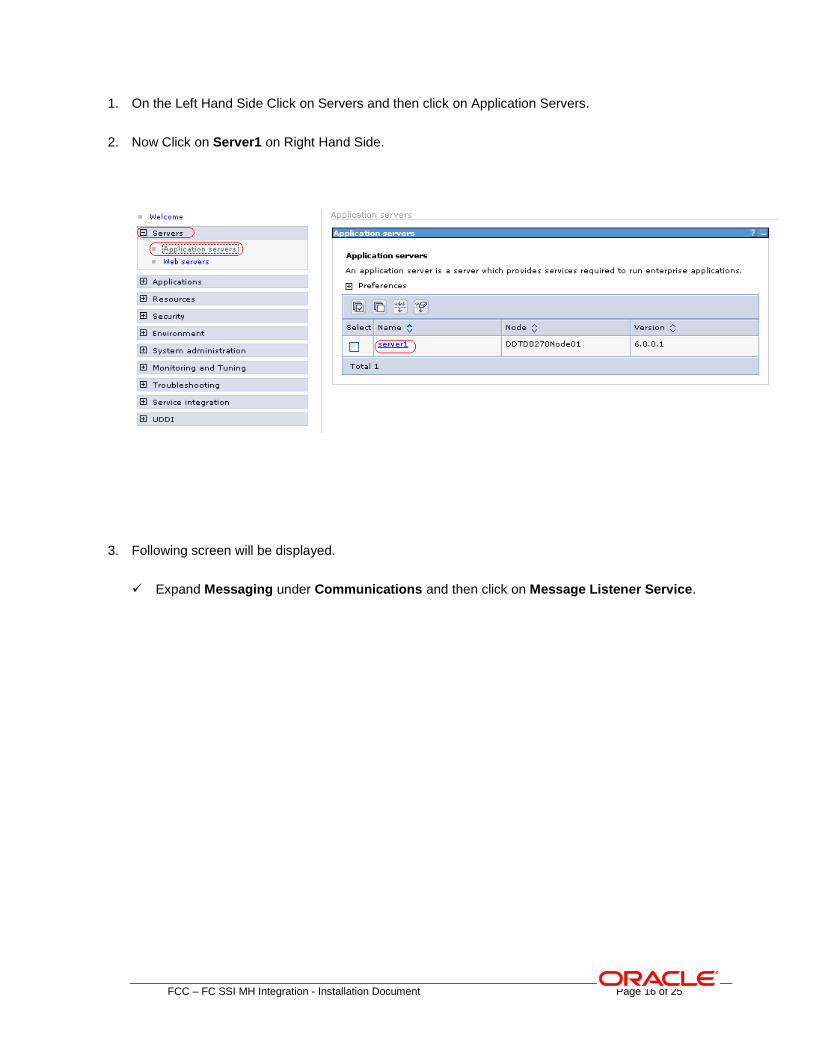
1. On the Left Hand Side Click on Servers and then click on Application Servers.
2. Now Click on Server1 on Right Hand Side.
3. Following screen will be displayed.
Expand Messaging under Communications and then click on Message Listener Service.

FCC – FC SSI MH Integration - Installation Document Page 17 of 25
FCC – FC SSI MH Integration - Installation Document Page 18 of 25
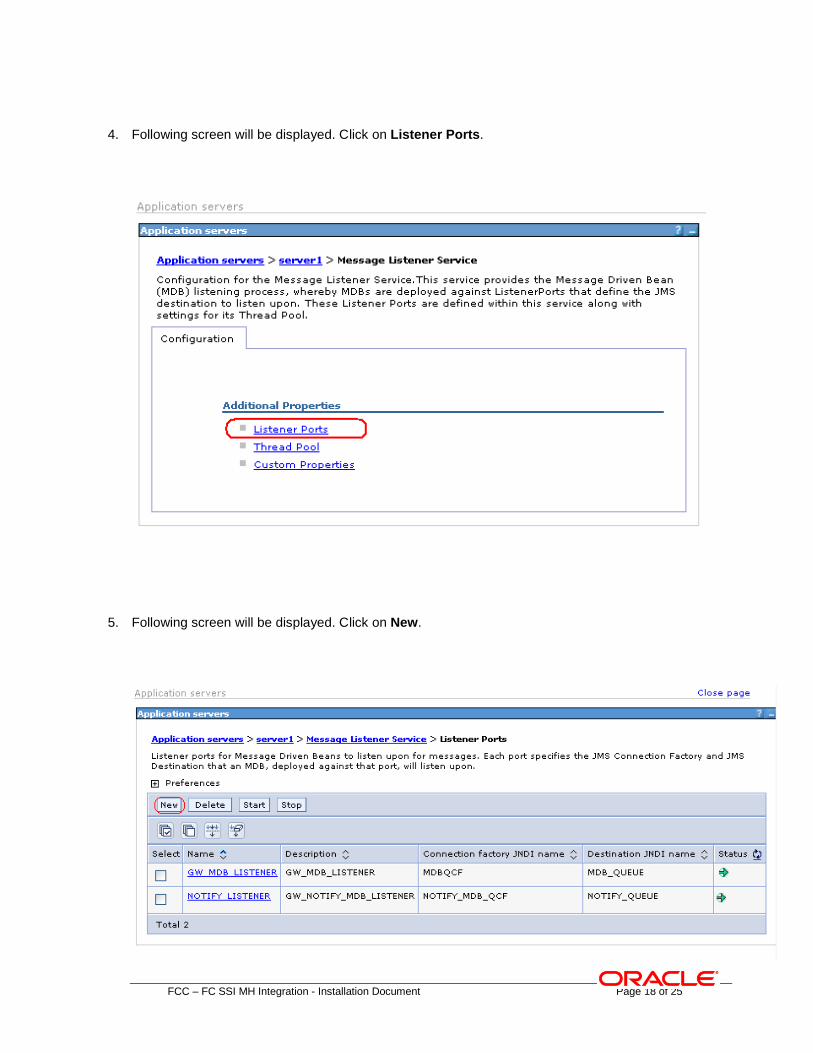
4. Following screen will be displayed. Click on Listener Ports.
5. Following screen will be displayed. Click on New.
FCC – FC SSI MH Integration - Installation Document Page 19 of 25
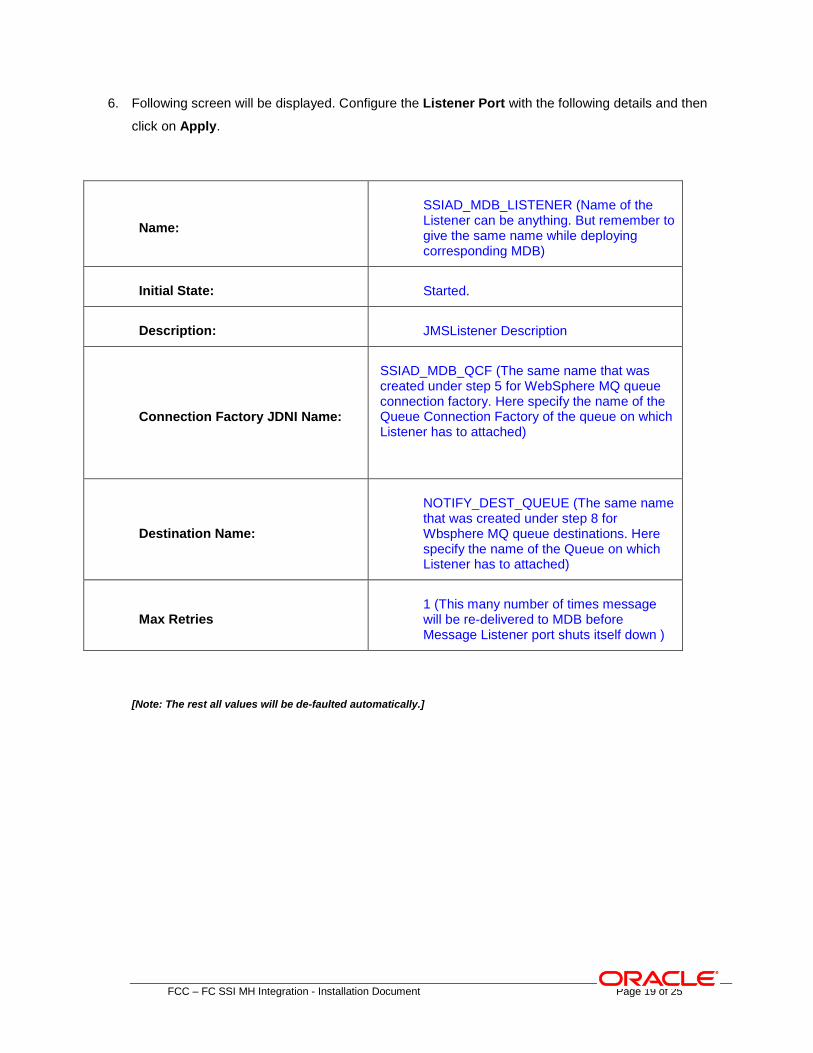
6. Following screen will be displayed. Configure the Listener Port with the following details and then
click on Apply.
Name:
SSIAD_MDB_LISTENER (Name of the Listener can be anything. But remember to give the same name while deploying corresponding MDB)
Initial State: Started.
Description: JMSListener Description
Connection Factory JDNI Name:
SSIAD_MDB_QCF (The same name that was created under step 5 for WebSphere MQ queue connection factory. Here specify the name of the Queue Connection Factory of the queue on which Listener has to attached)
Destination Name:
NOTIFY_DEST_QUEUE (The same name that was created under step 8 for Wbsphere MQ queue destinations. Here specify the name of the Queue on which Listener has to attached)
Max Retries 1 (This many number of times message will be re-delivered to MDB before Message Listener port shuts itself down )
[Note: The rest all values will be de-faulted automatically.]

FCC – FC SSI MH Integration - Installation Document Page 20 of 25
FCC – FC SSI MH Integration - Installation Document Page 21 of 25
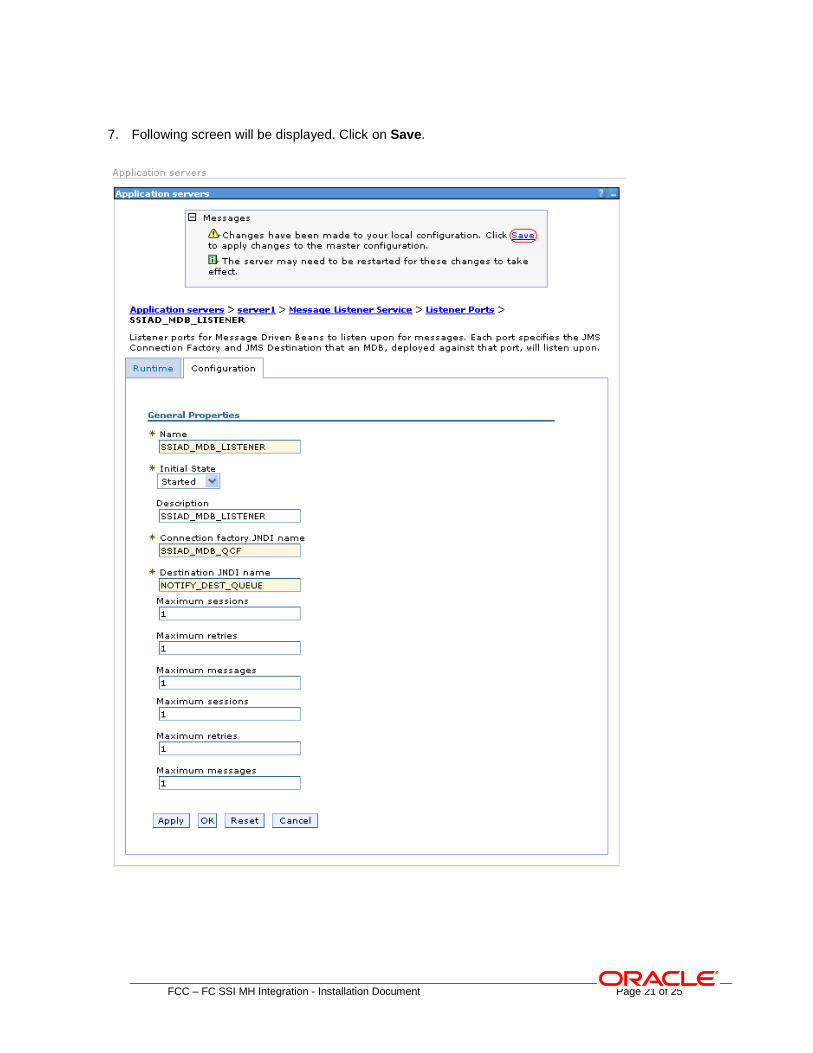
7. Following screen will be displayed. Click on Save.

FCC – FC SSI MH Integration - Installation Document Page 22 of 25
8. Following screen will be displayed. Click on Save.
9. Following screen will be displayed.
It should show the Listener Port that has been created in the above steps as shown bellow.
FCC – FC SSI MH Integration - Installation Document Page 23 of 25
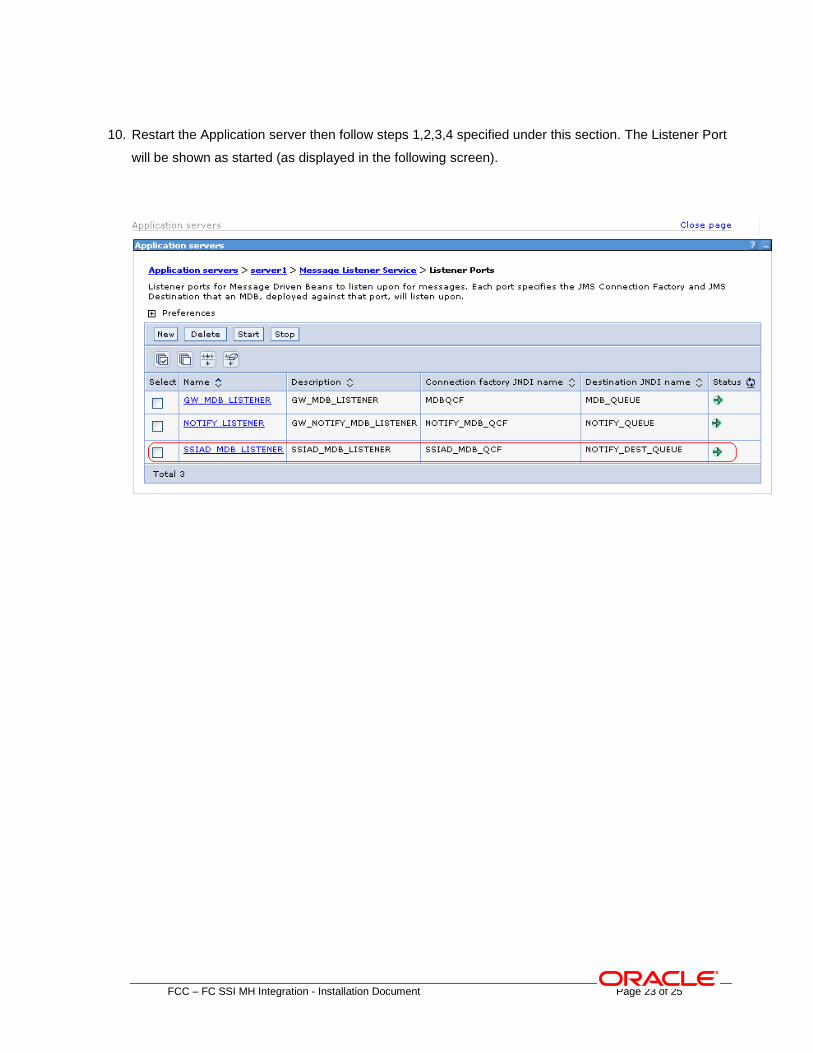
10. Restart the Application server then follow steps 1,2,3,4 specified under this section. The Listener Port
will be shown as started (as displayed in the following screen).

FCC – FC SSI MH Integration - Installation Document Page 24 of 25
3. Appendix
3.1 Kernel Installation Documents
Please refer SSIAD_Installation_FCUBSV.UM8.0.0.0.0.0.0.doc.

IBM Web Sphere MQ Installation [December] [2016] Version 12.3.0.0.0 Oracle Financial Services Software Limited Oracle Park Off Western Express Highway Goregaon (East) Mumbai, Maharashtra 400 063 India Worldwide Inquiries: Phone: +91 22 6718 3000 Fax:+91 22 6718 3001 www.oracle.com/financialservices/ Copyright © [2007], [2016], Oracle and/or its affiliates. All rights reserved. Oracle and Java are registered trademarks of Oracle and/or its affiliates. Other names may be trademarks of their respective owners. U.S. GOVERNMENT END USERS: Oracle programs, including any operating system, integrated software, any programs installed on the hardware, and/or documentation, delivered to U.S. Government end users are "commercial computer software" pursuant to the applicable Federal Acquisition Regulation and agency-specific supplemental regulations. As such, use, duplication, disclosure, modification, and adaptation of the programs, including any operating system, integrated software, any programs installed on the hardware, and/or documentation, shall be subject to license terms and license restrictions applicable to the programs. No other rights are granted to the U.S. Government. This software or hardware is developed for general use in a variety of information management applications. It is not developed or intended for use in any inherently dangerous applications, including applications that may create a risk of personal injury. If you use this software or hardware in dangerous applications, then you shall be responsible to take all appropriate failsafe, backup, redundancy, and other measures to ensure its safe use. Oracle Corporation and its affiliates disclaim any liability for any damages caused by use of this software or hardware in dangerous applications. This software and related documentation are provided under a license agreement containing restrictions on use and disclosure and are protected by intellectual property laws. Except as expressly permitted in your license agreement or allowed by law, you may not use, copy, reproduce, translate, broadcast, modify, license, transmit, distribute, exhibit, perform, publish or display any part, in any form, or by any means. Reverse engineering, disassembly, or decompilation of this software, unless required by law for interoperability, is prohibited. The information contained herein is subject to change without notice and is not warranted to be error-free. If you find any errors, please report them to us in writing. This software or hardware and documentation may provide access to or information on content, products and services from third parties. Oracle Corporation and its affiliates are not responsible for and expressly disclaim all warranties of any kind with respect to third-party content, products, and services. Oracle Corporation and its affiliates will not be responsible for any loss, costs, or damages incurred due to your access to or use of third-party content, products, or services.