ibm powerai vision version 1.1.0: powerai vision guide4. fr om the dir ectory that contains the...
TRANSCRIPT

IBM PowerAI Vision
Version 1.1.0
PowerAI Vision Guide
IBM

IBM PowerAI Vision
Version 1.1.0
PowerAI Vision Guide
IBM
NoteBefore using this information and the product it supports, read the information in “Notices” on page 35.
This edition applies to IBM PowerAI Vision Version 1.1.0 and to all subsequent releases and modifications untilotherwise indicated in new editions.
© Copyright IBM Corporation 2018.US Government Users Restricted Rights – Use, duplication or disclosure restricted by GSA ADP Schedule Contractwith IBM Corp.

Contents
About this document . . . . . . . . . vHighlighting . . . . . . . . . . . . . . vISO 9000. . . . . . . . . . . . . . . . v
IBM PowerAI Vision overview . . . . . 1IBM PowerAI Vision Trial . . . . . . . . . . 1
PowerAI Vision concepts . . . . . . . 5
Planning for PowerAI Vision . . . . . . 7
Installing PowerAI Vision . . . . . . . 9Prerequisites for installing PowerAI Vision . . . . 9Installing PowerAI Vision stand-alone . . . . . 10Installing PowerAI Vision with IBM Cloud Private 13
Uninstalling PowerAI Visionstand-alone. . . . . . . . . . . . . 15
Logging in to PowerAI Vision . . . . . 17
Administering PowerAI Vision. . . . . 19Managing users . . . . . . . . . . . . . 19
Scenario: Detecting objects in a video 21
Troubleshooting. . . . . . . . . . . 27Troubleshooting common issues . . . . . . . 27Gather PowerAI Vision logs and contact support . . 32Getting fixes from Fix Central . . . . . . . . 32
Notices . . . . . . . . . . . . . . 35Trademarks . . . . . . . . . . . . . . 37
© Copyright IBM Corp. 2018 iii

iv IBM PowerAI Vision Version 1.1.0: PowerAI Vision Guide
About this document
This document provides you with information about installing and using IBM® PowerAI Vision to createa dataset that contains images or videos.
HighlightingThe following highlighting conventions are used in this document:
Bold Identifies commands, subroutines, keywords, files, structures, directories, and other items whose names arepredefined by the system. Bold highlighting also identifies graphical objects, such as buttons, labels, andicons that the you select.
Italics Identifies parameters for actual names or values that you supply.
Monospace Identifies examples of specific data values, examples of text similar to what you might see displayed,examples of portions of program code similar to what you might write as a programmer, messages fromthe system, or text that you must type.
ISO 9000ISO 9000 registered quality systems were used in the development and manufacturing of this product.
© Copyright IBM Corp. 2018 v

vi IBM PowerAI Vision Version 1.1.0: PowerAI Vision Guide
IBM PowerAI Vision overview
IBM PowerAI Vision is a video and image analysis platform that is built for IBM Power Systems servers.PowerAI Vision uses GPUs to optimize performance.
PowerAI Vision includes tools and interfaces for anyone with limited skills in deep learning technologies.You can use PowerAI Vision to easily label images and videos that can be used to train and validate amodel.
The following are the main features for PowerAI Vision:
Streamlined model trainingYou can use existing models that are already trained as starting point to reduce the time requiredto train models and improve trained results.
Single-click model deploymentAfter you create a training model, you can deploy an API with one click. You can also developapplications based on the model that you deployed.
Data set management and labelingYou can manage data that is not labeled and labeled data.
Video object detection and labeling assistance Videos that you import can be scanned for objects and the objects can be automatically labeled.
IBM PowerAI Vision TrialPowerAI Vision offers a trial version of the product. It has full functionality, but is not licensed forproduction use.v “Installing the trial version”v “What happens when the trial expires?” on page 2v “Upgrading to the full version of PowerAI Vision” on page 2
Installing the trial version
Attention: You cannot install PowerAI Vision stand-alone on the same system that has the followingsoftware installed:v IBM Data Science Experience (DSX)v IBM Cloud Privatev Any other Kubernetes based applications1. You must complete the following installation prerequisites steps before you install PowerAI Vision.
a. Complete all steps in the “Prerequisites for installing PowerAI Vision” on page 9 topic.b. Your system must have a proper subscription and repository that provides you with updated
packages. For information, see the Red Hat Subscription Manager documentation.c. Turn on Extra Packages for Enterprise Linux (EPEL). For information, see the EPEL website.
2. Go to PowerAI Vision Marketplace and click Start your free trial. Download the .tar file and the .rpmfiles as instructed:
powerai-vision-<release>.trial.ppc64le.rpmpowerai-vision-ppa-<release>.tar
3. From the directory that contains the downloaded rpm file, run the sudo yum install ./file_name.rpmcommand.
© Copyright IBM Corp. 2018 1

4. From the directory that contains the downloaded tar file, run the sudo /opt/powerai-vision/bin/load_images.sh ./file_name.tar script as root or with sudo privileges.
Note: The installation process can take some time to complete.5. Open ports for the firewall to access PowerAI Vision by running the sudo /opt/powerai-vision/sbin/
firewall.sh script.6. After the installation is complete, you can start PowerAI Vision by running the sudo
/opt/powerai-vision/bin/powerai_vision_start.sh script. At this point, you must specify a user nameand password that will be used to log in to PowerAI Vision. You must read and accept the licenseagreement that is displayed before you can use PowerAI Vision.It can take several minutes to start PowerAI Vision. To check the status of the startup process, run thesudo /opt/powerai-vision/bin/helm.sh status vision script. In the output from the helm.sh statusvision script, you can verify which PowerAI Vision components are available by locating theDeployment section and identifying that the AVAILABLE column has a value of 1 for eachcomponent. The following is an example of the output from the helm.sh status vision script thatshows all components are available:
==> v1beta1/DeploymentNAME DESIRED CURRENT UP-TO-DATE AVAILABLE AGEpowerai-vision-mongodb 1 1 1 1 3hpowerai-vision-portal 1 1 1 1 3hpowerai-vision-postgres 1 1 1 1 3hpowerai-vision-taskanaly 1 1 1 1 3hpowerai-vision-ui 1 1 1 1 3hpowerai-vision-video-nginx 1 1 1 1 3hpowerai-vision-video-portal 1 1 1 1 3hpowerai-vision-video-rabmq 1 1 1 1 3hpowerai-vision-video-redis 1 1 1 1 3hpowerai-vision-video-test-nginx 1 1 1 1 3hpowerai-vision-video-test-portal 1 1 1 1 3hpowerai-vision-video-test-rabmq 1 1 1 1 3hpowerai-vision-video-test-redis 1 1 1 1 3h
What happens when the trial expires?
You can see how much time is left in the trial by reviewing the count down in the upper-right corner ofthe user interface. When the timed trial expires, the product will cease to work, including any runningtraining, inference, import, or export operations. However, if you purchase a license, you willautomatically regain access to all of your data sets, models, and so on.
If the trial expires and you want to purchase PowerAI Vision, follow the instructions in “Upgrading tothe full version of PowerAI Vision.”
If the trial expires and you do not decide to purchase PowerAI Vision, follow these steps:1. Remove previously installed images and data by running the following script:
sudo /opt/powerai-vision/bin/purge_image.sh
2. Remove PowerAI Vision by running the following command:sudo yum remove powerai-vision
3. Delete the data directory by running the following command:sudo rm -rf /opt/powerai-vision/
Upgrading to the full version of PowerAI Vision
When you are ready to purchase PowerAI Vision, you can buy a license from PowerAI VisionMarketplace. Use one of these methods to upgrade to the full version. Your data is not deleted when theproduct is uninstalled. You will automatically regain access to all of your data sets, models, and so on.1. Stop the current instance of PowerAI Vision by running the following script:
2 IBM PowerAI Vision Version 1.1.0: PowerAI Vision Guide

sudo /opt/powerai-vision/bin/powerai_vision_stop.sh
2. Obtain and install PowerAI Vision:Install PowerAI Vision from IBM Passport Advantage
a. Download the appropriate tar and rpm files from the IBM Passport Advantage website. Forexample, for 1.1.0, the files are PWAI_VIS_TI_1.1.0_RH_7.5_PWR9.tar andIBM_PWERAI_VISION_TRAINING_AND_IN.rpm
b. From the directory that contains the downloaded rpm file, run the sudo yum install./file_name.rpm command.
c. From the directory that contains the downloaded tar file, run the sudo /opt/powerai-vision/bin/load_images.sh ./file_name.tar script as root or with sudo privileges.
Note: The installation process can take some time to complete.d. Open ports for the firewall to access PowerAI Vision by running the sudo /opt/powerai-vision/
sbin/firewall.sh script.Install PowerAI Vision from AAS
a. Download the product tar.gz file from Advanced Administration System (AAS). This system isalso called Entitled Software Support (ESS): IBM_PowerAI_Vision_<release>.tar.gz.
b. Unzip and untar the tar.gz file by running this command. The install files are extracted topowerai-vision-aas-1.1.0.1/. The install files are powerai-vision-<release>.ppc64le.rpm andpowerai-vision-ppa-<release>.tar.gunzip -c file_name.tar.gz | tar -xvf
-
c. From the directory that contains the extracted rpm file, run the sudo yum install ./file_name.rpmcommand.
d. From the directory that contains the extracted tar file, run the sudo /opt/powerai-vision/bin/load_images.sh ./file_name.tar script as root or with sudo privileges.
Note: The installation process can take some time to complete.e. Open ports for the firewall to access PowerAI Vision by running the sudo /opt/powerai-vision/
sbin/firewall.sh script.Related concepts:“Uninstalling PowerAI Vision stand-alone” on page 15You must uninstall PowerAI Vision stand-alone on your system, before you can install IBM Cloud™
Private, IBM Data Science Experience Local, or other Kubernetes-based applications.
Overview 3

4 IBM PowerAI Vision Version 1.1.0: PowerAI Vision Guide

PowerAI Vision concepts
PowerAI Vision provides an easy to use graphical user interface (GUI) that you can use to quickly createcomputer vision-related artificial intelligence (AI) solutions.
You must be familiar with the following concepts before you can start using PowerAI Vision:
Data setA data set is a collection of images and videos that you uploaded to PowerAI Vision. An exampleof a data set would be images of cars.
CategoryA category is used to classify an image. The image can belong to only a single category. Anexample of a category for a data set that contains cars would be car manufacturers (Toyota,Honda, Chevy, and Ford).
ObjectAn object is used to identify specific items in an image or specific frames in a video. You canlabel multiple objects in an image or a frame in a video. An example of objects in an image ofcars might be wheel, headlights, and windshield.
Model A model is a set of tuned algorithms and that produces a predicted output. Models are trainedbased on the input that is provided by a data set to classify images or video frames, or findobjects in images or video frames.
© Copyright IBM Corp. 2018 5

6 IBM PowerAI Vision Version 1.1.0: PowerAI Vision Guide

Planning for PowerAI Vision
You must meet the software and hardware requirements and understand the supported file types beforeyou can install PowerAI Vision.v “Hardware requirements”v “Software requirements”v “Supported web browsers”v “Supported image types”v “Supported video types”
Hardware requirements
PowerAI Vision requires the following hardware:v POWER8 S822LC (8335-GTB) or POWER9 AC922 with at least one NVIDIA NVLink capable GPUv 128 GB of memoryv 40 GB of storagev Ethernet network interface
Software requirements
You must install the following software before you install PowerAI Vision:v Red Hat Enterprise Linux (RHEL) 7.5 (little endian), or later.v NVIDIA CUDA 9.2 drivers, or later. For information, see the NVIDIA CUDA Toolkit website.v Docker Version 1.13, or later, which is the version of Docker that is installed with RHEL 7.5.
Supported web browsers
The following web browsers are supported:v Google Chrome Version 60, or laterv Firefox Quantum 59.0, or later
Supported image types
The following image formats are supported:v JPEGv PNG
Supported video types
The following video formats are supported:
Can be played in the PowerAI Vision GUI:PowerAI Vision relies on HTML5 video support in web browsers for video playback. Certain fileformats such as MKV or MPEG4 part 2 (ASP) are not supported by modern web browsers.Therefore, they cannot be played in the PowerAI Vision user interface.v Ogg Vorbis (.ogg)v VP8 or VP9 (.webm)v H.264 encoded videos with MP4 format (.mp4) - Requires fix pack 1
© Copyright IBM Corp. 2018 7
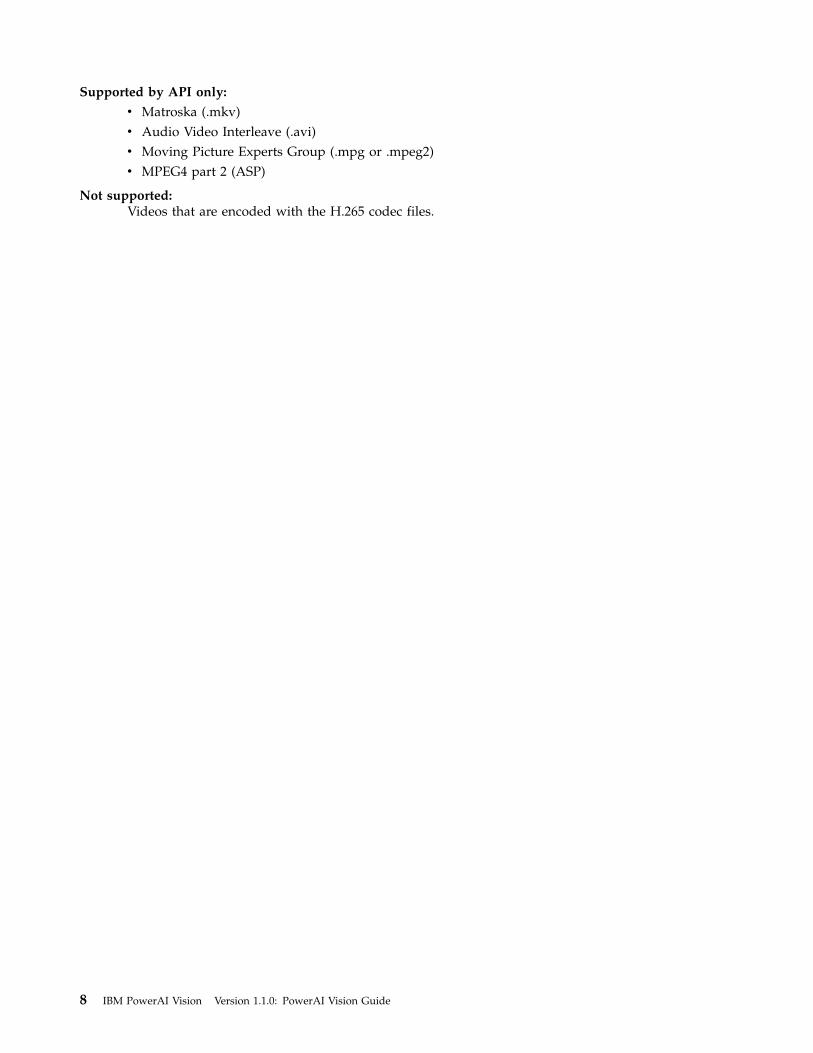
Supported by API only:
v Matroska (.mkv)v Audio Video Interleave (.avi)v Moving Picture Experts Group (.mpg or .mpeg2)v MPEG4 part 2 (ASP)
Not supported:Videos that are encoded with the H.265 codec files.
8 IBM PowerAI Vision Version 1.1.0: PowerAI Vision Guide

Installing PowerAI Vision
You can install PowerAI Vision by using the command line (stand-alone) or by using IBM Cloud Private.
Prerequisites for installing PowerAI VisionBefore you can install either PowerAI Vision stand-alone or PowerAI Vision with IBM Cloud Private, youmust configure Red Hat Enterprise Linux (RHEL), enable the Fedora Extra Packages for Enterprise Linux(EPEL) repository, and install NVIDIA CUDA drivers.
Note: Neither IBM PowerAI nor PowerAI Enterprise are required for running PowerAI Vision.
RHEL and repository requirements
To enable repositories for PowerAI Vision, complete the following steps to configure RHEL 7.5, or later:1. Enable the optional and extra repository channels by running the following commands:
a. Run the following commands for a POWER8® server:sudo subscription-manager repos --enable=rhel-7-for-power-le-optional-rpms
sudo subscription-manager repos --enable=rhel-7-for-power-le-extras-rpms
b. Run the following commands for a POWER9™ server:sudo subscription-manager repos --enable=rhel-7-for-power-9-optional-rpms
sudo subscription-manager repos --enable=rhel-7-for-power-9-extras-rpms
2. Enable the EPEL repository by running the following commands:wget https://dl.fedoraproject.org/pub/epel/epel-release-latest-7.noarch.rpm
sudo rpm -ihv epel-release-latest-7.noarch.rpm
3. Load the RHEL kernel by running the following commands:sudo yum update kernel kernel-tools kernel-tools-libs kernel-bootwrapper
sudo reboot
4. Install and start Docker by completing the following steps:a. Install Dock by running the sudo yum install docker command.b. Start Docker by running the sudo systemctl start docker command, and start Docker after a
system restarts by running the sudo systemctl enable docker command.c. The Docker interface must be in a trusted zone. If you are running the firewalld daemon, you
must run the following commands to configure the Docker interface to be in a trusted zone:sudo firewall-cmd --zone=trusted --change-interface=docker0
sudo systemctl restart NetworkManager
For more information, see the Docker on IBM Power Systems website.
NVIDIA component requirements
Complete the following steps to configure NVIDIA components for PowerAI Vision:1. On POWER9 systems, you must disable the udev Memory Auto-Onlining Rule to use the Compute
Unified Device Architecture (CUDA) drivers by completing the following steps:a. Copy the /lib/udev/rules.d/40-redhat.rules file to the directory for user overridden rules by
running the sudo cp /lib/udev/rules.d/40-redhat.rules /etc/udev/rules.d/ command.
© Copyright IBM Corp. 2018 9

b. Edit the /lib/udev/rules.d/40-redhat.rules file by running the sudo nano /etc/udev/rules.d/40-redhat.rules command, and comment out the following line in the file:SUBSYSTEM=="memory",ACTION=="add", PROGRAM="/bin/uname -p", RESULT!="s390*", ATTR{state}=="offline",ATTR{state}="online"
c. Remove the following line in the file as it does not apply anymore: # do not edit this file, itwill be overwritten on update
d. Restart the system by running the sudo reboot command.2. Install the CUDA Toolkit 9.2 drivers, or later, by completing the following steps:
a. Go to the NVIDIA CUDA Toolkit website.b. Click Linux > ppc64le > RHEL > 7 > rpm (local) or rpm (network)
c. Install the RPM by running the sudo yum install cuda-repo-rhel7*.ppc64le.rpm command.d. Install the CUDA Toolkit by running the sudo yum install cuda command.e. Verify that the CUDA drivers are installed by running the /usr/bin/nvidia-smi/ application.
Installing PowerAI Vision stand-aloneYou use the command line to install PowerAI Vision stand-alone.
PowerAI Vision stand-alone installation prerequisites
You must complete the following installation prerequisites steps before you install PowerAI Vision.1. Complete all steps in the “Prerequisites for installing PowerAI Vision” on page 9 topic.2. Your system must have a proper subscription and repository that provides you with updated
packages. For information, see the Red Hat Subscription Manager documentation.3. Turn on Extra Packages for Enterprise Linux (EPEL). For information, see the EPEL website.
Attention: You cannot install PowerAI Vision stand-alone on the same system that has the followingsoftware installed:v IBM Data Science Experience (DSX)v IBM Cloud Privatev Any other Kubernetes based applicationsv “Install PowerAI Vision from IBM Passport Advantage”v “Install PowerAI Vision from AAS ” on page 11v “Install PowerAI Vision trial mode” on page 12
Install PowerAI Vision from IBM Passport Advantage
To install PowerAI Vision stand-alone, complete the following steps:1. Download the appropriate tar and rpm files from the IBM Passport Advantage website. For example,
for 1.1.0, the files are PWAI_VIS_TI_1.1.0_RH_7.5_PWR9.tar andIBM_PWERAI_VISION_TRAINING_AND_IN.rpm
2. From the directory that contains the downloaded rpm file, run the sudo yum install ./file_name.rpmcommand.
3. From the directory that contains the downloaded tar file, run the sudo /opt/powerai-vision/bin/load_images.sh ./file_name.tar script as root or with sudo privileges.
Note: The installation process can take some time to complete.4. Open ports for the firewall to access PowerAI Vision by running the sudo /opt/powerai-vision/sbin/
firewall.sh script.
10 IBM PowerAI Vision Version 1.1.0: PowerAI Vision Guide
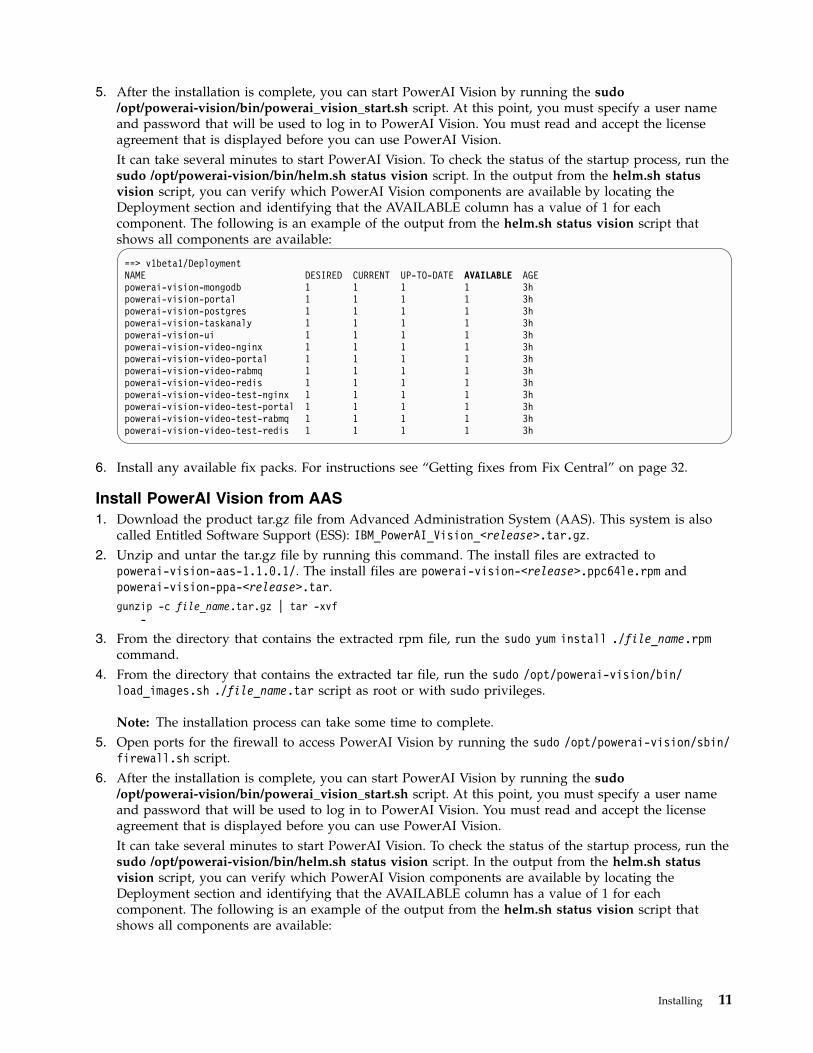
5. After the installation is complete, you can start PowerAI Vision by running the sudo/opt/powerai-vision/bin/powerai_vision_start.sh script. At this point, you must specify a user nameand password that will be used to log in to PowerAI Vision. You must read and accept the licenseagreement that is displayed before you can use PowerAI Vision.It can take several minutes to start PowerAI Vision. To check the status of the startup process, run thesudo /opt/powerai-vision/bin/helm.sh status vision script. In the output from the helm.sh statusvision script, you can verify which PowerAI Vision components are available by locating theDeployment section and identifying that the AVAILABLE column has a value of 1 for eachcomponent. The following is an example of the output from the helm.sh status vision script thatshows all components are available:
==> v1beta1/DeploymentNAME DESIRED CURRENT UP-TO-DATE AVAILABLE AGEpowerai-vision-mongodb 1 1 1 1 3hpowerai-vision-portal 1 1 1 1 3hpowerai-vision-postgres 1 1 1 1 3hpowerai-vision-taskanaly 1 1 1 1 3hpowerai-vision-ui 1 1 1 1 3hpowerai-vision-video-nginx 1 1 1 1 3hpowerai-vision-video-portal 1 1 1 1 3hpowerai-vision-video-rabmq 1 1 1 1 3hpowerai-vision-video-redis 1 1 1 1 3hpowerai-vision-video-test-nginx 1 1 1 1 3hpowerai-vision-video-test-portal 1 1 1 1 3hpowerai-vision-video-test-rabmq 1 1 1 1 3hpowerai-vision-video-test-redis 1 1 1 1 3h
6. Install any available fix packs. For instructions see “Getting fixes from Fix Central” on page 32.
Install PowerAI Vision from AAS1. Download the product tar.gz file from Advanced Administration System (AAS). This system is also
called Entitled Software Support (ESS): IBM_PowerAI_Vision_<release>.tar.gz.2. Unzip and untar the tar.gz file by running this command. The install files are extracted to
powerai-vision-aas-1.1.0.1/. The install files are powerai-vision-<release>.ppc64le.rpm andpowerai-vision-ppa-<release>.tar.gunzip -c file_name.tar.gz | tar -xvf
-
3. From the directory that contains the extracted rpm file, run the sudo yum install ./file_name.rpmcommand.
4. From the directory that contains the extracted tar file, run the sudo /opt/powerai-vision/bin/load_images.sh ./file_name.tar script as root or with sudo privileges.
Note: The installation process can take some time to complete.5. Open ports for the firewall to access PowerAI Vision by running the sudo /opt/powerai-vision/sbin/
firewall.sh script.6. After the installation is complete, you can start PowerAI Vision by running the sudo
/opt/powerai-vision/bin/powerai_vision_start.sh script. At this point, you must specify a user nameand password that will be used to log in to PowerAI Vision. You must read and accept the licenseagreement that is displayed before you can use PowerAI Vision.It can take several minutes to start PowerAI Vision. To check the status of the startup process, run thesudo /opt/powerai-vision/bin/helm.sh status vision script. In the output from the helm.sh statusvision script, you can verify which PowerAI Vision components are available by locating theDeployment section and identifying that the AVAILABLE column has a value of 1 for eachcomponent. The following is an example of the output from the helm.sh status vision script thatshows all components are available:
Installing 11
==> v1beta1/DeploymentNAME DESIRED CURRENT UP-TO-DATE AVAILABLE AGEpowerai-vision-mongodb 1 1 1 1 3hpowerai-vision-portal 1 1 1 1 3hpowerai-vision-postgres 1 1 1 1 3hpowerai-vision-taskanaly 1 1 1 1 3hpowerai-vision-ui 1 1 1 1 3hpowerai-vision-video-nginx 1 1 1 1 3hpowerai-vision-video-portal 1 1 1 1 3hpowerai-vision-video-rabmq 1 1 1 1 3hpowerai-vision-video-redis 1 1 1 1 3hpowerai-vision-video-test-nginx 1 1 1 1 3hpowerai-vision-video-test-portal 1 1 1 1 3hpowerai-vision-video-test-rabmq 1 1 1 1 3hpowerai-vision-video-test-redis 1 1 1 1 3h
7. Install any available fix packs. For instructions see “Getting fixes from Fix Central” on page 32.
Install PowerAI Vision trial mode1. Go to PowerAI Vision Marketplace and click Start your free trial. Download the .tar file and the .rpm
files as instructed:
powerai-vision-<release>.trial.ppc64le.rpmpowerai-vision-ppa-<release>.tar
2. From the directory that contains the downloaded rpm file, run the sudo yum install ./file_name.rpmcommand.
3. From the directory that contains the downloaded tar file, run the sudo /opt/powerai-vision/bin/load_images.sh ./file_name.tar script as root or with sudo privileges.
Note: The installation process can take some time to complete.4. Open ports for the firewall to access PowerAI Vision by running the sudo /opt/powerai-vision/sbin/
firewall.sh script.5. After the installation is complete, you can start PowerAI Vision by running the sudo
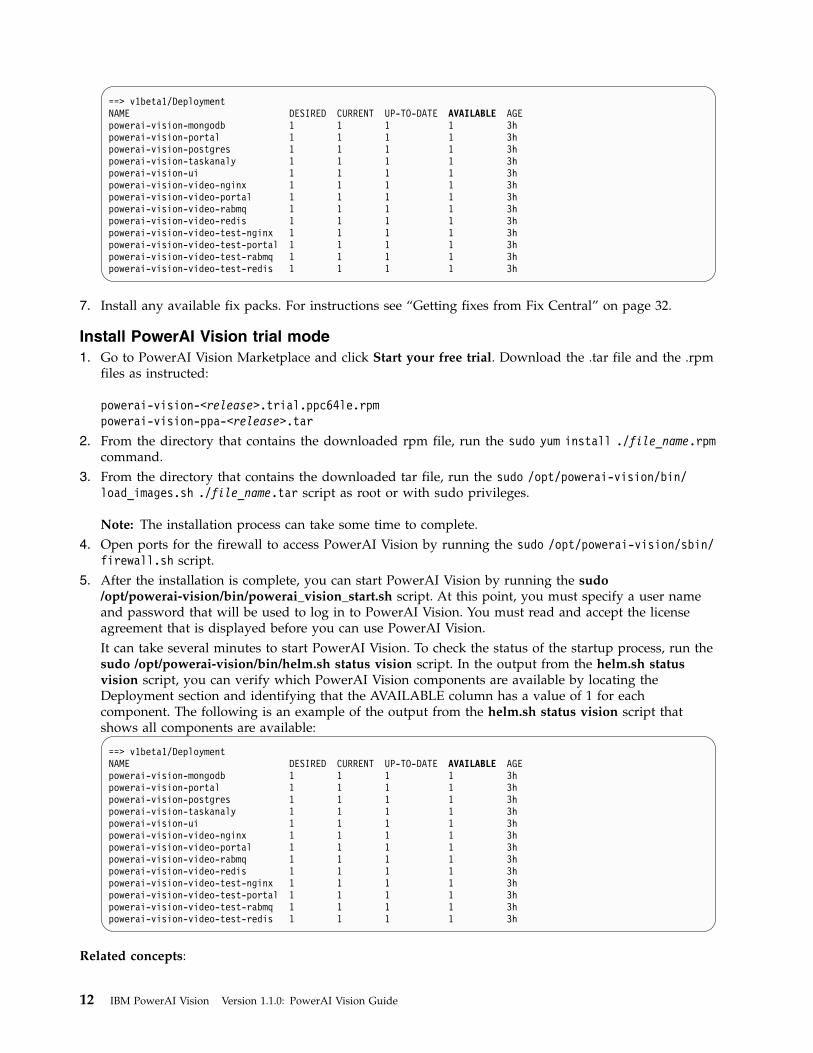
/opt/powerai-vision/bin/powerai_vision_start.sh script. At this point, you must specify a user nameand password that will be used to log in to PowerAI Vision. You must read and accept the licenseagreement that is displayed before you can use PowerAI Vision.It can take several minutes to start PowerAI Vision. To check the status of the startup process, run thesudo /opt/powerai-vision/bin/helm.sh status vision script. In the output from the helm.sh statusvision script, you can verify which PowerAI Vision components are available by locating theDeployment section and identifying that the AVAILABLE column has a value of 1 for eachcomponent. The following is an example of the output from the helm.sh status vision script thatshows all components are available:
==> v1beta1/DeploymentNAME DESIRED CURRENT UP-TO-DATE AVAILABLE AGEpowerai-vision-mongodb 1 1 1 1 3hpowerai-vision-portal 1 1 1 1 3hpowerai-vision-postgres 1 1 1 1 3hpowerai-vision-taskanaly 1 1 1 1 3hpowerai-vision-ui 1 1 1 1 3hpowerai-vision-video-nginx 1 1 1 1 3hpowerai-vision-video-portal 1 1 1 1 3hpowerai-vision-video-rabmq 1 1 1 1 3hpowerai-vision-video-redis 1 1 1 1 3hpowerai-vision-video-test-nginx 1 1 1 1 3hpowerai-vision-video-test-portal 1 1 1 1 3hpowerai-vision-video-test-rabmq 1 1 1 1 3hpowerai-vision-video-test-redis 1 1 1 1 3h
Related concepts:
12 IBM PowerAI Vision Version 1.1.0: PowerAI Vision Guide
“Logging in to PowerAI Vision” on page 17Follow these steps to log in to PowerAI Vision.
Installing PowerAI Vision with IBM Cloud PrivateIf you have more than one IBM Power Systems server available, you can use IBM Cloud Private 2.1.0.3 toinstall a single instance of PowerAI Vision that has access to all the Power Systems GPUs across theentire cluster.
If you have only a single IBM Power Systems server and do not have an existing IBM Cloud Privateenvironment, you should use the PowerAI Vision stand-alone process. For more information, see the“Installing PowerAI Vision stand-alone” on page 10 topic.
To install PowerAI Vision with IBM Cloud Private, complete the following steps:
Note: If IBM Cloud Private is already installed and configured in your environment, you can go to step4.1. Install IBM Cloud Private. For more information, see the Installing IBM Cloud Private topic.2. Install the IBM Cloud CLI. For more information, see the Install IBM Cloud CLI topic.3. Authenticate to your master node in your IBM Cloud Private environment. For more information,
see the Configuring authentication for the Docker CLI topic.4. Download the PWAI_VIS_TI_1.1.0_RH_7.5_PWR9.tar file from IBM Passport Advantage.5. To make PowerAI Vision available in IBM Cloud Private catalog, run the following command:
bx pr load-ppa-archive --archive PWAI_VIS_TI_1.1.0_RH_7.5_PWR9.tar [--clustername <cluster_CA_domain>]
Where cluster_CA_domain is the certificate authority (CA) domain. If you did not specify a CAdomain, the default value is mycluster.icp.
6. Verify that you have a minimum of 40 GB of persistent storage. If your IBM Cloud Privateinstallation has dynamic provisioned storage, you can use it for your 40 GB of persistent storage. Tomanually create persistent volumes in IBM Cloud Private, see the Creating a Persistent Volume topic.After you create the persistent volume, you must make the volume sharable across all nodes in thecluster.
7. To install PowerAI Vision from the IBM Cloud Private catalog, from the navigation menu selectCatalog > Helm Charts.
8. In the search box, enter vision and click powerai-vision. Review the information.9. Click Configure and enter information for the Release name and the Namespace fields.
Note: You can change the user name and password during this step by installing the httpd-toolsrpm and running the htpasswd -nm admin command. Next, use the output from this command toset the authentication.htpasswd value in the chart by using the --set authentication.htpasswd=option for helm install.
The following are the default user name and password for PowerAI Vision:v User name: adminv Password: passw0rd
10. Click Install.11. For information about accessing PowerAI Vision, see Logging into PowerAI Vision.
Installing 13

14 IBM PowerAI Vision Version 1.1.0: PowerAI Vision Guide

Uninstalling PowerAI Vision stand-alone
You must uninstall PowerAI Vision stand-alone on your system, before you can install IBM CloudPrivate, IBM Data Science Experience Local, or other Kubernetes-based applications.
To uninstall PowerAI Vision, complete the following steps:
Note: If you run the following commands, all the data that you gathered is deleted. Export your datasets and models before you run the following commands.1. Stop the current instance of PowerAI Vision by running the following script:
sudo /opt/powerai-vision/bin/powerai_vision_stop.sh
2. Remove previously installed images and data by running the following script:sudo /opt/powerai-vision/bin/purge_image.sh
3. Remove PowerAI Vision by running the following command:sudo yum remove powerai-vision
4. Delete the data directory by running the following command:sudo rm -rf /opt/powerai-vision/
5. Verify that PowerAI Vision was uninstalled by running the following command:rpm -q powerai-vision
© Copyright IBM Corp. 2018 15

16 IBM PowerAI Vision Version 1.1.0: PowerAI Vision Guide
Logging in to PowerAI Vision
Follow these steps to log in to PowerAI Vision.
Note: PowerAI Vision is supported on these browsers:v Google Chrome Version 60, or laterv Firefox Quantum 59.0, or later1. Enter the appropriate PowerAI Vision URL in a supported browser:
PowerAI Vision stand-alone URLhttps://hostname/powerai-vision/, where hostname is the system on which you installedPowerAI Vision.
PowerAI Vision with IBM Cloud Private URLhttps://proxyhost/powerai-vision-RELEASE/, where proxyhost is the host name of your IBMCloud Private proxy server, and RELEASE is the name you specified in the Release name fieldwhen you deployed the Helm chart.
2. Enter your user name and password.v If you installed PowerAI Vision stand-alone, you created your user name and password when you
ran the /opt/powerai-vision/bin/powerai_vision_start.sh script.v If you installed PowerAI Vision with IBM Cloud Private, your initial user name and password is
most likely admin and passw0rd.Related concepts:“Managing users” on page 19The way you work with users and passwords differs, depending on how PowerAI Vision is installed.
© Copyright IBM Corp. 2018 17

18 IBM PowerAI Vision Version 1.1.0: PowerAI Vision Guide

Administering PowerAI Vision
Use this information to administer PowerAI Vision, such as stopping, starting, and determining the statusof the pods.
Start or stop PowerAI Vision
There are several situations when you might need to stop and start PowerAI Vision. For example, whenupgrading or performing maintenance on the product or on the system, when troubleshooting a problem,and so on. Use these commands to start or stop PowerAI Vision, as appropriate:powerai-vision-stop.shpowerai-vision-start.sh
Determine the status of PowerAI Vision pods
When troubleshooting a problem with PowerAI Vision, you might need to check the status of the Dockerpods that are part of PowerAI Vision. For example, if the product does not start, if it is returning errors,or if actions are not completing. Run kubectl get pods to see the status. For example:
$ /opt/powerai-vision/bin/kubectl get podsNAME READY STATUS RESTARTS AGEpowerai-vision-mongodb-764f99fcf6-l2nzd 1/1 Running 0 12hpowerai-vision-portal-76fbc7db68-7rr47 1/1 Running 0 12hpowerai-vision-postgres-55c6f7fcf6-42fbt 1/1 Running 0 12hpowerai-vision-taskanaly-55bfb587d4-cvzln 1/1 Running 0 12hpowerai-vision-ui-845d8c8d8-bmfw7 1/1 Running 0 12hpowerai-vision-video-nginx-8474f7c44c-qmxm4 1/1 Running 0 12hpowerai-vision-video-portal-5b76558784-8mb8d 1/1 Running 0 12hpowerai-vision-video-rabmq-5d5d786f9f-nz7pn 1/1 Running 0 12hpowerai-vision-video-redis-59c557b69-hf8pg 1/1 Running 0 12hpowerai-vision-video-test-nginx-5dc6887666-l9tb8 1/1 Running 0 12hpowerai-vision-video-test-portal-54d85ff65b-945gp 1/1 Running 0 12hpowerai-vision-video-test-rabmq-6858cc749-grhgm 1/1 Running 0 12hpowerai-vision-video-test-redis-75977cdd8f-lbljb 1/1 Running 0 12h
If one or more pods is not running, try stopping and restarting PowerAI Vision.
Managing usersThe way you work with users and passwords differs, depending on how PowerAI Vision is installed.
PowerAI Vision installed as stand-alone
If you installed PowerAI Vision stand-alone, you can use the following scripts in the/opt/powerai-vision/bin/ directory to manage users.v List users: set_passwd.sh -l
v Change password: set_passwd.sh -u username
v Delete user: set_passwd.sh -u username -d
PowerAI Vision installed with IBM Cloud Private
If you installed PowerAI Vision with IBM Cloud Private, you can add, remove, or modify user namesand passwords by completing the following steps:
© Copyright IBM Corp. 2018 19
Note: In the following steps, RELEASE is the name you specified in the Release name field when youdeployed the Helm chart.1. Verify that the Kubernetes command line tool (kubectl) is installed. If you do not have the kubectl
installed, see the Accessing your cluster by using the kubectl CLI topic.2. Get the current set of user names and passwords and write them into the auth file by running the
following command:kubectl get secret powerai-vision-RELEASE-auth -o jsonpath={.data.auth} | base64 --decode > auth
3. You can set a password for a user name or create a new user and write the changes to the auth file byrunning the htpasswd -m auth username command.
4. Update the secret with the contents of the auth file that you changed by running the followingcommand:kubectl patch secret powerai-vision-RELEASE-auth -p {\"data\":{\"auth\":\"$(base64 -w 0 auth)\"}}
5. Update the ingress to read the updated secrets by running the following command:kubectl patch ing powerai-vision-RELEASE-ing -p {\"metadata\":{\"labels\":{\"modified\":\"$(date +%s)\"}}}
20 IBM PowerAI Vision Version 1.1.0: PowerAI Vision Guide
Scenario: Detecting objects in a video
In this fictional scenario, you want to create a deep learning model to monitor traffic on a busy road. Youhave a video that displays the traffic during the day. From this video, you want to know how many carsare on the busy road every day, and what are the peak times that have the most cars on the road.
You can complete the following tasks in this scenario:1. Importing a video2. Labeling objects in a video3. Training a model4. Deploying a model5. Automatically label frames in a video
Importing a video
To import a video and create a data set, complete the following steps:
Attention: You can play only the following video types in PowerAI Vision:v Ogg Vorbis (.ogg)v VP8 or VP9 (.webm)v H.264 encoded videos with MP4 format (.mp4) - Requires fix pack 1
For further support details, see “Planning for PowerAI Vision” on page 7.1. Login to PowerAI Vision2. From the Welcome page, click Get started to create a data set.3. From the Dataset page, click the icon and enter a name for your data set. For example, Traffic Video.4. Click the data set that you created in step 3. To import your video, click Import file and select the
video file. You can upload more than one video at a time by selecting multiple video files. You muststay on the page until the upload completes.
Labeling objects in a video
Now that the video is uploaded, you can label objects in the video. For object detection, you must haveat minimum five labels for each object. In this scenario, you want to create a Car and Motorcycle objectsand you must label at least five images with cars or motorcycles.
To label objects in a video, complete the following steps:1. Select the video from your data set and select Tag Objects.2. Click Auto capture frames and specify the time in seconds that you want to automatically create
frames from the video. You can click Capture frame to manually capture frames. If you use thisoption, you must capture a minimum of five frames from the video. In this scenario, the value that isspecified in the Capture Interval (Seconds) field is 10 seconds.
Note: Depending on the length and size of the video and the interval you specified to capture frames,the process to capture frames can take several minutes.
3. Create a new object label for the data set by clicking Add New. Enter the name of the object youwant to create, and click the (+) icon. You can add multiple object labels to the data set at the sametime. Next, click Add. In this scenario, you want to create a two new objects that are labeled Car andMotorcycle.
© Copyright IBM Corp. 2018 21

4. Select the first frame in the carousel. In the first frame, click the corresponding object label that youcreated in step 3 to start labeling objects in the frame. To label objects, hold down the left mousebutton and draw a box around the object.Review the following tips about identify and drawing objects:v Do not label part of an object. For example, you do not want to label a car that is only partially in
the video frame.v If a video frame has more than one object, you must label all objects. For example, you have two
objects (cars and motorcycles) in a video frame, you must label both objects. Do not label one object(cars) and not the other object (motorcycles). Label objects with a consistent approach.
v Draw a box around each individual object. Do not draw a box around groups of objects. Forexample, if two objects (Cars) are right next to each other, you must draw a box around eachindividual object.
v Draw the box as close to the objects as possible. Do not leave blank space around the object.v You can draw boxes around objects that overlap. For example, if one object is behind another
object. You can also draw boxes that touch each other.v You can zoom in on the video frame to make it easier to draw the box around objects.v You cannot draw boxes that extend off the edge of the image or video frame.
In this scenario, you want to select the Car or Motorcycle object and draw a box around the cars andmotorcycle in each frame.
5. You must select at least five frames in the video and add labels for the objects you previously taggedin step 4.In this scenario, the motorcycle is only in a single automatically captured frame at 40 seconds.Therefore, you must capture at minimum of four more frames with the motorcycle. The motorcyclecomes into view at 36.72 seconds. To correctly capture the motorcycle in motion you can create extraframes at 37.79 seconds, 41.53 seconds, and 42.61 seconds (total five frames with the motorcycle). Inthese new video frames, you must label both the cars and motorcycle.Complete the following steps to manually add new frames to an existing video data set:a. Play the video and when the frame you want is displayed, click the pause icon. You can also use
the video players status bar to find a frame you want.b. Click Capture Frame.c. The new frame is added to the carousel.
6. After all objects are labeled in all of the video frames in the carousel, click Done editing.
The following figure displays the captured video frame at 41.53 seconds with object labels of Car andMotorcycle. Figure 1 also displays a box around the five frames (four of the frames were addedmanually) in the carousel that required object labels for the motorcycle that is in each frame.
22 IBM PowerAI Vision Version 1.1.0: PowerAI Vision Guide

Training a model
With all the object labels that are identified in your video data set, you can now train your deep learningmodel.
To train a model, complete the following steps:1. From the Dataset page, click Train.2. From the Train Dataset page, complete the following steps:
a. Enter the name for the model.b. Click Object Detection.c. For the Performance Type field, select either System Default or Customized.
3. Click Train.
You can wait for the entire training model process complete, but it is recommend that you stop thetraining process after a few minutes or when the training graph looks similar to figure 2. The reason tostop the training process before it completes is because PowerAI Vision can automatically label a data setfor a deployed model. Therefore, the fastest way to deploy a model and refine our data set is to not waitfor the training process to complete. To stop the training model process, click Stop training > KeepModel > Continue.
As PowerAI Vision trains the model, the graph shows the relative performance of the model over time.The model should converge at the end of the training with low error and high accuracy. If the traininggraph converges quickly and has 100% accuracy, the data set does not have enough information and isinsufficient. The same is true in the opposite case; if the accuracy of the training graph fails to rise or theerrors in the graph do not fall at the end of the training process. For example, a model with highaccuracy might be able to discover all instances of different race cars, but might have troubledifferentiating between specific race cars that have different colors or logos.
Figure 1. Labeling objects in PowerAI Vision
Detecting objects in a video 23

In this scenario, the following figure displays a point in time when the Loss CLC line and the LossBboxline start to converge. Therefore, you can stop the training process even though the training for the modelis not complete. The model completed enough testing that you can deploy the model to help improve thequality and quantity of data set by using the auto label function.
Deploying a trained model
You can deploy models even if the model is not 100% complete. A deployed model uses one GPU on thesystem.
To deploy the trained model, complete the following steps:1. Click Models from the menu.2. Select the model name that you specified in step 2a, and click Deploy.3. Specify a name for the model, and click Deploy. The Deployed Models page is displayed, and the
model is deployed when the status column displays Ready.
Note: Each deployed model uses one GPU on your system.4. Double-click the deployed model to get the API endpoint and test other videos or images against the
model.
Automatically label frames in a video
You can use the auto label function only when a model is deployed. You can use the auto label functionto automatically identify objects in the frames of a video.
In this scenario, you have only nine frames. To improve the accuracy for your deep learning model, youcan add more frames to the data set. Remember, you can deploy a model even though it is not 100%
Figure 2. Model training graph
24 IBM PowerAI Vision Version 1.1.0: PowerAI Vision Guide

complete. Deploying a trained model that is not 100% complete is a quick method to add more objectlabels to your data set and improve the accuracy for your model.
To stop the training process, deploy a model, and use the auto label function, complete the followingsteps:1. Click Datasets from the menu, and select the data set that you used to create the previously trained
model.2. Select the video in the data set that had nine frames, and click Tag Objects.3. Click Auto label.4. Specify how often you want to capture frames and automatically label the frames. Select the name of
the trained model that you deployed in step 3, and click Auto label. In this scenario, you previouslycaptured frames every 10 seconds. To improve the accuracy of the deep learning model by capturingand labeling more frames, you can specify 6 seconds.
5. After the auto label process completes, the new frames are added to the carousel. Click the newframes and verify that the objects have the correct labels. The object labels that were automaticallyadded are green and the object labels you manually added are in blue. In this scenario, the carouselnow has 17 frames.
Next steps
You can continue to refine the data set as much as you want. When you are satisfied with the data set,you can retrain the model by completing steps 1 - 3. This time when you retrain the model, you do notwant to stop the training before it is 100% complete. The lines in the training model graph shouldconverge. After the training completes, you can redeploy the model by completing steps 1 - 3. You candouble-click the deployed model to get the API endpoint and test other videos or images against themodel.
Detecting objects in a video 25

26 IBM PowerAI Vision Version 1.1.0: PowerAI Vision Guide

Troubleshooting
To isolate and resolve problems with your IBM products, you can use the following troubleshooting andsupport information. This information contains instructions for using the problem-determinationresources that are provided with your IBM products, including PowerAI Vision.
Troubleshooting common issuesFollowing are some problems you might encounter when using PowerAI Vision, along with steps to fixthem.v “The PowerAI Vision GUI does not work”v “PowerAI Vision does not play video”v “I forgot my user name or password”v “PowerAI Vision cannot train a model” on page 28v “Auto labeling of a data set returns "Auto Label Error"” on page 28v “PowerAI Vision does not start” on page 29v “PowerAI Vision fails to start - Kubernetes connection issue” on page 29v “PowerAI Vision startup hangs - helm issue” on page 30v “Helm status errors when starting PowerAI Vision” on page 31v “Uploading a large file fails” on page 31v “Some PowerAI Vision functions don't work ” on page 31
The PowerAI Vision GUI does not work
ProblemYou cannot label objects, view training charts, or create categories.
SolutionVerify that you are using a supported web browser. The following web browsers are supported:v Google Chrome Version 60, or laterv Firefox Quantum 59.0, or later
PowerAI Vision does not play video
ProblemYou cannot upload a video, or after the video is uploaded the video does not play.
SolutionVerify that your video is a supported type:v Ogg Vorbis (.ogg)v VP8 or VP9 (.webm)v H.264 encoded videos with MP4 format (.mp4) - Requires fix pack 1
If your video is not in a supported format, transcode your video by using a conversion utility.Such utilities are available under various free and paid licenses.
I forgot my user name or password
ProblemYou forgot your user name or password and cannot log in to the PowerAI Vision GUI.
© Copyright IBM Corp. 2018 27

SolutionPowerAI Vision uses an internally managed users account database. To change your user name orpassword, see “Logging in to PowerAI Vision” on page 17.
PowerAI Vision cannot train a model
ProblemThe model training process might fail if your system does not have enough GPU resources.
Solution
v If you are training a data set for image classification, verify that at least two image categoriesare defined, and that each category has a minimum of five images.
v If you are training a data set for object detection, verify that at least one object label is used.You must also verify that each object is labeled in a minimum of five images.
v Ensure that enough GPUs are available. PowerAI Vision assigns one GPU to each activetraining job or deployed deep learning API. For example, if a system has four GPUs and youhave two deployed web APIs, there are two GPUs available for active training jobs. If atraining job appears to be hanging, it might be waiting for another training job to complete, orthere might not be a GPU available to run it.To determine how many GPUs are available on the system, run the sudo /opt/powerai-vision/bin/kubectl.sh describe nodes script and review the nVidiaGPU Limits column.The following is an example of the output from sudo /opt/powerai-vision/bin/kubectl.shdescribe nodes that shows two GPUs currently in use:
Name: 127.0.0.1Roles: <none>Labels: beta.kubernetes.io/arch=ppc64le
beta.kubernetes.io/os=linuxgpu/nvidia=TeslaV100-SXM2-16GBkubernetes.io/hostname=127.0.0.1
Annotations: node.alpha.kubernetes.io/ttl=0volumes.kubernetes.io/controller-managed-attach-detach=true...
Allocated resources:(Total limits may be over 100 percent, i.e., overcommitted.)CPU Requests CPU Limits Memory Requests Memory Limits NvidiaGPU Limits--------------------------------------------------------------------------0 (0%) 0 (0%) 0 (0%) 0 (0%) 2 (50%)
Events: <none>
If all the systems GPUs are in use, you can either delete a deployed web API (making the APIunavailable for inference) or you can stop a training model that is running.– To delete a deployed model, click Deployed Models. Next, select the model that you want
to delete and click Delete. You can redeploy the model later when more GPUs are available.The trained model is not deleted from PowerAI Vision.
– To stop a training model that is running, click Models. Next, select the model that has astatus of Training in Progress and click Stop Training.
Auto labeling of a data set returns "Auto Label Error"
ProblemAuto labeling cannot be performed on a data set that does not have unlabeled images, unlesssome of the images were previously labeled by the auto label function.
SolutionEnsure that the Objects section of the data set side bar shows there are objects that are“Unlabeled”. If there are none, that is, if “Unlabeled (0)” is displayed in the side bar, add newimages that are unlabeled or remove labels from some images, then run auto label again.
28 IBM PowerAI Vision Version 1.1.0: PowerAI Vision Guide

PowerAI Vision does not start
ProblemWhen you enter the URL for PowerAI Vision from a supported web browser, nothing isdisplayed. You see a 404 error or Connection Refused message.
Solution
Complete the following steps to solve this problem:1. Verify that IP version 4 (IPv4) port forwarding is enabled by running the /sbin/sysctl
net.ipv4.conf.all.forwarding command and verifying that the value fornet.ipv4.conf.all.forwarding is set to 1.If IPv4 port forwarding is not enabled, run the /sbin/sysctl -w net.ipv4.conf.all.forwarding=1command. For more information about port forwarding with Docker, see UCP requires IPv4IP Forwarding in the Docker success center.
2. If IPv4 port forwarding is enabled and the docker0 interface is a member of the trusted zone,check the Helm chart status by running this script:sudo /opt/powerai-vision/bin/helm.sh status vision
In the script output, verify that the PowerAI Vision components are available by locating theDeployment section and identifying that the AVAILABLE column has a value of 1 for eachcomponent. The following is an example of the output from the helm.sh status vision scriptthat shows all components are available:
RESOURCES:==> v1beta1/DeploymentNAME DESIRED CURRENT UP-TO-DATE AVAILABLE AGEpowerai-vision-mongodb 1 1 1 1 4dpowerai-vision-portal 1 1 1 1 4dpowerai-vision-postgres 1 1 1 1 4dpowerai-vision-taskanaly 1 1 1 1 4dpowerai-vision-ui 1 1 1 1 4dpowerai-vision-video-nginx 1 1 1 1 4dpowerai-vision-video-portal 1 1 1 1 4dpowerai-vision-video-rabmq 1 1 1 1 4dpowerai-vision-video-redis 1 1 1 1 4dpowerai-vision-video-test-nginx 1 1 1 1 4dpowerai-vision-video-test-portal 1 1 1 1 4dpowerai-vision-video-test-rabmq 1 1 1 1 4dpowerai-vision-video-test-redis 1 1 1 1 4d
If you recently started PowerAI Vision and some components are not available, wait a fewminutes for these components to become available. If any components remain unavailable,gather the logs and contact IBM Support, as described in this topic: “Gather PowerAI Visionlogs and contact support” on page 32.
3. If the docker0 interface is a member of a trusted zone and all PowerAI Vision components areavailable, verify that the firewall is configured to allow communication through port 443(used to connect to PowerAI Vision) by running this command:sudo firewall-cmd --permanent --zone=public --add-port=443/tcp
PowerAI Vision fails to start - Kubernetes connection issue
ProblemIf the host system does not have a default route defined in the networking configuration, theKubernetes cluster will fail to start with connection issues. For example:
Troubleshooting 29

$ sudo /opt/powerai-vision/bin/powerai_vision_start.shINFO: Setting up GPU...[...]Checking kubernetes cluster status...The connection to the server 127.0.0.1:8080 was refused - did you specify the right host or port?INFO: Probing cluster status #1:The connection to the server 127.0.0.1:8080 was refused - did you specify the right host or port?INFO: Probing cluster status #2:The connection to the server 127.0.0.1:8080 was refused - did you specify the right host or port?INFO: Probing cluster status #3:The connection to the server 127.0.0.1:8080 was refused - did you specify the right host or port?INFO: Probing cluster status #4:The connection to the server 127.0.0.1:8080 was refused - did you specify the right host or port?INFO: Probing cluster status #5:The connection to the server 127.0.0.1:8080 was refused - did you specify the right host or port?INFO: Probing cluster status #6:The connection to the server 127.0.0.1:8080 was refused - did you specify the right host or port?INFO: Probing cluster status #7:The connection to the server 127.0.0.1:8080 was refused - did you specify the right host or port?INFO: Probing cluster status #8:The connection to the server 127.0.0.1:8080 was refused - did you specify the right host or port?INFO: Probing cluster status #9:The connection to the server 127.0.0.1:8080 was refused - did you specify the right host or port?INFO: Probing cluster status #10:The connection to the server 127.0.0.1:8080 was refused - did you specify the right host or port?INFO: Probing cluster status #11:ERROR: Retry timeout. Error in starting kubernetes cluster, please check /opt/powerai-vision/log/kubernetes for logs.
SolutionDefine a default route in the networking configuration. For instructions to do this on Red HatEnterprise Linux (RHEL), refer to 2.2.4 Static Routes and the Default Gateway in the Red HatCustomer Portal.
PowerAI Vision startup hangs - helm issue
ProblemPowerAI Vision startup hangs with the message "Unable to start helm within 30 seconds - tryingagain." For example:
root> sudo /opt/powerai-vision/bin/powerai_vision_start.shChecking ports usage...Checking ports completed, no confict port usage detected.[ INFO ] Setting up the GPU...
Init cuda devices...Devices init completed!Persistence mode is already Enabled for GPU 00000004:04:00.0.Persistence mode is already Enabled for GPU 00000004:05:00.0.Persistence mode is already Enabled for GPU 00000035:03:00.0.Persistence mode is already Enabled for GPU 00000035:04:00.0.All done.
[ INFO ] Starting kubernetes...Checking kubernetes cluster status...Probing cluster status #1: NotReadyProbing cluster status #2: NotReadyProbing cluster status #3: NotReadyProbing cluster status #4: ReadyBooting up ingress controller...Initializing helm...[ WARN ] Unable to start helm within 30 seconds - trying again. If this continues, contact support.[ WARN ] Unable to start helm within 30 seconds - trying again. If this continues, contact support.[ WARN ] Unable to start helm within 30 seconds - trying again. If this continues, contact support.[ WARN ] Unable to start helm within 30 seconds - trying again. If this continues, contact support.
SolutionTo solve this problem, you must follow these steps exactly as written:1. Cancel PowerAI Vision startup by pressing ctrl+c.2. Stop PowerAI Vision by running this command:
30 IBM PowerAI Vision Version 1.1.0: PowerAI Vision Guide

sudo /opt/powerai-vision/bin/powerai_vision_stop.sh
3. Modify the Red Hat Enterprise Linux (RHEL) settings as follows:sudo nmcli connection modify docker0 connection.zone trustedsudo systemctl stop NetworkManager.servicesudo firewall-cmd --permanent --zone=trusted --change-interface=docker0sudo systemctl start NetworkManager.servicesudo nmcli connection modify docker0 connection.zone trustedsudo systemctl restart docker.service
4. Start PowerAI Vision again:sudo /opt/powerai-vision/bin/powerai_vision_start.sh
Helm status errors when starting PowerAI Vision
ProblemThere is an issue in some RHEL releases that causes the startup of PowerAI Vision to fail afterrestarting the host system. When this is the problem, the system tries to initialize Helm at 30second intervals but never succeeds. Therefore, the startup never succeeds. You can verify thisstatus by running the Helm status vision command:# /opt/powerai-vision/bin/helm status vision
Result:
Error: getting deployed release "vision": Get https://10.10.0.1:443/api/v1/namespaces/kube-system/configmaps[...]: dial tcp 10.10.0.1:443: getsockopt: no route to host
SolutionTo solve this problem, you must follow these steps exactly as written:1. Cancel PowerAI Vision startup by pressing ctrl+c.2. Stop PowerAI Vision by running this command:
sudo /opt/powerai-vision/bin/powerai_vision_stop.sh
3. Modify the Red Hat Enterprise Linux (RHEL) settings as follows:sudo nmcli connection modify docker0 connection.zone trustedsudo systemctl stop NetworkManager.servicesudo firewall-cmd --permanent --zone=trusted --change-interface=docker0sudo systemctl start NetworkManager.servicesudo nmcli connection modify docker0 connection.zone trustedsudo systemctl restart docker.service
4. Start PowerAI Vision again:sudo /opt/powerai-vision/bin/powerai_vision_start.sh
Uploading a large file fails
When uploading files into a data set, there is a 2GB size limit per upload session. This limit applies to asingle .zip file or a set of files. When you upload a large file that is under 2 GB, you might see theupload start (showing a progress bar) but then you get an error message in the user interface. This errorhappens due to a Nginx timeout, where the file upload is taking longer than the defined 5 minute Nginxtimeout.
Despite the notification error, the large file has been uploaded. Refreshing the page will show theuploaded files in the data set.
Some PowerAI Vision functions don't work
ProblemPowerAI Vision seems to start correctly, but some functions, like automatic labeling or automaticframe capture, do not function.
Troubleshooting 31

To verify that this is the problem, run /opt/powerai-vision/bin/kubectl.sh get pods and verifythat the powerai-vision-video-rabmq pods are in state CrashLoopBackOff. For example:
kubectl get podsNAME READY STATUS RESTARTS AGE...powerai-vision-video-rabmq-5d5d786f9f-7jfk9 0/1 CrashLoopBackOff 2 54s
SolutionPowerAI Vision Vision requires IPv6. Enable IPv6 on the system.
Gather PowerAI Vision logs and contact supportSometimes you cannot solve a problem by troubleshooting the symptoms. In such cases, you must collectdiagnostic data and contact support.
Collecting and inspecting data before you open a problem management record (PMR) can help you toanswer the following questions:v Do the symptoms match any known problems? If so, has a fix or workaround been published?v Can the problem be identified and resolved without a code fix?v When does the problem occur?
To gather logs for support, follow these steps:1. Run the sudo /opt/powerai-vision/bin/collect_logs.sh script. The directory where the log file is saved
is listed in the INFO: FFDC Collected section, as shown in the following example:
INFO: Collecting PowerAI Vision Application Logs...INFO: Collecting PowerAI Infrastructure Logs...INFO: Collecting configuration information...INFO: Collecting System Details...INFO: Collecting Platform Logs...INFO: FFDC Collected below:-rw-r--r--. 1 root root 95477342 May 22 18:15 /var/log/powerai-vision/powerai-vision.logs.18_15_11_May_22_2018.tgz
2. Submit the problem to IBM Support in one of the following ways:v Online through the IBM Support Portal: http://www.ibm.com/software/support/: You can open,
update, and view all of your service requests from the Service Request portlet on the ServiceRequest web page.
v By phone: For the phone number to call in your region, see the Directory of worldwide contactsweb page: http://www.ibm.com/planetwide/.
Getting fixes from Fix CentralYou can use Fix Central to find the fixes that are recommended by IBM Support for various products,including PowerAI Vision. With Fix Central, you can search, select, order, and download fixes for yoursystem with a choice of delivery options. A PowerAI Vision product fix might be available to resolveyour problem.
To find and install fixes:1. Obtain the tools that are required to get the fix. If it is not installed, obtain your product update
installer. You can download the installer from Fix Central: http://www.ibm.com/support/fixcentral.This site provides download, installation, and configuration instructions for the update installer.
Note: For more information about how to obtain software fixes, from the Fix Central page, clickGetting started with Fix Central, then click the Software tab.
2. Under Find product, type “PowerAI Vision” in the Product selector field.
32 IBM PowerAI Vision Version 1.1.0: PowerAI Vision Guide

3. Select PowerAI Vision. For Installed version, select All. For Platform, select the appropriate platformor select All, then click Continue.
4. Identify and select the fix that is required, then click Continue.5. Download the fix. When you download the file, ensure that the name of the maintenance file is not
changed, either intentionally or by the web browser or download utility.6. Stop PowerAI Vision by using this script:
sudo /opt/powerai-vision/bin/powerai_vision_stop.sh
7. Install the RPM that was downloaded by running this command:sudo yum install ./<fixpack-rpmfile>.rpm
8. Log in as root or with sudo privileges, then load the images provided in the TAR file that wasdownloaded by running this script:sudo /opt/powerai-vision/bin/load_images.sh ./<fixpack-tarfile>.tar
9. Start PowerAI Vision by running the following script. You must read and accept the license agreementthat is displayed before you can use PowerAI Vision.sudo /opt/powerai-vision/bin/powerai_vision_start.sh
Troubleshooting 33

34 IBM PowerAI Vision Version 1.1.0: PowerAI Vision Guide

Notices
This information was developed for products and services offered in the US.
IBM may not offer the products, services, or features discussed in this document in other countries.Consult your local IBM representative for information on the products and services currently available inyour area. Any reference to an IBM product, program, or service is not intended to state or imply thatonly that IBM product, program, or service may be used. Any functionally equivalent product, program,or service that does not infringe any IBM intellectual property right may be used instead. However, it isthe user's responsibility to evaluate and verify the operation of any non-IBM product, program, orservice.
IBM may have patents or pending patent applications covering subject matter described in thisdocument. The furnishing of this document does not grant you any license to these patents. You can sendlicense inquiries, in writing, to:
IBM Director of Licensing
IBM Corporation
North Castle Drive, MD-NC119
Armonk, NY 10504-1785
US
For license inquiries regarding double-byte character set (DBCS) information, contact the IBM IntellectualProperty Department in your country or send inquiries, in writing, to:
Intellectual Property Licensing
Legal and Intellectual Property Law
IBM Japan Ltd.
19-21, Nihonbashi-Hakozakicho, Chuo-ku
Tokyo 103-8510, Japan
INTERNATIONAL BUSINESS MACHINES CORPORATION PROVIDES THIS PUBLICATION "AS IS"WITHOUT WARRANTY OF ANY KIND, EITHER EXPRESS OR IMPLIED, INCLUDING, BUT NOTLIMITED TO, THE IMPLIED WARRANTIES OF NON-INFRINGEMENT, MERCHANTABILITY ORFITNESS FOR A PARTICULAR PURPOSE. Some jurisdictions do not allow disclaimer of express orimplied warranties in certain transactions, therefore, this statement may not apply to you.
This information could include technical inaccuracies or typographical errors. Changes are periodicallymade to the information herein; these changes will be incorporated in new editions of the publication.IBM may make improvements and/or changes in the product(s) and/or the program(s) described in thispublication at any time without notice.
Any references in this information to non-IBM websites are provided for convenience only and do not inany manner serve as an endorsement of those websites. The materials at those websites are not part ofthe materials for this IBM product and use of those websites is at your own risk.
© Copyright IBM Corp. 2018 35

IBM may use or distribute any of the information you provide in any way it believes appropriate withoutincurring any obligation to you.
Licensees of this program who wish to have information about it for the purpose of enabling: (i) theexchange of information between independently created programs and other programs (including thisone) and (ii) the mutual use of the information which has been exchanged, should contact:
IBM Director of Licensing
IBM Corporation
North Castle Drive, MD-NC119
Armonk, NY 10504-1785
US
Such information may be available, subject to appropriate terms and conditions, including in some cases,payment of a fee.
The licensed program described in this document and all licensed material available for it are providedby IBM under terms of the IBM Customer Agreement, IBM International Program License Agreement orany equivalent agreement between us.
The performance data and client examples cited are presented for illustrative purposes only. Actualperformance results may vary depending on specific configurations and operating conditions.
Information concerning non-IBM products was obtained from the suppliers of those products, theirpublished announcements or other publicly available sources. IBM has not tested those products andcannot confirm the accuracy of performance, compatibility or any other claims related to non-IBMproducts. Questions on the capabilities of non-IBM products should be addressed to the suppliers ofthose products.
Statements regarding IBM's future direction or intent are subject to change or withdrawal without notice,and represent goals and objectives only.
All IBM prices shown are IBM's suggested retail prices, are current and are subject to change withoutnotice. Dealer prices may vary.
This information is for planning purposes only. The information herein is subject to change before theproducts described become available.
This information contains examples of data and reports used in daily business operations. To illustratethem as completely as possible, the examples include the names of individuals, companies, brands, andproducts. All of these names are fictitious and any similarity to actual people or business enterprises isentirely coincidental.
COPYRIGHT LICENSE:
This information contains sample application programs in source language, which illustrate programmingtechniques on various operating platforms. You may copy, modify, and distribute these sample programsin any form without payment to IBM, for the purposes of developing, using, marketing or distributingapplication programs conforming to the application programming interface for the operating platform forwhich the sample programs are written. These examples have not been thoroughly tested under allconditions. IBM, therefore, cannot guarantee or imply reliability, serviceability, or function of these
36 IBM PowerAI Vision Version 1.1.0: PowerAI Vision Guide

programs. The sample programs are provided "AS IS", without warranty of any kind. IBM shall not beliable for any damages arising out of your use of the sample programs.
Each copy or any portion of these sample programs or any derivative work must include a copyrightnotice as follows:
© (your company name) (year).
Portions of this code are derived from IBM Corp. Sample Programs.
© Copyright IBM Corp. _enter the year or years_.
TrademarksIBM, the IBM logo, and ibm.com are trademarks or registered trademarks of International BusinessMachines Corp., registered in many jurisdictions worldwide. Other product and service names might betrademarks of IBM or other companies. A current list of IBM trademarks is available on the web atCopyright and trademark information at www.ibm.com/legal/copytrade.shtml.
Linux is a registered trademark of Linus Torvalds in the United States, other countries, or both.
Microsoft, Windows, Windows NT, and the Windows logo are trademarks of Microsoft Corporation in theUnited States, other countries, or both.
Java and all Java™-based trademarks and logos are trademarks or registered trademarks of Oracle and/orits affiliates.
UNIX is a registered trademark of The Open Group in the United States and other countries..
Notices 37

38 IBM PowerAI Vision Version 1.1.0: PowerAI Vision Guide


IBM®
Printed in USA