human measurements editor version 5 release 13 page 1...
TRANSCRIPT
Human Measurements Editor
Preface
Using this Guide
Where to Find More Information
Conventions
Getting Started
Access from the Start Menu
Access Using the Specification Tree
Access from the Manikin Tools Toolbar
User Tasks
Editing Anthropometric Variables
Entering New Values
Changing Variable Management from Automatic to Manual
Changing the Gender of a Manikin
Changing Manikin Display Attributes
Using Anthropometric Memos
Recovering Initial Settings
Using Predefined Postures
Using the Anthropometric Filter
Changing the Viewpoint
Anthropometric Copy/Paste Functions
Anthropometry Catalog Management
User-defined Population Databases
Determining the Current Nationality of a Manikin
Changing the Nationality of a Manikin
Adding a User-defined Population
1Page Human Measurements Editor Version 5 Release 13
Removing a User-defined Population
Interpolation Management
Using Anthropometric Variables in Formulas
Creating a Population File
Anthropometric Variables
Workbench Description
Human Measurements Editor Menu Bar
Anthropometry Editor Toolbar
Glossary
Index
2Page Human Measurements Editor Version 5 Release 13
PrefaceHuman Measurements Editor is based on a best-in-class human modeling system which, for many years, has permitted detailed investigation into human-centered design issues in the context of a workplace before it physically exists.
The Human Measurements Editor specifically focuses on creating detailed digital humans for advanced human factors analysis and global target audience accommodation.
In addition to six default manikins, Human Measurements Editor users can create any human being from any population anywhere in the world. Users can amend all 103 anthropometric variables on the manikin or manipulate a smaller number of "critical" variables and ask the Human Measurements Editor to determine the rest. These variables can be altered manually by inputting desired measurements in percentile value, unit measurement, or by an intuitive "click and drag" graphical user interface.
The Human Measurements Editor also has the capacity to define the mean and standard deviation of all anthropometry variables. Using a unique multi-normal technique, the Human Measurements Editor ensures that resultant manikins do exist in the target population. In addition, it is possible to specify the percentage of the population to be accommodated in the design using the boundary manikin technique.
3Page Human Measurements Editor Version 5 Release 13

Using this GuideThis book describes how to use the Human Measurements Editor. Before you read it, you should be familiar with basic concepts such as document windows, standard tool bars, and view tool bars.
If you are new user, start with the tutorial in the Getting Started section.
The User Tasks section of the book provides procedures for using the features of the Human Measurements Editor.
A Workbench Description section describes each functional icon or command in the workbenches.
The Glossary provides definitions of terms specific to Human Measurement Editor and related products.
4Page Human Measurements Editor Version 5 Release 13

Where to Find More InformationPrior to reading this book, we recommend that you read Human Builder. We also recommend that you read:● Human Posture Analysis
● Human Activity Analysis
● Conventions
5Page Human Measurements Editor Version 5 Release 13

ConventionsCertain conventions are used in CATIA, ENOVIA & DELMIA documentation to help you recognize and understand important concepts and specifications.
Graphic Conventions
The three categories of graphic conventions used are as follows:● Graphic conventions structuring the tasks
● Graphic conventions indicating the configuration required
● Graphic conventions used in the table of contents
Graphic Conventions Structuring the Tasks
Graphic conventions structuring the tasks are denoted as follows:This icon... Identifies...
estimated time to accomplish a task
a target of a task
the prerequisites
the start of the scenario
a tip
a warning
information
basic concepts
methodology
reference information
information regarding settings, customization, etc.
the end of a task
functionalities that are new or enhanced with this Release.
allows you to switch back the full-window viewing mode.
Graphic Conventions Indicating the Configuration Required
6Page Human Measurements Editor Version 5 Release 13

Graphic conventions indicating the configuration required are denoted as follows:
This icon... Indicates functions that are...
specific to the P1 configuration
specific to the P2 configuration
specific to the P3 configuration
Graphic Conventions Used in the Table of Contents
Graphic conventions used in the table of contents are denoted as follows:
This icon... Gives access to...
Site Map
Split View mode
What's New?
Overview
Getting Started
Basic Tasks
User Tasks or the Advanced Tasks
Workbench Description
Customizing
Reference
Methodology
Glossary
Index
Text Conventions
The following text conventions are used:
The titles of CATIA, ENOVIA and DELMIA documents appear in this manner throughout the text. File -> New identifies the commands to be used. Enhancements are identified by a blue-colored background on the text.
How to Use the Mouse
7Page Human Measurements Editor Version 5 Release 13

The use of the mouse differs according to the type of action you need to perform.Use this
mouse button...Whenever you read...
● Select (menus, commands, geometry in graphics area, ...)
● Click (icons, dialog box buttons, tabs, selection of a location in the document window, ...)
● Double-click
● Shift-click
● Ctrl-click
● Check (check boxes)
● Drag
● Drag and drop (icons onto objects, objects onto objects)
● Drag
● Move
● Right-click (to select contextual menu)
8Page Human Measurements Editor Version 5 Release 13

Getting StartedThis tutorial describes the tasks that enable you to access the anthropometric variables as well as modify their values.
The tasks described in this section are:
9Page Human Measurements Editor Version 5 Release 13
Access from the Start Menu
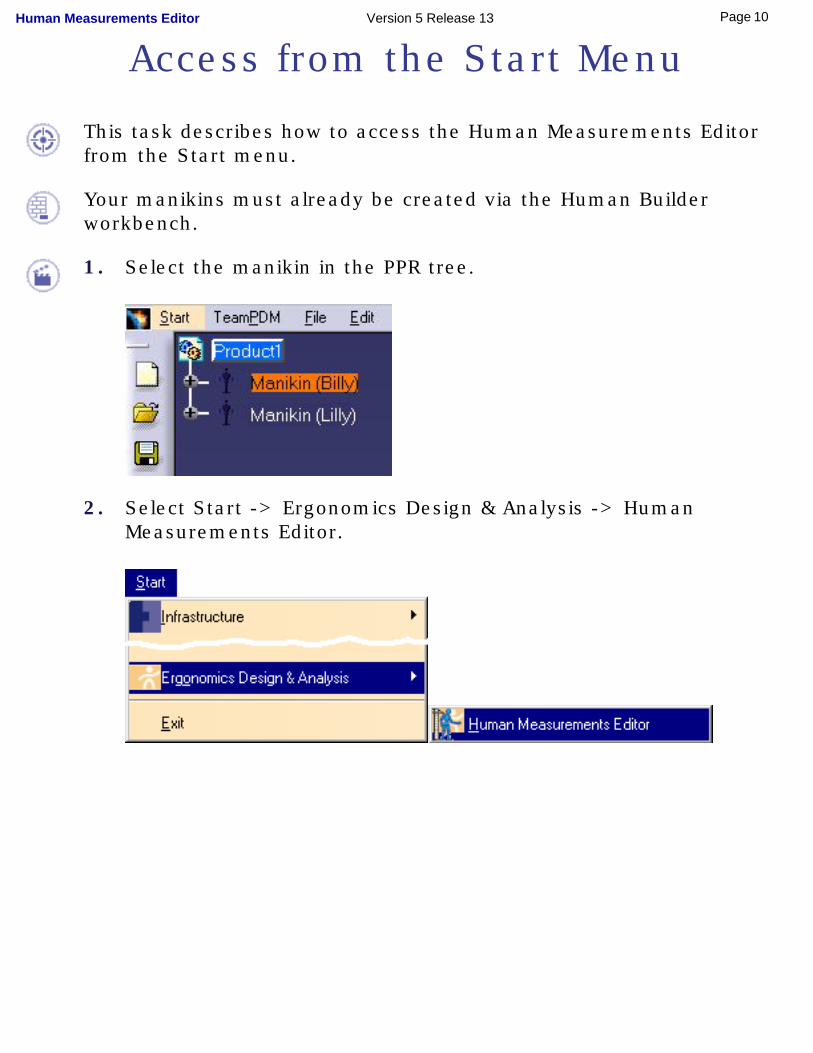
This task describes how to access the Human Measurements Editor from the Start menu.
Your manikins must already be created via the Human Builder workbench.
1. Select the manikin in the PPR tree.
2. Select Start -> Ergonomics Design & Analysis -> Human Measurements Editor.
10Page Human Measurements Editor Version 5 Release 13
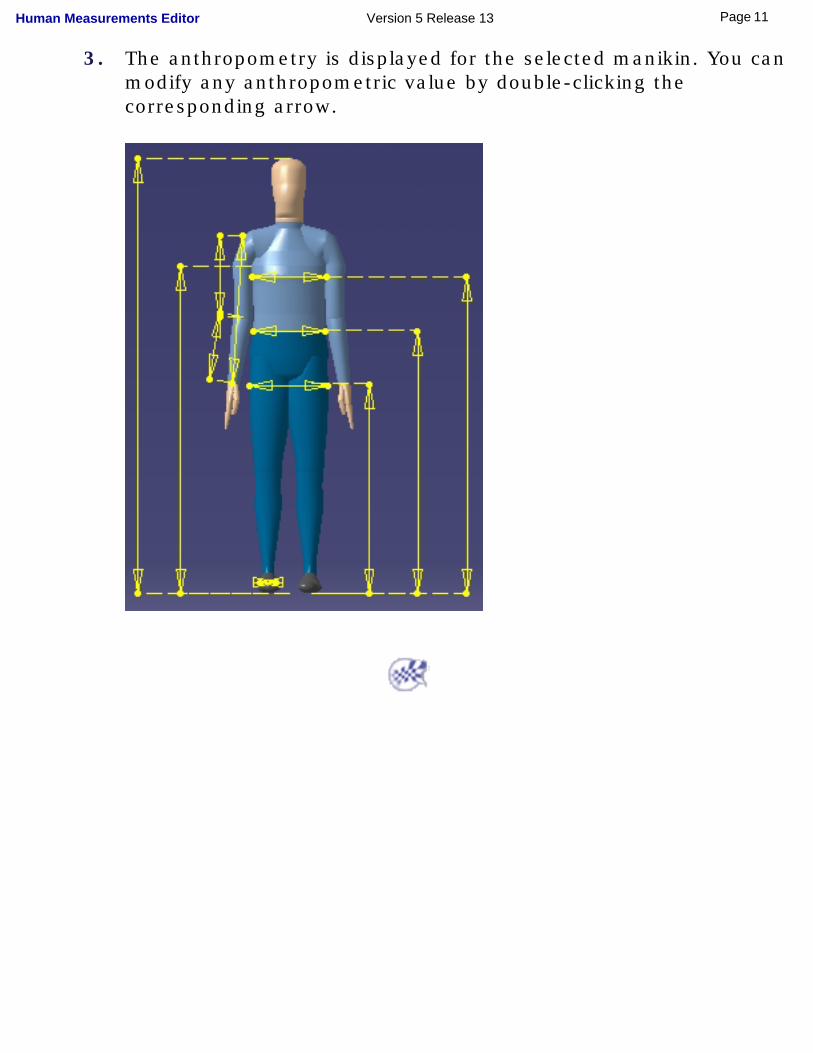
3. The anthropometry is displayed for the selected manikin. You can modify any anthropometric value by double-clicking the corresponding arrow.
11Page Human Measurements Editor Version 5 Release 13

Access Using the Specification Tree
This task describes how to access the Human Measurements Editor by using the Specification tree.
Your manikins must already have been created via the Human Builder workbench.
1. Double-click Anthropometry located below the desired manikin.
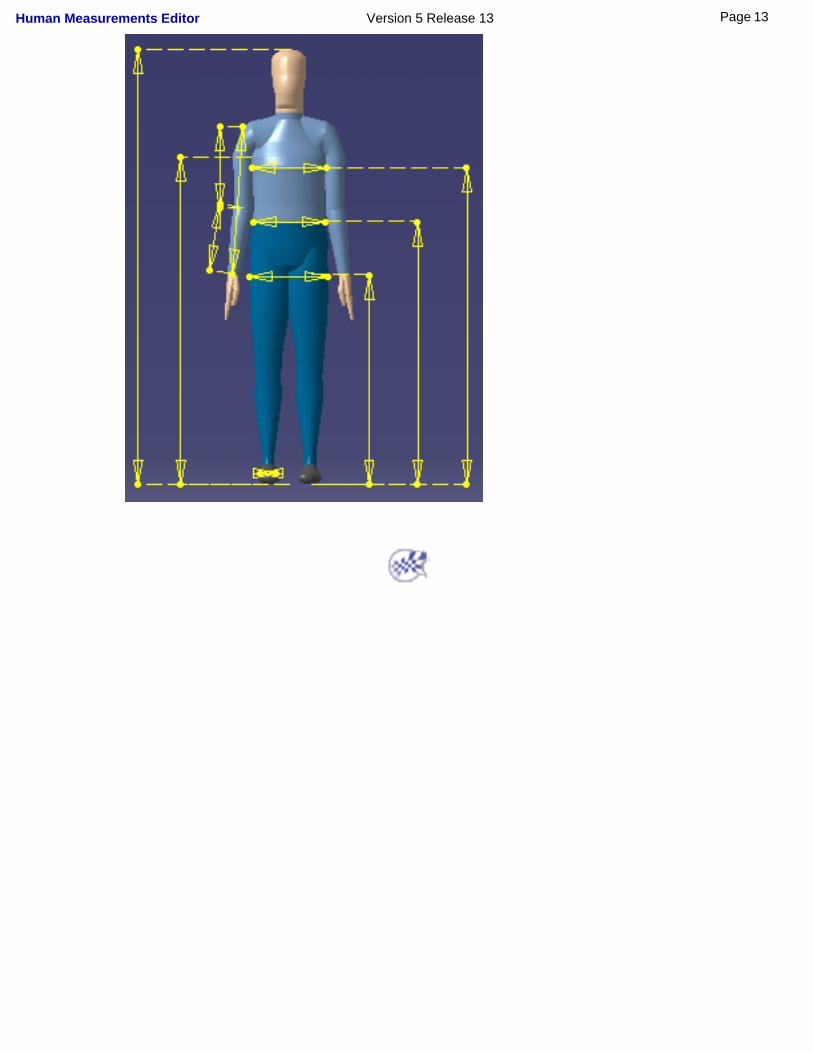
2. The anthropometry is displayed on the selected manikin. You can modify any anthropometric value by double-clicking the corresponding arrow.
12Page Human Measurements Editor Version 5 Release 13
13Page Human Measurements Editor Version 5 Release 13

Access from the Manikin Tools Toolbar
This task describes how to access the Human Measurements Editor by using the Manikin Tools toolbar.
Your manikins must already have been created via the Human Builder workbench.
1. Select the manikin.
2. Click the Anthropometry icon located in the Manikin Tools
toolbar.
3. The anthropometry is displayed on the selected manikin. You can modify any anthropometric value by double-clicking the corresponding arrow.
14Page Human Measurements Editor Version 5 Release 13

15Page Human Measurements Editor Version 5 Release 13

User TasksThese are the tasks that a user performs using Human Measurements Editor:
16Page Human Measurements Editor Version 5 Release 13
Editing Anthropometric Variables
This task describes how to display and modify all the anthropometric variables.
The manikin should already be displayed with its anthropometry.
1. Select the Display Variables icon from the Anthropometry Editor
toolbar.
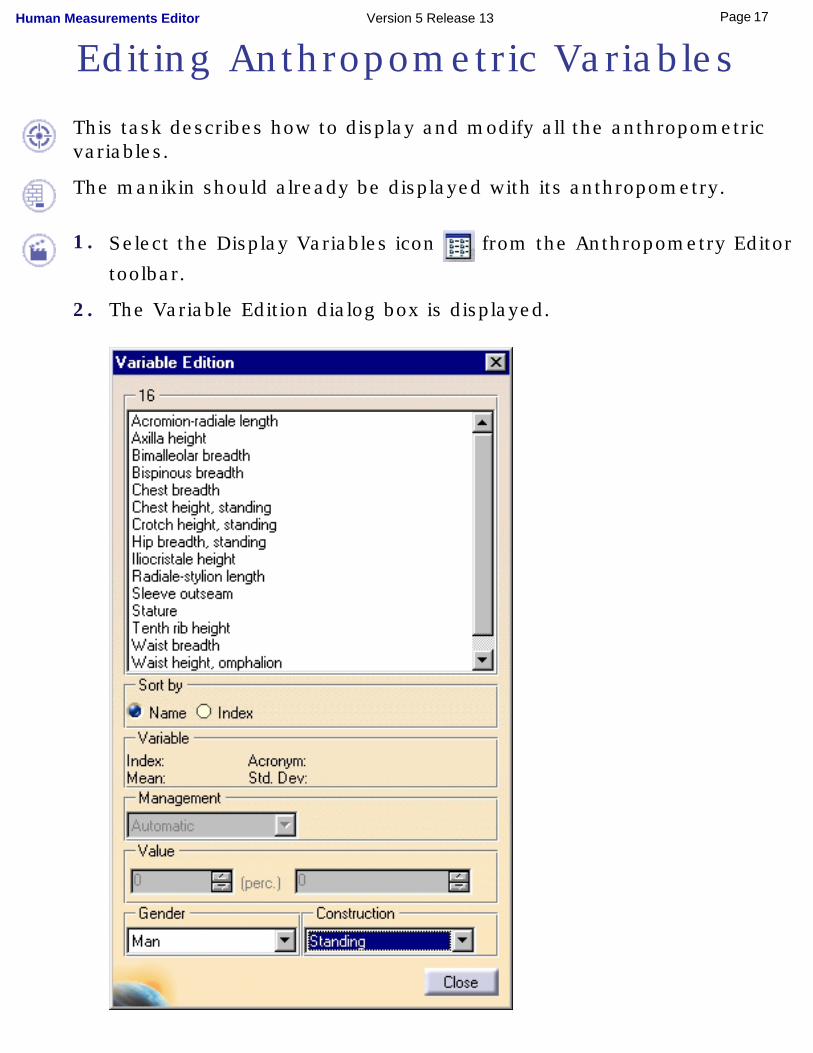
2. The Variable Edition dialog box is displayed.
17Page Human Measurements Editor Version 5 Release 13
3. Click on any variable to display its value and to activate all the items in the dialog box. The selected variable will appear in the viewer and its color will change.
18Page Human Measurements Editor Version 5 Release 13

Entering New Values
This task describes how to manually modify an anthropometric value using the Value section of the Variable Edition dialog box.
1. Display the Variable Edition dialog box by selecting the Display Variables icon from the Anthropometry Editor toolbar.
19Page Human Measurements Editor Version 5 Release 13

By setting the Management field to Manual, there are several ways to manually modify an anthropometric value.
All of the methods shown below have the same global effect. To avoid inconsistency, they modify the variable's value and update the manikin's anthropometry.
2. Type in a new percentile value. The variable will be automatically set to the corresponding value.
3. Type in a new value in the spinner.
4. Modify the value by increasing or decreasing it step-by-step using the spinner. You can specify the step of the spinner by using the spinner's contextual menu.
5. Assign a previous value using the contextual menu or the spinner.
6. Manipulate the red arrow directly in the 3D viewer.
20Page Human Measurements Editor Version 5 Release 13
Changing Variable Management from Automatic to Manual
This task describes how to change variable management from automatic (system default) to manual using the Variable Edition dialog box.
When a standard manikin is created, all the anthropometric variables are created and set to automatic, i.e., system managed. The values of these variables depend on the sex of the manikin and the anthropometry chosen at creation (5th, 50th, or 95th percentile).
You can manually modify any variable's value to customize the manikin. All variables have a minimum and maximum value taken from the database of the population to which the manikin belongs. If you enter a value that goes out of bounds, the system will set the variable value to its maximum or minimum.
To change the variable management to manual:
1. Display the Variable Edition dialog box by selecting the Display Variables icon from the Anthropometry Editor toolbar.
2. Select the desired variable; the Management area of the dialog box is activated.
21Page Human Measurements Editor Version 5 Release 13

3. Set the management to Manual. The corresponding arrow (if any) turns to red and you can now modify the value.
22Page Human Measurements Editor Version 5 Release 13

Changing the Gender of a Manikin
This task describes how to change the gender of a manikin. In this example, the manikin is replaced by a new manikin of opposite sex but with the same percentile.
1. Open the Variable Edition dialog box by selecting the Display Variables icon from the Anthropometry Editor toolbar. The manikin to be changed is
male and in the 50th percentile.
23Page Human Measurements Editor Version 5 Release 13
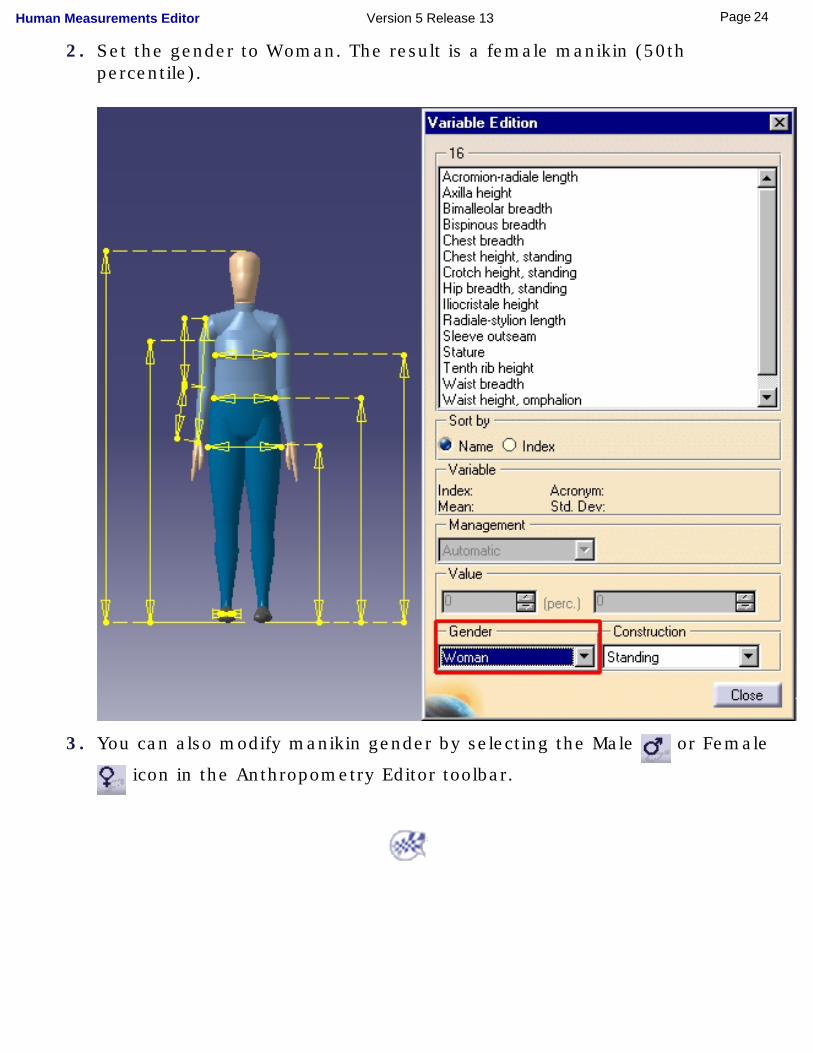
2. Set the gender to Woman. The result is a female manikin (50th percentile).
3. You can also modify manikin gender by selecting the Male or Female
icon in the Anthropometry Editor toolbar.
24Page Human Measurements Editor Version 5 Release 13
Changing Manikin Display Attributes
This task describes how to set and edit manikin display attributes.
In the toolbar, select the Display Attributes icon and in the 3D
view or the specification tree, select a manikin. The Display Attributes dialog box appears displaying the following choices:
Rendering
● Segments
● Ellipses
● Surfaces
● Resolution
Vision● Line of sight
● Peripheral cone
● Central cone
● Cone type
Others● Center of gravity
25Page Human Measurements Editor Version 5 Release 13
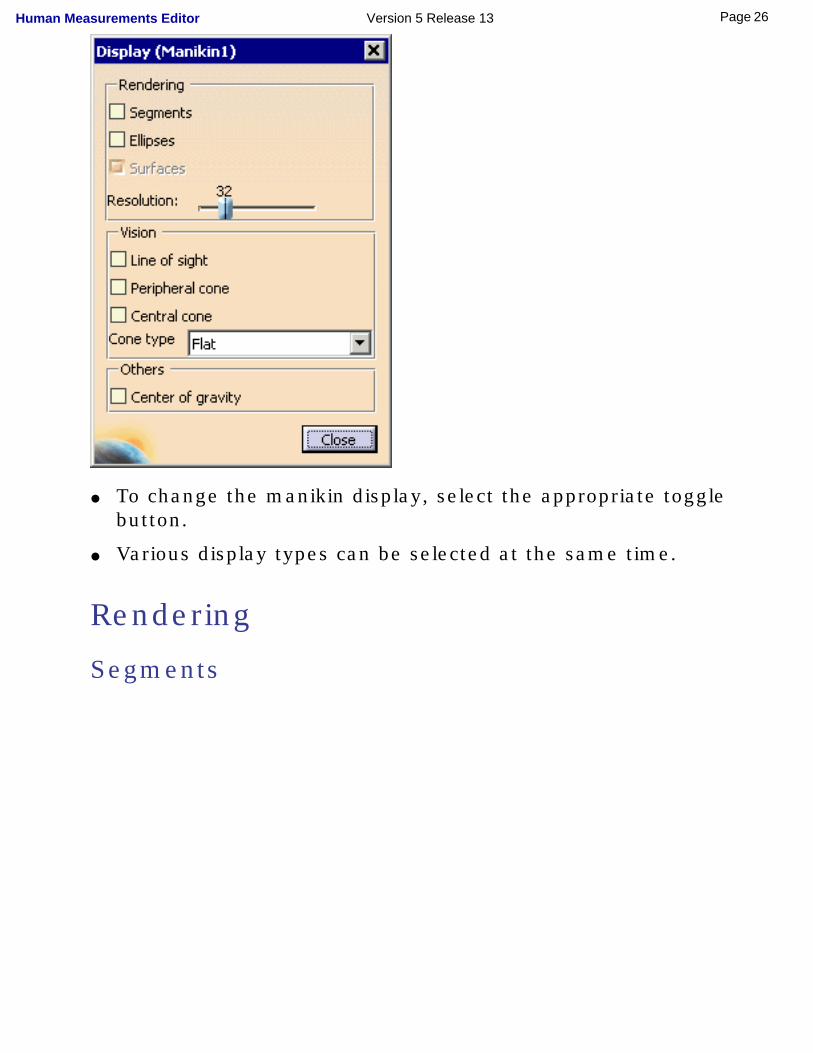
● To change the manikin display, select the appropriate toggle button.
● Various display types can be selected at the same time.
Rendering
Segments
26Page Human Measurements Editor Version 5 Release 13

Ellipses
27Page Human Measurements Editor Version 5 Release 13

Surfaces
28Page Human Measurements Editor Version 5 Release 13

Resolution
Resolution represents the number of points taken on each ellipse to draw the surfaces at manikin creation. The default value of this parameter is 32 but it can vary from 4 to 128.
Low resolution:
29Page Human Measurements Editor Version 5 Release 13

High resolution:
30Page Human Measurements Editor Version 5 Release 13
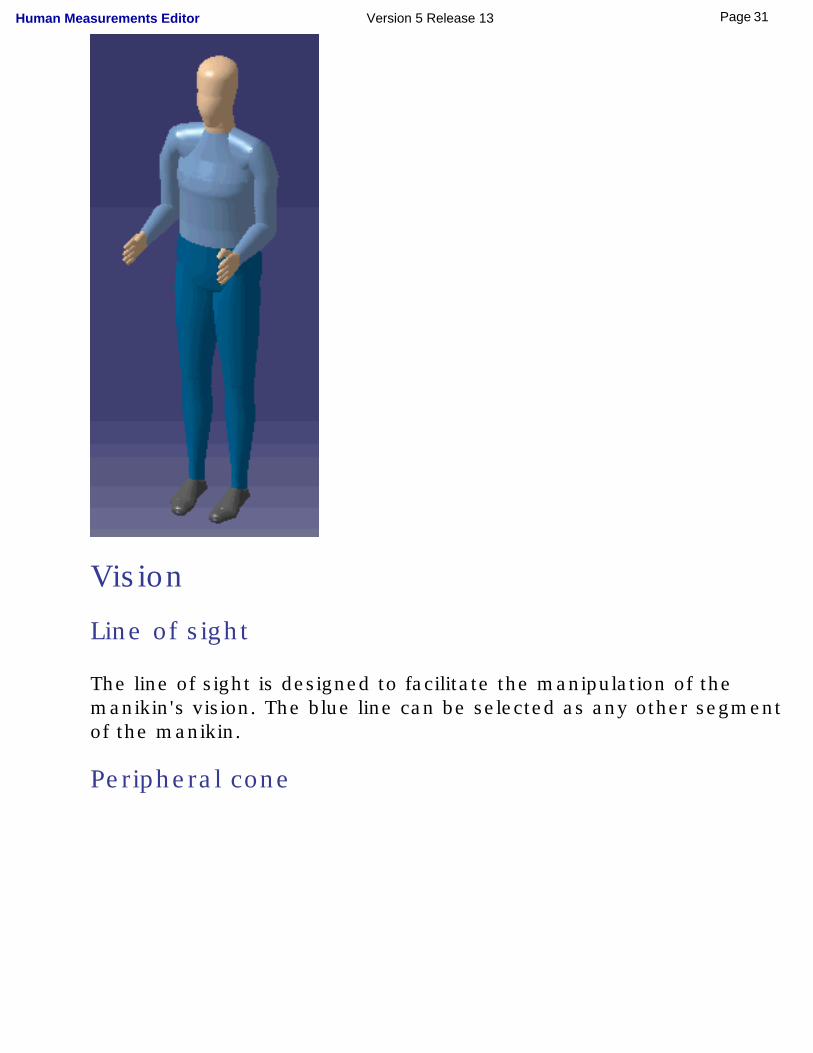
Vision
Line of sight
The line of sight is designed to facilitate the manipulation of the manikin's vision. The blue line can be selected as any other segment of the manikin.
Peripheral cone
31Page Human Measurements Editor Version 5 Release 13

Central cone
Cone type
32Page Human Measurements Editor Version 5 Release 13

In the drop-down menu, the default type is Flat. Choose from:
Others
Center of gravity
The center of gravity cannot be manipulated. However, the center of gravity's position automatically updates when any segment is manipulated.
33Page Human Measurements Editor Version 5 Release 13

Using Anthropometric Memos
The Human Measurements Editor enables you to add descriptions about the manikin's anthropometry or about an anthropometric variable. This is a convenient way for you to keep a history on the variables and to determine where, when and why they have been modified.
Create or modify a memo
1. To create or modify an anthropometric memo, select the manikin.
2. Display the anthropometry.
3. In the Anthropometry Editor toolbar, select the Memo icon .
The memo window is displayed. You can add to or modify any information in the memo. Click OK to save the memo with the anthropometry.
Create a memo on a particular variable
34Page Human Measurements Editor Version 5 Release 13
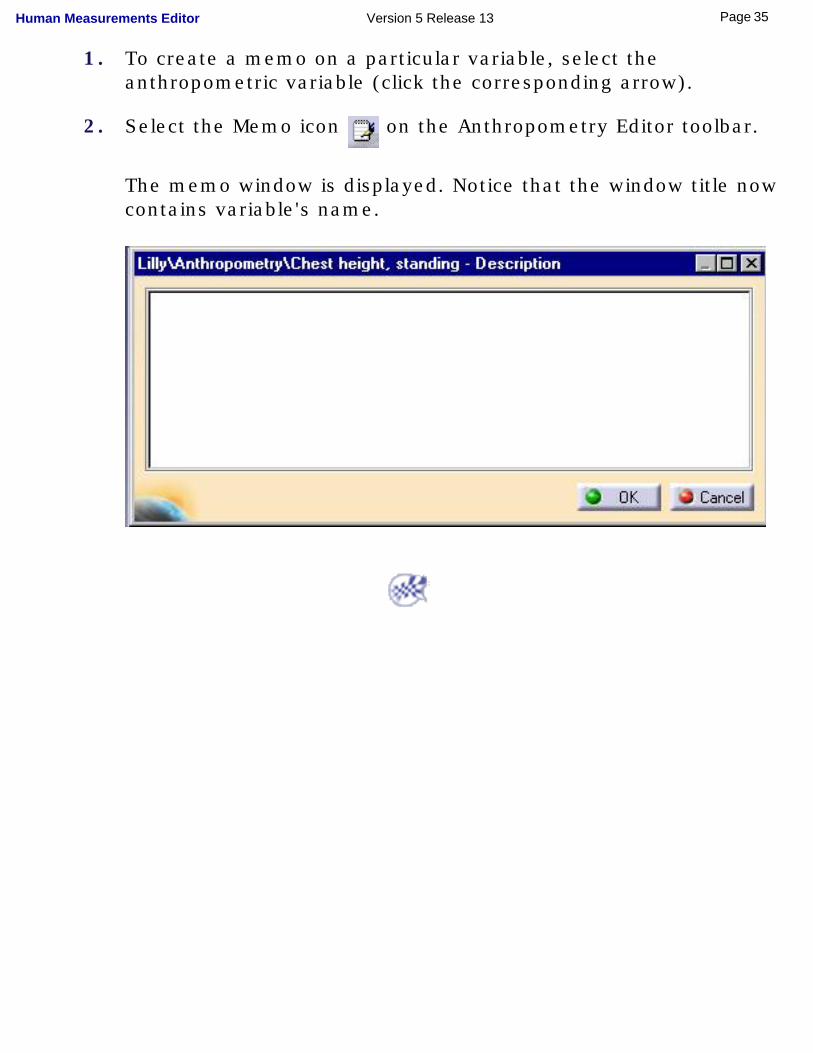
1. To create a memo on a particular variable, select the anthropometric variable (click the corresponding arrow).
2. Select the Memo icon on the Anthropometry Editor toolbar.
The memo window is displayed. Notice that the window title now contains variable's name.
35Page Human Measurements Editor Version 5 Release 13

Recovering Initial Settings
This task describes how to set the initial anthropometry on a manikin and then later recover the initial anthropometric settings after manual modifications have been made.
1. To see the real effect of the Reset function, create a manikin and manually modify some of the values. In the example below, these modified variables appear in red.
Remember, the anthropometry is automatically set to default at manikin creation.
2. Select the Reset icon in the Anthropometry Editor toolbar.
36Page Human Measurements Editor Version 5 Release 13
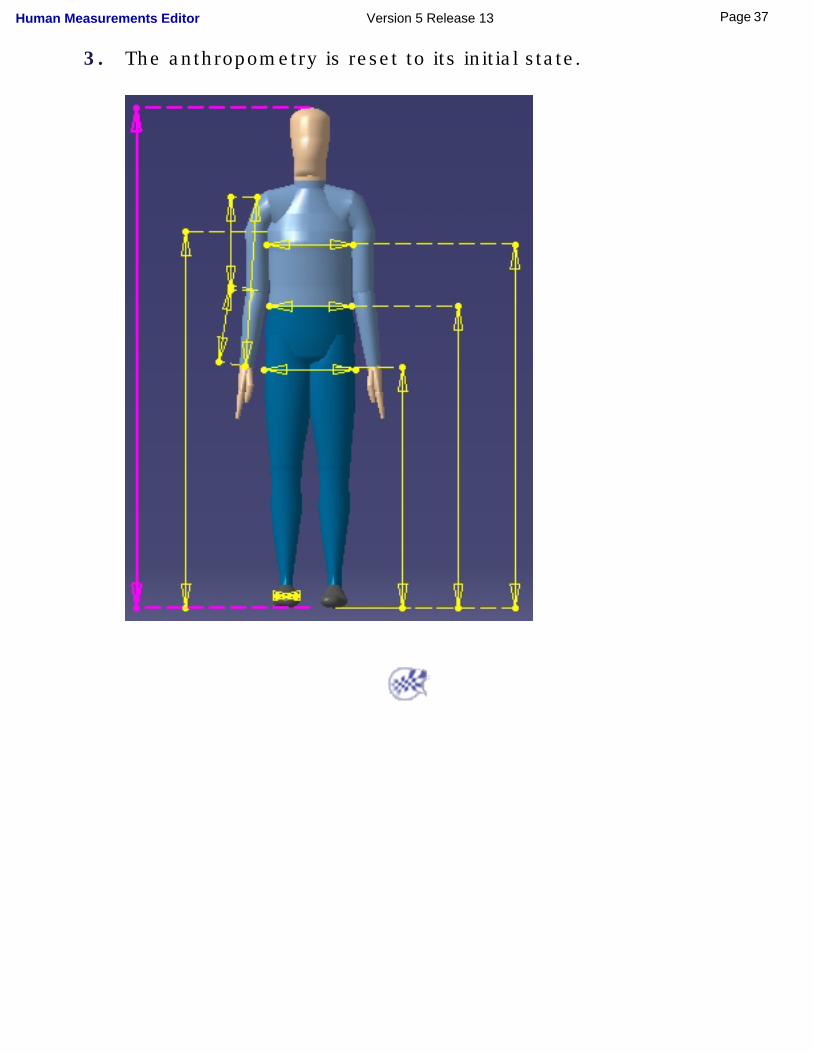
3. The anthropometry is reset to its initial state.
37Page Human Measurements Editor Version 5 Release 13
Using Predefined Postures
This task describes how to display and use predefined manikin postures.
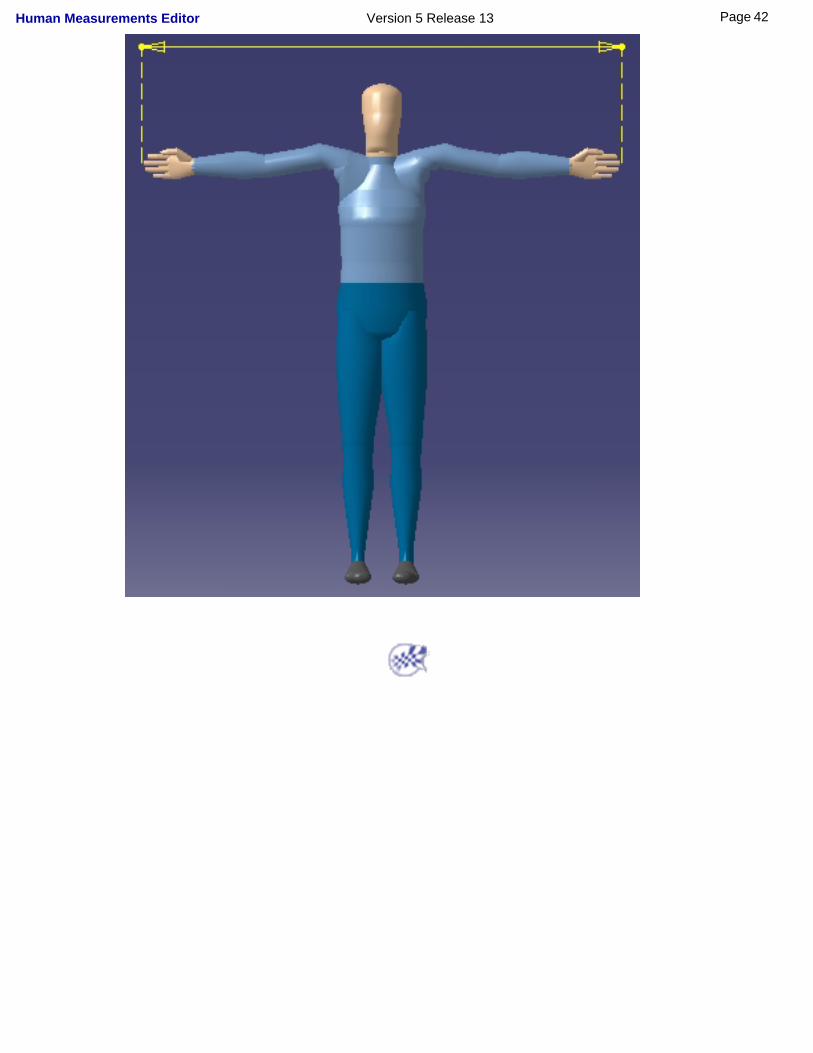
There are four predefined postures in the anthropometry module: Stand, Reach, Extended Reach, and Span. These postures are used to display the associated variables. Each selection cancels the previous one.
The manikin's default posture is standing.
To display a predefined posture:
1. Select the manikin.
2. Display the anthropometry.
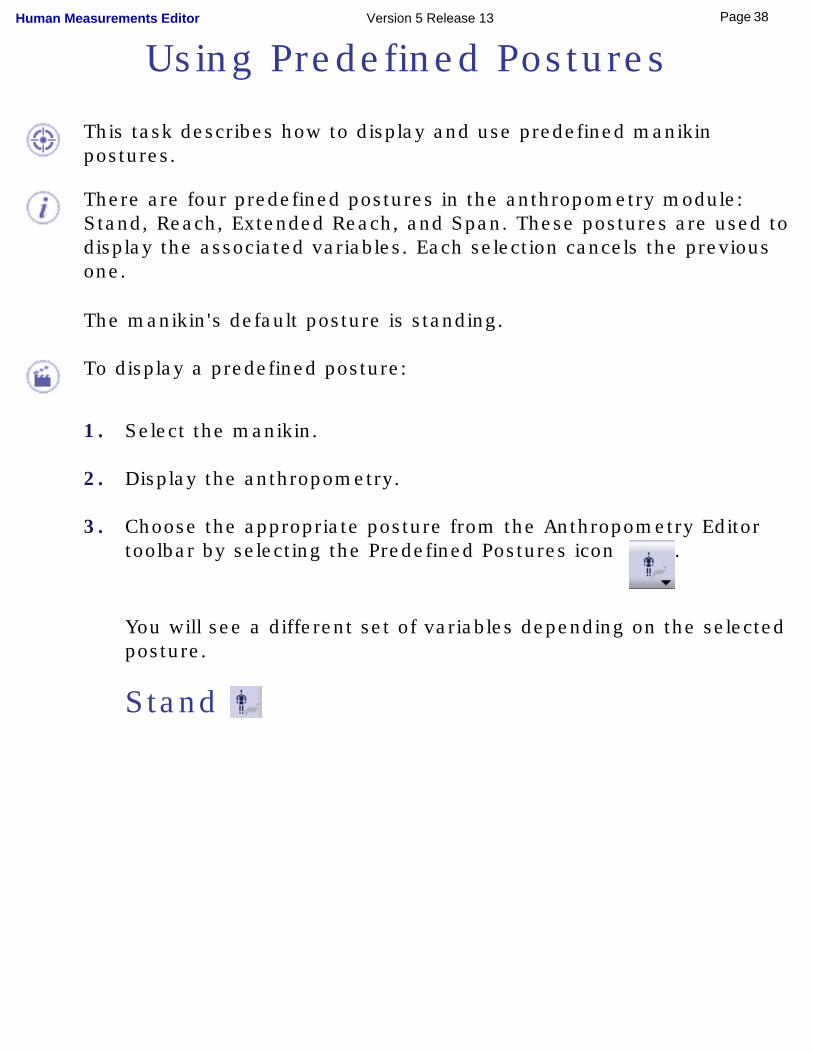
3. Choose the appropriate posture from the Anthropometry Editor toolbar by selecting the Predefined Postures icon .
You will see a different set of variables depending on the selected posture.
Stand
38Page Human Measurements Editor Version 5 Release 13
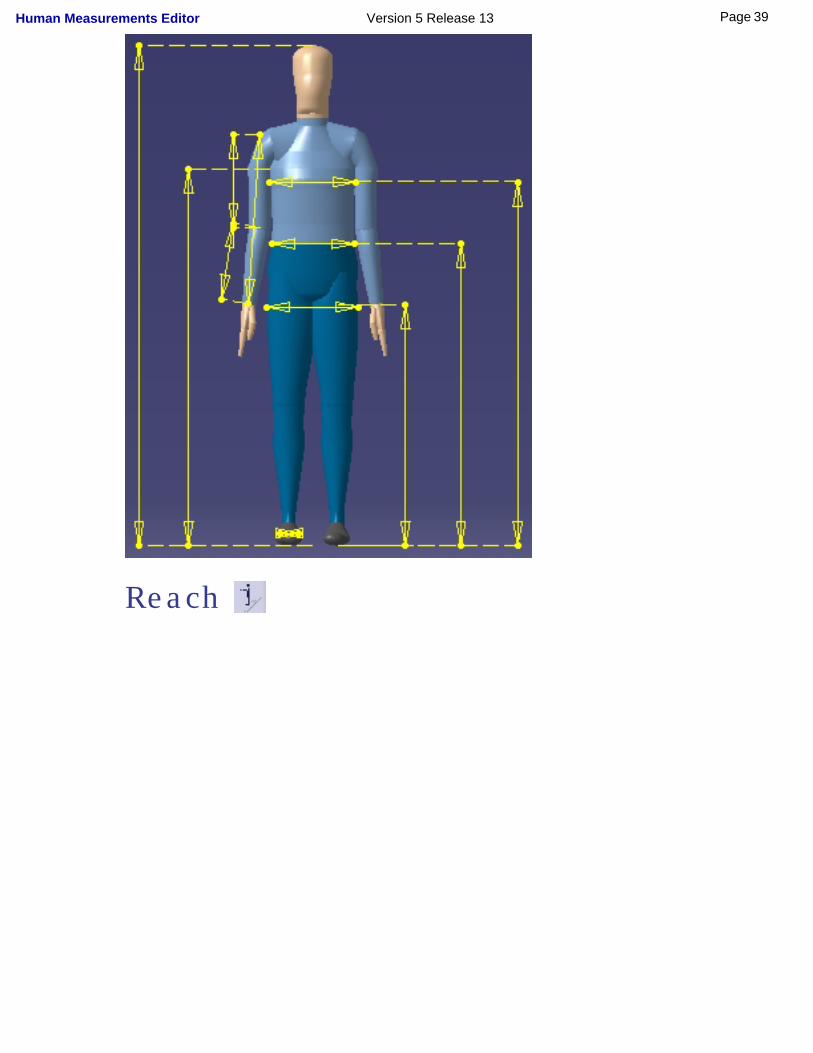
Reach
39Page Human Measurements Editor Version 5 Release 13
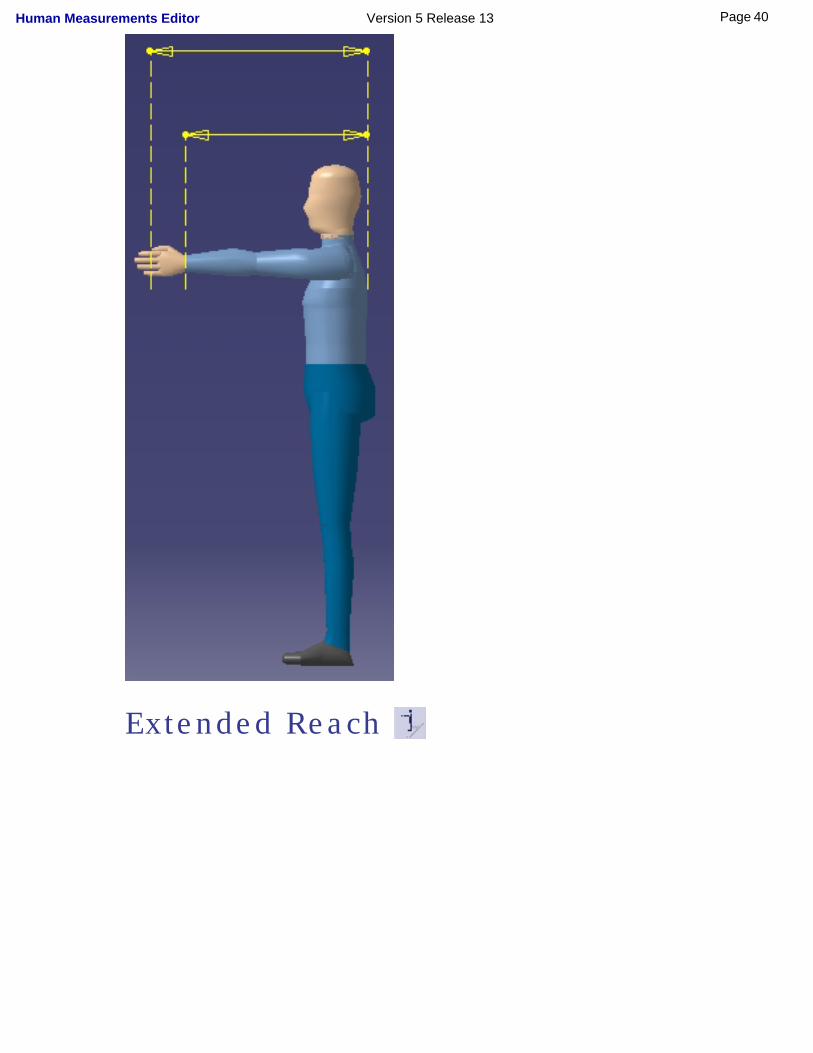
Extended Reach
40Page Human Measurements Editor Version 5 Release 13

Span
41Page Human Measurements Editor Version 5 Release 13
42Page Human Measurements Editor Version 5 Release 13
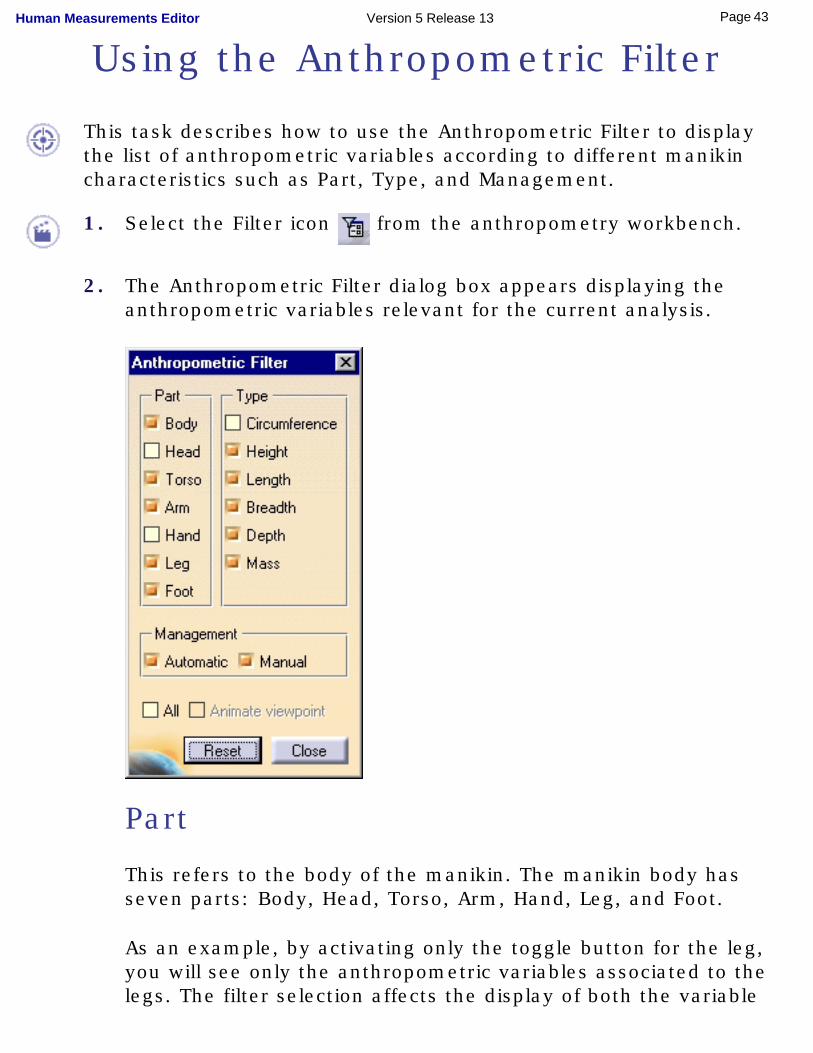
Using the Anthropometric Filter
This task describes how to use the Anthropometric Filter to display the list of anthropometric variables according to different manikin characteristics such as Part, Type, and Management.
1. Select the Filter icon from the anthropometry workbench.
2. The Anthropometric Filter dialog box appears displaying the anthropometric variables relevant for the current analysis.
Part
This refers to the body of the manikin. The manikin body has seven parts: Body, Head, Torso, Arm, Hand, Leg, and Foot.
As an example, by activating only the toggle button for the leg, you will see only the anthropometric variables associated to the legs. The filter selection affects the display of both the variable
43Page Human Measurements Editor Version 5 Release 13

list and the arrows.
Type
This refers to the anthropometric measurement type. There are six types of measurement: Circumference (girth), Height, Length, Breadth, Depth, and Mass. You can activate any combination of these.
Management
This refers to the way the variable values are calculated.
Automatic: Displays only the variables calculated by the system.
Manual: Displays the critical (user-defined) variables.
Reset
The Reset button brings the selection of the toggle buttons back to default.
44Page Human Measurements Editor Version 5 Release 13
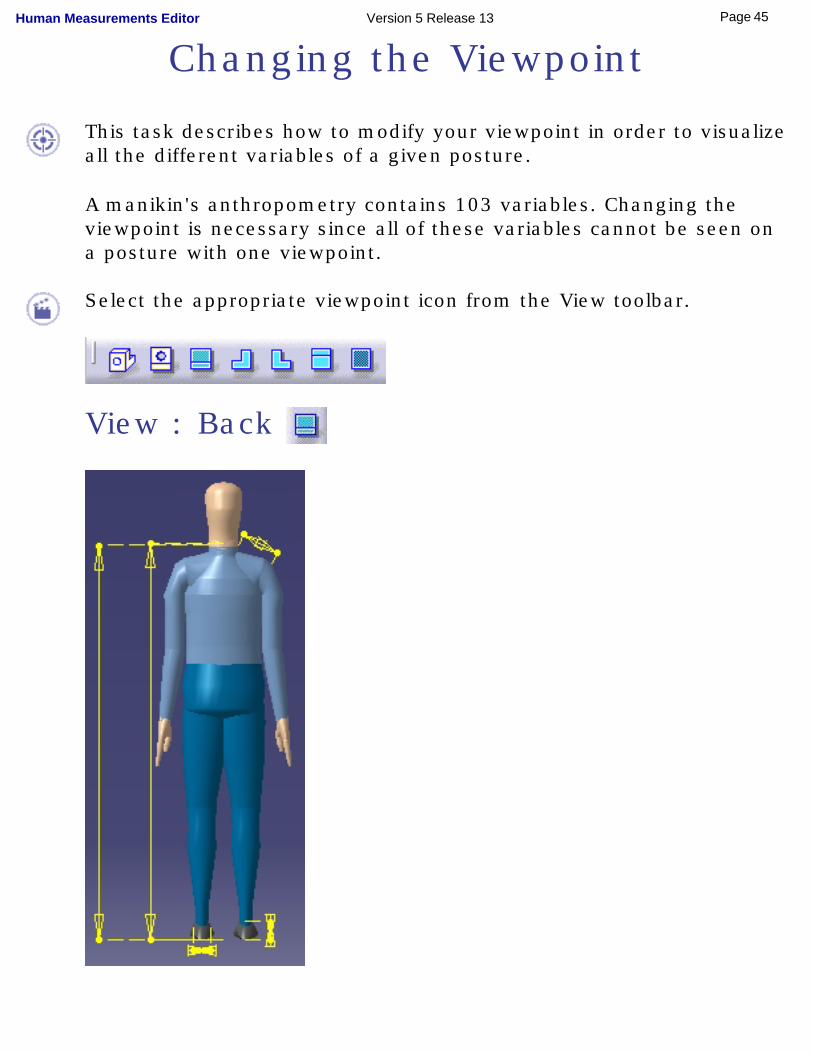
Changing the Viewpoint
This task describes how to modify your viewpoint in order to visualize all the different variables of a given posture.
A manikin's anthropometry contains 103 variables. Changing the viewpoint is necessary since all of these variables cannot be seen on a posture with one viewpoint.
Select the appropriate viewpoint icon from the View toolbar.
View : Back
45Page Human Measurements Editor Version 5 Release 13
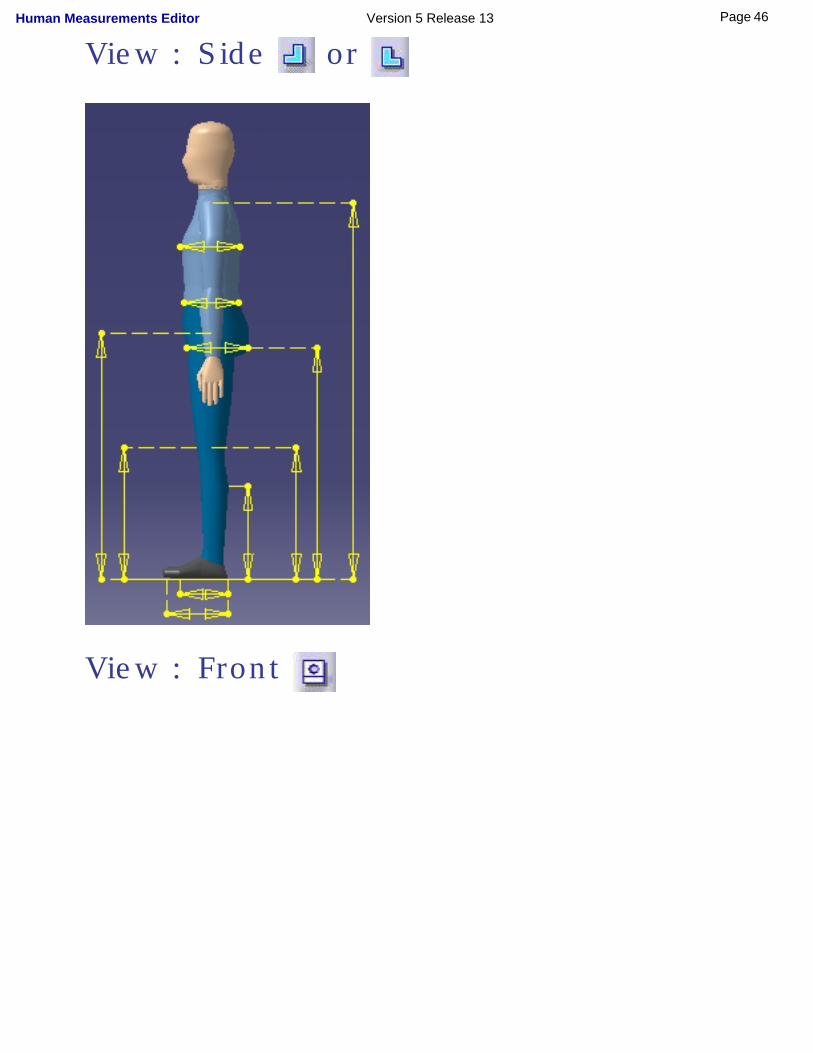
View : Side or
View : Front
46Page Human Measurements Editor Version 5 Release 13

47Page Human Measurements Editor Version 5 Release 13
Anthropometric Copy/Paste Functions
This task describes how to copy the anthropometry from one manikin and paste it on another manikin.
After this procedure is complete, the second manikin's anthropometry is set like the first, and the manikin is automatically updated.
1. From the Specification tree, select the anthropometry to copy.
2. Select the Edit -> Copy command or click the right mouse button to activate the contextual menu. Select Copy.
3. Select the second manikin's anthropometry.
4. Select the Edit -> Paste command (or Paste from the contextual menu).
48Page Human Measurements Editor Version 5 Release 13
Anthropometry Catalog Management
This procedure describes the commands that allow you to use Posture catalogs
The two library management commands are:
● Load from Posture Catalog
● Save in Posture Catalog
It is not possible to open manikin libraries with these commands nor is it possible to save postures as .swl files. You must convert any existing libraries into catalogs in order to use them. For more information on converting libraries into catalogs, please see "Manikin Catalog Managment" in the Human Builder User Guide.
Load from a Posture Catalog
This command opens the Open Human Library File dialog box that is used to load an existing library file.
1. Select the Load icon. The Open Human Library File dialog box is
displayed.
49Page Human Measurements Editor Version 5 Release 13
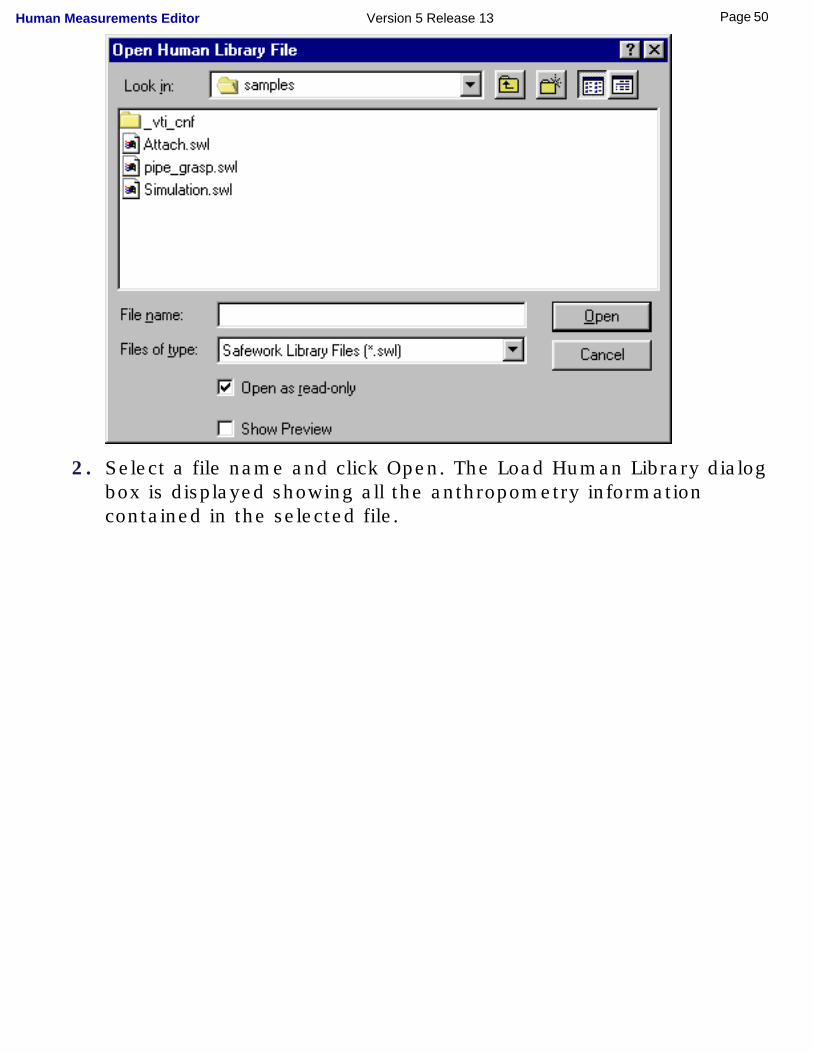
2. Select a file name and click Open. The Load Human Library dialog box is displayed showing all the anthropometry information contained in the selected file.
50Page Human Measurements Editor Version 5 Release 13
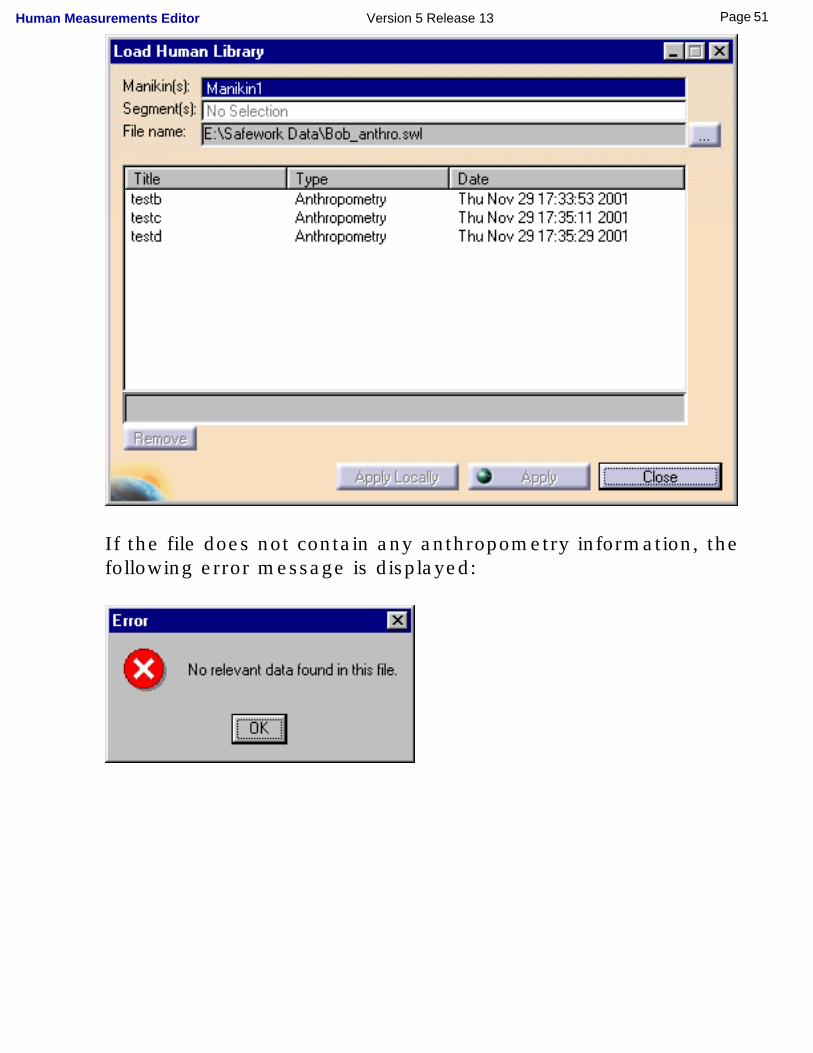
If the file does not contain any anthropometry information, the following error message is displayed:
51Page Human Measurements Editor Version 5 Release 13
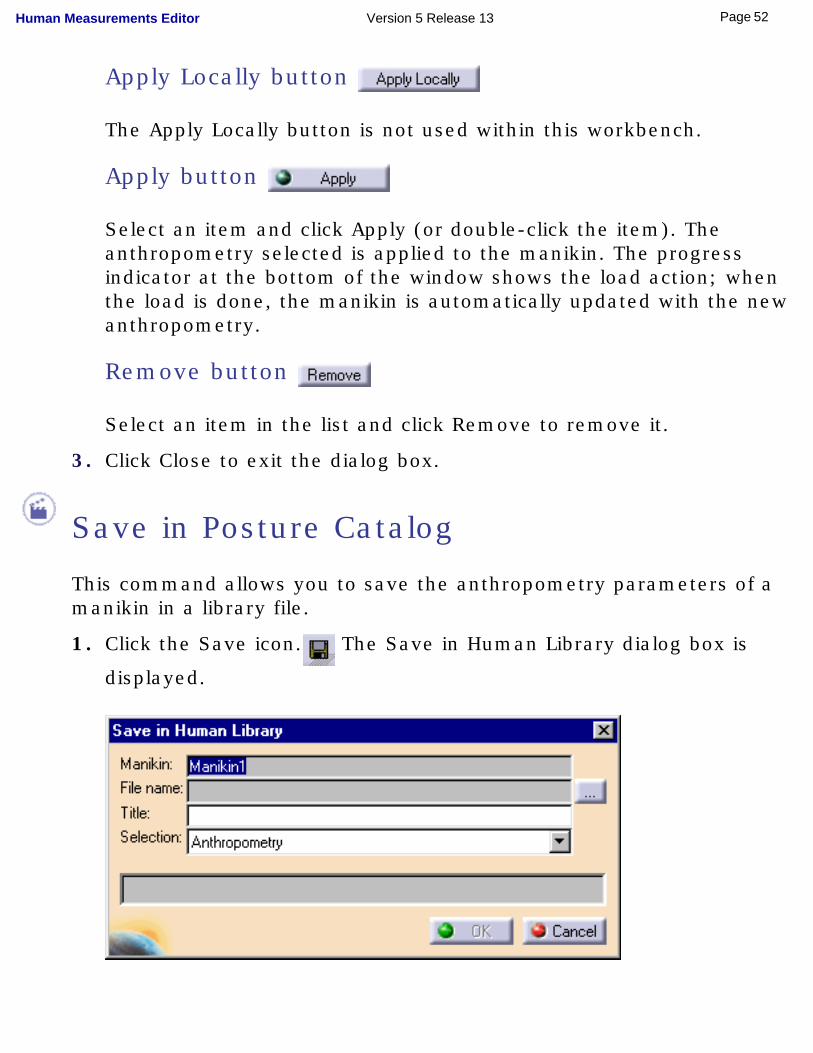
Apply Locally button
The Apply Locally button is not used within this workbench.
Apply button
Select an item and click Apply (or double-click the item). The anthropometry selected is applied to the manikin. The progress indicator at the bottom of the window shows the load action; when the load is done, the manikin is automatically updated with the new anthropometry.
Remove button
Select an item in the list and click Remove to remove it.
3. Click Close to exit the dialog box.
Save in Posture Catalog
This command allows you to save the anthropometry parameters of a manikin in a library file.
1. Click the Save icon. The Save in Human Library dialog box is
displayed.
52Page Human Measurements Editor Version 5 Release 13
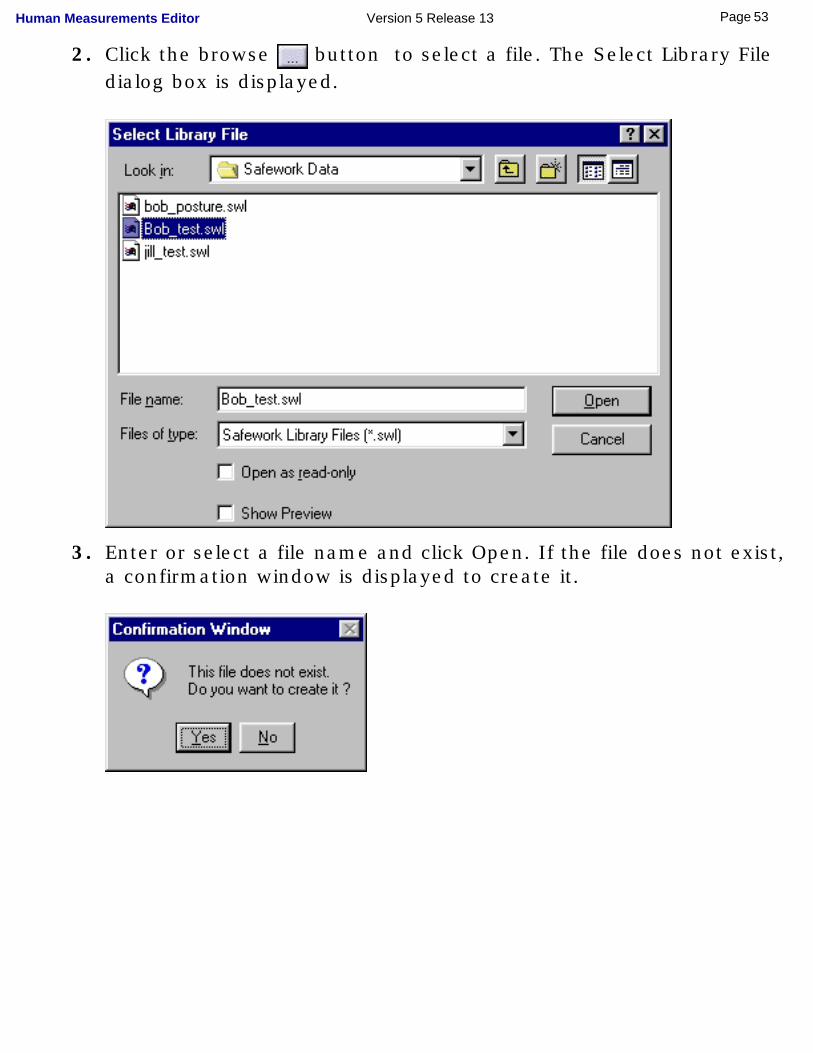
2. Click the browse button to select a file. The Select Library File dialog box is displayed.
3. Enter or select a file name and click Open. If the file does not exist, a confirmation window is displayed to create it.
53Page Human Measurements Editor Version 5 Release 13
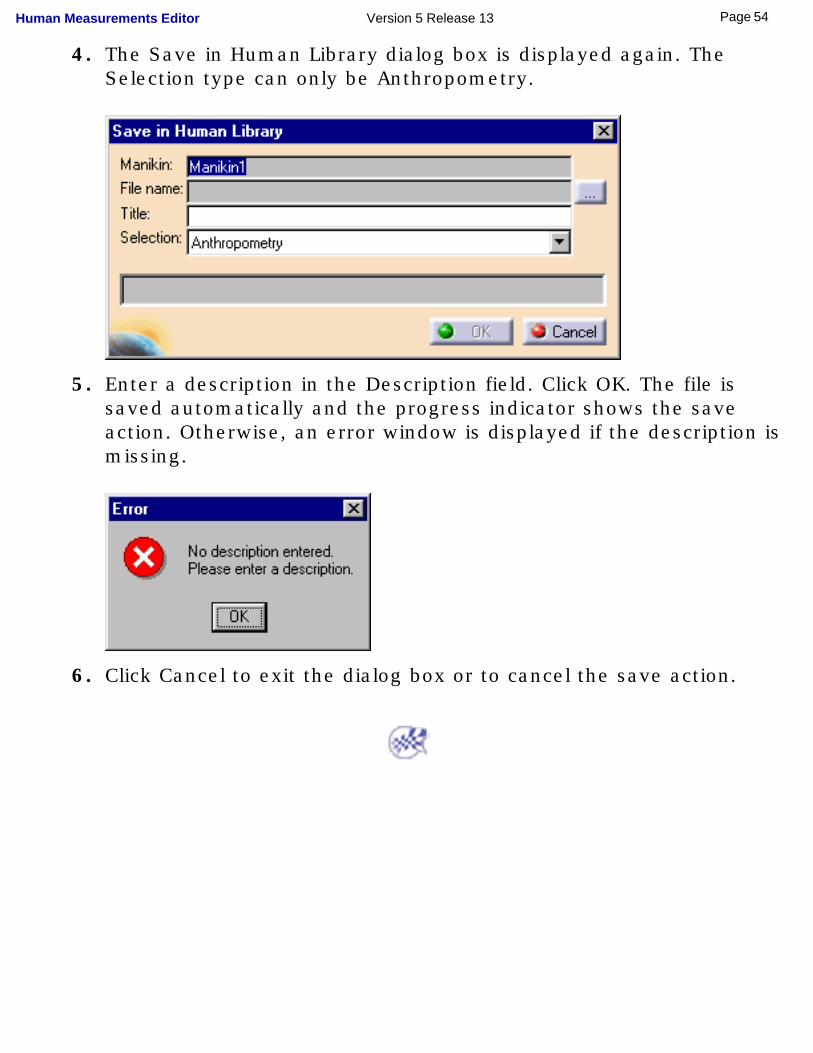
4. The Save in Human Library dialog box is displayed again. The Selection type can only be Anthropometry.
5. Enter a description in the Description field. Click OK. The file is saved automatically and the progress indicator shows the save action. Otherwise, an error window is displayed if the description is missing.
6. Click Cancel to exit the dialog box or to cancel the save action.
54Page Human Measurements Editor Version 5 Release 13
User-defined Population Databases
This task describes how to use the population integration capability of the Human Measurements product.
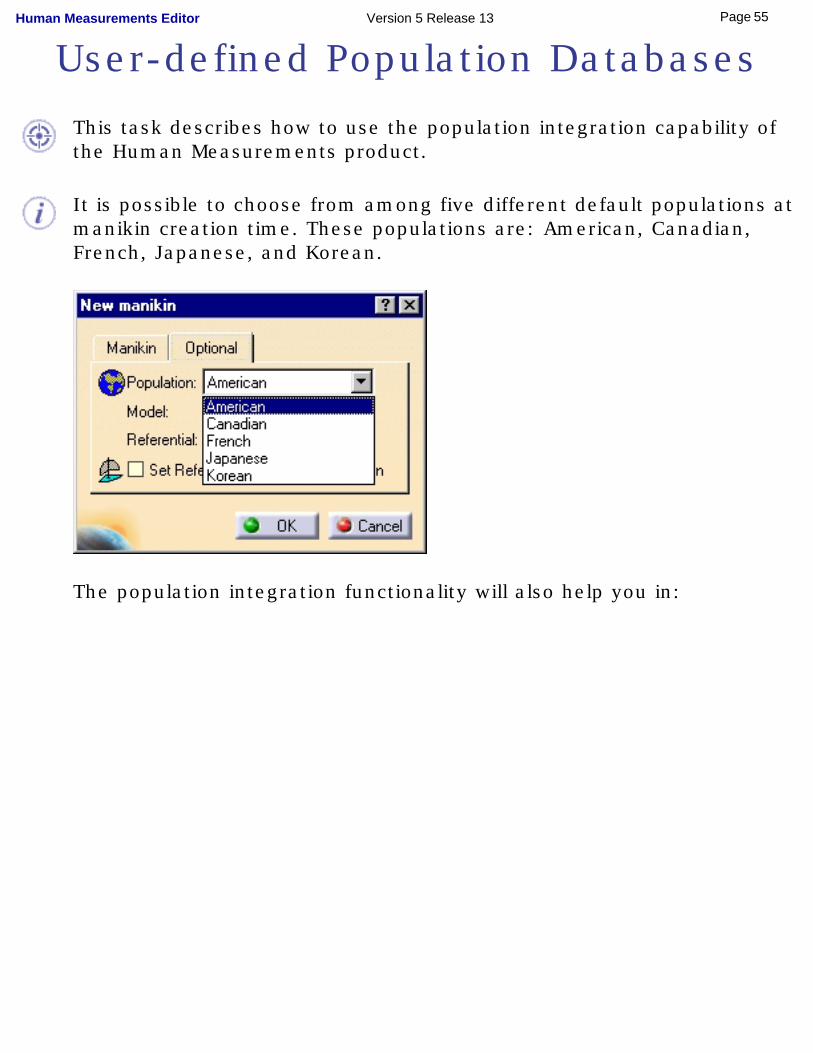
It is possible to choose from among five different default populations at manikin creation time. These populations are: American, Canadian, French, Japanese, and Korean.
The population integration functionality will also help you in:
55Page Human Measurements Editor Version 5 Release 13

Determining the Current Nationality of a Manikin
There are two ways to determine the current nationality of a manikin:
1. In the Human Builder workbench, through the Properties dialog box
2. In the Human Measurements Editor workbench, through the Population command
Human Builder workbench -> Properties dialog box1. Access the manikin Properties dialog box. To do this, select the
manikin, then select Edit -> Properties from the main menu bar.
56Page Human Measurements Editor Version 5 Release 13
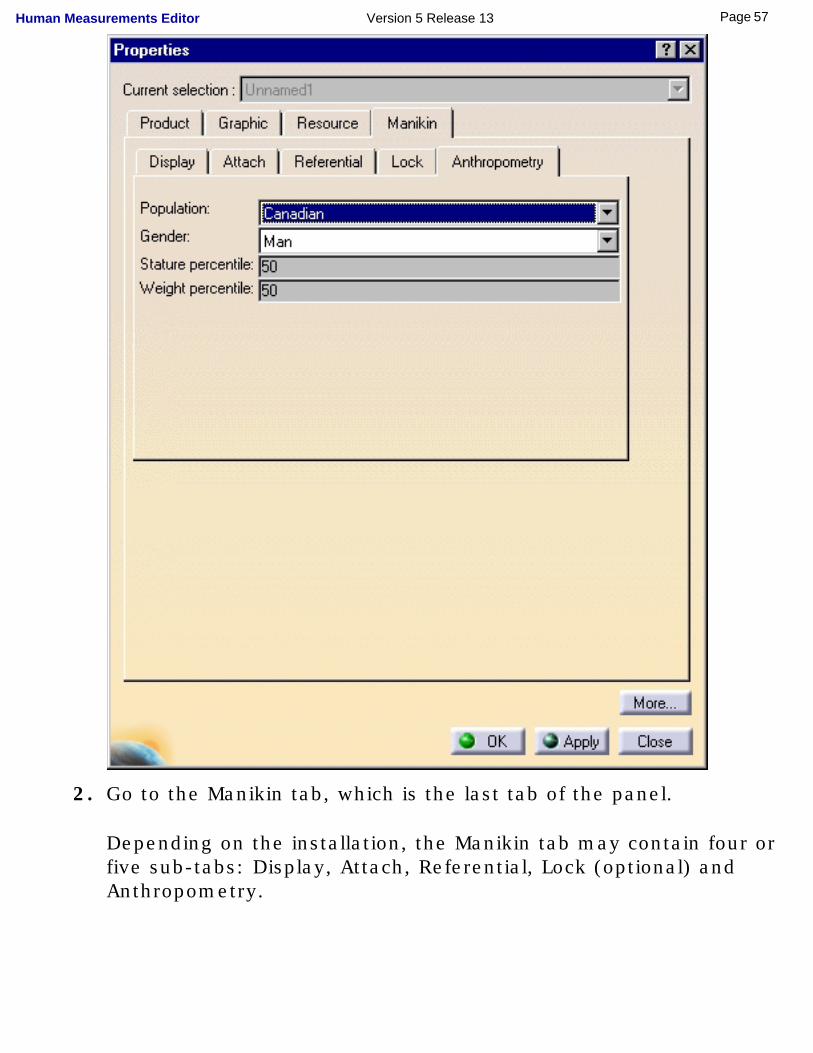
2. Go to the Manikin tab, which is the last tab of the panel.
Depending on the installation, the Manikin tab may contain four or five sub-tabs: Display, Attach, Referential, Lock (optional) and Anthropometry.
57Page Human Measurements Editor Version 5 Release 13
3. Select the Anthropometry sub-tab, which is the sub-tab dedicated to anthropometry management.
The current nationality of the manikin is displayed on the first line in the Population: field.
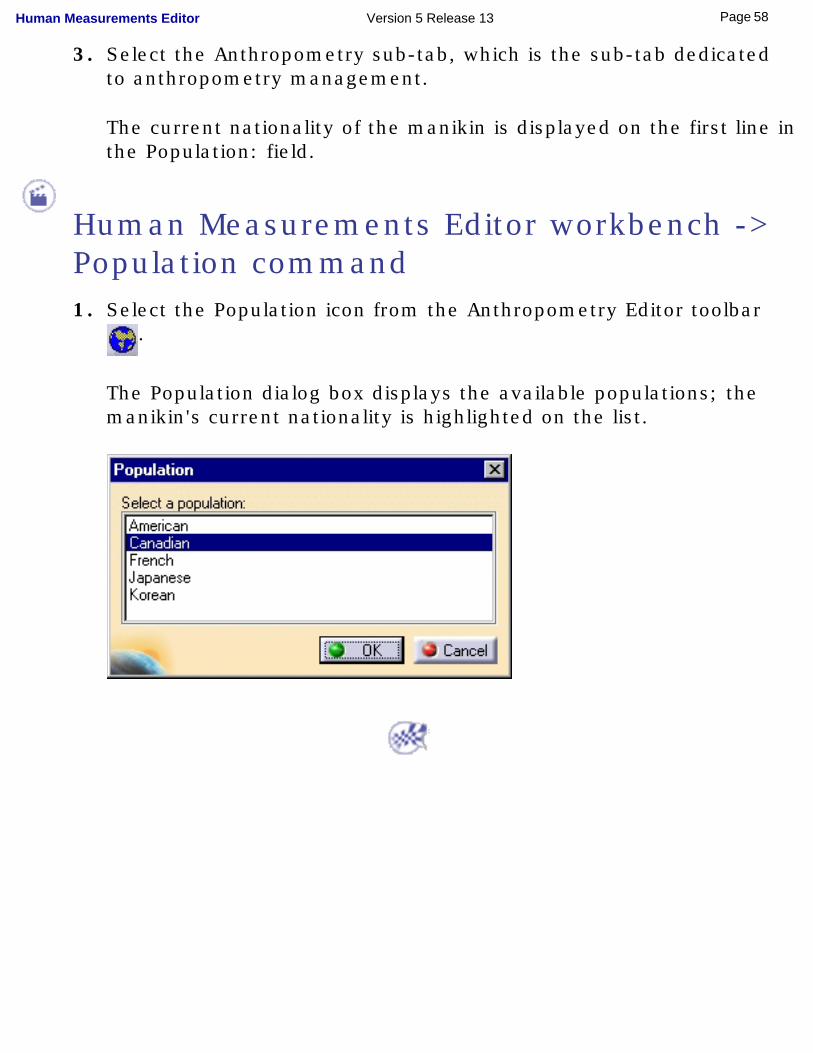
Human Measurements Editor workbench -> Population command1. Select the Population icon from the Anthropometry Editor toolbar
.
The Population dialog box displays the available populations; the manikin's current nationality is highlighted on the list.
58Page Human Measurements Editor Version 5 Release 13

Changing the Nationality of a Manikin
There are two ways to change the nationality of a manikin:
1. In the Human Builder workbench through the Properties dialog box
2. In the Human Measurements Editor workbench through the Population command
Human Builder workbench -> Properties dialog box1. Access the manikin Properties dialog box. To do this, select the
manikin, then select Edit -> Properties from the main menu.
2. Use the pull-down menu to select the new population of the manikin. Click the Apply button to complete the operation.
59Page Human Measurements Editor Version 5 Release 13

Failure to press the Apply button will cause the operation to remain incomplete; the new population will not take effect.
Human Measurements Editor workbench -> Population command
60Page Human Measurements Editor Version 5 Release 13
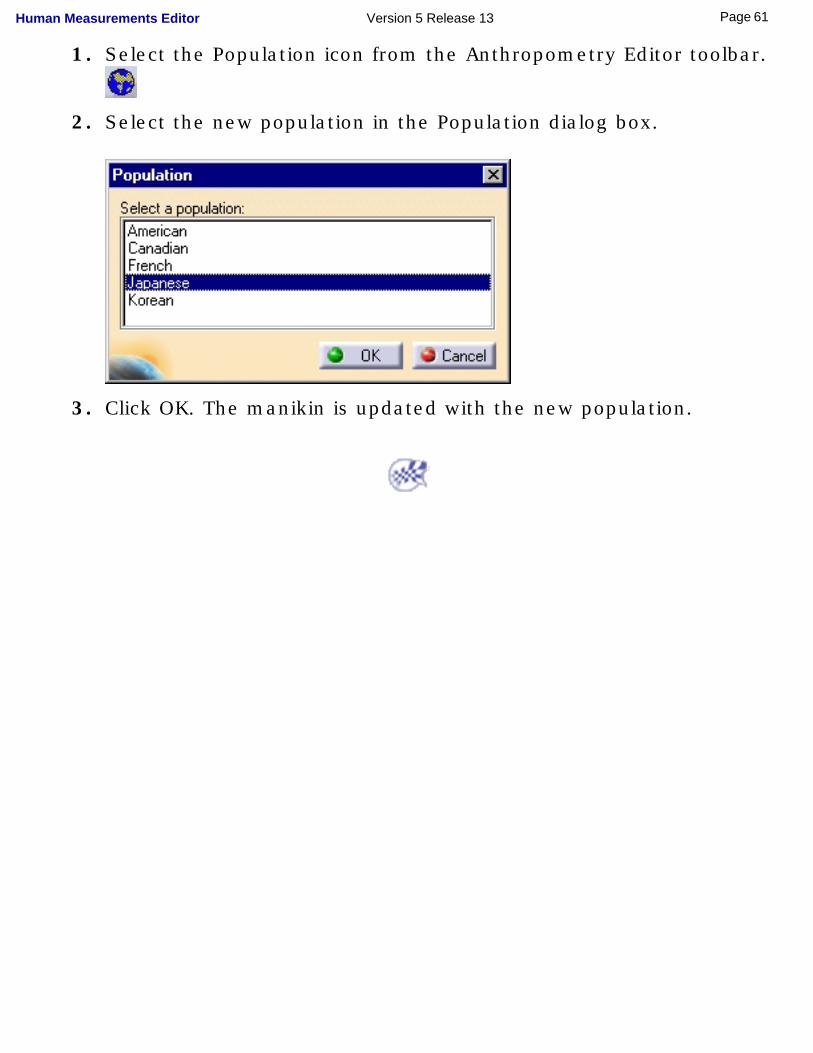
1. Select the Population icon from the Anthropometry Editor toolbar.
2. Select the new population in the Population dialog box.
3. Click OK. The manikin is updated with the new population.
61Page Human Measurements Editor Version 5 Release 13
Adding a User-defined Population
Follow these steps to add a new population into Human Measurements Editor:
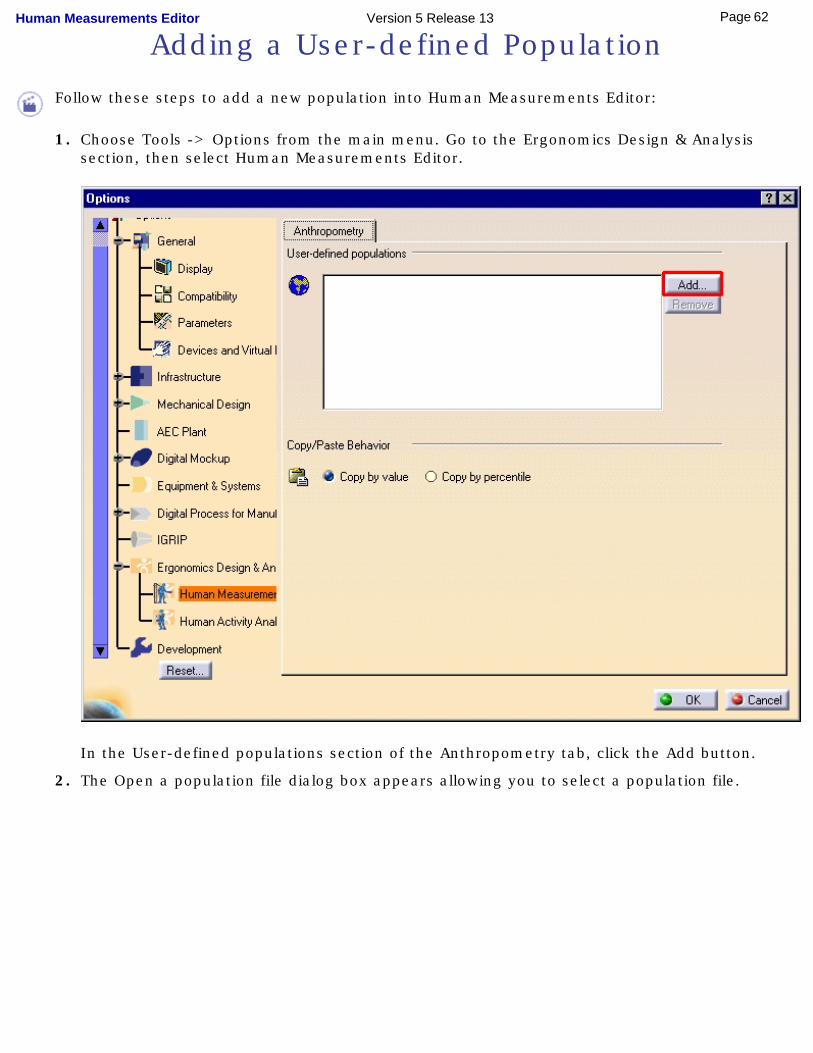
1. Choose Tools -> Options from the main menu. Go to the Ergonomics Design & Analysis section, then select Human Measurements Editor.
In the User-defined populations section of the Anthropometry tab, click the Add button.
2. The Open a population file dialog box appears allowing you to select a population file.
62Page Human Measurements Editor Version 5 Release 13

A population file is a safework statistic file describing a population. It contains the user-defined dimensions for the population under study, and follows a very precise format. The file, my_population.sws, is an example of such a population file. See the Advanced Task, Creating a Population File, for more details.
3. Select the desired population file, and click Open. If the file specified is read successfully, the corresponding population is added to the list; otherwise an error message is displayed.
4. To add another population to the list, repeat steps 1-3 above.
5. Click OK to close the Open a population file dialog box.
6. From now on, it is possible to create a manikin that uses the new population just added.
In the Human Builder Workbench, click the Create Manikin icon and choose
"my_population.sws" from the Population pull-down menu in the New Manikin dialog box.
63Page Human Measurements Editor Version 5 Release 13

Added user-defined populations will also be available in the Human Measurements Editor workbench by activating the Population icon in the Anthropometry Editor toolbar.
64Page Human Measurements Editor Version 5 Release 13
Removing a User-defined Population
Follow these steps to remove a user-defined population from Human Measurements Editor:
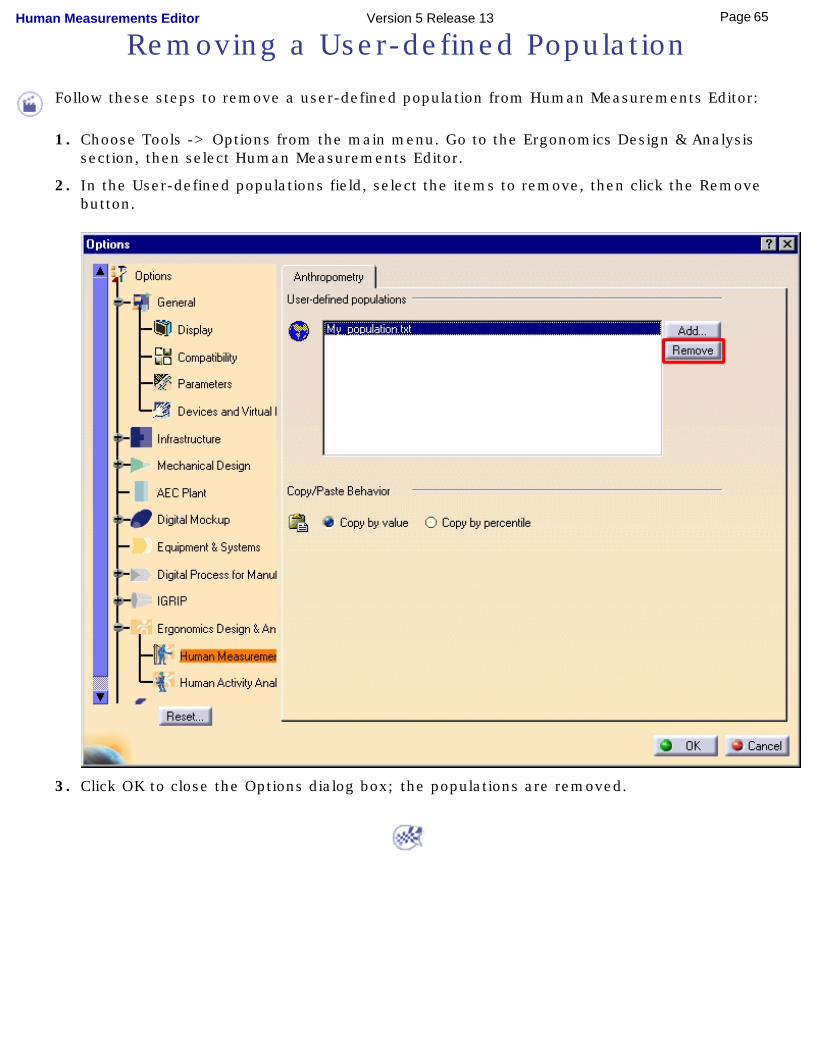
1. Choose Tools -> Options from the main menu. Go to the Ergonomics Design & Analysis section, then select Human Measurements Editor.
2. In the User-defined populations field, select the items to remove, then click the Remove button.
3. Click OK to close the Options dialog box; the populations are removed.
65Page Human Measurements Editor Version 5 Release 13
Interpolation Management
This task describes how to select the type of interpolation needed to calculate the anthropometric variables.
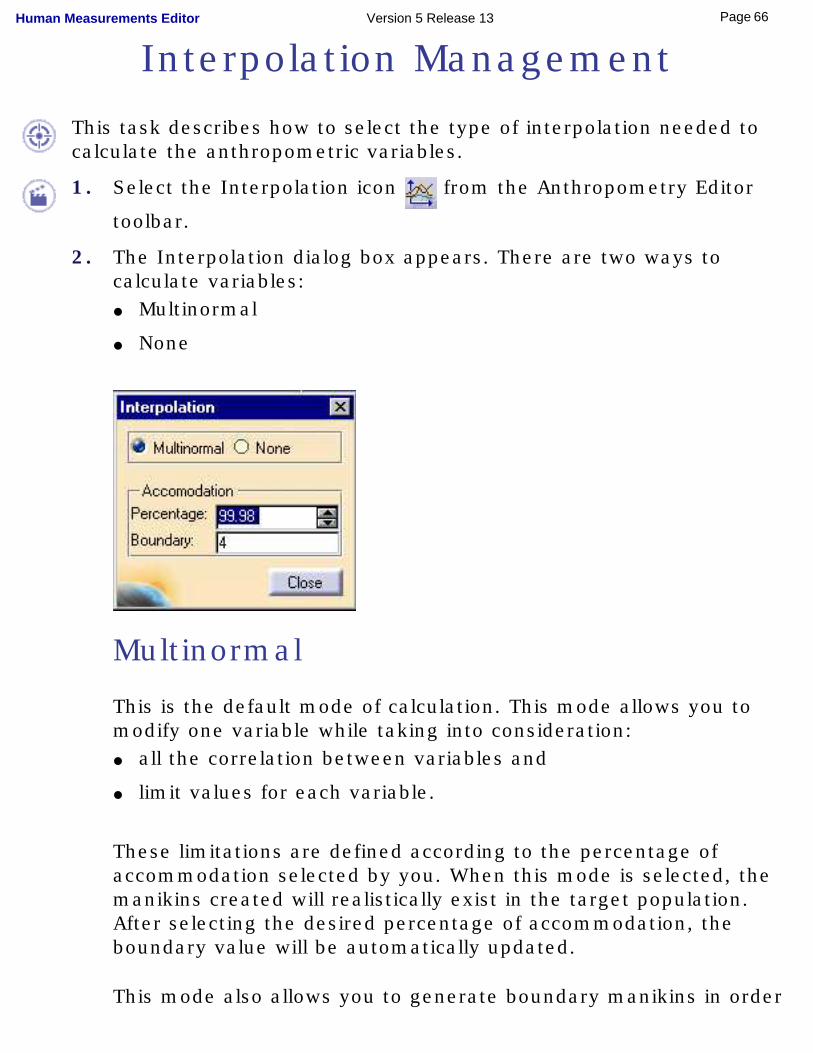
1. Select the Interpolation icon from the Anthropometry Editor
toolbar.
2. The Interpolation dialog box appears. There are two ways to calculate variables: ● Multinormal
● None
Multinormal
This is the default mode of calculation. This mode allows you to modify one variable while taking into consideration: ● all the correlation between variables and
● limit values for each variable.
These limitations are defined according to the percentage of accommodation selected by you. When this mode is selected, the manikins created will realistically exist in the target population. After selecting the desired percentage of accommodation, the boundary value will be automatically updated.
This mode also allows you to generate boundary manikins in order
66Page Human Measurements Editor Version 5 Release 13

to accurately achieve the accommodation of the target population.
None
As its name suggests, this mode removes all the limitations on the variable values. If there is no database available for your specific needs, this mode can be used to generate manikins that are not included in the current population. For example, if there is no database available on pregnant women, you can generate these women by removing the limitations of the current database.
WARNING!Be careful when using this mode; not only can you generate manikins not included in the target population, but you can generate manikins that are totally unrealistic. Be aware that impossible manikins will not necessarily look unrealistic.
67Page Human Measurements Editor Version 5 Release 13

Using Anthropometric Variables in Formulas
This task describes the how to use anthropometric variables and to change their values outside of the Anthropometry Editor.
1. In the Human Builder workbench, select the Formulas icon in the standard toolbar.
2. The Formulas dialog box will appear. From the Specification tree, select the manikin (or the father product) to work with. A filter will be applied and the list of all anthropometric variables for the selected manikin(s) will be displayed in the dialog box window as shown below.
3. With the Formula dialog box, it is possible to create formulas between user-set variables and other parameters defined elsewhere in the environment. An example of this would be to have the manikin automatically adapt whenever another critical dimension in the environment changes.
68Page Human Measurements Editor Version 5 Release 13
Creating a Population File
This page briefly explains the format that must be followed when creating a new population file for use with the Human Measurements Editor product. Any file extension will do, but the extension .sws (for Safework Statistic) is usually reserved for these types of files. Once the file is created, it possible to load it into V5 using the steps described in Basic Task User-defined Population Databases.
A population file is organized into sections of data; each section must begin with a keyword and end with a keyword. The ending keyword of one section is the beginning keyword of the next section, except for the last section where the ending keyword must be 'END'. All blank lines are discarded, and all lines beginning with the '!' (exclamation point) character are considered as comments, and are also discarded.
A population file may contain at most four sections, with the following keywords:● MEAN_STDEV M
● MEAN_STDEV F
● CORR M
● CORR F
All sections are optional; the MEAN_STDEV sections must appear before the CORR sections. Furthermore, a given keyword may not appear twice in the same population file.
In the MEAN_STDEV sections, the user may provide values (mean and standard deviation) of every measurement reflecting the population of the study. There must be one line per entry, and each entry must describe, at most, one variable in the following fashion:
<variable> <mean> <stddev>
where <variable> is the variable reference number, <mean> is the mean value of the variable and <stddev> is the standard
69Page Human Measurements Editor Version 5 Release 13

deviation value defining that variable.
A population file may be as simple as the following:! This is a sample population fileMEAN_STDEV Mus100 177.0 6.0MEAN_STDEV FUS100 164.0 6.0END
In the population file above, the mean value of the stature (variable us100) of a male manikin is defined as 177 centimeters (70 inches), with a standard deviation of 6.0. Likewise, the mean stature value of a female manikin is 164 centimeters (64.5 inches).
In the CORR sections, the user may provide correlation values between any pair of variables. The correlation between two variables can be defined as a real number in the range [-1.0 ; 1.0], expressing the relative dependency between the two variables. The higher the correlation absolute value, the more dependant the variables are on each other.
When defining correlations, there must be one line per entry, and each entry must describe one correlation between one pair of variables, in the following fashion:
<variable1> <variable2> <correlation>
where <variable1> is the reference number of the first variable, <variable2> is the reference number of the second variable, and <correlation> is the correlation value linking the two variables together. Please note that <variable1> must be different from <variable2>, because by definition, the correlation between a variable and itself is always 1.0. Furthermore, the reference number of <variable1> must be lower than the reference number of <variable2>
If the correlation value given is not within the range [-1.0; 1.0], then
70Page Human Measurements Editor Version 5 Release 13
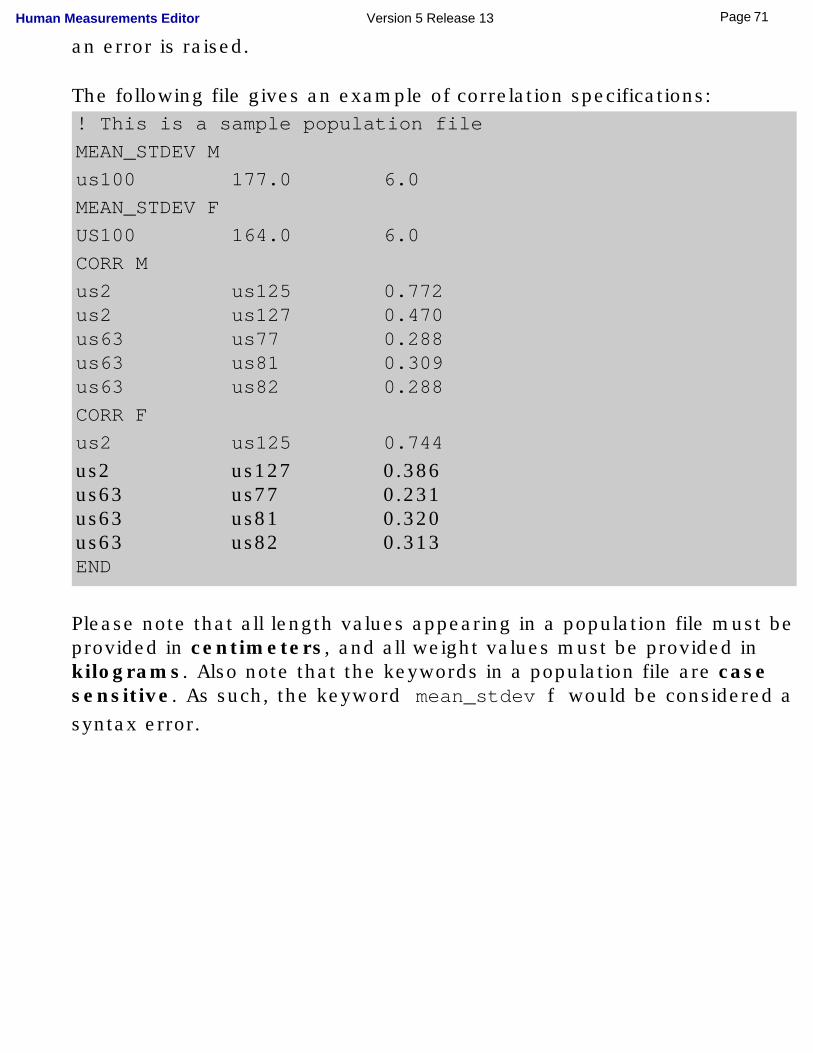
an error is raised.
The following file gives an example of correlation specifications:! This is a sample population fileMEAN_STDEV Mus100 177.0 6.0MEAN_STDEV FUS100 164.0 6.0CORR M us2us2us63us63us63
us125us127us77us81us82
0.7720.4700.2880.3090.288
CORR F us2
us2us63us63us63
us125
us127us77us81us82
0.744
0.3860.2310.3200.313
END
Please note that all length values appearing in a population file must be provided in centimeters, and all weight values must be provided in kilograms. Also note that the keywords in a population file are case sensitive. As such, the keyword mean_stdev f would be considered a syntax error.
71Page Human Measurements Editor Version 5 Release 13
An example of a population file, my_population.sws, is provided in the samples directory.
Also appearing in the samples directory are the five default populations available at manikin creation:
● American
● Canadian
● French
● Japanese
● Korean
Please refer to Anthropometric Variables for more information. This table contains all information about each variable used in Human Measurements Editor including the reference number, the acronym, the full name, and the definition of each variable.
72Page Human Measurements Editor Version 5 Release 13
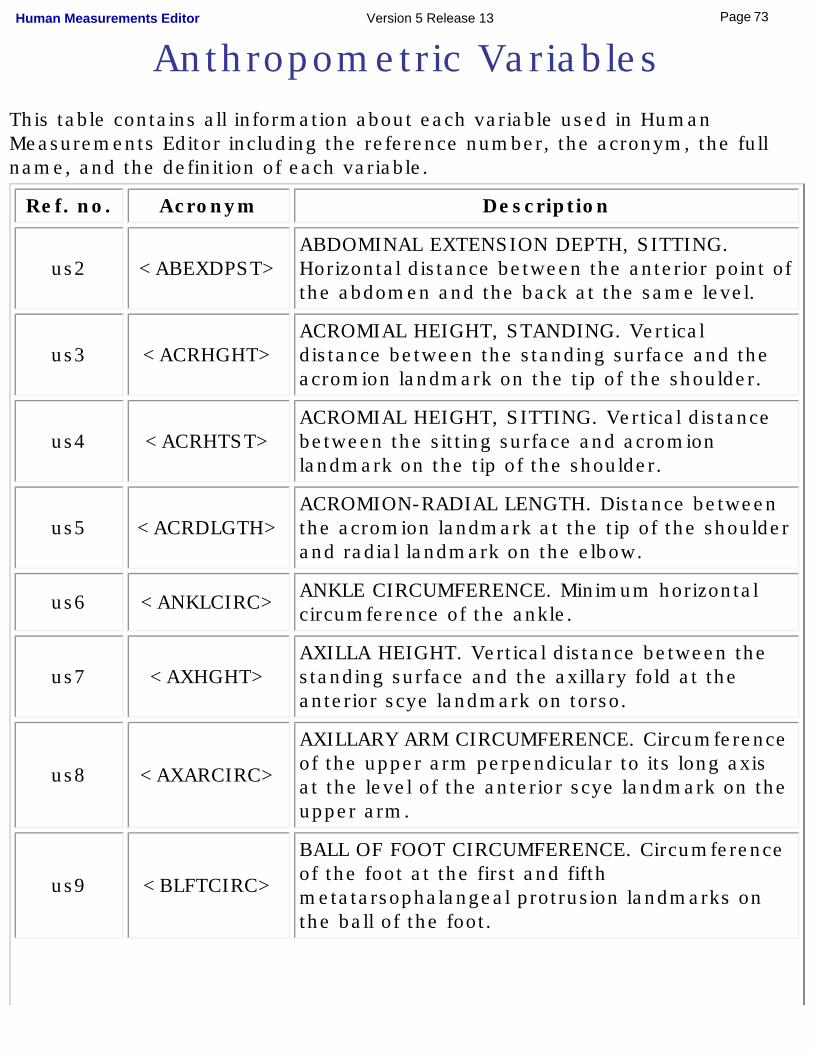
Anthropometric VariablesThis table contains all information about each variable used in Human Measurements Editor including the reference number, the acronym, the full name, and the definition of each variable.
Ref. no. Acronym Description
us2 <ABEXDPST>ABDOMINAL EXTENSION DEPTH, SITTING. Horizontal distance between the anterior point of the abdomen and the back at the same level.
us3 <ACRHGHT>ACROMIAL HEIGHT, STANDING. Vertical distance between the standing surface and the acromion landmark on the tip of the shoulder.
us4 <ACRHTST>ACROMIAL HEIGHT, SITTING. Vertical distance between the sitting surface and acromion landmark on the tip of the shoulder.
us5 <ACRDLGTH>ACROMION-RADIAL LENGTH. Distance between the acromion landmark at the tip of the shoulder and radial landmark on the elbow.
us6 <ANKLCIRC> ANKLE CIRCUMFERENCE. Minimum horizontal circumference of the ankle.
us7 <AXHGHT>AXILLA HEIGHT. Vertical distance between the standing surface and the axillary fold at the anterior scye landmark on torso.
us8 <AXARCIRC>
AXILLARY ARM CIRCUMFERENCE. Circumference of the upper arm perpendicular to its long axis at the level of the anterior scye landmark on the upper arm.
us9 <BLFTCIRC>
BALL OF FOOT CIRCUMFERENCE. Circumference of the foot at the first and fifth metatarsophalangeal protrusion landmarks on the ball of the foot.
73Page Human Measurements Editor Version 5 Release 13

us10 <BLFTLGTH>
BALL OF FOOT LENGTH. Distance between the back of the heel and the landmark at the first metatarsophalangeal protrusion on the ball of the foot.
us11 <BCRMBDTH>BIACROMIAL BREADTH. Posterior distance between the right and the left acromion landmarks on the tips of the shoulders.
us12 <BICIRCFL>
BICEPS CIRCUMFERENCE, FLEXED. Circumference of the upper arm at the level of the flexed biceps point measured perpendicular to the long axis of the arm.
us13 <BIDLBDTH>BIDELTOID BREADTH. Maximum horizontal distance between the lateral margins of the upper arms on the deltoid muscles.
us14 <BIMBDTH>BIMALLEOLAR BREADTH. Horizontal distance between the maximum protrusions of the ankle bones (medial and lateral malleoli).
us15 <BISBDTH>BISPINOUS BREADTH. Distance between the right and left anterior superior iliac spine landmarks.
us24 <BUTTCIRC>BUTTOCK CIRCUMFERENCE. Horizontal circumference of the trunk at the level of the maximum protrusion of the right buttock.
us25 <BUTTDPTH>BUTTOCK DEPTH. Horizontal depth of the torso at the level of the maximum protrusion of the right buttock.
us26 <BUTTHGHT>BUTTOCK HEIGHT. Vertical distance between the standing surface and the level of the maximum protrusion of the right buttock.
us27 <BUTTKLTH>
BUTTOCK-KNEE LENGTH. Horizontal distance between the most posterior point on either buttock and the front of the knee as measured in the sitting position with the knees flexed 90 degrees.
74Page Human Measurements Editor Version 5 Release 13
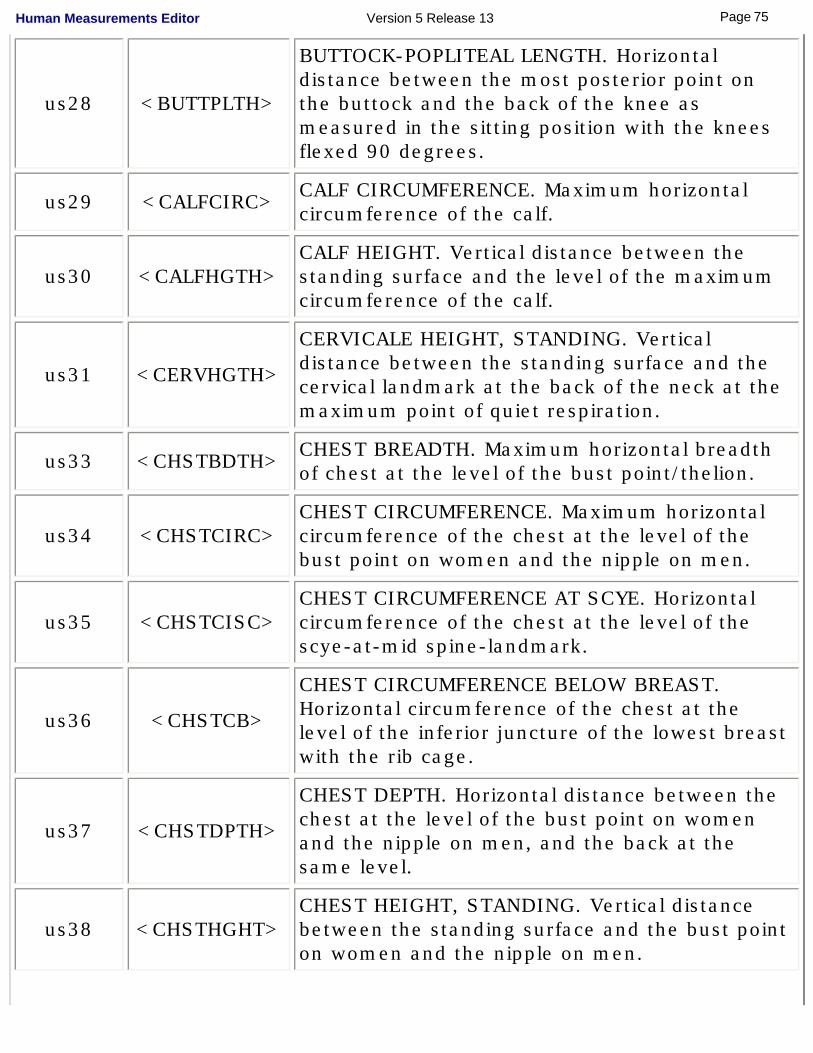
us28 <BUTTPLTH>
BUTTOCK-POPLITEAL LENGTH. Horizontal distance between the most posterior point on the buttock and the back of the knee as measured in the sitting position with the knees flexed 90 degrees.
us29 <CALFCIRC> CALF CIRCUMFERENCE. Maximum horizontal circumference of the calf.
us30 <CALFHGTH>CALF HEIGHT. Vertical distance between the standing surface and the level of the maximum circumference of the calf.
us31 <CERVHGTH>
CERVICALE HEIGHT, STANDING. Vertical distance between the standing surface and the cervical landmark at the back of the neck at the maximum point of quiet respiration.
us33 <CHSTBDTH> CHEST BREADTH. Maximum horizontal breadth of chest at the level of the bust point/thelion.
us34 <CHSTCIRC>CHEST CIRCUMFERENCE. Maximum horizontal circumference of the chest at the level of the bust point on women and the nipple on men.
us35 <CHSTCISC>CHEST CIRCUMFERENCE AT SCYE. Horizontal circumference of the chest at the level of the scye-at-mid spine-landmark.
us36 <CHSTCB>
CHEST CIRCUMFERENCE BELOW BREAST. Horizontal circumference of the chest at the level of the inferior juncture of the lowest breast with the rib cage.
us37 <CHSTDPTH>
CHEST DEPTH. Horizontal distance between the chest at the level of the bust point on women and the nipple on men, and the back at the same level.
us38 <CHSTHGHT>CHEST HEIGHT, STANDING. Vertical distance between the standing surface and the bust point on women and the nipple on men.
75Page Human Measurements Editor Version 5 Release 13

us39 <CRCHHGHT> CROTCH HEIGHT, STANDING. Vertical distance between the standing surface and the crotch.
us48 <ELBCIRC>
ELBOW CIRCUMFERENCE, STRAIGHT. Circumference of the elbow in a plane perpendicular to the long axis of the arm at the level of the olecranon center landmark, with the arm straight at the side.
us50 <EYEHTSIT>EYE HEIGHT, SITTING. Vertical distance between the sitting surface and the ectocanthus landmark at the outer corner of the eye.
us51 <FTBRHOR>
FOOT BREADTH, HORIZONTAL. Maximum breadth of the standing foot between the first and the fifth metatarsophalangeal landmark protrusions.
us52 <FOOTLGTH>FOOT LENGTH. Distance between the tip of the longest toe and the back of the hell of the standing foot.
us53 <FCIRCFL>
FOREARM CIRCUMFERENCE, FLEXED 90. Maximum circumference of the forearm just above the elbow crease with the elbow flexed 90 degrees and the first tightly clenched.
us55 <FORHDLG>FOREARM-HAND LENGTH. Horizontal distance between the back of the tip of the elbow to the tip of the middle finger.
us58 <HANDBRTH>HAND BREADTH. Maximum breadth of the hand between the metacarpal II and the metacarpal V.
us59 <HANDCIRC>HAND CIRCUMFERENCE. Maximum circumference of the of the hand at the level of the metacarpal II and metacarpal V.
us60 <HANDLGTH>HAND LENGTH. Length of the hand between the stylion landmark on the wrist and the tip of the middle finger.
76Page Human Measurements Editor Version 5 Release 13
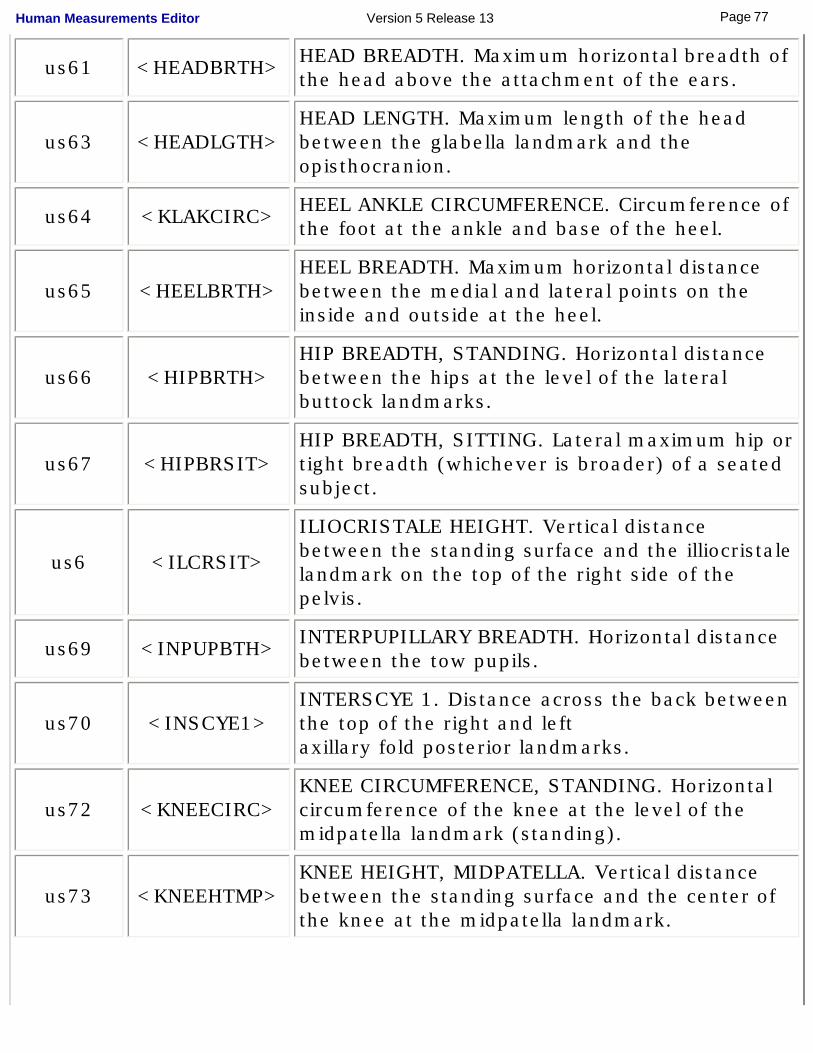
us61 <HEADBRTH> HEAD BREADTH. Maximum horizontal breadth of the head above the attachment of the ears.
us63 <HEADLGTH>HEAD LENGTH. Maximum length of the head between the glabella landmark and the opisthocranion.
us64 <KLAKCIRC> HEEL ANKLE CIRCUMFERENCE. Circumference of the foot at the ankle and base of the heel.
us65 <HEELBRTH>HEEL BREADTH. Maximum horizontal distance between the medial and lateral points on the inside and outside at the heel.
us66 <HIPBRTH>HIP BREADTH, STANDING. Horizontal distance between the hips at the level of the lateral buttock landmarks.
us67 <HIPBRSIT>HIP BREADTH, SITTING. Lateral maximum hip or tight breadth (whichever is broader) of a seated subject.
us6 <ILCRSIT>
ILIOCRISTALE HEIGHT. Vertical distance between the standing surface and the illiocristale landmark on the top of the right side of the pelvis.
us69 <INPUPBTH> INTERPUPILLARY BREADTH. Horizontal distance between the tow pupils.
us70 <INSCYE1>INTERSCYE 1. Distance across the back between the top of the right and left axillary fold posterior landmarks.
us72 <KNEECIRC>KNEE CIRCUMFERENCE, STANDING. Horizontal circumference of the knee at the level of the midpatella landmark (standing).
us73 <KNEEHTMP>KNEE HEIGHT, MIDPATELLA. Vertical distance between the standing surface and the center of the knee at the midpatella landmark.
77Page Human Measurements Editor Version 5 Release 13
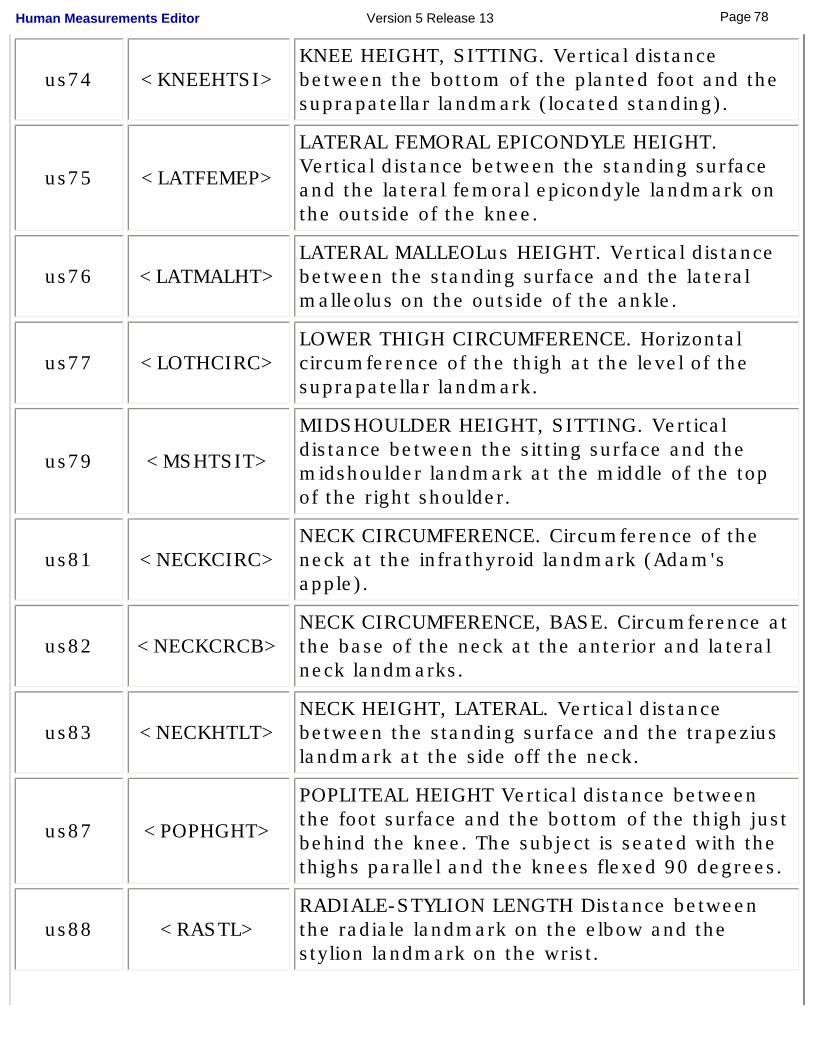
us74 <KNEEHTSI>KNEE HEIGHT, SITTING. Vertical distance between the bottom of the planted foot and the suprapatellar landmark (located standing).
us75 <LATFEMEP>
LATERAL FEMORAL EPICONDYLE HEIGHT. Vertical distance between the standing surface and the lateral femoral epicondyle landmark on the outside of the knee.
us76 <LATMALHT>LATERAL MALLEOLus HEIGHT. Vertical distance between the standing surface and the lateral malleolus on the outside of the ankle.
us77 <LOTHCIRC>LOWER THIGH CIRCUMFERENCE. Horizontal circumference of the thigh at the level of the suprapatellar landmark.
us79 <MSHTSIT>
MIDSHOULDER HEIGHT, SITTING. Vertical distance between the sitting surface and the midshoulder landmark at the middle of the top of the right shoulder.
us81 <NECKCIRC>NECK CIRCUMFERENCE. Circumference of the neck at the infrathyroid landmark (Adam's apple).
us82 <NECKCRCB>NECK CIRCUMFERENCE, BASE. Circumference at the base of the neck at the anterior and lateral neck landmarks.
us83 <NECKHTLT>NECK HEIGHT, LATERAL. Vertical distance between the standing surface and the trapezius landmark at the side off the neck.
us87 <POPHGHT>
POPLITEAL HEIGHT Vertical distance between the foot surface and the bottom of the thigh just behind the knee. The subject is seated with the thighs parallel and the knees flexed 90 degrees.
us88 <RASTL>RADIALE-STYLION LENGTH Distance between the radiale landmark on the elbow and the stylion landmark on the wrist.
78Page Human Measurements Editor Version 5 Release 13

us89 <SCYECIRC>
SCYE CIRCUMFERENCE Vertical circumference of the upper arm measured with a tape through the armpit passing over the acromion landmark on the tip of the shoulder.
us92 <SHOUELLL>
SHOULDER-ELBOW LENGTH Distance between the acromion landmark on the tip of the shoulder and the olecranon landmark at the bottom of the elbow flexed to 90 degrees.
us93 <SHOULGTH>
SHOULDER LENGTH Surface distance between the trapezius landmark at the base of the neck and the acromion landmark at the tip of the shoulder.
us94 <SITTHGHT> SITTING HEIGHT Vertical distance between the sitting surface and the top of the head.
us98 <SLOUTSM>
SLEEVE OUTSEAM Straight line distance between the acromion landmark on the tip of the shoulder and the stylion landmark on the wrist, measured with the arm is straight at side and the palm facing forward.
us99 <SPAN>SPAN Distance between the tips of the third fingers when the arms are stretched out horizontally.
us100 <STATURE> STATURE Vertical distance from a standing surface to the top of the head.
us103 <TENRIBHT>TENTH RIB HEIGHT Vertical distance between the standing surface and the tenth rib landmark at the bottom of the ribcage.
us104 <THGHCIRC> THIGH CIRCUMFERENCE Circumference of the thigh at its juncture with the buttock.
us105 <THGHCLR>THIGH CLEARANCE Vertical distance between the sitting surface and the highest point on the top of the thigh.
79Page Human Measurements Editor Version 5 Release 13

us106 <THUMBBR> THUMB BREADTH Maximum breadth of the thumb perpendicular to its long axis.
us107 <THMBTPR>
THUMPTIP REACH Horizontal distance between a wall against which the posterioir trunk is in contact and the tip of the thumb when the arm is extended anteriorly.
us108 <TROCHHT>TROCHANTERION HEIGHT Vertical distance between the standing surface and the trochanterion landmark on the hip.
us113 <WSTBRTH>WAIST BREADTH. Horizontal breadth of the waist at the level of the center of the navel (omphalion).
us115 <WSCIRCOM>WAIST CIRCUMFERENCE, OMPHALION Horizontal distance around the torso at the level of the center of the navel (omphalion).
us116 <WSTDEPTH>WAIST DEPTH. Horizontal distance between the front and back of the waist at the level of the center of the navel (omphalion).
us120 <WSTHOM>WAIST HEIGHT, OMPHALION Vertical distance between the standing surface and the center of the navel (omphalion).
us122 <WSHTSTOM>WAIST HEIGHT, SITTING, OMPHALION. Vertical distance between the sitting surface and the center of the navel (omphalion).
us125 <WEIGHT> WEIGHT. The Weight.
us126 <WRCTRGRL>
WRIST CENTER OF GRIP LENGTH. Horizontal distance between the stylion landmark on the wrist and the hole in the center of the gripped dowel.
us127 <WRISCIRC>WRIST CIRCUMFERENCE. Circumference of the wrist perpendicular to the long axis of the forearm at the level of the stylion landmark.
80Page Human Measurements Editor Version 5 Release 13

us130 <WRINFNGL>WRIST INDEX FINGER LENGTH. Distance between the stylion on the wrist and the tip of the index finger.
us131 <WRTHLGTH>WRIST-THUMBTIP LENGTH Horizontal distance between the stylion landmark on the wrist and the tip of the thumb.
us132 <WRWALLLN>
WRIST-WALL LENGTH Horizontal distance between a wall against which the posterior trunk is in contact and the stylion landmark on the wrist when the arm is extended anteriorly and the buttocks and shoulders are against the wall.
us133 <WRWALLEX>
WRIST-WALL LENGTH, EXTENDED Horizontal distance between a wall against which the posterior trunk is in contact and the stylion landmark on the wrist when the arm is maximally extended and the shoulder is rotated forward and the buttocks and shoulders are against the wall.
us212 <BIGBRH>BIGONIAL BREADTH HEADBOARD Straight line distance between the right and left gonion landmarks at the corners of the jaw.
us215 <BDRBDTHH>
BITRAGION BREADTH HEADBOARD Straight line distance between the right and left tragion landmarks on the cartilaginous flaps in front of each ear hole.
us216 <BIZYBRH>
BIZIGOMATIC BREADTH HEADBOARD Straight line distance between the right and left zygion landmarks at the most lateral point of the zygomatic arch.
us233 <ECTORBT>
ECTOORBITALE TO TOP OF HEAD. Vertical distance between the ectoorbitale landmark behind the bony eye socket at the level of the outer corner of the eye and the horizontal plane tangent to the top of the head.
81Page Human Measurements Editor Version 5 Release 13

us236 <GLABX>
GLABELLA TO BACK OF HEAD Horizontal distance between the glabella landmark on the forehead between the eyebrows and the vertical plane tangent to the back of the head.
us237 <GLABZ>
GLABELLA TO TOP OF HEAD Vertical distance between the glabella landmark on the forehead between the eyebrows and the horizontal plane tangent to the back of the head.
us240 <INFORBB>
INFRAORBITALE TO BACK OF HEAD Horizontal distance between the infraorbitale landmark on the bony eye socket under the eye and the vertical plane tangent to the back of the head.
us242 <MENTONX>
MENTON TO BACK OF HEAD Horizontal distance between the menton landmark at the bottom of the chin and the vertical plane tangent to the back of the head.
us243 <MENTONZ>
MENTON TO TOP OF HEAD Vertical distance between the menton landmark at the bottom of the chin and the horizontal plane tangent to the top of the head.
us244 <PMENTONX>
PROMENTON TO BACK OF HEAD Horizontal distance between the promenton landmark at the chin and the vertical plane tangent to the back of the head.
us245 <PMENTONZ>
PROMENTON TO TOP OF HEAD Vertical distance between the promenton landmark at the chin and the horizontal plane tangent to the top of the head.
us246 <PRONASX>
PRONASALE TO BACK OF HEAD Horizontal distance between the pronasale landmark at the tip of the nose and the vertical plane tangent to the back of the head.
82Page Human Measurements Editor Version 5 Release 13
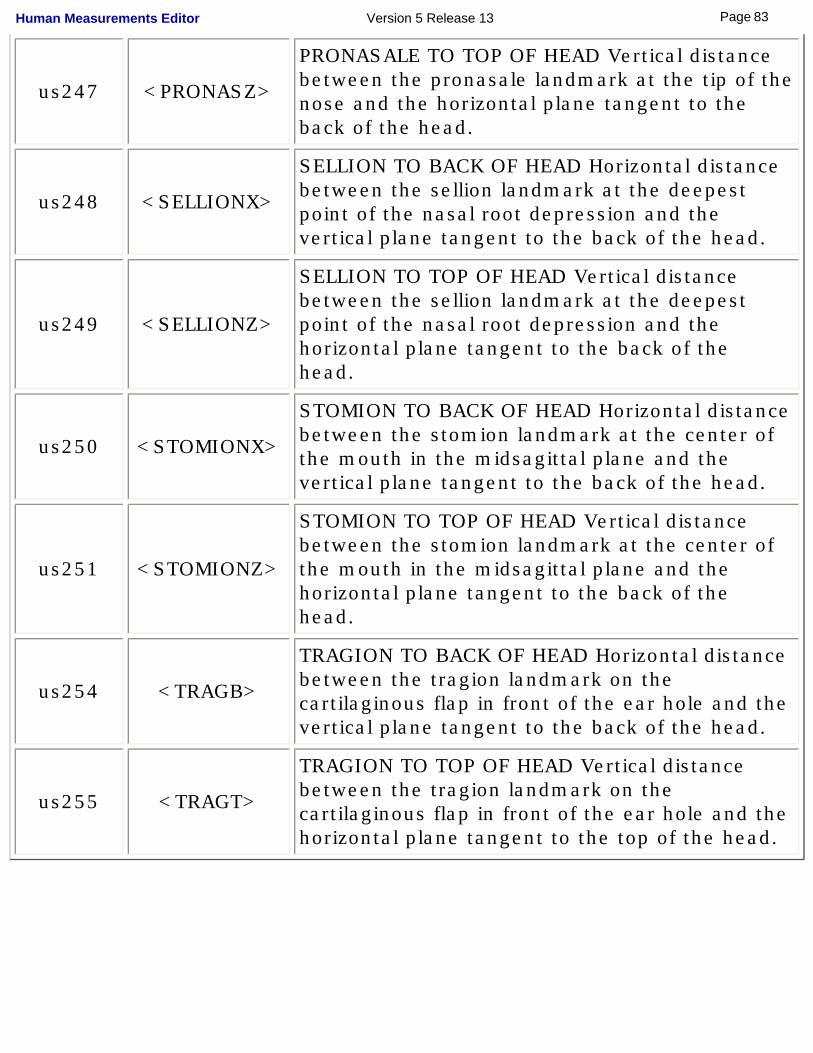
us247 <PRONASZ>
PRONASALE TO TOP OF HEAD Vertical distance between the pronasale landmark at the tip of the nose and the horizontal plane tangent to the back of the head.
us248 <SELLIONX>
SELLION TO BACK OF HEAD Horizontal distance between the sellion landmark at the deepest point of the nasal root depression and the vertical plane tangent to the back of the head.
us249 <SELLIONZ>
SELLION TO TOP OF HEAD Vertical distance between the sellion landmark at the deepest point of the nasal root depression and the horizontal plane tangent to the back of the head.
us250 <STOMIONX>
STOMION TO BACK OF HEAD Horizontal distance between the stomion landmark at the center of the mouth in the midsagittal plane and the vertical plane tangent to the back of the head.
us251 <STOMIONZ>
STOMION TO TOP OF HEAD Vertical distance between the stomion landmark at the center of the mouth in the midsagittal plane and the horizontal plane tangent to the back of the head.
us254 <TRAGB>
TRAGION TO BACK OF HEAD Horizontal distance between the tragion landmark on the cartilaginous flap in front of the ear hole and the vertical plane tangent to the back of the head.
us255 <TRAGT>
TRAGION TO TOP OF HEAD Vertical distance between the tragion landmark on the cartilaginous flap in front of the ear hole and the horizontal plane tangent to the top of the head.
83Page Human Measurements Editor Version 5 Release 13

Workbench DescriptionThe Human Measurements Editor Version 5 application window looks like this:
Click the hotspots to see the related documentation.
84Page Human Measurements Editor Version 5 Release 13
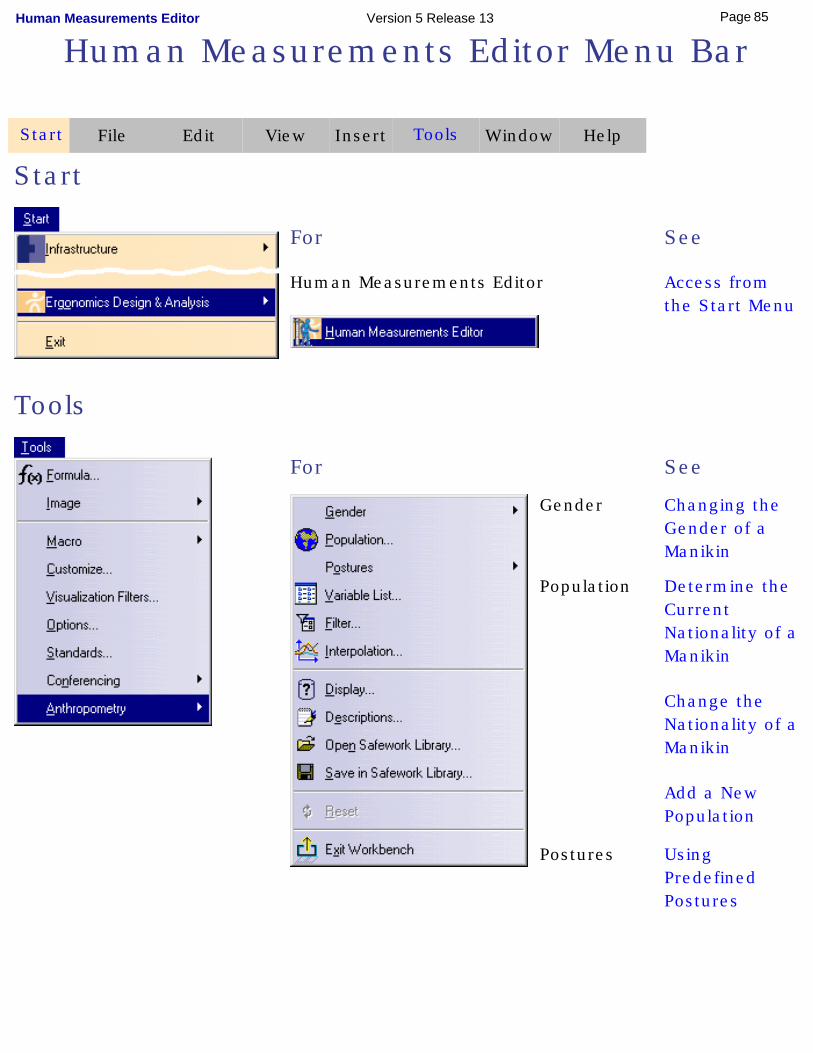
Human Measurements Editor Menu Bar
Start File Edit View Insert Tools Window Help
Start
For
Human Measurements Editor
See
Access from the Start Menu
Tools
For See
Gender Changing the Gender of a Manikin
Population Determine the Current Nationality of a Manikin
Change the Nationality of a Manikin
Add a New Population
Postures Using Predefined Postures
85Page Human Measurements Editor Version 5 Release 13

Variable List Editing Anthropometric Variables
Changing Variable Management from Automatic to Manual
Entering New Values
Changing the Gender of a Manikin
Filter Using the Anthropometric Filter
Interpolation Interpolation Managemen
Display Manikin Display Attributes
Descriptions Using Anthropometric Memos
Open Safework Library
Anthropometry Library Management
Save in Safework Library
Anthropometry Library Management
Reset Recovering Initial Settings
86Page Human Measurements Editor Version 5 Release 13
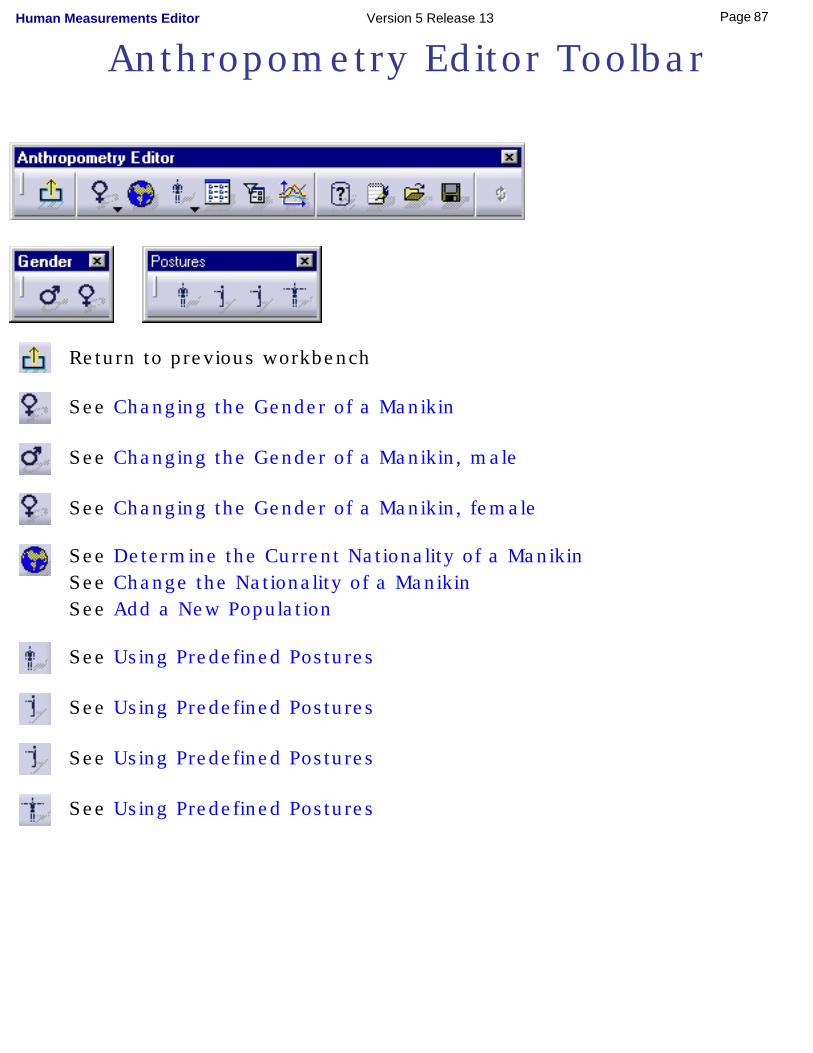
Anthropometry Editor Toolbar
Return to previous workbench
See Changing the Gender of a Manikin
See Changing the Gender of a Manikin, male
See Changing the Gender of a Manikin, female
See Determine the Current Nationality of a ManikinSee Change the Nationality of a ManikinSee Add a New Population
See Using Predefined Postures
See Using Predefined Postures
See Using Predefined Postures
See Using Predefined Postures
87Page Human Measurements Editor Version 5 Release 13
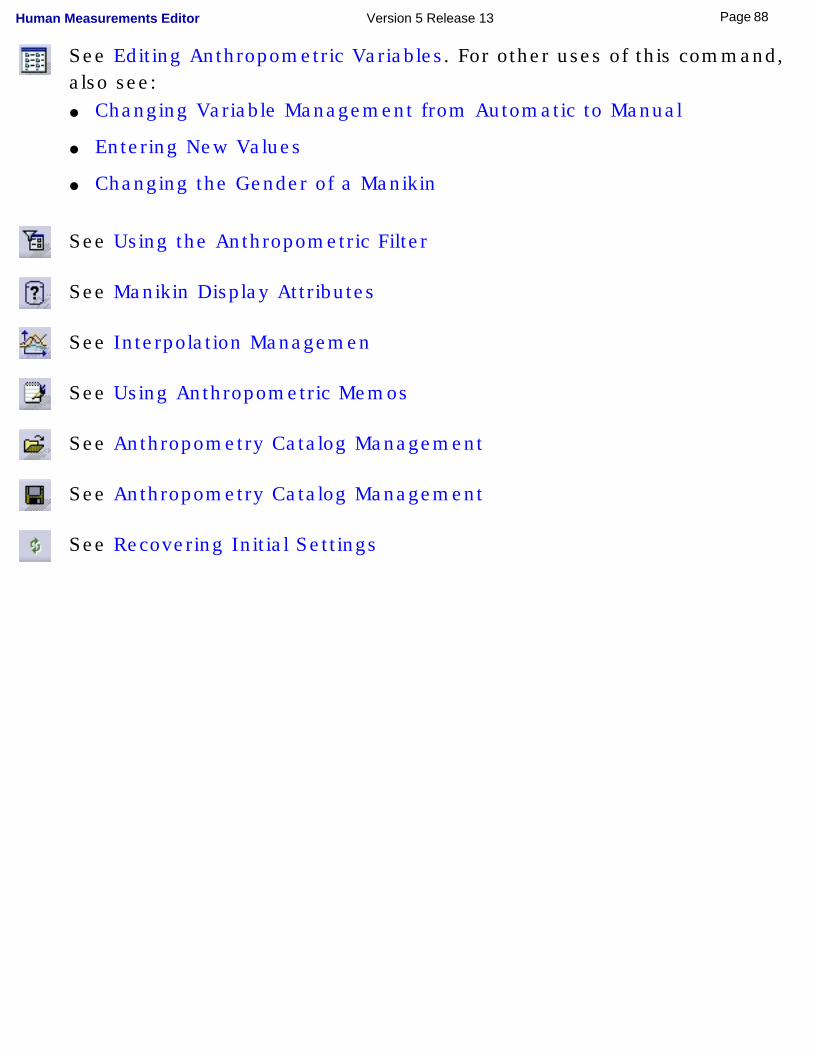
See Editing Anthropometric Variables. For other uses of this command, also see: ● Changing Variable Management from Automatic to Manual
● Entering New Values
● Changing the Gender of a Manikin
See Using the Anthropometric Filter
See Manikin Display Attributes
See Interpolation Managemen
See Using Anthropometric Memos
See Anthropometry Catalog Management
See Anthropometry Catalog Management
See Recovering Initial Settings
88Page Human Measurements Editor Version 5 Release 13

Glossary
Aangular limitations The manikin's joint limitations.
anthropometry The study of proportional relationships between the shape, weight and size of body segments.
Ddegree(s) of freedom Each linear or rotary movement along or about a
given axis. Manikin segments can have up to three DOFs.
DOF degree(s) of freedom
Ffather product The product the manikin will be attached to in the
specification tree. It can be the root product or any other product under the root.
Lline of sight Designed to facilitate the manipulation of the
manikin's field of vision. It can be selected as any other segment of the manikin.
Mmanikin A virtual human.
P
89Page Human Measurements Editor Version 5 Release 13

posture The position of the whole manikin (global posture) or of parts of the manikin such as hand posture (local posture).
Ssegment A section of the manikin such as forearm, neck,
thigh, ankle, etc.
specification tree Area of the document window reserved for viewing the design specifications of a part, presented in the form of a tree structure.
Vvisual field The entire area that can be seen when the eye is
forward, including peripheral vision.
90Page Human Measurements Editor Version 5 Release 13
Index
Aanthropometric
copy/paste function
filter, using
memos, using
variable management, manual
variables in formulas, using
variables, editing
Anthropometry Editor toolbar
Ccommands
Display Attributes
Display Variables
Extended Reach
Filter
Interpolation
Load from Posture Catalog
Memo
Population
Reach
Reset
Save in Posture Catalog
Span
Stand
91Page Human Measurements Editor Version 5 Release 13
Switch Gender to Female
Switch Gender to Male
copy/paste function
Ddisplay attributes, changing
Eediting anthropometric variables
Fformulas, using anthropometric variables in
Ggender of manikin, changing
HHuman Measurements Editor,
access from the Manikin Tools toolbar
access from the Start menu
access using the specification tree
92Page Human Measurements Editor Version 5 Release 13

Iinitial settings
how to set
recovering
interpolation management
LLibrary Management
Load from Posture Catalog command
Mmanikin
display attributes, changing
manikin gender, changing
memos, using anthropometric
menu bar, Start
menu bar, Tools
Nnationality, changing a manikin's
nationality, determining the current
Ppopulation databases, user-defined
population, adding a user-defined
93Page Human Measurements Editor Version 5 Release 13
population, changing a manikin's
population, determining the current predefined postures
extended reach
reach
span
stand
using
SSave in Posture Catalog command
Ttoolbars
Anthropometry Editor
Uuser-defined population, adding
Vvariable management, changing from automatic to manual
variable management, manual
viewpoint, changing
94Page Human Measurements Editor Version 5 Release 13

Wworkbench description
95Page Human Measurements Editor Version 5 Release 13