dmu space engineering assistant page 1 dmu space...
TRANSCRIPT

DMU Space Engineering Assistant Installation Guide
Overview
Conventions
What's New?
Getting Started
Basic Concepts How Does SPE Work? Quick Prerequisite Checklist
Road Map
Preparing to Install... Setting Up SPE Server
Customizing the Apache HTTP Server Customizing CATIA environment file and SPE server
Spatial index Customizing the Spatial Index
Setting Up the Client Environment Customizing CATIA Environment
Launching Space Engineering Assistant Customizing the ENOVIA Server
More About Knowledge Clash Rules
Detailed Installation Prerequisites
Hardware Requirements Basic Software Requirements
Customizing for DMU Space Engineering
Index
1Page DMU Space Engineering Assistant Version 5 Release 13

OverviewWelcome to the DMU Space Engineering Assistant Installation Guide. The DMU Space Engineering Assistant Installation Guide is intended for anyone who wants to install DMU Space Engineering Assistant. It is primarily intended for the system administrator, database administrator and data administrator, but it can also be used by general users or super users of ENOVIA V5 and CATIA applications.
This guide is a reference; it assumes that you will be installing DMU Space Engineering Assistant and therefore presents all of the data administration tasks such as customization, etc.
This overview provides the following information:
● DMU Space Engineering Assistant in a Nutshell
● Before Reading this Guide
● Getting the Most out of This Guide
● Conventions Used in this Guide
DMU Space Engineering Assistant in a NutshellDMU Space Engineering Assistant shortens design cycle time in concurrent environment through the capability it gives the designers to check the consistency of their design across configurations with the data stored in ENOVIA V5 while they are working. This is done thanks to interference analysis piloted by Knowledgeware rules allowing best practices compliance at the company level. Interference analysis results can then be stored in ENOVIA V5.
Thus, DMU Space Engineering Assistant fits the needs of designers working in a collaborative environment, in industries dealing with large assemblies (shipbuilding, automotive, aerospace, etc.).
Description
DMU Space Engineering Assistant checks the consistency of a design with the data stored in ENOVIA V5 according to pre-defined clash analysis rules allowing shorter design cycle time.
● Defines knowledgeware rules that will pilot clash computation ❍ Specifies the computation type (clearance, contact, clash) and the components on which the
clash computation must be applied
❍ User/company benefits : automation, productivity gains, best practices/standardization, more accurate and relevant clash results
● Performs interference analysis according to predefined clash rules between in-session component (s) and components stored in ENOVIA V5, across configurations
❍ Interference analysis computation is done on a dedicated server
2Page DMU Space Engineering Assistant Version 5 Release 13

❍ This interference analysis occurs when a component is created or modified in CATIA V5
❍ This interference analysis occurs when a set of components are moved in CATIA V5
❍ User benefits : ■ while working a designer can check the consistency of his design with the stored data in
ENOVIA V5
■ productivity and shorter design cycle in concurrent environment
● Stores the interference analysis results in ENOVIA V5 ❍ Browses the interference analysis results and manage conflicts
■ The user can choose the status of conflicts (irrelevant, relevant)
■ Dedicated browser presenting the interference analysis results
■ The user can also comment conflicts and filter them
❍ Loads from ENOVIA V5 the components interfering with the in-session components and the relevant interference analysis results
❍ Stores automatically interference analysis results when storing the in-session component in ENOVIA V5
❍ Interferences are detected between user sessions data and any part effective in any configuration
Before Reading this GuideBefore reading this guide, you should be familiar with basic ENOVIA and CATIA Version 5 concepts. Therefore, we recommend that you read the Enterprise Architecture Installation Guide (containing information necessary to set up an ENOVIA database and client) and the CATIA Infrastructure Installation Guide (containing information necessary to install CATIA Version 5 and providing information for administrators on topics such as hardware and software prerequisites, network licensing, code distribution and environment management.
You may also like to read the following complementary product guides, for which the appropriate license is required:
● Knowledge Expert User's Guide (containing information necessary to create Expert rules)
● DMU Space Analysis User's Guide
3Page DMU Space Engineering Assistant Version 5 Release 13

To get the most out of this guide, we suggest you start reading the Getting Started.This section gives you background information such as the basic concepts, a quick prerequisite checklist, a scheme explaining SPE functioning.
Once you have finished, you should move on to the next section: Road Map, an overview of the various phases of such an installation, it provides step-by-step instructions for installing and setting up the server and client environments. The next section Detailed Installation Prerequisites describes hardware and software prequisites. It may also be a good idea to take a look at the section describing how to write a clash rule intended for super users.
Conventions Used in this Guide
To learn more about the conventions used in this guide, refer to the Conventions section.
Getting the Most out of this Guide
4Page DMU Space Engineering Assistant Version 5 Release 13

ConventionsCertain conventions are used in CATIA, ENOVIA & DELMIA documentation to help you recognize and understand important concepts and specifications.
Graphic Conventions
The three categories of graphic conventions used are as follows:
● Graphic conventions structuring the tasks
● Graphic conventions indicating the configuration required
● Graphic conventions used in the table of contents
Graphic Conventions Structuring the Tasks
Graphic conventions structuring the tasks are denoted as follows:
This icon... Identifies...
estimated time to accomplish a task
a target of a task
the prerequisites
the start of the scenario
a tip
a warning
information
basic concepts
methodology
reference information
information regarding settings, customization, etc.
the end of a task
functionalities that are new or enhanced with this Release.
allows you to switch back the full-window viewing mode.
Graphic Conventions Indicating the Configuration Required
Graphic conventions indicating the configuration required are denoted as follows:
This icon... Indicates functions that are...
5Page DMU Space Engineering Assistant Version 5 Release 13

specific to the P1 configuration
specific to the P2 configuration
specific to the P3 configuration
Graphic Conventions Used in the Table of Contents
Graphic conventions used in the table of contents are denoted as follows:
This icon... Gives access to...
Site Map
Split View mode
What's New?
Overview
Getting Started
Basic Tasks
User Tasks or the Advanced Tasks
Workbench Description
Customizing
Reference
Methodology
Glossary
Index
Text Conventions
The following text conventions are used:
The titles of CATIA, ENOVIA and DELMIA documents appear in this manner throughout the text. File -> New identifies the commands to be used. Enhancements are identified by a blue-colored background on the text.
How to Use the Mouse
The use of the mouse differs according to the type of action you need to perform.
Use thismouse button... Whenever you read...
6Page DMU Space Engineering Assistant Version 5 Release 13

● Select (menus, commands, geometry in graphics area, ...)
● Click (icons, dialog box buttons, tabs, selection of a location in the document window, ...)
● Double-click
● Shift-click
● Ctrl-click
● Check (check boxes)
● Drag
● Drag and drop (icons onto objects, objects onto objects)
● Drag
● Move
● Right-click (to select contextual menu)
7Page DMU Space Engineering Assistant Version 5 Release 13

What's New?No enhancements in this release
8Page DMU Space Engineering Assistant Version 5 Release 13

Getting StartedBasic Concepts
How Does SPE Work?Quick Prerequisite Checklist
9Page DMU Space Engineering Assistant Version 5 Release 13

Space Engineering Assistant: Basics Space Engineering Assistant product architecture can be divided into three main sections:
CATIA Client Side
● User Interface to interact with SPE, clash browsing capability
● Model modifications detection system
● HTTP client to send modification information to the server and receive results
● Clash results comparison algorithm.
SPE Server (Space Engineering Server)
● launched by an Apache server, when a query is performed by a CATIA client.
● Spatial Index Client to perform proximity queries on modified parts.
● ENOVIA LCA Client to retrieve nearby parts geometry and related information.
● Rule-based clash computation capability between imported modified parts and digital mockup (retrieved from ENOVIA) nearby parts.
Spatial Index :
● Indexes a whole PRC from ENOVIA in space.
● Performs very fast proximity queries.
10Page DMU Space Engineering Assistant Version 5 Release 13

Before You Begin: check everything is working (connections established)This first scheme aims at illustrating a correct connection to Space Engineering Server
Connection between CATIA and ENOVIA is established
Click the Connect/Disconnect icon in the Spy toolbar to send a request to the Apache server. This step is useless, if you selected the automatic connection beforehand (Tools->Options>Digital Mockup->DMU Space Engineering)
Note: the HTTP Apache server has been previously launched ( as a service in automatic mode or in manual mode )
The HTTP Apache server launches SPE server process.
The SPE server launches a request to the Spatial Index (Are you here and running ?)
The Spatial index is running, it sends the information back to the SPE server.
The SPE server passes the information to CATIA via the Apache server.
DMU Space Engineering Assistant is ready to work: the icon changes in the Spy toolbar.
11Page DMU Space Engineering Assistant Version 5 Release 13

This second scheme aims at illustrating a failed connection to SPE
Connection between CATIA and ENOVIA is established
Click the Connect/Disconnect icon in the Spy toolbar to send a request to the Apache server. You can also select the automatic connection beforehand ( Tools->Options>Digital Mockup->DMU Space Engineering)
Note: the HTTP Apache server has been previously launched (as a service in automatic mode or in manual mode)
The HTTP Apache server launches SPE server process.
The SPE server sends a request to the Spatial Index (Are you here and running fine?)
The Spatial Index is not responding (it is not created nor running).
After a while, SPE server sends a message via the Apache server to CATIA. An error message is displayed.
12Page DMU Space Engineering Assistant Version 5 Release 13

How does Space Engineering Assistant work?
How does it work ?
Data coming from the ENOVIA V5 data base (please refer to "Set Up the ENOVIA Data base" in the Enterprise Architecture Installation Guide), an ENOVIA LCA Client session is running, the Product Editor is opened
User1 sends data into CATIA V5 session (using the Send to... command); the connection between CATIA and ENOVIA has been previously established.
Zooming on CATIA/DMU Session section:
13Page DMU Space Engineering Assistant Version 5 Release 13

User1 needs to connect to the Host server clicking on the Connection icon in the Space Engineering Assistant toolbar. He then enters the Host server name to enable the connection.
Or, user1 selected automatic connection beforehand ( Tools->Options>Digital Mockup->DMU Space Engineering)
User1 works in session, in our example, let's say he selects the part Floor and moves it.
A request is automatically sent to the Apache HTTP Server
The information (part identifier) is passed to the Spatial index (permanent running process).
The Spatial index runs a proximity query and performs other checking operations: the resulting data is sent to the Design Assistant server (nphSpaceEngCgi.bat) which performs the clash calculation with respect to the Knowledge clash Rules specified. Please refer to More About Knowledge Clash Rules
Clash results are sent to CATIA V5
Clash results are displayed in the Check clash dialog box (the user only needs to click the Browse clash result with committed models icon
User1 can then modify the status of one detailed clash result, add comments in the DMU Clash dialog box These (modified) clash results will be stored automatically in ENOVIA V5 while saving his session in ENOVIA V5.
In the ENOVIA LCA session, User1 clicks Refresh icon and searches for the clash result. ● Saving operation in the ENOVIA Data Base is launched
● Clash results computed with Space Engineering Assistant based on Knowledge Clash Rules and created in CATIA are displayed and refreshed in ENOVIA V5 session.
The ENOVIA Data Base passes the information to the Spatial index which is automatically updated accordingly taking into account the modified objects.
14Page DMU Space Engineering Assistant Version 5 Release 13

Quick Prerequisite Checklist
Server Side
Operating System SupportedWindows 2000 Yes
Client Side
Operating System Supported
HP-UX Yes
SOLARIS Yes
IRIX Yes
AIX Yes
Windows 2000 Yes
HTTP Server Prerequisites
Apache version 1.3.19 or later recommended.
Hardware and Software Prerequisites
Before starting the installation, refer to "What You Need Before Installing Space Engineering Assistant " to be sure you have all the hardware and software prerequisites.
File System Prerequisites
To perform all the following operations, the system administrator must have root authority.The server must have a minimum of 512 Megabytes free disk space.
Database Prerequisites
An ENOVIA V5 data base must already have been set up before starting the SPE installation.
WINDOWS/UNIX File Transfer Prerequisites
You need to install a mapping server Windows/UNIX (NFS type) to enable the data transfer from one platform to another.
15Page DMU Space Engineering Assistant Version 5 Release 13

Licensing Prerequisites
CATIA V5R11 must already have been installed on both client and server with:
● DMU Space Analysis -P2 and
● CATIA - ENOVIA V5 Integration Product version 5 (E5I) licenses.
● KWE-product (To edit Knowledgeware rules, please also read "Knowledgeware Rule-based Clash" in DMU Space Analysis User's Guide
About Installation Default Path
The installation default destination is already proposedBy default it is: C:\Program Files\Dassault Systemes\B13\intel_a. We assume throughout this Installation guide that you keep the default location.
Any way, it is strongly recommended to avoid blanks in the installation path. Therefore, feel free to change the default installation path. All you need to do is:
specify a folder of your choice in the Choose Destination Location dialog box, clicking the Browse... button and navigate to select another folder and click OK.
16Page DMU Space Engineering Assistant Version 5 Release 13

Road MapThis task gives you the road map to follow when starting Space Engineering Assistant Server and Client Setup
Prior to begin... please read carefully the Getting Started section
Preparing to Install...
Shared 'Rules CATProduct' documentSpace Engineering RepositorySystem Users Setup ENOVIA Users Setup
Setting Up Space Engineering Assistant Server
Installing CATIA version 5 on Windows, please refer to the "Getting Started" section in the Installation User's Guide Installing CATIA - ENOVIA V5 Integration Product version 5 on Windows, this additional product E5I (CATIA - ENOVIA V5 Integration Product) is a prerequisite to enable CATIA/ ENOVIA integration Installing the Apache HTTP Server, please refer to the installation procedure from http://www.apache.org/ Customizing the Apache HTTP ServerCustomizing SPE server and CATIA Environment
Setting Up Spatial Index Server
Installing CATIA version 5 on Windows, please refer to the "Getting Started" section in the Installation User's Guide Installing CATIA - ENOVIA V5 Integration Product version 5 on Windows, this additional product E5I (CATIA - ENOVIA V5 Integration Product) is a prerequisite to enable CATIA/ ENOVIA integration. Note: this step is unnecessary if you install the spatial index on the same machine as the SPE serverCustomizing the Spatial Index
Setting Up the ENOVIA Environment
Setting Up the ENOVIA Database on UNIX, please refer to "Set up the ENOVIA Database: Initial & Final Common Steps in the Enterprise Architecture Installation GuideCustomizing the ENOVIA Server
Setting Up the Client Environment
Installing an ENOVIA LCA Client, please refer to "Installing an ENOVIA LCA Client" in the Enterprise Architecture Installation GuideInstalling CATIA version 5 on Windows, please refer to the "Getting Started" section in the Installation User's GuideCustomizing CATIA EnvironmentLaunching Space Engineering Assistant
About Licensing prerequisites
Make sure, you install DMU Space Analysis -P2 and CATIA - ENOVIA V5 Integration Product version 5 on Windows (E5I) licenses. These products are prerequisites to install Space Engineering Assistant product.
17Page DMU Space Engineering Assistant Version 5 Release 13

Preparing to Install...
1. Shared 'Rules CATProduct' document
You need to create a CATProduct containing the clash rules which will be used for interference analysis. For more detailed information, please read More about clash rules.
This .CATProduct document must be located in a shared directory accessible from the SPE server user (Apache User), the spatial Index process user and all CATIA client users.
2. Space Engineering Repository
Create the 'Space Engineering Repository' directory This shared repository must be accessible from the SPE server user (Apache User), the spatial Index process user and all CATIA client users.
It is strongly recommended to give full access on this directory. For instance, if this directory is located on a Unix file system (i.e. yankerdsy:/SHARE/DesignAssistant/SEA), it is necessary to map the file system containing the directory to a network drive (let's say P see example below) on each NT machine.
You need to give full permissions checking each and every R, W and X options available in the NFS connection Properties dialog box.
Note: When working with both UNIX and NT machines, the best way to handle this, is to create shared directories on a UNIX server and map them as Network drives on NT machines with the NFS Client.
Later, in the installation procedure, you will specify SPACE_ENG_SERVER_REPOSITORY and SPACE_ENG_CLIENT_REPOSITORY variables referring to this directory respectively on the server and on the client.
3. System Users Setup
Declare a user for the SPE server. This person must have the appropriate privileges (administrator rights) on the SPE server machine, read access rights on the above shared file (CATProduct document containing clash rules) and directories
If you plan to use several spatial indexes (for several PRCs) on several machines different from the SPE server, create several users who should have read access rights on the shared directories for running those servers.
4. ENOVIA Users Setup
Declare an administrator user in ENOVIA P&O to enable the SPE server and spatial indexes ENOVIA connection (you can use the same for all servers).
Before starting the installation, refer to Detailed Installation Prerequisites to check you have all the hardware and software prerequisites
18Page DMU Space Engineering Assistant Version 5 Release 13

Setting Up SPE Server
Setting up CATIA EnvironmentInstalling CATIA version 5 and CATIA - ENOVIA V5 Integration Product version 5 on Windows
Refer to CATIA Installation Prerequisites and following procedure
Refer to the "Getting Started" section in the Infrastructure User's Guide
Setting Up Space Engineering Assistant Environment
Installing the Apache HTTP Server
Refer to the installation procedure from http://www.apache.org/
Customizing the Apache HTTP ServerCustomizing CATIA environment file and SPE server
19Page DMU Space Engineering Assistant Version 5 Release 13

Customizing the Apache HTTP Server On Windows
This task explains how to customize the APACHE Server on an Windows workstation
Note: the host site can either be a Windows or UNIX workstation
Before customizing the Apache server, you should have installed the Apache server on your NT server, following the installation procedure from http://www.apache.org/
The server is installed (if you used the default location) in the folder:C:\Program Files\Apache Group\
Also refer to "Detailed Installation Prerequisites" to check you have all the hardware and software prerequisites.
Note: you can choose to install Apache as a service, very handy if you do not want to launch it manually at each logon.
To check if the Apache installation is complete and that the Apache server is running, try to connect to http://name_of_machine using an internet browser.
1. Logon as root.
You need to customize the httpd.conf file, for this:
Note: the green lines are to be modified accordingly (i.e. with the correct path, we specified here the default installation path), the red lines are comments
2. in the Apache Configuration directory (for ex located as follows: C:\Program files\Apache Group\Apache\conf)
● Edit the following default ScriptAlias/cgi-bin path ScriptAlias controls which directories contain server scripts.
ScriptAlias /cgi-bin/ "C:/Program Files/Apache Group/Apache/cgi-bin/"
With:
ScriptAlias /cgi-bin/ "C:/Program Files/Dassault Systemes/B13/intel_a/code/bin/"
Of course, the path should be changed to whatever your ScriptAliased.
● add to the httpd.conf file the following lines (security directives for Apache):
<Directory "C:/Program Files/Dassault Systemes/B13/intel_a/code/bin"> AllowOverride None Options None </Directory>
20Page DMU Space Engineering Assistant Version 5 Release 13

3. Save the httpd.conf and restart Apache service to make sure the modifications are taken into account.● select Start-> Settings-> Control Panel-> Administrative Tools-> Services...
● In the Services dialog box, select Apache and click Start
You can also access restart Apache service using Start-> Programs-> Apache HTTP server-> Control Apache Server -> Restart...4. Check the Apache installation is complete and the Apache server is running, for this:
● Open an internet window
● Try to connect to http://name_of_machine
An Apache home Page is displayed.You should obtain something like this:
21Page DMU Space Engineering Assistant Version 5 Release 13

Let's now customize the Space Engineering Server referred to as nphSpaceEngCgi.bat delivered with Space Engineering Assistant product
22Page DMU Space Engineering Assistant Version 5 Release 13

Customizing CATIA Environment file and Space Engineering Server
This task explains how to customize the SPE server environmentWe customized the Apache HTTP server in the previous task in order to enable the Space Engineering Server (nphSpaceEngCgi.bat) launching. This file is provided on code CD.
1. Logon as root.
We assume that you use the default installation folder proposed
Note: one variable declaration must be written within the same line.
2. Add the following variables to the CATIA environment file:
ADL_ODT_USER=User_NameEnovia user name (for the SPE server user)
ADL_ODT_PASSWORD=User_Password
Enovia V5 Vault localization
VaultClient_PropertiesFilePath=Install_Path\intel_a\docs\java You need to recover this
file from the ENOVIA UNIX server and copy it in the Install_Path\intel_a\docs\java
VaultClient_PropertiesFileName=VaultClient.properties VaultClient.properties file name
DMU Clash variables
DMU_CLASH_USE_RULE=1 lets you specify that you want to use rules for clash detection
DMU_CLASH_DEFINE_PRODUCT_FOR_RULE=e:\DesignAssistant\Sea\RuleBasicShape3.CATProduct the rule to be used for clash detection
DMU_DONT_UNLOCK_DOC=1
Spatial Index and CATIA Variables
SPACE_ENG_SERVER_REPOSITORY=e:\DesignAssistant\Sea Directory where the tested cgr will be written (Note: this directory has to be created if it does not exist)This directory is a shared by both the client and server.
23Page DMU Space Engineering Assistant Version 5 Release 13

CAT_SES_ENOVIA_SERVER=Machine_Name:Port_Number
DMU_SPATIAL_INDEX_HOST=Prc_Name_1:Index_Host_1;Prc_Name_2:Index_Host_2
The Space Engineering Server must know the mapping between PRCs and host machines where the spatial index (es) is/are located. Each Host should have a running Spatial Index Server indexing the corresponding PRC.
See example below:
DMU_SPATIAL_INDEX_HOST=prc_Plane.1:Zeus;prc_Plane.2:Zeus;prc_Car.1:Knossos;
A PRC is an ENOVIA V5 product . DMU Space Engineering Assistant can check for interferences within a
PRC.
3. Run CATIA V5 when logged with the SPE user (Apache Service user) and set up the CATIA environment as you would do for any CATIA client (except the SPE settings, DO NOT CHECK THE AUTOCONNECT BOX!)
4. Copy the nphSpaceEngCgi.bat file from:
24Page DMU Space Engineering Assistant Version 5 Release 13
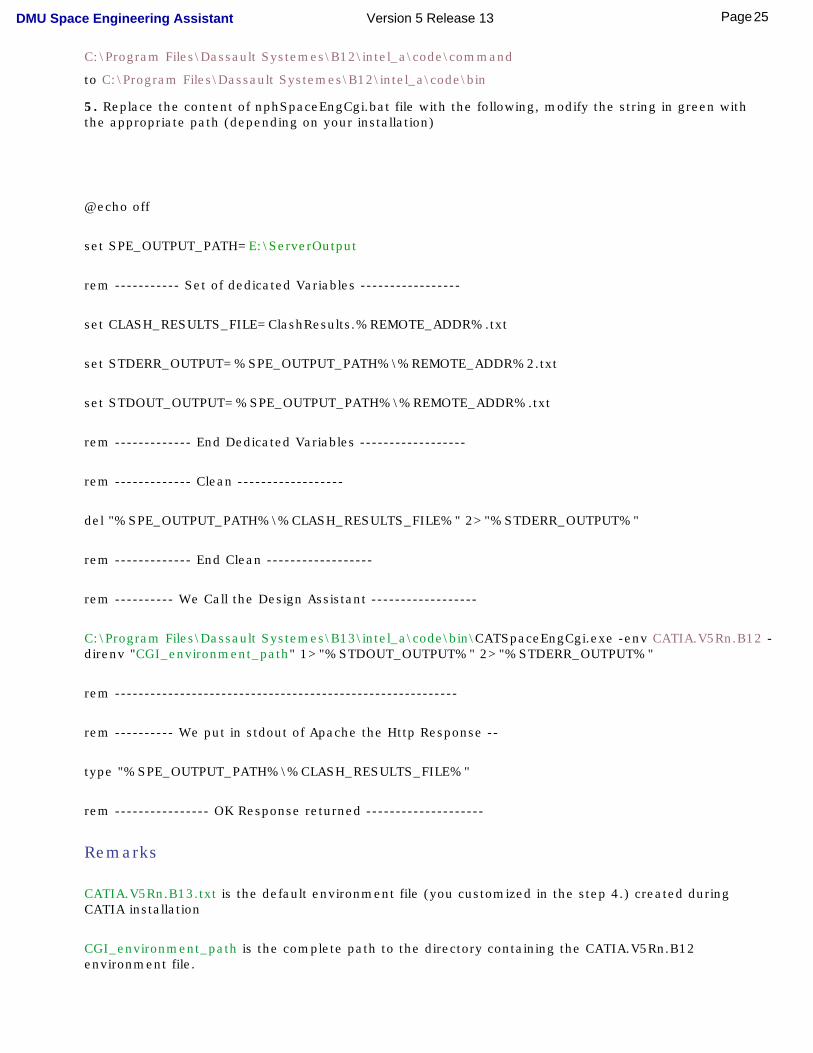
C:\Program Files\Dassault Systemes\B12\intel_a\code\command to C:\Program Files\Dassault Systemes\B12\intel_a\code\bin 5. Replace the content of nphSpaceEngCgi.bat file with the following, modify the string in green with
the appropriate path (depending on your installation)
@echo off
set SPE_OUTPUT_PATH=E:\ServerOutput
rem ----------- Set of dedicated Variables -----------------
set CLASH_RESULTS_FILE=ClashResults.%REMOTE_ADDR%.txt
set STDERR_OUTPUT=%SPE_OUTPUT_PATH%\%REMOTE_ADDR%2.txt
set STDOUT_OUTPUT=%SPE_OUTPUT_PATH%\%REMOTE_ADDR%.txt
rem ------------- End Dedicated Variables ------------------
rem ------------- Clean ------------------
del "%SPE_OUTPUT_PATH%\%CLASH_RESULTS_FILE%" 2>"%STDERR_OUTPUT%"
rem ------------- End Clean ------------------
rem ---------- We Call the Design Assistant ------------------
C:\Program Files\Dassault Systemes\B13\intel_a\code\bin\CATSpaceEngCgi.exe -env CATIA.V5Rn.B12 -direnv "CGI_environment_path" 1>"%STDOUT_OUTPUT%" 2>"%STDERR_OUTPUT%"
rem ----------------------------------------------------------
rem ---------- We put in stdout of Apache the Http Response --
type "%SPE_OUTPUT_PATH%\%CLASH_RESULTS_FILE%"
rem ---------------- OK Response returned --------------------
Remarks
CATIA.V5Rn.B13.txt is the default environment file (you customized in the step 4.) created during CATIA installation
CGI_environment_path is the complete path to the directory containing the CATIA.V5Rn.B12 environment file.
25Page DMU Space Engineering Assistant Version 5 Release 13

E:\ServerOutput corresponds to the CGI outputs directory (you should create it if not existing)
The Apache user should have read/write access to this directory
6. Test your nphSpaceEngCgi.bat file is running correctly, for this:● Open a internet window ( Internet Explorer or Netscape)
● Try to connect to http://name_of_the_machine/cgi-bin/nphSpaceEngCgi.bat
This is what you should obtain: an XML page containing an Error tag in which "PRC not find in list, no Spatial Index host to communicate with" is written.
If you obtain an http error instead, please check the following:
● httpd.conf cgi-bin path configuration
● Apache user rights (should be Administrator)
● nphSpaceEngCgi.bat file syntax
26Page DMU Space Engineering Assistant Version 5 Release 13

Spatial Index
Setting up CATIA Environment
Note: this step is unnecessary if you install the spatial index on the same machine as the SPE server
Installing CATIA version 5 and CATIA - ENOVIA V5 Integration Product version 5 on Windows Refer to CATIA Installation Prerequisites and following procedure
Refer to the "Getting Started" section in the Infrastructure User's Guide
Setting Up Space Engineering Assistant Environment
Customizing the Spatial Index
27Page DMU Space Engineering Assistant Version 5 Release 13

Customizing the Spatial Index
This task explains how to customize the Spatial Index
Note: you can run a spatial index on the same machine as the SPE server, in this case, steps1 is useless
1. Add the following variables CATIA environment file:
ADL_ODT_USER=User_NameEnovia user name (for the SPE server user)
ADL_ODT_PASSWORD=User_Password
Enovia V5 Vault localization
VaultClient_PropertiesFilePath=Install_Path\intel_a\docs\java You need to recover this file from the ENOVIA UNIX server and copy it in the Install_Path\intel_a\docs\java
VaultClient_PropertiesFileName=VaultClient.properties VaultClient.properties file name
Space Index and CATIA Variables
SPACE_ENG_SERVER_REPOSITORY=e:\DesignAssistant\Sea Directory where the tested cgr will be written (Note: this directory has to be created if it does not exist)This directory is a shared by both the client and server.
CAT_SES_ENOVIA_SERVER=Machine_Name:Port_Number
2. Customize the runSpaceIndexServer.bat which is located in C:\Program Files\Dassault Systemes\B12\intel_a\code\command
Spatial Index configuration
28Page DMU Space Engineering Assistant Version 5 Release 13

set PRC_TO_INDEX=PRC_NamePRC used for the Spatial Index queries.
set MAX_CLEARANCE=2Clearance used for proximity detection (this specifies the Index Spatial settings)This value has to be set as higher to the maximum Clearance distance of all Clash Rulesreferenced in the Space Engineering Assistant.
set VOXEL_SIZE=Voxel_SizeSize of the voxels in millimeters, this is a critical factor impacting spatialindex performance at creation time and at query time. on the first hand, the smallerit is, the sharper the index is. But, on the other hand, the smaller this value is, the higher memory used will be for spatial index..
Spatial Index installation
2. Modify this line accordingly:
Specify the correct path (if necessary )and the CATIA.V5Rn.B13 to whatever your environment.
C:\Program Files\Dassault Systemes\B12\intel_a\code\bin\CATBackboneSpaceIndex.exe %PRC_TO_INDEX% %MAX_CLEARANCE% %VOXEL_SIZE% -env CATIA.V5Rn.B13 -direnv "SPI_environment_file"
SPI_environment_path is the complete path to the directory containing the CATIA.V5Rn.Bn environment file.
3.Test that your spatial index is recognized by the Space Engineering Server
● Launch Spatial Index (runSpaceIndexServer.bat)
● Ensure that apache is running with the customized http.conf file
● Open a internet window ( Internet Explorer or Netscape)
● Try to connect to http://apache_host_name/cgi-bin/nphSpaceEngCgi.bat?PRCName=PRC_Name You should obtain a html page containing the message "INDEX HERE" is written.
29Page DMU Space Engineering Assistant Version 5 Release 13

If the message is different from the image above:
● If the message contains an http error, check the SPE server installation
● if the following error message is displayed: "PRC not found in list, no Spatial Index host to communicate with", check DMU_SPATIAL_INDEX_HOST variable (in the SPE server environment file) contains the PRC name you are indexing
● if the following error message appears: "Index is not here", check the Spatial index is running on the machine specified in DMU_SPATIAL_INDEX_HOST variable
30Page DMU Space Engineering Assistant Version 5 Release 13

Setting up the Client Environment
Installing an ENOVIA LCA ClientRefer to "Installing an ENOVIA LCA Client" in the Enterprise Architecture Installation GuideInstalling CATIA version 5 on Windows, Refer to the "Getting Started" section in the Infrastructure User's Guide
Refer Please refer to CATIA Installation Prerequisites
Customizing CATIA Environment
31Page DMU Space Engineering Assistant Version 5 Release 13

Customizing CATIA EnvironmentThis task shows you how to create a batch file with CATIA Environment variables
1. Add the following variables to the CATIA environment file (CATIA.V5R12.B12.txt)
For detailed information about CATIA environment file, please read About the Environment Created on Your Computer on Windows section in the 'Infrastructure Installation Guide'
CATSpaceEngineeringBeep=1 to hear a beep when the clash computation on the server side is over
SPACE_ENG_CLIENT_REPOSITORY=f:\DesignAssistant\Sea the directory where the cgr is written. This directory must have been created in the preliminary step, please read Preparing the Installation
Enovia V5 Vault localization
VaultClient_PropertiesFilePath=Install_Path\intel_a\docs\java You need to recover this file from the ENOVIA UNIX server and copy it in the Install_Path\intel_a\docs\java
VaultClient_PropertiesFileName=VaultClient.properties VaultClient.properties file name
The following variables have to be set if you want to perform clash detection using Knowledge rules in interactive mode:
DMU_CLASH_USE_RULE=1 lets you specify that you want to use rules for clash detection
DMU_CLASH_DEFINE_PRODUCT_FOR_RULE=e:\DesignAssistant\Sea\RuleBasicShape3.CATProduct the rule to be used for clash detection
Note: the user should create a CATProduct document containing the Knowledge clash rules to be checkedPlease read More About Knowledge Clash rules
DMU_CLASH_DISPLAY_COLUMN_PENETRATIONCANDIDATE=1to see the penetration candidate column in the interactive clash panel
DMU_CLASH_FILE_FOR_COMMENT=e:\users\Clash_Result_Comments\Comments.txtlets you add default comments (optional)
DMU_DONT_UNLOCK_DOC=1
DMU_CLEAN_ITF_ON_CLIENT=1
SPACE_ENG_CARE_ABOUT_LOCKS=1
DDX_FILTER_SAVE_SAVE_PDM=1
SPACE_ENG_WORK_IN_CONFIG=1
DMU_CLASH_ACTION_CANCEL=1
32Page DMU Space Engineering Assistant Version 5 Release 13

2. Launch a CATIA session
3. Customize DMU Space Engineering settings
For this:
● Select Tools->Options...
● Select the Digital Mockup category, then the DMU Space Engineering tab
● in the Server connection parameters field, enter the host server name (name of the machine where the Apache server is installed)
● In the Clash results path field, click Browse and specifiy the path directory where the clash results will be written
33Page DMU Space Engineering Assistant Version 5 Release 13

Launching DMU Space Engineering Assistant Server
This task shows you how to start DMU Space Engineering Assistant.
1. Apache server side (Administrator)
● launches Apache HTTP Server as a service ( automatic mode) or in manual mode
Note: you can choose to install Apache as a service (during Apache Installation), very useful if you do not want to launch it manually at each logon
2. Spatial Index Server side (Administrator)
● Launches Index Spatial shell (runSpaceIndexServer.bat) located in C:\Program Files\Dassault Systemes\B13\intel_a\code\command (default installation path)
3. Client side (user)
● launches a CATIA V5R11 session
● launches an ENOVIA LCA session
● connects to ENOVIA using the dedicated toolbar
● Sends data from ENOVIA to CATIA V5 using the Send to... command
● In CATIA V5 session, click the Connect/Disconnect icon from the Spy toolbar:
.
● The icon changes into this:
● DMU Space Engineering Assistant is ready to work.
34Page DMU Space Engineering Assistant Version 5 Release 13

● You can also select the automatic connection beforehand ( Tools->Options>Digital Mockup->DMU Space Engineering)
Note: During the connection operation, several checks are performed:
1. Is Apache server is running or not ?2. Is PRC send to CATIA indexed or not3. Is Spatial Index Server for the PRC running or not ?
DMU Space Engineering Assistant will be ready if all the conditions are fulfilled.
35Page DMU Space Engineering Assistant Version 5 Release 13

Customizing the ENOVIA Server on UNIX
This task explains how to customize the ENOVIA server
Once you have finished both the specific setup steps for the ENOVIA database and for the ENOVIA Client installation:
1.You need to create a SPATIAL.CATSettings file where the CATUserSettingPath is located.
This enables the ENOVIA connection to the Spatial Indexes. ENOVIA will warn all spatial
indexes for modifications in database, and so spatial indexes will be updated.
2. Execute the following commands in the code/command directory of the ENOVIA Server installation:
./catstart -run "VPMSettings -h" provides utility help
touch SPATIAL.CATSettings updates the access and modification times of a file
./catstart -run "VPMSettings -f SPATIAL -a -n
DMU_SPATIAL_INDEX_HOST_NUMBER -v num"
For each spatial index to declare, run the following command: (i being a number
incremented from 1 to num)
./catstart -run "VPMSettings -f SPATIAL -a -n DMU_SPATIAL_INDEX_HOST_i -v
'prc_name:hostname'"
num corresponds to the number of the to -be -declared spatial index hosts
Example: 2 hosts to be declared:
36Page DMU Space Engineering Assistant Version 5 Release 13

spatialhost1 and spatialhost2 are declared as spatial index recognized by theENOVIA LCA Server, respectively indexing PRC1 or PRC2
./catstart -run "VPMSettings -f SPATIAL -a -n DMU_SPATIAL_INDEX_HOST_NUMBER -v 2"
./catstart -run "VPMSettings -f SPATIAL -a -n DMU_SPATIAL_INDEX_HOST_1 -v PRC1:spatialhost1"
./catstart -run "VPMSettings -f SPATIAL -a -n DMU_SPATIAL_INDEX_HOST_2 -v PRC2:spatialhost2"
37Page DMU Space Engineering Assistant Version 5 Release 13

More About Knowledge Clash RulesClash rules written using knowledgeware capabilities can be used in the Clash command, ensuring clash analysis take corporate practices into account.
This task shows you how to write an Expert clash Rule to be used in further rule-based clash computation (using DMU Space Engineering Assistant).
Writing your Clash Rule
Before you begin, make sure you have selected the required packages. To load the required libraries, proceed as follows:
1. To customize Knowledge Settings: ● Select Tools->Options... command
The Options dialog box is displayed.
● Select General->Parameters and Measures and click the language tab.
● Check the load extended language libraries option
● Check All packages option
2. To customize Product Structure Settings: ● Select the Infrastructure category, then the Product Structure sub-category, and click the Tree
Customization tab:
● Activate both both Parameters and Relations options (the Constraints option is set to Yes by default)
You are now ready to write your rule.
38Page DMU Space Engineering Assistant Version 5 Release 13

3. Select Infrastructure->Knowledgeware->Knowledge Expert from the Start menu.4.
Click the Expert Rule iconThe Rule Editor dialog box appears.
5. (Optional) Modify the Default name and comments6. Click Ok when done.
The Rule Editor appears
7. Write your rule
39Page DMU Space Engineering Assistant Version 5 Release 13

Let's zoom on the clash rule example:
if (p1 != p2) { DefineInterferenceComputation (p1, p2, "Clash", 0mm, "Shape 1","Shape 1", ThisRule);}
8. Click Apply to check rule syntax 9. Click Ok to add the expert rule to the document10.Click the Update icon to solve the rule base. If needed, update the document. 11.Save your clash rule in the CATProduct document You need to declare this CATProduct containing your clash rule in:
● the CATIA environment File on both sides CATIA client and Space Engineering server
You can save more than one rule in the CATProduct document. If you do so, do not forget to give rules a priority in the Rule Editor dialog box. When running your interference analysis, rule priority is taken into account and if pairs of products and shapes satisfy more than one rule, the results of the rule with the highest priority only are output.
40Page DMU Space Engineering Assistant Version 5 Release 13

Detailed Installation PrerequisitesHardware Requirements
Basic Software Requirements
41Page DMU Space Engineering Assistant Version 5 Release 13

Hardware Requirements
DMU Space Engineering Assistant Client Hardware Requirements
Common Requirements
Disk drive: 150 MB of disk space is required.
Memory: minimum recommended, client workstation RAM: 512 MB
Internal/external drives: A CD-ROM drive is required for program and online documentation installation.
Display: A graphic color display, compatible with the selected platform-specific graphic adapter. The minimum recommended size for usability reasons is 17 inches. The minimum resolution required for Windows workstations is 800 x 600, and 1280 x 1024 on UNIX workstations.
Graphic Adapter: An OpenGL graphic adapter is required, compatible with the windowing manager of the selected operating system (CDE on AIX, HP-UX or Solaris; IRIX Interactive Desktop on SGI).
LAN adapter: a network adapter is required to connect the server and clients to the LAN or WAN.
Keyboard: a specific keyboard compatible with selected installation locale may be required for national language support.
Pointing device: 2-button or 3-button mouse.
Hardware Requirements for Windows NT 4.0
System Unit: Intel Pentium II, Pentium III, or Pentium 4-based workstations running Windows NT 4.0..
Hardware Requirements for IBM AIX
System Unit: Any RS/6000, based on PowerPC 604 (166 MHz minimum clock speed), Power2 or Power3 processor families, supported on AIX Version 4 Release 3.2 or 3.3.
Hardware Requirements for SGI IRIX
System Unit: Any O2, Indigo2, Octane, Octane2, Onyx2 or Onyx3000 workstations based on R5000, R10000 or R12000 processors, supported on IRIX 6.5
42Page DMU Space Engineering Assistant Version 5 Release 13

DMU Space Engineering Assistant Server Hardware Requirements
Common Requirements
The following requirements are common to all operating systems supported by ENOVIA LCA V5. System unit requirements are platform specific and are detailed in the topics that follow:
Disk drive: an internal or external disk drive is required to store program executables, program data, usage environment and paging space. 500 MB of disk space is required for program installation. Requirements may be larger when large amounts of data are used.
Memory: As a rule of thumb, ENOVIA LCA V5R7 requires 512 MB of real memory for the first session plus 60 MB for each additional session. Additional dimensioning rules will be provided after further capacity planning evaluations.
Note that if the ENOVIA LCA V5 server is installed on the same server as the database server, the amount of database memory required will be added to what is needed for ENOVIA LCA.
Internal/external drives: A CD-ROM drive is required for program and online documentation installation.
Display: A graphic color display, compatible with the selected platform-specific graphic adapter. The minimum recommended size for usability reasons is 17 inches. The minimum resolution required for Windows workstations is 800 x 600, and 1280 x 1024 on UNIX workstations.
Graphic Adapter: An OpenGL graphic adapter is required, compatible with windowing manager of the selected operating system (CDE on AIX, HP-UX or Solaris, IRIX Interactive Desktop on SGI).
LAN adapter: A network adapter is required to connect the server and clients to the LAN or WAN.
Keyboard: A specific keyboard compatible with selected installation locale may be required for national language support.
Pointing device: 3-button mouse.
Server Hardware Requirements for IBM AIX
System Unit: Any RS/6000, based on PowerPC 604 (166 MHz minimum clock speed), Power2 or Power3 processor families, supported on AIX Version 4 Release 3.2 or 3.3.
43Page DMU Space Engineering Assistant Version 5 Release 13
Basic Software Requirements
DMU Space Client Software Requirements
Specific Client Software Requirements
Windows
Microsoft Windows
● Microsoft Windows 2000 delivers an implementation of OpenGL libraries. These libraries may be updated depending on the selected graphic adapter, when installing the graphic adapter and associated drivers.
● A localized version of the operating system may be required when the selected installation differs from Latin1.
DMU Space Engineering Assistant Server Requirements
Specific Server Software Requirements● Apache HTTP server
● Do not use IBM HTTP server not yet supported.
● You need to install a mapping server Windows/UNIX (NFS type) to enable the data transfer from one platform to another (i.e. in case of one UNIX Client).
44Page DMU Space Engineering Assistant Version 5 Release 13

Customizing DMU Space Engineering Settings
This task explains how to customize DMU Space Engineering settings.
1. Select Tools -> Options from the menu bar:
The Options dialog box appears
2. Click Digital Mockup category.
3. Click the DMU Space Engineering tab.
The tab page appears, containing three categories of options:
❍ Connection Mode
❍ Server Connection Parameters
❍ Clash Result Path
Connection Mode
Automatic
If you select the Automatic check box, DMU space Engineering Assistant is automatically connected to the http server, you do not
need to click the Connect/Disconnect icon . (The connection is established during the Send to CATIA... operation)
If disabled (default mode), you need to connect manually the server clicking the Connect/Disconnect icon in the Spy toolbar.
Server Connections Parameters Host Server
Specify the host server name (name of the machine hosting the Apache server) using the drop-down list.
Port Server
Specify the port server name (it is grayed out by default).
Clash Result Path
Path
Click Browse and specify the path directory where the clash results are to be written.
4. Click OK in the dialog box when done.
45Page DMU Space Engineering Assistant Version 5 Release 13

Index
C
Customizing
Apache HTTP Server
ENOVIA Server on Unix
nphSpaceEngCGI.bat File
Spatial Index
D
Detailed Installation Prerequisites
L
Launching DMU Space Engineering Assistant Server
M
More About Knowledge Clash Rules
Q
Quick Prerequisite Checklist
46Page DMU Space Engineering Assistant Version 5 Release 13

R
Road Map
S
Setting Up the Client Environment
Setting Up the Server Environment
U
Understanding the Space Engineering Assistant Server and Client Setup
W
Writing a CATIA Starting Batch File
47Page DMU Space Engineering Assistant Version 5 Release 13