hsajet-cu user manual hsajet cu manual - … automatic aps side 4 af 41 17-11-2005 hsajet-cu user...
TRANSCRIPT

HS Automatic ApS Side 1 af 41 17-11-2005 HSAjet-CU user manual
Last saved Fejl! Ukendt argument for parameter.
HSAjet CU MANUAL
A guide to operating and managing the HSAjet CU print controller
Last update September 29, 2005

HS Automatic ApS Side 2 af 41 17-11-2005 HSAjet-CU user manual
Last saved Fejl! Ukendt argument for parameter.
Introduction Congratulations on the purchase of an HSAjet CU unit. You have a powerful stand-alone controller with features compareable to PC-solutions. With full remote control, on-line editing of content, security features and simple operation, this unit is suitable for many different applications.
For proper care of your unit, you should observe the following guidelines :
Observe the power requirements of the CU power supply. This is written on a sticker on the back of the unit.
Never connect different power to it.
Do not unplug any cables while the unit is turned on
Do not take out the compact flash card while the unit is on
Do not take out cartridges (HP) while the unit is on
Preferably you should shut down unit properly before turning off power. This will correctly close any open files on the compact flash card
Copyright and Trademark Information
Microsoft, and Windows are US registered trademarks of Microsoft Corporation.
HP is a registered trademark of the Hewlett-Packard Corporation
This and other litterature on HSAjet products is © HS Automatic ApS 2005. You may freely use this instruction and translate it, as long as you do not change the content.

HS Automatic ApS Side 3 af 41 17-11-2005 HSAjet-CU user manual
Last saved Fejl! Ukendt argument for parameter.
Features of the CU Print using normal printers, xaar- or HP based.
Messages stored on standard Compact Flash cards.
Uses 80x compact flash cards for improved read speed
Very simple to use
Variable text, date, clock, counter and barcode
Prompt input of variables
Print height 140 mm (Xaar) / 50,8 mm (HP)
Separates message design and use
16 different fonts for variable objects, selectable among all windows fonts
Input of all Latin-1 character set directly from unit
Security features available to avoid unwanted editing of messages
Ethernet connection / serial connection, allowing full remote control of unit

HS Automatic ApS Side 4 af 41 17-11-2005 HSAjet-CU user manual
Last saved Fejl! Ukendt argument for parameter.
The CU keyboard
Used to start print activity
Enter the setup menu
Enter the previous menu or go to main menu.
Stop print
Arrow keys, use with enter to select message navigate in menus
Enter activates edit mode or accepts a choice
Object keys that allow editing of the 6 different object types

HS Automatic ApS Side 5 af 41 17-11-2005 HSAjet-CU user manual
Last saved Fejl! Ukendt argument for parameter.
Designing CU pictures The CU pictures are designed using the OBJ INKdraw software. Please see OBJ INKdraw manual for help on installing.
Concept of CU objects vs background In a CU image, you have both fixed and variable content. The fixed content has no limitation, which means that you can design using any font size and have all the barcodes available.
On top of the fixed content, you place the variable content (CU objects). You have some limitations on the number of variable objects, and also in the content and fonts of these. Please see below.
As long as you are designing your picture in OBJ INKdraw, you can change both the background and variable content. Once you compile the CU file (save it to compact flash drive as a CU file), you can only edit the variable objects, on the CU unit itself.
Start a CU picture To start a CU picture, choose File->New on the menu, or click the "New File" icon. You will be presented with a menu where you select the file type.
q Select "Head type". Notice that you can not mix HP, Xaar 128, and Xaar 500 heads. Also notice that your unit is designed for one specific head type.
q Check the "CU" option. q Add the heads as necessary with the
buttons below. With XaarJet500 you will only have 1 size to choose from. You are only allowed to add as many heads as the CU can handle.
q Select the message length. You can change the unit between mm/inch/pixel/point.
q Click OK

HS Automatic ApS Side 6 af 41 17-11-2005 HSAjet-CU user manual
Last saved Fejl! Ukendt argument for parameter.
Once you have clicked OK, you are presented with the edit screen for CU files. Most of the screen is identical to normal OBJ INKdraw pictures, but there are some differences.
Most importantly, you see that there are 6 different CU objects available, and that these are placed on the canvas by anchors (please see below).You will also see the "CU Mode active" indicator right above the object panel.

HS Automatic ApS Side 7 af 41 17-11-2005 HSAjet-CU user manual
Last saved Fejl! Ukendt argument for parameter.
Working with font types / anchors The variable CU objects, except the logos and barcodes, display textual information. Because of it's resources, the CU is not able to place and scale fonts freely. That is why the font anchors were made.
For every CU message you can choose up to 16 different fonts, each linked to an anchor with a different color. Within each of the 16 fonts, you can choose between font type (Arial, Courier, and every other installed true type font), a font size, bold - you can even stretch the font freely.
Within each anchor, you can change the font offset from top to bottom.
An anchor is defined as 1/4 of the XJ128 head, equal to 32 pixels. You can place the anchor freely in the print direction (left/right), and in 32 pixels increments in the vertical direction.
Some illustrations will show the point of anchors:
Here is a purple and yellow anchor, with the same font but different offsets from the anchor.
You can see that the same anchor always displays the same font. If you change an anchor font definition, it will affect all variables with that anchor color.
To smaller make text lines closer together, use two anchors. The anchor itself is only visible in design mode. They are not printed.
It is not a problem to define a font that is larger than the anchor itself.

HS Automatic ApS Side 8 af 41 17-11-2005 HSAjet-CU user manual
Last saved Fejl! Ukendt argument for parameter.
To edit the anchor definitions, click the "A" button next to the anchor selector.
This will open the font editor. Select the anchor you wish to edit, and change the font as needed.
You can leave the default name (Name size (offset)) or make your own like "my big font"
Click "Close" when done.
CU file sizes and fonts The most space-demanding part of the CU files are the font files.
If you do not change any font settings, the CU files will occupy about 1-2 Mb on the CF card, depending on the head type.
Notice that larger fonts increase the CU memory use. For example, a 70mm high font will increase the font file to about 12 Mb. It is recommended to use smaller fonts.

HS Automatic ApS Side 9 af 41 17-11-2005 HSAjet-CU user manual
Last saved Fejl! Ukendt argument for parameter.
CU Objects The CU has 6 different variable objects. All of them are editable directly on the unit itself by pressing the corresponding object type key.
Dates
You can have a total of 10 different date objects, each with a user-defineable format and individual offset.
The format follows the standard codes such as "dd", "mm" and "yyyy", although the number of codes available are limited. You can choose from a pre-defined format, or type in your own string.
Month names are available, and changeable in the language file. Use mmm, Mmm and MMM for month names.
Counters
A total of 10 counters is available, each with a user-defineable start- and step value
Time
Allows 10 different clockes, each with a different time offset.
The clock is in 24-hour format, 12-hour format is currently not available.
Text
Up to 10 different text lines
Logo
10 different logos are possible. These can be placed anywhere, and are not limited to the position of an anchor.
Barcode
10 different barcodes are possible. At the moment, human-readable text is not supported, but will be added later.
The barcodes can contain variable information in the shape of either text, counter, date or time. It is not possible to have a barcode with multiple variable objects.
Notice that barcodes count against the 10 object limit in the respective object types. So, if you have 5 counter barcodes, you can only have 5 normal counters.

HS Automatic ApS Side 10 af 41 17-11-2005 HSAjet-CU user manual
Last saved Fejl! Ukendt argument for parameter.
Compiling / saving files (to CF) When you are done editing your image, you need to compile the ink file to use it in the CU.
As this is a one-way process (i.e. you can not edit CU files later in OBJ INKdraw) it is a good idea to save the .ink file along with the CU files.
The CU files are made of 2 individual files that are both required: A CU file with object data, and a FNT file with the font data.
NOTICE : On the CU, you only need to change parameters for HP resolution while editing your message. All other parameters are set on the CU unit itself.
You can however store a file on the CF card called "CUPARMS" containing parameters from your current message - then upload to the CU. Do this in the "Advanced mode" below.
q Click the "Save to CF" icon. This will open the Save dialog box.
q Select the compact flash in the disc dropdown. You can also choose to save on the harddrive, and copy the files later. (not recommended)
q Enter a filename. It is a good idea to save the ink file along with the CU file, since you can't edit CU files from OBJ INKdraw.
q It is a good idea to check "Auto-eject CF" if
you are not going to save more layouts on the card. Otherwise, the file system on the card may be destroyed.

HS Automatic ApS Side 11 af 41 17-11-2005 HSAjet-CU user manual
Last saved Fejl! Ukendt argument for parameter.
Using the CU The idea of the CU is a unit that will allow the user to select messages and print them using the standard HS Automatic printers – xaar or HP.
The messages are stored on the compact flash, and can be recalled by simply selecting the filename from the main menu and pressing enter to load.
In each message, there can be both static and variable content. All variable fields can be edited by pressing the corresponding object type key.
Basics You have two different ”cursor modes” in the machine: editing and moving. When you enter a menu, the cursor is in move mode. From here, you use the arrow keys to move between menus, commands and fields.
If you press enter on a field, you will activate edit mode
Edit mode • Enter activates your selection or starts edit mode.
• Esc cancels the editing
• Insert toggles between insert / overwrite
• Delete removes the character under the cursor
• Arrow up / arrow down chooses the values just above / below the current.
• Alt/Space with some letters will type european characters (Latin-1), such as á, ø, ú…
Navigation At any point it is possible to jump directly to other sections by using the object keys. If you are in edit mode, this is considered as ESC. For example, you could have finished editing a text object, then it is possible to jump directly to date editing by pressing the ”Date object” key.
Password protection It is possible to change setup values (print parameters) from the unit, but this menu can be protected by a password.

HS Automatic ApS Side 12 af 41 17-11-2005 HSAjet-CU user manual
Last saved Fejl! Ukendt argument for parameter.
Print function Activate the print function with the key. The red LED in the key will turn on if the print mode is active. Use ESC to stop print mode.
During print you can adjust the start distance with the arrow keys
Printing 00000 (ESC) 000.00mm 00000 Number of prints with this picture. Is reset when a new picture is loaded.
000.00 Start delay. You can adjust with arrows left / right or arrows up/down (decimals)
mm Units for start delay (mm / inch)
Prompts When the print mode is actived, there can be prompts set on one or more objects. Prompts is a way to ask the user to enter information that will be a part of the print, typically a best-before date or batch number.
Prompts are shown with the object name and room for editing. It is possible to activate prompts for the following objects:
q Text (string). Max 80 characters. q Date (input format chosen in OBJ INKdraw preferences) q Time q Counter (start value) q Barcode (variable object inside).
Tekst 1 Xxxxxxxxxxxxxj_
Date 1 11-05-2005_
Editing is cancelled with ESC, which deletes what is written. ESC again will cancel print start.
Navigation in prompts is done with the arrow keys. Use up/ down to jump a full screen if the text is longer than 16 characters.

HS Automatic ApS Side 13 af 41 17-11-2005 HSAjet-CU user manual
Last saved Fejl! Ukendt argument for parameter.
Main menu You reach the main menu from any menu by pressing ESC.
The main menu is where you select the message to print.
Orangesxxxxxx Choose file. or, if the current file is the active:
Test1 File selected
To load a file It is simple to load a file. Use the arrow keys to browse the available files stored on the CF card, or start typing the file name. Predictive type-ahead will find the best match for you.
When you have reached the correct file name, press enter to load it. You will see the text below the file name change to ”File selected.”.
If you try to load a file that is not made for your unit, you will see a warning that you can't use this file.
XJ128 files are invalid on XJ500
Shutting down the machine When you wish to shut down the CU, you should exit properly to minimize the risk of file damage on the Compact Flash card.
Press ESC from the main menu, and you are asked
Do you want to shut down? Y/N Press Y to shut down the CU unit or N to continue.
Shortly after you see
Its now safe to turn off the CU .. and you can turn the unit off on the power supply.
XJ500 files are invalid on XJ128 HP files are invalid on XJ128 HP files are invalid on XJ500 …

HS Automatic ApS Side 14 af 41 17-11-2005 HSAjet-CU user manual
Last saved Fejl! Ukendt argument for parameter.
Editing object / message content With the CU, there is a separation between content and design. While it is possible to change the size and position of objects in the design phase, this is not possible on the CU unit itself. Only the following can be changed.
q Content - except for logos. q Visibility (on/off)
You edit the object by pressing the corresponding object button. This can be done at any time, even in print mode. (Notice though that there is a buffer of 2 prints, changes in print mode do not happen instantly).
When you press an object button, you are presented with a list of objects of that type. If none are found, you receive a notice about this:
Counter: No objects (ESC) If objects in the category exist, you will see a list of objects, arranged by their order of appearance in INKdraw. Choose object with Ý and Þ.
Whan an object is selected, you see it's value and on/off setting. Use cursor Ü to move down from object name to edit field, and press Enter to edit value.
Counter 1 On 00000045
Notice: If the object name has (Bar) written next to it, it is contained inside a barcode. You can then only see it's content, and need to edit it through the barcode menu. Please see below.
What you see will depend on the object type.
Date 2 On 20-12-2006
Prod.time On 13:44
Text 1 On x The quick brown> Ûand Ü will move 1 character Shift Û /Ü will move 1 screen
As you can see from the example to the left, the text The quick brown| fox jumps ove|r the lazy dog is longer than one screen. You can scroll longer messages by using arrows up/down.
Selecting "X" deletes the entire line content.

HS Automatic ApS Side 15 af 41 17-11-2005 HSAjet-CU user manual
Last saved Fejl! Ukendt argument for parameter.
Text 1 On x < fox jumps ove>
Text 1 On x <r the lazy dog
After a change, you are informed about the change.
Value accepted (ENTER)
Enter returns you to the object list.
Special case: Barcodes If you choose a barcode, the format of the content will depend on the content type (Text / Counter/ date / time).
When you select the barcode, you can choose between the available barcodes with arrows up/down. Then move the cursor with arrow right and press enter on "Edit content".
Barcode 1 On Edit content You will now see the edit screen for the content of the barcode
Counter1 (Bar) 0000002 Once you are done editing the content, press ESC to exit to the barcode screen, or one of the other object type keys.

HS Automatic ApS Side 16 af 41 17-11-2005 HSAjet-CU user manual
Last saved Fejl! Ukendt argument for parameter.
Preventing object editing Sometimes it is necessary to prevent objects in the CU from being edited. This is possible by locking the object in OBJ INKdraw before you compile the CU file.
To lock objects, right-click the object in the object list and select "Locked". Now you can no longer select the object in OBJ INKdraw canvas, and you can not edit in the CU.
One exception is when the password to protect parameter menu has been set. Then you can use the same password to edit locked objects. Unlocked objects can always be edited.
Input pictures for object types Text String, max 80 characters
Scroll using up/down. Input of special characters possible.
Date Numbers, from an input mask. The input mask is selected in OBJ INKdraw. You do not need to enter separation characters. Ex: 14-04-2005
Counter Current value, entered as a decimal value. The number of digits can not be changed. Ex: 0000000
Barcode Depending on the variable content.
Logo Only visibility on/ off is possible
HS Automatic ApS Side 17 af 41 17-11-2005 HSAjet-CU user manual
Last saved Fejl! Ukendt argument for parameter.
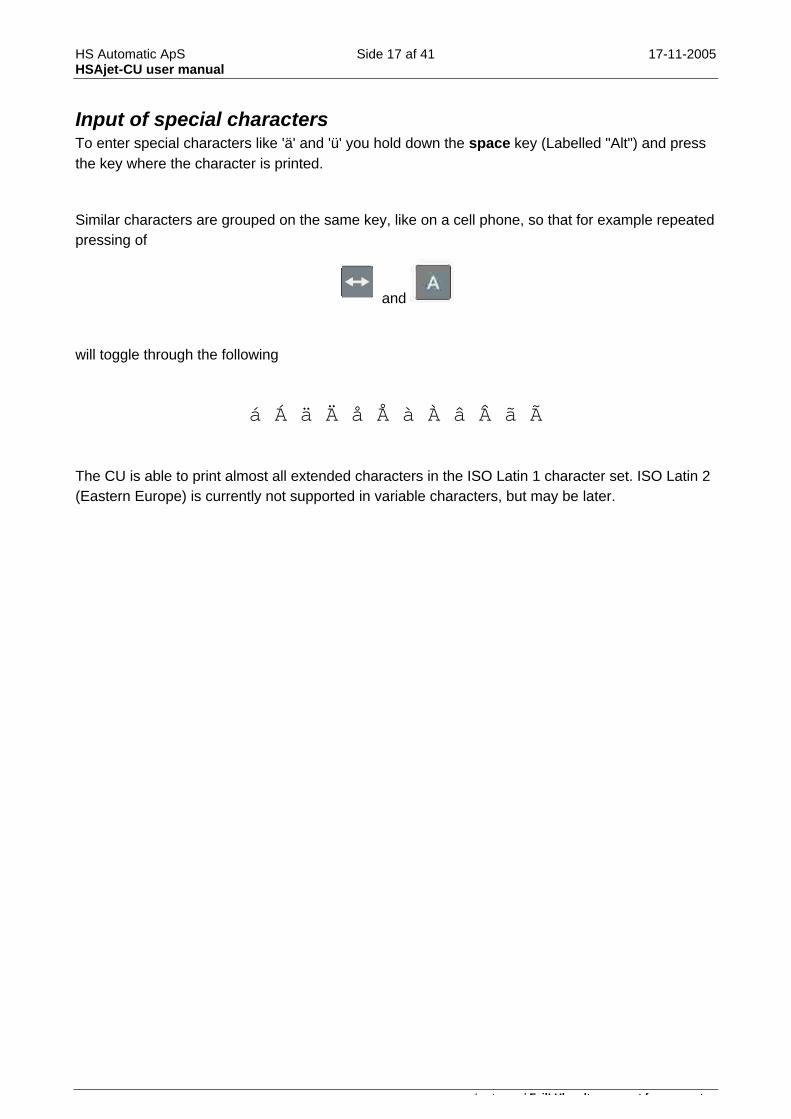
Input of special characters To enter special characters like 'ä' and 'ü' you hold down the space key (Labelled "Alt") and press the key where the character is printed.
Similar characters are grouped on the same key, like on a cell phone, so that for example repeated pressing of
and
will toggle through the following
á Á ä Ä å Å à À â Â ã Ã
The CU is able to print almost all extended characters in the ISO Latin 1 character set. ISO Latin 2 (Eastern Europe) is currently not supported in variable characters, but may be later.

HS Automatic ApS Side 18 af 41 17-11-2005 HSAjet-CU user manual
Last saved Fejl! Ukendt argument for parameter.
Keyboard layout, extended characters
1 ! ¿ ¡ 2 " 3 # 4 , 5 . 6 & 7 / 8 < 9 > 0 = A á Á ä Ä æ Æ å Å à À â Â ã Ã B \ { } [ ] | C ç Ç D ð Ð E é É è È ë Ë F * ÷ × G : H ; I í Í ì Ì ï Ï N ñ Ñ O ó Ó ö Ö ø Ø ò Ò ô Ô õ Õ S ß T Þ þ U ú Ú ü Ü ù Ù û Û Y ý Ý ÿ
Notice that due to display restrictions, your character may be displayed as a different character, but will print as expected.

HS Automatic ApS Side 19 af 41 17-11-2005 HSAjet-CU user manual
Last saved Fejl! Ukendt argument for parameter.
Setup menu Press the setup button to change settings that affect mainly the current file.
In setup you have a series of menus that can be navigated with the arrow keys. At any point, press ESC to return to the main menu.
Setup menu 1 (purge / Prime / spit / message length / ….)
Setup menu 2 (encoder / velocity).
Setup menu 3 (Date / Time setting)
Setup menu 4: System info, test I/O.
MAIN MENU

HS Automatic ApS Side 20 af 41 17-11-2005 HSAjet-CU user manual
Last saved Fejl! Ukendt argument for parameter.
Basic setup functions On the CU, hardware settings like start, offset, direction and encoder settings are generally not taken from the design software, but used from the machine's own settings. You can load a Hardware setup, but until you do that, all settings are as set on the CU unit.
Purge Spit + Start 000.00 mm Purge The purge function (shooting on all channels) is activated with ENTER. You purge as long as you hold down the key. Release to stop purging.
Spit settings Spit function is made to prevent the ink from drying in the head. It can be set to print n dots (burst) every x seconds, on all channels.
Secs 00 Burst 00 Seconds Time between each shot
Burst The number of shots
Start distance / unit / sensor 000.00 Start distance (1/100" or 1/100 mm). Max distance is 655,35 mm/ Inc.
mm/ In Toggle between mm and Inches. The units will be converted
+ Start sensor pos/neg edge

HS Automatic ApS Side 21 af 41 17-11-2005 HSAjet-CU user manual
Last saved Fejl! Ukendt argument for parameter.
Printer settings (1) Setup menu 2 is the most basic settings for the printer, that will have affect on this message.
Direction < Enc 0,00000 Qua
Direction > Vel 000 m/min Print settings Top row is used to choose direction. Toggle with enter.
Encoder Enc is a toggle that selects between encoder and velocity modes. The value when encoder is selected is written just like in OBJ INKdraw – mm/pulse.
Qua is a toggle for Quadrature (sensing on both channels, equal to 4 times the number of pulses. Qad = Quadrature, Lin = Linear.
Velocity In velocity mode, the encoder parameters are not available, only the speed can be entered as m/minute.
Printer settings (2)
Endless Y Rep 00 Distance 000.00 Endl. Y Toggle, endless. Y/N
Rep 00 Field, indicates repeat. 00 = no repeat.
Dist 000.00 Field for distance between repeats – also in Endless mode. Enter in units selected in first setup screen. (1/100" or 1/100 mm). Minimum distance is equal to maximum engine + head offset. Page printing only possible where there are no offsets.
Qad = Quadrature Lin = Linear
Display changes if you select Velocity.

HS Automatic ApS Side 22 af 41 17-11-2005 HSAjet-CU user manual
Last saved Fejl! Ukendt argument for parameter.
Date / Time The CU has a real-time clock built-in. The time and date of this determines the output for date objects.
You can set the current date / time in this menu, in the format YYYY-MM-DD HH:MM (24-hour clock).
You can see which part you are editing in the lower right corner, to avoid confusion between month/ day.
Press ENTER on the part you wish to edit, then enter again to accept.
2005-05-31 16:58 year
Test I/O Second last screen is used to test the I/O function - encoder and start sensor.
Encoder / Start signal ñ The encoder rotates the bar next to the word ( / | - \ ). Start signal switches between 2 arrows. ñ = high, ò = low
About-menu Finally there is the about-menu. Mostly for internal use, for identification of the Firmware and Hardware versions.
HSAjet CU XJ500 Release 1.01 If you press Enter on the word "Release" you will see further information about FPGA and uP version.
These numbers (Release, FPGA and uP version) are needed to HSA if you find a problem with your machine.
FPGA: 2.0.9 uP:1.16 (ESC)

HS Automatic ApS Side 23 af 41 17-11-2005 HSAjet-CU user manual
Last saved Fejl! Ukendt argument for parameter.
System setup (shift + Tool Button) In system setup, you change the settings that are not related to the individual message, but are more hardware related.
Head setup Contrary to the SA, the CU is not born with a setup of heads. You can take the unit and connect it to a different configuration of printers.
The number and types of heads is stored inside the CU message, but you can adjust the head offset and engine offset to suit your needs.
When you enter Head Setup menu you see a list of the heads configured in the message, listed with the number of engines per head in brackets. The total number of engines can not be more than 8.
XJ500 [1]
XJ128 [1][2][1] [4]
To change the settings for a head, press ENTER.
Head setup
Load HW parameters. Enter ethernet menu.
Passwords
MAIN MENU
On an XJ500 machine, one head has been set up
This is an XJ128 machine with 4 heads: 1, 2, 1 and 4 engines.

HS Automatic ApS Side 24 af 41 17-11-2005 HSAjet-CU user manual
Last saved Fejl! Ukendt argument for parameter.
Head <>000.00Inc Adj Ups N Oths N 000.00 Offset for the head. Notice that maximum value is 65.535 mm equal to 25.80 inch.
Adj Press Enter to adjust the engine offset(s). Only available if the head has more than one print engine.
Ups N Is this head printing upside / down.
Oths N Is this head printing on other side (in reverse direction)
Engine adjust Engine adjust is available if the head has more than one print engine (XJ128 for 2,3,4 engine heads, and HP with 2,3,4 stall unit)
Eng. 2 Offset 00.000 mm Select an engine (1..4) and choose settings
Offset Offset from the first engine in the head.

HS Automatic ApS Side 25 af 41 17-11-2005 HSAjet-CU user manual
Last saved Fejl! Ukendt argument for parameter.
Manage HW parameters / Ink size/usage and Ethernet Setup On the CU, all printing parameters (except resolution) are stored on the controller, not the message that you load. This ensures that you only have to focus on layout, once the parameters are correct.
It is possible to store the settings from OBJ INKdraw and save to the CF card. These settings can be loaded from the HW global setup screen.
From OBJ INKdraw select "Advanced Mode" in the save CU screen, and click "Save Hardware file". This file will be called CUPARMS and should simply be placed on the card.
Ethernet Ink Load HW settings Ethernet Setup To use the machine in a PC network, you should configure it's settings in the network.
DHCP Off IP: 192.168.002.120
Devicename: CU Device 1
DHCP If this is set to ON, the machine will expect to find a DHCP server in the network, to automatically obtain an IP address.
IP If no DHCP server is used, the machine will use this IP address.
DeviceName The name this machine will have in a network. Only shown with command to get device name (REQ:device name#)
Ink menu In this menu, you can set the size of your ink container and monitor how much ink has been used. This is also where you reset the value after replacing ink container.
Monitor Ink use Mode: user 000ml
Monitor Select this menu to see use of ink (HP) Mode Choose between Off (no low ink warning), cart 42ml, bulk 350ml and user set.
Notice that you can not edit IP address if DHCP is on, since it will be achived automatically. 000.000.000.000 until address has been assigned by DHCP.
USE PORT 1500 to communicate with the CU

HS Automatic ApS Side 26 af 41 17-11-2005 HSAjet-CU user manual
Last saved Fejl! Ukendt argument for parameter.
Monitor ink menu
1: 42ml 2:---ml 3:---ml 4:---ml You can see the approx. remaining ink for each defined cartridge. Press ENTER on the number to reset.
Load Hardware settings If you have saved a hardware setup file from INKdraw, you can load it by selecting "Load HW settings". If a file is found and loaded, the CU will display
Local settings saved to CU.
If you do not have a hardware file, you will see
File Error: HW file missing Press ESC to return to previous menu.
Output configuration The CU has 2 outputs on the start switch, out1 and out2. Each of these can be selected to give a signal on the following: off (nothing), print mode, printing, fault, ink low(HP)
Out1: off Out2: off By default, the outputs are both set to "off".

HS Automatic ApS Side 27 af 41 17-11-2005 HSAjet-CU user manual
Last saved Fejl! Ukendt argument for parameter.
Password
It is possible to protect the CU so that no-one without the password can access the parameters.
If there already is a password set, you need to enter it to change it. Otherwise, you just need to change it, and confirm it afterwards.
Password: ********
Passwd: * Confirm *
Password changed OK!
When you set the password, it will affect the following:
q Parameters / HW parameters are only available if you know the password q Locked objects are editable, but only if you know the password If NO password is set (equal to blank input on password change) the following will be the case: q Parameters freely available q Locked objects can NOT be edited ("Object Locked" will be shown)

HS Automatic ApS Side 28 af 41 17-11-2005 HSAjet-CU user manual
Last saved Fejl! Ukendt argument for parameter.
Remote communication with the CU The CU is an ideal unit for solutions where remote communication can be used to change message content. Typically behind weighing / measuring stations, or simply in complete factory automation.
Communication can be both with serial (RS232) and with Ethernet, using the same simple protocol.
For RS232: Use COM1 port. You must use a crossed cable (Null Modem)
For Ethernet: Use device IP address, port 1500. Password is same as parameter password, if set.
PLEASE SEE COMPLETE REFERENCE LATER IN THIS MANUAL
The communication is based on commands and response from the CU unit. The syntax is as follows: XXX:parameter;{value};{value};…#
where: XXX is a command keyword of 3 characters, upper case : always follows command parameter is a parameter to command ("which command"). ;{value} value. Not always needed, and always preceeded with a semi colon # end of command string.
This is a list of command keywords and their meaning:
CMD Command Basic functions such as start, stop print, connect, disconnect.
REQ Request Read information from the CU
OBJ Object Change message objects. Notice: you can only change, not create objects.
PAR Parameter Change print parameters in the CU
FIL File Send a file to the CU's flash card.
Each time you send a command to the CU, it will respond to confirm that the command has been accepted. The response, simlilarly, is based on a 3-letter keyword followed by colon (:) and one or more values separated by semicolon. All terminated by "#".
After every communication, you always get "RES:{error code}#", where 0 = no error.
Responses may be:
RES Result Error / result code.
DAT Data Data return, for example for objects / parameters
FIL File upload Ready for file upload
HS Automatic ApS Side 29 af 41 17-11-2005 HSAjet-CU user manual
Last saved Fejl! Ukendt argument for parameter.
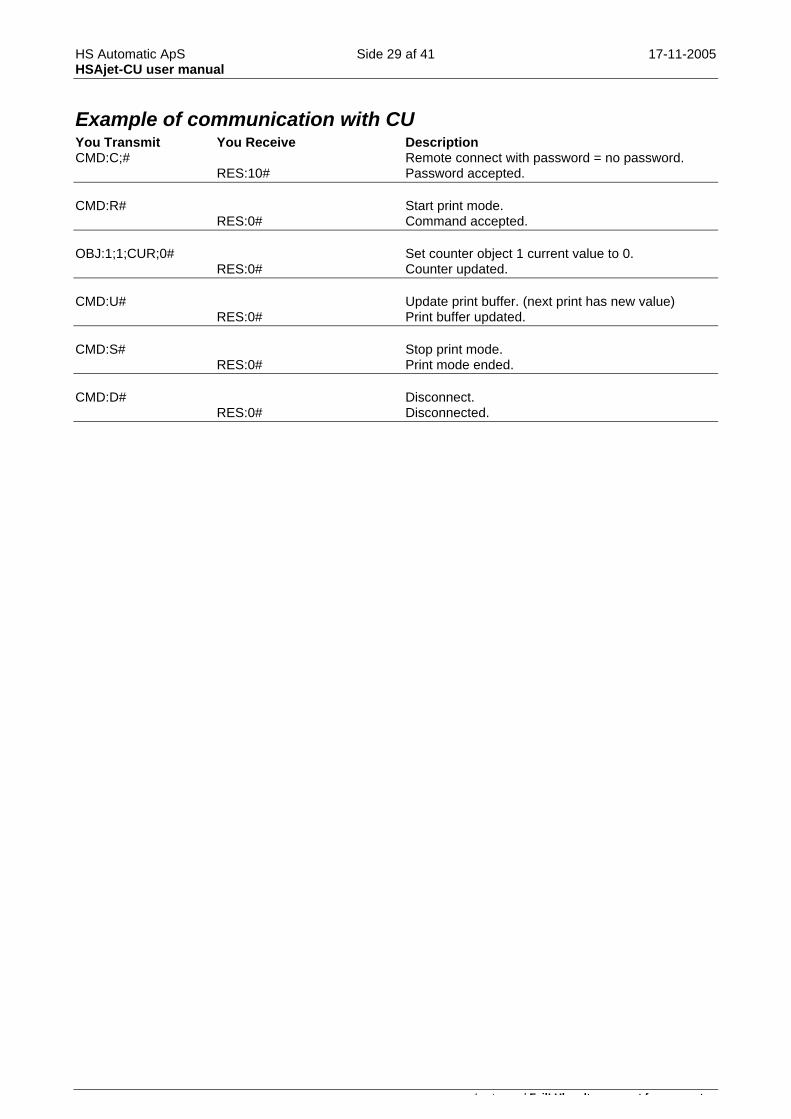
Example of communication with CU You Transmit You Receive Description CMD:C;# Remote connect with password = no password.
RES:10# Password accepted. CMD:R# Start print mode.
RES:0# Command accepted. OBJ:1;1;CUR;0# Set counter object 1 current value to 0.
RES:0# Counter updated. CMD:U# Update print buffer. (next print has new value)
RES:0# Print buffer updated. CMD:S# Stop print mode. RES:0# Print mode ended. CMD:D# Disconnect.
RES:0# Disconnected.

HS Automatic ApS Side 30 af 41 17-11-2005 HSAjet-CU user manual
Last saved Fejl! Ukendt argument for parameter.
Upgrading your unit Upgrades to the CU, typically new features, are released through the dealer's area of HS Automatic webpage. You can download the upgrades in the form of firmware files.
Simply place the new firmware files on the compact flash card and start up your unit.
To update the CU, you need to acquire 3 files, which must always be updated at the same time.
The files are the following (where XXX indicates the version number)
CUENET.XXX ethernet firmware update
CUFIRMW.XXX CU firmware update
CUFPGA.XXX CU FPGA firmware update
When you place the new firmware files on the CF card, the CU will display
New Firmware Upload y/n ? If you wish to update the unit now, press Y, and the update process will start. Do not turn off or remove the CF card during this process.
Alternatively, you may also see:
FPGA Firmware Upload y/n ? or
ENET Firmware Upload y/n ?
If you press N, the machine will continue with the previous firmware, and ask you next time.
If something should happen during upgrade, such as a power-out, the internal programs could become damaged. In that case, you can upgrade the unit through cable via a JTAG.
Please contact HS Automatic for purchase and instructions.

HS Automatic ApS Side 31 af 41 17-11-2005 HSAjet-CU user manual
Last saved Fejl! Ukendt argument for parameter.
Reference section
Language update It is possible to change the language of the CU display, with the limitation that you are have fixed length of the texts.
The editing of the language file happens with the free tool "Language File Editor" available from HS Automatic.
Please see separate manual for this tool.
To use the language you have created, place the language file on the CF card with the name "CULANG". You will be asked to upload the language.
HS Automatic ApS Side 32 af 41 17-11-2005 HSAjet-CU user manual
Last saved Fejl! Ukendt argument for parameter.
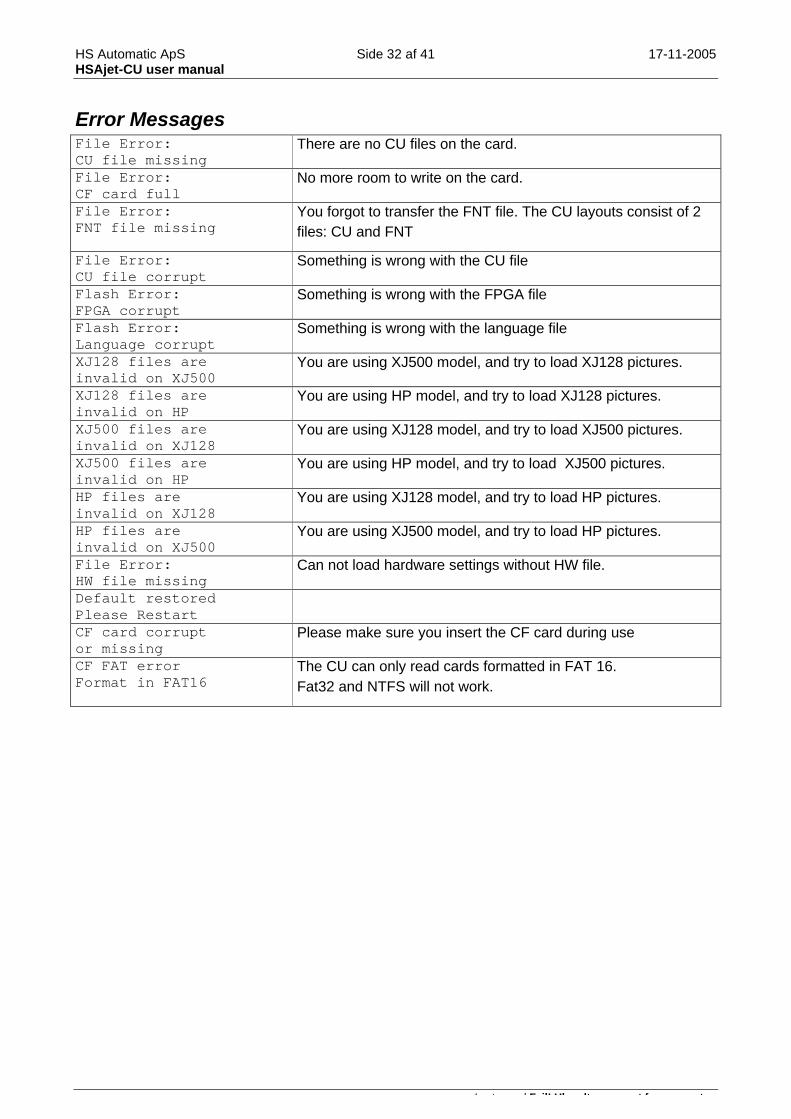
Error Messages File Error: CU file missing
There are no CU files on the card.
File Error: CF card full
No more room to write on the card.
File Error: FNT file missing
You forgot to transfer the FNT file. The CU layouts consist of 2 files: CU and FNT
File Error: CU file corrupt
Something is wrong with the CU file
Flash Error: FPGA corrupt
Something is wrong with the FPGA file
Flash Error: Language corrupt
Something is wrong with the language file
XJ128 files are invalid on XJ500
You are using XJ500 model, and try to load XJ128 pictures.
XJ128 files are invalid on HP
You are using HP model, and try to load XJ128 pictures.
XJ500 files are invalid on XJ128
You are using XJ128 model, and try to load XJ500 pictures.
XJ500 files are invalid on HP
You are using HP model, and try to load XJ500 pictures.
HP files are invalid on XJ128
You are using XJ128 model, and try to load HP pictures.
HP files are invalid on XJ500
You are using XJ500 model, and try to load HP pictures.
File Error: HW file missing
Can not load hardware settings without HW file.
Default restored Please Restart
CF card corrupt or missing
Please make sure you insert the CF card during use
CF FAT error Format in FAT16
The CU can only read cards formatted in FAT 16. Fat32 and NTFS will not work.

HS Automatic ApS Side 33 af 41 17-11-2005 HSAjet-CU user manual
Last saved Fejl! Ukendt argument for parameter.
Connectors The table below shows the CU as viewed from the back, with the keyboard upwards.
Encoder I/O (start) HEAD 1
COM1 (serial comm.)
COM2 HEAD 2
POWER PC Network (Ethernet comm)
SCSI (HP with 3 / 4 pen stall)
I/O connector The main function for this connector is to provide the start signal, to begin print.
It is a 9-pin female SUB-D.
The wiring of the I/O connector is required for function of the print – you will not get a printout without a start signal.
You can use either a simple mechanical switch or a 12V photo cell for the start signal, please see pinout and connection guide in the back of this manual.
Encoder connector This connector is where the signals for the encoder are coming in. You will notice that there is a “normal” encoder input and an inverse input. Which one you use depends on your encoder. Active high use normal, for active low use inverse.
The use of an encoder is optional, but will improve the accuracy of your print if your conveyor varies a bit in speed.
For accurate alignment of multiple-engine XJ128 printers or HP printers, an encoder is strongly recommended.
Head connectors Two head connectors are available for the print heads. Head1 and Head2 are both 25-pin SUB-D, you need a straight-through cable (1:1) to connect to the heads.
To each connector you can connect up to 4 XJ128 engines or 1 XJ500 engine or 1 HP engine.
The SCSI connector is used to connect 3 or 4 pen HP heads.
COM1 / COM2 For serial communication with the unit. Please see section on serial communication.
Ethernet connector Through the ethernet connection, you can control the CU remotely from a PC in the same network. You can use this select or change messages or parameters.

HS Automatic ApS Side 34 af 41 17-11-2005 HSAjet-CU user manual
Last saved Fejl! Ukendt argument for parameter.
Connector Wiring Connectors (start, encoder, etc) wiring.
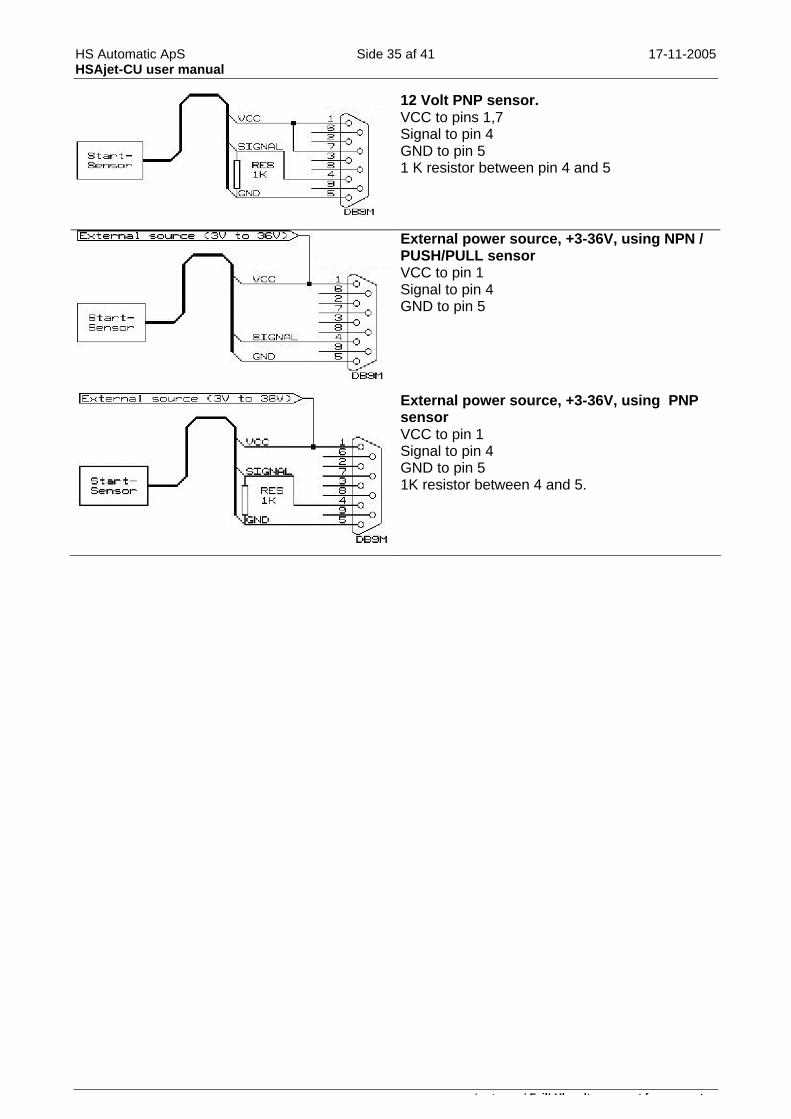
Start sensor connections As a start sensor, you can use a simple switch, or a photo cell.
PIN.......................................................... DESCRIPTION
1.............................................................. V I/O 2.............................................................. 5 V 3.............................................................. IN 2 4.............................................................. START 5.............................................................. GND 6.............................................................. IN 1 7.............................................................. 12 V 8.............................................................. OUT 1 9.............................................................. OUT 2
Using a simple mechanical switch. Loop pins 1-2 and connect the switch between pins 4 and 5.
5 Volt NPN / PUSH/PULL sensor. VCC to pins 1,2 Signal to pin 4 GND to pin 5
5 Volt PNP sensor. VCC to pins 1,2 Signal to pin 4 GND to pin 5 1 K resistor between pin 4 and 5
12 Volt NPN / PUSH/PULL VCC to pins 1,7 Signal to pin 4 GND to pin 5
HS Automatic ApS Side 35 af 41 17-11-2005 HSAjet-CU user manual
Last saved Fejl! Ukendt argument for parameter.
12 Volt PNP sensor. VCC to pins 1,7 Signal to pin 4 GND to pin 5 1 K resistor between pin 4 and 5
External power source, +3-36V, using NPN / PUSH/PULL sensor VCC to pin 1 Signal to pin 4 GND to pin 5
External power source, +3-36V, using PNP sensor VCC to pin 1 Signal to pin 4 GND to pin 5 1K resistor between 4 and 5.

HS Automatic ApS Side 36 af 41 17-11-2005 HSAjet-CU user manual
Last saved Fejl! Ukendt argument for parameter.
Encoder connections For the encoder, you can use either a single or double channel. If you have both channels connected, you need to activate “Quadrature”, and divide distance / pulse by 4.
PIN.......................................................... DESCRIPTION
1.............................................................. V ENC 2.............................................................. 5 V 3.............................................................. ENC A 4.............................................................. ENC B 5.............................................................. GND 6.............................................................. INK LEVEL 7.............................................................. 12 V 8.............................................................. ENC A (inv.) 9.............................................................. ENC B (inv.)
5 VOLT encoder double channel NPN / PUSH/PULL encoder
5 VOLT encoder double channel PNP encoder
12 VOLT encoder single channel NPN/ PUSH/PULL encoder
12 VOLT encoder single channel PNP encoder

HS Automatic ApS Side 37 af 41 17-11-2005 HSAjet-CU user manual
Last saved Fejl! Ukendt argument for parameter.
12 VOLT encoder double channel NPN / PUSH/PULL encoder
12 VOLT encoder double channel PNP encoder
External power source, 3-36V, encoder single channel NPN/ PUSH/PULL encoder
External power source, 3-36V, encoder single channel PNP encoder
External power source, 3-36V, encoder double channel NPN / PUSH/PULL encoder
External power source, 3-36V, encoder double channel PNP encoder
HS Automatic ApS Side 38 af 41 17-11-2005 HSAjet-CU user manual
Last saved Fejl! Ukendt argument for parameter.
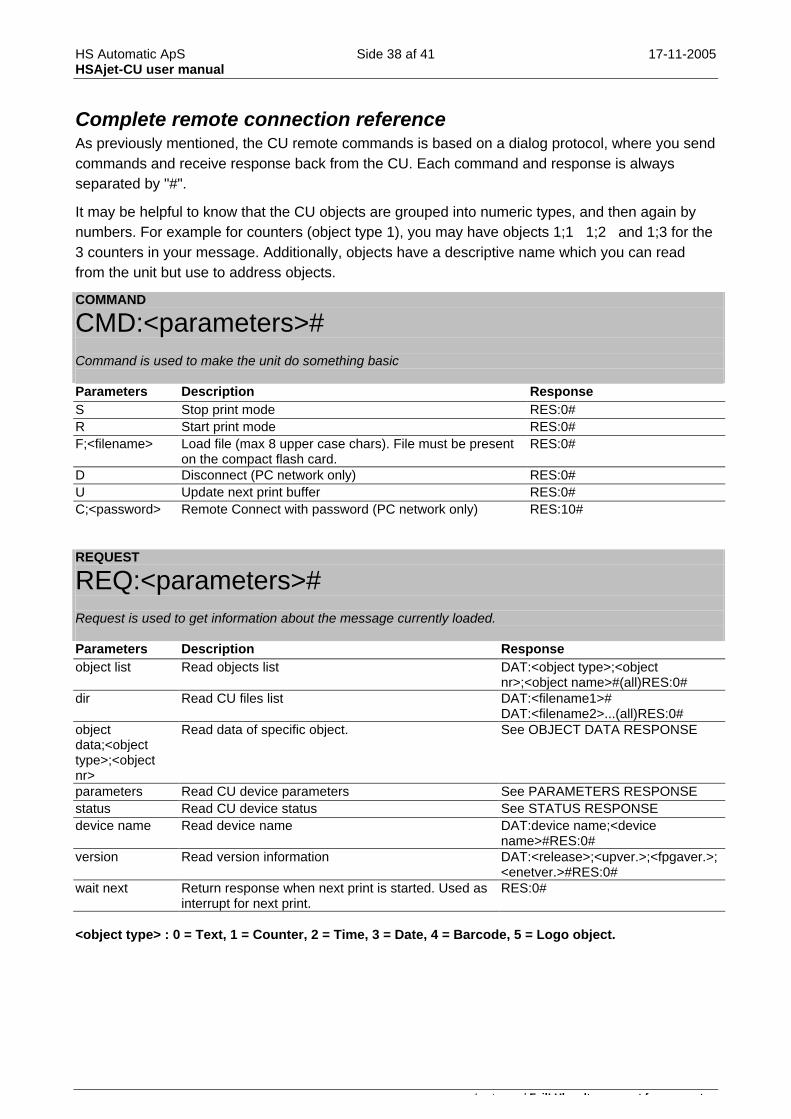
Complete remote connection reference As previously mentioned, the CU remote commands is based on a dialog protocol, where you send commands and receive response back from the CU. Each command and response is always separated by "#".
It may be helpful to know that the CU objects are grouped into numeric types, and then again by numbers. For example for counters (object type 1), you may have objects 1;1 1;2 and 1;3 for the 3 counters in your message. Additionally, objects have a descriptive name which you can read from the unit but use to address objects.
COMMAND
CMD:<parameters># Command is used to make the unit do something basic Parameters Description Response S Stop print mode RES:0# R Start print mode RES:0# F;<filename> Load file (max 8 upper case chars). File must be present
on the compact flash card. RES:0#
D Disconnect (PC network only) RES:0# U Update next print buffer RES:0# C;<password> Remote Connect with password (PC network only) RES:10# REQUEST
REQ:<parameters># Request is used to get information about the message currently loaded. Parameters Description Response object list Read objects list DAT:<object type>;<object
nr>;<object name>#(all)RES:0# dir Read CU files list DAT:<filename1>#
DAT:<filename2>...(all)RES:0# object data;<object type>;<object nr>
Read data of specific object. See OBJECT DATA RESPONSE
parameters Read CU device parameters See PARAMETERS RESPONSE status Read CU device status See STATUS RESPONSE device name Read device name DAT:device name;<device
name>#RES:0# version Read version information DAT:<release>;<upver.>;<fpgaver.>;
<enetver.>#RES:0# wait next Return response when next print is started. Used as
interrupt for next print. RES:0#
<object type> : 0 = Text, 1 = Counter, 2 = Time, 3 = Date, 4 = Barcode, 5 = Logo object.

HS Automatic ApS Side 39 af 41 17-11-2005 HSAjet-CU user manual
Last saved Fejl! Ukendt argument for parameter.
CHANGE OBJECT
OBJ:<object type>; <object nr>; <parameter>; <value># Set object is used to manipulate objects in the loaded message. For object type, please see above.
Parameters Description Allowed Values (Response = RES:0#)
activate / deactivate
activate or deactivate object. none
TEX;<text> Set text of text objects. Text string max 80 chars. MIN;<value> Set minimum count of counter objects. integer value (32 bit) CUR;<value> Set current count of counter objects. integer value (32 bit) MAX;<value> Set maximum count of counter objects. integer value (32 bit) DIG;<value> Set number of digits in counter objects. integer value (32 bit) DIR;<+/-> Set direction of counter objects. <+> : count up. <-> : count down. LDN;<0/1> Set leadin of counter objects. <0> : leadin with zeroes. <1> : blank
leadin. REP;<value> Set repeats per count of counter objects. integer value (0-255). TIM;<value> Set minutes offset of time objects. integer value (signed) DAT;<value> Set day offset of date objects. integer value (signed) FOR;<value> Set format of time/date objects. Format string. TYP;<value> Set symbology of barcode objects. 1=code128, 2=code39, 3=ean13,
4=itf, 5=upc, (6=ean128) SET PARAMETERS
PAR:<parameter>; <value># Set parameter is used to modify the print parameters of the unit.
Parameters Description Allowed Values (Response = RES:0#)
start;<value> Set start distance. integer value in mm. edge;<+/-> Set startswitch edge. <+> : positive edge. <-> : negative
edge. endless;<+/-> Set endless print mode. <+> : endless print. mode;<vel/pos> Set encoder mode. <vel> : set velocity mode. <pos> : set
position mode. encoder;<value> Set encoder value. integer value in 1/100000
mm/encoder pulses. velocity;<value> Set velocity value. integer value in m/sec. FILE
FIL:<parameters># <file> (after receiving response to send) Parameters Description Response N;<filename>;<file extension>; <file size>
Initialize new file transmission to CF card in CU unit.
FIL:G;<filename>#
Send file data after FIL:G response RES:0#

HS Automatic ApS Side 40 af 41 17-11-2005 HSAjet-CU user manual
Last saved Fejl! Ukendt argument for parameter.
OBJECT DATA RESPONSE This is the response you get on REQ:object data
Object type Responses parameters All active, name, font, prompt, locked, layer Text text Counter decimals, counter, direction, leadin, maxcount,
mincount, countstep, repeats Time format, minoffset Date format, dayoffset, houroffset Barcode
DAT:<parameters>;<value># … (RES:0# after last DAT response)
content, objtype, objnr, symbology, modul PARAMETERS RESPONSE This is the response you get on REQ:parameters#
Responses parameters DAT:<parameters>;<value># … (RES:0# after last DAT response)
startdelay, startedge, direction, upsidedown, otherside, spitdelay, spitlength, tickle, repeatnr, repeatdis, endless, firemode, modular, position, qudrature, velocity
STATUS RESPONSE This is the response you get on REQ:status# Responses parameters DAT:<parameters>;<value># … (RES:0# after last DAT response)
printactive, selectedfile, printcount, systime
ERROR RESPONSES Error number Error Description 0 No errors 1 Wrong password 2 Unknown command 10 Password accepted (ethernet only, not error) 11 Not connected (ethernet only. To connect use CMD:C;<password>#) 21 FIL: File not found / CF card full 24 File name error (use upper letters or numbers only) 100 CMD: Unknown command 101 Printer is not running 102 Printer is running 103 File not found 106 Printer active 200 Unknown request 300 Object not found 301 OBJ: Unknown or missing parameter 320 OBJ: illegal data 1000 PAR: Unknown or missing parameter 1020 PAR: Illegal edge 1040 PAR: Illegal data 1050 PAR: Illegal mode

HS Automatic ApS Side 41 af 41 17-11-2005 HSAjet-CU user manual
Last saved Fejl! Ukendt argument for parameter.
CU property sheet (TO-DO) Electrical
• Power consumption Xaar / HP max
• Available voltages
• Fuses
Physical
• Size
• Weight
• Brackets / mounting etc
• Display
Printing
• Max speed
• Max message size
• Max height
• Max resolution