hp deskjet 9800 - h10032. · produk ini untuk mengurangi risiko luka bakar atau luka akibat...
TRANSCRIPT

HP Deskjet 9800
Getting Started Guide
Panduan Persiapan Pemakaian
HP LaserJet Information Engineering

Untitled2.fm Page 1 Thursday, December 2, 2004 2:58 PM

Copyright Information
© 2005 Copyright Hewlett-Packard Development Company, L.P.
Reproduction, adaptation or translation without prior written permission is prohibited, except as allowed under the copyright laws.
The information contained herein is subject to change without notice.
The only warranties for HP products and services are set forth in the express warranty statements accompanying such products and services. Nothing herein should be construed as constituting an additional warranty. HP shall not be liable for technical or editorial errors or omissions contained herein.
Part number: C8165-90003
Edition 1, 2/2005
Safety information
Always follow basic safety precautions when using this product to reduce risk of injury from fire or electric shock.
1 Read and understand all instructions in the documentation that comes with the printer.
2 Use only a grounded electrical outlet when connecting this product to a power source. If you do not know whether the outlet is grounded, check with a qualified electrician.
3 Observe all warnings and instructions marked on the product.
4 Unplug this product from wall outlets before cleaning.5 Do not install or use this product near water, or when you are
wet.
6 Install the product securely on a stable surface.7 Install the product in a protected location where no one can
step on or trip over the cord, and the cord cannot be damaged.
8 If the product does not operate normally, see “Troubleshooting” in the onscreen user’s guide on the Starter CD.
9 There are no user-serviceable parts inside. Refer servicing to qualified service personnel.
Elion_GSG.book Page 1 Tuesday, December 7, 2004 11:26 AM

Informasi Keselamatan
Selalu patuhi dasar-dasar keselamatan saat menggunakan produk ini untuk mengurangi risiko luka bakar atau luka akibat sengatan listrik.
1 Harap baca dan pahami semua instruksi yang terdapat di dalam dokumentasi yang disertakan dengan printer ini.
2 Hanya gunakan sumber listrik yang telah dihubungkan dengan bumi untuk produk ini. Apabila Anda tidak yakin apakah sumber listrik Anda telah dihubungkan dengan bumi, tanyakan pada teknisi listrik yang kompeten.
3 Cermati semua peringatan dan instruksi yang terdapat pada produk.
4 Putuskan hubungan produk ini dengan sumber listrik sebelum membersihkan produk.
5 Jangan memasang atau menggunakan produk ini di dekat air, atau bila Anda dalam keadaan basah.
6 Pasang produk ini dengan aman di atas permukaan yang stabil.
7 Pasang produk pada lokasi yang terlindung, di mana kabel tidak akan terinjak atau menghalangi orang, sehingga kabel tidak rusak.
8 Jika produk tidak berfungsi secara normal, lihat “Troubleshooting” (Mengatasi Masalah) dalam panduan pengguna di layar yang terdapat pada CD Starter.
9 Dalam produk ini tidak ada bagian yang dapat diservis atau direparasi sendiri oleh pengguna. Servis produk ini harus dilakukan oleh petugas yang kompeten.
Elion_GSG.book Page 2 Tuesday, December 7, 2004 11:26 AM

En
glish
Bah
asa Ind
on
esia
Step 1: Check the package contents.1) HP Deskjet 9800 series printer, 2) power cord, 3) printed documentation (setup poster and this getting started guide), 4) Starter CD (software and electronic documentation), 5) black and tri-color print cartridges, 6) optional automatic two-sided printing accessory (duplex unit), which is included with HP Deskjet 9800d, 9803d, and 9808d printers.
Step 2: Remove the packing materials.Remove all packing tape from the printer.
Langkah 1: Periksa isi kemasan.1) Printer HP Deskjet 9800 series, 2) kabel daya, 3) dokumentasi cetak (poster pemasangan dan panduan persiapan ini, 4) CD Starter (perangkat lunak dan dokumentasi elektronik), 5) kartrid cetak hitam dan kartrid cetak tri-warna, 6) aksesori pencetakan dua-sisi otomatis opsional, yang disertakan bersama printer HP Deskjet 9800d, 9803d, dan 9808d.
Langkah 2: Lepaskan bahan-bahan pengemas.Lepaskan semua pita pengemas dari printer.
HP Deskjet 9800
Getting Started Guide
Getting Started Guide
Getting Started Guide
Getting Started Guide
HP Deskjet 9800
Elion_GSG.book Page 1 Tuesday, December 7, 2004 11:26 AM

En
glis
hB
ahas
a In
do
nes
ia
Step 3: Identify printer parts (front).1) Extendable input tray, 2) extendable output tray, 3) front manual feed paper guide, 4) front manual feed slot, 5) top cover, 6) print cartridge latch, 7) print cartridge cradle,
8) input tray lock, 9) small media guide, 10) paper width guide,11) print cartridge lights, 12) Cancel button, 13) Resume button and light, 14) Power button and light, 15) small media ejector.
Langkah 3: Kenali bagian-bagian printer (depan).1) Baki masuk yang dapat diperpanjang, 2) baki keluar yang dapat diperpanjang, 3) pembatas kertas pengumpanan manual depan, 4) lubang pengumpanan manual depan, 5) penutup atas, 6) pengancing kartrid cetak, 7) tempat kartrid cetak,
8) pengunci baki masuk, 9) pembatas media kecil, 10) pembatas lebar kertas, 11) lampu kartrid cetak, 12) tombol Cancel (Batal), 13) tombol dan lampu Resume (Lanjut), 14) tombol dan lampu Power (Daya), 15) pelepas media kecil.
6
7
Elion_GSG.book Page 2 Tuesday, December 7, 2004 11:26 AM

Identify printer parts (back).1) Universal serial bus (USB) port, 2) parallel port, 3) rear access panel, 4) rear manual feed slot, 5) rear manual feed paper guide, 6) rear access panel release buttons, 7) power input, 8) optional automatic two-sided printing accessory (duplex unit).
Step 4: Install the optional duplex unit (HP Deskjet 9800d, 9803d, and 9808d).1) Remove the rear access panel by pushing the release buttons toward each other. 2) Pull the rear access panel out of the printer. Note: Do not press the buttons on either side of the duplex unit when installing it. Use these buttons only for removing the duplex unit from the printer.
Kenali bagian-bagian printer (belakang).1) port Universal Serial Bus (USB), 2) port paralel, 3) panel akses belakang, 4) lubang pengumpanan manual belakang, 5) pembatas kertas pengumpanan manual belakang, 6) tombol pelepas panel akses belakang, 7) soket daya masuk, 8) aksesori pencetakan dua-sisi otomatis opsional (unit dupleks).
Langkah 4: Pasang unit dupleks opsional (HP Deskjet 9800d, 9803d, dan 9808d).1) Lepaskan panel akses belakang dengan menekan tombol pelepas ke arah satu sama lain. 2) Tarik panel akses belakang sampai terlepas dari printer. Catatan: Ketika memasang unit dupleks, jangan menekan tombol pada kedua sisi unit ini . Gunakan tombol-tombol ini hanya untuk melepaskan unit dupleks dari printer.
8
Elion_GSG.book Page 3 Tuesday, December 7, 2004 11:26 AM
En
glis
hB
ahas
a In
do
nes
ia
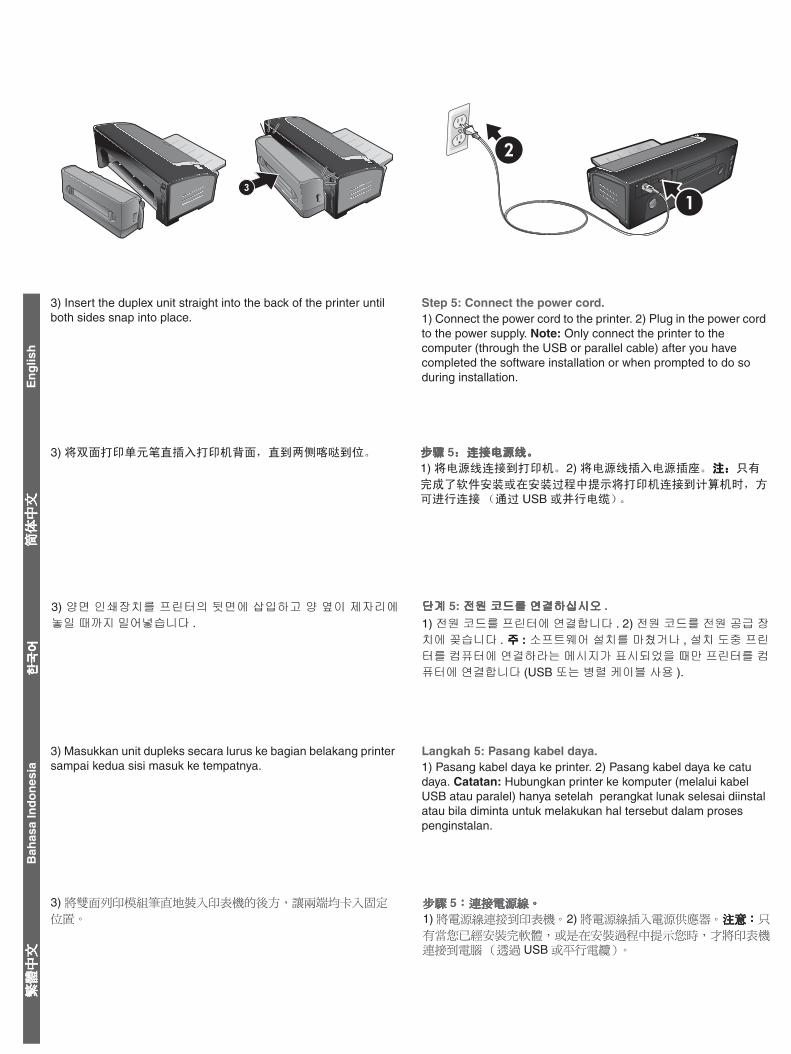
3) Insert the duplex unit straight into the back of the printer until both sides snap into place.
Step 5: Connect the power cord.1) Connect the power cord to the printer. 2) Plug in the power cord to the power supply. Note: Only connect the printer to the computer (through the USB or parallel cable) after you have completed the software installation or when prompted to do so during installation.
3) Masukkan unit dupleks secara lurus ke bagian belakang printer sampai kedua sisi masuk ke tempatnya.
Langkah 5: Pasang kabel daya.1) Pasang kabel daya ke printer. 2) Pasang kabel daya ke catu daya. Catatan: Hubungkan printer ke komputer (melalui kabel USB atau paralel) hanya setelah perangkat lunak selesai diinstal atau bila diminta untuk melakukan hal tersebut dalam proses penginstalan.
Elion_GSG.book Page 4 Tuesday, December 7, 2004 11:26 AM

Step 6: Load the paper.1) Raise the output tray. Wait a few seconds for the printer to initialize. 2a) Press the input tray lock. 2b) Extend the input tray. 3) Press the button on top of the paper width guide and slide the guide to the left to the outermost position.
4) Insert up to 150 sheets of paper, print-side down along the right side of the input tray until the paper stops. 5) Press the button on top of the paper width guide and slide the guide to the right until the guide stops at the edge of the media.
Langkah 6: Masukkan kertas.1) Angkat baki keluar. Tunggu beberapa detik sampai printer melakukan inisialisasi. 2a) Tekan pengunci baki masuk. 2b) Tarik perpanjangan baki masuk. 3) Tekan tombol di atas pembatas lebar kertas, kemudian geser pembatas ke arah kiri sampai ke posisi paling ujung.
4) Masukkan hingga 150 lembar kertas, dengan sisi cetak menghadap ke bawah dan kertas menempel ke sisi kanan baki masuk, hingga kertas terhenti. 5) Tekan tombol di atas pembatas lebar kertas, kemudian geser pembatas ke kanan hingga pembatas berhenti di tepi media (kertas) tersebut.
HP Deskjet 9800
2b
2a
Elion_GSG.book Page 5 Tuesday, December 7, 2004 11:26 AM

En
glis
hB
ahas
a In
do
nes
ia
6a) Press the input tray lock. 6b) Push the tray in until it stops at the edge of the media. 7) Lower the output tray.
Step 7: Turn on the printer and install the print cartridges.1) Press the Power button to turn on the printer. 2) Open the top cover and wait for the printer to initialize. Note: Wait a few seconds for the carriage to disengage before inserting the print cartridge. 3) Lift the print cartridge latches.
6a) Tekan pengunci baki masuk. 6b) Dorong baki ke dalam hingga berhenti pada tepi media. 7) Turunkan baki keluar.
Langkah 7: Hidupkan printer, kemudian pasang kartrid cetak.1) Tekan tombol Power (Daya) untuk menghidupkan printer. 2) Buka penutup atas, kemudian tunggu hingga printer melakukan inisialisasi. Catatan: Sebelum memasukkan kartrid cetak, tunggu beberapa detik hingga kereta kartrid terlepas. 3) Angkat pengancing kartrid cetak.
HP Deskjet 9800
HP Deskjet 9800
3
2
Elion_GSG.book Page 6 Tuesday, December 7, 2004 11:26 AM
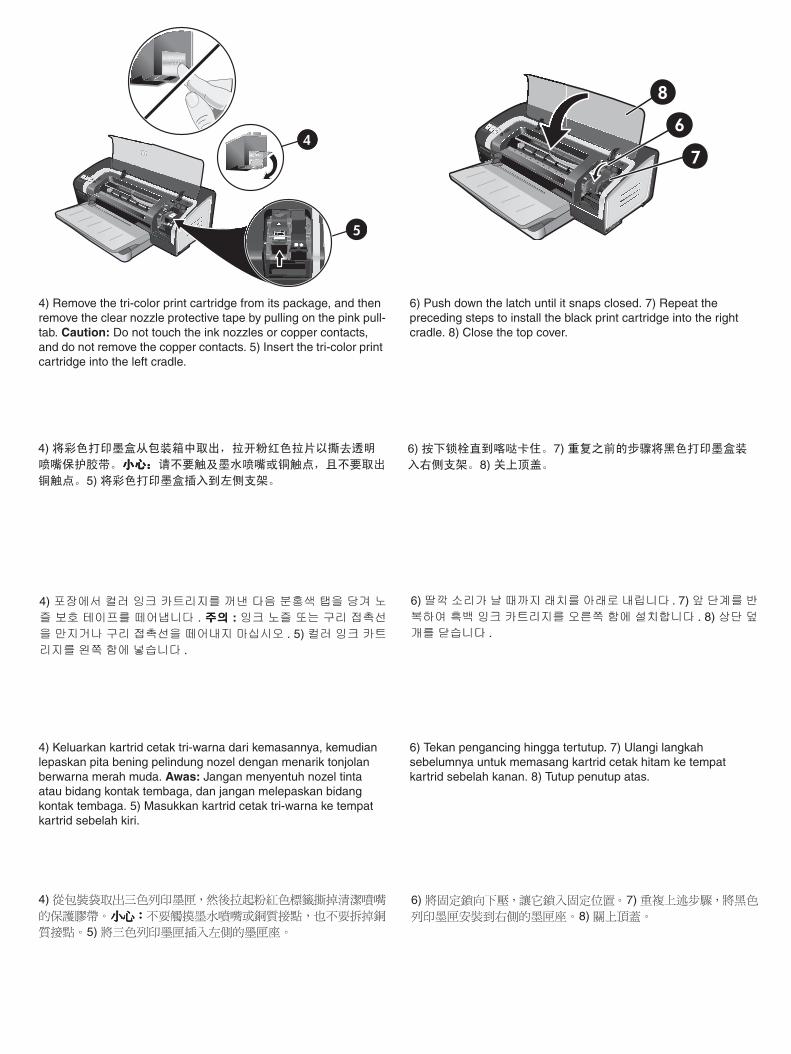
4) Remove the tri-color print cartridge from its package, and then remove the clear nozzle protective tape by pulling on the pink pull-tab. Caution: Do not touch the ink nozzles or copper contacts, and do not remove the copper contacts. 5) Insert the tri-color print cartridge into the left cradle.
6) Push down the latch until it snaps closed. 7) Repeat the preceding steps to install the black print cartridge into the right cradle. 8) Close the top cover.
4) Keluarkan kartrid cetak tri-warna dari kemasannya, kemudian lepaskan pita bening pelindung nozel dengan menarik tonjolan berwarna merah muda. Awas: Jangan menyentuh nozel tinta atau bidang kontak tembaga, dan jangan melepaskan bidang kontak tembaga. 5) Masukkan kartrid cetak tri-warna ke tempat kartrid sebelah kiri.
6) Tekan pengancing hingga tertutup. 7) Ulangi langkah sebelumnya untuk memasang kartrid cetak hitam ke tempat kartrid sebelah kanan. 8) Tutup penutup atas.
HP Deskjet 9800
7
6
8
Elion_GSG.book Page 7 Tuesday, December 7, 2004 11:26 AM

En
glis
hB
ahas
a In
do
nes
ia
The printer aligns the print cartridges and automatically prints an alignment page. The alignment process takes a few minutes. Note: Do not open the top cover when the printer is aligning the print cartridges.
Troubleshooting. If the printer does not print, make sure: 1) The power light is on. 2) The light on the power supply module is lit. 3) The power cord is firmly connected. 4) The rear access panel is locked into place. 5) The print cartridges are properly installed. 6) Paper is loaded in the input tray. 7) The top cover is closed. If it still does not print, see “Troubleshooting” in the onscreen user’s guide on the Starter CD.
Printer akan meluruskan kartrid cetak dan secara otomatis mencetak halaman pelurusan (alignment). Proses pelurusan ini memerlukan waktu beberapa menit. Catatan: Jangan membuka penutup atas bila printer sedang meluruskan kartrid cetak.
Mengatasi Masalah. Jika printer tidak mau mencetak, pastikan: 1) Lampu daya menyala. 2) Lampu pada modul catu daya menyala. 3) Kabel daya terpasang dengan kuat. 4) Panel akses belakang terkunci pada tempatnya. 5) Kartrid cetak terpasang dengan benar. 6) Kertas sudah dimasukkan ke dalam baki masuk. 7) Penutup atas dalam keadaan tertutup. Jika printer masih tidak dapat mencetak, lihat “Troubleshooting” (Mengatasi Masalah) dalam panduan pengguna di layar pada CD Starter.
HP Deskjet 9800
HP Deskjet 9800
6
4
32
HP Deskjet 9800 5
7
Elion_GSG.book Page 8 Tuesday, December 7, 2004 11:26 AM

Step 8: Install the software and connect the printer.Insert the Starter CD into the CD-ROM drive, and then follow the appropriate procedure for your operating system and connection (USB or parallel). Note: Only connect the printer to the computer after you have completed the software installation or when prompted to do so during installation. Also, connect only the cable you have selected during installation.
If you have connected the printer to the computer before you install the software, see “To connect the printer before installing the software” in the onscreen user's guide on the Starter CD to complete the printer installation.
Langkah 8: Instal perangkat lunak, kemudian hubungkan printer.Masukkan CD Starter ke drive CD-ROM, kemudian ikuti prosedur yang sesuai untuk sistem operasi dan koneksi (USB atau paralel) yang Anda gunakan. Catatan: Hubungkan printer ke komputer hanya jika perangkat lunak selesai diinstal atau bila diminta untuk melakukan hal tersebut sewaktu menginstal. Juga, hubungkan hanya kabel yang Anda pilih sewaktu menginstal.
Jika printer telah dihubungkan ke komputer sebelum perangkat lunak diinstal, lihat “To connect the printer before installing the software” (Cara menghubungkan printer sebelum menginstal perangkat lunak) dalam panduan pengguna di layar pada CD Starter untuk menyelesaikan pemasangan printer.
Elion_GSG.book Page 9 Tuesday, December 7, 2004 11:26 AM

En
glis
hB
ahas
a In
do
nes
ia
Step 9: Test the software installation.After you complete the software installation and connect the printer to the computer, print a document from an application you use frequently.
Step 10: Register the printer.Register the printer to receive important support and technical information. If you did not register your printer while installing the software, you can register at http://www.register.hp.com.
Langkah 9: Uji penginstalan perangkat lunak.Setelah perangkat lunak selesai diinstal dan printer sudah dihubungkan ke komputer, cetaklah satu dokumen menggunakan aplikasi yang sering Anda gunakan.
Langkah 10: Daftarkan printer.Daftarkan printer Anda agar bisa memperoleh dukungan dan informasi teknis yang penting. Jika Anda belum mendaftar ketika menginstal perangkat lunak, Anda dapat melakukannya di http://www.register.hp.com.
HP Deskjet 9800
WWW
Elion_GSG.book Page 10 Tuesday, December 7, 2004 11:26 AM
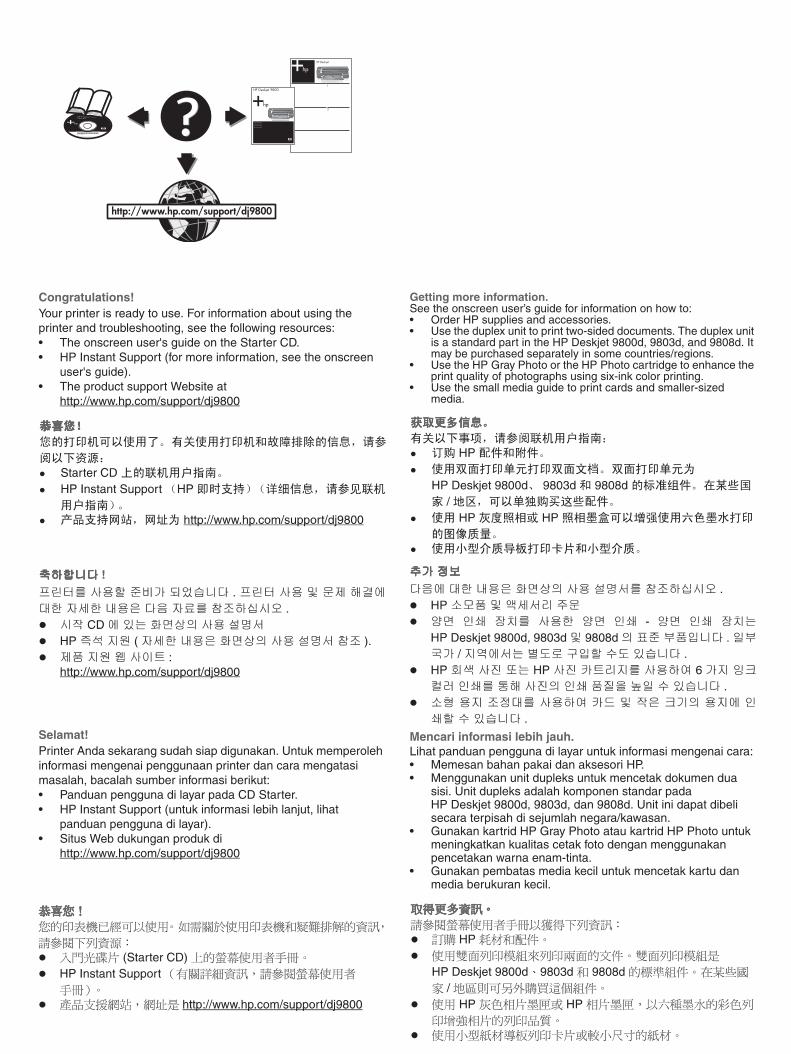
Congratulations!Your printer is ready to use. For information about using the printer and troubleshooting, see the following resources:• The onscreen user's guide on the Starter CD.• HP Instant Support (for more information, see the onscreen
user's guide).• The product support Website at
http://www.hp.com/support/dj9800
Getting more information.See the onscreen user’s guide for information on how to:• Order HP supplies and accessories.• Use the duplex unit to print two-sided documents. The duplex unit
is a standard part in the HP Deskjet 9800d, 9803d, and 9808d. It may be purchased separately in some countries/regions.
• Use the HP Gray Photo or the HP Photo cartridge to enhance the print quality of photographs using six-ink color printing.
• Use the small media guide to print cards and smaller-sized media.
Selamat!Printer Anda sekarang sudah siap digunakan. Untuk memperoleh informasi mengenai penggunaan printer dan cara mengatasi masalah, bacalah sumber informasi berikut:• Panduan pengguna di layar pada CD Starter.• HP Instant Support (untuk informasi lebih lanjut, lihat
panduan pengguna di layar).• Situs Web dukungan produk di
http://www.hp.com/support/dj9800
Mencari informasi lebih jauh.Lihat panduan pengguna di layar untuk informasi mengenai cara:• Memesan bahan pakai dan aksesori HP.• Menggunakan unit dupleks untuk mencetak dokumen dua
sisi. Unit dupleks adalah komponen standar pada HP Deskjet 9800d, 9803d, dan 9808d. Unit ini dapat dibeli secara terpisah di sejumlah negara/kawasan.
• Gunakan kartrid HP Gray Photo atau kartrid HP Photo untuk meningkatkan kualitas cetak foto dengan menggunakan pencetakan warna enam-tinta.
• Gunakan pembatas media kecil untuk mencetak kartu dan media berukuran kecil.
HP Deskjet 9800
Getting Started Guide
Getting Started Guide
Getting Started Guide
Getting Started Guide
Elion_GSG.book Page 11 Tuesday, December 7, 2004 11:26 AM

Printer lights referenceThe printer lights indicate printer status and are useful for diagnosing printing problems. The following table shows printer light patterns that might occur during the installation process.
You can find a complete list of printer light descriptions in the following locations:
• Onscreen user’s guide located on the Starter CD: See the “Printer lights reference” section.• Printer Driver: Right-click the printer icon. Select Printing Preferences. From the Services tab, select Help with Printer Lights.• Diagnostics page: Press and hold the Power button, press the Resume button four times, and then release the Power button.
Printer light indication Explanation and recommended action
Left and right print cartridge lights The left print cartridge light indicates tri-color print cartridge status; the right print cartridge light indicates black or photo print cartridge status.
The print cartridge lights can be on or blinking in combination with the Power light and Resume light behaviors listed in this table.
• On: Print cartridge is low on ink or out of ink. Replace the print cartridge soon. For instructions, see the onscreen user’s guide.
• Blinking: Print cartridge is damaged, missing, or incompatible. Reinstall or replace the print cartridge. For more information, see the onscreen user’s guide. If printing with a single print cartridge, ignore this light.
Printer lights cycle The printer lights cycle when the printer is reinitializing.• No action required.
Power light blinks Printer is printing or processing a print job.
• No action required.
Power and Resume lights on Check for one of the following conditions:
• Make sure the top cover is closed.• Make sure the rear access panel or duplex unit is correctly installed and
locked into place.
Elion_GSG.book Page 12 Tuesday, December 7, 2004 11:26 AM

Troubleshooting
Printing a diagnostics page
Use the diagnostics page to view current printer settings, to help troubleshoot printer problems, and to verify installation of optional accessories, such as trays. The diagnostics page also contains a log of recent events.
If you need to call HP, print the diagnostics page before calling.
To print a diagnostics pagePress and hold the Power button, press the Resume button four times, and then release the Power button.
Problems printing an alignment page
Check the printer to ensure the following:• Power light is on and not blinking. When the printer is first
turned on, it takes approximately 45 seconds to warm up.
• No printer lights are on or blinking and the printer is in the Ready state. If lights are on or blinking, see “Printer lights reference.”
• Power cord and other cables are working and firmly connected to the printer.
• All packing tapes and materials are removed from the printer.
• Print cartridges are properly installed in the correct cradle. The icon on the print cartridge should match the icon on the cradle. Press down firmly on each one to ensure proper contact. Ensure you have removed the tape from each print cartridge.
• Print cartridge latch and all covers are closed.
• Rear access panel or optional automatic two-sided printing accessory (duplex unit) is locked into place.
• Media is loaded correctly in the tray and is not jammed in the printer.
Problems installing software
Check the computer system• Make sure the computer meets the system requirements (see
the onscreen user’s guide on the Starter CD).
Verify installation preliminaries• Before installing software on a Windows computer, ensure all
other programs are closed.
• If the computer does not recognize the path to the CD drive that you type, ensure you are specifying the correct drive letter.
• If the computer cannot recognize the Starter CD in the CD drive, inspect the CD for damage. Also, you can download the printer driver from http://www.hp.com/support/dj9800.
Reinstall the printer software• If you are using Windows and the computer cannot detect the
printer, run the Scrubber utility (located in the Utils\Scrubber folder on the Starter CD) to perform a clean printer driver uninstallation. Restart your computer, and re-install the printer driver.
Problems connecting to a network
Note: After correcting any of the following, run the setup program again.
General network troubleshootingIf you are unable to install the printer software, verify the following:
• All cable connections to the computer and the printer are secure.
• The network is operational and the network hub is turned on.
• All applications, including virus protection programs and personal firewalls, are closed or disabled.
• Make sure the printer is installed on the same subnet as the computers that will be using the printer.
• If the installation program cannot discover the printer, print the diagnostics page and enter the IP address manually in the installation program.
• If you are using a computer running Windows, make sure that the network ports created in the printer driver match the printer IP address:
1 Print a diagnostics page.
2 From the Windows desktop, click Start, point to Settings, and then select Printers or Printers and Faxes.
3 Right-click the printer icon, click Properties, and then click the Ports tab.
4 Select the TCP/IP port for the printer, and then click Configure Port.
5 Compare the IP address listed in the dialog box and make sure it matches the IP address listed on the configuration page. If the IP addresses are different, change the IP address in the dialog box to match the address on the configuration page.
6 Click OK twice to save the settings and close the dialog boxes.
Problems connecting to a wired network• If the light on the network connector does not turn on, make
sure that all of the “General network troubleshooting” conditions listed above are met.
• Though it is not recommended that you assign the printer with a static IP address, you might resolve some installation problems (such as a conflict with a personal firewall) by doing so. For more information, see the onscreen user’s guide on the starter CD.
Elion_GSG.book Page 1 Tuesday, December 7, 2004 11:26 AM

Hewlett-Packard Limited Warranty Statement
Extent of Limited Warranty
1 Hewlett-Packard warrants to the end-user customer that the HP products specified above will be free from defects in materials and workmanship for the duration specified above, which duration begins on the date of purchase by the customer.
2 For software products, HP’s limited warranty applies only to a failure to execute programming instructions. HP does not warrant that the operation of any product will be uninterrupted or error free.
3 HP’s limited warranty covers only those defects that arise as a result of normal use of the product, and does not cover any other problems, including those that arise as a result of:
a Improper maintenance or modification;
b Software, media, parts, or supplies not provided or supported by HP;
c Operation outside the product's specifications;
d Unauthorized modification or misuse.
4 For HP printer products, the use of a non-HP print cartridge or a refilled print cartridge does not affect either the warranty to the customer or any HP support contract with the customer. However, if printer failure or damage is attributable to the use of a non-HP or refilled print cartridge, HP will charge its standard time and materials charges to service the printer for the particular failure or damage. This warranty does not extend to empty HP print cartridges, refilled HP print cartridges, or HP print cartridges which have been tampered with.
5 If HP receives, during the applicable warranty period, notice of a defect in any product which is covered by HP’s warranty, HP shall either repair or replace the product, at HP’s option.
6 If HP is unable to repair or replace, as applicable, a defective product which is covered by HP’s warranty, HP shall, within a reasonable time after being notified of the defect, refund the purchase price for the product.
7 HP shall have no obligation to repair, replace, or refund until the customer returns the defective product to HP.
Any replacement product may be either new or like new, provided that it has functionality at least equal to that of the product being replaced.
8 HP products may contain remanufactured parts, components, or materials equivalent to new in performance.
9 HP’s Limited Warranty Statement is valid in any country/region where the covered HP product is distributed by HP. Contracts for additional warranty services, such as on-site service, are available from any authorized HP service facility in countries/regions where the product is distributed by HP or by an authorized importer.
Limitations of Warranty
TO THE EXTENT ALLOWED BY LOCAL LAW, NEITHER HP NOR ITS THIRD-PARTY SUPPLIERS MAKES ANY OTHER WARRANTY OR CONDITION OF ANY KIND, WHETHER EXPRESS OR IMPLIED WARRANTIES OR CONDITIONS OF MERCHANTABILITY, SATISFACTORY QUALITY, AND FITNESS FOR A PARTICULAR PURPOSE.
Limitations of Liability
1 To the extent allowed by local law, the remedies provided in this Warranty Statement are the customer’s sole and exclusive remedies.
2 THE EXTENT ALLOWED BY LOCAL LAW, EXCEPT FOR THE OBLIGATIONS SPECIFICALLY SET FORTH IN THIS WARRANTY STATEMENT, IN NO EVENT SHALL HP OR ITS THIRD-PARTY SUPPLIERS BE LIABLE FOR DIRECT, INDIRECT, SPECIAL, INCIDENTAL, OR CONSEQUENTIAL DAMAGES, WHETHER BASED ON CONTRACT, TORT, OR ANY OTHER LEGAL THEORY AND WHETHER ADVISED OF THE POSSIBILITY OF SUCH DAMAGES.
Local Law
1 This Warranty Statement gives the customer specific legal rights. The customer may also have other rights which vary from state to state in the United States, from province to province in Canada, and from country/region to country/region elsewhere in the world.
2 To the extent that this Warranty Statement is inconsistent with local law, this Warranty Statement shall be deemed modified to be consistent with such local law. Under such local law, certain disclaimers and limitations of this Warranty Statement may not apply to the customer. For example, some states in the United States, as well as some governments outside the United States (including provinces in Canada), may:
a Preclude the disclaimers and limitations in this Warranty Statement from limiting the statutory rights of a customer (e.g., the United Kingdom);
b Otherwise restrict the ability of a manufacturer to enforce such disclaimers or limitations; or
c Grant the customer additional warranty rights, specify the duration of implied warranties which the manufacturer cannot disclaim, or allow limitations on the duration of implied warranties.
3 FOR CONSUMER TRANSACTIONS IN AUSTRALIA AND NEW ZEALAND, THE TERMS IN THIS WARRANTY STATEMENT, EXCEPT TO THE EXTENT LAWFULLY PERMITTED, DO NOT EXCLUDE, RESTRICT, OR MODIFY, AND ARE IN ADDITION TO, THE MANDATORY STATUTORY RIGHTS APPLICABLE TO THE SALE OF THE HP PRODUCTS TO SUCH CUSTOMERS.
HP product Duration of Limited Warranty
Software 90 days
Accessories 90 days
Print cartridges* Until the HP print cartridge has been depleted of HP ink, or until the “end of warranty” date printed on the HP print cartridge, whichever occurs first.
Printer peripheral hardware (see below for details) 1 year
*For more detailed warranty information, see http://www.hp.com/support/inkjet_warranty.
Elion_GSG.book Page 1 Tuesday, December 7, 2004 11:26 AM
打印机指示灯参考
打印机指示灯表示打印机状态,有助于诊断打印问题。 下表显示了安装过程中可能出现的打印机指示灯模式。
在以下位置可以找到打印机指示灯说明的完整列表:
Starter CD 上的联机用户指南: 请参见 “打印机指示灯参考”部分。
打印机驱动程序: 右击打印机图标。 选择打印首选项。 从服务选项卡中,选择打印机指示灯帮助。
诊断页: 按住电源按钮,按 4 下继续按钮,然后释放电源按钮。
打印机指示灯表示意义 说明和建议采取的行动
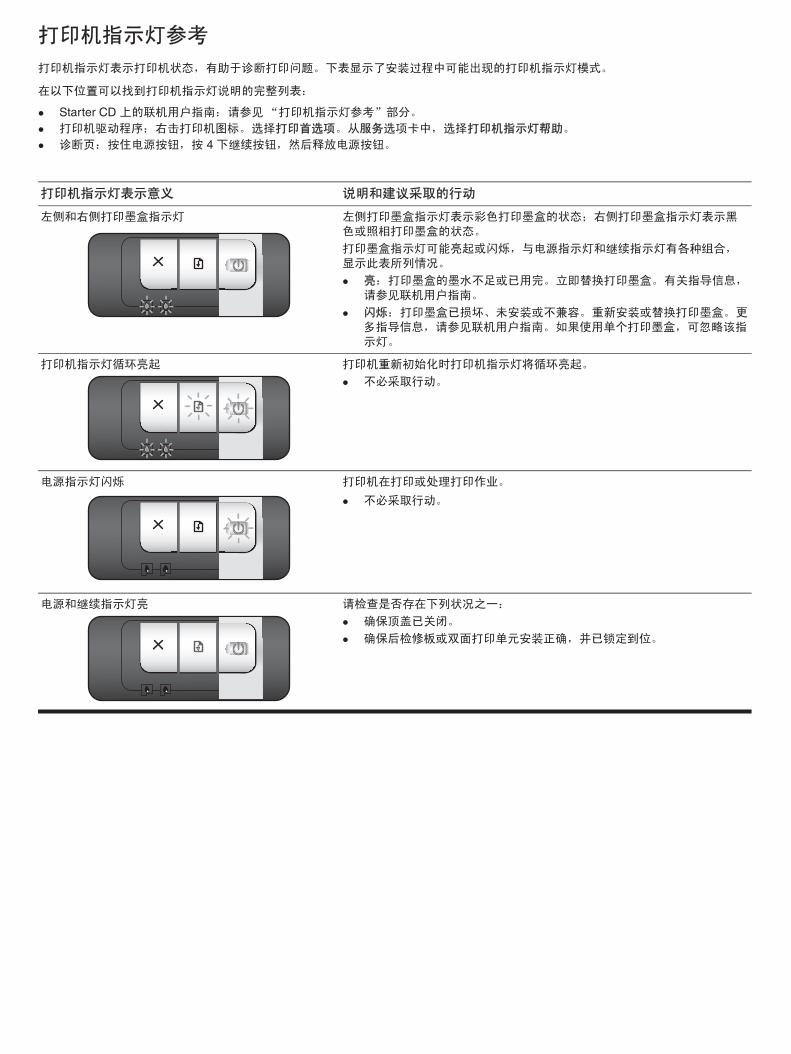
左侧和右侧打印墨盒指示灯 左侧打印墨盒指示灯表示彩色打印墨盒的状态;右侧打印墨盒指示灯表示黑色或照相打印墨盒的状态。
打印墨盒指示灯可能亮起或闪烁,与电源指示灯和继续指示灯有各种组合,显示此表所列情况。
亮: 打印墨盒的墨水不足或已用完。 立即替换打印墨盒。 有关指导信息,请参见联机用户指南。
闪烁: 打印墨盒已损坏、未安装或不兼容。 重新安装或替换打印墨盒。 更多指导信息,请参见联机用户指南。 如果使用单个打印墨盒,可忽略该指示灯。
打印机指示灯循环亮起 打印机重新初始化时打印机指示灯将循环亮起。
不必采取行动。
电源指示灯闪烁 打印机在打印或处理打印作业。
不必采取行动。
电源和继续指示灯亮 请检查是否存在下列状况之一:
确保顶盖已关闭。
确保后检修板或双面打印单元安装正确,并已锁定到位。
GSG_PrinterLights_ZHCN.fm Page 12 Tuesday, December 7, 2004 8:42 AM

故障排除
打印诊断页
使用诊断页可查看当前打印机设置,帮助解决打印机故障,检查可选附件的安装情况,例如纸盘。 诊断页还提供了最近发生事件的记
录。
如果需要联系 HP,请在联系之前打印诊断页。
打印诊断页按住电源按钮,按 4 下继续按钮,然后释放电源按钮。
打印校准页故障
检查打印机,确保以下事项:电源指示灯亮但不闪烁。 第一次开启打印机电源时,大约需要 45 秒预热。
没有打印机指示灯亮或闪烁,打印机处于就绪状态。 如果有指
示灯亮或闪烁,请参见“打印机指示灯参考”。
电源线和其它电缆已与打印机稳固连接且正常工作。
已从打印机上移除所有包装胶带和材料。
打印墨盒已正确安装至正确的支架中。 打印墨盒上的图标应与
支架上的图标相符。 将每个墨盒用力向下按,确保接触良好。 确保已移除每个打印墨盒上的胶带。
已关闭打印墨盒锁栓和所有封盖。
后维修板或可选双面打印附件(双面打印单元)已锁定到位。
介质已正确装入纸盘,打印机中未出现卡纸。
软件安装故障
检查计算机系统确保计算机符合系统要求(请参见 Starter CD 上的联机用户
指南)。
检查安装的预备步骤在 Windows 计算机上安装软件以前,确保已关闭其他所有程
序。
如果计算机无法识别您输入的光驱路径,请确保您指定的驱动
器盘符正确。
如果计算机不能识别光驱中的 Starter CD,检查一下光盘是否
有损坏。 也可以从网站下载打印机驱动程序: http://www.hp.com/support/dj9800。
重新安装打印机软件如果您使用的是 Windows 系统且计算机未检测到打印机,请
运行 Scrubber 实用程序(位于 Starter CD 的 Utils\Scrubber文件夹下)执行打印机驱动程序卸载。 重新启动计算机,然后
重新安装打印机驱动程序。
连接网络故障
注: 在解决以下故障后,请重新运行安装程序。
一般网络故障排除如果您无法安装打印机软件,请检查以下各项:
连接计算机和打印机的所有电缆都已稳固连接。
网络可正常运行且网络集线器已打开。
所有应用程序,包括防病毒程序和个人防火墙,均已关闭或禁
用。
确保将打印机安装至将使用该打印机的计算机的同一子网。
如果安装程序未找到打印机,请在安装程序中打印诊断页并手
动输入 IP 地址。
如果您使用的是运行 Windows 的计算机,请确保在打印机驱
动程序中创建的网络端口与打印机 IP 地址相符:
1 打印诊断页。
2 从 Windows 桌面上,单击开始,依次选择设置,打印机或
打印机和传真机。
3 右击打印机图标,单击属性,然后单击端口选项卡。
4 为打印机选择 TCP/IP 端口,然后单击配置端口。
5 对比对话框中列出的 IP 地址,确保其与配置页上列出的 IP 地址相符。 如果 IP 地址不同,请在对话框中更改 IP 地址
使其与配置页上的地址相符。
6 单击确定两次以保存设置并关闭对话框。
连接有线网络故障如果网络连接器上的指示灯未亮起,检查是否符合以上列出的
所有“一般网络故障排除”情况。
尽管不建议您为打印机指定静态 IP 地址,您有时还是可以这
么做来解决一些安装问题(例如与个人防火墙冲突)。 更多指
导信息,请参见 Starter CD 上的联机用户指南。
GSG_Troubleshooting_ZHCN.fm Page 1 Tuesday, December 7, 2004 8:44 AM

Hewlett-Packard 有限保修声明
有限保修范围
1 Hewlett-Packard 向 终用户保证:以上列出的 HP 产品在上述期限
内无材料和工艺瑕疵,期限自客户购买之日起计算。
2 对于软件产品, HP 的有限保修仅适用于无法执行程序指令的故障。 HP 并不保证任何产品的运行不会中断或没有错误。
3 HP 的有限保修仅适用于产品在正常使用情况下出现的瑕疵,不适用
于其它任何问题,包括由以下原因导致的问题:
a 维护或修改不当;
b 非 HP 提供或支持的软件、介质、部件或配件;
c 在产品规格外操作;
d 未授权的修改或滥用。
4 在 HP 打印机产品上使用非 HP 打印墨盒或重新装灌的墨盒并不影响
客户的保修权益或与客户的任何 HP 支持合同。 但是,如果因使用非 HP 或重新装灌的打印墨盒而造成打印机故障或损坏,HP 将对特定故
障或损坏按维修打印机的标准时间和材料收费。 本 “保修声明”不包
括空的 HP 打印墨盒、重新装灌的 HP 打印墨盒或擅自改装的 HP 打印墨盒。
5 如果在适用的保修期内 HP 收到关于在 HP 保修范围内的任何产品瑕
疵通知,由 HP 决定对产品进行修理或替换。
6 如果 HP 无法在适用的情况下修理或替换 HP 保修范围内的有瑕疵产
品, HP 将在收到瑕疵通知后的合理时间内退还产品的购买款项。
7 如果用户不把有瑕疵的产品退回 HP,HP 则没有义务修理、替换或退
款。
替换的产品可能是全新或近似新的,只要其性能至少与被替换产品相同。
8 HP 产品可能包含性能上等同于新的再生产部件、组件或材料。
9 HP 的 “有限保修声明”在任何由 HP 经销 HP 保修产品的国家 / 地区均有效。 在 HP 或授权的进口商经销该产品的国家 / 地区,可从任
何授权的 HP 维修站得到有关附加保修服务 (如现场服务)合同。
保修限制
在当地法律允许的范围内, HP 及其第三方供应商均不作其他任何保证或
任何种类的要件,无论是对适销性、质量满意度或对特殊用途的适用性都
不作任何明示或暗示的保证或要件。
责任限制
1 在当地法律允许的范围内,本 “保修声明”中提供的补偿是客户唯一
且排他的补偿。
2 在当地法律允许的范围内,除本 “保修声明”中具体列出的责任外,
在任何情况下,对任何直接、间接、特殊、偶然或继起性损坏,无论
是基于合同、侵权、或其他任何法律理论,且无论是否对此类损坏发
生的可能性有无通知, HP 或其第三方供应商均不承担责任。
当地法律
1 本 “保修声明”赋予客户特定的法律权利。 客户可能还有其它权利,
具体因美国的州、加拿大的省以及世界其它地方的国家 / 地区而各有
不同。
2 如果本 “保修声明”与当地法律不一致,则应将本 “保修声明”视
作修改成与当地法律一致。 在当地法律的制约下,本 “保修声明”的
某些免责声明和限制可能不适用客户。 例如,在美国的某些州以及美
国以外的一些政府 (包括加拿大各省)可能:
a 阻止本 “保修声明”中的免责声明和限制来限定客户的法定权利
(如英国);
b 以其他方式限制生产商实施此类免责声明或限制的能力;或者
c 授予客户其他保修权利、指定生产商不能否认的暗示保修期限,
或允许限制暗示保修期限。
3 对于澳大利亚和新西兰的消费者交易,在法律许可的范围内,本 “保
修声明”中的条款并不排除、限制或修改适用于向此类用户销售的 HP 产品的强制性法定权利,且是对这些法定权利的补充。
HP 产品 有限保修期限
软件 90 天
附件 90 天
打印墨盒 * 至 HP 打印墨盒用完 HP 墨水或印在 HP 打印墨盒上的 “保修截止日”,
以两者先发生的为准。
打印机外设硬件 (参见以下详细说明) 1 年
* 有关保修的更多详细信息,请访问 http://www.hp.com/support/inkjet_warranty。
GSG_Warranty_ZHCN.fm Page 1 Tuesday, December 7, 2004 8:48 AM

프린터 표시등 참조
프린터 표시등은 프린터 상태를 표시하며 인쇄 문제 진단에 유용하게 사용됩니다 . 다음 표는 설치 프로세스 중에 발생할 수 있는 프린터표시등 패턴을 보여줍니다 .
다음 위치에서 프린터 표시등에 관한 전체 설명 목록을 찾아볼 수 있습니다 .
시작 CD에 있는 전자 사용 설명서 ("프린터 표시등 참조 " 부분 참조 ).프린터 드라이버: 프린터 아이콘을 오른쪽 마우스 단추로 누릅니다. 인쇄 기본 설정을 선택합니다. 서비스 탭에서 프린터 표시등 도움말을 선택합니다 .진단 페이지 : 전원 버튼을 누른 상태에서 재실행 버튼을 한 번 누른 후 전원 버튼을 놓습니다 .
프린터 표시등 설명 및 권장 조치
왼쪽 및 오른쪽 인쇄 카트리지 표시등 왼쪽 잉크 카트리지 표시등은 컬러 잉크 카트리지 상태를 , 오른쪽 잉크 카트리지 표시등은 흑백 또는 사진 잉크 카트리지 상태를 표시합니다 .
인쇄 카트리지 표시등은 이 표에 나열된 전원 표시등 및 재실행 표시등의 동작에 따라 켜져 있거나 깜박일 수 있습니다 .
켜져 있음 : 잉크 카트리지의 잉크가 부족하거나 없습니다 . 인쇄 카트리지를 교체하십시오 . 교체 방법은 화면상의 사용 설명서를 참조하십시오 .
깜박임 : 인쇄 카트리지가 없거나 손상되었거나 호환되지 않습니다 . 인쇄카트리지를 재설치하거나 교체하십시오 . 자세한 내용은 화면상의 사용설명서를 참조하십시오 . 단일 인쇄 카트리지를 사용하여 인쇄 중인 경우이 표시등을 무시하십시오 .
프린터 표시등이 켜졌다 꺼짐 프린터를 초기화하면 프린터 표시등이 켜졌다 꺼집니다 .
작업 필요 없음 .
전원 표시등 깜빡임 프린터가 인쇄 중이거나 인쇄 작업을 처리 중입니다 .
작업 필요 없음 .
전원 및 재실행 표시등 켜짐 다음 중 하나가 발생하지 않았는지 점검합니다 .
앞면 덮개가 잘 닫혔는지 확인합니다 . 후면 액세스 패널 또는 자동 양면 인쇄 장치가 제대로 설치되었으며 제자리에 고정되었는지 확인합니다 .
GSG_PrinterLights_KO.fm Page 12 Monday, December 6, 2004 4:01 PM

문제 해결
진단 페이지 인쇄
진단 페이지를 사용하여 현재 프린터 설정을 보고, 프린터 문제를쉽게 해결하며, 용지함과 같은 선택사항 액세서리 설치를 확인할수 있습니다 . 진단 페이지에는 최근 이벤트 로그도 들어있습니다 .
HP의 지원이 필요할 경우, 먼저 진단 페이지를 인쇄한 후 문의해주십시오 .
진단 페이지 인쇄 방법전원 버튼을 누른 상태에서 재실행 버튼을 한 번 누른 후 전원 버튼을 놓습니다 .
정렬 페이지 인쇄 문제
프린터를 점검하여 다음 사항을 확인합니다 .전원 표시등이 켜져있으며 깜박거리지 않습니다 . 프린터를 처음 켠 후 인쇄할 수 있을때까지 약 45초간의 시간이 소요됩니다 .
프린터 표시등이 모두 꺼져있거나 깜빡이지 않으며 프린터가대기 상태에 있습니다 . 표시등이 켜져있거나 깜빡일 때는 "프린터 표시등 참조 "를 확인하십시오 .
전원 코드 및 기타 케이블이 작동하고 있으며 프린터에 제대로연결되어 있습니다 .
모든 포장 테이프 및 재료를 프린터에서 제거했습니다 .
잉크 카트리지가 정확한 카트리지함에 제대로 설치되어 있습니다 . 잉크 카트리지에 있는 아이콘은 카트리지함에 있는 아이콘과 일치해야 합니다. 각 카트리지를 단단히 눌러 제대로 접촉될 수 있게 합니다. 각 잉크 카트리지에서 테이프를 떼어냈는지 확인합니다 .
잉크 카트리지 래치 및 모든 덮개가 닫혀있는지 확인합니다 .
후면 액세스 패널이나 선택사항인 자동 양면 인쇄 액세서리(양면 인쇄 장치 )가 제 위치에 고정되어 있는지 확인합니다 .
용지함에 용지를 제대로 넣었으며 프린터에 용지가 걸려 있지않은지 확인합니다 .
소프트웨어 설치 문제
컴퓨터 시스템 점검컴퓨터에서 시스템 요구 사항을 충족하고 있는지 확인합니다(시작 CD에 있는 화면상의 사용 설명서 참조 ).
설치 준비 단계 확인Windows 컴퓨터에 소프트웨어를 설치하기 전에 다른 모든 프로그램이 닫혔는지 확인합니다 .
입력한 CD 드라이브 경로를 컴퓨터가 인식하지 못하는 경우정확한 드라이브 레터를 지정했는지 확인합니다 .
컴퓨터가 CD 드라이브의 시작 CD를 인식하지 못하는 경우CD에 손상이 있는지 검사합니다 . 프린터 드라이버는 http://www.hp.com/support/dj9800에서 다운로드할 수도 있습니다 .
프린터 소프트웨어 재설치Windows를 사용하고 있으며 컴퓨터가 프린터를 감지하지 못하는 경우 Scrubber 유틸리티 (시작 CD의 Utils\Scrubber 폴더에 위치)를 실행하여 프린터 드라이버를 제거합니다. 컴퓨터를다시 시작하고 프린터 드라이버를 재설치합니다 .
네트워크 연결 문제
주 : 다음 사항을 바로잡은 후 설치 프로그램을 다시 실행합니다 .
일반적인 네트워크 문제 해결프린터 소프트웨어가 설치되지 않는 경우에는 다음 사항을 확인하십시오 .
컴퓨터 및 프린터의 모든 케이블 연결이 올바른지 확인합니다 .
네트워크가 작동되고 있으며 네트워크 허브가 켜져 있는지 확인합니다 .
바이러스 방역 프로그램 및 개인 방화벽을 포함한 모든 응용프로그램이 종료 상태에 있거나 비활성화되어 있는지 확인합니다 .
프린터를 사용할 컴퓨터와 동일한 서브넷에 프린터가 설치되어있는지 확인합니다 .
설치 프로그램에서 프린터를 찾지 못하는 경우에는 진단 페이지를 인쇄한 후 설치 프로그램에 IP 주소를 직접 입력합니다 .
Windows를 실행하는 컴퓨터를 사용 중인 경우 프린터 드라이버에 생성된 네트워크 포트가 프린터 IP 주소와 일치하는지 확인합니다 .
1 진단 페이지를 인쇄합니다 .
2 Windows 바탕화면에서 시작 , 설정 , 프린터 또는 프린터 및팩스를 차례로 선택합니다 .
3 프린터 아이콘을 마우스 오른쪽 단추로 누르고 등록 정보를누른 후 포트 탭을 누릅니다 .
4 프린터의 TCP/IP 포트를 선택한 후 포트 구성을 누릅니다 .
5 대화 상자에 나와 있는 IP 주소가 구성 페이지에 있는 IP 주소와 일치하는지 확인합니다. IP 주소가 다르면 대화 상자에 있는 IP 주소가 구성 페이지에 있는 주소와 일치하도록변경합니다 .
6 확인을 두 번 눌러 설정을 저장하고 대화 상자를 닫습니다 .
유선 네트워크 연결 문제네트워크 커넥터 표시등이 켜져있지 않으면 위에서 언급된 모든 "일반적인 네트워크 문제 해결 " 조건이 충족되고 있는지 확인합니다 .
프린터를 정적 IP 주소에 할당하는 것을 권장하지는 않지만 일부 설치 문제(예: 개인 방화벽 충돌 문제)는 이러한 방법으로 해결할 수 있습니다 . 자세한 내용은 시작 CD에 있는 화면상의 사용 설명서를 참조하십시오 .
GSG_Troubleshooting_KO.fm Page 1 Monday, December 6, 2004 4:10 PM

Hewlett-Packard 제한 보증 조항
제한 보증 범위
1 Hewlett-Packard는 일반 사용자가 제품을 구입한 날로부터 정해진 기간 동안 상기 HP 제품이 재료와 기술에 있어 결함이 없음을 보증합니다.
2 소프트웨어 제품의 경우 HP의 제한 보증은 프로그래밍 설명이 제대로 실행되지 않는 경우에만 적용됩니다. HP는 제품의 작동이 중단되지 않거나 오류가 발생하지 않는다는 보증은 하지 않습니다.
3 HP의 제한 보증은 제품을 정상적으로 사용하여 발생한 결함에만 적용되며 다음의 결과로 발생한 결함을 포함하여 다른 문제에 대해서는적용되지 않습니다.
a 부적절한 유지보수 또는 개조;
b HP가 제공 또는 지원하지 않는 소프트웨어, 용지, 부품 또는 소모품;
c 제품 사양에서 벗어난 작동;
d 무단 개조 또는 오용
4 HP 프린터 제품의 경우 HP 제품이 아닌 잉크 카트리지나 잉크를 리필한 잉크 카트리지를 사용한 경우에도 고객에 대한 보증이나 고객과의기타 HP 지원 계약이 유효합니다. 하지만 프린터의 고장이나 손상이HP 제품이 아닌 잉크 카트리지나 잉크를 리필한 카트리지의 사용으로 인해 발생한 경우에는 HP에서 프린터의 특정 고장이나 손상을 수리하는 데 소요된 표준 시간 및 재료에 대해 비용을 청구합니다. 해당보증은 빈 HP 잉크 카트리지나, 리필된 HP 잉크 카트리지 또는 변경을 가한 HP 잉크 카트리지에는 적용되지 않습니다.
5 보증 기간 중에 HP의 보증 범위에 해당되는 제품에 결함이 있음을 통지 받는 경우 HP는 HP의 선택에 따라 결함 제품을 수리하거나 교환해줍니다.
6 HP의 보증 범위에 해당되는 결함 있는 제품을 HP에서 수리할 수 없거나 교환해 줄 수 없는 경우, 결함을 통지 받은 후 합당한 기간 내에 제품의 구입가를 환불해 드립니다.
7 고객이 결함 있는 제품을 HP에 반품하기 전에는 HP에서 해당 제품을수리, 교체 또는 환불해야 할 의무가 없습니다.
교환 제품은 신품이거나 적어도 교체할 제품과 동일한 기능을 가진신품과 동등한 제품입니다.
8 HP 제품에는 성능에 있어서 신품에 준하는 제조 부품, 구성 요소 또는재료가 포함됩니다.
9 HP 제한 보증은 HP에서 HP 제품을 판매하는 모든 국가/지역에서 유효합니다. 방문 서비스와 같은 추가 보증 서비스에 대한 계약은 HP나공인 수입업체에서 제품을 공급하는 공인된 HP 서비스 센터를 통해서만 이루어질 수 있습니다.
보증 제한
지역법이 허용하는 범위에서, HP 또는 협력업체는 상업성, 품질 만족 및 특정 목적에의 적합성에 대한 명시적이거나 묵시적인 어떠한 다른 보증도 하지 않습니다.
책임의 제한
1 현지법이 허용하는 범위에서 본 보증 조항에 명시된 배상은 고객에게유일하고도 독점적인 배상입니다.
2 지역법이 허용하는 범위에서 HP 또는 협력업체는 본 보증 조항에 특별히 명시한 책임을 제외하고 어떠한 계약이나 불법 행위 또는 다른어떤 법적 이론 근거에 관계없이 직접적, 간접적, 특별적, 우발적 또는결과적인 손해에 대해서 책임을 지지 않습니다.
현지법
1 본 보증 조항은 고객에게 특정한 법적 권리를 부여합니다. 고객은 미국에서는 주마다, 캐나다에서는 지방마다, 그리고 전세계 국가/지역마다 다른 권리를 가질 수 있습니다.
2 본 보증 조항이 현지법과 일치하지 않는 부분에 대해서는 본 보증 조항을 해당 현지법과 일관되게 수정해야 합니다. 이러한 현지법에 따라본 제한 보증 조항이 고객에게 적용되지 않을 수도 있습니다. 예를 들어, 미국 내의 일부 주와 미국 이외의 일부 국가(캐나다 주 포함)에서는 다음 사항이 적용됩니다.
a 본 보증 조항의 부인 및 제한으로 인해 고객의 법적 권리를 제한하지 못합니다(예: 영국).
b 그렇지 않으면, 그러한 부인 및 제한을 시행하는 제조업체의 자격을 제한합니다.
c 고객에게 추가 보증 권한을 부여하거나, 제조업체에서 부인할 수없는 묵시적 보증 기간을 지정하거나 그렇지 않으면 묵시적 보증기간에 대한 제한을 허용하지 않습니다.
3 호주나 뉴질랜드 고객 거래의 경우, 법적으로 허용되는 범위를 제외하고 본 보증 조항은 고객에게 HP 제품 판매에 적용할 수 있는 의무적인법적 권리를 배제, 제한, 수정할 수 없으며 해당 법적 권리의 부가 사항입니다.
HP 제품 제한 보증 기간
소프트웨어 90일
액세서리 90일
잉크 카트리지* HP 잉크 카트리지의 HP 잉크가 고갈될 때까지 또는 HP 잉크 카트리지에인쇄된 "보증 종료일"까지 중에서 빠른 날짜를 적용합니다.
프린터 주변 장치 하드웨어(자세한 내용은 아래 참조) 1년
*보증에 관하여 자세한 내용은 http://www.hp.com/support/inkjet_warranty에서 확인하십시오.
GSG_Warranty_KO.fm Page 1 Monday, December 6, 2004 4:18 PM

Acuan mengenai lampu printerLampu printer berfungsi menunjukkan status printer dan berguna untuk mendiagnosis masalah printer. Tabel berikut berisi penjelasan mengenai pola lampu printer yang mungkin terjadi sewaktu proses penginstalan.
Daftar lengkap uraian lampu printer dapat diperoleh pada lokasi berikut:
• Panduan pengguna di layar yang terdapat pada CD Starter: Lihat bagian “Printer lights reference” (Acuan mengenai lampu printer).• Driver Printer: Klik kanan ikon printer. Pilih Printing Preferences (Preferensi Cetak). Dari tab Services (Layanan), pilih Help with
Printer Lights (Bantuan mengenai Lampu Printer).• Halaman diagnostik: Tekan terus tombol Power (Daya), tekan tombol Resume (Lanjut) empat kali, kemudian lepaskan tombol Power
(Daya).
Indikasi lampu printer Penjelasan dan tindakan yang dianjurkan
Lampu kartrid cetak kiri dan kanan Lampu kartrid cetak kiri menunjukkan status kartrid cetak tri-warna, lampu kartrid cetak kanan menunjukkan status kartrid cetak hitam atau kartrid foto.Lampu kartrid cetak dapat menyala atau berkedip bersamaan dengan Lampu Power (Daya) dan lampu Resume (Lanjut) yang tercantum dalam tabel ini.• Menyala: Tinta pada kartrid cetak tinggal sedikit atau sudah habis.
Gantilah segera kartrid cetak. Untuk petunjuk, lihat panduan pengguna di layar.
• Berkedip: Kartrid cetak rusak, tidak ada, atau tidak kompatibel. Ulangi pemasangan kartrid, atau gantilah kartrid. Untuk informasi lebih lanjut, lihat panduan pengguna di layar. Jika mencetak dengan hanya satu kartrid cetak, abaikan lampu ini.
Lampu printer menyala bergantian Lampu printer akan menyala bergantian bila printer melakukan inisialisasi ulang.• Tidak diperlukan tindakan apa-apa.
Lampu daya berkedip Printer sedang mencetak atau memproses pekerjaan cetak.
• Tidak diperlukan tindakan apa-apa.
Lampu Power (Daya) dan Resume (Lanjut) menyala Periksa kondisi berikut ini:• Pastikan penutup atas dalam keadaan tertutup.
• Pastikan panel akses belakang atau unit dupleks terpasang dengan benar dan terkunci pada tempatnya.
Elion_GSG.book Page 13 Tuesday, December 7, 2004 11:26 AM
Mengatasi masalah
Mencetak halaman diagnostik
Gunakan halaman diagnostik untuk mengetahui setelan printer yang sekarang, untuk membantu mengatasi masalah-masalah printer, dan untuk memeriksa pemasangan aksesori opsional, misalnya baki. Halaman diagnostik juga berisi rekaman (log) kejadian-kejadian yang terakhir.
Jika Anda perlu menghubungi HP, cetak dulu halaman diagnostik ini sebelum menelepon.
Cara mencetak halaman diagnostikTekan terus tombol Power (Daya), tekan tombol Resume (Lanjut) empat kali, kemudian lepaskan tombol Power (Daya).
Masalah pencetakan halaman pelurusan
Periksa printer untuk memastikan yang berikut:• Lampu Power (Daya) menyala tapi tidak berkedip. Waktu
pertama kali printer dihidupkan, diperlukan kira-kira 45 detik untuk pemanasan mesin.
• Lampu printer tidak ada yang menyala atau berkedip dan printer dalam keadaan Siap. Jika ada lampu yang menyala atau berkedip, lihat “Acuan mengenai lampu printer.”
• Kabel listrik dan kabel-kabel lain dalam kondisi baik dan terpasang dengan kuat ke printer.
• Semua pita dan bahan pengemas yang menempel ke printer telah dilepaskan.
• Kartrid cetak terpasang dengan benar pada tempatnya masing-masing. Ikon pada kartrid cetak harus sesuai dengan ikon pada tempat kartrid. Tekan setiap kartrid dengan mantap untuk memastikan kontak (hubungan permukaan) yang benar. Pastikan Anda telah melepaskan pita dari masing-masing kartrid cetak.
• Pengancing kartrid cetak dan semua penutup telah ditautkan.
• Panel akses belakang atau aksesori cetak dua sisi otomatis (unit dupleks) sudah terkunci pada tempatnya.
• Kertas atau media lain telah diisikan ke dalam baki dengan benar dan tidak tersangkut di dalam printer.
Masalah penginstalan perangkat lunak
Periksa sistem komputer• Pastikan komputer memenuhi persyaratan minimum (lihat
panduan pengguna di layar pada CD Starter).
Verifikasi tindakan pra-instalasi• Sebelum menginstal perangkat lunak pada komputer berbasis
Windows, pastikan bahwa semua program lain telah ditutup.
• Jika komputer tidak mengenali ‘path’ (jalur) drive CD yang Anda ketik, pastikan huruf drive yang Anda masukkan mengacu ke drive yang benar.
• Jika komputer tidak dapat mengenali CD Starter di dalam drive, coba periksa barangkali CD-nya rusak. Anda juga dapat
men-download driver untuk printer Anda dari http://www.hp.com/support/dj9800.
Instal ulang perangkat lunak printer• Jika Anda menggunakan Windows dan komputer tidak dapat
mendeteksi printer, jalankan program Scrubber utility (terdapat di folder Utils\Scrubber dalam CD Starter) untuk menghapus instalasi driver sampai bersih. Hidupkan ulang komputer Anda, kemudian instal ulang driver printer.
Masalah koneksi ke jaringan
Catatan: Setelah yang berikut diperbaiki (yang manapun), jalankan lagi program setup.
Mengatasi masalah umum jaringanJika Anda tidak dapat menginstal perangkat lunak printer, pastikan:
• Semua hubungan kabel ke komputer dan ke printer sudah benar.
• Jaringan sudah operasional dan hub jaringan telah diaktifkan.
• Semua aplikasi, termasuk program anti virus dan firewall pribadi, ditutup atau dinonaktifkan.
• Pastikan bahwa printer dan komputer-komputer yang akan menggunakan printer ini diinstal di dalam satu subnet.
• Jika program instalasi tidak dapat menemukan printer, cetak halaman diagnostik, kemudian masukkan alamat IP secara manual dalam program instalasi.
• Jika Anda menggunakan komputer yang menjalankan Windows, pastikan bahwa port jaringan yang dibuat dalam driver printer cocok dengan alamat IP printer:
1 Cetak halaman diagnostik.
2 Dari desktop Windows, klik Start, arahkan kursor ke Settings, kemudian pilih Printers atau Printers and Faxes.
3 Klik kanan ikon printer, klik Properties, kemudian klik tab Ports.
4 Pilih port TCP/IP untuk printer, kemudian klik Configure Port.
5 Bandingkan dan pastikan bahwa alamat IP yang terdapat dalam kotak dialog cocok dengan alamat IP yang tercantum dalam halaman konfigurasi. Jika kedua alamat IP tidak sama, ubahlah alamat IP pada kotak dialog agar sama dengan yang ada pada halaman konfigurasi.
6 Klik OK dua kali untuk menyimpan setelan ini dan menutup kotak dialog.
Masalah koneksi ke jaringan berkabel• Jika lampu pada konektor jaringan tidak menyala, pastikan
bahwa semua persyaratan pada “Mengatasi masalah umum jaringan” di atas telah dipenuhi.
• Meskipun tidak dianjurkan untuk memberikan alamat IP statis pada printer, namun, dengan cara ini Anda mungkin dapat mengatasi beberapa masalah penginstalan (misalnya konflik dengan firewall pribadi). Untuk informasi lebih lanjut, lihat panduan pengguna di layar pada CD Starter.
Elion_GSG.book Page 2 Tuesday, December 7, 2004 11:26 AM

Pernyataan Jaminan Terbatas Hewlett-Packard
Cakupan Jaminan Terbatas
1 HP menjamin kepada pelanggan pengguna akhir bahwa produk HP yang disebutkan di atas bebas dari cacat bahan maupun pengerjaan selama jangka waktu yang ditentukan di atas, yang dimulai sejak tanggal pembelian produk oleh pelanggan.
2 Untuk produk perangkat lunak, jaminan terbatas HP hanya berlaku pada kegagalan untuk menjalankan perintah pemrograman. HP tidak menjamin bahwa operasi suatu produk apapun akan berjalan tanpa gangguan atau bebas dari kesalahan (error).
3 Jaminan terbatas HP hanya mencakup cacat yang muncul sebagai akibat dari penggunaan normal produk ini, dan tidak mencakup masalah lain apapun, termasuk yang diakibatkan oleh:
a Perawatan atau modifikasi yang tidak semestinya;
b Perangkat lunak, media, suku cadang, atau bahan pakai yang tidak disediakan atau didukung oleh HP;
c Pengoperasian di luar spesifikasi produk;
d Modifikasi tanpa izin atau kesalahan penggunaan.
4 Untuk produk printer HP, penggunaan kartrid tinta non-HP atau kartrid isi-ulang tidak mempengaruhi jaminan bagi pelanggan atau kontrak dukungan antara HP dengan pelanggan. Namun, jika kegagalan atau kerusakan printer diakibatkan oleh penggunaan kartrid cetak non-HP atau kartrid isi-ulang, HP akan membebankan biaya standar berdasarkan waktu dan bahan yang digunakan untuk memperbaiki kegagalan atau kerusakan printer tersebut. Jaminan ini tidak mencakup kartrid cetak HP kosong, kartrid cetak HP isi-ulang, atau kartrid cetak HP yang sudah diubah.
5 Jika pada masa jaminan yang berlaku tersebut, HP menerima pemberitahuan adanya cacat dalam suatu produk yang tercakup dalam jaminan HP, HP akan memperbaiki atau mengganti produk tersebut, berdasarkan pertimbangan HP.
6 Jika HP tidak dapat memperbaiki atau mengganti, mana yang berlaku, produk cacat yang dicakup oleh jaminan HP, HP akan, dalam jangka waktu yang wajar setelah diberi tahu mengenai cacat tersebut, mengembalikan uang seharga pembelian produk tersebut.
7 HP tidak berkewajiban untuk memperbaiki, mengganti, atau mengembalikan uang jika pelanggan belum mengembalikan produk yang cacat tersebut ke HP.
Produk pengganti dapat berupa produk baru atau yang seperti baru, selama produk tersebut memiliki fungsionalitas yang setidaknya setara dengan produk yang digantikannya.
8 Produk-produk HP dapat mengandung suku cadang, komponen, atau bahan hasil pembuatan-ulang yang kinerjanya setara dengan produk baru.
9 Pernyataan Jaminan Terbatas HP berlaku di negara/kawasan di mana produk HP tersebut didistribusikan oleh HP. Kontrak untuk layanan jaminan tambahan, seperti layanan di tempat, dapat diperoleh dari tempat servis resmi HP di negara/kawasan di mana produk tersebut didistribusikan oleh HP atau oleh importir resmi.
Batasan Jaminan
SEJAUH DIIZINKAN OLEH HUKUM SETEMPAT, HP MAUPUN PEMASOK PIHAK KETIGANYA TIDAK MEMBERIKAN JAMINAN ATAU KONDISI APAPUN, BAIK JAMINAN TERSURAT MAUPUN TERSIRAT ATAU KEADAAN DAPAT DIPERDAGANGKAN (MERCHANTABILITY),
KUALITAS YANG MEMUASKAN, SERTA KESESUAIAN UNTUK TUJUAN TERTENTU.
Batas Pertanggungjawaban
1 Sejauh diizinkan oleh hukum setempat, ganti rugi yang disediakan dalam Pernyataan Jaminan ini adalah satu-satunya ganti rugi yang dapat Anda peroleh.
2 SEJAUH DIIZINKAN OLEH HUKUM SETEMPAT, KECUALI KEWAJIBAN YANG SECARA KHUSUS DIURAIKAN DALAM PERNYATAAN JAMINAN INI, DALAM KEADAAN APAPUN HP ATAU PEMASOK PIHAK KETIGANYA TIDAK BERTANGGUNG JAWAB ATAS KERUSAKAN LANGSUNG, TIDAK LANGSUNG, KHUSUS, INSIDENTAL, ATAU KONSEKUENSIAL, BAIK YANG BERDASARKAN KONTRAK, TORT, ATAU TEORI HUKUM LAIN APAPUN DAN APAKAH HP SUDAH DIBERI TAHU MENGENAI KEMUNGKINAN ADANYA KERUSAKAN TERSEBUT.
Hukum Setempat
1 Pernyataan Jaminan ini memberi pelanggan hak-hak hukum khusus. Pelanggan mungkin juga memiliki hak lain yang bervariasi dari suatu negara bagian ke negara bagian lain di Amerika Serikat, dari suatu provinsi ke provinsi lain di Kanada, dari suatu negara/kawasan ke negara/kawasan lain di tempat lain di dunia.
2 Sejauh Pernyataan Jaminan ini tidak sesuai dengan hukum setempat, Pernyataan Jaminan ini dianggap sudah diubah agar sesuai dengan hukum setempat tersebut. Menurut hukum setempat tersebut, beberapa penafian (disclaimer) dan pembatasan Pernyataan Jaminan ini mungkin tidak berlaku bagi pelanggan. Misalnya, beberapa negara bagian di Amerika Serikat, dan sejumlah pemerintah di luar Amerika Serikat (termasuk provinsi di Kanada) mungkin:
a Tidak memberlakukan penafian dan pembatasan dalam Pernyataan Jaminan ini agar tidak membatasi hak-hak hukum pelanggan (misalnya, United Kingdom);
b Dengan cara lain membatasi kemampuan produsen untuk memberlakukan penafian atau pembatasan tersebut; atau
c Memberikan hak jaminan tambahan kepada pelanggan, menentukan jangka waktu jaminan tersirat yang tidak dapat dinafikan (disclaim) oleh produsen, atau membolehkan pembatasan pada jangka waktu jaminan tersirat tersebut.
3 UNTUK TRANSAKSI PELANGGAN DI AUSTRALIA DAN SELANDIA BARU, KETENTUAN JAMINAN YANG TERCANTUM DALAM PERNYATAAN JAMINAN INI, KECUALI SEBATAS YANG DIBOLEHKAN OLEH HUKUM, TIDAK MENGECUALIKAN, MEMBATASI, ATAU MENGUBAH, NAMUN MERUPAKAN TAMBAHAN DARI, HAK-HAK YANG DIWAJIBKAN OLEH HUKUM YANG BERLAKU TERHADAP PENJUALAN PRODUK HP INI KEPADA PELANGGAN SEPERTI ITU.
Produk HP Jangka Waktu Jaminan Terbatas
Perangkat Lunak 90 hari
Aksesori 90 hari
Kartrid cetak* Hingga kartrid HP kehabisan tinta, atau hingga tanggal “akhir jaminan” yang tercantum pada kartrid cetak HP, mana yang lebih dahulu.
Perangkat keras pelengkap printer (lihat di bawah ini untuk rinciannya) 1 tahun
*Untuk informasi jaminan yang lebih rinci, lihat http://www.hp.com/support/inkjet_warranty.
Elion_GSG.book Page 2 Tuesday, December 7, 2004 11:26 AM

印表機指示燈說明
印表機指示燈可以顯示出印表機的狀態,並且對於列印問題的診斷很有幫助。 下表顯示在安裝過程中可能會發生的印表機指示燈模式。
您可以在下列位置找到印表機指示燈說明的完整清單。
入門光碟片 (Starter CD) 上的螢幕使用者手冊: 請參閱 《印表機指示燈說明》一節。
印表機驅動程式: 用滑鼠右鍵按一下印表機圖示。 選取「列印喜好設定」。 在「服務」標籤,選取「印表機指示燈說明」。
診斷頁: 按住 「電源」按鈕不要放開、按四下 「繼續」按鈕,然後鬆開 「電源」按鈕。
所顯示的印表機指示燈 說明和建議的操作
左側和右側列印墨匣指示燈 左側列印墨匣指示燈表示三色列印墨匣的狀態,而右側列印墨匣指示燈則表示黑色或相片列印墨匣的狀態。
列印墨匣指示燈可能會亮起或是閃爍,配合電源指示燈和繼續指示燈的各種組合,顯示此表所列出的狀況。
亮起: 列印墨匣的墨水不足或墨水已用完。 盡快更換列印墨匣。 如需指示,請參閱螢幕使用者手冊。
閃爍: 列印墨匣有損壞、沒有安裝,或是和印表機不相容。 重新安裝或是更換列印墨匣。 如需詳細資訊,請參閱螢幕使用者手冊。 如果僅用一個列印墨匣列印文件,請忽略這個指示燈訊號。
印表機的指示燈依序循環亮起 印表機重新初始化時,其指示燈會依序循環亮起。
不需要任何操作。
電源指示燈閃爍 印表機正在列印或是正在處理列印工作。
不需要任何操作。
電源指示燈和繼續指示燈亮起 請檢查下列狀況:
確定頂蓋有關好。
確定後方機蓋或是雙面列印模組有正確並牢固地裝好。
GSG_PrinterLights_ZHTW.fm Page 12 Tuesday, December 7, 2004 9:28 AM

疑難排解
列印診斷頁
利用診斷頁可檢視目前的印表機設定、協助疑難排解印表機的問題,並確定選購配件(例如紙匣)的安裝。 診斷頁也包含一份最近狀況
的記錄。
如果您需要聯絡 HP,請在洽詢之前列印診斷頁。
列印診斷頁按住「電源」按鈕不要放開、按四下「繼續」按鈕,然後鬆開「電源」按鈕。
列印調整頁的問題
檢查印表機,確認下列事項:電源指示燈亮起,並且不閃爍。 第一次開啟印表機電源時,會
花費約 45 秒鐘來暖機。
沒有印表機指示燈亮起或閃爍,且印表機在「就緒」狀態。 如果指示燈亮起或閃爍,請參閱《印表機指示燈說明》。
電源線和其他電纜在運作中,並且牢固地連接在印表機上。
印表機上的所有包裝膠帶和包裝材料都已經撕掉。
列印墨匣已正確安裝在正確的墨匣座中。 列印墨匣上的圖示應
該符合墨匣座上的圖示。 將每個列印墨匣用力向下壓,確定接
點有適當地接觸到。 確定已經撕掉每一個列印墨匣的膠帶。
列印墨匣固定鎖和所有蓋子都關上。
後方機蓋或選購的自動雙面列印配件(雙面列印模組)有牢固
地裝好。
紙材正確地添裝在紙匣中,而且沒有卡在印表機內。
軟體的安裝問題
檢查電腦系統請確定電腦符合系統需求(請參閱入門光碟片 (Starter CD) 上的螢幕使用者手冊)。
確定安裝前置作業在 Windows 電腦安裝軟體之前,請確定先關閉所有其他程式。
如果電腦不接受您所輸入的光碟機路徑,請確定您指定了正確
的代號字母。
如果電腦無法讀取光碟機內的入門光碟片 (Starter CD),請檢查
光碟是否有損壞。 印表機驅動程式也可以從
http://www.hp.com/support/dj9800 下載。
重新安裝印表機軟體如果您採用 Windows 系統,而電腦無法偵測到印表機,請執行
Scrubber 清除公用程式(位於入門光碟片 (Starter CD) 上的
Utils\Scrubber 資料夾內)來做清理印表機驅動程式的解除安
裝。 重新啟動電腦,然後重新安裝印表機驅動程式。
連線到網路的問題
注意: 在修正下列任何問題之後,請再執行一次設定程式。
一般網路疑難排解如果您無法安裝印表機軟體,請確定下列事項:
所有連接到電腦和印表機的電纜都有連接好。
網路可操作而且有打開網路集線器的電源。
所有應用程式(包括病毒防護程式和個人防火牆)均關閉或停
用。
確定印表機和要使用印表機的電腦安裝在相同子網路上。
如果安裝程式找不到印表機,請列印診斷頁並在安裝程式中手
動輸入 IP 位址。
如果您使用採用 Windows 系統的電腦,請確定印表機驅動程式
建立的網路連接埠符合印表機 IP 位址:
1 列印診斷頁。
2 從 Windows 桌面按一下「開始」、指向「設定」,然後選
取「印表機」或「印表機和傳真」。
3 用滑鼠右鍵按一下印表機圖示,按一下 「內容」,然後按「連接埠」索引標籤。
4 為印表機選取 TCP/IP 連接埠,然後按「設定連接埠」。
5 比較對話方塊中列出的 IP 位址,並確定符合組態頁中列出
的 IP 位址。 如果 IP 位址不同,變更對話方塊中的 IP 位址
以符合組態頁上的位址。
6 按兩下「確定」來儲存設定值並關閉對話方塊。
連接到有線網路的問題如果網路連接器上的指示燈沒有亮,請確定符合所有《一般網
路疑難排解》列出的狀況。
雖然不建議您為印表機指定靜態 IP 位址,但是這麼做可以解決
部分安裝問題(例如與個人防火牆的衝突)。 如需詳細資訊,
請參閱入門光碟片上的螢幕使用者手冊。
GSG_Troubleshooting_ZHTW.fm Page 1 Tuesday, December 7, 2004 9:29 AM

惠普科技有限保固聲明
有限保固範圍
1 惠普科技向一般使用者客戶保證,上述 HP 產品在上述的期間內,不
會有材料和製造上的瑕疵;而保固的期間以客戶購買產品的日期開始
計算。
2 對於軟體產品,HP 的有限保固僅涵蓋無法執行程式指令的情形。 HP無法保證任何產品的運作不會中斷或是不會發生錯誤。
3 HP 的有限保固僅適用於正常使用產品時所遭遇到的問題;而並不適用
於任何其它問題,例如下列原因所造成的問題:
a 不良的維護或是不當的改裝;
b 使用不是由 HP 提供或是 HP 所不支援的軟體、紙材、零件或耗材;
c 在適用的產品規格範圍之外使用產品;
d 未授權的修改或濫用。
4 在 HP 印表機產品上使用非 HP 牌或是重灌墨水的列印墨匣,不會影
響客戶的保固權益或是任何客戶所購買的 HP 支援服務合約。 但是,如
果因為使用非 HP 牌或重灌墨水的列印墨匣而造成印表機故障或損
壞,對於該特定故障或損壞的印表機修理服務,HP 會收取標準的時間
和材料費用。 這個保固服務不適用於墨水用完、重灌過墨水,或是有
拆開或改動過的 HP 列印墨匣。
5 如果 HP 在適用的保固期中,收到具有 HP 保固服務之任何產品有瑕
疵的通知,HP 得依其意願為客戶修理或更換該產品。
6 如果 HP 無法依據其適當的決定,修理或更換具有 HP 保固服務之有
瑕疵的產品,HP 會在收到有瑕疵之通知後的一段合理時間內,退還產
品的原購買金額給客戶。
7 在客戶將有瑕疵產品退回給 HP 之前,HP 沒有修理、更換或是退款的
義務。
用來更換的產品可能是全新的也可能是近似新的產品,而其功能最少和所更換的產品一樣。
8 HP 的產品中可能包含重新翻修過的零件、元件或材料,但它們的性能
和新品一樣。
9 HP 的有限保固聲明適用於任何 HP 有銷售該 HP 產品的國家 / 地區。
在任何 HP 或授權進口商有銷售產品的國家 / 地區,客戶可向任何授權
的 HP 維修服務單位選購額外的保固服務合約,例如到府服務合約。
保固限制
在當地法律允許的範圍內,HP 及其協力廠商均不提供任何其它的保固或
例外。不論是明確或暗示性的保固,或是對於適銷性、品質滿意度或特定
用途之適用性的條款,都不包含在產品保固的範圍內。
責任的限制
1 在當地法律允許的範圍內,此保固聲明所提供的補償,是客戶唯一而
所有的補償。
2 在當地法律允許的範圍內,除了此保固聲明明確敘述的義務之外,對
於任何直接、間接、特殊、附屬或後果性損害,不論是以合約、侵權
或任何其他法律理論為基礎,亦不論是否有事先通知這種損害的可能
性,HP 及其協力廠商均不負任何責任。
當地法律
1 本 「保固聲明」為客戶提供明確的法律權益。 美國的各州、加拿大的
各省,以及全球的各國家 / 地區,均可能另有不同的法律,因此客戶可
能還會有其他的權益。
2 如果本「保固聲明」和當地法律有所抵觸,則這個「保固聲明」視為
自動修訂,以符合當地法律的規定。 如果有這樣的當地法律,則這個
「保固聲明」中的某些聲明事項和限制,可能不適用於客戶。 例如美國
某些的州,以及美國以外的某些政府 (包括加拿大的省),可能會:
a 禁止這個「保固聲明」用聲明事項和限制條文來限制客戶的法定權
益 (例如英國);
b 限制廠商運用這些免責聲明或限制的權限;或
c 提供客戶額外的保固權益、指定廠商必須承擔的暗示性保固期限,
或允許限制暗示性保固的期限。
3 對於在澳洲和紐西蘭所發生的消費交易,除非當地法律許可,這個保
固聲明的條款並不排除、限制,或是修改原適用於客戶購買 HP 產品,
在法律上所保障的法定權益,而是在這些權益之上另外提供您保證。
HP 產品 有限保固期限
軟體 90 天
配件 90 天
列印墨匣 * HP 列印墨匣內的 HP 墨水用完時,或是印在 HP 列印墨匣上的 「保固結
束」日期;而以先到期的日期為準。
印表機週邊硬體 (參閱下面的詳細說明) 一年
* 如需詳細的保固資訊,請參閱 http://www.hp.com/support/inkjet_warranty。
GSG_Warranty_ZHTW.fm Page 1 Tuesday, December 7, 2004 9:28 AM

Untitled2.fm Page 1 Thursday, December 2, 2004 2:58 PM

Printed on recycled paper
© 2005 Hewlett-Packard Development Company, L.P.
Printed in Singapore
www.hp.com/support/dj9800
*C8165-90003**C8165-90003*C8165-90003
HP LaserJet Information Engineering