how to use both versions of the estrus synchronization plannerbasic excel features – the estrus...
TRANSCRIPT
How to use the Estrus Synchronization Planner
Sandy Johnson, Ph.D., Extension Beef Specialist, Kansas State University;
Garland Dahlke, Ph.D., Assistant Scientist, Iowa Beef Center, Iowa State University, Ames, IA
Multigroup Edition Standard Edition Requires MS Excel on Windows operating system Requires MS Excel on Windows or Mac and
may work with “Open Office” Puts multiple groups on the same calendar Works with a single group on a single
calendar To use the Estrus Synchronization Planner you will need a copy of MS Excel or Open Office. The planner can be downloaded at no charge from the Iowa Beef Center at http://www.iowabeefcenter.org/estrussynch.html. This page also contains additional reference materials related to synchronization of estrus and AI. You will also find tips for downloading and saving your copy of the Estrus Synchronization Planner in two forms; printed document or video. A video on use of the planner is also available, those familiar with spreadsheets will find they need little instruction to run the program. Before you download the spreadsheet, it will ask for your contact information. This is very important as we will contact you by e-mail when updates are made to the planner, generally on an annual basis. The current version is Synch 18.0 released in November of 2017. Every attempt is made to have the program free from bugs before release. In the rare event you do get an error message or unexpected value, check your version against what is listed at the website and if the error occurs in the current issue please contact one of us: Garland Dahlke ([email protected]) or Sandy Johnson at [email protected].
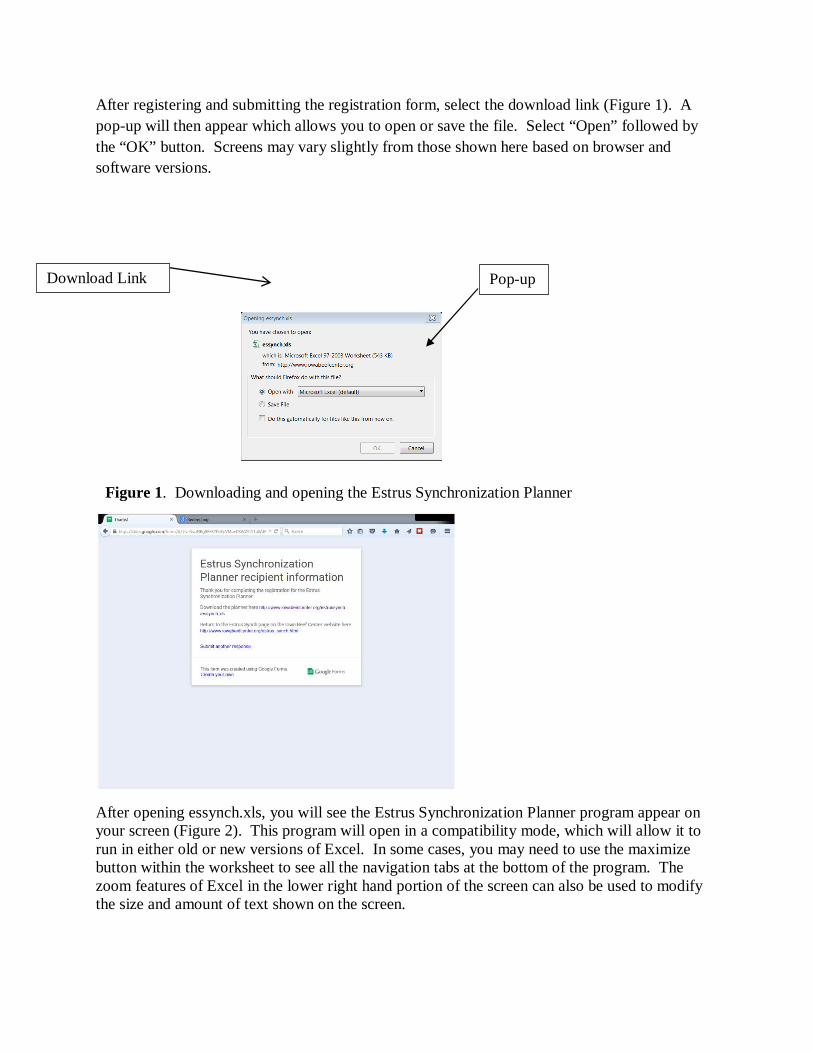
After registering and submitting the registration form, select the download link (Figure 1). A pop-up will then appear which allows you to open or save the file. Select “Open” followed by the “OK” button. Screens may vary slightly from those shown here based on browser and software versions.
After opening essynch.xls, you will see the Estrus Synchronization Planner program appear on your screen (Figure 2). This program will open in a compatibility mode, which will allow it to run in either old or new versions of Excel. In some cases, you may need to use the maximize button within the worksheet to see all the navigation tabs at the bottom of the program. The zoom features of Excel in the lower right hand portion of the screen can also be used to modify the size and amount of text shown on the screen.
Pop-up Download Link
Figure 1. Downloading and opening the Estrus Synchronization Planner
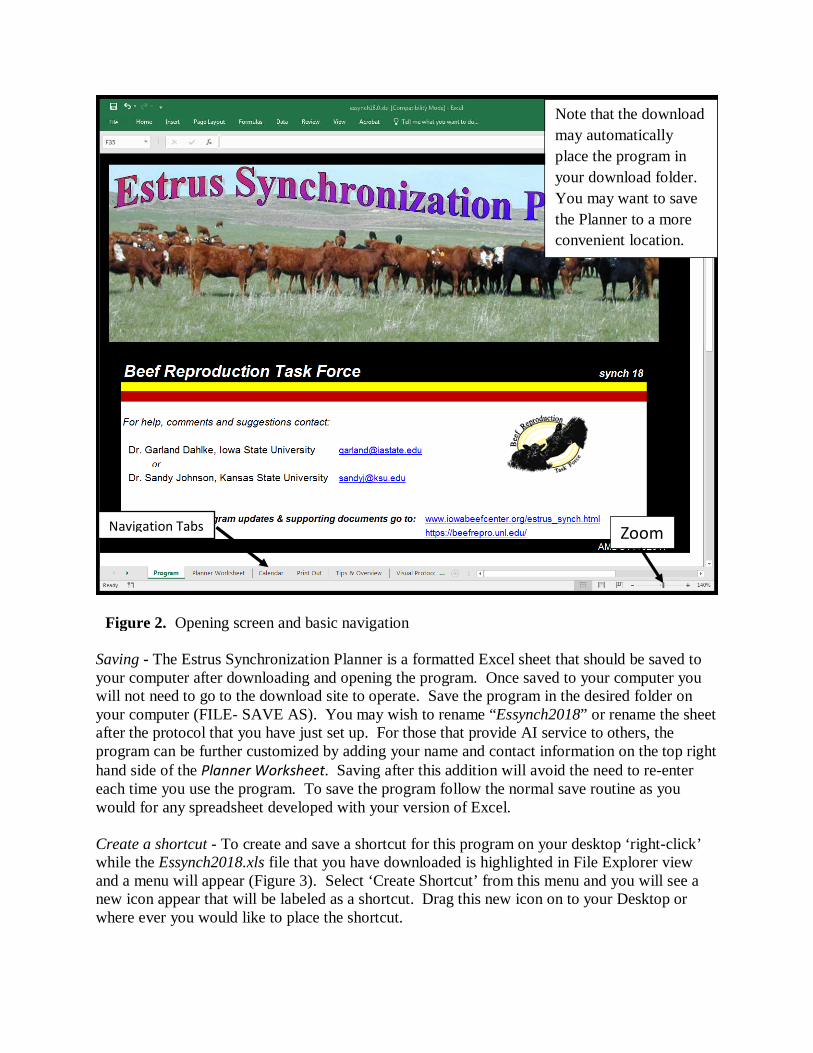
Figure 2. Opening screen and basic navigation
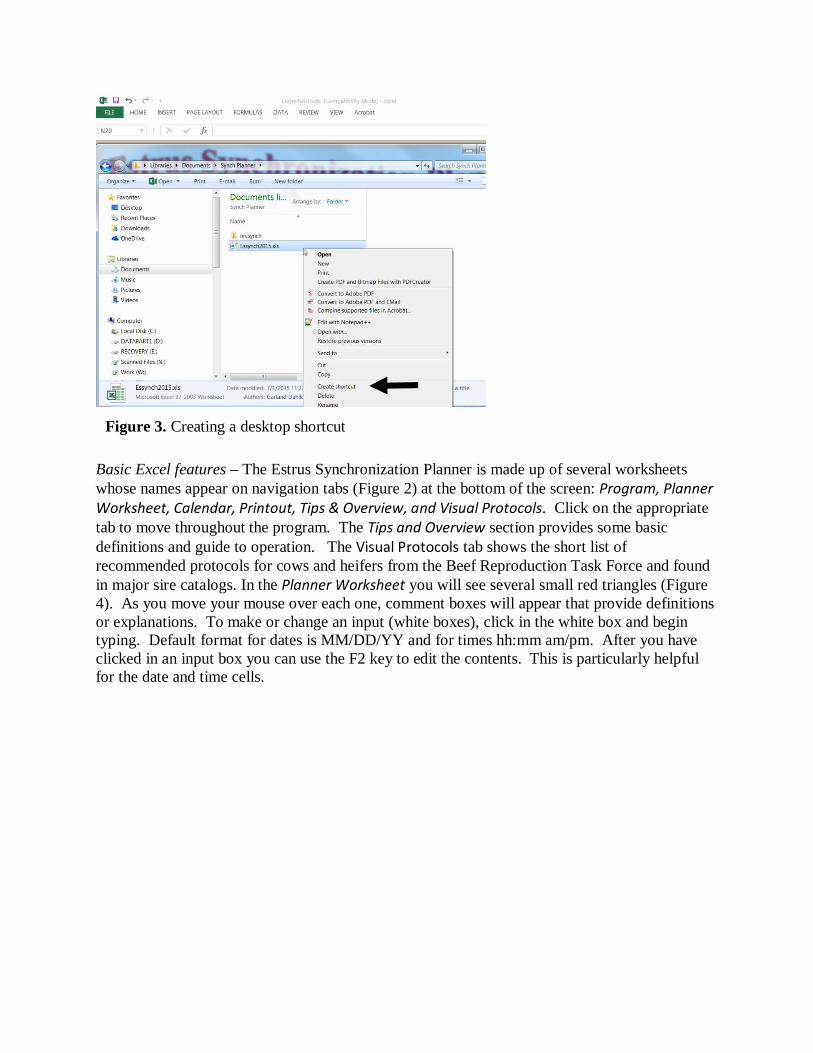
Saving - The Estrus Synchronization Planner is a formatted Excel sheet that should be saved to your computer after downloading and opening the program. Once saved to your computer you will not need to go to the download site to operate. Save the program in the desired folder on your computer (FILE- SAVE AS). You may wish to rename “Essynch2018” or rename the sheet after the protocol that you have just set up. For those that provide AI service to others, the program can be further customized by adding your name and contact information on the top right hand side of the Planner Worksheet. Saving after this addition will avoid the need to re-enter each time you use the program. To save the program follow the normal save routine as you would for any spreadsheet developed with your version of Excel. Create a shortcut - To create and save a shortcut for this program on your desktop ‘right-click’ while the Essynch2018.xls file that you have downloaded is highlighted in File Explorer view and a menu will appear (Figure 3). Select ‘Create Shortcut’ from this menu and you will see a new icon appear that will be labeled as a shortcut. Drag this new icon on to your Desktop or where ever you would like to place the shortcut.
Navigation Tabs Zoom
Note that the download may automatically place the program in your download folder. You may want to save the Planner to a more convenient location.
Basic Excel features – The Estrus Synchronization Planner is made up of several worksheets whose names appear on navigation tabs (Figure 2) at the bottom of the screen: Program, Planner
Worksheet, Calendar, Printout, Tips & Overview, and Visual Protocols. Click on the appropriate tab to move throughout the program. The Tips and Overview section provides some basic definitions and guide to operation. The Visual Protocols tab shows the short list of recommended protocols for cows and heifers from the Beef Reproduction Task Force and found in major sire catalogs. In the Planner Worksheet you will see several small red triangles (Figure 4). As you move your mouse over each one, comment boxes will appear that provide definitions or explanations. To make or change an input (white boxes), click in the white box and begin typing. Default format for dates is MM/DD/YY and for times hh:mm am/pm. After you have clicked in an input box you can use the F2 key to edit the contents. This is particularly helpful for the date and time cells.
Figure 3. Creating a desktop shortcut
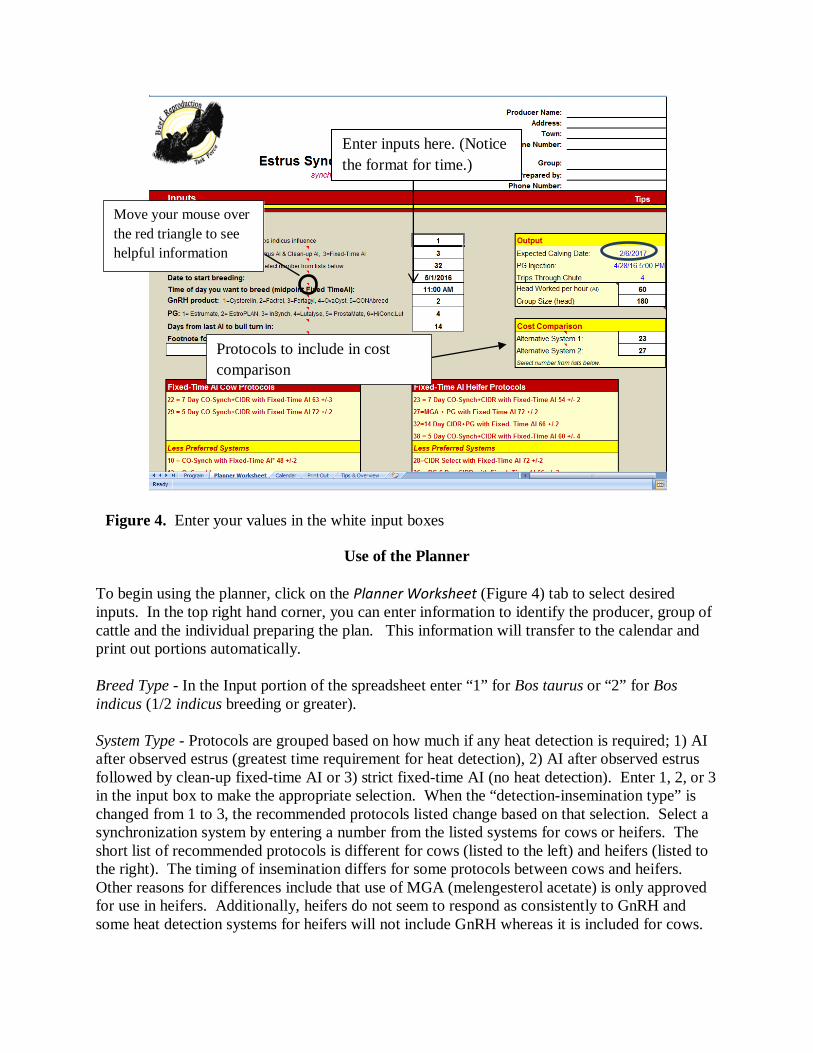
Figure 4. Enter your values in the white input boxes
Use of the Planner To begin using the planner, click on the Planner Worksheet (Figure 4) tab to select desired inputs. In the top right hand corner, you can enter information to identify the producer, group of cattle and the individual preparing the plan. This information will transfer to the calendar and print out portions automatically. Breed Type - In the Input portion of the spreadsheet enter “1” for Bos taurus or “2” for Bos indicus (1/2 indicus breeding or greater). System Type - Protocols are grouped based on how much if any heat detection is required; 1) AI after observed estrus (greatest time requirement for heat detection), 2) AI after observed estrus followed by clean-up fixed-time AI or 3) strict fixed-time AI (no heat detection). Enter 1, 2, or 3 in the input box to make the appropriate selection. When the “detection-insemination type” is changed from 1 to 3, the recommended protocols listed change based on that selection. Select a synchronization system by entering a number from the listed systems for cows or heifers. The short list of recommended protocols is different for cows (listed to the left) and heifers (listed to the right). The timing of insemination differs for some protocols between cows and heifers. Other reasons for differences include that use of MGA (melengesterol acetate) is only approved for use in heifers. Additionally, heifers do not seem to respond as consistently to GnRH and some heat detection systems for heifers will not include GnRH whereas it is included for cows.
Enter inputs here. (Notice the format for time.)
Move your mouse over the red triangle to see helpful information
Protocols to include in cost comparison
Systems listed as “less preferred” generally require additional handlings and/or costs with no improvement in results, or do not work on non-cycling animals. Date to start breeding - Entering the date to start breeding provides the expected calving date in the Output cells to the right (Figure 4, circled). The calving date is based on a 281-day gestation length. This will be the day of fixed-timed AI for strict fixed-time insemination or the day you can begin heat detection in systems requiring heat detection. The time of day you want to breed (midpoint Fixed-time AI) becomes important for protocols that use fixed-time AI or clean-up fixed-timed AI. Only synchronize as many females as you can comfortably inseminate in a 3 to 4-hour period in the given situation. You can enter the number of head you can inseminate per hour and the total number in the group. A “reduce breeding group size” message will appear when you have at least one more animal than what you can breed in 3 hours. This is a conservative number to account for times when things don’t happen as quickly as expected. Enter the midpoint of the time of day you want to conduct fixed-timed AI and check the time of day for CIDR removal or PG injection to the right under the Output section. This will help you meet the specified interval prescribed for the protocol. Trial and error may be needed so that PG injection/CIDR removal and AI both occur at workable times. Or review Table 1 to see common times used. To get the best response from the selected protocol it is important to follow the schedule and timing of activities as described. Fixed-timed insemination systems require a precise interval between CIDR removal and timed AI. By asking what day and time you want to begin breeding, the planner calculates the precise day and hour other treatments of the protocol should be administered.
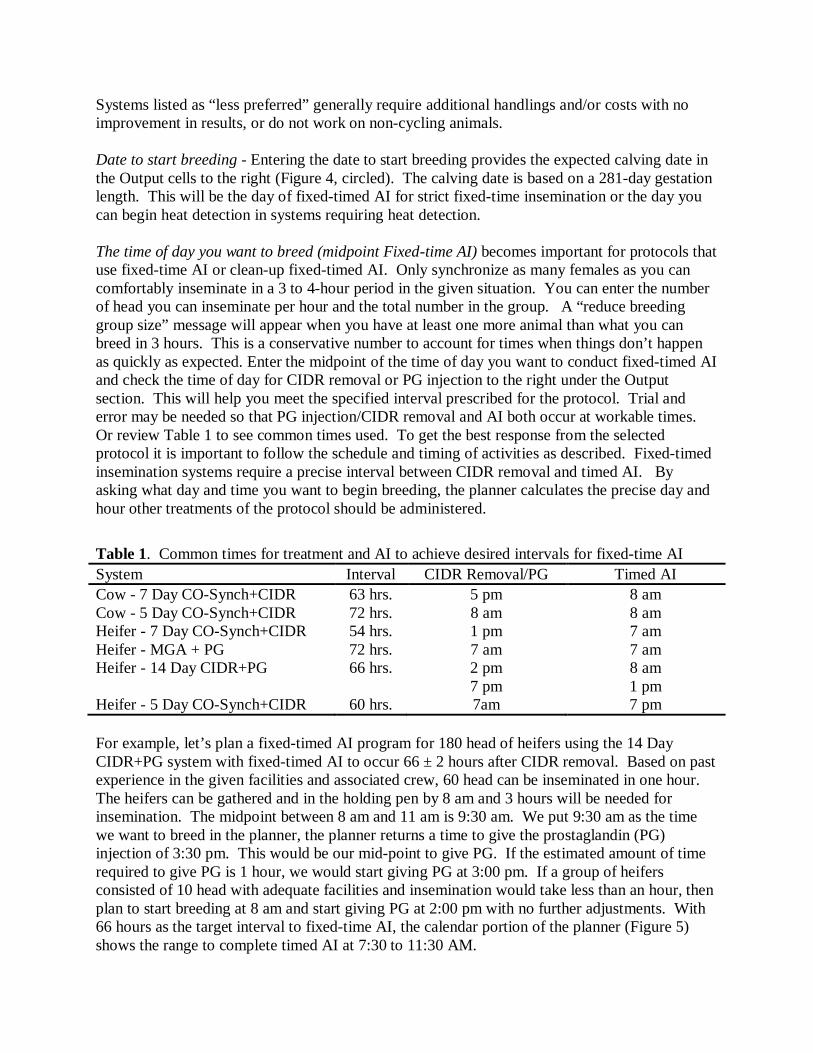
Table 1. Common times for treatment and AI to achieve desired intervals for fixed-time AI System Interval CIDR Removal/PG Timed AI Cow - 7 Day CO-Synch+CIDR 63 hrs. 5 pm 8 am Cow - 5 Day CO-Synch+CIDR 72 hrs. 8 am 8 am Heifer - 7 Day CO-Synch+CIDR 54 hrs. 1 pm 7 am Heifer - MGA + PG 72 hrs. 7 am 7 am Heifer - 14 Day CIDR+PG 66 hrs. 2 pm 8 am 7 pm 1 pm Heifer - 5 Day CO-Synch+CIDR 60 hrs. 7am 7 pm For example, let’s plan a fixed-timed AI program for 180 head of heifers using the 14 Day CIDR+PG system with fixed-timed AI to occur 66 ± 2 hours after CIDR removal. Based on past experience in the given facilities and associated crew, 60 head can be inseminated in one hour. The heifers can be gathered and in the holding pen by 8 am and 3 hours will be needed for insemination. The midpoint between 8 am and 11 am is 9:30 am. We put 9:30 am as the time we want to breed in the planner, the planner returns a time to give the prostaglandin (PG) injection of 3:30 pm. This would be our mid-point to give PG. If the estimated amount of time required to give PG is 1 hour, we would start giving PG at 3:00 pm. If a group of heifers consisted of 10 head with adequate facilities and insemination would take less than an hour, then plan to start breeding at 8 am and start giving PG at 2:00 pm with no further adjustments. With 66 hours as the target interval to fixed-time AI, the calendar portion of the planner (Figure 5) shows the range to complete timed AI at 7:30 to 11:30 AM.

GnRH product/ PG product - If you would like the name of the specific GnRH (Gonadotropin- releasing hormone) or prostaglandin (PG) product you are using to show up on the calendar or other print outs, select the number of the appropriate product. The recommended dosage to use will also show up on the output sheets. If the specific product is unknown at the time, zero, the default, will return GnRH or prostaglandin on the output. The right product must be given on the right day and at the correct dosage for a synchronization protocol to work. Days from last AI to bull turn in - The interval from the last AI to bull turn in can be indicated so it will be shown on the calendar. Generally, if identifying AI sired calves is not a priority bulls can be turned out the day after AI. However, if correct identification of parentage is critical, consideration should be given to the method of sire identification and timing when planning bull turnout. Alternative System 1/Alternative System 2 - A cost comparison can be done on up to two alternative systems. Select a number from the lists. Systems do not need to be of the same system type. The lower portion of the Planner Worksheet has input areas to estimate costs (Figure 6). The feed/yardage costs are only figured into MGA programs. The default labor estimate is based on the number of working days in a particular system and the group size. This includes gathering, sorting, synchronization treatments, heat detection and AI service (Loeske, 1989). Users can override this value and enter their own estimate of total number of hours of labor for the cost analysis. User defined charges can be added. To complete the cost analysis, enter your own values for the cost of various inputs. If no cost information is needed, proceed directly to the program outputs (Calendar and Print Out tabs). Updated cost information is not needed to continue.
Figure 5. Top portion of calendar sheet showing range of times to complete timed AI

Figure 6. Cost input section of Planner Worksheet Program Output Depending on the priority of the users, the next step would be to go to either the Calendar tab or the Print Out tab. The Print Out tab gives comments on using the selected synchronization system and then a written summary of what needs to occur each day (Figure 7). The next section of this worksheet (Figure 8) gives a summary of the immediate costs of using the system along with the costs of the alternative systems selected on the Planner Worksheet. Costs are broken down into synchronization cost, AI cost, total cost per synchronized female, feed and yardage cost (MGA systems only) and total cost. The bottom section (Figure 8) gives a cost per pregnancy based on the estrous response rate and conception rate. To see how the selected synchronization system falls on the calendar (missing Grandma’s birthday party or when help will be home from school) go to the Calendar tab to see the agenda in a calendar format (Figure 9). If the system or the dates don’t work, then go back to the Planner Worksheet to make the needed changes and re-evaluate. Select PRINT from your Excel menu to print the Calendar or Print Out output. To create a pdf version of the output to share electronically, use the print command in Excel (FILE – PRINT - PRINTER) and change the printer to Adobe PDF or other pdf printer. It will ask you to name the file and where to save it. The PDF document can be printed to paper or attached and sent anywhere by attaching to an e-mail message.
Note the associated costs of the synchronization protocol can be indicated here. The feed/yardage costs are only figured into the MGA programs. The labor (hours) required is estimated. These figures do not need to be updated to run the program.

Figure 7. Estrus Synchronization Planner spreadsheet, page 1 of Print Out worksheet
Information based on selections made in Planner Worksheet

Figure 8. Estrus Synchronization Planner spreadsheet, page 2 of Print Out worksheet
Information based on selections made in Planner Worksheet Compares cost of the selected system to chosen alternatives Cost response analysis shows costs based on varying conception and estrous response rates
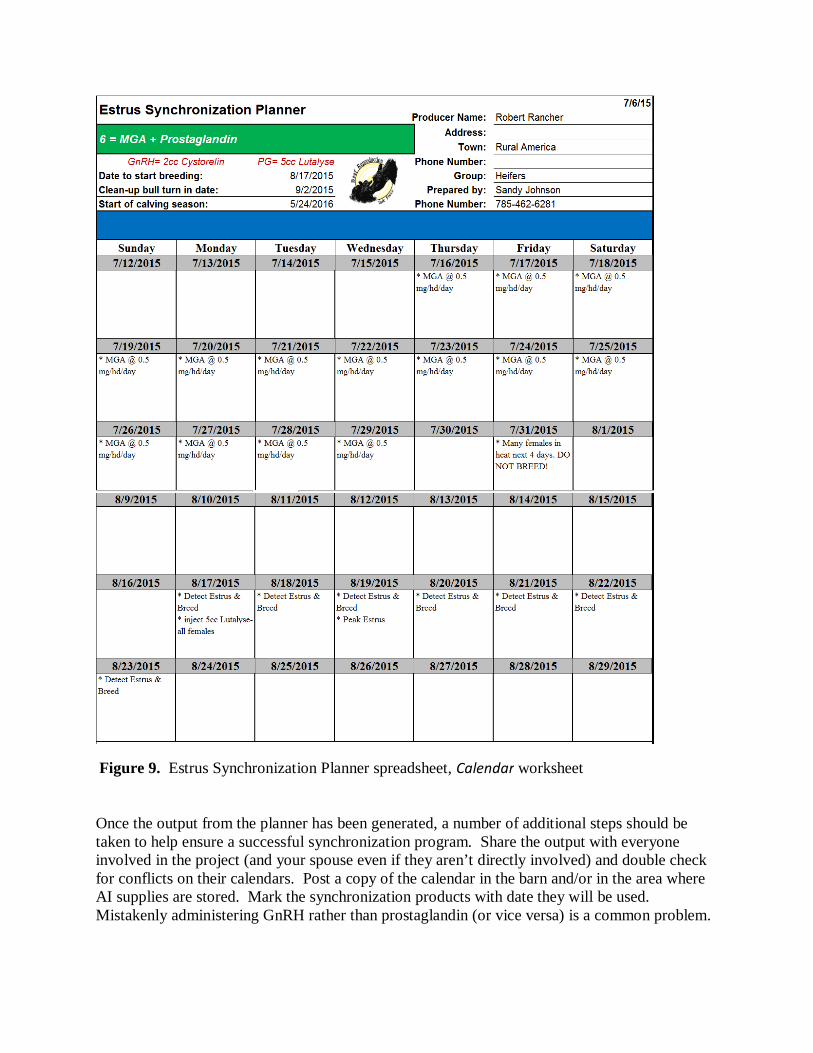
Once the output from the planner has been generated, a number of additional steps should be taken to help ensure a successful synchronization program. Share the output with everyone involved in the project (and your spouse even if they aren’t directly involved) and double check for conflicts on their calendars. Post a copy of the calendar in the barn and/or in the area where AI supplies are stored. Mark the synchronization products with date they will be used. Mistakenly administering GnRH rather than prostaglandin (or vice versa) is a common problem.
Figure 9. Estrus Synchronization Planner spreadsheet, Calendar worksheet

Make sure necessary supplies are on hand including appropriately sized needles, syringes, gloves, AI sheaths, lube, paper towels and heat detection aids. Test temperature of automatic thaw units. Clean and check condition of insemination gun(s), tweezers and straw cutter. Review record keeping plans and methods. For timed-AI systems you may want to record how much time it took to inseminate, number of cows and number of people helping (perhaps names as that relates to level of experience/ability). This can be used to plan in subsequent years. Check facilities for any needed repairs. Based on responses of users to a 2013 survey (Johnson and Dahlke, 2015) the Estrus Synchronization Planner has been successful in helping producers with their AI programs. Producers moderately to strongly agreed that the planner made scheduling easier (93%, 140/150), reduced errors in implementing protocols (88%, 123/140), improved communication with those involved with the breeding project (88%, 123/140), and helped to find the most cost effective protocol for their situation (86%, 121/140). The planner guides users to appropriate protocols and based on user inputs, translates selections into dates and times on a calendar. Estrus Synchronization Planner – Multi-Group Edition A new version of the Estrus Synchronization Planner, Multi-Group Edition, is now available (http://www.iowabeefcenter.org/software.html ) that allows you to show 2 to 8 groups of females to be inseminated on 10-week calendar. Groups could be replacement heifers, 2 year olds and mature cows or a heifer development enterprise that might breed different groups of heifers daily or weekly. In comparison to the original planner, it has a bit more programming and some users may need a little help to get started. A video with step-by-step instructions as well as written instructions are available from the download site. If you have any questions, please contact one of us for help. Before using this version for the first time, you will need to enable all macros in Excel. To do so, open Excel, go to File – Options - Trust Center - Trust Center Settings – Macro Settings – and 1) make sure “enable all macros” is indicated and 2) check “Trust Access to VBA project object model “. You will need Microsoft Excel (Open Office won’t work here) and a Windows compatible machine to run this version of the program. After downloading the multi-group planner as directed above for the original version, start with the Planner Worksheet tab. If you set-up synchronization programs for multiple producers, enter your name and contact information in the upper right corner of the screen and save the program before first use. The program saves each new synchronization plan in a folder that corresponds to the producer name given at the top. For example if you will be breeding 6 groups for the Jones Ranch, press the “New Producer” button and enter “Jones Ranch” as the Producer Name, including additional contact information as desired. When entry of contact information is complete, hit the “Save Producer” button. This will create a subfolder under the folder that contains the program that is shown within the spreadsheet and in the upper right of Figure 10.
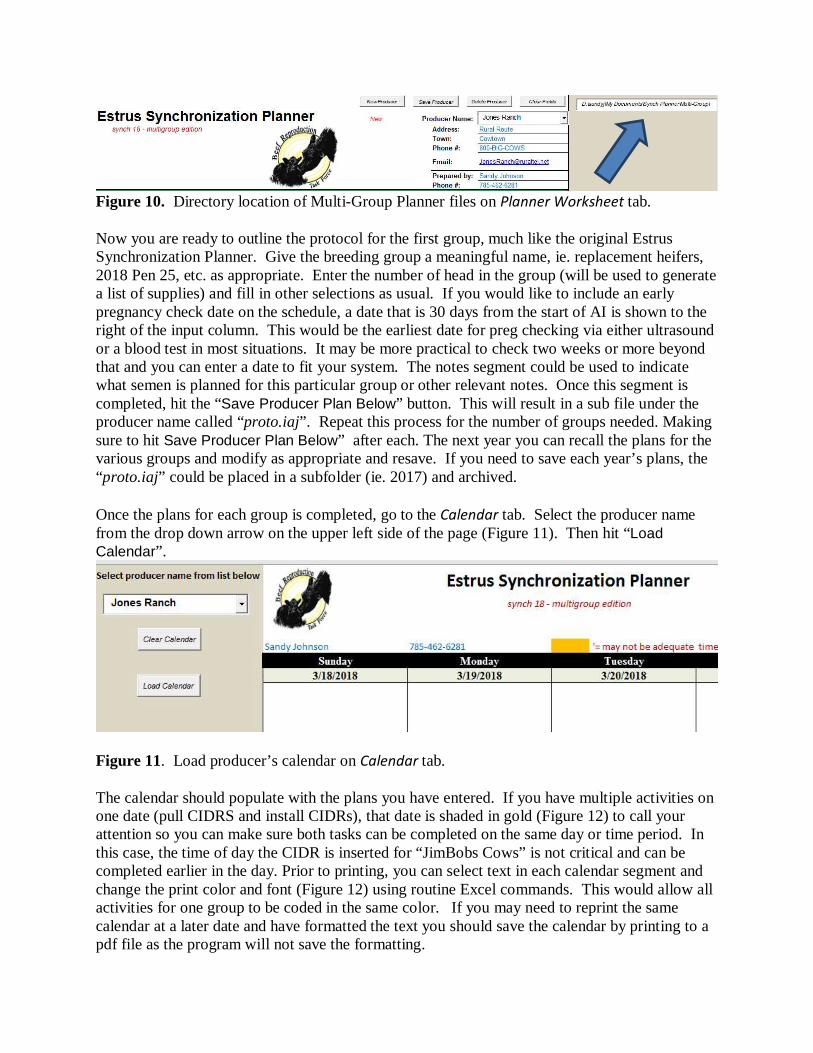
Figure 10. Directory location of Multi-Group Planner files on Planner Worksheet tab. Now you are ready to outline the protocol for the first group, much like the original Estrus Synchronization Planner. Give the breeding group a meaningful name, ie. replacement heifers, 2018 Pen 25, etc. as appropriate. Enter the number of head in the group (will be used to generate a list of supplies) and fill in other selections as usual. If you would like to include an early pregnancy check date on the schedule, a date that is 30 days from the start of AI is shown to the right of the input column. This would be the earliest date for preg checking via either ultrasound or a blood test in most situations. It may be more practical to check two weeks or more beyond that and you can enter a date to fit your system. The notes segment could be used to indicate what semen is planned for this particular group or other relevant notes. Once this segment is completed, hit the “Save Producer Plan Below” button. This will result in a sub file under the producer name called “proto.iaj”. Repeat this process for the number of groups needed. Making sure to hit Save Producer Plan Below” after each. The next year you can recall the plans for the various groups and modify as appropriate and resave. If you need to save each year’s plans, the “proto.iaj” could be placed in a subfolder (ie. 2017) and archived. Once the plans for each group is completed, go to the Calendar tab. Select the producer name from the drop down arrow on the upper left side of the page (Figure 11). Then hit “Load Calendar”.
Figure 11. Load producer’s calendar on Calendar tab. The calendar should populate with the plans you have entered. If you have multiple activities on one date (pull CIDRS and install CIDRs), that date is shaded in gold (Figure 12) to call your attention so you can make sure both tasks can be completed on the same day or time period. In this case, the time of day the CIDR is inserted for “JimBobs Cows” is not critical and can be completed earlier in the day. Prior to printing, you can select text in each calendar segment and change the print color and font (Figure 12) using routine Excel commands. This would allow all activities for one group to be coded in the same color. If you may need to reprint the same calendar at a later date and have formatted the text you should save the calendar by printing to a pdf file as the program will not save the formatting.

Figure 12. Calendar page with conflicting activities (*) and use of color to distinguish groups.
*
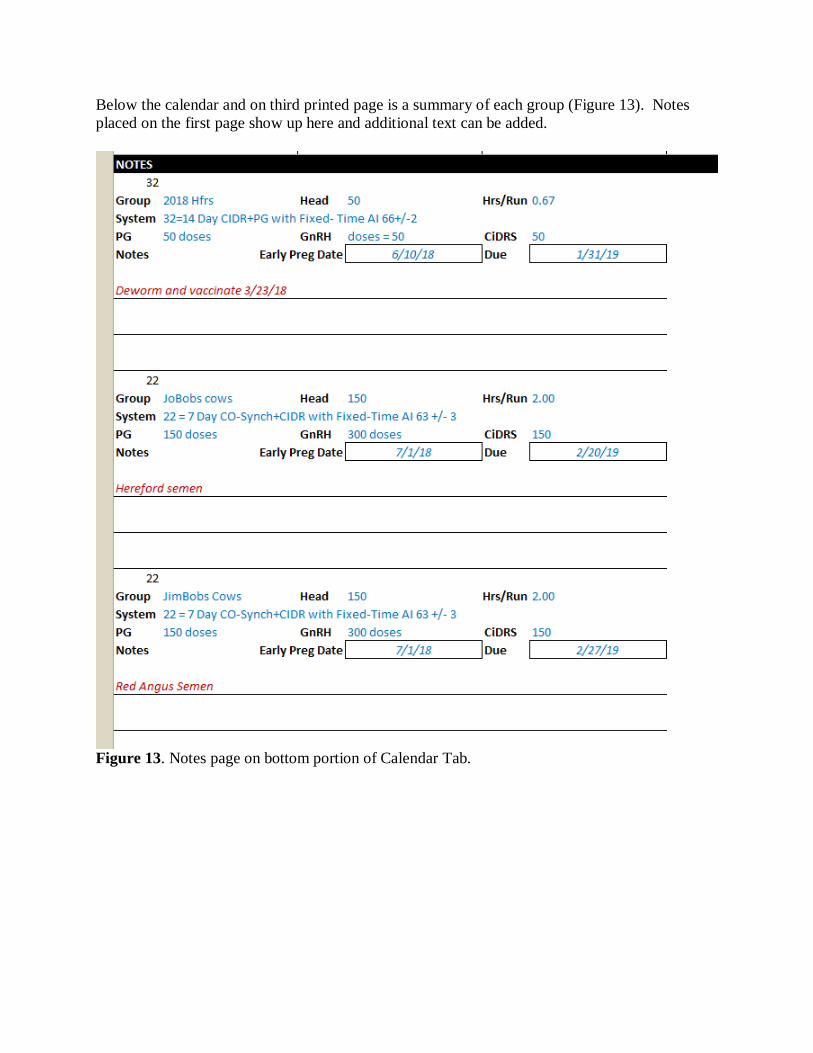
Below the calendar and on third printed page is a summary of each group (Figure 13). Notes placed on the first page show up here and additional text can be added.
Figure 13. Notes page on bottom portion of Calendar Tab.

A supply list is available on the Supplies tab (Figure 14). It provides summary of number of animals in each group and can calculate total costs of supplies listed.
Figure 14. Supplies tab