how to take digital photographs of equine eyes in practice. in
TRANSCRIPT

Close this window to return to IVIS http://www.ivis.org
Proceedings of the 56th Annual Convention of the
American Association of Equine Practitioners
- AAEP -
December 4-8, 2010 Baltimore, Maryland, USA
Next Meeting : Nov. 18-22, 2011 - San Antonio, Texas, USA
Reprinted in the IVIS website with the permission of the AAEP
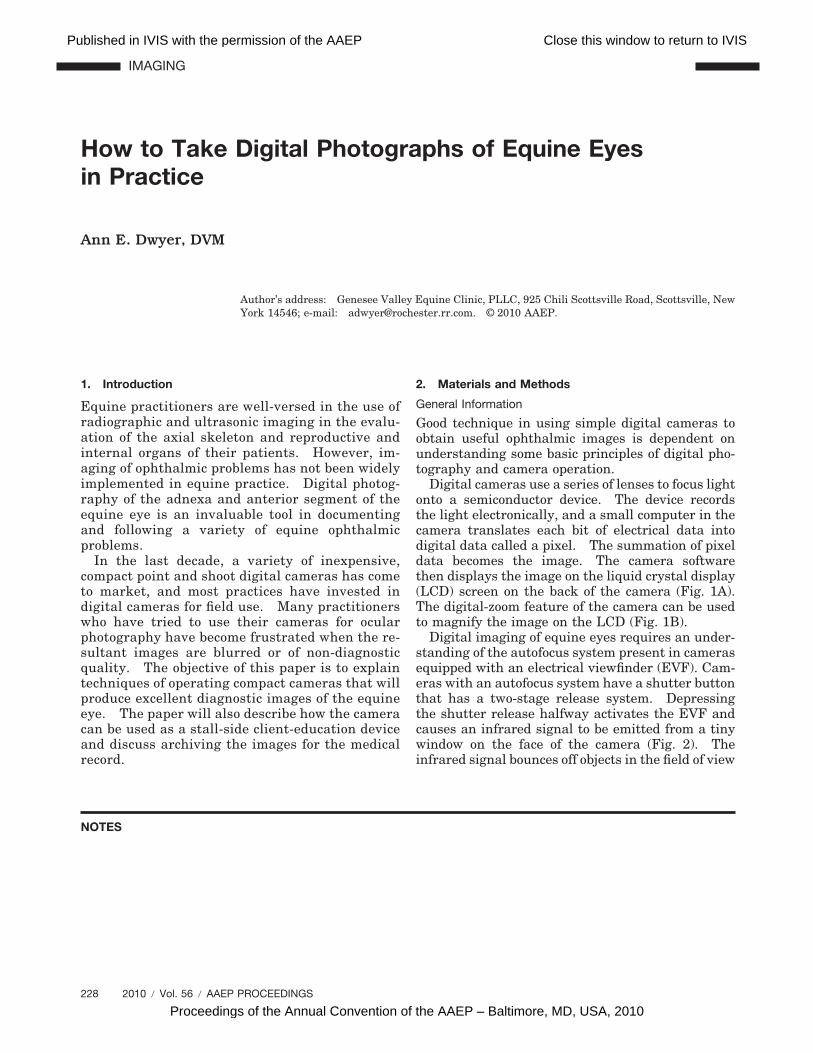
How to Take Digital Photographs of Equine Eyesin Practice
Ann E. Dwyer, DVM
Author’s address: Genesee Valley Equine Clinic, PLLC, 925 Chili Scottsville Road, Scottsville, NewYork 14546; e-mail: [email protected]. © 2010 AAEP.
1. Introduction
Equine practitioners are well-versed in the use ofradiographic and ultrasonic imaging in the evalu-ation of the axial skeleton and reproductive andinternal organs of their patients. However, im-aging of ophthalmic problems has not been widelyimplemented in equine practice. Digital photog-raphy of the adnexa and anterior segment of theequine eye is an invaluable tool in documentingand following a variety of equine ophthalmicproblems.
In the last decade, a variety of inexpensive,compact point and shoot digital cameras has cometo market, and most practices have invested indigital cameras for field use. Many practitionerswho have tried to use their cameras for ocularphotography have become frustrated when the re-sultant images are blurred or of non-diagnosticquality. The objective of this paper is to explaintechniques of operating compact cameras that willproduce excellent diagnostic images of the equineeye. The paper will also describe how the cameracan be used as a stall-side client-education deviceand discuss archiving the images for the medicalrecord.
2. Materials and Methods
General Information
Good technique in using simple digital cameras toobtain useful ophthalmic images is dependent onunderstanding some basic principles of digital pho-tography and camera operation.
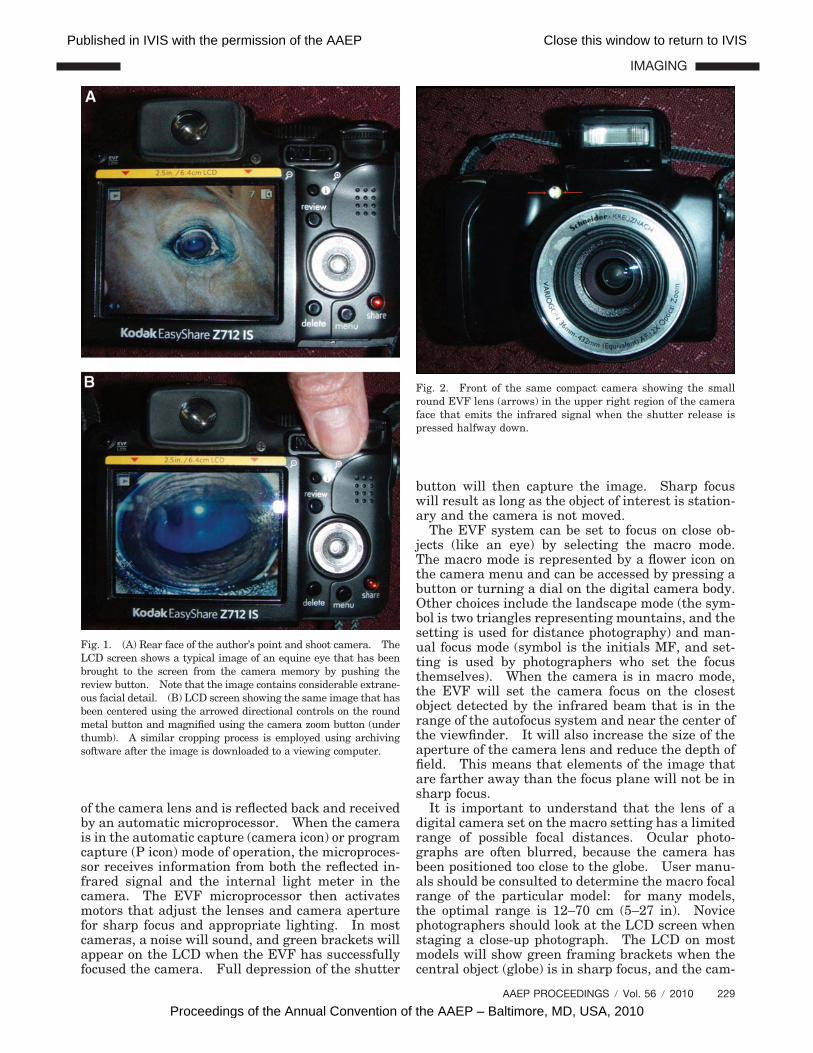
Digital cameras use a series of lenses to focus lightonto a semiconductor device. The device recordsthe light electronically, and a small computer in thecamera translates each bit of electrical data intodigital data called a pixel. The summation of pixeldata becomes the image. The camera softwarethen displays the image on the liquid crystal display(LCD) screen on the back of the camera (Fig. 1A).The digital-zoom feature of the camera can be usedto magnify the image on the LCD (Fig. 1B).
Digital imaging of equine eyes requires an under-standing of the autofocus system present in camerasequipped with an electrical viewfinder (EVF). Cam-eras with an autofocus system have a shutter buttonthat has a two-stage release system. Depressingthe shutter release halfway activates the EVF andcauses an infrared signal to be emitted from a tinywindow on the face of the camera (Fig. 2). Theinfrared signal bounces off objects in the field of view
228 2010 � Vol. 56 � AAEP PROCEEDINGS
IMAGING
NOTES
Published in IVIS with the permission of the AAEP Close this window to return to IVIS
Proceedings of the Annual Convention of the AAEP – Baltimore, MD, USA, 2010
of the camera lens and is reflected back and receivedby an automatic microprocessor. When the camerais in the automatic capture (camera icon) or programcapture (P icon) mode of operation, the microproces-sor receives information from both the reflected in-frared signal and the internal light meter in thecamera. The EVF microprocessor then activatesmotors that adjust the lenses and camera aperturefor sharp focus and appropriate lighting. In mostcameras, a noise will sound, and green brackets willappear on the LCD when the EVF has successfullyfocused the camera. Full depression of the shutter
button will then capture the image. Sharp focuswill result as long as the object of interest is station-ary and the camera is not moved.
The EVF system can be set to focus on close ob-jects (like an eye) by selecting the macro mode.The macro mode is represented by a flower icon onthe camera menu and can be accessed by pressing abutton or turning a dial on the digital camera body.Other choices include the landscape mode (the sym-bol is two triangles representing mountains, and thesetting is used for distance photography) and man-ual focus mode (symbol is the initials MF, and set-ting is used by photographers who set the focusthemselves). When the camera is in macro mode,the EVF will set the camera focus on the closestobject detected by the infrared beam that is in therange of the autofocus system and near the center ofthe viewfinder. It will also increase the size of theaperture of the camera lens and reduce the depth offield. This means that elements of the image thatare farther away than the focus plane will not be insharp focus.
It is important to understand that the lens of adigital camera set on the macro setting has a limitedrange of possible focal distances. Ocular photo-graphs are often blurred, because the camera hasbeen positioned too close to the globe. User manu-als should be consulted to determine the macro focalrange of the particular model: for many models,the optimal range is 12–70 cm (5–27 in). Novicephotographers should look at the LCD screen whenstaging a close-up photograph. The LCD on mostmodels will show green framing brackets when thecentral object (globe) is in sharp focus, and the cam-
Fig. 1. (A) Rear face of the author’s point and shoot camera. TheLCD screen shows a typical image of an equine eye that has beenbrought to the screen from the camera memory by pushing thereview button. Note that the image contains considerable extrane-ous facial detail. (B) LCD screen showing the same image that hasbeen centered using the arrowed directional controls on the roundmetal button and magnified using the camera zoom button (underthumb). A similar cropping process is employed using archivingsoftware after the image is downloaded to a viewing computer.
Fig. 2. Front of the same compact camera showing the smallround EVF lens (arrows) in the upper right region of the cameraface that emits the infrared signal when the shutter release ispressed halfway down.
AAEP PROCEEDINGS � Vol. 56 � 2010 229
IMAGING
Published in IVIS with the permission of the AAEP Close this window to return to IVIS
Proceedings of the Annual Convention of the AAEP – Baltimore, MD, USA, 2010
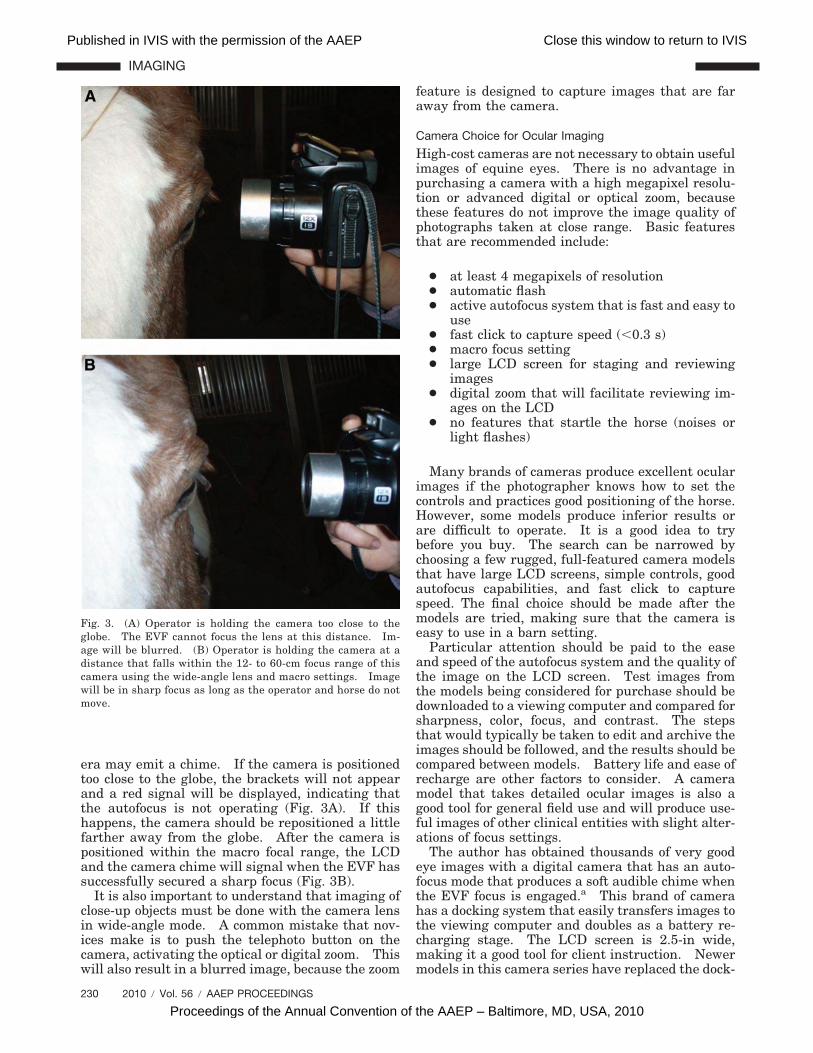
era may emit a chime. If the camera is positionedtoo close to the globe, the brackets will not appearand a red signal will be displayed, indicating thatthe autofocus is not operating (Fig. 3A). If thishappens, the camera should be repositioned a littlefarther away from the globe. After the camera ispositioned within the macro focal range, the LCDand the camera chime will signal when the EVF hassuccessfully secured a sharp focus (Fig. 3B).
It is also important to understand that imaging ofclose-up objects must be done with the camera lensin wide-angle mode. A common mistake that nov-ices make is to push the telephoto button on thecamera, activating the optical or digital zoom. Thiswill also result in a blurred image, because the zoom
feature is designed to capture images that are faraway from the camera.
Camera Choice for Ocular Imaging
High-cost cameras are not necessary to obtain usefulimages of equine eyes. There is no advantage inpurchasing a camera with a high megapixel resolu-tion or advanced digital or optical zoom, becausethese features do not improve the image quality ofphotographs taken at close range. Basic featuresthat are recommended include:
● at least 4 megapixels of resolution● automatic flash● active autofocus system that is fast and easy to
use● fast click to capture speed (�0.3 s)● macro focus setting● large LCD screen for staging and reviewing
images● digital zoom that will facilitate reviewing im-
ages on the LCD● no features that startle the horse (noises or
light flashes)
Many brands of cameras produce excellent ocularimages if the photographer knows how to set thecontrols and practices good positioning of the horse.However, some models produce inferior results orare difficult to operate. It is a good idea to trybefore you buy. The search can be narrowed bychoosing a few rugged, full-featured camera modelsthat have large LCD screens, simple controls, goodautofocus capabilities, and fast click to capturespeed. The final choice should be made after themodels are tried, making sure that the camera iseasy to use in a barn setting.
Particular attention should be paid to the easeand speed of the autofocus system and the quality ofthe image on the LCD screen. Test images fromthe models being considered for purchase should bedownloaded to a viewing computer and compared forsharpness, color, focus, and contrast. The stepsthat would typically be taken to edit and archive theimages should be followed, and the results should becompared between models. Battery life and ease ofrecharge are other factors to consider. A cameramodel that takes detailed ocular images is also agood tool for general field use and will produce use-ful images of other clinical entities with slight alter-ations of focus settings.
The author has obtained thousands of very goodeye images with a digital camera that has an auto-focus mode that produces a soft audible chime whenthe EVF focus is engaged.a This brand of camerahas a docking system that easily transfers images tothe viewing computer and doubles as a battery re-charging stage. The LCD screen is 2.5-in wide,making it a good tool for client instruction. Newermodels in this camera series have replaced the dock-
Fig. 3. (A) Operator is holding the camera too close to theglobe. The EVF cannot focus the lens at this distance. Im-age will be blurred. (B) Operator is holding the camera at adistance that falls within the 12- to 60-cm focus range of thiscamera using the wide-angle lens and macro settings. Imagewill be in sharp focus as long as the operator and horse do notmove.
230 2010 � Vol. 56 � AAEP PROCEEDINGS
IMAGING
Published in IVIS with the permission of the AAEP Close this window to return to IVIS
Proceedings of the Annual Convention of the AAEP – Baltimore, MD, USA, 2010
ing stage with a battery compartment that acceptsdisposable or rechargeable batteries.
Regardless of model or brand chosen, practitio-ners are also advised to invest in a padded cameracase, an extra battery, and additional storage media(SD, SDHC, or MMC card).
Camera Settings for Novice Photographers
1. Set the camera capture mode to program (P).The P option allows full access to menu op-tions, but the camera will set the shutterspeed and aperture based on available light-ing.
2. Set the focus mode to macro (flower icon).3. Enable the autoflash or flash fill option to
assure that the flash will operate.4. If applicable, set the autofocus EVF to spot or
center to assure that the camera focuses onthe object in the center of the LCD (not neededin every camera).
5. Check that the zoom button is in the defaultwide-angle mode.
Stall-Side Considerations in Ocular Imaging
The horse should be placed in a relatively dark area,and the handler should stand on the opposite side ofthe eye to be photographed, holding the horse with alead rope attached to the halter. The practitionermust remember that the equine cornea is a glossysurface that will reflect objects like a fish-eye mirror.No windows, doors, or bright objects should bepresent in back of the horse’s head or behind thephotographer, because these will produce trouble-some reflections (Fig. 4). Red or white clothing pro-duces reflections on the corneal surface, andtherefore, the photographer should wear darkclothes.
Mild sedation may be appropriate, especially if thehorse is experiencing pain in the eye being imaged.Auriculopalpebral and frontal (supraorbital) nerveblocks will deter blepharospasm and optimize theimaging of painful, swollen eyes. Dirt, tears, andocular discharge should be removed before imaging.
Horses become restless if the operator spends toomuch time setting up a photograph, and subsequenthead movements can impair image quality. Thebest results will occur if the photographer learns tostage photographs quickly and takes the image assoon as the camera is in focus. An external lightsource, such as a Finnoff transilluminator or brightflashlight, is useful if held lateral to the globe, be-cause it will acclimatize the horse to the pendingflash stimulus.
Ideally, an assistant should lift the upper lid tomaximize exposure of the cornea. When an assis-tant is not present, the photographer may need touse their dominant hand to spread the lids and theother hand to operate the camera, but this practicemay produce a reflection of the operator’s palm anddigit on the corneal surface.
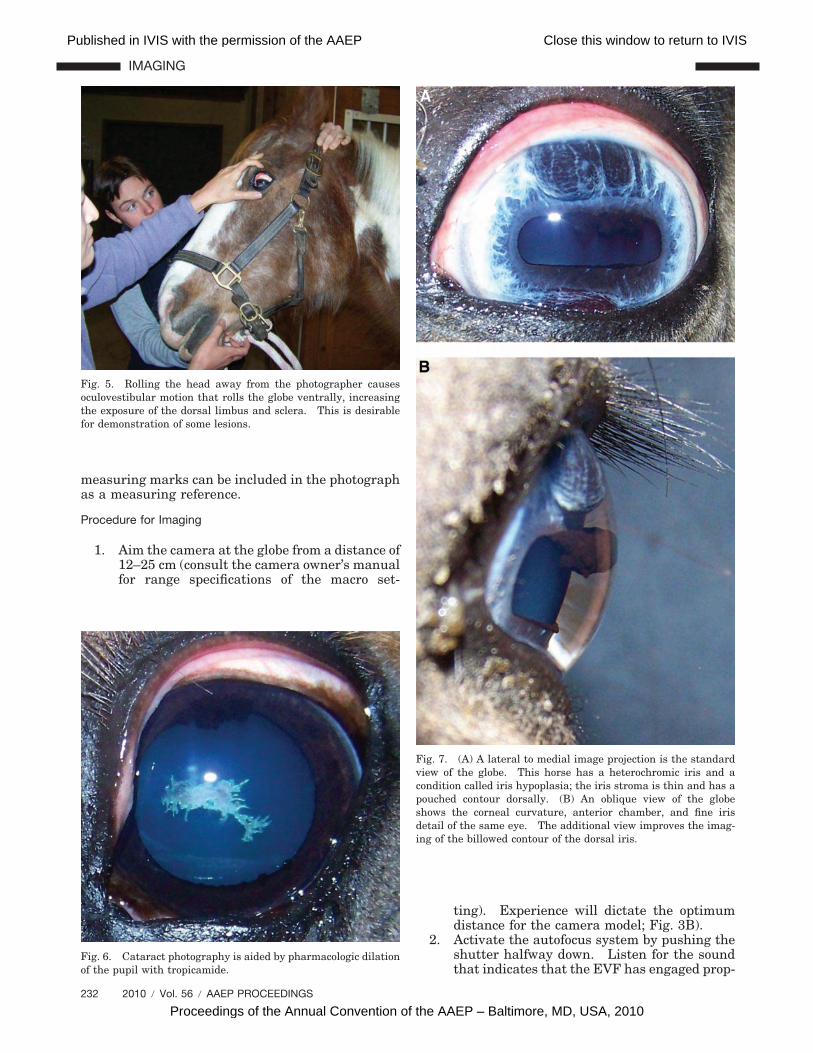
Positioning the horse’s head on a homemade tableconstructed of 4–5 stacked bales of shavings, hay, orstraw may be helpful in some instances. Exposingthe sclera and limbus will be aided by rotating thehorse’s head and taking advantage of the resultantoculovestibular motion: rotating the poll regionaway from the photographer will aid exposure of thedorsal region of the globe, and rotating the poll to-ward the photographer will aid exposure of the ven-tral region of the globe (Fig. 5).
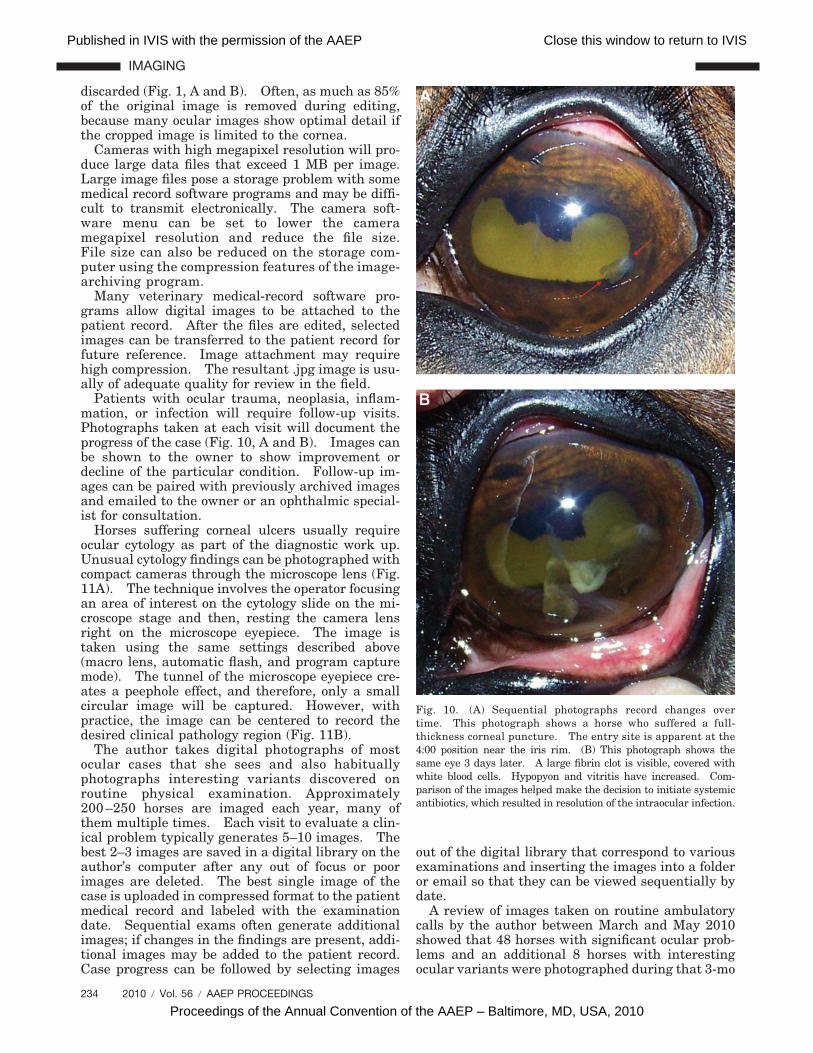
Cataracts and lens-position abnormalities canbest be imaged with the pupil fully dilated (Fig. 6).Short-term (4–8 h) mydriasis can be accomplishedby the application of topical tropicamide.b A tuber-culin syringe attached to a 25-gauge needle is usedto draw 0.3–0.5 ml of drug out of the dropper bottle.The needle is then broken off, and the medication issprayed onto the corneal surface through the re-maining hub. Full dilation will occur 15–20 minafter application.
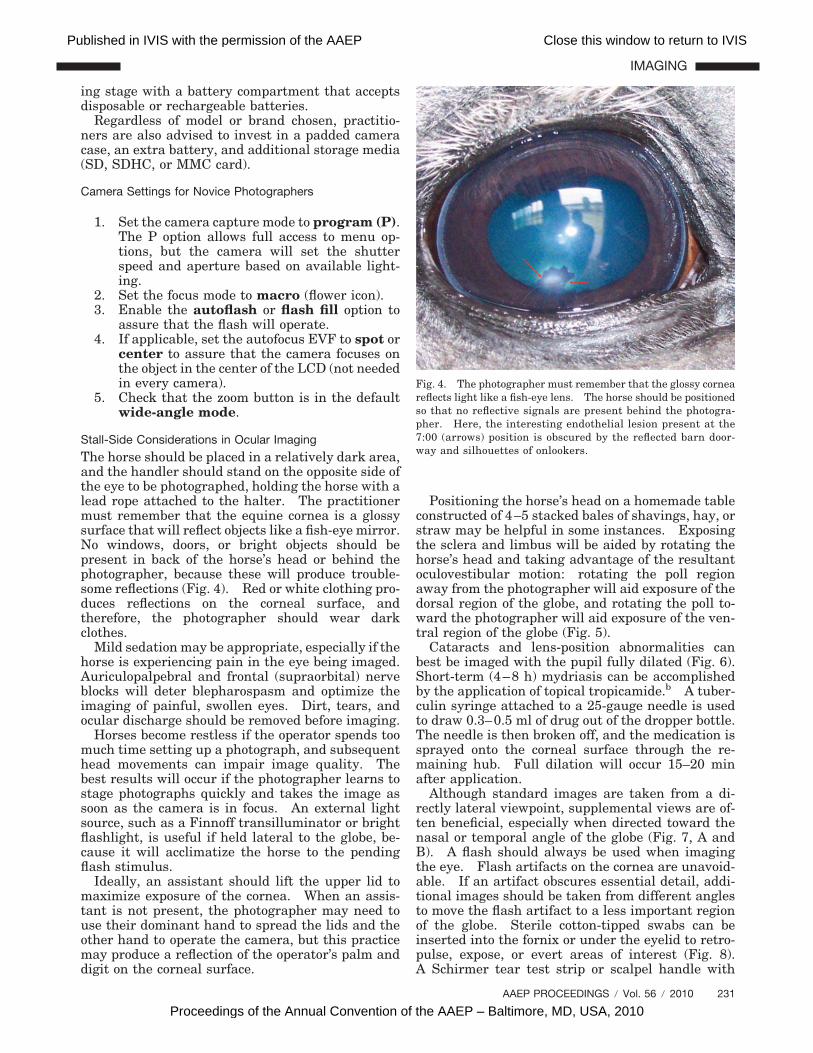
Although standard images are taken from a di-rectly lateral viewpoint, supplemental views are of-ten beneficial, especially when directed toward thenasal or temporal angle of the globe (Fig. 7, A andB). A flash should always be used when imagingthe eye. Flash artifacts on the cornea are unavoid-able. If an artifact obscures essential detail, addi-tional images should be taken from different anglesto move the flash artifact to a less important regionof the globe. Sterile cotton-tipped swabs can beinserted into the fornix or under the eyelid to retro-pulse, expose, or evert areas of interest (Fig. 8).A Schirmer tear test strip or scalpel handle with
Fig. 4. The photographer must remember that the glossy corneareflects light like a fish-eye lens. The horse should be positionedso that no reflective signals are present behind the photogra-pher. Here, the interesting endothelial lesion present at the7:00 (arrows) position is obscured by the reflected barn door-way and silhouettes of onlookers.
AAEP PROCEEDINGS � Vol. 56 � 2010 231
IMAGING
Published in IVIS with the permission of the AAEP Close this window to return to IVIS
Proceedings of the Annual Convention of the AAEP – Baltimore, MD, USA, 2010
measuring marks can be included in the photographas a measuring reference.
Procedure for Imaging
1. Aim the camera at the globe from a distance of12–25 cm (consult the camera owner’s manualfor range specifications of the macro set-
ting). Experience will dictate the optimumdistance for the camera model; Fig. 3B).
2. Activate the autofocus system by pushing theshutter halfway down. Listen for the soundthat indicates that the EVF has engaged prop-
Fig. 5. Rolling the head away from the photographer causesoculovestibular motion that rolls the globe ventrally, increasingthe exposure of the dorsal limbus and sclera. This is desirablefor demonstration of some lesions.
Fig. 6. Cataract photography is aided by pharmacologic dilationof the pupil with tropicamide.
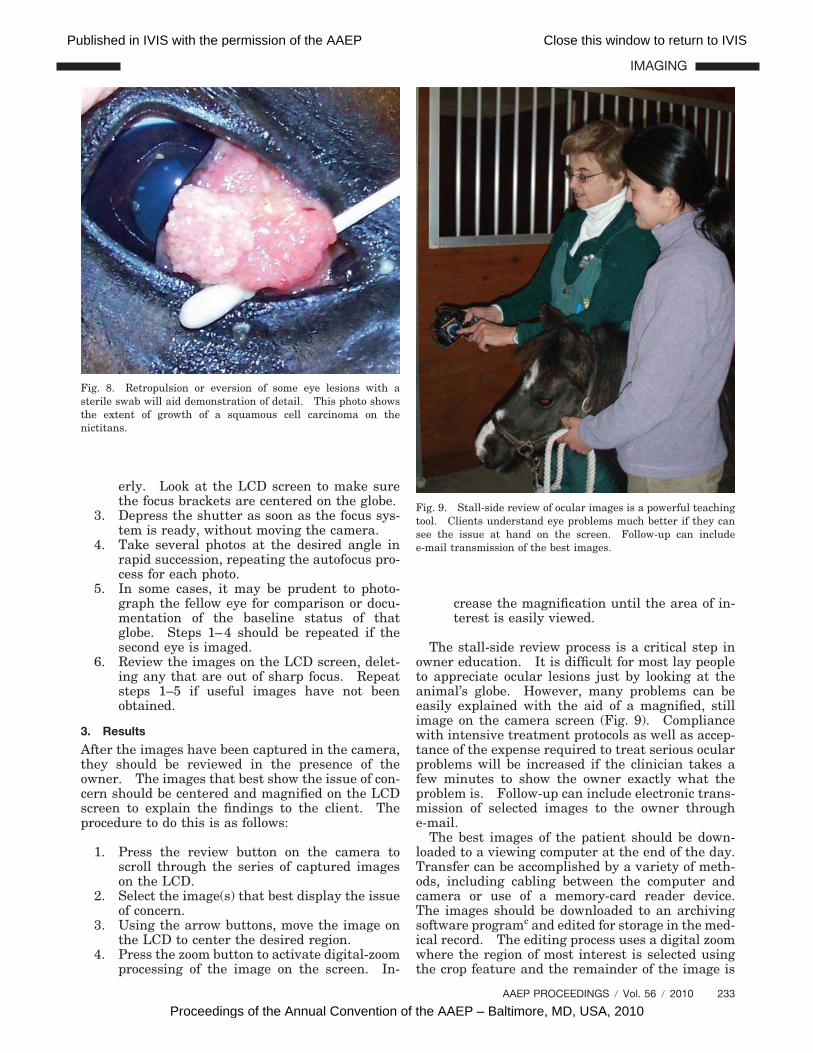
Fig. 7. (A) A lateral to medial image projection is the standardview of the globe. This horse has a heterochromic iris and acondition called iris hypoplasia; the iris stroma is thin and has apouched contour dorsally. (B) An oblique view of the globeshows the corneal curvature, anterior chamber, and fine irisdetail of the same eye. The additional view improves the imag-ing of the billowed contour of the dorsal iris.
232 2010 � Vol. 56 � AAEP PROCEEDINGS
IMAGING
Published in IVIS with the permission of the AAEP Close this window to return to IVIS
Proceedings of the Annual Convention of the AAEP – Baltimore, MD, USA, 2010
erly. Look at the LCD screen to make surethe focus brackets are centered on the globe.
3. Depress the shutter as soon as the focus sys-tem is ready, without moving the camera.
4. Take several photos at the desired angle inrapid succession, repeating the autofocus pro-cess for each photo.
5. In some cases, it may be prudent to photo-graph the fellow eye for comparison or docu-mentation of the baseline status of thatglobe. Steps 1–4 should be repeated if thesecond eye is imaged.
6. Review the images on the LCD screen, delet-ing any that are out of sharp focus. Repeatsteps 1–5 if useful images have not beenobtained.
3. Results
After the images have been captured in the camera,they should be reviewed in the presence of theowner. The images that best show the issue of con-cern should be centered and magnified on the LCDscreen to explain the findings to the client. Theprocedure to do this is as follows:
1. Press the review button on the camera toscroll through the series of captured imageson the LCD.
2. Select the image(s) that best display the issueof concern.
3. Using the arrow buttons, move the image onthe LCD to center the desired region.
4. Press the zoom button to activate digital-zoomprocessing of the image on the screen. In-
crease the magnification until the area of in-terest is easily viewed.
The stall-side review process is a critical step inowner education. It is difficult for most lay peopleto appreciate ocular lesions just by looking at theanimal’s globe. However, many problems can beeasily explained with the aid of a magnified, stillimage on the camera screen (Fig. 9). Compliancewith intensive treatment protocols as well as accep-tance of the expense required to treat serious ocularproblems will be increased if the clinician takes afew minutes to show the owner exactly what theproblem is. Follow-up can include electronic trans-mission of selected images to the owner throughe-mail.
The best images of the patient should be down-loaded to a viewing computer at the end of the day.Transfer can be accomplished by a variety of meth-ods, including cabling between the computer andcamera or use of a memory-card reader device.The images should be downloaded to an archivingsoftware programc and edited for storage in the med-ical record. The editing process uses a digital zoomwhere the region of most interest is selected usingthe crop feature and the remainder of the image is
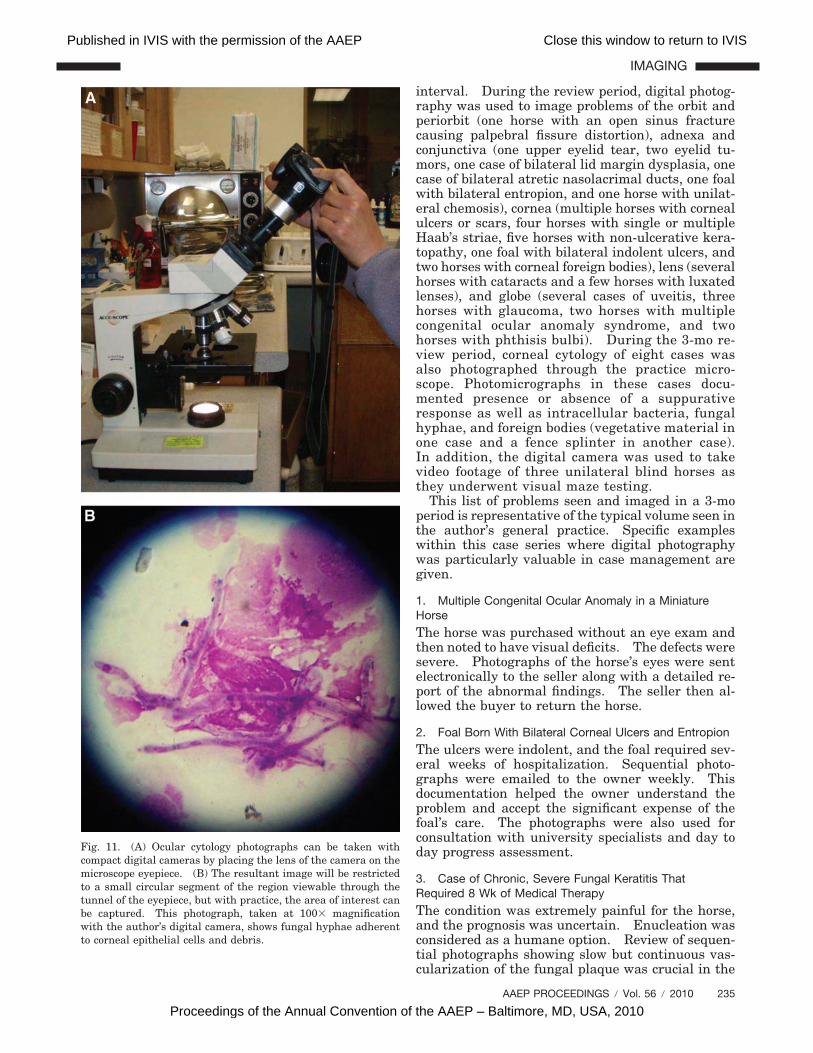
Fig. 8. Retropulsion or eversion of some eye lesions with asterile swab will aid demonstration of detail. This photo showsthe extent of growth of a squamous cell carcinoma on thenictitans.
Fig. 9. Stall-side review of ocular images is a powerful teachingtool. Clients understand eye problems much better if they cansee the issue at hand on the screen. Follow-up can includee-mail transmission of the best images.
AAEP PROCEEDINGS � Vol. 56 � 2010 233
IMAGING
Published in IVIS with the permission of the AAEP Close this window to return to IVIS
Proceedings of the Annual Convention of the AAEP – Baltimore, MD, USA, 2010
discarded (Fig. 1, A and B). Often, as much as 85%of the original image is removed during editing,because many ocular images show optimal detail ifthe cropped image is limited to the cornea.
Cameras with high megapixel resolution will pro-duce large data files that exceed 1 MB per image.Large image files pose a storage problem with somemedical record software programs and may be diffi-cult to transmit electronically. The camera soft-ware menu can be set to lower the cameramegapixel resolution and reduce the file size.File size can also be reduced on the storage com-puter using the compression features of the image-archiving program.
Many veterinary medical-record software pro-grams allow digital images to be attached to thepatient record. After the files are edited, selectedimages can be transferred to the patient record forfuture reference. Image attachment may requirehigh compression. The resultant .jpg image is usu-ally of adequate quality for review in the field.
Patients with ocular trauma, neoplasia, inflam-mation, or infection will require follow-up visits.Photographs taken at each visit will document theprogress of the case (Fig. 10, A and B). Images canbe shown to the owner to show improvement ordecline of the particular condition. Follow-up im-ages can be paired with previously archived imagesand emailed to the owner or an ophthalmic special-ist for consultation.
Horses suffering corneal ulcers usually requireocular cytology as part of the diagnostic work up.Unusual cytology findings can be photographed withcompact cameras through the microscope lens (Fig.11A). The technique involves the operator focusingan area of interest on the cytology slide on the mi-croscope stage and then, resting the camera lensright on the microscope eyepiece. The image istaken using the same settings described above(macro lens, automatic flash, and program capturemode). The tunnel of the microscope eyepiece cre-ates a peephole effect, and therefore, only a smallcircular image will be captured. However, withpractice, the image can be centered to record thedesired clinical pathology region (Fig. 11B).
The author takes digital photographs of mostocular cases that she sees and also habituallyphotographs interesting variants discovered onroutine physical examination. Approximately200 –250 horses are imaged each year, many ofthem multiple times. Each visit to evaluate a clin-ical problem typically generates 5–10 images. Thebest 2–3 images are saved in a digital library on theauthor’s computer after any out of focus or poorimages are deleted. The best single image of thecase is uploaded in compressed format to the patientmedical record and labeled with the examinationdate. Sequential exams often generate additionalimages; if changes in the findings are present, addi-tional images may be added to the patient record.Case progress can be followed by selecting images
out of the digital library that correspond to variousexaminations and inserting the images into a folderor email so that they can be viewed sequentially bydate.
A review of images taken on routine ambulatorycalls by the author between March and May 2010showed that 48 horses with significant ocular prob-lems and an additional 8 horses with interestingocular variants were photographed during that 3-mo
Fig. 10. (A) Sequential photographs record changes overtime. This photograph shows a horse who suffered a full-thickness corneal puncture. The entry site is apparent at the4:00 position near the iris rim. (B) This photograph shows thesame eye 3 days later. A large fibrin clot is visible, covered withwhite blood cells. Hypopyon and vitritis have increased. Com-parison of the images helped make the decision to initiate systemicantibiotics, which resulted in resolution of the intraocular infection.
234 2010 � Vol. 56 � AAEP PROCEEDINGS
IMAGING
Published in IVIS with the permission of the AAEP Close this window to return to IVIS
Proceedings of the Annual Convention of the AAEP – Baltimore, MD, USA, 2010
interval. During the review period, digital photog-raphy was used to image problems of the orbit andperiorbit (one horse with an open sinus fracturecausing palpebral fissure distortion), adnexa andconjunctiva (one upper eyelid tear, two eyelid tu-mors, one case of bilateral lid margin dysplasia, onecase of bilateral atretic nasolacrimal ducts, one foalwith bilateral entropion, and one horse with unilat-eral chemosis), cornea (multiple horses with cornealulcers or scars, four horses with single or multipleHaab’s striae, five horses with non-ulcerative kera-topathy, one foal with bilateral indolent ulcers, andtwo horses with corneal foreign bodies), lens (severalhorses with cataracts and a few horses with luxatedlenses), and globe (several cases of uveitis, threehorses with glaucoma, two horses with multiplecongenital ocular anomaly syndrome, and twohorses with phthisis bulbi). During the 3-mo re-view period, corneal cytology of eight cases wasalso photographed through the practice micro-scope. Photomicrographs in these cases docu-mented presence or absence of a suppurativeresponse as well as intracellular bacteria, fungalhyphae, and foreign bodies (vegetative material inone case and a fence splinter in another case).In addition, the digital camera was used to takevideo footage of three unilateral blind horses asthey underwent visual maze testing.
This list of problems seen and imaged in a 3-moperiod is representative of the typical volume seen inthe author’s general practice. Specific exampleswithin this case series where digital photographywas particularly valuable in case management aregiven.
1. Multiple Congenital Ocular Anomaly in a MiniatureHorse
The horse was purchased without an eye exam andthen noted to have visual deficits. The defects weresevere. Photographs of the horse’s eyes were sentelectronically to the seller along with a detailed re-port of the abnormal findings. The seller then al-lowed the buyer to return the horse.
2. Foal Born With Bilateral Corneal Ulcers and Entropion
The ulcers were indolent, and the foal required sev-eral weeks of hospitalization. Sequential photo-graphs were emailed to the owner weekly. Thisdocumentation helped the owner understand theproblem and accept the significant expense of thefoal’s care. The photographs were also used forconsultation with university specialists and day today progress assessment.
3. Case of Chronic, Severe Fungal Keratitis ThatRequired 8 Wk of Medical Therapy
The condition was extremely painful for the horse,and the prognosis was uncertain. Enucleation wasconsidered as a humane option. Review of sequen-tial photographs showing slow but continuous vas-cularization of the fungal plaque was crucial in the
Fig. 11. (A) Ocular cytology photographs can be taken withcompact digital cameras by placing the lens of the camera on themicroscope eyepiece. (B) The resultant image will be restrictedto a small circular segment of the region viewable through thetunnel of the eyepiece, but with practice, the area of interest canbe captured. This photograph, taken at 100� magnificationwith the author’s digital camera, shows fungal hyphae adherentto corneal epithelial cells and debris.
AAEP PROCEEDINGS � Vol. 56 � 2010 235
IMAGING
Published in IVIS with the permission of the AAEP Close this window to return to IVIS
Proceedings of the Annual Convention of the AAEP – Baltimore, MD, USA, 2010
decision to continue treatment, which eventually re-sulted in a pain-free globe.
4. On Pre-Purchase Examination, a Horse Was Found toHave a Single Haab’s Stria on the Right CorneaA Haab’s stria is a finding of uncertain significance,but it is permanent. Digital photographs of thestria were emailed to the buyer’s home veterinarianalong with the full pre-purchase report. The homeveterinarian was then able to give his client anopinion on the purchase of the horse.
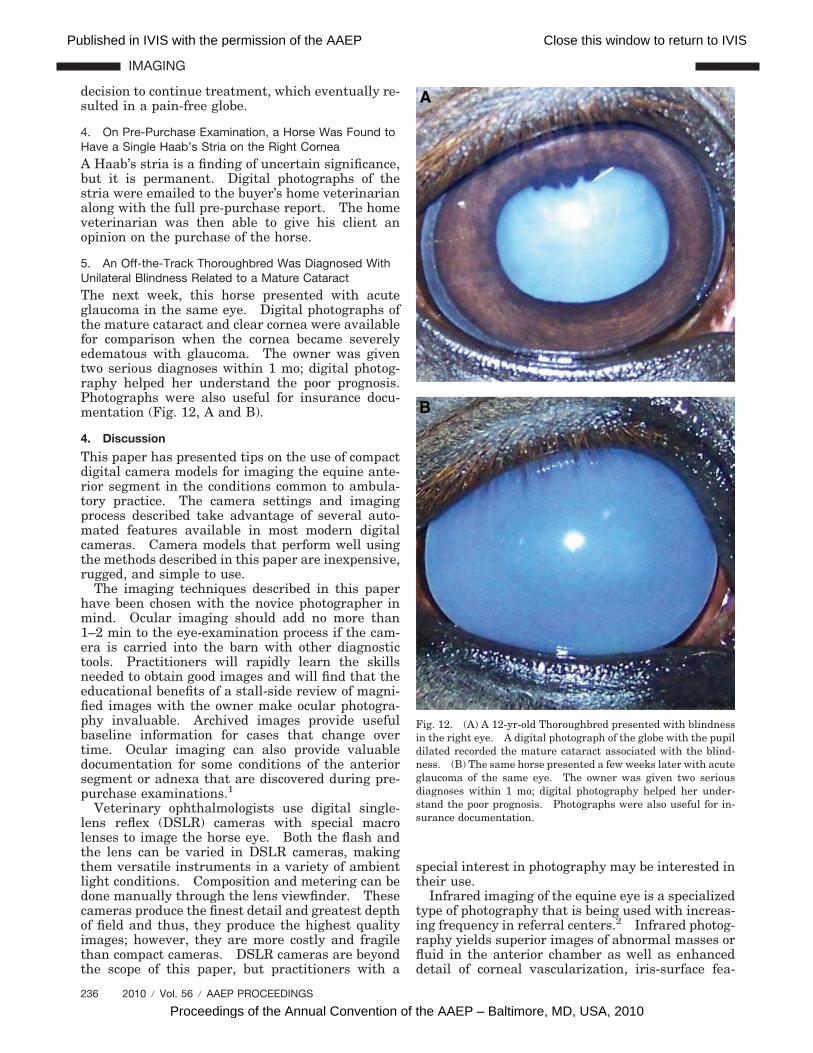
5. An Off-the-Track Thoroughbred Was Diagnosed WithUnilateral Blindness Related to a Mature CataractThe next week, this horse presented with acuteglaucoma in the same eye. Digital photographs ofthe mature cataract and clear cornea were availablefor comparison when the cornea became severelyedematous with glaucoma. The owner was giventwo serious diagnoses within 1 mo; digital photog-raphy helped her understand the poor prognosis.Photographs were also useful for insurance docu-mentation (Fig. 12, A and B).
4. Discussion
This paper has presented tips on the use of compactdigital camera models for imaging the equine ante-rior segment in the conditions common to ambula-tory practice. The camera settings and imagingprocess described take advantage of several auto-mated features available in most modern digitalcameras. Camera models that perform well usingthe methods described in this paper are inexpensive,rugged, and simple to use.
The imaging techniques described in this paperhave been chosen with the novice photographer inmind. Ocular imaging should add no more than1–2 min to the eye-examination process if the cam-era is carried into the barn with other diagnostictools. Practitioners will rapidly learn the skillsneeded to obtain good images and will find that theeducational benefits of a stall-side review of magni-fied images with the owner make ocular photogra-phy invaluable. Archived images provide usefulbaseline information for cases that change overtime. Ocular imaging can also provide valuabledocumentation for some conditions of the anteriorsegment or adnexa that are discovered during pre-purchase examinations.1
Veterinary ophthalmologists use digital single-lens reflex (DSLR) cameras with special macrolenses to image the horse eye. Both the flash andthe lens can be varied in DSLR cameras, makingthem versatile instruments in a variety of ambientlight conditions. Composition and metering can bedone manually through the lens viewfinder. Thesecameras produce the finest detail and greatest depthof field and thus, they produce the highest qualityimages; however, they are more costly and fragilethan compact cameras. DSLR cameras are beyondthe scope of this paper, but practitioners with a
special interest in photography may be interested intheir use.
Infrared imaging of the equine eye is a specializedtype of photography that is being used with increas-ing frequency in referral centers.2 Infrared photog-raphy yields superior images of abnormal masses orfluid in the anterior chamber as well as enhanceddetail of corneal vascularization, iris-surface fea-
Fig. 12. (A) A 12-yr-old Thoroughbred presented with blindnessin the right eye. A digital photograph of the globe with the pupildilated recorded the mature cataract associated with the blind-ness. (B) The same horse presented a few weeks later with acuteglaucoma of the same eye. The owner was given two seriousdiagnoses within 1 mo; digital photography helped her under-stand the poor prognosis. Photographs were also useful for in-surance documentation.
236 2010 � Vol. 56 � AAEP PROCEEDINGS
IMAGING
Published in IVIS with the permission of the AAEP Close this window to return to IVIS
Proceedings of the Annual Convention of the AAEP – Baltimore, MD, USA, 2010

tures, and cataractous changes of the lens. Thelong wavelengths of infrared light penetrate a cor-nea that is opaque as a result of edema or fibrosismuch better than wavelengths in the visible spec-trum. This property allows greater visualization ofintraocular structures than is possible with tradi-tional photography. Several companies provide in-frared conversion services for most DSLR camerasand selected EVF (point and shoot) camera models.d
References and Footnotes1. Dwyer AE. Practical general field ophthalmology. In:
Gilger BG, ed. Equine ophthalmology, 2nd ed. St. Louis,MO: Elsevier, 2010;84–85.
2. McMullen RJ, Clode AB, Gilger, BC. Infrared digital imag-ing of the equine anterior segment. Vet Ophthalmol 2009;12:125–131.
aKodak EasyShare model Z712IS, Eastman Kodak Company,Rochester, NY. (This camera is no longer in production, butsimilar models in the current Kodak Z series produce comparableimages and cost between $200 and $350. Useful images havealso been obtained from the Kodak M series cameras, which retailbetween $130 and $200.)
bMydriacil, Alcon Laboratories, Inc., Fort Worth, TX 76134.cApple Iphoto, Apple Aperture, Adobe Photoshop, Microsoft
Photo editor.dwww.lifepixel.com or www.maxmax.com.
AAEP PROCEEDINGS � Vol. 56 � 2010 237
IMAGING
Published in IVIS with the permission of the AAEP Close this window to return to IVIS
Proceedings of the Annual Convention of the AAEP – Baltimore, MD, USA, 2010