how to create an invoice - cigna...isupplier job aid: how to create an invoice page 1 introduction...
TRANSCRIPT
iSupplier Job Aid: How to create an invoice
Page 1
INTRODUCTION Use this job aid to help you create an invoice. Prior to beginning this process, open the iSupplier Portal.
OVERVIEW 1. Select CIGNA - iSUPPLIER USER. 2. Click the Finance tab. 3. Make sure that With a PO is selected in the Create Invoice drop-down, then click the
Go button. 4. Use any of these fields to help narrow your search. 5. Click the Go button. 6. Select the purchase order you’d like to create an invoice for. 7. Click the Add to Invoice button. 8. Scroll down to review the whole page. 9. Click the Next button. 10. Review the Remit To and Address fields for accuracy. 11. Type an invoice number. 12. Add sales tax, if applicable, by choosing Cigna Additional Invoice Information from the
Context drop-down menu and typing the amount in the Sales Tax field that appears. 13. Verify that the correct quantity was auto-populated. 14. If additional charges need to be added, you can add those to the invoice. Click the Add
Row button. 15. Click the Next button. 16. Review the information on this screen to ensure that it's correct. 17. Click the Submit button.
DETAILS
Step Action
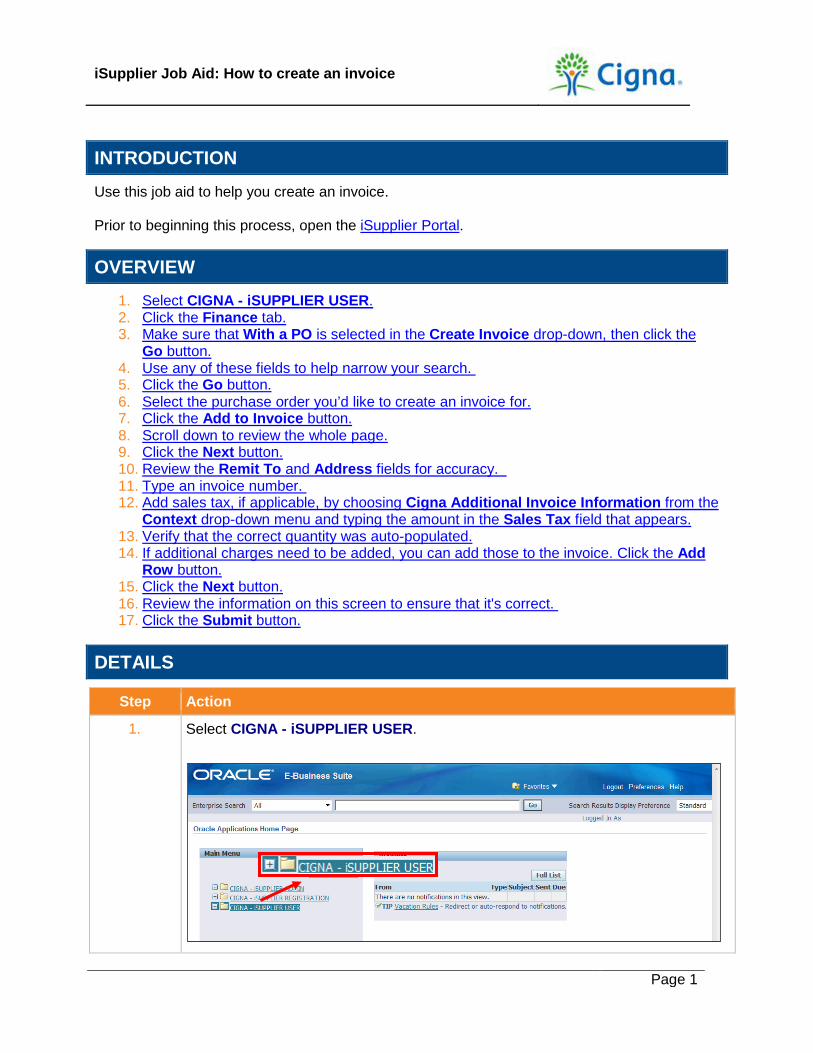
1. Select CIGNA - iSUPPLIER USER.

iSupplier Job Aid: How to create an invoice
Page 2
Step Action
2. Click the Finance tab.
3. Make sure that With a PO is selected in the Create Invoice drop-down, then click the Go button.

iSupplier Job Aid: How to create an invoice
Page 3
Step Action
4. Use any of these fields to help narrow your search. In this example, we'll use the purchase order number.
5. Click the Go button.
If you entered the search data correctly, but the purchase order you want to find is not displayed, verify that the order is available for invoicing by clicking the Orders tab.

iSupplier Job Aid: How to create an invoice
Page 4
Step Action
6. Select the purchase order you’d like to create an invoice for.
7. Click the Add to Invoice button.

iSupplier Job Aid: How to create an invoice
Page 5
Step Action
8. Scroll down to review the whole page.

iSupplier Job Aid: How to create an invoice
Page 6
Step Action
9. Click the Next button.
10. Review the Remit To and Address fields for accuracy. If it's incorrect, you can click the magnifying glass and search for the correct one. Remember that you can use % to see all results.

iSupplier Job Aid: How to create an invoice
Page 7
Step Action
11. Type an invoice number. IMPORTANT: Do not enter any special characters (for example, "/", "#", or "-") or spaces in this field. The processing team will remove any special characters or spaces that come through the system. If you do not already have an invoice numbering system, use the date and amount as a default. In this example, 052820154620 will be entered because the invoice was created on May 28, 2015 for $4,620.00.
12. Add sales tax, if applicable, by choosing Cigna Additional Invoice Information
from the Context drop-down and typing the amount in the Sales Tax field that appears.

iSupplier Job Aid: How to create an invoice
Page 8
Step Action
13. Verify that the correct quantity was auto-populated.
iSupplier Job Aid: How to create an invoice
Page 9
Step Action
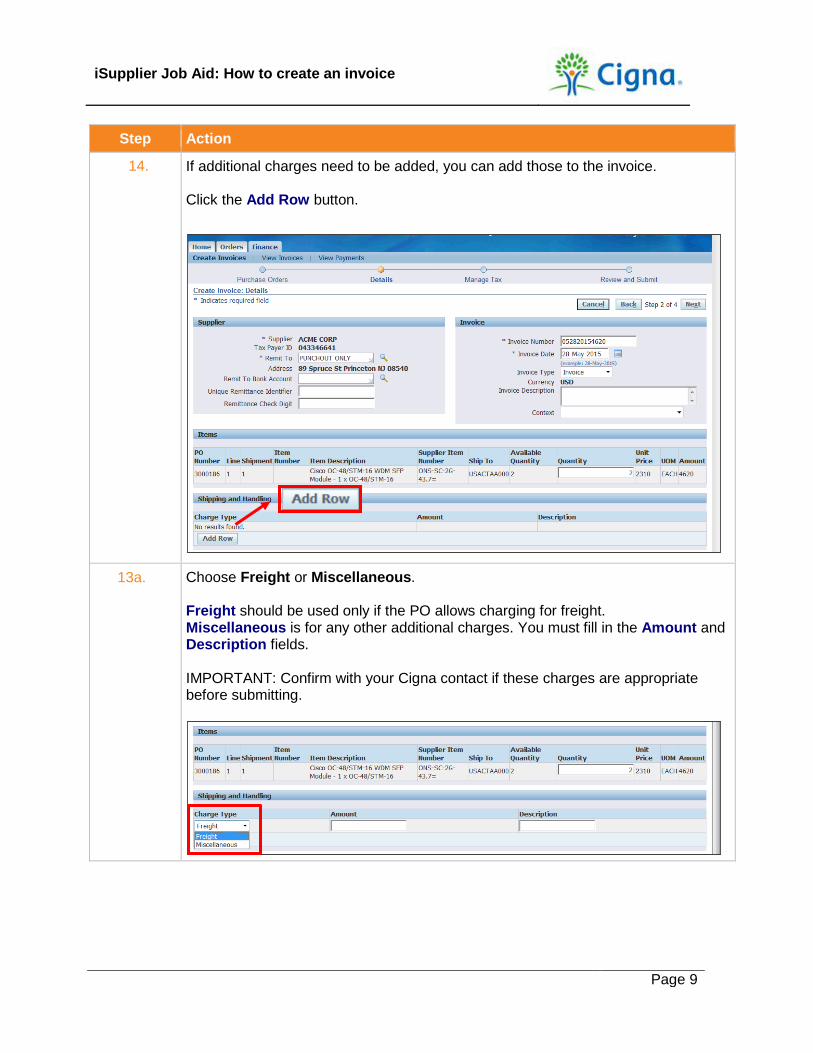
14. If additional charges need to be added, you can add those to the invoice. Click the Add Row button.
13a. Choose Freight or Miscellaneous. Freight should be used only if the PO allows charging for freight. Miscellaneous is for any other additional charges. You must fill in the Amount and Description fields. IMPORTANT: Confirm with your Cigna contact if these charges are appropriate before submitting.

iSupplier Job Aid: How to create an invoice
Page 10
Step Action
15. Click the Next button.

iSupplier Job Aid: How to create an invoice
Page 11
Step Action
16. Review the information on this screen to ensure that it's correct. If changes are needed, you can click the Back button. Do not use the back button on your browser. You can click Cancel to discard the draft.

iSupplier Job Aid: How to create an invoice
Page 12
Step Action
17. Click the Submit button.
iSupplier Job Aid: How to create an invoice
Page 13
Step Action
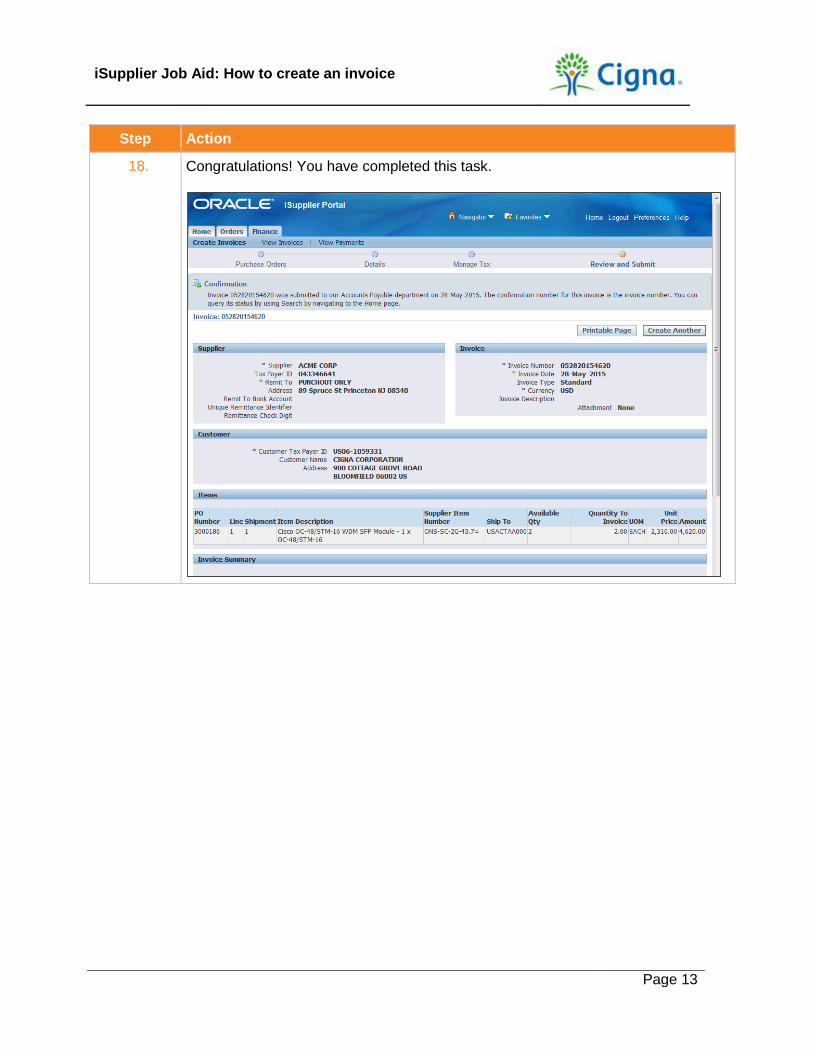
18. Congratulations! You have completed this task.