horticultural youth society newsletter · horticultural youth society newsletter fall 2012 ......
TRANSCRIPT

HORTICULTURAL YOUTH SOCIETY NEWSLETTER FALL 2012
White Socks - Photo by Rad Dad
“I don’t like formal gardens. I like wild nature. It’s just the wilderness instinct in me, I guess.” — Walt Disney (Rad Dad through and through!)
Editor: “Rad Dad” - Harry Wyma Box 1136 – Ridgetown ON – N0P 2C0 E-mail: [email protected]
Phone: 519-674-3493
For recent copies of the Youth Newsletters: Go to the www.gardenontario.org, click on ‘ABOUT OHA’ And then Click on YOUTH at the bottom of that column.
Please: if you are no longer the youth leader then please forward this copy to the proper person. Note: For all leaders’ name changes or cancellations, please inform either one of the following: OHA Youth Chair: Anna Peterson, Box 101, St Marys, ON, N4X 1AG - [email protected], and/or OHA Secretary: Kelly Taylor, e-mail [email protected] - Thanks, Rad Dad

2
CONTENTS .............................................................. 02 ACTIVITIES. - Alphabet Soup Pictures ........................................... 03 - Secret Invisible Ink .................................................. 07 - Rainforest In A Jar ................................................... 08 - Terrific Terrarium .................................................... 08 - Make Butter ........................................................... 10 ARTICLES
- You Go Girls ........................................................... 03 CRAFTS & PROJECTS
- Egg Carton Rose Craft ............................................... 03 - Growing A Magnet Craft ........................................... 04 - Colourful Streamers.................................................. 04 - Personalized Gingerbread Ornaments .......................... 05 - Snowman Factory ................................................... 05 - Watercolour Leaf Rubbing .......................................... 06 - Paper Faux Stained Glass Craft ................................... 06 - Sanded Paper Mandalas Craft ................................... 07 - Water Bottle Flowers ............................................... 07 - Make Copper Pipe Wind Chimes .................................. 09 POEMS Remembrance Day .................................................... 02 Surprised .................................................................. 02 My Friend .................................................................. 02
QUOTES
“A seed hidden in the heart of an apple is an orchard invisible” - A Welsh Saying
“Trees grow above the height of one’s eyes; flowering plants below it; but shrubs that are at eye level, like well hung pictures, occupy the most important space in the garden gallery.” - Neltje Blanchan, The American Flower Garden, 1909 “Every gardener should plant at least one apple tree in their life with the fervent prayer that one-day love might be made beneath its branches without offending the neighbors.”
- Monty Don, Gardening Mad, 1997 “Dahlias are in their fullest beauty in these Autumn months; and few plants give us greater variety of rich and delicate shades.” - Rose Kingsley, Garden Colour, 1905
REMEMBRANCE DAY
When I think of Remembrance Day, I think of the soldiers in a special way I wear a poppy every year, to remember the people who lived with fear I hate to think that some people died, even though some survived So that’s what I think of Remembrance Day. I think of soldiers in a special way. - Taigan Walters, Grade 5 Port Dover P.S SURPISED As I walk slowly down the road I can hear The blue jays singing The crows cawing The wind whistling
The leaves falling from above
I stop to pick one up I look closely There lays a little tree worm Green with a hundred tiny legs As I drop the leaf It swirls to the ground A arrive at my doorstep Surprised
- Jeff Smith, Grade 6 - West Lynn P.S.
MY FRIEND
Once I was walking Along a path, and I Came to a stop, I looked Down, I had come to a Stop at a pond and when I looked into the pond, I saw my Friend. The friend was my REFLECTION - Charity Born, Grade 5 Port Rowan P.S.
- Boston P.S. From “Mirrors”, a collection of poetry 1994-1995 of The Norfolk Board of Education

3
You Go, Girls!
Faye Craig is understandably proud of her Arthur Horticultural Society Youth Group members. The girls decided that they would be donating their Convention prize earnings to their 9-year-old friend Sheyanne O’Donnell, which will go towards her Cancer treatment expenses. The photo shows Faye and 5 of her 20 Youth Members holding their prize winning exhibits from the Convention. They are, from left to right: Chloe Meyers, Brenna Charlton, Chelsea Lindo, Aislinn Charlton, and Claudia Meyers.
EGG CARTON ROSE CRAFT By Sheri Osborn Source: About.com This rose, created by Jan Hennings, is made using two egg carton cups. This rose, either attached to a stem or placed on top of a box like pictured here, would make a nice present for a special lady. Materials Needed: - Two Cardboard Egg Carton Cups - Bowl of Water - Red food coloring or other color
Instructions:
Start out by cutting two cups from a cardboard egg carton. Fill a large bowl with enough water to submerge the egg carton cups in. Put the egg carton cups into the water and let them soak for about 5 minutes. Carefully remove one from the water. Pinch the bottom of the egg carton cup and manipulate the cup so it looks like rose petals. Remove the second egg carton cup from the water, pinch the bottom, and shape it around the first cup. Manipulate the cups until you get it to the desired look. Color your rose red by using drops of red food coloring. Be careful, the red food coloring can stain fingers! Set the rose in a safe place and let it dry. This may take several hours. Jan used her rose as an embellishment on top of a recycled coffee container.
ALPHABET SOUP PICTURE How to Make an Alphabet Collage By Sheri Osborn Source: About.com Find out how to make an alphabet collage using noodles or cereal and construction paper. This is a fun craft and a great way to help with letter recognition. Age Guideline: 5 Years and Up Time Required: 20 minutes (Does not include drying time) The above age and time guidelines are estimates. This project can be modified to suit other ages and may take more or less time depending on your circumstance Materials Needed:
• Construction Paper • Alphabet Shape Noodles • Crayons or Markers • Craft Glue • Scissors Instructions:
Cut a large circle out of construction paper, any color - this will be the bowl. Cut another circle, about 3 cm/ ½” smaller, out of a light colored piece of paper - this will be the alphabet soup broth. Glue the broth circle into the center of the bowl circle. Cut a spoon shape using a contrasting piece of construction paper. You can trace a real spoon, draw your own spoon, or use. Cut out the spoon and glue it onto the bowl. Now comes the fun part! Use the alphabet cereal or noodles to "write" your name or other words in your soup bowl. Glue the letters in place.
4
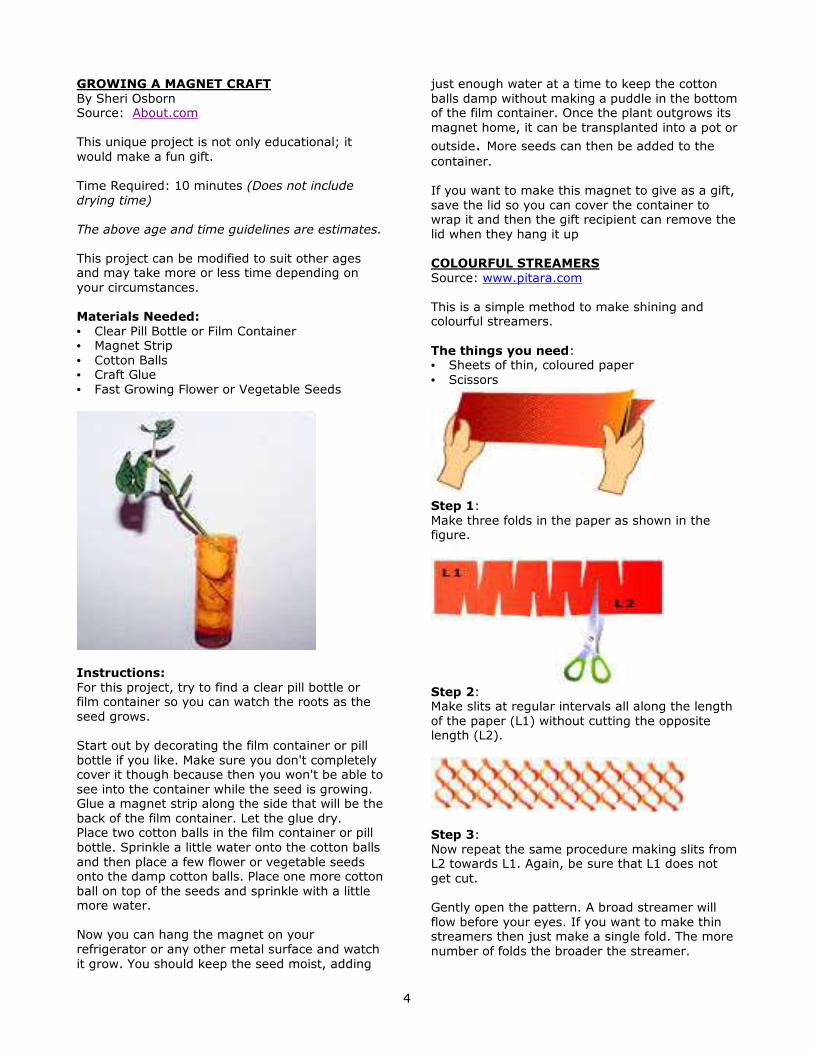
GROWING A MAGNET CRAFT
By Sheri Osborn Source: About.com This unique project is not only educational; it would make a fun gift. Time Required: 10 minutes (Does not include drying time) The above age and time guidelines are estimates. This project can be modified to suit other ages and may take more or less time depending on your circumstances. Materials Needed:
• Clear Pill Bottle or Film Container • Magnet Strip • Cotton Balls • Craft Glue • Fast Growing Flower or Vegetable Seeds
Instructions:
For this project, try to find a clear pill bottle or film container so you can watch the roots as the seed grows. Start out by decorating the film container or pill bottle if you like. Make sure you don't completely cover it though because then you won't be able to see into the container while the seed is growing. Glue a magnet strip along the side that will be the back of the film container. Let the glue dry. Place two cotton balls in the film container or pill bottle. Sprinkle a little water onto the cotton balls and then place a few flower or vegetable seeds onto the damp cotton balls. Place one more cotton ball on top of the seeds and sprinkle with a little more water. Now you can hang the magnet on your refrigerator or any other metal surface and watch it grow. You should keep the seed moist, adding
just enough water at a time to keep the cotton balls damp without making a puddle in the bottom of the film container. Once the plant outgrows its magnet home, it can be transplanted into a pot or
outside. More seeds can then be added to the container. If you want to make this magnet to give as a gift, save the lid so you can cover the container to wrap it and then the gift recipient can remove the lid when they hang it up COLOURFUL STREAMERS
Source: www.pitara.com
This is a simple method to make shining and colourful streamers. The things you need: • Sheets of thin, coloured paper • Scissors
Step 1: Make three folds in the paper as shown in the figure.
Step 2: Make slits at regular intervals all along the length of the paper (L1) without cutting the opposite length (L2).
Step 3: Now repeat the same procedure making slits from L2 towards L1. Again, be sure that L1 does not get cut. Gently open the pattern. A broad streamer will flow before your eyes. If you want to make thin streamers then just make a single fold. The more number of folds the broader the streamer.

5
PERSONALIZED GINGERBREAD ORNAMENTS
By Carol Knowlton-Dority Source: candianliving.com This easy holiday craft makes a festive stocking stuffer, ornament or gift topper. Gingerbread ornaments are a classic Christmas tree adornment – and with these, you don't have to worry about hungry dogs (or kids) taking a bite out of your decorating scheme. Consider stitching one up for every member of your family – they'd make lovely personalized gift toppers or stocking stuffers.
You need: • Gingerbread
template • Cardboard scraps • Brown felt • Rickrack (white and green) • Thread (white, brown, green and red) • Seed beads (red, white, blue and black) • Sequins (red, white, blue and black) • Red embroidery floss • Heavy gold thread, embroidery floss or cord,
for hanging loop • Polyester stuffing • Scrap red tulle • Pencil and scissors • Straight pins • Sewing needles (sewing, embroidery and
beading) Instructions: With pencil, trace gingerbread shape onto cardboard to create sturdy template. 1. Trace template onto felt cut out. Repeat to
make two fronts and two backs. 2. On front, for "icing" trim, pin white rickrack
around edge. Stitch in place with white thread, tucking in and finishing ends neatly in an inconspicuous place.
3. On front, using pencil, lightly mark the positions of eyes, buttons and decorations at ends of limbs. For example, we used blue beads sitting on blue sequins for the girl's eyes (see larger photo, above). Place beads and sequins where desired, then stitch eyes, buttons and body decorations onto felt using matching thread.
4. For mouth, mark mouth line on felt lightly with pencil. Stitch over line with red embroidery floss, making large or looping stitches. Finish mouth with red bead atop a red sequin at each end of mouth (see photo).
5. For hanging loop, make loop with heavy gold
thread. Stitch base of loop securely to the inside of back, at the top of the head.
6. Pin front and back felt pieces together, wrong sides facing. Using brown thread, stitch front and back together using overhand or blanket stitch. Begin stitching on the top side of right arm and stitch clockwise around head, left arm and legs, then stop stitching, leaving side below arm open.
7. Using small amounts of stuffing at a time, insert stuffing through opening, pushing in with end of pencil if needed.
8. Stitch opening closed. To make a skirt: • Fold length of red tulle approx 10 x 30 cm/4 x
12 inches long, several layers thick, to make desired skirt length. Baste with red thread across top of tulle to create waistband; pull on stitching to gather into full skirt. Pin in place; stitch skirt to body.
• For the sash, wrap green rickrack around body, leaving extra to make tails of sash and cutting ends on diagonal. Pin in place. Secure by stitching in place with green thread. To make a bow, fold over small pieces and stitch in place on top of sash closing.
To make a tie: • About 4 cm (1-1/2 inches) from end of green
rickrack, tie a small square knot. Wrap other end of rickrack around neck, leaving extra to make a tail. Cut on diagonal. Position this end of rickrack beneath knot, letting tails fly free out to side. Pin and secure by stitching in place with green thread.
SNOWMAN FACTORY
By Renée Schwarz Source: candianliving.com Cut out a whole chain of snow people, and then dress them up with colourful clothes. “Scissor” up a whole chain of snow people and then paste on faces and colourful clothes. Join chains together, end to end, to wrap around a Christmas tree or stretch across a classroom.

6
You need: • Large sheet of stiff textured white paper • Scraps of stiff coloured paper • Pencil • Ruler • Scissors • Glue stick To make: 1. Trace pattern onto scrap paper; cut just
outside of lines. You can enlarge pattern. 2. From white paper, cut 10 cm / 4 in high and
desired length, they must be a multiple of 7 cm/2 ¾”. At 7 cm/2 ¾” intervals fold an accordion-fold strip to make a series of 7 cm/2 ¾” wide rectangles; open out. With broken lines on side edges and arrow up, lay pattern on first rectangle; trace solid lines only. Repeat flipping each time so arm heights match, to mark all rectangles. Cut along lines.
3. From coloured paper, cut out desired features; glue on.
WATERCOLOUR LEAF RUBBING By: Amanda Formaro Source: Kaboose Crafts By using certain crayon colors matched with brown watercolor paint, you can create a cool, almost neon affect with your leaf rubbings! What you'll need:
• Various leaves • 2 sheets of white copy paper • Glue stick • 2 paper clips • Orange and green crayons • Water color paints: brown, orange, yellow, red • 1 sheet orange construction paper How to make it:
1. Place a piece of white paper onto the work surface. Arrange leaves face down, onto the paper. Tack them in place with a glue stick. See photo.
2. Place the second piece of paper over the top of the first and hold together with a couple of paper clips.
3. Use orange and green crayons to color over the top of the leaves on the paper, causing the imprint of the leaves' veins to show through. See photo.
4. Remove the paper clips and take the paper with the leaves out from underneath your rubbing.
5. Paint over the top of the entire picture using brown watercolor paint. Water down the paint so it is rather thin and add a bit more paint when painting over the leaves since it will bead up a little. Spread the paint around with your fingers and spread it around. You will see the colors of the crayons come through the paint. See photo.
6. Mount the white paper on a larger piece of colored construction paper to give it a framed look.
Tips:
1. This creates a pretty cool picture on the back of your painting as well! Turn it over to see the result.
2. Look for leaves that are free of bugs or any small growths.
You do not have to use a glue stick to attach the leaves, but it does help to keep them in place.
PAPER FAUX STAINED GLASS CRAFT Source: freekidscrafts Jamie’s team designed this beautiful Paper Faux Stained Glass project. It would make the perfect craft for a picture to hang on the wall or for a one of a kind card. What is even better, you will be recycling old wallpaper samples.
Supplies • Wall Paper
Samples • Scissors • Black
Cardstock or Construction Paper
• Glue • Cardstock or
cardboard for backing
7
Instructions
1. Create a design for your faux stained glass by
copying our design or look up stained glass patterns and sketch it onto your backing. You can be adventurous and create your own design.
2. Select complementary wallpapers from your sample book and cut them into the shapes for your design. Ask your paint store to save old wallpaper sample books for you as these make great craft materials.
3. Glue to the backing. 4. Cut thin strips of black cardstock or
construction paper to look like the leading found in stained glass projects.
The finished project will make a beautiful wall hanging or a special card. SANDED PAPER MANDALAS CRAFT
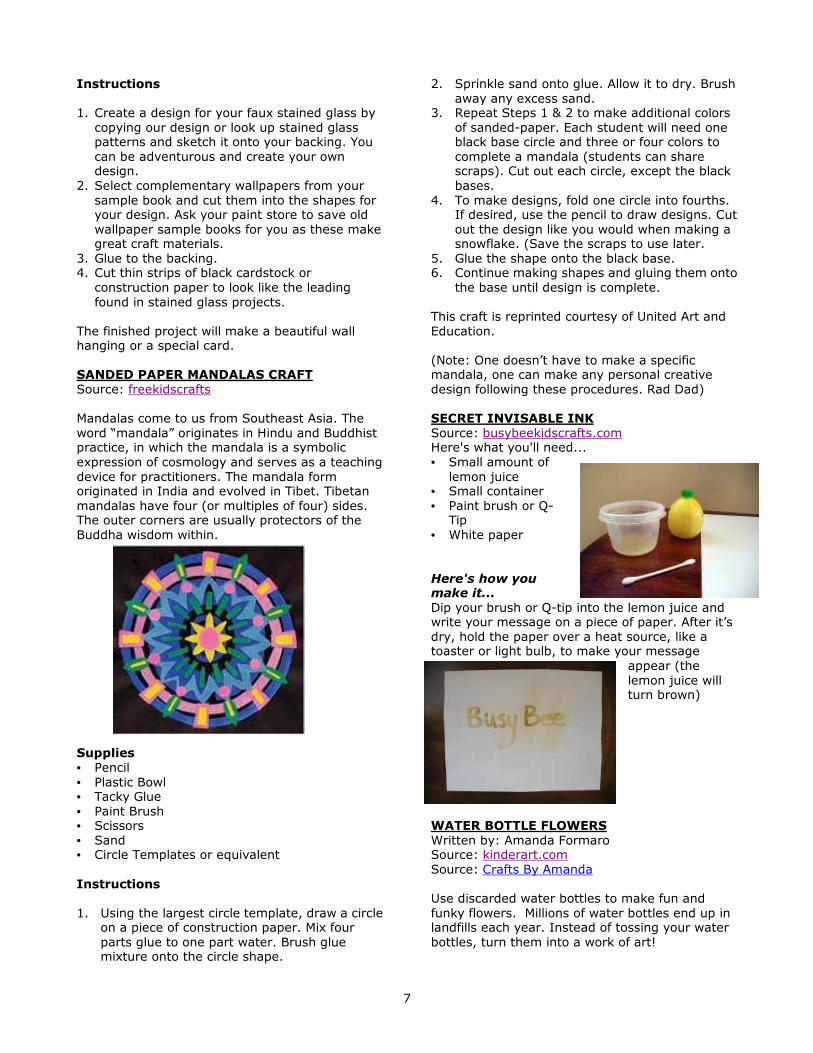
Source: freekidscrafts Mandalas come to us from Southeast Asia. The word “mandala” originates in Hindu and Buddhist practice, in which the mandala is a symbolic expression of cosmology and serves as a teaching device for practitioners. The mandala form originated in India and evolved in Tibet. Tibetan mandalas have four (or multiples of four) sides. The outer corners are usually protectors of the Buddha wisdom within.
Supplies
• Pencil • Plastic Bowl • Tacky Glue • Paint Brush • Scissors • Sand • Circle Templates or equivalent
Instructions
1. Using the largest circle template, draw a circle on a piece of construction paper. Mix four parts glue to one part water. Brush glue mixture onto the circle shape.
2. Sprinkle sand onto glue. Allow it to dry. Brush away any excess sand.
3. Repeat Steps 1 & 2 to make additional colors of sanded-paper. Each student will need one black base circle and three or four colors to complete a mandala (students can share scraps). Cut out each circle, except the black bases.
4. To make designs, fold one circle into fourths. If desired, use the pencil to draw designs. Cut out the design like you would when making a snowflake. (Save the scraps to use later.
5. Glue the shape onto the black base. 6. Continue making shapes and gluing them onto
the base until design is complete. This craft is reprinted courtesy of United Art and Education. (Note: One doesn’t have to make a specific mandala, one can make any personal creative design following these procedures. Rad Dad) SECRET INVISABLE INK
Source: busybeekidscrafts.com Here's what you'll need... • Small amount of
lemon juice • Small container • Paint brush or Q-
Tip • White paper
Here's how you make it... Dip your brush or Q-tip into the lemon juice and write your message on a piece of paper. After it’s dry, hold the paper over a heat source, like a toaster or light bulb, to make your message
appear (the lemon juice will turn brown)
WATER BOTTLE FLOWERS
Written by: Amanda Formaro Source: kinderart.com Source: Crafts By Amanda Use discarded water bottles to make fun and funky flowers. Millions of water bottles end up in landfills each year. Instead of tossing your water bottles, turn them into a work of art!

8
What You Need:
• Plastic single serve water bottle with lid • White craft glue • Scissors • Sand or soil • Pebbles or rocks • Drinking straw or twig
What You Do: 1. Remove labels and lids, but don’t throw them
away. We will be using the entire water bottle! If your water bottle does not have a label, have a bit of scrap paper nearby to use instead.
2. Cut the water bottle in half, put the bottle half aside. Cut slits, about an inch or so wide, in the top half of the bottle. You should end up with 8 “petals”. Bend the petals outward.
3. Put the lid on the bottle top. Squeeze some white glue into the lid and insert the straw or twig into the glue. Next, wad up the bottle wrapper and surround the straw with it, to help give the straw stability.
4. Put some sand or soil into the bottom half of the water bottle, about 3cm – 5 cm / 1.5 – 2 inches in depth. Pack it down a bit and insert the bottom end of the straw into it. Add pebbles or stones on top of the sand to help stabilize the straw (stem).
Optional: If you like, cut strips of fabric to decorate the flower petals and the flowerpot. You can also round the petals by trimming the ends with scissors. RAINFOREST IN A JAR Source: familyfun.go.com
Thanks to a sealed environment that traps moisture but lets in light, this self-contained mini greenhouse needs little care.
Materials
• Glass container with a top and an opening wide enough to fit your hand into
• Pea gravel or aquarium gravel • Activated charcoal (available at gardening
stores) • Potting soil mix • Selection of small houseplants (ours included a
prayer plant, a button fern, a Persian shield, an aluminum plant, and a miniature African violet)
• Spray bottle Instructions: 1. Place a 2 ½ - 5 cm / 1 - 2” layer of the gravel
in the container, and then sprinkle on a thin layer of the activated charcoal. Top this with a layer from 5 cm / 2” to as much as one fourth of the height of the terrarium of potting soil.
2. To add the plants, first scoop out holes for planting, then take the plants from their pots and carefully remove any excess soil from their roots. Set the plants in their holes, and then gently pack the soil around each one. Lightly mist the plants with a spray bottle.
3. Replace the jar's lid and set the rain forest in a bright spot away from direct sunlight. Your indoor garden may never need watering, but check it every few weeks and add more water by lightly spritzing the plants with the spray bottle if the soil feels dry. If heavy condensation forms inside the glass, temporarily lift the cover to let some of the moisture escape.
TERRIFIC TERARIUM Source: familyfun.go.com Bring nature indoors and create your own tiny, tropical ecosystem. Materials
• Wide, clear, lidded container (we got ours at • Michaels) • Pebbles • Activated carbon (sold at pet stores) • Soil • Stones, moss, and
small plants* • Spray mister • Decorations (optional) Instructions
1. Cover the bottom of your container with 2 ½ cm / 1” of pebbles.
2. Add a layer of activated carbon to curb any earthy odors, and then top it with 7 ½ cm / 3” of soil.

9
3. Arrange the stones, moss, and plants to make a garden.
4. Mist the terrarium with water until the soil is moist but not wet.
5. Add decorations, if you like, then close the lid. If the container becomes cloudy, remove the top to let excess moisture evaporate.
6. Mist the terrarium lightly if the soil starts to dry out.
Tips: *You can collect these in the woods - no rare species, please! Or buy tiny ivies, palms, pilea, and African violets from a local nursery.
MAKE COPPER WINDCHIMES Source: allcrafts.net To start, you need to get some copper pipe, which you can get at a local hardware. At the plumbing section find a 2.5 meters / 10′ long piece of 3 or 4 cm / ½”- ¾” copper pipe. To cut it you need a copper pipe cutter, however, a department staff may be willing to cut it for you. You will need 7 pieces of pipe with each one to be 5 cm / 2″ longer than the last, so cut the pieces approximately 25 cm/10″, 30 cm/12″, 35 cm/14″, 40 cm/16″, 45 cm/18″, 50 cm/20″, and 56 cm/22″ long. Next drill a small hole in the end of each pipe,
making sure to drill all the way straight through the pipe so that the hole was on the back, too. Next you need two wooden circles. The larger one will be the top, where the pipes would hang. The smaller one will be the clapper that will hang in the middle, keeping the pipes from constantly tangling. Make sure the smaller one is small enough to leave room for the pipes to hang down around it, about 20 cm/8” and 10 cm/4” across.
You then need to mark 7 spots on the larger circle, equally spaced. Then drill a hole about a 3 cm / ½” in from the edge at each mark then drill a hole in the middle of each circle as well as drill three holes around the center hole in the larger wood circle. These will be used for the hanger later on. Then it’s time to start putting this thing together! The pipes need to hang from the wood by some sort of cord. I recommend using a nylon cord that’s suitable for outdoors. Use something pretty thin and very flexible. Cut a piece of cord about 20 cm /8″ long and thread it through the holes at the end of one of the pipes.
Then take both ends, slip them up through a hole in the large wooden circle and tie them in a knot.
Repeat this for the second pipe holding the wood up level making sure that the string is the same length as the one on the first pipe. Do the same for all the remaining pipes, making sure to put them in order from shortest to the longest.
Next is the hanger. Take three more pieces of cord, tied a big knot in each, and feed them up through the three middle holes in the larger wooden circle. Hold all three cords tightly in your hand and hold the whole thing up in the air. Here is where balance becomes very important; making sure that each of the cords is exactly the same length to ensure that the wooden circle remains level. The varying lengths of pipes make

10
one side heavier than the other, but you can make it all hang level by carefully adjusting those three cords. When you have it just how you wanted it, tie them in a knot and trim the ends. This part is then ready to hang with an S-hook from a hook in a tree or from a porch ceiling.
If the spot to hang the wind chimes isn’t quite breezy enough to make them chime much, add a clapper to help the breeze along. To do this, just cut a little 5 cm / 2″ x 10 cm / 4″ piece of thin wood, drill a hole in it, and string more cord through the hole. Then feed the end up through the hole in the clapper and knot it. Then feed the other end up through the middle hole in the larger wooden circle, adjusted for length, and tied it in a knot and … the wind chimes are done.
Wind chimes are really not very hard to make! You can make them out of just about any material you like. Copper has a most wonderful sound when the pipes hit each other in the breeze.
Taste the buttermilk …
MAKE BUTTER
Source: acornpies.blogspot.ca When you make butter with your young children, it's fun to shake it in a mason jar. I used to have the children sit in the grass as they shook the jar so it would have a soft place to land if it slipped. As you churn you can chant this traditional churning rhyme: Come, butter, come, Come, butter, come, Johnny's standing at the gate, Waiting for his butter cake, Come, butter, come. It takes patience to make butter. But it helps if you can take turns. It's fun to watch the butter turn to whipped cream. Eventually, the butter fats starts to separate from the buttermilk. The butter clumps together in a lump and starts to slosh in the buttermilk. The butter is ready Taste the buttermilk. It is delicious … much better
than the sour tasting kind you buy in the store Wash your butter with plenty of cold water, until the water runs clear. Now mix in
some salt to taste. We used kosher salt. My daughter had been soaking the butter press in ice water. She filled it with the fresh butter and chilled it.