honeycomb pleatwork apron - the german …germanrenaissance.net/.../honeycomb-pleatwork-apron... ·...
TRANSCRIPT

– 1 –
Honeycomb Pleatwork Apron
by Baroness Genoveva von Lübeck
Aprons are an ubiquitous accessory in medieval and renaissance ages. Not only do they protect clothing from dirt and grime, they serve as a handy way to carry items and can even be fashionable. Pleating the top of an apron is a simple way to gather a larger quantity of fabric as well as show off one skill with a needle. Simple pleated aprons are popular in Europe in the 14th, 15th, and 16th centuries, as seen in the images below.
Unknown Master of the Nativity
Image from the Luttrell Psalter (1325-35)
Landsknecht Seamstress, 1535
– 2 –
How to Make a Pleatwork Apron:Here are instruction to make your own apron similar to the one shown on the previous pages. It’s possible to do this in as little as an hour, or as long as an afternoon—it depends upon the size of your pleats and how much hand stitching you want to do.
What You Need:One yard (36” x 55”) of medium weight linen (selvedge to selvedge)Linen, cotton, or silk threads (one matching, one contrasting)BeeswaxMilliner’s needleScissorsDot TemplateMethod of marking the dots, such as water soluble marking pen (modern) or pounce (period)
Step-by-Step Instructions:
1. Square up your linen (cut it straight along grain). For a tutorial on how to do this, see http://germanrenaissance.net/squaring-up-your-linen-how-to-cut-evenly-along-the-grain-by-pulling-a-thread/
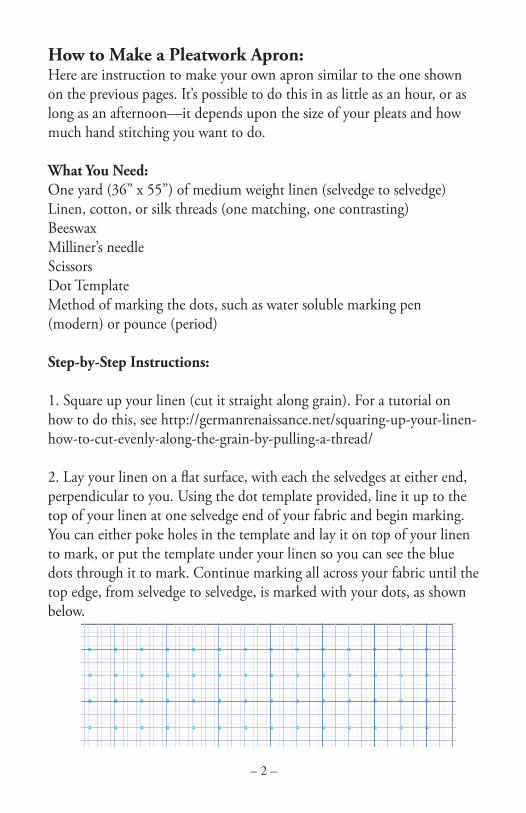
2. Lay your linen on a flat surface, with each the selvedges at either end, perpendicular to you. Using the dot template provided, line it up to the top of your linen at one selvedge end of your fabric and begin marking. You can either poke holes in the template and lay it on top of your linen to mark, or put the template under your linen so you can see the blue dots through it to mark. Continue marking all across your fabric until the top edge, from selvedge to selvedge, is marked with your dots, as shown below.

– 3 –
3. Thread your needle with contrasting thread (single strand of at least 60” long), knot it well on the end, wax it with beeswax, and do a running stitch along one row of dots. You’ll go into the fabric on a dot then come back through the fabric on the next dot. Continue until you reach the end of the row of dots, leaving a long trail of thread at the end. Continue with a new thread in a new row. Repeat until you have all rows threaded.
4. Holding the threads tightly all in one hand, gently pull the threads until pleats form and the fabric folds into a neat stack. Press and hold the pleats in your fingers to crease the fabric (be wary of ironing, as this may cause your marking dots to become permanent). Historically, they would have wetted the material and used a press or simple gravity to crease the pleats. Creasing them like this makes the next steps easier and makes the pattern we’re about to make stand out nicely. Once your fabric has been creased, allow it to relax slightly.

– 4 –
Slate Frame(document-
RoundFrame
5. Now thread your needle with matching thread, then wax your thread with beeswax to strengthen and lubricate your thread. Bring your first stitch up from the back of your fabric to the front, right into the top-right pleat, as shown in the photo below.
6. Now put your needle through the top edge of the pleat you started at and the next one to the left, as shown below.
7. Pull the needle through, then backstitch over these two pleats twice to secure them together.8. Push your needle back into the second crease, maneuvering it so it stays in the crease on the backside, then push it back through on the row below.

– 5 –
9. Repeat with the two creases on the row below, making sure you’re offsetting the pleats (this is how you get the honeycomb pattern). Backstitch at least twice to secure the stitch before inserting your needle back in behind the crease.
10. Push your needle back up through the fabric, behind the crease, at the top of the next pleat and stitch again. Continue like this across the top two rows.

– 6 –
11. Repeat with the remaining sets of rows.
12. Now cut off the knots of the thread you used to gather your pleats and gently pull them out.
To make the apron band and tie, cut about 4” off the bottom of your apron (or, if your waist is larger than 40”, cut two 4” lengths off and sew them together). Fold the top down one inch and the bottom up one inch, then iron. Now fold in half (tucking those two folds in) and iron again. Sandwich the top of your apron into the folded band, centered in the band, and stitch closed along the full length of the band, creating your apron band and tie. Feel free to shorten the tie to the length you desire.
Now just hem the bottom and, optionally, the sides (if your selvedges are clean, you can leave it as is).
Voila! You have a pleated apron.

– 7 –
Notes:This apron makes a honeycomb pattern that is quite large. Use a smaller gauge of dots to create a smaller pattern, such as 1/2” or even 1/4” for a very fine matrix.
The honeycomb stitch is flexible. When determining how much fabric you need for a project, estimate that you need about 3-4” of material for everyone 1” of finished pleatwork. If you want a wider apron, sew two panels together, selvedge to selvedge, with a whipstitch.
Most aprons were white linen, but records in the 16th century indicate that other colors were used, including yellow, red, black, and green.
To care for your apron, you can machine wash it, but do not machine dry. Instead, carefully press the folds of your pleats with your fingers when it is still damp, then allow to air dry.
Pleatwork can be done on shirt necklines, collars, sleeves, and cuffs.
The modern name for pleatwork is smocking. The German word is fitz-arbeit (which means pleat-work). The German word for apron is schurz.
Only two pleatwork styles have survived in clothing: honeycomb (Alpirsbach monastery find) and pattern darning (Mary of Hapsburg chemise).

– 8 –
About the Author, Contact Details, and Copyright Notice
Baroness Genoveva von Lübeck resides in the Barony of Cynnabar within the Kingdom of the Middle. She has been sewing, stitching and embroidering from the age of 7.
I love to help anyone who is interested in embroidery, pleatwork, and the German Renaissance! You can e-mail me at [email protected] and visit my web site at http://GermanRenaissance.net, where you’ll find tutorials, projects, photos, articles, and information!
This publication is protected under the US Copyright Act of 1976 and all other applicable international, federal, state and local laws, and all rights are reserved. You may use the pattern I developed to create hats, and you are free to sell the hats you make. You may not sell the patterns themselves in hardcopy or in digitized form, and you may not reprint or repost the patterns in any form without my express permission. When in doubt, please e-mail [email protected]. I’m nice and I’d love to hear from you!
For more information on pleatwork, check out these websites:
Web sites: http://germanrenaissance.net/tag/pleatwork/http://www.PleatworkEmbroidery.comhttp://catrijn.blogspot.com/2009/05/smocked-apron-part-1.htmlhttp://haandkraft.blogspot.com/2008/12/pleated-apron.htmlhttp://matildalazouche.livejournal.com/2569.htmlhttp://m-silkwork.blogspot.com/2010/06/smocked-apron-tutorials.htmlhttp://maniacalmedievalist.wordpress.com/category/aprons/http://opusanglicanum.wordpress.com/2013/05/03/smocked-apron/