home canning techniques - university of arizona
TRANSCRIPT

Jars and Lids: Food may be canned in glass jars or metal containers. Metal containers can be used only once. They require special sealing equipment and are much more costly than jars. Regular and wide-mouth Mason-type, threaded, home-canning jars with self-sealing lids are the best choice (Illustration 1). They are available in ½ pint, pint, 1½ pint, quart, and ½ gallon sizes. The standard jar mouth opening is about 2⅜ inches. Wide-mouth jars have openings of about 3 inches, making them more easily filled and emptied. Half-gallon jars may be used for canning very acid juices. Regular-mouth decorator jelly jars are available in 8 and 12 ounce sizes. With careful use and handling, Mason jars may be reused many times, requiring only new lids each time. When jars and lids are used properly, jar seals and vacuums are excellent and jar breakage is rare. Most commercial pint- and quart-size mayonnaise or salad dressing jars may be used with new two-piece lids for canning acid foods. However, you should expect more seal failures and jar breakage. These jars have a narrower sealing surface and are tempered less than Mason jars, and may be weakened by repeated contact with metal spoons or knives used in dispensing mayonnaise or salad dressing. Seemingly insignificant scratches in glass may cause cracking and breakage while processing jars in a canner. Mayonnaise-type jars are not recommended for use with foods to be processed in a pressure canner because of excessive jar breakage. Other commercial jars with mouths that cannot be sealed with two-piece canning lids are not recommended for use in canning any food at home.
The
Uni
vers
ity o
f Ariz
ona
Coo
pera
tive
Ext
ensi
on
Mar
icop
a C
ount
y ●
4341
E. B
road
way
, Pho
enix
, AZ
8504
0-88
07 ●
(602
) 827
-824
1
Home Canning Techniques
Illustration 1.
(OVER)

Jar Cleaning and preparation Before every use, wash empty jars in hot water with detergent and rinse well by hand, or wash in a dishwasher. Unrinsed detergents may cause unnatural flavors and colors. These washing methods do not sterilize jars. Scale or hard-water films on jars are easily removed by soaking jars several hours in a solution containing 1 cup of vinegar (5 percent acidity) per gallon of water. Sterilization of Empty Jars All jams, jellies, and pickled products processed less than 10 minutes should be filled into sterile empty jars. To sterilize empty jars, put them right side up on the rack in a boiling-water canner. Fill the canner and jars with hot (not boiling) water to 1 inch above the tops of the jars. Boil 10 minutes at altitudes less than 1,000 ft. At higher elevations, boil 1 additional minute for each additional 1,000 ft. elevation. Remove and drain hot sterilized jars one at a time. Save the hot water for processing filled jars. Fill jars with food, add lids, and tighten screw bands. Empty jars used for vegetables, meats, and fruits to be processed in a pressure canner need not be pre-sterilized. It is also unnecessary to pre-sterilize jars for fruits, tomatoes, and pickled or fermented foods that will be processed 10 minutes or longer in a boiling-water canner. Lid Selection, Preparation, and Use The common self-sealing lid consists of a flat metal lid held in place by a metal screw band during processing (Illustration 2). The flat lid is crimped around its bottom edge to form a trough, which is filled with a colored gasket compound. When jars are processed, the lid gasket softens and flows slightly to cover the jar-sealing surface, yet allows air to escape from the jar. The gasket then forms an airtight seal as the jar cools. Gaskets in unused lids work well for at least 5 years from date of manufacture. The gasket compound in older unused lids may fail to seal on jars.
Illustration 2. Buy only the quantity of lids you will use in a year. To ensure a good seal, carefully follow the manufacturer’s directions in preparing lids for use. Examine all metal lids carefully. Do not use old, dented, or deformed lids or lids with gaps or other defects in the sealing gasket. After filling jars with food, release air bubbles by inserting a flat plastic (not metal) spatula between the food and the jar. Slowly turn the jar and move the spatula up and down to allow air bubbles to escape. Adjust the headspace and then clean the jar rim (sealing surface) with a dampened paper towel. Place the lid, gasket
2

down, onto the cleaned jar-sealing surface. Uncleansed jar-sealing surfaces may cause seal failures (Illustration 3). Illustration 3. Then fit the metal screw band over the flat lid. Follow the manufacturer’s guidelines enclosed with or on the box for tightening the jar lids properly. Do not retighten lids after processing jars. As the jars cool, the contents in the jar contract, pulling the self-sealing lid firmly against the jar, forming a high vacuum. ● If rings are too loose, liquid may escape
from jars during processing, and seals may fail.
● If rings are too tight, air cannot vent during processing, and food will discolor during storage. Over tightening also may cause lids to buckle and jars to break, especially with raw-packed, pressure-processed food.
Screw bands are not needed on stored jars. They can be removed easily after jars are cooled. When removed, washed, dried, and stored in a dry area, screw bands may be used many times. If left on stored jars, they become difficult to remove, often rust, and may not work properly again. Recommended Canners Equipment for heat-processing home-canned food is of two main types — boiling-water canners and pressure canners. Most are designed to hold seven quart jars or eight to nine pints. Small pressure canners hold four quart jars; some large pressure canners hold 18 pint jars in two layers, but hold only seven quart jars. Pressure saucepans with smaller volume capacities are not recommended for use in canning. Small capacity pressure canners are treated in a similar manner as standard larger canners, and should be vented using the typical venting procedures. Low-acid foods must be processed in a pressure canner to be free of botulism risks. Although pressure canners may also be used for processing acid foods, boiling-water canners are recommended for this purpose because they are faster. A pressure canner would require from 55 to 100 minutes to process a load of jars; while the total time for processing most acid foods in boiling water varies from 25 to 60 minutes. A boiling-water canner loaded with filled jars requires about 20 to 30 minutes of heating before its water begins to boil. A loaded pressure canner requires about 12 to 15 minutes of heating before it begins to vent; another 10 minutes to vent the canner; another 5 minutes to pressurize the canner; another 8 to 10 minutes to process the acid food; and, finally, another 20 to 60 minutes to cool the canner before removing jars.
3
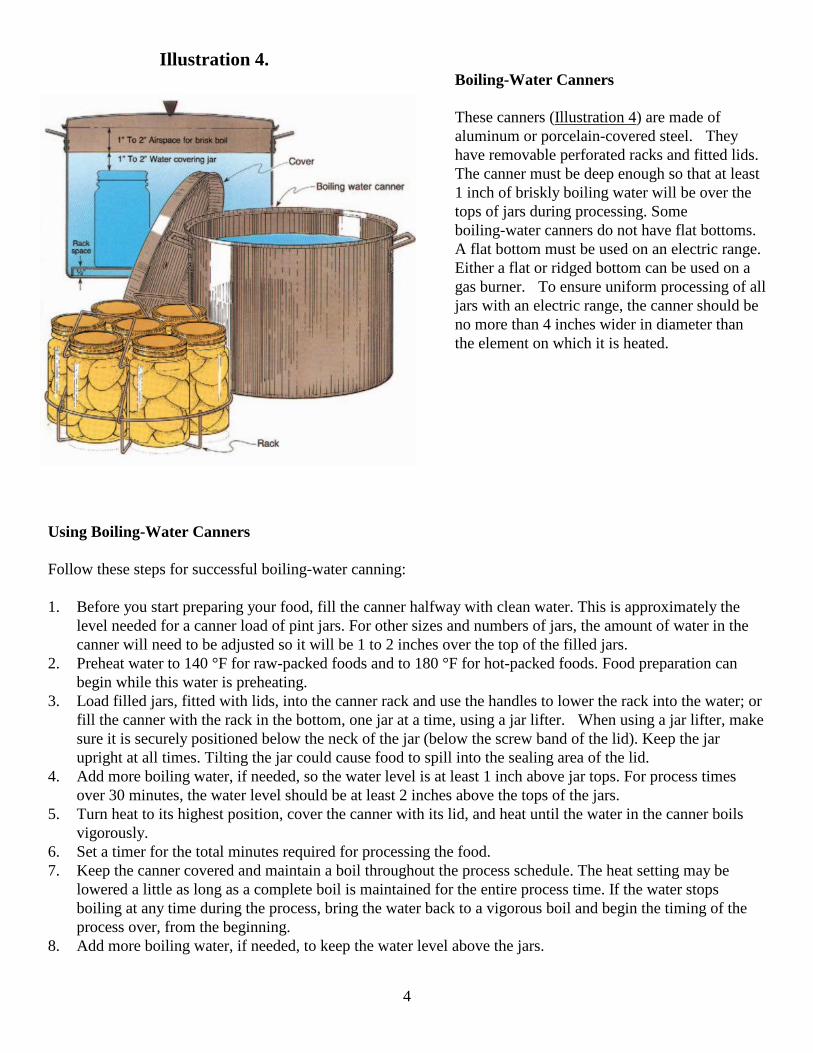
Illustration 4. Boiling-Water Canners These canners (Illustration 4) are made of aluminum or porcelain-covered steel. They have removable perforated racks and fitted lids. The canner must be deep enough so that at least 1 inch of briskly boiling water will be over the tops of jars during processing. Some boiling-water canners do not have flat bottoms. A flat bottom must be used on an electric range. Either a flat or ridged bottom can be used on a gas burner. To ensure uniform processing of all jars with an electric range, the canner should be no more than 4 inches wider in diameter than the element on which it is heated.
Using Boiling-Water Canners Follow these steps for successful boiling-water canning: 1. Before you start preparing your food, fill the canner halfway with clean water. This is approximately the
level needed for a canner load of pint jars. For other sizes and numbers of jars, the amount of water in the canner will need to be adjusted so it will be 1 to 2 inches over the top of the filled jars.
2. Preheat water to 140 °F for raw-packed foods and to 180 °F for hot-packed foods. Food preparation can begin while this water is preheating.
3. Load filled jars, fitted with lids, into the canner rack and use the handles to lower the rack into the water; or fill the canner with the rack in the bottom, one jar at a time, using a jar lifter. When using a jar lifter, make sure it is securely positioned below the neck of the jar (below the screw band of the lid). Keep the jar upright at all times. Tilting the jar could cause food to spill into the sealing area of the lid.
4. Add more boiling water, if needed, so the water level is at least 1 inch above jar tops. For process times over 30 minutes, the water level should be at least 2 inches above the tops of the jars.
5. Turn heat to its highest position, cover the canner with its lid, and heat until the water in the canner boils vigorously.
6. Set a timer for the total minutes required for processing the food. 7. Keep the canner covered and maintain a boil throughout the process schedule. The heat setting may be
lowered a little as long as a complete boil is maintained for the entire process time. If the water stops boiling at any time during the process, bring the water back to a vigorous boil and begin the timing of the process over, from the beginning.
8. Add more boiling water, if needed, to keep the water level above the jars.
4

9. When jars have been boiled for the recommend time, turn off heat and remove the canner lid. Wait 5 minutes before removing jars.
10. Using a jar lifter, remove the jars and place them on a towel, leaving at least 1-inch spaces between the jars during cooling. Let jars sit undisturbed to cool at room temperature for 12 to 24 hours.
Pressure Canners Pressure canners (Illustration 5) for use in the home have been extensively redesigned in recent years. Models made before the 1970's were heavy-walled kettles with clamp-on or turn-on lids. They were fitted with a dial gauge, a vent port in the form of a petcock or counterweight and a safety fuse. Modern pressure canners are lightweight, thin-walled kettles; most have turn-on lids. They have a jar rack, gasket, dial or weighted gauge, an automatic vent/cover lock, a vent port (steam vent) to be closed with a counterweight or weighted gauge, and a safety fuse. Pressure does not destroy microorganisms, but high temperatures applied for an adequate period of time do kill microorganisms. The success of destroying all microorganisms capable of growing in canned food is based on the temperature obtained in pure steam, free of air, at sea level. At sea level, a canner operated at a gauge pressure of 10.5 lbs. provides an internal temperature of 240 °F. Two serious errors in temperatures obtained in pressure canners occur because:
• Internal canner temperatures are lower at higher altitudes. To correct this error, canners must be operated at the increased pressures for appropriate attitude ranges.
• Air trapped in a canner lowers the
temperature obtained at 5, 10, or 15 pounds of pressure and results in under processing. The highest volume of air trapped in a canner occurs in processing raw-packed foods in dial-gauge canners. These canners do not vent air during processing. To be safe, all types of pressure canners must be vented 10 minutes before they are pressurized.
To vent a canner, leave the vent port uncovered on newer models or manually open petcocks on some older models. Heating the filled canner with its lid locked into place boils water and generates steam that escapes through the petcock or vent port. When steam first escapes, set a timer for 10 minutes. After venting 10 minutes, close the petcock or place the counterweight or weighted gauge over the vent port to pressurize the canner.
Illustration 5.
5

Weighted-gauge models exhaust tiny amounts of air and steam each time their gauge rocks or jiggles during processing. They control pressure precisely and need neither watching during processing nor checking for accuracy. The sound of the weight rocking or jiggling indicates that the canner is maintaining the recommended pressure. The single disadvantage of weighted-gauge canners is that they cannot correct precisely for higher altitudes. At altitudes above 1,000 feet, they must be operated at canner pressures of 10 instead of 5, or 15 instead of 10, PSI. Check dial gauges for accuracy before use each year. Gauges that read high cause under-processing and may result in unsafe food. Low readings cause over-processing. Pressure adjustments can be made if the gauge reads up to 2 pounds high or low. Replace gauges that differ by more than 2 pounds. Every pound of pressure is very important to the temperature needed inside the canner for producing safe food, so accurate gauges and adjustments are essential when a gauge reads higher than it should. If a gauge is reading lower than it should, adjustments may be made to avoid over-processing, but are not essential to safety. Gauges may be checked at many county Cooperative Extension offices or contact the pressure canner manufacturer for other options. Handle canner lid gaskets carefully and clean them according to the manufacturer’s directions. Nicked or dried gaskets will allow steam leaks during pressurization of canners. Keep gaskets clean between uses. Gaskets on older model canners may require a light coat of vegetable oil once per year. Gaskets on newer model canners are pre-lubricated and do not benefit from oiling. Check your canner’s instructions if there is doubt that the particular gasket you use has been pre-lubricated. Lid safety fuses are thin metal inserts or rubber plugs designed to relieve excessive pressure from the canner. Do not pick at or scratch fuses while cleaning lids. Use only canners that have the Underwriter’s Laboratory (UL) approval to ensure their safety. Replacement gauges and other parts for canners are often available at stores offering canning equipment or from canner manufacturers. When ordering parts, give your canner model number and describe the parts needed. Using Pressure Canners Follow these steps for successful pressure canning: 1. Put 2 to 3 inches of hot water in the canner. Some specific products require that you start with even more
water in the canner. Always follow the directions with USDA processes for specific foods if they require more water added to the canner. Place filled jars on the rack, using a jar lifter. When using a jar lifter, make sure it is securely positioned below the neck of the jar (below the screw band of the lid). Keep the jar upright at all times. Tilting the jar could cause food to spill into the sealing are of the lid. Fasten canner lid securely.
Illustration 6.
6

Illustration 7. 2. Leave weight off vent port or open petcock. Heat it at the highest setting until steam flows freely from the
open petcock or vent port. 3. While maintaining the high heat setting, let the steam flow (exhaust) continuously for 10 minutes, and then
place the weight on the vent port or close the petcock. The canner will pressurize during the next 3 to 5 minutes.
4. Start timing the process when the pressure reading on the dial gauge indicates that the recommended pressure has been reached, or when the weighted gauge begins to jiggle or rock as the canner manufacturer describes.
5. Regulate heat under the canner to maintain a steady pressure at or slightly above the correct gauge pressure. Quick and large pressure variations during processing may cause unnecessary liquid losses from jars. Follow the canner manufacturer’s directions for how a weighted gauge should indicate it is maintaining the desired pressure.
IMPORTANT: If at any time pressure goes below the recommended amount, bring the canner back to pressure and begin the timing of the process over, from the beginning (using the total original process time). This is important for the safety of the food.
6. When the timed process is completed, turn off the heat, remove the canner from heat if possible, and let the
canner depressurize. Do not force-cool the canner. Forced cooling may result in unsafe food or food spoilage. Cooling the canner with cold running water or opening the vent port before the canner is fully depressurized will cause loss of liquid from jars and seal failures. Force-cooling may also warp the canner lid of older model canners, causing steam leaks. Depressurization of older models without dial gauges should be timed. Standard-size heavy-walled canners require about 30 minutes when loaded with pints and 45 minutes with quarts. Newer thin-walled canners cool more rapidly and are equipped with vent locks. These canners are depressurized when their vent lock piston drops to a normal position.
7. After the canner is depressurized, remove the weight from the vent port or open the petcock. Wait 10 minutes, unfasten the lid, and remove it carefully. Lift the lid away from you so that the steam does not burn your face.
7

8. Remove jars with a jar lifter, and place them on a towel, leaving at least 1-inch spaces between the jars during cooling. Let jars sit undisturbed to cool at room temperature for 12 to 24 hours.
Selecting the Correct Processing Time When canning in boiling water, more processing time is needed for most raw-packed foods and for quart jars than is needed for hot-packed foods and pint jars. To destroy microorganisms in acid foods processed in a boiling-water canner, you must: ● Process jars for the correct number of minutes in boiling water. ● Cool the jars at room temperature. The food may spoil if you fail to add process time for lower boiling-water temperatures at altitudes above 1,000 feet, process for fewer minutes than specified, or cool jars in cold water. To destroy microorganisms in low-acid foods processed with a pressure canner, you must: ● Process the jars using the correct time and pressure specified for your altitude. ● Allow canner to cool at room temperature until it is completely depressurized. The food may spoil if you fail to select the proper process times for specific altitudes, fail to exhaust canners properly, process at lower pressure than specified, process for fewer minutes than specified, or cool the canner with water. (Note: The following information applies to using the tables for selecting processing times given with food products from the USDA Complete Guide to Home Canning. Other resources may not provide the processing times and altitude adjustments in the same type of table.)
Using Tables for Determining Proper Process Times The set of guides includes processing times with altitude adjustments for each product. Process times for ½-pint and pint jars are the same, as are times for 1½ pint and quart jars. For some products, you have a choice of processing at 5, 10, or 15 PSI. In these cases, choose the canner pressure you wish to use and match it with your pack style (raw or hot) and jar size to find the correct process time. The following examples show how to select the proper process for each type of canner. Process times are given in separate tables for sterilizing jars in boiling-water, dial-gauge, and weighted- gauge canners. Example A: Boiling-water Canner Suppose you are canning peaches as a hot-pack in quarts at 2,500 ft. above sea level, using a boiling-water canner. First, select the process table for boiling-water canner. The example for peaches is given in Table for Example A below. From that table, select the process time given for (1) the style of pack (hot), (2) the jar size (quarts), and (3) the altitude where you live (2,500 ft.). You should have selected a process time of 30 minutes. 8

Table for Example A. Recommended process time for peaches in a boiling-water canner.
Process Time at Altitudes of
Style of Pack Jar Size 0-1,000 ft. 1,001-3,000 ft. 3,001-6,000 ft. Above 6,000 ft.
Hot Pints Quarts
20 min 25
25 min 30
30 min 35
35 min 40
Raw Pints Quarts
25 30
30 35
35 40
40 45
Example B: Dial- gauge Pressure Canner Suppose you are canning peaches as a hot-pack in quarts at 2,500 ft. above sea level, using a dial-gauge pressure canner. First, select the process table for dial-gauge pressure canner. The example for peaches is given Table for Example B below. From that table, select the process pressure (PSI) given for (1) the style of pack (hot), (2) the jar size (quarts), (3) the process time (10 minutes), (4) the altitude where you live (2,500 ft.). You should have selected a pressure of 7 lbs. for the 10 minutes process time.
Table for Example B. Recommended process time for peaches in a dial-gauge pressure canner.
Canner Pressure (PSI) at Altitudes of
Style of Pack Jar Size Process Time 0-2,000 ft. 2,001-4,000 ft. 4,001-6,000 ft. 6,001-8,000 ft.
Hot and Raw Pints or Quarts
10 min 6 lbs. 7 lbs. 8 lbs. 9 lbs.
Example C: Weighted-gauge Pressure Canner Suppose you are canning peaches as a hot-pack in quarts at 2,500 ft. above sea level, using a weighted-gauge pressure canner. First, select the process table for weighted-gauge pressure canner. The example for peaches is given in Table for Example C below. From that table, select the process pressure (PSI) given for (1) the style of pack (hot), (2) the jar size (quarts), (3) the process time (10 minutes), and (4) the altitude where you live (2,500 ft.). You should have selected a pressure of 10 lbs. for the 10 minutes process time.
Table for Example C. Recommended process time for peaches in a weighted-gauge pressure canner.
Canner Pressure (PSI) at Altitudes of
Style of Pack Jar Size Process Time 0-1,000 ft. Above 1,000 ft.
Hot and Raw Pints or Quarts 10 min 5 lbs. 10 lbs.
9

Cooling Jars When you remove hot jars from a canner, do not retighten their jar lids. Retightening of hot lids may cut through the gasket and cause seal failures. Cool the jars at room temperature for 12 to 24 hours. Jars may be cooled on racks or towels to minimize heat damage to counters (Illustration 8). The food level and liquid volume of raw-packed jars will be noticeably lower after cooling. Air is exhausted during processing and food shrinks. If a jar loses excessive liquid during processing, do not open it to add more liquid. Check for sealed lids. Testing Jar Seals After cooling jars for 12 to 24 hours, remove the screw bands and test seals with one of the following options: Option 1. Press the middle of the lid with a finger or thumb. If the lid springs up when you release your finger the lid is unsealed. Option 2. Tap the lid with the bottom of a teaspoon. If it makes a dull sound, the lid is not sealed. If food is in contact with the underside of the lid, it will also cause a dull sound. If the jar is sealed correctly, it will make a ringing, high-pitched sound. Option 3. Hold the jar at eye level and look across the lid. The lid should be concave (curved down slightly in the center). If center of the lid is either flat or bulging, it may not be sealed.
Illustration 8.
10

Reprocessing unsealed jars
If a lid fails to seal on a jar, remove the lid and check the jar-sealing surface for tiny nicks. If necessary, change the jar, add a new, properly prepared lid, and reprocess within 24 hours using the same processing time. Headspace in unsealed jars may be adjusted to 1-½ inches and jars could be frozen instead of reprocessed. Foods in single unsealed jars could be stored in the refrigerator and consumed within several days. Storing Canned Foods If lids are tightly vacuum sealed on cooled jars, remove screw bands, wash the lid and jar to remove food residue; then rinse and dry jars. Label and date the jars and store them in a clean, cool, dark, dry place. For best quality, store between 50 and 70 °F. Can no more food than you will use within a year. Do not store jars above 95 °F or near hot pipes, a range, a furnace, in an uninsulated attic, or in direct sunlight. Under these conditions, food will lose quality in a few weeks or months and may spoil. Dampness may corrode metal lids, break seals, and allow re-contamination and spoilage. Accidental freezing of canned foods will not cause spoilage unless jars become unsealed and re-contaminated. However, freezing and thawing may soften food. If jars must be stored where they may freeze, wrap them in newspapers, place them in heavy cartons, and cover with more newspapers and blankets.
Identifying and Handling Spoiled Canned Food Do not taste food from a jar with an unsealed lid or food that shows signs of spoilage. You can more easily detect some types of spoilage in jars stored without screw bands. Growth of spoilage bacteria and yeast produces gas which pressurizes the food, swells lids, and breaks jar seals. As each stored jar is selected for use, examine its lid for tightness and vacuum. Lids with concave centers have good seals. Next, while holding the jar upright at eye level, rotate the jar and examine its outside surface for streaks of dried food originating at the top of the jar. Look at the contents for rising air bubbles and unnatural color. While opening the jar, smell for unnatural odors and look for spurting liquid and cotton-like mold growth (white, blue, black, or green) on the top food surface and underside of lid. Spoiled low-acid foods, including tomatoes, may exhibit different kinds of spoilage evidence or very little evidence. Therefore, all suspect containers of spoiled low-acid foods, including tomatoes, should be treated as having produced botulinum toxin and handled carefully in one of two ways:
If the swollen metal cans or suspect glass jars are still sealed, place them in a heavy garbage bag. Close and place the bag in a regular trash container or dispose in a nearby landfill.
If the suspect cans or glass jars are unsealed, open, or leaking, they should be detoxified before disposal.
Detoxification process: Wear disposable rubber or heavy plastic gloves. Carefully place the suspect containers and lids on their sides in an 8-quart volume or larger stock pot, pan, or boiling-water canner. Wash your hands with gloves thoroughly. Carefully add water to the pot and avoid splashing the water. The water should completely cover the containers with a minimum of a 1-inch level above the containers. Place a lid on the pot 11

and heat the water to boiling. Boil 30 minutes to ensure detoxifying the food and all container components. Cool and discard the containers, their lids, and food in the trash or dispose in a nearby landfill. Cleaning up the area: Contact with botulinum toxin can be fatal whether it is ingested or enters through the skin. Take care to avoid contact with suspect foods or liquids. Wear rubber or heavy plastic gloves when handling suspect foods or cleaning up contaminated work surfaces and equipment. A fresh solution of 1 part unscented liquid household chlorine bleach (5 to 6% sodium hypochlorite) to 5 parts clean water should be used to treat work surfaces, equipment, or other items, including can openers and clothing, that may have come in contact with suspect foods or liquids. Spray or wet contaminated surfaces with the bleach solution and let stand for 30 minutes. Wearing gloves, wipe up treated spills with paper towels being careful to minimize the spread of contamination. Dispose of these paper towels by placing them in a plastic bag before putting them in the trash. Next, apply the bleach solution to all surfaces and equipment again, and let stand for 30 minutes and rinse. As a last step, thoroughly wash all detoxified counters, containers, equipment, clothing, etc. Discard gloves when cleaning process is complete. (Note: Bleach is an irritant itself and should not be inhaled or allowed to come in contact with the skin.) Source: USDA, Extension Service, Agriculture Information Bulletin No. 539, Complete Guide to Home Canning. Revised by: Susie Lyons, Instructional Specialist, Sr., Family and Consumer Sciences: 10/2013. Issued in furtherance of Cooperative Extension work, acts of May 8 and June 30, 1914, in cooperation with the U.S. Department of Agriculture, Jeffrey C. Silvertooth, Associate Dean & Director, Economic Development & Extension, College of Agriculture Life Sciences, The University of Arizona. The University of Arizona is an equal opportunity, affirmative action institution. The University does not discriminate on the basis of race, color, religion, sex, national origin, age, disability, veteran status, or sexual orientation in its programs and activities.
12