high performance content hosting
TRANSCRIPT

High Performance Content Hosting
Aleksey Korzun
1

Agenda
• Operating system choices
• Preparing OS for high volume content hosting
• Setting up web daemon
• Benchmarking
• Bottlenecks
• Disclosure
2

Operating System Choices
Good:
• Lightweight
• Secure
• Proven
• Flexible
3
Bad:• Windows

Operating System Choices
4

Installing FreeBSD
5
When installing FreeBSD follow guidelines below for great success and fame
Guidelines:
• Use RELEASE, not STABLE or CURRENT
• Match platform to your CPU (amd64 for X2, etc)
• Enable only what you need in network services
• Disable debugging options
• If possible, disable DHCP
• When prompted, install binaries and full source, we do not want X11 garbage
If you already installed FreeBSD, simply use `sysinstall` to manage your configuration.

Preparing FreeBSD 1.0
6
# -- disable NIS service
nisdomainname="NO"
# -- disable USB
usbd_enable="NO"
# -- enable sshd
sshd_enable="YES"
# -- disable inetd 'super server'
inetd_enable="NO"
# -- disable incoming sendmail daemon
sendmail_enable="NO"
Upon booting to your freshly installed FreeBSD you will have perform a few tweaks before
we recompile kernel.
First, let’s disable un-needed services by editing /etc/rc.conf and appending following:
Your /etc/rc.conf file should contain hostname and network configuration information along
with appended code above.
Let’s save and move on to modifying our kernel!

Preparing FreeBSD 1.1
7
Next step is to compile additional features in our kernel and remove dead weight from
slowing us down.
Installing custom kernel is pretty straight forward process in 5.x+ compared to older OS
versions, so this presentation will not cover it. Instead we will focus on optimizations
you should make to your kernel configuration.
If you need help with custom kernel installation, take a peak at:
http://www.freebsd.org/doc/en/books/handbook/kernelconfig-building.html
Open up your new kernel configuration (should be copy of GENERIC file), we will go over
stuff we do not need on our content server.
Lets break it down in a nice list (this will be specific to your system)

• You do not need to support multiple CPU platforms, settle on one choice.
• Remove DEBUG from makeoptions
• Following options are save to remove: INET6, NFSCLIENT, NFSSERVER, NFS_ROOT, MSDOSFS, KTRACE,
• By default kernel supports tons of drivers you do not need. Go through device parameters and get rid of
everything that you will never have on your server.
• Be careful when removing devices that are required by other modules. For example USB ethernet requires
miibus device. 8
Preparing FreeBSD 1.2
Trim the fat:

• We want to enable device polling, even on SMP systems.
• We will want to load several network components that we can utilize.
• If you are running FreeBSD 5.x-STABLE or greater, you want to enable ACCEPT_FILTER_HTTP.
• Custom kernel configuration (along with other content for this presentation) that I use can be located at:
http://www.webfoundation.net/public/high-performance-content-hosting/
• Next slide will show options you will need to add to your kernel configuration, you can see brief explanation for
each option in comments. 9
Preparing FreeBSD 1.3
Add following:

10
Preparing FreeBSD 1.4
Add following:# Device polling
options DEVICE_POLLING # Reduce overheard of network cards, let kernel handle everything
options HZ=1000 # Delay that kernel will obey when polling network cards
# Network
options IPFIREWALL # Load firewall, IPFW
options IPFIREWALL_FORWARD # Enable forwarding of packets from x to y (not required, but keep this)
options IPFIREWALL_VERBOSE # Enable firewall logging
options IPFIREWALL_VERBOSE_LIMIT=100 # But cap messages to specific limit (100 is good)
options IPFIREWALL_DEFAULT_TO_ACCEPT # Make sure firewall is set to ACCEPT everything by default
options DUMMYNET # Traffic shaper, bandwidth manager, etc.
Options IPDIVERT # Divert sockets (RAW IP sockets) for IPFW.
# Enable ACCEPT_FILTER_HTTP on 5.x-STABLE or greater, vulnerable in previous releases
# see: http://securitytracker.com/alerts/2002/May/1004405.html
options ACCEPT_FILTER_HTTP # Allows kernel to pre-process incoming requests
# Misc
options QUOTA # Quota support
Compile and re-build your kernel. Reboot your system and flip to the next slide!

Preparing FreeBSD 2.0
11
# Maximum number of open files
kern.maxfiles=36984 # Default is 12328
# Maximum number of open files per process
kern.maxfilesperproc=18492 # Default is 11095
# Listen queue for incoming connections
kern.ipc.somaxconn=32544 #Default is 128
# Max this out
kern.ipc.maxsockets=163840 # Default is 12328
kern.ipc.maxsockbuf=10485760 # Default is 262144
# Maximum number of dynamic rules for dummynet
net.inet.ip.fw.dyn_max=5000
# Lifetime for various connection types (dropped after xx secs)
net.inet.ip.fw.dyn_ack_lifetime=300 # Default as of 6.x
net.inet.ip.fw.dyn_syn_lifetime=2 # Default 20, we want this lowered
# Enlarge port range to prevent FIN_WAIT 2 from using up all ports
net.inet.ip.portrange.hifirst=8000
net.inet.ip.portrange.hilast=65535
In order to allow our system to process and handle more data we will have to increase some
default configuration limits.
Open up /etc/sysctl.conf with your favorite editor, let’s add following parameters

Preparing FreeBSD 2.1
12
# Lower amount of time we want to wait for ACK replies
net.inet.tcp.msl=7000 # Default is 30000, too high!
# Adjust limitation of TCP RST responses
net.inet.icmp.icmplim=2000 # Default is 200
# Enable high performance TCP extension
net.inet.tcp.rfc1323=1 # Default as of 6.x
# Do not delay packet acks (don't queue stuff up, send right away)
net.inet.tcp.delayed_ack=0
# Adjust window spaces for TCP/UDP
net.inet.tcp.sendspace=65535 # Default as of 6.x
net.inet.tcp.recvspace=65535 # Default as of 6.x
net.inet.udp.recvspace=41600 # Default as of 6.x
net.inet.udp.maxdgram=57344 # Default as of 6.x
# Simply drop tcp/udp packets that are not expect, without replying
net.inet.tcp.blackhole=2
net.inet.udp.blackhole=1
# Allow local resources to become free faster
net.inet.tcp.nolocaltimewait=1
# And.. for local network
net.local.stream.sendspace=65535 #Default 8192
net.local.stream.recvspace=65535 #Default 8192
# Read: http://unix.derkeiler.com/Mailing-Lists/FreeBSD/performance/2005-10/0015.html
#net.isr.enable=1

Preparing FreeBSD 2.2
13
# During peak loads check your usage with `sysctl vfs.numvnodes`, increase this
# if you are near this limit!
kern.maxvnodes=70236 # Default as of 6.x
# If you have following cards bge, dc, em, fwe, fwip, fxp,
# ixgb, nge, re, rl, sf, sis, ste, stge, vge, vr or xl
# enable this option to improve network throughput
kern.polling.enable=1
# Disable core dumps
kern.coredump=0
Make sure to play around with values, this is not a fit all configuration but merely an idea of
what you should adjust, test, adjust, test until you get desired result.
You can also get everything in a single file at: http://www.webfoundation.net/public/high-
performance-content-hosting/

Preparing FreeBSD 3.0
14
#Raise process limits
kern.maxproc="12328" # Default 6164
kern.maxprocperuid="11528" # Default 5547
#Sendfile system for transmitting files
kern.ipc.nsfbufs="13312" # Default 6656
There are few parameters that we can’t adjust on a running system, those values need to be
set at system boot, and fortunately for us is very straight forward.
Let’s open up /boot/loader.conf with your favorite editor and add following parameters
Quick and easy, reboot your system and we can start installing and configuring Lighttpd!

Preparing FreeBSD 4.0
15
cd /usr/ports/devel/pcre && make install clean
Before we begin installation of Lighttpd 1.4.x and Apache 2.2.x,we need to install several
packages/libraries to support some of the features two daemons offer.
While most of the packages might not required for your content server, I will demonstrate few
tricks at the end of this presentation that will make use of them.
First let’s install PCRE port, this will give us support for regular expressions:
Let’s proceed to daemon installation...
Now let’s grab latest copy of LUA from http://www.lua.org/download.html and install it, LUA is
lightweight scripting language that we can pass Lighttpd requests to
cd ~
wget http://www.lua.org/ftp/lua-5.1.4.tar.gz
tar xvfz lua-5.1.4.tar.gz
cd lua-5.1.4
make freebsd install

Installing Lighttpd 1.0
16
cd ~
wget http://www.lighttpd.net/download/lighttpd-1.4.20.tar.gz
tar xvfz lighttpd-1.4.20.tar.gz
cd lighttpd-1.4.20
Now, let’s install Lighttpd from source. We will use stable 1.4.x release from
http://www.lighttpd.net/
We will be serving static content on IPV4 network, let’s disable some stuff we do not need
and enable support for PCRE and LUA (packages we just installed).
./configure --without-zlib \
--without-bzip2 \
--with-pcre \
--with-lua LUA_CFLAGS="-I/usr/local/include/" LUA_LIBS=/usr/local/lib/liblua.a \
--disable-ipv6
Complete installation by doing make and make install clean
make
make install clean

Configuring Lighttpd 1.0
17
Now let’s create configuration file, I will walk you thought each section.
First, lets load server modules we would use. You will need mod_expire (that will allow us to specify
expiration date for our images/files so they are not re-fetched every time user reloads page that links to static
content hosted on Lighttpd) and mod_accesslog will provide us with ability to log server requests.
#additional modules
server.modules = ("mod_expire","mod_accesslog")
Now let’s set up access and error logs, I prefer to house them in /var/log/lighttpd/
#where to send error logs
server.errorlog = "/var/log/lighttpd/error.log"
#where to send access logs
accesslog.filename = "/var/log/lighttpd/access.log"
Document root tells Lighttpd to serve content out of this directory, this is where your content will reside, I
picked /usr/local/www/ in this example.
#document root
server.document-root = "/usr/local/www/"

Configuring Lighttpd 1.1
18
This directive is not required, but if you would like to display index.html by default in every directory add this to
your configuration
#files to check for if open directory is requested
index-file.names = ("index.html")
Since our content server will be serving images and occasional html/text page we will only map file types we
need
#mimetypes to map
mimetype.assign = (
".gif" => "image/gif",
".jpg" => "image/jpeg",
".jpeg" => "image/jpeg",
".png" => "image/png",
".html" => "text/html"
)
Now lets tell our daemon on what port we would like it to listen on and what username/group it should run as,
keep in mind that you should keep this port under 8000 since we configured net.inet.ip.portrange.hifirst
parameter in sysctl
#server and user/group bindings
server.port = 80
server.username = "daemon"
server.groupname = "daemon"

Configuring Lighttpd 1.2
19
Now it’s time to utilize mod_expire, in this example if you are serving images/ and thumbs/ under
/usr/local/www/ directory you will want to put something like this in your configuration
#set expiration date for static content
expire.url = (
"/images/" => "access 2 years",
"/thumbs/" => "access 2 years"
)
Most modern browsers will check expiration stamp on content they are fetching and if our server informs them
that all of our content under /images/ directory will not change for 2 years it will not fetch a new copy when
user requests your content again (unless of course they flush their cache).
This will save you bandwidth and system resources.
Keep alive setting could be a little tricky. In this example I will disable it.
If you have control over your content (not allowing hot linking) and you are only serving one image from your
content server per page request you should disable or at least set keep alive to a very low value.
If you are allowing hot linking, user will most likely link multiple images. In cases like this you may benefit from
enabling keep alive. Do not set them too high.
#server tweaks
server.max-keep-alive-idle = 0
server.max-keep-alive-requests = 0

Configuring Lighttpd 1.3
20
Now lets lower write idle so we can free up resources quicker for extremely slow requests, raise number of file
descriptors to compliment our file and socket limit tweaks we did to FreeBSD
server.max-write-idle = 180
server.max-fds = 20048
Last but not least, let’s turn on stat caching, when you serve same content to different users you can bypass
stat() call to files you are serving.
“Simple” stat engine will cache each stat() call for up to 1 second. If you need better and more robust caching
take a look at FAM.
server.stat-cache-engine = "simple"
You are done! Save your file to /usr/local/etc/lighttpd.conf and create logging directories and files
mkdir /var/log/lightttpd/
touch /var/log/lighttpd/access.log
touch /var/log/lighttpd/error.log
Start your web server with –f parameter pointing to your new configuration file
/usr/local/sbin/lighttpd –f /usr/local/etc/lighttpd.conf
You should be able to access it from outside/locally on port 80. Don’t forget to put content in your document
root (/usr/local/www/)!
21
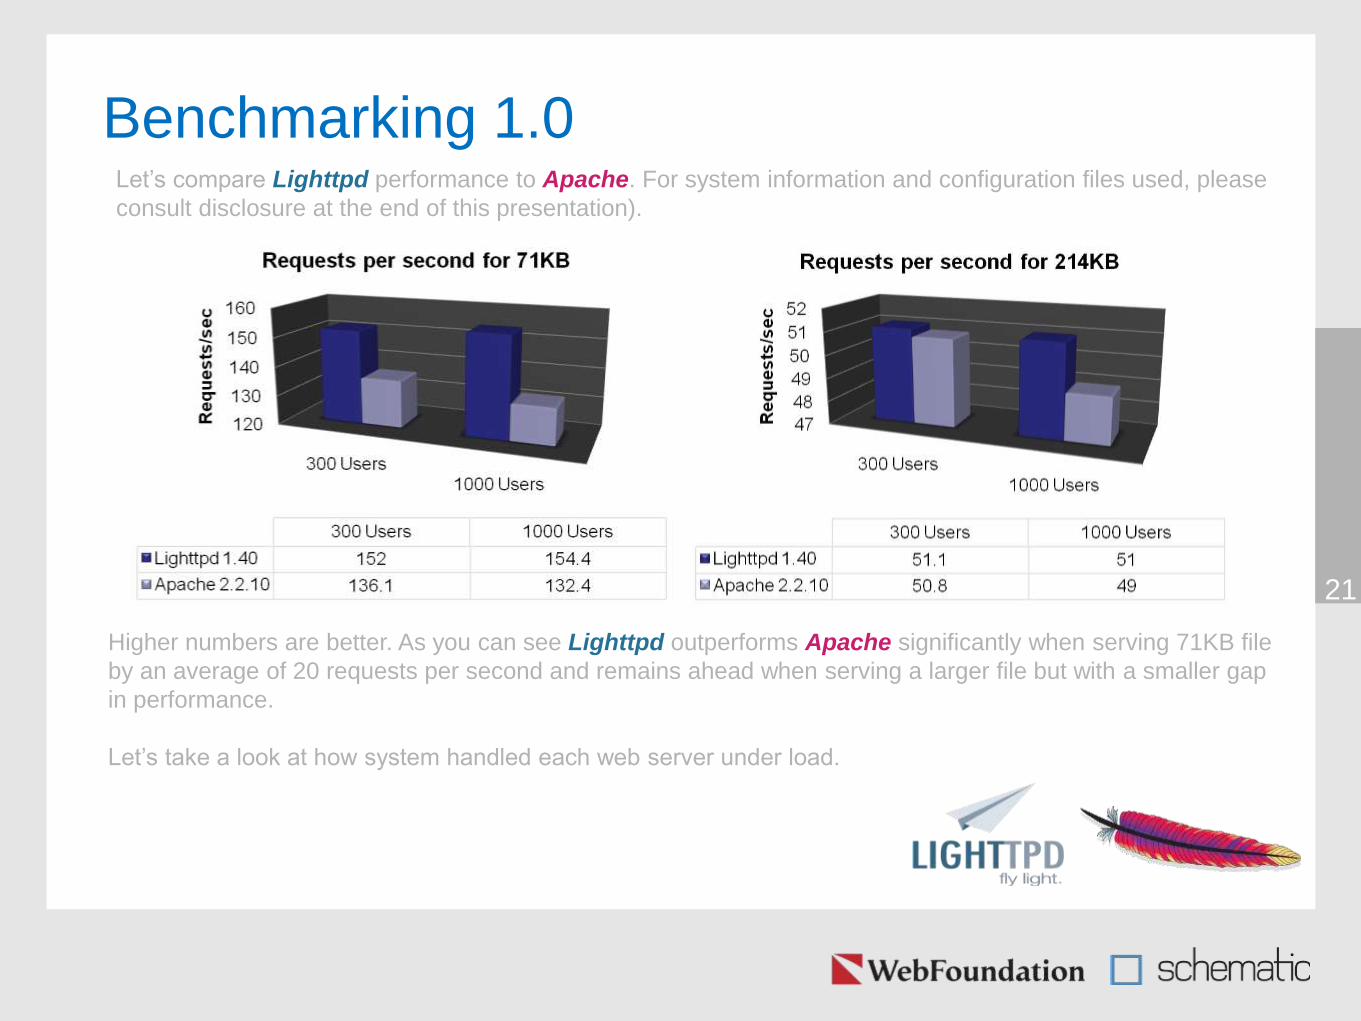
Benchmarking 1.0Let’s compare Lighttpd performance to Apache. For system information and configuration files used, please
consult disclosure at the end of this presentation).
Higher numbers are better. As you can see Lighttpd outperforms Apache significantly when serving 71KB file
by an average of 20 requests per second and remains ahead when serving a larger file but with a smaller gap
in performance.
Let’s take a look at how system handled each web server under load.
22
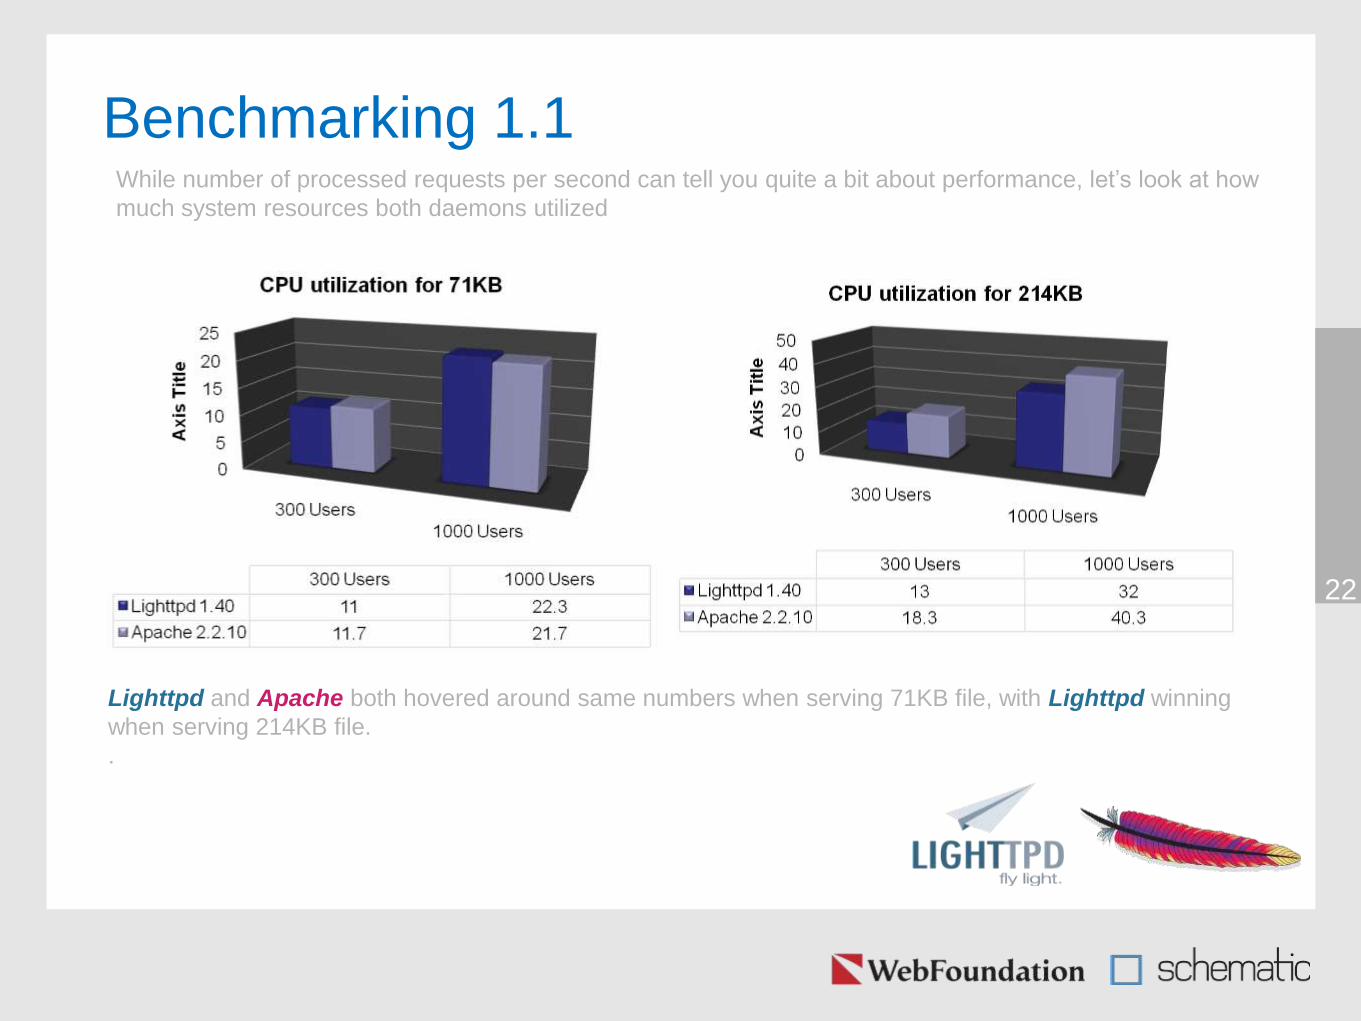
Benchmarking 1.1
Lighttpd and Apache both hovered around same numbers when serving 71KB file, with Lighttpd winning
when serving 214KB file.
.
While number of processed requests per second can tell you quite a bit about performance, let’s look at how
much system resources both daemons utilized

23
Benchmarking 1.2
300 Users 1000 Users
Lighttpd 1.40 215164 214564
Apache 2.2.10 505921 941223
VM
Res
ou
rce
s
Memory allocation for 71KB
Lighttpd’s footprint remained practically identical when serving 300 and 1000 users for both small and large
files.
Apache used more then double of memory then Lighttpd for 300 users and as much of 639% more for 1000
users downloading 214KB of data.
Memory is important, our tests showed that Apache required a lot more memory allocation to handle same
amount of traffic (with lesser performance) then Lighttpd .
300 Users 1000 Users
Lighttpd 1.40 211716 220217
Apache 2.2.10 570793 1407199
VM
Res
ou
rce
s
Memory allocation for 214KB

Bottlenecks 1.0
24
Based on personal experience you will eventually hit some bottlenecks as your service grows, I will provide
solutions to most common problems
Hot-Linking:• Hot-Linking can drain your bandwidth and hardware resources very quickly
• You do not get paid for hot linked content
Bandwidth:• Bandwidth is very expensive
• Purchasing more bandwidth is not always an option when dealing with custom platforms

Bottlenecks 2.0
25
If you are like most system administrators, you hate hot linking, but in some cases you can’t disable it and you
find your self monitoring your system resources and trying to find offenders that ruin it for everybody else.
We can use Lighttpd to track and limit resources automatically without giving up performance.
Remember when we configured Lighttpd to compile with LUA libraries? LUA is a lightweight scripting
language that we will use to handle requests.
First we need to add mod_magnet to our module list, this module will pipe incoming requests to LUA for
processing. Let’s open up our configuration file and locate server.modules directive and add mod_magnet.
It should look something like this
Now let’s add a new configuration directive where we will check if referrer is not mydomain.com,
mydomain.net, mydomain.org and forward request to LUA script.
Notice /usr/local/etc/lighttpd.lua, will be using this file to store a small hash table of content that we will be
restricting access, along with a small snippet that will check each request and attempt to match it against the
table.
#additional modules
server.modules = ("mod_expire","mod_accesslog”,”mod_magnet”)
#forward hot-linkers to LUA
$HTTP["referer"] !~ "^($|http://([^/]*\.)?mydomain\.(com|net|org)/)" {
magnet.attract-physical-path-to = ("/usr/local/etc/lighttpd.lua")
}
Bottlenecks 2.1
26
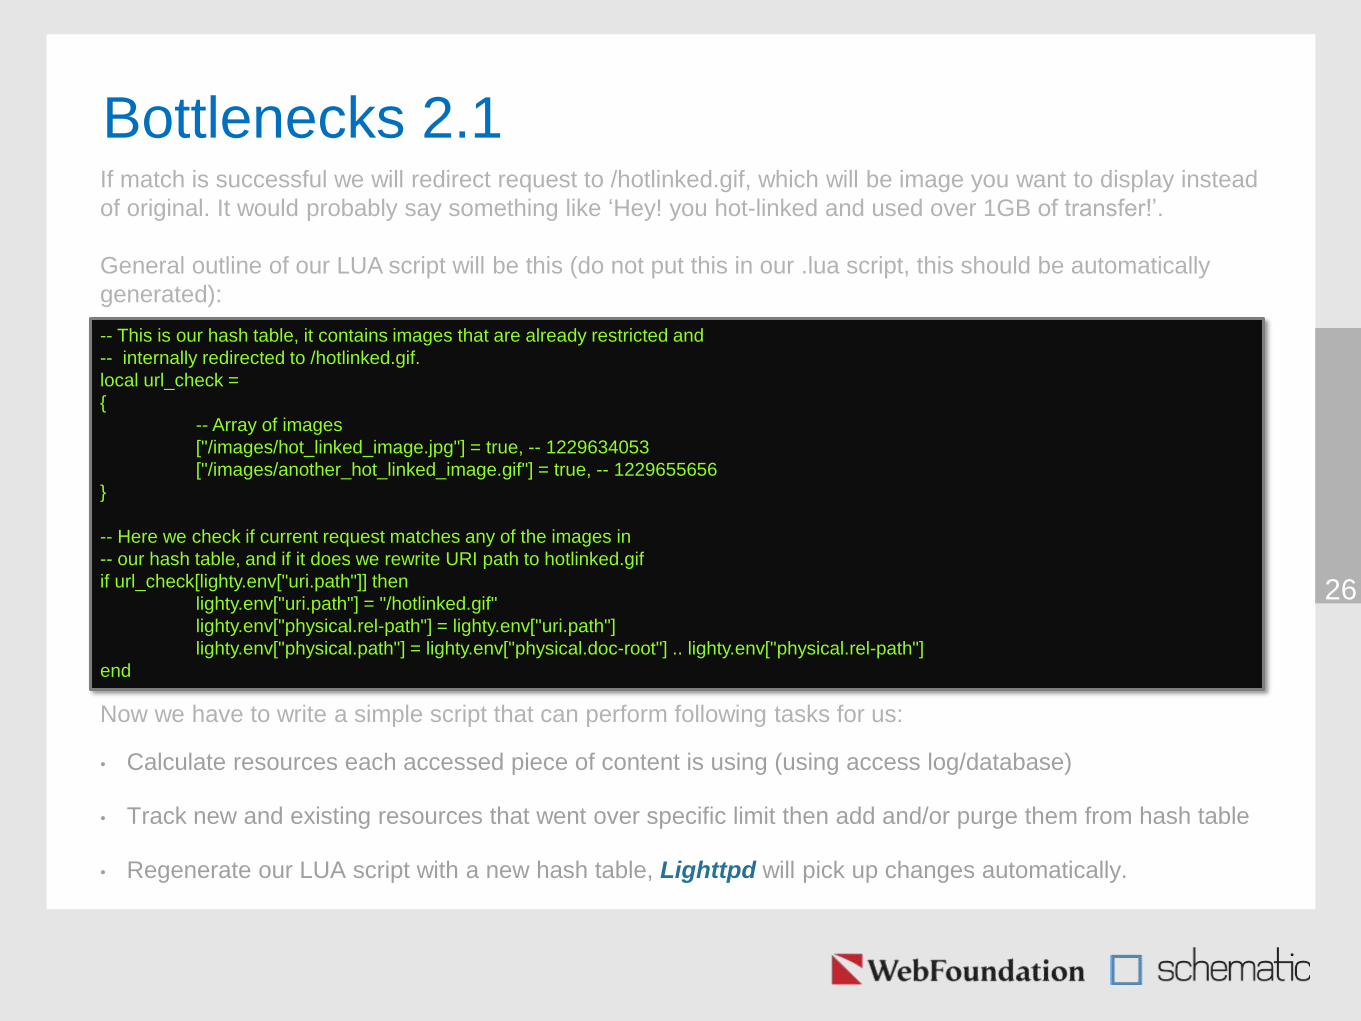
If match is successful we will redirect request to /hotlinked.gif, which will be image you want to display instead
of original. It would probably say something like ‘Hey! you hot-linked and used over 1GB of transfer!’.
General outline of our LUA script will be this (do not put this in our .lua script, this should be automatically
generated):
-- This is our hash table, it contains images that are already restricted and
-- internally redirected to /hotlinked.gif.
local url_check =
{
-- Array of images
["/images/hot_linked_image.jpg"] = true, -- 1229634053
["/images/another_hot_linked_image.gif"] = true, -- 1229655656
}
-- Here we check if current request matches any of the images in
-- our hash table, and if it does we rewrite URI path to hotlinked.gif
if url_check[lighty.env["uri.path"]] then
lighty.env["uri.path"] = "/hotlinked.gif"
lighty.env["physical.rel-path"] = lighty.env["uri.path"]
lighty.env["physical.path"] = lighty.env["physical.doc-root"] .. lighty.env["physical.rel-path"]
end
Now we have to write a simple script that can perform following tasks for us:
• Calculate resources each accessed piece of content is using (using access log/database)
• Track new and existing resources that went over specific limit then add and/or purge them from hash table
• Regenerate our LUA script with a new hash table, Lighttpd will pick up changes automatically.

Bottlenecks 2.2
27
You can retrieve a sample PHP script from http://www.webfoundation.net/public/high-performance-content-
hosting/
I’m using access logs to calculate bandwidth usage of each file that is accessed from within /images/ directory,
ignoring requests initiated directly from my web site.
You can also make it fancy and introduce database to the equation.
Basic Workflow:• Retrieve content of hash table elements inside LUA script
• Check time stamps for each item, if expired purge them. Otherwise add them to new Array()
• Process access log and calculate resources each accessed file used, if it’s above specific limit add file to new
Array() for processing
• Re-generate LUA script with data from our new Array(), that now contains non-expired images as well as our
new additions
• Reset/Archive your system log every 24 hours. Either let syslog do that for you, or write your own script

28
The ‘count IP’ parameter will allow you to track bandwidth that IP utilized and queue/pipe will limit all traffic
sent from 68.68.68.68 to 20Mbit/s.
connection.kbytes-per-second = 512
#Automatic purge
ipfw -f flush
#Statistics
ipfw add count ip from any to 68.68.68.68 #Incoming
ipfw add count ip from 68.68.68.68 to any #Outgoing
#Limiting upload rate from dedicated IP to 20Mbit/s
ipfw add queue 1 ip from 68.68.68.68 to any
ipfw queue 1 config weight 1 pipe 1 mask dst-ip 0x000000ff
ipfw pipe 1 config bw 20Mbit/s
Bottlenecks 3.0In order to have more control of your bandwidth you can do couple of things.
First, you can limit each connection to Lighttpd to specific number of kbytes. This will prevent high bandwidth
users eating up your bandwidth while they browse content, leaving other users dry as they use 90% of your
resources
Putting above in your lighttpd.conf file will limit each connection to maximum of 51~ KB/s of transfer.
To enforce global limit on system level, we can use IPFW/DUMMYNET to throttle traffic to a specific IP
address that our Lighttpd is binded to. Create a new file /etc/ipfw.rules and following template below

29Top output should look something like this
#Firewall
firewall_enable="YES"
firewall_script="/etc/ipfw.rules"
firewall_quiet="YES"
firewall_logging_enable="NO"
Bottlenecks 3.1
Make sure firewall_script is pointing to ipfw.rules file you just created. You can reload the rules right away by
running
To activate your throttling rules on system boot append following lines to your /etc/rc.conf
sh /etc/ipfw.rules
Throttling for IP address you provided in your ipfw.rules configuration file should now be active. You can view
number of packets and bytes IP received/sent by running
ipfw show
00100 1365 133932 count ip from any to 68.68.68.68
00200 147 11451 count ip from 68.68.68.68 to any
First line has ‘from any to IP’, that means it will represent incoming traffic and second line has from IP to any
which means it will represent outgoing traffic.
Second column represents number of packets processed and third column is number of total bytes
transferred. So if you have multiple IP’s in round robin DNS or for different content you can use this for quick
bandwidth check.

30
Bottlenecks 4.0Some quick tips on controlling your bandwidth resources
Load Balancing• Setup an A record that points to multiple IP’s (different servers) within Bind (DNS software), Bind will act as a
‘load balancer’ by evenly resolving requests to different IP addresses. So all requests will be spread across
your server farm evenly.
95% Percentile• When using IPFW to throttle outgoing bandwidth on 95% percentile network you can setup a script to lift limits
on specific time period that your site is getting the most traffic.
31
Disclosure 1.0Disclosure of benchmarks procedures and hardware
Hardware• CPU: Intel(R) Pentium(R) D 3.20GHz (3192.97-MHz 686-class CPU)
• Memory: 2048 MB
• Disk: Maxtor 6L200P0 BAH41G10, UDMA1000
• FreeBSD, version 6.1
• Optimized kernel and sysctl variables, per this presentation. Copy available at
http://www.webfoundation.net/public/high-performance-content-hosting/
• Tested Apache v2.2.11 and Lighttpd v1.4.18, configuration files are available at
http://www.webfoundation.net/public/high-performance-content-hosting/
• ApacheBench 2.0.41-dev rev1.141
• Siege 2.68b3
Software

32
Disclosure 1.1Disclosure of benchmarks procedures and hardware
Procedure• Each test had a background daemon to record system health status in a loop of 1 execution per second
• Web server daemon was restarted and access logs flushed after finishing each test (300 users for small file,
1000 users for small file, 300 users for big file, 1000 users for big file, etc)
• FreeBSD was restarted in-between of daemon switch (when switching testing from Lighttpd to Apache and
vise versa)
• Each test was performed 5 times for each test case, median value was calculated for this report

33
Photo Credits 1.0Network cable pictures were obtained from following individuals, thank you guys
Flickr Members• Mathieu Ramage
• Pascal Charest
• Jerry John