help - lesson planner - teacher guide
TRANSCRIPT
Page 1 of 17
Lesson Planner - Teacher Startup Guide
This is the “Getting Started” guide for teachers using the Realtime Lesson Planner. Detailed instructions for the options reviewed in this guide and additional lesson planner features can be found by clicking Main>Help after logging into the Lesson Planner. To access a recorded training video or additional help documentation, use
this area at the top right of any Realtime page and click the icon. A legend of all Lesson Planner icons is on the last page of this document.
Realtime’s Lesson Planner allows teachers to build lessons and attach NJSL Standards into district defined section descriptions for each of their assigned classes. For the teacher to utilize the Lesson Planner, their classes must be assigned through the location’s Master Schedule. Lessons can be submitted for administrator approval; at which time the administrator may choose to add the lesson to the “Lesson Library”. When the teacher creates a lesson, they have the option to add “graded” assignments which will post to the Realtime Gradebook and Portal modules, or the teacher can create “ungraded” assignments which will display on the Portal. Teachers can share lessons with other teachers if the district permits.
Table of Contents
Table of Contents ............................................................................................................................................ 1 First Time Log In................................................................................................................................................ 1 Lesson Planner Customization .......................................................................................................................... 3
a. Preferences ............................................................................................................................................ 3 b. Time Templates ...................................................................................................................................... 6 c. Lesson Templates ................................................................................................................................... 6 d. Course Titles ........................................................................................................................................... 7 e. Sharing ................................................................................................................................................... 8
Adding & Maintaining Lessons ........................................................................................................................... 9 Approval Process ............................................................................................................................................ 14 Views ............................................................................................................................................................... 15 Printing Options ............................................................................................................................................... 16 Icon Legend ..................................................................................................................................................... 17
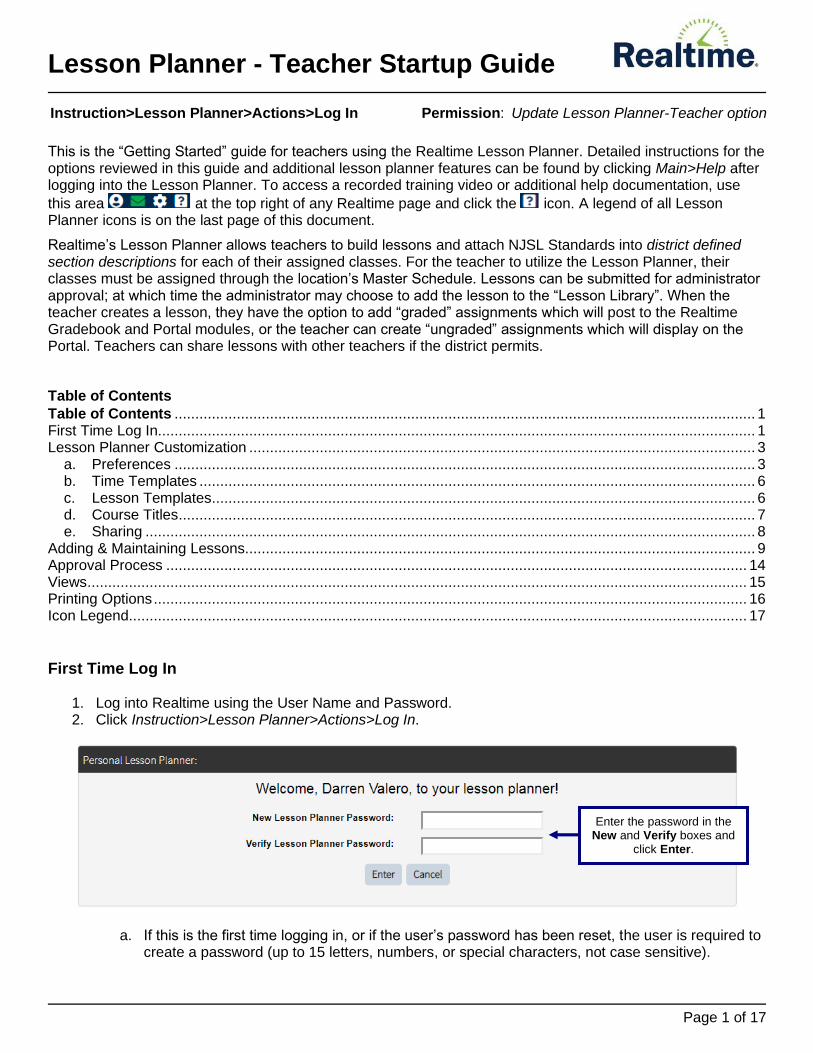
First Time Log In 1. Log into Realtime using the User Name and Password. 2. Click Instruction>Lesson Planner>Actions>Log In.
a. If this is the first time logging in, or if the user’s password has been reset, the user is required to create a password (up to 15 letters, numbers, or special characters, not case sensitive).
Instruction>Lesson Planner>Actions>Log In Permission: Update Lesson Planner-Teacher option
Enter the password in the New and Verify boxes and
click Enter.
Page 2 of 17
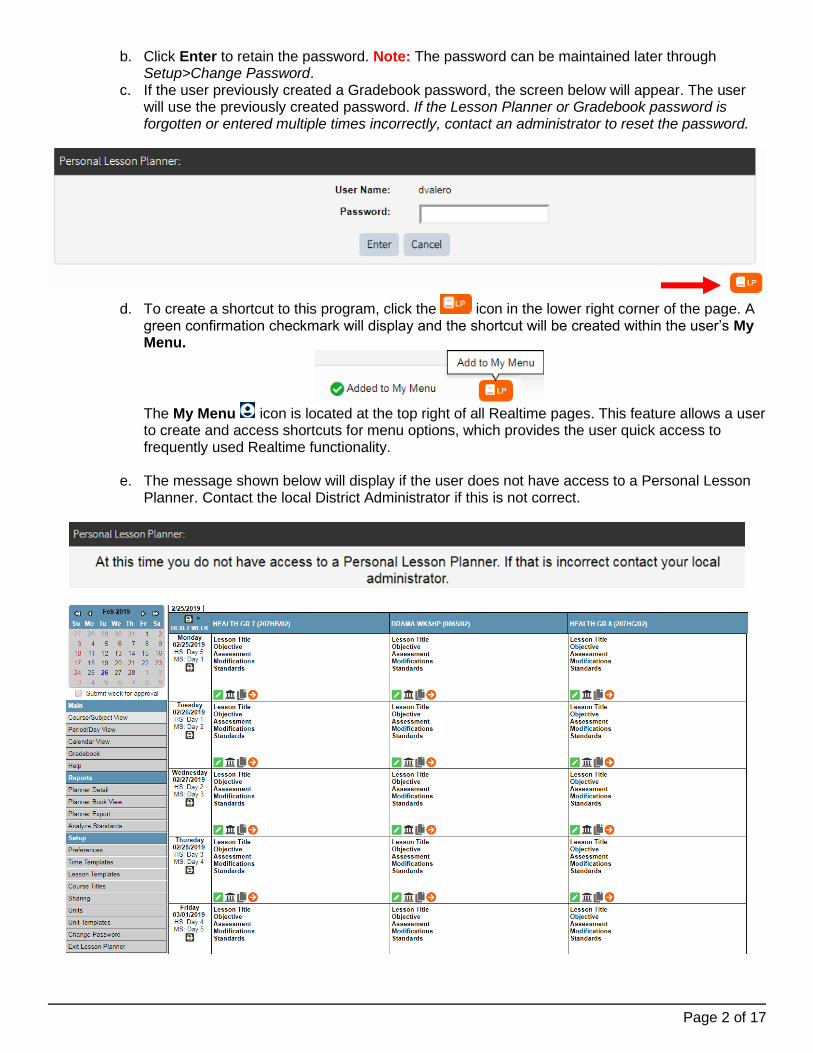
b. Click Enter to retain the password. Note: The password can be maintained later through Setup>Change Password.
c. If the user previously created a Gradebook password, the screen below will appear. The user will use the previously created password. If the Lesson Planner or Gradebook password is forgotten or entered multiple times incorrectly, contact an administrator to reset the password.
d. To create a shortcut to this program, click the icon in the lower right corner of the page. A green confirmation checkmark will display and the shortcut will be created within the user’s My Menu.
The My Menu icon is located at the top right of all Realtime pages. This feature allows a user to create and access shortcuts for menu options, which provides the user quick access to frequently used Realtime functionality.
e. The message shown below will display if the user does not have access to a Personal Lesson
Planner. Contact the local District Administrator if this is not correct.
Page 3 of 17
Lesson Planner Customization
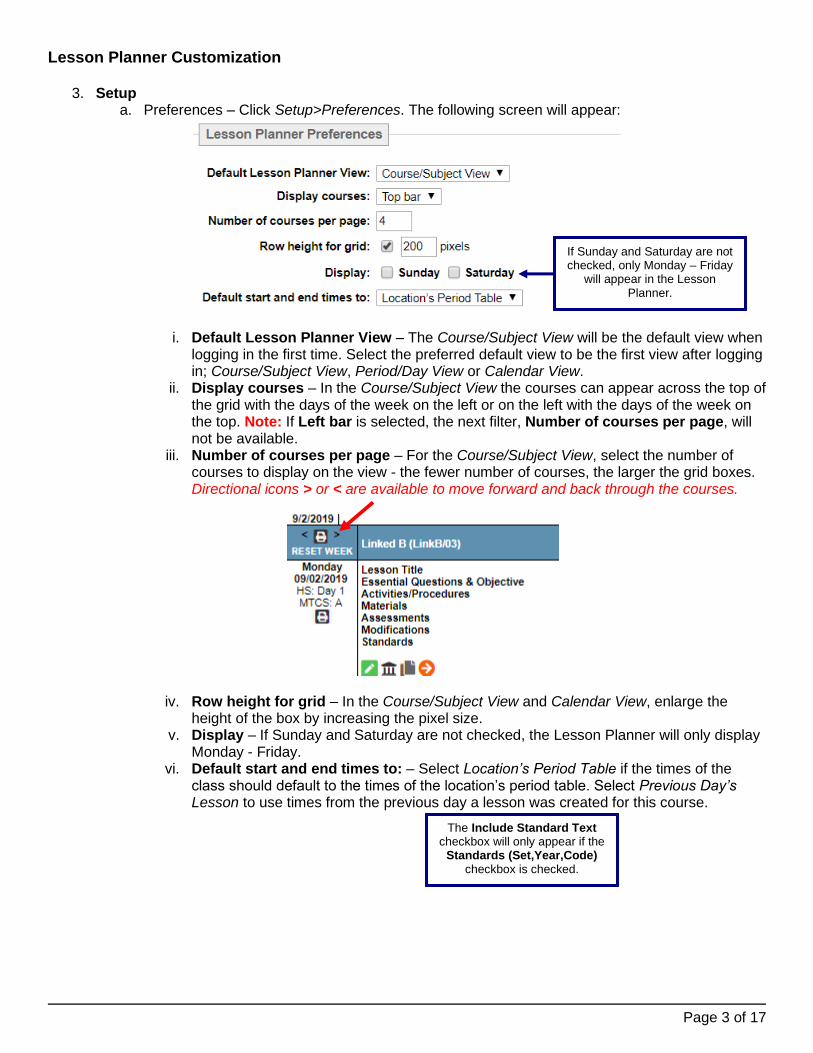
3. Setup a. Preferences – Click Setup>Preferences. The following screen will appear:
i. Default Lesson Planner View – The Course/Subject View will be the default view when logging in the first time. Select the preferred default view to be the first view after logging in; Course/Subject View, Period/Day View or Calendar View.
ii. Display courses – In the Course/Subject View the courses can appear across the top of the grid with the days of the week on the left or on the left with the days of the week on the top. Note: If Left bar is selected, the next filter, Number of courses per page, will not be available.
iii. Number of courses per page – For the Course/Subject View, select the number of courses to display on the view - the fewer number of courses, the larger the grid boxes. Directional icons > or < are available to move forward and back through the courses.
iv. Row height for grid – In the Course/Subject View and Calendar View, enlarge the height of the box by increasing the pixel size.
v. Display – If Sunday and Saturday are not checked, the Lesson Planner will only display Monday - Friday.
vi. Default start and end times to: – Select Location’s Period Table if the times of the class should default to the times of the location’s period table. Select Previous Day’s Lesson to use times from the previous day a lesson was created for this course.
If Sunday and Saturday are not checked, only Monday – Friday
will appear in the Lesson Planner.
The Include Standard Text checkbox will only appear if the
Standards (Set,Year,Code) checkbox is checked.
Page 4 of 17
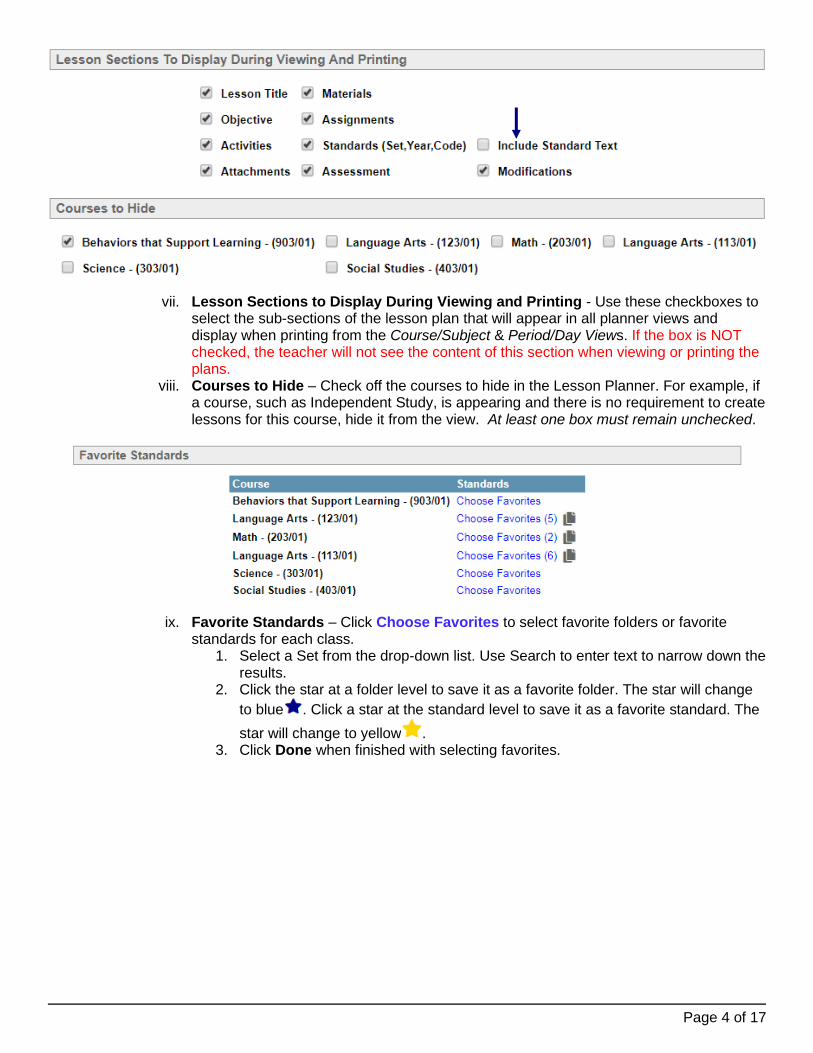
vii. Lesson Sections to Display During Viewing and Printing - Use these checkboxes to select the sub-sections of the lesson plan that will appear in all planner views and display when printing from the Course/Subject & Period/Day Views. If the box is NOT checked, the teacher will not see the content of this section when viewing or printing the plans.
viii. Courses to Hide – Check off the courses to hide in the Lesson Planner. For example, if a course, such as Independent Study, is appearing and there is no requirement to create lessons for this course, hide it from the view. At least one box must remain unchecked.
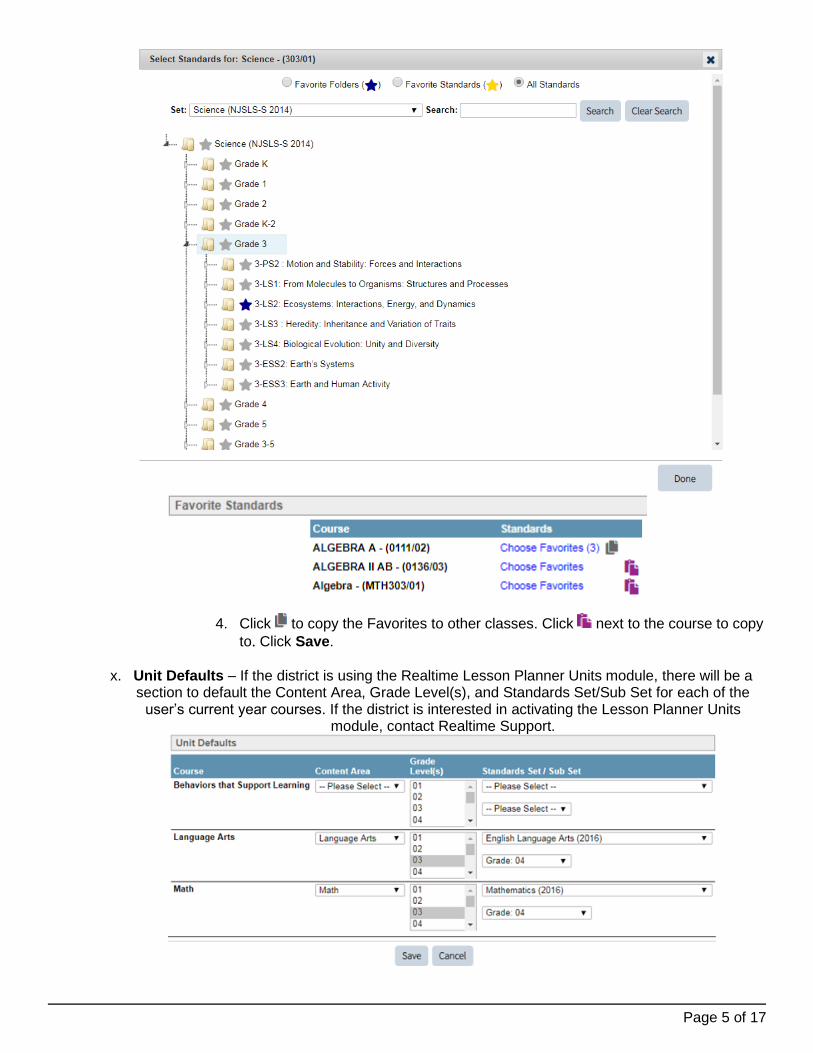
ix. Favorite Standards – Click Choose Favorites to select favorite folders or favorite standards for each class.
1. Select a Set from the drop-down list. Use Search to enter text to narrow down the results.
2. Click the star at a folder level to save it as a favorite folder. The star will change
to blue . Click a star at the standard level to save it as a favorite standard. The
star will change to yellow . 3. Click Done when finished with selecting favorites.
Page 5 of 17
4. Click to copy the Favorites to other classes. Click next to the course to copy
to. Click Save.
x. Unit Defaults – If the district is using the Realtime Lesson Planner Units module, there will be a
section to default the Content Area, Grade Level(s), and Standards Set/Sub Set for each of the user’s current year courses. If the district is interested in activating the Lesson Planner Units
module, contact Realtime Support.
Page 6 of 17
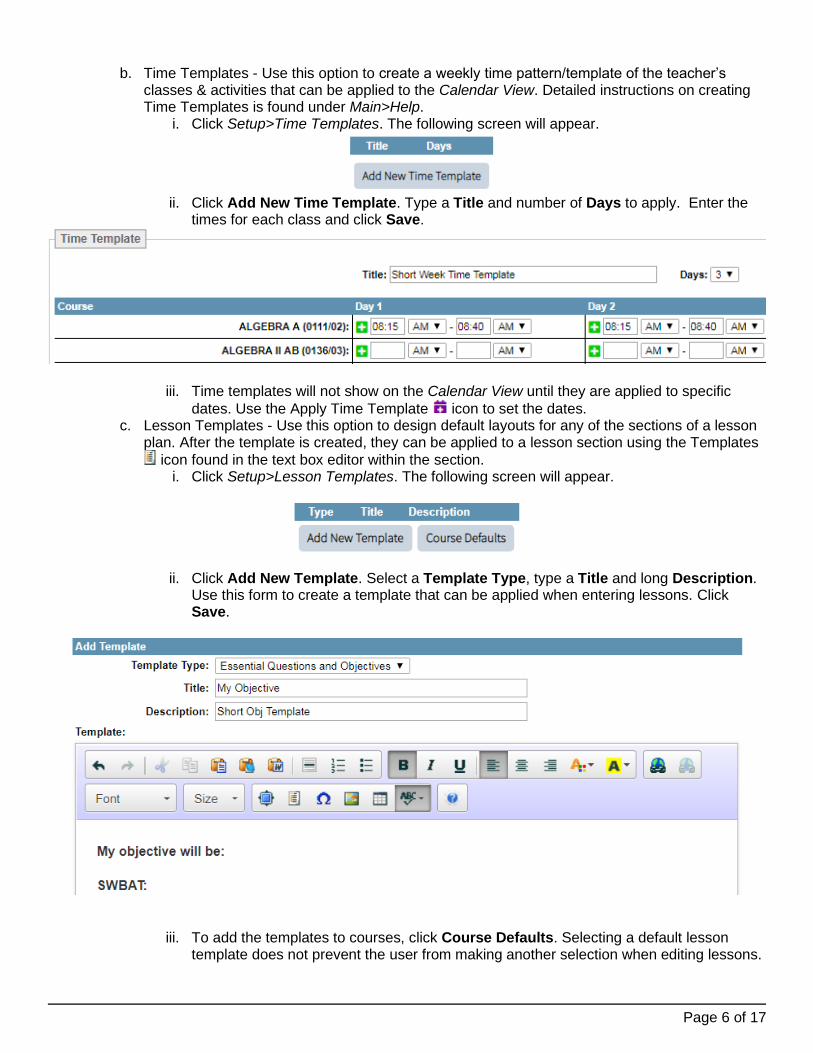
b. Time Templates - Use this option to create a weekly time pattern/template of the teacher’s
classes & activities that can be applied to the Calendar View. Detailed instructions on creating Time Templates is found under Main>Help.
i. Click Setup>Time Templates. The following screen will appear.
ii. Click Add New Time Template. Type a Title and number of Days to apply. Enter the
times for each class and click Save.
iii. Time templates will not show on the Calendar View until they are applied to specific
dates. Use the Apply Time Template icon to set the dates. c. Lesson Templates - Use this option to design default layouts for any of the sections of a lesson
plan. After the template is created, they can be applied to a lesson section using the Templates
icon found in the text box editor within the section. i. Click Setup>Lesson Templates. The following screen will appear.
ii. Click Add New Template. Select a Template Type, type a Title and long Description. Use this form to create a template that can be applied when entering lessons. Click Save.
iii. To add the templates to courses, click Course Defaults. Selecting a default lesson
template does not prevent the user from making another selection when editing lessons.
Page 7 of 17
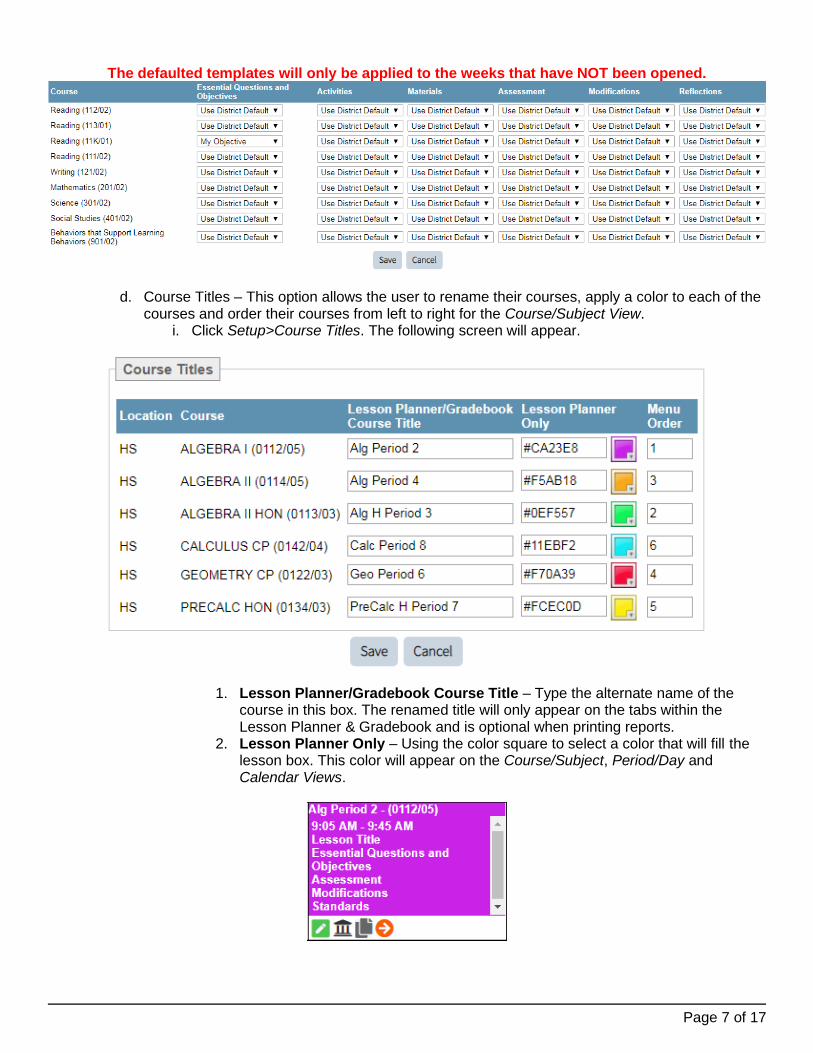
The defaulted templates will only be applied to the weeks that have NOT been opened.
d. Course Titles – This option allows the user to rename their courses, apply a color to each of the courses and order their courses from left to right for the Course/Subject View.
i. Click Setup>Course Titles. The following screen will appear.
1. Lesson Planner/Gradebook Course Title – Type the alternate name of the course in this box. The renamed title will only appear on the tabs within the Lesson Planner & Gradebook and is optional when printing reports.
2. Lesson Planner Only – Using the color square to select a color that will fill the lesson box. This color will appear on the Course/Subject, Period/Day and Calendar Views.
Page 8 of 17
3. Menu Order – Type the number order sequence of how the course tabs will appear from left to right in the Course/Subject View.
4. Click Save.
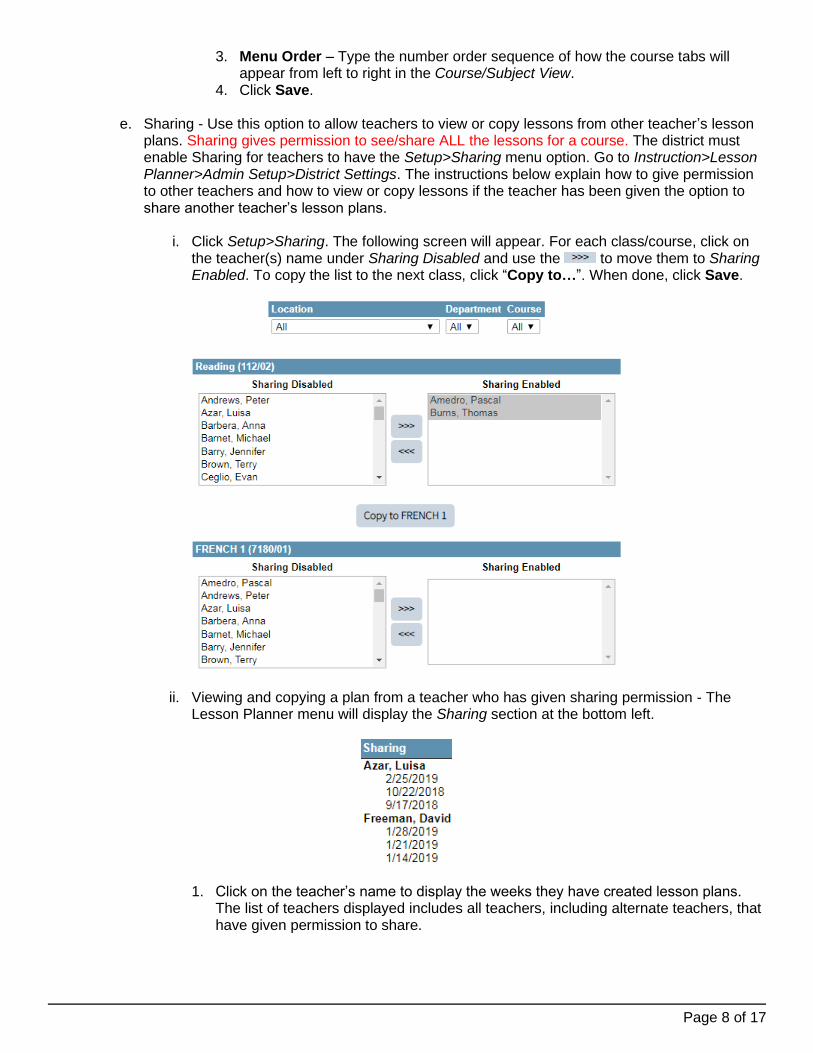
e. Sharing - Use this option to allow teachers to view or copy lessons from other teacher’s lesson plans. Sharing gives permission to see/share ALL the lessons for a course. The district must enable Sharing for teachers to have the Setup>Sharing menu option. Go to Instruction>Lesson Planner>Admin Setup>District Settings. The instructions below explain how to give permission to other teachers and how to view or copy lessons if the teacher has been given the option to share another teacher’s lesson plans.
i. Click Setup>Sharing. The following screen will appear. For each class/course, click on
the teacher(s) name under Sharing Disabled and use the to move them to Sharing Enabled. To copy the list to the next class, click “Copy to…”. When done, click Save.
ii. Viewing and copying a plan from a teacher who has given sharing permission - The Lesson Planner menu will display the Sharing section at the bottom left.
1. Click on the teacher’s name to display the weeks they have created lesson plans. The list of teachers displayed includes all teachers, including alternate teachers, that have given permission to share.
Page 9 of 17
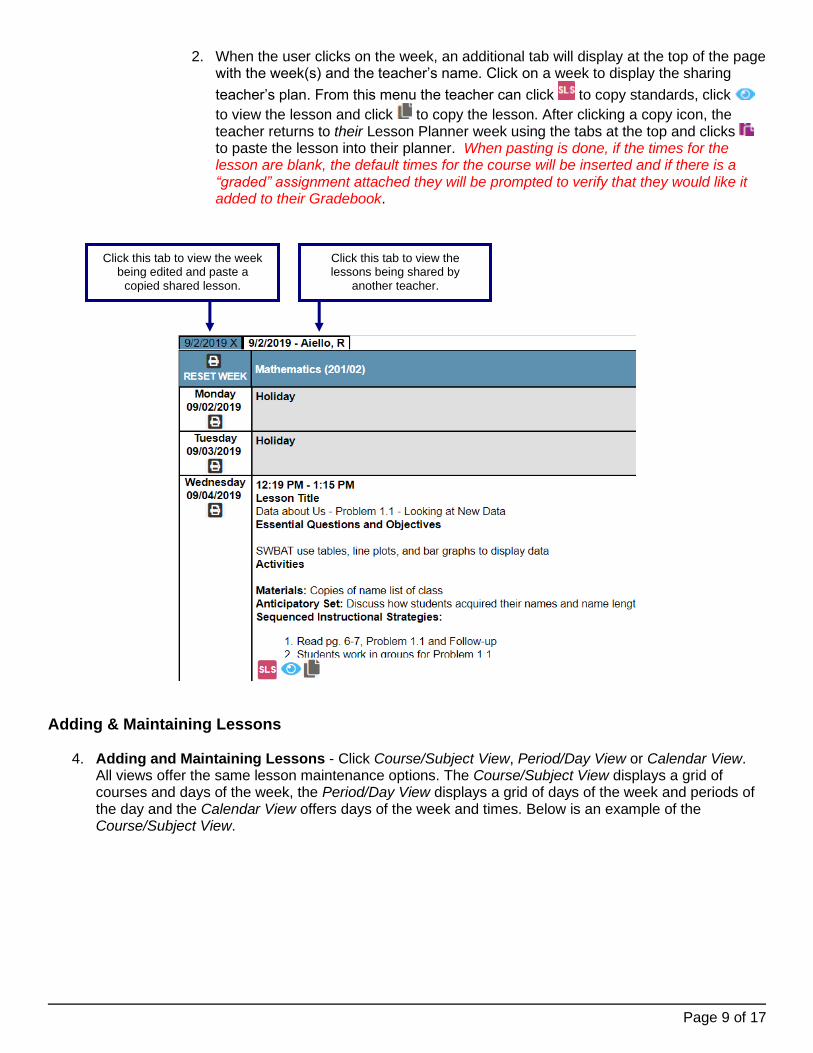
2. When the user clicks on the week, an additional tab will display at the top of the page with the week(s) and the teacher’s name. Click on a week to display the sharing
teacher’s plan. From this menu the teacher can click to copy standards, click
to view the lesson and click to copy the lesson. After clicking a copy icon, the teacher returns to their Lesson Planner week using the tabs at the top and clicks to paste the lesson into their planner. When pasting is done, if the times for the lesson are blank, the default times for the course will be inserted and if there is a “graded” assignment attached they will be prompted to verify that they would like it added to their Gradebook.
Adding & Maintaining Lessons
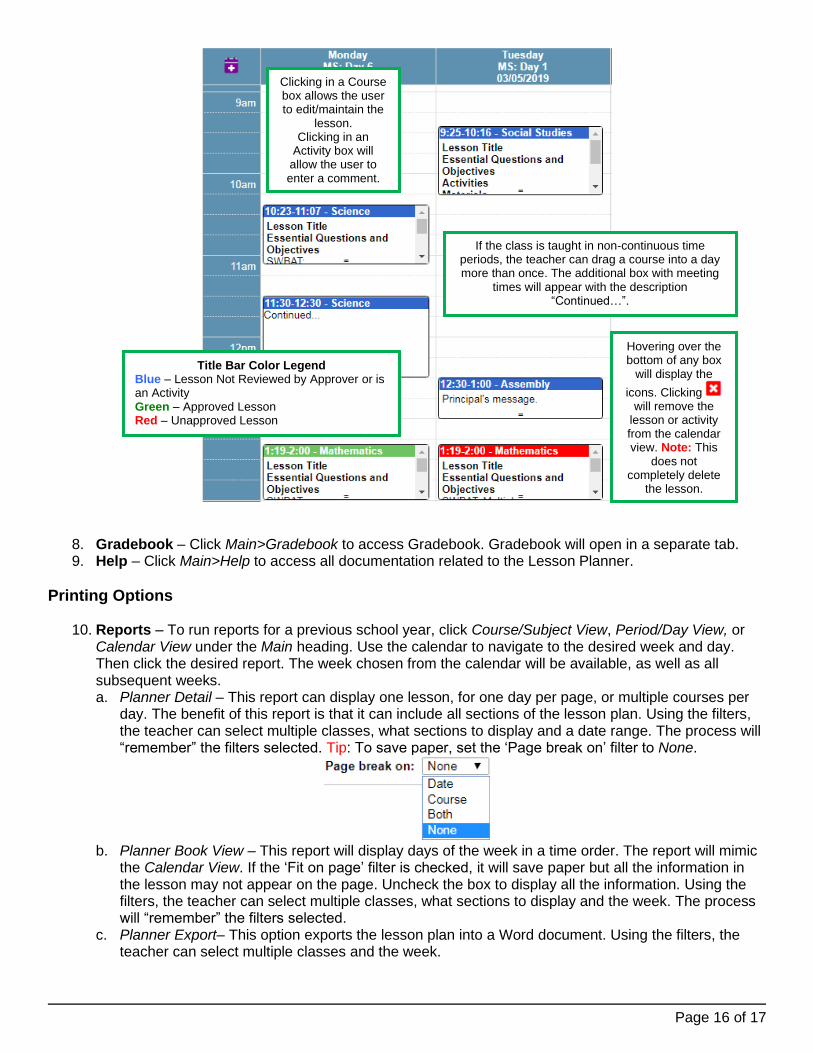
4. Adding and Maintaining Lessons - Click Course/Subject View, Period/Day View or Calendar View. All views offer the same lesson maintenance options. The Course/Subject View displays a grid of courses and days of the week, the Period/Day View displays a grid of days of the week and periods of the day and the Calendar View offers days of the week and times. Below is an example of the Course/Subject View.
Click this tab to view the lessons being shared by
another teacher.
Click this tab to view the week being edited and paste a
copied shared lesson.

Page 10 of 17
a. The calendar at the left allows movement to different days and weeks by clicking on the arrows or on a specific date. IMPORTANT CONCEPT: When clicking on a date in the calendar box, the lesson plans for that week have been “opened”. During the “opening” process the Lesson Planner verifies the location’s master schedule to decide whether the course is being taught that day and the time it is being taught. The process also verifies if the teacher has created default lesson templates for any of the courses. This happens the very FIRST time a week has been clicked on. Why are we explaining this? Because if any of these settings were incorrect at the time the user clicked on the week and have since been corrected, how can the user get the corrected master schedule information and/or the updated default templates to display? Click the RESET WEEK link
located under the icon in the top left corner. A message will appear explaining the consequences of resetting a week and provide the opportunity to continue or cancel.
b. To zoom in on any lesson day, click on the DAY (Monday, Tuesday, etc.) or on the COURSE
NAME. To return to the full view, click the day or course name again.
c. Click the icon within the top left corner of the grid to print all course lessons for every day of the week. To print lessons for just 1 day of the week, click the print icon under the desired day of the week. Note: There are additional reports found under the Reports heading.
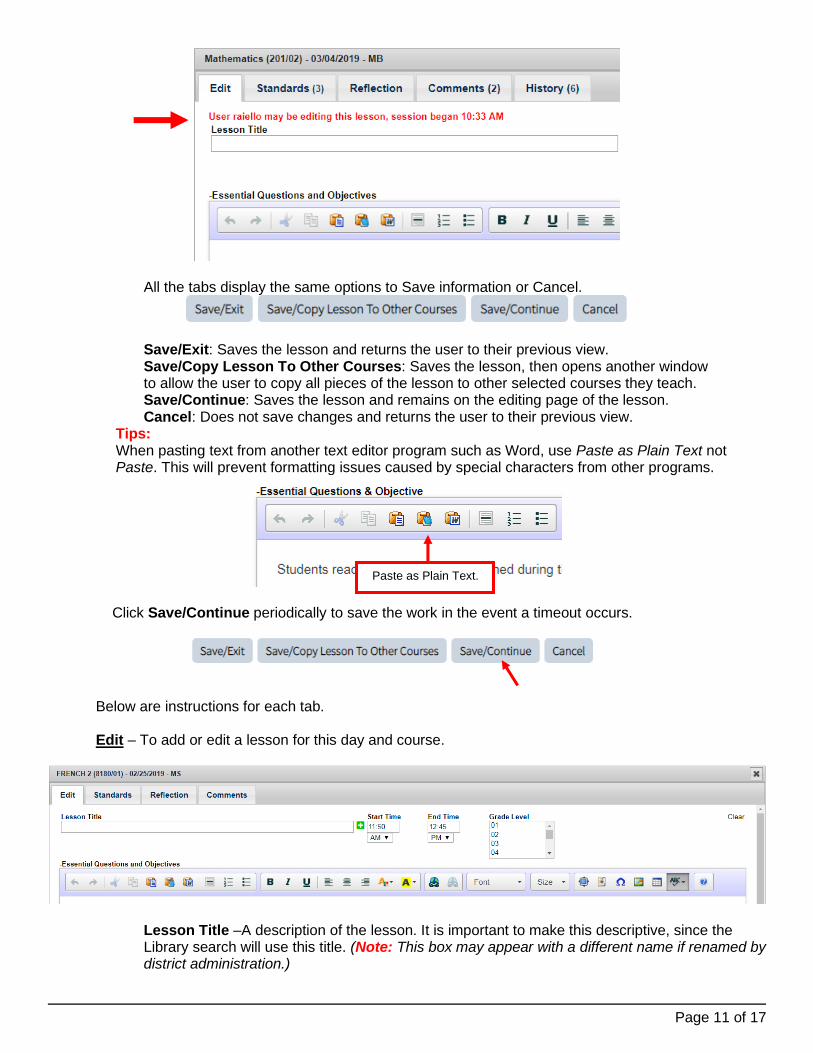
d. Click the icon to add or edit a lesson. There will be 5 tabs at the top: Edit, Standards, Reflection, Comments and History. If a teacher partners with another teacher for a class (Inclusion/Alternate) and the other teacher is working in the Lesson Planner they will see this warning message below.
Page 11 of 17
All the tabs display the same options to Save information or Cancel.
Save/Exit: Saves the lesson and returns the user to their previous view. Save/Copy Lesson To Other Courses: Saves the lesson, then opens another window to allow the user to copy all pieces of the lesson to other selected courses they teach. Save/Continue: Saves the lesson and remains on the editing page of the lesson. Cancel: Does not save changes and returns the user to their previous view.
Tips: When pasting text from another text editor program such as Word, use Paste as Plain Text not Paste. This will prevent formatting issues caused by special characters from other programs.
Click Save/Continue periodically to save the work in the event a timeout occurs.
Below are instructions for each tab.
Edit – To add or edit a lesson for this day and course.
Lesson Title –A description of the lesson. It is important to make this descriptive, since the Library search will use this title. (Note: This box may appear with a different name if renamed by district administration.)
Paste as Plain Text.

Page 12 of 17
Start Time/End Time – These boxes display the meeting times. The times are populated depending on the default set in Setup>Preferences. They can come from the location’s period table, the previous day’s lesson or use the time where courses were placed. Click the icon to enter additional meeting times. For example, this may be needed if teaching the class for non-continuous time periods during the day. Grade Level – Select the grade level(s) of students that this lesson is appropriate for. Grade level will be used when a lesson is added to the “Lesson Library”. The first time a grade level is selected, it will become the default Grade Level, so if it will be the same on all lessons, it will not have to be selected again. Objective – This area is a free form text box with a toolbar containing formatting functions and icons for spell check, formatting, and inserting templates. Hover over an icon to see its purpose. (Note: This box may appear with a different name if renamed by district administration.) Activity/Procedure – This area is a free form text box with a toolbar containing formatting functions and icons for spell check, formatting, and inserting templates. Hover over an icon to see its purpose. (Note: This box may appear with a different name if renamed by district administration.) Assignments (graded) – Click Add Assignment to create a graded assignment. If the district is using the Realtime Gradebook module, the assignment created will LINK to the Gradebook. If the district is not using the Realtime Gradebook module, only the Title and Description boxes will display. Below is a description of possible fields that will display.
• Title – An 8-character short description of the assignment.
• Description – A 500-character detailed description of the assignment. If the school is using Portal, this description will appear under Gradebook and Homework.
• Attach – Click the paperclip icon to attach links and documents for the assignment.
• Display on Portal – GB, HW – If the school is using Portal, this assignment can be displayed on Portal under Gradebook and Homework. If the user does not want the assignment to display, uncheck the boxes.
• Assignment Date – Date the assignment was assigned. Defaults to the date of the lesson. This field cannot be left blank. This is important for Portal display on the Calendar.
• Due Date – Date the assignment is due. Defaults to the day after the lesson. This is important for Portal display on the Calendar.
• Category – Select the category for the assignment.
• Grade Type – Select the grade type for the assignment.
• Total Points – If using Points as the Grade Type, enter the Total Points for the assignment.
• Allow Extra Credit – If using Points or Percentage as the Grade Type, check the box to allow extra credit.
• Ungraded – If this box is checked, the assignment value entered for the students will not be CALCULATED in the grade average. These assignments will have gray shading when displayed in Gradebook.
• Linked – If the user copied this assignment to another course using Save/Copy Lesson To Other Courses, Yes will display under the Linked heading.
• Click the icon to delete the assignment from the lesson. The assignment will not be deleted from the Gradebook.
Portal Comments/Assignments - Ungraded – Click Add Comment/Assignment to add a note on the Portal that pertains to this lesson, such as “Watch National Geographic Tuesday at
7:00pm – Living Seas”. The date defaults to date of lesson. Click the icon to delete the assignment. Attachments – Click Add Document to attach a document to the lesson plan, such as worksheets or handouts used for the lesson. This will be viewable by the lesson plan approver. Materials – This area is a free form text box with a toolbar containing formatting functions and icons for spell check, formatting, and inserting templates. Hover over an icon to see its purpose. (Note: This box may appear with a different name if renamed by district administration.)
Page 13 of 17
Assessments - This area is a free form text box with a toolbar containing formatting functions and icons for spell check, formatting, and inserting templates. Hover over an icon to see its purpose. (Note: This box may appear with a different name if renamed by district administration.) Modifications - The area is a free form typing box with a toolbar containing formatting functions and icons for spell check, formatting, and inserting templates. Hover over an icon to see its purpose. (Note: This box may appear with a different name if renamed by district administration)
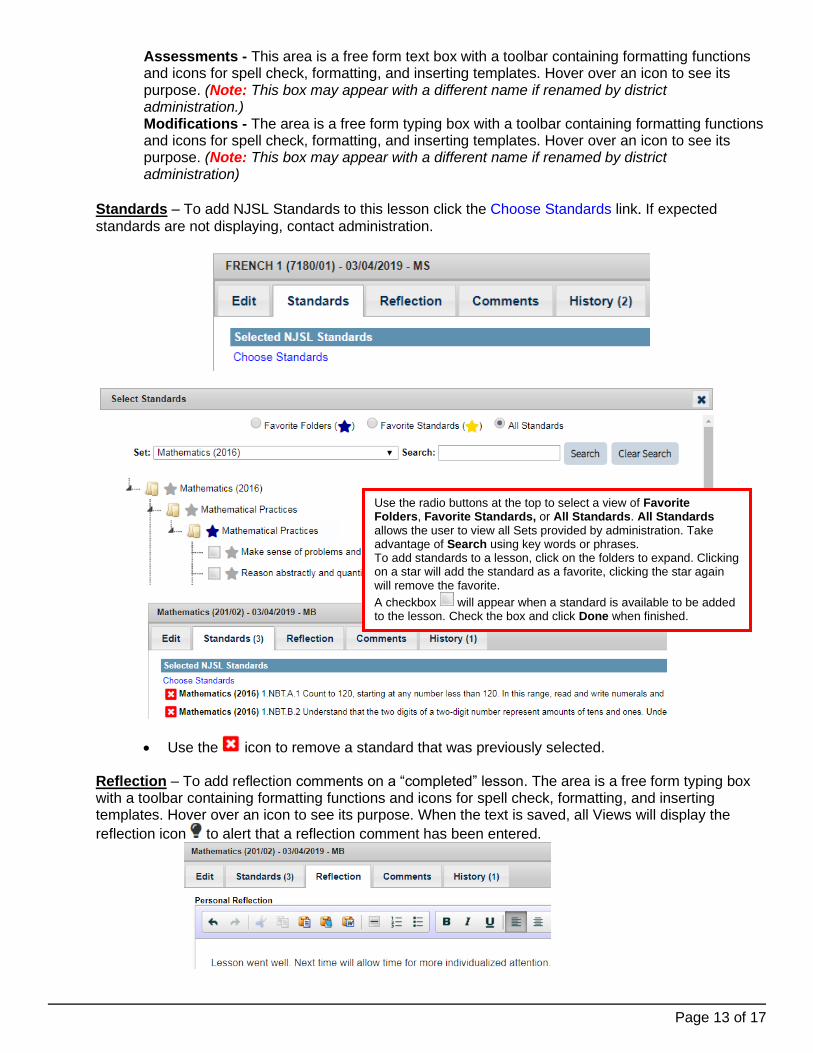
Standards – To add NJSL Standards to this lesson click the Choose Standards link. If expected
standards are not displaying, contact administration.
• Use the icon to remove a standard that was previously selected.
Reflection – To add reflection comments on a “completed” lesson. The area is a free form typing box with a toolbar containing formatting functions and icons for spell check, formatting, and inserting templates. Hover over an icon to see its purpose. When the text is saved, all Views will display the
reflection icon to alert that a reflection comment has been entered.
Use the radio buttons at the top to select a view of Favorite Folders, Favorite Standards, or All Standards. All Standards allows the user to view all Sets provided by administration. Take advantage of Search using key words or phrases. To add standards to a lesson, click on the folders to expand. Clicking on a star will add the standard as a favorite, clicking the star again will remove the favorite.
A checkbox will appear when a standard is available to be added to the lesson. Check the box and click Done when finished.
Page 14 of 17
Comments – To view comments made by an approver and to add comments to the approver. The text area is a free form typing box for approvers to comment on the lesson when reviewing it, and for the teacher to comment back. For example, if the lesson needs adjustment and the teacher is returning it for approval. The area is a free form typing box with a spell check.
History – To view changes made within the lesson. The History screen will only show the latest date and time a lesson plan is saved by the teacher if it is not in a submitted status. When the lesson has been submitted, it tracks all changes saved. It also tracks all changes made by an alternate teacher, regardless of the status.
Approval Process
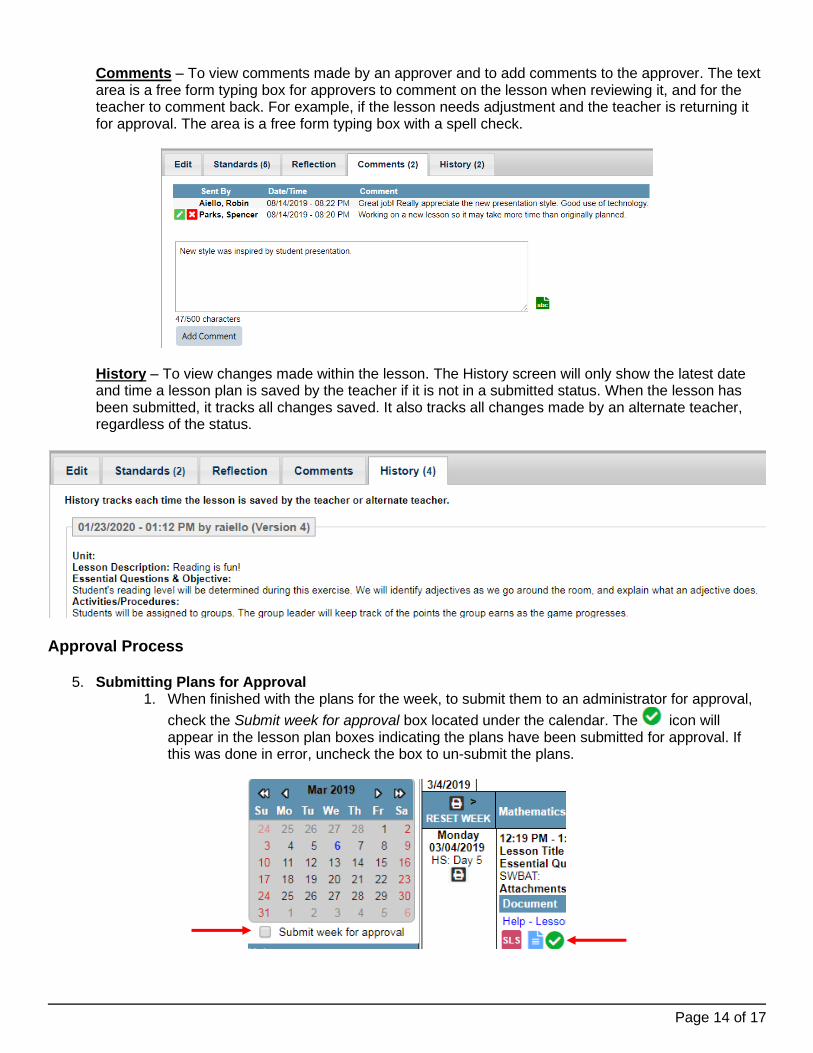
5. Submitting Plans for Approval 1. When finished with the plans for the week, to submit them to an administrator for approval,
check the Submit week for approval box located under the calendar. The icon will appear in the lesson plan boxes indicating the plans have been submitted for approval. If this was done in error, uncheck the box to un-submit the plans.

Page 15 of 17
Views
6. Using Period/Day View – The Period/Day View allows the user to view their plans in a grid with the days of the week across the top and the periods of the day down the left. The intersection will be the course that is assigned to that day/period. This view is only effective if the master schedule has been maintained with the correct period and day of the week pattern. A teacher CANNOT adjust this view. The view is created by the master schedule for the location. The same features are available for creating plans in this view that are available in the Course/Subject View.
7. Using Calendar View – The Calendar View allows the lesson plan user to drag and drop courses and
activities into a weekly calendar. The teacher will be able to view their day with Lessons and Activities using this menu option.
a. The teacher’s courses and activities display at the bottom of the page. Use the Courses drop-down to toggle between Courses and Activities. Administration maintains the activities available. If the area for activities is blank or additional activities are needed, contact administration.
b. To build the Calendar View, grab a course by clicking on it and drag it to the desired day
and time. Increase or decrease the time by clicking on the = lines at the bottom of the box and pull up or down. The time will change on the colored bar. If the course already has a lesson created for that day, the lesson will appear in the box. A course cannot be moved from one day into another. If this is required, grab the course again from the bottom bar and
drag it into the correct day and delete the incorrect one using the icon. Note: When
deleting a plan within the calendar view, it will not delete it from the other views. It only removes the event from the calendar.
c. The icon will appear in the lower right of the file bar and in the upper left if the user has created Time Templates. Click the icon to apply a previously created time template to the Calendar View. Review the Help – Lesson Planner – Teacher Time Templates document for instructions on creating time templates.
Page 16 of 17
8. Gradebook – Click Main>Gradebook to access Gradebook. Gradebook will open in a separate tab. 9. Help – Click Main>Help to access all documentation related to the Lesson Planner.
Printing Options
10. Reports – To run reports for a previous school year, click Course/Subject View, Period/Day View, or Calendar View under the Main heading. Use the calendar to navigate to the desired week and day. Then click the desired report. The week chosen from the calendar will be available, as well as all subsequent weeks. a. Planner Detail – This report can display one lesson, for one day per page, or multiple courses per
day. The benefit of this report is that it can include all sections of the lesson plan. Using the filters, the teacher can select multiple classes, what sections to display and a date range. The process will “remember” the filters selected. Tip: To save paper, set the ‘Page break on’ filter to None.
b. Planner Book View – This report will display days of the week in a time order. The report will mimic
the Calendar View. If the ‘Fit on page’ filter is checked, it will save paper but all the information in the lesson may not appear on the page. Uncheck the box to display all the information. Using the filters, the teacher can select multiple classes, what sections to display and the week. The process will “remember” the filters selected.
c. Planner Export– This option exports the lesson plan into a Word document. Using the filters, the teacher can select multiple classes and the week.
If the class is taught in non-continuous time periods, the teacher can drag a course into a day more than once. The additional box with meeting
times will appear with the description “Continued…”.
Title Bar Color Legend Blue – Lesson Not Reviewed by Approver or is an Activity Green – Approved Lesson Red – Unapproved Lesson
Clicking in a Course box allows the user to edit/maintain the
lesson. Clicking in an
Activity box will allow the user to enter a comment.
Hovering over the bottom of any box
will display the
icons. Clicking will remove the
lesson or activity from the calendar view. Note: This
does not completely delete
the lesson.
Page 17 of 17
d. Analyze Standards – This report analyzes how many times standards have been used in lesson plans. Using the filters, the teacher can select multiple classes, a date range and the minimum number of times the standard was used. The teacher must select which standards to analyze.
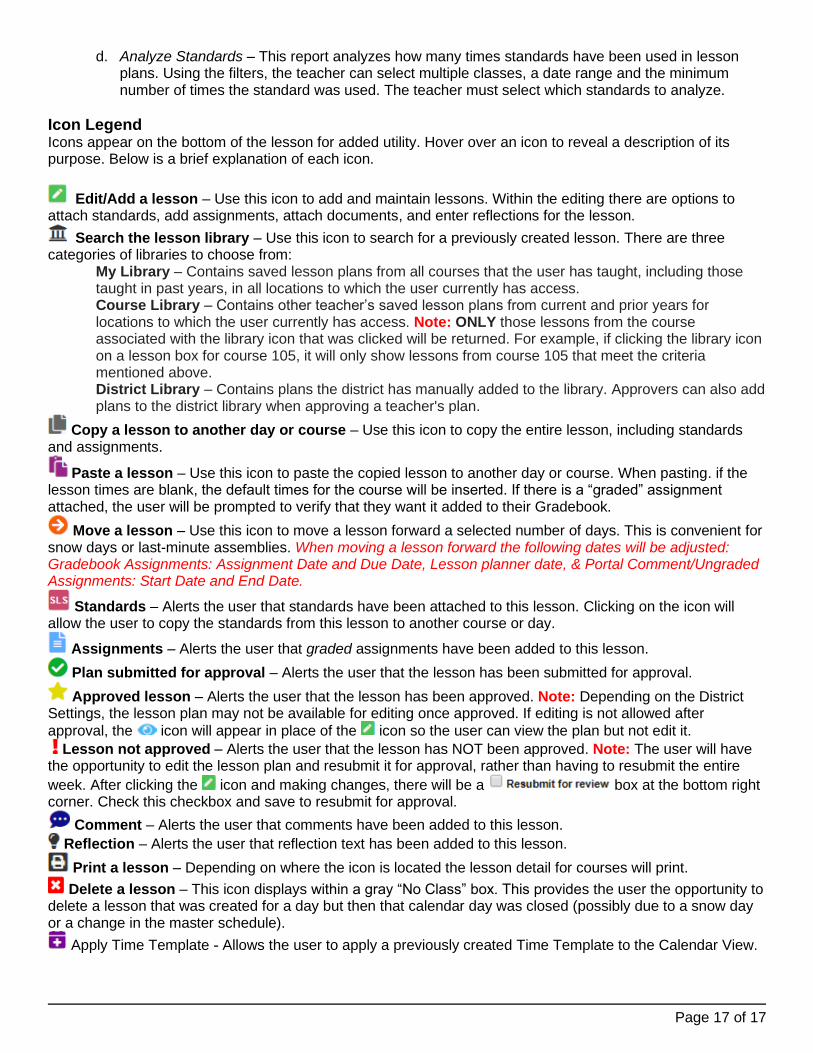
Icon Legend Icons appear on the bottom of the lesson for added utility. Hover over an icon to reveal a description of its purpose. Below is a brief explanation of each icon.
Edit/Add a lesson – Use this icon to add and maintain lessons. Within the editing there are options to attach standards, add assignments, attach documents, and enter reflections for the lesson.
Search the lesson library – Use this icon to search for a previously created lesson. There are three categories of libraries to choose from:
My Library – Contains saved lesson plans from all courses that the user has taught, including those taught in past years, in all locations to which the user currently has access. Course Library – Contains other teacher’s saved lesson plans from current and prior years for locations to which the user currently has access. Note: ONLY those lessons from the course associated with the library icon that was clicked will be returned. For example, if clicking the library icon on a lesson box for course 105, it will only show lessons from course 105 that meet the criteria mentioned above. District Library – Contains plans the district has manually added to the library. Approvers can also add plans to the district library when approving a teacher's plan.
Copy a lesson to another day or course – Use this icon to copy the entire lesson, including standards and assignments.
Paste a lesson – Use this icon to paste the copied lesson to another day or course. When pasting. if the lesson times are blank, the default times for the course will be inserted. If there is a “graded” assignment attached, the user will be prompted to verify that they want it added to their Gradebook.
Move a lesson – Use this icon to move a lesson forward a selected number of days. This is convenient for snow days or last-minute assemblies. When moving a lesson forward the following dates will be adjusted: Gradebook Assignments: Assignment Date and Due Date, Lesson planner date, & Portal Comment/Ungraded Assignments: Start Date and End Date.
Standards – Alerts the user that standards have been attached to this lesson. Clicking on the icon will allow the user to copy the standards from this lesson to another course or day.
Assignments – Alerts the user that graded assignments have been added to this lesson.
Plan submitted for approval – Alerts the user that the lesson has been submitted for approval.
Approved lesson – Alerts the user that the lesson has been approved. Note: Depending on the District Settings, the lesson plan may not be available for editing once approved. If editing is not allowed after
approval, the icon will appear in place of the icon so the user can view the plan but not edit it.
Lesson not approved – Alerts the user that the lesson has NOT been approved. Note: The user will have the opportunity to edit the lesson plan and resubmit it for approval, rather than having to resubmit the entire
week. After clicking the icon and making changes, there will be a box at the bottom right corner. Check this checkbox and save to resubmit for approval.
Comment – Alerts the user that comments have been added to this lesson.
Reflection – Alerts the user that reflection text has been added to this lesson.
Print a lesson – Depending on where the icon is located the lesson detail for courses will print.
Delete a lesson – This icon displays within a gray “No Class” box. This provides the user the opportunity to delete a lesson that was created for a day but then that calendar day was closed (possibly due to a snow day or a change in the master schedule).
Apply Time Template - Allows the user to apply a previously created Time Template to the Calendar View.