health abc operations manual vol. x chapter 2c, page 1 ... · blood collection health abc...
TRANSCRIPT

Health ABC Operations Manual Vol. X Chapter 2C, page 1
BLOOD COLLECTION TABLE OF CONTENTS 1. Background and rationale .................................................................................................... 2 2. Equipment and supplies........................................................................................................ 2 2.1 Sample ID labels .................................................................................................................... 2 2.2 Blood collection trays and tubes........................................................................................... 3 2.2.2 Blood collection rack: labeling and setup............................................................................ 3 2.2.3 Description of blood collection tubes ................................................................................... 3 3.1 Precautions for handling blood specimens.......................................................................... 4 3.2 Participant precautions and cxclusions ............................................................................... 4 3.2.1 Participant phlebotomy questionnaire ................................................................................ 4 3.2.2 PRECAUTIONS WHEN A PARTICIPANT FEELS FAINT OR LOOKS FAINT
FOLLOWING THE BLOOD DRAWING.......................................................................... 5 3.3 Participant refusal of phlebotomy ...................................................................................... 5 4. Participant and exam room preparation............................................................................. 5 4.1 Phlebotomy room .................................................................................................................. 5 4.2 Preparation for phlebotomy ................................................................................................. 5 4.3 Preparation of participants for phlebotomy ....................................................................... 6 5. Detailed procedures............................................................................................................... 6 5.1 Forms...................................................................................................................................... 6 5.1.2 Return visit aliquots .............................................................................................................. 7 5.2 Phlebotomy ............................................................................................................................ 7 5.2.1 General ................................................................................................................................... 7 5.2.2 Handling participants who are extremely apprehensive about having blood drawn ..... 8 5.2.3 Venipuncture procedure ....................................................................................................... 8 5.2.4 Removing the needle ............................................................................................................. 9 5.2.5 Bandaging the arm ................................................................................................................ 9 5.2.6 Completing the blood drawing procedure .......................................................................... 9 5.2.7 Procedures for difficult draw ............................................................................................. 10 5.2.8 Other possible problems ..................................................................................................... 10 5.2.9 Priority of tubes ................................................................................................................... 10 5.3 Blood mixing during venipuncture .................................................................................... 11 6. Procedures for performing the measurements at home................................................... 11 7. Alert values/Follow-up ........................................................................................................ 11 8. Quality assurance ............................................................................................................... 12 8.1 Training requirements .............................................................................................................. 12 8.2 Certification requirements ....................................................................................................... 12 8.3 Quality assurance checklist ...................................................................................................... 12 Appendix 1 Sample Label Sheet (Bar Codes) ................................................................................ 14 Appendix 2 Phlebotomy Form ........................................................................................................ 15 Appendix 3 Phlebotomy Checklist .................................................................................................. 18 Appendix 4 Sample Letter to Physician Regarding Alert Values ................................................ 19
Lab.Collect.OM8 Version 1.0
7/26/04

Blood Collection Health ABC Operations Manual Vol. X Chapter 2C, page 2 1. Background and rationale The Health ABC study involves the collection of approximately 15 mL of blood from participants. Since the study depends on the voluntary return of participants over an extended period of time, every effort must be made to make the entire procedure as easy and painless as possible both for the participants and for the Field Center personnel. A standard informed consent has been prepared for this study. With regard to laboratory procedures, the consent statement informs study participants that there is a small risk of bruising at the spot on the arm where the blood is taken and that about what amount of blood is drawn. The consent statement also informs study participants that they will be contacted if clinically significant test results are discovered. 2. Equipment and supplies
2.1 Sample ID labels You will be supplied with sheets of sample ID barcode labels to use for labeling forms, draw tubes, and cryovials. A sample sheet of barcode labels can be found in Appendix 1. All labels on each sheet have the same 6-digit sample ID number (the first digit identifies the clinic - Memphis = 1, Pittsburgh = 2). Each sheet contains 8 labels. Three are to be used to label the 3 draw tubes. None of these labels has a barcode except draw tube #3, and they have test indicating which specimen container they are intended for, including the stopper color and volume, if applicable. There are also 2 barcoded labels with the ID number, one called “Phlebotomy Form,” which is placed on the Phlebotomy Form (Appendix 2), and the other called, “Laboratory Processing Form” which is placed on the Laboratory Processing Form. This process of matching the participant-specific ID (already on the form brought to the lab by the participant) to the sample-specific ID barcode is crucial to being able to use the data collected from laboratory tests. There are 2 labels intended for labeling cryovials. These have extensions -01 and -02 (see Lab Specimen Processing chapter). Finally, there is one spare barcode label as back-up.
Lab-collect.OM8 Version 1.0
7/26/04

Blood Collection Health ABC Operations Manual Vol. X Chapter 2C, page 3 2.2 Blood collection trays and tubes Blood drawing trays are prepared in advance for the following day. Each tray is stocked with a full supply of blood drawing equipment for 6-9 participants and holds an ice bath and the individual blood collection tube rack for each participant. Several racks will also be prepared to hold various plastic tubes and vials for the tubes and aliquots sent to the Dr. Bernd Meibohm’s Laboratory at the University of Tennessee and for the local clinical laboratory that will perform the lipid determinations. The blood collection tube racks and aliquot tube racks are prelabeled from the same sheet of sample ID barcode labels. 2.2.1 Blood collection tray. The collection tray itself is made of hard plastic, which is unbreakable and can be easily cleaned. The tray has ten individual compartments which are filled with the following supplies: Alcohol swabs Smelling salts Band-Aids Timer/stopwatch Gauze Scissors Tourniquets (2) Adhesive tape Vacutainer holders Pencils/pens Needle/sharps container Latex gloves Styrofoam ice bath filled ~10 min before draw 21G Butterfly needles with Luer adapter 2.2.2 Blood collection rack: labeling and setup A separate tube rack containing the necessary draw tubes is set up for each participant. They are arranged according to the priority of the draw. This rack will fit into the blood collection tray. The blood collection tubes should be prelabeled with sample ID labels. After the labels have been used for setting up the blood collection rack and the aliquot rack (see Lab Specimen Processing chapter), there will be 3 labels left: 1 “Backup” label, 1 “Phlebotomy Form” label, 1 “Laboratory Processing Form” label. These can be separated into 2 mini-sheets: The “Backup Vacutainer,” “Phlebotomy Form,” and “Laboratory Processing Form” labels should be clipped to the corresponding blood collection tray. 2.2.3 Description of blood collection tubes Each draw tube is color coded to aid in handling. Tube #1 is a special 8-mL cell separation (CPT) tube with a blue/black stopper. This tube will be processed to obtain clean buffy coat in which to determine cellular mRNA levels. This tube uses citrate as the anticoagulant, so the plasma from these tubes is aliquoted into a blue-capped cryovial. Tube #2 is a tube drawn for local cholesterol determinations. Check with your local lab for details.
Lab-collect.OM8 Version 1.0
7/26/04

Blood Collection Health ABC Operations Manual Vol. X Chapter 2C, page 4 Tube #3 is a special PAXgene blood RNA collection tube with a red stopper. This tube does not need to be processed and will be used to isolate expressed RNA in an ancillary study. Even though the tube is a 10 mL tube, only 2.5 mL of blood are collected in this tube. The tube contains already approximately 5 mL of a chemical additive that stabilizes the RNA in the collected blood.
3.1 Precautions for handling blood specimens In accordance with the OSHA regulations on blood borne pathogens (see OSHA regulations that are kept in the laboratory), the the central lab recommends the following laboratory safety protocol for the field center laboratories: • Non-permeable lab coats, latex gloves, and face shields should be used when handling any
blood in any situation where splashes, spray, spatter, or droplets of blood may be generated and eye, nose, or mouth contamination can be reasonably anticipated.
• 'Universal Precautions' should be followed when handling any blood products. • Contaminated needles and sharps shall be immediately placed in a puncture-resistant,
leakproof container. Never recap or break needles.
• Hepatitis B vaccine should be offered to all unvaccinated technicians handling blood and documentation of vaccination or technicians’ declining to be vaccinated should be kept.
3.2 Participant precautions and cxclusions 3.2.1 Participant phlebotomy questionnaire Following the questionnaire format on the Phlebotomy Form, each participant is asked whether they have a bleeding disorder before the blood is drawn (Ques. 1). If they have had any problems with excessive bleeding or bruising at a venipuncture site, use your own judgment to decide whether or not a clinic physician or nurse supervisor should be consulted. If the participant has experienced fainting spells during phlebotomy (Ques. 2), ask the participant the frequency of fainting spells. If the participant frequently faints, again, use your own judgment to determine whether or not a consultation with the clinic physician or nurse supervisor is necessary. Provide smelling salts, basin, and a cold cloth if needed. See section below on precautions when a participant feels faint. Questions 3 and 4 relate to rare, but important exclusions. If a participant has had a radical mastectomy, including removal of the axillary (armpit) lymph nodes, any damage to veins on the side from which the lymph nodes were removed could result in chronic edema and clotting problems. Therefore, it is safest to use the arm from which lymph nodes were not removed. If a participant has had a bilateral radical mastectomy, it is safest not to do the
Lab-collect.OM8 Version 1.0
7/26/04

Blood Collection Health ABC Operations Manual Vol. X Chapter 2C, page 5 blood draw at all. If they aren't sure whether their mastectomy was radical or a modified procedure, it is safest to treat it like a radical mastectomy.
Similarly, if a participant has had a graft or shunt implanted to allow kidney dialysis, application of the tourniquet and venipuncture in the area of the graft could seriously compromise the graft. Again, it is safest to use the arm without the graft or, if the participant has had grafts in both arms, not to do the blood draw at all.
3.2.2 PRECAUTIONS WHEN A PARTICIPANT FEELS FAINT OR LOOKS FAINT FOLLOWING THE BLOOD DRAWING.
• Have the participant remain in the chair, if necessary have them sit with their head between their knees.
• Provide the participant with a basin if they feel nauseated. • Have the participant stay sitting until the color returns and they feel better. • Place a cold wet cloth on the back of the participant's neck. • If the participant faints, use smelling salts to revive by crushing the ampule and
waving it under the participant's nose for a few seconds. • If the participant continues to feel sick, contact a medical (nursing) staff member
who will advise you on further action. 3.3 Participant refusal of phlebotomy Rarely, a participant will refuse phlebotomy. Please keep a list of Health ABC Enrollment ID #s of any of these participants and identify which test they refused.
4. Participant and exam room preparation
4.1 Phlebotomy room The blood drawing should take place in an isolated room or participants should be separated by room dividers. The room should be equipped with all of the necessary blood drawing supplies. A separate counter or work table should be equipped with all of the materials and vials that are used in the blood handling and processing. The centrifuge, refrigerator, and freezer should be nearby. 4.2 Preparation for phlebotomy Preparation for phlebotomy is done in the following manner. Early morning, before any participants arrive:
• Check to make sure that blood collection tray is properly equipped. Every item on the checklist (Appendix 3) must be ready before proceeding.
Lab-collect.OM8 Version 1.0
7/26/04

Blood Collection Health ABC Operations Manual Vol. X Chapter 2C, page 6
• Check that each vacutainer tube is properly labeled with sample ID labels and numbered 1-2.
• Check that the sample processing station is properly equipped (see Lab Sample
Processing chapter). • Make sure the phlebotomy room is tidy and stocked with extra smelling salts,
basin, and disposable wash cloths, and that blood mixer is functional. Approximately 10 minutes before scheduled participant arrival:
• Fill styrofoam ice bath 3/4 full with crushed ice.
4.3 Preparation of participants for phlebotomy It should be stressed that this study requires the voluntary cooperation of the participants. These people are donating both time and blood on a purely voluntary basis, with no reward other than the knowledge that they are contributing to progress in medicine. Thus, the whole experience must be made as pleasant as possible. Three tubes of blood are collected, containing a total of approximately 3 teaspoons (15 mL) of blood. Any participants who are concerned about the volume of blood should be reassured that the total amount of blood drawn is only 3 teaspoons, although it may look like more. The phlebotomist may also assure participants that they donate more than 20 times as much blood (450 mL) when they donate a unit of blood. 5. Detailed procedures
5.1 Forms An example of the Phlebotomy form is in Appendix 2. The purpose of this form is to provide a vital link between the sample ID# and the participant ID# and to facilitate the collection of plasma and serum samples from participants. The collection must be done in a rapid and efficient manner, with maximum protection for the participant. In addition, the process must facilitate the monitoring of phlebotomy and other quality assurance parameters. All forms must be completed in ink. The Phlebotomy form has the following purposes:
1. Assure the most efficient and safest possible venipuncture for participants. 2. Allow the monitoring of the quality of the above procedures. 3. Allow more efficient processing of the samples at Dr. Meibohm’s lab. 4. Provide information critical to the interpretation of the assay results
The participant will arrive at the phlebotomy station with their Health ABC participant ID# already filled in on their Phlebotomy and Laboratory Processing forms. The sample ID will
Lab-collect.OM8 Version 1.0
7/26/04

Blood Collection Health ABC Operations Manual Vol. X Chapter 2C, page 7 be determined by the set of prelabeled tubes used to collect their samples. It is vital that this same sample ID be matched up with the participant ID on both the Phlebotomy and the Laboratory Processing forms (see Lab Specimen Processing chapter). There will be a small sheet of labels clipped to the rack of vacutainers. On it is a “Phlebotomy Form” label, to be affixed to the upper right corner of the Phlebotomy Form, and a “Laboratory Processing Form” label, which should be affixed to the upper right corner of the Laboratory Processing Form. This should be done before drawing any blood, to insure that this critical task is not forgotten. There are actually two parts to the Phlebotomy form associated with blood drawing. The first section contains questions that are important for participant safety; these questions should be asked immediately before phlebotomy and deal with any propensity to bleed or faint, plus questions about fasting. The second part deals with details of the phlebotomy procedure, whether it went smoothly, how long it took, etc.
5.1.2 Return visit aliquots Occasionally, participants return to the clinic after their Year 8 clinic visit just to have a fasting blood draw or because they were unable to give a sample at the regular clinic visit. The same type of form is used for the first sample collection as for the second. The only difference is that for the first sample collection the “first sample collection” bubble on the first page is filled; for a repeat collection the “repeat sample collection” bubble is filled. 5.2 Phlebotomy
5.2.1 General Blood drawing is standardized for the sitting position. The venipuncture is performed with a 21-gauge butterfly needle with 12 inches of plastic tubing between the venipuncture site and the blood collection tubes. A 23-gauge needle may be used, if necessary, for a difficult draw, but this must be noted on the Phlebotomy form under “Comments on blood collection.” The butterfly has a small, thin-walled needle, which minimizes trauma to the skin and vein. The use of 12 inches of tubing allows tubes to be changed without any movement of the needle in the vein. If the participant is concerned about the venipuncture, they may be reassured to know such care is taken. The participant should be given enough time to feel comfortable both before and after the blood collection. In many cases the most memorable part of the experience for the participant will be the contact with the technician who draws the blood and their general attitude and competence. If the participant is nervous or excited, the technician briefly describes the procedure. Sample script: "I am going to be drawing about3 teaspoons of blood. This blood will be used in tests for, lipid and some new experimental tests. We hope to be able to use the results of these tests to better understand health and disease in older people."
Lab-collect.OM8 Version 1.0
7/26/04

Blood Collection Health ABC Operations Manual Vol. X Chapter 2C, page 8
5.2.2 Handling participants who are extremely apprehensive about having blood drawn Do not under any circumstances force the participant to have blood drawn. It may help to explain to the participant that the blood drawing is designed to be as nearly painless as possible. It is sometimes best to let the participant go on with another part of the visit. It may also be helpful to have the participant relax in the blood drawing chair just so the phlebotomist can check the veins in the participant's arms, without actually drawing blood. If the participant has "good veins," the phlebotomist can reassuringly say, "Oh, you have good veins; there should be no problem." Elderly participants are often aware of the difficulty they pose to phlebotomists and should receive extra consideration and detailed explanations as required.
5.2.3 Venipuncture procedure • Wear Latex gloves and a lab coat. • Arrange draw tubes in order of draw (see Section 5.2.9) on the table top within easy reach.
Assemble butterfly apparatus and vacutainer holders, gauze, and alcohol prep prior to tourniquet application.
• Apply tourniquet. • Examine participant's arms for the best site for venipuncture. Generally the antecubital
vein is preferred, if feasible. Release tourniquet. • Cleanse venipuncture site. Prepare area by wiping with alcohol swab in a circular motion
from center to periphery. Allow area to dry. • Reapply tourniquet and start timer. Note the start time on the Phlebotomy form. • Grasp the participant's arm firmly, using your thumb to draw the skin taut. This anchors
the vein. The thumb should be 1 or 2 inches below the venipuncture site. • With the needle bevel upward, enter the vein in a smooth continuous motion. • Make sure the participant's arm is in a flat or downward position while maintaining the
tube below the site when the needle is in the vein. It may be helpful to have the participant make a fist with the opposite hand and place it under the elbow for support.
• Grasp the flange of the vacutainer holder and push the tube forward until the butt end of the needle punctures the stopper, exposing the full lumen of the needle.
• Note the blood flow into the first collection tube. If blood is flowing freely, the butterfly needle can be taped to the participant's arm for the duration of the draw. If the flow rate is very slow, the needle may not be positioned correctly.
• Remove the tourniquet as soon as you connect the PAXgene tube (#3). Once the draw has started, do not change the position of the tube until it is withdrawn from the needle. If blood flow ceases after the tourniquet is removed, it may be reapplied for another 2 minutes. Note on the Phlebotomy form the total length of time the tourniquet was on.
• Keep a constant, slight forward pressure (in the direction of the needle) on the end of the tube. This prevents release of the shutoff valve and stopping of blood flow. Do not vary pressure or reintroduce pressure after completion of the draw.
• Fill each vacutainer tube as completely as possible; i.e., until the vacuum is exhausted and blood flow ceases. If a vacutainer tube fills only partially, remove the vacutainer and
Lab-collect.OM8 Version 1.0
7/26/04

Blood Collection Health ABC Operations Manual Vol. X Chapter 2C, page 9
attach one of your extra, backup tubes of the same type without removing the needle from the vein. Be sure to place one of the “Backup Vacutainer” labels on that tube after completing phlebotomy.
• When the blood flow ceases, remove the tube from the holder. The shutoff valve re-covers the point, stopping blood flow until the next tube is inserted.
• Because tube 3 volume contains mostly additive, care must be taken to ensure no inadvertent backflow of its contents to the participant. The tube should be held upright below the level of the participant’s arm during filling.
• After tube 3 is removed, invert it 10 times and place in a rack.. • Average venipuncture time is 2-3 minutes, but any difficulties may increase this time to
10 minutes. Be sure to note the time venipuncture is completed on the Phlebotomy form. 5.2.4 Removing the needle • To remove the needle, lightly place clean gauze over venipuncture site. Remove the
needle quickly and immediately apply pressure to the site with a gauze pad. Discard needle into puncture-proof sharps container.
• Have the participant hold the gauze pad firmly for one to two minutes to prevent a hematoma.
• Remove tube #1 and place in ice. Handle tube #2 according to your local lab’s preference. After 10 inversions, Tube #3 does not need further processing and should be stored in a designated rack in a freezer (-20ºC).
5.2.5 Bandaging the arm Under normal conditions: • Slip the gauze pad down over the site, applying mild pressure. • Apply an adhesive or gauze bandage over the venipuncture site after making sure that
blood flow has stopped. • Tell the participant to leave the bandage on for at least 15 minutes. If the participant continues to bleed: • Apply pressure to the site with a gauze pad. Keep the arm elevated until the bleeding
stops. • Wrap a gauze bandage tightly around the arm over the pad. • Tell the participant to leave the bandage on for at least 15 minutes. 5.2.6 Completing the blood drawing procedure • Dispose of needle and tubing in the appropriate biohazard needle sharps containers. • Complete the Phlebotomy form. This includes rating the venipuncture as clean or
traumatic and writing any comments about any difficulties with the phlebotomy under “Comments on Phlebotomy.”
Lab-collect.OM8 Version 1.0
7/26/04

Blood Collection Health ABC Operations Manual Vol. X Chapter 2C, page 10 • Clean up the venipuncture area (if necessary). • Bring blood collection tray to the processing area with the filled vacutainer tubes and
Laboratory Processing form.
5.2.7 Procedures for difficult draw If a blood sample is not forthcoming, the following manipulations may be helpful. • If there is a sucking sound, turn needle slightly or lift the holder in an effort to move the
bevel away from the wall of the vein. • If no blood appears, move needle slightly in hope of entering vein. Do not probe. If not
successful, release tourniquet and remove needle. A second attempt can be made on the other arm.
• Loosen the tourniquet. It may have been applied too tightly, thereby stopping the blood flow. Reapply the tourniquet loosely. If the tourniquet is a velcro type, quickly release and press back together. Be sure, however, that the tourniquet remains on for no longer than two minutes at a time.
• DO NOT attempt a venipuncture more than twice unless a participant encourages you to do so.
• Reassure the participant that the inability to obtain a clean venipuncture is not any sign of a medical problem on their part.
• If venipuncture is unsuccessful, participant should be rescheduled at a later date, preferably with a different Field Center phlebotomist.
• Document any problems with venipuncture and sample collection on the Phlebotomy form. In particular, note whether a vein other than one of the antecubital veins was used.
5.2.8 Other possible problems 1) Not all tubes are collected (blood flow ceases, difficult venipuncture, etc.): Always fill the collection tubes in the order specified. Make notations of difficulties on the Phlebotomy form. If the participant is willing, another attempt should be made to complete the draw. 2) Collection tube does not fill: First, try another tube of the same type. Partially filled plasma tubes are not acceptable if less than 2/3 full. Partial tubes for serum are okay, but will result in a reduced number of aliquots. Check “No” (not filled to capacity) and explain why under Question #10 of the Phlebotomy form if a tube is not completely filled. 5.2.9 Priority of tubes A total of approximately 15 mL of blood will be drawn from each participant in 4 tubes. Tubes are numbered 1-2 and arranged in the rack to be drawn in the following order of priority: 1. Citrated Plasma Tube blue/black top 2. Local Tube As specified by local lab.
Lab-collect.OM8 Version 1.0
7/26/04

Blood Collection Health ABC Operations Manual Vol. X Chapter 2C, page 11 3. Paxgene tube 10mL red top
5.3 Blood mixing during venipuncture Each tube should be treated as follows:
#1 CPT: place on mixer for ~30 seconds, then place in ice bath #2 Local tube: as specified by local lab #3 PAXgene: invert 10 times and place in a rack at room temperature.
6. Procedures for performing the measurements at home This examination can be done on home visits. The timing of the draw should be arranged so that there is sufficient time to be sure that the participant will not faint or bleed after the examiner has left the home, but late enough in the visit so that the samples can be returned to the lab for processing within two hours (preferably less than 1 hour) after the draw. Serum tubes if applicable should be held at room temperature, not on ice, for transport back to the lab. The CPT tube (#1) and the Paxgene tube (#2) should be kept on ice. A Year 6 Return Visit Phlebotomy and Laboratory Processing form and a Year 6 Laboratory Processing Addendum are included in the Year 6 Visit-Specific Home Visit Workbook, which should be completed in addition to the Core Home Visit Workbook. 7. Alert values/Follow-up
It is the responsibility of the clinics to respond appropriately to the results obtained from the local clinical chemistry. .Health ABC has used the following alert values in the past Analyte Reference Range for Reports Immediate Alerts Lipids: Total Cholesterol
<200 mg/dL Normal 200-239 mg/dL Borderline >239 mg/dL Elevated**
None
HDL-Cholesterol ≥35 mg/dL Normal None LDL-Cholesterol <130 mg/dL Normal
130-159 mg/dL Borderline >159 mg/dL Elevated**
None
Triglycerides 35-160 mg/dL >1000 mg/dL **Notify participant and participant’s physician by fax/letter if participant has granted permission to notify physician. Use modified letter from CHS with abnormal value filled in.
Lab-collect.OM8 Version 1.0
7/26/04
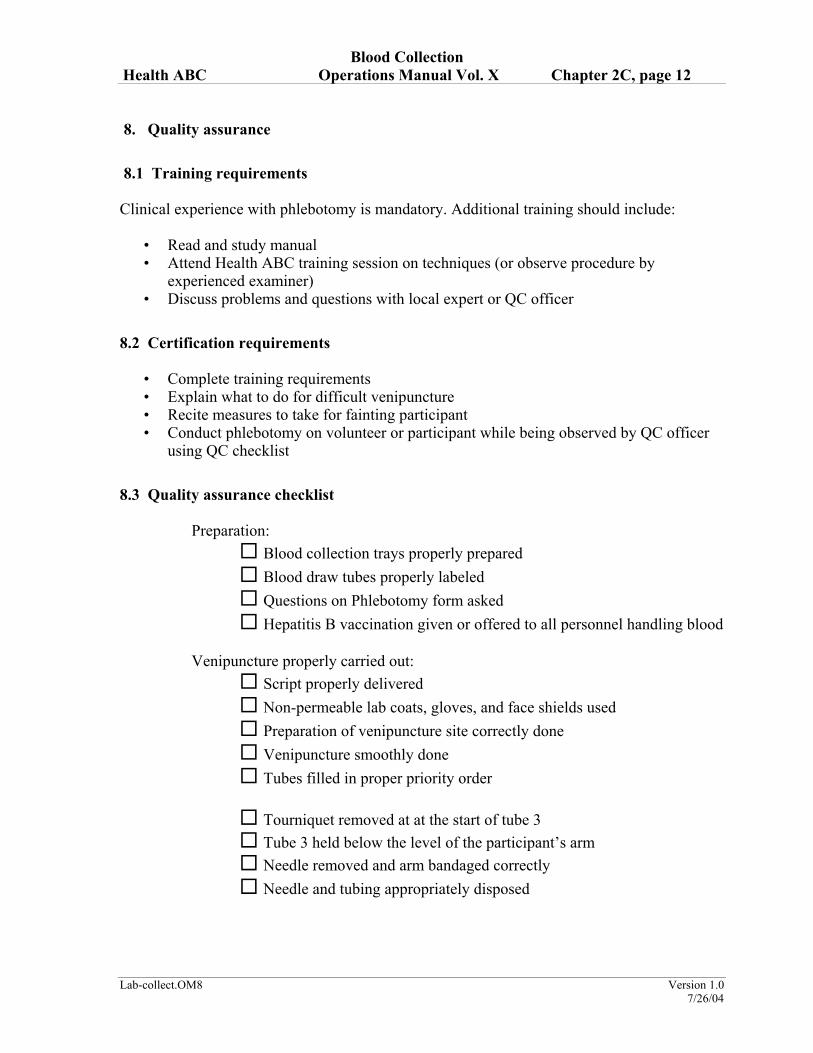
Blood Collection Health ABC Operations Manual Vol. X Chapter 2C, page 12 8. Quality assurance 8.1 Training requirements Clinical experience with phlebotomy is mandatory. Additional training should include:
• Read and study manual • Attend Health ABC training session on techniques (or observe procedure by
experienced examiner) • Discuss problems and questions with local expert or QC officer
8.2 Certification requirements
• Complete training requirements • Explain what to do for difficult venipuncture • Recite measures to take for fainting participant • Conduct phlebotomy on volunteer or participant while being observed by QC officer
using QC checklist
8.3 Quality assurance checklist
Preparation: Blood collection trays properly prepared Blood draw tubes properly labeled Questions on Phlebotomy form asked
Hepatitis B vaccination given or offered to all personnel handling blood Venipuncture properly carried out:
Script properly delivered Non-permeable lab coats, gloves, and face shields used
Preparation of venipuncture site correctly done Venipuncture smoothly done Tubes filled in proper priority order
Tourniquet removed at at the start of tube 3 Tube 3 held below the level of the participant’s arm
Needle removed and arm bandaged correctly Needle and tubing appropriately disposed
Lab-collect.OM8 Version 1.0
7/26/04

Blood Collection Health ABC Operations Manual Vol. X Chapter 2C, page 13
Tubes mixed and handled correctly after filling: Tube 1 mixed for at least 30 seconds, placed in ice bath Tube 3 inverted 10 times and place in a rack
Phlebotomy form properly filled out:
Sample ID barcode label affixed to upper right corner (and to upper right corner of Lab Processing form)
Time at start of venipuncture entered Time at end of venipuncture entered Total elapsed time with tourniquet entered Quality of venipuncture checked Total fasting time correctly calculated
Lab-collect.OM8 Version 1.0
7/26/04
Blood Collection Health ABC Operations Manual Vol. X Chapter 2C, page 14
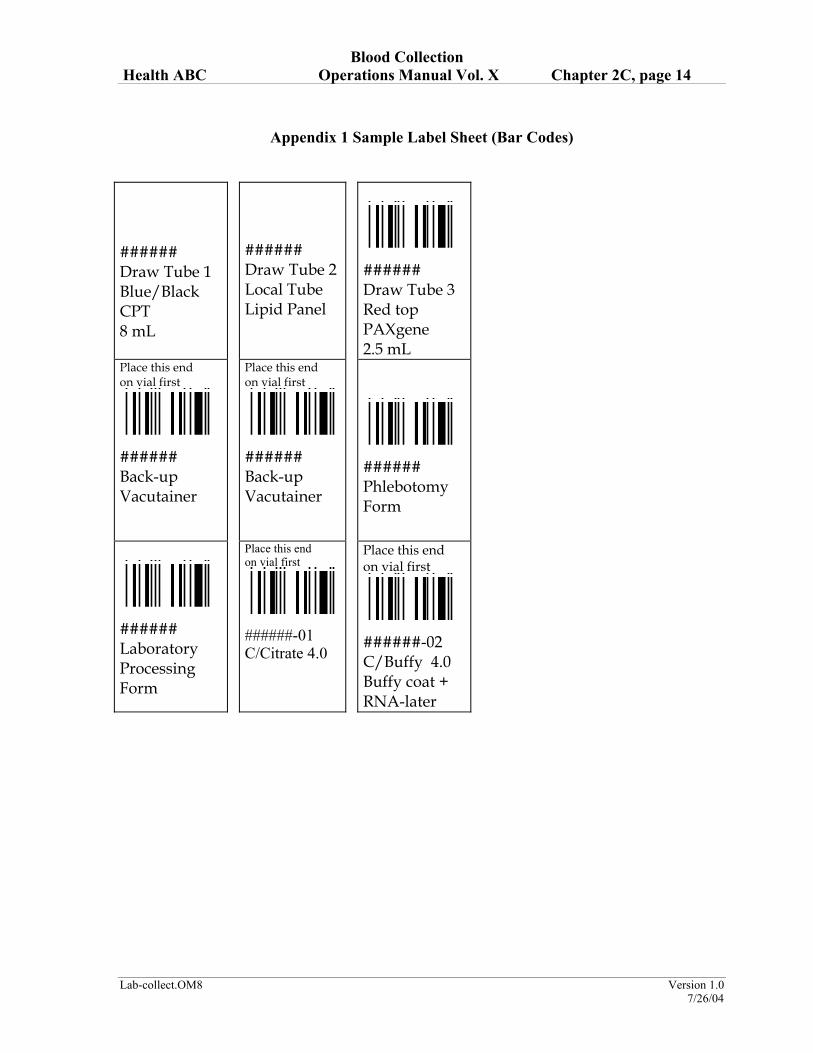
Appendix 1 Sample Label Sheet (Bar Codes) ###### Draw Tube 1 Blue/Black CPT 8 mL
###### Draw Tube 2 Local Tube Lipid Panel
###### Draw Tube 3 Red top PAXgene 2.5 mL
Place this end on vial first
###### Back-up Vacutainer
Place this end on vial first
###### Back-up Vacutainer
###### Phlebotomy Form
###### Laboratory Processing Form
Place this end on vial first
######-01 C/Citrate 4.0
Place this end on vial first
######-02 C/Buffy 4.0 Buffy coat + RNA-later
Lab-collect.OM8 Version 1.0
7/26/04

Blood Collection Health ABC Operations Manual Vol. X Chapter 2C, page 15
Appendix 2 Phlebotomy Form
Lab-collect.OM8 Version 1.0
7/26/04

Blood Collection Health ABC Operations Manual Vol. X Chapter 2C, page 16
Lab-collect.OM8 Version 1.0
7/26/04

Blood Collection Health ABC Operations Manual Vol. X Chapter 2C, page 17
Lab-collect.OM8 Version 1.0
7/26/04

Blood Collection Health ABC Operations Manual Vol. X Chapter 2C, page 18
Appendix 3 Phlebotomy Checklist Blood Collection Tray Checklist Per Tray: 10 21G Butterfly needles with Luer Adapters 10 Alcohol Swabs 15 Band-Aids 15 Gauze pads 5 Vacutainer holders complete set of extra, unlabeled collection tubes 2 Tourniquets 1 Smelling salts 1 Timer or stopwatch 2 Pencils/pens Latex gloves 1 Hemostats 1 Adhesive tape 1 Scissors ~10 min before draw: 1 styrofoam ice bath filled with ice Per participant: 1 Blood tube rack with 5 draw tubes labeled and numbered. At the Phlebotomy Station: Basin Cold cloth Tube mixer Biohazard containers
Needle/Sharps container Paper towels
Lab-collect.OM8 Version 1.0
7/26/04
Blood Collection Health ABC Operations Manual Vol. X Chapter 2C, page 19
Lab-collect.OM8 Version 1.0
7/26/04
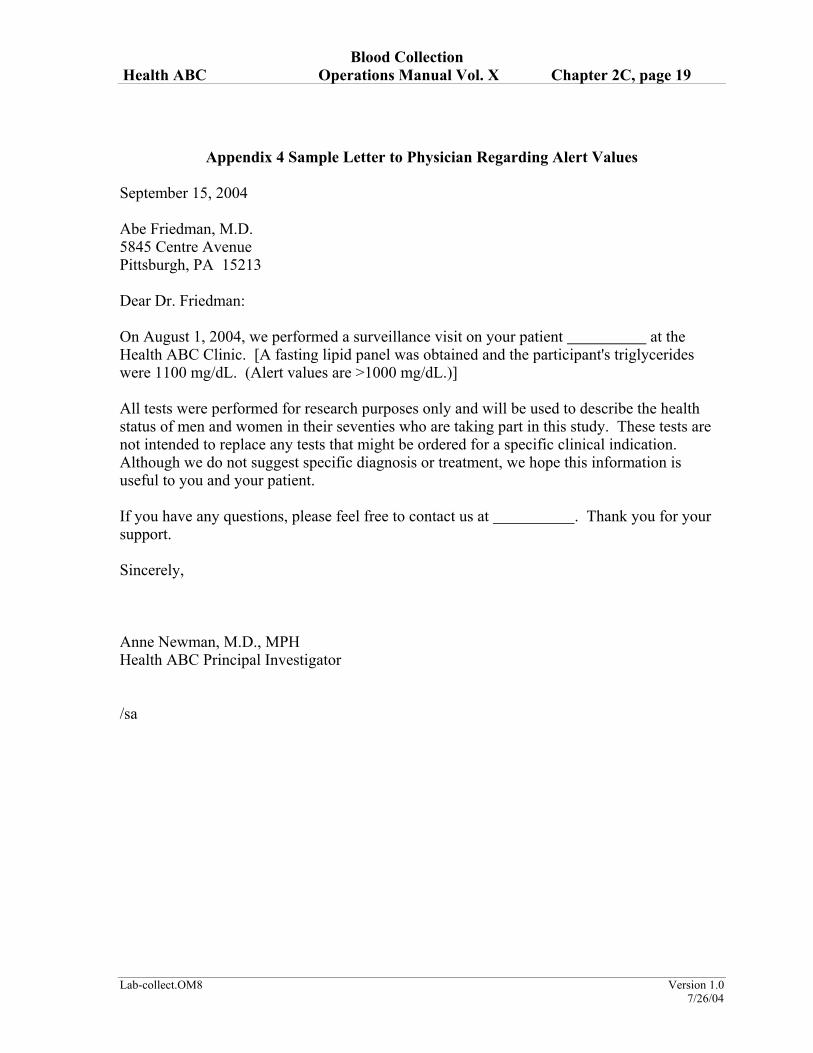
Appendix 4 Sample Letter to Physician Regarding Alert Values
September 15, 2004 Abe Friedman, M.D. 5845 Centre Avenue Pittsburgh, PA 15213 Dear Dr. Friedman: On August 1, 2004, we performed a surveillance visit on your patient at the Health ABC Clinic. [A fasting lipid panel was obtained and the participant's triglycerides were 1100 mg/dL. (Alert values are >1000 mg/dL.)] All tests were performed for research purposes only and will be used to describe the health status of men and women in their seventies who are taking part in this study. These tests are not intended to replace any tests that might be ordered for a specific clinical indication. Although we do not suggest specific diagnosis or treatment, we hope this information is useful to you and your patient. If you have any questions, please feel free to contact us at . Thank you for your support. Sincerely, Anne Newman, M.D., MPH Health ABC Principal Investigator /sa