handydrive-5 operations manual r - fujitsu global · handydrive-5 - operations manual r.1 ......
TRANSCRIPT

HandyDrive-5 - Operations Manual R.1
HandyDrive-5
Operations Manual
R.1
HandyDrive-5 - Operations Manual R.1
HandyDrive Key Product Features
Capacity : 250/320/400/500GB (Using M250) Sleek & Slim Design 85mm x 135mm x 15mm Less than 170g Power Saving Firmware (M250+Handy) Backup Software Security Password Lock Tool Format & Partition Utility Bundled Software Supports 11 Languages:
o English o French o Spanish o Portuguese o German o Italian o Russian o Traditional-Chinese o Simplified-Chinese o Korean o Japanese
Warranty Period in Americas: 3 years (Asia:3yrs, EMEA:2yrs) Fujitsu Supported Diagnostics

HandyDrive-5 - Operations Manual R.1
Table of Contents
HandyDrive HDD Installation
HandyDrive Hard Disk Format Tool
Backup Utility Software
Password Lock Tool
HandyDrive Diagnostics
Diagnostic Error Codes
HandyDrive-5 - Operations Manual R.1
HandyDrive Installation Steps
1. Plug the USB Mini-B end of the cable into the HandyDrive, and place the USB Series “A” plug into the host computer.
2. MS Windows will detect the connection of a “USB Mass Storage Device”, and report that “USB2.0 HandyDrive500” is ready for use. Depending upon the capacity, you will see the new drive in the storage device list, e.g. Handy160 (D:)
3. Installation is complete, when the MS Windows Found New Hardware wizard reports that the drive is ready for use.
Should the need arise to reset the partitions from the factory defaults; a Format & Partition Utility is included with the bundled software package. See the next section of the manual for the utility software operating procedure.

HandyDrive-5 - Operations Manual R.1
HandyDrive Hard Disk Format Tool
Purpose The Hard Disk Format Tool is the software utility for Windows which enables you to reset the HandyDrive partitions and the format to:
o The factory default setting o To split drive into multiple partitions o To delete the partitions
Caution: The data inside the hard disk will be lost if any alteration, deletion or formatting of the partition is executed. Please take extra care when using this software. What does [Partition] mean?
It is the part or the area created by dividing the hard disk logically into multiple parts. One hard disk is used as multiple drives by dividing the hard disk into multiple partitions.
What does [Format] mean?
This is the operation to enable write/read of data to hard disks and floppy disks etc. All the recorded data are deleted when formatting is executed.
Operating Environments This software operates under the environments described below. Supported OS:
o Microsoft® Windows Vista™ Ultimate o Microsoft® Windows Vista™ Enterprise o Microsoft® Windows Vista™ Business o Microsoft® Windows Vista™ Home Premium o Microsoft® Windows Vista™ Home Basic o Microsoft® Windows® XP Home Edition o Microsoft® Windows® XP Professional o Microsoft® Windows® 2000 Professional o Microsoft® Windows® Millennium Edition o Microsoft® Windows® 98 Second Edition
Caution: This software is a 32 bit application. As for this software operating in a 64 bit OS, it is not guaranteed. Supported Device:
o FUJITSU HandyDrive only.
HandyDrive-5 - Operations Manual R.1
Precautions and Limitations for Usage
o This software can be used when only one HandyDrive is connected to the PC. o It cannot be used when no HandyDrive is connected, or two or more units are connected. o Close all the other applications before use. o Do not start other applications during use. o The contents of the disk may be corrupted if shutdown is executed during formatting. Never
execute it. o The contents of the disk may be corrupted if this software is closed forcefully during
formatting. Never execute it. o Do not connect or remove the HandyDrive when using this software. o Log on with the administrator's account, if you use this software on Windows Vista, Windows
XP or Windows 2000 Professional. o Reconnect the HandyDrive after using this software. o When you reconnect the HandyDrive, execute Safely Remove Hardware in the task tray to
make it removable before you remove the HandyDrive and then reconnect it. o Refer to the Quick Start Guide for the method to remove it. o When you remove the hardware after using this software, an error message may be displayed
and it will become unremovable. o In this case, make sure that other applications are not using it first. o If the problem is not solved yet, restart the OS to remove properly. o Make sure the PC does not enter into a standby or suspend state before using this software. o Do not execute standby or suspend during use of this software. o If it becomes standby or suspend state during use of this software, the contents of the disk
may be corrupted. o The process may take a long time depending on the function. o Connect an AC adapter to the PC to prevent shortage of battery power during the process if
using on a notebook PC. o This software can only create a maximum of 8 partitions.
HandyDrive-5 - Operations Manual R.1
Installation Caution: When the OS is upgraded with the Hard Disk Format Tool, the operation of the Hard Disk Format Tool is not guaranteed. Please uninstall the Hard Disk Format Tool before upgrading the OS and re-install latest version of the Hard Disk Format Tool after upgrading the OS. Please uninstall old version of the Hard Disk Format Tool before installing latest version of the Hard Disk Format Tool. Refer to section, "Uninstall". Install this software package using the following procedure below.
1. Log on with the administrator's account, if you are use Windows Vista, Windows XP or Windows 2000 Professional.
2. Double-click UtySetup.exe to start installation. a. In Windows Vista, when the User Account Control is valid b. Click [Allow] when the "User Account Control" dialog box is displayed, and selecting
the [Cancel] or [Allow] is required. 3. Click [Next >] when the computer is ready for installation, and the "Welcome to the
InstallShield Wizard for HandyDrive Format Tool V3.21" dialog box is displayed. 4. Click [Finish] when the installation is over and "InstallShield Wizard Completed" dialog box is
displayed.
Running the Software Start this software using the following procedure below.
1. Connect only one HandyDrive to the PC. 2. Click the [Start] menu of [Task Bar]. 3. Click the [All Programs] menu in case of Windows XP/Vista and, [Programs] in case of
Windows98SE/Me/2000. 4. Click the [Fujitsu HandyDrive] menu. 5. Click the [Hard Disk Format Tool V3.21] menu. 6. Click [Format Tool].
a. In Windows Vista, when the User Account Control is valid, Click [Allow] when the "User Account Control" dialog box is displayed, and selecting the [Cancel] or [Allow] is required.
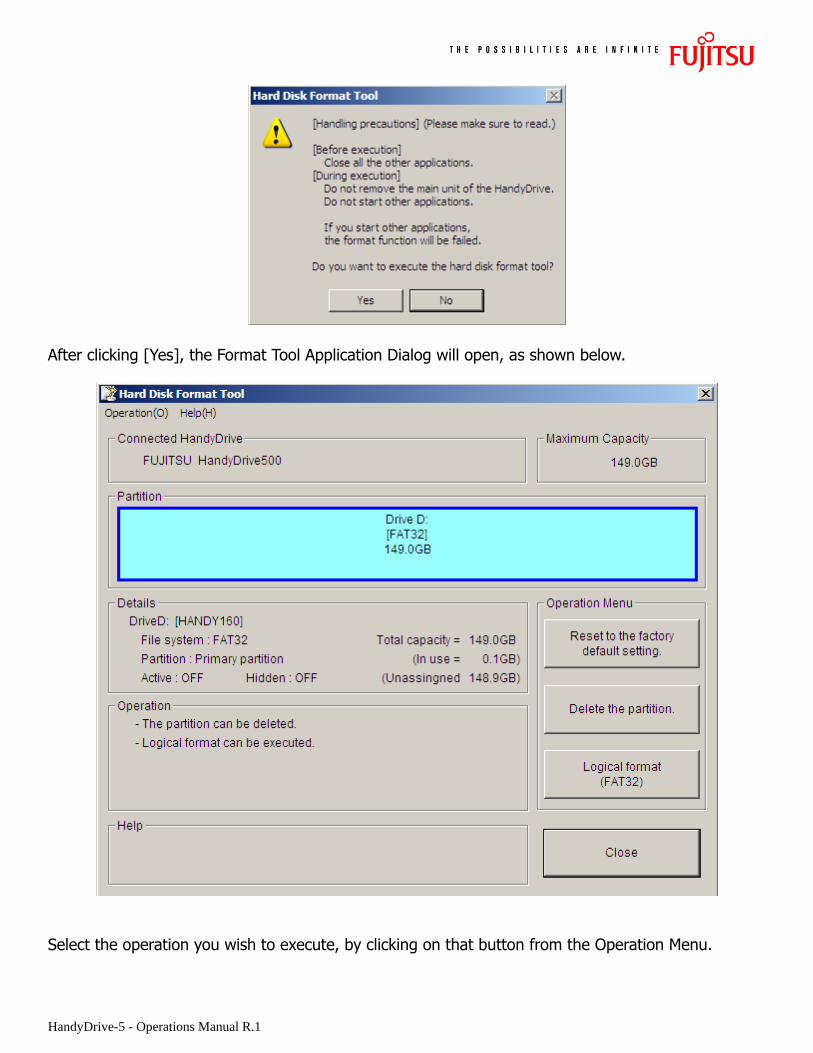
7. Click [Yes], after confirming the contents in the list, when the dialog box "Handling Precautions" is displayed.
HandyDrive-5 - Operations Manual R.1
After clicking [Yes], the Format Tool Application Dialog will open, as shown below.
Select the operation you wish to execute, by clicking on that button from the Operation Menu.

HandyDrive-5 - Operations Manual R.1
Display of the User's Guide Display the user's guide for this software package, following the method below. [Displaying from this software] Click [Help]-[Users Guide] from the menu bar at the top of the main screen. [Displaying from the start menu]
1. Click [Start] on the [Task Bar]. 2. Click [All Programs] menu in case of Windows XP/Vista, click the [Programs] menu in case
of Windows98SE/Me/2000. 3. Click the [Fujitsu HandyDrive] menu. 4. Click the [Hard Disk Format Tool V3.21] menu. 5. Click [User's Guide].
Uninstall Uninstall the Hard Disk Format Tool using the following procedure below.
1. Log on with the administrator's account if you use Windows Vista, Windows XP or Windows 2000 Professional.
2. Open [My Computer] and click [Control Panel]. Note: [Control Panel] can also be opened through [Start]-[Settings]-[Control Panel].
a. In Windows Vista, click [Control Panel] from the Windows [Start] menu. 3. Open [Add or Remove Programs].
a. In Windows Vista, open [Uninstall a program]. 4. Select [HandyDrive Format Tool V3.21] and click the [Remove].
a. In Windows Vista, select [HandyDrive Format Tool V3.21] and click the [Uninstall].
5. Click [Yes] when the "Are you sure you want to remove HandyDrive Format Tool V3.21 from your computer?" dialog box is displayed.
6. Uninstallation starts. a. In Windows Vista, when the User Account Control is valid, Click [Allow] when the "User
Account Control" dialog box is displayed, and selecting the [Cancel] or [Allow] is required.
HandyDrive-5 - Operations Manual R.1
Backup Utility Software
Installation Install this software package using the following procedure below.
1. Log on with the administrator's account, if you are use Windows Vista, Windows XP or Windows 2000 Professional.
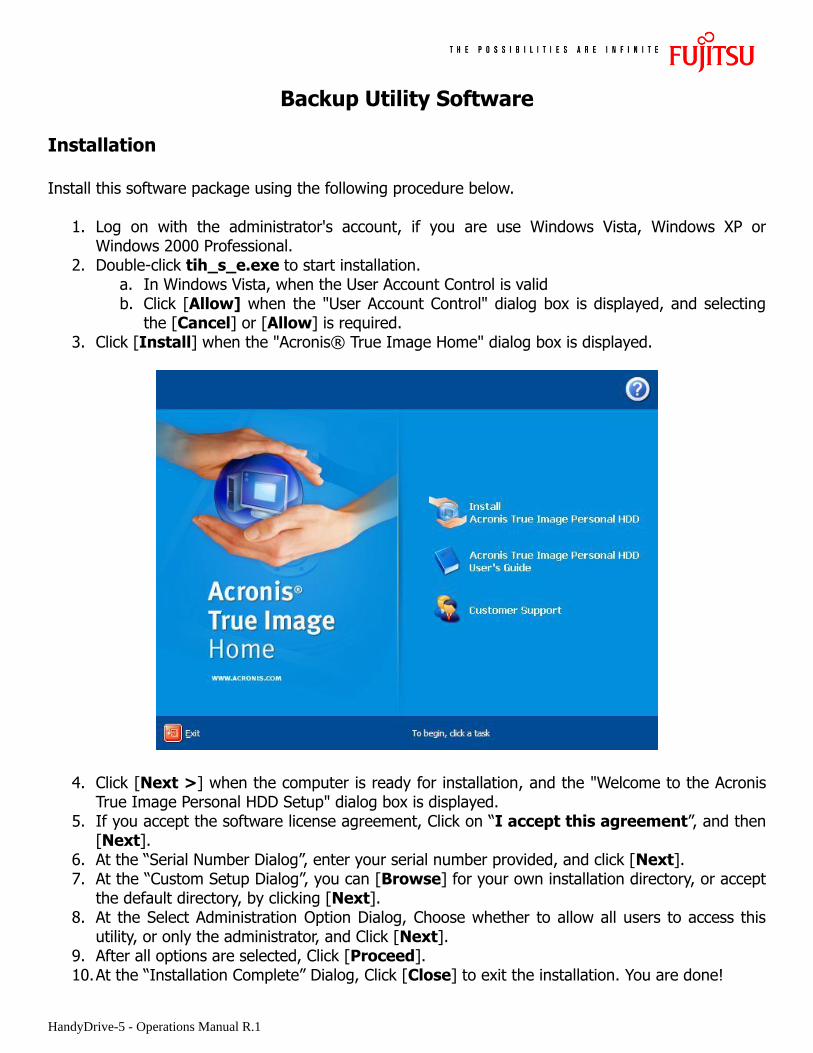
2. Double-click tih_s_e.exe to start installation. a. In Windows Vista, when the User Account Control is valid b. Click [Allow] when the "User Account Control" dialog box is displayed, and selecting
the [Cancel] or [Allow] is required. 3. Click [Install] when the "Acronis® True Image Home" dialog box is displayed.
4. Click [Next >] when the computer is ready for installation, and the "Welcome to the Acronis True Image Personal HDD Setup" dialog box is displayed.
5. If you accept the software license agreement, Click on “I accept this agreement”, and then [Next].
6. At the “Serial Number Dialog”, enter your serial number provided, and click [Next]. 7. At the “Custom Setup Dialog”, you can [Browse] for your own installation directory, or accept
the default directory, by clicking [Next]. 8. At the Select Administration Option Dialog, Choose whether to allow all users to access this
utility, or only the administrator, and Click [Next]. 9. After all options are selected, Click [Proceed]. 10. At the “Installation Complete” Dialog, Click [Close] to exit the installation. You are done!
HandyDrive-5 - Operations Manual R.1
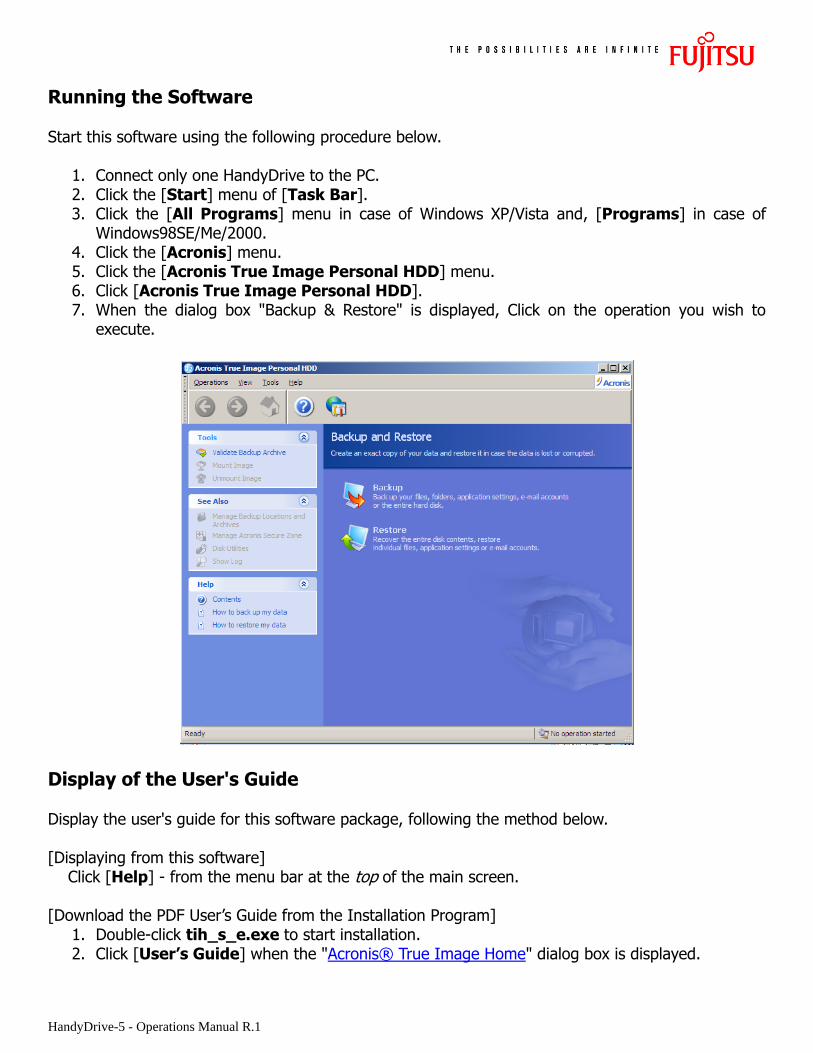
Running the Software Start this software using the following procedure below.
1. Connect only one HandyDrive to the PC. 2. Click the [Start] menu of [Task Bar]. 3. Click the [All Programs] menu in case of Windows XP/Vista and, [Programs] in case of
Windows98SE/Me/2000. 4. Click the [Acronis] menu. 5. Click the [Acronis True Image Personal HDD] menu. 6. Click [Acronis True Image Personal HDD]. 7. When the dialog box "Backup & Restore" is displayed, Click on the operation you wish to
execute.
Display of the User's Guide Display the user's guide for this software package, following the method below. [Displaying from this software] Click [Help] - from the menu bar at the top of the main screen. [Download the PDF User’s Guide from the Installation Program]
1. Double-click tih_s_e.exe to start installation. 2. Click [User’s Guide] when the "Acronis® True Image Home" dialog box is displayed.

HandyDrive-5 - Operations Manual R.1
HandyDrive Hard Disk Password Lock Tool
Purpose The HandyDrive hard disk password lock tool, contains security software to set passwords in the HandyDrive and protect data from unauthorized reading and writing. HandyDrives that have been set with passwords cannot be read or written as they do not display the drive icon unless the correct password is entered with this software. This software is effective as a safety measure to prevent problems through the leakage and theft of data stored in the HandyDrive. Features
o Protects important data by setting passwords in the HandyDrive. o The password uses a maximum of 32 alphanumeric characters and certain symbols for the
password. o Setting, changing and deleting the password do not affect the stored data. o The password can be changed as many times as needed. (although the password that is
already set is required for this.) o The password can be cleared to return the HandyDrive to its original state. o The password will not be accepted unless the HandyDrive is disconnected once when an
incorrect password has been entered five consecutive times. o The data is protected even if the HandyDrive is dismantled and the drive removed from it, as
the password is set onto the hard disk drive itself.
Operating Environment This software operates under the environment described below. Compatible OS:
o Microsoft® Windows Vista™ Ultimate o Microsoft® Windows Vista™ Enterprise o Microsoft® Windows Vista™ Business o Microsoft® Windows Vista™ Home Premium o Microsoft® Windows Vista™ Home Basic o Microsoft® Windows® XP Home Edition o Microsoft® Windows® XP Professional o Microsoft® Windows® 2000 Professional
Intended Device
o FUJITSU HandyDrive only

HandyDrive-5 - Operations Manual R.1
Precautions and Limitations Precautions
o Do not forget passwords or EraseKeys. o Unlocking is not possible if the password is forgotten. Forgotten passwords cannot
be recovered by Fujitsu. o Always use long passwords that cannot be easily guessed by third parties. o Third parties will be able to read and write data when the lock is open. Disconnect the USB
cable when it is not in use and remove the HandyDrive. Disconnect the AC adapter too, if one is in use.
o Never disconnect the USB cable when passwords are being set or changed. Failure to observe this may result in unintended passwords being set, rendering the device inaccessible.
o Never disconnect the USB cable when EraseKeys are being set or changed. Failure to observe this may result in unintended EraseKeys being set, rendering the device inaccessible.
o Do not put the PC in an energy saving mode when a HandyDrive for which a password has been set is connected.
o Energy saving mode refers to Standby / Suspend modes. o Do not perform any actions using Password Lock Tool Ver. 1 on a HandyDrive for which a
password has been set using Password Lock Tool Ver.2 except unlocking the drive. Restrictions Do not execute the following operations below, when passwords are being entered, set, changed or deleted with the password lock tool.
o Disconnect the HandyDrive or connect or disconnect other USB devices o Read/ write files that are stored on the HandyDrive o Log off from Windows, or switch to another user o Locked HandyDrives cannot be used when the following applications are in use.
- Symantec "Norton GoBack(TM)" - Hard disk monitoring software, such as system recovery software
Installation Install this software package using the following procedure below.
1. Close all of the working programs before installation. 2. Log on with the Administrator's account. 3. Double-click Setup.exe to start installation. 4. Click [Next >] when the computer is ready for installation, and the "Welcome to the
InstallShield Wizard for HandyDrive Password Lock Tool" dialog box is displayed. 5. At the “Choose Destination Location” Dialog, you can [Browse] for your own installation
directory, or accept the default directory, by clicking [Next]. 6. Click [Finish] when the installation is over and "InstallShield Wizard Completed" dialog box is
displayed. Note: Make sure the earlier version, if available, is uninstalled before installing this package.

HandyDrive-5 - Operations Manual R.1
Running the Software Start this software using the following procedure below.
1. Click the [Start] menu of [Task Bar]. 2. Click the [All Programs] menu in case of Windows XP/Vista and, [Programs] in case of
Windows98SE/Me/2000. 3. Click the [Fujitsu HandyDrive] menu. 4. Click the [Hard Disk Password Lock Tool] menu. 5. Click [Password Lock Tool].
The first time the program is run, it will display “Non Password” to indicate that the Password has not been set on this drive.
Uninstall Follow the procedure below for uninstall.
1. Open [Control Panel] from the [Start Menu]. 2. Open [Add or Remove Programs ]. 3. Select "HandyDrive Hard Disk Password Lock Tool" and click [Remove]. 4. Uninstall following the instructions on screen.

HandyDrive-5 - Operations Manual R.1
HandyDrive Diagnostics
Purpose
The purpose of this diagnostic is to reduce NTF/CND drives in field returns. If the customer encounters problems and suspects the drive is faulty, before returning it, we would like to request the customer to run this tool first. This tool will be run on every drive request for RMA, prior to issuance of the number.
Running the Diagnostics
1. Double-click FJDTWin113.exe to start diagnostic tool. 2. The Dialog above will be displayed, with the list of available drives for testing. 3. Click the “check box” for the HandyDrive, and select it as the target. 4. Click on either the [Short Test] or [Extended Test] to initiate diagnostic testing. 5. At the conclusion of the testing, a results window will display the results of the testing, with
the option to save those results to the host computer.

HandyDrive-5 - Operations Manual R.1
Note: FJDTWin versions prior to V1.13 do not support the HandyDrive-5.
The Result file will be saved with the last 5 digits of the serial number, e.g. Result_26K4N.txt, and will contain the exact same verbiage as contained in the results window. Any error codes reported by the testing can be referenced in the associated Test Status Codes Document.

HandyDrive-5 - Operations Manual R.1
Test Methodology Short Test The following are test items of Short test, and the duration time is 2 minutes or less.
o Pre-SMART check o Drive Error Log Check o SDRAM Check o Write/Read/Compare Test o Servo Check o Random Read Test o Read Scan Test (Outer 500MB and Inner 300MB) o Post-SMART Check
Extended Test The following are test items of the Extended test, and the duration time is about 2 minutes per GB of capacity or less.
o Pre-SMART check o Drive Error Log Check o SDRAM Check o Write/Read/Compare Test o Servo Check o Random Read Test o Read Scan Test (All Surface) o Post-SMART Check
Updated Contents
o Added detect the security lock condition of target HDD. (If FJDT detects the security lock condition, Extended test is aborted.)