hand instruments in operative dentistry
TRANSCRIPT

HAND INSTRUMENTS IN OPERATIVE DENTISTRY
By
Dr.Anoop.V.Nair
PG, Dept of Cons. Dentistry & Endodontics

Contents• Introduction, history & classification
• Parts of a hand cutting instrument
• Instrument nomenclature
• Instrument formula
• Instrument design
• Instrument applications
• Techniques
• Rests and guards
• Sharpening hand instruments
• Sterilization and disinfection
• Whats new?
• References

• The term ‘instrument’ refers to a tool, device or
implement used for a specific purpose or type of work
and is preferred in professional or scientific fields as
precision items to perform specific procedures.
• In order to perform the intricate or detailed procedures
associated with operative dentistry, the dentist must
have a complete knowledge of the purpose and
application of the many instruments required.
The instruments available
The purpose of the instrument
The position or manner of use
The application of the instrument.

HAND INSTRUMENTS
• IN OPERATIVE DENTISTRY
• IN ENDODONTICS

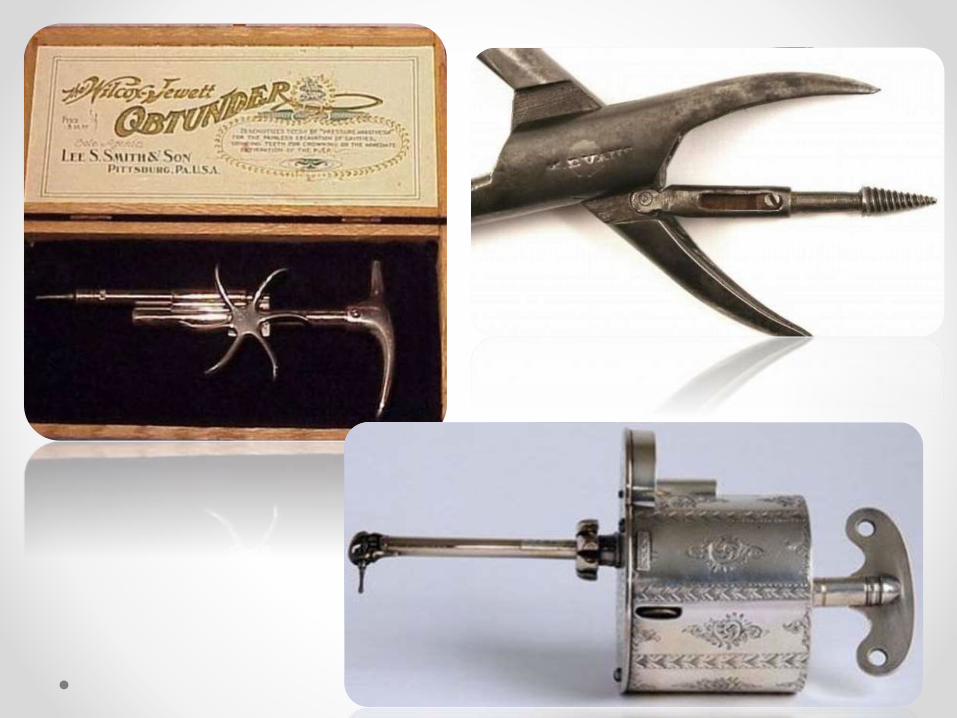
• EARLY HAND OPERATED INSTRUMENTS
- large, heavy handles and inferior metal alloys
- cumbersome, awkward to use, ineffective
- no uniformity of manufacture or nomenclature

• Dr.G.V.Black- credited with the first acceptable nomenclature for and classification of hand instruments
• Dr.Arthur.D.Black- developed many of the instruments and techniques
• Dr.Charles E.Woodbury- first to modify blacks instrumentation.
• Designed 39 sets of hand instruments for class III cavity preparations and condensing points for gold foil restorations
• Dr.Wedelstaedt- developed Wedelstaedt chisel now referred to as curved chisel
• Dr.Waldon I Ferrier- developed a new set of instruments called ferrier set which were more refined and had uniform thickness on the cutting edge
• Dr.George Hollenback- invented pneumatic condenser.

Stainless steelChromium- 18%Carbon-1%Iron-81.4%Adv-Chromium in the alloyReduces corrosion tendency by depositing an oxide layer on the surface of the metal.Remains bright under most conditions.Disadv-Maintaining the sharpness of the blade is a problemLoses a keen edge during much useMainly used for working points and cement instruments.
Carbon steel-Carbon-1%Manganeese-0.2%Silicon-0.2%Iron- 98.4-98.6%Adv-Harder than stainless steelDisadv-When unprotected, it will corode
Stellite-cobalt 65- 90%Chromium- 35%Trace amounts-tungsten, molybdenum, ironAdv-High resistance to acidHardnessUse-Manufacture of mixing and inserting instruments
*Alloys of nickel, cobalt or chromium are also used


Heat treatment
HARDENING TREATMENT TEMPERING TREATMENT• The steel is heated to
1500-16000 F (8150c) and then quenched in oil to harden the working edge
• Not more than 1-2mm of the tip is heated for hardening purpose, otherwise the instrument will lose its balance after sharpening
• Hardens the alloy, but it also makes it brittle, especially when the carbon content is high.
• Cutting edges are
usually tempered to
produce additional
hardness and to remove
some of the brittle
properties.
• To accomplish this, the
tip is reheated at a lower
temperature
• Quenched in solutions of
oil, acid or mercury at
200-4500c for 10 min.
controlled heating and cooling of metals to alter their physical and mechanical properties without changing the product shape.

G.V.BLACK- first acceptable nomenclature for
and classification of hand instruments
CUTTING NON-CUTTING
a. Excavators- ordinary hatchet- hoes- angle formers- spoons
a. Chisels- straight- curved- bin angle- enamel hatchet- GMT
a. Other cutting insruments
- Knives, carvers- files, scalers
- Amalgam condensors
- Mirrors- Explorers- Probes
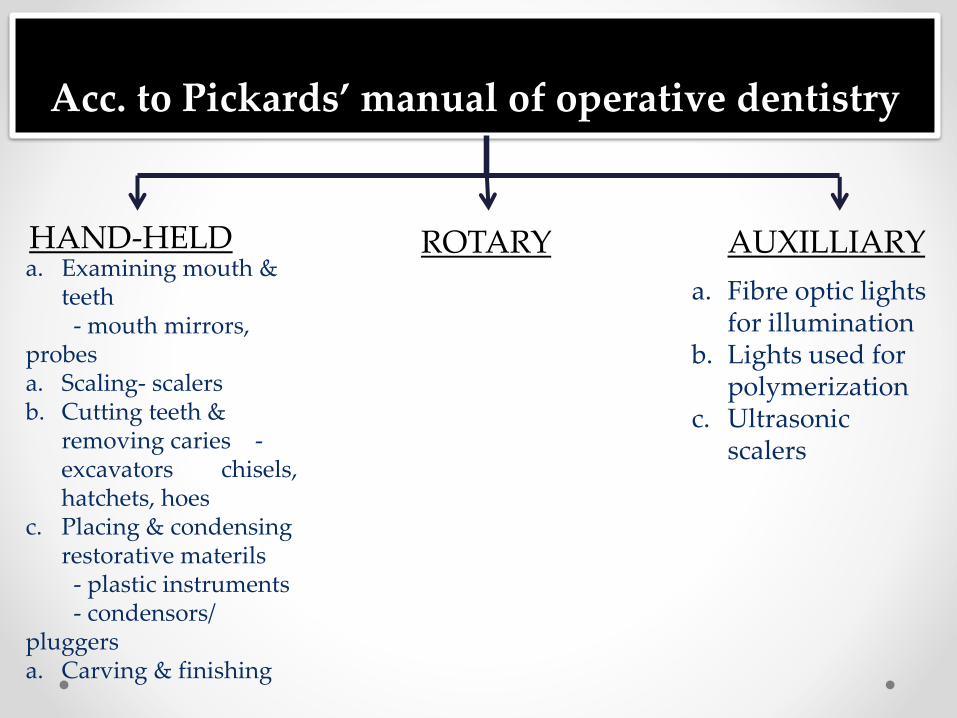
Acc. to Pickards’ manual of operative dentistry
HAND-HELD ROTARY AUXILLIARYa. Examining mouth &
teeth- mouth mirrors,
probesa. Scaling- scalersb. Cutting teeth &
removing caries -excavators chisels, hatchets, hoes
c. Placing & condensing restorative materils- plastic instruments- condensors/
pluggersa. Carving & finishing
a. Fibre optic lights for illumination
b. Lights used for polymerization
c. Ultrasonic scalers

Acc to Charbeneau- Principles & Practice of Operative
Dentistry
• Six categories- according to use-
1. Cutting instruments hand- hatchets, chisels, hoes,
excavators, others
rotary- burs, stones, disks, others
2. Condensing instruments pluggers- hand &
mechanical
3. Plastic instruments spatulas, carvers, burnishers,
packing instruments
4. Finishing & polishing instruments
hand- orange wood sticks, polishing points, finishing strips
rotary- finishing burs, mounted brushes, mounted stones, rubber cups, impregnated disks & wheels

5. Isolation instruments rubber dam frame, clamps,
forceps, punch
saliva ejectors, cotton roll holders, evacuating
tips & equipment
6. Miscellaneous mouth mirrors, explorers, probes,
scissors, pliers, others
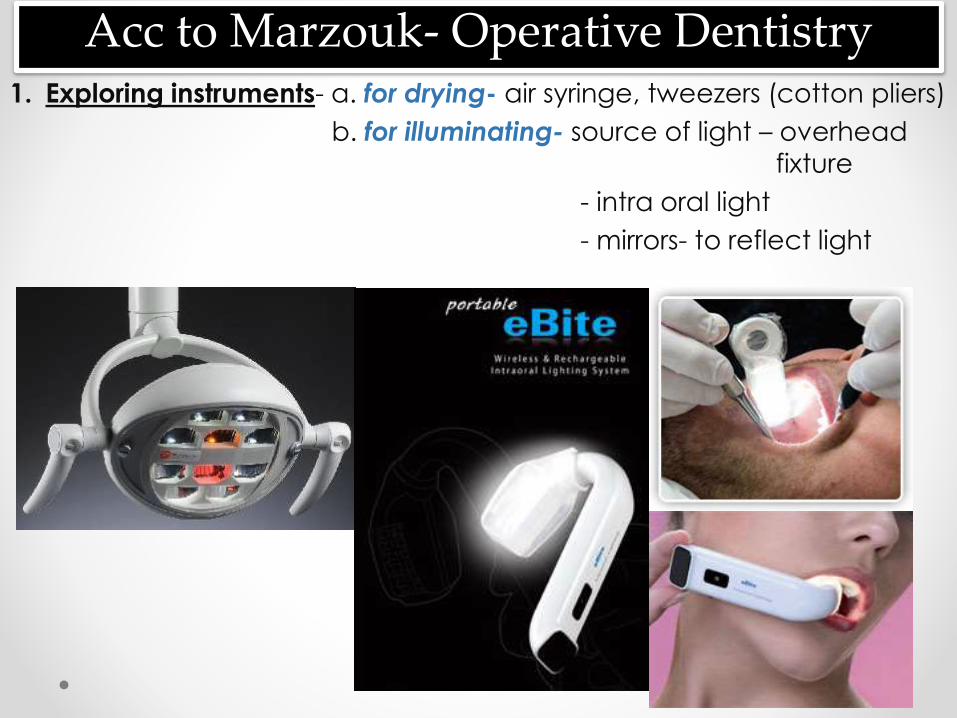
Acc to Marzouk- Operative Dentistry1. Exploring instruments- a. for drying- air syringe, tweezers (cotton pliers)
b. for illuminating- source of light – overhead
fixture
- intra oral light
- mirrors- to reflect light

c. For retracting soft tissues- hand mirrors, tongue
depressors, cheek retractors, plastic instruments
(restorative blunt headed instruments)
d. Probe the potential lesions- explorers- straight, right
angled, arch explorers, inter proximal
e. Seperators

2. To remove tooth structure-
(i) Hand cutting instruments-
a. excavators- hatchet, hoe, spoon, discoid,
cleoid
b. chisels- straight, mon angled, bin angled, triple
angled
c. special chisels- enamel hatchet, GMT, angle
former, Wedelstaedt, off-set, triangular, hoe chisel
(ii) Rotary cutting/ rotary abrasives-
a. speed- ultra low, low, medium, high, ultra high
b. pressure
c. heat
d. vibration
(iii) Ultrasonics
3. Ultrasonic instruments
4. Restorating instruments
- mixing, plastic, condensing, burnishing, carvers
- files, knives
- finishing & polishing- finishing burs, paper-
carried abrasives, brushes, rubber, cloth, felt
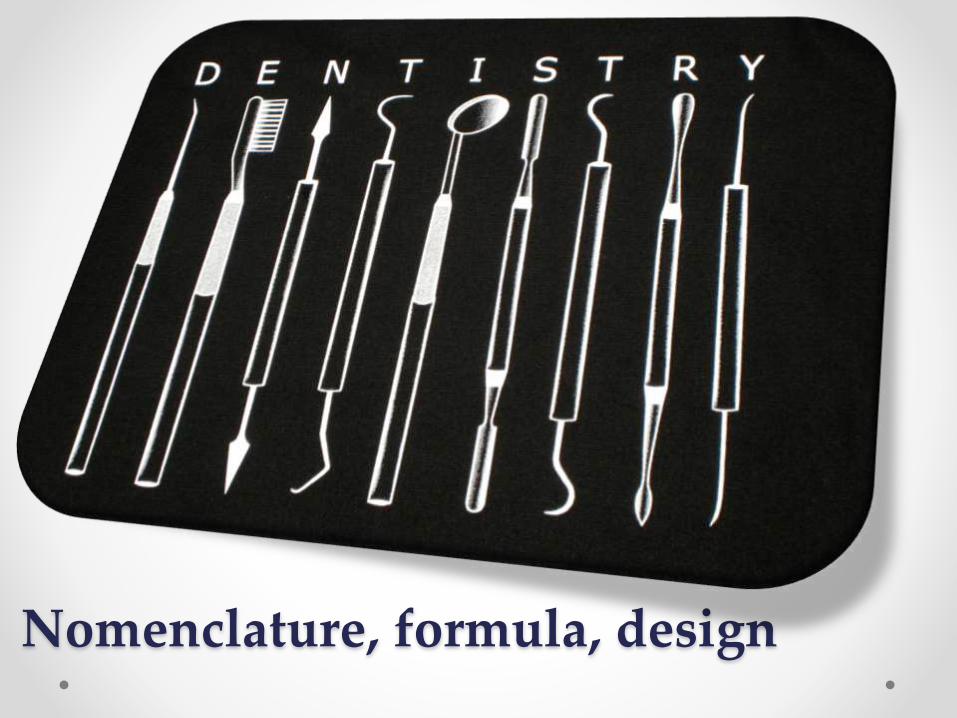
Nomenclature, formula, design
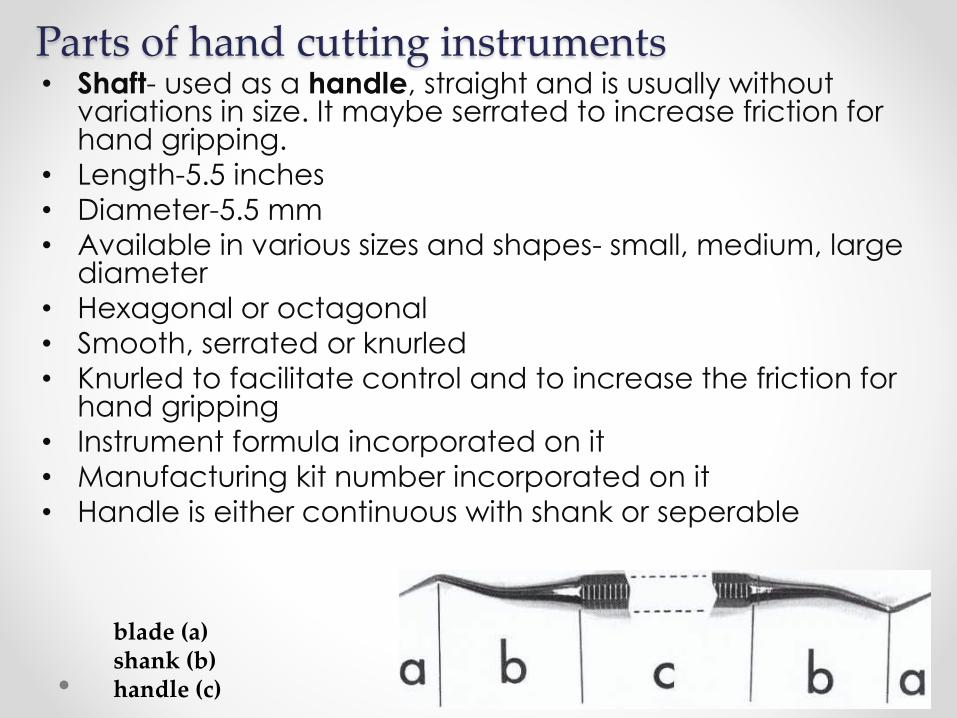
Parts of hand cutting instruments• Shaft- used as a handle, straight and is usually without
variations in size. It maybe serrated to increase friction for hand gripping.
• Length-5.5 inches
• Diameter-5.5 mm
• Available in various sizes and shapes- small, medium, large diameter
• Hexagonal or octagonal
• Smooth, serrated or knurled
• Knurled to facilitate control and to increase the friction for hand gripping
• Instrument formula incorporated on it
• Manufacturing kit number incorporated on it
• Handle is either continuous with shank or seperable
blade (a)shank (b)handle (c)

Shank- connects the shaft with the blade or working point or nib. It usually extends from its connection with the shaft to where the blade begins.It is here where any angulation of the instrument can be placed.Smooth, round, tapered and contrangledHave one or more bends to avoid the instrument from having tendency to twist in use where force is appliedG.V.Black classified instruments depending on the number of angles in the shank as-Mon angleBin angleTriple angleQuaternary angle

Blade- is the part of the instrument bearing the cutting edge. It begins at the angle if one angle is present at the shank, or at the last angle, if more than one angle is present in the shank or at the point which terminates in the shank.The blade ends in the cutting edge.

• Cutting edge- is the working part of the instrument. It is
usually in the form of a bevel in different shapes.
• Beveled-
- single beveled
- Bibeveled
- Triple beveled
- Circumferentially beveled
• Regular bevel-
- distal to shaft
• Reverse bevel-
- mesial to shaft eg:- binangle chisel

Blade angle- defined as the angle between the long axis of the blade and the long axis of the shaft.* Non cutting instruments- part corresponding to blade- is called NIB, end of the nib or working surface is called FACECutting edge angle- defined as an angle between the margins of the cutting edge and the long axis of the shaft.Some instruments have a blade on both ends of the handle and are known as double-ended instruments.

• Enamel and dentin are difficult substances to cut and require the generation of substantial forces at the tip of the instrument.
• Hand instruments must be balanced and sharp.
• Balance allows for the concentration of force onto the blade without causing rotation of the instrument in the grasp.
• Sharpness concentrates the force onto a small area of the edge, producing a high stress

• Balance is accomplished by designing the angles of the shank so that the cutting edge of the blade lies within the projected diameter of the handle and nearly coincides with the projected axis of the handle .
• For optimal antirotational design, the blade edge must not be off axis by more than 1 to 2 mm.
• All dental instruments and equipment need to satisfy this principle of balance.

Instrument nomenclature (G.V.Black)1. Order- denotes the purpose of the instrument.
Eg:- excavator, scaler
2. Sub order- denotes the position or manner of
use of the instrument
Eg:- push, pull
3. Class- form of the blade.
Eg:- hatchet, chisel
4. Angle/ Subclass- denotes the number of angles
in the shank/ shape of the shank
Eg:- 1- mon angle, 2- bin angle
NAMING GOES FROM 4-1
Eg:- ‘bin angle’ ‘hatchet’ ‘push’ ‘excavator’
(‘push’ can be omitted)

MEASURING GAUGES


Instrument formula
• To describe the parts of
an instrument accurately.
• 3 measurement, all
expressed in metric system
• Carved on one side
of the instruments shaft,
in the following sequence.
1. Width of the blade
in 1/10 of a mm.
2. Primary cutting edge angle-
Measured from line parallel to
Long axis of handle in clockwise
centigrade in percent of 3600
eg:- 85= 85% x 360= 3060
• If edge is perpendicular to blade,
this number is omitted

3. Blade length- in mm4. Blade angle- relative to long axis of handle in clockwise centigrade
* In some instances, an additional number on the handle- manufacturer’s identification number, to assist the manufacturer in cataloging and ordering
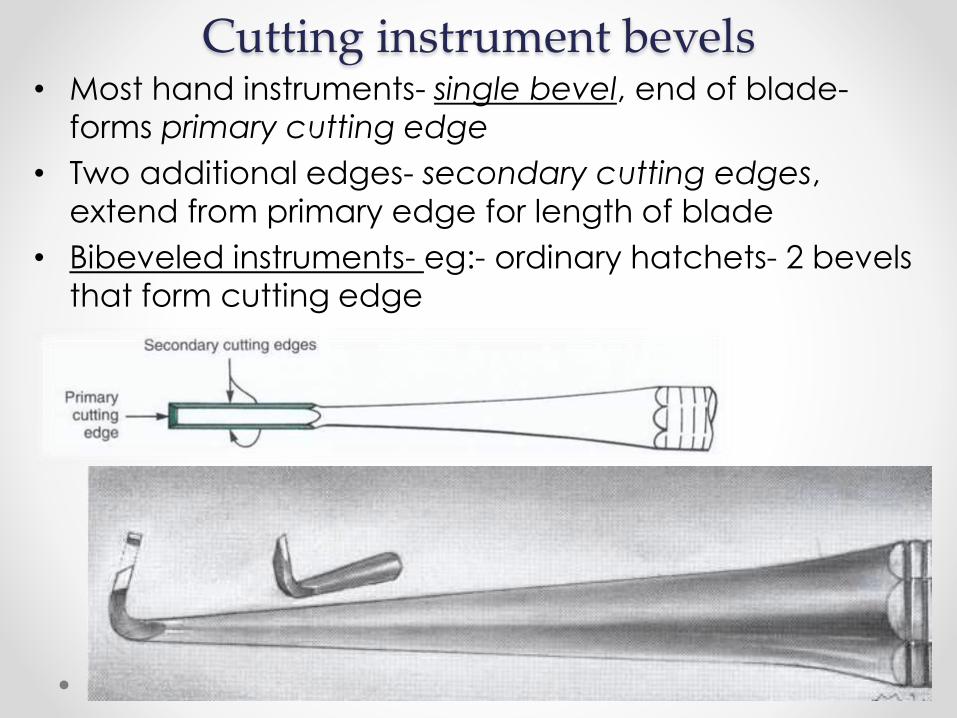
Cutting instrument bevels• Most hand instruments- single bevel, end of blade-
forms primary cutting edge
• Two additional edges- secondary cutting edges,
extend from primary edge for length of blade
• Bibeveled instruments- eg:- ordinary hatchets- 2 bevels
that form cutting edge

• Spoon excavators and gingival margin trimmers-
scraping or lateral cutting motion.
• Enamel hatchets- planing or direct cutting motion, as
well as a lateral cutting motion.
• For such single-beveled designs, the instruments must
be made in pairs, having the bevels on opposite sides
of the blade.

• Such instruments are designated as right or left
beveled and are indicated by appending the letter R
or L to the instrument formula.
• To determine whether the instrument has a right or left
bevel, the primary cutting edge is held down and
pointing away, and if the bevel appears on the right
side of the blade, it is the right instrument of the pair.
This instrument, when used in a scraping motion, is
moved from right to left. The opposite holds true for the
left instrument of the pair.

• Most instruments are available with blades and shanks
on both ends of the handle- double-ended.
• In many cases the right instrument of the pair is on one
end of the handle, and the left instrument is on the
other end.
• Sometimes similar blades of different widths are placed
on double-ended instruments.
• Single-ended instruments may be safer to use, but
double-ended instruments are more efficient because
they reduce instrument exchange.

• Instruments having the cutting edge perpendicular to
the axis of the handle such as bin-angle chisels, those
with a slight blade curvature (Wedelstaedt chisels), and
hoes are single-beveled and not designated as rights or
lefts, but as having a mesial bevel or a distal bevel.

If when one observes the inside of the blade curvature (or the inside of the angle at the junction of the blade and shank) the primary bevel is not visible, the instrument has a distal bevel. Conversely, if the primary bevel can be seen (from the same viewpoint) the instrument has a mesial or reverse bevel.

Instrument design• Hand instruments- made of either stainless steel,
carbon steel or blades of tungsten carbide soldered to
a steel handle.
• Carbon steel (better cutting edge)> stainless steel, however, carbide blades most efficient in cutting,
even though they are brittle.
* Main principle- of cutting with hand instruments- to
concentrate force on a very thin cross section of the
instrument at the cutting edge.
• Thinner the cross section more the pressure that is
concentrated more efficient the instrument will be.
10 lbs 10 lbs
70o
200 lbs 20o 20 lbs

Direct cutting & lateral cutting instruments• A direct cutting instrument is one in which the force is applied in
the same plane as that of the blade & handle single planed
instrument
• Lateral cutting instruments are those in which the force is applied at a right angle to the plane of the blade and handle usually
have curved blade double planed instrument
Single planed Double planed
May have two or more curves or angles in their shanks, al in the same plane as the handle
Have angle or curve in a plane at right angle to that of handle
Used in direct & lateral cutting Used only in lateral cutting

Contra angling• In order to gain access, many instruments have shank, bent
at one or more points to angle the blade relative to the handle.
• Depends on - length of blade
- degree of angulation in shank
• The working point is moved out of line with the angle of handle.
• If this occurs more than 3 mm, from the handle axis, the instrument will be out of balance in lateral cutting motion and force will be required to keep the instrument from rotating in one hand.
• To solve this problem, modern instruments are designed to have one or more angles in the shank placing the working point within 3mm from the axis of the handle CONTRANGLING

• Short blade and small blade angle requires only binangle-
contrangling, while longer blades and greater blade angles
require triple contrangling.
• Length of the blade required is determined by depth of the
cavity and the blade angle is determined by the
accessibility requirements.
• Hence, greater angles are required for more posterior teeth
and incisal portions of proximal cavities in anterior teeth.
• So, in addition to balance, contrangling will provide better
access and a clearer view for the field of operation.

RIGHT AND LEFT INSTRUMENTS
• Direct cutting instruments are made either right or left by placing a bend on one side of the blade.
R L
• If the instrument is held with the cutting edge down and pointing away from the operator, and the bevel is on the right side right instrument, if bevel on the leftleft instrument
• For lateral cutting move instrument from bevelledside to non-bevelled side of blade in lateral scrapping action
• Lateral cutting instruments are made left and right by having curve or angle, which is at a right angle to the principal plane (shaft plane), either on right or left.

Single bevelled instruments
• Single planed intruments with cutting edge at right
angle to the long axis of the shaft.
• If bevelled on side away from the shaft distally
bevelled.
• If bevelled on side of the blade towards the shaft
mesially bevelled
• If these instruments have no angle in shank, or an angle of 12o or less used in ‘push & scrapping
motion’
• If angle in shank>12o, used in ‘pull’ (distally bevelled) &
‘push’ (mesially bevelled) motion.

Bi-bevelled instruments• Hatchets and straight chisels
• Cut by pushing them in the direction of long axis of
blade
Triple bevelled instruments• Bevelling in the blade laterally together with the end=
form three cutting edge.

Circumferentially bevelled• Usually occurs in double planed instruments where
blade bevelled at all peripheries

Single ended/ double ended
• Double ended- incorporates right and left or the mesial and distal form on the same handle.
• Single planed instruments with no angle in shank- 5 cutting movements- vertical
- right
- left
- push
- pull
Right-left single planed instrument with one or more angles in shank- 5 cutting movements - vertical
- push
- pull
- right
- left

Instrument applications
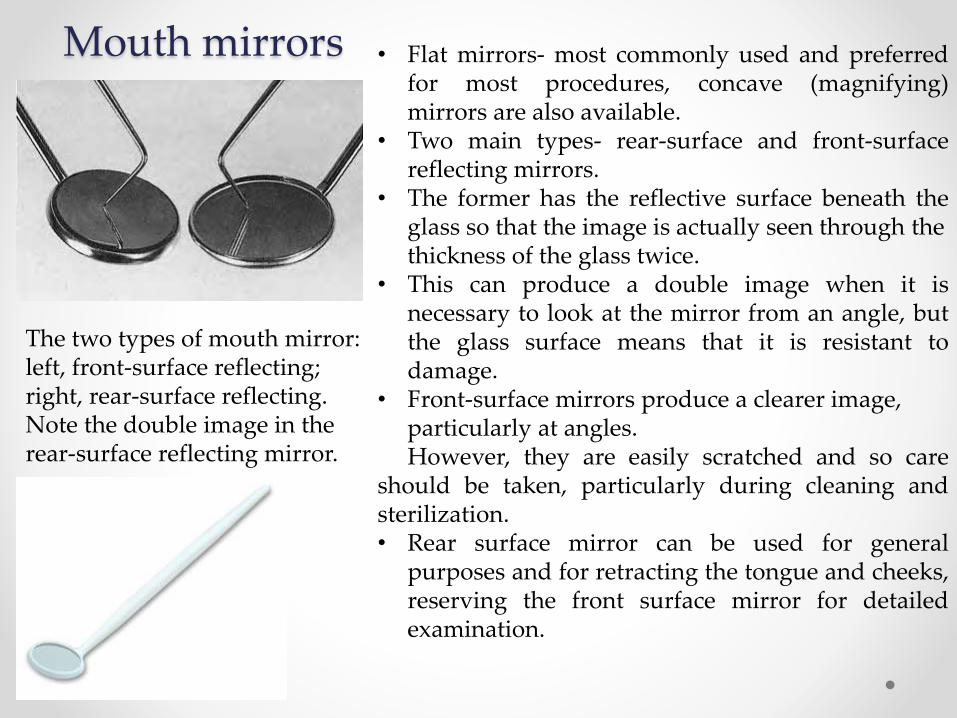
Mouth mirrors
The two types of mouth mirror: left, front-surface reflecting;right, rear-surface reflecting. Note the double image in the rear-surface reflecting mirror.
• Flat mirrors- most commonly used and preferredfor most procedures, concave (magnifying)mirrors are also available.
• Two main types- rear-surface and front-surfacereflecting mirrors.
• The former has the reflective surface beneath theglass so that the image is actually seen through thethickness of the glass twice.
• This can produce a double image when it isnecessary to look at the mirror from an angle, butthe glass surface means that it is resistant todamage.
• Front-surface mirrors produce a clearer image,particularly at angles.However, they are easily scratched and so care
should be taken, particularly during cleaning andsterilization.• Rear surface mirror can be used for general
purposes and for retracting the tongue and cheeks,reserving the front surface mirror for detailedexamination.

Forceps and tweezers
• Tweezers/ cotton forceps
• Hemostats
• Articulating paper forceps
Tweezers-
• Hand instruments with two narrow and pointed,
straight or curved beaks to grasp small objects.
• 2 long arms
• Locking device
• 2 long arms joined at one end
• Other end remains apart
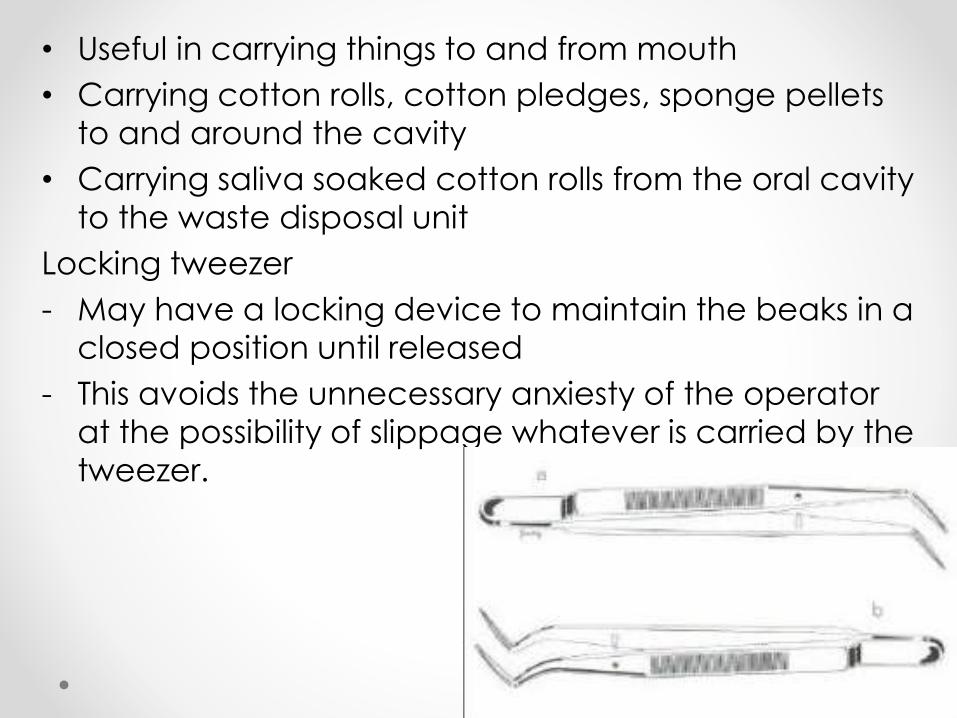
• Useful in carrying things to and from mouth
• Carrying cotton rolls, cotton pledges, sponge pellets
to and around the cavity
• Carrying saliva soaked cotton rolls from the oral cavity
to the waste disposal unit
Locking tweezer
- May have a locking device to maintain the beaks in a
closed position until released
- This avoids the unnecessary anxiesty of the operator
at the possibility of slippage whatever is carried by the
tweezer.


A set of four titanium nitride instruments used for placing and shaping composite.The surface of the instrument is very hard and isnot scratched by the composite filler particles. It also resists the composite sticking to it. From the left: flat-plastic, carving instrument, burnisher, plugger.
Stainless steel ‘plastic’ instruments. From the left: amalgam condenser, burnisher, carving instrument (a half Hollenback), flat-plastic.
Instruments used for placing and condensing restorative materials

Cutting instrument application
• Used to cut hard or soft tissues of the mouth
EXCAVATORS-
1. Ordinary hatchet excavator- cutting edge of blade
directed in the same plane as that of the long axis of the
handle and is bibevelled. Used primarily on anterior teeth
for preparing retentive areas and sharpening internal line
angles, particularly in preparations for direct gold
restorations.

2. Hoe excavator- primary cutting edge of the blade
perpendicular to the axis of the handle. Used for planing
tooth preparation walls and forming line angles.
Commonly used in class III and V preparations for direct
gold restorations.

3. Angle former- used for sharpening line angles and creating
retentive features in dentin in preparation for gold restorations.
Used in placing bevel on enamel margins. Mon-angled and
has primary cutting edge at an angle to the blade.
4. Spoon excavators- used for removing caries and carving
amalgam or direct wax patterns. Blades are slightly curved and
cutting edges are either circular (discoid) or claw like (cleoid).
Shanks are bin-angled or triple-angled to facilitate accessibility.

CHISELS-
Intended primarily for cutting enamel.
1. Straight chisel-
• Straight shank and blade with bevel on only one side.
• Primary edge perpendicular to the axis of the handle.
• Shank and blade of chisel maybe slightly curved
(Wedelstaedt design) or bin-angled.
• Primary cutting edges in a plane perpendicular to the
axis of the handle and may have either a distal bevel or
mesial bevel (reverse).

2. Enamel hatchet-
• Blade larger, heavier and beveled on only one side,
rather than the ordinary hatchet
• Cutting edge in a plane parallel with the axis of the
handle
• Used for cutting enamel and comes as right or left types
for use on opposite sides of the preparation

3. Gingival marginal trimmer-
• To produce proper bevel on gingival enamel margins
of proximo occlusal preparations.
• Blade curved and primary cutting edge is at an angle
• Right and left types- can be mesial or distal pairs
• Second number in the formula-
• 90-100- pair used on the distal gingival margin
• 85-75- pair used to bevel the mesial margin
• 100 & 75 pairs- for inlay/ onlay preparations with steep
gingival bevels
• 90 & 85 pairs- for amalgam preparations with gingival
enamel bevels that decline gingivally only slightly
• Used for rounding or bevelling of the axiopulpal line
angle of two surface preparations
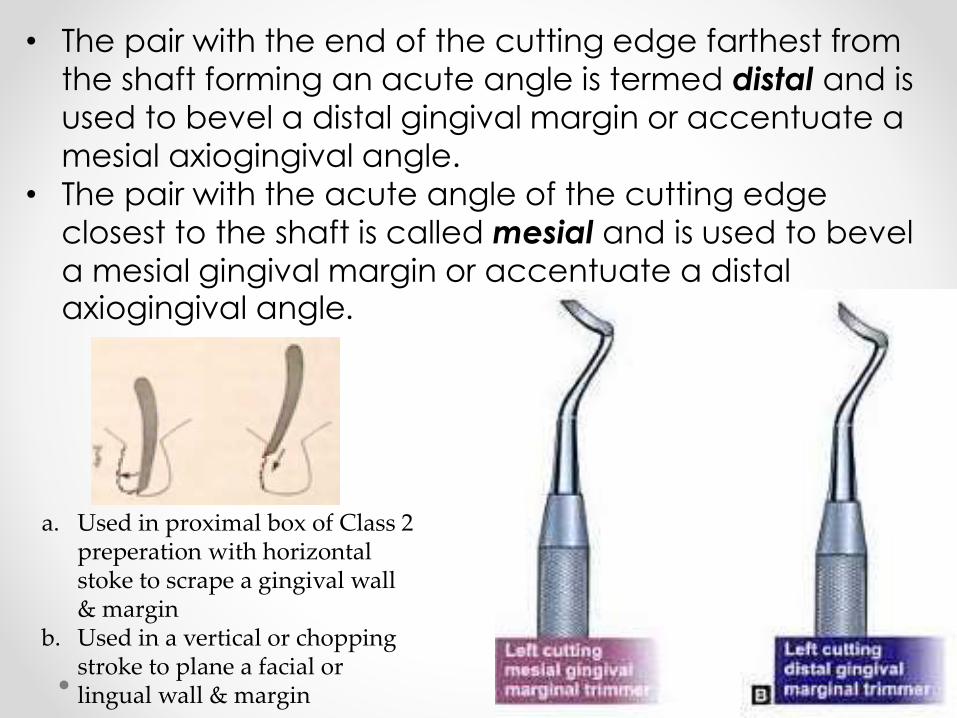
• The pair with the end of the cutting edge farthest from
the shaft forming an acute angle is termed distal and is
used to bevel a distal gingival margin or accentuate a
mesial axiogingival angle.
• The pair with the acute angle of the cutting edge
closest to the shaft is called mesial and is used to bevel
a mesial gingival margin or accentuate a distal axiogingival angle.
a. Used in proximal box of Class 2 preperation with horizontal stoke to scrape a gingival wall & margin
b. Used in a vertical or chopping stroke to plane a facial or lingual wall & margin

Other cutting instruments
KNIVES-
• finishing knives, amalgam knives or gold knives
designed with thin knife-like blade
• For trimming excess restorative material on the gingival,
facial or lingual margins of a proximal restoration
• For trimming and contouring the
surface of a class V restoration
• Sharp secondary edges on the
heel aspect of the blade are
very useful in scrape-pull mode

FILES
• To trim excess restorative material
• Particularly useful at gingival margins
• Blades are very thin & short teeth on cutting surfaces
• Either push or pull instrument
DISCOID-CLEOID
• Used principally for carving occlusal
anatomy in unset amalgam restorations
• To trim/ burnish inlay-onlay margins

Hand instrument techniquesModified pen grasp-
• Permits the greatest delicacy of touch
• Similar to holding a pen, not identical
• Pads of thumb, index and middle finger contact
instrument, while tip of the ring finger and/or little finger
is placed on a nearby tooth of the same arch as REST
• Palm of the hand,
facing away from
operator
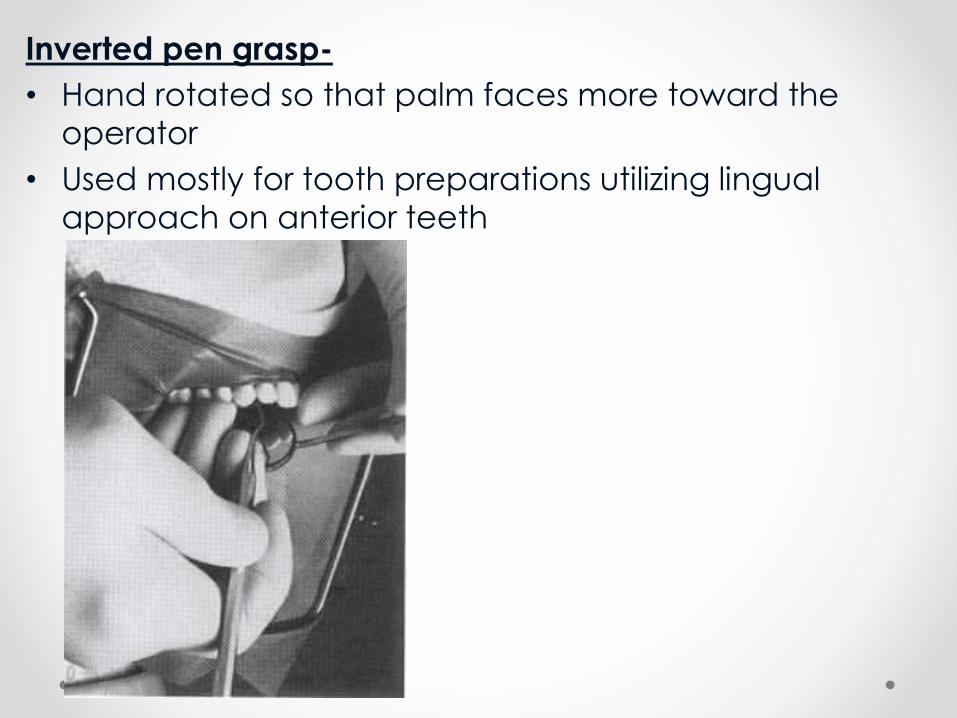
Inverted pen grasp-
• Hand rotated so that palm faces more toward the
operator
• Used mostly for tooth preparations utilizing lingual
approach on anterior teeth

Palm and thumb grasp-
• Handle placed in the palm of the hand and grasped by
all the fingers, while thumb is free of the instrument and
rest provided by tip of thumb on nearby tooth of same
arch or on a firm, stable structure

Modified palm and thumb grasp-
• Used when its feasible to rest the thumb on the tooth
being prepared or the
adjacent tooth
• Used universally
• Used in areas of maxillary
arch and best adopted
when dentist is
operating from rear
chair positions

RESTS –
• In modified pen grasp and inverted pen grasp, rests are
established by placing ring or ring and little fingers on
tooth of the same arch and as close to operating site
as possible
• Closer the rest- more reliable
No rest One finger rest Two finger rest
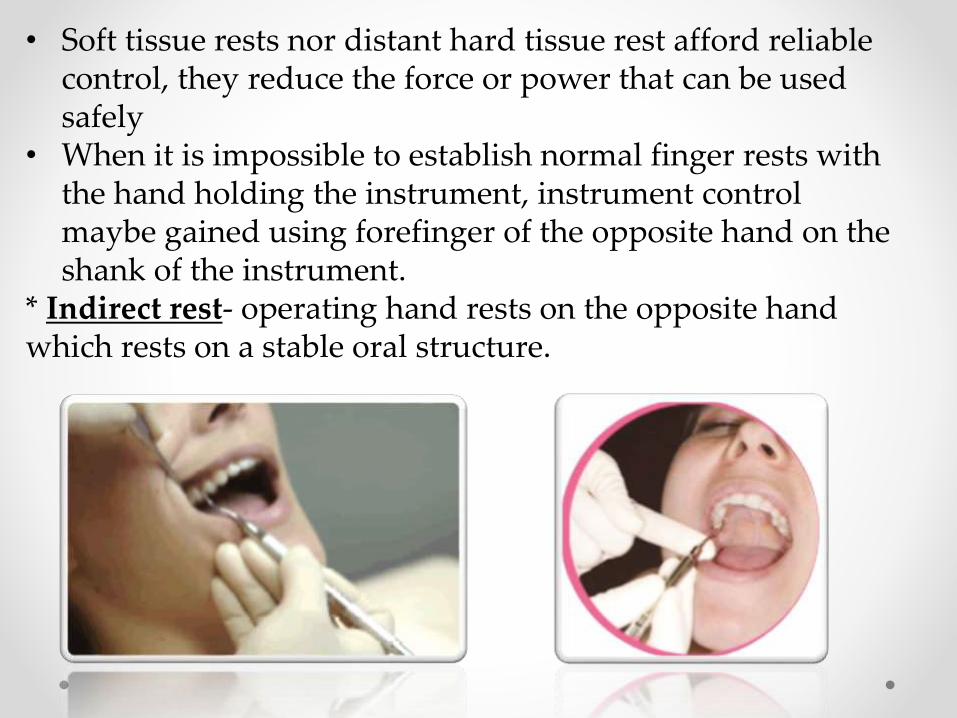
• Soft tissue rests nor distant hard tissue rest afford reliable control, they reduce the force or power that can be used safely
• When it is impossible to establish normal finger rests with the hand holding the instrument, instrument control maybe gained using forefinger of the opposite hand on the shank of the instrument.
* Indirect rest- operating hand rests on the opposite hand which rests on a stable oral structure.

Finger rest classified• Intra oral finger rest• Extra oral fulcrumIntra oral finger rest-1. Conventional- finger rest is established on the tooth surface
immediately adjacent to the working area2. Cross-arch- finger rest is established on the tooth surfaces on
the other side of the same arch3. Opposite-arch- finger rest is established on tooth srfaces on
the opposite arch (Eg:- mandibular arch finger rest for instrumentation on maxillary arch)
4. Finger-on- finger- finger rest is established on the index finger or thumb of the non operating hand.
Extra oral fulcrumsTwo most commonly used-1. Palm up-
established by resting the backs of the middle and ring fingers on the skin overlying the lateral aspect of the mandible on the right side of the face2. Palm down-
established by resting the front surfaces of the middle and ring fingers on the skin overlying lateral aspect of the mandible on the left side of the face

GUARDS-
• Hand instruments or other items, such as interproximal
wedges, used to protect soft tissue from contact with
sharp cutting or abrasive instruments.

a) The dental nurse is picking up a mirror and probe. Note that she grasps the non-working ends.(b) The mirror and probe are placed firmly into the dentist’s hands. They are immediately ready for use.
Instrument transfer

(c) To exchange an instrument the dental nurse brings in the new instrument (a Briault probe in this picture) parallel with the instrument that thedentist is using.(d) Exchange is completed by the dental nurse taking away the old instrument with the little finger of her left hand while placing the new instrument intothe dentist’s hand.

Close-support dentistry/ 4-handed dentistry
• When aspirating, the dental nurse should place the aspirator in the mouth before the dentist positions the mirror and handpiece.
• She first retracts the lip with her finger or the tip of the three-in-one syringe and then places the aspirator tip in position.
• The dentist may then position the mirror and handpiece. • If this order is reversed the dentist’s view is likely to be obstructed by
the aspirator tip.• The tip of the aspirator should never contact the patient’s soft palate
as this might cause retching.
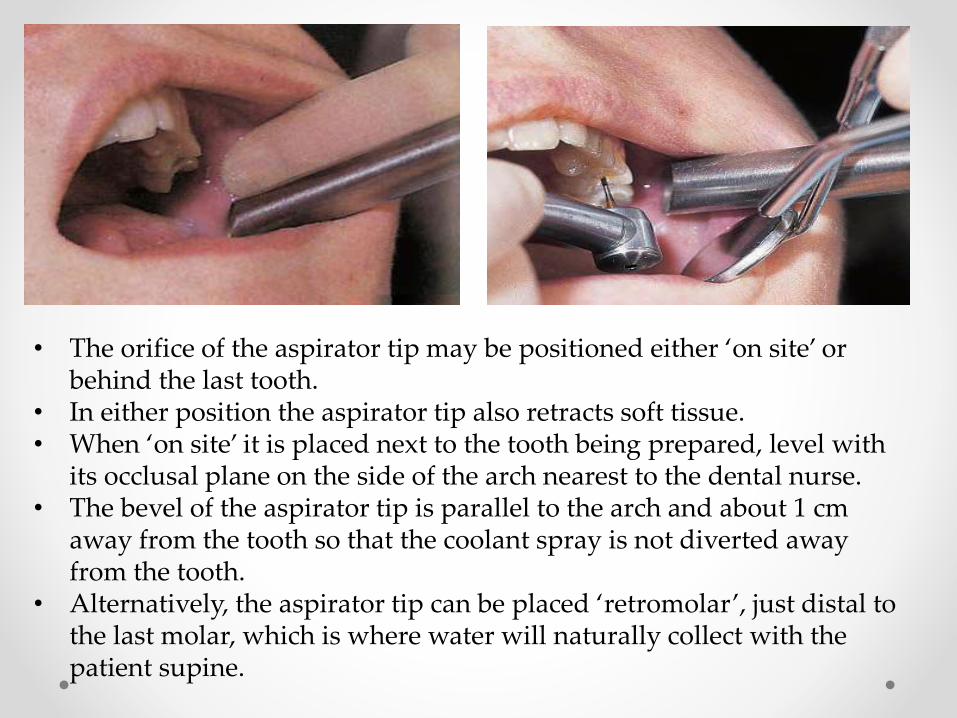
• The orifice of the aspirator tip may be positioned either ‘on site’ or behind the last tooth.
• In either position the aspirator tip also retracts soft tissue.• When ‘on site’ it is placed next to the tooth being prepared, level with
its occlusal plane on the side of the arch nearest to the dental nurse. • The bevel of the aspirator tip is parallel to the arch and about 1 cm
away from the tooth so that the coolant spray is not diverted away from the tooth.
• Alternatively, the aspirator tip can be placed ‘retromolar’, just distal to the last molar, which is where water will naturally collect with the patient supine.

• The dental nurse also assists with soft tissue retraction in other ways, mainly with tissues on her side of the arch.
• Thus, when working on the left side of the mouth, the cheek and lips on the patient’s left side are the responsibility of the dental nurse, whilst tongue retraction is the responsibility of the dentist.
• Conversely, when working on the right-hand side, tongue retraction is the responsibility of the dental nurse while the dentist retracts lips and cheeks.
• When cutting with the air turbine, the mirror surface quickly becomes obscured by spray.
• The dental nurse should keep the mirror clear by washing it with spray and blowing air over it.
• Each time the cutting stops, the dental nurse should wash and dry the cavity and the mirror so that the dentist can see clearly.

Moisture control
Two endpieces for a saliva ejector. The design on the right is made of disposable plastic. The metal saliva ejector on the left has a flange to retract and protect the tongue and the floor of the mouth.
Cotton rolls
Rubber dam
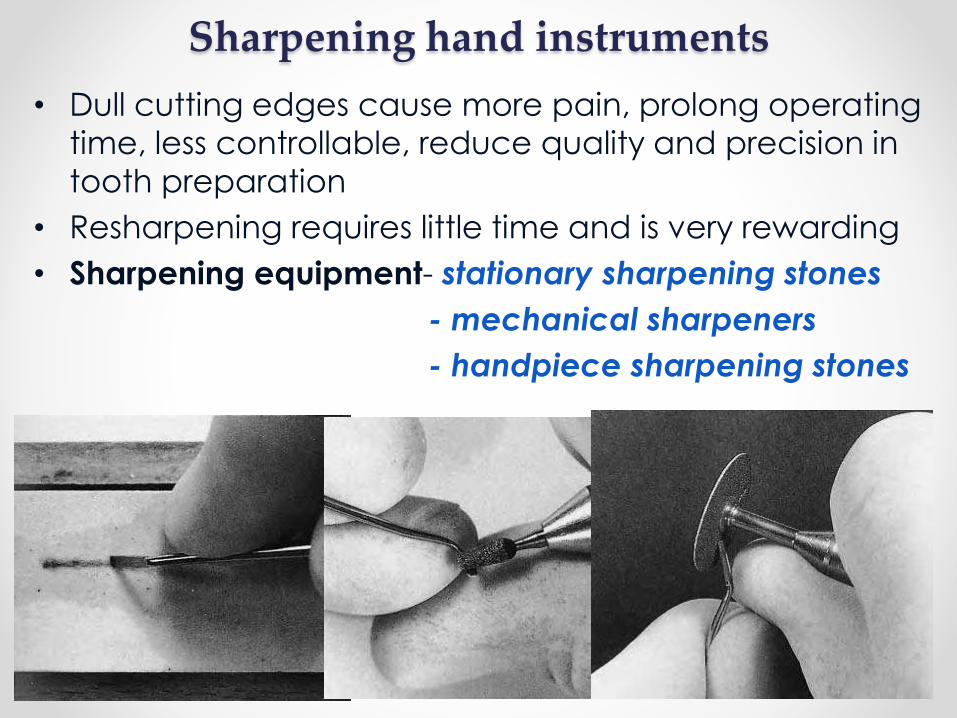
Sharpening hand instruments
• Dull cutting edges cause more pain, prolong operating
time, less controllable, reduce quality and precision in
tooth preparation
• Resharpening requires little time and is very rewarding
• Sharpening equipment- stationary sharpening stones
- mechanical sharpeners
- handpiece sharpening stones
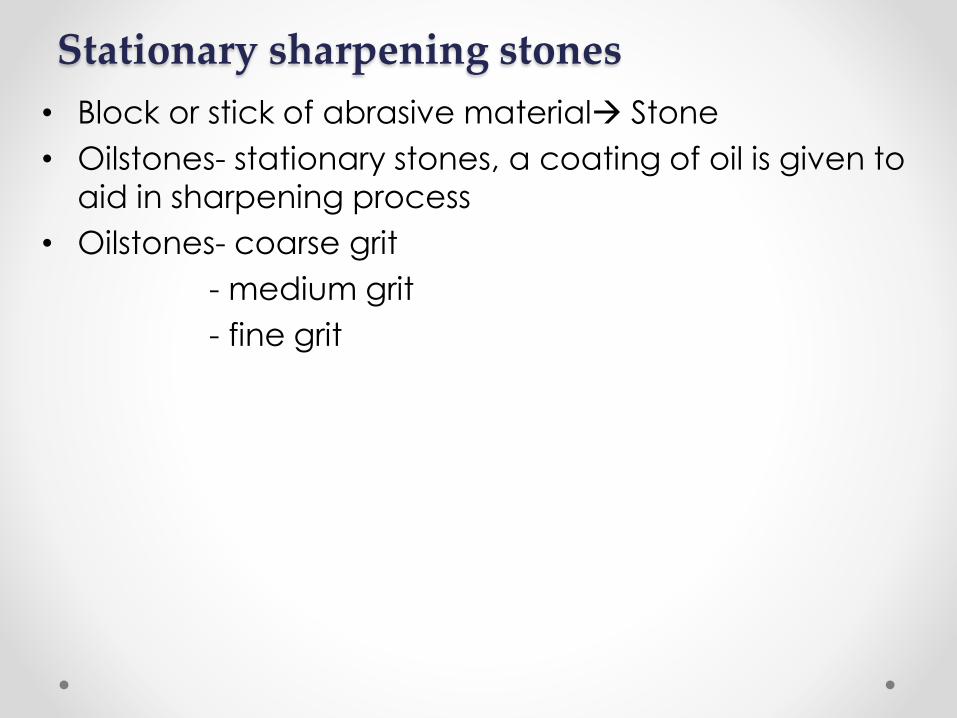
Stationary sharpening stones
• Block or stick of abrasive material Stone
• Oilstones- stationary stones, a coating of oil is given to
aid in sharpening process
• Oilstones- coarse grit
- medium grit
- fine grit

Coarse and medium grit stones-
• Initial reshaping of a badly damaged instrument or for
sharpening other dental equipment such as bench
knives.
• Coarser used as little as needed for reshaping and
then final sharpening done with a fine stone.
Fine grit stones-
• Sharpening dental instruments to be used for tooth
preparation

Stationary stones –
- flat- sharpening instruments with straight cutting edges
- grooved
- cylindric- concave edges
- tapered- permit using a portion of stone with curvature
matching that of instrument
Sharpening stones- made of – natural or synthetic

Four types of materials most commonly used-
1. Arkansas stone-
- naturally occurring containing microcrystalline quartz.
- Semitranslucent, white or gray color
- Hard enough to sharpen steel, but not carbide
instruments
- Available in hard and soft varieties
- Should be lubricated with light machine oil before use
- Should be covered in thin film of oil when stored

2. Silicon carbide (SiC)-
- Industrial abrasive
- Grinding wheels, sand papers
- Hard enough to cut steel, but
not hard enough to sharpen
carbide instruments
- Available- coarse and medium
- Moderately porous, require
lubrication with a light oil to
prevent clogging
3. Aluminium oxide-
- Being increasingly used
- Coarse & medium- speckled tan
/bromide color
- Fine- white, less porous,
less lubrication

Diamond-
- Hardest abrasive
- Most effective
- Capable of sharpening
carbide and steel instruments
Diamond hones-
- Small blocks of metal with
fine diamond particles
impregnated in surface,
held in place by
electroplated layer of
corrosion- resistant metal
- Non porous, but lubrication extends life
- Cleaved with mild detergent & medium bristle brush

Mechanical sharpeners-• Hand sharpening decreased due to more use of high
speed rotary cutting instruments
• Rx honing machine- example of mechanical
sharpener
• Move a hone in a reciprocating manner at a slow
speed, while instrument is held at the appropriate
angulation and supported by a rest.

Principles of sharpening• Sharpen instruments only after they have been cleaned and
sterilized
• Establish proper bevel (450) and the desired angle of cutting
edge to the blade before placing the instrument against the
stone, and maintain these angles while sharpening.
• Use a light stroke or pressure against the stone to minimize
frictional heat
• Use rest or guide whenever possible
• Remove as little metal from blade as possible
• Lightly hone the unbeveled side of the blade after
sharpening, to remove the fine bur that may be created.
• After sharpening, resterilize the instruments along with other
items on the instrument tray setup
• Keep sharpening stones clean and free of metal cuttings

MECHANICAL TECHNIQUES
• Blade is placed against the steady rest and proper
angle of the cutting edge of the blade is established
before starting the motor
• Light pressure of instrument against reciprocating hone
is maintained with a firm grasp on instrument
• A trace of metal debris on the face of a flat hone along
the length of the cutting edge is an indication that the
entire cutting edge is contacting the hone.
• Quick method
• Handpiece stones used for instruments with curved
blades.

STATIONARY STONE TECHNIQUE
• Stationary sharpening stone- atleast 2 inches wide X 5
inches long
• Should be medium grit
• Thin film of oil lubricant placed on working surface
• 45 degree angle of bevel and cutting edge should be
used to the stone

Fundamental rules in using stationary stones
• Lay stone on flat surface and do not tilt the stone while
sharpening
• Grasp the instrument firmly, usually with a modified pen
grasp, so it will not rotate or change angles while being
sharpened
• To ensure stability during sharpening strokes, use the ring
and little fingers as a rest and guide along a flat surface
or along the stone. This prevents rolling or dipping of the
instrument, which results in a distorted and uneven
bevel.
• Use a light stroke to prevent the creation of heat and
the scratching of the stone.
• Use different areas of the stones surface while
sharpening because this helps prevent the formation of
grooves on the stone that impair efficiency and
accuracy of the sharpening procedure

Sharpness test• Tested by lightly resting the cutting edge on a hard
plastic surface.
• If cutting edge digs in during an attempt to slide the
instrument forward over the surface, the instrument is
sharp.
• If it slides the instrument is dull.
• Only very light pressure is exerted in testing for
sharpness
• It cannot be overemphasized that sharp instruments
are necessary for optimal operating procedures.

Sterilization & disinfection• Sterilization: destruction of both the vegetative form
and bacterial spores
• Disinfection: destruction of only vegetative form
• Procedures involved in instrument processing:
1. Presoaking
2. Cleaning
3. Corrosion control and lubrication
4. Packaging
5. Sterilization
6. Sterilization monitoring
7. Drying or cooling
8. Storage
9. Distribution
10.Sharpening

1. Presoaking: - prevent drying
- begin to dissolve or soften organic debris
- begin microbial kill in some instances
Presoak solution contains:
- detergents
- enzymes or detergent containing disinfectant such as
phenolic compounds or quarternary ammonium
compounds

2. Cleaning:
Manual: hand scrubbing with soft brush under water to
prevent aerosolizing and splashing.
Utrasonic: safest and most efficient way to clean

3. Corrosion control and lubrication:
- a rust inhibitor should be applied on non stainless steel
instruments
- lubrication of instruments with moving parts should be
done prior to steam sterilization
- water based lubricants that contain preservative are
ideal
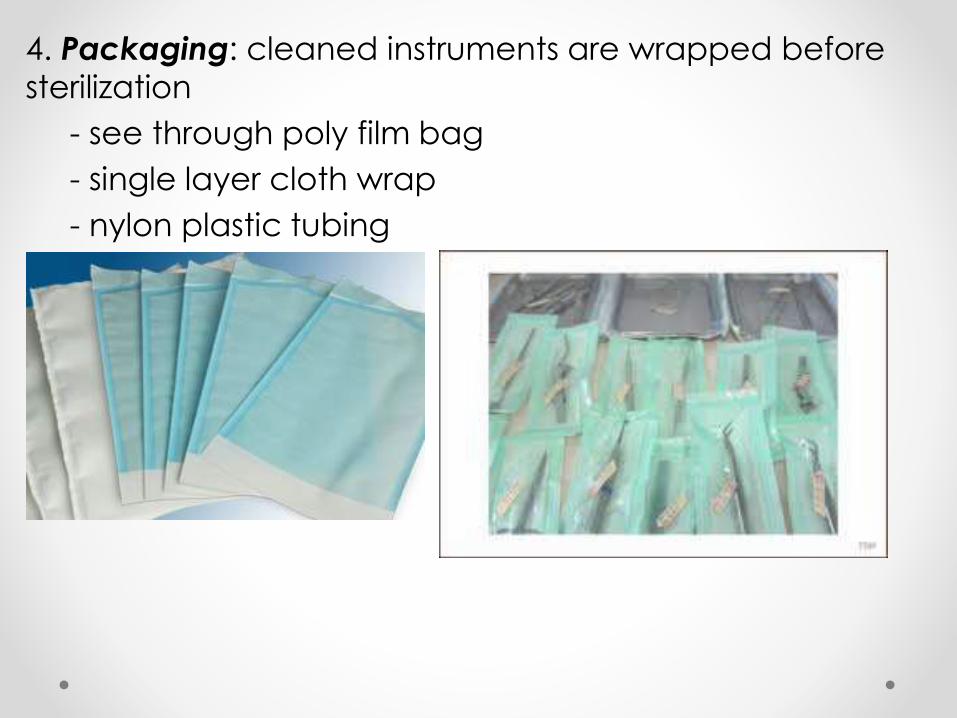
4. Packaging: cleaned instruments are wrapped before
sterilization
- see through poly film bag
- single layer cloth wrap
- nylon plastic tubing
5. Sterilization
4 accepted methods
- steam pressure sterilization (autoclave)
- chemical vapor pressure sterilization (chemiclave)
- dry heat sterilization (dryclave)
- ethylene oxide sterilization
new methods-
- microwave oven
- ultraviolet light

Steam pressure sterilization (autoclave)
• Time required-
o 15 min time at 2500F(1210C) and 15 lbs of pressure (light load of instruments)
o Wrapped instruments- 7 min, 2730F (1340C) at 30 pounds of pressure
o Performed in a steam autoclave
• Advantages
- most rapid and effective method for sterilizing cloth surgical packs and towel packs
• Disadvantages
- items sensitive to elevated temperature cannot be autoclaved
- tends to rust carbon steel instruments and burs
- burs can be protected by submerging in anticorrosive agent- 2% sodium nitrite

Chemical vapor sterilization (chemiclave)
- performed in a chemiclave
- operate at 2700F(1310C) at 20 lbs for half an hour
Advantages:
- Carbon steel and burs are said to be sterilized without
rust
Disadvantages:
• Items sensitive to elevated temperature will be
damaged.
• Towels and heavy cloth wrapping may not be
penetrated to provide adequate sterilization.
• Only dry instruments should be loaded.

Dry heat sterilization
o Conventional dry heat oven:-
• Heated at 3200F (1600C) for 30 min. instruments should
be packaged in foil wrap or nylon bags
• Wrapped instruments- 3350- 3450F for 60-90 mins.
o Short cycle high temperature dry heat oven:-
Sterilization time reduced
• 6 mins for unwrapped
• 12 mins for wrapped
• Temperature- 370-3750 F

Advantages-
• Carbon steel instruments and burs do not rust, corrode
or lose their temper or cutting edge if they are dried
before processing
Disadvantages-
• Damage heat sensitive items such as rubber or plastic
goods.
• Inaccurate calibration, lack of attention to proper
setting and adding instrument without restarting the
timing are common source of error.

Ethylene oxide sterilization:
• Best method of sterilizing complex instrument and
delicate materials
• Expensive
Disinfection:
Boiling water-10 min
Use of chemicals- 6-10 hrs
• Glutaraldehyde- 2-3 %
• Sodium hypochlorite- 1-5 %
6. Sterilization monitoring:
Sterilization indicator on instrument bag
Daily color change process indicator strip
Weekly biologic spore test
Documentation note book
7. Storage:
In a sterile, wrapped tray set up or in an individual sterile
wrapping.

WHATS NEW?

Hand instruments for composites
P1 resin plugger- Ivoclar vivadent
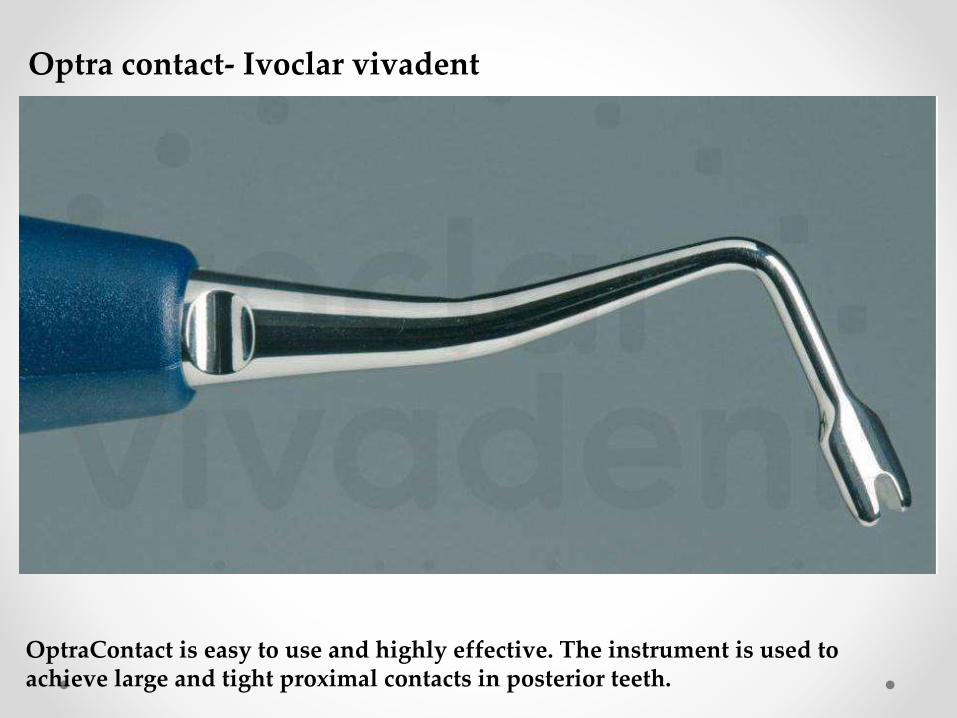
OptraContact is easy to use and highly effective. The instrument is used to achieve large and tight proximal contacts in posterior teeth.
Optra contact- Ivoclar vivadent

OptraContact features a patented forked working end with which a composite bridge is formed while the first layer is cured. The bridge, which is created in the contact region, stabilizes the matrix. Furthermore, OptraContact allows contacts to be selectively created in the anatomically-correct upper third of the proximal surface. OptraContact is available in two sizes: one for molars and one for premolars or for large and small cavities.
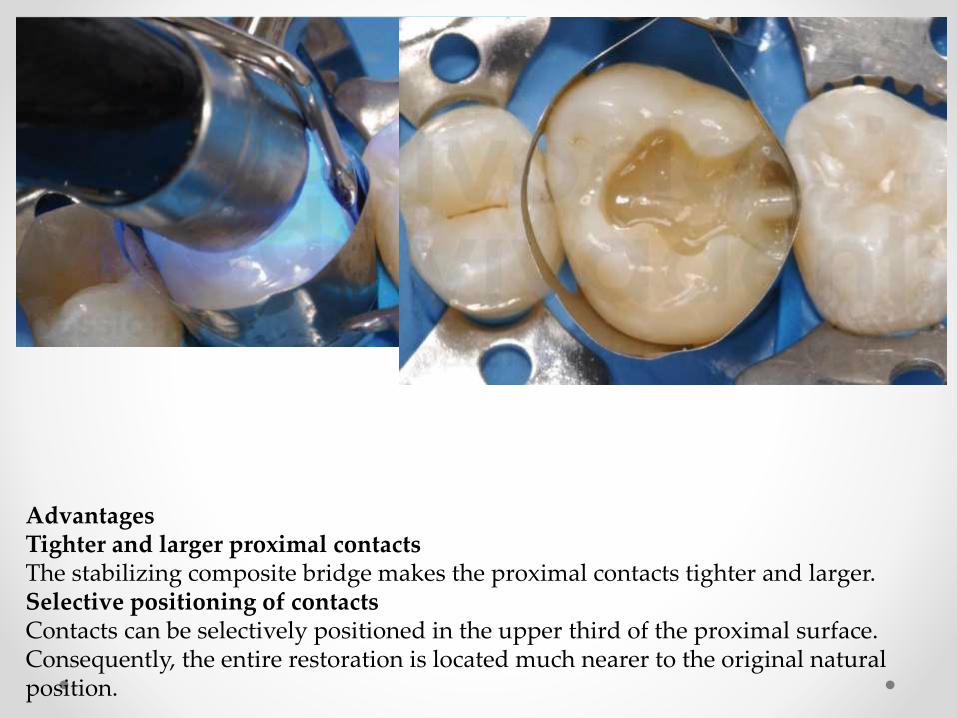
Advantages Tighter and larger proximal contactsThe stabilizing composite bridge makes the proximal contacts tighter and larger. Selective positioning of contactsContacts can be selectively positioned in the upper third of the proximal surface. Consequently, the entire restoration is located much nearer to the original natural position.

Top tips from Dentsply• The special surface of Dentsply Ash composite materials enables them to be
used with composite and glass ionomer materials. • Anodised aluminium tips give them exceptional non-stick properties.• Placing and shaping composite material is significantly easier and quicker than
with conventional hand instruments. • The anodised surface of the composite instrument is not scratched by the
composite filler particles and it also resists composites sticking to it without risk of discolouring the materials.
• Dentsply Ash composite instruments are available in Ceramicolor and Lustra.
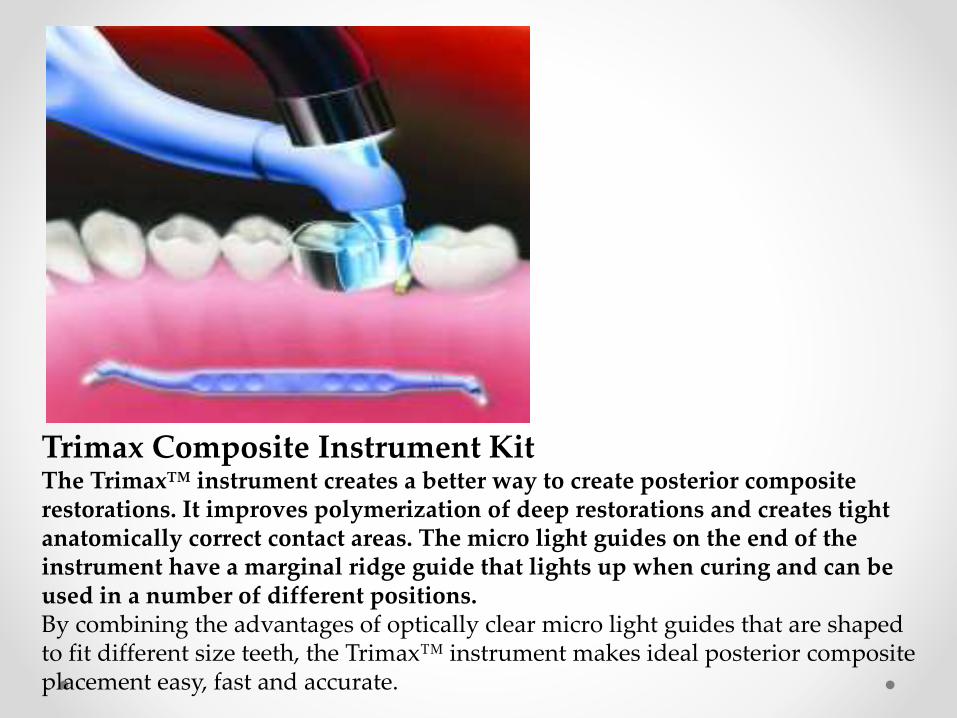
Trimax Composite Instrument KitThe Trimax™ instrument creates a better way to create posterior composite restorations. It improves polymerization of deep restorations and creates tight anatomically correct contact areas. The micro light guides on the end of the instrument have a marginal ridge guide that lights up when curing and can be used in a number of different positions. By combining the advantages of optically clear micro light guides that are shaped to fit different size teeth, the Trimax™ instrument makes ideal posterior composite placement easy, fast and accurate.

Garrison Dental universal Composite & plastic filling instruments
#3 Goldstein Flexi-Thin XTS Composite Instrument with #6S Smooth Satin Steel Handle
NB Anterior Composite placement instrument
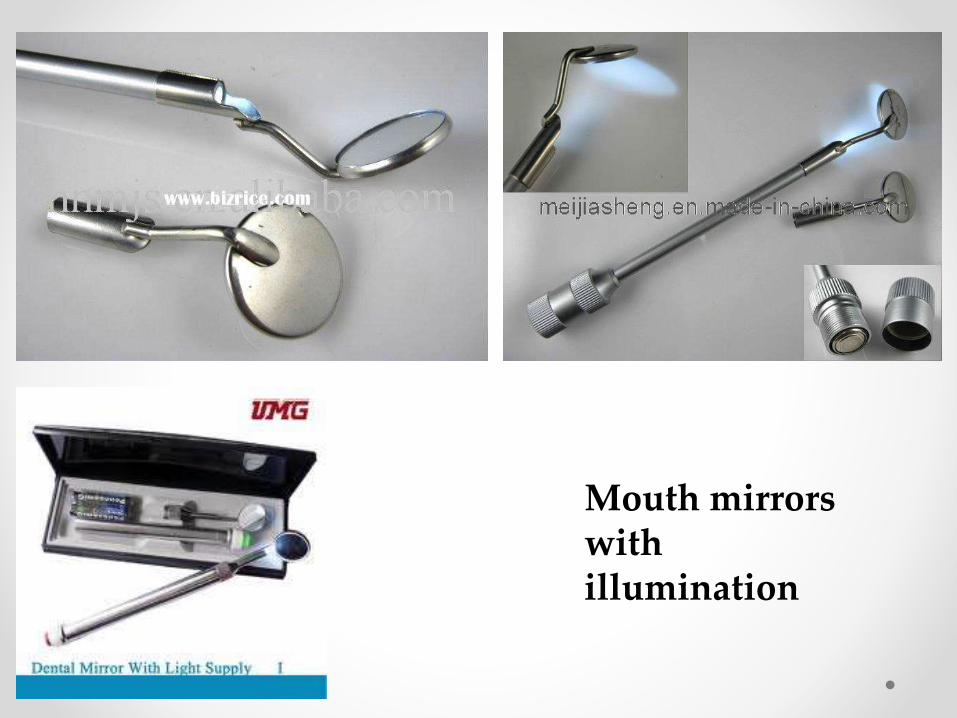
Mouth mirrors with illumination

Mouth mirrors with suction

References • Sturdevant’s Art and Science of Operative dentistry (4th
edition)
• Operative dentistry- modern theory and practice-Marzouk, Simonton and Gross (1st edition)
• Principles and practice of Operative dentistry by Gerald T.Charbenau (2nd edition)
• Atlas of operative dentistry- William W Howard, Richard C Moller (3rd edition)
• History of dentistry- Melvin E Eing
• Text book of operative dentistry- Gilmore, Lund, Bales, Vernetti (4th edition)
• Current concepts in Operative dentistry- Goldman, Gilmore, Inby, McDonald (6th volume)
• Modern concepts in operative dentistry- Horsted, Ivar, Mjor
• Pickard’s manual of operative dentistry (5th edition)
• Mosby Dental hygiene – Michele L Darby (5th edition)

THANK YOU