guidelines for nobel biocare products including mri ... · the information on nobel biocare passive...
TRANSCRIPT

Guidelines for Nobel Biocare products including MRI information
Cleaning and sterilization

Note: In order to improve readability, Nobel Biocare does
not use ™ or ® in the running text. By doing so, however,
Nobel Biocare does not waive any right to the trademark
or registered mark and nothing herein shall be construed
to the contrary.
Disclaimer: Some products may not be regulatory
cleared / released for sale in your market. Please contact
your local Nobel Biocare offi ce for current product
assortment and availability.

3Cleaning and sterilization guidelines
Contents.
Introduction Purpose of this document 4
Warnings and precautions 5
Symbols used 6
Magnetic Resonance Imaging (MRI) information 8
Terms and defi nitions 10
Workfl ow 12
1 Point of use 14
2 Transport 15
3 Preparation and disassembly 16
4 Cleaning 4a Manual cleaning, disinfection and drying 17
4b Automated cleaning, disinfection and drying 22
5 Inspection and assembly 25
6 Packaging 6a Packaging of single devices 26
6b Assembly and packaging of kit boxes 27
7 Sterilization 7a Sterilization of single devices 28
7b Sterilization of kit boxes 30
8 Storage 32
Appendices References 33
Cleaning agents and disinfectants 34
Final inspection 35
Frequently asked questions 50
Customer service worldwide 51

4 Cleaning and sterilization guidelines // Introduction
Purpose of this document.
This document gives general guidance on how medical de-
vices supplied by Nobel Biocare that are suitable for clean-
ing and sterilization may be processed to prepare them for
use. It also gives instructions for inspection to determine
when an instrument has reached the end of its serviceable
life and must be replaced.
The following devices are suitable for cleaning and steriliza-
tion if not otherwise indicated in the instructions for use:
multiple-use instruments and drills including surgical kits,
temporary and fi nal prosthetic components such as abut-
ments, screws, crowns and bridges.
Note: Do not reprocess implants, single-use devices,
NobelGuide surgical templates and Telio® CAD Crowns and
Bridges by NobelProcera.
This document is valid in conjunction with the assembly and
disassembly instructions for multi-component instruments
that need to be disassembled prior to cleaning and steriliza-
tion, and the instructions for use that are delivered together
with the devices.
Nobel Biocare has demonstrated that the processes described
in these instructions are effective. Procedures manuals with
an earlier publishing date will be superseded by this docu-
ment with regards to cleaning and sterilization. Wherever
the instructions for use for a specifi c product show other
procedure conditions, these will supersede the recommen-
dations given in these general guidelines.
Equipment, operators, cleaning agents and procedures all
contribute to the effi cacy of the processing. The healthcare
facility should ensure that the combination actually in use
results in a medical device that is safe for use.
The information on Nobel Biocare passive implants in MR
environment provides the necessary data for radiologists to
perform safe diagnostic imaging.
Alternative methods of processing may be equally suitable.
In the event of confl icting national cleaning and sterilization
requirements, these shall prevail over Nobel Biocare recom-
mendations.
The given Nobel Biocare guidelines for cleaning, disinfection
and sterilization are based on validated processes. It is rec-
ommended to follow these instructions to avoid affecting
the performance of the products negatively.
Note: According to ISO 17665, the fi nal responsibility for
validation of cleaning, disinfection and sterilization tech-
niques and equipment lies directly with the end user. To en-
sure optimal processing, all cycles and methods should be
validated.
Telio® CAD is a trademark of Ivoclar Vivadent AG.

5Cleaning and sterilization guidelines // Introduction
Warnings and precautions.
Devices labeled “Do not reuse” must not be reprocessed for
reuse.
When “Do not reuse” devices are supplied non-sterile and
require sterilization before use, the appropriate sections in
these guidelines may be applied unless other specifi c in-
structions are provided in the package.
“Do not resterilize” devices are not designed to perform as
intended after the fi rst usage or an additional sterilization
process. Changes in mechanical, physical or chemical char-
acteristics introduced under conditions of repeated use,
cleaning and/or resterilization may compromise the integrity
of the design and/or material, leading to diminished safety,
performance and/or compliance with relevant specifi cations.
Please refer to the device label to identify single or
multiple use.
The devices delivered sterile have a “Sterile” symbol on the
label. The “R” in the right rectangle indicates that the device
is sterilized by irradiation.
Opened packages of abutments, screws, crowns, bridges
and accessories may be cleaned and sterilized / autoclaved
again following the procedures stated on the following pages,
unless other specifi c instructions are provided in the package.
Note: Implants are strictly exempted for cleaning and steril-
ization. Any doubt regarding the sterility of the implant must
result in direct disposal of the device or return to the manu-
facturer for further research.

6 Cleaning and sterilization guidelines // Introduction
Symbols used.
Manufacturer
Indicates the medical device manufacturer, as defi ned in EU
Directives 90/385/EEC, 93/42/EEC and 98/79/EC.
Open the package like this
Do not resterilize
Indicates a medical device that is not to be resterilized.
Do not reuse
Indicates a medical device that is intended for one use, or
for use on a single patient during a single procedure.
Note: Synonyms for “Do not reuse” are “Single
use” and “Use only once”.
Non-sterile
Indicates a medical device that has not been subjected to a
sterilization process.
Sterilized using irradiation
Indicates a medical device that has been sterilized using ir-
radiation.

7Cleaning and sterilization guidelines // Introduction
Use-by date
Indicates the date after which the medical device is not to
be used.
Example: June 2015 is expressed as 2015-06.
Batch code
Indicates the manufacturer's batch code so that the batch or
lot can be identifi ed.
Article number
Indicates the manufacturer's catalog number so that the
medical device can be identifi ed.
Consult instructions for use
Indicates the need for the user to consult the instructions
for use.
Caution
Indicates the need for the user to consult the instructions for
use for important cautionary information, such as warnings
and precautions that cannot, for a variety of reasons, be pre-
sented on the medical device itself.
MR Safe
An item that poses no known hazards in all MR environ-
ments (ASTM F 2503-8). For details see the following pages.
MR Conditional
An item that has been demonstrated to pose no known haz-
ards in a specifi c MR environment with specifi ed conditions
of use (ASTM F 2503-8). For details see the following pages.

8 Cleaning and sterilization guidelines // Introduction
1 American Society for Testing and Materials (ASTM) International, Designation: F2503-05. Standard Practice for Marking Medical Devices and Other Items for
Safety in the Magnetic Resonance Environment. ASTM International, West Conshohocken, PA, 2005
Magnetic Resonance Imaging (MRI) information.
The following defi nitions of Magnetic Resonance (MR) Safe and MR Conditional have been developed by
the American Society for Testing and Materials (ASTM) International.1
MR Safe
Items that pose no known hazards in all MRI environments
are labeled MR Safe. This includes all Nobel Biocare products
that are non-conducting, non-metallic and non-magnetic.
Examples are abutments, crowns and bridges made of
ceramic, temporary abutments made of PEEK, and healing
caps made of nylon.
Items marked with the MR Safe icon may be taken into,
used or placed anywhere within any MRI environment with-
out causing any additional risk to the patient or any other
individual.
MR Conditional
Items that have been demonstrated to pose no known hazards
in a specifi ed MRI environment with specifi ed conditions of
use are labeled MR Conditional. Non-clinical worst-case
testing has demonstrated that metallic Nobel Biocare products
made of titanium, titanium alloy, gold alloy and cobalt chrome
alloy are MR Conditional. Examples are implants, temporary
and fi nal abutments, clinical screws, implant bars overden-
ture, and crowns and bridges.
A patient with such a device may be scanned safely after
placement under the following conditions:
– Static magnetic fi eld of 1.5–3.0 Tesla
– Maximum spatial gradient magnetic fi eld of 720 Gauss/cm
– Maximum MR system reported, whole body averaged
specifi c absorption rate (SAR) of 2 W/kg for 15 minutes of
scanning (i.e. per pulse sequence)
– Normal operating mode of the MR system
9Cleaning and sterilization guidelines // Introduction
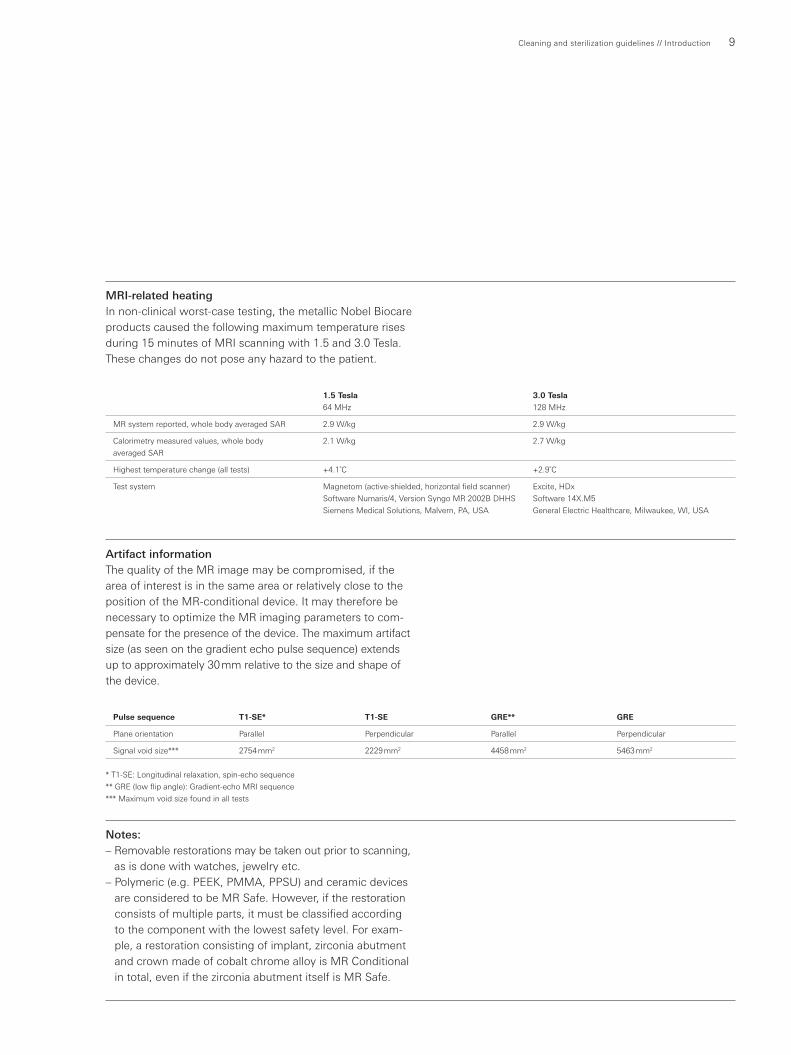
MRI-related heating
In non-clinical worst-case testing, the metallic Nobel Biocare
products caused the following maximum temperature rises
during 15 minutes of MRI scanning with 1.5 and 3.0 Tesla.
These changes do not pose any hazard to the patient.
Artifact information
The quality of the MR image may be compromised, if the
area of interest is in the same area or relatively close to the
position of the MR-conditional device. It may therefore be
necessary to optimize the MR imaging parameters to com-
pensate for the presence of the device. The maximum artifact
size (as seen on the gradient echo pulse sequence) extends
up to approximately 30 mm relative to the size and shape of
the device.
Notes:
– Removable restorations may be taken out prior to scanning,
as is done with watches, jewelry etc.
– Polymeric (e.g. PEEK, PMMA, PPSU) and ceramic devices
are considered to be MR Safe. However, if the restoration
consists of multiple parts, it must be classifi ed according
to the component with the lowest safety level. For exam-
ple, a restoration consisting of implant, zirconia abutment
and crown made of cobalt chrome alloy is MR Conditional
in total, even if the zirconia abutment itself is MR Safe.
1.5 Tesla
64 MHz
3.0 Tesla
128 MHz
MR system reported, whole body averaged SAR 2.9 W/kg 2.9 W/kg
Calorimetry measured values, whole body
averaged SAR
2.1 W/kg 2.7 W/kg
Highest temperature change (all tests) +4.1˚C +2.9˚C
Test system Magnetom (active-shielded, horizontal fi eld scanner)
Software Numaris/4, Version Syngo MR 2002B DHHS
Siemens Medical Solutions, Malvern, PA, USA
Excite, HDx
Software 14X.M5
General Electric Healthcare, Milwaukee, WI, USA
Pulse sequence T1-SE* T1-SE GRE** GRE
Plane orientation Parallel Perpendicular Parallel Perpendicular
Signal void size*** 2754 mm2 2229 mm2 4458 mm2 5463 mm2
* T1-SE: Longitudinal relaxation, spin-echo sequence
** GRE (low fl ip angle): Gradient-echo MRI sequence
*** Maximum void size found in all tests

10 Cleaning and sterilization guidelines // Introduction
Terms and defi nitions.
Pre-cleaning
Wiping or rinsing the device to remove gross soil, blood and
tissue before the initial cleaning process starts.
Cleaning
Removal of visible soil (e.g. organic and inorganic material)
from objects and surfaces. This is normally accomplished
manually or mechanically using water with detergents or
enzymatic products. Thorough cleaning is essential prior to
disinfection and sterilization, as inorganic and organic mate-
rials that remain on the surfaces of instruments interfere
with the effectiveness of these processes.
After cleaning no visible contamination is found by inspec-
tion with the naked eye under good light conditions. Special
attention must be given to edges, lumens, hollows and other
soil traps.
Decontamination
Removal of pathogenic microorganisms from objects so
that the devices are safe to handle, use, or discard.
To avoid misunderstandings of the most frequently used terms, the meaning
of each of these terms inside this document is listed:

11Cleaning and sterilization guidelines // Introduction
Disinfection
A process that kills most disease-producing microorganisms,
but not necessarily all microbial forms (e.g. bacterial spores).
Cleaning and sterilization
Validated processes to render a medical device that is de-
signed for multiple use and that has been previously used
or contaminated, fi t for a subsequent single use on another
patient or another treatment.
These processes are designed to remove soil and contami-
nants by cleaning and to inactivate microorganisms by dis-
infection and/or sterilization.
Sterilization
A validated process used to render a product free from
viable microorganisms.
Note: In a sterilization process, the nature of microbial death
is described by a mathematical function. Therefore, the
presence of microorganisms on any specifi c device can be
expressed in terms of probability. While this probability can
be reduced to a very low number, it can never be reduced
to zero.

12 Cleaning and sterilization guidelines // Introduction
Workfl ow.
The preparation for reuse of medical devices or for initial use of new devices requires a
sequence of processing steps shown in the workfl ow. This workfl ow can be downloaded
as PDF document from the Nobel Biocare website: nobelbiocare.com/sterilization
More detailed instructions for each step are given on the following pages. The circled
numbers refer to the corresponding section in these guidelines.
*Following the recommendations of the Robert Koch Institute
(RKI) and other organizations / authorities, the exposure time
can be extended up to 20 minutes.
– Min. 3 pre-vacuum cycles < 60 mbar
– Sterilization at 132–135°C / 270–275°F
max. 137°C / 279°F for 4 minutes*
– Drying in chamber for 30 minutes
– Min. 3 pre-vacuum cycles < 60 mbar
– Sterilization at 132–135°C / 270–275°F
max. 137°C / 279°F for 3 minutes*
– Drying in chamber for 10 minutes
– Sterilization at 132–135°C / 270–275°F
max. 137°C / 279°F for 3 minutes*
– Drying in chamber for 10 minutes
– Sterilization at 132–135°C / 270–275°F
max. 137°C / 279°F for 15 minutes*
– Drying in chamber for 30 minutes
– Control storage conditions
– Control shelf life
– Inspect devices visually
– Perform functional check
– Assemble devices and kit box
– Place kit box into pouch
– Label pouch
– Assemble devices and seal them
in pouches
– Label pouches
– Remove debris in lukewarm water and
soak devices in cleaning solution
– Scrub with soft bristled nylon brush
– Flush reusable drills, abutments and tools with
channels / lumen using cleaning solution
– Rinse with tap water
– Load devices into thermodisinfector
– Run cleaning and disinfection cycle
– Run drying cycle
– Dry with compressed air or wipes if needed
– Avoid mechanical damage
– Minimize time before cleaning
– Immerse devices in cleaning solution if needed
– Handle devices with tweezers
– Remove gross soil
– Dispose devices if needed
– Disassemble devices if applicable
– Disassemble kit boxes completely
1
2
3
5
8
4a
6a
7a
4b
6b
7b
Point of use
Transport
Preparation and
disassembly
Manual cleaning,
disinfection and drying
Automated cleaning,
disinfection and drying
(incl. pre-cleaning)
Inspection,
assembly of devices
Storage
Packaging of
single devices
Sterilization”Forced air removal or pre-vacuum method”
”Saturated steam or gravity method”
Sterilization”Forced air removal or pre-vacuum method”
”Saturated steam or gravity method”
Assembly and
packaging of kit boxes
– Remove debris in lukewarm water and
soak devices in cleaning solution
– Scrub with soft bristled nylon brush
– Flush reusable drills, abutments and tools
with channels / lumen using cleaning
solution
– Soak in ultrasonic bath
– Rinse and fl ush with purifi ed or sterile water
– Soak in disinfection solution
– Flush internal channels / lumen with disinfection solution
– Rinse and fl ush with purifi ed or sterile water
– Dry with compressed air or wipes

13Cleaning and sterilization guidelines // Introduction
Two evaluated methods for cleaning
Nobel Biocare has evaluated two methods for cleaning
medical devices, and appropriate instructions are provided
in these guidelines:
– Manual method
– Method using an automated thermodisinfector
Whenever possible the automated method should be used.
The automated cleaning process is more reproducible and
therefore more reliable. In addition, staff is less exposed to
contaminated devices and cleaning agents.
Protective clothing and equipment
Whichever method is used, staff should use suitable protec-
tive clothing and equipment at all times.
In particular, take note of the instructions provided by the
cleaning agent manufacturer for correct handling and use of
the product.
Cleaning agents and disinfectants
For cleaning or disinfecting medical devices only specifi cally
formulated cleaning agents and/or disinfectants (detergents)
should be used.
Since not all cleaning agents and disinfectants may be avail-
able worldwide, criteria for the selection of appropriate de-
tergents are provided in the appendix (see page 34). A list of
cleaning agents and disinfectants that Nobel Biocare used in
the validation of these cleaning and sterilization guidelines is
also provided in the appendix. Nobel Biocare does not rec-
ommend any specifi c cleaning and/or disinfection agents.
The guidelines for concentrations and times for device im-
mersion in the cleaning solutions and/or disinfectants given
by the detergent manufacturers must be observed. If these
concentrations and times are signifi cantly exceeded, discol-
oration or corrosion could occur with some materials. This
could also happen if rinsing after cleaning and/or disinfect-
ing is insuffi cient.
Water quality
The quality of the water used for diluting cleaning agents
and/or disinfectants and for rinsing medical devices should
be carefully considered. Application of freshly prepared
purifi ed water / highly purifi ed water or sterile water for
rinsing purposes (according to the pharmacopeias) with
less than 10 cfu/ml and 0.25 EU/ml is highly recommended.
Mineral residues from hard water as well as higher contami-
nation with microorganisms and endotoxins can result in
staining of the device or prevent effective cleaning and dis-
infection.

14 Cleaning and sterilization guidelines // Point of use
1 Point of use.
1 Handle devices with tweezers
To avoid contamination of the kit box (mainly the instrument
plate) and damage of the sterile gloves by the sharp drills,
it is recommended to pick up the devices using a pair of
tweezers.
2 Remove gross soil
Directly after use of reuseable tools (within a maximum of
1 hour postoperatively), remove gross soil using absorbent
paper wipes. Additionally, intensive rinsing of the medical
devices with running water is recommended.
3 Dispose devices if needed
Sharp and cutting single-use products, dull multi-use drills,
worn out tools etc. must be properly disposed in the surgery
room, in containers specially designed for this purpose.

15Cleaning and sterilization guidelines // Transport
2 Transport.
1 Avoid mechanical damage
Avoid mechanical damage, e.g. do not mix heavy devices
with delicate ones. Pay particular attention to cutting
edges, both to avoid injury and to avoid damage to the
medical devices.
2 Minimize time before cleaning
Get the medical devices to the point where cleaning is to be
performed as soon as practical. If transfer to the processing
area is likely to be delayed, consider covering the medical
devices with a damp cloth or store the medical devices in
closed boxes to avoid drying of soil and/or debris.
3 Immerse devices in cleaning solution if needed
When longer delays are expected, immerse the devices in
a bath of a lukewarm cleaning solution to avoid drying of
soil and/or debris.
16 Cleaning and sterilization guidelines // Preparation and disassembly
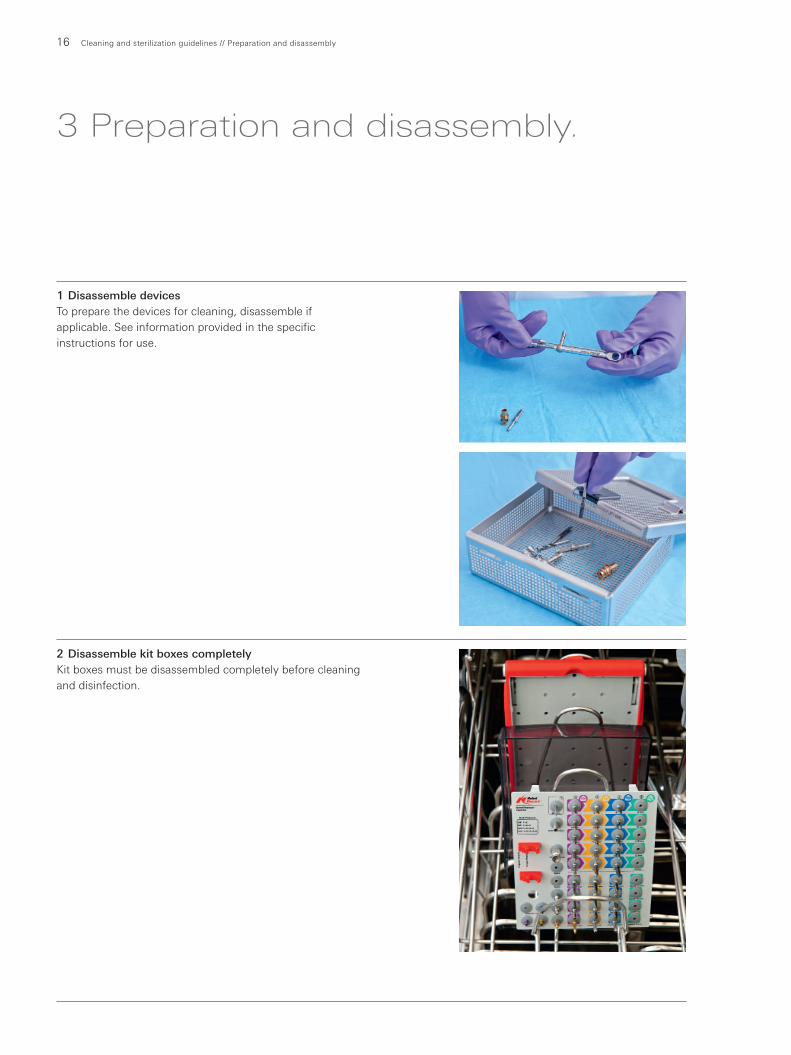
3 Preparation and disassembly.
1 Disassemble devices
To prepare the devices for cleaning, disassemble if
applicable. See information provided in the specifi c
instructions for use.
2 Disassemble kit boxes completely
Kit boxes must be disassembled completely before cleaning
and disinfection.
17Cleaning and sterilization guidelines // Cleaning
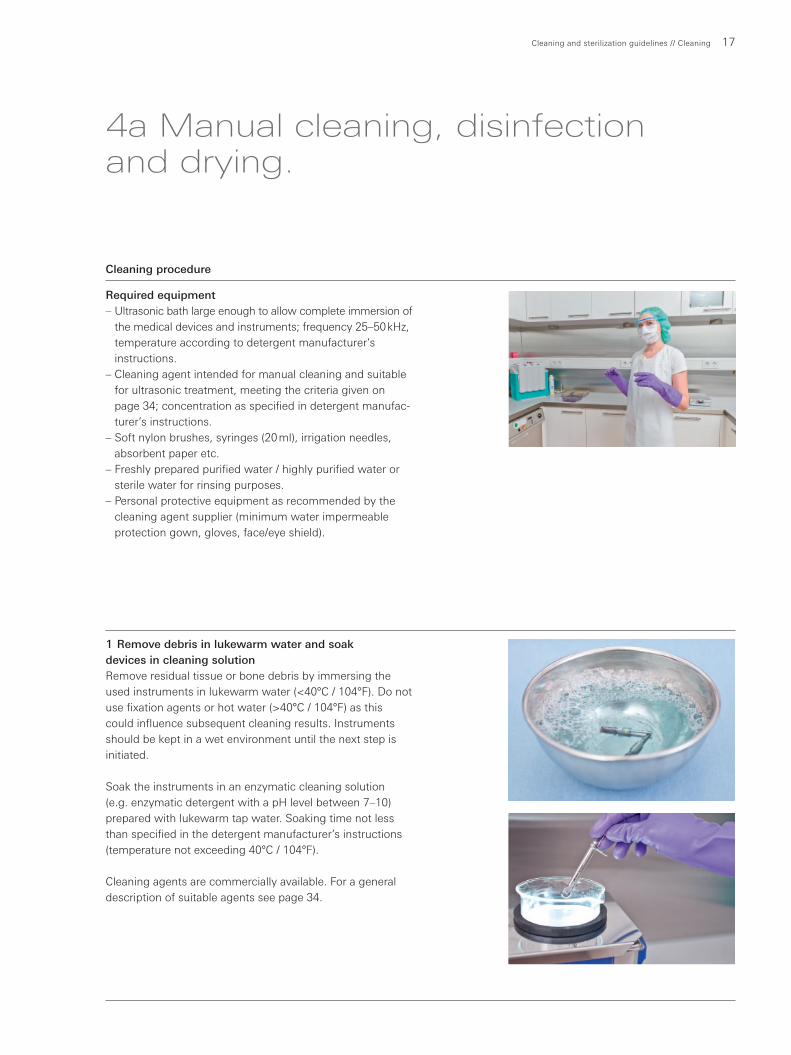
Required equipment
– Ultrasonic bath large enough to allow complete immersion of
the medical devices and instruments; frequency 25–50 kHz,
temperature according to detergent manufacturer’s
instructions.
– Cleaning agent intended for manual cleaning and suitable
for ultrasonic treatment, meeting the criteria given on
page 34; concentration as specifi ed in detergent manufac-
turer’s instructions.
– Soft nylon brushes, syringes (20 ml), irrigation needles,
absorbent paper etc.
– Freshly prepared purifi ed water / highly purifi ed water or
sterile water for rinsing purposes.
– Personal protective equipment as recommended by the
cleaning agent supplier (minimum water impermeable
protection gown, gloves, face/eye shield).
4a Manual cleaning, disinfection and drying.
Cleaning procedure
1 Remove debris in lukewarm water and soak
devices in cleaning solution
Remove residual tissue or bone debris by immersing the
used instruments in lukewarm water (<40°C / 104°F). Do not
use fi xation agents or hot water (>40°C / 104°F) as this
could infl uence subsequent cleaning results. Instruments
should be kept in a wet environment until the next step is
initiated.
Soak the instruments in an enzymatic cleaning solution
(e.g. enzymatic detergent with a pH level between 7–10)
prepared with lukewarm tap water. Soaking time not less
than specifi ed in the detergent manufacturer’s instructions
(temperature not exceeding 40°C / 104°F).
Cleaning agents are commercially available. For a general
description of suitable agents see page 34.

18 Cleaning and sterilization guidelines // Cleaning
4 Soak in ultrasonic bath
Prepare an ultrasonic bath with a cleaning solution at the
concentration and temperature specifi ed in the detergent
manufacturer’s instructions.
Immerse the device completely and activate the bath for
at least the time specifi ed in the detergent manufacturer’s
instructions.
Note: Avoid direct contact of the instruments with sharp
cutting edges during ultrasonic treatment so as not to
damage devices or reduce shelf life (e.g. drills).
2 Scrub devices with soft bristled nylon brush
Scrub the outer and, if applicable, the inner side of the
instruments with a soft bristled nylon brush until all visible
soil and/or debris is removed. Pay particular attention to
features that may be shielded from the brushing action.
3 Flush reusable drills, abutments and tools with
channels / lumen using cleaning solution
Flush the internal channels / lumen with 20 ml cleaning solu-
tion using the irrigation needle (provided with the surgical
kit or purchased separately) connected to a 20 ml syringe.
Check the channels / lumen for residual soil and/or debris.
Note: The irrigation needle must pass the silicone barrier in
the middle of the drill.

1919Cleaning and sterilization guidelines // Cleaning
6 Flush internal channels / lumen
with purifi ed or sterile water
Flush the internal channels / lumen with 20 ml freshly pre-
pared purifi ed water / highly purifi ed water or sterile water
using the irrigation needle (provided with the surgical kit or
purchased separately) connected to a 20 ml syringe.
Note: The irrigation needle must pass the silicone barrier
in the middle of the drill.
7 Repeat cleaning step if needed
If encrusted soil and/or debris remaining on the device have
to be removed with a brush after completion of the cleaning
step in the ultrasonic bath, the cleaning step must be repeated
as described above.
5 Rinse with purifi ed or sterile water
Rinse for at least 1 minute with freshly prepared purifi ed
water / highly purifi ed water or sterile water until all traces of
cleaning solution are removed.

20 Cleaning and sterilization guidelines // Cleaning
Required equipment
– Bath large enough to allow complete immersion of the
medical devices and instruments; temperature according
to detergent manufacturer’s instructions.
– Disinfection agent intended for manual disinfection and
compatible with the applied cleaning detergent meeting
the criteria given on page 34; concentration as specifi ed in
detergent manufacturer’s instructions.
– Syringe (20 ml) together with the irrigation needle (provided
with the surgical kit or purchased separately).
– Freshly prepared purifi ed water / highly purifi ed water or
sterile water for rinsing purposes.
– Filtered medical compressed air (if available) or clean and
lint-free single use wipes.
– Personal protective equipment as recommended by the
cleaning agent supplier (minimum water impermeable
protection gown, gloves, face/eye shield).
Note: The use of an ultrasonic bath is recommended.
8 Soak in disinfection solution
Prepare a bath with a disinfection solution at the concen-
tration and temperature specifi ed in the detergent manu-
facturer’s instructions.
Immerse the devices completely for at least the time speci-
fi ed in the detergent manufacturer’s instructions.
Disinfection and drying procedure

21
9 Flush internal channels / lumen
with disinfection solution
Flush minimum 3 times the internal channels / lumen with
20 ml disinfection solution using the irrigation needle
(provided with the surgical kit or purchased separately)
connected to a 20 ml syringe.
Note: The irrigation needle must pass the silicone barrier in
the middle of the drill.
10 Rinse with purifi ed or sterile water
Rinse for at least 1 minute with freshly prepared purifi ed
water / highly purifi ed water or sterile water until all traces of
disinfection solution are removed.
11 Flush internal channels / lumen
with purifi ed or sterile water
Flush the internal channels / lumen minimum 3 times with
20 ml freshly prepared purifi ed water / highly purifi ed water
or sterile water using the irrigation needle (provided with the
surgical kit or purchased separately) connected to a 20 ml
syringe.
Note: The irrigation needle must pass the silicone barrier in
the middle of the drill.
12 Dry with compressed air or wipes
Dry the medical devices using medical compressed air and
clean and lint-free single-use wipes.
13 Repeat complete cleaning and disinfection if needed
Visually inspect and repeat complete manual cleaning and
disinfection if necessary.
Cleaning and sterilization guidelines // Cleaning
22 Cleaning and sterilization guidelines // Cleaning
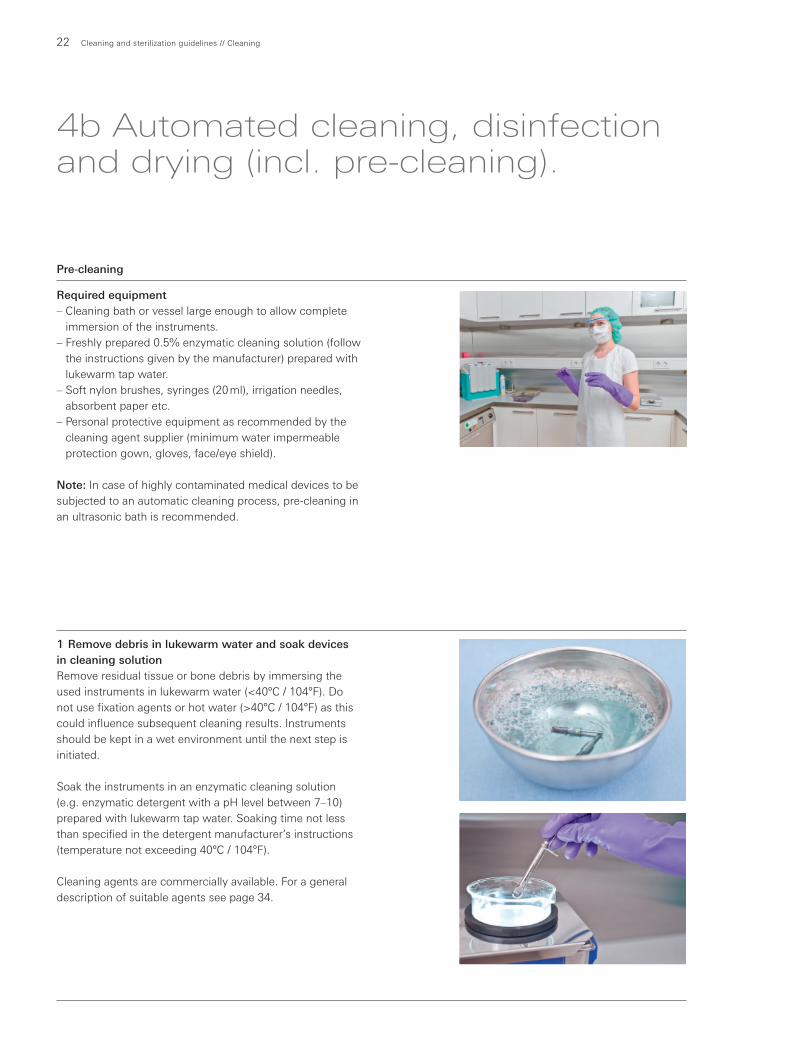
Required equipment
– Cleaning bath or vessel large enough to allow complete
immersion of the instruments.
– Freshly prepared 0.5% enzymatic cleaning solution (follow
the instructions given by the manufacturer) prepared with
lukewarm tap water.
– Soft nylon brushes, syringes (20 ml), irrigation needles,
absorbent paper etc.
– Personal protective equipment as recommended by the
cleaning agent supplier (minimum water impermeable
protection gown, gloves, face/eye shield).
Note: In case of highly contaminated medical devices to be
subjected to an automatic cleaning process, pre-cleaning in
an ultrasonic bath is recommended.
1 Remove debris in lukewarm water and soak devices
in cleaning solution
Remove residual tissue or bone debris by immersing the
used instruments in lukewarm water (<40°C / 104°F). Do
not use fi xation agents or hot water (>40°C / 104°F) as this
could infl uence subsequent cleaning results. Instruments
should be kept in a wet environment until the next step is
initiated.
Soak the instruments in an enzymatic cleaning solution
(e.g. enzymatic detergent with a pH level between 7–10)
prepared with lukewarm tap water. Soaking time not less
than specifi ed in the detergent manufacturer’s instructions
(temperature not exceeding 40°C / 104°F).
Cleaning agents are commercially available. For a general
description of suitable agents see page 34.
Pre-cleaning
4b Automated cleaning, disinfection and drying (incl. pre-cleaning).

23Cleaning and sterilization guidelines // Cleaning
2 Scrub devices with soft bristled nylon brush
Scrub the outer and, if applicable, the inner side of the in-
struments with a soft bristled nylon brush until all visible soil
and/or debris is removed. Pay particular attention to features
that may be shielded from the brushing action.
3 Flush reusable drills, abutments and tools with
channels / lumen using cleaning solution
Flush the internal channels / lumen with 20 ml cleaning solu-
tion using the irrigation needle (provided with the surgical
kit or purchased separately) connected to a 20 ml syringe.
Check the channels / lumen for residual soil and/or debris.
Note: The irrigation needle must pass the silicone barrier in
the middle of the drill.
4 Rinse with tap water
Rinse outer and inner sides of the instruments with tap water
to remove all cleaning solution.
Note: The irrigation needle must pass the silicone barrier in
the middle of the drill.

24 Cleaning and sterilization guidelines // Cleaning
5 Load devices into thermodisinfector
After pre-cleaning, place the instruments in an instrument
tray or on an instrument rack and load them into the
washer / disinfector.
If the kit box is contaminated, it is recommended to run
the cycle twice:
– Run the fi rst cycle with the disassembled kit box alone.
Ensure to remove all silicone fi ttings from the instrument
plate.
– After the fi rst cycle, assemble the base plate with the
silicone pieces and mount the devices (without devices
that are disassembled such as the torque wrench).
– Run a second cycle to clean and disinfect the devices.
6 Run cleaning and disinfection cycle
Start the cycle by applying the following:
– 2 minutes pre-cleaning with cold water and emptying.
– 5 minutes cleaning at 55°C / 131°F with an enzymatic
machine cleaner and emptying.
– 3 minutes neutralization with tap water and emptying.
– 2 minutes intermediate rinsing with cold tap water and
emptying.
Note: Special instructions provided by the manufacturers of
automated washing machines must be followed.
Second cycle with mounted instruments
7 Run drying cycle
Dry the outer side of the instruments through drying cycle
of washer / disinfector.
8 Dry with compressed air or wipes if needed
If needed, additional manual drying can be performed with
clean and lint-free single-use wipes. Insuffl ate cavities,
channels or lumens of the disinfected parts can be dried by
using sterile compressed air.
Automated cleaning, disinfection and drying

25Cleaning and sterilization guidelines // Inspection and assembly
5 Inspection and assembly.
1 Inspect devices visually
Before preparing for sterilization, all medical devices should
be inspected. Generally, unmagnifi ed visual inspection
under good light conditions is suffi cient. All parts of the
devices should be checked for visible soil and/or corrosion.
Particular attention should be paid to:
– Soil “traps” such as mating surfaces, shafts of reamers.
– Recessed features like channels / lumens and threads.
– Features where soil may be pressed into contact with
the device, e.g. drill fl utes adjacent to the cutting tip.
– Cutting edges should be checked for sharpness
and damage.
2 Perform functional check
– Check mating devices for proper assembly.
– Operate medical devices with moving parts to check
correct operation.
– Check drills for sharpness (see appendix for examples).
Notes:
– Nobel Biocare does usually not defi ne the maximum num-
ber of uses appropriate for reusable medical devices. The
useful life of these devices depends on a number of fac-
tors including the method and duration of each use, and
the handling between uses.
– Careful inspection and functional testing of the device be-
fore use is the best method for determining the end of
serviceable life for the medical device.
– However, for certain instruments end of life has been de-
fi ned, verifi ed and specifi ed with either a number of uses
(e.g. single-use devices) or an expiration date.
– See appendix “Final inspection” for detailed descriptions.

26 Cleaning and sterilization guidelines // Packaging
6a Packaging of single devices.
1 Assemble devices and seal them in pouches
Where appropriate, the cleaned, disinfected and checked
medical devices should be assembled.
To sterilize abutments, screws, crowns, bridges and
instruments place them in sterilization pouches for further
processing.
Note: Instruments with sharp or cutting edges like drills
must be packed separately in pouches if they are not placed
in a kit box.
The packaging for thermal sterilized medical devices should
fulfi ll the following requirements:
– ISO 11607 and/or DIN 58953-7
– Suitable for steam sterilization (temperature resistance up
to at least 137 °C / 279 °F, suffi cient steam permeability)
– Suffi cient protection of the instruments and sterilization
packaging from mechanical damage
2 Label pouches
Label the pouches / packages clearly with the following:
– Expiration date
– Name of the person who packed the devices
– Lot (if applicable)
– “Sterile” and the sterilization method (if several methods
are available).
Packages without a clear window to identify the devices
inside, the following needs to be added to the above
mentioned information:
– Product name with article number
– Number of devices

27Cleaning and sterilization guidelines // Packaging
6b Assembly and packaging of kit boxes.
1 Assemble devices and kit box
Where appropriate, the cleaned, disinfected, and checked
medical devices should be assembled.
Reassemble the surgical and prosthetic kit boxes and mount
the instruments in the silicone grommets / brackets.
2 Place kit box into pouch
Place the kit box in a sterilization pouch.
The packaging for thermal sterilized medical devices should
fulfi ll the following requirements:
– ISO 11607 and/or DIN 58953-7
– Suitable for steam sterilization (temperature resistance up
to at least 137 °C / 279 °F, suffi cient steam permeability)
– Suffi cient protection of the instruments as well as of the
sterilization packaging to mechanical damage
3 Label pouch
The pouches / packages must be labeled clearly and show:
– Expiration date
– Name of the person who packed the devices
– Lot (if applicable)
– “Sterile” and the sterilization method (if several methods
are available)
Packages without a clear window to identify the devices
inside, the following needs to be added to the above
mentioned information:
– Product name with article number
– Number of devices

28 Cleaning and sterilization guidelines // Sterilization
Both the pre-vacuum and gravity method have been validat-
ed by Nobel Biocare as being capable of achieving sterile
medical devices.
However, autoclave design and performance can affect the
effi cacy of the process. Healthcare facilities should validate
the processes that they use, employing the actual equip-
ment and operators that routinely process the devices.
All autoclaves / sterilizers should comply with the require-
ments of, and be validated, maintained and checked in
accordance with EN 285/EN 13060, EN ISO 17665, ANSI
AAMI ST79 or your national standard.
Steam autoclave (moist heat) sterilization using a pre-vacuum
(forced air removal) cycle or gravity method (saturated
steam) is applicable for most Nobel Biocare medical devices.
For devices made of zirconia, the presence of steam may
impair the long-term performance of the device, as it trig-
gers the so-called low temperature degradation or aging
of tetragonal zirconia. Therefore the number of sterilization
cycles is to be kept as low as necessary.
When loading the autoclave with several blister packages or
pouches, place them in an upright position, side by side,
with the clear foil surfaces facing each other.
The parameters recommended in this section in general are
not applicable to the entire Nobel Biocare portfolio. There
are exceptions for which other validated cleaning and steril-
ization cycles are applicable. These are described in the
respective instructions for use and have binding character.
If you are in doubt about the applicable sterilization para-
meters for a particular product, consult the specifi c instruc-
tions for use or contact your local Nobel Biocare sales offi ce.
Note: According to EN ISO 17665, the fi nal responsibility
for validation of sterilization techniques and equipment lies
directly with the processor. To ensure optimal processing, all
cycles and methods should be validated for different steril-
ization chambers, wrapping methods and/or various load
confi gurations.
7a Sterilization of single devices.

29Cleaning and sterilization guidelines // Sterilization
Method Moist heat sterilization
Cycle Pre-vacuum Gravity
Temperature 270°F (132°C)
Temperature max. 279°F (137°C)
Exposure time 3 minutes*
Pre-vacuum 3 times < 60 mbar N/A
Drying time 10 minutes (minimum in chamber)
Cooling time 10 minutes at room temperature
Method Moist heat sterilization according to ISO 17665
Cycle Saturated steam with
fractional forced air removal
Saturated steam
Temperature 132–135°C (270–275°F)
Temperature max. 137°C (279°F)
Exposure time 3 minutes*
Pre-vacuum 3 times < 60 mbar N/A
Drying time 10 minutes in chamber
Method Moist heat sterilization according to ISO 17665
Cycle Saturated steam with
fractional forced air removal
Saturated steam
Temperature 134–135°C (273–275°F)
Temperature max. 137°C (279°F)
Exposure time 3 minutes*
Pre-vacuum 3 times < 60 mbar N/A
Drying time 10 minutes in chamber
Recommended sterilization parameters for single devices sealed in pouches
USA
Outside USA
Alternative UK
*Following the recommendations of the Robert Koch Institute (RKI) and other organizations / authorities, the exposure time
can be extended up to 20 minutes.

30 Cleaning and sterilization guidelines // Sterilization
Both the pre-vacuum and gravity method have been validat-
ed by Nobel Biocare as being capable of achieving sterile
medical devices.
However, autoclave design and performance can affect the
effi cacy of the process. Healthcare facilities should therefore
validate the processes that they use, employing the actual
equipment and operators that routinely process the devices.
All autoclaves / sterilizers should comply with the require-
ments of, and be validated, maintained and checked in ac-
cordance with, EN 285/EN 13060, EN ISO 17665, ANSI
AAMI ST79 or your national standard.
Steam autoclave (moist heat) sterilization using a pre-vacu-
um (forced air removal) cycle or gravity method (saturated
steam) is applicable for all Nobel Biocare devices, if not oth-
erwise stated in the instructions for use.
Complete kit boxes with tools and assembled instruments
must be sterilized in their “ready for use” state. There is no
need to disassemble these instruments for sterilization. The
process parameters shown are validated and recommended
by Nobel Biocare for sterilization.
The parameters recommended in this section in general are
applicable for all Nobel Biocare devices, if not stated other-
wise in the instructions for use. There are exceptions for
which other validated cleaning and sterilization cycles are
applicable. These are described in the instructions for use
and have binding character.
If you are in doubt about the applicable sterilization para-
meters for a particular product, consult the specifi c instruc-
tions for use or contact your local Nobel Biocare sales offi ce.
Note: According EN ISO 17665, the fi nal responsibility
for validation of sterilization techniques and equipment lies
directly with the processor. To ensure optimal processing, all
cycles and methods should be validated for different steril-
ization chambers, wrapping methods and/or various load
confi gurations.
7b Sterilization of kit boxes.

31Cleaning and sterilization guidelines // Sterilization
Method Moist heat sterilization
Cycle Pre-vacuum Gravity
Temperature 270°F (132°C)
Temperature max. 279°F (137°C)
Exposure time 4 minutes* 15 minutes*
Pre-vacuum 3 times < 60 mbar N/A
Drying time 30 minutes in chamber
Cooling time 10 minutes at room temperature
Method Moist heat sterilization according to ISO 17665
Cycle Saturated steam with
fractional forced air removal
Saturated steam
Temperature 132–135°C (270–275°F)
Temperature max. 137°C (279°F)
Exposure time 4 minutes* 15 minutes*
Pre-vacuum 3 times < 60 mbar N/A
Drying time 30 minutes in chamber
Method Moist heat sterilization according to ISO 17665
Cycle Saturated steam with
fractional forced air removal
Saturated steam
Temperature 134–135°C (273–275°F)
Temperature max. 137°C (279°F)
Exposure time 4 minutes* 15 minutes*
Pre-vacuum 3 times < 60 mbar N/A
Drying time 30 minutes in chamber
Recommended sterilization parameters for devices mounted in kit boxes and sealed in pouches
USA
Outside USA
Alternative UK
*Following the recommendations of the Robert Koch Institute (RKI) and other organizations / authorities, the exposure time
can be extended up to 20 minutes.

32 Cleaning and sterilization guidelines // Storage
8 Storage.
After sterilization, place the devices in a dry and dark place
such as a closed cupboard or drawer.
Follow the instructions of the manufacturer of the pouches
regarding storage conditions and expiration date of sterilized
goods.

33Cleaning and sterilization guidelines // Appendices
21CFR58 (1978) Good Laboratory
Practice for Non-clinical Studies
AAMI TIR12:2010 Designing, testing,
and labeling reusable medical devices
for reprocessing in health care facili-
ties: A guide for medical device
manufacturers
AAMI TIR39:2009 Guidance on select-
ing a microbial challenge and inocula-
tion sites sterilization validation of
health care products
ANSI/AAMI ST8:2008 Hospital Steam
Sterilizers
ANSI/AAMI ST79:2010/A2:2011 Com-
prehensive guide to steam sterilization
and sterility assurance in health care
facilities
ANSI/AAMI ST81:2004 Sterilization of
medical devices – Information to be
provided by the manufacturer for the
processing of resterilizable medical
devices
ASTM E 1054-02 (2002) Standard Test
Methods for Evaluation of Inactivators
of Antimicrobial Agents
ASTM E 1837-96 (2007) Standard
Test Method to Determine Effi ciency
of Disinfection Processes for Reusable
Medical Devices (Simulated Use Test)
ASTM E 2314-03 (2003) Standard
Test Method for Determination of
Effectiveness of Cleaning Processes
for Reusable Medical Instruments
Using a Microbiologic Method
(Simulated Use Test)
ASTM F 2503-08 (2008) Standard
Practice for Marking Medical Devices
and Other Items for Safety in the
Magnetic Resonance Environment
Bundesgesundheitsblatt 2006: Infek-
tionsprävention in der Zahnheilkunde
– Anforderungen an die Hygiene
Bundesgesundheitsblatt 2012: Anfor-
derungen an die Hygiene bei der
Aufbereitung von Medizinprodukten
(Recommendations of the Robert
Koch Institute, RKI)
CSA Standard Z314.8-08, 2008 Decon-
tamination of reusable medical devices
CSA Standard Z314.3-09, 2009
Effective Sterilization in Health Care
Facilities by the Steam Process
DIN 58953-7:2010-05 Anwendungs-
technik von Sterilisationspapier,
Vliesstoffen, gewebten textilen Materi-
alien, Papierbeuteln und siegelfähigen
Klarsichtbeuteln und -schläuchen
FDA Guidance Document UCM253010
(2011) Processing/Reprocessing Medi-
cal Devices in Health Care Settings:
Validation Methods and Labeling
ISO 11607:2006 Packaging for termi-
nally sterilized medical devices – Part 1:
Requirements for materials, sterile bar-
rier systems and packaging systems
ISO 14161:2009 Sterilization of Health
Care Products – Biological Indicators
– Guidance for the selection, use and
interpretation of results
ISO 14937:2009 Sterilization of Health
Care Products – General Requirements
for characterization of a sterilizing
agent and the development, validation
and routine control of a sterilization
process for medical devices
ISO 15223-1:2012 Medical devices –
Symbols to be used with medical
device labels, labeling and information
to be supplied
ISO 17664:2004 Sterilization of medical
devices– Information to be provided
by the manufacturer for the processing
of re-sterilizable medical devices
ISO 17665-1:2006 Sterilization of health
care products Part 1: Development,
validation and routine control of a
sterilization process for medical devices
References.

34 Cleaning and sterilization guidelines // Appendices
Cleaning agents and disinfectants.
Cleaning and sterilization step Detergents used in Nobel Biocare validation
If cleaning is delayed, place the devices in a bath of a clean-
ing and disinfection solution to avoid drying of soil and/or
debris, blood and other contaminations.
Commercially available mild pre-cleaning solution with
a pH value 7–10 and approx. 35°C / 95°F
Manual cleaning
A mild agent is recommended to remove all visible soil and/
or debris, blood and other contaminations from the devices.
Cidecyme / Enzol
0,5% solution in an ultrasonic bath for 5 minutes at
40°C / 104°F
Manual disinfection
The solution was prepared according to the manual of the
detergent manufacturer and the devices were soaked in
the bath.
Cidex Opa
Minimum effective concentration 0.3%
Minimum temperature 20°C / 68°F
(according to manufacturer’s instruction for use)
Automated cleaning, disinfection and drying
For this step, a thermodisinfector with reusable
instruments was used.
Machine: Miele G7735 CD
Detergent: neodisher Mediclean
Cleaning Program Vario TD
– 2 minutes pre-washing with cold water
– Emptying
– 5 minutes washing at 55°C / 131°F with 0.5% cleaner
neodisher MediClean
– Emptying
– 3 minutes neutralizing with cold tap water
– Emptying
– 2 minutes intermediate rinsing with cold tap water
– Emptying
If the used detergents are not commercially available in your
market, use an equivalent one and follow the instructions of
the manufacturer.
Notes:
– Nobel Biocare does not recommend these detergents in
preference to others that are available. Other detergents
may perform equally well or better in conjunction with the
equipment being used.
– The instructions provided by the supplier of the detergents
should be followed.
– Suitability of alternative detergents should be checked by
referencing the supplier’s information and/or physical
testing.
– Personal protection for operators should be provided in
accordance with the supplier’s instructions and safety
data sheets.

35Cleaning and sterilization guidelines // Appendices
Final inspection.
If there are devices that do not function properly during the
intervention, these instruments need to be discarded imme-
diately at the point of use according to your local regulations
for biohazard substances.
All instruments need to be checked properly after
disinfection:
– Are they visibly clean?
– Do they function properly (perform a function check,
e.g. torque wrench)?
– Are the cutting edges dull or worn out?
– Are the fi ttings deformed?
– Are any parts broken?
– Have any parts fallen apart?
– Is there any rust or corrosion?
The following pages show examples that help determine
whether a product has reached the end of its shelf life or not.
The following examples are shown:
– Torque wrench (without adapter)
– Torque wrench adapter
– Screwdriver
– Tapered multiple-use drill
– Implant driver
– Bone mill
– Latch
– Drill extension
– Guided implant mount
– Depth probe
– Rust

36
2
3
1
Cleaning and sterilization guidelines // Appendices
New torque wrench:
1 The torque spring is parallel to the tube.
2 The torque spring is properly guided and the laser
marking is clear.
3 The direction indicator moves properly back into the tube
after changing the working direction.
Torque wrench (without adapter)

37Cleaning and sterilization guidelines // Appendices
Direction indicator does not move back completely into tube
Spring no longer fi xed
Spring out of guidance pillar
Direction indicator broken
Head of tool broken
Spring bent due to overload

38 Cleaning and sterilization guidelines // Appendices
Torque wrench adapter
New adapter
New adapter
Adapter structure worn out
O-ring broken

39Cleaning and sterilization guidelines // Appendices
Screwdriver
New screwdriver
Deformed tip
Deformed and worn-out tip

40
New dense bone drill with sharp blades
Cleaning and sterilization guidelines // Appendices
Tapered multiple-use dense bone drill
Cutting area
Sharp edge
Intact black coating
on the cutting edge

41
Blades with lost sharpness
Dull blades
Cleaning and sterilization guidelines // Appendices
Edge starts to lose sharpness
Edge is round
Worn coating
Coating is gone on the blade and
the steel shines silver

42 Cleaning and sterilization guidelines // Appendices
Tapered multiple-use drill
New drill with sharp cutting edges Cutting edges are dull / worn out
Starting corrosion

43Cleaning and sterilization guidelines // Appendices
Implant driver
Missing sliding ring
Worn-out edges
Corrosion
New implant driver Worn-out implant driver
Worn-out edgesNew implant driver

44 Cleaning and sterilization guidelines // Appendices
Bone mill
New bone mill with sharp cutting edge
Bone mill with round cutting edge Broken bone mill
45Cleaning and sterilization guidelines // Appendices
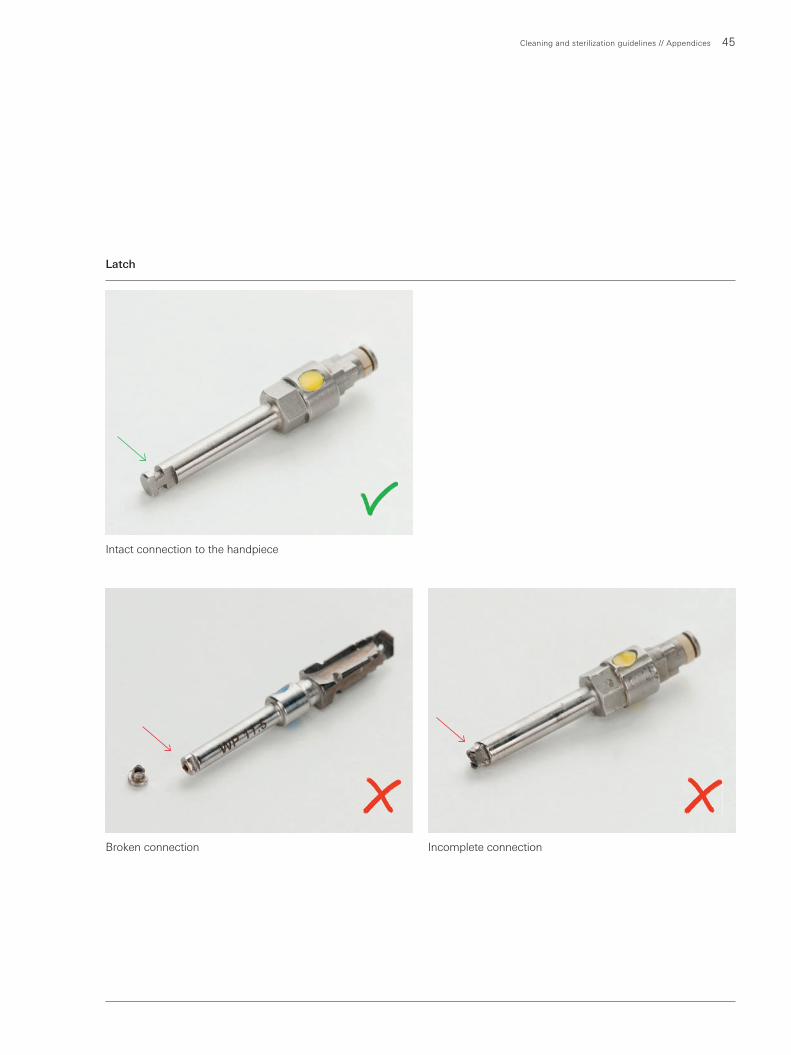
Latch
Intact connection to the handpiece
Broken connection Incomplete connection

46 Cleaning and sterilization guidelines // Appendices
Drill extension
Drill extension fallen apart
New drill extension

47Cleaning and sterilization guidelines // Appendices
Guided implant mount
Broken guided implant mount

48 Cleaning and sterilization guidelines // Appendices
Depth probe
Bent depth probe
New depth probe
Broken depth probe

49Cleaning and sterilization guidelines // Appendices
Rust
Instruments with rusty surface need to be discarded
50 Cleaning and sterilization guidelines // Appendices
Frequently asked questions.
How do you reprocess implants made of titanium? Implants must not be cleaned and sterilized. Any doubt
regarding the sterility of the implant must result in direct
disposal of the device or send it back to the manufacturer
for further investigation.
Can we use other sterilization parameters? Conditions other than those recommended by Nobel Biocare
can be used and may also lead to safe and sterile medical
devices. It is the responsibility of the processor to validate
and maintain their processes and equipment according to
the applicable standards.
Are these cleaning and sterilization guidelines
legally binding?
Yes, as these guidelines are part of the instructions for use.
Are guidance documents from legal authorities
(FDA, RKI etc) legally binding?
No, these are only recommendations. However, they are
sophisticated information and represent the thinking of legal
authorities.
How often can a multiple-use drill be used? A direct value for re-usable instruments cannot be given.
The shelf life of an instrument depends on a number of fac-
tors during use as well as cleaning and sterilization. Chapter
6 on inspection and assembly gives recommendations and
advice for your decision.
Is it possible to rework drills for further use? Drills are not designed for rework or re-sharpening due to
their special coating, which provides a smooth surface for
better transport of tissue and bone fragments.
For questions that are not answered in these cleaning and sterilization guidelines, contact [email protected]

51Cleaning and sterilization guidelines // Appendices
Customer service worldwide.
Europe and Russia
Austria
Nobel Biocare Austria
Phone: +43 1 892 89 90
Belgium
Nobel Biocare Belgium
Phone: +32 2 467 41 70
Denmark
Nobel Biocare Denmark
Phone: +45 39 40 48 46
Finland
Nobel Biocare Finland
Phone: +358 9 343 69 70
France
Nobel Biocare France
Phone: +33 1 49 20 00 30
Germany
Nobel Biocare Germany
Phone: +49 221 500 85 590
Hungary
Nobel Biocare Hungary
Phone: +36 1 279 33 79
Ireland
Nobel Biocare Ireland
Phone: toll free 1800 677 306
Italy
Nobel Biocare Italy
Phone: +39 039 683 61
Cust. support: toll free 800 53 93 28
Lithuania
Nobel Biocare Lithuania
Phone: +370 5 268 3448
Netherlands
Nobel Biocare Netherlands
Phone: +31 30 635 4949
Norway
Nobel Biocare Norway
Phone: +47 64 95 75 55
Poland
Nobel Biocare Poland
Phone: +48 22 549 93 50
Cust. support: +48 22 549 93 52
Portugal
Nobel Biocare Portugal
Phone: +351 22 374 73 50
Cust. support: toll free 800 300 100
Russia
Nobel Biocare Russia
Phone: +7 495 974 77 55
Cust. support: toll free 8 800 250 77 55
Spain
Nobel Biocare Spain
Phone: +34 93 508 8800
Cust. support: toll free 900 850 008
Sweden
Nobel Biocare Sweden
Phone: +46 31 335 49 00
Cust. support: +46 31 335 49 10
Switzerland
Nobel Biocare Switzerland
Phone: +41 43 211 53 20
United Kingdom
Nobel Biocare UK
Phone: +44 208 756 3300
North America
Canada
Nobel Biocare Canada
Phone: +1 905 762 3500
Cust. support: +1 800 939 9394
USA
Nobel Biocare USA
Phone: +1 714 282 4800
Cust. support: +1 800 322 5001
Central/South America
Distributor Markets
Brazil
Nobel Biocare Brazil
Phone: +55 11 5102 7000
Cust. support: 0800 169 996
Chile
ECM Ingeniera S.A.
Phone: +56 2 655 5500
Cust. support: +56 2 655 5502
Colombia
Hospimedics S.A.
Phone: +57 1 620 9410
Cust. support: +57 1 620 9410
Mexico
Nobel Biocare Mexico
Phone: +52 55 524 974 60
Asia Pacifi c
Australia
Nobel Biocare Australia
Phone: +61 2 8064 5100
Cust. support: toll free 1800 804 597
China
Nobel Biocare China
Phone: +86 21 5206 6655
Cust. support: +86 21 5206 0974
Hong Kong
Nobel Biocare Hong Kong
Phone: +852 2845 1266
Cust. support: +852 2823 8926
India
Nobel Biocare India
Phone: +91 22 6751 9999
Cust. support: toll free 1 800 22 9998
Japan
Nobel Biocare Japan
Phone: +81 3 6717 6191
New Zealand
Nobel Biocare New Zealand
Phone: +61 2 8064 5100
Cust. support: toll free 0800 441 657
Singapore
Nobel Biocare Singapore
Phone: +65 6737 7967
Cust. support: +65 6737 7967
Taiwan
Nobel Biocare Taiwan
Phone: +886 2 2793 9933
Africa
South Africa
Nobel Biocare South Africa
Phone: +27 11 802 0112
Europe and Middle East
Distributor Markets
Bahrain, Bulgaria, Croatia, Cyprus,
Czech Republic, Greece, Iran, Iraq,
Israel, Jordan, Kuwait, Lebanon,
Malta, Oman, Romania, Saudi Arabia,
Serbia, Slovakia, Slovenia, Turkey,
United Arab Emirates, Qatar
Phone: +48 22 549 93 56
Cust. support: +48 22 549 93 55
v 12.3
nobelbiocare.com/contact

76290 G
B 1
308 P
rinte
d in
Sw
ed
en ©
Nob
el B
iocare
Serv
ices
AG
, 2013. A
ll rig
hts
rese
rved
.
Nob
el B
iocare
, th
e N
ob
el B
iocare
log
oty
pe a
nd
all
oth
er
trad
em
ark
s are
, if n
oth
ing
els
e is
sta
ted
or
is e
vid
ent
from
the c
onte
xt
in a
cert
ain
case
, tr
ad
em
ark
s of N
ob
el B
iocare
. P
rod
uct
imag
es
are
not
necess
arily
to s
cale
.
nobelbiocare.com/sterilization
76290_Cleaning & sterilization guidelines_GB.indd 52 2013-08-09 10:54