great teachers series: jacque fresco on...
TRANSCRIPT

simple•ology® Great Teachers Series:
Jacque Fresco on Drawing
by Mark Joyner
Virtuosity Book V1.0
http://www.simpleology.com
This book is intended to be distributed as part of the simple•ology® Great Teachers Series to authorized members only. It must be used in conjunction with
the simple•ology® Course Checklist. Distribution is prohibited.
If you wish to share this document with someone, please direct them to www.simpleology.com and ask them to sign up for a free account.
Copyright © 2007 – Present Simpleology.com (a Construct Zero company) This document is part of the simple•ology Great Teachers Series: Jacque Fresco on Drawing
http://www.simpleology.com | http://www.constructzero.com
1

Contents Page
LESSON 1 ............................................................................................................................... 3 Lines and Shapes.......................................................................................................... 3
LESSON 2 ............................................................................................................................ 10 The Ellipse .................................................................................................................. 10
LESSON 3 ............................................................................................................................ 12 Introduction to 3D Drawing ...................................................................................... 12
LESSON 4 ............................................................................................................................ 16 One-Point Perspective ............................................................................................... 16
LESSON 5............................................................................................................................. 19 One-Point Perspective Part 2: Drawing an Aerial View of a City Block ................... 19
LESSON 6 ............................................................................................................................ 24 Two-Point Perspective ............................................................................................... 24
LESSON 7 ............................................................................................................................. 29 Two-Point Perspective Part 2: Drawing the Letters of the Alphabet ....................... 29
LESSON 8 ............................................................................................................................ 34 Two-Point Perspective Part 3: Drawing Furniture ................................................... 34
LESSON 9 ............................................................................................................................ 37 Drawing Irregular Shapes .......................................................................................... 37
LESSON 10 ........................................................................................................................... 43 Drawing a Cylinder .................................................................................................... 43
LESSON 11 ........................................................................................................................... 50 Using Ellipses to Draw Flowers ................................................................................. 50
LESSON 12 ........................................................................................................................... 55 Rendering: Basic Shading .......................................................................................... 55
LESSON 13 ........................................................................................................................... 62 Rendering Part 2: Adding Shadow ............................................................................ 62
LESSON 14 ........................................................................................................................... 69 Drawing the Human Face: Front View ..................................................................... 69
LESSON 15 ........................................................................................................................... 78 Drawing the Human Face at an Angle ...................................................................... 78
LESSON 16 ........................................................................................................................... 87 The Next 16 Days ........................................................................................................ 87
Copyright © 2007 – Present Simpleology.com (a Construct Zero company) This document is part of the simple•ology Great Teachers Series: Jacque Fresco on Drawing
http://www.simpleology.com | http://www.constructzero.com
2

Lesson 1 Lines and Shapes
Lines
Let us start with the simplest and most basic component of drawing – Lines.
A Line is simply a continuous mark applied to a surface.
Lines can be drawn straight or curved…
Thin or thick…
Long or short…
Fat that becomes skinny and wiggly at the end…
Copyright © 2007 – Present Simpleology.com (a Construct Zero company) This document is part of the simple•ology Great Teachers Series: Jacque Fresco on Drawing
http://www.simpleology.com | http://www.constructzero.com
3

The variations are endless…
And when we’re talking about straight lines, they can be:
Horizontal…
Vertical…
Perpendicular…
Or parallel…
Copyright © 2007 – Present Simpleology.com (a Construct Zero company) This document is part of the simple•ology Great Teachers Series: Jacque Fresco on Drawing
http://www.simpleology.com | http://www.constructzero.com
4

And parallel lines can be:
Horizontal…
Vertical…
Inclined…
Copyright © 2007 – Present Simpleology.com (a Construct Zero company) This document is part of the simple•ology Great Teachers Series: Jacque Fresco on Drawing
http://www.simpleology.com | http://www.constructzero.com
5

Fat…
Long…
Short…
Well, you get the point.
Lines can also be drawn in various thicknesses or weights. You can have different thicknesses simply by using different grades or kinds of drawing pencils, markers or brushes. And you can also vary the weight of the line by applying different amounts of pressure to your pencil, marker, or brush.
There is no single, proper way of holding a pencil or marker when drawing a line. You may hold your pen in a normal writing position or under your palm or whatever is most comfortable for you.
Copyright © 2007 – Present Simpleology.com (a Construct Zero company) This document is part of the simple•ology Great Teachers Series: Jacque Fresco on Drawing
http://www.simpleology.com | http://www.constructzero.com
6

Normal Under the palm
But no matter how you hold your pencil, here are some tips for drawing lines:
1. For shorter strokes, swing and control the length of the lines from your wrist.
2. For longer strokes, swing and control from your elbow. 3. If you wish to turn your sheet of paper at an angle to help you draw better,
by all means do so. The idea is to find the most comfortable position that will get the job done.
Shapes
Shapes are defined by lines. Unlike lines that only have one dimension – length – shapes have two dimensions: length and width. (Later we’ll be moving on to three-dimensional or 3D figures, but don’t worry about that for now…)
There are five basic shapes:
The square, oval, rectangle, circle and the triangle.
These five shapes are the basis of all the complex shapes we see around us, from books to boats to elephants!
Copyright © 2007 – Present Simpleology.com (a Construct Zero company) This document is part of the simple•ology Great Teachers Series: Jacque Fresco on Drawing
http://www.simpleology.com | http://www.constructzero.com
7

Exercise:
Look at a complex shape – like a tree leaf or an ear of corn – and try to “decode” it by breaking it down into its simple shapes. The ear of corn, for example, is bound to have lots of ovals and circles, but it will also have a triangle at its tip and a rectangle defining its body.
Do this “decoding” experiment as often as you can to train your eyes to see the way an artist sees – in simple lines and shapes!
If you want to learn how to draw, it is not enough that your mind understands what lines and shapes are. It’s just as important that your hands get the feel for drawing lines and shapes!
A good way to teach your hands some discipline is to practice by drawing parallel lines, perpendicular lines, and circles – all without using a ruler. Check out how Jacque Fresco does it in the companion video for this lesson!
Copyright © 2007 – Present Simpleology.com (a Construct Zero company) This document is part of the simple•ology Great Teachers Series: Jacque Fresco on Drawing
http://www.simpleology.com | http://www.constructzero.com
8

You can access the companion videos by clicking on the “Companion Videos” tab when you’re logged in to the WebCockpit.
Don’t skip the videos for each lesson. Not only will you learn from the master himself, it will reinforce all the new concepts you’re learning. And practice as much as you can. Once you get the hang of it, the next lessons will be easy.
Copyright © 2007 – Present Simpleology.com (a Construct Zero company) This document is part of the simple•ology Great Teachers Series: Jacque Fresco on Drawing
http://www.simpleology.com | http://www.constructzero.com
9

Lesson 2
The Ellipse
An ellipse is a circle seen in perspective.
“In perspective” is simply artist-speak for “at an angle,” so… an ellipse is simply a circle seen at an angle.
The ellipse is a very special shape because it is widely used in perspective drawing (we’ll get to that soon, but no peeking…).
There are many ways to draw a perfect ellipse, but this is one of the simplest and easiest ways of doing it:
1. Draw a horizontal line on a sheet of paper. Then draw a shorter vertical line at the center of the horizontal line. Make sure that the two lines are perfectly perpendicular or your ellipse will be lopsided.
2. Draw a circle on each end of the horizontal line. The diameter of the circle should be about half the length of the vertical line.
Copyright © 2007 – Present Simpleology.com (a Construct Zero company) This document is part of the simple•ology Great Teachers Series: Jacque Fresco on Drawing
http://www.simpleology.com | http://www.constructzero.com
10

3. Turn the sheet of paper at an angle and draw an arc at the top of one of the circles.
4. Turn the sheet of paper again and draw an arc going towards the other circle until you form a complete ellipse.
If you want to see how it’s done, watch the companion video and see how Jacque draws his ellipses.
The ellipse will form the basis of many complex drawings, so practice drawing ellipses and it will pay off big time later on. Draw big ellipses, small ellipses, fat ellipses, thin ellipses… as much as you want, in different sizes and proportions.
Copyright © 2007 – Present Simpleology.com (a Construct Zero company) This document is part of the simple•ology Great Teachers Series: Jacque Fresco on Drawing
http://www.simpleology.com | http://www.constructzero.com
11

Lesson 3
Introduction to 3D Drawing
After learning how to draw shapes, which only have 2 dimensions (width and length), it’s now time to move on to three-dimensional drawing.
Three-dimensional drawing, or simply 3D drawing, is a type of drawing that shows an object as a solid, rather than as a flat shape.
To better understand the concept of 3D, look at this drawing of a shoebox in both 2D and 3D.
On the left is a 2D drawing of the top of a shoebox, while on the right is a 3D drawing of the same shoebox. The top view drawing is just a flat rectangle, while the 3D version shows the front, right side and the top of the box which makes it look more realistic and solid.
Before you can learn how to draw in 3D, you need to understand 3 important concepts: The Horizon Line, the Vanishing Point, and Perspective.
The Horizon Line
The Horizon Line is where the earth meets the sky.
Now wait a minute…
We know that the earth doesn’t really meet the sky!
So let’s reword that: the Horizon Line is where the earth appears to meet the sky. And it doesn’t matter whether you’re sitting down, kneeling, or standing up… the Horizon Line is always at your eye level. No matter what.
Copyright © 2007 – Present Simpleology.com (a Construct Zero company) This document is part of the simple•ology Great Teachers Series: Jacque Fresco on Drawing
http://www.simpleology.com | http://www.constructzero.com
12

Exercise:
Go outside right now and check out the Horizon Line. It doesn’t matter where you live. You can check out the Horizon Line from a beach, from the top of a mountain, or from the middle of a city (provided that your view isn’t blocked by those pesky billboards…).
Does the Horizon Line appear lower than your eye level from your side of the world? Or maybe it’s higher?
I bet not!
Since the horizon line is always at eye level, artists use it in their drawings to create an illusion of depth and distance. By choosing the position of the horizon line, they control whether they want viewers to feel like they're above or below the objects in their drawing.
Exactly how do they do that?
We’ll get to that soon!
The Vanishing Point
When you’re driving on a straight, flat stretch of road, have you noticed how the road seems to converge on the Horizon Line? This point, which is always on the Horizon Line, is known as the Vanishing Point.
Copyright © 2007 – Present Simpleology.com (a Construct Zero company) This document is part of the simple•ology Great Teachers Series: Jacque Fresco on Drawing
http://www.simpleology.com | http://www.constructzero.com
13

Artists use Vanishing Points in 3D drawing to create the illusion of depth, solidity, and distance.
In a 3D drawing, the Vanishing Point is where the parallel lines appear to converge and vanish – just like they do in real life.
Point of View or Perspective
Perspective comes from the Latin word “perspicere”, which means “to see clearly”. In drawing, perspective refers to an approximate representation of an image as it is seen by the human eye.
That’s because to the human eye:
1. Objects appear smaller the farther away they are from the viewer; and
2. Objects become slightly distorted when viewed at an angle.
In order for you to better understand the concepts of Horizon Line, the Vanishing Point and Perspective, here is a simple illustration:
Copyright © 2007 – Present Simpleology.com (a Construct Zero company) This document is part of the simple•ology Great Teachers Series: Jacque Fresco on Drawing
http://www.simpleology.com | http://www.constructzero.com
14

Notice that all the artist did was draw two men, one of whom is smaller than the other.
If he had simply put them side by side, we would have thought that one of them is a midget or a Hobbit.
But since he used a Horizon Line and a Vanishing Point to create Perspective, our eyes are fooled into believing that one of the men is actually standing farther away.
Amazing isn’t it?
Now what if I told you that you could easily draw in 3D using these very same principles?
It’s not really that hard, since we’ll be breaking it all down into simple, easy-to-understand lessons.
As a matter of fact, you’ll be drawing in perspective by tomorrow!
But first, check out what Jacque has to say about perspective drawing by going to the Companion Videos tab on your WebCockpit…
Copyright © 2007 – Present Simpleology.com (a Construct Zero company) This document is part of the simple•ology Great Teachers Series: Jacque Fresco on Drawing
http://www.simpleology.com | http://www.constructzero.com
15

Lesson 4
One-Point Perspective
In lesson 3, we defined perspective (or point of view) as a rough representation of an image as it is seen by the human eye.
One-point perspective is a basic style of perspective drawing that is commonly used when drawing in 3D. However, one-point perspective is an extremely simplified drawing. It is only useful when the scene being represented is composed entirely of straight lines that intersect at 90 degrees to each other. Objects that are made up of lines either directly perpendicular or directly parallel with the viewer’s line of sight can be drawn and represented using one-point perspective.
A single vanishing point is used in drawing a basic one-point perspective so that the front is directly facing the viewer.
To better understand this lesson, we’ll do a step-by-step drawing of a simple cube in one-point perspective.
Get your paper and pencil ready. You may use a ruler to help you draw straight lines.
Place a sheet of paper in a landscape position (wider than it is tall). With your pencil and ruler, draw a straight horizontal line and mark it with “H”. This is your horizon line:
1. Draw a dot in the center of the horizon line and mark it with “VP”. This is
your vanishing point.
VP
Horizon Line
Copyright © 2007 – Present Simpleology.com (a Construct Zero company) This document is part of the simple•ology Great Teachers Series: Jacque Fresco on Drawing
http://www.simpleology.com | http://www.constructzero.com
16

2. Draw a square or rectangle below the horizon line but in the middle of the page.
3. Draw faint lines to connect the top corners of the rectangle or box to the vanishing point. These are your “construction lines” and they are just meant as guides. They will be erased later on.
4. Draw a horizontal line between the top two lines to represent the back of the box.
Copyright © 2007 – Present Simpleology.com (a Construct Zero company) This document is part of the simple•ology Great Teachers Series: Jacque Fresco on Drawing
http://www.simpleology.com | http://www.constructzero.com
17

5. Darken the lines along the cube and erase the construction lines.
I know it can be tricky at first, but if you practice a few more times it will get easier and easier. You can also check out Jacque’s video to see how it’s done in real time.
Copyright © 2007 – Present Simpleology.com (a Construct Zero company) This document is part of the simple•ology Great Teachers Series: Jacque Fresco on Drawing
http://www.simpleology.com | http://www.constructzero.com
18

Lesson 5
One-Point Perspective Part 2: Drawing an Aerial View of a City Block
In the previous lesson, we learned how to draw a 3D cube in simple one-point perspective.
By now you must be wondering “why should I learn this technique?” and “when can I use it?”
Let’s say you need to draw an aerial view of a city block. Sounds daunting doesn’t it? Well, you can now do this easily even if you don’t have any sophisticated graphics software. All you need is a piece of paper, a ruler, a pencil, and the principles of one-point perspective to draw an aerial view of a city block.
Definition:
Aerial view refers to the view from straight above, as if you were riding an airplane and looking straight down. It is also synonymous with the term “bird’s eye view”.
Here’s what you need to do:
1. Place your sheet of paper in landscape position and draw horizontal boxes to represent the top view of the buildings. It could be any shape, but for this purpose let’s use squares and rectangles.
Copyright © 2007 – Present Simpleology.com (a Construct Zero company) This document is part of the simple•ology Great Teachers Series: Jacque Fresco on Drawing
http://www.simpleology.com | http://www.constructzero.com
19
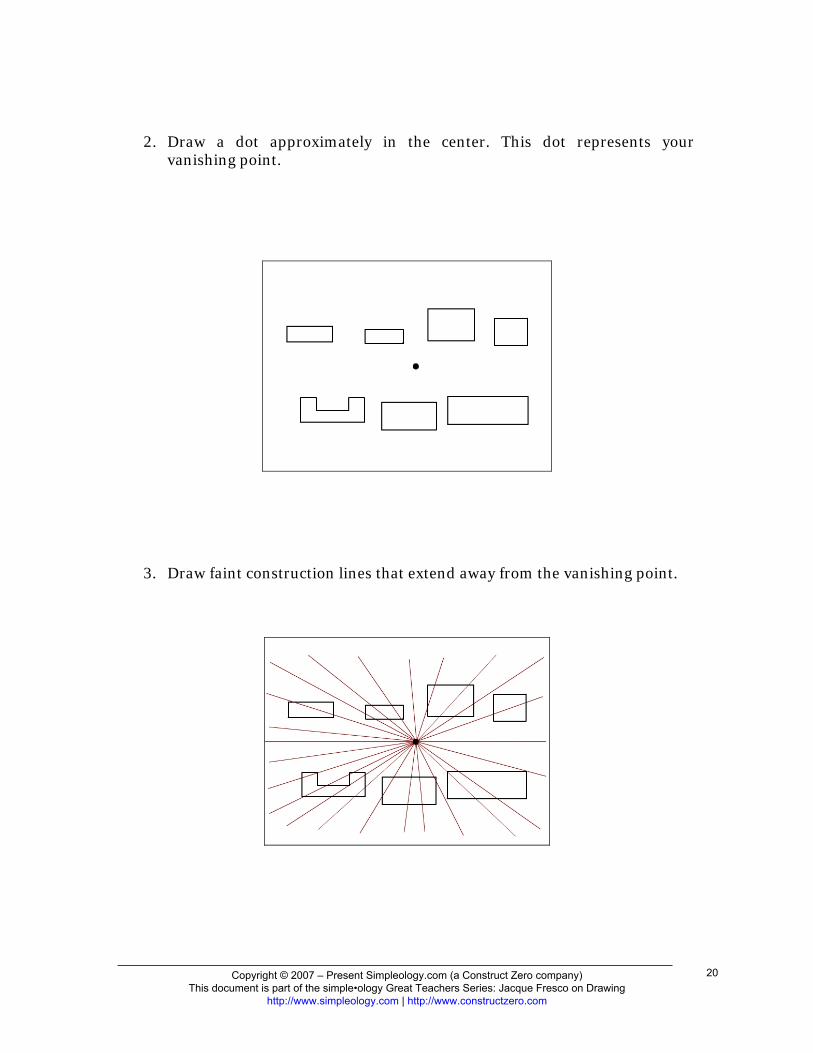
2. Draw a dot approximately in the center. This dot represents your vanishing point.
3. Draw faint construction lines that extend away from the vanishing point.
Copyright © 2007 – Present Simpleology.com (a Construct Zero company) This document is part of the simple•ology Great Teachers Series: Jacque Fresco on Drawing
http://www.simpleology.com | http://www.constructzero.com
20

4. Using the construction lines as your guide, you may now start constructing your buildings by drawing a line from each corner of the boxes. Extend the lines downward to the direction of the vanishing point. Make sure you stop before the lines reach the dot because at this point, you want to see the dot and not cover it.
5. When drawing the base of the buildings, use the top view horizontal boxes as your guide. Make sure that the lines you draw at the base are parallel with the lines from the top view.
Copyright © 2007 – Present Simpleology.com (a Construct Zero company) This document is part of the simple•ology Great Teachers Series: Jacque Fresco on Drawing
http://www.simpleology.com | http://www.constructzero.com
21

6. Draw a walkway at the base of the buildings by extending the lines away from them.
7. Draw lines from the top view box going downward along one side of the building (the side that faces the dot) to represent windows. Make sure you follow the angle to fit the shape of the building.
Copyright © 2007 – Present Simpleology.com (a Construct Zero company) This document is part of the simple•ology Great Teachers Series: Jacque Fresco on Drawing
http://www.simpleology.com | http://www.constructzero.com
22

8. Repeat the process for every building on your drawing. Make sure that the base of your buildings and the walkways are along a straight line. You can use either horizontal or vertical lines to represent building details, like windows and floors.
9. You may darken the lines along the buildings and color them afterwards. Erase the construction lines for a cleaner look.
This requires a bit of practice, but doing this should be fun! Again, it would be a good idea to see how it’s done in real time, so be sure to watch Jacque’s video in the Companion Videos section of the WebCockpit.
In the next lesson, we’ll take things to the next level by studying two-point perspective.
Copyright © 2007 – Present Simpleology.com (a Construct Zero company) This document is part of the simple•ology Great Teachers Series: Jacque Fresco on Drawing
http://www.simpleology.com | http://www.constructzero.com
23

Lesson 6
Two-Point Perspective
We already know that perspective is a realistic way of drawing objects in 3D. In this lesson we’ll learn about two-point perspective, which can be used to illustrate the same objects drawn using one-point perspective, but viewed from an angle.
Two-point perspective has two separate vanishing points at the horizon line. One vanishing point corresponds to one set of parallel lines while the other vanishing point corresponds to another set. For example, looking at an image of a house from a corner, one wall would diminish to one vanishing point and the other wall towards the opposite vanishing point.
Review:
The horizon line is also known as the eye level. You establish the viewer's eye level by choosing the position of the horizon line. You control whether you want viewers to feel like they're above or below the objects in your drawing by choosing the position of the horizon line.
The vanishing point is where all the lines meet on the horizon line.
Let’s practice drawing a cube using two-point perspective.
Look at the image below.
To draw a cube in two-point perspective, follow these steps:
Copyright © 2007 – Present Simpleology.com (a Construct Zero company) This document is part of the simple•ology Great Teachers Series: Jacque Fresco on Drawing
http://www.simpleology.com | http://www.constructzero.com
24
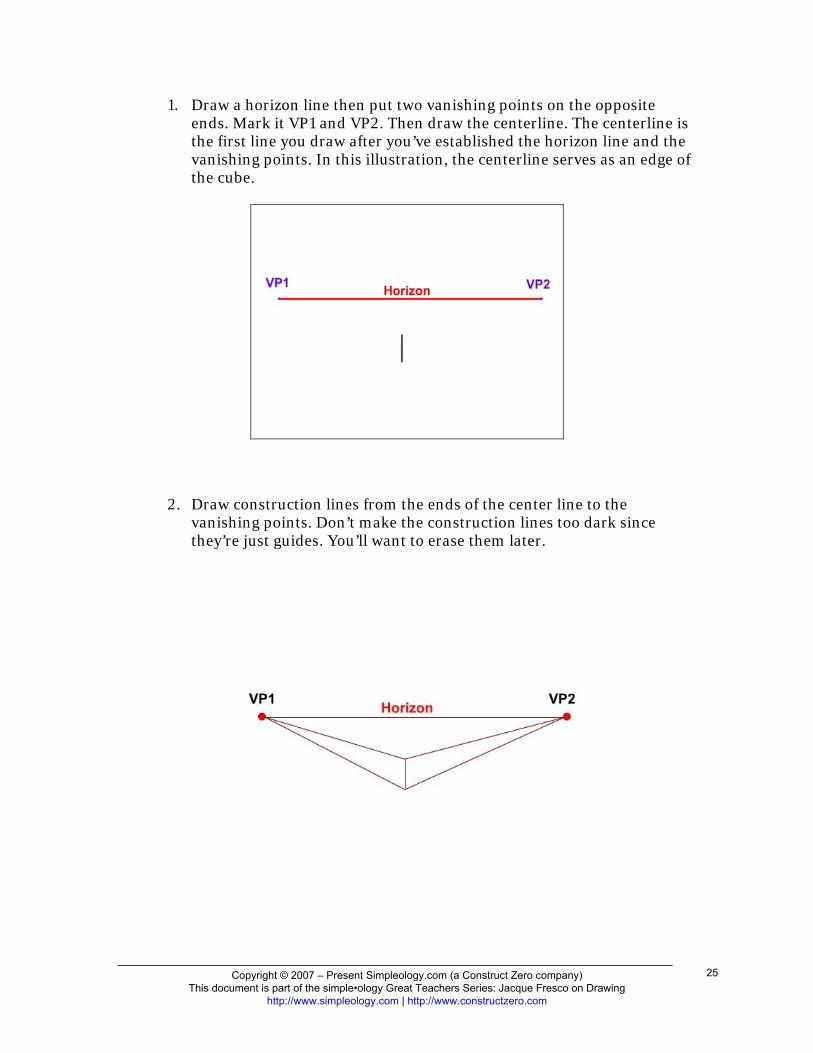
1. Draw a horizon line then put two vanishing points on the opposite ends. Mark it VP1 and VP2. Then draw the centerline. The centerline is the first line you draw after you’ve established the horizon line and the vanishing points. In this illustration, the centerline serves as an edge of the cube.
2. Draw construction lines from the ends of the center line to the vanishing points. Don’t make the construction lines too dark since they’re just guides. You’ll want to erase them later.
Copyright © 2007 – Present Simpleology.com (a Construct Zero company) This document is part of the simple•ology Great Teachers Series: Jacque Fresco on Drawing
http://www.simpleology.com | http://www.constructzero.com
25

3. Draw two more vertical parallel lines to show the two sides of the cube.
4. Draw faint construction lines from the ends of these lines to the opposite vanishing point.
Copyright © 2007 – Present Simpleology.com (a Construct Zero company) This document is part of the simple•ology Great Teachers Series: Jacque Fresco on Drawing
http://www.simpleology.com | http://www.constructzero.com
26

5. Finish the drawing by using a fine black pen to draw over the outline of the cube. Erase your construction lines and add some shading if you like. (We’ll learn proper shading techniques later so don’t worry too much about getting it right for now.)
Now consider this figure:
Notice that if you place the box below the horizon line, viewers will feel like they are looking downward and see more of the top of the box.
Copyright © 2007 – Present Simpleology.com (a Construct Zero company) This document is part of the simple•ology Great Teachers Series: Jacque Fresco on Drawing
http://www.simpleology.com | http://www.constructzero.com
27

Conversely, if you place the box above the horizon line, viewers will feel like they are looking upward and see more of the box’s underside.
That’s how powerful the concept of the Horizon Line is. By deciding where to put your drawing in relation to the horizon line, you automatically control the perspective, or how you want the viewer to see your drawing.
As we go further along this course, you will learn to draw different objects from both below and above the horizon line.
For now, you can practice drawing a book using two vanishing points. Watch how our expert, Jacque Fresco, does it in the companion video. You can see it by going to the Companion Videos tab when you’re logged in to the WebCockpit.
Learning how to draw a basic box using two vanishing points is very helpful because you can use it as the basis for all your future drawings in two-point perspective.
For our next lesson, we’ll apply what we’ve learned and draw the letters of the alphabet in two-point perspective.
Copyright © 2007 – Present Simpleology.com (a Construct Zero company) This document is part of the simple•ology Great Teachers Series: Jacque Fresco on Drawing
http://www.simpleology.com | http://www.constructzero.com
28

Lesson 7
Two-Point Perspective Part 2: Drawing the Letters of the Alphabet
We’ve drawn a box and a book in the previous lesson, now let’s add more excitement by learning how to draw the letters of the alphabet using two-point perspective.
In the companion video, Jacque Fresco advises us to “Practice putting the letters in a box.” The box will serve as a frame, which can be used to draw any letter of the alphabet. (If you get confused, review the previous lesson on how to draw simple boxes.)
To start this lesson, we should first draw the box that will “house” our letters:
Now that we have our box, we can begin drawing our letter.
1. Put an X on top of the box.
Copyright © 2007 – Present Simpleology.com (a Construct Zero company) This document is part of the simple•ology Great Teachers Series: Jacque Fresco on Drawing
http://www.simpleology.com | http://www.constructzero.com
29

2. Draw the frame. You can do this by placing a dot on the lower right portion of the X then draw a vertical line. When your line hits the X, stop and head for the vanishing point. Draw a vertical line again and then head for the other vanishing point. Remember that you have two vanishing points in this perspective.
3. Draw a small square in the middle section of the X.
Copyright © 2007 – Present Simpleology.com (a Construct Zero company) This document is part of the simple•ology Great Teachers Series: Jacque Fresco on Drawing
http://www.simpleology.com | http://www.constructzero.com
30

4. Head this small square to the vanishing points by drawing horizontal lines.
5. Put vertical lines in all corners of the box and draw them towards the vanishing points. This means extending the corner line to create the bottom perspective.
This will be your frame for all the letters that you’d like to draw.
Copyright © 2007 – Present Simpleology.com (a Construct Zero company) This document is part of the simple•ology Great Teachers Series: Jacque Fresco on Drawing
http://www.simpleology.com | http://www.constructzero.com
31

Let’s try the letter E. Using this frame, draw the letter E on the inside of it. You can do this by extending the basic horizontal lines, dropping them down and then drawing towards the vanishing points. Erase the construction lines on the right side. Add corner lines to finish the illustration.
Copyright © 2007 – Present Simpleology.com (a Construct Zero company) This document is part of the simple•ology Great Teachers Series: Jacque Fresco on Drawing
http://www.simpleology.com | http://www.constructzero.com
32

Don’t let all the lines in the box confuse you. Just like the example above, when creating other letters, just extend and darken some lines and erase the extra lines that you don’t need. One good example is the letter A. To create the letter A, eliminate the bottom portion of the perspective. You can practice drawing letters C, T, and H using this technique. There’s also a way to draw a letter using the box in a vertical position.
Check out how Jacque does it by going to the Companion Videos tab in your WebCockpit. In the next lesson, we’ll apply the same techniques to draw furniture in 3D.
Copyright © 2007 – Present Simpleology.com (a Construct Zero company) This document is part of the simple•ology Great Teachers Series: Jacque Fresco on Drawing
http://www.simpleology.com | http://www.constructzero.com
33

Lesson 8
Two-Point Perspective Part 3: Drawing Furniture
In our previous lessons we learned that one-point perspective uses only one vanishing point while two-point perspective uses two vanishing points. With one-point perspective, the viewer is looking at the front of an object while with two-point perspective the viewer is looking at the edge of an object.
A lot of people prefer two–point perspective because it looks more natural than one-point perspective. Look at this image of a table drawn in one-point perspective.
Copyright © 2007 – Present Simpleology.com (a Construct Zero company) This document is part of the simple•ology Great Teachers Series: Jacque Fresco on Drawing
http://www.simpleology.com | http://www.constructzero.com
34

Now let’s practice drawing the same table using two-point perspective.
1. Draw a horizon line and mark both vanishing points. Draw a center line and connect its ends to the vanishing points. You can use the figure we’ve created for lesson 6.
2. Draw the table top.
3. Draw the front legs of the table.
Copyright © 2007 – Present Simpleology.com (a Construct Zero company) This document is part of the simple•ology Great Teachers Series: Jacque Fresco on Drawing
http://www.simpleology.com | http://www.constructzero.com
35

4. Draw one of the back legs.
5. Draw the final leg and add other details.
Practice drawing a dresser or chair using two-point perspective. Watch Jacque’s companion video to see how he does it.
…………………….. Drawing cubes and furniture may now seem easy to you because you’re just dealing with straight lines. But how do you apply two-point perspective when you’re drawing a complex or irregular shape, such as say, a boat with a curved hull? We’ll learn how in the next lesson.
Copyright © 2007 – Present Simpleology.com (a Construct Zero company) This document is part of the simple•ology Great Teachers Series: Jacque Fresco on Drawing
http://www.simpleology.com | http://www.constructzero.com
36

Lesson 9
Drawing Irregular Shapes
We’ve drawn boxes, letters of the alphabet and a table using two-point perspective. Now let’s move on to a more complex shape like a rowboat.
1. Draw a straight line to represent the horizon line. Mark your vanishing points, then draw the box that you would want your boat to fit into.
2. Draw an X on the front plane of the box to find your center line. Remember to draw these initial lines faintly, as you will erase them later.
Copyright © 2007 – Present Simpleology.com (a Construct Zero company) This document is part of the simple•ology Great Teachers Series: Jacque Fresco on Drawing
http://www.simpleology.com | http://www.constructzero.com
37

3. Extend the center line toward the vanishing point.
4. Draw the front curvature of the boat on the upper plane of the box.
Copyright © 2007 – Present Simpleology.com (a Construct Zero company) This document is part of the simple•ology Great Teachers Series: Jacque Fresco on Drawing
http://www.simpleology.com | http://www.constructzero.com
38

5. Draw a portion of an ellipse at the far end of the block to represent the back of the boat.
6. Find the point where the front curvature of the boat touches the edge of the box. Then extend this point toward the vanishing point to find where the curvature will hit the opposite edge of the box.
Copyright © 2007 – Present Simpleology.com (a Construct Zero company) This document is part of the simple•ology Great Teachers Series: Jacque Fresco on Drawing
http://www.simpleology.com | http://www.constructzero.com
39

7. Give a back rake to the boat by drawing a slanted line downward from the tip of the upper curvature.
8. Repeat the top curvature on the bottom of the boat, head it toward the vanishing point, and connect it to the back of the boat.
Copyright © 2007 – Present Simpleology.com (a Construct Zero company) This document is part of the simple•ology Great Teachers Series: Jacque Fresco on Drawing
http://www.simpleology.com | http://www.constructzero.com
40

9. Draw the bottom portion of the boat and add seats – but always remember to head them off toward the vanishing point.
10. Erase the construction lines and add shading to further define the shape of your boat. (Don’t worry, shading will be discussed in more detail in Lesson 12.)
Copyright © 2007 – Present Simpleology.com (a Construct Zero company) This document is part of the simple•ology Great Teachers Series: Jacque Fresco on Drawing
http://www.simpleology.com | http://www.constructzero.com
41

You may think this a bit complicated, but with practice, soon you will be able to draw almost any irregular shape in proper perspective. As Jacque Fresco says, “No matter how complex the drawing, it’s still the same two vanishing points that we’re using!”
The trick is to start with the box that the shape will fit into. And always mind your Vanishing Points!
Check out how Jacque Fresco uses this technique to draw many other irregular shapes – from cars to calculators to eyeglasses – by checking out the Companion Video to this lesson. You can watch it by going to the Companion Videos tab on your WebCockpit.
Keep practicing using vanishing points as you gradually embark on more complex drawings. You’ll find that the more you use them, the more proficient you will become. In the next lesson, we’ll move on to learning how to draw a 3D cylinder. This is a shape that will prove very useful as we delve into more advanced techniques later on.
Copyright © 2007 – Present Simpleology.com (a Construct Zero company) This document is part of the simple•ology Great Teachers Series: Jacque Fresco on Drawing
http://www.simpleology.com | http://www.constructzero.com
42

Lesson 10
Drawing a Cylinder A cylinder is a three-dimensional surface shaped like a tin can or drum. Despite the curved top and bottom, it is easy to draw using ellipses. Review:
An ellipse is a circle seen at an angle. It could be circular or rather elongated depending on the angle you are looking at. But remember, Jacque Fresco says, “An ellipse is round at the end – it’s never pointed.”
Back in Lesson 2 we learned how to draw an ellipse. We can now build on that skill by drawing a cylinder. We’ll show you two techniques for drawing a cylinder in this Lesson. The first technique simply uses perpendicular lines to draw a cylinder, which is useful if you just want to approximate how a cylinder looks. The second technique is more exact, and uses a 3D box with two Vanishing Points. The second technique is useful when you need to draw a cylinder with more accurate proportions. Here’s the first technique for approximating a cylinder using perpendicular lines. 1. Determine the length of your cylinder and draw a construction line in the
center. Remember, draw it faintly because you will want to erase it later.
Copyright © 2007 – Present Simpleology.com (a Construct Zero company) This document is part of the simple•ology Great Teachers Series: Jacque Fresco on Drawing
http://www.simpleology.com | http://www.constructzero.com
43

2. Draw two lines at the ends of, and perpendicular to your construction line. An
ellipse is always at right angles to the line in the center (in this case, your construction line).
3. Draw the ellipses at the ends of your construction line, top and bottom. The
key point to remember here is that the top ellipse is always thinner compared to the bottom ellipse, even though both ellipses are of the same length.
Copyright © 2007 – Present Simpleology.com (a Construct Zero company) This document is part of the simple•ology Great Teachers Series: Jacque Fresco on Drawing
http://www.simpleology.com | http://www.constructzero.com
44

4. Finish the cylinder by drawing two vertical lines to connect the ends of the top and bottom ellipses. Take note that at the bottom of the cylinder, the ellipse does not smack straight into the vertical lines – rather it flows gracefully into it.
5. Erase your construction lines and add some shading, if you wish.
Copyright © 2007 – Present Simpleology.com (a Construct Zero company) This document is part of the simple•ology Great Teachers Series: Jacque Fresco on Drawing
http://www.simpleology.com | http://www.constructzero.com
45

Now let’s move on to the second technique, which is useful when you need to have a more accurate representation of a cylinder. 1. Start by establishing your Horizon Line and Vanishing Points, then draw the
box that the cylinder will fit into.
2. Mark the four upper corners of the box. These four markers will give you the
height and width of the upper ellipse.
Copyright © 2007 – Present Simpleology.com (a Construct Zero company) This document is part of the simple•ology Great Teachers Series: Jacque Fresco on Drawing
http://www.simpleology.com | http://www.constructzero.com
46

3. Draw a circle touching the left and right corner markers. The circle should be half as big as the distance between the top and bottom corner markers. You can turn the paper sideways to make it easier to draw curved lines.
4. Complete the upper ellipse by drawing two curved lines from one circle to the
other, making sure that the curve touches both the top and bottom corner markers.
Copyright © 2007 – Present Simpleology.com (a Construct Zero company) This document is part of the simple•ology Great Teachers Series: Jacque Fresco on Drawing
http://www.simpleology.com | http://www.constructzero.com
47

5. Start drawing the lower ellipse by marking the four lower corners of the box.
Then draw a midsection line that will help you position the lower ellipse.
6. Fill in the lower ellipse by drawing curved lines outside of the box to connect
the four corner markers. This will give you a lower ellipse that is deeper than the upper ellipse.
Copyright © 2007 – Present Simpleology.com (a Construct Zero company) This document is part of the simple•ology Great Teachers Series: Jacque Fresco on Drawing
http://www.simpleology.com | http://www.constructzero.com
48
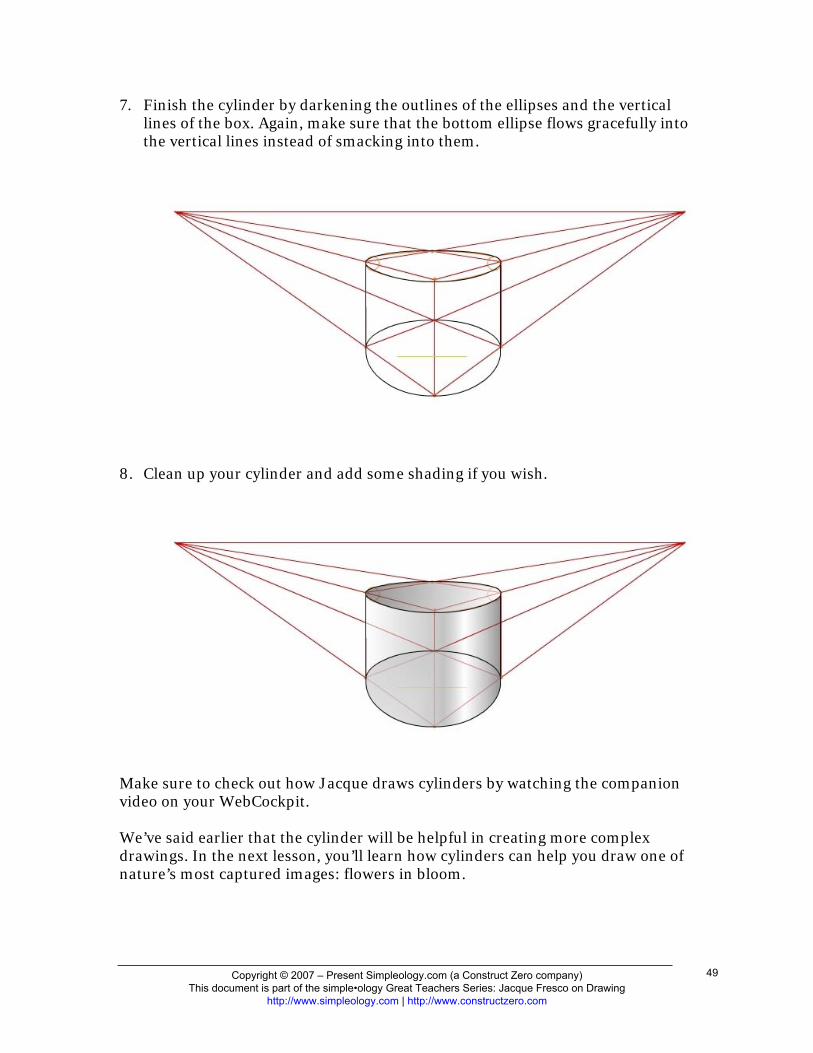
7. Finish the cylinder by darkening the outlines of the ellipses and the vertical lines of the box. Again, make sure that the bottom ellipse flows gracefully into the vertical lines instead of smacking into them.
8. Clean up your cylinder and add some shading if you wish.
Make sure to check out how Jacque draws cylinders by watching the companion video on your WebCockpit. We’ve said earlier that the cylinder will be helpful in creating more complex drawings. In the next lesson, you’ll learn how cylinders can help you draw one of nature’s most captured images: flowers in bloom.
Copyright © 2007 – Present Simpleology.com (a Construct Zero company) This document is part of the simple•ology Great Teachers Series: Jacque Fresco on Drawing
http://www.simpleology.com | http://www.constructzero.com
49

Lesson 11
Using Ellipses to Draw Flowers
Flowers are a favorite subject for many seasoned artists. However, their complex shape often scares beginners. But remember that even the most complex shapes are just made up of several basic shapes.
Remember our previous lessons on drawing cylinders and ellipses? Today, we’ll be using simple ellipses and cylinders to help us draw realistic 3D flowers.
Ready?
Get a sheet of paper and a pencil, and follow these steps:
1. Draw about three stems.
2. In order to draw the flowers, you need to draw ellipses at right angles. Draw your centerlines at the end of the stems. Draw these centerlines lightly as you will want to erase them later on.
Copyright © 2007 – Present Simpleology.com (a Construct Zero company) This document is part of the simple•ology Great Teachers Series: Jacque Fresco on Drawing
http://www.simpleology.com | http://www.constructzero.com
50

3. Draw a shorter perpendicular line that crosses each centerline.
4. Decide on the proportion of the ellipses before you draw them. You can use dots at the tips of the lines to define the proportion.
5. Connect these dots with an ellipse. Do this for the rest of the stems making sure that each ellipse is at a right angle to the centerline.
Copyright © 2007 – Present Simpleology.com (a Construct Zero company) This document is part of the simple•ology Great Teachers Series: Jacque Fresco on Drawing
http://www.simpleology.com | http://www.constructzero.com
51

6. Draw a half circle underneath each ellipse.
7. Join the half circles to the stems by drawing slightly curved lines at the base.
8. To create petals, draw curved lines along the half circles.
Copyright © 2007 – Present Simpleology.com (a Construct Zero company) This document is part of the simple•ology Great Teachers Series: Jacque Fresco on Drawing
http://www.simpleology.com | http://www.constructzero.com
52

9. Draw smaller petals on the opposite side of the half circles to fill the entire flower.
10. Once you have drawn petals on all the flowers, draw a shaft with a rounded tip in the middle of each ellipse. This is the pistil of the flower.
11. You may add leaves and other details to your drawing.
Copyright © 2007 – Present Simpleology.com (a Construct Zero company) This document is part of the simple•ology Great Teachers Series: Jacque Fresco on Drawing
http://www.simpleology.com | http://www.constructzero.com
53

12. You may also color your finished work.
And just like that, you’re well on your way to drawing a full bouquet. So the next time you draw flowers, just remember to start with an ellipse as your guide.
For more inspiration, watch how Jacque draws his flowers by watching the companion video for this lesson!
………………..
Ever wonder why some drawings look more realistic than others? The secret is in the shading. And that’s exactly what you’re going to learn in the next lesson!
Copyright © 2007 – Present Simpleology.com (a Construct Zero company) This document is part of the simple•ology Great Teachers Series: Jacque Fresco on Drawing
http://www.simpleology.com | http://www.constructzero.com
54

Lesson 12
Rendering: Basic Shading Now that we’ve learned how to draw basic shapes, it’s time to learn how to make these shapes come to life through shading. When done properly, shading gives depth to a drawing so it looks more realistic. No matter how well-drawn an object is, without shading it will still look flat. Shading can go from darkest black to varying shades of gray. These are called halftones. Imagine going up a flight of stairs, with each step getting twice as dark as the one before; or going down the stairs, this time each step getting half as dark as the previous.
You can achieve these varying tones by applying different kinds of pressure (light, medium, heavy) on your pencil.
Exercise:
Get a fresh piece of paper and a pencil.
Draw seven boxes about half an inch apart from each other.
Start shading in your boxes, first from light to dark by gradually increasing pressure on your pencil as you go from one box to the next. To make the shading even darker you can also add another layer of shading to a box.
Copyright © 2007 – Present Simpleology.com (a Construct Zero company) This document is part of the simple•ology Great Teachers Series: Jacque Fresco on Drawing
http://www.simpleology.com | http://www.constructzero.com
55

Now, draw another set of boxes and start shading it going from dark to light, this time gradually decreasing pressure on your pencil.
You can also practice with shapes other than squares.
When you’ve perfected shading using a pencil you can experiment on doing halftones using other mediums like pen and ink, crayons, watercolors or even paint! Once you get the hang of it, check out Jacque Fresco’s technique on how to shade curved objects like a cylinder and a bowl. You can see it by going to the Companion Videos tab on your WebCockpit. Shading a Cylinder
1. Above your drawing of a cylinder, draw half of a color wheel.
Copyright © 2007 – Present Simpleology.com (a Construct Zero company) This document is part of the simple•ology Great Teachers Series: Jacque Fresco on Drawing
http://www.simpleology.com | http://www.constructzero.com
56

2. Trace the lines of the color wheel down to your cylinder so that the body of the cylinder appears to have segments.
3. Start shading from the edge, lightening the shade as you move toward the middle of the body.
Copyright © 2007 – Present Simpleology.com (a Construct Zero company) This document is part of the simple•ology Great Teachers Series: Jacque Fresco on Drawing
http://www.simpleology.com | http://www.constructzero.com
57

4. To shade the top part of the cylinder, start from the opposite end, using
the same technique of going from dark to light.
5. It is important to note that to bring depth to the drawing, the darkest
shade on the body and on the top of the cylinder must be on opposite ends.
Once you remove the construction lines and smoothen out the shading, your final drawing can look like this.
Copyright © 2007 – Present Simpleology.com (a Construct Zero company) This document is part of the simple•ology Great Teachers Series: Jacque Fresco on Drawing
http://www.simpleology.com | http://www.constructzero.com
58

Shading a Bowl
1. Draw a bowl. We will be using the same principle as the color wheel technique.
2. The middle line on the bowl will be straight, but the lines on either side
will follow the curve of the bowl. As the lines get nearer the edge, they appear to get closer and closer to each other.
3. Again, start shading from the edge, easing on the pressure as you go toward the middle.
Copyright © 2007 – Present Simpleology.com (a Construct Zero company) This document is part of the simple•ology Great Teachers Series: Jacque Fresco on Drawing
http://www.simpleology.com | http://www.constructzero.com
59

4. Shade the inside of the bowl starting from the opposite edge and going from dark to light.
5. Shading opposite ends of the body and the inside will help bring out the shape of the drawing.
The end result after the meticulous shading is a more realistic looking bowl.
Copyright © 2007 – Present Simpleology.com (a Construct Zero company) This document is part of the simple•ology Great Teachers Series: Jacque Fresco on Drawing
http://www.simpleology.com | http://www.constructzero.com
60

………………………….
Now that we are beginning to master shading, our drawings are really going to pop out of the paper. Keep practicing shading different shapes using halftones. In the next lesson we will discuss how adding shadows can add real-world depth to our drawings.
Copyright © 2007 – Present Simpleology.com (a Construct Zero company) This document is part of the simple•ology Great Teachers Series: Jacque Fresco on Drawing
http://www.simpleology.com | http://www.constructzero.com
61

Lesson 13
Rendering Part 2: Adding Shadow Depending on available light, all objects cast a shadow. In this lesson we will practice drawing shadows for two basic shapes: the cube and the sphere. Have you been practicing shading in half-tones? It will come in handy when you shade in your shadows for this lesson. Shading a Simple Cube
1. Using two vanishing points, draw a cube.
2. Next, determine the source of light.
Copyright © 2007 – Present Simpleology.com (a Construct Zero company) This document is part of the simple•ology Great Teachers Series: Jacque Fresco on Drawing
http://www.simpleology.com | http://www.constructzero.com
62

3. Lightly shade the surface of the cube that is on the same side as the source of light. The overall shade of the other side will be a half tone darker. Angle the strokes toward the vanishing point.
4. To shade the dark side, start from the top and gradually decrease the pressure going down. The tone becomes lighter toward the bottom.
Adding a Shadow to the Cube
1. Extend a light beam from the source of light, passing through the corners of the cube, toward the surface.
Copyright © 2007 – Present Simpleology.com (a Construct Zero company) This document is part of the simple•ology Great Teachers Series: Jacque Fresco on Drawing
http://www.simpleology.com | http://www.constructzero.com
63

2. Extend lines from the bottom edges of the cube to meet the light beam and
create the outline of the shadow.
3. Fill in the shadow starting from the edge closest to the cube, going from dark to light as you move toward the outer edge of the shadow.
Copyright © 2007 – Present Simpleology.com (a Construct Zero company) This document is part of the simple•ology Great Teachers Series: Jacque Fresco on Drawing
http://www.simpleology.com | http://www.constructzero.com
64

When you erase your construction lines (vanishing points, source of light) your image will look like this.
Shading a Sphere
1. Draw a circle.
2. Identify where the light is coming from, and where the light hits the sphere. This is called the highlight.
Copyright © 2007 – Present Simpleology.com (a Construct Zero company) This document is part of the simple•ology Great Teachers Series: Jacque Fresco on Drawing
http://www.simpleology.com | http://www.constructzero.com
65

3. Start shading from the edge of the circle, gradually easing the pressure as you near the highlight.
Adding a Shadow to the Sphere
1. Place your horizon line just above the bottom of the sphere.
2. Draw an ellipse along the horizontal line starting from the base of the sphere, using the light beam as your guide.
Copyright © 2007 – Present Simpleology.com (a Construct Zero company) This document is part of the simple•ology Great Teachers Series: Jacque Fresco on Drawing
http://www.simpleology.com | http://www.constructzero.com
66

3. Make sure that a thin shaft of light highlights the edge of the sphere to mark its separation from the shadow.
4. Shade the entire ellipse, again with the darkest tones near the base of the sphere.
Copyright © 2007 – Present Simpleology.com (a Construct Zero company) This document is part of the simple•ology Great Teachers Series: Jacque Fresco on Drawing
http://www.simpleology.com | http://www.constructzero.com
67

Your end result, without the horizon line and source of light lines, should look something like this.
………….. Learning to use shadows will make your drawings more realistic and will give you more range to explore the kind of things you will eventually want to draw. Check out how Jacque does it in real time by watching the companion video for this lesson. In the next lesson, we will tackle an even more challenging subject: the human face.
Copyright © 2007 – Present Simpleology.com (a Construct Zero company) This document is part of the simple•ology Great Teachers Series: Jacque Fresco on Drawing
http://www.simpleology.com | http://www.constructzero.com
68

Lesson 14
Drawing the Human Face: Front View Drawing the human face is a great challenge for both experienced and beginning artists. So expect to put in a lot of practice, and don’t despair if you don’t get it right the first few times. Fortunately, human faces all share common ratios and proportions. So once you know these “secret formulas” then drawing human faces will get easier and easier. In the companion video for this lesson, Jacque suggests that you start by drawing a letter “T”, this will serve as your framework for the facial features. The Eyes and Eyebrows
1. The two eyes are the same size and the distance between them is about the size of one eye, so start by dividing the horizontal bar of the T into three equal parts.
2. Draw the eyes on the spaces at the end. Draw a circle inside each eye, with
the top and bottom ends extending unseen outside the opening of the eye. This is the iris, or the colored part of the eye.
Copyright © 2007 – Present Simpleology.com (a Construct Zero company) This document is part of the simple•ology Great Teachers Series: Jacque Fresco on Drawing
http://www.simpleology.com | http://www.constructzero.com
69

3. Draw the eyebrows following the curve of the eye. The space between the eye and eyebrow is about the width of one eye.
4. Below each eye, draw a curve from the inside corner of each eye, extending
to about the middle of the eye.
Copyright © 2007 – Present Simpleology.com (a Construct Zero company) This document is part of the simple•ology Great Teachers Series: Jacque Fresco on Drawing
http://www.simpleology.com | http://www.constructzero.com
70

The Nose
1. Find the middle point of the T stem and draw an inverted “v.” The v is about as wide as one eye. The point of the inverted v is the tip of the nose.
2. Add a small circle just above the tip of the nose.
3. Draw a thin ellipse on top of the small circle up to the horizontal bar of the
T.
Copyright © 2007 – Present Simpleology.com (a Construct Zero company) This document is part of the simple•ology Great Teachers Series: Jacque Fresco on Drawing
http://www.simpleology.com | http://www.constructzero.com
71

4. Add two thin ellipses to the ends of the inverted v to show nostrils.
Copyright © 2007 – Present Simpleology.com (a Construct Zero company) This document is part of the simple•ology Great Teachers Series: Jacque Fresco on Drawing
http://www.simpleology.com | http://www.constructzero.com
72

5. From each nostril, draw a small semicircle.
6. Lightly draw a straight line at the bottom of the inverted v and shade in the
space.
Copyright © 2007 – Present Simpleology.com (a Construct Zero company) This document is part of the simple•ology Great Teachers Series: Jacque Fresco on Drawing
http://www.simpleology.com | http://www.constructzero.com
73

The Lips
1. Begin by drawing the upper lip. Below the nose, draw a front view of a bird in flight. The wings extend up to the middle of each eye. Make another bird just above the first.
2. Finish off the lower lip by drawing a curved line connecting the “wings” of
the bird.
Copyright © 2007 – Present Simpleology.com (a Construct Zero company) This document is part of the simple•ology Great Teachers Series: Jacque Fresco on Drawing
http://www.simpleology.com | http://www.constructzero.com
74

3. Darken the upper lip and the area just beneath the lower lip.
4. From the small semicircles on the nose, draw a larger semicircle that connects to the corners of the lips.
The Chin
1. Draw the chin about the length of the nose below the lips and about as wide as the height of the lips.
Copyright © 2007 – Present Simpleology.com (a Construct Zero company) This document is part of the simple•ology Great Teachers Series: Jacque Fresco on Drawing
http://www.simpleology.com | http://www.constructzero.com
75

The Face
1. The edge of the face is half an eye’s distance from each corner of the eyes. Follow a curve from these edges down to the chin to create half of an oval.
2. Draw the top of the head, placing the eyes in the middle of the oval.
Copyright © 2007 – Present Simpleology.com (a Construct Zero company) This document is part of the simple•ology Great Teachers Series: Jacque Fresco on Drawing
http://www.simpleology.com | http://www.constructzero.com
76

The Ears
1. Draw half a heart on each side of the face from the top of the eyebrow to the bottom of the nose to show the ears.
Finish up by shading the face. Darken underneath the eyebrows and one side of the nose.
Don’t be discouraged if the face doesn’t look as good as you’d like. With time and practice your drawings will look better and better. And you can always check out how Jacque does it by watching the companion video for this lesson! Tomorrow’s lesson continues by showing us a simple but effective technique for drawing the human face at any angle.
Copyright © 2007 – Present Simpleology.com (a Construct Zero company) This document is part of the simple•ology Great Teachers Series: Jacque Fresco on Drawing
http://www.simpleology.com | http://www.constructzero.com
77

Lesson 15
Drawing the Human Face at an Angle Now that you know the secret formulas for drawing the human face, we’ll take things even further by showing you how it’s done when the face is tilted at an angle. Remember that the face is just another irregular shape, so you will have to start by drawing a perspective box. Let’s start by drawing a face that’s facing forward, but angled either upward or downward. 1. First, draw the box that the face will fit into. Since the face will be facing
directly forward, you will need to draw a box in One-Point Perspective. If you draw the box above the Horizon Line, it will appear as if you are looking at the face from below. Conversely, if you draw the box below the Horizon Line, it will appear as if you are looking at the face from above. Let’s try it with the box below the Horizon Line.
Copyright © 2007 – Present Simpleology.com (a Construct Zero company) This document is part of the simple•ology Great Teachers Series: Jacque Fresco on Drawing
http://www.simpleology.com | http://www.constructzero.com
78

2. Find the centerline of the front of the box by drawing an X from corner to
corner.
3. Find the horizontal and vertical center lines by using the X as a guide. This
will give you the letter T that will be the basis for positioning all the facial features.
Copyright © 2007 – Present Simpleology.com (a Construct Zero company) This document is part of the simple•ology Great Teachers Series: Jacque Fresco on Drawing
http://www.simpleology.com | http://www.constructzero.com
79

4. You can now start drawing the eyes using the horizontal center line as your
guide.
5. Continue drawing the face, using the techniques and proportions you learned
in the previous lesson.
Copyright © 2007 – Present Simpleology.com (a Construct Zero company) This document is part of the simple•ology Great Teachers Series: Jacque Fresco on Drawing
http://www.simpleology.com | http://www.constructzero.com
80

Now what if you want to draw a face that’s angled to the side? To do that, you would have to draw a box that’s also angled to the side, so you will start by drawing a box in Two-Point Perspective. 1. Draw a box in Two-Point Perspective.
2. The direction of the face will depend on which surface of the box you will draw
on. If you want the face to look toward the right, start by drawing an X on the right side of the box.
Copyright © 2007 – Present Simpleology.com (a Construct Zero company) This document is part of the simple•ology Great Teachers Series: Jacque Fresco on Drawing
http://www.simpleology.com | http://www.constructzero.com
81

3. Using the X as a guide, find your vertical and horizontal center lines by extending them toward the Vanishing Point. You now have the letter T, which will tell you the proper positioning of the facial features within the box.
4. Continue drawing the eyes, eyebrows, nose, and the rest of the face as you
learned in the previous lesson. Make sure that they all go toward the vanishing point.
Copyright © 2007 – Present Simpleology.com (a Construct Zero company) This document is part of the simple•ology Great Teachers Series: Jacque Fresco on Drawing
http://www.simpleology.com | http://www.constructzero.com
82

Copyright © 2007 – Present Simpleology.com (a Construct Zero company) This document is part of the simple•ology Great Teachers Series: Jacque Fresco on Drawing
http://www.simpleology.com | http://www.constructzero.com
83

Copyright © 2007 – Present Simpleology.com (a Construct Zero company) This document is part of the simple•ology Great Teachers Series: Jacque Fresco on Drawing
http://www.simpleology.com | http://www.constructzero.com
84

Copyright © 2007 – Present Simpleology.com (a Construct Zero company) This document is part of the simple•ology Great Teachers Series: Jacque Fresco on Drawing
http://www.simpleology.com | http://www.constructzero.com
85

Experiment drawing faces looking at different directions by using different surfaces of the box.
Notice that just by choosing a different facet of the box to draw on immediately changes the angle of the face. This takes a bit of time to get the hang of but it’s a lot of fun to practice. Be sure to watch Jacque’s companion video, as it will really help reinforce what you’ve learned in this lesson. ……. Learning these tips and tricks is the first step to becoming a true drawing wiz. But drawing, just like any other skill (like shooting hoops or driving, for example), will take constant practice before you can be a master. Keep at it and soon you’ll be drawing like a pro!
Copyright © 2007 – Present Simpleology.com (a Construct Zero company) This document is part of the simple•ology Great Teachers Series: Jacque Fresco on Drawing
http://www.simpleology.com | http://www.constructzero.com
86

Lesson 16
The Next 16 Days Congratulations! You have completed your last lesson in the simple•ology® Great Teachers Series: Jacque Fresco on Drawing. Just as you did in simple•ology® 101, you should now go through all 16 lessons one more time one per day as per your Course Checklist. Doing this will greatly enhance your learning. Remember, practicing over and over will definitely build your confidence in the skills you’ve just learned. Plus the more you go over the concepts, the more these drawing secrets will become second nature to you. Meanwhile, please check back in to the MarkJoyner.name Discussion Community and make the following post in the “Success Stories” board: “I’m a Drawing Master!” And relay your experiences and observations with the simple•ology® Great Teachers Series: Jacque Fresco on Drawing. http://www.markjoyner.name/forums I’ll see you there! Mark Mark Joyner Founder of simple•ology®
Copyright © 2007 – Present Simpleology.com (a Construct Zero company) This document is part of the simple•ology Great Teachers Series: Jacque Fresco on Drawing
http://www.simpleology.com | http://www.constructzero.com
87