grandslam & mcp card - dasan...
TRANSCRIPT

Hotwire DSL Access System Student Guide MCP Card
GranDSLAM & MCP Card
Revision 4.1 2003 Paradyne Corporation Page 1

MCP Card Student Guide Hotwire DSL Access System
Prepared by:
Paradyne Corporation Technical Support Center
Phone: 800-257-5033 Fax: 727-530-8270 Address: 8545 126th Avenue North
Largo, Florida 33779-2811 E-Mail: [email protected] Internet: http://www.paradyne.com Copyright 2003 Paradyne Corporation. All rights reserved. No part of this document shall be reproduced, stored in a retrieval system, or transmitted by any means, electronic, magnetic, mechanical, photocopying, recording, xerographic, or otherwise, without the express written permission of Paradyne.
Page 2 2003 Paradyne Corporation Revision 4.1
Hotwire DSL Access System Student Guide MCP Card
Contents 8820 FRONT ACCESS MODULE............................................................................................................ 9
ASSIGNING MANAGEMENT DOMAIN IP ADDRESS..................................................................... 15
INITIALIZE UNIT ................................................................................................................................... 15
MAIN MENU ............................................................................................................................................ 17
QUICK CARD SELECT.......................................................................................................................... 17
PORT CARD SELECT ............................................................................................................................ 19
MANAGEMENT CARD SELECT ......................................................................................................... 19
MANAGED SN SELECT......................................................................................................................... 21
CURRENT USERS................................................................................................................................... 21
MAIN MENU ............................................................................................................................................ 23
DSLAM CHASSIS INFORMATION ..................................................................................................... 23
CARD SELECTION................................................................................................................................. 25
MCP MAIN MENU .................................................................................................................................. 25
MCP CONFIGURATION MENU........................................................................................................... 27
MCP CARD MENU.................................................................................................................................. 29
MCP CARD INFORMATION ................................................................................................................ 29
DNS MENU ............................................................................................................................................... 31
DNS CONFIGURATION......................................................................................................................... 31
TIME AND DATE MENU....................................................................................................................... 33
CONFIGURING TIME AND DATE ...................................................................................................... 33
BACKUP & RESTORE MENU .............................................................................................................. 35
BACKUP & RESTORE ........................................................................................................................... 35
FIRMWARE UPGRADE MENU............................................................................................................ 37
FIRMWARE UPGRADE......................................................................................................................... 37
ETHERNET PORT MENU ..................................................................................................................... 39
ETHERNET PORT .................................................................................................................................. 39
Revision 4.1 2003 Paradyne Corporation Page 3

MCP Card Student Guide Hotwire DSL Access System
INTERFACES MENU.............................................................................................................................. 41
INTERFACES IP NETWORK................................................................................................................ 41
USER ACCOUNTS MENU ..................................................................................................................... 43
USER ACCOUNTS................................................................................................................................... 43
RADIUS SECURITY MENU .................................................................................................................. 45
RADIUS SECURITY................................................................................................................................ 45
ACCESS SECURITY MENU .................................................................................................................. 47
ACCESS RESTRICTIONS...................................................................................................................... 49
STATIC ROUTES .................................................................................................................................... 51
SNMP COMMUNITIES/TRAPS MENU............................................................................................... 53
RESET CARD/SLOT MENU .................................................................................................................. 57
RESET CARD/SLOT ............................................................................................................................... 57
FILE SYSTEM MENU............................................................................................................................. 59
FILE SYSTEM.......................................................................................................................................... 59
FIRMWARE FILE ................................................................................................................................... 61
SLOT FILE................................................................................................................................................ 61
AUTO CODE DOWNLOAD ................................................................................................................... 63
AUTO CODE DOWNLOAD EXAMPLE .............................................................................................. 63
AUTO BACKUP & RESTORE............................................................................................................... 65
AUTO BACKUP & RESTORE............................................................................................................... 65
Page 4 2003 Paradyne Corporation Revision 4.1

Hotwire DSL Access System Student Guide MCP Card
This page is intentionally left blank.
Revision 4.1 2003 Paradyne Corporation Page 5

MCP Card Student Guide Hotwire DSL Access System
The following items are needed to set up the GranDSLAM/DSLAM Layer 2 system: • 8820 GranDSLAM
• MCP (8000) card
• SCM (8021) card
• 8312 MVL card (IP Packet)
• 8374 RADSL card (IP Packet)
• 8314 MVL card (IP Packet)
• 8335 SDSL card (2B1Q)
• 8365 ADSL card
• 8344 SDSL card (CAP) (IP Packet)
• 6371 RADSL DSL Router
• 6341 or 6342 SDSL DSL Router
• 6310 MVL Endpoint
• ADSL Endpoint
• SDSL Endpoint
• 9 pin to 8 pin adapter cable
• Ethernet straight through cables
• 50 pin to 50 pin cable
• 6 pin RJ11 to RJ11 twisted pair cables (3 each)
• Breakout box (Amphenol to twisted pair)
• Power strip
• Power cord
• IPC (connects to MCP, 8312 to networks)
Page 6 2003 Paradyne Corporation Revision 4.1

Hotwire DSL Access System Student Guide MCP Card
IPC
Daisy chain (EIA422)Tx/Rx, Clock,
Gnd, Fan Alarm
AmphenolPOTS Splitter 12/card
(12 Lines)
AC Power
DSLDSLDSL
DSLDSLDSL
DSLDSLMCP
AB
AB
-48VDC Power
BAUserData
(10BaseT)
VT100 Management(RS-232) SNMP Management
(10BaseT)
Attachment on back of RADSL / MVL card
IPC
Daisy chain (EIA422)Tx/Rx, Clock,
Gnd, Fan Alarm
AmphenolPOTS Splitter 12/card
(12 Lines)
AC Power
DSLDSLDSL
DSLDSLDSL
DSLDSLMCP
AB
AB
-48VDC Power
BA-48VDC Power
BAUserData
(10BaseT)
VT100 Management(RS-232) SNMP Management
(10BaseT)
Attachment on back of RADSL / MVL card
8610 Wiring
To Pots Splitter
AC or DCIN/OUT
Stack Switch LANMCP
To Pots Splitter
AC or DCIN/OUT
Stack Switch LANMCP
8610 Front Panel Connections
Revision 4.1 2003 Paradyne Corporation Page 7

MCP Card Student Guide Hotwire DSL Access System
To Pots Splitter
DC Alarm LAN For Management
8620 Front Panel Connections
Clock Serial AC
8820 Front Ports
Amphenol to CO POTS SplitterConnections are on the back of the 88201 connection per card
Amphenol to CO POTS SplitterConnections are on the back of the 88201 connection per card
Page 8 2003 Paradyne Corporation Revision 4.1

Hotwire DSL Access System Student Guide MCP Card
8820 Front Access Module
Physical locations of connections on the Front Access Module of the 8800 DSLAM.
Clock A & B – Used as an input clock source (Not used)
Serial MCP – Used to gain access through a serial connection. All cards can be accessed through this port.
Serial SCM – Used to gain access to the SCM only.
Alarm – Used in a CO to drive audible and visual alarms.
LAN Slot – Used by the Ethernet Uplink cads (8303, 8343, 8373, & 8312). The MCP for external management control uses Port 9 for SNMP, Telnet, FTP and TFTP access. Port A is used to support external Ethernet devices when internal management for the MCP and bridging has been enabled on the SCM.
Revision 4.1 2003 Paradyne Corporation Page 9

MCP Card Student Guide Hotwire DSL Access System
General Navigation Keys
ctrl a - exit to top of the menu for the selected cardctrl e - exit the selected cardctrl r – reset countersctrl v - pop up menu (used for selecting network profiles on the cross connect screenctrl z - exit the screen or menutab - to move within a screenenter/return - used to accept data inputarrow keys - to move within the screen
Pop-Up Menu Navigation Keys
ctrl w – scrolls up one pagectrl x – scrolls down one pageup arrow – moves cursor up one menu itemdown arrow – moves cursor down one menu itemctrl z – exits pop-up menu without accepting selected entryenter – accepts selected entry and exits pop-up menu
Page 10 2003 Paradyne Corporation Revision 4.1

Hotwire DSL Access System Student Guide MCP Card
Quick Card Select
Position Display Description
12 ATM The vertical column indicates the current Bus connection to the SCM. U = Up, and X = booting
SCM Links The horizontal line indicates the current Bus connection to each of the card slots. I = incompatible (Ethernet Uplink Card), U = Up, E = Empty,
<slot number> Slt. M = MCP / MCC+ card; 1–18 = slot number for a DSL card <card type>
Mdl#. First four digits of the card model number.
1 T (Test mode) Card currently in test mode 2 M (Major alarm) Major alarm present on card 3 R (Minor alarm) Minor alarm present on card 4 e (Ethernet) Status of Ethernet link (U=UP, D=Down, or X=Disabled) 4 –7 (4port) or 4 – 11 (8port)
d1 – d4 or d1 - d12 (DSL)
Status of DSL card Port 1 (U=UP, D=Down, or X=Disabled (not been used), or H=Handshaking)
13-37 * w1 (WAN)* Status of WAN link (U=Up, D=Down, L=Loopback) – w2 (WAN)* Status of WAN link Port 2 (U=Up, D=Down, L=Loopback) – w3 (WAN)* Status of WAN link Port 3 (U=Up, D=Down, L=Loopback) – w4 (WAN)* Status of WAN link Port 4 (U=Up, D=Down, L=Loopback)
* Valid for 877X & 878X cards only
Revision 4.1 2003 Paradyne Corporation Page 11

MCP Card Student Guide Hotwire DSL Access System
This page is intentionally left blank.
Page 12 2003 Paradyne Corporation Revision 4.1

Hotwire DSL Access System Student Guide MCP Card
Configuring MCP Card Use this procedure in the following order to configure the MCP and DSL cards The basic setup for terminal management and user data connectivity. The following table lists the basic steps you need to configure the MCP card. For the Management Domain perform task
On the . . .
*1. Set the IP address and Subnet Mask for the eth1:1 on the MCP.
MCP
2. Configure Chassis information.
MCP
3. Set MCP System Information
MCP
4. Configure time and date.
MCP
5. Configure Telnet and SNMP Access so that only your IP address has full telnet and SNMP access
MCP
*6. Create a SNMP route for your management subnet.
MCP
7. Configure SNMP Community Strings, Authentication Failure Trap, and trap destinations
MCP
Revision 4.1 2003 Paradyne Corporation Page 13

MCP Card Student Guide Hotwire DSL Access System
Who Am I
Restart MCP
Page 14 2003 Paradyne Corporation Revision 4.1

Hotwire DSL Access System Student Guide MCP Card
Assigning Management Domain IP Address
After powering on the system for the first time, you must set the management IP address and subnet mask of the MCP card. To set the management IP address and subnet mask of the MCP card: Power up the chassis. When the self-test is complete, the Who Am I screen appears. Enter the management domain IP address at the (nnn.nnn.nnn.nnn): prompt. For example, if the IP address of the MCP card is 172.20.42.44, type this value at the (nnn.nnn.nnn.nnn): prompt on the Input Line at the bottom of the screen.
The subnet mask is automatically calculated. Do one of the following at the (nnn.nnn.nnn.nnn): prompt: — Press Return to accept the subnet mask. — Enter a new subnet mask and press Return. The system highlights the OK to Restart?: prompt. Enter y at the yes/no: prompt to restart the card or n to decline the restart. The system displays the Hotwire Chassis Main Menu. From the Who Am I screen, enter the management domain IP address of the MCP card and press the Return key.
Initialize Unit
Restart the card by typing y or yes to restart and pressing the enter key.
Note: The terminal settings are as follows; 8 data bits, 1 stop bit, No parity, Flow control - none, VT100 emulation, and Font = terminal.
Revision 4.1 2003 Paradyne Corporation Page 15

MCP Card Student Guide Hotwire DSL Access System
Main Menu
Quick Card Select Page 1
Page 16 2003 Paradyne Corporation Revision 4.1

Hotwire DSL Access System Student Guide MCP Card
Main Menu The Main Menu allows the user to select cards and end point it four different menus
Quick Card Select – All cards are displayed in an abbreviated format
Port Card Select – Only port cards are displayed. This gives the user more information about the ports and connections.
Management Card Select – Only displays the MCP and SCM cards.
Managed SN Select – Displays the cards and allows the user to select a managed end point (DSL Router, M/SDSL or M/HDSL).
Chassis Information – Allows the user to identify the GranDSLAM / DSLAM.
Quick Card Select
Displays all of the available cards. The display is limited to the MCP, SCM and thirteen slots.
To view the remaining slots press return.
To attach to a managed end point select the slot number then a comma followed by the port number.
Revision 4.1 2003 Paradyne Corporation Page 17

MCP Card Student Guide Hotwire DSL Access System
Port Card Select
Management Card Select
Page 18 2003 Paradyne Corporation Revision 4.1

Hotwire DSL Access System Student Guide MCP Card
Port Card Select
The port card select will display four cards on a single display. This display will give the user a more detailed view for each card to include card status, uplink type, port status, model number, and card type.
Management Card Select
This screen is similar to the port card select in that more detailed information is displayed on the individual cards. The MCP and SCM are the only cards that are displayed.
Revision 4.1 2003 Paradyne Corporation Page 19

MCP Card Student Guide Hotwire DSL Access System
Managed SN Select
Current Users
Page 20 2003 Paradyne Corporation Revision 4.1
Hotwire DSL Access System Student Guide MCP Card
Managed SN Select
Displays all of the available port cards
To view the remaining slots press return.
To attach to a managed end point select the slot number then a comma followed by the port number.
Current Users Displays all of the logged in users
This screen tracks users by login name (Blank if no login security is set. It also keeps track of the time, privelege and type of login (Console, Telnet, or FTP).
With current software there is no provision for disconnecting users.
Revision 4.1 2003 Paradyne Corporation Page 21

MCP Card Student Guide Hotwire DSL Access System
Main Menu
Chassis Information
Page 22 2003 Paradyne Corporation Revision 4.1

Hotwire DSL Access System Student Guide MCP Card
Main Menu The Main Menu allows the user to select cards and end point it four different menus
Quick Card Select – All cards are displayed in an abbreviated format
Port Card Select – Only port cards are displayed. This gives the user more information about the ports and connections.
Management Card Select – Only displays the MCP and SCM cards.
Managed SN Select – Displays the cards and allows the user to select a managed end point (DSL Router, M/SDSL or M/HDSL).
Chassis Information – Allows the user to identify the GranDSLAM / DSLAM.
Current Users – Allows the user to identify all users logged into the system (this does not keep track of SNMP connections).
DSLAM Chassis Information
On the Chassis Information screen, you can enter pertinent chassis information, such as the chassis name, name of person responsible for the system, and physical location of the chassis.
This information is used in the general section of the SNMP MIB II.
Bay number – Used to identify the location in a CO. Chassis number – Should be the serial number of the chassis (8610 & 8820) found on the back sticker (This can be an arbitrary number with the 8620 because the serial number appears automatically).
Revision 4.1 2003 Paradyne Corporation Page 23

MCP Card Student Guide Hotwire DSL Access System
Quick Card Select
MCP Main Menu
Page 24 2003 Paradyne Corporation Revision 4.1

Hotwire DSL Access System Student Guide MCP Card
Card Selection
Card selection is accomplished through selecting “B” or highlighting card selection and pressing the enter key from the DSLAM Main Menu screen.
Type (“M1” or 9) to select the MCP card. The cards that can be selected are displayed.
Note: This is the normal display for the GranDSLAM/DSLAM after initial power up.
MCP Main Menu
This is the Main Menu for the MCP card. Control-t command will cause the main menu screen to appear this is the fastest way to the top of the menu tree. Use Control-z to exit a screen or move up one level in the menu structure. Use Control-u to clear current input. Use Control-r to clear current counters.
Revision 4.1 2003 Paradyne Corporation Page 25

MCP Card Student Guide Hotwire DSL Access System
MCP Configuration Menu
Page 26 2003 Paradyne Corporation Revision 4.1

Hotwire DSL Access System Student Guide MCP Card
MCP Configuration Menu
Select Configuration > (A).
This menu will allow you to configure the MCP for telnet and SNMP support for the MCP and all of the cards in the associated GranDSLAM/DSLAM. Card Status – Used to identify the Card. The information from the Chassis Info is used by SNMP to identify the GranDSLAM/DSLAM. Ports – Used to identify and configure the physical ports. The defaults work. The e1a port is set for half-duplex. Interfaces - Used to modify the e1a IP address. Access Security – Use to restrict access for telnet and SNMP. IP Router – Used to configure a route to SNMP managers. SNMP – Used to configure User Authentication Trap Failures, Community Names, Authorities, and Trap manager IP addresses. Slot – Used to reset and or clear NVRAM on a specified slot. The card in the slot does not have to be accessible form a card selection menu. Syslog – Enables statistics gathering for the FTP or TFTP servers. Files – Displays the configuration and or firmware files that are stored on the MCP, and used to configure when to backup and restore configuration and firmware files.
Revision 4.1 2003 Paradyne Corporation Page 27

MCP Card Student Guide Hotwire DSL Access System
MCP Card Status Menu
MCP Card Information
Page 28 2003 Paradyne Corporation Revision 4.1

Hotwire DSL Access System Student Guide MCP Card
MCP Card Menu
Select Configuration > Card Status > Card Info (A-A-A).
MCP Card Information
Input the appropriate system information for the MCP card here. This is used by SNMP to identify the card.
Revision 4.1 2003 Paradyne Corporation Page 29

MCP Card Student Guide Hotwire DSL Access System
MCP Card DNS Setup
DNS Configuration
Page 30 2003 Paradyne Corporation Revision 4.1

Hotwire DSL Access System Student Guide MCP Card
DNS Menu
Select Configuration > Card Status > Card Info (A-A-B).
DNS Configuration
This screen is used when the connection to the MCP for fFTP, FTP, Telnet or SNMP requires the use of a DNS Server. Fill in the IP addresses and the default Domain Name. The Time to wait & number of retries will depend upon the IP network the MCP is attached.
Note: Only required if the NOC network requires the use of DNS.
Revision 4.1 2003 Paradyne Corporation Page 31

MCP Card Student Guide Hotwire DSL Access System
Time/Date Menu
Time/Date
Page 32 2003 Paradyne Corporation Revision 4.1

Hotwire DSL Access System Student Guide MCP Card
TIME And DATE Menu
Select Configuration > Card Status > Time/Date (A-A-C).
Configuring TIME And DATE
To set the time and date on the MCP card: Time zone – Use the help screen to view the allowable time zones. Enter the current local time and date at the Enter time in hh:mm [am|pm] format: prompt. Enter the current date at the Enter today’s date in mm/dd/yy or dd-mm-yy format: prompt. Enter Broadcast or Unicast at the Action (Broadcast/Unicast): prompt. Enter the IP address of the NTP server at the (nnn.nnn.nnn.nnn): prompt. NOTE: While this field is optional, it is recommended that a value be entered to ensure the time of the GranDSLAM/DSLAM stays in sync with “real time.” Enter the number of hours between synchronization (1 --- 24) at the Input Number: prompt. Press Ctrl-z and save the changes. NOTE: At system boot time, the time on the DSL card automatically synchronizes with the MCP card. Therefore, it is usually not necessary to use this screen on the DSL card.
Revision 4.1 2003 Paradyne Corporation Page 33

MCP Card Student Guide Hotwire DSL Access System
Manual Backup & Restore Menu
Manual Backup & Restore
Page 34 2003 Paradyne Corporation Revision 4.1

Hotwire DSL Access System Student Guide MCP Card
Backup & Restore Menu
Select Configuration > Card Status > Card Info (A-A-E).
Backup & Restore
Allows for the manual (automatic is available in another menu selection) saving and restoration of MCP configuration file to a tFTP server.
Upload-to-server – Is used to send the configuration to the tFTP server.
Download-from server – Is used to send the configuration file from the tFTP server to the MCP.
Note: Each card has this same function.
Revision 4.1 2003 Paradyne Corporation Page 35

MCP Card Student Guide Hotwire DSL Access System
Firmware Upgrade Menu
Firmware Upgrade
Page 36 2003 Paradyne Corporation Revision 4.1

Hotwire DSL Access System Student Guide MCP Card
Firmware Upgrade Menu
Select Configuration > Card Status > Card Info (A-A-G).
Firmware Upgrade
This screen is used to allow the user to manually upload firmware files from either an external tFTP server or if the files have been uploaded through the use of a FTP server from the MCP to any card or Paradyne endpoint.
Automatic firmware download is configurable from another menu selection.
Revision 4.1 2003 Paradyne Corporation Page 37

MCP Card Student Guide Hotwire DSL Access System
Ethernet Port Menu
Ethernet Port
Page 38 2003 Paradyne Corporation Revision 4.1

Hotwire DSL Access System Student Guide MCP Card
Ethernet Port Menu
Use the Ethernet Menu to access the Ethernet control screen.
Selecting Configuration > Access Security> User Accounts (A-B-A) from the Hotwire MCP menu.
Ethernet Port Management Port Type: External = Ethernet connected, Internal = ATM connected through the SCM.
Warning: If Internal is selected then Full Duplex MUST be disabled.
Note: This can only be changed from the console.
Revision 4.1 2003 Paradyne Corporation Page 39

MCP Card Student Guide Hotwire DSL Access System
Interfaces Menu
Interfaces
Page 40 2003 Paradyne Corporation Revision 4.1

Hotwire DSL Access System Student Guide MCP Card
Interfaces Menu
Use Interfaces Menu selection to modify the MCP IP address or subnet mask.
Selecting Configuration > Access Security> RADIUS Security (A-C-B) from the Hotwire MCP menu.
Interfaces IP Network
This screen is used to change the IP Address and subnet mask of the GranDSLAM.
Note: You must reset the card before the new address and subnet mask become active.
Revision 4.1 2003 Paradyne Corporation Page 41

MCP Card Student Guide Hotwire DSL Access System
User Accounts Menu
User Accounts
Page 42 2003 Paradyne Corporation Revision 4.1

Hotwire DSL Access System Student Guide MCP Card
User Accounts Menu
Use the User Accounts Menu to access the User Accounts screen.
Selecting Configuration > Access Security> User Accounts (A-D-A) from the Hotwire MCP menu.
User Accounts
Use the User Accounts screen to add Logins and passwords to various users in the GranDSLAM/DSLAM.
There are two levels of accounts (privileges) for the system: administrator and user. Once added users must be authenticated from either Telnet or terminal access. These accounts are good for the entire GranDSLAM/DSLAM. Once added the administrator should document all created user accounts and lock them away. Because there are no “back door” entries. The M/SDSL and M/HDSL cards are exceptions to the above text. Each card can have its own user accounts. The above rules apply for individual card user account on the M/SDSL and M/HDSL cards.
If the passwords or logins are lost then, the recovery procedure must be performed through the serial connection. You must remove the MCP or power down the GranDSLAM. During the boot process press the x key until the “who am I screen” comes up.
Note: The system has a limit of ten accounts.
Revision 4.1 2003 Paradyne Corporation Page 43

MCP Card Student Guide Hotwire DSL Access System
RADIUS Security Menu
RADIUS Security
Page 44 2003 Paradyne Corporation Revision 4.1

Hotwire DSL Access System Student Guide MCP Card
RADIUS Security Menu
Use Radius Security Menu selection to configure RADIUS Security functions.
Selecting Configuration > Access Security> RADIUS Security (A-D-B) from the Hotwire MCP menu.
RADIUS Security
Obviously the first task that must be done is to enable the RADIUS Security function.
In order for RADIUS security to function the administrator must have first created at least one admin login for the DSLAM. The system software checks for this before sending a RADIUS authentication request.
The RADIUS server may be chosen from a list of RADIUS in priority order.
The Port field allows the administrator to modify this value to match the port actually used by the RADIUS server.
The Secret field is the password for RADIUS Security.
Port number 1812 is used by Radius.
The Radius server takes over the authentication process. The MCP redirects the request to the Radius server.
Revision 4.1 2003 Paradyne Corporation Page 45

MCP Card Student Guide Hotwire DSL Access System
Access Restrictions Menu
Page 46 2003 Paradyne Corporation Revision 4.1

Hotwire DSL Access System Student Guide MCP Card
Access Security Menu
Use the Access Security screen to enable Telnet & SNMP security (i.e., prevent unauthorized users accessing, browsing or configuring the Hotwire GranDSLAM/DSLAM network).
Selecting Configuration > SNMP> Security (A-D-C) from the Hotwire MCP menu.
Revision 4.1 2003 Paradyne Corporation Page 47

MCP Card Student Guide Hotwire DSL Access System
Access Restrictions
Access Restrictions Example
Page 48 2003 Paradyne Corporation Revision 4.1

Hotwire DSL Access System Student Guide MCP Card
Access Restrictions
Determine whether you want to enable or disable Telnet & SNMP security and the IP addresses that will have access: – At the SNMP Security enter enable at the Enable/Disable: prompt to enable (turn on) SNMP security. – At the Telnet Security enter enable at the Enable/Disable: prompt to enable (turn on) Telnet security. – At the FTP Security enter enable at the Enable/Disable: prompt to enable (turn on) FTP security. At the (nnn.nnn.nnn.nnn) prompt, enter either the IP address of an SNMP NMS manager or a subnet that will have either Telnet or SNMP access. Access is broken into three sections (XYZ). For each entry, specify the access permission: X SNMP - N (No Access), R (SNMP Read Only), W (SNMP Read Write) Y Telnet - N (No Access) or T (Telnet access) Z FTP N (No Access) or F (FTP access) NOTE: You can enter up to sixteen entries. If you enable either Telnet or SNMP and do not enter any addresses then your access is limited to the serial connection.
Revision 4.1 2003 Paradyne Corporation Page 49

MCP Card Student Guide Hotwire DSL Access System
Static Routes Menu
Default Route for IP Access
Page 50 2003 Paradyne Corporation Revision 4.1

Hotwire DSL Access System Student Guide MCP Card
Static Routes To create the SNMP route to direct management domain traffic to the MCP card:
Select Configuration >IP Router > Static Routes (A-E-A).
Default Route for IP Access
A IP route must be entered to route traffic to the next hop router in the event no path is found for the packet. The IP route will be used to forward management domain traffic from the MCP card. To create the route to direct management domain traffic to the MCP card: Enter 0 or press Return at the Item Number prompt. Enter the IP address or subnet at the Host/Net: prompt. Enter the correct Subnet Mask for the Host/Net entry at the Subnet Mask: (nnn.nnn.nnn.nnn) prompt. Type the IP address of the router that is directly connected to the same subnet as the MCP e1a. This will be the default route at the Next Hop IP Address (nnn.nnn.nnn.nnn) prompt. Type 1 for preference at the Input Number prompt. Leave default fields for S/D (Source/Destination) and PA (Proxy ARP) fields. Press Ctrl-z and save the changes.
Revision 4.1 2003 Paradyne Corporation Page 51

MCP Card Student Guide Hotwire DSL Access System
Communities/Traps Menu
SNMP Communities/Traps
12 2
2 2
3
3
3
3
12 2
2 2
3
3
3
3
Page 52 2003 Paradyne Corporation Revision 4.1

Hotwire DSL Access System Student Guide MCP Card
SNMP Communities/Traps Menu
From the MCP / MCC+ Main Menu, select Configuration >SNMP > Communities/Traps (A-F-A).
SNMP Communities / Traps
This screen consists of three separate but related functions.
1 – Authentication Failure used to send a trap for one of the following:
Wrong login ID
Wrong IP address
Invalid SNMP command
2 – Community Names: four are supported. The default community names are public with a read only access (get community) and nms with a read write access (set community).
3 – The IP address for the SNMP manager that will receive the trap, 162 port number (well know port number for traps) and disable or enable.
Revision 4.1 2003 Paradyne Corporation Page 53

MCP Card Student Guide Hotwire DSL Access System
SNMP Communities/Traps
Page 54 2003 Paradyne Corporation Revision 4.1

Hotwire DSL Access System Student Guide MCP Card
SNMP Communities/Traps
Prompt Your Configuration Setting 1. Determine whether you want to enable or disable Authentication Failure traps: – Enter enable at the Enable/Disable: prompt to forward authentication failure traps to all SNMP NMS managers assigned to a community name. – Enter disable at the Enable/Disable: prompt to prevent the forwarding of authentication failure traps to all SNMP NMS managers assigned to a community name.
Authentication Failure Trap =
2. Change the default community names at the Community Name: prompt if desired. Hotwire DSLAM provides the following default community names: public (RO – Read Only) MCP / MCC+ (RW – Read Write) nms (RW – Read Write) nms - 2 (RO – Read Only)
You can also change the access permission for these communities. At the ReadOnly (ro), ReadWrite (rw), NoAccess (na,): prompt, specify the desired permission for each community. NOTE: Make sure the SNMP NMS manager knows the correct community name. It will need the correct permission to access/browse the Hotwire DSLAM.
Record the Community Names (default or new names) and their access permissions. public or ____________________ Access permission = MCP / MCC+ or ____________________ Access permission = nms or ____________________ Access permission = nms --- 2 or ____________________ Access permission =
3. For each community name, you can enter IP addresses of up to three SNMP NMS managers. – At the (nnn.nnn.nnn.nnn): prompt, enter the IP addresses of the SNMP NMS managers. – At the Input Number: prompt, enter the port number for each SNMP NMS manager specified. All traps will go to the specified port. – At the Enable/Disable: prompt, indicate whether or not you want to enable or disable the generation of traps. Enter E to enable traps. This will forward traps to the specified SNMP NMS manager. Enter D to disable traps. This prevents the forwarding of traps.
public (RO) or ____________________: IP address = Port = Forward traps (E or D) = IP address = Port = Forward traps (E or D) = IP address = Port = Forward traps (E or D) = MCP / MCC+ (RW) or ____________________: IP address = Port = Forward traps (E or D) = IP address = Port = Forward traps (E or D) = IP address = Port = Forward traps (E or D) = nms (RW) or ____________________:
Revision 4.1 2003 Paradyne Corporation Page 55

MCP Card Student Guide Hotwire DSL Access System
Reset Card/Slot Menu
Reset Card/Slot
Page 56 2003 Paradyne Corporation Revision 4.1

Hotwire DSL Access System Student Guide MCP Card
Reset Card/Slot Menu
Selecting Configuration > Slot> Reset Card (A-G-A) from the Hotwire MCP menu.
Reset Card/Slot
This selection allows the user to reset and or clear NVRAM on a card that is not being displayed from any of the card selection menus.
Revision 4.1 2003 Paradyne Corporation Page 57
MCP Card Student Guide Hotwire DSL Access System
File System Menu
File System
Page 58 2003 Paradyne Corporation Revision 4.1

Hotwire DSL Access System Student Guide MCP Card
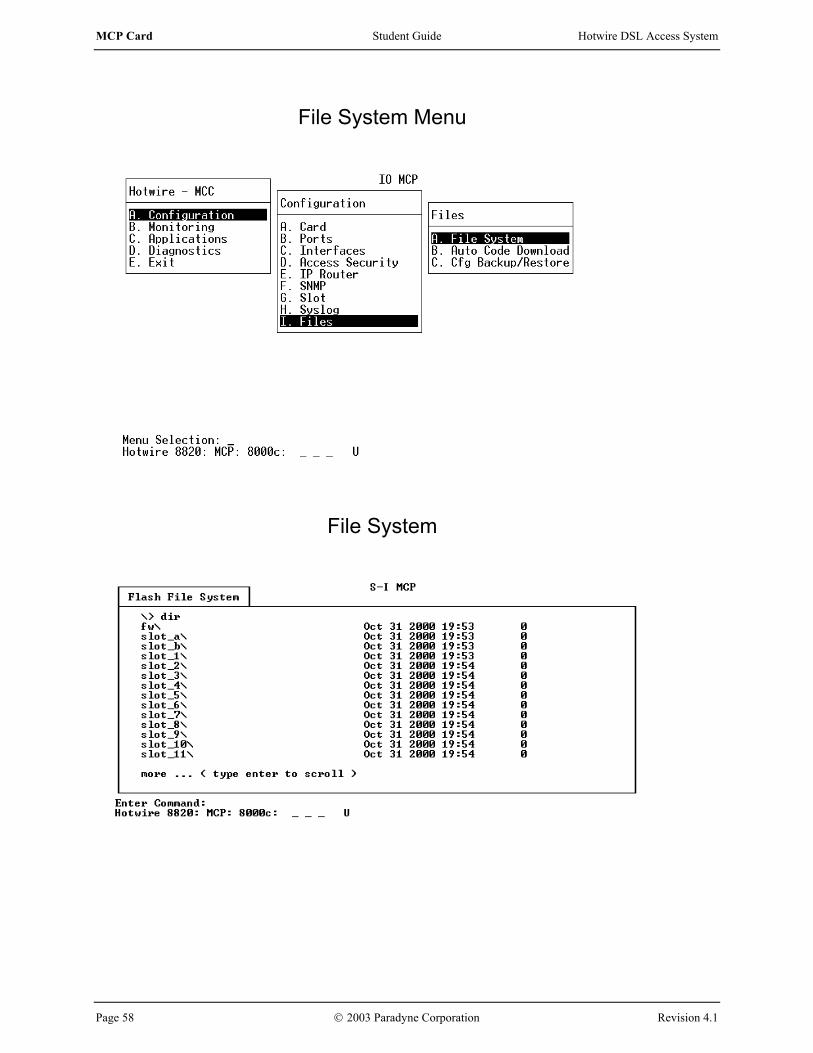
File System Menu
Selecting Configuration > Slot> Reset Card (A-I-A) from the Hotwire MCP menu.
File System The file system screen will accept both DOS and UNIX commands (ls and dir). There two main directories root (/) and fw directories. The fw directory is used for all of the firmware files.
To view all of the directories in the root directory you must enter either ls or dir at the prompt.
To view the file(s) for one of the slots directories you must enter the following:
cd slot_a\
ls
Note: Only one firmware for each of the line cards can be in the fw directory. The slots directoryies should contain the configuration file.
Revision 4.1 2003 Paradyne Corporation Page 59

MCP Card Student Guide Hotwire DSL Access System
Firmware File
Slot File
Page 60 2003 Paradyne Corporation Revision 4.1

Hotwire DSL Access System Student Guide MCP Card
Firmware File This screen is an example of the firmware files that have been downloaded to the MCP. The information that is provided is the release number, file name, card type, date downloaded and the file size.
Note: This is the default location for all firmware files.
Slot File This is the default location for the configuration files for all of the GranDSLAM cards. Only one configuration file may be stored in this directory; however, with latest software firmware files may also be stored in a Slot directory.
Revision 4.1 2003 Paradyne Corporation Page 61

MCP Card Student Guide Hotwire DSL Access System
Auto Code Download
Auto Code Download Example
Page 62 2003 Paradyne Corporation Revision 4.1

Hotwire DSL Access System Student Guide MCP Card
Auto Code Download
Used to enable or disable downloading of firmware files that have be loaded on the MCP
Auto Code Download Example
When enabled the MCP will automatically download firmware to any card that does not have the same release of firmware that exists in the MCP firmware directory. This is done any time after a card reset or card insertion.
Revision 4.1 2003 Paradyne Corporation Page 63

MCP Card Student Guide Hotwire DSL Access System
Page 64 2003 Paradyne Corporation Revision 4.1

Hotwire DSL Access System Student Guide MCP Card
Auto Backup & Restore
Selecting Configuration > Files > Cfg Backup/Restore (A-I-C) from the Hotwire MCP menu.
Auto Backup & Restore
Backup Configuration Dynamic = auto backup upon configuration changes (you select how long to wait prior to performing the back up).
Fixed = Performs a backup based on day hour and minute.
Disabled Dynamic Schedule = how long do you wait after a configuration change is made.
Default = Disable
DSLAM Auto Restore Configuration = used to restore the configuration contained in the MCP slot directory after any of the following: Reset card Clear NVRAM Card removal / insertion Default = Disable Initiate Backup or restore Performs a back or restore globally.
Revision 4.1 2003 Paradyne Corporation Page 65

MCP Card Student Guide Hotwire DSL Access System
Page 66 2003 Paradyne Corporation Revision 4.1
Auto Backup & Restore Help