google sites - multimedia universitykhairol/googlesites.docx · web viewgoogle sites is a web...
TRANSCRIPT

Google Sites
Objectives:
Upon completion of this topic, the participants should be able to: Be familiar with Google Sites interface and functions. Create a basic Web page using Google Sites. Identify the basic Web site design concepts. Be familiar with different types of Web page content. Identify the Web page editing tools.
.
1.0 Introduction
Google Sites is a Web design program that comes with Google Apps for Education. It is a great option to create Web sites for teachers, clubs, sports, organizations, or even entire buildings.
There are many good reasons to use Google Sites, some of which include:
It is all Web-based, so you do not need to install anything and can edit your Web site from any computer with Internet access.
It is easy to use, so you can quickly set up a basic Web site, but is also very powerful, so you can design a very complex site if you wish.
It integrates with other Google services, so it is easy to insert documents, forms, presentations, spreadsheets, images, videos, maps, and more.
It allows you to create as many sites as you wish, so you can create, edit, or manage various sites for your class, clubs, certain projects, and more.
It allows you to make certain pages public or private, and to choose who is allowed to see the private pages. This is great for content that should only be accessed by staff or for just specific students.
It allows you to share edit rights with others, so other people can help edit and add to the site. This can be done on a per-page level, so you can share edit rights with just certain people and for just certain pages.
It is free!
2.0 Create a Site
With Google Sites you can create as many sites as you want. Each site just needs to have a unique Web address. To create your classroom site, do the following:
1. First, log into your Google Apps account as normal (by going to your Gmail for example).2. Now click the Sites link from your Apps launcher icon, or alternately you can go to
https://sites.google.com3. You will now be on a page where you will see all the sites you own (which may be empty
if you have not made any sites yet.)4. Click the red Create button to begin making a new site.5. Under Select a template to use choose Blank Template (see picture below for details)6. In the box labeled Name your site type in the name for your Web site, such as PCA0075
Web site or yourName Homepage.7. In the section titled Site location a suggested Web address will appear for your site based
on the name you typed in. Typically this will be quite long. You can delete what is in that box and type in something shorter, such as PCA0084 or yourName. This needs to be unique in the district.
8. Optional - If you wish to pick a color theme for your site, you can do that now by clicking Select a theme although you can wait and do this at any time later.
9. When done, click the red Create button at the top of the screen to make your site.

3.0 How to modify the look of your site
You can change the look of your site by modifying the background, colors, fonts, and more. This can be done by choosing a new theme, or by modifying specific elements in an existing theme.
To change these options:
1. Click More in the top right of your site and then click Manage Site from the drop down menu.
2. Next, click Themes, Colors, and Fonts in the bottom left corner.3. To change the overall theme for your site, click on the drop-down menu under Base
theme to scroll through and select a new theme.4. Or if you wish to make adjustments to specific elements (background, colors, fonts, etc.)
click the page element you wish to change. The options you can adjust will appear on the right.
5. When done, click Save at the top to save your changes and return to the main page of your site.

4.0 Basic editing
How to edit your welcome page
You can edit the main page of your Web site to include information about yourself, your classes, how to contact you (email, phone, etc.), pictures of you, and such. Below we will look at some basic editing options. Keep in mind there are many more things you can add, edit, and change about any page in Sites, but these steps will give you the basics to get started.
How to edit text on a page
Below are some basic editing options for the text on a Web page.
To go into edit mode for a page, click the edit button (looks like a pencil icon) in the top right corner.
To add new text simply type in your content. To delete existing text, simply use your Delete or Backspace key on your keyboard. To format text, highlight the text and then use the formatting toolbar at the top of the screen.
This includes features such as font size, bold, italic, underline, font color, bullets, numbering, indents, and aligning left, right, and center.
Even more formatting options are available by clicking Format in the top menu bar. When done, click the Save button in the top right corner of the page.
How to add Web links to a page
You can make links on your Web pages that link to external Web sites or to other pages on your own site. To add a link on a page:
1. Go into edit mode for the page by clicking the edit button (looks like a pencil icon) in the top right corner.
2. Highlight the text you want to make into a link.
3. Next click the Link button in the top toolbar (looks like a chain link) 4. If the text you highlighted was already a Web address (such as www.google.com) then
the text will automatically get linked to that site.

5. If the text is just regular words, then the Create Link window will open.
a. You can click Sites page to pick another page on your own site that you want to link to.
b. Or you can click Web address to type in (or copy and paste in) the Web address you wish to link to.
c. If you want the linked page to open in a new window or tab, check the box labeled Open this link in a new window.
d. Click OK when done.
6. You can change the link in the future by clicking the linked text (in edit mode) and clicking Change
7. When done, click the Save button in the top right corner of the page.
How to add pictures to a page
You can insert images into a page by uploading them, or by choosing a picture you already have saved in your Google Drive or in your Google+ (or Picasa) photos.
To upload and insert an image:1. Go into edit mode for the page by clicking the edit button (looks like a pencil icon) in the
top right corner.2. Click Insert in the top menu bar, and choose Image from the drop-down menu.3. The Add an Image window will open.4. Click Choose File and then browse to locate and select the image you wish to upload.5. Click OK to insert the image.

To add an image from Google Drive or Google+ Photos (or Picasa Web Albums)
Google allows you to store images in your Google Drive and in your Google+ Photos (or Picasa Web Albums if you are not using Google+). Any of the images you have stored in these Google services can be inserted into your Google Site.
1. Go into edit mode for the page by clicking the edit button (looks like a pencil icon) in the top right corner.
2. Click Insert in the top menu bar, and then choose Drive and then Image.3. Or click Insert and then click Google+ and then Photo.4. This will open a window showing you your photos and/or photo albums.5. Choose an image to insert (open albums as needed to locate images).6. Click Select at the bottom of the window to insert the image.
Once the image has been inserted you can edit it as follows: Go into edit mode for the page by clicking the edit button (looks like a pencil icon) in the
top right corner. You can click and drag the image around the page as needed. You can also click on the image to access the image toolbar where you can choose the
following:
Image Alignment - left, center, right
Image Size - small, medium, large, original
Image Wrapping - wrap on, wrap off (in line with text)
Delete Image

How to add other items to a page
Google Sites allows you to add a wide variety of elements to any page on your Site. Below is a list of some of the more common items you can embed.
In each case you would begin by going into edit mode for the page by clicking the edit button (looks like a pencil icon) in the top right corner, then clicking Insert in the top menu bar.
Common Image - upload a picture to the page Link - add a hyperlink Table of contents - list of headings from the page Subpage listing - list of subpages underneath the current page Horizontal line - insert a dividing bar on the page
Gadgets Recent posts - short blurbs of latest posts from a chosen Announcement Page Recently updated files - list of new files added to a chosen File Cabinet Page Recent list items - list of items last added to a chosen List Page Test Box - insert a box with rich text input HTML Box - insert more advanced HTML, CSS, and Javascript that otherwise might get
stripped out More gadgets - search for other interactive gadgets to add to your page
Google Calendar - insert an interactive Google Calendar on your page Chart - insert a specific chart from one of your Google Spreadsheets Drive
Document - embed a Google Document from your Google Drive Drawing - embed a Google Drawing from your Google Drive Folder - embed a Folder from your Google Drive and display the contents of the
folder Form - embed a Google Form for visitors to complete Image - insert a picture from your Google Drive Presentation - embed a Google Slideshow for visitors to view Spreadsheet - embed a Google Spreadsheet from your Google Drive Video - embed a video from your Google Drive for visitors to play
Google+ Photo - add a specific image from your Google+ Photos Album - add a slideshow of images from an album in your Google+ Photos
Group - add the posts from a Google Group to your page Map - insert a Google map YouTube - insert a YouTube video

5.0 Adding Pages
How to add new pages to your site
Of course instead of just editing your welcome page, you can add new pages to your site. Google provides several templates for new pages including:
Web Page - This is a basic blank Web page. You can add all sorts of things to it later such as text, pictures, maps, docs, gadgets, calendars, and more.
Announcements - This is a page that allows you to add chronological posts for news and announcements. This can be used as a blog page, for class news, to highlight recent student work, and more.
File Cabinet - This is a page that lets you upload files or link to files that are already online. This can be used for common forms, class notes, study guides, example student work, newsletters, and more.
List - This is a page that lets you create and edit a list of data in a table format. This can be used for a list of educational links, a club roster, a list of upcoming events, or more.
To add a new page, do the following:
1. Click the new page button in the top menu bar (looks like a page with a + sign on it).
2. Type in a name for your page in the box labeled Name your page. Examples might be Calendar, Files, Links, Pictures, Announcements, and such.
3. Sites will create a Web address (URL) based on the page name you type in. If it is a long and ugly address, you can click change URL and type in a shorter and cleaner address for your new page.
4. Choose the page template you want in the drop down menu under Select a template to use.
5. For Select a location choose Put at the top level if this is a main page such as a Files Page or Pictures Page or such. Top level pages get added to the navigation links on the page.
6. If the page is not a main page, but instead is something like a category page under your Files Page or Links Page, then click Choose a different location and put this child-page under the appropriate parent-page.
7. When done, click the red Create button at the top of the screen.
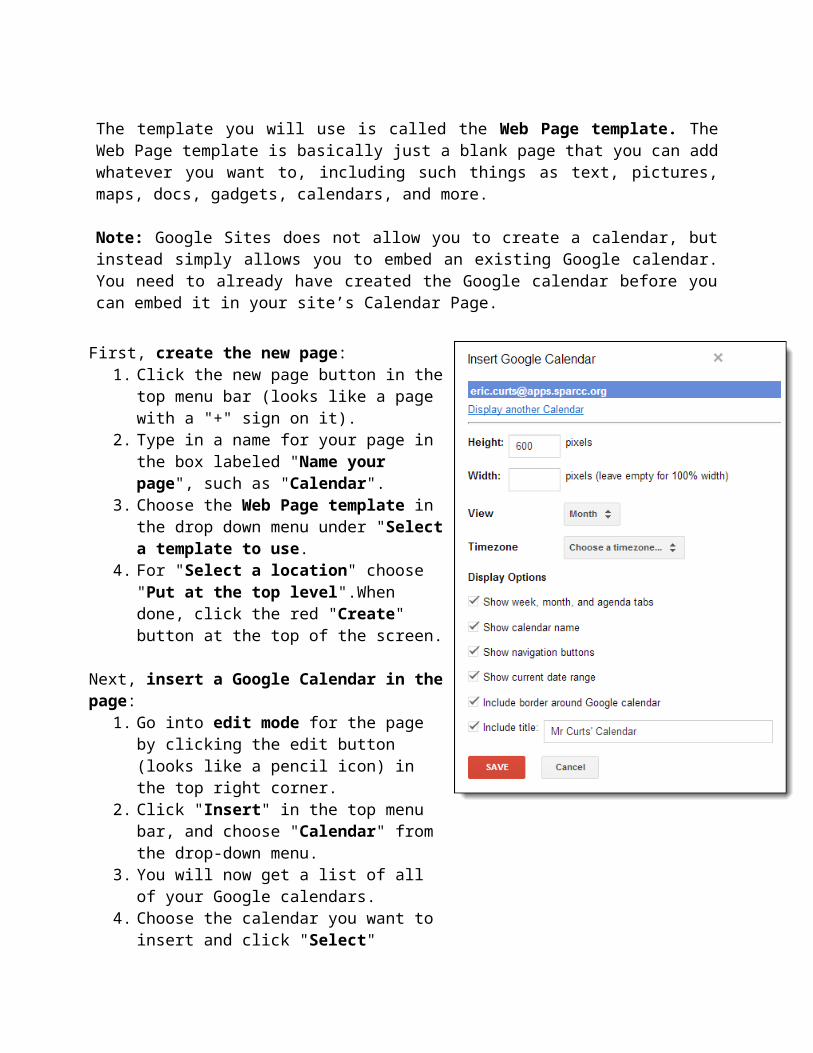
Sample: Calendar Page
A common page you may want to have on your site is a calendar page where students and parents can see your upcoming assignment, quizzes, and tests.
The template you will use is called the Web Page template. The Web Page template is basically just a blank page that you can add whatever you want to, including such things as text, pictures, maps, docs, gadgets, calendars, and more.
Note: Google Sites does not allow you to create a calendar, but instead simply allows you to embed an existing Google calendar. You need to already have created the Google calendar before you can embed it in your site’s Calendar Page.
First, create the new page:1. Click the new page button in the top menu bar
(looks like a page with a "+" sign on it).2. Type in a name for your page in the box labeled
"Name your page", such as "Calendar".3. Choose the Web Page template in the drop
down menu under "Select a template to use.4. For "Select a location" choose "Put at the top
level".When done, click the red "Create" button at the top of the screen.
Next, insert a Google Calendar in the page:1. Go into edit mode for the page by clicking the
edit button (looks like a pencil icon) in the top right corner.
2. Click "Insert" in the top menu bar, and choose "Calendar" from the drop-down menu.
3. You will now get a list of all of your Google calendars.
4. Choose the calendar you want to insert and click "Select"
5. If you want more calendars added, click "Display another calendar" to pick another.
6. If you want, you can set the default View to be Week or Month or Agenda.
7. When done, edit the calendar title at the bottom of the window and click "Save".8. The calendar will now get inserted into the page.9. When done, click the Save button in the top right corner of the page.
Sample: Announcements Page
Another useful page for a school site is an announcements page where you can put chronological posts for news, announcements, blog entries, and such. This is a great way to share the latest happenings for your class, highlight recent student work, or share news of upcoming events.
The template you will use is called the Announcements template. The Announcements template allows you to add new posts, and then orders them for you chronologically.
First you need to create the new page for your Web site:
1. Click the new page button in the top menu bar (looks like a page with a "+" sign on it).
2. Type in a name for your page in the box labeled Name your page, such as Announcements or News.
3. Choose the Announcements template in the drop down menu under Select a template to use.
4. For Select a location choose Put at the top level.
5. When done, click the red Create button at the top of the screen.
Now that your Announcements Page is created, you can add a new post at any time by doing the following:
1. Click the New post button. This will open a new edit screen for the new post. 2. Replace Untitled Post at the top with the name for your post.3. In the area below that, type in your content. Feel free to add images, change formatting,
insert links, and such as desired.4. When done, click Save in the top right corner.5. You can edit an existing post in the future by opening the post and then clicking the edit
button (looks like a pencil icon) in the top right corner.6. As you add new posts, the new posts will appear at the top of the Announcements Page.

Sample: Links Page
You can use your Web page to help your students to access valuable educational sites on the Web by creating a links page. If you do not have a very large amount of links, you can put them all on one page as described below. If you think you have lots of links, and would rather break them out onto different category pages, then see the next section.
The template you will use is called the List template. The List template allows you to create a custom grid of rows and columns where you can add, edit, and sort your information. The List template is good for rosters, a list of events, a links page, and more.
First you need to create the new page as follows:1. Click the new page button in the top menu bar (looks like a page with a "+" sign on it).2. Type in a name for your page in the box labeled "Name your page", such as Links Page.3. Choose the List template in the drop down menu under "Select a template to use.4. For "Select a location" choose "Put at the top level".5. When done, click the red "Create" button at the top of the screen.
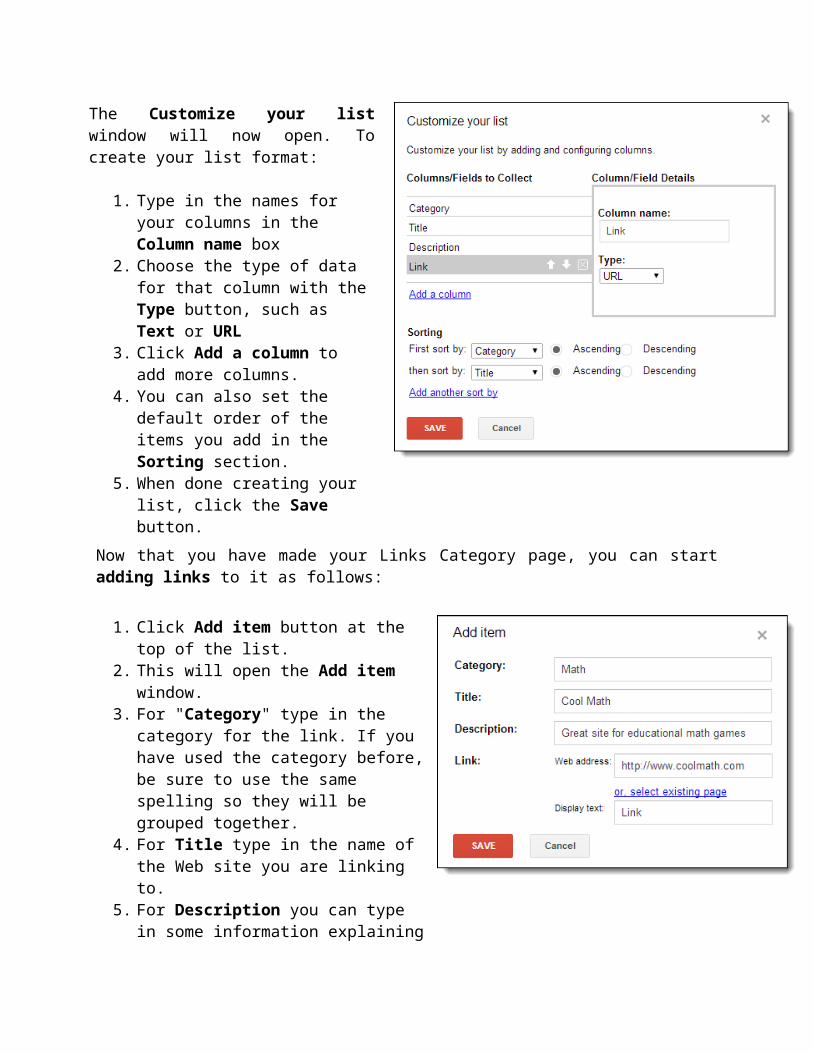
Now that you have created the List page, you need to create your list format. Since we are making a Links Page for this example, we probably want columns for Category, Title, Description, and Link.
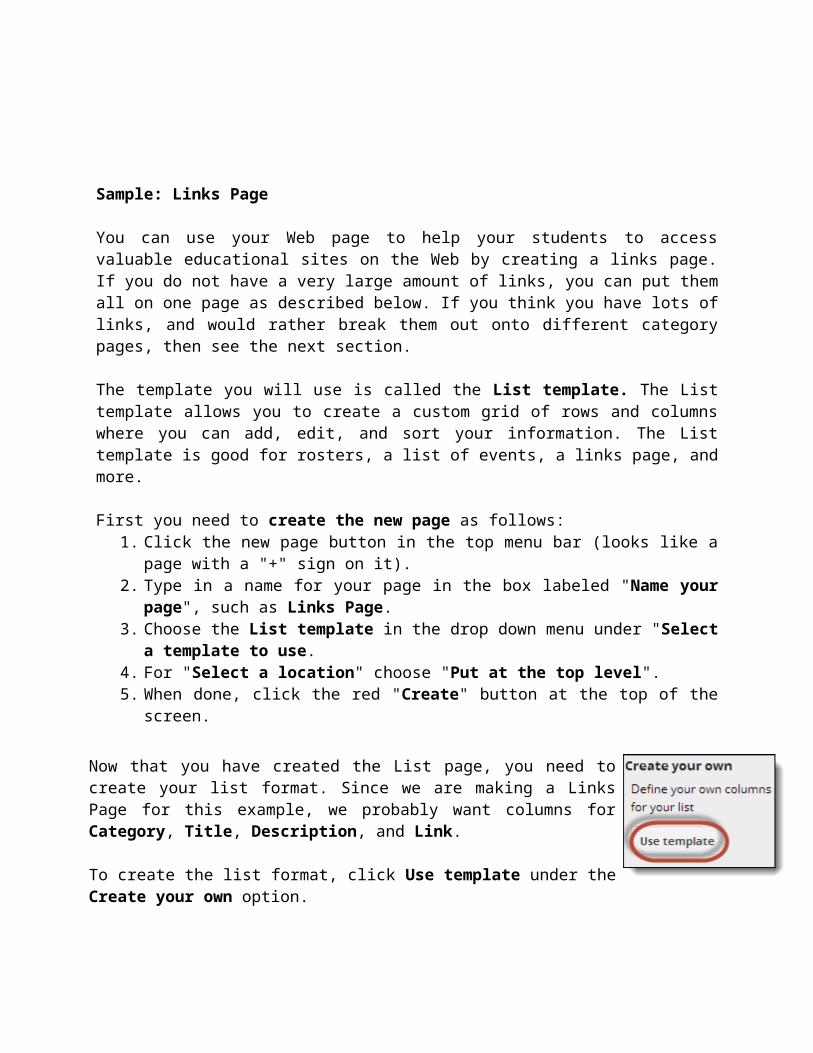
To create the list format, click Use template under the Create your own option.
The Customize your list window will now open. To create your list format:
1. Type in the names for your columns in the Column name box
2. Choose the type of data for that column with the Type button, such as Text or URL
3. Click Add a column to add more columns.
4. You can also set the default order of the items you add in the Sorting section.
5. When done creating your list, click the Save button.
Now that you have made your Links Category page, you can start adding links to it as follows:
1. Click Add item button at the top of the list.2. This will open the Add item window.3. For "Category" type in the category for the
link. If you have used the category before, be sure to use the same spelling so they will be grouped together.
4. For Title type in the name of the Web site you are linking to.
5. For Description you can type in some information explaining the site.
6. For Link type in (or copy and paste) the full Web address for the site. The full address must include the http:// part to work.
7. For Display text you can just type in the word Link
8. Click Save when done.
The new link will now be added to the list. You can edit a link later by clicking on its title to open the Edit item window. You can delete a link by clicking on its title to open the Edit item window, and then
clicking Delete this item. Repeat as needed to add more links.
Sample: Files Page
Your class Web site can also be a great way to make files available to your students and their parents, such as common forms, class notes, study guides, example student work, newsletters, and more. If you do not have a very large amount of files, you can put them all on one page as described below. If you think you have lots of files, and would rather break them out onto different category pages, then see the next section.
The template you will use is called the File Cabinet template. The File Cabinet template lets you upload files or link to files that are already online. This can be used for common forms, class notes, study guides, example student work, newsletters, and more.
First you need to create the new page as follows:1. Click the new page button in the top menu bar (looks like a page with a "+" sign on it).2. Type in a name for your page in the box labeled "Name your page", such as Files Page
or Forms and Docs.3. Choose the File cabinet template in the drop down menu under "Select a template to
use.4. For "Select a location" choose "Put at the top level".5. When done, click the red "Create" button at the top of the screen.
Adding Files: Now that you have made your Files Page, you can start adding files to it in three ways:
Option 1 - Add File button - Use this to select and upload a file to your site. This stores a copy of the file on the site. However, there is a limited amount of storage space for Google Sites, so use this carefully and with smaller files.
Option 2 - Add Link button - Use this to link to a file or resource already stored online somewhere else.
Option 3 - Add from Drive button - Use this option to add a link to a file you have already stored in your Google Drive. This is a very useful option because Google Drive has much more storage space (30GB per user) and can properly open and display many file types including MS Office files, PDF’s, and more.
Note: Adding a file from your Google Drive does not change its visibility permissions. If you want the file to be viewable by anyone, you need to change the sharing permissions on the file in Drive.

Moving Files: You can organize your files on the page by grouping them under folder headings. To move a file to a category:
Check the box in front of the file(s) you want to move Click the Move to button in the toolbar above your files Choose the category under Existing folder Or click New folder to make a new category
Deleting Files: To delete a file later, just check the box in front of the file(s) and then click the Delete button in the toolbar above your files.
Sample: Pictures Page Another good use for a class page is to share photo albums, where you can display pictures from class activities, field trips, presentations, student artwork, and more.
One way to make a pictures page would be to simply upload individual images to a page by clicking Insert and then Image. However, you can add image slideshows instead so users can easily browse through all the pictures from a particular event or topic. This is done using Google+ Photos.
Add images to Google+
First, you will need to add your images to an album in your Photos pages in Google+ You can do this by uploading pictures from your computer. Or you can link your smartphone to Google+ to automatically upload the pictures you
take. Next you will need to set the sharing options on the album so it is viewable by the public.
Add the slideshow to your site:
Now that you have some images in your Google+ Photos, you can create a Pictures Page for your Web site:
1. Click the new page button in the top menu bar (looks like a page with a "+" sign on it).2. Type in a name for your page in the box labeled "Name your page", such as "Pictures"
or Photo Gallery.3. Choose the Web Page template in the drop down menu under "Select a template to use.4. For "Select a location" choose "Put at the top level".5. When done, click the red "Create" button at the top of the screen.
Now that you have the page created, you can add slideshows to it:
1. Go into edit mode for the page by clicking the edit button (looks like a pencil icon) in the top right corner.
2. Next click Insert then Google+ then Photo Album
3. You will now see a list of your Photo Albums. Choose the album you wish to display and click Select
4. Choose a size for your slideshow, such as Large 400px or Extra Large 600px
5. For Include Title feel free to edit the title if needed.
6. Next click Save to insert the album slideshow.
7. Click the Save button in the top right to save your changes to the page.
8. Repeat as needed for other picture albums.
Sample: Subpages
Sometimes you may have so much information, links, or files, that you may prefer to organize the information on multiple pages. For example, if you have lots and lots of links, or if you just really like organization, you can put your links on multiple pages with each page listing links for just one category.
You can use subpages to organize any of your information, such as links, files, pictures, and more. For this example, we will make multiple links pages, although the process could be applied to any type of page. The basic setup will look like this:
● Main Links Page - This is the page that will list all of the categories for your links. This page will be the parent page, and all the Category pages will be child pages underneath this page. You will create this page by using the Web Page template and by inserting the Subpage listing gadget.
● Category Pages - These pages will list all the links in a specific category. Each page will be a child page underneath the main Links Page which lists all the categories. You will make these pages by using the List template just like in the section above for a one-page Links Page.
Typically you will have one Links Page and then many Links Category pages under that one page. See the diagram below for an example of the page relationships:
Step #1 - Create the Main Links Page
Begin by first creating your main Links Page as follows:1. Click the new page button in the top menu bar (looks like a page with a "+" sign on it).2. Type in a name for your page in the box labeled "Name your page", such as "Links
Page".3. Choose the Web Page template in the drop down menu under "Select a template to use.4. For "Select a location" choose "Put at the top level".5. When done, click the red "Create" button at the top of the screen.
Next, you will insert a gadget call the Subpage listing which will list all of the Category Pages that branch off of the main page (once you create them later).
1. Click Insert in the top menu bar, and choose Subpage listing from the drop-down menu.
2. This will open the Insert Subpage Listing window.3. For Title type in something such as Categories4. For Width make the box blank so the listing will be
100% wide on your page.5. For Appearance choose the first option to get a
cleaner look to the subpage listing.6. Click Save when done, and then click Save again on
your Web page to save the changes.
Note: Until you add subpages for the categories, nothing will show up in the Subpage Listing. However, as soon as you add the subpage for the link categories, the category names will automatically show up in the Subpage Listing.
Step #2 - Create the Category Links Pages
Now all you need to do is create the category pages as subpages below the main Links Page. The category pages are where you will add the actual links that you want to share with your students. You will do this just like described in the earlier section about creating a one-page Links Page, with one small difference listed below:
First you need to create a category page as follows:1. While on the main Links Page (but not in Edit mode) click the new
page button in the top menu bar (looks like a page with a "+" sign on it).2. Type in a name for your page in the box labeled "Name your page", using the category
for that page, such as Fractions or Reference or Educational Games.3. Choose the List template in the drop down menu under "Select a template to use.4. IMPORTANT DIFFERENCE: For "Select a location" choose "Put page under Links
Page" (or whatever you named your main Links Page). This will make the category page be a subpage of the main Links Page so it will show up in the Subpage Listing.
5. When done, click the red "Create" button at the top of the screen.
From here on out follow the directions from the earlier section for creating a one-page Links Page to customize your list and add your links. Repeat the process as needed to add other categories.

6.0 Sharing your Site
By default your Google Site will be private and viewable only by you. When you are ready you will need to change the privacy and sharing settings for your Site for others to be able to access it.
1. First, click the big blue Share button in the top right corner of your Site.
2. This will open your Sharing and Permissions screen.
3. If you want to share the site with just specific people, then enter their email addresses at the bottom in the Invite people box.
4. As usual with sharing, you can choose to give people edit or view rights.
5. Click Send when done to share your Site with those specific people.
6. If you want the site to be visible to more people, you will need to click Change… under the Who has access section.
7. This will open your Visibility options screen where you can choose who can see your Site including Public on the Web, Anyone with the link, or only people within your domain.
8. Click Save when done.
9. You also have the option to set permissions and visibility on individual pages within your Site rather than the entire Site as a whole.
10. To do this, click the button in the top right labeled Enable page-level permissions.
11. You will now be able to select individual pages and adjust who has access to them. This is useful to have sections of your site that are not public or only viewable by staff.