goldmine administrators guide - ticomix · goldmine administrators guide 5675 gibraltar drive...
TRANSCRIPT

GoldMine Administrators Guide
5675 Gibraltar DrivePleasanton, CA 94588 USA
TEL: 800.776.7889www.frontrange.com
Rev: 85-03-11-09
Copyrights and TrademarksThe following information pertains to copyrights and trademarks of FrontRange, its affiliates, and other companies.
FrontRange Copyright InformationCopyright 2009 FrontRange Solutions USA Inc. All Rights Reserved.
Window captures and dialog box sample views are the copyright of their respective owners.
Use of this software and its related user documentation IS subject to the terms and conditions of the applicable End-User License Agreement (EULA), a copy of which is found in the user documentation. You must agree to the terms and conditions of the EULA in order to use this software. If you do not agree to the terms and conditions of the EULA, promptly return the unused software IN ITS UNOPENED CD PACKAGE to the place from which you obtained it for a refund.
WARNING: The software described in this manual and its related user documentation are protected by copyright law. In no event, shall any part of the related user documentation be copied, reproduced, distributed, transmitted, stored in a retrieval system, or translated into any language, without the express written permission of FrontRange Solutions USA Inc.
Contact FrontRange Solutions at our Web site: www.frontrange.com
FrontRange Trademark InformationThe following are trademarks of FrontRange Solutions USA Inc. and/or its affiliates in the United States and/or other countries:
FrontRange Solutions®, FrontRange™, GoldMine®, GoldSync®, GoldMine® Answer Wizard™, GoldMine® Management Intelligence™, GoldMine® Manager's Console™, iGoldMine™, HEAT®, HEAT® Service & Support™, HEAT® PowerDesk™, iHEAT™, HEAT® Self Service™, HEAT® Manager's Console™, HEAT® Answer Wizard™, HEAT® Quick Start Wizard™, InfoCenter®, Automated Processes™, First Level Support®, enteo®, Centennial™, DeviceWall®, Centennial Discovery®, Discovery Dashboard®, MicroAudit®, SAM™ and other FrontRange products and brands.

Other Trademark Information The following are trademarks of their respective owners or companies:
Trademark or Registered Trademark Company
ACT!® CRM Division of Best Software Inc.
Adobe®, Acrobat®, Reader® Adobe Systems Inc.
Apple®, Mac® OS, Macintosh® Apple Computer, Inc.
Avaya® Avaya, Inc.
Beyond Gold™ Computerese
Borland® Interbase® Borland International Inc.
Calyx® Calyx Software
Cisco® Cisco Technology, Inc.
Citrix® Citrix Systems, Inc.
Corel® Corel Corporation
Crystal Reports® Business Objects S.A.
dBASE® dBASE Inc.
dbCams+™ Financial Computer Support, Inc.
Fast™, Folio®, NXT®, LivePublish®, GetSmart™ Fast Search and Transfer SAS
Firebird® FirebirdSQL Foundation Incorporated (Australia)
Genesys® Genesys Telecommunications Laboratories, Inc.
Genesis 2000® Genesis 2000, Inc.
GlobalCall® IDT Corporation
GoldBox© copyright of Redstone Softbase Company
GraphOn®, GO-Global® GraphOn Corporation
Great Plains® Great Plains Software Inc.
Hewlett Packard® Hewlett Packard Company
IBM®, Lotus®, Lotus Organizer® IBM Corporation
InaPlex™, Inaport™ Inaplex Limited
Intel®, Pentium®, Dialogic® Intel Corporation
Intuit®, QuickBooks®, QuickBooks Pro® Intuit Inc.
ITIL® The Office of Government Commerce
KNOWLIX™ Peregrine Systems Inc.
LANDesk® LANDesk Group Ltd.
Linux® Linus Torvalds

Maximizer Enterprise™ Multiactive Software
Microsoft®, Active Directory®, Microsoft® SQL Server™, ActiveX®, Outlook®, Windows®, Windows NT®, .NET™,
Visual FoxPro®, Microsoft Exchange Server®, Microsoft®.NET™
Microsoft Corporation
Netcensus® Tally Systems Corporation
Netilla® Netilla Networks, Inc.
Netscape®, Netscape Navigator® Netscape Communications Corp.
Novell®, Netware®, Groupwise® Novell, Inc.
OmniRush™ (formerly FaxRush®) Z-Firm LLC
Oracle® Oracle Corporation
Palm®, MyPalm™, Palm Powered™, Palm.Net®, PalmOS®, PalmPak®
Palm, Inc.
Pink Elephant™ Pink Elephant Inc.
Red Hat® Red Hat, Inc.
RightFax® Captaris, Inc.
Rolodex® Rolodex Corp.
Sage Line™ The Sage Group plc
SaleMaker® SaleMaker Corp.
SAP® SAP Aktiengesellschaft Corporation
Scansoft®, SpeechPearl® Scansoft, Inc.
SPARC® SPARC International Inc.
Sun®, Java™, Solaris® Sun Microsystems, Inc.
Sybase® Sybase, Inc.
Symantec®, pcAnywhere®, WinFax® Symantec Corporation
UNIX® UNIX System Laboratories, Inc.
VNC™ AT&T Laboratories Cambridge
Voxpoint® Cayo Communications, Inc.
Visor® Handspring, Inc.
Zetafax® Equisys PLC Company
Trademark or Registered Trademark Company
Table of Contents
Welcome to GoldMine® Premium Edition 17Introduction...............................................................................................................................17 What's New Overview .............................................................................................................18
What's New in the Premium Edition .................................................................................19
What's New in GoldMine Premium Edition 21
Getting Started 23Key Terms and Concepts ..........................................................................................................23Launching GoldMine ................................................................................................................24
Changing the Default Login ..............................................................................................25Viewing Information About GoldMine Premium Edition.................................................25
About the GoldMine Architecture ...........................................................................................26The GoldMine File System................................................................................................26
User Administration 29Setting Up User Groups, Users, and Resources........................................................................29
About Record Ownership ..................................................................................................30 Users Security...................................................................................................................31Setting the User Profile......................................................................................................31Setting Up User Membership ............................................................................................32Setting Up User Groups.....................................................................................................33Setting User Access ...........................................................................................................34Setting User Menus............................................................................................................37Creating User Menu Templates .........................................................................................38Viewing the User Time Clock ...........................................................................................39Cloning User Settings ........................................................................................................40
About User Options ..................................................................................................................40Setting Options on the Personal Tab..................................................................................41Changing Your Password...................................................................................................42Setting Options for the Record Tab ...................................................................................42Color Dialog Box...............................................................................................................45Setting Options for the Calendar Tab ................................................................................45Configuring Calendar Options Dialog Box, Activity Details Tab.....................................47Configuring Calendar Options Dialog Box, Holidays Tab................................................47Setting Options for the Schedule Tab ................................................................................49
GoldMine User Guide Table of Contents • 5
Setting Options for the Alarms Tab ...................................................................................50Setting Options for the Lookup Tab...................................................................................51Setting Options for the E-mail Tab ....................................................................................52Setting Internet Options on the Composing Tab................................................................54Setting Internet Options on the Retrieval Tab....................................................................56Setting Internet Options on the Accounts Tab ...................................................................58Setting Internet Options on the Security Tab.....................................................................59
Using Digital IDs with Email Messages ...................................................................................60Using Digital IDs ...............................................................................................................61Public and Private Keys .....................................................................................................61Levels of Security ..............................................................................................................61Sharing Public Keys...........................................................................................................62Using Digital IDs in GoldMine .........................................................................................62Setting Digital IDs in Contact Details ...............................................................................63Sending Digitally Signed E-mail .......................................................................................63Sending Encrypted Email ..................................................................................................64Sending Email Messages Encrypted Using GoldMine......................................................64Sending E-mail Messages Encrypted Using Digital ID.....................................................65Reading E-mail Sent with Digital IDs ...............................................................................66Setting Internet Options on the E-mail Center Tab............................................................67Setting Internet Options on the Advanced Tab ..................................................................68Setting Options for the Telephony Tab ..............................................................................70Setting Options for the Pager Tab......................................................................................71Setting Options for the Speller Tab....................................................................................72Creating Dictionaries .........................................................................................................73
Setting Options for the Login Tab.............................................................................................75Setting Options for the Lookup Tab..........................................................................................77
Setting Options for the System Tab ...................................................................................79Updating Undocked Users .................................................................................................80Creating Undocked User Licenses.....................................................................................81
.INI Files and Macros................................................................................................................82Configuring the INI File ....................................................................................................82GM.ini Settings ..................................................................................................................84Username.ini ......................................................................................................................86Changing Settings the INI File in GoldMine.....................................................................88Configuring System Settings .............................................................................................89Changing ini Settings.........................................................................................................91Setting Email Preview Text Amounts................................................................................91Setting Keep or Clear on Tagged Records.........................................................................91Setting Calendar Publishing Output to XML ....................................................................91Username.tbi ......................................................................................................................92
About DDE Macros ..................................................................................................................92Recording Macros............................................................................................................102Adding GoldMine User's Macros ....................................................................................103GoldMine Report Macros ................................................................................................103All Report Categories ......................................................................................................103
6 • Table of Contents GoldMine User Guide

Calendar Printouts Section Only .....................................................................................105iSearch.ini ........................................................................................................................108
Record Types 111About Record Types ............................................................................................................... 111About Primary Field Views ....................................................................................................112
Creating Primary Field Views .........................................................................................113Customizing Primary Fields ............................................................................................114Customizing Field Properties ..........................................................................................115Editing Field Properties, Profile Tab ...............................................................................115Adding Expression Fields to Screens ..............................................................................117Editing Field Properties, Color Tab .................................................................................119Editing Field Properties, Layout Tab...............................................................................120Editing Field Properties, Security Tab.............................................................................121Required Fields Alert Dialog Box ...................................................................................122
Customizing Field Typing.......................................................................................................123Inserting Labels in Reports..............................................................................................124Hiding Field Labels and Values.......................................................................................125Combining Hiding and Color ..........................................................................................125Saving the Field Typing in Your Primary Fields Views ..................................................126
Creating Custom Fields ..........................................................................................................126Creating Custom Screens........................................................................................................128
Custom Screen Profile Dialog Box..................................................................................128Adding Fields to Screens ........................................................................................................129About the GM+Browser Tab ..................................................................................................131
Configuring GM+Browser ..............................................................................................132GM+View Templates.......................................................................................................135Inserting Pictures in GM+View Templates......................................................................137Inserting Links in GM+View Templates .........................................................................137Inserting Fields in GM+View Templates.........................................................................137Inserting Linked Images in GM+View Templates...........................................................138Inserting Linked Documents in GM+View Templates ....................................................138
Creating GM+View Rules ......................................................................................................139Creating GM+View Rules for Field Values.....................................................................139Creating GM+View Rules for dBASE Expressions ........................................................140Creating GM+View Rules for the User Selected Option ................................................140
Using the Record Types Administration Center .....................................................................141Using Record Types and Contact Records ......................................................................141
Using the Record Types Administration Center .....................................................................141Creating Record Types ....................................................................................................142Configuring Record Type Rules ......................................................................................143
GoldMine User Guide Table of Contents • 7

Contact Management 145About Contact Records ...........................................................................................................145About Record-Related Settings...............................................................................................146Setting Phone Formatting in the Record-Related Settings......................................................146Setting Ownership in the Record-Related Settings.................................................................148Setting Alerts in the Record-Related Settings.........................................................................149
Changing the Delay Time on Alerts ................................................................................151Setting Digital IDs in Contact Details.....................................................................................151Creating Details Information Fields........................................................................................152
Deleting Custom Detail Tabs ...........................................................................................153Using Filters, Queries, and Groups .........................................................................................153
About Filters and Groups.................................................................................................153Creating Filters........................................................................................................................155Filter Expression Operators ....................................................................................................157
Boolean Operators ...........................................................................................................159Using the Optimizing Filters Options .....................................................................................160Using the Previewing Filters Options .....................................................................................160Creating SQL Query Filters ....................................................................................................161View New Contact Records Entered During a Specific Time Period.....................................163Groups .....................................................................................................................................164
How Groups Differ from Filters .....................................................................................164Group Members Local Menu...........................................................................................165
Using the Groups Tab..............................................................................................................166Group Building Wizard...........................................................................................................166Groups Based on Filtered Records..........................................................................................167Group Optional Settings..........................................................................................................168Group Based on Scheduled Activities ....................................................................................169
Group Based on Completed Activities ............................................................................170Group Based on Supplemental Contact Data ..................................................................170
Saving Search Results as a Group...........................................................................................171Using Filters and Groups .......................................................................................................171Activating and Releasing Filters .............................................................................................172
Activating and Releasing Groups ....................................................................................173
Contact Communication 175About Communicating with Contacts.....................................................................................175About the Document Center ...................................................................................................176Creating Document Templates................................................................................................178
Editing Document Templates...........................................................................................181Faxing Correspondence...........................................................................................................182
Faxing Your Default Fax Sheet........................................................................................184Printing Documents.................................................................................................................185
To print documents from the Goldmine Document Center .............................................185Using Mail Merge Properties (Printing) .................................................................................186
8 • Table of Contents GoldMine User Guide

Printing Envelopes and Labels ........................................................................................187Using the E-mail Center .........................................................................................................188E-mail Center Components.....................................................................................................188
General Email Toolbar.....................................................................................................189Edit the Email Toolbar.....................................................................................................191Local Menus ....................................................................................................................193
Creating and Sending Email ...................................................................................................193Adding Email Attachments..............................................................................................195Sending Email to Multiple Recipients.............................................................................195Creating Email Templates................................................................................................196Sending Emails from the Document Management Center ..............................................198Setting Email Account Properties....................................................................................199Replying to an Activity ...................................................................................................202
Spell-Checking Email .............................................................................................................203Creating Dictionaries .......................................................................................................205
Retrieving Internet Email........................................................................................................207Retrieving Email ..............................................................................................................208
Linking Email Messages to Contacts......................................................................................210Reading Email.........................................................................................................................211
Using E-mail Templates ..................................................................................................211Creating Distribution Lists ..............................................................................................214
Using the Document Management QuickStart Wizard...........................................................215Using Encryption and Digital IDs ..........................................................................................215
Using Digital IDs with E-mail Messages ........................................................................215Using Digital IDs.............................................................................................................216Public and Private Keys...................................................................................................216Levels of Security ............................................................................................................217Sharing Public Keys ........................................................................................................217Using Digital IDs in GoldMine .......................................................................................217
Sending Encrypted Email .......................................................................................................218Sending Email Messages Encrypted Using GoldMine....................................................218Sending Email Messages Encrypted Using Digital ID....................................................219Sending Digitally Signed Email .....................................................................................219
Reading Email Sent with Digital IDs .....................................................................................220About the Literature Fulfillment Center .................................................................................221
Queued Documents Local Menu .....................................................................................223Adding Documents to the Literature Fulfillment Center........................................................223
Editing Documents in the Literature Fulfillment Center.................................................224Fulfilling or Rejecting Scheduled Literature Requests...........................................................224Fulfilling or Rejecting Queued Documents ............................................................................225
Editing Scheduled Literature Requests............................................................................226About Telemarketing Scripts ..................................................................................................226
Branching Scripts Workflow ...........................................................................................227Creating Telemarketing Scripts...............................................................................................228
Branching Scripts Listing Dialog Box.............................................................................228Branching Scripts Profile Dialog Box .............................................................................228
GoldMine User Guide Table of Contents • 9

Branching Script Question Dialog Box ...........................................................................229Branching Script Answer Dialog Box .............................................................................229Using Telemarketing Scripts............................................................................................230
Making and Answering Calls with SoftPhone........................................................................230Using SoftPhone ..............................................................................................................231About the Personal Contacts............................................................................................232
Data Maintenance and Management 233About Managing Information .................................................................................................233About Contact Set Databases ..................................................................................................233Defining Contact Set Profiles .................................................................................................234Opening Databases..................................................................................................................235About Creating Databases.......................................................................................................236
Creating SQL Databases ..................................................................................................236Using the Databases Wizard ...................................................................................................237Using the Database Alias Manager for SQL and Firebird Databases.....................................241
Editing an Alias ...............................................................................................................242Deleting an Alias .............................................................................................................242
About Maintaining Databases .................................................................................................243Attaching Databases................................................................................................................244Globally Replacing Fields with a Value..................................................................................244About the Lookup.ini ..............................................................................................................246
Examples of Using Lookup.ini ........................................................................................247Globally Updating Fields Using Advanced Options...............................................................254Moving Linked Documents and Attachments ........................................................................256Backing Up Databases ............................................................................................................257Restoring SQL Databases .......................................................................................................257
Running the SQL Counting Query ..................................................................................258Using the GoldMine Maintenance Wizard..............................................................................258
Indexing Databases ..........................................................................................................259Sorting and Verifying Databases......................................................................................261Setting Up Automatic Maintenance.................................................................................262
Viewing System Logs .............................................................................................................263About the Database Alias Manager ........................................................................................264Using the Database Alias Manager for SQL Databases .........................................................264Editing an Alias.......................................................................................................................266
Deleting an Alias .............................................................................................................266Using the Database Alias Manager for Firebird Database...............................................266
Globally Replacing Field Data Using the Global Replace Wizard.........................................268Globally Exchanging the Values to Two Fields...............................................................268
Importing and Exporting Data ................................................................................................270About Importing Data ......................................................................................................270About Exporting Data ......................................................................................................270Considerations for Importing and Exporting Data ..........................................................271
10 • Table of Contents GoldMine User Guide
Data Preparation ..............................................................................................................272Using the Import Wizard.........................................................................................................272Using the Export Wizard.........................................................................................................273About Importing and Exporting XML Files ...........................................................................274
Exporting to XML ...........................................................................................................275Exporting Data Using an Existing XML Profile .............................................................276
Importing XML.......................................................................................................................277Import a New File Dialog Box ........................................................................................279
Importing from Other Applications ........................................................................................279Importing Data from ACT!..............................................................................................279Using the ACT! Import Wizard .......................................................................................279
Using the Outlook Conversion Wizard...................................................................................280Exporting to GoldMine From Microsoft Excel ......................................................................282Importing and Exporting iCalendar Files ...............................................................................284
Importing iCalendar Files ................................................................................................284Exporting iCalendar Files ................................................................................................284
Importing ZIP Codes ..............................................................................................................285About WebImporting ..............................................................................................................287
Using the WebImport Wizard ..........................................................................................288Requiring Passwords on WebImport Files ......................................................................288
Merging, Purging, and Deleting Records................................................................................289About Merging and Purging ............................................................................................289Using the Merge/Purge Wizard .......................................................................................289
Selecting the Merge and Purge Methods ................................................................................291Merging Visible Contacts ................................................................................................293Merging Tagged Records.................................................................................................293
Using the Delete Wizard .........................................................................................................294Monitoring Processes..............................................................................................................295GoldMine Tables.....................................................................................................................296
Marketing Tools 303About the Leads Management Center ....................................................................................303Using the Leads Management Center .....................................................................................303About the Campaign Management Center..............................................................................304Campaign Local Menu............................................................................................................305Campaign Management Center Toolbar .................................................................................306Using the Campaign Management Center ..............................................................................307
Creating Campaigns.........................................................................................................307Cloning Campaigns .........................................................................................................309Renaming Campaigns......................................................................................................309Creating New Campaign Tasks .......................................................................................309Completing Campaign Tasks...........................................................................................310Deleting Campaigns.........................................................................................................310Deleting Campaign Tasks ................................................................................................311
GoldMine User Guide Table of Contents • 11
Changing Campaign Task Properties...............................................................................311About WebImporting ..............................................................................................................312
Service Center 313About the Service Center ........................................................................................................313
Using the Service Center .................................................................................................313Service Center List View .................................................................................................314Service Center Detail View..............................................................................................314Using the Service Center Toolbar (List View).................................................................316Using the Service Center Toolbar (Detail View) .............................................................317
Creating a New Case...............................................................................................................318New Record Tabs ....................................................................................................................320Customizing Tabs....................................................................................................................321Creating a New Template........................................................................................................323Reassigning a Case..................................................................................................................325Escalating a Case ....................................................................................................................326Resolving a Case .....................................................................................................................327Creating a Performance Report for a Case..............................................................................328
Customizing Data Appearance ........................................................................................329About the Set Case Number Mask Dialog.......................................................................332
Reporting 335About the Reports Center........................................................................................................336 Report Types ..........................................................................................................................337 Using the Reports Center .......................................................................................................338 About Report Properties.........................................................................................................340
Setting Report Properties, Profile Tab .............................................................................341Setting Report Properties, Sort Tab .................................................................................341Setting Report Properties, Options Tab ...........................................................................344 Running Crystal Reports from the GoldMine Reports Center .......................................345Adding Crystal Reports to the Reports Center ................................................................346Configuring Crystal Reports Data Source Names ...........................................................347
Creating Reports ....................................................................................................................348 Cloning Reports ..............................................................................................................349 Editing Report Layouts ...................................................................................................351Cloning Reports ...............................................................................................................352Editing Report Parameters ...............................................................................................353Inserting Sections in Reports ...........................................................................................354Editing Report Sections ...................................................................................................354Inserting Report Fields.....................................................................................................355Examples of Formatting Sections ....................................................................................356
Previewing GoldMine Reports...............................................................................................358 Printing Reports .....................................................................................................................358 Saving Reports with Data ......................................................................................................359
12 • Table of Contents GoldMine User Guide
Viewing Saved Reports...................................................................................................360 Sorting Report Data ...............................................................................................................360 Answer Wizard Reports .........................................................................................................361
Using Answer Wizard.....................................................................................................362 Reporting Services Integration ..............................................................................................363
About Scheduled Reports ................................................................................................363Using Scheduled Reports.................................................................................................363
Configuring for E-Mail Delivery ...........................................................................................366 Configuring the INI File ........................................................................................................368
Automated Processes 369About Automated Processes ...................................................................................................369Automated Processes Components .........................................................................................369
Designing Automated Processes......................................................................................370Automated Processes Center Components .............................................................................372
Process Local Menu.........................................................................................................373Process Options Update ..........................................................................................................374Creating Automated Processes ...............................................................................................374Working with Automated Processes .......................................................................................379Creating Processes ..................................................................................................................379
Editing Processes .............................................................................................................381Creating Events.......................................................................................................................381
Using the Automated Processes Center...........................................................................381Event Properties Dialog Box ...........................................................................................382
Attaching Processes to a Contact............................................................................................383Attaching Processes to Multiple Contact Records...........................................................383
Executing Processes................................................................................................................384Removing Attached Automated Processes .............................................................................385Trigger Dialog Boxes..............................................................................................................386
Schedule Action Dialog Box ...........................................................................................387
Synchronization 389About Transfer Sets ................................................................................................................391
About Synchronizing with Microsoft Outlook, Palm/Treo, or a Pocket PC Device .......394Configuring Synchronization with Microsoft Outlook....................................................394Configuring Synchronization with Palm/Treo.................................................................396Configuring the Advanced Synchronization Options (Outlook) .....................................398Configuring Synchronization Settings.............................................................................398Using Copy/Move Records..............................................................................................401Using the Sync Spy..........................................................................................................402Sync Spy Local Menu......................................................................................................404
About the Synchronization Wizard.........................................................................................404Using the Synchronization Wizard ..................................................................................404
GoldMine User Guide Table of Contents • 13

Configuring the Synchronization Connection Method ....................................................405About GoldSync......................................................................................................................406
GoldSync Key Terms and Concepts ................................................................................407GoldSync Implementation Considerations ......................................................................409GoldSync Sites Local Menu ............................................................................................410Configuring Synchronization Settings.............................................................................411Using the GoldSync Administration Center ....................................................................414Configuring GoldSync as a Service.................................................................................416Creating Sites ...................................................................................................................417Configuring the Goldsync Site Group Override Options ................................................418Creating Site Groups........................................................................................................419Configuring the General Options (Site Groups) ..............................................................420Configuring the Retrieve Options....................................................................................421Creating Servers...............................................................................................................423Cloning Site Settings .......................................................................................................424Creating Server Processes................................................................................................425Configuring the Number of Connections.........................................................................425Configuring Incoming E-mail Settings............................................................................426Configuring Outgoing E-mail Settings ............................................................................426Configuring the Active Periods for Synchronization ......................................................426Running GoldSync as a Service.......................................................................................429Configuring GoldSync as a Service.................................................................................430
About One-Button Synchronization........................................................................................431Synchronizing Using One-Button Synchronization ........................................................431Creating One-Button Synchronization Profiles ...............................................................432Retrieving One-Button Synchronization Profiles ............................................................432E-mailing One-Button Synchronization Profile to Remote .............................................433Creating Installation Files for One-button Synchronization............................................434Retrieving One-Button Synchronization Installation Files..............................................435Configuring Send Options ...............................................................................................436Monitoring Processes.......................................................................................................437
About Licensing......................................................................................................................437Creating Undocked User Licenses...................................................................................441Creating Site Licenses .....................................................................................................442About Sub-licenses ..........................................................................................................443
Calendars 445About Sharing Free/Busy Times .............................................................................................445
Using a Contact's Free/Busy Time when Scheduling in GoldMine ................................446Scheduling Based on Free/Busy Times...................................................................................448
Distributing Your Free/Busy URL to others ....................................................................448Setting Free/Busy Times..................................................................................................448Configuring IIS to Access .ifb File Types .......................................................................450Configuring Free/Busy URLs..........................................................................................450
14 • Table of Contents GoldMine User Guide

Scheduling Activities Based on Available Times............................................................451About Scheduling from Meeting Requests .............................................................................452
Creating Meeting Requests..............................................................................................453Sharing Calendar Information .........................................................................................454Accessing Shared Calendars............................................................................................454
Configuring Calendar Publishing in the Server Agents Administrator ..................................455Publishing Calendar Information.....................................................................................456Publishing Free/Busy Times............................................................................................456Calendar Options Dialog Box, Free/Busy Tab ................................................................457
Server Agents 459Starting the Server Agents ......................................................................................................460Configuring Sending and Retrieving Email in the Server Agents Administrator ..................460Configuring GoldSync in the Server Agents Administrator...................................................461Configuring Outlook Sync in the Server Agents Administrator.............................................462Configuring Printing and Faxing in the Server Agents Administrator ...................................463Configuring Automated Processes in the Server Agents Administrator ................................465Configuring Calendar Publishing in the Server Agents Administrator ..................................465
F2 Lookup Lists 467F2 Lookup Benefits .........................................................................................................467
Managing F2 Lookup Lists.....................................................................................................468Using the F2 Lookup ..............................................................................................................468Creating F2 Lookup Values ....................................................................................................469
Dependency Between Lookup Lists ................................................................................470Setting up a Dependency .................................................................................................470Available Dependency Tables..........................................................................................471Manually Editing Dependencies......................................................................................472Selecting an Entry by Ignoring Dependency Settings .....................................................472
Configuring F2 Lookup List Security.....................................................................................473Editing F2 Lookup Entries......................................................................................................475
My GoldMine 477About My GoldMine ..............................................................................................................477Configuring My GoldMine.....................................................................................................478Using My GoldMine ...............................................................................................................479Select a Resource to Add Dialog Box in My GoldMine ........................................................480
GoldMine User Guide Table of Contents • 15
Knowledge Base 481Knowledge Base Toolbar ........................................................................................................482Creating Knowledge Base Books, Folders, and Topics ..........................................................483Editing Knowledge Base Books, Folders, and Topics ............................................................484
Adding Keywords to Knowledge Base Topics ................................................................486Setting Security Access on Knowledge Base Topics.......................................................486Adding HTML Text to Knowledge Base Topics .............................................................487
GoldMine Plus for Microsoft Office 489About GoldMine Plus for Microsoft Office............................................................................489
GoldMine Plus for Word..................................................................................................489GoldMine Plus for Excel .................................................................................................490
Installing GoldMine Plus for Microsoft Office.......................................................................491Setting Preferences in GoldMine Plus for Microsoft Office...................................................492Using GoldMine Fields in Microsoft Word ............................................................................494
To install GoldMine fields into a Word document...........................................................494Using GoldMine Fields in Microsoft Excel ............................................................................495Exporting to GoldMine From Microsoft Excel.......................................................................497Adding Excel Templates .........................................................................................................498
Integration 501 Integrating with HEAT...........................................................................................................501
Advantages of a HEAT Integration..................................................................................502 How the HEAT Integration Works..................................................................................503 Launching HEAT from GoldMine ..................................................................................504 Ticket Transfer Utility with HEAT Integration...............................................................504
Integrating with .NET ............................................................................................................505
Glossary 507
End User’s License Agreement 517
Index 521
16 • Table of Contents GoldMine User Guide

Welcome to GoldMine® Premium Edition
IntroductionGoldMine is a powerful tool designed to automate and manage your day-to-day business activities. Maintain business relationships, manage time, establish and achieve goals more easily than ever before with new features and enhancements in GoldMine Premium Edition.GoldMine automates key areas of daily business activity:• Client/contact management• Time and task management• Document and email management• Sales Management• Service Management For additional support, please visit: http://www.frontrange.com/ and http://support.frontrange.com.
GoldMine Administrators Guide Welcome to GoldMine® Premium Edition • 17
What's New OverviewGoldMine supports a variety of business processes with improved efficiency and automated administration. New features and enhancements make GoldMine Premium Edition more powerful and easy to use than ever.• New User Interface: GoldMine Premium Edition has been designed with
a sleek, modern look and feel. Navigation, automation, and communication are now more streamlined and uniform, for improved workflow efficiency and ease-of-use.
• Customer Service Module (Service Center): GoldMine Premium Edition includes a Customer Service Center module for tracking, resolving, and reporting customer service cases for GoldMine contacts.• Tabbed View provides a quicker navigation between open windows is
now possible in GoldMine Premium Edition, thanks to a new tabbed view that utilizes available screen space more effectively. To enter the tabbed view, simply maximize any open window in the GoldMine workspace.
• Auto-complete capability has been added, improving speed and accuracy during such tasks as entering field data, or adding recipients to e-mail messages.
• Tip of the day offers helpful information about various features in GoldMine each time you open the application.
18 • Welcome to GoldMine® Premium Edition GoldMine Administrators Guide

What's New in the Premium EditionGoldMine Premium Edition features a number of significant improvements designed to make interacting with GoldMine faster and more productive.
New User InterfaceGoldMine Premier Edition is more efficient and easier to use than ever, thanks to a new user interface designed for pure efficiency and ease-of-use. Menus and toolbars are incorporated consistently throughout each section of the application, for faster and more intuitive operation.
ToolbarsThe pre-set toolbars familiar to users of GoldMine Corporate Edition have been replaced with a single, customizable Global Toolbar, along with streamlined toolbars built into each window in your GoldMine workspace. As always, local menus are accessible via toolbar buttons or by right-clicking elements on your screen. Less time searching for menu items or often-used functions means more time spent running your business.
Navigation PaneIn place of the Taskbar feature in GoldMine Corporate Edition, a newly designed Navigation Pane has been added, with a contextual view window that will be the most precious real-estate on your screen, thanks to its seamless integration with GoldMine functions in the main workspace. Browse activities and e-mail, move around your calendar with ease, and access dynamic lists of recently viewed items, all in one convenient location. Simple, one-button access to the most important features in GoldMine has also been added, along with a search field for instant access to GoldMine's powerful Contact Search Center.
Contact ListA new option for viewing Contact Records has been added, called the Contact List. Now, most functions in the contact window can be accessed without opening individual contact records, saving you valuable time and effort.For more information on GoldMine Premium Edition's new user interface, see “Getting Started” on page 23.
GoldMine Administrators Guide Welcome to GoldMine® Premium Edition • 19

Service CenterCase management functionality in GoldMine® Premium Edition provides customer service agents the ability to capture service requests, then filter and access the details of each case. The customer service center enables your entire service division to pursue, arrange and filter all service requests and optimize work flow throughout the day.GoldMine Premium Edition case management features allow your service professionals to assign, escalate and resolve customer service requests quickly and efficiently. Quickly access customer service issues, route them to the service agent who can best solve the problem, and keep clients informed of their service request progress, all within your customized GoldMine environment.Your GoldMine users can now accept incoming customer service requests from multiple sources, be alerted to upcoming and urgent cases, and get details for any open or closed service request. Individual agents and customer service managers can filter their daily case activities, improving work efficiency and enabling optimal customer care.
Contact Record Organizational Charts are now Contact Relationships TreesCustomers familiar with Organization Charts (Org Charts) from GoldMine Corporate Edition will find these same features within each contact record, consolidated in the Relationships Tab. The organizational charts have been replaced with relationship trees.Relational functions built into contact records are easier and more intuitive to use, and allow for greater definition between relationship and organization types.
Universal SearchUniversal Search is a one-box search engine that allows you to quickly access a summary view of the information you are looking for, along with links to more detailed information.
20 • Welcome to GoldMine® Premium Edition GoldMine Administrators Guide

What's New in GoldMine Premium Edition
GoldMine Premium Edition features a number of significant improvements designed to make interacting with GoldMine faster and more productive.
New User InterfaceGoldMine Premier Edition is more efficient and easier to use than ever, thanks to a new user interface designed for pure efficiency and ease-of-use. Menus and toolbars are incorporated consistently throughout each section of the application, for faster and more intuitive operation.
ToolbarsThe pre-set toolbars familiar to users of GoldMine Corporate Edition have been replaced with a single, customizable Global Toolbar, along with streamlined toolbars built into each window in your GoldMine workspace. As always, local menus are accessible via toolbar buttons or by right-clicking elements on your screen. Less time searching for menu items or often-used functions means more time spent running your business.
Navigation PaneIn place of the Taskbar feature in GoldMine Corporate Edition, a newly designed Navigation Pane has been added, with a contextual view window that will be the most precious real-estate on your screen, thanks to its seamless integration with GoldMine functions in the main workspace. Browse activities and e-mail, move around your calendar with ease, and access dynamic lists of recently viewed items, all in one convenient location. Simple, one-button access to the most important features in GoldMine has also been added, along with a search field for instant access to GoldMine's powerful Contact Search Center.
GoldMine Administrators Guide What's New in GoldMine Premium Edition • 21

Service CenterCase management functionality in GoldMine® Premium Edition provides customer service agents the ability to capture service requests, then filter and access the details of each case. The customer service center enables your entire service division to pursue, arrange and filter all service requests and optimize work flow throughout the day.GoldMine Premium Edition case management features allow your service professionals to assign, escalate and resolve customer service requests quickly and efficiently. Quickly access customer service issues, route them to the service agent who can best solve the problem, and keep clients informed of their service request progress, all within your customized GoldMine environment.
Contact ListA new option for viewing Contact Records has been added, called the Contact List. Now, most functions in the contact window can be accessed without opening individual contact records, saving you valuable time and effort.
Contact Record RelationshipsCustomers familiar with Organization Charts (Org Charts) from GoldMine Corporate Edition will find these same features within each contact record, consolidated in the Relationships Tab. The organizational charts have been replaced with relationship trees.Relational functions built into contact records are easier and more intuitive to use, and allow for greater definition between relationship and organization types.
Universal SearchUniversal Search is a one-box search engine that allows you to quickly access a summary view of the information you are looking for, along with links to more detailed information.
22 • What's New in GoldMine Premium Edition GoldMine Administrators Guide

Getting Started
Now that you have installed GoldMine Premium Edition, this chapter will help you get started using the application.For more information and procedures, see the GoldMine 8.5 User Guide.
Key Terms and ConceptsThe following is a list of GoldMine key terms and concepts.Activity List. A categorized list of activities associated with a particular contact record or assigned to a GoldMine user. Use the Activity List to view details of an activity, display the contact record linked to an activity, schedule and complete the activity, and save reference information in the history file. Browse Window. A list of contacts, Calendar events, reports, and other items. Browse windows differ from other types of windows in GoldMine because they display information in columns. Calendar. Activity information organized in tabs that access different levels and types of detail. Use the Calendar to schedule and complete activities. Contact record (also Contact). Standard contact information, such as name, company, phone number, and address. Most operations in GoldMine are performed on the contact record. The contact record is the basis for scheduled work in GoldMine, acting as the link between GoldMine’s Calendar and History by maintaining pending and past events related to each contact record.When multiple windows are open in your GoldMine work area, the title bar of an active contact record is a different color from other items occupying the work area.
GoldMine Administrators Guide Getting Started • 23

F2 Lookup. A data entry tool listing frequently used or code-specific entries. Security options control F2 Lookups, ensuring user input and allowing data standardization. Work Area. Displays open contact records, the Calendar, Activity List, E-mail Center, and any other open windows. Although you can open, position, and size multiple contact records in the work area, only one contact record can be active at a time. Universal Search. A one-box search to give you a summary view of the information along with links to more detailed information.
Launching GoldMineUse the following procedure to launch GoldMine Premium Edition on your desktop computer.1. On the Windows desktop, select Start>>Programs>>GoldMine or dou-
ble-click the GoldMine desktop icon. The GoldMine Premium Edition login window appears.
2. Type your user name in the Username field, type your password in the Password field and then click OK.
24 • Getting Started GoldMine Administrators Guide

Changing the Default Login Use the following procedure to change the username and/or the password of your login.1. Login to GoldMine using the default login.2. To change the username, navigate to Tools>>Options and select the Login
tab. 3. At the Default Login user field, select the new username from the drop-
down menu.4. To change the password, navigate to Tools>>Options and select the
Personal tab. 5. Click Change Password.
The Change Password dialog box opens.
6. Type in the old password and then the new password (twice) in the appropriate fields and then click OK.
Viewing Information About GoldMine Premium EditionView summary information, credits, installation details, or contact information for FrontRange Solutions. Use the following procedure to view information about GoldMine.1. Select Help>>About GoldMine. The About GoldMine window opens.2. View version, registered owner, product serial number, and copyright
information.• Credits. Displays integrated applications.• FrontRange. Displays contact information for FrontRange Solutions.
GoldMine Administrators Guide Getting Started • 25

• System. Displays information about your GoldMine installation. To copy the information, click Copy All. Paste the information into your outside application.
3. Click OK.
About the GoldMine Architecture
The GoldMine File SystemGoldMine stores information in one or more databases in which related records are logically organized. Storing information in a database provides advantages such as a common point of access for multiple users, applications, and data security.Network applications managing information typically organize shared data in a relational database structure, supervised by a Database Management System (DBMS). The DBMS supervises maintenance of and access to the database. It has a database engine that defines the database structure, stores data, and responds to requests by retrieving data from the stored locations. The DBMS can organize data in one large database that stores all system data or in multiple unique databases in the same system. Information systems today facilitate quick and reliable data management and retrieval using the relational database. At the most basic level, a relational database consists of tables organizing data in columns and rows. The cell at any column/row can contain only one value. Columns and rows work together to define the type of information a cell contains. GoldMine, acting as a DBMS, uses a number of different files to store various elements of the data it collects:
• In GoldMine Standard, the default installation places the GoldMine files, Contact files, and System files in folders under the main GoldMine folder.
• In a GoldMine Premium Edition installation, the shared database files and Contact files are hosted on the server database while licensing and user files remain local to the GoldMine folder.
26 • Getting Started GoldMine Administrators Guide

In a network environment, you can run workstations from the executable on the server. You can also install GoldMine's executable files locally to a workstation if the data files are centrally located and accessible to all GoldMine users. The physical configuration of GoldMine on the hard drive is important. The main GoldMine executables should always be one level deep in a directory structure. The path to GoldMine should be x:\GoldMine, where x is the network drive where GoldMine is installed. Installing by using Universal Naming Convention (UNC) paths, the server path should be \\server\GoldMine\GoldMine or \\server\sharename\GoldMine.
File Server and Client/Server ArchitectureNetworks require configuration that manages shared data stored in a central location. Users need a way of accessing information from the central file(s), and the organization needs a way of protecting data integrity and controlling traffic to maintain the availability of shared resources. These needs are met using file server and client/server architecture.
Client/Server ArchitectureGoldMine Premium Edition utilizes a client/server architecture:• The client/server uses network resources more efficiently to reduce
network traffic and respond to requests for data while maintaining data security.
• The client/server architecture effectively divides the functions of the DBMS between the client and the server.
• The server acts as the database engine maintaining and administering access to the data.
• When the server receives a request from a client, the server scans the database for data on the server and returns only the requested piece rather than a whole block.
• Processing occurs at the server, so the server sends back the data in final form as the response to the query.
• Structured Query Language (SQL) is the tool enabling the application user interface to communicate with the server database engine.
GoldMine Administrators Guide Getting Started • 27

28 • Getting Started GoldMine Administrators Guide

User Administration
Setting Up User Groups, Users, and ResourcesGoldMine’s security is based on user groups and users, which must be set up to make the security effective.Each GoldMine user should have a unique user name and password. This is the first level of security. The GoldMine administrator assigns each user the minimum level of necessary access without restricting the functionality related to the user’s job performance.Define user groups according to the function users perform. User and user group security access applies to: • GoldMine Functions. The administrator can permit or deny access to
GoldMine functions. For example, permit or deny a user or user group the ability to create new Contact Records, delete records, or access other users’ Calendars.
• Menu Commands, Toolbar, and Taskbar Settings. Remove menu items from the user’s menu customizing the selection of available menu options and customize toolbars and the Taskbar.
• Contact Databases. Assign user groups access to databases. If a database is assigned to a user or user group, only members of the group can open the database in GoldMine. Each database can have different access restrictions.
• Screens and Fields. Restrict access rights to user-defined screens attached to particular contact databases. If a screen is public, all GoldMine users may view the information. If access is set to a user group, only members of the group may see the screen.
GoldMine Administrators Guide User Administration • 29
• Record Ownership. Each Contact Record is assigned an owner. The default owner is public; however, assign a record or group of records to a user or user group. If a record is owned by a group, each group member is treated as the owner of the record. Ownership determines whether a user who is not an owner can read all or part of the Contact Record or whether a user can edit the record.
The GoldMine administrator can also restrict access to such items as the Relationship Trees, InfoCenter entries, and the ability to launch HEAT from GoldMine Premium Edition.Users with Master Rights can access all parts of the system and bypass all the security settings except for the user’s: • Personal Contacts • PersonalBase files in the InfoCenter• Encrypted email Master Rights users are the only users permitted to access and modify user settings. GoldMine administrators should have Master Rights.
About Record OwnershipContact records can be owned by everyone (public), by a user, or by user groups. Ownership determines security on contact records. Consider the following when setting record ownership:• Records owned by (public) can be viewed and edited by all users.
• Record Ownership is used when record curtaining is applied.
• Ownership can be set when you create a contact record. See “Setting the User Profile” on page 31.
NOTE: Viewing and editing security can be set on individual fields.
NOTE: Ownership is stored in the Owner field in the Contact1 table.
30 • User Administration GoldMine Administrators Guide
Users SecurityControl a user's security access in GoldMine through the User Properties.• Profile Tab. Defines security, automatic record ownership, and forced log-
out for a user.• Membership Tab. Assigns or removes a user from a group.• Access Tab. Sets general security to control user access to GoldMine
features.• Menu Tab. Configures menu options available to the user.• Time Clock Tab. Displays a log showing the user’s activity in GoldMine.
Setting the User ProfileUse the Profile tab to create and set basic user information such as a user name, initial security, and force log out (forcing users out at a particular time or when inactive for a period of timeUse the following procedure to set up a user profile.1. Select Tools>>Users' Settings. 2. At the Users' Master File dialog box, click New to create a new user, or
select an existing user and click Properties.3. At the user's Properties dialog box, click the Profile tab.4. Type the Username (up to 8 characters; must begin with a letter).5. Type the user's Full Name.6. In the Security area configure these settings:
• Master Rights. Select to give the user unrestricted access to all of GoldMine.
• Password.Type the password assigned to the user. You must provide the user name and password you created so the user can log into GoldMine.
• Valid for days. In the drop-down list, select the number of days the user’s password is valid, or accept the default (Always).
• Next change. If you change the Valid for days field, select the date the password becomes invalid and the user cannot launch GoldMine.
GoldMine Administrators Guide User Administration • 31

• Ownership. Displays the New Record Ownership dialog box. Ownership lets you specify whether the new Contact Records the user adds to the database are public records or owned by a specific user or user group.
7. In the Forced log out area, select:• Log out user and terminate GoldMine when idle for a period of
time. Click this box to automatically log the user out of GoldMine. • When idle for. Select the period of inactivity for users before they are
automatically logged out of GoldMine• Forced logout only after this time. Select the time for a forced logout.
8. Click OK to save the user's Profile settings without configuring the detailed user security settings, or click the Membership tab to continue configuring the user’s properties
Setting Up User MembershipUsers can belong to several groups, allowing them access to the group’s contacts for collaboration. Groups must be created before assigning a user to a user group. If user groups were not created, click User Groups Setup to add the user to a group or to create a group(s). See “Setting Up User Groups” on page 33.Use the following procedure to set up a user membership1. Select Tools>>Users' Settings.
Select the user and click Properties.
NOTE: These fields are useful for making your system available for nightly maintenance, without forcing users to log out during the business day.
TIP: For an administrator, the Force log out options are important in managing a limited number of licenses. Also, many maintenance functions can be performed only if all users are logged out of GoldMine.
32 • User Administration GoldMine Administrators Guide
2. Click the Membership tab.The Member of Groups list indicates which groups the user already belongs to. The Excluded from list indicates which groups the user is not a member of. To change the user's membership, double-click the user name to move the user from one column to the other.
3. To create user groups or refine the membership, click User Groups Setup.4. At the User Groups Setup dialog box, highlight the group to which to add
the user.5. Click Member Setup to launch the Group Membership Setup dialog
box.6. Double-click the user's name in the Users' List box to add the user to the
Group Members list.7. To add the user to other groups, return to the User Groups Setup dialog box
and highlight the new group. Click Member Setup to launch the Group Membership Setup dialog box and double-click the user's name in the Users' List box.
8. Click OK and then click Close.The Member of Groups list displays the groups of which the user is a member.
9. Click OK to return to the Users' Master File, or click the Access tab to continue configuring the user’s properties.
Setting Up User GroupsIt is recommended that you logically group users according to functions they perform. User group names store in the Lookup table; user group members are encrypted in the User.dbt table.Use the following procedure to set up user groups.1. Select Tools>>User Groups. 2. At the User Groups Setup dialog box, click New.
NOTE: You can create User Groups while adding the user to a group. On the User Groups Setup dialog box, click New and follow the steps.
GoldMine Administrators Guide User Administration • 33

3. Type the User Group's name in the field and click OK. The user group displays in the User Groups box.
4. To add users, click Members Setup. The Group Membership Setup dialog box opens.
5. To add individual users or all members of an existing group to the Group Members box, double-click the user in the User List, or the group in the Group List, to add users to the Group Members list.
6. Click OK.7. After creating groups and adding members, click Close.
Setting User AccessUse the Access tab to configure a user’s access rights on Contact Records, access to information of other users, and miscellaneous access rights. If an item is selected, the user can perform the action in GoldMine. 1. Select Tools>>Users' Settings.
Select the user's name and click Properties.2. Click the Access tab.3. In the Contact Record area, select:
• Add New. Add a contact record.• Edit Fields. Edit fields in the top half of the contact record, the user-
defined fields in the Fields tab, and the Notes tab.
• Delete. Delete contact records.• Required field override. Authorize an override on a required field.• Assign Owner. Assign Contact Record ownership to other users.• Edit Tab Folders. Edit data in the tabs.
NOTE: Without Edit Fields rights, users cannot edit fields on any contact records, including the records they own.
NOTE: Without Edit Tab folders rights, users cannot edit tab folders on any contact records, including the records the they own.
34 • User Administration GoldMine Administrators Guide

• Schedule Process. Assigns an automated process to a contact.4. In the General Access area, select:
• Build Groups. Build their own groups of Contact records in the Filters and Groups dialog box.
• ‘Output to’ menu. Enable the Output to option in the local menus in GoldMine to allow output to printer, Word, Excel, and clipboard.
• Issue SQL Queries. Write and send SQL queries to retrieve data for display.
• Toolbar settings. Add and remove toolbar icons.• Net-Update connections. Run a version update on the live system
using the Internet.
• Real-Time Tab. View the Real-Time tab in the Activity List. Displays all users’ completed activities.
• SQL Logon name and SQL Password. If using GoldMine with a SQL database and you assigned the user an individual or group logon name and password in SQL, type the information in the text boxes. This launches GoldMine without requiring the user's SQL logon name and password each time.
5. In the Notes Access area, select: • Insert Notes. Allow endusers to add notes.• Edit/Delete. Allow endusers to edit or delete their own notes.
NOTE: Non-Master users cannot select Printer in the Output to menu because of Reports security considerations.
CAUTION: This option should be carefully controlled by the GoldMine administrator.
NOTE: When applied to many users, this option can affect network performance.
GoldMine Administrators Guide User Administration • 35
• Edit/Delete others’ notes. Allow endusers to edit or delete notes from other users.
6. In the Access to Others area, select the options as needed:• Calendar. Select this option to do the following:
• Designate the available options from the User drop-down on either the Calendar or Activity List window.
• Designate if the Edit function will be available from the popup menu for activities owned by another user.If this option is not selected, the user cannot edit the activities on the Pending tab. Therefore the Edit and Delete options are not available to the user in the pop up menu.
• History. Select this option to do the following:• View other users’ completed activities in the Closed or Filed tab of
the Activity List.• Edit or delete history records in the History tab on the contact
record or the Real-Time tab in the Activity List.• Build contact groups based on another users’ completed activities,
or view other users’ completed sales activities in the Completed Activities Analysis dialog box.
• Forecast. Select this option to designate the users available when you click the Select User(s) button on the Forecasted Sales Analysis window. (Go To >> Analysis >> Forecast Analysis). Checking (or unchecking) this option will change what is viewed on the Pending tab.
• Reports. Access other users’ reports.• Template. Access other users’ templates in the Document
Management Center.• Links. Access and launch other users’ linked documents.• Filters. Access other users’ Contact record filters.• Groups. Access other users' groups of contacts.• Opp/projects. View opportunities and projects assigned to other users.• Cases. View cases (on the Cases tab and in the Service Center)
assigned to other users.7. Click OK to return to the Users' Master File, or click the Menu tab to
continue configuring the user’s properties.
36 • User Administration GoldMine Administrators Guide

Setting User MenusUse the Menu tab to configure menu options available to users. This is another way of setting security and controlling user access to features. Also create templates of menu options to apply to users as you create their properties. Use the following procedure to set up a user menu.1. Select Tools>>Users' Settings. 2. Highlight the user and click Properties.3. Click the Menu tab in the User Properties dialog box.4. To use a menu, select one option:
• Apply a menu template you created by selecting the template name in the drop-down list.
• Click Expand to display all menu options.To expand the menu display, click the icon next to each option to change the status. When the icon is red, the option is unavailable to the user. When the icon is green, the option is available.
NOTE: If the Resize menu option located under Edit>>Record Details>>Resize is restricted, the custom screens in the Fields tab display as GoldMine menu options.
5. Click OK to save the Menu configuration and return to the Users' Master File, or click the Time Clock tab to continue configuring the user’s properties
GoldMine Administrators Guide User Administration • 37
Creating User Menu TemplatesSave User Property Menu configurations as a template and apply the template to other users. Use the following procedure to set up a user menu template.1. Select Tools>>Users' Settings.
Highlight the user and click Properties.2. Click the Menu tab in the User Properties dialog box.3. Click Expand to display menu options.4. Click the icon beside the option to change the status.
When the icon is red, the menu option is unavailable to the user. When the icon is green, it is available.
5. Click Save to save the setup as a menu template.6. At the Save Menu Template dialog box, type the name of the template.7. Click OK to save the template.
NOTE: To delete a Menu template, select it in the drop-down list and click Delete.
38 • User Administration GoldMine Administrators Guide
Viewing the User Time ClockThe Time Clock tab is a management tool rather than a configuration option. 1. View the user's activities in GoldMine.
• Date. Date of the logged activity by the selected user.• Login. Time the user logged into GoldMine.• Logout. Time the user logged out of GoldMine.• Logged. Total time the user was logged into GoldMine, including any
time logged away.• In. Total number of times the user logged into GoldMine.• Keys. Number of keystrokes pressed by the user while working in
GoldMine.• Clicks. Number of mouse clicks performed by the user while working
in GoldMine.• CRC. Indicates whether the data in the user log was modified outside
of GoldMine. This column displays OK for every log entry that is free of tampering; that is, external.
NOTE: Create one or several ideal users to reflect basic settings applicable to many users. For example, you may have two prototype users: Sales Staff and Supervisor. Each of these user types has different rights and menus in GoldMine. Allow the Sales Staff to add and edit new contacts but not to delete contacts or view other’s calendars. The Supervisor can add and delete contacts and view anyone’s calendar. After the ideal user or users are created, clone the user’s settings for each actual user with the same rights.
GoldMine Administrators Guide User Administration • 39

Cloning User SettingsAfter creating an ideal user with settings applying to many users, clone the user's Properties. All security settings in the User Properties apply to the new user except the Username, Full Name, and Password on the Profile tab.Use the following procedure to clone a user setting.1. Select Tools>>Users' Settings. 2. Right-click the user whose settings to clone and select Clone.
3. At the New User Properties dialog box, type Username, Full Name, and Password; select the other Profile settings.The Membership, Access, and Menu settings apply to the new user.
4. Change the individual user properties as needed. 5. Click OK.
About User Options Define GoldMine settings unique to you. GoldMine saves User Preference settings in your user’s initialization file (username.ini).
NOTE: While User Options let users customize their work environment, many GoldMine administrators configure these settings for users and then restrict their ability to change the Options.
TIP: For Administrators: To restrict the user's access to the User Options dialog box, select Tools>>Users' Settings. Select a user from the list, and click Properties, then select Menu. Choose available main menu items for the selected user and click Save. Menu layouts can be saved for instant recall for any user.
Set up user options on the following tabs:• Personal. Change your password and add personal information. See
“Setting Options on the Personal Tab” on page 41.• Record. Control the appearance of Contact records, tab displays, and zip
code validation. See “Setting Options for the Record Tab” on page 42.
40 • User Administration GoldMine Administrators Guide

• Calendar. Determine calender appearance and functions. See “Setting Options for the Calendar Tab” on page 45
• Schedule. Set parameters for scheduling and working with activities. See “Setting Options for the Schedule Tab” on page 49.
• Alarms. Configure GoldMine alarms. See “Setting Options for the Alarms Tab” on page 50.
• Lookup. Set display options for Contact records and the Contact Search Center. See “Setting Options for the Lookup Tab” on page 51.
• Email. Configure settings for your e-mail server, login information, and rules to apply when sending and receiving email. See “Setting Options for the E-mail Tab” on page 52.
• Telephony. Control settings for your computer's modem and dialing options and SoftPhone advanced settings in GoldMine. See “Setting Options for the Telephony Tab” on page 70.
• Pager. Identify your pager's telephone number and PIN number. See “Setting Options for the Lookup Tab” on page 77.
• Login. Determine the locations of the GoldMine default databases and system files, and other system settings. This tab is available only to users with Master Rights. See “Setting Options for the Lookup Tab” on page 77.
• Speller. Specify GoldMine spell checking options. See • System. Set date and time settings. Select classic navigation and taskbar
settings, and specify an Outlook username, if different than your GoldMine username. See “Setting Options for the System Tab” on page 79.
Setting Options on the Personal TabUse the following procedure to set up user personal information.1. Select Tools>>Options. 2. At the User's Options dialog box, select Personal.
The Personal tab displays User Name and Full Name.
3. Click Change Password to change your GoldMine Password.
NOTE: A Master Rights user can change the Full Name in the User Profile.
GoldMine Administrators Guide User Administration • 41
4. In the Title field, type your professional title.
NOTE: For Title and following Department, Phone, and FAX text boxes, selecting the Select contents of field option chooses the entire contents of a field. If this option if selected and your screen saver is set to On, you may inadvertently delete the contents of the field when you clear the screen saver. If you press ESC before leaving the field, the data is replaced.
5. In the Department field, type the name of the organization or group you are affiliated with.
6. In the Phone field, type your primary telephone number.7. In the FAX field type your fax number.8. Click OK to save the settings and close the dialog box.
Changing Your PasswordTo change your GoldMine Login password, you must be the user logged into GoldMine.1. Select Tools>>Options. 2. At the User's Options dialog box, select the Personal tab. 3. Click Change Password. 4. At the Change Password dialog box, type your current password in the
Enter your current password field.5. Type your new password in the Please enter a new password field, and
then type it again in the next text box.6. Click OK to save the new password and return to the Personal tab.
Setting Options for the Record TabUse the Record tab to customize the display of the contact record and set the ZIP code validation and title appearing on the contact window.1. Select Tools>>Options. 2. At the User's Options dialog box, select Record.3. In the Appearance area select:
• Dark background. Browse windows appear with a gray background.
42 • User Administration GoldMine Administrators Guide

• Bright background. Browse windows appear with a white background.
• Use Large Font. Displays dialog box text in a large font. This setting is designed for use with monitor display resolution of 1024x768 or higher using Windows’ small font option. It is not available if your display is set to a resolution of 640x480 or if using Windows’ large font option. The Use Large Font option does not apply to the GM+View tab. To increase the display font size in IE 6.0, select View>>Text Size and select the appropriate size.
• Label Color. Displays the Color dialog box to select a color for all field labels displayed in Contact Records.
• Data Color. Displays the Color dialog box to select a color for all field data displayed in Contact Records.
• Tabs. Displays the Display Tabs dialog box to select the tabs to appear in the contact record and the tab order.
• Select contents of fields. Selects or highlights data entered in a field when you click inside it.
• Use a word format for user-defined dates. Displays dates in text form based on the format selected in the drop-down list.
• Show numerics aligned to the right. Right-aligns numbers.• Show sort-by field on status bar. Displays the sort field on the left
side of the status bar.• Open org tree when maximized. Displays the organization tree
automatically when you maximize a contact record. 4. In the ZIP Code Validation area, select.
• No Validation. GoldMine does not perform ZIP Code validation. When adding a new Contact Record or editing an existing record, the City field is edited first, followed by the State and Zip fields.
NOTE: Typically, this setting affects fields in the Fields tab of the Contact Record, but the selected format affects user-defined fields placed anywhere in the Contact Record. The user-defined date format you select from this tab overrides the Show dates format of the local settings option if selected in the Misc tab.
GoldMine Administrators Guide User Administration • 43
• Default to primary city. GoldMine automatically validates ZIP Code entries on the contact record. When adding a new record or editing an existing record, the Zip field is edited first. If the entered ZIP code is found in the ZIP Code file, the city and state from the first matching ZIP Code record is placed automatically in the City and State fields on the Contact Record.
• Show window of cities. When more than one city exists for a particular ZIP Code, GoldMine displays a browse window containing all the cities that ZIP Code is valid for. To select the appropriate city from the window, highlight the record, then press ENTER or double-click the entry.
• Show 9 digits in lookup. Enlarges the ZIP column in the All ZIP Codes Lookup list to display a ZIP plus four entry.
5. In the Contact Window Title area, select:• Contact name. Displays the name of the contact in the title bar of each
Contact Record. For example, if the contact name entry is John Doe, the title bar displays John Doe for that Contact Record.
• Company name. Displays the company name in the title bar of the contact record.
6. Click OK to save the settings and close the dialog box.
NOTE: A complete ZIP Code database is available. Call your local FrontRange Solutions Partner or FrontRange Solutions Inc. for information.
NOTE: Whether this option displays Contact name or another name depends on the field label in GoldMine. If the field name is Contact, the label can be customized by the administrator.
NOTE: Whether this option displays Company name or another name depends on the field label in GoldMine. If the field name is Company, the label can be customized by the administrator.
44 • User Administration GoldMine Administrators Guide

Color Dialog BoxUse this dialog box to select from a predefined palate of colors or customize the color selection. 1. Click Define Custom Colors to view the full customization window.
2. Select or define the custom color, and click OK.
Setting Options for the Calendar TabUse the Calendar tab to set up your calender appearance and functions.1. Select Tools>>Options. 2. At the User's Options dialog box, select Calendar.3. At the Calendar Settings area, select:
• Set Work day starts at. Type the time or using the F2 graphical clock to indicate the time you typically arrive at the office. This information is used to set up your available time on the calendar.
• Set Work day ends at. Type the time or using the F2 graphical clock to indicate the time you typically leave the office each day.
• Select the Increment time by. In the drop-down list. This option sets the minutes in your displayed calendar. The default is 30 minutes. If you select 10 minutes, for example, the daily and weekly calendar will be broken into 10-minute increments.
• Set color as. At the drop-down list, select your calendar color.• Font size. Select the font size in the drop-down list.
GoldMine Administrators Guide User Administration • 45

4. Click More Options. The Calendar Options dialog box opens with the Activity Details tab active.
5. Click Holidays. The Calendar Options dialog box opens with the Holiday tab active.
6. In the Work Days area, select the days of the week you work. Days selected display as a lighter shade in the calendar. Days cleared display as a darker shade and are not considered work days.
7. In the Auto Roll-over area, select the types of activities to automatically roll the activity to the next day if it is not completed.
NOTE: Auto Roll-over is not normally set for Appointments or Forecasted Sales because users cannot make today's 10:00 appointment tomorrow or the next day at the same time. They should reschedule.
8. Select Sync Roll-overs for the new roll-over date to synchronize to remote users. Clear the box to preserve the original date.
9. Set the Calendar refresh rate (sec): by typing the number of seconds or scrolling through the numbers in the text box. GoldMine updates the Calendar entries at the end of the interval you specify in number of seconds. The default entry 0 disables the option so GoldMine will not automatically update the calendar.
10. Click OK to save the settings and close the dialog box.
NOTE: Increasing the Calendar refresh rate sends a signal to the server to update every x seconds and sends you the same data again if no changes are made to your Calendar. Setting this option to update too frequently might increase the network load unnecessarily.
46 • User Administration GoldMine Administrators Guide
Configuring Calendar Options Dialog Box, Activity Details TabUse the Activity Details tab to configure how scheduled and completed activities display on your calendar. 1. Select Tools>>Options>>Calendar. 2. Click More Options. 3. At the Calendar Options dialog box, select the Activity Details tab.4. In the Scheduled Activity Detail Display area and the Completed Activity
Detail Display area, select:• Show 'Contact's Name. Reference'. Displays the name of the contact
before the activity reference information in the calendar entry on the Day tab, Week tab, and Month tab. This is the default display option.
• Show 'Reference. Contact's Name'. Displays the activity reference information before the name of the contact in the calendar entry on the Day tab, Week tab, and Month tab.
• Show results of an xBase expression. Lets users specify text appearing for each activity in the calendar on the Day tab, Week tab, and Month tab. Type the expression in the text box. For example, to display an entry listing the contact’s city then reference information, type this expression:
Trim(Contact1->City)+ ":"
5. Select Show Activity Code to display the three-character activity code as the first part of the calendar entry on the Day tab, Week tab, and Month tab. The activity code appears first, if available, when selected with any other format option; that is, with Contact's Name: Reference, Reference: Contact's Name, and xBase expression.
Configuring Calendar Options Dialog Box, Holidays TabUse the following procedure to add predefined holidays to your calendar display, or create your own.
NOTE: Only users with Master Rights can add or edit Holiday Categories. The Holiday Categories are available to all users with access to their User Options. They can select the categories appearing on their individual calendars.
1. Select Tools>>Options>>Calendar.
GoldMine Administrators Guide User Administration • 47
2. On the Calendar tab, click Holidays. The Calendar Options dialog box opens with the Holiday tab active.
3. In the Holiday Categories list, select any predefined holidays you are adding to your calendar display. Holidays for the selected categories display in the Holidays list. Predefined sets include both fixed holidays such as New Year's Day and variable holidays such as Easter.
4. To create a new holiday category, click New. 5. At the Add a Holiday Category dialog box, type the name in the field and
click OK. The new category adds to the list.
6. Manage the Holiday Categories with these options:• Import. Imports iCalendar (.ics) holidays.• Export. Exports holidays to iCalendar.• Reset. Removes user-defined categories and adds predefined
categories previously removed.• New. The Add a Holiday Category dialog box opens.• Remove. Removes the select category.• Edit. The Add a Holiday Category dialog box opens. Edit the category
name.
Adding or Editing Holidays1. At the Holiday area, click New.2. At the Add a Holiday dialog box, type a name of the holiday in the
Holiday field.3. In the Repeats area, type or select how often the holiday repeats in the
Every: x year(s) field.4. In the Duration area, type or select the number of days the holiday lasts in
the # Days: field.5. Select the holiday either by:
• Specific Date. Select the month and day in the drop-down lists.• Day of the Week. Select the week, the day of the week, and the month
in the drop-down lists.6. Click OK.
48 • User Administration GoldMine Administrators Guide

Adding and Editing Holidays to Categories1. Highlight the holiday category to which you are adding the holiday.2. In the Holidays area, click New.
The Add a Holiday dialog box opens. 3. To change the settings for a holiday, highlight the holiday and click Edit.
The Edit a Holiday dialog box opens. The editing options are the same as the Add a Holiday dialog box options.
4. To remove a holiday, select the holiday and click Remove.
Setting Options for the Schedule TabUse the Schedule tab to set parameters for scheduling and working w activities.1. Select Tools>>Options. 2. At the User's Options dialog box, select Schedule.3. To configure the Schedule, select:
• Check for timing conflicts while scheduling. Notifies you of a scheduling conflict.
• Carry over completion notes when scheduling follow-up calls. The notes are carried over from the completed activity to the follow-up activity. Selecting this option means the notes from a completed call are available in the scheduled follow-up call. This allows for consistency when working with the customer by providing information about previous conversations.
• Start timer when completing activities. Helps managers review team member activities in Statistical Analysis. If not activated, numbers do not appear in analysis features. Users do not need to know this is turned on.
• Show the details section in the Activity Listing window. Displays two detail panes in the Activity List that include the contact, company, create on, as well as notes and related information for the activity.
• Sync the Contact window with the Activity Listing window. Displays the contact record for the selected activity in the Activity Listing window.
4. Click OK to save the settings and close the dialog box.
GoldMine Administrators Guide User Administration • 49
Setting Options for the Alarms TabUse the Alarms tab to select how GoldMine notifies you of an appointment. 1. Select Tools>>Options. 2. At the User's Options dialog box, select Alarms.3. Select one of the following:
• Disable alarms. Turns alarms off and disables the remaining alarm options.
• Pop-up alarms. An alarm window pops up on your screen.• Task-bar notification. The notification alarm displays on the
Windows taskbar and an alarm icon appears in the system tray.4. After you select Pop-up alarms or Task-bar notification, select the
Alarms default lead time. x minutes to specify the number of minutes before an event the alarm pops up.
5. Set the Scan for alarms every. x seconds to specify how often GoldMine scans for alarms.
6. Set the Task-bar notification reminder. x minutes. This option determines the number of minutes before an event the taskbar notice appears. GoldMine also plays an alarm sound if specified.
7. Set the number of minutes on the When I ignore alarms, snooze the ignored alarm for. x minutes option.
8. Select Page me with the alarm when not acknowledged within x minutes and set the time. This only works if you configured the Pager tab notify you if an alarm is not acknowledged.
9. Select Play alarm sound file and browse to the sound file to play as an alarm signal.
10. Select Place GoldAlarm icon on my desktop to place a shortcut to the GoldAlarm.exe on the desktop and place the icon in the system tray when GoldAlarm is running in the background.
NOTE: GoldAlarm notifies you about alarms even when GoldMine is not running.
11. Select Run GoldAlarm when Windows starts to automatically launch the GoldAlarm.exe as soon as Windows starts.
50 • User Administration GoldMine Administrators Guide

12. Click OK to save the settings and close the dialog box.
Setting Options for the Lookup TabConfigure display attributes for the Contact Search Center.1. Select Tools>>Options. 2. At the User's Options dialog box, select Alarms.3. Select Sync the Contact window with the Search Center window to
display the selected record in the Contact Search Center as the active record in the work area.
4. Type or select the Lookup alignment delay while typing (1/10 sec). This specifies the delay in tenths of a second between when you type an entry in the Find Value field of the Contact Search and when the Contact Search Center window displays a record that matches the entry.
5. At the Default Lookup by field, select, Contact, Company, or Remember Lookup by.
The Contact Search Center window defaults to this field when selected on the toolbar or the menu.
6. In the Once a record is selected from the Search Center area, select one of the following:• Move the Search Center window to the back. GoldMine brings the
Contact Record to the front and places the Contact Search Center behind the contact record.
• Close the Search Center window. GoldMine closes the Contact Search Center.
• Minimize the Search Center window. GoldMine minimizes the Contact Search Center.
7. Click OK to save the settings and close the dialog box.
GoldMine Administrators Guide User Administration • 51

Setting Options for the E-mail TabTo send and retrieve e-mail through GoldMine, configure e-mail options on the E-mail tab.
NOTE: You cannot edit E-mail Options while the E-mail Center window is active on the screen.
1. Select Tools>>Options. 2. At the User's Options dialog box, select E-mail.3. In the Getting Mail area, complete the fields:
• Server.• Select either the POP3 or the IMAP protocol radio button.• Type your email server name or IP address. It can be your local
Exchange server or the POP3 or IMAP server for your ISP.
• Username. Type your login for the Exchange server or ISP email account.
• Password. Type your password on the Exchange server or your ISP e-mail account.
• Use encrypted connection (SSL). Select this checkbox to use a secure connection. This ensures the privacy of the connection between your account and the server. Enabling SSL does not verify the identity of your account or the e-mail server, but does prevent a third party from listening or recording messages sent between them.
NOTE: POP3 and IMAP are two types of protocols for receiving e-mail. They are not compatible with each other, and use different port numbers on the server side. Contact your network administrator or ISP if you are unsure of which protocol to use.
NOTE: Select Over SSL changes port numbers on the server side. Servers usually have dedicated ports for secure connections.
52 • User Administration GoldMine Administrators Guide

4. Select Use GoldMine as Explorer’s e-mail client so Microsoft Internet Explorer (IE) recognizes GoldMine as your Internet e-mail application.
5. In the Sending Mail area, complete the fields: • SMTP server. Type your e-mail server name or IP address. It can be
your local Exchange server or the SMTP server for your ISP.• Your return address. Type your complete e-mail address on the
Exchange server or your ISP.• Use encrypted connection (SSL). The same protocol used for
retrieving e-mail securely. Choosing this option will also cause a switch to a dedicated secure connection port number on the SMTP server.
6. In the Network connection area, select:• User Dial-up networking. Dials your Internet provider automatically
when you send and retrieve Internet e-mail. If you subscribe to more than one Internet provider, select the provider you want GoldMine to dial by selecting the Internet account in the drop-down list next to the field that appears below this option.
• Hang up when done. Terminates the telephone connection after finishing sending and retrieving Internet email.
7. Click More Options to configure Internet settings in more detail:• Composing• Retrieval• Accounts• Security• E-mail Center• Advanced
8. The Accounts button takes you directly to the Accounts tab that is also available through More Options.
GoldMine Administrators Guide User Administration • 53
Setting Internet Options on the Composing TabDefine settings for GoldMine to apply when writing an Internet e-mail. 1. Select Tools>>Options. 2. At the User's Options dialog box, select E-mail and then click More
Options. 3. At the Internet Options dialog box, select Composing.4. In the General area, select:
• Show public E-mail templates. The drop-down list in the email Subject line lists all email templates saved to (public) in the E-mail Templates dialog box.
• Attach VCard to outgoing E-mail. Attaches your VCard (.VCF file) to each email message. A VCard contains information similar to a contact record. If the receiving system has VCard capabilities, the system will decipher the .VCF file to import this information.
• Use signature file. Attaches a signature file (a text file containing information about you, your organization, telephone number quotations, and so on) to messages for the single account or for the default account if additional Internet accounts were defined in the Accounts tab. This entry overrides an entry for the default account made in the Accounts tab; however, the entry has no effect on other accounts. Type or browse to the signature file in the field below the option label.
• When forcing line wrap, wrap at column x. Specifies how many characters GoldMine includes before the text wraps to the next line.
• Send attachments as links for GM users. Provides the link to each attached file for GoldMine users instead of sending the files to each recipient. This is a space saver for users on the same shared network.
5. In the Replies area, select:• Complete original message. Places the original message in the History
tab when you reply or forward a message. If you do not want to designate the original message as a completed activity when you respond, clear the check box.
• Use line quote style with prefix. Specifies the characters GoldMine uses to identify lines quoted from the original message when you copy those lines into your reply. By default, GoldMine uses >>.
54 • User Administration GoldMine Administrators Guide

• Quote entire message by default. GoldMine copies the entire text of the original message in your reply, using the characters entered in Use line quote style with prefix.
• Wrap quoted lines in replies at column x:. Specifies the number of characters GoldMine uses before wrapping to the next line of quoted text. You can use this option to create an indented block for text quoted from the original message.
6. In the Misc. area, select:• Use 8 bit encoding. Converts 7-bit encoding into 8-bit encoding.
Useful for international GoldMine users.• Always send a Bcc to myself. Sends a blind courtesy copy (bcc) of
each outgoing message to your e-mail account.• Use user supplied VCard. Ensures the VCard attached to your
outgoing e-mail includes updates.• Encode E-mail using character set. To encode your messages with a
special character set, type the character set in the field. For example, to use the Western European character code, type iso-8859-1. If left blank, GoldMine uses the local default character set for encoding.
7. In the Default templates area, select Public or your user-defined templates in the drop-down lists: • For new outgoing E-mail messages• For replies• For forwarded messages
8. Click OK to save the settings and close the window, or click the next Internet Options tab to configure.
NOTE: Templates must be created before they are available in the drop-down lists.
GoldMine Administrators Guide User Administration • 55

Setting Internet Options on the Retrieval TabSpecify a variety of Internet email retrieval options to define attachment locations, scan intervals, and the criteria GoldMine uses to select messages for retrieval.1. Select Tools>>Options. 2. At the User's Options dialog box, select E-mail.3. Click More Options. 4. At the Internet Options dialog box, select Retrieval.5. In the Retrieval Options area, select:
• Open ‘Read E-mail’ dialog on retrieval. After the email is retrieved, GoldMine opens and displays the first retrieved message.
• Use date from mail header. Sets the date of incoming mail to the date sent as indicated in the header information of the message and posts email in true chronological order on your calendar.If you do not retrieve e-mail frequently, you may want to clear the check box corresponding to this option.
• Scan mail for UUEncoded data. GoldMine scans the Internet mail server for any e-mail messages that contain UUEncoded attachments. Selecting this option does not affect the retrieval of MIME-encoded files.
• Prompt if E-mail address is not on file. GoldMine displays the Attach E-mail to Contact dialog box upon retrieving an unlinked email message. Options are available for linking the message.
• Preview x lines of the message. Specifies the number of lines of text GoldMine displays in the lower pane of the E-mail Center. By default, GoldMine displays 15 lines.
• Do not retrieve VCard attachments. If you select this option, GoldMine will not retrieve VCards with incoming email.
• Mark incoming messages as private. Limits the information available to other users about your incoming messages and prevents unauthorized users from reading the text.Example: On the Pending tab, received messages are marked (Private); Master users can read the messages, but other users cannot.
6. In the Background E-mail Retrieval area, select:
56 • User Administration GoldMine Administrators Guide

• Retrieve mail every x minutes. GoldMine connects with your POP3 mail server to check for new mail at the interval you specified. For example, to retrieve waiting Internet e-mail every 2 hours, type 120 in this field. The default value of 15 sets GoldMine to scan for and retrieve waiting e-mail every 15 minutes. If you do not select Auto-retrieve on the Accounts tab but select Retrieve mail every x minutes and Send queued messages, GoldMine sends queued mail only.The following options are available only if you select Retrieve mail automatically every x minutes.• Skip read mail (recommended). Bypasses displaying e-mail mes-
sages you already read.• Skip mail larger than x KB. GoldMine retrieves only Internet
email messages that are equal to or smaller than the kilobyte (KB) value in this field.
• Skip messages from contacts not on file. GoldMine retrieves only e-mail from those contacts who have Internet e-mail addresses in their detail records.
• Send queued messages. GoldMine sends all queued messages when automatically retrieving mail.
7. Type or browse to the location of the Attachments directory. This is the destination folder for retrieved e-mail attachments.
NOTE: These directories should be shared so other users can access the attachments.
8. Select Save attachments as linked documents to link files attached to incoming e-mail to the senders’ contact records. To prevent linking attachments to your contacts, clear this option.
9. Click OK to save the settings and close the window, or click the Internet Options tab to configure.
GoldMine Administrators Guide User Administration • 57
Setting Internet Options on the Accounts TabAdd and edit additional Internet accounts for sending e-mail from GoldMine. Establish a non-standard authentication protocol for your primary account.1. Select Tools>>Options. 2. At the User's Options dialog box, select E-mail.3. Click More Options. 4. At the Internet Options dialog box, select Accounts.
The accounts are listed in the field. 5. To add an account, click New. 6. At the E-mail Account Properties dialog box, define properties for an
Internet email account. A user can log in and retrieve mail for up to 256 separate accounts.
7. To edit an existing account, select the account and click Edit. At the E-mail Account Properties dialog box, make changes to the Internet email account.
8. To remove an Internet account, select the account and click Delete.
WARNING: No confirmation prompt appears to verify the deletion.
9. With multiple accounts, set one account as your primary account by highlighting it and clicking Set as Default. The default account is indicated by a green ball or dot in the accounts display box.
10. Select Show only the default account in the E-mail Center if you have multiple accounts but only want the default account to display in the E-mail Center. The accounts set to display in the E-mail Center are indicated by eyeglasses to the left of the account name in the Accounts display box.
NOTE: By default, GoldMine shows all accounts in the E-mail Center letting you check Internet accounts from one location in GoldMine.
58 • User Administration GoldMine Administrators Guide

11. Change the order of the accounts displayed in the E-mail Center. Click Move Up to move the highlighted account up one line. Click Move Down to move the highlighted account down one line.
12. Click OK to save the settings and close the window, or click the next Internet Options tab to configure.
Setting Internet Options on the Security TabIf you have a digital ID (digital certificate) to verify your signature and receive encrypted e-mail messages, GoldMine lets you configure your Internet Options to include the information when sending a message. 1. Select Tools>>Options. 2. At the User's Options dialog box, select E-mail.3. Click More Options. 4. At the Internet Options dialog box, select Security.5. Click Digital ID(s) to configure your IDs.
The Manage Digital IDs dialog box opens.6. In the Signature Settings area, you can select one option:
• Sign ALL outgoing E-mail with a Digital ID, by default. Sends all your e-mail messages with your digital ID. If you do not select this option, you can still encrypt individual messages by selecting Encrypt Messages on the Edit E-mail toolbar. The message is sent with a signature but is not encoded (clear), allowing recipients who cannot support S/MIME to read the message.
• Encode any outgoing E-mail signed with a Digital ID (Recipients required to have S/MIME to read 'opaque' messages). Sends outgoing e-mail messages signed with your digital ID as S/MIME encoded (opaque). Older email clients that do not support S/MIME cannot read the body of this type of e-mail message.
7. To encrypt all outgoing messages by default, select Encrypt ALL outgoing E-mail, by default (Recipients' Certificates are required in advance). Selecting this option sets the encryption to digital IDs on outgoing messages. With this option selected, you can still select Do not Encrypt on the encryption menu on the Edit E-mail toolbar.
8. In the Other Settings area, select:
GoldMine Administrators Guide User Administration • 59

• Import new/updated certificates for ALL incoming signed E-mails, by default. Automatically imports the digital ID on all signed incoming messages into the contact's Record Properties>>Contact Details>>Digital IDs tab.
• Save ALL incoming S/MIME e-mails as 'clear' messages. Saves all S/MIME encoded (opaque) messages and all encrypted messages as clear, or not encoded. As clear-text messages, all GoldMine users with access to the e-mail record can read the messages. If this option is not selected, the messages are saved as they were received. Whenever GoldMine users want to read the e-mail message, they must enter the password for the private key of the GoldMine recipient.
9. Click another tab or click OK to save and close the dialog box.
Using Digital IDs with Email MessagesIf you and your contact use digital IDs to verify signatures and send encrypted email messages, use GoldMine to configure your Internet E-mail Options and the Edit>>Record Properties>>Contact Details>>Digital IDs to include necessary information for S/MIME-enabled e-mail.Your digital ID, also known as a digital certificate, is a file sent with an e-mail message identifying you as the authentic sender. Digital ID certificates are files issued by a certified security authority such as VeriSign, Inc., or from your Microsoft Exchange Server administrator. Digital IDs have an expiration date and must be renewed periodically to remain valid. A digital ID typically contains: • Your name and e-mail address as a digital signature• Your public key • Expiration date of the public key • Name of the Certification Authority (CA) who issued your Digital ID • Serial number of the Digital ID
NOTE: If you do not select this setting, encrypted messages from contacts are unreadable by other users on the History and Pending tabs. Carefully consider the consequences before clearing this option.
60 • User Administration GoldMine Administrators Guide

• Digital signature of the CA
Using Digital IDsA digital signature provides security by verifying the message originated from a specific person and that the message has not been altered. A digital ID also works as a message encryption method. Digital ID encryption scrambles a message with a recipient-specific algorithm.
Public and Private KeysThe digital ID encryption uses a system of key pairs that include a public key used to encrypt a message and a private key used to decrypt a message. The sender of a secure e-mail must have the recipient's public key to encrypt the message. When the message is received, it is decrypted using the recipient's matching private key. Using GoldMine you can exchange encrypted e-mail messages with a contact. You must have the contact's digital ID that includes his or her public key and the contact must have your digital ID that includes your public key. In GoldMine, you must then import the contact's Digital ID using the contact's Edit>>Record Properties>>Contact Details>>Digital IDs tab and import your Digital ID using your Internet E-mail Options>>Security tab.For example, when you send an encrypted message to a contact, it is encrypted in GoldMine using the public key the contact provided you. When he or she receives the message, it is decrypted by the contact's e-mail application using his or her private key. Conversely, when a contact sends you an encrypted message it is encrypted by the sender's e-mail application with your public key (provided earlier). When you receive the message, it is decrypted using your private key.
Levels of SecuritySigned. The message is signed with the sender's private key. Sending a message with a digital signature confirms the message was sent by the sender listed in the From address.Encrypted. The message is sent with the recipient's public key. The recipient provides you with his or her public key before you send the message. When a message is encrypted, the body and attachments are hidden from anyone who does not have the recipient's private key. Only the recipient should have the recipient's private key. An encrypted message does not guarantee to the recipient that the sender is the name in the From address.
GoldMine Administrators Guide User Administration • 61

Signed and Encrypted.The message is signed with the sender's private key, confirming for the recipient the message was sent by the sender in the From address, and it is encrypted with the recipient's public key and then decrypted with the recipient's private key when he or she receives the message.
Sharing Public KeysFor security reasons do not share your private key. You can share your public key with contacts two ways:Digital ID Signature. Your Digital ID is attached to any message that includes a Digital ID Signature. The recipient can then extract it and import it into his or her e-mail application. For example, in Outlook the user can right-click the sender's name on a message and add the contact to his or her existing contacts. The digital ID certificate is included.Export. Export your Digital ID send it to a contact who can then import the file into his or her e-mail application. For example, in Outlook the file is imported on the contact's Certificate tab.
Using Digital IDs in GoldMineConfiguring Contacts' Digital IDs. Imports a contact's digital ID into the contact record. See “Setting Digital IDs in Contact Details” on page 63.Configuring GoldMine Users' Digital IDs. Imports your digital ID into GoldMine. You determine the signature and encryption settings. See “Setting Internet Options on the Security Tab” on page 59.Sending Digitally Signed E-mail Messages. Sends a message with your Digital ID signature. See “Sending Digitally Signed E-mail” on page 63.Sending Encrypted E-mail Messages. Sends individual messages with a digital ID signature or GoldMine encryption. See “Sending Encrypted Email” on page 64.Reading E-mail Messages Sent with Digital IDs. Reading digitally signed, encrypted, or signed and encrypted e-mail messages. See “Reading E-mail Sent with Digital IDs” on page 66.
62 • User Administration GoldMine Administrators Guide
Setting Digital IDs in Contact DetailsIf a contact uses a digital ID when sending you email, configure the contact's record with the ID information. 1. With the contact record active in GoldMine, select Edit>>Record Proper-
ties>>Contact Details. 2. At the Contact Details dialog box, select the Digital IDs tab. 3. Click Import to add a contact's digital ID file to the GoldMine contact
record. The Import Digital ID dialog box opens.
4. In the Filename field, type or browse to the *.p7b or *.cer certificate file you are importing.
5. In the Name field, type the name to display.6. Click OK to return to the Digital IDs tab.7. To export the file to another location, click Export.8. To review the certificate details, click View.9. To remove a digital ID, highlight the ID and click Delete.
Sending Digitally Signed E-mail When digitally signing a message, you must have a digital ID configured in GoldMine (see “Setting Internet Options on the Security Tab” on page 59). The digital signature contains your private key and confirms for the recipient your From address matches the signature. Configure your Internet Security settings to automatically sign all outgoing messages with your digital ID.
On the toolbar, click the Sign with Digital ID button. Your digital signature is added to the outgoing message.
GoldMine Administrators Guide User Administration • 63

Sending Encrypted EmailProtect email messages with encryption. Messages encrypted with Encrypt using GoldMine can only be read by GoldMine users with the correct password. Messages sent as Encrypt using Digital ID can only be sent using the recipient's public key and can only be decrypted and read using the recipient's private key. Sending Encrypted Messages Using GoldMine. See “Sending Email Messages Encrypted Using GoldMine” on page 64.Sending Encrypted Messages Using Digital ID. See “Sending E-mail Messages Encrypted Using Digital ID” on page 65.To automatically encrypt outgoing messages with digital IDs, configure your settings on the Security tab in your Internet Preferences. Use the Encrypt Message toolbar button drop-down menu to select Do not Encrypt and send a message without encryption.
Sending Email Messages Encrypted Using GoldMineYou can protect email messages with encryption. Messages encrypted with Encrypt using GoldMine can be read only by other GoldMine users with the correct password.
1. On the toolbar, click the Encrypt Message button (if you are reading a message and want to encrypt it before sending it to other GoldMine users or filing the message, automatically encrypt using GoldMine; otherwise, select Encrypt using GoldMine). The Encryption Settings dialog box opens.
2. Select Encrypt the message. 3. In the Password field, type the password you are using on the message.4. In the Encryption mode drop-down list, select the encryption level.5. Click OK to save your settings.
Now only users with the proper password and working in GoldMine can open the message.
64 • User Administration GoldMine Administrators Guide

Sending E-mail Messages Encrypted Using Digital IDWhen you encrypt a message using a digital ID, you must have the contact/recipient's digital ID configured in the Record Properties>>Contact Details. Encrypting a message to a recipient with a digital ID encrypts the message using the recipient's public key. When the recipient receives the message, he or she decrypts it using his or her private key. You can configure your Internet Security settings to automatically encrypt all outgoing messages with a Digital ID.
1. On the tool bar, click the Encrypt Message drop-down arrow button and select Encrypt using Digital ID. The outgoing message will be sent encrypted.
2. If a Digital ID is not configured for the contact, a warning box states GoldMine cannot encrypt the message. • Click OK to return to the unsent message window. • Configure the contact's Digital ID or remove the encryption from the
message by clicking the Encrypt Message drop-down arrow and toggling the Encrypt using Digital ID option off.
GoldMine Administrators Guide User Administration • 65

Reading E-mail Sent with Digital IDsReceive email messages digitally signed and encrypted from non-GoldMine users. To send a signed email message, the sender must have a Digital ID from a valid Certificate Authority. To send you an encrypted e-mail message, the sender must have your Digital ID public key from a valid Certificate Authority. When receiving the message, GoldMine asks you for your password in the Private Key Password dialog box.
Signed Icon in Inbox
Signed with a Digital ID: When receiving a digitally signed message, the message includes the sender's digital signature and public key.When the message signature is verified, the Inbox displays a signature icon next to the message. When you open the message, you are notified if the signature is verified or if the signature verification failed.Automatically add a new or updated signature file to the contact's Digital IDs. (See “Setting Internet Options on the Security Tab” on page 59.)
Encrypted Icon in Inbox
Encrypted: When receiving a digitally encrypted message, the message was encrypted with your public key (supplied to the sender at an earlier time). The message is decrypted using your private key (configured in GoldMine). You are asked to supply the password to your private key to read the message.
Signed and Encrypted Icon in Inbox
Signed and Encrypted: When receiving a digitally signed and encrypted message, the message includes the sender's digital signature and a message encrypted with your public key (supplied to the sender at an earlier time).
The message signature is verified and the message decrypted using your private key (configured in GoldMine). You are asked to supply the password to your private key in order to read the message. Signature Verified Banner on Message
Failed Encrypted and Signed Icon in Inbox
Signature Verification Failed Banner on Message
Reasons signatures can fail:• The sender and signature do not match.• The digital signature is expired. • The Certificate Authority is not configured in GoldMine
66 • User Administration GoldMine Administrators Guide
Setting Internet Options on the E-mail Center TabConfigure the E-mail Center using the E-mail Center tab of the Internet Options dialog box. 1. Select Tools>>Options. 2. At the User's Options dialog box, select E-mail.3. Click More Options. 4. At the Internet Options dialog box, select E-mail Center.5. In the General Settings area, select:
• Show both E-mail Address and Account Name (if available) for Online accounts. Select to list the accounts in the E-mail Center by both the E-mail Address and the Account Name. If the Account Name is left blank, GoldMine uses the e-mail address as the account name. If the Account Name contains an entry and you clear this option, GoldMine lists the account by the Account Name only.
• Show Outlook Folder. Displays the Outlook folder from the local computer in the E-mail Center.
6. In the Trash Can Settings area, select: • Move deleted E-mail to Trash Can. Places deleted mail in the
Deleted folder in the E-mail Center. GoldMine holds the mail until you select Empty trash can in the local menu.
• Empty Trash Can when closing the E-mail Center. Automatically deletes any messages placed in the Deleted folder when you close the E-mail Center.
• Confirm before emptying Trash Can. Displays a warning prompt for confirmation to delete messages in the Deleted folder.
7. In the Header Display Options area, select one option: • Hide Headers. Shows no header information in the e-mail message.• Show Summary Headers. Shows relatively high-level information
only in the email message such as date, sender, subject, recipient, and so on. This option does not show detailed routing information.
• Show ALL Headers. Shows all header information in the e-mail message including routing information and message ID.
8. In the Date Display Options area, select one option: • Long date format. Spells out the date in the E-mail Center including
the day.
GoldMine Administrators Guide User Administration • 67

• Short date format. Uses numeric format for month, day, year, and transmission time.
• The Auto-filed Folders' Storage Options assign names to the E-mail Center folders storing incoming and outgoing messages. Leave the default settings of Filed (incoming e-mail messages) and Sent (outgoing e-mail messages), or overwrite the entries to rename the folders. Select one option:
• Organize Auto-filed mail in month-year folders. Uses one level to store incoming messages by month, year.
• Organize Auto-filed mail by year folders first, and by month sub-folders second. Uses two levels to store incoming messages in month folders under separate folders for each year.
9. Click More Auto-filed Folders’ Options to change the default month-name labels assigned to folders. The Auto-filed Folders' Month Names dialog box appears. Select Override the default month names and type the new label names to assign to the Filed folders.
10. Click OK to return to the E-mail Center tab.11. Click OK to save the settings and close the window, or click the next
Internet Options tab to configure.
Setting Internet Options on the Advanced TabDefine advanced Internet settings to apply globally to your E-mail Center, existing attachment files, message operations, and data imported from a Web site.Use the following procedure to set up Internet Options on the Advanced tab.1. Select Tools>>Options. 2. At the User's Options dialog box, select E-mail.3. Click More Options. 4. At the Internet Options dialog box, select Advanced.5. In the E-mail Center area, select from:
• Enable ‘Delete All Server Mail’. Activate the Delete all messages on the server button on the E-mail Center toolbar to delete all messages on the Internet mail server. By default, GoldMine excludes this icon in the E-mail Center toolbar.
68 • User Administration GoldMine Administrators Guide

• Download old messages first. Retrieve messages from the mail server in chronological order (oldest to newest). By default, GoldMine retrieves messages in reverse chronological order (newest to oldest).
• Suppress file overwrite prompt. Do not display a warning before overwriting an existing file with an attached file having the same name.
6. In the Existing attachment default action area, specify the default method for handling a file of the same name:
NOTE: This option will not work automatically unless the Suppress file overwrite prompt option is also selected.
• Overwrite existing file. Replaces the existing file.• Choose a new file name. Lets you rename the file.• Auto name assignment. Appends a number to the file name. If
GoldMine cannot append a number (up to 64), a random, unique name assigns to the new file.
• Do not save the file. Deletes the attached file.7. In the Message area, select from:
• Use HTML when creating new E-mail. GoldMine recognizes HTML encoding in incoming messages, and applies HTML formatting to outgoing messages. This option adds an HTML editing toolbar to the Create Internet E-mail dialog box letting you add a formatting attributes, such as color, picture file insertion, and alignment.
• Auto spell-check before sending. Checks the spelling in a message when selecting Send in the Create Internet E-mail dialog box.
• Show next message after delete/complete. After disposing of a selected message, GoldMine displays the next message listed in the E-mail Center.
• Link e-mail address to contact record by default. When retrieving an e-mail message that is linked to a contact record, selecting this option causes the From: address in the message to be linked to the same contact. To link messages to contacts without linking the e-mail address, un-select this option.
• Mark attachments for synching by default. Marks e-mail attachments as linked documents to be synchronized, except for VCards and transfer sets.
GoldMine Administrators Guide User Administration • 69

• Delete attachments when deleting the mail. Deletes attachments when you delete messages.
8. In the WebImport area, select from: • Import data when retrieving E-mail Center mail. Imports WebImport
data when GoldMine retrieves e-mail messages. To manually import WebImport data, clear this option.
• Import data on background e-mail retrieval. Imports WebImport data when GoldMine performs background e-mail retrieval.
• Discard message after importing data. Deletes the WebImport message from the Web site after GoldMine retrieves the message.
9. In the Communication timeout field, type the number of seconds GoldMine remains idle before disconnecting from the mail server (default is 60 seconds).
10. Click OK to save the settings and close the window, or click on the next Internet Options tab to configure.
Setting Options for the Telephony TabConfigure special modem and dialing settings to use with GoldMine's auto-dialer feature.
NOTE: You must have a TAPI modem locally installed and working on your computer before you can successfully configure the modem settings.
Use the following procedure to set up options on the Telephony tab.1. Select Tools>>Options. 2. At the User's Options dialog box, select Telephony.3. In the Modem Settings area, configure these settings:
• TAPI Line. Select the TAPI settings in the drop-down list that match your computer's Phone Dialer TAPI settings.
• Dialing Properties. Displays the Phone And Modem Options dialog box.
70 • User Administration GoldMine Administrators Guide
• Line Properties. Displays the modem Connection Options dialog box.
4. In the Dial Number Formatting area, configure:• Let TAPI format phone numbers. Allows TAPI to add numbers
required for dialing a phone number such as international access and country codes.
• Dial numbers as entered. Dials the numbers as they are formatted in GoldMine.
• Local Area Code. The area code you are dialing from.• Dial Prefix. A number sequence accessing a special line or service.• Dial Suffix. A number sequence after the telephone number to access a
special line or service.• Hang up after: x sec. Specifies the number of seconds before
GoldMine tries to reconnect.5. In the SoftPhone area, enter the local extension number and set SoftPhone
as the default. Access and edit SoftPhone advanced settings by clicking the Advanced button.
6. Click OK to save the settings and close the dialog box.
Setting Options for the Pager TabEnter information about your pager to receive messages from other GoldMine users and alarms set up in GoldMine. To send a pager message to GoldMine users, select Actions>>Send Pager Message. Select the GoldMine user or user group in the drop-down list.Use the following procedure to set up options on the Telephony tab.1. Select Tools>>Options. 2. At the User's Options dialog box, select Pager.3. Type the Pager ID (PIN).
This is the identification code identifying your pager. If necessary, contact your service provider for this information.
NOTE: Consult your Windows and modem documentation for configuration details.
GoldMine Administrators Guide User Administration • 71
4. Select one of the following: • Page by sending an Internet E-mail to address. Type your Internet
email address. Select this option to receive a pager message by e-mail instead of receiving a call to the pager’s telephone number.
• Page by dialing a terminal phone number. GoldMine sends a message to the pager’s telephone number when you provide:
• Terminal Number. Telephone number to the pager. Include prefix or suffix sequences required to access a special line or service. For example, dialing 9 before the telephone number to access an outgoing line.
• Terminal’s maximum character length. Greatest number of characters the pager can accept. Most pagers can accept 80–100 characters.
Setting Options for the Speller TabUse the E-mail Center to check the spelling in the message, improve professional presentation, and customize the spell-checker. Open the User Options>>Speller tab dialog box for basic customization. However, you can customize the speller as you work, adding words and creating individual or company dictionaries. For more information, see “Creating Dictionaries” on page 73.Use the following procedure to spell check an email.1. After creating your e-mail, click Check Spelling button on the E-mail Cen-
ter toolbar. The Check Spelling dialog box opens. The questionable word appears in the Not in Dictionary text box. Suggestions are listed in the Suggestions list. The words displayed are based on the options selected on the Speller tab.
2. Select an option:• Ignore. Skips this occurrence of the questionable word; if the word
comes up again, it will be tagged and displayed.• Ignore All. Skips this and all subsequent occurrences of the word in
this document. • Add. The word is added to the dictionary displayed in the Add words to
text box.
72 • User Administration GoldMine Administrators Guide

• Change. Replaces the questionable word with the one highlighted in the Suggestions list; or, if the word is edited, the edited word is used as the replacement.
• Change All. Changes this and all subsequent occurrences of the word in the document. The selected word in the Suggestions list is used unless the word is edited, in which case the edited word is used.
• Suggest. Searches more thoroughly for a suggested replacement word for the questionable word. Each time you press the Suggest button, a deeper search is made. When the spell checker exhausts all possibilities, the Suggest button is disabled.
3. To edit a questionable word, type a revised version of the word in the Not in Dictionary text box. Ignore changes to Undo edit. Clicking Undo edit returns the edited word to the original form.
4. Use the Check Spelling dialog box to change the Options and Dictionaries. 5. Select Undo if you made changes to a document with Ignore or Change and
wish to undo the changes. The Undo button takes you back one word at a time.
6. Click Cancel to stop the spell checker and close the window.
Creating DictionariesUse the GoldMine spell checker to configure and customize the dictionary for each user. Add words, import files, and change the action on individual words.1. Select Tools>>Options, and select the Speller tab. 2. Click Setup Dictionaries.
GoldMine Administrators Guide User Administration • 73

3. The Dictionaries dialog box opens.
4. Select from the following options as needed.The Words text box lets you add a word or edit the highlighted word from the text box. The text box listing displays the words in the Files .tlx file.• To add a word, type the word and then click Add Word.• To edit a word, highlight the word, type the correction and click Add
Word.• To type case variations on a word, at the Other word text box type in
the word and then click Add Word.5. Click Delete Word to remove the word from the dictionary file.6. Click Import to import the words in a .txt file to the current Files .tlx file.
NOTE: When files with multiple word phrases are imported, each word adds individually rather than as a phrase.
7. Click Export to export the words in the current Files .tlx file to a .txt file.8. At the Action drop-down list, select an action to apply to individual words:
• Auto change (use case of checked word)• Conditionally change (use case of other word)• Conditionally change (use case of checked word)• Ignore (skip)• Exclude (treat as misspelled)
74 • User Administration GoldMine Administrators Guide
9. To apply an action to a word:• Highlight the word in the Words text box listing.• Select the action from the Action drop-down list.• Click Add Word. The action you selected applies to that word.
10. The Files drop-down list displays available custom .tlx dictionaries. 11. Click Add File to browse to other .tlx files.
NOTE: The .tlx files store in user folders in the Speller folder of the main GoldMine directory.
12. To create a new dictionary:• Click New File.
A .tlx file is created, and the New Dictionary dialog box opens.• Type the new File Name. Select the Language from the drop-down list
and click OK.13. Click Remove File to delete the current .tlx file.14. Click Close to save the settings.
Setting Options for the Login TabUse the Login tab to set default databases and login information. This tab is available only to users with Master Rights.
WARNING: These settings rewrite the GM.ini file and are global. Note that the changes you make affect all users
1. Navigate to Tools>>Options.The Options dialog box opens.
2. Click on the Login tab.3. At the GoldMine home directory field, browse to the GoldMine directory
location. for which you want to set the default.If you are working on a network, this should be the drive mapped to the main GoldMine directory, for example, g:\Apps\GoldMine.
GoldMine Administrators Guide User Administration • 75
4. At the GoldMine database, select the alias for which you want to set the default from the drop-down list (for example, GoldMine 8.1).
5. At the Default contact database, select the alias for the database for which you want to set the default in the drop-down list (for example, MSSQL: GoldMine: dbo).
6. Click on the Default login user checkbox to write to the local gm.ini file.This is fine for single-user installations but not for network installations. For network installations, each workstation generally has a different user with their own login.
7. The Time Clock drop-down list contains three options for monitoring the login activity of the user. The information displays on the Time Clock tab in each User Properties dialog box. Select from the following:Disable Time Clock. Turns off the login and time tracking. Track daily totals. Monitors the total number of times a user logs into GoldMine and displays the cumulative amount of time the user is logged in per day. These statistics appear in the Time Clock tab of the User Properties dialog box. Track each login. Monitors the amount of time a user is logged in to GoldMine for each login session. These statistics appear in the Time Clock tab of the [Username] Properties dialog box.
NOTE: On some operating systems, especially NT-based operating systems, the Default login user is not respected and the GoldMine login defaults to the network login name. On a network workstation where you log in to GoldMine with a login differing from your network login, create a GoldMine shortcut on the desktop. Then right-click the shortcut and select Properties>>Shortcut. In the Target text box, type /u:username (where username is your GoldMine login). An example of a full path is: GoldMine\gmw 8.1 exe/u:username. This populates the GoldMine login with your correct GoldMine login name.
76 • User Administration GoldMine Administrators Guide

8. Click on the Bypass login banner checkbox to skip the login banner if there is no password for the user.
9. Click on the Open files exclusively checkbox to allow only the currently logged in user to open GoldMine.
NOTE: Open files exclusively is useful for GoldMine administrators working in the database who need to keep other users out. When you are finished using the files exclusively, remove this option so other users can log in. When selected, this option writes the line Exclusive=1 in the [GoldMine] section of the GM.ini file and locks the Flags.bin table. Do not enable this feature if planning to use the GoldMine Backup Wizard.
10. Click OK to save the settings and close the dialog box.
Setting Options for the Lookup TabConfigure display attributes for the Contact Search Center.1. Navigate to Tools>>Options.
The Options dialog box opens. 2. Click on the Lookup tab.
GoldMine Administrators Guide User Administration • 77
3. Select Sync the Contact window with the Search Center window to display the selected record in the Contact Search Center as the active record in the work area.
4. Type or select Lookup alignment delay while typing (1/10 sec). This specifies the delay in tenths of a second between when you type an entry in the Find Value field of the Contact Search and when the Contact Search Center window displays a record that matches the entry.
5. Select the Name or Company as the Default Lookup by field radio button.The Contact Search Center window defaults to this field when selected on the toolbar or the menu.
6. In the Once a record is selected from the Search Center area, select the following options as needed:• Move the Search Center window to the back. Select this radio button
to bring the contact record to the front and place the Contact Search Center behind the contact.
• Close the Search Center window. Select this radio button to close the Contact Search Center.
• Minimize the Search Center window. Select this radio button to minimize the Contact Search Center.
7. Click OK to save the settings and close the dialog box.
78 • User Administration GoldMine Administrators Guide

Setting Options for the System TabClick the System tab on the Options dialog box to define your GoldMine system settings.1. Navigate to Tools>>Options.
The Options dialog box opens.2. Select the System tab.
3. In the Navigation area, select the checkbox next to the following options as needed:• Use classic GoldMine menu. Select this option to display the
GoldMine Corporate Edition default main menu rather than the current menu configuration.
• Show status bar. Select this option to use the status bar in GoldMine Corporate Edition.
• Recent item shown. In the dropdown box, select the number of recent items you want to display.
4. In the Classic toolbar area, click Show button text to show the Classic GoldMine toolbar buttons.
5. In the Activity tabs area, select Show activity code in history tabs to show the activity code in the History tab.
6. In the Date and Time area, select the checkbox next to the following options as needed:
GoldMine Administrators Guide User Administration • 79
• Show time in 24 hour format. Select this option to display time in a 24-hour format on the status bar and the time fields of windows. For example, 9:00 P.M. appears as 21:00 in the 24-hour time format.
• Set EPOCH. Select this option to determine how GoldMine interprets dates when no century is indicated, that is, a date entry containing only the last two digits of the year. To scroll through values by five-year increments, click the up and down arrows next to the field. For example, if you set the value to 80, GoldMine will interpret the entry 03/10/80 as March 10, 1980 and the entry 10/01/70 as October 1, 2070.
7. In the Help area, select the checkbox next to Show tips at startup to display the User Tips when you launch GoldMine. Do not select this checkbox if you do not want to see the User Tips.
NOTE: For best results, assign the same user name in both GoldMine and MS Outlook.
8. At the MS Outlook user name if not the same as the GoldMine user text box, type the Microsoft Outlook user name if the Outlook user name is different than the GoldMine user name.
9. After making all of your selections, click OK.
Updating Undocked Users
CAUTION: Do not allow undocked users to synchronize with an updated GoldMine system until that undocked user has updated to the same version the updated site is using.
To update undocked users after performing a NetUpdate on the main GoldMine system, locate the gmsetup.exe file. Depending on how undocked users communicate with the network and GoldMine system and on the connection speed, send the gmsetup.exe file to the undocked user by putting it on CD, posting it on an FTP site, e-mailing it, or placing it on an accessible network drive. Include directions on executing the gmsetup.exe file and what undocked users should expect after the upgrade. After the undocked users update to the same version of GoldMine, they can use NetUpdate to sync with the master site.
80 • User Administration GoldMine Administrators Guide

Use the following procedure to perform an update.1. Click Net-Update Now and follow the prompts. 2. To change the registration information, select Update Registration
Information.
Creating Undocked User LicensesGoldMine has a sub-license for an individual user called an Undocked License (U-License). This license type is created for users who work primarily with GoldMine at a remote location on a laptop, notebook, or home office computer but who may also need to log on to the network occasionally. Consider the following before creating an undocked user licence:• Creating an undocked user decreases the available users of the network site
(Master License or Site License) by one; however, when an undocked user logs on to the site from which they were sub-licensed, they do not take up an additional seat.
• Every user supported by the GoldMine license can have an Undocked license to work on a remote computer. For example, on a 5-user GoldMine system, 5 Undocked licenses can be created. This is in contrast to creating an “S” sub-license which requires one seat to remain available from the Master License.
• All undocked users, as well as the total number of users that make up the difference in the total number allowed by the Master License can log on to GoldMine. For example, on a 5-user GoldMine system with 3 undocked users, 3 undocked users plus 2 other users can log on to GoldMine.
• If you undock all users, only those users will be able to log in. If you have not assigned master rights to any of those undocked users, GoldMine administration cannot take place.
• When used in combination with GoldSync, administrators can synchronize security settings to undocked users including new passwords, menu items, and options in addition to data.
• To work on an undocked basis, users must have an Undocked license on their laptop. Create an Undocked license from the Master License or a Site license.
Use the following procedure to create an undocked user
GoldMine Administrators Guide User Administration • 81
1. From the GoldMine main menu, select Tools>>Configure>>License Manager.
2. At the License Manager window, click the Licenses tab and Undock Users.
3. At the Create Undocked User Licenses dialog box, select the check box next to the user you want to create a sub-license for, and click Create Undocked License.
4. At the Sub-Licenses dialog box, review the information and click I Agree. The sub-license number for a remote user or an undocked user appears in the Sub-license for Remote Site [Name of Site] dialog box.
5. Write the sub-license number down or copy it to Windows Notepad.The sub-license number is needed for each remote computer installation. Send the remote site license number to the remote user who can type the license number during the GoldMine installation.
.INI Files and MacrosGoldMine contains .ini files (initialization files) that define program and user parameters. Each GoldMine user has a username.ini and username.tbi (which is the user login name followed by the file extension; for instance, if the user’s login is JohnS then the user’s .ini file is johns.ini).The username.ini stores options and is in the GoldMine directory. See “Username.ini” on page 86.The username.tbi file stores the user’s taskbar settings. See “Username.tbi” on page 92.
Configuring the INI FileAfter installing Microsoft SQL Server Reporting Services and configured on the network, add a section to the gm.ini file typically located in Program Files/GoldMine/. This tells GoldMine where the Reporting Services is hosted.Use the following procedure to configure the ini file1. Close GoldMine.2. Open the gm.ini file using Notepad.
82 • User Administration GoldMine Administrators Guide
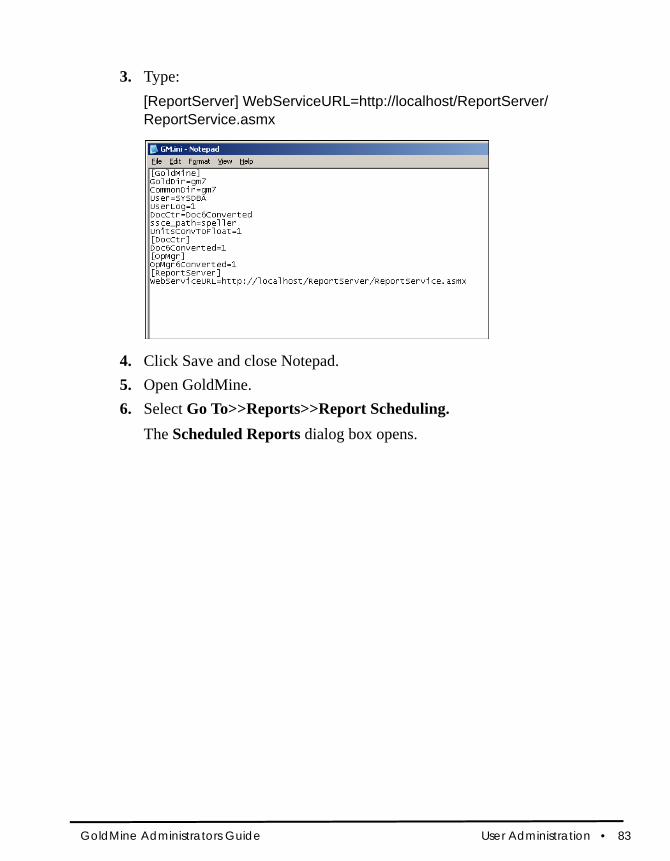
3. Type:[ReportServer] WebServiceURL=http://localhost/ReportServer/ReportService.asmx
4. Click Save and close Notepad.5. Open GoldMine. 6. Select Go To>>Reports>>Report Scheduling.
The Scheduled Reports dialog box opens.
GoldMine Administrators Guide User Administration • 83
GM.ini SettingsThe GM.ini file found in the main GoldMine folder contains the paths to these locations:[GoldMine]GoldDir=MSSQL: GoldMine_Sales: dbo:CommonDir=MSSQL: GoldMine_Sales: dbo:
Select Help>>AboutGoldMine>>System to display the About GoldMine dialog box and view the file locations.
Section Command Values Description
[GoldMine] UserNameFormat= 1 Orders the username display as FirstName LastName (LoginName). If the command is not added, the default display is LoginName (FirstName LastName).
UserLogo= <path\filename> Places your custom logo on the GoldMine login screen.
RecAlertSec= <number of seconds>
Changes the delay before an alert appears.
NewComplete= 0 Creates only a partial record (Contact1) rather than a full record (Contact1 and Contact2).
GoldDir= <path\filename> Path to the GMBase files.
CommonDir= <path\filename> Path to the Contact files.
SysDir= <path\filename> Path to the GoldMine system files.
Exclusive= 1 Locks all other users out of GoldMine.
LastRun= <number of days> Set the number of days to wait before performing another Automatic Maintenance.
HTML_Cal_Notes= 0 Displays the scheduled activity Notes as simple text rather than HTML. To display the Notes as HTML, the value is 1.
SQLQueryTimeout= <minutes> Sets the global timeout for all database queries.
LongSQLQueryTimeout
<minutes> Sets the global timeout for critical operations such as synchronization and database re-indexing.
84 • User Administration GoldMine Administrators Guide

OnByDefault Turn calendar alarms on by default (separate setting for each activity type).
Turns calendar alarms on by default. Also enabled in Tools>>Options>>Alarms
FollowUp Prompt to schedule a follow-up activity when completing an activit
Prompt to schedule a followup activity.Also enabled in Tools>>Options>>Schedule
ShowTipOfThe Days
Also enabled in Tools>>Options>>System
ROTabs Renames tabs. In global setting area, only admin with master rights can edit.
MSSQLMaxBrowseRecs
In global setting area, only admin with master rights can edit.Admin UI only needs support as corporate override in gm.ini)
SearchTopRec Maximum records displayed in Contact Search Center
The maximum records displayed in Contact Search Center. Only admin with master rights can edit.Admin UI only needs support as corporate override in gm.ini)
SQLQueryLimit 1000 In global setting area, only admin with master rights can edit. Admin UI only needs support as corporate override in gm.ini)
AllowDupEmails - Allows having duplicate email's address
Allows e-mail addresses to be duplicated on multiple records.This should be in a global setting area.
[WebImpPassword]
Passwordx= <password> Requires passwords on WebImport files. X is the number of the password.
[WebImportOverwrite]
IAgree= I Want To Allow Fields To Be Updated By WebImport
Lets fields update by WebImport. Specify the fields using the Fields= setting.
Fields= <field names separated by commas>
Specifies the fields updated by WebImport.
Section Command Values Description
GoldMine Administrators Guide User Administration • 85
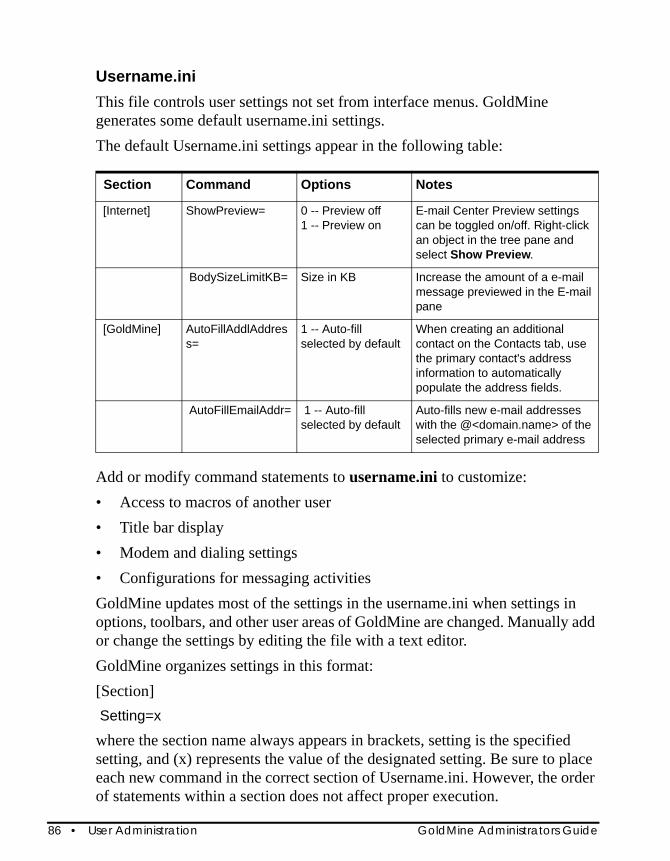
Username.iniThis file controls user settings not set from interface menus. GoldMine generates some default username.ini settings. The default Username.ini settings appear in the following table:
Section Command Options Notes
[Internet] ShowPreview= 0 -- Preview off 1 -- Preview on
E-mail Center Preview settings can be toggled on/off. Right-click an object in the tree pane and select Show Preview.
BodySizeLimitKB= Size in KB Increase the amount of a e-mail message previewed in the E-mail pane
[GoldMine] AutoFillAddlAddress=
1 -- Auto-fill selected by default
When creating an additional contact on the Contacts tab, use the primary contact's address information to automatically populate the address fields.
AutoFillEmailAddr= 1 -- Auto-fill selected by default
Auto-fills new e-mail addresses with the @<domain.name> of the selected primary e-mail address
Add or modify command statements to username.ini to customize: • Access to macros of another user • Title bar display • Modem and dialing settings • Configurations for messaging activities GoldMine updates most of the settings in the username.ini when settings in options, toolbars, and other user areas of GoldMine are changed. Manually add or change the settings by editing the file with a text editor. GoldMine organizes settings in this format:[Section] Setting=x
where the section name always appears in brackets, setting is the specified setting, and (x) represents the value of the designated setting. Be sure to place each new command in the correct section of Username.ini. However, the order of statements within a section does not affect proper execution.
86 • User Administration GoldMine Administrators Guide
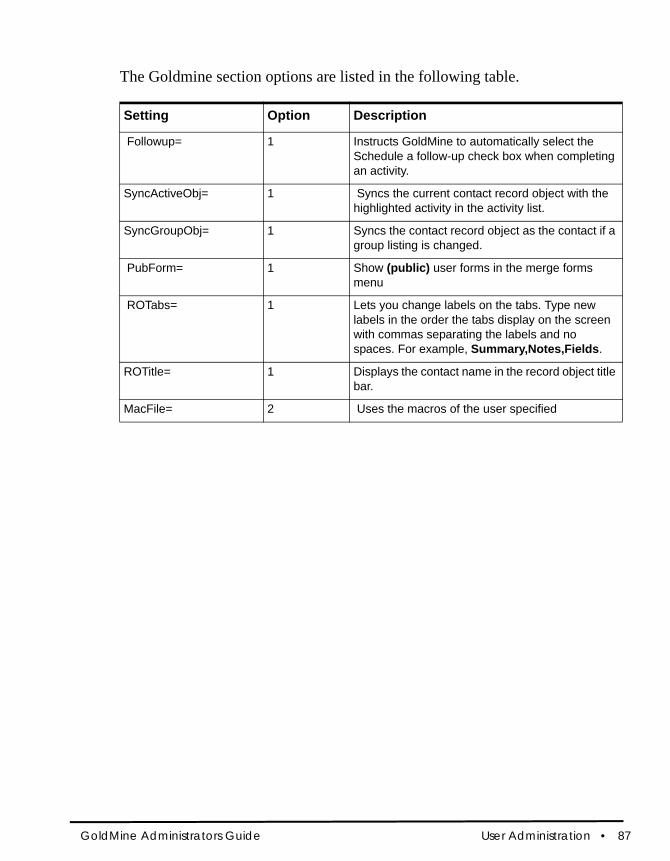
The Goldmine section options are listed in the following table.
Setting Option Description
Followup= 1 Instructs GoldMine to automatically select the Schedule a follow-up check box when completing an activity.
SyncActiveObj= 1 Syncs the current contact record object with the highlighted activity in the activity list.
SyncGroupObj= 1 Syncs the contact record object as the contact if a group listing is changed.
PubForm= 1 Show (public) user forms in the merge forms menu
ROTabs= 1 Lets you change labels on the tabs. Type new labels in the order the tabs display on the screen with commas separating the labels and no spaces. For example, Summary,Notes,Fields.
ROTitle= 1 Displays the contact name in the record object title bar.
MacFile= 2 Uses the macros of the user specified
GoldMine Administrators Guide User Administration • 87

Changing Settings the INI File in GoldMineGoldMine has the ability to change some settings in the ini file by configuring the System Settings tab. For more information, see “Configuring System Settings” on page 89.You can change the settings in the following table.
Setting Configure
HTML_CAL_NOTES To view notes as HTML navigate to Tools>>Configure>>System Settings>>Display tab. In the Notes Format area, select HTML and click OK.
HTML_CAL_NOTES To view notes as Plain text navigate to Tools>>Configure>>System Settings>>Display tabIn Notes Format area, select Plain text and click OK.
MSSQLMaxBrowseRecs SearchTopRec
To set Maximum number of records shown in CSC, Activity List, Contact List and Contact Record tabs navigate to Tools>>Configure>>System Settings>>Display tab. Set Maximum records shown in CSC, Activity List, Contact List and Contact Record tabs value to desired number and click OK.
SQLQueryLimit To set Maximum number of records shown in SQL Query results navigate to Tools>>Configure>>System Settings>>Display tab. Set Maximum number of records shown in SQL Query results value to desired number and click OK.
AllowDupEmails To allow Duplicated e-mail addresses navigate to Tools>>Configure>>System Settings>>Advanced tab. Check Allow e-mail addresses to be duplicated on multiple records check box and click OK.
OnByDefault To turn Calendar alarms on by default navigate to Tools>>Options>>Alarms, click Alarms on by Default button. Check desired types of Activity for which you want Alarm to be checked for
FollowUp To set automatic scheduling of Follow-Up activity when completing an activity navigate to Tools>>Options>>Schedule. Check Prompt to schedule a follow-up activity when completing an activity check-box.
ShowTipOfThe Days To switch on the option of Showing Tips at every startup navigate to Tools>>Options>>System. Check Show Tips at startup check-box.
88 • User Administration GoldMine Administrators Guide
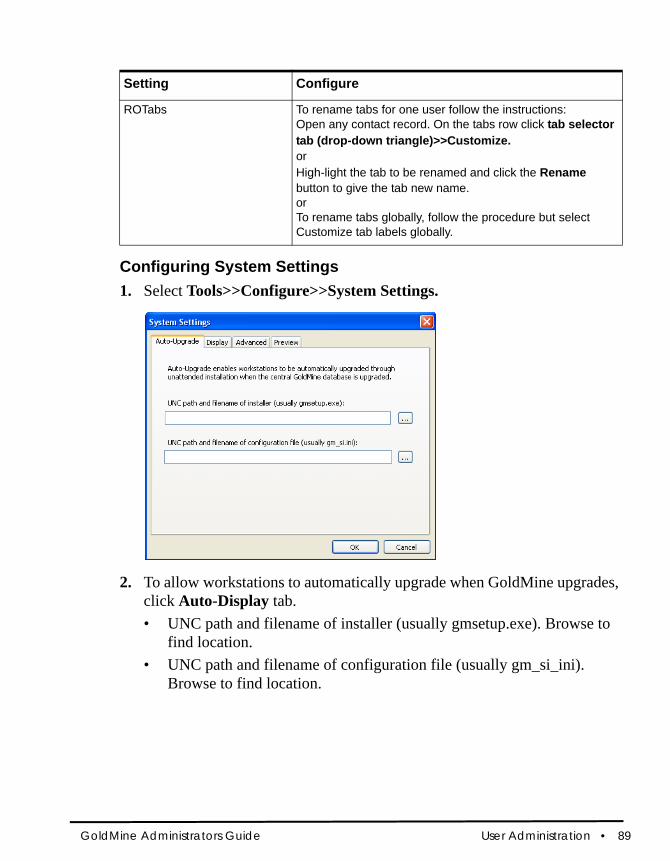
Configuring System Settings1. Select Tools>>Configure>>System Settings.
2. To allow workstations to automatically upgrade when GoldMine upgrades, click Auto-Display tab.• UNC path and filename of installer (usually gmsetup.exe). Browse to
find location.• UNC path and filename of configuration file (usually gm_si_ini).
Browse to find location.
ROTabs To rename tabs for one user follow the instructions:Open any contact record. On the tabs row click tab selector tab (drop-down triangle)>>Customize. orHigh-light the tab to be renamed and click the Rename button to give the tab new name.orTo rename tabs globally, follow the procedure but select Customize tab labels globally.
Setting Configure
GoldMine Administrators Guide User Administration • 89

3. To set contact record result limits and Notes formats, click the Display tab.
4. At the Limits area:• Select the maximum number of records to display in the Contact
Search Center, contact lists. Activity list and contact record tab.• Select the maximum number of MSSQL query results to display.
5. At the Notes area, select the HTML or Plain text option6. To allow emails to be duplicated on multiple records, click the Advanced
tab.7. At the Contact’s permissions area, click the checkbox to allow emails to
be duplicated on multiple records.8. At the Universal Search area, click the button to install or uninstall
Universal Search. See the Contact Management chapter for more information on Universal Search.
9. To select the file types to display, such as Microsoft Word Document (doc) or HTML (htm), click the tab.• Click each file type you want to display. The default is all are selected.• To create a new file type, click New and type in the name of the file.• To delete a file type, select the type and click Delete.
10. Click OK to close the dialog box.
90 • User Administration GoldMine Administrators Guide
Changing ini Settings 1. Open the Username.ini file:
• From Windows Explorer, double-click username.ini; the file opens in Notepad.
• From a text editor (such as Notepad), select File>>Open. Navigate to the GoldMine directory and select username.ini.
2. To customize the file with command statements, see:• Setting E-mail Preview Text Amounts. See “Setting Email Preview
Text Amounts” on page 91• Setting Keep or Clear on Tagged Records. See “Setting Keep or
Clear on Tagged Records” on page 91.• Setting Calendar Publishing Output to XML. See “Setting Calendar
Publishing Output to XML” on page 91.
Setting Email Preview Text AmountsBy default, GoldMine displays 63 KB of message text. Increase the amount to preview very large messages.1. Open Username.ini.2. Beneath the [Internet] section, add:
BodySizeLimitKB=size in KB3. Select File>>Save and then exit.
Setting Keep or Clear on Tagged RecordsSet a standard of keeping or clearing tagged records.1. Open Username.ini.2. Beneath the [GoldMine] section, add this line, using a defined number:
ClickUnselectDefault=<a number (where 0 is always ask, 1 is keep tagged records without asking, and 2 is clear tagged records without asking)>
3. Select File>>Save and then exit.4. Restart GoldMine to apply the changes.
Setting Calendar Publishing Output to XMLBy default, GoldMine publishes the calendar to HTML. You can also publish to an XML file.
GoldMine Administrators Guide User Administration • 91
1. Open Username.ini.2. Beneath the [CalObj] section, add:
XMLOutput=1 (Publishes to XML. If XMLOutput=0 or if there is not XMLOutput setting, the calendar publishes to HTML.)
3. Use a customized XSLT file when publishing daily, weekly, or monthly calendars. In the same section, specify these transformation files:• ExternalXSLDaily=DailyFile.xsl• ExternalXSLWeekly=WeeklyFile.xsl• ExternalXSLMonthly=MonthlyFile.xsl
4. Select File>>Save and then exit.
NOTE: For best results, backup your .ini file before adding or changing any settings, and change only settings exactly as described in the online Help topics or contact Technical Support.
Username.tbiCopy entire taskbars or just task groups from one user to another. The taskbar has one section, called [gmbar]. If you delete the username.tbi, you must log back into GoldMine as the user to recreate the file; however, it only has global task groups. You must copy or manually create the task groups.
About DDE MacrosFacilitate DDEAUTO fields by selecting a macro as the service item. A DDE service item starts with an ampersand (&). When encountered, GoldMine searches an internal table of macro names. If a match is found, the macro processes and the result returns, as if a DDE function or expression was used.Most macros are sensitive to the setting of the RECORDOBJ function’s SETRECORD subfunction. This function gains access to contacts and supplementary information. When the SETRECORD type is set to PRIMARY, macros return the value from the corresponding fields in the primary information portion of the contact record. When set to CONTACTS (additional contacts), or another supplementary record type, macros return the value from the corresponding field in the supplementary file (CONTSUPP).
92 • User Administration GoldMine Administrators Guide

These macros can be used as DDE service items:
&AddressReturns a string containing the values of &ADDRESS1 and &ADDRESS2, separated by a carriage return and line feed character. If &ADDRESS1 or &ADDRESS2 do not contain data, a single line of data returns, without the carriage return and line feed character.Use this macro to perform rudimentary blank line suppression within linked applications that do not support blank address line suppression internally.Use the &ADDRESS macro to return an additional contact address using the RECORDOBJ SETRECORD subfunction.
&Address1 Returns the first Address field from the active contact record. Typically, this value is extracted from the Address1 field in the primary display portion of the contact record; however, when using the RECORDOBJ SETRECORD subfunction to change the returned record type to CONTACTS, GoldMine returns the value from the Address1 field on the additional contact record, if a value is entered. When the Address1 field on the additional contact record is blank, the &Address1 macro returns the value in the Address1 field in the primary display portion of the contact record. When the RECORDOBJ SETRECORD type is set to return a record type other than CONTACTS, the &Address1 macro returns the value in Address1 field of the primary display portion of the contact record.
GoldMine Administrators Guide User Administration • 93
&Address2Returns the second Address field from the active Contact Record. Typically, this value is extracted from the Address2 field in the primary display portion of the contact record; however, when using the RECORDOBJ SETRECORD subfunction to change the returned record type to ADDITIONAL, GoldMine returns the value from the Address2 field on the additional contact record, if an entry exists in the Address2 field on the additional contact record. When the Address2 field on the additional contact record is blank, the &ADDRESS2 macro returns the value in the Address2 field in the primary display portion of the contact record. When the RECORDOBJ SETRECORD type is set to return record types other than PRIMARY or ADDITIONAL, the &Address2 macro returns the value in the Address2 field of the primary display portion of the contact record.
&BrowseRecNoReturns the record ID of the last selected record in a browse window.
&CalRefreshRefreshes the graphical calendar display. Set up GoldMine to run this macro after adding calendar records using DDE.
&CityReturns the City field from the active contact record (similar to the action of the &Address1). Use the &City macro to return an additional contact city using the RECORDOBJ SETRECORD subfunction.
&CityStateZipReturns a format string of text containing the City, State and Zip fields from the active contact record. This string returns in this format:City, State ZIPThe action of this macro string is similar to the action of the &Address1. Use the &CityStateZIP macro to return an additional contact city, state, and ZIP Code using the RECORDOBJ SETRECORD subfunction.
&CommonDirReturns the BDE alias where the contact sets are located.
94 • User Administration GoldMine Administrators Guide

&ContactReturns a contact name from the active Contact Record. Typically, this value is extracted from the Contact field in the primary display portion of the contact record; however, use the RECORDOBJ SETRECORD subfunction to change the returned record type to additional contact or another type of supplementary record. When the RECORDOBJ SETRECORD type is set to return record types other than PRIMARY, the &Contact macro returns the value in Contact field in CONTSUPP for the current supplementary record.
&CountryReturns the Country field from the active Contact Record (similar to the action of the &Address1 macro). Use the &Country macro to return an additional contact country using the RECORDOBJ SETRECORD subfunction.
&Dial1Returns the Phone1 entry from the active Contact Record. The returned phone number is formatted for dialing. GoldMine applies the same rules used to dial the phone via TAPI. If selected, PREDIAL.INI settings are applied to phone number selection.
&Dial2Returns the Phone2 entry from the active Contact Record. For details, see &Dial1 above.
&Dial3Returns the Phone3 entry from the active Contact Record. For details, see &Dial1 above.
&DialFaxReturns the FAX entry from the active Contact Record. For details, see &Dial1 above.
&EmailAddressReturns the primary e-mail address for the selected contact.
&FaxReturns the fax number as it is sent to an auto-dialer for automatic fax transmission.
GoldMine Administrators Guide User Administration • 95

&FilterReturns the activated filter expression.
&FirstNameReturns the first name of the current contact.
&FullAddressReturns a string containing the address for the Contact Record, composed of values of &Address1, &Address2, &City, &State, and &ZIP. The action of this macro string is similar to the action of the &Address1. Use the &FullAddress macro to return an additional contact address using the RECORDOBJ SETRECORD subfunction.
&GetRoTabIDReturns the ID of the currently selected tab. Typically, this value verifies that the correct tab is selected when a user starts a custom application. The following values are valid:• Value Tab• 0 Summary• 1 Fields• 2 Notes• 3 Contacts• 4 Details• 5 Referral• 6 Pending• 7 History• 8 Links• 9 Members• 10 Tracks• 11 Opps• 12 Projects• 13 Tickets
96 • User Administration GoldMine Administrators Guide
Example: (The following example tests the selection of the Details tab):ch=DDEInitiate("GoldMine", "Data")If DDERequest$(Ch, "&GetRoTabID") <> "4" ThenMsgBox "You must select a detail record first"End If
&GetRoTabPosReturns the currently selected tab position. Since the tabs can be rearranged, this method is not always reliable for determining the currently selected tab. For more information, see &GetRoTabID above.
&GoldDirReturns path information for BDE alias in which GoldMine is installed.
&LastFirstNameReturns the name of the current contact in the format: last name, first name.
&LicUsersReturns the number of concurrent users allowed to log in to the installed copy of GoldMine.
&LicUsersAvailableReturns the number of users allowed to log in to the installed GoldMine license copy.
&NameAddressReturns a string containing the contact name, company, and complete address of the active Contact Record. Each address line is separated by a carriage return and line feed, and the string is formatted so it can be inserted into a merge template. Any empty address lines on the Contact Record are suppressed. Use this macro to perform rudimentary blank line suppression within linked applications that do not support blank address line suppression internally.The action of this macro string is similar to the action of the &Address macros, and the &NameAddress macro can be used to return an additional contact address using the RECORDOBJ SETRECORD subfunction.
GoldMine Administrators Guide User Administration • 97

&NameTitleAddressReturns a string containing the contact name, title, department, company, and complete address of the active Contact Record. Each line is separated by a carriage return and line feed, and the string is formatted so it can be inserted into a merge template. Any empty lines on the contact record are suppressed. Use this macro to perform rudimentary blank line suppression within linked applications that do not support blank address line suppression internally.The action of this macro string is similar to the action of the &Address macros, and the &NameTitleAddress macro can be used to return an additional contact address using the RECORDOBJ SETRECORD subfunction.
&NewRecIDReturns a unique record ID, which can be used when creating records.
&NotesReturns the Notes from the active Contact Record. Typically, this value is extracted from the Notes field in the primary display portion of the Contact Record; however, use the RECORDOBJ SETRECORD subfunction to change the returned record type to additional contact or another type of supplementary record. When the RECORDOBJ SETRECORD type is set to return record types other than PRIMARY, the &Title macro returns the value in Notes field in CONTSUPP for the current supplementary record.
&PhoneReturns a telephone number from the currently selected Contact Record (similar to the action of the &Address1 macro).
Use the &Phone macro to return an additional contact telephone number using the RECORDOBJ SETRECORD subfunction.
&Profile(s)Includes two related macros:• &Profile. Returns the first matching detail record for the selected contact.• &Profiles. Returns detail records for the selected contact.These macros take optional parameters. Each parameter must be separated by a period (.). Although GoldMine does not typically pass parameters with a DDE macro, the structure of &Profiles must be different for DDE fields in Microsoft Word document templates, which do not take DDE commands.
98 • User Administration GoldMine Administrators Guide

These examples show the syntax for the &Profile(s) macros:
&Profile Example 1&Profile.ProfileName.Reference.FlagsRetrieves the first profile that matches the ProfilleName and Reference.
&Profiles Example 1&Profiles.ProfileName.Reference.FlagsRetrieves all profiles matching the ProfileName and Reference.In both of these examples, the Reference parameter is optional. If passed, it acts as a begin with condition on the profile reference. If the Reference parameter is not passed, all ProfileName profiles are evaluated.
Flag ParametersThe Flags parameter is also optional; it has these values:• 2 returns the extended profile fields• 4 returns the ProfileName and ReferenceThe &Profile(s) macro can easily fill in a Word table with the selected contact’s profile information because tabs separate each field value, and a CR/LF separates each profile record.
&Profile Example 2This example returns the first e-mail address of the contact:• &Profile.E-mail Address• &Profiles Example 2This example returns computer profiles beginning with the word notebook:• &Profiles.Computer.Notebook• &Profile Example 3These examples use the Flag parameter to specify the profile fields to return:• &Profiles.Computer.NotebookNotebook Toshiba P105-S6167|Notebook
HP Pavilion dv9260us|Notebook Lenovo ThinkPad T60|• &Profiles.Computer.Notebook.2Computer|Notebook Toshiba P105-
S6167|Computer|Notebook HP Pavilion dv9260us|Computer|Notebook Lenovo ThinkPad T60|
GoldMine Administrators Guide User Administration • 99
• &Profiles.Computer.Notebook.4Computer|Notebook Toshiba P105-S6167|Toshiba|1.60GHz|Computer|Notebook HP Pavilion dv9260us|HP|2.0GHz|Computer|Notebook Lenovo ThinkPad T60|Lenovo|166GHz|
&RoTabPageReturns the selected tab. Typically, this value verifies that the correct tab is selected when a user starts a custom application. Values between 1–9 represent tabs in the first row of tabs; for example, 1 represents the Summary tab. Values between 10–18 represent tabs in the second row, and 19–27 represent tabs in the third row.This example tests the selection of the fifth (Details) tab:ch=DDEInitiate("GoldMine", "Data")If DDERequest$(Ch, "&RoTabPage") <> "5" ThenMsgBox "You must select a profile record first"End If
&SerialNoReturns the serial number of the installed GoldMine program.
&ShutDownLogs out the currently logged user, and quits GoldMine.
&StateReturns the State field from the active Contact Record (similar to the action of the &ADDRESS1). Use the &State macro to return an additional contact state using the RECORDOBJ SETRECORD subfunction.
&SysDirReturns the GoldMine system directory.
&SysInfoDisplays system information as returned by Help>About GoldMine>System information.
100 • User Administration GoldMine Administrators Guide

&TitleReturns the Title from the active Contact Record. Normally, this value is extracted from the Title field in the primary display portion of the contact record; however, use the RECORDOBJ SETRECORD subfunction to change the returned record type to additional contact or another type of supplementary record. When the RECORDOBJ SETRECORD type is set to return record types other than PRIMARY, the &Title macro returns the value in the Title field in CONTSUPP for the current supplementary record.
&User_VarReturns the defined field value from all users, a specified user, or the currently logged user. The &User_Var macro allows GoldMine users to store specific data that can be retrieved later into applications that are linked via DDE with GoldMine. This macro can be defined in the [user_var] section of both the GM.INI and the username.INI of GoldMine.Usage Syntax: &User_Var.<variable name>.<GoldMine username>Example: &User_Var.Territory.Danwhere<variable name>is a descriptive name of the macro and <GoldMine username> assigns a defined value to a specific GoldMine user. <GoldMine username> is optional, as GoldMine will assign these values to the current GoldMine user.
&UserFullNameReturns the full name of the logged in GoldMine user as it appears in the FullName field in the Users Master File.
&UserNameReturns the name of the logged in GoldMine user.
&VersionReturns the version number of the installed GoldMine program.
&WebSiteReturns http://<web site> for the active contact.
GoldMine Administrators Guide User Administration • 101
&ZIPReturns the ZIP field from the active Contact Record (similar to the action of the &ADDRESS1). Use the &ZIP macro to return an additional contact ZIP Code using the RECORDOBJ SETRECORD subfunction.
Recording Macros1. With Macro buttons activated in the Global Toolbar, click Record. The macro is ready to record. Also start the recording process by typing CTRL+SHIFT+HOME.
TIP: Record a macro using keystrokes rather than mouse-clicks. To use the GoldMine menus, type ALT+<Underlined letter of menu item>. Use the arrow keys to navigate the menu options
2. Begin the steps to record. 3. When finished, click Stop on the Global Toolbar or press
CTRL+SHIFT+END. The Define Macro Button dialog box opens.
4. In the Status Bar Description field, type a description of the macro to serve as the button name and pop-up text.
5. The Optional Hot Key is optional. Type the hot keys you are assigning to the macro; for example, to use ALT+9 as the hot key, hold down the ALT key and the 9 key. The Optional Hot Key box displays ALT+9.
CAUTION: Define hot keys carefully. SHIFT and a letter runs the macro every time it is typed. For example, using SHIFT+ G as your hot key, and then trying to type a company or contact name that begins with G in a new Contact record, the capital letter will not work. In other areas, such as the Contact Search Center, it runs the macro rather than searching for contacts beginning with capital G.
6. From the Playback drop-down list, select the playback speed for the macro. Select Full Speed to launch or run the macro quickly, or Recorded Speed to run the macro at the speed it was recorded.
102 • User Administration GoldMine Administrators Guide
Adding GoldMine User's Macros Use the following procedure to create macros to speed or ease workflow. 1. Right-click on the GoldMine taskbar and select Add New Item. 2. At the Taskbar Group Item Selection dialog box, select GoldMine Users’
Macro from the Item Type drop-down list. 3. Select the user who created the macro from the User drop-down list.
Highlight the macro to add to the taskbar. 4. Browse to an icon file.
The options display in the area below. Select an icon. 5. Click OK to add the item to the taskbar.
GoldMine Report MacrosThe following is a compiled listing of information pertaining to the macros used within GoldMine reports along with a short description.Some macros are only available within the “Calendar Printouts” reports category. The remaining macros are available in all of the report categories. They have been separated within this document for organizational purposes.
All Report Categories
&FullAddressDisplays Address1, Address2, City, State, Zip, and Country. A line feed separates address lines. City, State, Zip values are displayed on one line.
&Company&Address Displays Contact Name, Company Name, Address1, Address2, City, State, Zip, and Country. A line feed separates all fields except for City, State, and Zip, which are displayed on one line.
&Address1&2Displays Address1 and Address2 data separated by a line feed.
&Contact, Company Displays Contact Name and Company Name separated by a semi-colon.
GoldMine Administrators Guide User Administration • 103

&Name&AddressDisplays Contact Name, Title, Department, Company Name, Address1, Address2, City, State, Zip and Country. A line feed separates all fields except for City, State, and Zip, which are displayed on one line.
&CompanyContact Company Name, Contact Name separated by a semi-colon.
&Title&AddressContact Name, Title, Department, Company Name, Address1, Address2, City, State, Zip, and Country. All fields separated by a line feed, except for City, State, Zip, which appear on the same line.
&CityStateZip City, State, Zip displayed on the same line. City and state values are separated by comma.
&SourceFile Returns the name of the database file being accessed in the current Section.
&CalActvName Outputs the name of the scheduled activity being printed, based on the RECTYPE. For example, if a record of RECTYPE S is printed, the macro will return a value of “Sale”.
&HistActvName Works in the same manner as &CalActvName, except that it returns names based on history records, not calendar data.
&User Outputs the user name of the currently logged in user.
&FullName Returns the full name of the currently logged in user, as defined in File>>Configure GoldMine>>Users File.
&LicenseeOutputs the “Licensed To:” company name as defined when the GoldMine serial number was specified.
104 • User Administration GoldMine Administrators Guide

&Sort1 Outputs the data from the field set as the primary sort for the report. Can also be used to specify a break field within a sort header. For example, if the primary sort of a report is set to contact1->company and I insert the value of &Sort1 for the break field in the sort header, the report will then break on contact1->company.
&Sort2 Outputs the data from the field set as the secondary sort for the report. Can also be used to specify a break field in the same manner as the &Sort1 value.
&Sort3 Outputs the data from the field set as the tertiary sort for the report. Can also be used to specify a break field in the same manner as the &Sort1 value.
&PhonesOutputs all three of the phone numbers, the fax number, and the extension fields.
&LocalLabel: Returns the local label of the field specified after the colon.&Suppfile=”xxx” Used to specify break fields and filters within sections of reports. The “xxx” value must be at least two characters, but no greater than three. It is used to specify the database and record types you wish to include in a report section. The first two characters specify the database and the third specifies the RECTYPE within that database. Possible values for the different databases are as follows: cs = CONTSUPP.DBF, ca = CALENDAR.DBF, ch = CONTHIST.DBF. The different RECTYPEs that can be specified as the third character are listed in the “Database Structures” section of your manual.
NOTE: The ADDRESS3 field data found in the GoldMine CONTACT1 table is included in those macros that return address information.
Calendar Printouts Section Only
&Detail1 Displays the information that has been specified in the “Options” window for the report.
GoldMine Administrators Guide User Administration • 105
&Year Returns the value of the current year in four-digit format, such as 1998. The macro will also return the value of the year for all dates within the specified date range under the report’s options. For example, if the date range is set as 01/01/95 to 01/31/97, the macro will return all values that fall within the date range (i.e. 1995, 1996, and 1997).&Month Returns the numeric equivalent of the current month. For example, January = 1, February = 2, etc. The macro also returns the value of the month for all dates within the specified date range in the report’s options. For example, if the date range is set as 10/01/96 to 01/31/97, the macro will return all values that fall within the date range (i.e. 10, 11, 12 and 1).
&CMonth Returns the name of the current month (For Example, January, February, etc.). The macro will also return the value of the month for all dates within the specified date range under the report’s options. For example, if the date range is set as 10/01/96 to 01/31/97, the macro will return all values that fall within the date range (i.e. October, November, December and January).
&CMonthYr Returns the name of the current month, plus the 4-digit year (For example: January 1998). The macro will also return the value of the month and year for all dates within the specified date range in the report’s options. For example, if the date range is set as 11/01/96 to 01/31/97, the macro will return all values that fall within the date range (i.e. November 1996, December 1996, and January 1997).
&Day Returns the numeric value of the current day (For example, 12, 100, 300, etc.). The macro will also return the value of the day for all dates within the specified date range under the report’s options. For example, if the date range is set as 01/29/97 to 01/31/97, the macro will return all values that fall within the date range (i.e. 29, 30, and 31).
&Dow Returns the numeric value of the day of the week. For example, a date which falls on Wednesday would return a value of 4, etc. Sunday is considered as being the 1st day of the week. This macro will also return all values within a date range.
106 • User Administration GoldMine Administrators Guide
&CDow Functions much in the same manner as the &Dow macro, except that instead of returning a numeric value, it returns the actual name of the day. For example, if a date falls on a Sunday, the macro will return the value “Sunday” and so forth.
&DayNo Returns the day number based on the year. For Example: January 2, 1997 = Day 2.
&WeekNo Returns the week number of the year, similar to &DayNo. Jan 5–11 = Week 2
&WDay1 Returns the numeric day value of the Monday for the workweek in which the date falls. Assume that we are looking at records that fall on Wednesday January 29, 1997, the value returned by the macro would be 27. Since the 29th is a Wednesday, Monday is the 27th for the week of January 29, 1997.
&WDay3 Functions in the same manner as the macro &Wday1, except that it returns the numeric day value of the third work day of the week, or Wednesday.
&WDay4 Functions in the same manner as the macro &Wday1, except that it returns the numeric day value of the fourth work day of the week, or Thursday.
&WDay7Functions in the same manner as the macro &Wday1, except that it returns the numeric value of the seventh work day of the week, or Sunday.
&Hour Displays the time in hourly increments from 7:00 AM to 7:00 PM, generated in 12-hour format.
&Time Returns the scheduled time for calendar records, in 12-hour format.
&FrDate Displays the From: date entry from the report’s options.
GoldMine Administrators Guide User Administration • 107

&ToDate Displays the To: date entry from the report’s options.
&LastMonth Generates a graphical representation of the prior month, based on the date of the calendar records on the current report page. For example, if my report is displaying items for the month of January, the macro will print the graphical month of December.
&ThisMonthGenerates a graphical representation of the current month, based on the date of the calendar records on the current report page. For example, if my report is displaying items for the month of January, the macro will print the graphical month of January.”&NextMonth Generates a graphical representation of the next month, based on the date of the calendar records on the current report page. For example, if my report is displaying items for the month of January, the macro will print the graphical month of “February.”
iSearch.iniThis INI determine the engines available in the Internet Search dialog box. Use the following procedure to add search engines to the listings. 1. Select Lookup>>Internet Search.
2. At the Internet Search dialog box, click iSearch.ini properties .
The iSearch.ini file opens in Notepad.3. Select the location where the new search engine displays.
Press Return to give yourself a line of space.4. Type the appropriate information.
Example: Insert Google as a new corporate search engine. [Section: Corporate Search: <<Company>>]Icon= 1[AltaVista]URL1= http://www.altavista.digital.com/cgi-bin/query?pg=q&what=web&kl=XXData= &q=<<Company>>
108 • User Administration GoldMine Administrators Guide

Icon= 5[Yahoo]URL1= http://search.yahoo.com/bin/searchData= ?p=<<Company>>Icon= 5[Google]URL1= http://www.google.com/search?hl=en&ie=UTF8&oe=UTF8Data= &q=<<Company>>[Yahoo Corporate News]URL1= http://search.news.yahoo.com/search/newsData= ?p=<<Company>>Icon=6
In this example, the test search returned the following results in the Internet Explorer Address text boxhttp://www.google.com/search?hl=en&lr=&ie=UTF8&oe=UTF8&q=global+sales+corp
Notice the search command for Google, &q, and the company name, Global Sales Corp, at the end. In the iSearch.ini entry, this is replaced by the company macro, <<Company>>. The macro allows the search to remain interactive with the current contact record.
5. Select File>>Save. When launching the Internet Search, the new entry appears in the dialog box.
NOTE: Determine the structure of the entry (unique to each search engine) by testing a search and determining where the search begins.
GoldMine Administrators Guide User Administration • 109

110 • User Administration GoldMine Administrators Guide

Record Types
About Record TypesRecord types are customized combinations of Primary Fields Views, Custom Screens, and GM+Views. Linked and applied based on user-defined rules, record types determine what users see when working in GoldMine. The full record type combination (Primary Field View, Custom Screens and GM+View) is an entity. Manage record types in the Record Types Administration Center. Effective use of the Record Types Administration Center depends on a workflow. The Workflow: Creating Primary Fields Views, Custom Screens, and GM+Views1. Defining Primary Fields Views. See “About Primary Field Views” on page
112.• Creating Primary Fields Views. See “Creating Primary Field Views”
on page 113.• Editing fields. See “Customizing Field Properties” on page 115.• Using Field Typing. See “Customizing Field Typing” on page 123.
GoldMine Administrators Guide Record Types • 111

2. Creating Custom Screens • Creating Custom Screens. See “Creating Custom Screens” on page
128.• Adding Fields to Screens. See “Adding Fields to Screens” on page
129.• Editing fields• Using Field Typing• Customizing Labels. See “Customizing Field Typing” on page 123.• Creating GM+Views. See “Creating GM+View Templates” on page
135.
About Primary Field ViewsPrimary field views are customized views of primary fields. Primary fields are in the upper pane of a Contact Record and are Contact1 fields. GoldMine now allows you to move fields around the screen as your needs dictate. The customizations can include changing the displayed label or color for a field or hiding a field. Apply many changes to many fields, creating a unique view for a type of record you are creating, and save the combination of customization as a primary fields view. Create as many primary field views as needed. The only set limit to the number of views in GoldMine is the amount of available computer memory.Creating a primary field view relies primarily on the field typing. Use field typing to customize the look of the fields and the values displayed in GoldMine's primary and user-defined fields. Primary field views are a key component of record typing in the Record Types Administration Center. for more information, see “Using the Record Types Administration Center” on page 141. Use Primary Fields Views to:• Create Primary Fields Views. See “Creating Primary Field Views” on page
113.• Customize Primary Fields. See “Customizing Field Properties” on page
115.• Edit Primary Fields Views. “Editing Field Properties, Profile Tab” on page
115.
112 • Record Types GoldMIne Administrators Guide
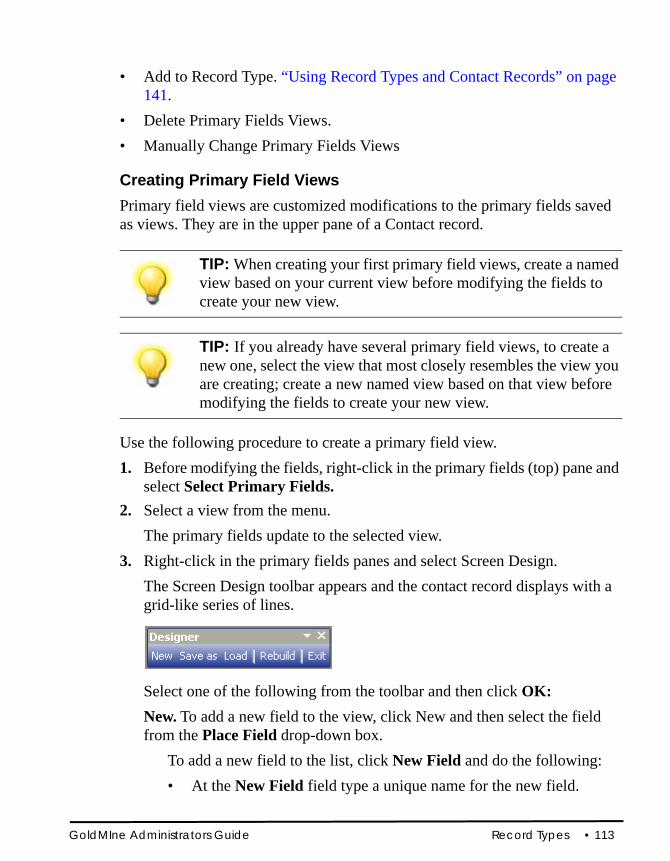
• Add to Record Type. “Using Record Types and Contact Records” on page 141.
• Delete Primary Fields Views. • Manually Change Primary Fields Views
Creating Primary Field ViewsPrimary field views are customized modifications to the primary fields saved as views. They are in the upper pane of a Contact record.
TIP: When creating your first primary field views, create a named view based on your current view before modifying the fields to create your new view.
TIP: If you already have several primary field views, to create a new one, select the view that most closely resembles the view you are creating; create a new named view based on that view before modifying the fields to create your new view.
Use the following procedure to create a primary field view.1. Before modifying the fields, right-click in the primary fields (top) pane and
select Select Primary Fields. 2. Select a view from the menu.
The primary fields update to the selected view.3. Right-click in the primary fields panes and select Screen Design.
The Screen Design toolbar appears and the contact record displays with a grid-like series of lines.
Select one of the following from the toolbar and then click OK: New. To add a new field to the view, click New and then select the field from the Place Field drop-down box.
To add a new field to the list, click New Field and do the following:• At the New Field field type a unique name for the new field.
GoldMIne Administrators Guide Record Types • 113

• At the Description field type a brief description of the new field.• At the Field Type field select the type of the new field and then add
the number of characters in the Len (length) and/or Date fields.Save As. Save the screen as a new Primary Fields View.Load. Load the new Primary Fields View.Rebuild. Rebuild the database and add the fields to the Contact2 table. Review details on rebuilding before proceeding at “About Maintaining Databases” on page 243.Exit. Exit the Screen Designer.
4. Click Save as a Primary Field. .The Main View Profile dialog box appears. Use this dialog box to name and set access on Primary Fields Views. Complete the following fields and then click OK:• Name. Type a descriptive name in the field.• User Access. Select the user or user group to have access to this new
group in the User Access. Select (public) for all users to have access this view.
The new view appears in screen design mode and ready for modification.5. To modify the fields in the view, see Customizing Primary Fields.
Customizing Primary FieldsPrimary fields appear in the upper pane of the contact record. Many fields are indexed fields. You can modify the field labels and data display with colors or other expressions using the fields properties to create custom field typing.
NOTE: Whenever a form of DDE is used, the external application extracts data based on the hard-coded Field Name regardless of the field label.
After you make the modifications to the primary fields, save as primary fields views. The Contact1 table stores primary field data.
114 • Record Types GoldMIne Administrators Guide
Customizing Field PropertiesField Properties determine the field type, label and data appearance, field location, label and data field size, and field security.Use the following procedure to edit the field properties.1. Right-click on the field label and select Properties.
The Field Properties dialog box appears.2. Configure the settings on these tabs and then click OK:
Profile. Field labels and field data options. For more information on editing these properties, see “Editing Field Properties, Profile Tab” on page 115.Color. Colors on the Contact record for the field label and field data. For more information on editing these properties, see “Editing Field Properties, Color Tab” on page 119.Layout. Field size, position, and tab order. For more information on editing these properties, see “Editing Field Properties, Layout Tab” on page 120.Security. Fields requiring data, users having read and update rights to the field, and options to update the log on the History tab. For more information on editing these properties, see “Editing Field Properties, Security Tab” on page 121.
Editing Field Properties, Profile Tab1. Select the Profile tab. In the Field Label area, select Global Label and
type the field label in the associated field.The Global Label applies to all GoldMine databases. Global Labels:• Display in all databases unless there is a Local Label.• Have a length limit of 15 characters, but are limited by the field label
size.• Are stored in the Contudef and Fields5 table in the database.
GoldMIne Administrators Guide Record Types • 115

2. Type the field label in the Local Label field if the local label differs from the Global Label. The Local Label applies only to the current database.Local Labels:• Display in the current database.• Have a length limit of 15 characters, but are limited by the field label
size.• Are stored in the Contudef table in the database.• Take precedence over the Global Label.• Are always applied when the field is displayed within the
corresponding contact set database, regardless of Record Type or Primary Fields View being used.
3. Select Expression if editing an expression field. See“Adding Expression Fields to Screens” on page 117 for details about the Expression option and the Label Reference.
4. In the Field Data area, select Name in Database. The field name displays in the field. The All Fields button is active for user-defined fields, not primary contact fields.
5. Select All Fields to change the data field. The User Defined Fields dialog box opens.Select the new field data to display in the field. After selecting a new field, the Global Label remains the same; however, the Local Label changes to reflect new data.
6. Select Expression if editing the data expression.See “Adding Expression Fields to Screens” on page 117 for details about the Expression option.
7. Configure the Color tab, Layout tab, and Security tab.
NOTE: Use expressions to create complex field typing related to displaying and hiding the field label and data.
116 • Record Types GoldMIne Administrators Guide
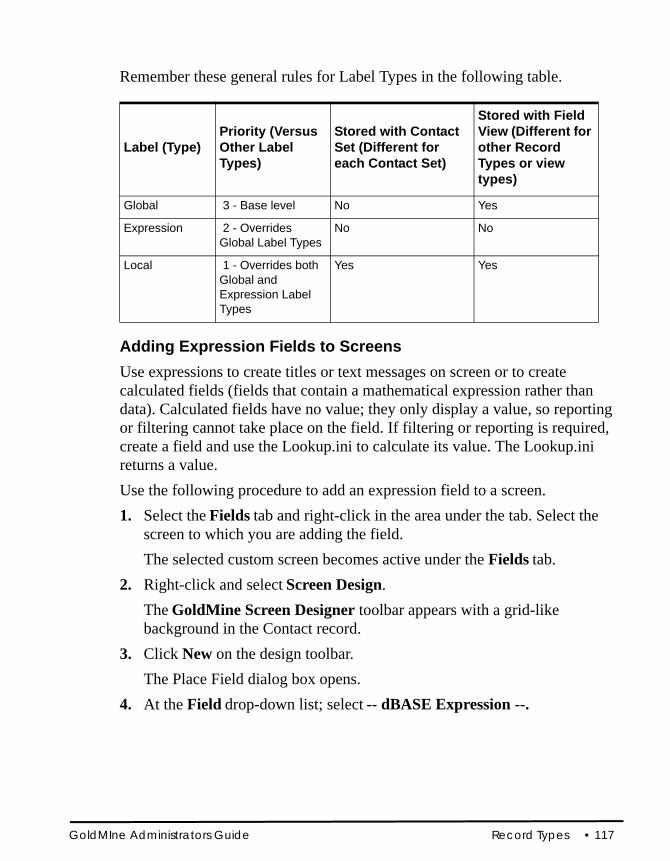
Remember these general rules for Label Types in the following table.
Label (Type)Priority (Versus Other Label Types)
Stored with Contact Set (Different for each Contact Set)
Stored with Field View (Different for other Record Types or view types)
Global 3 - Base level No Yes
Expression 2 - Overrides Global Label Types
No No
Local 1 - Overrides both Global and Expression Label Types
Yes Yes
Adding Expression Fields to ScreensUse expressions to create titles or text messages on screen or to create calculated fields (fields that contain a mathematical expression rather than data). Calculated fields have no value; they only display a value, so reporting or filtering cannot take place on the field. If filtering or reporting is required, create a field and use the Lookup.ini to calculate its value. The Lookup.ini returns a value.Use the following procedure to add an expression field to a screen.1. Select the Fields tab and right-click in the area under the tab. Select the
screen to which you are adding the field. The selected custom screen becomes active under the Fields tab.
2. Right-click and select Screen Design. The GoldMine Screen Designer toolbar appears with a grid-like background in the Contact record.
3. Click New on the design toolbar. The Place Field dialog box opens.
4. At the Field drop-down list; select -- dBASE Expression --.
GoldMIne Administrators Guide Record Types • 117
5. Click OK.The field box appears in the upper left corner of the Fields tab. Drag and drop the field in the desired location on the Field Screen.
6. Double-click the field.The Field Properties dialog box opens.
7. In the Field Label area on the Type tab, select either: • Global Label. Designate the Global Label that applies to all databases.
With Expression fields, the Local Label is not an option.• Expression. Type text in quotes or type a field expression.
Examples: • To create a text expression label, type Total: in the Field Label area
Expression box. GoldMine displays Total: as the field label.• To create a field expression label, type Contact1->Company in the
Expression box. GoldMine displays the first 15 characters of the company name as the field label.
8. If you use Expression as a field label, type the Label Reference label for the expression field.
9. In the Field Data area, select Expression and type the expression that displays the field value.
ExampleFor two numeric fields, called USUM1 and USUM2, create a calculation expression to add them together. For example, Contact2->USUM1+Contact2->USUM2. Remember, you cannot report on the total value. If you create a complex expression, test it using the dBASE Expression Tester.
118 • Record Types GoldMIne Administrators Guide
Editing Field Properties, Color Tab1. Right-click the field label and select Properties. 2. At the Field Properties dialog box, select the Color tab. 3. In the Label Color area, select Fixed Color and click Colors.
The Color dialog box opens.4. Select the color from the palette to use as the label color.
• Select Define Custom Colors to create custom colors. • Click Use default label color to reset the color to black.
5. Select Expression if you know the system number for the color.6. Type the number in the field.
NOTE: Use expressions to create more complex field typing, related to changing the color of field labels and field data.
ExamplesUse expressions to create a variable color based on a more complex expression. For example, to display a red label on Key1 if the field is empty and a black label if it not empty, use this expression: iif((len(trim(contact1->Key1))=0),255,0). In the example 255 is the Windows color profile for red and 0 is the profile for black. Use field label expressions with predefined colors. For example, to flag companies with a credit limit of $1000 or higher with a red field label and a green label for less than $1000, use this expression: color(iif(contact2->u_credit>1000, "RED","GREEN")) where u_credit is the user-defined numeric field storing the credit limit value. If a user-defined field is empty, change the color on the Company field label to red; otherwise, it displays black. The expression to add to the Company field is: iif(contact2->u_userdefinedfield=" ",color("RED"),color("BLACK")).
In the last two examples, the expressions are configured differently — Either is valid.Use expressions to create more complex field typing, related to displaying and hiding the field label and field data.
GoldMIne Administrators Guide Record Types • 119

7. In the Data Color area, select Fixed Color and click Colors. The Color dialog box opens.
8. Select the color from the palette to use as the data color. • Select Define Custom Colors to create custom colors. • Click Use default data color to reset the color to dark blue.
9. Select Expression if you know the system number for the color. Type the number in the field.
10. Configure the Profile tab, the Layout tab, and the Security tab.
Editing Field Properties, Layout Tab1. Right-click the field label and select Properties. 2. At the Field Properties dialog box, select the Layout tab to configure field
size and position and to select field tab order.3. In the Field Size & Position area, configure these by typing in numbers or
increasing or decreasing the values with the up and down arrows for each field:• Field Label Size. Sets the size of the field label (up to 15 characters).• Data Size. Sets the size of the data field to display. To increase the
actual size of a field, select File>>Configure>>Custom Fields.• (:) Row (y): and Column (x). Sets the placement of the field based on
a grid of rows and columns. Refine field placement after dragging and dropping.
4. In the Field Order area, Position field, type or select the numbered tab order for the field.
NOTE: Increase data entry efficiency by setting the field tabs in the order the data should be entered.
5. Click Screen Fields to view field order on the active Field Screen.6. Configure the Profile tab, the Color tab, and the Security tab.
120 • Record Types GoldMIne Administrators Guide
Editing Field Properties, Security Tab1. Right-click the field label and select Properties. 2. At the Field Properties dialog box, select the Security tab to specify
whether the field requires data, configure fields access, and turn on auditing.
3. In the Field Data Entry Requirement area, select Required Data Entry to force users to fill in the field. A required field displays on the contact record with a red box around it. If the field requires data and the user has neglected to provide data in the field when saving the record, the Required Fields Alert warning appears letting authorized users override the requirement. When a required field is overridden, an Override activity adds to the associated History tab with a Result code of OVR. The record is not removed when the field is updated and can only be deleted by a user with Master rights.
4. In the Field Access area, leave the Read Rights as (public) to allow users to view field data. • To limit user access to fields, select a user or user group from the drop-
down list.• If Required Data Entry is selected, the field must have (public) read
and update rights.
5. To set Update rights, select the user or user group from the drop-down list. Only the selected user or user group can update field data. To let users update the field, leave as (public).
NOTE: This setting does not override record ownership and record curtaining. If record ownership is assigned and record curtaining is activated, only the owning user or user group sees the field.
NOTE: This setting does not override record ownership. If record ownership as been assigned, only the owning user or user group can update the field.
GoldMIne Administrators Guide Record Types • 121
6. In the Field Audit area, select Log changes in history to record changes made to the field data.
NOTE: The record is kept on the History tab with an Activity code of Other and a Result code of LOG.
7. Configure the Profile tab, the Color tab, and the Layout tab.
Required Fields Alert Dialog BoxThe Required Fields Alert dialog box appears when saving or leaving a Contact Record with one or more fields requiring data or when changing a primary fields view without populating the field. Configure the Required Data Entry setting for a field on the Field Properties dialog box, Security tab.When receiving the warning, type the correct data or override the field requirements. To override the required field you must have the Required field override permission selected on the User Properties dialog box, Access tab.Use the following procedure to override Required Fields.1. When the Required Fields Alert dialog box appears, select either:
• OK. Closes the dialog box, letting you add data to the fields.• Skip Required Entry. Expands the dialog box, letting you specify the
reason and authorize the override.2. If you selected Skip Required Entry, the dialog box expands. In the
Reason field, type the reason for not updating the field or select the reason from the F2 Lookup list.
3. At the Authorizing user drop-down list, select the user with permission to override the entry.
4. Type the user's Password. 5. Click Authorized!. 6. Save the contact record without the required data; an Override activity adds
to the History tab of the record.
122 • Record Types GoldMIne Administrators Guide
Customizing Field TypingUse field typing to customize the look of field labels and values, including changing the label or data color in a field based on the value in that field or another field, hide labels and values, assign a generic field use name to a field that may have different labels and values. Create custom views for different users or user groups, or let users switch between customized views. Field typing is the first level of customization you can add to primary field views and record types.Use the following procedure to customize a field type1. Right-click on the field label and select Properties.2. At the Field Properties dialog box, select the Profile or Color tab as
needed. The Profile tab holds the settings for the field label and data. The Color tab holds settings for the label color and field data color.
ExamplesField TypeChange the text of the label depending on the value in that field or in another field. The following example displays the field label as all capital letters if the field is blank and as initial capital if it contains a value. This expression is added to the Field Label Expression box on the Profile tab for the Key1 field.
iif((len(trim(contact1->key1))=0), "ACCT TYPE:","Acct Type:")
Change the label depending on the value in another field. In the following example the country field is evaluated to determine what is displayed as the Zip field label. This expression is added to the Field Label Expression field on the Profile tab for the Zip field.
iif((upper(contact1->country)="U.S.A.").or.(len(trim(contact1->country))=0),"Zip:","PostCode:")
GoldMIne Administrators Guide Record Types • 123
Field ColorGoldMine provides several predefined color choices or you can specify the Windows profile color number. Add the expressions to the Label Color Expression field to affect the label or to the Data Color Expression field to affect the data color.• Using Predefined Colors
iif(contact1->key1=" ", color("red"),color("black"))
• Using Windows Color Profile Codesiif((len(trim(contact1->key1))=0),255,0)
Inserting Labels in Reports1. Right-click the report template and select Insert>>Label.
An edit box opens. Drag the edit box to the desired location and click to place.
2. The box shows the word Label, Double-click the label box and the Text Field Parameters dialog box opens.
NOTE: Labels appear on the report regardless of whether the field contains data.
3. In the Text field, type the words to appear in the label.4. In the Text Position area, select the Horizontal and Vertical placement of
the text within the label box.5. Click Outline to create an outline of the text field and set the Line
Properties.6. Click Background to create a background color and type within the label
box.7. Click Font to select the text font.8. Click OK to save and close the text parameters.
124 • Record Types GoldMIne Administrators Guide

Hiding Field Labels and ValuesHide the label and the value based on the value in the field or in another field using the Label Color Expression and the Data Color Expression fields. In the following example, the label and data for the Source field are hidden if the Key1 field value is Employee.
ExampleTo hide both the label and the data, add the expression to the Label Color Expression field and the Data Color Expression field in the Field Properties of the Source field.
iif((Contact1->key1)="Employee",-2,-1)
Combining Hiding and ColorTo effectively use color and hiding, add expressions in several Field Property areas. Add this data to the Field Properties of the Source field: Use the following procedure to combine hiding and color.1. Right-click on the Source field and select Properties.
The Field Properties dialog box opens.2. On the Profile tab, select Expression in the Field Label area. 3. Copy this into the Expression field:
iif((len(trim(contact1->source))=0).and.(trim(contact1->key1)<>"Employee"),"SOURCE:", "Source:")
4. Select the Color tab. 5. Select Expression in the Label Color area.6. Copy this into the Expression text field:
iif((len(trim(contact1->source))=0).and.trim(contact1->key1)<>"Employee",255,iif(contact1->key1="Employee",-2,-1))
NOTE: In this example the expression looks for an exact match with Employee. If the Key1 field data is entered as employee, the expression fails and the Source field and data remain visible. Force valid data with F2 Lookup lists to keep data entry consistent.
GoldMIne Administrators Guide Record Types • 125

7. Select Expression in the Data Color area and copy the following:iif((len(trim(contact1->source))=0).and.trim(contact1->key1)<>"Employee",255,iif(contact1->key1="Employee",-2,-1))
8. Click OK to save the changes.Results: If the Key1 field contains the value Employee, the Source field label and value are hidden. If the Key1 field does not contain Employee, and the Source field is empty, the Source field label displays SOURCE:; if there is a value, the field label displays Source: in the default color.
Saving the Field Typing in Your Primary Fields ViewsAfter customizing field typing (saved to your current view), save the customizations as a new Primary Fields View.
Creating Custom FieldsGoldMine's flexibility meets a range of business information needs. The ability to create user-defined custom fields goes beyond the variety of options in GoldMine and better tailors the contact record to meet your company's needs. • Plan custom field implementation by considering these questions:• What is the field type?• What data is going into the field?• Will the field calculate?When adding user-defined fields, create a custom screen to display the related fields.
NOTE: Always back up your databases before creating user-defined fields.
TIP: Create telephone number fields that format numbers like other phone fields. Create a field named UPHONEn, where n is a user-defined number.
Use the following procedure to create a custom field.1. Select Tools>>Configure>>Custom Fields.
126 • Record Types GoldMIne Administrators Guide

2. At the User Defined Fields dialog box, select New. The User Defined Field Profile dialog box opens.
3. Type a unique name, beginning with U, in the Field Name field (it can be up to nine alphanumeric characters in length, including the U). The field name should not contain spaces or special characters, such as asterisks (*) or percent signs (%); however, you can use the underscore (_).
4. In the Description field, type the field label to appear in the contact record.5. At the Field Type options select one of the following:
• Character. Formats data as a text string.• Numeric. Formats data as numbers to run mathematical functions
against.• Date. Formats data as a date, month/day/year.
6. In the Len field, type or select a field data length. The maximum length for a character field is 256; numeric is 16.
7. The Dec field is available when creating a numeric field. It sets the number of decimal places within the field. GoldMine assigns one character place to the decimal point in determining field length. For example, create a field that can accept hold values up to 9.99 by assigning a Len value of 4 and a Dec value of 2. This field applies to numeric data types.
8. Click OK. The User Defined Fields dialog box reopens with your new field added to the list. Next, add the field to your custom screen.
NOTE: The Field Name appears when inserting fields into Microsoft Word; therefore, make the field name user-friendly and identifiable.
GoldMIne Administrators Guide Record Types • 127
Creating Custom ScreensCustom screens are user-defined areas that appear under the Fields tab or as an individual tab. Use these screens to logically group user-defined fields.You can create up to 20 screens, each one with maximum of 250 fields.Custom screens are a key component of the record typing in the Record Type Administration Center. 1. Select Tools>>Configure>>Custom Screens. 2. At the Custom Screens Setup dialog box, click New.
The Custom Screen Profile dialog box opens. See “Custom Screen Profile Dialog Box” on page 128.
3. After configuring the Custom Screen Profile dialog box, click OK. The Custom Screens Setup dialog box reopens.
4. Click Close. You can now add fields to your new custom screen.
Custom Screen Profile Dialog Box1. In the Screen Name field, type the name (up to 20 characters) you want to
appear in the Fields tab local menu and on the configuration dialog boxes. 2. In the Tab Name field, type the name for the tab.
Leave this box blank for the screen to not display as an individual tab. View Tab Name tips.• Due to viewing limitations, the tab name should not exceed six to eight
characters, and it should not have spaces. • GoldMine alphabetizes tabs. To reorder tabs, place a number at the
beginning of the tab name. The number does not appear on the tab, but determines the position of the title in the bank. For example, for the Reseller View tab to appear before the Mgt View tab, type 1Reseller in the Tab Name field.
• To create a special tab without the name appearing on it, type two asterisks (**) in this field. The tab label remains blank.
3. Leave the User Access as (public) to let users view the screen, or select a user or user group from the drop-down list.
128 • Record Types GoldMIne Administrators Guide

4. Select This screen is available in the current Contact Set to let users see the screen listed in the Fields tab local menu. When this option is cleared, the screen is unavailable in the current contact set. If you have three contact sets, disable the screen in only two of the databases, log on to each contact set and disable the option.
5. When finished, click OK.
Adding Fields to ScreensAfter you have created the fields and screens, place these types of fields on the screens: • Fields. Hold data.• Expression fields. Display titles, messages, or mathematical calculations
based on other fields.Use the Screen Designer to place the fields on screens. Only users with Master Rights can access the Screen Designer. The Screen Designer lets you click and drag fields in the display. Only unindexed fields can be dragged from the upper panes to the Fields tab area.
NOTE: If asked to rebuild the database, review Help topics regarding rebuilding and maintaining Firebird and SQL.
Use the following procedure to add fields to a screen.1. At the Screen Designer, select the Fields tab and right-click in the area
under the tab. 2. Select the screen to which you are adding the field.
The selected custom screen becomes active under the Fields tab.3. Right-click and select Screen Design.
GoldMIne Administrators Guide Record Types • 129
The GoldMine Screen Designer toolbar appears with a grid-like background in the contact record.
4. Click New on the design toolbar. The Place Field dialog box opens.
5. From the Field drop-down list, select the field to place on the screen.
TIP: Click New Field to create a new field without accessing Tools>>Configure>>Custom Fields.
6. Click OK. The field appears in the upper left corner of the Fields tab. Drag and drop the field in the desired location on the Field Screen.
7. Double-click the field. The Field Properties dialog box opens.
8. Make changes to the Profile, Color, Layout, and Security tabs and click OK. The field is placed on the screen with an n/a in the data area.
9. Log out and back into GoldMine to see the field. Select File>>Exit and then relaunch GoldMine.
NOTE: Changing the field order position of Company, Contact, Phone1, or any of the Key 1–5 fields can cause problems–especially with synchronization and querying the database.
NOTE: When working with Row and Column entries, do not delete indexed fields from the primary Contact Record display or move indexed fields to custom user screens. Moving or deleting indexed fields can reduce GoldMine’s ability to find records based on these fields when using search commands from the Lookup menu.
130 • Record Types GoldMIne Administrators Guide

About the GM+Browser TabCreate a customizable information page using HTML capabilities. Display images, linked documents, or inserted GoldMine fields. Create several templates, set default templates, and then create rules controlling what template displays for contacts meeting the rules. The tab uses Internet Explorer 6 or 7; the local menu and HTML design options are IE-based. Settings in the IE menu (View>>Text Size) control font size. Information in the tab stores in the Mailbox table and synchronizes to remote users. Users with Master Rights can create or edit a template by selecting Web>>Setup GM+Browser. The GM+Browser Tab Settings dialog box opens.Views on this tab are a key component of the record-typing used in the Record Type Administration Center. If record type rules are activated, right-click in the tab area and select another view; or, to reactivate the rules, right-click in the tab area and select Rules-Based Selection.
GoldMIne Administrators Guide Record Types • 131

Configuring GM+Browser1. In the GM+Browser tab bar, click GM+Browser Setup.
The setup page appears.
2. From the Available list, highlight an available GM+View (such as, Property, from the demo data).
NOTE: This list is autofilled based on all available GM+View templates.
3. Click the [>>] move button. The Property view moves to the Selected list.
132 • Record Types GoldMIne Administrators Guide

4. To make all views available, click Add All. All Available views move to the Selected list.
5. To create a placeholder for other Web pages in GM+Browser, in the Add _ Browser Tabs field, type 2.
6. Click Save. A tab for the Property and Car views and an extra Browser tab now appear in the GM+Browser tab bar.
7. Click the unassigned Browser tab. It loads the default Web page until changed.
GoldMIne Administrators Guide Record Types • 133

8. In the address bar, type the appropriate Web address of a different Web page to assign to this tab and click Go (alternatively, you can navigate to the appropriate page through the default page). The tab title changes to the assigned page.
NOTE: When the tab bar exceeds the size of the GM+Browser window, forward and back buttons appear on the right side of the bar. Use these buttons to navigate to additional tabs. Or, resize the window.
• As you work in GoldMine, minimize GM+Browser or leave it open. • If you click a Contact record, GM+Browser moves behind the record. • When you close this instance of GM+Browser, it retains all settings
except the additional Browser tab addresses. • The Browser tabs always display ahead of the GM+View tabs in the tab
bar
134 • Record Types GoldMIne Administrators Guide

GM+View TemplatesUsers with Master Rights can create HTML templates with different designs or formats.
NOTE: The Microsoft Internet Explorer embedded in the GM+View does not support the Framesets tags. To use IFrames, enable the Internet Explorer security settings for IFrame.
About the GM+View TabCreate a customizable information page using HTML capabilities. Display images, linked documents, or inserted GoldMine fields. Create several templates, set default templates, and then create rules controlling what template displays for contacts meeting the rules. The tab uses Internet Explorer 6 or 7; the local menu and HTML design options are IE-based. Settings in the IE menu (View>>Text Size) control font size. Information in the tab stores in the Mailbox table and synchronizes to remote users. Users with Master Rights can create or edit a template by selecting Web>>Setup GM+View. The GM+View Tab Settings dialog box appears.Views on this tab are a key component of the record-typing used in the Record Type Administration Center. If record type rules are activated, right-click in the tab area and select another view; or, to reactivate the rules, right-click in the tab area and select Rules-Based Selection.
Creating GM+View TemplatesUse the following procedure to create a GM+View template.1. Select Web>>Setup GM+View.
The GM+View Tab Settings dialog box opens. 2. In the Template List area, click New.
The Edit GM+View dialog box opens.
3. Type a name in the Template Name field.
NOTE: Select Edit to change an existing template, or Rules to set the display rules.
GoldMIne Administrators Guide Record Types • 135

4. Click in the design box to activate the template design toolbar.5. Design using these toolbar options (or right-click and Select):
• Font. Formats fonts. • Paragraph. Sets alignment and check spelling.• Style. Selects from Normal, Formatted, Address, Heading.• Picture. Inserts images stored in shared directories. See “Inserting
Pictures in GM+View Templates” on page 137.• Insert HyperLink. Inserts a hyperlink to a Web site.• Insert Fields. Inserts GoldMine fields (user name and contact
information), linked images, or linked documents.• Insert Background Image. Browses to the location of the .bmp file. • Remove Background Image. Deletes the background.• Spell check. Checks spelling.• Save as file. Saves to a location.• Print. Prints.• Edit HTML Source. Edits the template directly in the HTML code.
6. Right-click in the design box and select Save.
Examples
Hyperlink in Template Display Full Web Page
This code example configures a GM+View template to display the FrontRange Solutions Web site as a GM+View template:<!DOCTYPE HTML PUBLIC "-//W3C//DTD HTML 4.0 Transitional//EN"><HTML><HEAD><STYLE type=text/css> P, UL, OL, DL, DIR, MENU, PRE { margin: 0 auto;}</STYLE><META content="MSHTML 6.00.2800.1264" name=GENERATOR></HEAD><BODY leftMargin=1 topMargin=1 rightMargin=1><FONT face="MS Sans Serif" color=#ff0000 size=4><DIV>Please wait while the FrontRange Solutions Web Site loads.......</DIV><SCRIPT>window.location.href = "http://www.frontrange.com/"</SCRIPT></FONT></BODY></HTML>
136 • Record Types GoldMIne Administrators Guide

To insert a fixed hyperlink Type the following in the HTML code: <A href="http://www.frontrange.com">FRS</A>
This inserts a hyperlink to the FrontRange Solutions Web site with FRS as the label.
Inserting Pictures in GM+View Templates1. Place cursor in the design box where you want to insert the picture.2. Right-click and select Insert>>Insert Picture. 3. At the Picture dialog box, click Browse to select the Picture Source from
a shared directory.4. Type Alternative Text to describe the picture.5. In the Layout area, select the Alignment from the drop-down list and type
the number of pixels to use for the Border Thickness.6. In the Spacing area, type the number of pixels to use as the Horizontal and
Vertical spacing around the picture.7. Click OK.
Inserting Links in GM+View Templates1. Place cursor in the design box where you want to insert the link.2. Right-click and select Insert>>Insert Link. 3. At the Hyperlink dialog box, select hyperlink type from the Type drop-
down list.4. Type the appropriate Internet address in the URL field and then click OK.
Inserting Fields in GM+View Templates1. Place cursor in the design box where you want to insert the field.2. Right-click and select Insert>>Insert Field. 3. At the Field local menu, select the field to insert.
The field macro is inserted in the template (use <<&company>> to insert the appropriate company name). The Contact Details expands to include more fields, including Linked Image and Linked Document File name.
4. Right-click and select Save.
GoldMIne Administrators Guide Record Types • 137

Inserting Linked Images in GM+View Templates1. At the GM+View design template dialog box, right-click and select
Insert>>Insert Field>>Contact details>>Linked Image. The Linked Image Field Properties dialog box opens.
2. Type the Linked Image (Links tab Document Name). The name must be the one that appears in the Links tab Document field.
3. Type a description for the linked image in the HTML Alt (Alternative Text) Attribute field.
4. Select the Linked Image's Alignment from the drop-down list.5. In the More HTML Attributes field, type the HTML code for the other
formatting options.6. Click OK.
Inserting Linked Documents in GM+View Templates1. At the GM+View design template dialog box, right-click and select
Insert field>>Contact details>>Linked Document File name. The statement <<LinkedImageFileName:?>> is inserted.
2. Replace the question mark (?) with the document name in the Document column of the Links tab (<<LinkedImageFileName:MyDocument>>).
3. Save and Exit. The path to the linked document displays on the GM+View tab.
138 • Record Types GoldMIne Administrators Guide

Creating GM+View RulesApply templates to particular contact records by creating rules. GoldMine evaluates a rule and if a Record meets the criteria, the specified template is displayed. Create templates prior to creating rules.Use the following procedure to create a GM+ View rule.1. Select File>>Configure>>GM+View tab.
The GM+View Tab Settings dialog box opens.2. In Template List, click Rules.
The GM+View Tab Rules for Template Selection dialog box opens.The template rule selected becomes the primary set of rules that are applied to the GM+View templates: • Field Value. See “Creating GM+View Rules for Field Values” on page
139.• dBase Expression. See “Creating GM+View Rules for dBASE
Expressions” on page 140.• User Selected. See “Creating GM+View Rules for the User Selected
Option” on page 140.
Creating GM+View Rules for Field Values1. Select File>>Configure>>GM+View tab. 2. At the GM+View Tab Settings dialog box, click Rules. 3. At the GM+View Tab Rules for Template Selection dialog box, select
Field Value.4. Select a Field Name.
This is the field for which you will select the Field Value. 5. Click New.
The Field Value and Corresponding Template dialog box opens.6. In the Field Value field, type the value to be the trigger for the rule.
If the values in the field are determined by F2 Lookup list, the right arrow on the Field Value text box will display the F2 Lookup value for the field.
7. Select a Template. This is the template that displays when the Field Value is triggered.
GoldMIne Administrators Guide Record Types • 139

8. Click OK. The GM+View Tab Rules for Template Selection dialog box reopens.
Creating GM+View Rules for dBASE Expressions1. Select File>>Configure>>GM+View tab. 2. At the GM+View Tab Settings dialog box, Click Rules. 3. At the GM+View Tab Rules for Template Selection dialog box, select
dBase Expression. 4. Type the dBASE expression in the Expression field.
Examples: The expression used must return a string, and the string must be the name of one of the templates. One option is iif, which functions as an if ... else statement: iif(contact2->uacctbal<500,"GM+View1","GM+View2")
In the above statement, GM+View1 and GM+View2 are defined templates. If the amount in the Account Balance field is less than 500, the GM+View1 template displays. If the amount is over 500, the GM+View2 template displays.iif(trim(CONTACT1->KEY1)=="test","GM+View1","GM+View2")
If the Key1 field is "test," then the GM+View1 template displays. If the value of Key1 is not equal to "test," then the GM+View2 template displays. Please note the double equal signs (==) in the above statement.
Creating GM+View Rules for the User Selected Option1. Select File>>Configure>>GM+View tab. 2. At the GM+View Tab Settings dialog box, click Rules. 3. At the GM+View Tab Rules for Template Selection dialog box, select
User Selected. 4. Right-click the GM+View tab and select a template to display for the
current contact.
140 • Record Types GoldMIne Administrators Guide

Using the Record Types Administration Center The Record Types Administration Center manages record types.• Creating Record Types. See “Creating Record Types” on page 142.• Configuring Record Type Rules
Using Record Types and Contact RecordsAfter creating record types and configuring the in the Record Types Administration Center, the record type (entity) displaying in GoldMine is based on how the record meets the rules criteria.With the Field value-based rules activated, the File>>New menu expands to include record types with the New Record Creation Options configured. The New Default Record Type option provides you with an efficient data entry option.You are not always restricted to the views determined by the record types and rules. With sufficient GoldMine permissions, manually change the primary field view, custom screen, or GM+View.
Using the Record Types Administration CenterThe Record Types Administration Center allows you to create and manage Contact Record customizations. Record typing is powerful and dynamic, letting you customize the type of Contact Record GoldMine users see and combine, within one database, what may appear to be disparate types of Contact Records.
GoldMIne Administrators Guide Record Types • 141
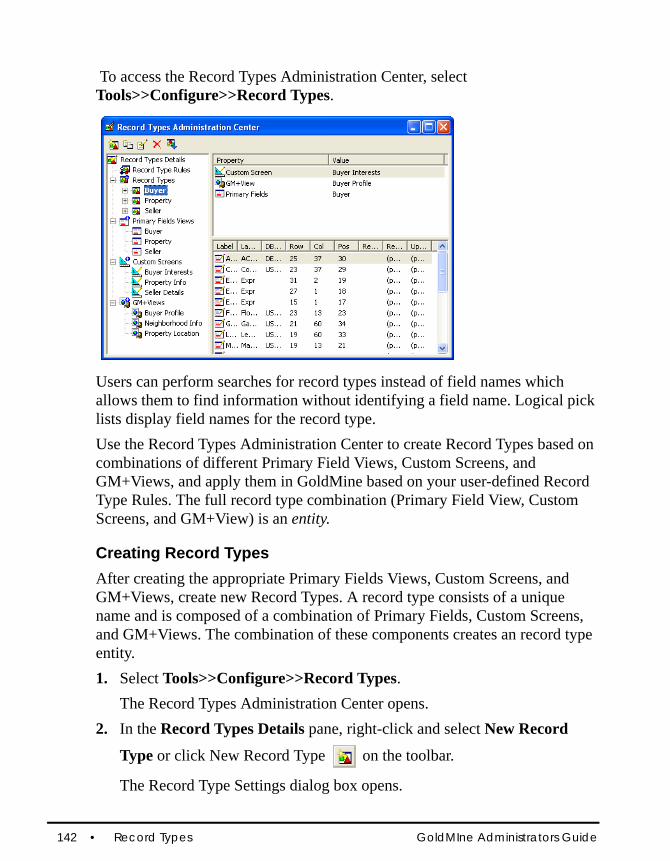
To access the Record Types Administration Center, select Tools>>Configure>>Record Types.
Users can perform searches for record types instead of field names which allows them to find information without identifying a field name. Logical pick lists display field names for the record type.Use the Record Types Administration Center to create Record Types based on combinations of different Primary Field Views, Custom Screens, and GM+Views, and apply them in GoldMine based on your user-defined Record Type Rules. The full record type combination (Primary Field View, Custom Screens, and GM+View) is an entity.
Creating Record TypesAfter creating the appropriate Primary Fields Views, Custom Screens, and GM+Views, create new Record Types. A record type consists of a unique name and is composed of a combination of Primary Fields, Custom Screens, and GM+Views. The combination of these components creates an record type entity. 1. Select Tools>>Configure>>Record Types.
The Record Types Administration Center opens.2. In the Record Types Details pane, right-click and select New Record
Type or click New Record Type on the toolbar.
The Record Type Settings dialog box opens.
142 • Record Types GoldMIne Administrators Guide
3. Specify:• Record Type Name text box. A unique name for the record type.• Primary Fields drop-down list. The Primary Fields View to associate
with this record type.• Custom Screens drop-down list. The Custom Screen to associate with
this record type.• GM+View drop-down list. The GM+View to associate with this
record type.4. To specify a different field layout for the New Default Record Type dialog,
check New record dialog uses different field layout, and select a layout from the New Record Layout pull-down menu.
5. Select Set as Default Record Type to use the current record type as the default when record type rules are not met. The default record type could be a generic view or the record type used by the largest number of users. Only one record type can be the default at one time. Selecting this option on a different record type makes it the default. Bold Type in the Record Types Details pane identifies the default record type.
6. Click Apply Changes .
Configuring Record Type RulesRecord type rules are key to effective use of record types. They govern which record types display when the conditions of the rules are met.Select one of three rules to apply to the record types: use text boxes and drop-down lists, use dBASE expressions, or disable rules. If no rules are configured, users can manually select Primary Fields Views, Custom Screens, and GM+Views as they work in GoldMine. Apply only one set of rules at a time when working with record types. 1. Select Tools>>Configure>>Record Types.
The Record Types Administration Center opens.2. In the Record Types Details pane, right-click on Record Type Rules and
select Edit. The Rule Definition for Record Type dialog box appears.
GoldMIne Administrators Guide Record Types • 143

3. Select a rule type:• Field value-based: Evaluates the field for the specified values and
displays the record type you select. • dBase Expression result-based: Evaluates an expression that returns a
string the name of a record type. Inactive (disable rules): Turns off the record type rules. When the rules are inactive, manually change the primary field view, custom screen, or GM+View.
4. Click Apply Changes to apply the changes to your GoldMine records.
NOTE: Field value-based rules are limited to 32. If you have 33 or more, no rules are evaluated.
NOTE: f the rules are not met, GoldMine displays your default record type.
144 • Record Types GoldMIne Administrators Guide

Contact Management
About Contact RecordsGoldMine uses the contact record (contact) as the core component to which all information is tied. When a contact is added to GoldMine's database, a contact record is created. It contains such basic information as name, address, and telephone information about a person or company you keep in contact with. The record's many fields record pertinent and updated information, always making the newest information available to GoldMine users working with the contact.
NOTE: The default view for Contact Records is the Contact List view. Double-click on a contact to open that Contact Record.
The Contact Record has two basic sections:• Upper section.Contains standard contact information such as name,
address and telephone numbers, and five user-definable fields. This part of the screen is the primary contact information because it displays the company's name and the name of the company's primary contact. It is common to complete the rest of the Contact Record with information related to the primary contact of that company.
• Lower part. Organizes secondary information, such as Relationships, notes, pending activities, and history records, into Contact tabs storing information linked to the Contact Record.
GoldMine Administrators Guide Contact Management • 145

Each record also has a set of associated customizable properties:• Record-related Settings. Phone number format, record ownership,
and alerts. • Contact Details. Occasions, free/busy, and digital IDs.
For more information on user procedures, please see the GoldMine 8.5 User Guide.
About Record-Related SettingsYou can define or view record-related settings for the active contact record. To access the Record-related Settings dialog box, select Edit>>Record Properties>>Record-related Settings and select a tab:• Phone Formatting. Select the USA Format, which applies the standard
telephone number format for the United States and Canada, or the Non-USA Format, which does not apply formatting. See “Setting Phone Formatting in the Record-Related Settings” on page 146.
• Ownership. Control what information can be viewed and updated by other users. See“Setting Ownership in the Record-Related Settings” on page 148
• Alerts. Assign a code to an active contact record to alert other GoldMine users of a special status or situation regarding the contact. See “Setting Alerts in the Record-Related Settings” on page 149.
Setting Phone Formatting in the Record-Related SettingsGoldMine formats telephone numbers in standard US format if your Windows language setting is English. The standard US format is (999)999-9999. You can type the numbers in without formatting, and GoldMine translates it in the formatted style. Change the telephone number format for an active contact record from the Phone Formatting tab of the Record-related Settings dialog box.For other language settings, GoldMine formats telephone numbers in the international telephone number format. The international telephone number format leaves the telephone number as entered.
146 • Contact Management GoldMine Administrators Guide

Each contact record maintains its own telephone format setting. To specify the international telephone number format when adding a new contact record, change the setting of the International Format field in the Add a New Record dialog box. Use the following procedure to set up phone formatting.1. At the contact detail view, select Edit>>Record Properties>>Record-
related Settings.
2. Select the Phone Formatting tab and select one of the following:USA Format. Formats the telephone number on the contact record to the United States and Canadian standard: (999) 999-9999. No matter how the numbers are entered they will be formatted in this style.Non-USA Format. Does not apply formatting to the telephone numbers. Use a consistent format for international phone number entries. When checking for duplicate records, GoldMine considers entries for the same number but with differing formatting as separate entries. For example, GoldMine considers 55 12 345-6789 to differ from 5512 345-6789.
3. Click OK. The phone format you selected applies to the active contact record.
GoldMine Administrators Guide Contact Management • 147
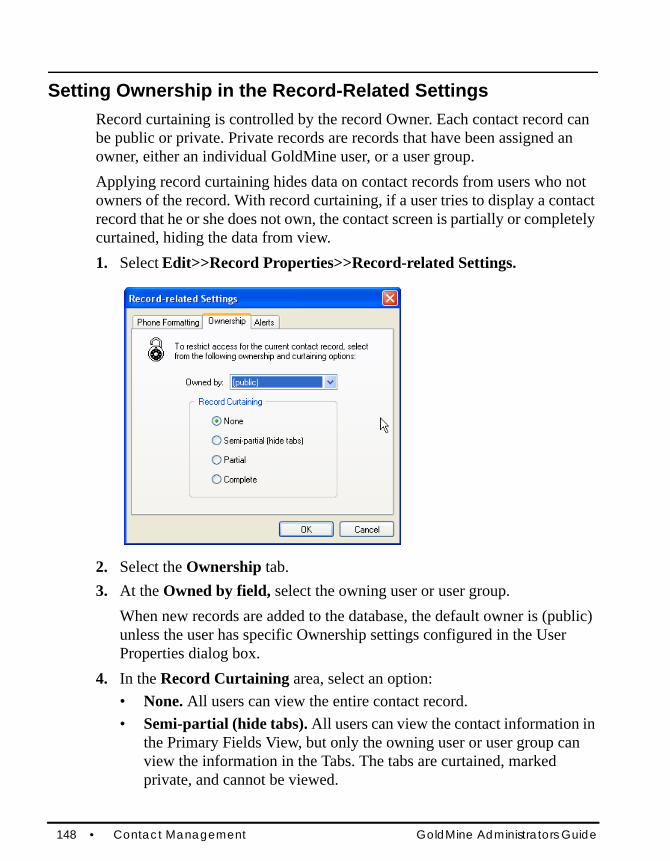
Setting Ownership in the Record-Related SettingsRecord curtaining is controlled by the record Owner. Each contact record can be public or private. Private records are records that have been assigned an owner, either an individual GoldMine user, or a user group.Applying record curtaining hides data on contact records from users who not owners of the record. With record curtaining, if a user tries to display a contact record that he or she does not own, the contact screen is partially or completely curtained, hiding the data from view.1. Select Edit>>Record Properties>>Record-related Settings.
2. Select the Ownership tab.3. At the Owned by field, select the owning user or user group.
When new records are added to the database, the default owner is (public) unless the user has specific Ownership settings configured in the User Properties dialog box.
4. In the Record Curtaining area, select an option:• None. All users can view the entire contact record.• Semi-partial (hide tabs). All users can view the contact information in
the Primary Fields View, but only the owning user or user group can view the information in the Tabs. The tabs are curtained, marked private, and cannot be viewed.
148 • Contact Management GoldMine Administrators Guide

• Partial. All users can view the top four rows of the Primary Fields View. The other rows in the Primary Fields View and the tabs are curtained, marked private. The owning user or user group can view all information in the Contact record.
• Complete. The entire record is curtained, which means that users who do not own the record cannot see it or locate it using the Contact Search Center. The owning user or user group can view all information in the Contact record.
• Note. Users with Master Rights are able to view information in the contact records, without regard to the owner or what level of curtaining has been set.
5. When you are finished, select OK. The settings you configured are now applied to the active contact record.
Setting Alerts in the Record-Related SettingsAssign an alert to an active contact record to notify other GoldMine users of a special status or situation regarding the contact. Use the following procedure to set up an alert.1. Select Edit>>Record Properties>>Record-related Settings.
2. Select the Alerts tab.
GoldMine Administrators Guide Contact Management • 149

3. Click on the Enable alerts check box. After selecting this option you can activate one or more of the alerts in the panel.By default, GoldMine displays the alert seven seconds after you display the record. However, change the delay period by changing the GM.ini file setting for RecAlertSec.
4. Click New Alert to add a new alert.
5. On the New Contact Alert dialog box, define these options for the three-character alert code you are creating:• Code. Type the three-character code representing the alert status.• Alert Description. Type a brief description of the alert. • Note. You must enter an Alert Description to save the alert.• Message. Type the extended message to appear when users activate the
Contact record.6. Click OK to return to the Alerts tab.7. Select one or more alerts to activate when accessing the contact record.8. Select Log this alert in history when user is alerted to log the date, time
viewing user, alert code and the assigning user in the History tab. GoldMine adds the history record when the alert appears, not when the view user closes the alert.
9. When finished, click OK. The alerts are assigned to the active Contact record.View available alert codes in the InfoCenter. In the InfoCenter, select System>>Contact Alerts.
150 • Contact Management GoldMine Administrators Guide
Changing the Delay Time on AlertsBy default, GoldMine displays an alert 7seconds after the user displays a contact record to which an alert has been assigned. To change the time delay before the alert appears, place the following setting in the [GoldMine] section of the GM.ini. RecAlertSec= <number of seconds before alert appears>
Setting Digital IDs in Contact DetailsIf a contact uses a digital ID when sending you email, configure the contact's record with the ID information. Use the following procedure to set digital IDs.1. With the contact record active in GoldMine, select Edit>>Record
Properties>>Contact Details. 2. At the Contact Details dialog box select the Digital IDs tab. 3. Click Import to add a contact's digital ID file to the GoldMine contact
record. 4. At the Import Digital ID dialog box, at the Filename field type or browse to
the *.p7b or *.cer certificate file you are importing.In the Name field, type the name to display.
5. Click OK to return to the Digital IDs tab.6. To export the file to another location, click Export and select a location.
7. To review the certificate details, click View.
To remove a digital ID, highlight the ID and click Delete.
GoldMine Administrators Guide Contact Management • 151

Creating Details Information FieldsMaster rights users can customize twelve fields on the Details tab. The extended detail fields must be character-based, not numeric or date fields. If searched, they are searched as a character string. The eleventh and twelfth fields do not display on the user-defined Details tab. Use the following procedure to create a detail field.1. At the Detail tab, double-click on a detail.
2. In the Detail Properties dialog box, select the Setup tab. 3. In each text box, type a field label to apply to each field, following the
procedure that appears on the Setup tab. The number to the right of the text box is the fixed field length. Neither the format, order, nor length can be changed. Therefore, carefully consider your custom labels, based on the length of the field. To use only a few of the fields, hide a field by typing at least two asterisks (**) rather than a name in the field label text box.
4. At the Tab Name field, type the label name again.• Tab Name. The tab name should not exceed six to eight characters,
depending on the letters used, and should not contain any spaces.
152 • Contact Management GoldMine Administrators Guide

• Shortcut. To access the new tab with a shortcut key, type the tab namewith an & before the letter you want to use. For example, type & if you want to use Ctrl+H as the shortcut keys.
• Click the Save Tab column positions check box to save modifications made to the new and the standard Details tab and then click OK.
The details entered on the new tab are recorded on the standard Details tab. Be careful when deleting details that have been converted into custom detail tabs.
Deleting Custom Detail Tabs1. At the Details tab, right-click on the detail and select Edit.2. Select the Setup tab.3. Delete the value from the Tab Name field and then click OK.
Using Filters, Queries, and Groups
About Filters and GroupsTo create a subset for longer-term use, build a filter or group. Both options create subsets based on selected criteria, but differ in how they handle these subsets.
FiltersGoldMine’s filters are based on Boolean expressions (logical statements that have 2 possible outcomes: true or false). When activating a filter, the entire database evaluates based on the Boolean expression. The Contact Records matching the Boolean expression are selected. The filter ignores records that do not match.
ExampleFor a project or campaign, you decide to work with your corporate clients located in Los Angeles. You create this Boolean expression:Contact1->City= “Los Angeles”
GoldMine Administrators Guide Contact Management • 153

A Boolean expression consists of 2 parts: operators and operands. Operands act as the data to be evaluated, while the operator determines the comparison method deciding whether the statement is true or false. In the example, the operands are City and Los Angeles and are equal to the operator. When this filter is activated, pressing PAGE UP and PAGE DOWN displays only those Contact Records in the database that are evaluated as true for this statement. The filter evaluates each Contact Record. If the record does not meet the condition(s) of the statement, GoldMine continues to the next record and repeats the process to find a Contact Record that does meet the conditions. GoldMine then selects the record. The filter shrinks your database to present a subset of only those contacts with addresses in Los Angeles.By constructing Boolean expressions, build and maintain an unlimited number of filters to categorize the records in your database.Use the following procedure to access Filters.1. Select Tools>>Filters.
The Filters and Groups window opens.2. Select the Filters tab. 3. At the View Filters drop-down list, select a user name. Each filter
associated with that user name lists alphabetically by the Filter Name assigned when it was created. Activate, Release, Delete, or create a New filter.
154 • Contact Management GoldMine Administrators Guide
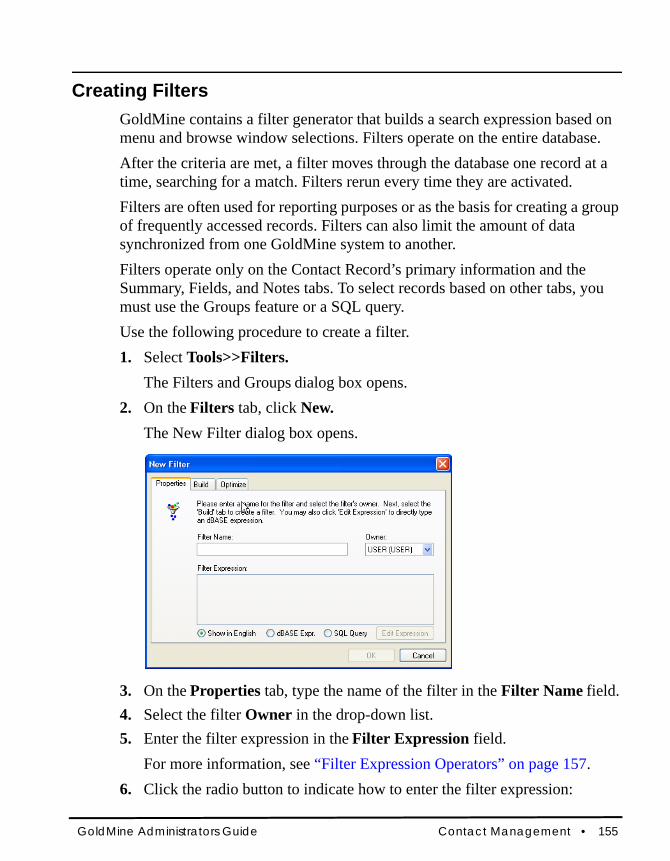
Creating FiltersGoldMine contains a filter generator that builds a search expression based on menu and browse window selections. Filters operate on the entire database. After the criteria are met, a filter moves through the database one record at a time, searching for a match. Filters rerun every time they are activated.Filters are often used for reporting purposes or as the basis for creating a group of frequently accessed records. Filters can also limit the amount of data synchronized from one GoldMine system to another. Filters operate only on the Contact Record’s primary information and the Summary, Fields, and Notes tabs. To select records based on other tabs, you must use the Groups feature or a SQL query.Use the following procedure to create a filter.1. Select Tools>>Filters.
The Filters and Groups dialog box opens.2. On the Filters tab, click New.
The New Filter dialog box opens.
3. On the Properties tab, type the name of the filter in the Filter Name field.4. Select the filter Owner in the drop-down list.5. Enter the filter expression in the Filter Expression field.
For more information, see “Filter Expression Operators” on page 157.6. Click the radio button to indicate how to enter the filter expression:
GoldMine Administrators Guide Contact Management • 155
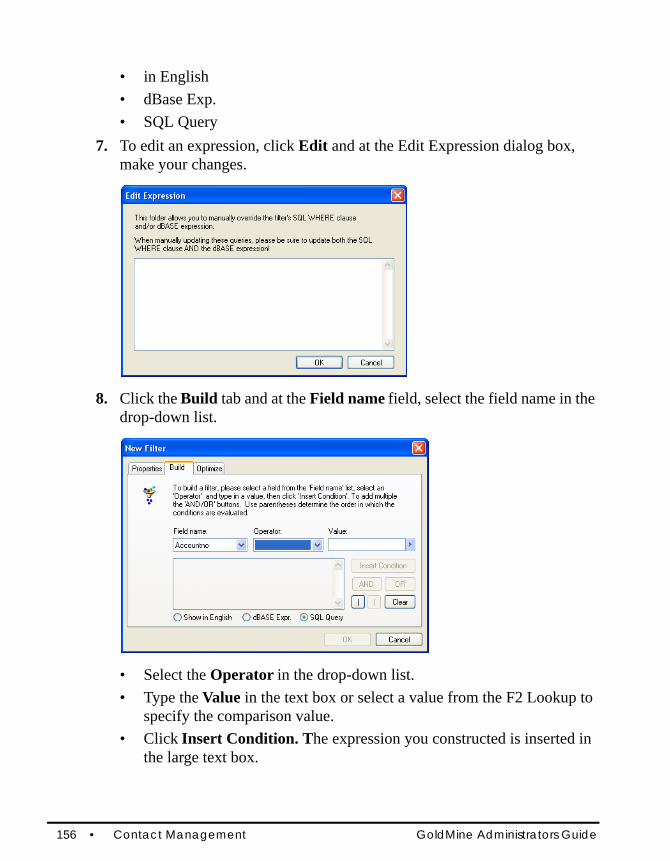
• in English • dBase Exp.• SQL Query
7. To edit an expression, click Edit and at the Edit Expression dialog box, make your changes.
8. Click the Build tab and at the Field name field, select the field name in the drop-down list.
• Select the Operator in the drop-down list. • Type the Value in the text box or select a value from the F2 Lookup to
specify the comparison value.• Click Insert Condition. The expression you constructed is inserted in
the large text box.
156 • Contact Management GoldMine Administrators Guide

• Click AND or OR to insert a Boolean operator and then construct the additional expression using Field, Operator, and Value.
Click OK to return to the Filters and Group dialog box. 9. Select Optimize to improve the performance of a filter with a Sort field.
See “Using the Optimizing Filters Options” on page 160.10. Click OK.
The filter appears in the Filters and Groups window. 11. Click Properties to view and edit the filter.12. Select the filter and click Delete to delete the filter.
Filter Expression OperatorsOperators specify the criteria a field must meet to be included or excluded from a filter.Select one of these operators: • Equal to. Tests for an exact match between the field designated in Field
Name and the entry in the Value field. When the data field and comparison value match, the record is selected. Example: Selecting the field City and the Value entry Los Angeles creates the filter City Equal to “Los Angeles” that will select every record with the City entry of Los Angeles.
• Not Equal to. Tests for a difference between the field designated in Field Name and the entry in the Value field. When the data field and comparison value match, the record is selected. Example: Selecting the field City and the Value entry Los Angeles creates the filter City Not Equal to “Los Angeles”. Each record with the City entry of Los Angeles will not be selected. Records with City entries of any other city will.
• Greater than. Tests for a value in the data field alpha-numerically higher than the comparison value. In a test for alphabetic entries, such as City, a higher value is one that comes after the entered value, meaning, later in the alphabet. When the data field’s value is alphanumerically higher than the comparison value, the record is selected.
GoldMine Administrators Guide Contact Management • 157

Example: Selecting the file and the Value entry I creates the filter City Greater than “Los Angeles”. A record with a City entry of Pacific Palisades will be selected, but a record with a City entry of Burbank or Los Angeles will not.
• Less than. Tests for a value in the data field alphanumerically lower than the comparison value. In a test for alphabetic entries, such as City, a lower value is one that comes before the entered value, meaning, earlier in the alphabet. When the data field’s value is alphanumerically lower than the comparison value, the record is selected.Example: Selecting the field City and the Value entry Los Angeles creates the filter City Less Than “Los Angeles”. A record with a City entry of Glendale will be selected, but a record with a City entry of Los Angeles or Santa Monica will not.
• Greater or Equal. Tests for a value in the data field equal to or alphanumerically higher than the comparison value. In a test for alphabetic entries, such as City, a higher value is one that comes after the entered value, meaning, later in the alphabet. When the data field’s value is alphanumerically higher than the comparison value, the record is selected.Example: Selecting the field City and the Value entry Los Angeles creates the filter City Greater or Equal to “Los Angeles”. Any records with City entries of Los Angeles and any records with City entries that come later in the alphabet, such as Pacific Palisades, will be selected. Records with City entries that come earlier in the alphabet, such as Burbank, will not.
• Lesser or Equal. Tests for a value in the data field equal to or alphanumerically lower than the comparison value. In a test for alphabetic entries, such as City, a lower value is one that comes before the entered value, that is, earlier in the alphabet. When the data field’s value is alphanumerically lower than the comparison value, the record is selected.Example: Selecting the field City and the Value entry Los Angeles creates the filter City Lesser or Equal to “Los Angeles”. Any records with City entries of Los Angeles and any with City entries that come later in the alphabet, such as Glendale, will be selected. Records with City entries that come later in the alphabet, such as Santa Monica, will not.
• Begins with. Tests for a value in the data field that starts with the comparison value. If the characters of the comparison value match the starting characters in the data field, the record is selected.
158 • Contact Management GoldMine Administrators Guide

Example: The filter City I will include records in which the City entries all start with P such as Pacific Palisades, Pasadena, Pico Rivera, and so on.
• Contains. Tests for the existence of the comparison value anywhere within the data field. If the data field contains the comparison value, the record is selected.Example: The filter City Contains "P" will include records in which the City entries include P anywhere in the city name such as Pacific Palisades and Corpus Christie.
• Does Not Contain. Tests for the absence of the comparison value anywhere within the data field. If the data field does not contain the comparison value, the record is selected.Example: The filter City Does Not Contain "P" will include records in which the City entries do not include P anywhere in the city name such as New York and Los Angeles. However, Pacific Palisades and Corpus Christie will not be selected.
• Is Empty. Tests for an absence of any entry in the specified field. Character fields are empty when they contain only spaces.Example: If you have contacts in the United States and other countries and you want to search for only contacts in the United States—assuming you have not entered country data for domestic clients—the filter Country Is Empty will select contacts located in the United States.
• Is Not Empty. Tests for any value in the specified field. Example: If you want to fax an announcement to all of your client companies, the filter Fax Is Not Empty will select all companies with a telephone number entered in the Fax field.
Boolean OperatorsBoolean operators are the functions used between filter expressions to refine the scope of your search or filter.You can link two search terms, for example, Sales Rep equals Bill and Sales Territory equals Southwest, with these operators:• AND. Only records that contain both expressions are retrieved.
Filter includes only records where Sales Rep = Bill AND Sales Territory = Southwest. Both conditions must be true for the record to be included in the filter group.
GoldMine Administrators Guide Contact Management • 159

• OR. Any record that contains either expression is retrieved.Filter includes all records where Sales Rep = Bill OR Sales Territory = Southwest. Either condition can be true for the record to be included in the filter group.
Using the Optimizing Filters OptionsUse the Filter Optimization option to improve the performance of a filter by associating the filter expression with a particular sort order, narrowing the range of records selected for the filter. Optimization creates a subset before the filter is applied.1. In the Filters and Groups dialog box, highlight the filter and select Proper-
ties. The Filter: name dialog box appears.
2. Click the Optimize tab.3. Select the Sort Order in the drop-down list.4. Type in the Beginning Limit to set the first valid record to be considered
part of the filtered subset.5. Type in the Ending Limit to set the last valid record to be considered part
of the filtered subset.6. Click OK.
Using the Previewing Filters OptionsUse the Preview tab on the Filters and Groups dialog box to test your filter before activating it.Use the following procedure to test your filter.1. In the Filters and Groups dialog box, on the Filters tab, highlight the filter
to test and click the Preview tab.The Preview tab displays the selected filter in the upper text box.
2. To edit the filter expression in the upper text box, right-click and select the necessary options from the local menu.
160 • Contact Management GoldMine Administrators Guide
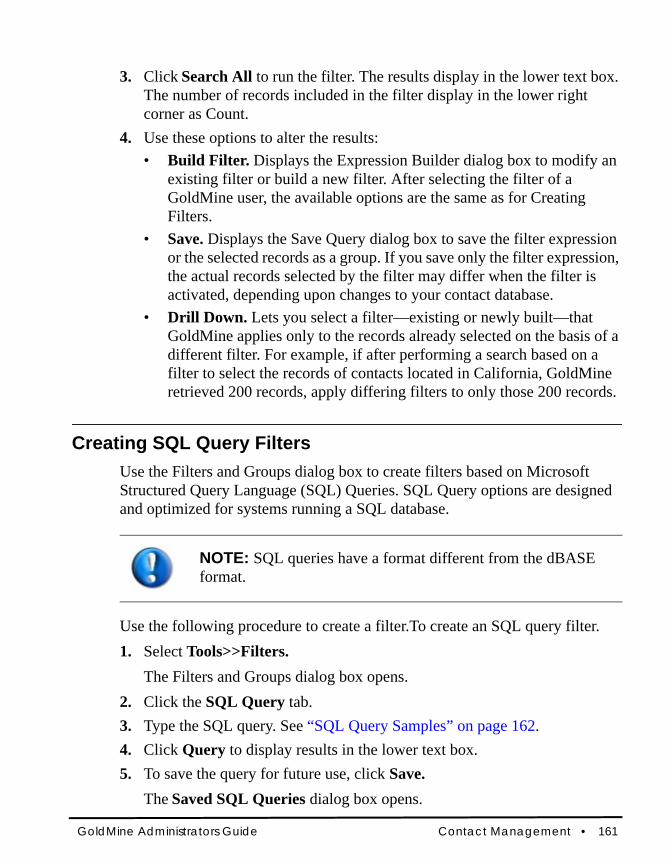
3. Click Search All to run the filter. The results display in the lower text box. The number of records included in the filter display in the lower right corner as Count.
4. Use these options to alter the results:• Build Filter. Displays the Expression Builder dialog box to modify an
existing filter or build a new filter. After selecting the filter of a GoldMine user, the available options are the same as for Creating Filters.
• Save. Displays the Save Query dialog box to save the filter expression or the selected records as a group. If you save only the filter expression, the actual records selected by the filter may differ when the filter is activated, depending upon changes to your contact database.
• Drill Down. Lets you select a filter—existing or newly built—that GoldMine applies only to the records already selected on the basis of a different filter. For example, if after performing a search based on a filter to select the records of contacts located in California, GoldMine retrieved 200 records, apply differing filters to only those 200 records.
Creating SQL Query FiltersUse the Filters and Groups dialog box to create filters based on Microsoft Structured Query Language (SQL) Queries. SQL Query options are designed and optimized for systems running a SQL database.
NOTE: SQL queries have a format different from the dBASE format.
Use the following procedure to create a filter.To create an SQL query filter.1. Select Tools>>Filters.
The Filters and Groups dialog box opens. 2. Click the SQL Query tab. 3. Type the SQL query. See “SQL Query Samples” on page 162.4. Click Query to display results in the lower text box.5. To save the query for future use, click Save.
The Saved SQL Queries dialog box opens.
GoldMine Administrators Guide Contact Management • 161
6. Type a name in the Query name field.
SQL Query Samples
Count Number of RecordsTo count the number of Contact Records, write your statement as: SELECT count (*) FROM Contact1
For count statements, notice the wildcard (*) is surrounded by parentheses.
Fields in Each TableTo return a listing of all fields in each table for GoldMine, write a query such as:
SELECT * FROM Contact1
and then change the table name for each listing required: SELECT * FROM CAL, select * from ContHist
Restrict to City To find all contacts in New York City, write your statement as:
SELECT * FROM Contact1 WHERE city = “New York”
A query to find all New York City records where users entered both initial cap and lowercase:
SELECT * FROM Contact1 WHERE city like “_ew _ork”
Use the underscore _ character to match any single character.
Restrict to Two StatesTo find all contacts in CA and NY, write your statement as:
SELECT * FROM Contact1 WHERE state = “NY” OR state = “CA” ORDER BY state, city
Duplicate ContactsFinding all possible duplicates in a database can be difficult. A query to find duplicate Contact Records in the database is to search on duplicate Account Numbers looking in both the Contact1 and Contact2 tables:
SELECT count(*), AccountNo FROM Contact2 GROUP BY AccountNo HAVING Count(*) > 1
162 • Contact Management GoldMine Administrators Guide
Duplicate RecID To find Contact Records with duplicate RecIDs, use this query:
SELECT recid FROM Contact2 GROUP BY recid HAVING count(recid) > 1
Find OrphansAn orphan record exists when there is a Contact2 record but NOT a Contact1 record.
SELECT * FROM Contact2 WHERE AccountNo NOT IN (SELECT AccountNo from Contact1)
Contact Records with No E-mail AddressTo subset Contact Records with no e-mail address, use this query:
SELECT company, contact FROM Contact1 WHERE accountno NOT IN (SELECT accountno FROM ContSupp WHERE contact = “E-mail Address”)
View New Contact Records Entered During a Specific Time Period
The Summary tab of a contact record has a create on field that records the date the record was entered. Use the createon field to build a subset of records created on a certain date. Create a filter or an SQL query to build the subset.Use the following example and procedure to view contacts during a specific time period.Example:To create a filter to find new Contact Records created during the week of June 24, 2003, create on is greater than “6/24/2003” AND createon is less than “6/28/2003”. 1. Create this filter:
SELECT * FROM Contact1 WHERE createon > “20030624” and createon < “20030628”
2. Select one:• Save as new query. Saves the SQL query as a new expression. Once
saved, the entered title appears in the Query name drop-down list.
GoldMine Administrators Guide Contact Management • 163

• Update current query. Saves changes to a previously created query expression. The title appears in the Query name field.
• Delete query. Deletes the query expression specified in the Query name field.
3. Click OK.
GroupsA group is a fixed set of records that meets a specified set of conditions and allows instantaneous access to member records.To Access Groups:1. Select Tools>>Filters.
The Filters and Groups dialog box opens. 2. Select the Groups tab. The upper pane lists the groups owned by the user. The lower pane lists members of the group highlighted in the upper pane. GoldMine orders member records by the Sort code, defined while building the group.
How Groups Differ from Filters Working with groups can be more efficient than applying a filter. When you activate a filter, GoldMine searches through the database for Contact Records meeting the criteria. Once a group is created, membership is fixed and you can work with the group members without performing the search again.Each member contact record remains in the group until removed. However, since each record evaluates when the filter is activated, a selected filter displays new contact records added to the database if they match the filter’s criteria.Groups also have optional sort capabilities, letting you list member records in the order best fitting your needs.
164 • Contact Management GoldMine Administrators Guide

Group Members Local Menu1. To access the Group members local menu, at the Filters and Groups tab,
right-click in the Groups tab>>Member area.
2. Select one of the options:• Sort Members. Opens the Sort Group Members dialog box; sort group
members by clearing all sorting options or sort by field, by an expression, or a reference expression.
• Sync Contact. Displays the selected group member's Contact Record as the active contact.
• View. Changes the display from company to contact, or both.• Find. Searches within the group for the specified contact.• Output to. Sends the list of group members to the printer, Word,
Excel, or the clipboard.• New. Displays the Group Member Profile dialog box where you add
the current contact to the group with the reference you type or select.• Delete. Removes a member from the group.• Edit. Displays the Group Member Profile dialog box so you can
change the reference or sort for a member.
GoldMine Administrators Guide Contact Management • 165
Using the Groups TabUse the Groups tab to create and activate static groups of contacts.Use the following procedure to create a group of contacts.1. Select Tools>>Filters.
The Filters and Groups dialog box appears.2. At the Filters and Groups dialog box, click the Groups tab. 3. Right-click in the group tab and select New.
The New Group dialog box opens.4. Type or select a name in the Name field.
• Type or select the code in the Code field.• Select another user in the User field.• Select the following options as needed:• Assign a descriptive name to each group in Group Name field.
Members of the highlighted group displayed in the lower portion. • Code. An optional identification code assigned to each group to help
locate a group if you defined many in GoldMine.• Click Build the Group and/or the Synchronize button as needed.
5. The Group Building Wizard opens. See “Group Building Wizard” on page 166.
Group Building WizardIn the Group Building Wizard, select one option and click Next:
Filtered records. Uses an existing filter created by any user. The Build a Group based on a Filter dialog box opens. See “Groups Based on Filtered Records” on page 167.Previewed records. Uses records you are previewing in the Preview tab in the Filters and Groups dialog box to preview filter results. The Optional Settings dialog box appears. See “Using the Optimizing Filters Options” on page 160.SQL Query records. Uses an existing SQL query on the SQL Query tab of the Filters and Groups dialog box to query an MSSQL Server database. The Optional Settings dialog box appears.
166 • Contact Management GoldMine Administrators Guide

Tagged records. Uses records you tagged in the Contact Search Center using CTRL+click. Once multiple contacts are highlighted, select GoTo>>Contact Groups and create a new group. The Optional Settings dialog box appears.Scheduled calendar activities: Creates a group based on scheduled activities in the Calendar. The Group Based on Scheduled Activities dialog box appears.Completed history activities. Creates a group based on historical activities. Select a User. Enter the date range and type an Activity code (the default is blank). Select an Activity Type. The Build a Group based on Completed Activities dialog box appears.Supplemental contact data. Creates a group based on detail records, linked documents, additional contacts, or referrals to build a group based on supplemental data. The Build a Group based on Contact Details dialog box appears.
Groups Based on Filtered Records1. In the Group Building Wizard, select Filtered records. 2. Click Next.
The Build a Group based on Filtered Records dialog box opens.3. Select one option:
• Build on a Filter. Create a group based on an existing filter. Select the filter Owner in the drop-down list and the filter name in the Build on a Filter drop-down list.
GoldMine Administrators Guide Contact Management • 167

• Build Filter. Create a filter if one does not exist.• Build on an Expression. Type a new filter expression or edit the filter
expression. 4. Click Next.
5. The Optional Settings dialog box appears. See “Group Optional Settings” on page 168.
Group Optional SettingsWhen building a group, use the Optional Settings to refine your choices.1. At the Optional Settings dialog box, select the Sort Field in the drop-down
list.
NOTE: The Sort Field specifies a contact field or user-defined field GoldMine sorts the group by. Select the field to sort the group by, and GoldMine places the value from that field in the group Sort field for each group member’s contact record. When the group is active, group members are arranged alphabetically by this sort field.
168 • Contact Management GoldMine Administrators Guide

2. Type or select the Reference value from the F2 Lookup list.
NOTE: Each member has a group Reference field. The field contains information you type or select. When GoldMine builds a group, you can select the value placed in the group Reference field for each group member, for example, {Database->Fieldname}.
3. Type or select a Filter Expr. from the F2 Lookup list. The filter expression must be a valid dBASE Boolean expression.
NOTE: This option is not available of you are creating a group based on filtered records.
4. Click Next. The Ready to Build dialog box opens.
5. Click Finish. The GoldMine Process Monitor opens and displays the status of the building process until it is completed. It then displays the number of records added to the group.
When the group is built, the name is added to the Group Name box on the Groups tab.
Group Based on Scheduled Activities1. In the Group Building Wizard, select Scheduled calendar activities and
click Next.2. At the Build a Group based on Scheduled Activities dialog box, in the
Range area, select:• User. Select the user in the drop-down list.• From Date. Type or select the date from the F2 graphical calendar.• To Date. Type or select the date from the F2 graphical calendar.• Activity. Type the activity code.
3. In the Activity Type area, select All Activities or a specific activity.
GoldMine Administrators Guide Contact Management • 169
4. Click Next and complete the Optional Settings dialog box appears. See “Group Optional Settings” on page 168.
Group Based on Completed Activities1. In the Group Building Wizard, select Completed history activities and
click Next.2. At the Build a Group based on Completed Activities dialog box, in the
Range area, select:• User. Select a user in the drop-down list.• From Date. Type or select the date from the F2 graphical calendar.• To Date. Type or select the date from the F2 graphical calendar.• Activity. Type the activity code.• Result. Type the result code.
3. In the Activity Type area, select All Activities or a specific activity.4. Click Next and complete the Optional Settings dialog box appears. See
“Group Optional Settings” on page 168.
Group Based on Supplemental Contact Data1. In the Group Building Wizard, select Supplemental contact data and
click Next. 2. At the Build a Group based on Contact Details dialog book, select an
option:• Details. Builds the group based on detail records.• Document Links. Builds the group based on linked documents.• Additional Contact. Builds the group based on other contact records.• Referrals. Builds the group based on referral records.
3. Type or select the Keyword in the F2 Lookup list. This option specifies a word or phrase to be searched within the Reference field in the select supplemental data.
NOTE: If you select Details, type or select a value from the F2 Lookup list to limit the detail-based group to a particular detail, for example, email address. This option is not available with the other options.
170 • Contact Management GoldMine Administrators Guide
4. Click Next and complete the Optional Settings dialog box opens. See “Group Optional Settings” on page 168.
Saving Search Results as a Group1. After creating a search, save the results as a group by clicking Save.
The Save menu appears.2. Select Only Tagged Records to save only tagged records in the new
group, or All Listed Records to save the entire list of records.3. Select Save as Group.
The Group Profile dialog box opens.4. Type a name in the Group Name field.5. In the Code text box, type or select a code from the F2 Lookup list.6. Select a group owner from the User drop-down list.7. Click OK.
The results are saved and the group name appears below the selected user's groups in the Groups tab of Filters and Groups.
Using Filters and Groups When you have a large number of contact records in your database, create subsets based on criteria to categorize groups of records to access for special activities.
ExampleCreate a subset of contacts you telephoned in the past week, and send a mass mailing only to those contacts.Create and manage subsets of data using filters and groups and the Filters and Groups dialog box, or in the Contact Search Center, where you can build and save search criteria as Filters, or search results as Groups.1. Select Tools>>Filters.
The Filters and Groups dialog box appears.2. Click a tab:
GoldMine Administrators Guide Contact Management • 171

• Filters. Create and delete filters. Also activate and release filters. See “Creating Filters” on page 155
• Preview. Preview filter results. See “Using the Previewing Filters Options” on page 160.
• Group. Build groups and review members. Also activate and release groups. See “Groups” on page 164
• SQL Query. Write and save a SQL query from scratch or using the Lookup wizard. See “Creating SQL Query Filters” on page 161.
Activating and Releasing FiltersUse created filter expressions in an operation such as performing a global replace based on a filter. While the filter is active, the filter name becomes part of the Contact Record window title.
NOTE: The Contact Search Center still lets you deviate from filter results to locate and display a record that does not meet filter criteria. However, selecting the Next Record (PAGE DOWN) or Previous Record (PAGE UP) returns you to the filter results.
Use the following procedure to activate a filter. Note that activating the filter affects the following GoldMine operations:
• PAGE UP and PAGE DOWN and corresponding menu commands, Next Record and Previous Record
• Merge Forms command• Record deletion commands: Delete Old History of ALL Contact
Records and Delete ALL Contact Records• Global Replace commands• Synchronize commands• Export Contact Records command
Use the following procedure to activate a filter.
172 • Contact Management GoldMine Administrators Guide

1. Navigate to Tools>>Filters. The Filters and Groups dialog box opens.
2. On the Filters tab, highlight a filter and click Activate. • The active filter name appears in the Contact Record title bar. • The filter remains active until released.
Use the following step to activate to release a filter.On the Filters tab, highlight a filter and click Release. The filter is deactivated and you can now access the entire database.
Activating and Releasing GroupsWhen selecting this command, GoldMine’s database appears containing only contact records that are members of the group. After you build a group, it must be activated before it can be used in an operation.
NOTE: Create, activate, and release groups in the Contact Search Center.
GoldMine Administrators Guide Contact Management • 173
• Activate. Restricts the contact list to displaying only contacts within the activated group (or filter, etc.)
• Release. Deactivates the filter.
Use the following procedure to activate a Group.1. Select Tools>>Filters. 2. At the Filters and Groups dialog box, click the Groups tab. 3. Highlight a group and click Activate.
Use the following procedure to release a Group.1. Select Tools>>Filters. 2. At the Filters and Groups dialog box, click the Groups tab. 3. Highlight a group and click Release.
174 • Contact Management GoldMine Administrators Guide

Contact Communication
About Communicating with ContactsYou can use GoldMine to print and fax correspondence, send e-mail, send pages, and distribute literature. GoldMine integrates the functionality of your word processor and email software to communicate with contacts and coworkers.• Email. Send, retrieve, and manage Internet email. Individuals within an
organization can use GoldMine email, providing the same features as Internet email, but not requiring an online connection.
• Printing and Faxing Correspondence. GoldMine works with Microsoft Word to merge contact information from GoldMine into templates, generating personalized correspondence. GoldMine’s Document Management Center provides a central location to access and manage correspondence.
• Distributing Literature. Organizations can manage requests for printed material, such as brochures and price lists, using GoldMine’s Literature Fulfillment Center.
• Paging. Send a pager message by dialing or sending email.For user procedures see the GoldMine 8.5 User Guide.
GoldMine Administrators Guide Contact Communication • 175

About the Document CenterThe Document Management Center helps you manage document templates. It contains a lists of templates for emails, memos and faxes and other documents you might use in communicating with a contact.
Use the Document Management Center's merge form capability to generate letters, memos, and emails. GoldMine lets you print a letter for one contact or a group of contacts, print labels and envelopes, and fax documents if your word processor supports facsimile transmission).The Document Management Center works with GoldMine Plus for Microsoft Word.Use the Document Management Center to:• Create Document Templates• Create email Templates• Clone Document Templates• Clone E-mail Templates• Edit Document Templates• Edit E-mail Templates
176 • Contact Communication GoldMine Administrators Guide

• Mail Merge Documents• Mail Merge E-mail Messages• Print Documents• Send E-mail Messages• Add SubfoldersAlso specify, in the GM.ini, the default destination and file name format for templates, merged.
GoldMine Administrators Guide Contact Communication • 177

Creating Document TemplatesGoldMine installs predefined templates but you can create your own templates as well. A template is a document created in an application, such as Microsoft Word, that links to GoldMine and contains embedded DDE link fields. The DDE fields link contact information to the document; merging to one or more contacts with the template produces a printable document.There are two ways to create templates:• With GoldMine Plus installed• Without GoldMine Plus installedIn both cases you can create new templates. The most common options for creating a document are using WordPad and Microsoft Word with GoldMine Plus for Microsoft Office installed. Use the following procedure to create a document template.1. Select Go To>>Document Templates. 2. At the Document Management Center, select the User from the drop-down
list.
178 • Contact Communication GoldMine Administrators Guide
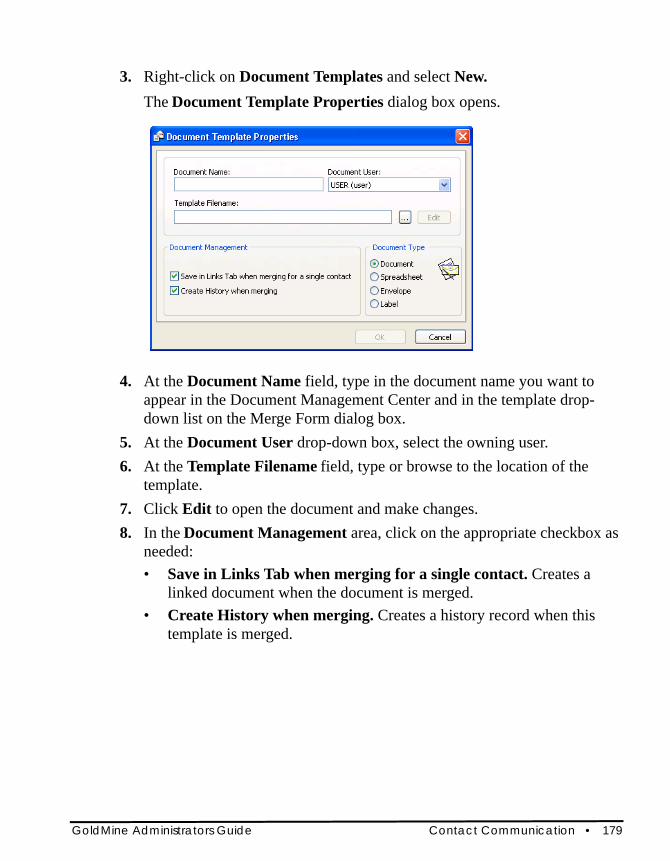
3. Right-click on Document Templates and select New. The Document Template Properties dialog box opens.
4. At the Document Name field, type in the document name you want to appear in the Document Management Center and in the template drop-down list on the Merge Form dialog box.
5. At the Document User drop-down box, select the owning user.6. At the Template Filename field, type or browse to the location of the
template. 7. Click Edit to open the document and make changes.8. In the Document Management area, click on the appropriate checkbox as
needed:• Save in Links Tab when merging for a single contact. Creates a
linked document when the document is merged.• Create History when merging. Creates a history record when this
template is merged.
GoldMine Administrators Guide Contact Communication • 179
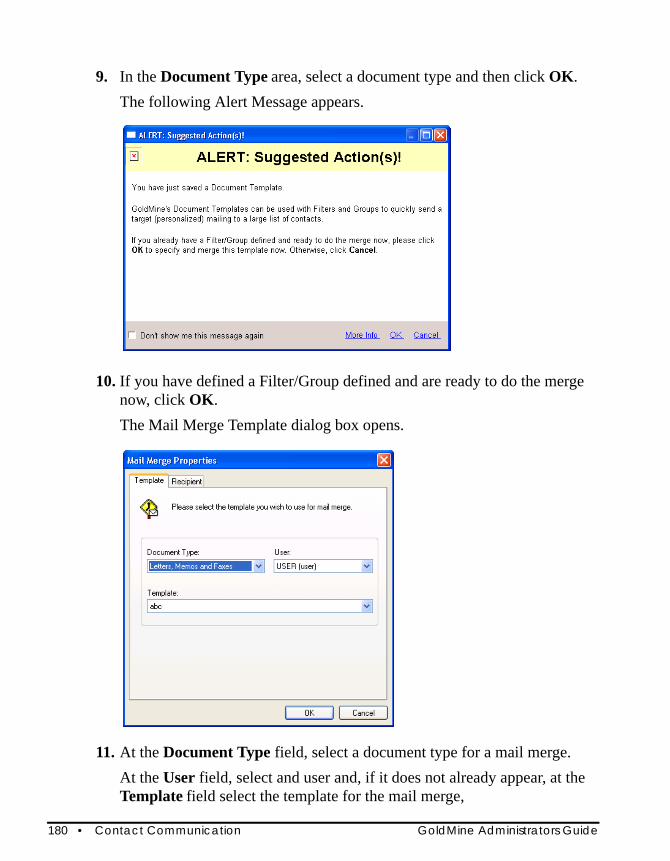
9. In the Document Type area, select a document type and then click OK.The following Alert Message appears.
10. If you have defined a Filter/Group defined and are ready to do the merge now, click OK.The Mail Merge Template dialog box opens.
11. At the Document Type field, select a document type for a mail merge.At the User field, select and user and, if it does not already appear, at the Template field select the template for the mail merge,
180 • Contact Communication GoldMine Administrators Guide
12. Click OK.The actual merge occurs after you click OK. The settings of this merge will be defined after filling the information on Recipient tab, where you can select a current contact (filter/group) and delivery method (printer/fax) or queue for day(s). So, if the default settings are selected, the template will be printed with the current contact information.
Editing Document TemplatesYou can edit document templates using the application you used to create the template. In the following procedure, Microsoft Word is used as an example. 1. Select Go To>>Document Templates.
The Document Management Center opens.2. At the User dropdown box, select a user.3. Right-click on a template name and select Properties.
The Document Template Properties dialog box appears.4. Click Edit.
The document opens in the application used to create it. Use your Word functionality to add, delete, or edit the text.
5. To add GoldMine fields to the document, at the Word document, select GoldMine>>Insert GoldMine Field. The Insert GoldMine Field dialog box opens.
6. Select the field or field macro from the drop-down list. For example, Contact is an example of the field macro format.
7. To save the edited template to the same file, select GoldMine>>Update GoldMine Form.
8. To save the edited template as a new template, select GoldMine>>Save as GoldMine Form.
9. At the Title field type in a new title and then click OK.
GoldMine Administrators Guide Contact Communication • 181

Faxing CorrespondenceYou can fax correspondence from GoldMine if you install one of these applications:
• Symantec WinFax PRO 7.01 or later. Check the version of WinFax PRO by selecting the WinFax main menu command Help>>About. To use Symantec WinFax PRO, you must have Microsoft Word version 7.0 or later installed with the WinFax PRO printer driver.
• RightFax, a network faxing system. To use RightFax, you must install a printer driver in Windows named RightFax configured to print to the RightFax server.
• Zetafax 7.5 or later.Third-party add-on OmniRush provides an integrated fax support solution. For details, visit www.frontrange.com or the Z-Firm LLC Web site at www.zfirmllc.com.
Use the following procedure to fax a correspondence from GoldMine Document Center.1. Select Go To>>Document Templates.
The Document Management Center opens.
182 • Contact Communication GoldMine Administrators Guide

2. Right-click on Fax, Fax Cover Sheet>>Fax.The Mail Merge Properties dialog box opens.
3. At the Contact Selection area, select the contact or contacts you want the fax to reach by clicking on the appropriate radio button.• This Contact. Merges the fax with the primary contact from the active
contact record or an additional contact selected from the drop-down list.
• All contacts linked to (contact name). Merges the fax with the primary and additional contacts for the active contact.
• All contacts in the following filter or group. Merges the fax with all contact records or with the filtered group or contact group you select from the drop-down list.
4. If you select All contacts linked to (contact name) or All contacts in the following filter or group, you can also select these options:• Primary. Merges the fax with the primary contact.• Additional. Merges the fax with the additional contacts.• Merge code. Merges the fax based on the code you select in the F2
Lookup list.
GoldMine Administrators Guide Contact Communication • 183
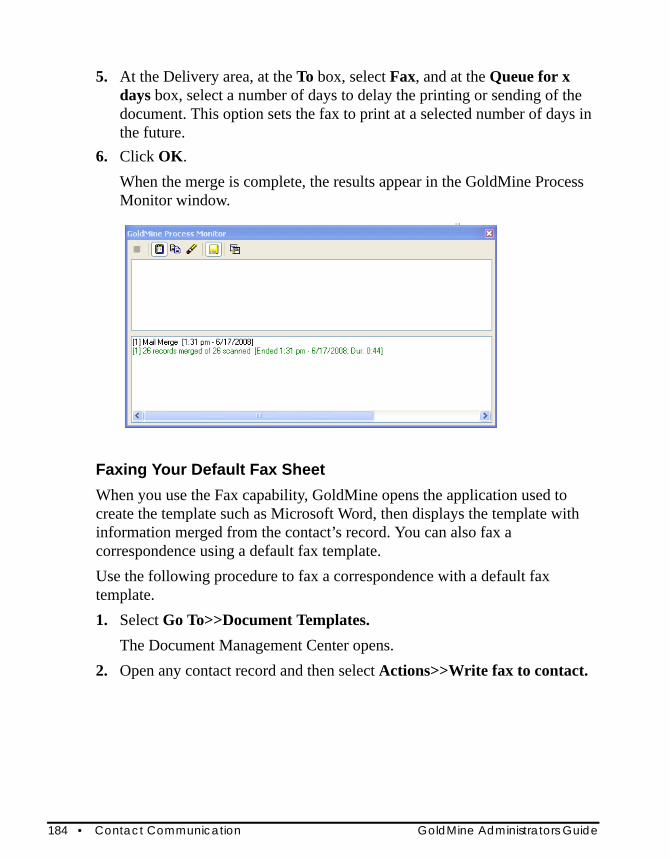
5. At the Delivery area, at the To box, select Fax, and at the Queue for x days box, select a number of days to delay the printing or sending of the document. This option sets the fax to print at a selected number of days in the future.
6. Click OK. When the merge is complete, the results appear in the GoldMine Process Monitor window.
Faxing Your Default Fax SheetWhen you use the Fax capability, GoldMine opens the application used to create the template such as Microsoft Word, then displays the template with information merged from the contact’s record. You can also fax a correspondence using a default fax template.Use the following procedure to fax a correspondence with a default fax template.1. Select Go To>>Document Templates.
The Document Management Center opens.2. Open any contact record and then select Actions>>Write fax to contact.
184 • Contact Communication GoldMine Administrators Guide

Printing DocumentsYou can print documents for one contact or for a filtered group or group of contacts.
To print documents from the Goldmine Document Center3. Select Go To>>Document Templates.
The Document Management Center opens.4. Select the User from the drop-down list.5. Highlight the document template you are printing and right-click.6. Select one of the following options:
• Merge & Edit. Opens the document on the screen with the inserted GoldMine fields populated with information for the current contact record. Edit the document as needed and print using the program's print command.
Due to a Microsoft limitation, the GoldMine menu in Microsoft Word is disabled during the Merge & Edit process.• Print. Opens the Mail Merge Properties dialog box. See "Using Mail
Merge Properties (Printing)" on page 6-186.If you print immediately, a record of what was sent to the contact is filed on the History tab.
GoldMine Administrators Guide Contact Communication • 185

Using Mail Merge Properties (Printing)Use the following procedure when merging and printing documents.1. In the Document Management Center, right-click a document template and
select Print or Fax. The Mail Merge Properties dialog box opens.
To access this dialog outside of the Document Management Center select Actions>>Begin Mail Merge. The Mail Merge Properties dialog opens with an additional Template tab.
2. In the Contact Selection area, select from the following:This Contact. Merges the document with the primary contact from the active contact record, or select an additional contact from the drop-down list.All contacts linked to (contact name). Merges the document with the primary and additional contacts for the active contact record.All contacts in the following filter or group. Merges the document with ALL contact records or with the filtered group or contact group selected from the drop-down list.If you select All contacts linked to (contact name) or All contacts in the following filter or group, select from the following:
186 • Contact Communication GoldMine Administrators Guide
• Primary. Merges the document with the primary contact.• Additional. Merges the document with the additional contacts.• Merge code. Merges the document based on the code you select in the
F2 Lookup list.3. In the Delivery area, select the To method from the drop-down list (Printer
or FAX). 4. Type or select the Queue for x days to delay the printing or sending of the
document. This option sets the document to print at a selected number of days in the future using the Server Agents or the Literature Fulfillment Center.Printing a mail merge document for a contact produces a History item for that contact.
Printing Envelopes and LabelsUse the same method as for printing letters, memos, and faxes. Set up GoldMine to print envelopes or labels for documents waiting in a print queue on the same date GoldMine generates the queued documents.1. To check on queued correspondence in GoldMine’s Literature Fulfillment
Center, select GoTo>>Literature.2. To print envelopes or labels when queued documents are printed, select
GoTo>>Literature.3. Select the folder under Queued Documents corresponding to the date the
queued correspondence is scheduled to be sent. For example, if the letters are scheduled to be printed later in the current week, select This Week.
4. In the upper-right area, right-click each queued document for which to print an envelope or label. From the local menu, select Print Envelopes or Print Labels. GoldMine displays the Print Envelopes dialog box or the Print Labels dialog box that contain the same commands.
5. In the Print Envelopes dialog box, select the contacts for whom to print envelopes, then select the envelope template to use. By default, GoldMine displays your templates. However, look in the User drop-down list and select a (public) template or another user’s template.
GoldMine Administrators Guide Contact Communication • 187
Using the E-mail CenterUse GoldMine’s E-mail Center to view, organize, and send your queued Internet emails. Use the E-mail Center to:
• Edit email preferences• Creating emails• Send email messages• Retrieve email messages• Link email messages to contacts• Create and use email templates• Set email rules• Create distribution listsIf you subscribe to more than one Post Office Protocol version 3 (POP3) mail server, you can set up the E-mail Center to retrieve mail from multiple Internet mail servers.
E-mail Center ComponentsThe E-mail Center contains the following components:• E-mail Center Toolbars. Allows quick access to E-mail Center functions.• E-mail Center tree. Allows you to connect to your mail server and
organize incoming, outgoing, and filed messages.• E-mail message listing browse window. Displays messages available in
the in-box, out-box, or selected folder.The default limit for messages that can be displayed at once is set at 2,500. You or your administrator can implement a <USER>.ini file setting to override this limit, but this is not recommended because of the negative side effects are associated with this action, including:
• Increased load on the database server and the network (the database server will have to read your records from disk, and they will be sent over the network).
• Increased time to load the list of e-mails in the Email Center list. During this time GoldMine may be unresponsive.
188 • Contact Communication GoldMine Administrators Guide
• Increased memory usage by GoldMine. You may have a slower response in the Email Center because it has to process a large number of emails and use more memory.For more information on message limits, see the System Settings section of the GM 8.5 Administrators Guide.
• Text display. Preview the body of a message selected in the listing browse window.
To turn the preview option on and off, right-click the E-mail Center tree and select Options>>Show Preview.
NOTE: Set Show Preview as the default in the [Internet] section of the Username.ini using this command: ShowPreview=1
General Email ToolbarThe General E-mail Center Toolbar contains buttons and menus for creating, sending, receiving, and filing e-mail messages, setting up e-mail rules, templates, and distribution lists, and editing e-mail options. Buttons in the toolbar will appear and disappear depending on the type of activity you are performing. The General E-mail Center Toolbar differs depending on which folder is opened in Email Center assuming there are letters in them. • If an online folder is opened then General E-mail Center Toolbar consists
of: • New Message, Print, Refresh, Delete, Stop, Reply, Reply to all,
Forward and Actions (which is a drop-down button with the following functions: Get selected items, Get all Items, Set up E-mail rules, Customize E-mail templates, Set up Distribution lists, Sync Contact, Show Preview, Edit E-mail Options)
• If an Inbox (or any sub-), Deleted or Filed subfolder is opened then General E-mail Center Toolbar consists of: • New Message, Print, Refresh, Delete, Reply, Reply to all, Forward,
File it (with its options), Re-link/Unlink and Actions (which is a drop-down button with the following functions: Mark as Read (Un-read), Set up E-mail rules, Customize E-mail templates, Set up Distribution lists, Sync Contact, Show Preview, Edit E-mail Options)
GoldMine Administrators Guide Contact Communication • 189

• If an Outbox or Drafts folder is opened then General E-mail Center Toolbar consists of: • New Message, Print, Refresh, Delete, Re-link/Unlink, Send, Send all,
Re-Send, Re-Queue and Actions (which is a drop-down button with the following functions: Set up E-mail rules, Customize E-mail templates, Set up Distribution lists, Sync Contact, Show Preview, Edit E-mail Options)
• If a Sent subfolder is opened then General E-mail Center Toolbar consists of: • New Message, Print, Refresh, Delete, Forward, File it (with its options)
Re-link/Unlink, Re-Send, Re-Queue and Actions (which is a drop-down button with the following functions: Set up E-mail rules, Customize E-mail templates, Set up Distribution lists, Sync Contact, Show Preview, Edit E-mail Options)
Depending on the action being performed, the following commands are available in the General Toolbar:• New Message. Creates a new message in the Edit E-mail window, or create a
new mail subfolder.• Re-link/Unlink. Links files to or unlink files from contacts.• Print. Prints the currently selected message.• Refresh. Refreshes the contents of the e-mail list.• Delete. Deletes the currently selected message.• Stop. Stops any current retrieval process.• Set up Email Rules. Sets up E-mail rules.• Customize E-mail Templates. Creates and edits email templates, in the
Document Management Center.• Set up Distribution Lists. Creates and edit Distribution Lists.• Send. Sends the selected message.• Send All. Send all outbox messages.• Re-Send. Resends the selected message.• Re-Queue. Opens the selected message in the Edit E-mail window and add
to the queue in the Outbox.• Reply. Opens a reply to the sender using the Edit E-mail window.
190 • Contact Communication GoldMine Administrators Guide
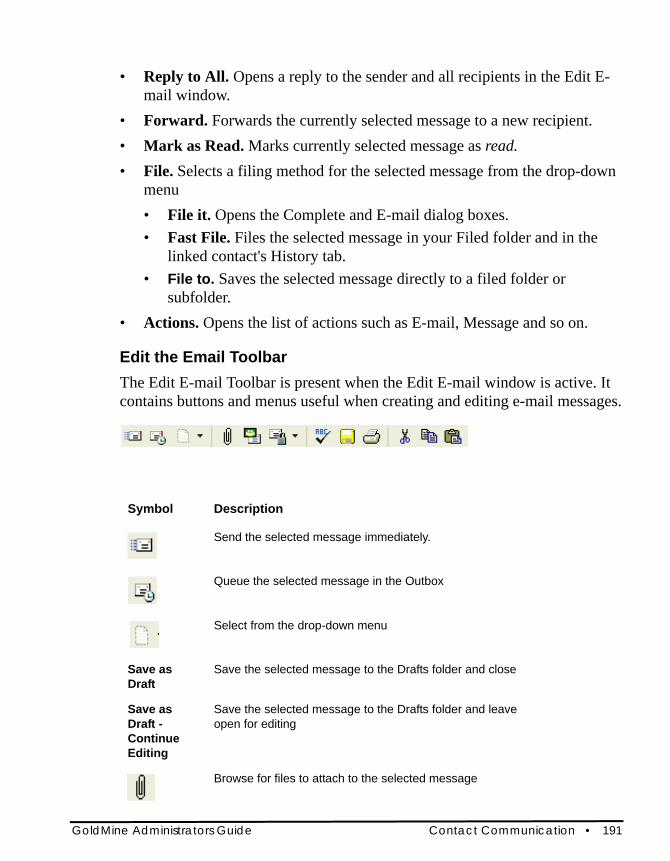
• Reply to All. Opens a reply to the sender and all recipients in the Edit E-mail window.
• Forward. Forwards the currently selected message to a new recipient.• Mark as Read. Marks currently selected message as read.• File. Selects a filing method for the selected message from the drop-down
menu• File it. Opens the Complete and E-mail dialog boxes.• Fast File. Files the selected message in your Filed folder and in the
linked contact's History tab.• File to. Saves the selected message directly to a filed folder or
subfolder.• Actions. Opens the list of actions such as E-mail, Message and so on.
Edit the Email ToolbarThe Edit E-mail Toolbar is present when the Edit E-mail window is active. It contains buttons and menus useful when creating and editing e-mail messages.
Symbol Description
Send the selected message immediately.
Queue the selected message in the Outbox
Select from the drop-down menu
Save as Draft
Save the selected message to the Drafts folder and close
Save as Draft - Continue Editing
Save the selected message to the Drafts folder and leave open for editing
Browse for files to attach to the selected message
GoldMine Administrators Guide Contact Communication • 191

Sign with Digital ID
Do Not Encrypt
Send messages without encryption
Encrypt Using GoldMine
Send messages with GoldMine encryption
Encrypt Using Digital ID
Send messages encrypted with Digital ID
Spell check selected message
Save the selected message as an HTML or text file
Print the selected message
Cut selection
Copy selection
Paste selection
Symbol Description
192 • Contact Communication GoldMine Administrators Guide
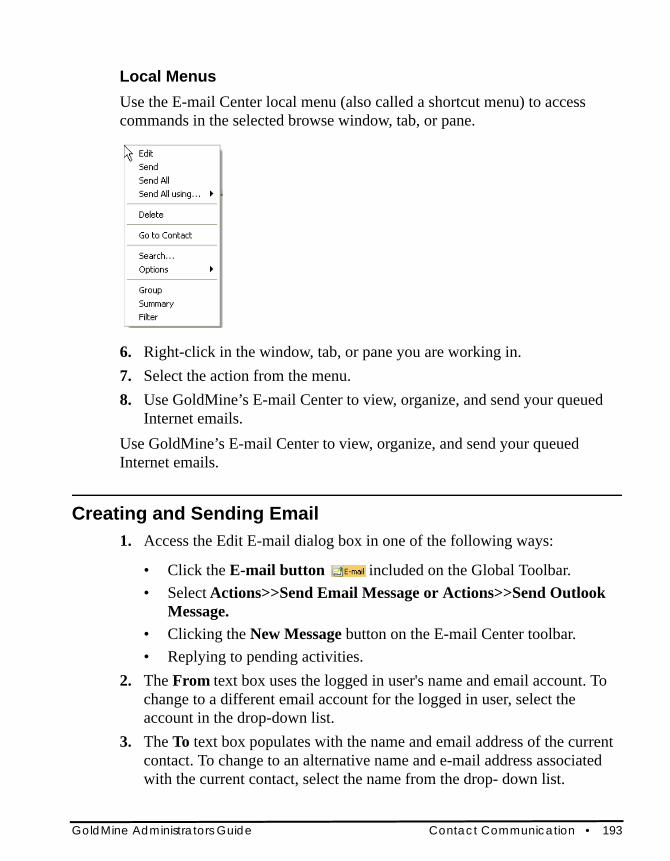
Local MenusUse the E-mail Center local menu (also called a shortcut menu) to access commands in the selected browse window, tab, or pane.
6. Right-click in the window, tab, or pane you are working in.7. Select the action from the menu. 8. Use GoldMine’s E-mail Center to view, organize, and send your queued
Internet emails.Use GoldMine’s E-mail Center to view, organize, and send your queued Internet emails.
Creating and Sending Email1. Access the Edit E-mail dialog box in one of the following ways:
• Click the E-mail button included on the Global Toolbar. • Select Actions>>Send Email Message or Actions>>Send Outlook
Message.• Clicking the New Message button on the E-mail Center toolbar.• Replying to pending activities.
2. The From text box uses the logged in user's name and email account. To change to a different email account for the logged in user, select the account in the drop-down list.
3. The To text box populates with the name and email address of the current contact. To change to an alternative name and e-mail address associated with the current contact, select the name from the drop- down list.
GoldMine Administrators Guide Contact Communication • 193

4. To send the email to additional recipients, at the Additional Recipients box, click on a line and select one of the following:• To: Contact. Displays the Contact Search Center to locate a new
contact.• To: Manual recipient. Displays the Manual Recipients Entry dialog
box. Type a manual email address.• To: GoldMine user or group. Displays the GoldMine User Recipient
dialog box. Select a GoldMine user or user group.• To: Distribution list. Displays the Distribution List dialog box. Select
a predefined distribution list.• To: Outlook (MAPI) recipient: Launches your local or network
Outlook address book.5. Click Link to link the email message to the current contact and file the
message in the History tab when sent.6. To add recipients, click Cc:. At the pop up menu, select one of the
following:• To: Adds recipients to the To list.• Cc: Sends copies to other recipients.• Bcc: Sends a blind copy to other recipients.
7. Click the Recipients button again and select one of the recipient types listed in step 6. Multiple types of recipients are allowed.
8. In the Subject text box, type a subject or select a template in the Subject drop-down list.
9. Type a message in the message text box. To use HTML formatting in the message, in the Options tab, select Rich text (HTML). Check your spelling by right-clicking and selecting Actions>>Spell check.
10. To configure settings for: for the • Adding email attachments• Options tab• Mail merge tab
11. Click the Attachments icon to add email attachments.12. Click Send to send the message immediately or Queue to queue it for
sending at the times defined in the Server Agents Administrator.
194 • Contact Communication GoldMine Administrators Guide
Adding Email AttachmentsUse the Edit E-mail dialog box to add one or more files as attachments to your e-mail message.1. At the Edit E-mail dialog box, click the Attachments tab 2. Right-click the Attached documents area and then select Attach.
3. Browse to the location of the file to attach.4. Click Open to attach the file. Repeat the procedure for each file to attach.5. Click Send to immediately send the message, or Queue to queue it for
sending at the times defined in the Server Agents Administrator.
NOTE: If a file is edited after it has been sent as an attachment, the attached file reflects these changes, even though the message is in the Sent folder.
Sending Email to Multiple RecipientsUse the Mail Merge tab on the Edit E-mail dialog box to send the e-mail to all contacts or to a filtered group of contacts.6. At the Edit E-mail dialog box, click the Mail Merge tab. 7. Select Merge this E-mail to a group of contacts to activate the mail merge
options. 8. Select your filter or group in the drop-down list, or click on <Filters of:>
or <Groups of:> to select other users and use their filters or groups.9. Select Confirm each recipient to display a confirmation prompt for each
selected recipient.10. Select merge options:
• Primary. Merges primary contact information with the selected template.
• Additional. Merges additional contacts with the selected template. GoldMine can mass merge both primary and additional contacts into documents. This control is used to include or exclude additional contacts from a mass mailing.
• Other. Merges other email addresses linked to the primary contacts.• Limit to E-mail merge code. Merges primary and additional contacts
with the specified merge codes. Select the merge codes from the F2
GoldMine Administrators Guide Contact Communication • 195

Lookup list. To enter multiple merge codes, separate each entry with a semi-colon (;).
11. Click Send to send the message immediately or Queue to queue it for sending at the times defined in the Server Agents Administrator.
Creating Email TemplatesUse the following procedure to create an email template.1. Select Go To>>Document Templates. 2. At the Document Management Center, at the User drop-down list on the
toolbar, select the user to create the template for. If the template is for all users, select (public).
3. Right-click on E-mail Templates and select New. The Edit E-mail window opens.
4. The cursor is automatically on the Subject line. Type the subject of the email.
NOTE: The subject you type becomes the subject line when using the template; consider what you are sending to contacts. The subject is also the template name appearing in the Document Management Center, so it must be unique.
5. Click Attach files on the Edit E-mail toolbar to attach a file to the template. 6. Browse to locate the file you are attaching to the template.7. Select the Options tab to configure template formatting and encoding
options.
196 • Contact Communication GoldMine Administrators Guide
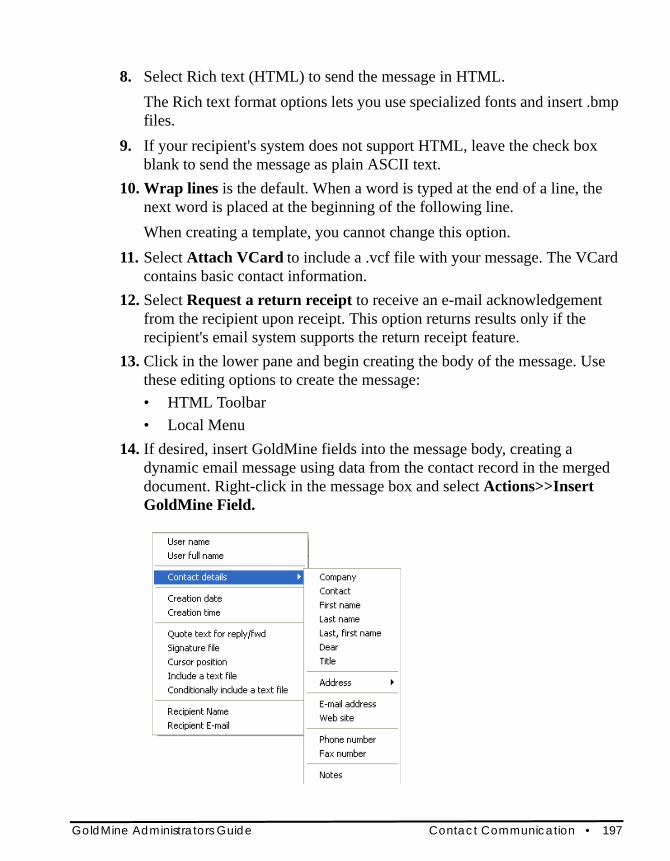
8. Select Rich text (HTML) to send the message in HTML. The Rich text format options lets you use specialized fonts and insert .bmp files.
9. If your recipient's system does not support HTML, leave the check box blank to send the message as plain ASCII text.
10. Wrap lines is the default. When a word is typed at the end of a line, the next word is placed at the beginning of the following line. When creating a template, you cannot change this option.
11. Select Attach VCard to include a .vcf file with your message. The VCard contains basic contact information.
12. Select Request a return receipt to receive an e-mail acknowledgement from the recipient upon receipt. This option returns results only if the recipient's email system supports the return receipt feature.
13. Click in the lower pane and begin creating the body of the message. Use these editing options to create the message:• HTML Toolbar• Local Menu
14. If desired, insert GoldMine fields into the message body, creating a dynamic email message using data from the contact record in the merged document. Right-click in the message box and select Actions>>Insert GoldMine Field.
GoldMine Administrators Guide Contact Communication • 197
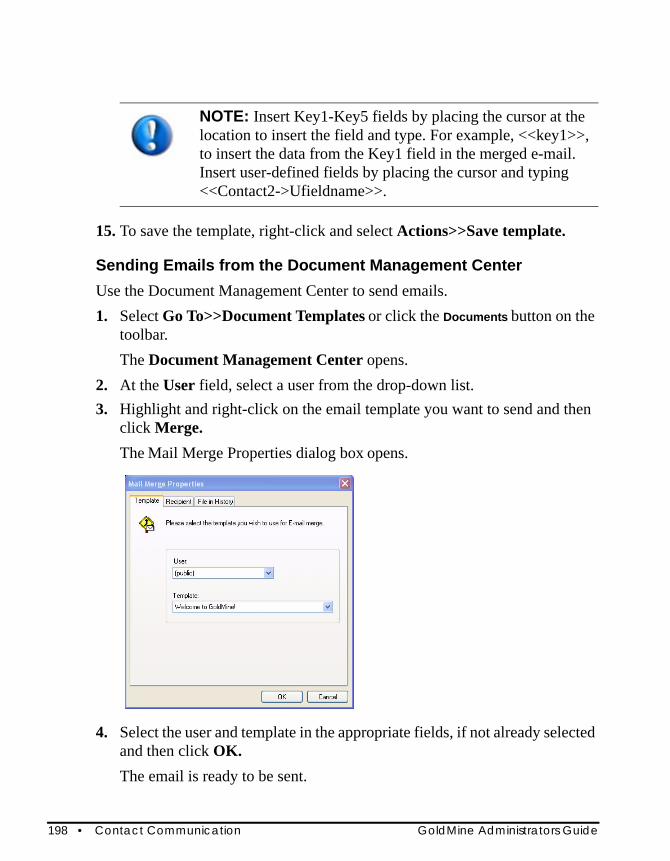
NOTE: Insert Key1-Key5 fields by placing the cursor at the location to insert the field and type. For example, <<key1>>, to insert the data from the Key1 field in the merged e-mail. Insert user-defined fields by placing the cursor and typing <<Contact2->Ufieldname>>.
15. To save the template, right-click and select Actions>>Save template.
Sending Emails from the Document Management CenterUse the Document Management Center to send emails.1. Select Go To>>Document Templates or click the Documents button on the
toolbar.The Document Management Center opens.
2. At the User field, select a user from the drop-down list.3. Highlight and right-click on the email template you want to send and then
click Merge.The Mail Merge Properties dialog box opens.
4. Select the user and template in the appropriate fields, if not already selected and then click OK.The email is ready to be sent.
198 • Contact Communication GoldMine Administrators Guide

If you send the email immediately, a record of what was sent to the contact is filed on the History tab.
Use GoldMine for your email by acquiring an email account and setting up your system to access the Internet email account. After set up, configure settings to:• Format outgoing messages.• Handle incoming messages.• Add Internet email accounts.• Customize the GoldMines E-mail Center.• Define advanced settings to apply globally to the E-mail Center, existing
attachment files, message operations, and data imported from a World Wide Web (www) site.
For information about configuring GoldMine for sending and retrieving internet email, please see See "Setting Email Account Properties" on page 6-199..Use the e-mail Options tab on the Edit E-mail dialog box to configure: • Properties of your message such as formatting the body text in Rich Text
Format (.rft) and including a return receipt.• Options for recording your message such as saving in the recipient’s
History record and with an Opportunity or Project.• Date and time to send a queued message.
Setting Email Account PropertiesDefine properties for individual Internet e-mail accounts when selecting New or Edit from the Accounts tab of the Internet Preferences window. The E-mail Account Properties dialog box opens.1. On the Internet Preferences Accounts tab, highlight the account you are
changing and click Edit; or click New to create a new account.
GoldMine Administrators Guide Contact Communication • 199

The E-mail Account Properties dialog box opens.2. In the Account Name field, type a descriptive name for the account to
appear on the E-mail Center>>Accounts tab.3. Select Show the account in the E-mail Center to display the account in the
E-mail Center. For the account to not appear in the E-mail Center, clear the option.
4. In the Getting Mail area, configure:• E-mail retrieval protocol. Choose either:
POP3IMAP
• Server. The name of the mail server retrieving your mail. For example, the structure of the entry might look like mail.somewhere.com. Typically, the same server is used for outgoing protocol SMTP and retrieval protocols POP3 or IMAP. If you do not know the correct entry for this field, contact your Internet service provider.
• Username. The name you use to log into your Internet mail server. Type only your user account name, not your entire e-mail address.
• Password. The password you use to log into your Internet mail server. When you type the password into the field, each character appears as asterisks (*).
• Auto-retrieve. Select Auto-retrieve for GoldMine to automatically connect with your POP3 or IMAP mail server for the selected account and check for new mail. The interval for checking the account is defined globally in the Retrieval tab. GoldMine checks for new mail in all accounts with this option.
• Auto-delete. Select Auto-delete to remove messages from the Internet mail server after they have been retrieved.
• Use encrypted connection (SSL). Select this checkbox to use a secure connection. This ensures the privacy of the connection between your account and the server. Implementing SSL does not verify the identity
NOTE: POP3, or Post Office Protocol version 3, and IMAP, or Internet Message Access Protocol, are systems for retrieving e-mail.
200 • Contact Communication GoldMine Administrators Guide

of your account or the e-mail server, but does prevent third parties from listening or recording messages sent between them.
• Port. Type any non-standard port address to the POP3 or IMAP server for the selected account. This option allows greater flexibility in setting up a nonstandard server. The default POP3 Port value is 110. The default IMAP Port value is 143. Typically, this entry should not be changed. However, if your account uses a non-standard POP3 or IMAP server configuration requiring a different port entry, contact your network administrator or Internet service provider.
5. In the Authentication area, configure the way your POP3 or IMAP server recognizes and authenticates your account and password. The selections are:• 4 PASS• SPA• APOP• MSN
6. In the Sending Mail area, configure: • SMTP server. Type the name of the mail server sending your mail. For
example: mail.somewhere.com. Typically, the same server is used for both SMTP and POP3 or IMAP. If you do not know the correct entry for this field, contact your Internet service provider or network administrator.
• Your return address. Type your Internet address. This is typically a combination of your Internet user name and server name. For example, [email protected].
7. In the Authentication area, configure the way your SMTP server recognizes and authenticates your account and password.
NOTE: Selecting Use encrypted connection (SSL) changes port numbers on the server side. Servers usually have dedicated ports for secure connections.
NOTE: SMTP, or Simple Mail Transport Protocol, is a system for sending mail.
GoldMine Administrators Guide Contact Communication • 201
• Use signature file. Attach a signature file (a text file containing information about you, your organization, telephone number quotations, and so on) to account messages. Select Use signature file and browse to the file location.
8. Click the Advanced Options button to set special options for the POP and SMTP server.
9. Select OK to return to the Accounts tab of the Internet Preferences window.
If your computer is connected to a LAN or other high-speed internet connection, you need only set account properties in GoldMine to access email and other Internet-based features. Use the following procedure to create a new network connection in Microsoft Windows.1. From the desktop, select Start>>Programs>>Accessories>>Communi-
cations>>Network Connections.The Network Connections dialog box opens.
2. At the Network Tasks menu, click Create a new connection.3. At the New Connection Wizard welcome screen, follow the on screen
instructions to create a new high-speed or dial-up connection.For more information about configuring Windows networking functions, please see Microsoft Windows Help.
NOTE: Default modem and dialing properties in Windows are set up in the Phone and Modem Options Control Panel. However, select special modem and dialing settings for use only with GoldMine in the Options dialog box under the Telephony tab.
Replying to an Activity Use the Reply to an activity dialog box to determine how activity information is recorded when replying to a user's email. Use the following procedure to reply to an activity.4. At the Pending tab, right-click on a listed activity and select Reply.
The Reply to an activity dialog box opens.
202 • Contact Communication GoldMine Administrators Guide

5. Select one of the following radio buttons:File in history. This button deletes the activity and creates a record of the outgoing e-mail message on the current tab. It creates a history record of the activity and adds a record of the outgoing email message on the History tab.Delete the activity. This button deletes the activity from the current tab and creates a record of the outgoing email message on the current tab and the History tab.Retain in the In-Box. This button leaves the activity on the current tab and creates a record of the outgoing e-mail message on the History tab.Select Carry over notes to keep notes with the activity record.
6. Click Reply. The Edit E-mail window opens with the message addressed to the GoldMine user who created the activity.
7. Edit the message as needed and then click Send.
Spell-Checking EmailUse the E-mail Center to check the spelling in the message, improve professional presentation, and customize the spell-checker. Open the User Options>>Spell tab dialog box for basic customization; for more information. see “Setting Options for the Speller Tab” on page 72.
GoldMine Administrators Guide Contact Communication • 203

However, you can customize the speller as you work, adding words and creating individual or company dictionaries. For more information, see “Creating Dictionaries” on page 205.1. After creating your e-mail, click Check Spelling button on the E-mail Cen-
ter toolbar. The Check Spelling dialog box opens. The questionable word appears in the Not in Dictionary field. Suggestions are listed in the Suggestions list. The words displayed are based on the options selected on the Speller tab.
2. Select an option:• Ignore. Skips this occurrence of the questionable word; if the word
comes up again, it will be tagged and displayed.• Ignore All. Skips this and all subsequent occurrences of the word in
this document. • Add. The word is added to the dictionary displayed in the Add words to
text box. • Change. Replaces the questionable word with the one highlighted in
the Suggestions list; or, if the word is edited, the edited word is used as the replacement.
• Change All. Changes this and all subsequent occurrences of the word in the document. The selected word in the Suggestions list is used unless the word is edited, in which case the edited word is used.
• Suggest. Searches more thoroughly for a suggested replacement word for the questionable word. Each time you press the Suggest button, a deeper search is made. When the spell checker exhausts all possibilities, the Suggest button is disabled.
3. To edit a questionable word, type a revised version of the word in the Not in Dictionary field. Ignore changes to Undo edit. Clicking Undo edit returns the edited word to the original form.
4. Use the Check Spelling dialog box to change the Options and Dictionaries. 5. Select Undo if you made changes to a document with Ignore or Change
and wish to undo the changes. The Undo button takes you back one word at a time.
6. Click Cancel to stop the spell checker and close the window.
204 • Contact Communication GoldMine Administrators Guide

Creating DictionariesUse the GoldMine spell checker to configure and customize the dictionary for each user. Add words, import files, and change the action on individual words.Use the following procedure to create dictionaries.7. Select Tools>>Options, and select the Speller tab. 8. Click Setup Dictionaries. The Dictionaries dialog box opens.
9. Select from the following options as needed.The Words text box lets you add a word or edit the highlighted word from the text box. The text box listing displays the words in the Files.tlx file.• To add a word, type the word and then click Add Word.• To edit a word, highlight the word, type the correction and click Add
Word.• To type case variations on a word, at the Other word field, type in the
word and then click Add Word.10. Click Delete Word to remove the word from the dictionary file.11. Click Import to import the words in a .txt file to the current Files .tlx file.
NOTE: When files with multiple word phrases are imported, each word adds individually rather than as a phrase
GoldMine Administrators Guide Contact Communication • 205

12. Click Export to export the words in the current Files .tlx file to a .txt file.13. At the Action drop-down list, select an action to apply to individual words:
• Auto change (use case of checked word)• Conditionally change (use case of other word)• Conditionally change (use case of checked word)• Ignore (skip)• Exclude (treat as misspelled)To apply an action to a word:
• Highlight the word in the Words text box listing.• Select the action from the Action drop-down list.• Click Add Word. The action you selected applies to that word.• The Files drop-down list displays available custom .tlx dictionaries. • Click Add File to browse to other .tlx files.
14. To create a new dictionary, click New File. A .tlx file is created, and the New Dictionary dialog box appears.Type the new File Name. Select the Language from the drop-down list and click OK.
15. Click Remove File to delete the current .tlx file.16. Click Close to save the settings.
NOTE: The .tlx files store in user folders in the Speller folder of the main GoldMine directory.
206 • Contact Communication GoldMine Administrators Guide
Retrieving Internet EmailTo retrieve Internet email within GoldMine using a dial-up Internet Service Provider (ISP), you must use a ISP with true Internet mail access. Internet access provided by most commercial online services, such as CompuServe and Microsoft Network, will not work with the GoldMine Internet email feature. You must configure Windows for dial-up networking to connect to your ISP.
NOTE: For assistance with setting up Windows to communicate with your Internet service provider, contact your service provider.
You can retrieve email two ways.
Retrieve Email ManuallyThe default configuration in Windows requires manual dialing.1. From the Microsoft Windows status bar, click Start.
2. Select Programs>>Accessories>>Dial-up Networking.3. In the Dial-Up Networking window, double-click the icon for your service
provider. 4. In the Connect To window, ensure all settings are correct, then select
Connect. 5. After your computer connects successfully, start or switch to GoldMine,
then retrieve Internet email.
GoldMine Administrators Guide Contact Communication • 207
Retrieve Email AutomaticallyYour Internet Preferences must be configured properly in the User's Preferences. Using the Microsoft Internet Explorer, you can configure Windows to automatically dial your ISP when you retrieve Internet email. The default configuration in Windows requires manual dialing.1. From the Microsoft Windows status bar, click Start and then select
Programs>>Accessories>>Dial-up Networking. 2. In the Dial-Up Networking window, double-click the icon for your service
provider. 3. In the Connect To window, ensure all settings are correct, then select
Connect. 4. After your computer connects successfully, start or switch to GoldMine,
then retrieve Internet email.
Retrieving EmailUse the following procedure to retrieve Internet email.1. Select Go To>>E-mail to jump directly to the POP Password dialog box
for retrieving from your primary account.2. If you are in the E-mail Center, click the e-mail account to retrieve. 3. The POP Password dialog box appears if you do not have your Internet
email password configured in the Internet tab of your User's Options. 4. Type the Password and click OK.
GoldMine downloads the waiting e-mail from your POP3 server e-mail account.
5. Read and process your e-mail while connected online or move it to your GoldMine Inbox and disconnect from your e-mail server. To read email in the E-mail Center, double-click the message.
NOTE: When you move messages from Online to Inbox, the Attach E-mail to Contact dialog box appears. Select how to link messages to contacts.
208 • Contact Communication GoldMine Administrators Guide

6. To process the message, right click the message in the E-mail re: field and select Actions. You can also read retrieved email by selecting Read from the local menu in the Activity List or on the Pending tab of the contact record.
7. Configure e-mail settings by selecting Tools>>Options.The User's Options dialog box opens. Select the E-mail tab.
8. After the email options have been set, retrieve internet or Outlook email messages manually or automatically in the E-mail Center.
9. Select Go To>>Mail. The E-mail Center opens. In the view window of the Navigation Pane, click an account in your Online folder to check internet e-mail, or open the Outlook folder to manage Outlook messages.
10. To process the message, right click on Action.
You can select any option depending on how you want to process the message (for example, Reply, Forward, and so on.)You can also read retrieved email by navigating to the local menu in the Activity List or Pending tab of the contact record and the selecting Read.
11. Configure email settings by selecting Tools>>Options. The User's Options dialog opens. Select the E-mail tab.
12. After email options have been set, retrieve internet or Outlook email messages manually or automatically in the E-mail Center. • Select Go To>>Mail.
The E-mail Center opens. 13. In the view window of the Navigation Pane, click an account in your
Online folder to check internet email, or open the Outlook folder to manage Outlook messages.
GoldMine Administrators Guide Contact Communication • 209

Linking Email Messages to ContactsYou can attach e-mail messages to contacts using the Attach E-mail to Contact dialog box. 1. Select GoTo>>Mail.2. In the E-mail Center, move messages to the Inbox or right-click and select
File. The Attach E-Mail to Contact dialog box appears displaying the sender's Internet account name, return address, subject of the message, and the VCard name if there is one.If the message was sent with a VCard, select Use the VCard information if you create a new contact based on the VCard information.
3. For an unlinked message select one:• Find an existing contact and link this message to it. Use the Contact
Search Center to select a contact. GoldMine will associate the message and VCard file with the selected contact.
• Create a new contact and link this message to it. Uses the VCard information to create a contact and displays the Read E-mail dialog box. GoldMine will associate the message and VCard file with the selected contact.
• Find an existing contact, create a new additional contact, and link this message to it. Use the Contact Search Center to select a contact. GoldMine will create an additional contact from the sender of the message, then link the message to the contact record.
• Do not link this message to any contact. Displays the Read E-mail dialog box without associating the message or VCard information to a new or existing contact. If you have selected one of the first three options, you may select Link the address <E-mail Address> to the contact to link the "From:" e-mail address of the retrieved mail to the contact. Click OK. If linking multiple messages, the dialog box appears for the next message.
210 • Contact Communication GoldMine Administrators Guide

Reading EmailThe E-mail Reader window is the primary way you work with individual email messages. Use the following procedure to read an email.1. Launch the E-mail Reader by double-clicking a message in the E-mail
Center or the contact.2. On the Retrieval tab of the Internet Preferences dialog box, select Open
'Read E-mail dialog.GoldMine opens your email upon retrieval.
3. The E-mail Reader window displays the full message with selected header information. Use the toolbar or right-click the message body and select an option from the local menu.
NOTE: GoldMine decodes and displays email messages and attachments created in the MS RTF (Rich Text Format) sent as winmail.dat files rather than displaying them as attachments. This creates smooth inter-operability between Outlook messages created in Outlook and GoldMine.
Using E-mail TemplatesAfter creating an e-mail template in the Document Management Center, select it when creating an e-mail. For information on creating an email template, see “Creating Email Templates” on page 196.4. Select Actions>>E-mail, or Schedule>>GoldMine E-mail. 5. From the E-Mail Center, click New Message in the toolbar.
The Edit E-mail dialog box opens.6. At the Subject drop-down list. select the template.7. To select the template of another user, click Select Template User.8. Edit the message as needed.9. Click Send to send the message immediately or Queue to queue it for
sending at the times defined in the Server Agents Administrator.
GoldMine Administrators Guide Contact Communication • 211

212 • Contact Communication GoldMine Administrators Guide

GoldMine Administrators Guide Contact Communication • 213
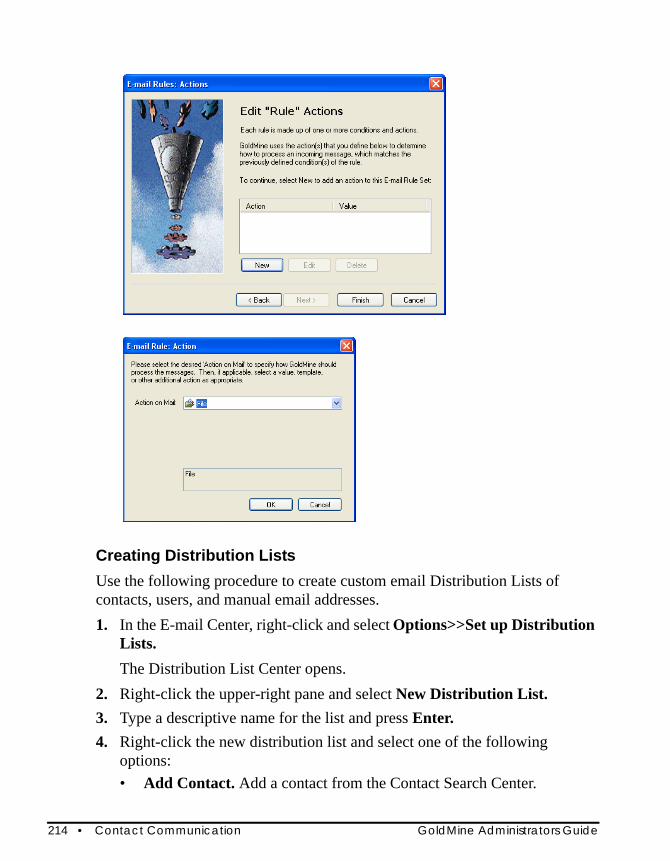
Creating Distribution ListsUse the following procedure to create custom email Distribution Lists of contacts, users, and manual email addresses.1. In the E-mail Center, right-click and select Options>>Set up Distribution
Lists. The Distribution List Center opens.
2. Right-click the upper-right pane and select New Distribution List. 3. Type a descriptive name for the list and press Enter.4. Right-click the new distribution list and select one of the following
options:• Add Contact. Add a contact from the Contact Search Center.
214 • Contact Communication GoldMine Administrators Guide

• Add Contacts E-mail. Add a contact from the Contact Search Center and specify the email address.
• Add User. Add a user or user group.• Add Manual E-mail address. Select or type the e-mail address.• You can add more than one recipient to the Distribution list.
Using the Document Management QuickStart WizardGoldMine Plus for Microsoft Office is installed during the main GoldMine application installation. It can also be installed independently by using the Add/Remove Programs Windows control panel. GoldMine Plus for Adobe Acrobat is installed from its own installer. For more information about installing and using GoldMine Plus for Adobe Acrobat, please see the document: GMAcrobatLink.pdf, located on your GoldMine installer CD, or via: http://support.frontrange.com.
NOTE: GoldMine must be installed locally in order to install the Acrobat Link. It will not function from a shared folder location.
This Document Management QuickStart Wizard directs you to an informational web page. It does not install any add-on products.1. Select Tools>>Quick Start Wizard.
The GoldMine QuickStart Wizard dialog box opens.
2. Click the Document Management Wizard button .
A web page opens in your browser showing details about the GoldMine Plus suite of products.
Using Encryption and Digital IDs
Using Digital IDs with E-mail MessagesIf you and your contact use digital IDs to verify signatures and send encrypted email messages, you can use GoldMine to configure your Internet E-mail Options.
GoldMine Administrators Guide Contact Communication • 215
Your digital ID, also known as a digital certificate, is a file sent with an e-mail message identifying you as the authentic sender. Digital ID certificates are files issued by a certified security authority such as VeriSign, Inc., or from your Microsoft Exchange Server administrator. Digital IDs have an expiration date and must be renewed periodically to remain valid. A digital ID typically contains: • Your name and e-mail address as a digital signature• Your public key • Expiration date of the public key • Name of the Certification Authority (CA) who issued your Digital ID • Serial number of the Digital ID • Digital signature of the CA
Using Digital IDsA digital signature provides security by verifying the message originated from a specific person and that the message has not been altered. A digital ID also works as a message encryption method. Digital ID encryption scrambles a message with a recipient-specific algorithm.
Public and Private KeysThe digital ID encryption uses a system of key pairs that include a public key used to encrypt a message and a private key used to decrypt a message. The sender of a secure e-mail must have the recipient's public key to encrypt the message. When the message is received, it is decrypted using the recipient's matching private key. Using GoldMine you can exchange encrypted e-mail messages with a contact. You must have the contact's digital ID that includes his or her public key and the contact must have your digital ID that includes your public key. In GoldMine, you must then import the contact's Digital ID using the contact's Edit>>Record Properties>>Contact Details>>Digital IDs tab and import your Digital ID using your Internet E-mail Preferences>>Security tab.For example, when you send an encrypted message to a contact, it is encrypted in GoldMine using the public key the contact provided you. When he or she receives the message, it is decrypted by the contact's e-mail application using his or her private key. Conversely, when a contact sends you an encrypted message it is encrypted by the sender's e-mail application with your public key
216 • Contact Communication GoldMine Administrators Guide

(provided earlier). When you receive the message, it is decrypted using your private key.
Levels of Security• Signed. The message is signed with the sender's private key. Sending a
message with a digital signature confirms the message was sent by the sender listed in the From address.
• Encrypted. The message is sent with the recipient's public key. The recipient provides you with his or her public key before you send the message. When a message is encrypted, the body and attachments are hidden from anyone who does not have the recipient's private key. Only the recipient should have the recipient's private key. An encrypted message does not guarantee to the recipient that the sender is the name in the From address.
• Signed and Encrypted. The message is signed with the sender's private key, confirming for the recipient the message was sent by the sender in the From address, and it is encrypted with the recipient's public key and then decrypted with the recipient's private key when he or she receives the message.
Sharing Public KeysFor security reasons do not share your private key. You can share your public key with contacts two ways:
• Digital ID Signature. Your Digital ID is attached to any message that includes a Digital ID Signature. The recipient can then extract it and import it into his or her e-mail application. For example, in Outlook the user can right-click the sender's name on a message and add the contact to his or her existing contacts. The digital ID certificate is included.
• Export. Export your Digital ID send it to a contact who can then import the file into his or her e-mail application. For example, in Outlook the file is imported on the contact's Certificate tab.
Using Digital IDs in GoldMine• Configuring Contacts' Digital IDs. Imports a contact's digital ID into the
contact record.• Configuring GoldMine Users' Digital IDs. Imports your digital ID into
GoldMine. You determine the signature and encryption settings.
GoldMine Administrators Guide Contact Communication • 217

• Sending Digitally Signed E-mail Message. Sends a message with your Digital ID signature.
• Sending Encrypted E-mail Messages. Sends individual messages with a digital ID signature or GoldMine encryption.
• Reading E-mail Messages Sent with Digital IDs. Reading digitally signed, encrypted, or signed and encrypted e-mail messages.
Sending Encrypted EmailProtect e-mail messages with encryption. Messages encrypted with Encrypt using GoldMine can only be read by GoldMine users with the correct password. Messages sent as Encrypt using Digital ID can only be sent using the recipient's public key and can only be decrypted and read using the recipient's private key. • Sending Encrypted Messages Using GoldMine• Sending Encrypted Messages Using Digital IDTo automatically encrypt outgoing messages with digital IDs, configure your settings on the Security tab in your Internet Preferences. Use the Encrypt Message toolbar button drop-down menu to select Do not Encrypt and send a message without encryption.
Sending Email Messages Encrypted Using GoldMineYou can protect e-mail messages with encryption. Messages encrypted with Encrypt using GoldMine can be read only by other GoldMine users with the correct password.
3. On the toolbar, click the Encrypt Message button (if you are reading a message and want to encrypt it before sending it to other GoldMine users or filing the message, automatically encrypt using GoldMine; otherwise, select Encrypt using GoldMine. The Encryption Settings dialog box opens.
4. Select Encrypt the message. 5. In the Password field, type the password you are using on the message.
6. In the Encryption mode drop-down list, select the encryption level.
218 • Contact Communication GoldMine Administrators Guide
7. Click OK to save your settings.
NOTE: Only users with the proper password and working in GoldMine can open the message.
Sending Email Messages Encrypted Using Digital IDWhen you encrypt a message using a digital ID, you must have the contact/recipient's digital ID configured in the Record Properties>>Contact Details. Encrypting a message to a recipient with a digital ID encrypts the message using the recipient's public key. When recipients receive the message, they decrypts it using his or her private key. You can configure your Internet Security settings to automatically encrypt all outgoing messages with a Digital ID.
8. On the tool bar, click the Encrypt Message drop-down arrow button and select Encrypt using Digital ID. The outgoing message will be sent encrypted.
9. If a Digital ID is not configured for the contact, a warning box states GoldMine cannot encrypt the message. Click OK to return to the unsent message window.
10. Configure the contact's Digital ID or remove the encryption from the message by clicking the Encrypt Message drop-down arrow and toggling the Encrypt using Digital ID option off.
For more information on encrypted email messages, see the GoldMine 8.5 Administrator’s Guide.
Sending Digitally Signed Email When digitally signing a message, you must have a digital ID configured in GoldMine. The digital signature contains your private key and confirms for the recipient your From address matches the signature. Configure your Internet Security settings to automatically sign all outgoing messages with your digital ID.
On the toolbar, click the Sign with Digital ID button. Your digital signature is added to the outgoing message.
GoldMine Administrators Guide Contact Communication • 219

Reading Email Sent with Digital IDsReceive email messages digitally signed and encrypted from non-GoldMine users. Senders must have a Digital ID from a valid Certificate Authority before they can send you a signed email. To send you an encrypted email message, senders must have your Digital ID public key from a valid Certificate Authority. When receiving the message, GoldMine asks you for your password in the Private Key Password dialog box.
Signed Icon in Inbox Signed with a Digital ID. When receiving a digitally signed message, the message includes the sender's digital signature and public key. When the message signature is verified, the Inbox displays a signature icon next to the message. When you open the message, you are notified if the signature is verified or if the signature verification failed.
Encrypted Icon in Inbox
Encrypted. When receiving a digitally encrypted message, the message was encrypted with your public key (supplied to the sender at an earlier time). The message is decrypted using your private key You are asked to supply the password to your private key to read the message.
Signed and Encrypted Icon in Inbox
Signed and Encrypted. When receiving a digitally signed and encrypted message, the message includes the sender's digital signature and a message encrypted with your public key (supplied to the sender at an earlier time). The message signature is verified and the message decrypted using your private key (configured in GoldMine). You are asked to supply the password to your private key in order to read the message.
Signature Verified Banner on Message
Failed Encrypted and Signed Icon in Inbox
Signature Verification Failed Banner on Message
220 • Contact Communication GoldMine Administrators Guide
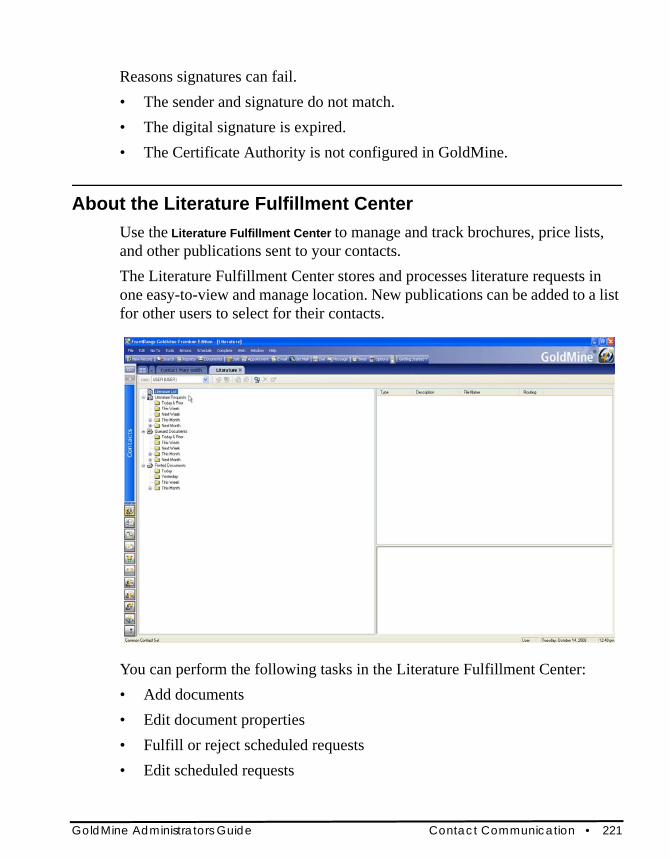
Reasons signatures can fail. • The sender and signature do not match.• The digital signature is expired. • The Certificate Authority is not configured in GoldMine.
About the Literature Fulfillment CenterUse the Literature Fulfillment Center to manage and track brochures, price lists, and other publications sent to your contacts. The Literature Fulfillment Center stores and processes literature requests in one easy-to-view and manage location. New publications can be added to a list for other users to select for their contacts.
You can perform the following tasks in the Literature Fulfillment Center:• Add documents• Edit document properties• Fulfill or reject scheduled requests• Edit scheduled requests
GoldMine Administrators Guide Contact Communication • 221

• Fulfill or reject queued documents• Edit scheduled documentsGeneral management displays in the left pane and specific requests in the upper right pane. The lower right pane displays associated attachments or a preview window of the document that was printed.Use the following procedure to access the Literature Fulfillment Center.11. Select Go To>>Literature.
The Literature Fulfillment Center opens. 12. Use the toolbar to execute commands or local menu options in the left pane
to manage:• Literature List. A predefined literature list that varies depending on
which user created the literature packet. This list is available when you schedule a Literature Request. When selecting a Literature List in the left-hand pane, the literature options display in the right pane. Right-click on the Literature List to access the local menu.• Refresh. Refresh the Literature List.• Refresh All. Refresh everything in the left pane.
• Literature Requests. Literature requests by date. When you select a date, the literature requests scheduled for that date or date range are displayed in the upper right pane. The literature requests are added by scheduling a Literature Request. Right-click on Literature Requests to access the local menu.• Refresh. Refresh the Literature List.• Refresh All. Refresh everything in the left pane.• Expand. Expand the date options.
• Queued Documents. Queued requests by date. When selecting a date, the literature requests scheduled for that date or date range display in the upper right pane. Queued documents are added to the Literature Fulfillment Center when configuring Mail Merge properties through the Document Management Center. Queued documents can be manually fulfilled through the Literature Fulfillment Center or automatically executed at the selected time if you configured the Server Agents to Print/FAX.
222 • Contact Communication GoldMine Administrators Guide

Right-click Queued Documents to access the local menu. For more information on Mail Merge properties, see “Using Mail Merge Properties (Printing)” on page 186.
Queued Documents Local Menu• Refresh. Refresh the Literature List.• Refresh All. Refresh everything in the left pane.• Printed Documents. Documents and literature requests you fulfilled.
Right-click Printed Documents to access the local menu.• Refresh. Refresh the Literature List.• Refresh All. Refresh everything in the left pane.• Expand. Expand the date options.• Purge All. Delete all information from the Printed Documents list.
Adding Documents to the Literature Fulfillment CenterAdd an existing publication or file to the Literature List.13. Select Go To>>Literature. 14. At the Literature Fulfillment Center, highlight Literature List in the left
pane and right-click and select New from the local menu. The Literature dialog box opens.
15. In the Output To drop-down list you can select one of the following:• Stock. Literature that is printed and available as shelved stock.• Printer. Literature that is to be printed from a file.
GoldMine Administrators Guide Contact Communication • 223
• FAX. Literature that is to be sent via fax.16. In the Type field, type or select the literature type from the F2 Lookup list.17. In the Description field, type or select a brief description of the literature
from the F2 Lookup list.18. Click OK.
Editing Documents in the Literature Fulfillment Center19. Select Go To>>Literature. 20. At the Literature Fulfillment Center, highlight Literature List in the left
pane. The documents are listed in the upper right pane.
21. Right-click the document to edit and select Edit from the local menu. The Literature dialog box opens.
22. In the Output To drop-down list, select one:• Stock. Printed literature available as shelved stock.• Printer. Literature to print from a file. Select the file path and click
Edit to make changes.• FAX. Literature to fax. Select the file path needed and click Edit to
make changes.23. In the Type field, type or select the literature type from the F2 Lookup list.24. In the Description field, type or select a brief description of the literature
from the F2 Lookup list.25. Click OK.
Fulfilling or Rejecting Scheduled Literature RequestsWhen a Literature Request is assigned to you, the request appears on your calendar as Lit in the Task pane. To fulfill or reject the request, open the Literature Fulfillment Center.1. Select Go To>>Literature. 2. At the Literature Fulfillment Center, select your name in the User drop-
down list to view requests assigned to you. 3. Select the Literature Requests date or date range for the request. The
literature request appears in the upper right pane.
224 • Contact Communication GoldMine Administrators Guide
4. Highlight the literature request and right-click. Select options in the local menu.
5. To fulfill the request, note the attachments to send and select Fulfill.If a literature request is to be printed or faxed, the document is printed or faxed. Attachments are not sent automatically and must be handled as per your usual office procedure.
6. To reject the request, select Reject. 7. At the Rejection of Literature Requests dialog box, type or select the reason
in the F2 Lookup list. If this activity was scheduled with an RSVP, GoldMine notifies the person who assigned it to you stating why it was rejected.
Fulfilled requests are moved from Pending to the History tab; the request appears in the Printed Documents area of the Literature Fulfillment Center.
Fulfilling or Rejecting Queued DocumentsQueued Documents in the Literature Fulfillment Center come from the Document Management Center and were merged with one or more contacts. For multiple contacts, each contact is listed separately in the upper right pane when you select the assigned user and date the document was queued for.Queued documents are fulfilled when using the Print/FAX Server Agent; to send the document immediately or remove it from the queue, use the Queued Documents area of the Literature Fulfillment Center. Use the following procedure to fulfill or reject queued documents.1. Select Go To>>Literature. 2. At the Literature Fulfillment Center, select your name in the User drop-
down list to view requests assigned to you. 3. Select the Queued Documents date or date range for the request. The
queued document appears in the upper right pane. 4. Highlight the document and right-click. Select options in the local menu. 5. To fulfill the print or fax request, right-click and select Fulfill.
The document will print or send, depending on the settings configured.6. To reject the request, right-click and select Reject.
GoldMine Administrators Guide Contact Communication • 225

The Rejection of Queued Document dialog box opens. Type or select the reason in the F2 Lookup list.
Fulfilled requests are written to the History tab; the request appears in the Printed Documents area of the Literature Fulfillment Center.
Editing Scheduled Literature RequestsUse this procedure to edit a Literature Request assigned to you7. Select Go To>>Literature Fulfillment. 8. At the Literature Fulfillment Center, select your name in the User drop-
down list to view requests assigned to you. 9. Select the Literature Requests date or date range for the request to act on.
The literature request appears in the upper right pane. 10. Highlight the literature request, right-click, and select Edit.
The Schedule a Literature Request dialog box appears.
About Telemarketing ScriptsUsing GoldMine’s branching scripts, a user can gather information by working through a series of interactive questions. Branching scripts organize questions in a flowchart-type format.Use scripts to automate a variety of tasks such as guiding telemarketers through sales calls, collecting survey information, and training new salespeople.Branching scripts are GoldMine’s version of online questionnaires. With a branching script, telemarketers can deliver structured information to a prospect and, based on the prospect’s response, work through a predefined dialog of related information.Additional information can be designed to answer the customer’s anticipated inquiries or provide requested information, so an accurate response to the customer’s needs is readily available.Each script question can contain an unlimited number of possible answers, and each answer can branch out to a different question. A script can contain up to 99 questions.
226 • Contact Communication GoldMine Administrators Guide

While the script is being executed, information on the prospect’s responses can be saved in the Notes field of the active contact record or placed directly into one of the fields of the contact’s record. Once this data is entered, filter expressions can be used to select contacts who responded similarly to script questions.
Branching Scripts WorkflowBefore attempting to enter a branching script in GoldMine, map the entire script structure on paper. This strategy can be helpful in creating a branching script:11. Decide what questions to ask and the possible responses. List questions
with all the related responses directly below them. Draw lines connecting each response to the appropriate follow-up question. Note each question can have several response lines leading to it. However, no response should have more than one line leading from it (each response can only branch to one question).
12. Number each question. Try to select a numbering scheme that keeps questions in a natural sequence. If there are sub-branches within the script, you will have to jump numbers. A good rule to follow is to number the questions in a way that no answer leads to a lower-valued question. Number questions in intervals of 5 or 10 so additional questions can be inserted later in the script without having to change the numbering scheme.
13. When all the questions are numbered, follow each question back to the preceding answer, and enter the question number next to the response. These numbers are the Goto values entered into GoldMine.
14. Determine if any questions should be omitted from the dialog. Mark them on the worksheet.
15. To store the text of a selected response in a field, enter the name of the field to be used next to the question number on the worksheet. Most fields in the contact record can be used to store script responses.
Now you are ready to enter the script in GoldMine.
GoldMine Administrators Guide Contact Communication • 227

Creating Telemarketing Scripts1. Select Go To>>Scripts.
The Script dialog box appears.2. Click Maintain Scripts.
The Branching Scripts Listing dialog box opens. It lists the script names in the main pane and the number of times it was run.
3. Click New.The Branching Scripts Profile dialog box opens.
Branching Scripts Listing Dialog BoxThe following buttons appear on the Branching Scripts Listing dialog box: • New or Edit. Opens the Branching Script Profile dialog box.
Click New to create a telemarketing script.• Delete. Removes the script.• Reset. Resets the selected script statistics, including all response
percentages, and the number of runs.• Close. Exits the dialog box.
Branching Scripts Profile Dialog BoxThe following options appear on the Branching Scripts Profile dialog box: • Number. Determines the location of the script in the browse window.
Lower numbered scripts appear higher on the list.• Script. Descriptive title for the script. • Existing questions display in the Script Questions pane.
• New. Displays the Branching Script Question dialog box where you add a script question.
• Click New to create a telemarketing script.• Edit. Displays the Branching Script Question dialog box where you edit
the highlighted script question’s number, title, or responses.• Delete. Deletes the selected script question.
228 • Contact Communication GoldMine Administrators Guide
Branching Script Question Dialog BoxWhen you select New or Edit from the Branching Script Profile, the Branching Script Question dialog box opens.• Title. Descriptive title for the question that appears at the top of the
question screen when the script is used.• Update field. Optionally, you can select a field in the drop-down list to
store the response to this question when the script is executed. When a field is used, GoldMine places the text of the response in the selected field in the contact record.
• Notes. Question and any other text to be delivered to the participant.• Question No. The question number assigned to the script question.
You should have selected a question number for each question when you designed the script. Enter numbers lower than 10 with a leading zero. For example, enter 1 as 01.
• Save History. Select this field to include the question’s title and response in the script dialog text. If this field is cleared, the question is excluded from the dialog when the script is executed.
• New. Adds a response record. The Branching Script Answer dialog box opens.
• Edit. Edits a response. The Branching Script Answer dialog box appears.• Delete. Removes the selected response.
Branching Script Answer Dialog BoxWhen you select New or Edit to add a response record, the Branching Script Answer dialog box opens.• Number. The number of the response determines the position of the
response in the listing. Lower number responses appear on the top of the list.
• Goto. Type the number of the question this response leads to. The Goto question number displays if this response is selected during script execution.
• Answer. Type the text of the response.• Prompt for response. Select this field to prompt the operator to enter a
response when this answer is selected.
GoldMine Administrators Guide Contact Communication • 229
This option can be selected only when an entry is made in Update field in the Branching Script Question dialog box. The operator’s response saves to the field specified by Update field. If the script question contains only one answer and that script answer has the Response box checked, GoldMine automatically displays the Enter Response dialog box, eliminating the need to select the answer.
After entering all the questions and responses into GoldMine, perform a test by running the script.
Using Telemarketing ScriptsUse telemarketing scripts to construct structured dialogs with customers.4. Select Go To>>Scripts.
The Telemarketing Script dialog box opens.
5. Select the script in the Script drop-down list and begin asking questions. Update fields as needed.
Making and Answering Calls with SoftPhoneSoftPhone integration with GoldMine uses SIP (Session Initiation Protocol) and VoIP (Voice over IP) technology to place and answer contact calls. The SIP Proxy (not included with GoldMine) must be configured and its functionality verified by an administrator. The administrator can then configure GoldMine to make and receive calls through the SIP Proxy Server by setting SoftPhone preferences.
NOTE: For administrators: If a SIP Proxy Server is being unused in the environment, edit user properties to remove Launch SoftPhone from the GoldMine menu. This avoids attempts to call through this feature when a SIP Proxy Server is not present.
NOTE: All the responses you log while using the script are applied to the current contact record.
230 • Contact Communication GoldMine Administrators Guide
NOTE: IMPORTANT: You may record phone calls through the use of the Licensed Software. The law on recording phone calls varies from country to country and state to state. FrontRange recommends that you inform the other party or parties to your phone call that you are recording their conversation. However, it is your responsibility to comply with all applicable laws and regulations in your use of the Licensed Software. You agree to abide by all applicable communication, privacy and similar rules, directives and other laws in your use of the Licensed Software. In no event will FrontRange be liable for any action or inaction on your part which leads to or causes you to break the law.
Using SoftPhone1. Select Actions>>Call Contact>>Launch SoftPhone.
The SoftPhone control dialog box opens.2. Use SoftPhone to Answer incoming calls, manually Dial phone numbers,
Transfer calls, Hang up, place calls on Hold, and make Blind Transfer calls to another number or GoldMine user.
3. GoldMine reads the phone1, phone2, and phone3 fields and pulls those numbers into the Contact Numbers area. Click a number to dial it.
NOTE: UPHONE fields are user-defined fields GoldMine users can create and use as extra phone fields. If the name starts with UPHONE, GoldMine recognizes the field as an extra phone field.
4. After placing or receiving a call, adjust the speaker and microphone volume.
5. To use SoftPhone by default, select Tools>>Options>>Telephony and select Use SoftPhone by default.
GoldMine Administrators Guide Contact Communication • 231
About the Personal ContactsTo keep a separate phone log for other important or commonly used telephone numbers, use the Personal Contacts feature to maintain a private file you can access easily while working in GoldMine. Only the user who created the file can access a Personal Contacts.1. Select Go to>>Personal.
Your Personal Contacts dialog box opens.2. Click Dial to use the Phone Dialer.3. Click New to add a new entry.4. Click Edit to change the selected entry.5. Click Delete to remove the selected entry.6. Click OK to close.
NOTE: The Contact field must be limited to 30 characters.
232 • Contact Communication GoldMine Administrators Guide
Data Maintenance and Management
About Managing InformationGoldMine's extensive feature set lets you share data between GoldMine and other applications, to globally replace field data, and to monitor running processes.Maintaining the data in your GoldMine database ensures the highest performance for your system and the most effective use of information. GoldMine is equipped with many features to help maintain your system.
About Contact Set DatabasesUse the Contact Set Databases dialog box to create, attach, delete, and edit the properties of contact databases. To open the Contact Set Databases dialog box, use the following procedure. 1. Select Tools>>Databases>>Open Database.
• The Contact Set Databases dialog box opens. The currently attached Contact Set databases display in the database list stored in the SPFiles table. The buttons are explained below:
• New. Launches the Database Wizard. Create a new database. See “Data Maintenance and Management” on page 233.
• Attach. Opens the Contact Set Profile dialog box. Attach a database to the Contact Set listing. See “Defining Contact Set Profiles” on page 234.
• Delete. Deletes the highlighted database.
GoldMine Administrators Guide Data Maintenance and Management • 233
• Properties. Opens the Contact Set Profile dialog box. Edit properties of an existing database. See “Defining Contact Set Profiles” on page 234.
• Open. Opens the highlighted database in GoldMine. See “Opening Databases” on page 235.
• Close. Closes the Contact Set Databases dialog box.2. If you right-click the database list with a database highlighted, select
Open, Attach Database, New, Delete, and Properties options, and also select:• Maintain Database. Launches the Maintenance Wizard. See “About
Maintaining Databases” on page 243.• Find. Searches for words in the Description, Access, and Database/
Location fields.• Output to. Output the Contact Set list to the printer in a GoldMine
Report format, Word, Excel, or the clipboard.
Defining Contact Set ProfilesThe Contact Set Profiles dialog box appears when editing the Properties or Attaching Databases. You can set the description and path, ownership and access, and the SQL login information.Use the following procedure to define contact set profiles.1. Select Tools>>Databases>> Open Database.
The Contact Set Databases dialog box opens. 2. Highlight the database and click Properties to edit an existing database, or
click Attach to add a database to the Contact Set Database list. The Contact Set Profiles dialog box opens.
3. In the Contact Set area, type the Description in the field.4. Type the three-letter File Code.
This is a unique code used to identify a database among multiple databases when GoldMine synchronizes.
NOTE: The File Code is required for synchronization.
234 • Data Maintenance and Management GoldMine Administrators Guide
5. The Server Type drop-down list displays the type of database (fixed; you cannot add or change an entry in this field).
6. Select the appropriate Alias from the drop-down list (displays known aliases; auto populated based on Database Connections Manager).
7. In the Owner text box, retain the default dbo or type the owner of a SQL database (Firebird has no owner).
8. In the GoldMine File Ownership & Access area, select a user or user group from the Grant access to this file for drop-down list, or leave as (public). Only the owning user or user group can open this Contact Set.
NOTE: Users with Master Rights can access all contact databases, without regard to the owner.
9. Select Grant Access from this GoldMine license only to let only the currently running GoldMine to open the database.
NOTE: For SQL users only, type the Logon name and Password you placed on the SQL database.
10. Click OK.
Opening DatabasesGoldMine lets you have more than one Contact Set database. For example, departments within your company may use different databases.1. Select Tools>>Databases>>Open Database.
The Contact Set Databases dialog box opens.2. Highlight the database to open and click Open. The new database opens
with the database name in the lower left corner of the GoldMine status bar.
GoldMine Administrators Guide Data Maintenance and Management • 235
About Creating DatabasesUse the Databases Wizard to create a database for new data or rehost an existing database to a new database. You can create or rehost the Contact files and/or the GoldMine files. The Contact files contain all the tables related to the Contact records; when you create a new database, the database name is added to the Contact Set Databases dialog box. The GoldMine files contain the shared tables such as Calendar, Filters, Mailbox. When you create a new database of any of these files, GoldMine does not add the database name to the Contact Set Databases dialog box. Rehosting creates a new database, but copies or converts data from the old database to the new one without affecting the original database. The rehosting process converts dBASE to Firebird or SQL, letting an organization support multiple platforms.
Creating SQL DatabasesCreating a new SQL database is a three-stage process. Create the:• SQL database shell• Alias• Database in GoldMine
1. From the Windows Start menu, select Programs>>Microsoft SQL Server>>SQL Server Manager Studio.
2. Expand the files under the Console Root to locate the correct server. Expand the server to locate Databases.
3. Right-click Databases and select New Database. The Database Properties dialog box appears.
4. In the Name text box, type the database name.5. Click OK. The new database now appears in the database list. 6. Create an alias for the database in the Database Connections Manager.
NOTE: Follow the steps below to initiate the process, or use the Database Wizard. For detailed information, see your Microsoft SQL documentation.
236 • Data Maintenance and Management GoldMine Administrators Guide

Using the Databases WizardUse the Databases Wizard to create a new database or contact set. The new database can be created as either a copy of the currently active database, or as an empty database containing the same fields as the currently active database. You can also copy data from a dBASE database. 1. Select Tools>>Databases>>New Database.
The Welcome to the Databases Wizard dialog box opens.
Select the check boxes corresponding to the type of data you will create or copy.• Contact set tables. Select this option to create or rehost a new Contact
Set.• Common GoldMine tables. Select to create or rehost the shared
GoldMine files. Select this option only if you are rehosting from dBASE to SQL or creating a complete copy of the entire database.
Click Next.
NOTE: For this example, both contact set and common GoldMine tables are selected.
GoldMine Administrators Guide Data Maintenance and Management • 237

2. To create a new alias or database, click the Alias Manager button. The Database Alias Manager dialog opens. After you create your new alias or database, the Databases Wizard will reopen. See “Using the Database Alias Manager for SQL and Firebird Databases” on page 241.• If you chose to create or copy contact set tables in the previous step of
the Wizard, select the database alias for the new contact set from the drop-down menu, then enter a description for it in the text field below.
• If you chose to create or copy common GoldMine tables in the previous step of the Wizard, select the database alias for the new GoldMine tables from the drop-down menu.Click Next.
238 • Data Maintenance and Management GoldMine Administrators Guide

Select the data source for your new database using the radio buttons• Create blank tables. (no data, except for a few system records):
Select to create an empty database. Click Next, or go to Select individual tables to rehost below to individually select the tables for your new database.
• Copy data from the currently active database. Select to copy records from the currently active database into the new database. Click Next, or go to Select individual tables to rehost below to individually select the tables for your new database.
• Copy data from 6.x dBASE tables:. Select to open a dialog box for defining paths to external dBASE data.
• Advanced Settings:• Select individual tables to rehost: Select this check box to choose
individual tables to rehost in your new database. • Click Next. The Rehost Selected Tables dialog box opens.
After the dBASE and Rehosting processes are completed, (or if you did not select these optional step), the Database Access dialog opens.
3. Select from the following options:• From the Allow access to drop-down list, accept the default (public).
This grants access to all users and groups. To select a user or user group, select a name in the drop-down list.
• In the Contact set code text box, type a unique value (such as GM7_P). GoldMine uses this to associate synchronized data with the correct database, regardless of its local name.
GoldMine Administrators Guide Data Maintenance and Management • 239

Example: An East Coast branch office and a West Coast branch office might have the same Contact Set. Each branch office wants to synchronize data from their local Contact Set with the other office. The East Coast office names the Contact Set Industrial; the West Coast office names the same contact set "Manufacturing". As long as each office assigns the same Contact set code value to the local copy of the database, the offices can synchronize data.
4. Clear the Allow database access only from this GoldMine installation check box.
NOTE: Selecting this check box allows only the currently active GoldMine system (as determined by serial number) to log into the database. A GoldMine system with a different serial number cannot log into the database.
Click Next. The Creating Database Files dialog box opens.
5. Click Finish. The status dialog box opens. When complete, a message appears asking if you want to open this new database now. Click No.
NOTE: If you are creating a Firebird database and receive an error message (ODBC drivers are not present), install the ODBC driver first, then copy the FBclient32.dll to the GoldMine installation directory.
240 • Data Maintenance and Management GoldMine Administrators Guide

Using the Database Alias Manager for SQL and Firebird Databases
1. From the menu bar, select Tools>>Databases>>Alias Manager, or From the appropriate window in the Databases Wizard, click the Alias Manager button. The Database Alias Manager opens. To alias a database, click New Alias. The Edit Alias dialog opens.
2. In the Alias Name field, type a name for the alias. There is a 100-character limit.
3. From the Server Type drop-down list, select either MSSQL or Firebird.
NOTE: : The form will change depending on the Server Type selected.
4. In the Host field, type the name of the computer hosting the database.5. In the Database field, type the name of the database.6. In the Owner field, type the database owner's name. [Typically, this is dbo.
This applies only to MSSQL aliases.]7. In the Login field, type the username for the database.8. In the Password field type the password for the database.
NOTE: By default, the Password text box displays a fixed number of asterisks as a security measure.
NOTE: This dialog window contains a form for collecting information used to build an ADO connection string. This information is stored in an INI file.
GoldMine Administrators Guide Data Maintenance and Management • 241

NOTE: This action registers the alias and creates the database specified. The new database will not be created without completing this step, although it will appear in the list. You cannot test it prior to completing this step.
9. Select the Use Windows Authentication (SSPI) check box if you have designated Windows Authentication Mode instead of the SQL authentication. [This only applies to MSSQL aliases.]
10. Click Create New Database.11. Click Test Connection. This verifies that the alias was created
successfully.12. Repeat this process for each alias you wish to create and the click OK
when done.
Editing an Alias1. From the menu bar, select Tools>>Databases>>Alias Manager.
The Database Alias Manager opens. 2. Select an alias from the list and click Edit.
This activates the associated form.3. Make appropriate changes to the information in the text boxes.4. Click Save and then click OK.
Deleting an Alias1. To delete an alias, select the alias.2. Click Delete and then click OK.
242 • Data Maintenance and Management GoldMine Administrators Guide

About Maintaining DatabasesGoldMine includes a database Maintenance Wizard that generates indexes, rebuilds and packs the data, and sorts and verifies the database. Indexing ensures data integrity and quick access to the data in indexed fields. Rebuilding and packing creates fresh data files and builds tables, and then repacks the database, minus the deleted records. Sorting the database orders database files by the most-used indexes. Verifying data ensures it is readable, that the fields in the synchronization records are populated and readable, and that unique fields are not duplicated.• Indexing Databases• Rebuilding and Packing Databases• Sorting and Verifying Databases
Only one user should be logged into the GoldMine system during maintenance operations. Before the maintenance begins, GoldMine ensures no other user is accessing that data. Once the operation is in progress, GoldMine prevents other users from accessing the system by renaming the License.bin to License.bix. When maintenance is completed, the license renames back to License.bin.To monitor what database maintenance has been initiated, view the Maintenance Logs.
CAUTION: Before maintaining the database, always do a full backup of your database. This guarantees you can restore the database if something interrupts the process. For example, a power outage or network failure during the process could cause data loss.
GoldMine Administrators Guide Data Maintenance and Management • 243
Attaching DatabasesAttach an existing database to make it available in GoldMine. Then tell GoldMine where the database is located, who the owner is, and, if necessary, the SQL login information.Use the following procedure to attach a database.1. Select Tools>>Databases>> Open Database. 2. At the Contact Set Databases dialog box, click Attach.
The Contact Set Profile dialog box opens. 3. Update the fields as needed. See “Defining Contact Set Profiles” on page
234.4. Click OK.
Globally Replacing Fields with a ValueUse the Replace a Field with a Value option in the Global Replace Wizard to change the value of a field with another value.1. Select Tools>>Data Management>>Global Replace. 2. At the Global Replace Wizard, select Replace a Field with a Value, then
click Next. 3. Select a Replace Field in the drop-down list.
This specifies the field to be updated. The data in this field will be replaced by the value specified in the With Value field. Select the GoldMine fields in the drop-down list.
4. Type or select from the F2 Lookup list the With Value to insert in the selected field. This option specifies the replacement value that will be placed in the Replace Field. GoldMine will replace the specified field in all contact records with the value in this field. For example, if the Replace Field is City, and the With Value entry is Long Beach, GoldMine will replace all City entries with Long Beach.
5. Click Next. 6. Check the fields and replacement values before initiating the process:
244 • Data Maintenance and Management GoldMine Administrators Guide
• Expand partial contact records. Expands partial contact records in the database into complete records if the field to be replaced is contained in the Contact2.dbf file. If the field is contained in Contact2.dbf, this option is selected by default. If you clear the Expand partial contact records option, partial records are not expanded, and field values in these records are not updated. However, when additional entries require more space, GoldMine converts a partial record to a complete record. Clearing Expand partial contact records prevents GoldMine from automatically converting partial records during a global replacement.
• Update linked fields (based on lookup.ini). Changes values in linked fields according to the instructions in the [AutoUpdate] section of the Lookup.ini file. This option is available only if one or more selected fields include fields listed in Lookup.ini.
• Log updates in history. Records global changes to fields in the following System Logs:
• Process Monitor Logs. Displays the date, time, user, and number of records affected by the global replacement
• Contact Files Logs. Displays the date, time, user, field name, and the value inserted by the global replacement. This option appears only if you selected Log updates in history for each field from the Field Label dialog box which you can access by pressing CTRL and double-clicking the field label.
7. You can globally replace more than one field at a time. To add another field and replacement value, click Back.
8. If you have more than one replacement entry, Remove becomes active. You can delete any entry other than a single entry.
9. Click Remove to delete the highlighted global replacement entry.10. Click Next.
The Global Replace Wizard displays a list of available filters and groups to apply to limit the records updated by the global replacement. The filter or group does not have to be activated prior to selection.Select the filter or group to apply in the drop-down list, then click Next. The final Global Replace dialog box appears.
11. Click Finish.
GoldMine Administrators Guide Data Maintenance and Management • 245

About the Lookup.iniLookup.ini does not exist in GoldMine until you create it using a text editor. It writes as a standard configuration file, similar to the Win.ini and System.ini files and stores in the GoldMine directory.• Lookup.ini performs functions based on a trigger and resulting action:• Update a Contact1 or Contact2 field based on an entry in another Contact1
or Contact2 field.• Update Contact1 or Contact2 field based on an expression.• Launch an external application based on an expression or the occurrence of
a specified field entry.• Apply an activity color code to calendar activities based on either an
activity type, an activity code, or both.• Launch an external application when a new record is created.Note: If the Lookup.ini script updates a field based on updates to another field, the update of the second field does not follow the update access security for the second field set in the Field Properties dialog box. Example: use a Lookup.ini to update Key2 based on updates to Key1. The user has update rights to Key1, but not to Key2 – but can update Key1 and the Lookup.ini updates Key2.Lookup.ini includes: • [AutoUpdate]: Specifies trigger fields (fields that create an update if
modified) and the resulting field to be updated. The second section comprises the specific instructions and parameters used when updating the GoldMine field.
• [OnNewRun] and [OnEditRun]: Determines the external application to launch when a new record is created (a contact record or a supplemental file record adding a new calendar activity).
• [CalClrCode]: Specifies the color to assign to the activity being scheduled.
246 • Data Maintenance and Management GoldMine Administrators Guide
Examples of Using Lookup.ini
Entering Data in One Field Updates AnotherA company requires that the Salesperson field, USalesRep, automatically update [AutoUpdate] when the GoldMine user typing data populates the City field. The Lookup.ini is headed [AutoUpdate]. It is where the trigger and update fields are defined in the format: Trigger field=Update field.There is no need to prefix field names with a database (Contact1->City) because no two fields in the Contact1 or Contact2 data files (except AccountNo) have the same field name. This example is automatically updating field data.[AutoUpdate]
City=USalesRep
When the trigger field (City) is updated, the Lookup.ini evaluates the subroutine of the same update field name (USalesRep). The result of this evaluation determines what is entered into the USalesRep field. In this example, the subroutine (USalesRep) contains a reference to the trigger field (City) and a list of potential values that could be contained within the City field (Seattle, Aspen, Kansas City). [USalesRep]
Lookup1=Contact1->City
Seattle=Janice Parks
Aspen=Danny Davis
Kansas City=Ken Linden
If a match is found, for example, the City field contains Seattle, Lookup.ini populates the USalesRep field with Janice Parks (Seattle=Janice Parks). For every possible entry in the City field, a Lookup must be listed if it is to update another field.
Checking a Sequence of Fields to Update FieldA company requires the Salesperson field (USalesRep) automatically update when the GoldMine user entering data populates the City field. If no city is matched, the State field (or other geographic boundary) must be evaluated so a second attempt is made at populating the Salesperson field.
GoldMine Administrators Guide Data Maintenance and Management • 247

Apply a second Lookup command. If GoldMine cannot match the City field with one of the listed values, it moves on to the next Lookup, which in this case is State. If required, a maximum of 9 different Lookups can be defined. [AutoUpdate]
City=USalesRep
[USalesRep]
Lookup1=Contact1->City
Seattle=Janice Parks
Aspen=Danny Davis
Kansas City=Ken Linden
Lookup2=Contact1->State
WA=Janice Parks
CO=Danny Davis
MO=Ken Linden
If the City field does not contain Seattle, Aspen, or Kansas City, the State field is evaluated. If the State returns a value of CO, the USalesRep field populates with Danny Davis. Set every parameter to update the field correctly.
248 • Data Maintenance and Management GoldMine Administrators Guide
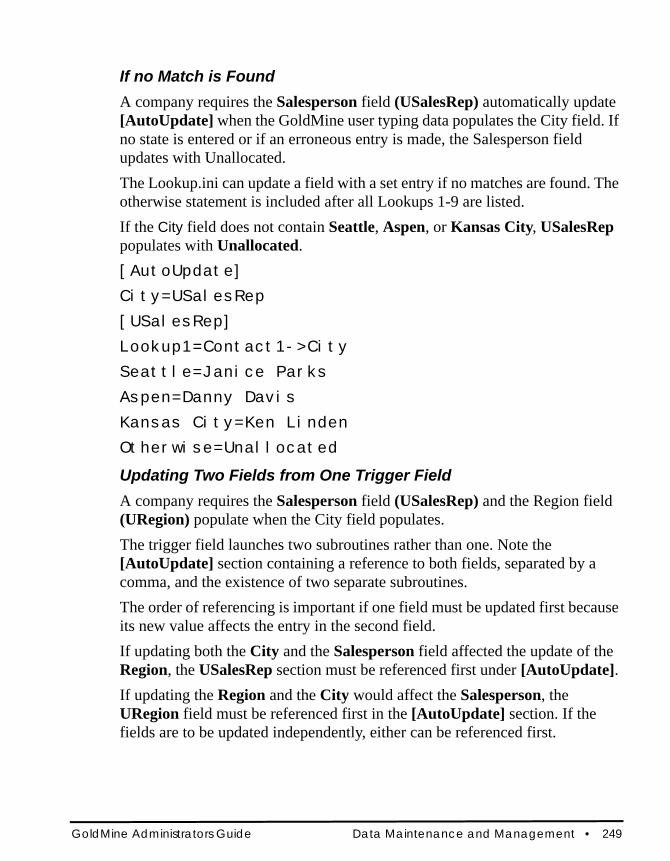
If no Match is FoundA company requires the Salesperson field (USalesRep) automatically update [AutoUpdate] when the GoldMine user typing data populates the City field. If no state is entered or if an erroneous entry is made, the Salesperson field updates with Unallocated.The Lookup.ini can update a field with a set entry if no matches are found. The otherwise statement is included after all Lookups 1-9 are listed. If the City field does not contain Seattle, Aspen, or Kansas City, USalesRep populates with Unallocated.[AutoUpdate]
City=USalesRep
[USalesRep]
Lookup1=Contact1->City
Seattle=Janice Parks
Aspen=Danny Davis
Kansas City=Ken Linden
Otherwise=Unallocated
Updating Two Fields from One Trigger FieldA company requires the Salesperson field (USalesRep) and the Region field (URegion) populate when the City field populates. The trigger field launches two subroutines rather than one. Note the [AutoUpdate] section containing a reference to both fields, separated by a comma, and the existence of two separate subroutines.The order of referencing is important if one field must be updated first because its new value affects the entry in the second field. If updating both the City and the Salesperson field affected the update of the Region, the USalesRep section must be referenced first under [AutoUpdate]. If updating the Region and the City would affect the Salesperson, the URegion field must be referenced first in the [AutoUpdate] section. If the fields are to be updated independently, either can be referenced first.
GoldMine Administrators Guide Data Maintenance and Management • 249
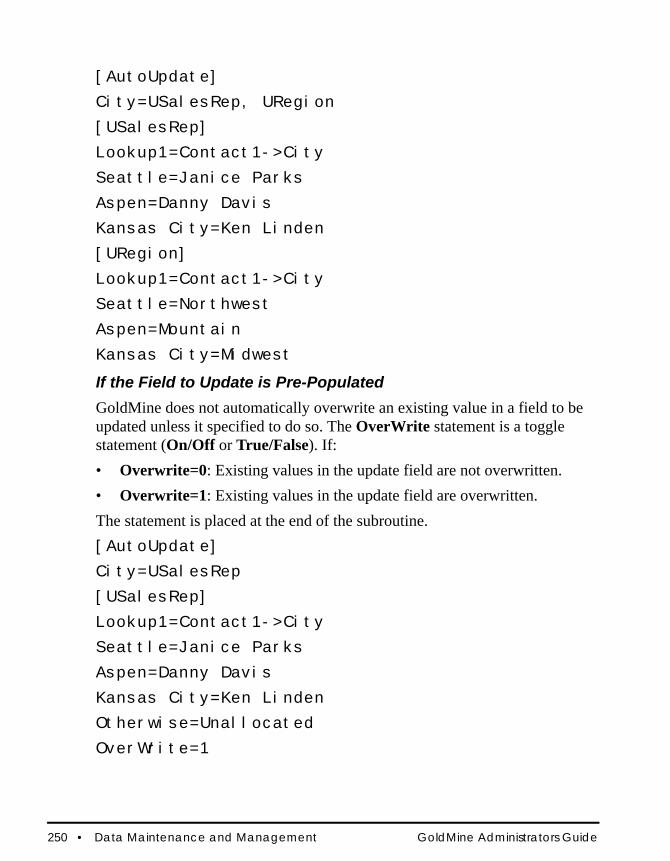
[AutoUpdate]
City=USalesRep, URegion
[USalesRep]
Lookup1=Contact1->City
Seattle=Janice Parks
Aspen=Danny Davis
Kansas City=Ken Linden
[URegion]
Lookup1=Contact1->City
Seattle=Northwest
Aspen=Mountain
Kansas City=Midwest
If the Field to Update is Pre-PopulatedGoldMine does not automatically overwrite an existing value in a field to be updated unless it specified to do so. The OverWrite statement is a toggle statement (On/Off or True/False). If:• Overwrite=0: Existing values in the update field are not overwritten. • Overwrite=1: Existing values in the update field are overwritten.The statement is placed at the end of the subroutine.[AutoUpdate]
City=USalesRep
[USalesRep]
Lookup1=Contact1->City
Seattle=Janice Parks
Aspen=Danny Davis
Kansas City=Ken Linden
Otherwise=Unallocated
OverWrite=1
250 • Data Maintenance and Management GoldMine Administrators Guide
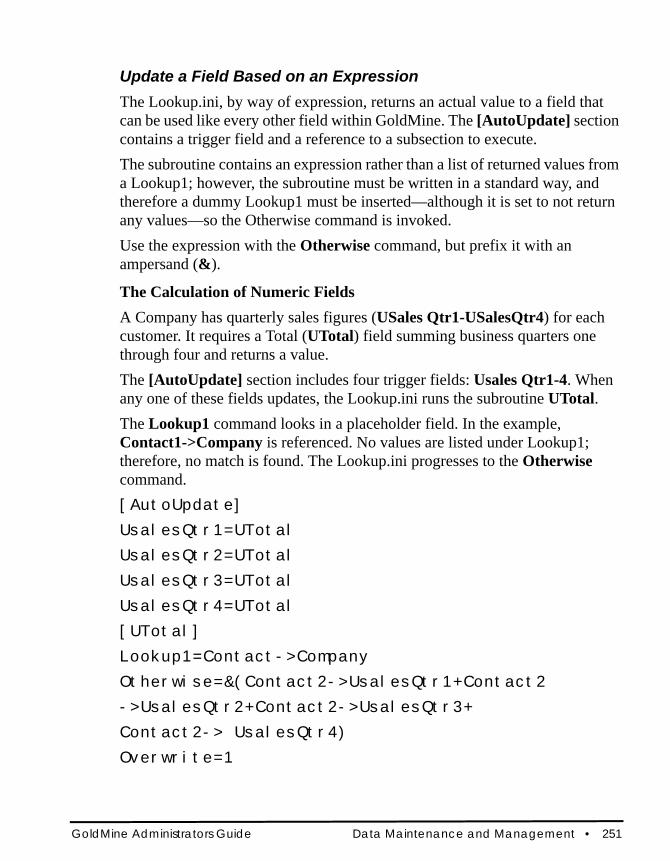
Update a Field Based on an ExpressionThe Lookup.ini, by way of expression, returns an actual value to a field that can be used like every other field within GoldMine. The [AutoUpdate] section contains a trigger field and a reference to a subsection to execute.The subroutine contains an expression rather than a list of returned values from a Lookup1; however, the subroutine must be written in a standard way, and therefore a dummy Lookup1 must be inserted—although it is set to not return any values—so the Otherwise command is invoked.Use the expression with the Otherwise command, but prefix it with an ampersand (&).
The Calculation of Numeric FieldsA Company has quarterly sales figures (USales Qtr1-USalesQtr4) for each customer. It requires a Total (UTotal) field summing business quarters one through four and returns a value.The [AutoUpdate] section includes four trigger fields: Usales Qtr1-4. When any one of these fields updates, the Lookup.ini runs the subroutine UTotal.The Lookup1 command looks in a placeholder field. In the example, Contact1->Company is referenced. No values are listed under Lookup1; therefore, no match is found. The Lookup.ini progresses to the Otherwise command.[AutoUpdate]
UsalesQtr1=UTotal
UsalesQtr2=UTotal
UsalesQtr3=UTotal
UsalesQtr4=UTotal
[UTotal]
Lookup1=Contact->Company
Otherwise=&(Contact2->UsalesQtr1+Contact2
->UsalesQtr2+Contact2->UsalesQtr3+
Contact2-> UsalesQtr4)
Overwrite=1
GoldMine Administrators Guide Data Maintenance and Management • 251

Calculation Fields Using Decimal PlacesFor the Lookup.ini to calculate a value that includes a decimal place, each field referenced when calculating must contain the same amount of decimal places whether needed.The Otherwise command must include a String statement (STR) in order to calculate to x decimal places.[AutoUpdate]
UsalesQtr1=UTotal
UsalesQtr2=UTotal
UsalesQtr3=UTotal
UsalesQtr4=UTotal
[UTotal]
Lookup1=Contact->Company
Otherwise=&STR(Contact2->UsalesQtr1+Contact2->UsalesQtr2+Contact2->UsalesQtr3+Contact2->UsalesQtr4,2,10)
Overwrite=1
The Otherwise statement ends in 2,10 where 2 indicates the number of decimal places and 10 the length of the field.
Averaging Blank and Filled Fileds Using Hypothesis ValuesIf the Otherwise command holds an expression that calculates the sum of the contents of all fields, then divides the total by the number of fields, those empty fields (set to zero) are also included. Otherwise=&((Contact2>Ufield1+Contact2->Ufield2+Contact2->Ufield3)/3)
If the field values were:• 10, 20 and 30, the Lookup.ini returns a value of 20 (60 divided by 3).• 10, 20 and 0, the Lookup.ini returns a value of 10 (30 divided by 3).Inclusion of the blank or zero fields may be inappropriate. In our example the final calculation should be divided by 2 not 3, resulting in an average of 15.
252 • Data Maintenance and Management GoldMine Administrators Guide
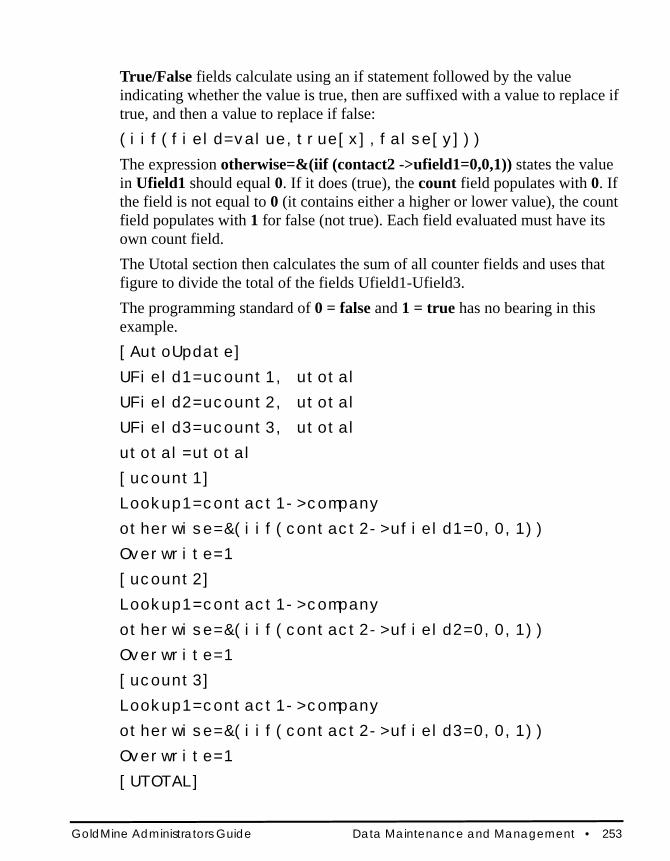
True/False fields calculate using an if statement followed by the value indicating whether the value is true, then are suffixed with a value to replace if true, and then a value to replace if false:(iif(field=value,true[x],false[y]))
The expression otherwise=&(iif (contact2 ->ufield1=0,0,1)) states the value in Ufield1 should equal 0. If it does (true), the count field populates with 0. If the field is not equal to 0 (it contains either a higher or lower value), the count field populates with 1 for false (not true). Each field evaluated must have its own count field.The Utotal section then calculates the sum of all counter fields and uses that figure to divide the total of the fields Ufield1-Ufield3.The programming standard of 0 = false and 1 = true has no bearing in this example.[AutoUpdate]
UField1=ucount1, utotal
UField2=ucount2, utotal
UField3=ucount3, utotal
utotal=utotal
[ucount1]
Lookup1=contact1->company
otherwise=&(iif(contact2->ufield1=0,0,1))
Overwrite=1
[ucount2]
Lookup1=contact1->company
otherwise=&(iif(contact2->ufield2=0,0,1))
Overwrite=1
[ucount3]
Lookup1=contact1->company
otherwise=&(iif(contact2->ufield3=0,0,1))
Overwrite=1
[UTOTAL]
GoldMine Administrators Guide Data Maintenance and Management • 253

Lookup1=contact1->company
otherwise=&((contact2->ufield1+contact2> ufield2+contact2->ufield3)/(contact2> ucount1+contact2->ucount2->+contact2> ucount3))
Overwrite=1
Globally Updating Fields Using Advanced OptionsUse the Updating Fields Using Advanced Options in the Global Replace Wizard for the following advanced options: • Replacing an entire field with a value• Replacing field text only with a value• Evaluating the replacement value as a dBase expression• Replacing field text with a value at the specified position1. Select Tools>>Data Management>>Global Replace. 2. A the The Global Replace Wizard, select the Update a field using
advanced options and click Next. 3. Select from the following options:
• Update Field. Specifies the field to replace with the selected option. • Replace. Type the value to insert into the specified field. GoldMine
replaces the specified field in all contact records with this value.• Replace the entire Field with Value. Removes any entry in the field
and inserts the contents of the field.• Replace text with Value. Removes specified text only from the field
and inserts the value from this field. GoldMine conducts a case-sensitive search for the value you enter. An F2 Lookup list is not available for this option.
• Insert Value at position. Specifies the position, in character spaces, where the replacement value appears in the specified field.
• Evaluate Value as dBase expression. Replaces the field with the result of the dBase expression entered in Replace.
4. In the Convert to area, select one:
254 • Data Maintenance and Management GoldMine Administrators Guide

• Proper case. Converts characters in the field value to initial capitals. For example, if the field value is ACME PRODUCTS, the entry is converted to Acme Products.
• Upper case. Converts all alphabet characters in the field value to capital letters. For example, if the field value is Acme Products, the entry is converted to ACME PRODUCTS.
• Lower case. Converts all alphabet characters in the field value to lowercase letters. For example, if the field value is Acme Products, the entry is converted to acme products.
• Phone format. Converts all telephone numbers in the replacement entry to the format that was selected for the record. Telephone numbers in contact records set up for a USA format appear as (999)999-9999; telephone numbers in contact records set up for an international phone format have no formatting applied.
• Click Next.5. Check the fields and replacement values before initiating the process.
• Expand partial contact records. Expands partial records in the database into complete records if the field to replace is contained in the Contact2.dbf file.
• Update linked fields (based on lookup.ini). Changes values in linked fields according to the instructions in the [AutoUpdate] section of the Lookup.ini file. This option is available only if one or more selected fields include the field(s) listed in Lookup.ini.
6. You can globally replace more than one field at a time. To add another field and replacement value, click Back.
7. Click Remove to delete the highlighted global replacement entry.If you have more than one replacement entry, Remove becomes active. You can delete any entry other than a single entry.
8. Click Next.
NOTE: If the field is contained in Contact2.dbf, this option is selected by default. If you clear the Expand partial contact records options, partial records are not expanded, and field values in these records are not updated.
GoldMine Administrators Guide Data Maintenance and Management • 255

The Global Replace Wizard displays a list of available filters and groups you can apply to limit the records to be updated by the global replacement. The filter or group does not have to be activated prior to selection.
9. Select the filter or group to apply from the drop-down list and click Next. 10. At the final Global Replace dialog box, click Finish.
Moving Linked Documents and AttachmentsEmail attachments and/or documents linked to contacts, the Knowledge Base and Service Center may be stored in folders on disks. Use the following procedure to move that folder to another location, (for example from the C: drive to the E: drive, or from Program Files to ProgramData for Vista compliance). Use the following procedure to move linked documents and attachments.1. Select Tools>>Data Management>>Move Linked Docs and Attach-
ments.2. Click the Move the Linked Documents, Knowledge Base and Case
Attachments to checkbox if not selected and then define destination folder.The Move Linked Docs and Attachments dialog box opens.• Go to Step 3 if you want GM to automatically find ALL linked
documents, knowledge base and attachments, and move them to destination folder.
• Click the Add button and select the source folder(s) to set the list of directories manually. Each time a new record will appear in the Move documents from: list.
• To remove a record from Move documents from: list highlight it by right mouse click and click Remove.
3. To move mail attachments check the Move all Mailbox Attachments to: checkbox and then define destination folder.
4. In the Options area, select one:• Move actual files and folders, and update database references.• Update the database reference only. (Choose this selection when
files and folders are already been moved to destination directory).
256 • Data Maintenance and Management GoldMine Administrators Guide
5. Click Go to finish or Cancel to cancel operation.The files are moved along with all existing subdirectories.
Backing Up DatabasesIf you encounter a problem while working in GoldMine that causes data loss or data corruption, the problem may be internal or external to your system. Ensure data availability in the event of data loss or corruption using a regular program of data backup.To maintain an optimal backup system, make a separate backup on each day for a 2-week cycle. That is, your backup system should include 10 to 14 individual backups. Two weeks of backups are recommended because data corruption may not be discovered for several days. Only 1 or 2 backups may contain corrupted data. Use tape or diskettes as a backup medium. For added security and recovery, keep a backup in secure offsite location (a bank deposit). Ensure you periodically update the backup.
NOTE: Maintain regular backups of GoldMine contact data, setup data, and program files. To back up contact data in GoldMine on an MSSQL database, use a utility designed to back up SQL data
Restoring SQL DatabasesTo use the SQL restore utility, find the SQL Server Enterprise Manager and right-click the database name. Select All Tasks>>Restore Database. The SQL Server Restore dialog box appears. Select the backup file to restore and click OK. The Restore Progress window shows the restoration process status.SQL Query for Counting ContactsIf you are running GoldMine on an SQL database, the Summary tab does not display the database count. Instead you see n/a in the Record field. You can, however, count the number of records in an SQL database by running a query from the SQL Query tab of the Filters and Groups dialog box.
GoldMine Administrators Guide Data Maintenance and Management • 257

Running the SQL Counting Query1. Select Lookup>>SQL Queries. The Filters and Groups dialog box opens
to the SQL Query tab.2. In the large upper pane, type this statement:
Select Count(*) from contact1
3. Select Query. GoldMine displays the record count results under Column1 in the lower pane.
Using the GoldMine Maintenance WizardConfigure these maintenance options:• Indexing. Ensures data integrity and quick access to the data in indexed
fields. See “Indexing Databases” on page 259.• Rebuilding and Packing: Creates fresh data files and builds tables, then
repacks the database minus deleted records.• Sorting and Verifying: Sort reorders records in the tables based on the
most-used indexes. Verify checks data for readability. It checks to see if all fields in the synchronization records of the database files are populated and for any duplication of unique fields. See “Sorting and Verifying Databases” on page 261.
Use the following procedure to use the Maintenance Wizard.1. Select Tools>>Databases>>Maintain Databases. The Welcome to the
GoldMine Maintenance Wizard dialog appears.
CAUTION: Always back up your database before maintaining GoldMine.
258 • Data Maintenance and Management GoldMine Administrators Guide
2. Select: • Current Contact Set Files. Includes currently open contact files. Does
not include GoldMine files, such as Calendar, Lookup, or Mailbox.• Individual Files. Lets you select individual tables from open contact
files and GoldMine files.• All Database Files. Lets you select GoldMine files, current Contact
Set, or all contact sets.• Automatic Maintenance. Lets you configure automatic maintenance
options (regular maintenance without user intervention). 3. Click Next.
The dialog box that opens varies based on previous selection (each box eventually opens the Rebuild, Sort and Verify Database Files dialog box).
Indexing DatabasesWhether you are using Firebird or SQL, indexes may become lost or corrupt. For example, if a large amount of data is added or removed or statistics update has been disabled, you may want to re-index the database in order to let the SQL engine recalculate index selectivity (also known as index statistics). Selectivity is an internal measurement of efficiency of the index and it is used by the SQL engine in deciding how best to access the data.Use the following procedure to index the database.1. Select Tools>>Databases>>Maintain Databases.
The Welcome to the GoldMine Maintenance Wizard dialog box opens.
2. Select:• Current Contact Set Files. Indexes only the contact files/tables in the
currently open contact database. If you select Current Contact Set Files, the Rebuild, Sort and Verify Database Files dialog box opens.
NOTE: : Depending on the size of your database, indexing the entire database can be time-consuming. Select All Database Files if you are indexing the entire database. To index a particular table, select Individual Files.
GoldMine Administrators Guide Data Maintenance and Management • 259

• Individual Files. Specifies which files/tables in the GoldMine directory and in the open database that GoldMine indexes. If you select Individual Files, the Maintain Selected Tables dialog box opens.
• All Database Files. Indexes and rebuilds contact files/tables in the open contact database, and those contained in the GoldMine system directory. If you select All Database Files, the Maintain All Database Files dialog box opens.
3. Click Next.4. Based on your selection in step 2:
• If you selected Individual Files, at the Maintain Selected Tables dialog box, select the table or tables to be indexed. Click Next.To select all tables, click Set All. To clear all tables, select Reset All.
• If you selected All Database Files, select Files in GoldMine Directory and Current Contact Set Files. Select All Contact Set Files to index other contact databases. Click Next.
5. The Rebuild, Sort and Verify Database Files dialog box opens. To perform a simple indexing, do not select the options. Click Next.
6. Select Force all users to exit GoldMine within x minutes. Set the number of minutes. A message is sent to the currently logged in users telling them the GoldMine Administrator is performing maintenance, to complete their work, and close GoldMine.
7. Click Finish. GoldMine deletes the current indexes for the selected table or tables, and creates new ones.
NOTE: Select Automatic Maintenance to configure GoldMine to automatically perform indexing and rebuilding. The Automatic Maintenance dialog box opens.
260 • Data Maintenance and Management GoldMine Administrators Guide

Sorting and Verifying DatabasesSort reorders records in the tables based on the most-used indexes. Verify checks data for readability. It checks to see if all fields in the synchronization records of the database files are populated and for any duplication of unique fields.
NOTE: Always back up your database before maintaining GoldMine.
1. Select Tools>>Databases>>Maintain Databases. 2. At the Welcome to the GoldMine Maintenance Wizard dialog box select:
• Current Contact Set Files. Includes currently open contact files. Does not include GoldMine files, such as Calendar, Lookup, or Mailbox.
• Individual Files. Lets you select individual tables from both the currently open contact files and the GoldMine files.
• All Database Files. Lets you select GoldMine files, current Contact Set, or all contact sets.
• Automatic Maintenance. Lets you configure automatic maintenance options (regular maintenance without user intervention).
3. Click Next.The dialog box that appears varies based on previous selection (each box eventually opens the Rebuild, Sort and Verify Database Files dialog box).
4. Select Rebuild and Pack the database files. If using GoldMine with a SQL database, a warning message appears reminding you SQL tables do not need rebuilt.
5. If appropriate, select Sort the database files.6. If appropriate, select Verify the data and synchronization information.
Click Next.7. From the GoldMine Maintenance Wizard dialog box, select Force all
users to exit GoldMine within x minutes. Set the number of minutes. A message is sent to the currently logged in users telling them the GoldMine Administrator is performing maintenance, to complete their work, and close GoldMine.
8. Click Finish.
GoldMine Administrators Guide Data Maintenance and Management • 261

Setting Up Automatic MaintenanceConfigure GoldMine to automatically maintain the database based on specified criteria. 1. Select Tools>>Databases>>Maintain Databases. The Welcome to the
GoldMine Maintenance Wizard dialog box appears.2. Select Automatic Maintenance.3. Click Next. The Automatic Maintenance dialog box appears. 4. Select the Logged User (designates the user with Master Rights
responsible).
NOTE: The Logged User must be logged into GoldMine at the specified start time and day for the automatic maintenance to run.
5. Type or select the Start Time. Click the right arrow to access the F2 graphical clock.
6.
NOTE: Because GoldMine forces all network users to log out of GoldMine during indexing and rebuilding, index after regular business hours.
In the Maintain Files box, select a file to maintain.
NOTE: Maintain Calendar File and Sync Log Files often (rebuild and pack weekly).
7. Select the Frequency. • Pack, rebuild and index: Indexes, rebuilds, and packs the selected
files.• Index only: Only indexes the selected files. Available only for the
GoldMine Files, Current Contact Set, All Contact Sets, and System Logs.
8. Select Save.
262 • Data Maintenance and Management GoldMine Administrators Guide

View the Maintenance Logs to verify the process has run successfully.
Viewing System LogsGoldMine records system activity for a variety of operations in System Logs. To view a system log, select Go To>>Logs>>GoldMine Logs. The left pane displays the log types and the right pane displays the details. To see details, expand the log type until you locate the day to view. Select the day; details appear in the right pane.The System Logs window displays these log types:• Process Monitor Logs: Activities recorded in the GoldMine Process
Monitor.• Maintenance Logs: Dates and outcomes of database maintenance
procedures. • Users' Login Logs: Users' login activity.• Sync Wizard Logs: Dates and details for GoldMine synchronization.• GoldSync Logs: Details about GoldSync synchronization.• Contact Files Logs: Changes made to the Contact Set files.• GoldMine Files Logs: Changes made to GoldMine files.• Error Logs: Details of errors.Use the logs for troubleshooting. To prevent performance problems, periodically purge the logs.
NOTE: If you maintain a SQL database with the Wizard, you must reset table permissions. Be aware you may lose data in the Contact2 table if you have more than 233 user-defined fields.
GoldMine Administrators Guide Data Maintenance and Management • 263
About the Database Alias ManagerThe Database Connections Manager lets you establish an alias for each database management system used with GoldMine. An alias is required to connect your database to the application. It tells GoldMine where to find the database, collecting information from which to build the ADO connection string. Use the Manager if you are already using an existing or multiple databases with GoldMine. It imports any existing MSSQL BDE aliases.
NOTE: The Database Connections Manager creates the alias and the shell (only two of the three stages for creating a database). If you are creating a new database, use the Databases Wizard. The wizard process leads you through the three-stage process often needed for creating the database and allows you to create the tables as well. To access the wizard, select Tools>>Databases>>New Database.
See “Using the Database Alias Manager for SQL Databases” on page 264.
Using the Database Alias Manager for SQL DatabasesFrom the menu bar, select Tools>>Databases>>Alias Manager, or from the appropriate window in the Databases Wizard, click the Alias Manager button. The Database Alias Manager appears. To alias a database, click New Alias. The Edit Alias dialog opens.
NOTE: This dialog window contains a form for collecting information used to build an ADO connection string. This information is stored in an INI file.
1. In the Alias Name text box, type a name for the alias. There is a 100-character limit.
264 • Data Maintenance and Management GoldMine Administrators Guide

2. From the Server Type drop-down list, select either MSSQL.
NOTE: The form will change depending on the Server Type selected.
3. In the Host text box, type the name of the computer hosting the database.4. In the Database text box, type the name of the database.5. In the Owner text box, type the database owner's name. [Typically, this is
dbo. This applies only to MSSQL aliases.]6. In the Login text box, type the username for the database.7. In the Password text box, type the password for the database.
NOTE: By default, the Password text box displays a fixed number of asterisks as a security measure. .
NOTE: This action registers the alias and creates the database specified. The new database will not be created without completing this step, although it will appear in the list. You cannot test it prior to completing this step
8. Select the Use Windows Authentication (SSPI) check box if you have designated Windows Authentication Mode instead of the SQL authentication. [This only applies to MSSQL aliases.]
9. Click Create New Database.10. Click Test Connection. This verifies that the alias was created
successfully.11. Repeat this process for each alias you wish to create. 12. Click OK when done.
GoldMine Administrators Guide Data Maintenance and Management • 265

Editing an Alias1. From the menu bar, select Tools>>Databases>>Alias Manager. The Data-
base Alias Manager opens. 2. To edit an alias, select an alias from the list.3. Click Edit.
This activates the associated form.4. Make appropriate changes to the information in the text boxes.5. Click Save.6. Click OK.
Deleting an Alias1. Select the alias.2. Click Delete and then click OK.
Using the Database Alias Manager for Firebird Database1. From the menu bar, select Tools>>Databases>>Alias Manager. The
Manager appears.
2. To alias a database, click New Alias. This creates a blank form.3. In the Alias Name text box, type a name for the alias. There is a 100-
character limit.4. From the Server Type drop-down list, select Firebird.5. In the Host text box, type the name of the computer name where the
Firebird database server is run. If the database server is on the same host as the Goldmine installation, you can enter localhost.
NOTE: Any previously aliased databases are listed on the left. The right side of the dialog box contains a form for collecting information from which it will build an ADO connection string. This information is stored in an INI file.
266 • Data Maintenance and Management GoldMine Administrators Guide

6. In the Database text box, type the path to the database. Firebird maintains the database in a regular disk file. Your entry in this field should specify a fully qualified path to this file. By default the GoldMine installer creates an initial database file in \Program Files\GoldMine\Data\GOLDMINE.fdb. It is advisable to keep the same file naming convention and create additional database files in the same folder and maintain the same .fdb extension.
7. In the Login text box, type a valid login name for the firebird server. 8. By default, during GoldMine installation, the installer gives you the option
to create a login: GMSYSDBA. If you accepted this default value at the time of the GoldMine installation, enter GMSYSDBA in this field. Otherwise the value you specified during installation should be entered.
9. In the Password text box, type the password for the database.
NOTE: By default, the Password text box displays a fixed number of asterisks as a security measure.
10. (Perform this step only if you are creating an entirely new database) Click Create Database. Skip to step 11 if you are connecting to an existing database.
11.
NOTE: This action registers the alias and creates the database specified. It will not exist without this step, even though it appears in the list on the left. You cannot test it prior to this step.
Click Test Connection.
This action validates the parameters you entered above and also checks for the existence of the database.
12. Click OK. 13. Repeat this process for each alias you want to create and then click OK
when done.
GoldMine Administrators Guide Data Maintenance and Management • 267
Globally Replacing Field Data Using the Global Replace Wizard
The Global Replace Wizard helps you replace the value of a field in the contact record.
NOTE: Before beginning a global replace, back up the GoldMine databases.
If using a global replace to operate on a subset of data, first build that subset with a filter or group you can then select during the process.• Users without Master Rights cannot replace the Owner or Status fields.• Apply global updates only to Contact1 and Contact2 fields.Use the following procedure to globally replace field data.1. Select Tools>>Global Replace Wizard. 2. At the Global Replace Wizard dialog box, select one option:
• Replace a Field with a value• Update a field using advanced options• Exchange the value of two fields
Globally Exchanging the Values to Two FieldsUse the Global Replace Wizard to update data in one field with data from another field by:• Exchanging values of two specified fields on a contact record • Replacing the value of one field on a contact record with the value of
another field1. Select Tools>>Global Replace Wizard. 2. At the Global Replace Wizard, select Exchange the values of two fields,
and then click Next. 3. Select one option:
• Exchange the values of both fields. Trades the value of one specified field with the value of a second specified field.
268 • Data Maintenance and Management GoldMine Administrators Guide
• Replace value of the left field with the value of the right field. Inserts the value in the first specified field with the value in the second specified field. The original field remains unchanged.
4. Select the fields to update in the drop-down lists.• Update this field. The field to replace or exchange. • With this field. The field to exchange data with the first field or
provide the replacement value.
5. Click Next. 6. Use the Global Replace Wizard setup dialog box to check fields and
replacement values before initiating the process. • Expand partial contact records. Expands partial records in the database
into complete records if the field to replace is contained in the Contact2.dbf file. If so, this option is selected by default. If you clear Expand partial contact records, partial records are not expanded, and field values in these records are not updated.
• Update linked fields (based on lookup.ini). Changes values in linked fields according to the instructions in the [AutoUpdate] section of the Lookup.ini file. This option is available only if one or more selected fields include the fields listed in the Lookup.ini. You can globally replace more than one field at a time. To add another field and replacement value, click Back.
7. Select Remove to delete the highlighted global replacement entry.
NOTE: If you have more than one replacement entry, Remove becomes active. You can delete any entry other than a single entry
8. Click Next. The Global Replace Wizard displays a list of available filters and groups to apply to limit the records to be updated by the global replacement. The filter or group does not have to be activated prior to selection.
NOTE: GoldMine converts the replacement data into the appropriate data type before copying the data into the selected replace field.
GoldMine Administrators Guide Data Maintenance and Management • 269
9. Select the filter or group o apply, then click Next. The final Global Replace dialog box opens.
10. Click Finish.
Importing and Exporting Data
About Importing DataGoldMine provides several ways to import data. Use the GoldMine Import Wizard to import data from other applications into GoldMine using predefined profiles or by creating your own profiles using the wizard. A predefined utility is included for importing from ACT!. Import data into GoldMine from these database sources:• DBF file
• ASCII file
• SDF file
• SQL file
GoldMine also provides a wizard for importing data from an XML file.
About Exporting DataThe exporting process copies data into a formatted file the receiving application understands. The Export Wizard provides simplifies the task. Using the Export Wizard, create a data file from GoldMine records according to criteria in a predefined profile, or define your own profile. GoldMine can export from the current database in three formats:• DBF file• ASCII (TXT) file • SDF (fixed length) file • export data to an XML file.
270 • Data Maintenance and Management GoldMine Administrators Guide
Considerations for Importing and Exporting DataWhen importing and exporting data:• Only fields in the Contact1 and Contact2 tables and the primary e-mail and
Web site Details are available for standard import or export. The XML import and export lets you import or export the full database.
• Merge information and check for duplicates while importing.• Save import and export profiles to facilitate the process. A profile is
predefined field mappings and specifics of data file locations.• GoldMine supports the importing and exporting of calendar, history, and
supplemental contact information when using the predefined ACT! import profile or XML.
• When importing or exporting, all fields are referenced by their GoldMine field names, which may differ from their label name. Once created, the field name never changes, though the label may be changed by the user.
• For example, the field Key1 located in the Contact1 table is commonly labeled Contact Type. This means the field would be listed as Key1 and not as Contact Type in the lists of GoldMine fields in the import and export wizards. This is important because you may not recognize the field name as the field you wish to use.
NOTE: If your import requirements include calendar, supplemental contact information, or history records, use third-party utilities to import. Several products designed to work with GoldMine are GoldBox Utilities, Inaport, CRMSwitch, and Beyond Gold. As third-party products, they are not supported by FrontRange Solutions technical support.
GoldMine Administrators Guide Data Maintenance and Management • 271

Data PreparationBefore importing, establish the source file and destination file components. Do not start the importing procedure until you create necessary fields in GoldMine. Taking the source file, create a list of all of the field names and lengths, then manually match the GoldMine field and its length. If the fields do not exist or are not long enough, make structural changes to the fields before proceeding. The data should be in ASCII, SDF, SQL, or DBF format for importing.
CAUTION: Failure to save the file correctly could result in loss of data.
Using the Import Wizard1. Select File>>Import and Export>>Import contact records.
The Welcome to GoldMine's Import Wizard dialog box opens.2. Select one option:
• Import a new file: Incoming data formats according to the profile you define in the Import Wizard. You can save the profile for future use.
• Import a new file using an existing profile: If importing:• DBF, ASCII, or SDF, select a profile you created on the Select File
to Import dialog box. • DBF, select an ACT profile or one you created. • ASCII or SDF, select a profile you created. • from SQL, the Select SQL Table to Import dialog box appears.
3. Select one option for the file type to import.• DBF file. Incoming data is in dBASE file format. Fields in a dBASE
file are referred to by field name, for example, the Company field might be referred to as COMPANY, and the Contact field might be referred to as CONTACT.
• ASCII file. Incoming data is in delimited text file format. A delimited text file formats data with field delimiters, field separators, and record separators. In the delimited ASCII format, fields are referred to by their position in the record.
272 • Data Maintenance and Management GoldMine Administrators Guide

• SDF file. Incoming data is in a text file with fixed-length record format which is commonly used by mainframe computers. Fields in the SDF format are referred to by starting and ending character positions.
• SQL file. Incoming data is from an SQL table. 4. Click Next.
The dialog box that appears depends on the options you selected:• Import an new file from DBF, ASCII, or SDF, the Import a New File
dialog box opens. • Import a new file from SQL, the Import a New SQL Table dialog box
opens.• Import a new file using an existing profile from DBF, ASCII, or
SDF, the Select File to Import dialog box opens. • Import a new file using an existing profile from SQL, the Select
SQL Table to Import dialog box opens.
Using the Export Wizard1. Select File>>Import and Export>>>>Export Contact Records.
The Welcome to the GoldMine Export Wizard dialog box opens.2. Select an export option:
• Export to a new file: GoldMine exports the data according to the settings defined in the Export Wizard. You can save the new settings for future use.
• Export to a new file using an existing profile: Displays the Select Export Profile dialog box where you select a predefined profile GoldMine will use to format the data for export.
3. Select the file type to export into:• DBF file: Specifies data will export in the dBASE file format. Fields in
a dBASE file are referred to by field name; for example, the Company field is called COMPANY, and the Contact field is called CONTACT.
• ASCII (TXT) file: Specifies data will export in the delimited text file format. A delimited text file formats data with field delimiters, field separators, and record separators. In the delimited ASCII format, fields are referred to by their position in the record. For example, company name is field 1, contact name is field 2, and so on.
GoldMine Administrators Guide Data Maintenance and Management • 273
• SDF (fixed length) file: Specifies data will export to a text file with fixed-length record format which is commonly used by mainframe computers. Fields in the SDF format are referred to by starting and ending character positions.
4. Click Next. If you selected:• Export to a new file, the Select Filter/Group dialog box opens. • Export to a new file using an existing profile, the Select Export
Profile dialog box opens.
About Importing and Exporting XML FilesImport and export GoldMine contact data to or from an Extensible Markup Language (XML) format. XML is a meta language used to facilitate the easy exchange of data between systems using different applications. Importing or exporting your GoldMine data as an XML file helps you share information with different applications, such as contact management systems, that support XML. Like HTML, XML uses tags (words bracketed by < and >) and attributes (name = "value"). However, XML provides more flexibility when interpreting the tags and values. For example, HTML specifically defines the meaning of each tag and attribute as well as the appearance of the tagged text when displayed in a browser; XML uses tags only as data delimiters, leaving the interpretation to the receiving application.
NOTE: When exchanging data with other GoldMine systems, be sure to synchronize with GoldMine instead of sharing exported data. Synchronization provides features unavailable when you export data as an XML file, including cutoff dates to limit the date range of data and the capability to exchange updates to additional contact data and calendar data.
Use the GoldMine XML Import Wizard to import data from an XML file. The wizard takes you through the process and lets you save the settings in a profile to reuse.
274 • Data Maintenance and Management GoldMine Administrators Guide

Use the GoldMine XML Export Wizard to export your contact data as an XML file. The wizard guides you through the procedure. All the data you export is placed in one file that the recipient can import and use as a key to map the imported data into the recipient’s database.
Exporting to XMLExport GoldMine contact data to Extensible Markup Language (XML) format. XML is a meta language is used to facilitate the exchange of data between systems using different applications. Exporting your GoldMine data as a .xml file helps you share information with recipients using a different contact management application supporting XML. Data exported is placed in one file the recipient can import and use as a key to map the imported data into the recipient’s database.The following is a view part of a sample XML export.
GoldMine Administrators Guide Data Maintenance and Management • 275

NOTE: When exchanging data with other GoldMine users, synchronize with GoldMine instead of sharing exported data. Synchronization provides features unavailable when you export data as an XML file, including cutoff dates to limit the date range of data as well as the capability to exchange updates to additional contact data and calendar data.
1. Select File>>Import and Export>>Export GoldMine Data to an XML File. The GoldMine XML Export Wizard opens.• Export to a new XML file: Displays the Select GoldMine Data for
Export dialog box. GoldMine exports the data according to a profile created as you define settings in the GoldMine XML Export Wizard. You can save the new profile for future use.
• Export to a new XML file using an existing profile: Displays the Select Profile dialog box to select a predefined profile GoldMine will use to format the data for export.
2. Make a selection and click Next to advance to the Select GoldMine Data for Export dialog box (new .xml file) or Select Profile dialog box (select an existing profile).
Exporting Data Using an Existing XML ProfileIf you selected Export to a new XML file using an existing profile, the Select Profile dialog box appears.1. In the Select one of the following, predefined XML export profiles text
box, select the existing profile you want to use. 2. Click Delete Profile to delete the highlighted profile.3. After highlighting your profile, click Next. The Select GoldMine Data for
Export dialog box appears
276 • Data Maintenance and Management GoldMine Administrators Guide

Importing XMLGoldMine can import contact data and user activities from an XML file. The GoldMine XML schema dictates how data is arranged within the XML file in order for GoldMine to recognize contacts, calendar activities, and other data when importing into GoldMine. The XML file you importing into GoldMine must conform to the GoldMine XML schema for the field mapping to work. You can use XSL Transformations (XSLT) to transform XML source documents to GoldMine-compliant XML documents.
NOTE: For more about XSLT, see www.w3.org/TR/xslt
Create an XML transformation sheet converting the XML file to match the GoldMine schema. Then import the data into GoldMine. Example: Your XML source schema has the contact’s first name in one field and the last name in another field. Because the GoldMine schema requires the first and last names to be in the same field, you must create a transformation sheet merging the two fields in your source XML file. Once your source file matches the GoldMine schema, you can import the XML data into GoldMine.
TIP: To view the GoldMine schema, export your GoldMine data to an XML file and include the schema. Open the file in Internet Explorer and view the schema.TIP: To create a transformation sheet (a language for transforming XML documents into other XML documents) and transform the data, use Notepad or an XML transformation utility.
GoldMine Administrators Guide Data Maintenance and Management • 277

Example of the first few lines of a GoldMine schema:
1. Select File>>Import and Export>>>>Import GoldMine Data from an
XML File. The GoldMine XML Import Wizard appears.2. Select one option in the GoldMine XML Import Wizard:
• Import a new file: Displays the Import a New File dialog box. GoldMine imports the data according to a profile created as you define settings in the GoldMine XML Import Wizard.
• Import a new file using an existing profile: Displays the Select File to Import dialog box to select a predefined profile GoldMine will use to format the data you import from.
3. Click Next to advance to the Import a New File dialog box or the Select File to Import dialog box.
278 • Data Maintenance and Management GoldMine Administrators Guide

Import a New File Dialog BoxThis box appears when you select Import a new file from DBF, ASCII, or SDF on the GoldMine XML Import Wizard dialog box.1. In the Enter the full path and filename of the file to be imported text box,
type or browse to the path of the .xml file to import.2. Click Next.
Either the Select Data to be Imported From File or Import File Profile dialog box appear.
Importing from Other Applications
Importing Data from ACT!GoldMine offers an import wizard to help convert ACT! data to GoldMine. Select an import method based on the ACT! version you are importing from.
• If importing from ACT! 6.x, select File>>Import and Export>>Convert from ACT! 6.0. The Welcome to the ACT! Import Wizard! opens.
• If importing from ACT! 2000 or ACT! 4 and lower, select File>>Import and Export>>Import Contact Records. The Welcome to GoldMine's Import Wizard opens.
Using the ACT! Import WizardThe ACT! Import Wizard appears when configuring ACT! data importing using one of these methods:1. Select File>>Import and Export>>Convert from ACT! 6.0. The ACT!
Import Wizard appears.2. Select File>>Import and Export>>Import Contact Records.)
NOTE: We recommend backing up your data before beginning.
3. On the ACT! Import Wizard dialog box, type or browse to the location of your ACT! .dbf file in the Enter the full path and filename of the ACT! file to be imported text box.
GoldMine Administrators Guide Data Maintenance and Management • 279
4. In the User field, type the name of the ACT! user.5. In the Password field, type the user's password.6. Click Next. The ACT! Import Options dialog box appears.
Using the Outlook Conversion WizardThe Outlook Conversion Wizard provides an easy way to convert your Outlook files (Contacts, Calendar, Tasks, and E-mail folders) to GoldMine. This is useful when moving information from Outlook to GoldMine as your business contact management system. The conversion wizard is an import feature and is not to be used in lieu of Outlook synchronization.
NOTE: Outlook contact and calendar notes with rich text formatting and embedded URLs import into GoldMine as plain text.
1. Select File>>Import and Export>>Convert from Outlook. The Outlook Conversion Wizard dialog box appears.
2. Click Next. The Import Options dialog box appears.• Apply GoldMine's Formatting to phone numbers being imported:
Converts the Outlook format—commonly (719) 555-5555) to GoldMine—commonly (719)555-5555.
• Select the username...: Select the user in the drop-down list who will become the owner of the records and who the calendar and history activities will be assigned to.
• Select one duplicate checking option:• Do not import duplicate records: Does not import any records where
the company, contact, and phone fields in Outlook match a GoldMine record.
• Import all record to GoldMine: Imports all selected records into GoldMine without checking for duplicate records.
3. Click Next. The Contact Folder(s) dialog box appears.• To select Contact folders to import, click Add. The Select Folder
dialog box appears. Select a contact folder to import and click OK. Repeat the process for each contact folder to import.
280 • Data Maintenance and Management GoldMine Administrators Guide

• Click Remove to delete a highlighted folder on the Contact Folder(s) dialog box.
• If not importing any contact folders, click Next without adding folders to the Folder list.
4. Click Next. The Calendar Folder(s) dialog box appears.• To select Calendar folders to import, click Add. The Select Folder
dialog box appears. Select a calendar folder to import and click OK. Repeat the process for each calendar folder to import.
• Click Remove to delete a highlighted folder on the Calendar Folder(s) dialog box.
• If not importing any calendar folders, click Next without adding folders to the Folder list.
5. Click Next. The Calendar Options dialog box appears.• To set the date range of calendar records you are importing, select
number of days, months, years before today for the Starting date, and the number of day, month, or year before today for Ending date.
6. Click Next. The Task Folder(s) dialog box appears.• To select Task folders to import, click Add. The Select Folder dialog
box appears. Select a task folder to import and click OK. Repeat the process for each task folder to import.
• Click Remove to delete a highlighted folder on the Task Folder(s) dialog box.
• If not importing any task folders, click Next without adding folders to the Folder list.
7. Click Next. The E-mail Folder(s) dialog box appears.• To select E-mail folders to import, click Add. The Select Folder dialog
box appears. Select an e-mail folder to import and click OK. Repeat the process for each e-mail folder to import.
• Click Remove to delete a highlighted folder on the E-mail Folder(s) dialog box.
NOTE: Imported e-mail folders and Inbox messages are categorized and filed in the E-mail Center in a separate Outlook Import folder.
GoldMine Administrators Guide Data Maintenance and Management • 281

• If not importing any e-mail folders, click Next without adding folders to the Folder list.
8. Click Next. The Ready to Import dialog box appears.9. Click Back to change any settings and then click Finish.
Exporting to GoldMine From Microsoft ExcelOnce GoldMine Plus for Microsoft Office is installed, data can be exported from Microsoft Excel to your GoldMine database using new menu options in Excel.GoldMine Plus for Office adds an export feature to the GoldMine menu in Excel. Use this menu option to map Excel columns to GoldMine fields and initiate the export process.Important! Backup your database before beginning.
NOTE: Before proceeding with the export, verify that phone numbers are formatted consistently and make changes as needed. The format of the phone numbers in your Excel spreadsheet must be the same for the Excel ODBC to interpret the numbers correctly. If formats are inconsistent, the ODBC driver interprets all the values in the column as null and you lose phone number data during the export process. For example, you cannot have one phone number that is 1235557894 and another that is 777-555-1236. Before exporting to GoldMine, specify one format and update all phone numbers in your spreadsheet to match the selected format. When the phone number format is consistent, begin exporting to GoldMine.
1. Launch GoldMine.2. Open the Excel spreadsheet you are exporting to GoldMine.
282 • Data Maintenance and Management GoldMine Administrators Guide

3. Select the cells you are exporting to GoldMine and specify the Named Range. In Excel, select Insert>>Name>>Define. The Define Name dialog box appears. See Excel Help for details.
NOTE: To perform this function in Microsoft Office 2007, select the cells to export to GoldMine, right-click on the selected cell range and select Name a Range from the drop-down menu. You may also select the Formulas tab, then select Define Name>>Define Name... from the Defined Names sub-menu.
4. In the Names text box, type the desired name of the range.
NOTE: The first row of the selected range must contain only header data.
5. Select either Workbook or Sheet from the Scope drop-down menu.6. Select GoldMine>>Export Data to GoldMine. The Export Data to
GoldMine dialog box appears.The Welcome to the GoldMine Plus for Microsoft Excel Export Wizard! appears.
7. Click Next. The field mapping dialog box appears.8. To map columns to GoldMine fields, highlight the column in the Excel
Fields list and then highlight the GoldMine field to map the column to. Click Add Mapping. Your selection is added to the Mapped Fields list (for example, Column1<=>C1.Company).
9. Continue to map desired fields. When finished, click Next. The GoldMine is now Ready to export your Excel data! dialog box appears.
10. Click Finish. When the import process completes, a dialog box appears, indicating the number of records imported into GoldMine.
GoldMine Administrators Guide Data Maintenance and Management • 283

Importing and Exporting iCalendar Files
Importing iCalendar Files1. Select File>>Import and Export>>Import from an iCalendar file. The
Windows Open dialog box appears. 2. Locate the iCalendar (*.ics) files to import and click Open. The Import
from an iCalendar file dialog box appears. 3. To import a single iCalendar activity, select the activity and click Import.
NOTE: When importing iCalendar files from Lotus Notes, GoldMine schedules activities without assigned participants, or invitees, as unlinked. Identify this situation whenever the Organizer entry is UNKNOWN.
4. To import all activities, click Import All.5. As each activity is processed, the Attach imported activity to contact
dialog box appears. Select one option:• Find an existing contact and then link this activity.• Find an existing contact, create a new additional contact and link to it.• Create a new contact and then link this activity.• Do not link this activity to any contact
6. Click OK. Depending on the option selected, different windows and dialog boxes appear.
7. Click Close.
Exporting iCalendar FilesExport iCalendar files so users of iCalendar-enabled applications, such as Microsoft Outlook or Lotus Notes can import activities from your iCalendar file to their calendars.1. Select File>>Import and Export>>>>Export to an iCalendar file. The
Export to an iCalendar file dialog box appears.
284 • Data Maintenance and Management GoldMine Administrators Guide
2. In the Select based on Contact(s)/User(s) area, select one:• Activities based on Contact(s). Exports activities scheduled for the
current contact record, or for records based on the selected filter.• Select from:• Current Contact record: Exports the information for the current
record.• Filters/Groups: Exports information based on the filter or group
selected in the drop-down list.• Activities based on the User(s): Exports activities scheduled for
selected users.• Select the any or all users' activities to export.
3. In the Selection Criteria area, select the activity types to export.4. To narrow the export to a range of dates, select Date range and select the
From and To dates on the F2 graphical calendar.5. Click Export.
The Windows Save As dialog box appears.6. Locate the folder to save the files to and type the File Name.
Verify the Save as type is iCalendar format (*.ics).7. Click Save.
The GoldMine Process Monitor appears displaying the progress of the export.
Importing ZIP CodesThe ZIP Code Database is an add-on product used in conjunction with GoldMine.With GoldMine and the ZIP Code Database, city and state names are automatically entered in the appropriate fields on the Contact Management screen when a valid ZIP Code is entered in the Zip field. This reduces the amount of data entry necessary, minimizing errors. The optional ZIP Code Database contains a compressed ZIP Code data file; GoldMine is required to import this ZIP code data.
GoldMine Administrators Guide Data Maintenance and Management • 285

The volume of data contained in the ZIP Code file is very large, so importing the entire ZIP Code database can take several hours. However, since the data is divided into 57 zones, you can import all ZIP codes in the USA, in a specific time zone, or only ZIP codes of individual states.
NOTE: Importing the ZIP Codes to a network drive requires the exclusive use of the ZIP Code database; therefore, no other user can be working in GoldMine. The user performing the import must have these network security rights in the GoldMine directory: Open, Create, Read, Write, Delete and Rename.
1. Select File>>Import and Export>>Import ZIP Codes. The ZIP Code Import dialog box appears.• Import Zip Codes From: Type the letter of the drive containing the
ZIP Code data file. For example, if you are importing ZIP codes from a file on diskette, type the letter of the disk drive.
• Zone or State to Import: Type the identification code of the state or ZIP code zone to import in the Zone or State to Import field. For example, to import ZIP codes for California, type CA.
• Include Suburban Cities: Select to import all cities. Clear the check box to import only the primary city of each ZIP code.
2. Select Import. During processing, the ZipCode Import status window appears containing:• Import Zone: ZIP code zone being imported.
NOTE: Prior to adding ZIP codes, the import process marks as deleted any ZIP codes present in the current ZIP Code database that belong in the zone being imported. This ensures the correct city and state are matched with each ZIP Code in the database.
NOTE: Some ZIP codes include suburban cities and towns. Import all cities or only the primary city of each ZIP Code. If you import all city names, a ZIP code can have more than one matching city. In this case GoldMine displays a dialog box letting you select the appropriate city.
286 • Data Maintenance and Management GoldMine Administrators Guide

• File Size: Amount of disk space occupied when the import is completed.
• Build Size: Minimum amount of free disk space required to perform the import process.
About WebImportingSet up Internet Web sites to collect contact information from interested visitors. Use the data in GoldMine by creating a Web form that includes instructions for handling the data.Once information is submitted, a Web server script can format the data into an Internet email message which can then be sent to a designated recipient. When retrieving the email message, GoldMine recognizes the import instructions and creates a contact record with data captured from the Web page. Or, if a WebImport contact duplicates an existing contact, update selected fields.Combining the WebImport feature with GoldMine’s Automated Processes can automate capturing and responding to leads. Initiate Automated Processes automatically and send e-mail messages to GoldMine users alerting them of the incoming contact data. An advanced knowledge of gateway scripts is not needed to implement the GoldMine WebImport feature. Begin by contacting your Web administrator and providing him or her with the sample HTML and Perl script. Writing and modifying scripts requires some programming expertise not covered in this material. Many sources for getting started with Common Gateway Interface (CGI) scripts are available on the Internet and in bookstores.
NOTE: FrontRange Solutions’ technical support cannot provide support for creating or maintaining HTML code or CGI scripts.
GoldMine Administrators Guide Data Maintenance and Management • 287

Using the WebImport WizardThe WebImport Wizard creates the HTML form and script to process the contact information input by visitors on a Web site. You do not need to type the code and can create the forms in PERL, ASP, and PHP. Because all activities are driven off the Web server, Internet access is necessary. The Web form captures the data, and the script formats it into an Internet e-mail message which can then be sent to a designated recipient. When retrieving the email message, GoldMine recognizes the import instructions and creates a Contact Record with all the data captured from the Web page or updates selected fields if a WebImport contact is a duplicate of an existing contact.Attach an Automated Process to a new or duplicate contact. Automated Processes can be initiated automatically, and e-mail messages sent to GoldMine users alerting them of the incoming contact data. Once the form and script are emailed to the designated recipient, the Web administrator can place the HTML form page and the script source code on the WebImport server(s). To use the WebImport Wizard, select Go To>>Campaigns, click the Campaigns button in the Navigation Pane, then click Configure WebImport on the toolbar, Alternately, select Web>>Setup Web Import and click New. Set an authorization password, then create, edit, rename, and delete WebImport Profiles in the WebImport Profiles dialog box.
Requiring Passwords on WebImport FilesWeb Import processes are protected with passwords to allow importation of only authorized incoming instruction files. This prevents unauthorized persons from sending email messages and inundating a GoldMine system with unwanted data. A password is always required to use Web Import. The incoming instruction file will not be processed if it does not contain a password or if it contains an invalid password.The Web Import authorization password is set at the top of the Web Import Profiles dialog. A password must be set before the Web Import functions are made available.
288 • Data Maintenance and Management GoldMine Administrators Guide

Merging, Purging, and Deleting Records
About Merging and PurgingUsers may accidentally create duplicate contact records in GoldMine that, over time, may be too great for manual deletion. GoldMine provides several methods for consolidating information and deleting duplicate records:• Merge/Purge Wizard. Simplifies the replacement process by guiding you
through the entire procedure. • Merge Visible Records. Updates the contact record with input focus by
merging information in two contact records displayed in GoldMine’s work area.
• Merge Tagged Records. Creates one contact record by merging information from all tagged records.
Using the Merge/Purge WizardUse the Merge/Purge Wizard to select records based on a predefined profile or define your own criteria. Set up a custom merge/purge profile by defining:• Contact record field. Select as many as you want GoldMine to use during
the evaluation process to match records.• Method. Select a criterion for each record match which can be case
sensitive, case insensitive, Soundex, or first n characters.• Weight. Select and assign a numeric weight to each criterion. When a
record is evaluated, each match with a criterion accrues the assigned weight value. If the total weight earned by matches between two records and the specified criteria equal or exceed the qualifying weight value, GoldMine selects the records as duplicates.
CAUTION: Merging and purging permanently changes the database. We recommend backing up the database first,
GoldMine Administrators Guide Data Maintenance and Management • 289

You can also select the method for disposing of duplicate records. Merge data from two duplicate records to create one updated record, or delete one of the duplicates according to a condition such as deleting the older record. Specify GoldMine process the merge/purge automatically, or display duplicate records for viewing or manual deletion.
CAUTION: Merging and purging permanently changes the database. We recommend you back it up before performing a merge/purge.
NOTE: It is highly recommended that you select Prompt me before merging records and Dry run: Only show duplicates—do not merge nor purge before actually performing a purge.
1. Select Tools>>Data Management>>Merge/Purge Records. The Gold-Mine Merge/Purge Wizard appears.
2. Select one procedure:• Merge/Purge using a predefined profile: Displays the Select a
Merge/Purge Profile dialog box containing a list of previously defined merge/purge profiles. Highlight the profile to use to search for duplicate records.
• Merge/Purge using new criteria: Set up weighted criteria for the current merge/purge. The settings can be used one time only or saved as a merge/purge profile for future use.
3. Click Next. • If you selected Merge/Purge using a predefined profile, select the
profile from the Select a Merge/Purge Profile dialog box. You can also delete a previously defined profile by selecting Delete Profile. After selecting a profile, click Next. The Select a Filter/Group dialog box appears.
• If you select Merge/Purge using new criteria, the Select a Filter/Group dialog box appears.
290 • Data Maintenance and Management GoldMine Administrators Guide

Selecting the Merge and Purge MethodsThe Merge Method and Purge Method dialog boxes contain settings that determine how GoldMine treats records selected as duplicates. 1. The Merge Method dialog box appears after selecting merge/purge crite-
ria.2. Select one merge method:
• Keep the record that was Created First: Selects the contact record saved first. The date is determined by the entry logged in the Creation field of the Summary tab.
• Keep the record that was Last Updated: Selects the contact record changed last. The date is determined by the entry logged in the Last Update field of the Summary tab.
• Create Linked Additional Contacts in each record: GoldMine keeps both records and creates additional contacts in the Contacts tab of the duplicate records. For example, if GoldMine determines Jon Smith and John Smyth are duplicate contacts, Jon Smith is added as an additional contact in the John Smyth contact record. John Smyth is added as an additional contact in the Jon Smith contact record.
3. Select one: • Create Additional Contact of non-surviving record: The primary
contact of the deleted duplicate record is stored as an additional contact in the surviving contact record. GoldMine stores the new additional contact in the Contacts tab of the surviving contact record.
• Prompt me before merging records: Check this box for GoldMine to display duplicate records and offer options so the user can make individual decisions on each set of duplicate records.
NOTE: Selecting Create Linked Additional Contacts does not prompt you for a purge method, but displays the Save the Merge/Purge Profile dialog box.
GoldMine Administrators Guide Data Maintenance and Management • 291

• Dry run: Only show duplicates—do not merge nor purge: Check this box for GoldMine to display duplicate records without any options to select records for purging. At the end of the process, duplicate records remain in the contact database.
4. After selecting a merge/purge option, click Next. Unless creating linked additional contacts or performing a dry run, the Purge Method dialog box appears.
5. Select one option:• Delete the duplicate record: GoldMine automatically deletes records
meeting the qualifying weight specified in the merge/purge profile. • Update a field with a value to indicate record deletion: Changes the
specified field with a specified value—selecting this option does not purge duplicate records.
6. Click Next. The Purge Method: Update Field Settings dialog box opens.• Update Field: Select the field in the drop-down list. • Value: Type the value you are updating the field with to indicate
deletion. If any record had an entry in the specified field, this data overwrites the existing value.
NOTE: If you select Dry run, GoldMine does not prompt you for a purge method, but displays the Save the Merge/Purge Profile dialog box.
NOTE: It is recommended that you select Prompt me before merge records and Dry run: Only show duplicates—do not merge or purge before actually performing a purge.
TIP: Selecting Update a field with a value to indicate record deletion is the safest way to merge/purge records. This option performs the merge based on your criteria and then marks the non-surviving record but leaves it in your database. Review the records and delete based on the value with which the specified field is updated.
292 • Data Maintenance and Management GoldMine Administrators Guide

7. Select Merge Calendar, History, and ContSupp records to move this data to the surviving contact record from the purged record. This option moves data from these records:• Calendar• History• Additional contact• Referral• Detail
8. Click Next. The Save the Merge/Purge Profile dialog box opens.
Merging Visible ContactsYou can merge two or more visible contact records. The active contact record is updated with information from the other record. The non-active contact is deleted.1. Select Window>>New Contact Window. A second contact window
opens. 2. Display the second record you are merging. Make the record you are
keeping in the database the active contact record. 3. Select Tools>>Data Management>>Merge/Purge Records>>Merge
Visible Records. The Merge/Purge Visible Contact Records dialog box appears.
4. The dialog box reminds you that the active contact record will survive. Information from the other records will be consolidated on the surviving record, and the other records will be deleted.
5. Click Yes.
Merging Tagged RecordsYou can consolidate information from all tagged contact records into one contact record.
NOTE: GoldMine updates the first tagged contact record and deletes all other tagged contact records.
1. Tag the records to merge.
GoldMine Administrators Guide Data Maintenance and Management • 293
2. Select Tools>>Merge/Purge Records>>Merge Tagged Records. The Merge/Purge Tagged Contact Records dialog box appears.
3. The dialog box reminds you that the first record tagged will be the surviving record with data from the other records consolidated on that one record. Once consolidated, the other records are deleted.
4. Click Yes.
Using the Delete WizardTo update your contact database by deleting some or all Calendar records, history records, and/or contact records, use GoldMine’s Delete Wizard to reduce the possibility of an unintentional deletion.
NOTE: Only users with Master Rights can access the Delete Wizard.
1. Select Tools>>Data Management>>Delete Records. The Delete Wizard appears.
2. Select one delete option:• Delete old history records: Purges old history data from the contact
database. Delete all history records from the contact database, or activate a filter or group, then use this option to delete history records from the subset of records.
• Delete ALL (filtered) contact records: Deletes a subset of records from the contact database based on a filter or group.
3. Click Next. If you selected Delete old history records or Delete ALL, the select filter/group dialog box appears.
NOTE: Removing old history records periodically can significantly reduce the amount of disk space used by contact sets.
294 • Data Maintenance and Management GoldMine Administrators Guide
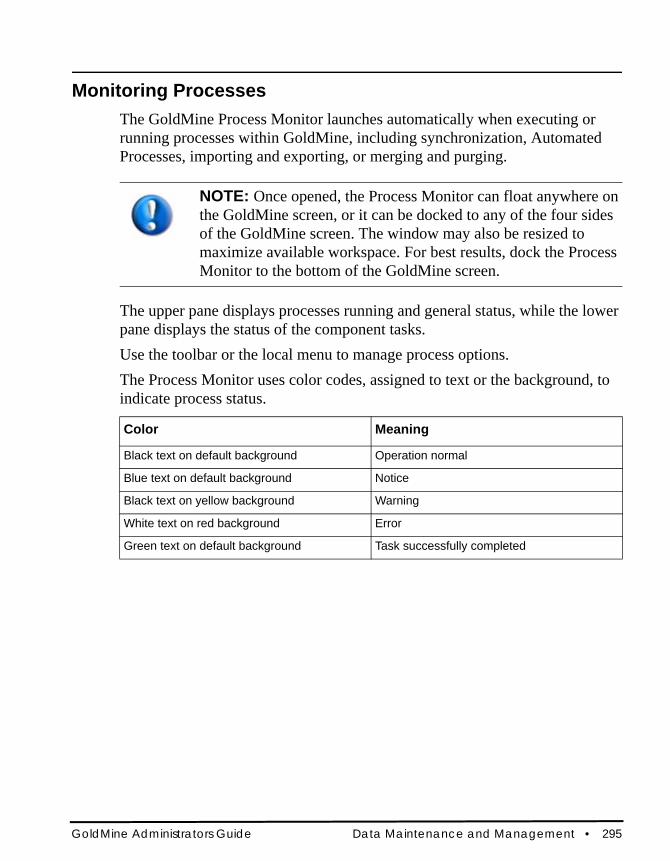
Monitoring ProcessesThe GoldMine Process Monitor launches automatically when executing or running processes within GoldMine, including synchronization, Automated Processes, importing and exporting, or merging and purging.
NOTE: Once opened, the Process Monitor can float anywhere on the GoldMine screen, or it can be docked to any of the four sides of the GoldMine screen. The window may also be resized to maximize available workspace. For best results, dock the Process Monitor to the bottom of the GoldMine screen.
The upper pane displays processes running and general status, while the lower pane displays the status of the component tasks.Use the toolbar or the local menu to manage process options.The Process Monitor uses color codes, assigned to text or the background, to indicate process status.
Color Meaning
Black text on default background Operation normal
Blue text on default background Notice
Black text on yellow background Warning
White text on red background Error
Green text on default background Task successfully completed
GoldMine Administrators Guide Data Maintenance and Management • 295

GoldMine TablesThe Cal table contains a record for each scheduled activity. Different record types are distinguished by the RecType. Each record type may use the same field for different purposes. The Cal table is part of the GoldMine files
Field Name Type Length Description
USERID String 8 User Name
ACCOUNTNO String 20 Account number of the linked contact
ONDATE Date 8 Activity date
ONTIME String 5 Activity time
ENDDATE Date 8 Ending date of a scheduled activity
ALARMFLAG String 1 Alarm flag
ALARMTIME String 5 Alarm time
ALARMDATE String 8 Alarm date
ACTVCODE String 3 Activity code
RSVP String 1 RSVP notification
DURATION Integer 3 Duration/Probability
RECTYPE String 1 Record type
ACONFIRM String 3 Meeting confirmation
APPTUSER String 10 Meeting confirmation user
STATUS String 4 The first character is flag. The second character=1 if notes exist.
DIRCODE String 10 Contact Set code of the contact file
NUMBER1 Integer 8 Sales potential
NUMBER2 Integer 8 Units of a forecasted sale
COMPANY String 60 Company/Contact name
REF String 80 Reference
296 • Data Maintenance and Management GoldMine Administrators Guide

• Fields5 stores the location and tab order of every field within the Fields tab and the field position and tab order of the primary contact fields.
• Filters holds all filters created in the system.• Forms stores the merge form template properties added to the merge forms
system.• FormsFld contains information about fields in the merge forms.• FormsQue is a queue of mail-merged documents waiting to be sent.• GMTLog, with the ContTlog table, controls the synchronization process.
The Primary Tlog holds the synchronization time stamp for the tables in the GoldMine files, such as Cal, Filters, and others.
• GSLogs is the GoldSync log table.• GSServer contains the GoldSync server settings.• GSSites contains configuration parameters for GoldSync sites.• InfoMine stores data from the InfoCenter. The InfoCenter is part of the
GoldMine files.
NOTES Memo 1 Notes
LINKRECID String 15 Linked record ID
LDOCRECID String 15 Reserved for future use
LOPRECID String 15 Linked Opportunity Manager record ID
CREATEBY String 8 Created by user
CREATEON Date 8 Created date
CREATEAT String 6 Creation time
LASTUSER String 8 Last modified by
LASTDATE String 8 Last modified date
LASTTIME Date 8 Last modified time
RECID String 15 Record ID
Field Name Type Length Description
GoldMine Administrators Guide Data Maintenance and Management • 297

• ImpExp stores the Import/Export profiles used to export and import data.• LeadDbfs holds leads analysis definitions set from the GoTo>>Analysis
menu.
Field Name Type Length Description
ACCOUNTNO String 20 Account number
CREATEBY String 8 Creation user
RECTYPE String 10 Record type
SORTKEY String 20 Sort key
TSECTION String 100 Section
TOPIC String 80 Topic
KEYWORDS String 80 Keywords
OPTIONS String 10 Options
OPTION1 String 20 Option 1
OPTION2 String 20 Option 2
LINKEDDOC Memo 1 Linked document
NOTES Memo 1 Notes
USERREAD String 8 Read access
USERWRITE String 8 Write access
LASTUSER String 8 Last modified by
LASTDATE Date 8 Last modified date
LASTTIME String 5 Last modified time
RECID String 15 Record ID
298 • Data Maintenance and Management GoldMine Administrators Guide

• Lookup contains each F2 Lookup entry. The Lookup table is part of the GoldMine files.
• Mailbox stores all GoldMine e-mail. The Mailbox is part of the GoldMine files. The history display of messages pulls information from here. If an e-mail message has an attachment, it stores in the \goldmine\mailbox\attach folder by default.
Field Name Type Length Description
FIELDNAME String 11 Field name
LOOKUPSUPP String 10 Lookup Options
ENTRY String 40 Description
RECID String 15 Record ID
MASTERVALUE String 40 Corresponding value for cross-field validation
Field Name Type Length Description
LINKRECID String 15 Linked Record ID
FLAGS String 8 Flags
USERID String 8 User name
FOLDER String 20 Folder
FOLDER2 String 20 Subfolder
ACCOUNTNO String 20 Account number
CREATEON Date 8 Creation date
MAILSIZE String 8 Mail size
MAILDATE Date 8 Mail date
MAILTIME String 8 Mail time
MAILREF String 100 Linked contact name and subject line
RFC822 Memo 1 Mail message
RECID String 15 Record ID
GoldMine Administrators Guide Data Maintenance and Management • 299
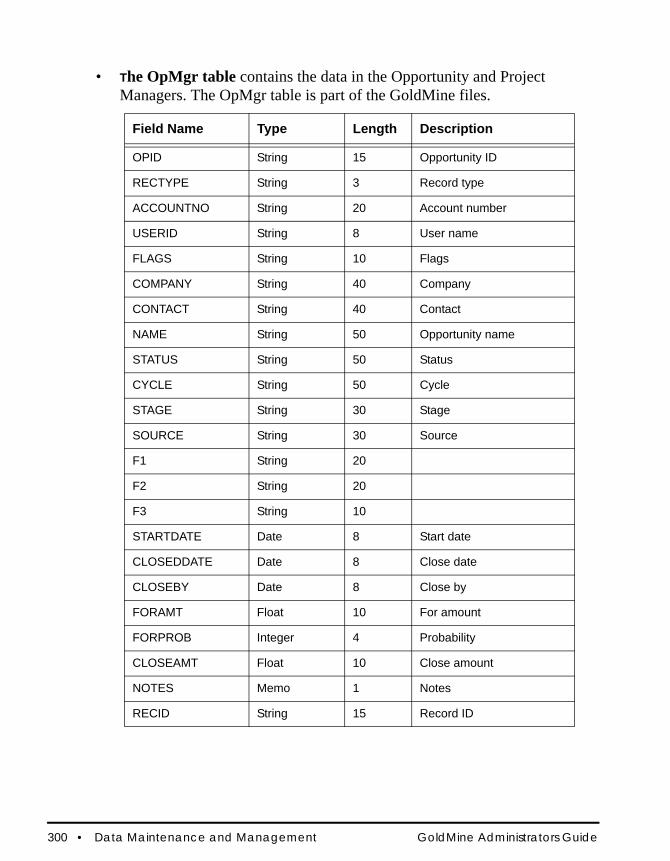
• The OpMgr table contains the data in the Opportunity and Project Managers. The OpMgr table is part of the GoldMine files.
Field Name Type Length Description
OPID String 15 Opportunity ID
RECTYPE String 3 Record type
ACCOUNTNO String 20 Account number
USERID String 8 User name
FLAGS String 10 Flags
COMPANY String 40 Company
CONTACT String 40 Contact
NAME String 50 Opportunity name
STATUS String 50 Status
CYCLE String 50 Cycle
STAGE String 30 Stage
SOURCE String 30 Source
F1 String 20
F2 String 20
F3 String 10
STARTDATE Date 8 Start date
CLOSEDDATE Date 8 Close date
CLOSEBY Date 8 Close by
FORAMT Float 10 For amount
FORPROB Integer 4 Probability
CLOSEAMT Float 10 Close amount
NOTES Memo 1 Notes
RECID String 15 Record ID
300 • Data Maintenance and Management GoldMine Administrators Guide
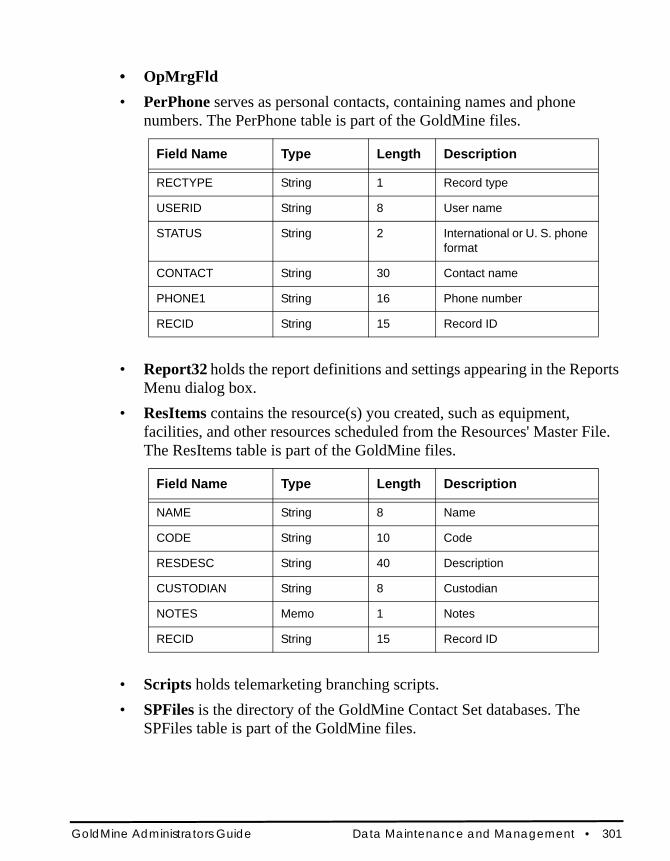
• OpMrgFld• PerPhone serves as personal contacts, containing names and phone
numbers. The PerPhone table is part of the GoldMine files.
• Report32 holds the report definitions and settings appearing in the Reports Menu dialog box.
• ResItems contains the resource(s) you created, such as equipment, facilities, and other resources scheduled from the Resources' Master File. The ResItems table is part of the GoldMine files.
• Scripts holds telemarketing branching scripts. • SPFiles is the directory of the GoldMine Contact Set databases. The
SPFiles table is part of the GoldMine files.
Field Name Type Length Description
RECTYPE String 1 Record type
USERID String 8 User name
STATUS String 2 International or U. S. phone format
CONTACT String 30 Contact name
PHONE1 String 16 Phone number
RECID String 15 Record ID
Field Name Type Length Description
NAME String 8 Name
CODE String 10 Code
RESDESC String 40 Description
CUSTODIAN String 8 Custodian
NOTES Memo 1 Notes
RECID String 15 Record ID
GoldMine Administrators Guide Data Maintenance and Management • 301
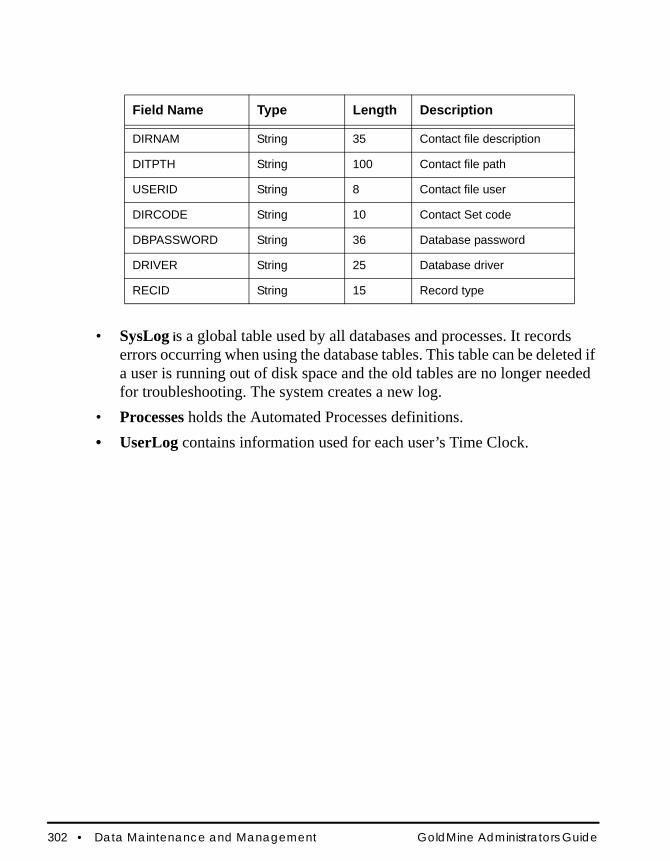
• SysLog is a global table used by all databases and processes. It records errors occurring when using the database tables. This table can be deleted if a user is running out of disk space and the old tables are no longer needed for troubleshooting. The system creates a new log.
• Processes holds the Automated Processes definitions.• UserLog contains information used for each user’s Time Clock.
Field Name Type Length Description
DIRNAM String 35 Contact file description
DITPTH String 100 Contact file path
USERID String 8 Contact file user
DIRCODE String 10 Contact Set code
DBPASSWORD String 36 Database password
DRIVER String 25 Database driver
RECID String 15 Record type
302 • Data Maintenance and Management GoldMine Administrators Guide
Marketing Tools
About the Leads Management CenterThe Center provides a sequence of activities to help manage marketing activities related to the base of contacts and potential leads. Identify and track who brings in the lead, who and how contact is made, and the lead's progress through the sales cycle. Use the Leads Management Center along with the Campaign Management Center and Web Import to design, test, and implement customer treatment strategies and campaigns to improve marketing efficiency and measure effectiveness.
Using the Leads Management CenterUse the following procedure to access and use the Leads Management Center.1. Select GoTo>>Leads Management Center
or Click Administer leads on the Getting Started toolbar.
2. At the Leads Management Center, select from these options to process your set of leads:• Import data from a variety of sources including ACT!, DBF, ASCII,
SDF, SQL, or XML files. • Assign an owner/manager and record curtaining to control who can
update or view a lead.• Assign an Automated Process to process the leads according to a
predefined track of actions and triggers.
GoldMine User Guide Marketing Tools • 303

• Schedule an activity to route, manage, and schedule one or more activities using calls, next actions, appointments, literature requests, forecasting sales, events, to-dos, and email communication.
• Organize filters/groups to work with leads and filter and group. Create new, add or remove members from existing, or modify the criteria of filters and groups. To add a current lead to an existing filter or group you must walk through the steps of editing the filter or group. For more information on filters, see the GoldMine 8.5 Administrators Guide.
About the Campaign Management CenterOne of GoldMine's marketing tools, this interface lets you view customer interactions from initial contact to closing the first sale to future purchases. Use the Campaign Management Center, Web Import, and the Leads Management Center to design, test, and implement customer treatment strategies and campaigns to improve marketing efficiency and measure effectiveness. By tying sales and marketing promotions with customer data you can provide consistent, personalized customer experiences.Select Go To>>Campaigns, click F10, or click Campaigns in the Navigation Pane. The Campaign Management Center opens.The Center interface contains three panes, a menu, and a toolbar. The navigation pane (tree view) displays each campaign. Expand a campaign in the tree to reveal its Open, Completed and Contacts folders. Select a folder to display details and contact names (in the right panes). The Center tracks open/completed activities and which customers have been contacted. When you complete a scheduled activity generated from a campaign, GoldMine tracks the activity and records it as completed in the Completed folder. A completed campaign activity is also noted in the Contract Record History tab.The Campaign Creation Wizard provides a checklist of activities for conducting a campaign. Use the Wizard to import data, schedule calls, perform mail merges, and run Automated Processes.
304 • Marketing Tools GoldMine User Guide

Click the Configure Web Import button on the toolbar. A wizard appears. Use it to create the HTML form and the script for Web imports. Web import capabilities help you collect contact information from interested visitors directly from your Web site, to feed that into marketing campaigns.
Campaign Local MenuAccess the local menu by right-clicking on a campaign in the Campaign Management Center.
New Campaign. Launches Campaign Creation Wizard. Delete Campaign. Removes selected campaign.Rename Campaign. Renames selected campaign.Clone Campaign. Copies selected campaign to a new campaign. New Task. Adds new task to selected campaign. Task Properties. Modifies selected campaign.Delete Task. Removes selected task from the campaign.Complete Task. After task is accomplished, marks it as complete.Assign Contacts. Opens the Contact Search Center.Expand/Collapse. Opens or folds up sub-entries in the navigation pane.Expand All. Opens all folders in the navigation pane.Refresh. Updates campaigns listed in the navigation pane.
GoldMine User Guide Marketing Tools • 305

Campaign Management Center Toolbar
New Campaign: Launches the Campaign Creation Wizard.
Clone Campaign: Copies selected campaign to a new campaign.
Rename Campaign: Changes given name of a campaign.
Delete Campaign: Removes selected campaign.
New Task: Adds new task to selected campaign.
Complete Task: Updates a task to Completed.
Delete Task: Removes selected task from campaign.
Task Properties: Modifies selected campaign task.
Assign Contacts: Opens the Contact Search Center.
Configure WebImport: Displays the WebImport Profiles dialog box.
306 • Marketing Tools GoldMine User Guide
Using the Campaign Management CenterCreate, modify, or delete campaigns using the Campaign Management Center. Use the Toolbar or Navigation Pane Menu to access actions.Use the following procedure to create, modify, or delete campaigns.1. Select Go To>>Campaigns
or Click Campaigns in the Navigation Pane.
2. At the Campaign Management Center, click OK. 3. At the Campaign Management Center dialog box, select an option:
• Create Campaigns. See “Creating Campaigns” on page 307.• Clone Campaigns. See “Cloning Campaigns” on page 309.• Rename Campaigns. See “Renaming Campaigns” on page 309.• Create a New Campaign Task. See “Creating New Campaign Tasks”
on page 309• Complete a Campaign Task. See “Completing Campaign Tasks” on
page 310.• Delete Campaigns. See “Deleting Campaigns” on page 310.• Delete Campaign Tasks. See “Deleting Campaign Tasks” on page
311.• Modify Campaign Properties. See “Changing Campaign Task
Properties” on page 311.
Creating CampaignsYou can use marketing campaigns to consolidate a variety of communication activities. Use the following procedure to create a campaign; it displays in the Campaign Management Center navigation pane.1. Select GoTo>Campaigns. 2. At the Campaign Management Center window, in the navigation pane,
right-click and select New Campaign, or click New Campaign on the toolbar. The Campaign Creation Wizard opens.
GoldMine User Guide Marketing Tools • 307

3. Click Next. 4. At the Select Contacts dialog box, select a filter or group from the drop-
down list. • To change the filters or groups to those of a different owner, select
<Filters of:> or <Groups of:>. The Select a User dialog box opens.
• Select a user and then click OK.Click Next.
5. At the Assign tasks to this campaign dialog box, click New task.6. Configure the following:
• Import Data. GoldMine provides several ways to import data. Select to open the Select Import Data Source dialog box.
• Mail Merge. Merge contact information with templates (document, envelope, or label). Select to open the Mail Merge Properties dialog box.
• E-mail Merge. Use templates to communicate a promotion to customers using queued Internet e-mail. Select to open the Mail Merge Properties dialog box appears.
• Call. Schedule outgoing telephone calls to initiate a contact or follow-up. Select to open the Schedule a Call dialog box. Only the Detail tab is available.
• Automated Processes. Use predefined or create new. Select to open the Select an Automated Processes dialog box.
Add tasks as needed. 7. Click Edit to modify a task. 8. Click Delete to delete a task from the campaign.9. Click Next to move to the Summary of selections dialog box. 10. Review the information presented. Click Back to modify the tasks. 11. Click Finish.
308 • Marketing Tools GoldMine User Guide

Cloning CampaignsCloning a campaign is useful if you want to create a campaign with similar attributes to an existing campaign. Use the following procedure to clone a campaign.1. Select GoTo>>Campaign. 2. At the Campaign Management Center window, select a campaign.3. Click Clone Campaign.
GoldMine copies the campaign and displays it in the navigation pane with the same name and a number. for example, Chicago051604 cloned would appear Chicago051604 (1).
4. Select the cloned campaign and click Rename Campaign. 5. Type a new name and then press Enter.
Renaming CampaignsUse the following procedure to rename a campaign.1. Select GoTo>>Campaign. 2. At the Campaign Management Center window, select a campaign.3. Click Rename Campaign. 4. The insertion point is positioned in the campaign name in enter mode.5. Type a new name and then press Enter.
Creating New Campaign TasksUse the following procedure to create a new campaign task.1. Select GoTo>>Campaign. 2. At the Campaign Management Center window, select a campaign.3. Expand the Open folder and then click New Task.4. Configure the following:
• Import Data. GoldMine provides several ways to import data. Select to open the Select Import Data Source dialog box.
• Mail Merge. Merge contact information with templates (document, envelope, or label). Select to open the Mail Merge Properties dialog box.
GoldMine User Guide Marketing Tools • 309

• E-mail Merge. Use templates to communicate a promotion to customers using queued Internet e-mail. Select to open the Mail Merge Properties dialog box appears.
• Call. Schedule outgoing telephone calls to initiate a contact or follow-up. Select to open the Schedule a Call dialog box. Only the Detail tab is available.
• Automated Processes. Use predefined or create new processes. See the GoldMine 8.5 Administrators Guide.
5. Add tasks as needed and then click OK.
Completing Campaign TasksUse the following procedure to complete a campaign task.1. Select GoTo>>Campaign. 2. At the Campaign Management Center window, select a campaign.3. Expand the Open folder and select a task.4. Click Completed Tasks.
A confirmation prompt appears. 5. Click Yes.
Deleting CampaignsUse the following procedure to delete a campaign.1. Select GoTo>>Campaign. 2. At the Campaign Management Center window, select a campaign.3. Click Delete Campaign.
A confirmation prompt appears. 4. Click Yes.
NOTE: If an Automated Processes process was attached to a campaign, GoldMine removes the process from the designated records.
310 • Marketing Tools GoldMine User Guide

Deleting Campaign TasksUse the following procedure to delete a campaign task.1. Select GoTo>>Campaign. 2. At the Campaign Management Center window, select a campaign.3. Click Delete Tasks.
A confirmation prompt appears. 4. Click Yes.
Changing Campaign Task PropertiesUse the following procedure to change a campaign task’s properties,1. Select GoTo>>Campaign. 2. At the Campaign Management Center window, select a campaign.3. Expand the Open folder and select a task.4. Click Properties.
The specific task dialog box opens.5. Change task properties as needed.
GoldMine User Guide Marketing Tools • 311
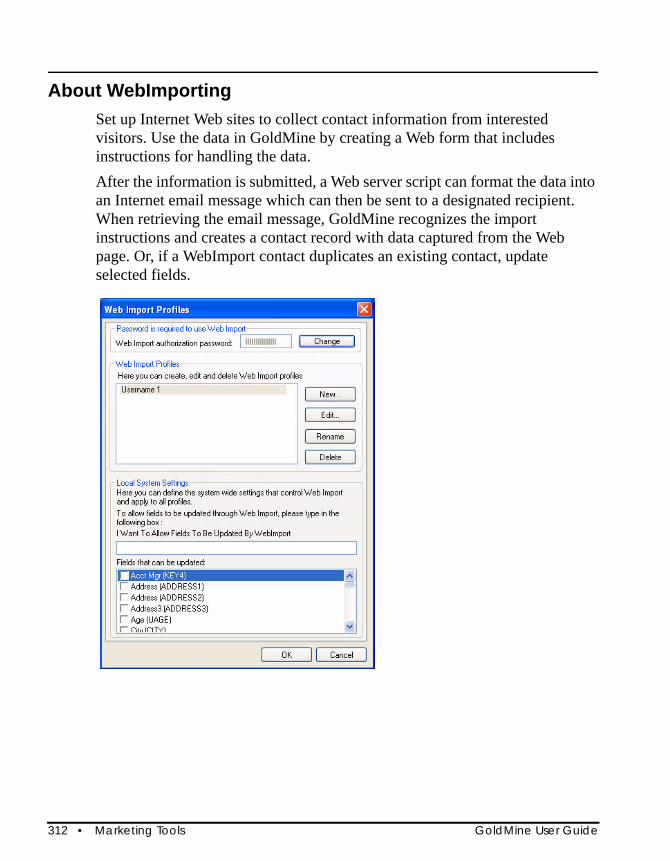
About WebImportingSet up Internet Web sites to collect contact information from interested visitors. Use the data in GoldMine by creating a Web form that includes instructions for handling the data.After the information is submitted, a Web server script can format the data into an Internet email message which can then be sent to a designated recipient. When retrieving the email message, GoldMine recognizes the import instructions and creates a contact record with data captured from the Web page. Or, if a WebImport contact duplicates an existing contact, update selected fields.
312 • Marketing Tools GoldMine User Guide

Service Center
About the Service CenterThe Service Center provides Customer Service Representatives (CSRs) with case management functionality that allows them to capture service requests and then filter and access the details of each case. Users can accept incoming customer service requests from multiple sources, be alerted to upcoming and urgent cases, and get details for any open or closed service request. Individual agents and customer service managers can filter the users’ daily case activities.
Using the Service CenterThe Service Center window is divided into two views; a List view that lists all cases and a Detail view that displays the details of a particular case.
To view the Service Center List viewAt the menu bar, select GoTo>>Service Center.
The Service Center List view opens.
To view the Service Center Detail view6. At the Service Center List view, double-click on a case.
The Details view for that case opens.
7. Click on the click link in the upper left corner of the Service Center
Details view and you return to the List view.
GoldMine Administrators Guide Service Center • 313
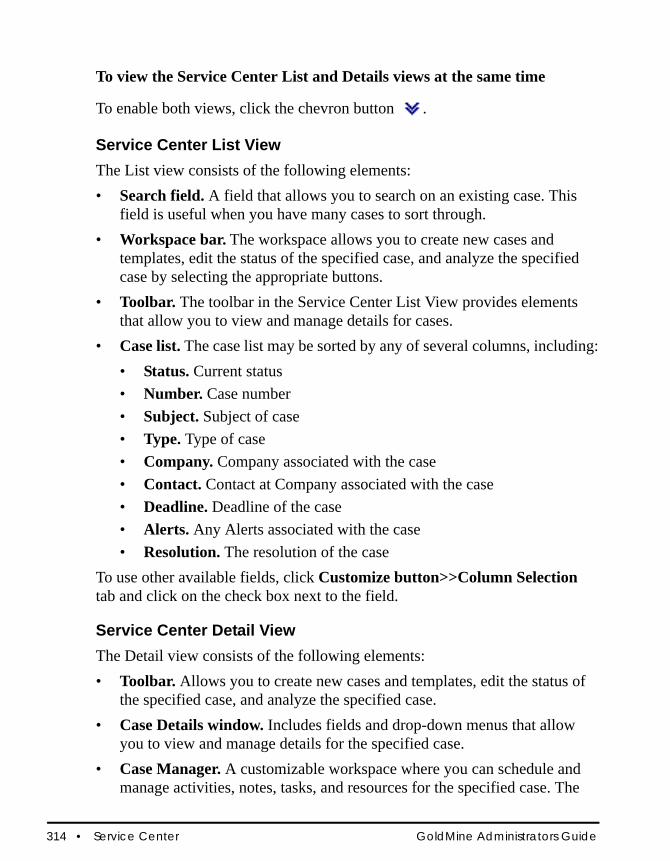
To view the Service Center List and Details views at the same time
To enable both views, click the chevron button .
Service Center List ViewThe List view consists of the following elements: • Search field. A field that allows you to search on an existing case. This
field is useful when you have many cases to sort through.• Workspace bar. The workspace allows you to create new cases and
templates, edit the status of the specified case, and analyze the specified case by selecting the appropriate buttons.
• Toolbar. The toolbar in the Service Center List View provides elements that allow you to view and manage details for cases.
• Case list. The case list may be sorted by any of several columns, including:• Status. Current status• Number. Case number• Subject. Subject of case• Type. Type of case• Company. Company associated with the case• Contact. Contact at Company associated with the case• Deadline. Deadline of the case• Alerts. Any Alerts associated with the case• Resolution. The resolution of the case
To use other available fields, click Customize button>>Column Selection tab and click on the check box next to the field.
Service Center Detail ViewThe Detail view consists of the following elements:• Toolbar. Allows you to create new cases and templates, edit the status of
the specified case, and analyze the specified case.• Case Details window. Includes fields and drop-down menus that allow
you to view and manage details for the specified case.• Case Manager. A customizable workspace where you can schedule and
manage activities, notes, tasks, and resources for the specified case. The
314 • Service Center GoldMine Administrators Guide

Case Manager can contain any of the following functional tabs, based on your selections in Case Manager Preferences:• Pending. Click on this tab to schedule activities for new or existing
cases and templates.• Notes. Click on this tab to create and edit notes pertaining to an
individual service case.• Team. Click on this tab to add users to a team for the specified case.• Tasks. Click on this tab to create and assign tasks to users for the
specified case.• Attachments. Click on this tab to attach documentation supporting a
problem or solution for the specified case.• Resolution. Click on this tab to enter and manage notes and
Knowledge Base documents supporting the resolution of the specified case
• History. When an activity or task is competed, it is moved from the Pending or Tasks tab to the History tab. Double-click on an activity or task in the History Tab to view additional details about the history of that item.
• Contacts. Click this tab to display information about additional contacts. Additional Contacts are individuals with whom you communicate regularly, usually on behalf of the primary contact.
• Navigation Panel. The navigation panel provides a shortcut to view the GoldMine screens. Click the buttons at the bottom of the panel to open each screen.
• Activities and Notes Panel. This panel contains the following fields:• Next Activity. Displays the next activity scheduled for this case.• Last Activity. Displays the last activity performed for this case.• Last Note. Displays the last note applied to this case.
NOTE: To switch to the list view, use the chevron button in the top-right portion of the window.
GoldMine Administrators Guide Service Center • 315
Using the Service Center Toolbar (List View)The toolbar in the service center List View provides elements that allow you to view and manage details for cases. Open new cases and create case templates, choose viewing and grouping options, reassign, escalate, and resolve cases.• New Case. Click this button to create a new case or template.• Show. Click this button to filter how your Cases list displays information,
for example Open Cases or My Group’s Cases.Note that the headings will change based on your selections.
• Group. Click this button to group your cases by category, for example, Due Date or Owner.
• Reassign. Click on this button to reassign (move) a selected case to another user. You can email the user by clicking Reassign button>>E-mail checkbox. The Status field changes to Reassigned.
• Escalate. Click on this button to escalate a specific case to a higher priority. You can email the user by clicking Escalate button>>E-mail checkbox. The Status field changes to Escalated.
• Resolve. Click on this button to mark a specific case as Resolved” and enter resolution notes for the case. You can email the user by clicking Resolve button>>E-mail checkbox. The Status field changes to Resolved.
• Analyze. Click this button to open the Case Management Analysis dialog box where you can filter performance data by user. You can also export this information to a Microsoft Excel spreadsheet or Microsoft Word.
• Customize. Click this button to customize the Customize Case Manager settings.
316 • Service Center GoldMine Administrators Guide

Using the Service Center Toolbar (Detail View)The Service Center Detail View toolbar provides the following elements, which allow you to view and manage details for an individual case:The Service Center workspace tool bar consists of these buttons:• Reassign.Click on this button to reassign (move) a selected case to another
user. You can email the user by clicking Reassign button>>E-mail checkbox. The Status field changes to Reassigned.
• Escalate. Click on this button to escalate a specific case to a higher priority. You can email the user by clicking Escalate button>>E-mail checkbox. The Status field changes to Escalated.
• Resolve. Click on this button to mark a specific case as Resolved” and enter resolution notes for the case. You can email the user by clicking Resolve button>>E-mail checkbox. The Status field changes to Resolved.
• Abandon. Click on this button to mark a specific case Abandoned and enter resolution notes for that case. You can email the user by clicking Abandon button>>E-mail checkbox.
• Templates. Select from drop-down menu:• Save as Template. Open the Manage Case Templates dialog box with
predefined values populated from the specified case.• Manage Templates. Open the Manage Case Templates dialog box
with predefined values not populated.• Analyze. Click this button to open the Case Management Analysis dialog
box where you can filter performance data by user. You can also export this information to a Microsoft Excel spreadsheet or Microsoft Word.
• Customize. Click this button to customize the Customize Case Manager settings.
GoldMine Administrators Guide Service Center • 317

Creating a New CaseUse the following procedure to create a new service request (Case).8. At the Service Center, click New Case.
The Contact Search Center window opens.
9. Double-click on a contact or group of contacts for which you want to create the case and click Select.• If you have many records listed, use the Search capability at the top of
the window.• To create a case from a new contact, click New Contact and complete
the New Record dialog box.The Service Center window opens and the new case appears with a system-generated case number in the Case Number field. Depending on the case, some fields also may be system-generated.
318 • Service Center GoldMine Administrators Guide
10. Complete each field by clicking next to the field and either entering text in the field box or selecting values by clicking the down arrow on the box.
NOTE: Define the values in the drop-down box using F2 Lookup. If you have not created any values, no values will appear. For more information, see the Lookup chapter.
11. Click on the Pending tab and complete the dialog box as needed. For more information on the Pending tab, see the GoldMine 85 User’s Guide.
12. Click on the Notes tab and then click Add Notes. Type any notes you have in the workspace, as needed and then click the Save icon in the top left side of the Notes workspace.
13. Click on the Team tab and complete the team information as needed.• To add a team member, click Add. At the Add Member dialog box,
select a user from the drop-down box and type in the user’s role in the Role field.
• To edit a team member, either double-click on the team member or click on the team member and click Edit, and then make the changes.
• To delete a team member, click on the team member and then click Delete.
14. Click on the Task tab and complete the tasks properties as needed.• To add a team member, click Add and complete the New Task dialog
box.• To edit a task, double-click on the task or select the task and click Edit.• To mark a task Complete, click Complete and at the Complete
Task>>Options section, select or type 100 in the % completed field.• To print a task, select the task and click Print>>Print. • To delete a task, select the task and click Delete.
15. Click on the Attachments tab and add attachments as needed.• To add an attachment, click Add and complete the New Attachment
dialog box. • To delete an attachment, click on the attachment and click Delete.
• To view an attachment, click View.
GoldMine Administrators Guide Service Center • 319
16. Click on the Resolution tab to add resolution information to the case, as needed.• To add a note, click Add Note and type the note in the workspace.• To add a Knowledge Base article, click Search Knowledge Base. • To delete a Knowledge base entry, click Remove Knowledge Entry.
17. When an activity or task is competed, it is moved from the Pending or Tasks tab to the History tab. Click on the History tab and double-click on an activity or task to view additional details about the history of that item.
18. Click on the Contacts tab to view the contacts associated with this case.• Save this case by clicking on the Save icon in the toolbar
New Record TabsAfter completing the new record, customize the tabs for the record. You may have additional tabs on your system.To view the tabs that are off screen, click the left or right arrow at the end of the tabs.1. Click on the Pending tab and complete the dialog box as needed. For more information on the Pending tab, see the GoldMine 85 User’s Guide.2. Click on the Notes tab and then click Add Notes.
Type any notes you have in the workspace, as needed and then click the Save icon in the top left side of the Notes workspace.
3. Click on the Team tab and complete the team information as needed.• To add a team member, click Add. At the Add Member dialog box,
select a user from the drop-down box and type in the user’s role in the Role field.
• To edit a team member, either double-click on the team member or click on the team member and click Edit, and then make the changes.
• To delete a team member, click on the team member and then click Delete.
4. Click on the Task tab and complete the tasks properties as needed.• To add a team member, click Add and complete the New Task dialog
box.• To edit a task, double-click on the task or select the task and click Edit.
320 • Service Center GoldMine Administrators Guide
• To mark a task Complete, click Complete and at the Complete Task>>Options section, select or type 100 in the % completed field.
• To print a task, select the task and click Print>>Print. • To delete a task, select the task and click Delete.
5. Click on the Attachments tab and add attachments as needed.• To add an attachment, click Add and complete the New Attachment
dialog box. • To delete an attachment, click on the attachment and click Delete.• To view an attachment, click View.
6. Click on the Resolution tab to add resolution information to the case, as needed.• To add a note, click Add Note and type the note in the workspace.• To search the Knowledge Base, click Search Knowledge Base. • To delete a Knowledge base entry, click Remove Knowledge Entry.
7. When an activity or task is competed, it is moved from the Pending or Tasks tab to the History tab. Click on the History tab and double-click on an activity or task to view additional details about the history of that item.
8. Click on the Contacts tab to view the contacts associated with this case.9. Save this case by clicking on the Save icon in the toolbar.
Customizing TabsYou can customize the Service Center tabs to your particular needs. You can can add or delete a tab, rearrange the order in which they appear or rename the tabs.1. At the Service Center, in the tabs area, click the more tab which appears
left of the tabs. A list of the tabs appears.
GoldMine Administrators Guide Service Center • 321

2. Click Customize.The Display Tabs dialog box opens.
3. To add a tab, click on the checkbox next to the tab and a check appears in the box and then click OK. The tab is added.• To delete a tab, click on the marked checkbox. The check disappears.
Then click OK. The tab is deleted.• To rearrange the order of the tabs, select the tab and click the Move Up
or Move Down and then click OK. The tabs order changes.• To rename a tab, select the tab and click Rename. Type the new name
in the dialog box and click OK. The new name appears on the tab. To make this change global throughout GoldMine, click Customize tab labels globally.
• To abandon the changes, click Reset and then click OK. The original tabs and tab order appear.
322 • Service Center GoldMine Administrators Guide

Creating a New TemplateUse the following procedure to create a new template in the Service Center.The Template fields are based on typical service case categories and prioritization. For example, a template might be used when the service call center logs a request from a customer to repair a telephone that is under warranty.1. At the Service Center, click the down arrow on New Case>>New
Template.The Edit Template dialog window opens.
2. At the New Template Name field, type a name for the new template.3. Select or type or select appropriate F2 lookup field values and then click
Save.
GoldMine Administrators Guide Service Center • 323

To clone or edit an existing template1. At the Service Center, click the down arrow on New Case>>New Tem-
plate and then click Save.The Manage Template window opens.
2. Select the template you want to clone or edit and click Edit or Clone.3. Make the changes in the appropriate fields and then click Save.4. To make changes on other templates, select the template and follow steps 3
and step 4, and then click Close.
324 • Service Center GoldMine Administrators Guide

Reassigning a CaseYou can reassign a case to another user or another group.1. At the Service Center window, at the toolbar, click Reassign.
The Reassign Case dialog box opens and displays the selected case's unique number.
2. Click the Use the Reassign To drop-down menu to select a user to whom you will reassign the case.
NOTE: To notify the selected user of the reassignment via email, make sure the E-mail Notification checkbox is checked, and type your message into the Message box provided.
3. Click Reassign to reassign the case or Cancel to exit the dialog without reassigning the case.
GoldMine Administrators Guide Service Center • 325

Escalating a CaseUse the Escalate function to escalate a case to a higher priority.1. At the Service Center window, at the toolbar, click Escalate.
The Escalate Case dialog box opens and displays the selected case's unique number.
2. Click the Escalate To drop-down menu to select the user to whom you will escalate the case.
NOTE: To notify the selected user of the escalation via e-mail, make sure the E-mail Notification checkbox is checked, and type your message into the Message box provided.
3. Click Escalate to escalate the case or Cancel to exit the dialog without re-escalating the case.
326 • Service Center GoldMine Administrators Guide
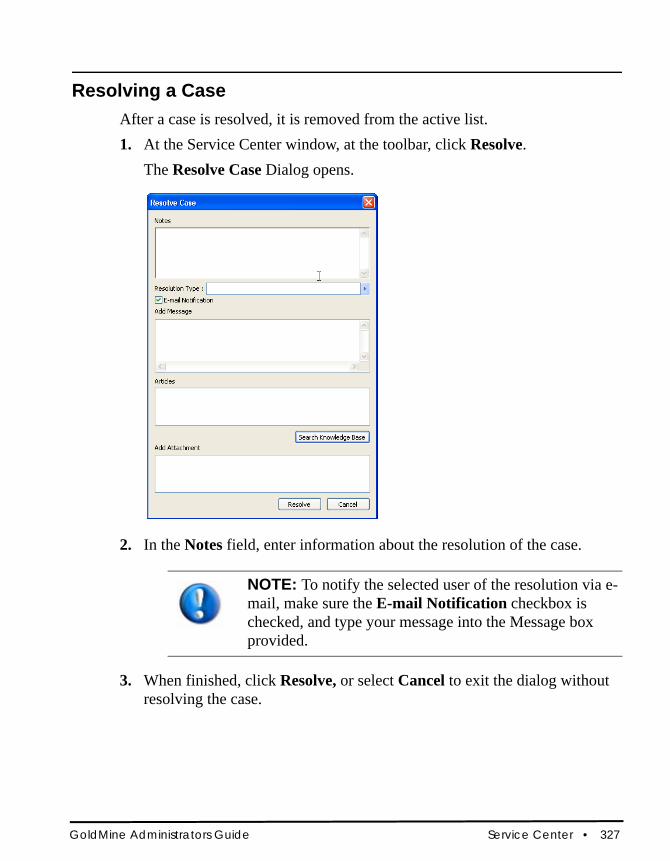
Resolving a CaseAfter a case is resolved, it is removed from the active list.1. At the Service Center window, at the toolbar, click Resolve.
The Resolve Case Dialog opens.
2. In the Notes field, enter information about the resolution of the case.
NOTE: To notify the selected user of the resolution via e-mail, make sure the E-mail Notification checkbox is checked, and type your message into the Message box provided.
3. When finished, click Resolve, or select Cancel to exit the dialog without resolving the case.
GoldMine Administrators Guide Service Center • 327
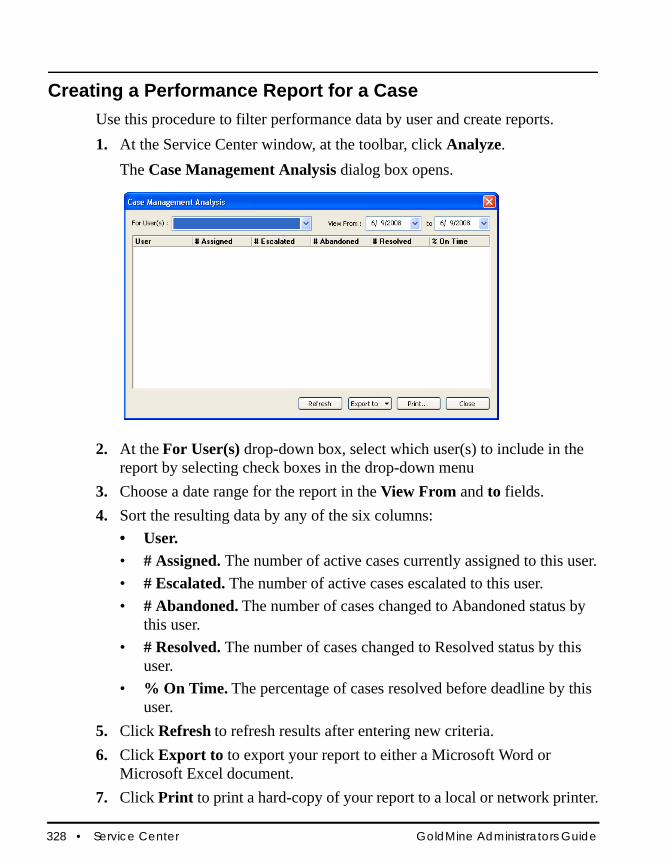
Creating a Performance Report for a CaseUse this procedure to filter performance data by user and create reports.1. At the Service Center window, at the toolbar, click Analyze.
The Case Management Analysis dialog box opens.
2. At the For User(s) drop-down box, select which user(s) to include in the report by selecting check boxes in the drop-down menu
3. Choose a date range for the report in the View From and to fields.4. Sort the resulting data by any of the six columns:
• User.• # Assigned. The number of active cases currently assigned to this user.• # Escalated. The number of active cases escalated to this user.• # Abandoned. The number of cases changed to Abandoned status by
this user.• # Resolved. The number of cases changed to Resolved status by this
user.• % On Time. The percentage of cases resolved before deadline by this
user.5. Click Refresh to refresh results after entering new criteria.6. Click Export to to export your report to either a Microsoft Word or
Microsoft Excel document.7. Click Print to print a hard-copy of your report to a local or network printer.
328 • Service Center GoldMine Administrators Guide
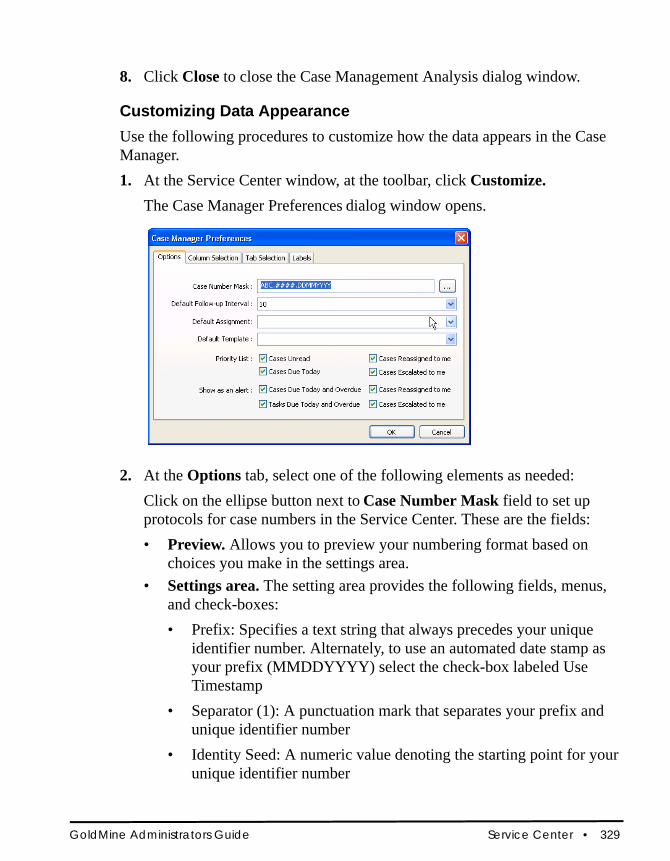
8. Click Close to close the Case Management Analysis dialog window.
Customizing Data AppearanceUse the following procedures to customize how the data appears in the Case Manager.1. At the Service Center window, at the toolbar, click Customize.
The Case Manager Preferences dialog window opens.
2. At the Options tab, select one of the following elements as needed:Click on the ellipse button next to Case Number Mask field to set up protocols for case numbers in the Service Center. These are the fields:• Preview. Allows you to preview your numbering format based on
choices you make in the settings area.• Settings area. The setting area provides the following fields, menus,
and check-boxes:• Prefix: Specifies a text string that always precedes your unique
identifier number. Alternately, to use an automated date stamp as your prefix (MMDDYYYY) select the check-box labeled Use Timestamp
• Separator (1): A punctuation mark that separates your prefix and unique identifier number
• Identity Seed: A numeric value denoting the starting point for your unique identifier number
GoldMine Administrators Guide Service Center • 329

• Identity Format: The total number of digits in your unique identifier number. This number must have at least 4 digits and no more than 10 digits
• Suffix: Specifies a text string that always follows your unique iden-tifier number. Alternately, to use an automated date stamp as your prefix (MMDDYYYY) select the check-box labeled Use Times-tamp
• Separator (2): A punctuation mark that separates your unique iden-tifier number and suffix.
• Default Follow-up Interval. Allows you to determine the default interval, in days, between the case's creation date and the date automatically set in the Deadline field (Detail View). For example, to set a default interval of 7 days, select 7 from the drop-down menu
• Default Assignment. Allows you to choose the user, if any, that cases will be assigned to, by default.
• Default Template. Allows you to choose the case template, if any, to whom all cases will default.
• Priority List. Allows you to select the types of cases that will automatically be added to your priority list.
• Show as an Alert. Allows you to select the types of cases that will automatically create alerts.
TIP: Use the Priority List to create a custom filter for cases. For example, to display only unread cases in the Service Center for a user, select only the checkbox for Cases Unread in the Options window, then select My Priority List from the Show menu in the Service Center toolbar.
330 • Service Center GoldMine Administrators Guide

3. At the Column Selection tab, choose the columns to display in the window in the Case Manager.
4. At the Tab Selection tab, choose the tabs to be displayed and the order in which to display in the Case Manager.
• Select a tab and click on Move Up or Move Down to arrange the order of the tabs.
• Select the customize tab labels globally checkbox to apply the changes to all users.
• Select a tab and click Rename to rename the tab.• Click Reset to return to the original tab order.
5. At the Labels tab, change the labels for the fields used in the Cases properties dialog window, if needed.
GoldMine Administrators Guide Service Center • 331

• Double-click on the row you want to change and type in the new label name.
• Create a new Contacts tab on the Case record, which will enable multiple contacts to be associated.
About the Set Case Number Mask DialogThe Set Case Number Mask dialog allows you to set up protocols for case numbers in the Service Center.Use the following procedure to set up a protocol.1. At the Service Center, select Customize.2. At the Case Number Mask: field, click the ellipse button at the end of the
field.
The Set Case Number Mask dialog box contains the following elements:
332 • Service Center GoldMine Administrators Guide

Preview field. Preview your numbering format based on choices you make in the Settings area. Settings area. This are contains the following fields, menus, and check-boxes.
Prefix. Specify a text string that always precedes your unique identifier number. Alternately, to use an automated date stamp as your prefix (MMDDYYYY) select the check-box labeled Use TimestampSeparator (1). A punctuation mark that separates your prefix and unique identifier numberIdentity Seed. A numeric value denoting the starting point for your unique identifier numberIdentity Format. The total number of digits in your unique identifier number. This number must have at least 4 digits and no more than 10 digitsSuffix. Specify a text string that always follows your unique identifier number. Alternately, to use an automated date stamp as your prefix (MMDDYYYY) select the check-box labeled Use TimestampSeparator (2). A punctuation mark that separates your unique identifier number and suffix
When finished, select OK to save changes, or select Cancel to exit the dialog without saving changes.
GoldMine Administrators Guide Service Center • 333

334 • Service Center GoldMine Administrators Guide
Reporting
GoldMine provides analysis reports for reviewing metrics. For example, you can calculate statistics based on activities scheduled and completed by GoldMine users.Select from over 200 standard GoldMine reports or design a custom report tailored to meet your organization's needs. If using GoldMine with an E-license, you can use Answer Wizard reports. A report can include data from these database tables:
• Contact1. Main area of the Contact Record and the Summary and Notes tabs.
• Contact2. Fields tab and user-defined fields.• ContSupp. Contacts, Details, Referrals, and Links. • Cal. Calendar tab• ContHist. History tab• OpMgr. Opportunity Manager.• Cases. Service Center
Special fields can include:• Dialog. Prompts users to input data used within the report.• Calculations. Calculates the total or performs other mathematical
operations.• Macros. Places multiple fields in the report. Macros are like those
used within GoldMine/Microsoft Word templates. For a list of available report Macros, see GoldMine Report Macros.
GoldMine Administrators Guide Reporting • 335
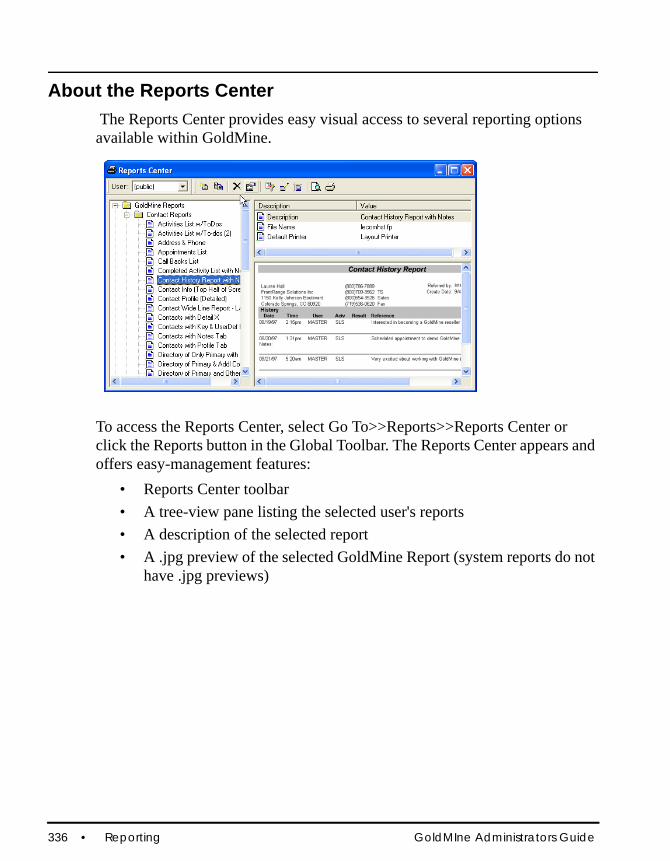
About the Reports Center The Reports Center provides easy visual access to several reporting options available within GoldMine.
To access the Reports Center, select Go To>>Reports>>Reports Center or click the Reports button in the Global Toolbar. The Reports Center appears and offers easy-management features:
• Reports Center toolbar• A tree-view pane listing the selected user's reports• A description of the selected report• A .jpg preview of the selected GoldMine Report (system reports do not
have .jpg previews)
336 • Reporting GoldMIne Administrators Guide
Report Types• GoldMine Reports. Generate reports from the data in your databases.
Using the report generator, select data from your contact database and then present the information in an easy-to-read format for printing or displaying on screen. Approximately 200 reports are included when GoldMine is installed. Use GoldMine reports to generate reports, clone reports, edit reports, and create reports.The easy to run standard reports, which cover most aspects of the database, are organized in the following categories and access only the listed tables:• Contact Reports: Contact1, Contact2, ContHist, ContSupp, Cal,
OpMgr, OpMgrFld.• Calendar Printouts:Cal, Contact1, Contact2, ContHist, Cal, OpMgr,
OpMgrFld.• Analysis Reports: Contact1, Contact2, ContHist, Cal, OpMgr,
OpMgrFld.• Labels and Envelopes: Contact1, Contact2, ContHist, ContSupp, Cal,
OpMgr, OpMgrFld.• Other Reports: Users, Lookup, Filters, Reports, PerPhone, Forms,
ScriptsW, OpMgr, OpMgrFld, Mailbox.
• Crystal Reports. Crystal Reports you created and linked to GoldMine. The Crystal Reports node on the tree view is available only when you have the necessary Crystal Reports files on your computer. (If you are running Crystal 9, the files needed are different from those needed if running previous versions of Crystal. Contact FRS Support for the current information.)
NOTE: If you are using Crystal Reports version 11, you must have the CR 11 RDC Runtime files installed in order to integrate with GoldMine.
NOTE: It is recommended that you use the Answer Wizard Reports (available through a Premium Edition add-on module).
GoldMine Administrators Guide Reporting • 337
• System Reports. The GoldMine Output to printer reports are available from the various GoldMine local menus. The System Reports list is only available on the tree view when the selected user is (public).
Using the Reports Center GoldMine’s report generator organizes data from your contact databases into a report and sends the report to an on-screen display or a selected printer. Select from approximately 200 standard templates provided by GoldMine to meet reporting and printing needs. For special reports, a developer can use GoldMine’s form designer to create custom report templates.1. Select Go To>>Reports>>Report Center.
The Reports Center appears.2. From the User drop-down list, select (public) to see the standard reports.
Select a user if the user has created a custom report. 3. In the report name tree-view area, expand the report types:
• GoldMine: GoldMine Reports.• Crystal Reports: Crystal Decisions Crystal Reports created and
linked to GoldMine.• System Reports: GoldMine "Output to printer" reports available from
GoldMine local menus. 4. In the report tree-view pane, expand report categories:
• Contact Reports. Displays Contact Listing reports.• Calendar Printouts. Displays Activity List reports.• Analysis Reports. Displays the following analytical reports:
Types of Analysis Reports Descriptions
Contact record Information about activities scheduled and completed with the contact. These statistics show the state of your relationship with the contact, such as the amount of time you are dedicating to the contact and the amount of sales generated by the contact.
Completed activity Completed activity information of an individual user, a group of users, or on a system-wide basis. This analysis provides insight into your or others' performance.
338 • Reporting GoldMIne Administrators Guide

• Labels and Envelopes. Displays templates that print data on special paper sizes.
• Other Reports. Displays six special report templates.
Forecasted sales A summary analysis of sales performance by one or more individuals or sales teams; displays actual numbers and percentage-of-goal figures for quotas, forecast sales, and closed sales for a period of time.
Graphical analysis of activities Summary graphs, displayed as a bar or line graph, of user activity data based on criteria. Graphs represent activity for a defined period of time or one of several defined types of activity, and also represent total activities, a comparison of all users, or selected users.
Leads Calculated profitability of marketing sources or groups of campaigns. GoldMine reports the total number of leads generated from each seminar, advertisement, or trade show (source), the total sales volume, and potential sales pending from each source value. Identify the most effective lead sources in terms of total leads or total sales volume generated.
Quota The actual performance of individuals against assigned quotas for a specified period. This analysis uses data about the assigned quota, forecast sales, completed sales, and lost sales to derive a percentage of quota or a percentage of forecast sales attained by a salesperson. A track record for each salesperson can be seen via listings over multiple periods.
Types of Analysis Reports Descriptions
GoldMine Administrators Guide Reporting • 339

5. Select the report to generate.
NOTE: Depending on the selections made in the Reports Categories area, reports available in the Report Description list vary. Access a local menu for each report. Highlight the report and right-click. The Reports Center local menu appears. (Also use the Reports Center toolbar.)
• Report Properties • Creating Reports• Cloning Reports• Editing Report Layouts• Previewing GoldMine Reports• Printing Reports• Viewing Saved Reports
About Report PropertiesUse the Report Properties dialog box to specify descriptive and file names, select sorting fields and levels, and set data and date options. The Sorting and Options information can be altered before running or printing a report and will change the information in the report based on changes made on these tabs.
Click the Report Properties button on the Reports Center toolbar for these tabs:• Profile. Report's name, owner, notes, file name, and printer. See Setting
Report Properties, Profile Tab• Sorting. Report's sort levels and fields. See Setting Report Properties, Sort
Tab• Options. Report's data and date inclusion options. See Setting Report
Properties, Options Tab
340 • Reporting GoldMIne Administrators Guide

Setting Report Properties, Profile TabThe Report Properties Profile tab allows you to display or configure report description, filename and owner.
1. At the Report Center, select a report and click Report Properties on the Reports Center toolbar.
2. At the Reports Properties dialog box, click the Profile tab.• Type (or edit) the name of the report in the Report description field.• Select the owner of the report in the Owner drop-down list.• Type in extra details about the report and variables in the Notes field.• Type or select the name of the report file name in the Reports
Filename field.Reports store in the Reports folder of the main GoldMine directory. Report templates end with the extension .fp; for example, MyReport.fp.
• Select a printer.• Selected Printer. The printer designated in the Output to section
of the Reports Menu. • Layout Printer. The printer selected in GoldMine’s layout mode.
Setting Report Properties, Sort TabThe Report Sorts tab of the Report Properties dialog box allows you to assign up to three sorting levels to a report. For example, you can sort a report by Company, City, and finally Contact.
1. At the Report Center, select a report and click Report Properties on the Reports Center toolbar.
2. At the Reports Properties dialog box, click the Sort tab.
You can also select the Sort button on the Report Center toolbar.
3. Select a sort level.• Primary Sort. This sort specifies the first set of parameters for
ordering records.
GoldMine Administrators Guide Reporting • 341
NOTE: Every GoldMine report must have at least a Primary Sort defined to operate properly, even if no sorting is required. To preclude sorting, set Sort Database to (none). If Primary Sort is defined as (none), the Data Preparation browse window entry dims, indicating GoldMine sorts records by the natural order of record entry.
To complete the sort definition, select the database Sort Database and Field Name GoldMine uses to order records in the report. To specify a range of records, set a Start at and an End at value.
• Secondary Sort. This sort specifies a second set of parameters for ordering records. To complete the sort definition, select the Sort Database and the Field Name by which GoldMine sorts records. To specify a range of records, set a Start at and an End at value.
NOTE: Define a first-level sort before defining a second-level sort. For a report with only one sort level, define the first level sort only.
• Tertiary Sort. Specifies the third set of parameters for ordering records. To complete the sort definition, select the Sort Database and the Field Name by which GoldMine sorts records. To specify a range of records, set a Start at and an End at value. Define a second level sort before defining a third level sort. For a report with only two sort levels, define the first and second level sorts only.
4. In the Sort Database drop-down list, select the contact table containing the field on which the records are sorted for the selected sort level (Primary, Secondary, or Tertiary). The selected database appears to the right of the sort level.
5. In the Field Name drop-down list, select the field on which records sort for the selected sort level (Primary, Secondary, or Tertiary). Available fields are determined by the table selected from the Sort Database list. The selected field appears to the right of the sort level and the contact database name.
342 • Reporting GoldMIne Administrators Guide
6. As needed, at the Start at field, type the beginning value of a range of ordered records. If the Start at field and End at field are blank, (all) appears to the right of the sort level database and field, and all records sort in ascending order.
7. At the End at field type the ending value of a range of ordered records.
NOTE: The Start/End range constraints are character-to-character comparisons. For example, if you constrain your start and end range to FrontRange, the sort will return all contacts for FrontRange but none for FrontRange Solutions or FrontRange Solutions, Inc. FrontRange is within the start/end range, but FrontRange<space> is outside the end range. Also, searching for FrontRange would not return any results for Frontrange, because r is greater than R and therefore outside the end range of the sort. Finally, note that the range criteria is limited to 20 characters, so FrontRange Solutions, Inc. would show up in none of the above-described sorts, as it is outside the character limit.
GoldMine Administrators Guide Reporting • 343
Setting Report Properties, Options TabThe Options tab determines what type of information displays in the report, similar to a filter applied internally to the report. Available options depend on the selected report category. Contacts, Analysis, and Labels and Envelopes display one set of Options, while the Calendar displays another.
1. At the Report Center, select a report and click Report Properties on the Reports Center toolbar.
2. At the Reports Properties dialog box, click the Options tab.
You can also select the Options button on the Report Center toolbar.
3. In the History Data area, select the activity types to be included in the report and complete these fields:• User. At the drop-down list, select (all) or select the individual user of
the report.• Date. Type or click the drop-down arrow and select the beginning date
from the F2 Graphical Calendar. This is the first date you want the report data to reflect.
• To. Type or click the drop-down arrow and select the end date from the F2 Graphical Calendar. This is the last date you want the report data to reflect.
• Actv. Type the Activity Code assigned to the completed activities. • Result. Type the Result Code assigned to the completed activities.This
is a completion code to categorize the outcome of activities.You can use result codes to analyze specific completed activities.
4. In the Calendar Data area, select the activity types to be included in the report and complete these fields:• User. At the drop-down list, select (all) or select the individual user of
the report.• Date. Type or click the drop-down arrow and select the beginning date
from the F2 Graphical Calendar. This is the first date you want the report data to reflect.
• To. Type or click the drop-down arrow and select the end date from the F2 Graphical Calendar. This is the last date you want the report data to reflect.
• Actv. Type the Activity Code assigned to the completed activities
344 • Reporting GoldMIne Administrators Guide
5. In the Linked Data area, select the linked data to be included in the report. The selections are: Other Contacts, Document Links, Details, Referrals, and Organizations.
Running Crystal Reports from the GoldMine Reports Center To use the Crystal Reports in the Reports Center, first perform the following:
• Add Crystal Reports to the Reports Center. See “Adding Crystal Reports to the Reports Center” on page 346
• Configure Crystal Reports Data Source Names. See “Configuring Crystal Reports Data Source Names” on page 347.
Then:1. Select Go To>>Reports>>Reports. The Reports Center appears. 2. Select the owner of the report in the User drop-down list.3. In the tree-view report list, expand Crystal Report.4. To configure the report sorting, right click the report name and select
Sorts. The Report Properties dialog box, Sorting tab appears. Select the sort field for your report. Crystal Reports limits to one sort level.
5. To configure the report option, right click the report name and select Options. The Report Properties dialog box, Options tab appears. Add the Crystal Record Selection Expression and Group Selection Expression to filter results before running the report. The Record Selection Expression and Group Selection Expression do not accept dBase or SQL expressions; they only accept Crystal expressions, such as:{CONTACT1.STATE} = "MO"
6. To review the report before printing, right-click and select Print. The Print Report dialog box appears.
7. Select Window in the Print Report Output to area and click OK. The report opens in an abbreviated Crystal window.
8. To update the values in the report based on sorting or options settings,
click Refresh .
GoldMine Administrators Guide Reporting • 345

Adding Crystal Reports to the Reports CenterAdd Crystal Reports to the Reports Center by adding a new report to the Reports Center display. The report must already be created and saved to a shared location. Or clone a report already added to the Reports Center.To use the Crystal Reports option you must have:• Crystal Reports installed.• ODBC (Open Database Connectivity) Data Sources mapped to the
GoldMine databases.• Reports created in Crystal based on the GoldMine data.Use the following procedure to add Crystal Reports.1. Select Go To>>Reports>>Report Center. 2. At the Reports Center, select the owner of the report in the User drop-down
list.3. In the tree-view report list, expand Crystal Reports.4. To add a Crystal Report already created, expand and select a report
category. • Right-click a report category and select New.
The Report Properties dialog box appears with the Profile tab active. • From here attach an existing Crystal Report. In the Report Filename
field, browse to the location of the Crystal Report with the extension of .RPT.
5. Click OK. The report name appears in the report tree-view pane.6. Right-click the report name and select Set ODBC Data Sources from the
local menu. The Crystal Report Data Source Names dialog box opens.
Your report is added to the Reports Center. Now configure and run your report.
346 • Reporting GoldMIne Administrators Guide

Configuring Crystal Reports Data Source NamesCrystal Reports use ODBC data sources to connect to your GoldMine database. To use Crystal Reports in the GoldMine Reports Center, you must set the ODBC data sources.Use the following procedure to configure Crystal Reports.1. Select Go To>>Reports>>Report Center. 2. At the Reports Center, select the owner of the report in the User drop-down
list.3. In the tree-view report list, expand Crystal Reports.4. Right-click the report name and select Set ODBC Data Sources from the
local menu. The Crystal Report Data Source Names dialog box opens.5. In the GoldMine home directory data source name text box, type the name
of the ODBC data source you created to connect to the GoldMine Users table.
6. In the GoldMine database data source name field, type the name of the ODBC data source you created to connect to the GoldMine tables (tables that store other database information. Also referred to as GMBase files. The GoldDir line in the GM.ini points to the shared GoldMine files.) such as Cal, Mailbox, and SPFiles.
7. Type any associated User ID and Password to access the GoldMine tables. If connecting to a Firebird database, use your GoldMine user name and password. If connecting to a SQL Server database, use the SQL login and password.
8. In the Contact database data source name field, type the ODBC data source you created to connect to the Contact tables (tables that store a database's contact information. Also referred to as Common files. The CommonDir line in the GM.ini points to the default contact files.) such as Contact1, Contact2, ContHist.
GoldMine Administrators Guide Reporting • 347

9. Type any associated User ID and Password to access the GoldMine tables. If connecting to a Firebird database, use your Firebird user name and password. If connecting to a SQL Server database, use the SQL login and password.
NOTE: When using SQL Server, GoldMine can store the GoldMine tables and the Contact tables in the same SQL database. Therefore, the ODBC data source for the GoldMine database and Contact database may be the same.
10. Click OK.
11. Click Print .
Creating ReportsCreate GoldMine Reports from a blank template or clone the template closest to your desired results and edit it. Creating a report from a blank template is not recommended for beginners, but cloning reports and editing reports is.1. Select Go To>>Reports>>Report Center.
2. At the Reports Center click the New Report button or right-click inside the report name tree-view pane and select New. The Report Properties dialog box opens.
3. When creating a report, click the Profile tab:• Report Description: The name to display in the Report Center.• Owner: Select the report owner in the drop-down list.• Notes: Type extra details about the report and report variables.• Report Filename: Type or select the file name of the report template.
The reports store in the Reports folder of the main GoldMine directory. Report templates should end with the extension .fp. For example, MyReport.fp.
WARNING: If you do not give the report a unique file name at this stage of the process, it does not save.
348 • Reporting GoldMIne Administrators Guide
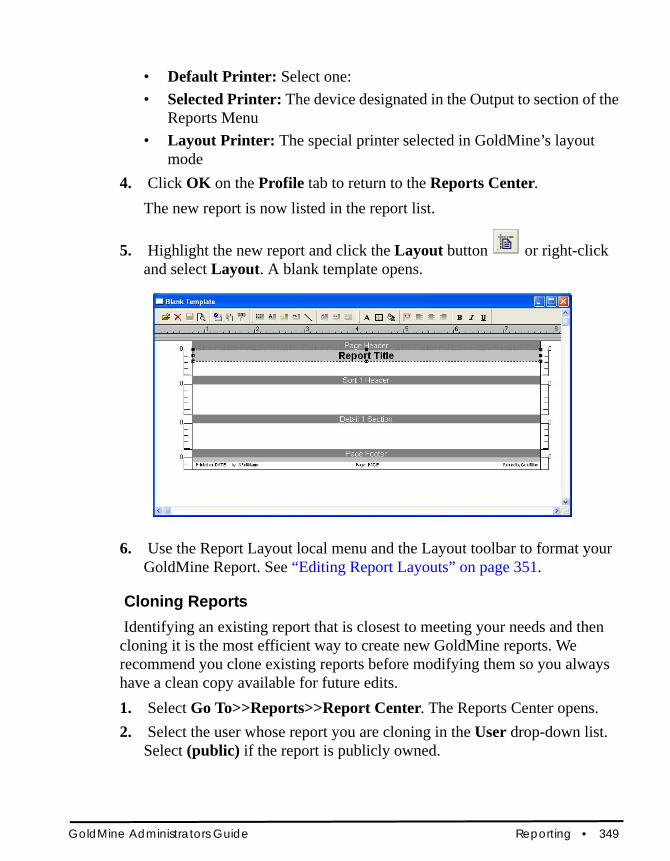
• Default Printer: Select one:• Selected Printer: The device designated in the Output to section of the
Reports Menu • Layout Printer: The special printer selected in GoldMine’s layout
mode4. Click OK on the Profile tab to return to the Reports Center.
The new report is now listed in the report list.
5. Highlight the new report and click the Layout button or right-click and select Layout. A blank template opens.
6. Use the Report Layout local menu and the Layout toolbar to format your
GoldMine Report. See “Editing Report Layouts” on page 351.
Cloning Reports Identifying an existing report that is closest to meeting your needs and then cloning it is the most efficient way to create new GoldMine reports. We recommend you clone existing reports before modifying them so you always have a clean copy available for future edits.1. Select Go To>>Reports>>Report Center. The Reports Center opens.2. Select the user whose report you are cloning in the User drop-down list.
Select (public) if the report is publicly owned.
GoldMine Administrators Guide Reporting • 349
3. Select the report to clone and click the Clone Report button or right-click the report name tree-view pane and select Clone.
4. At the Report Properties dialog box, select the Profile tab and configure:• Report Description: When cloning a report, the description defaults
to Copy of <report name>. Type a new and unique name for the report to replace the default.
• Owner: Select the report owner in the drop-down list.• Notes: Type extra details about the report and the report variables.• Report Filename: Type a new, unique name for the report template.
Reports store in the Reports folder of the main GoldMine directory. Report templates should end with the extension .fp.
• Default Printer: Select one:• Selected Printer: The device designated in the Output to section
of the Reports Menu • Layout Printer: The special printer selected in GoldMine’s layout
mode.5. Click OK on the Profile tab to return to the Reports Center. The new
report is now listed in the report list.
6. Highlight the new report and click the Layout button or right-click and select Layout. The report layout appears.
WARNING: If you do not give the report a unique file name at this stage of the process, it does not save.
350 • Reporting GoldMIne Administrators Guide
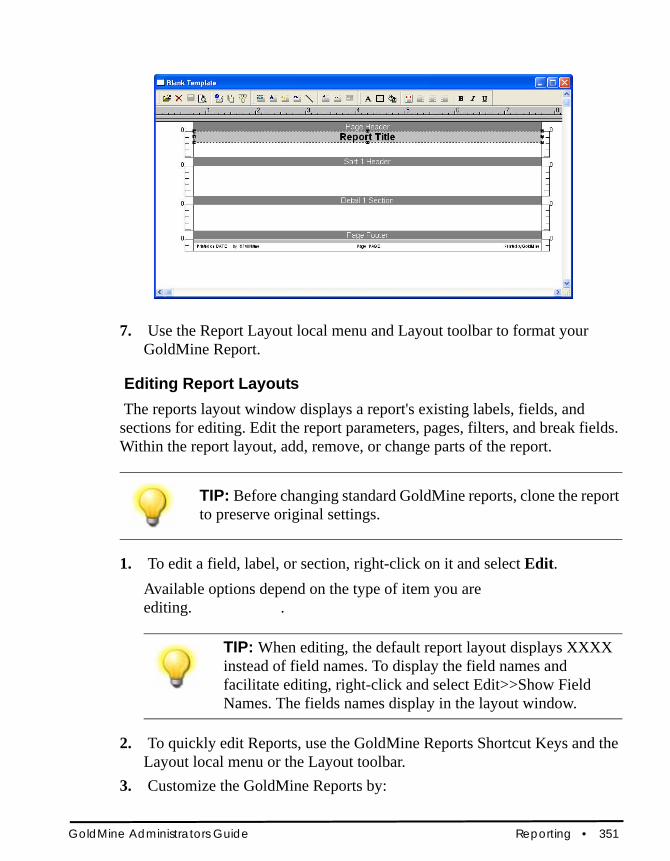
7. Use the Report Layout local menu and Layout toolbar to format your
GoldMine Report.
Editing Report Layouts The reports layout window displays a report's existing labels, fields, and sections for editing. Edit the report parameters, pages, filters, and break fields. Within the report layout, add, remove, or change parts of the report.
TIP: Before changing standard GoldMine reports, clone the report to preserve original settings.
1. To edit a field, label, or section, right-click on it and select Edit. Available options depend on the type of item you are editing.editingediting.
2. To quickly edit Reports, use the GoldMine Reports Shortcut Keys and the Layout local menu or the Layout toolbar.
3. Customize the GoldMine Reports by:
TIP: When editing, the default report layout displays XXXX instead of field names. To display the field names and facilitate editing, right-click and select Edit>>Show Field Names. The fields names display in the layout window.
GoldMine Administrators Guide Reporting • 351
• Cloning a Template. See “Cloning Reports” on page 349.• Creating a New Template. See “Creating Reports” on page 348.
4. Refine the reports by:• Editing Report Parameters. See “Editing Report Parameters” on
page 353.• Editing Report Pages.• Inserting Sections. See “Inserting Sections in Reports” on page 354.• Inserting Fields. See “Inserting Report Fields” on page 355• Editing FieldsThese settings also determine the information and the order it displays in the report:• Filters. Determines the information included in the report; apply filters
on a global level or to a report section.• Break Fields. Manages the grouping of report information.
Cloning ReportsIdentifying an existing report that is closest to meeting your needs and then cloning it is the most efficient way to create new GoldMine reports. We recommend you clone existing reports before modifying them so you always have a clean copy available for future edits.1. Select Go To>>Reports>>Report Center. The Reports Center opens.2. Select the user whose report you are cloning in the User drop-down list.
Select (public) if the report is publicly owned.
3. Select the report to clone and click the Clone Report button or right-click the report name tree-view pane and select Clone.
4. At the Report Properties dialog box select the Profile tab and configure:• Report Description. When cloning a report, the description defaults to
Copy of <report name>. Type a new and unique name for the report to replace the default.
• Owner. Select the report owner in the drop-down list.• Notes. Type extra details about the report and the report variables.
352 • Reporting GoldMIne Administrators Guide

• Report Filename. Type a new, unique name for the report template. Reports store in the Reports folder of the main GoldMine directory. Report templates should end with the extension .fp.
• Default Printer. Select one:• Selected Printer. The device designated in the Output to section of
the Reports Menu • Layout Printer. The special printer selected in GoldMine’s layout
mode.5. Click OK on the Profile tab to return to the Reports Center. The new report
is now listed in the report list.
6. Highlight the new report and click the Layout button or right-click and select Layout. The report layout appears.
Editing Report ParametersSet report margins, rulers, date format, and print defaults with the report parameters. 1. Right-click on the report template and select Report Settings>>Options.
At the Report Parameters dialog box opens.2. In the Margins area, type the Left, Right, Top, and Bottom margins in
inches.3. In the Ruler Selection area, determine if a ruler displays and whether it
appears in inches or centimeters:• Hide. No ruler displays on the template window.• Inches. Each section displays a ruler calibrated in inches.• Centimeters. Each section displays a ruler calibrated in centimeters.
4. In the Default Date Format area, select MM/DD/YY to display dates as month/day/year, or DD/MM/YY to display day/month/year.
NOTE: If you do not give the report a unique file name at this stage of the process, it does not save.
GoldMine Administrators Guide Reporting • 353

5. Select Print trial records when output to printer prior to running a report. Use this option to run a test printing and adjust paper feed through the printer before sending the records.
6. Select Print report header before the page header to print report headers added before printing the page header.
7. Click OK.
Inserting Sections in Reports1. Right-click the report template and select Insert>>Section.
The New Section window opens. The window displays sections available for inclusion. Detail and Sort sections are numbered from 1 to 9 and are only available for inclusion in numeric order.
2. Select the section to insert in the Section Name area. 3. Click OK.4. Edit sections after inserting them. See “Editing Report Sections” on page
354.
Editing Report Sections1. Click on the header, detail, or footer section. An editing box appears
around the section.2. Right-click and select Edit:
• Delete. Deletes the section.• Outlines. Accesses the Line Properties dialog box. Select lines that
outline the section. Also select the line size and color.• Background. Accesses the Item Background dialog box. Select the
color and type of section background.• Filter. Accesses the Section Selection Criteria dialog box. Create a
filter to specify section contents.• Show Field Names. Toggles the template display from XXXX to field
names.3. To edit using the Sort # Header or Detail # Section dialog boxes, double-
click the section title. Select from:• Compress Space Before the First Item. Compresses space between
the beginning of the section and the object at the top of the section.
354 • Reporting GoldMIne Administrators Guide

• Compress Space After the Last Item. Removes space after the last object of the section to allow for large word-wrapped fields.
• Advance Page Before Printing the Section. Advances to the next page before the beginning of the section.
• Advance Page After Printing the Section. Advances to the next page after printing the section.
• Reprint Titles on Every Page. Prints titles on every page (available for sort sections only).
• Number of Records Across the Page. Specifies the number of records that can be placed across the report template. This option is useful for printing labels and is available for Detail Sections only.
• Filter. Accesses the Section Selection Criteria dialog box. Create a filter to specify section contents.
• Outlines. Accesses the Line Properties dialog box. Select the lines that outline the section. Select the line size and color.
• Break Field. Accesses the Break Field for Section dialog box. Edit a break field to manage the grouping of multiple entries (available for Sort Header sections).
• Background. Accesses the Item Background dialog box. Select the color and type of section background.
Inserting Report FieldsInsert several types of fields into a GoldMine report. After inserting, edit the fields.1. Right-click on the report template. 2. At the layout local menu, select Insert.3. Insert the following field types as needed:
• Label. A text field to act as a field label.• Section. A section in the report.• Data Field. A macro field or a field from the database.• Expression Field. A calculation field in the report.• System Field. A predefined system field, such as a record count.• Dialog Field. An interactive field in the report that requires a response
from the user.• Line. A line into the report.
GoldMine Administrators Guide Reporting • 355

• Picture from Clipboard. The .bmp that is in the clipboard.• Picture from Disk File. A .bmp from a saved location.
Examples of Formatting SectionsThe Contact Profile (Detailed) report example shows report template divided into 17 sections, each one holding different information. By default, the information displays as rows of Xs, plain text labels, and dates. To display the field names instead of the Xs, right-click and select Edit>>Show Field Names.
• Page Header. Company and Contact Name fields from the Contact1 database. Also displays a line dividing the header from following sections.
• Sort 1 Header. Contact name, address details, and telephone numbers as macros. It also displays the five key fields and the first 10 user-defined fields along with the local label names. The final information shown is that drawn from the Summary tab.
• Sort 2 Header. Title bar information for displaying additional contacts within the report. If additional contacts exist, this section defines where they are displayed.
• Sort 3 Header. Sort 2 Header, but displays Details.• Sort 4 Header. Sort 2 Header, but displays Referrals.
356 • Reporting GoldMIne Administrators Guide

• Sort 5 Header. Sort 2 Header, but displays Pending Activities.• Sort 6 Header. Sort 2 Header, but displays History Activities.• Sort 7 Header. Sort 2 Header, but displays Linked Documents.• Detail 1 Section. Information defined in Sort 2 Header listing all
additional contacts.• Detail 2 Section. Information defined in Sort 3 Header listing all
profiles.• Detail 3 Section. Information defined in Sort 4 Header listing all
referrals.• Detail 4 Section. Information defined in Sort 5 Header listing all
pending calendar activities.• Detail 5 Section. Information defined in Sort 6 Header listing
completed history activities.• Sort 5 Header. Sort 2 Header, but displays Pending Activities.• Sort 6 Header. Sort 2 Header, but displays History Activities.• Sort 7 Header. Sort 2 Header, but displays Linked Documents.• Detail 1 Section. Information defined in Sort 2 Header listing all
additional contacts.• Detail 2 Section. Information defined in Sort 3 Header listing all
profiles.• Detail 3 Section. Information defined in Sort 4 Header listing all
referrals.• Detail 4 Section. Information defined in Sort 5 Header listing all
pending calendar activities.• Detail 5 Section. Information defined in Sort 6 Header listing
completed history activities.• Detail 6 Section. Information defined in Sort 7 Header listing all linked
documents.• Sort 1 Footer. Section for notes from the Notes tab. With no criteria
for determining whether notes exist, this section prints in every report.• Page Footer. System information such as the date the report was
printed, by which user, and the page number.When running this report, the page header and footer and Sort 1 Header and Footer have no filter and therefore always display. The other sections use filters. If the data for the section exists, the section displays in the report.
GoldMine Administrators Guide Reporting • 357
Title bars for the optional sections display in sort headers while the actual information displays in detail sections.
Previewing GoldMine Reports Previewing a GoldMine Report to check report results before printing or to view information without printing the entire report.1. Use one of these methods:
• In the Reports Center, configure the Report Properties to return the desired results and click the Print button on Reports Center toolbar.The Print Report dialog box opens. Configure the dialog box and select Print Report Output to Window. The Preview window appears with the data in the report.
• When working in the GoldMine Report layout, click the Preview
button on the toolbar. The Preview window appears with data in the report.
2. To print the report, right-click and select Print. The Print Pages dialog box appears. Type the first and last pages to print and click OK.
3. To save a report with the previewed data, click Save .
Printing Reports Select and print an existing report by one of the following ways:• Selecting File>>Print a Report. The Print Report dialog box appears.• Selecting Go To>>Reports>>Report Center. The Reports Center
dialog box appears. Select the report to print and click Print on the Reports Center toolbar. The Print Report dialog box appears.
• From the Calendar, click Print on the Calendar toolbar. The Print Report dialog appears.
1. In the Print Report dialog box, select the report Type in the drop-down list. Select GoldMine or Crystal Reports.
2. In the Category drop-down list, select the report category to select from:• Contact Reports
358 • Reporting GoldMIne Administrators Guide

• Calendar Reports• Service Reports• Analysis Reports• Labels and Envelopes• Other Reports
3. In the User drop-down list, select the owning user of the report to print. If it is a public report, select (public) in the drop-down list.
4. In the Report drop-down list, select the report name.5. Determine the contacts against which the report is run:
• Current Contact Only: Prints the report based on the active Contact Record.
• All contacts in the following filter or group: Selects ALL Contact Records to generate the report for the entire database (this can be time consuming), or select a predefined filter or group.
6. In the Print Report Output To area, select from:• Window: Generates the report and displays data in a report Preview
window.• Printer: Generates the report and sends it to your designated printer.
7. Click OK to generate the report.
Saving Reports with DataAfter previewing a report with specified Report Properties, save report results as a file and access the information later. 1. In the Report Center, configure the Report Properties and preview the
report.2. Click Save. The Save the Report to a Disk File dialog box appears.3. Select the location. and then type a File name.4. Select Native Format (*.FRC) in the Save as type drop-down list.5. Click OK. The report saves to that location.
6. To view a saved report, click View saved report on the Report Center toolbar.
GoldMine Administrators Guide Reporting • 359
Viewing Saved ReportsView reports saved with data.
1. In the Reports Center, click View saved report . The Open dialog box appears.
2. Browse to the location of the *.frc file you are viewing. 3. Select the file and click Open. The report opens in a GoldMine report
preview window.
Sorting Report Data Present data in order of selected field(s). GoldMine provides 3 levels of sorting for each report. For example, if you select Company as the first sort field, GoldMine orders all the records in the report alphabetically by company name. However, if you select Zip as the first sort field, GoldMine lists records by ZIP code. GoldMine queries the database in the most efficient way available. If you set up a multilevel sort, or a single-level sort on a field not already indexed, GoldMine builds a report sort table. This additional step lets other users access GoldMine data while the report is printing and also speeds the printing process.
NOTE: The Sorts option is only available for Contact Reports, Analysis Reports, and Other Reports.
4. In the Reports Menu dialog box, highlight the report, then click Report Sorts.
5. The Report Properties dialog box appears. Select the Sort Orders tab.6. Select a second level of sorting for those records having the same primary
sort field. For example, if you select Company for the Primary Sort, and the Secondary Sort is Contact, GoldMine first orders records by company name. When 2 records have the same company name, GoldMine sorts them alphabetically by contact name.
7. Select a Tertiary Sort field to order records by the third sort field when the first and second level sort fields are identical. For example, if the first and second-level sorts are State and City, and the third level sort is Zip,
360 • Reporting GoldMIne Administrators Guide
GoldMine orders records by Zip entries only when 2 or more records have the same City and State values.
NOTE: Without a second- or third-level sort, GoldMine orders records with the same first-level sort values by the records’ creation date and time. Listing records by entry order is known as the natural order of records.
8. In the Start at field, specify the beginning value of a range defining record order within the selected sort level.
9. In the End at field, specify the end of the range. If Start at and End at are blank, (all) appears to the right of the sort level database and field, and GoldMine sorts all records in ascending order. Example:Primary Sort: Contact1->Lastname (all): The first level sort is ordering all records by the Lastname field of the Contact1 database in alphabetical order. When selecting a Start at value and an End at value, GoldMine displays (range) to the right of the sort level database and field.
10. Click OK.
Answer Wizard ReportsAnswer Wizard is a reporting tool that allows users run detailed reports about company issues and trends. When selecting a report from the Answer Wizard tree, the wizard prompts you to answer questions related to the output of your report, such as content parameters and printing options. Answer Wizard may prompt you to answer report-specific questions, such as date and time ranges, priorities, and so on. The wizard then runs these specifications against information in your database and returns the results.
GoldMine Administrators Guide Reporting • 361

If you are using GoldMine with a SQL database, Answer Wizard reports provide a quicker way to produce reports based on GoldMine data. Select from a variety of predefined Answer Wizard reports. The Answer Wizard is installed when you select Management Intelligence during a custom installation of GoldMine using an E-license.
NOTE: Also install Crystal Reports and create your own reports. The Crystal Reports installation file is on your GoldMine Premium Edition CD-ROM.
The Answer Wizard provides independent online Help for configuring and using it. Select from these report categories:• Account/Contact Information• Personal and Team Calendars• Past Activities• Sales Analysis• Other Analysis
To launch the Answer Wizard, click Start on the Window taskbar and select Programs>>GoldMine>>Answer Wizard.
Using Answer Wizard1. Click Start on the Windows taskbar and select Programs>>Gold-
Mine>>Answer Wizard. The Answer Wizard appears. 2. If necessary, click Preferences to configure database settings and login
information.3. Expand the tree and select the report you are running. Click Next to work
through the wizard.
NOTE: In a network environment, Answer Wizard must be installed locally (on the computer of those individuals using the reports).
362 • Reporting GoldMIne Administrators Guide
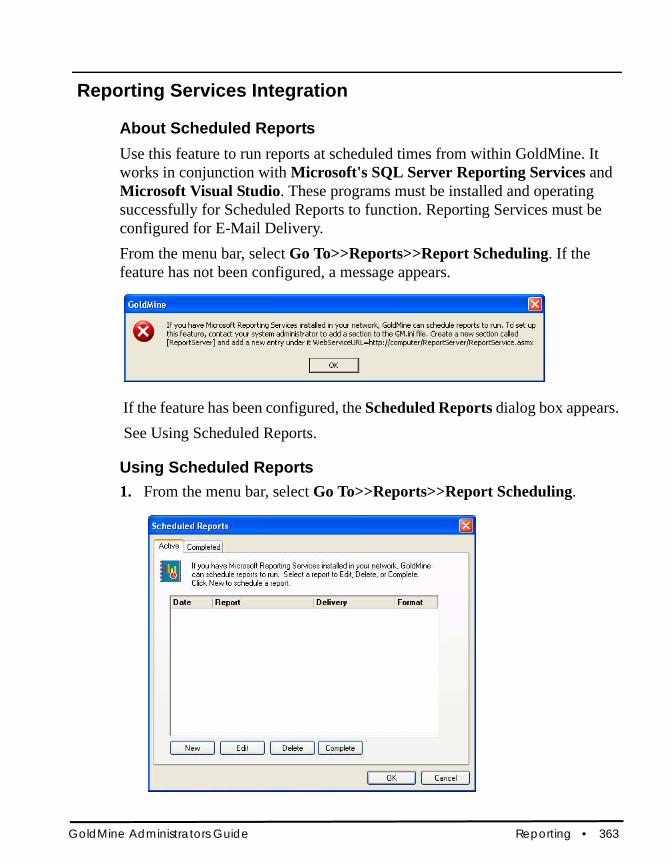
Reporting Services Integration
About Scheduled ReportsUse this feature to run reports at scheduled times from within GoldMine. It works in conjunction with Microsoft's SQL Server Reporting Services and Microsoft Visual Studio. These programs must be installed and operating successfully for Scheduled Reports to function. Reporting Services must be configured for E-Mail Delivery.From the menu bar, select Go To>>Reports>>Report Scheduling. If the feature has not been configured, a message appears.
If the feature has been configured, the Scheduled Reports dialog box appears. See Using Scheduled Reports.
Using Scheduled Reports1. From the menu bar, select Go To>>Reports>>Report Scheduling.
GoldMine Administrators Guide Reporting • 363
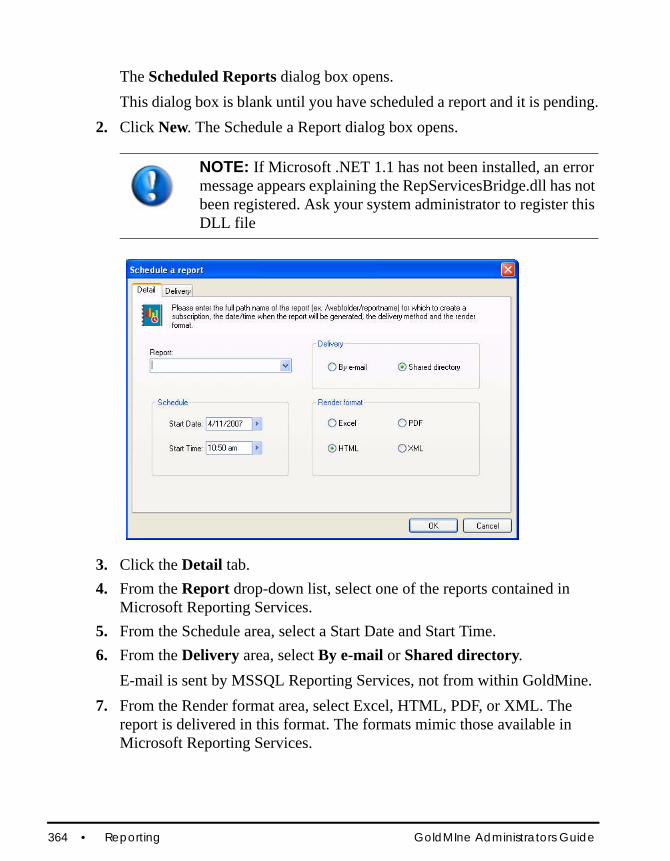
The Scheduled Reports dialog box opens. This dialog box is blank until you have scheduled a report and it is pending.
2. Click New. The Schedule a Report dialog box opens.
NOTE: If Microsoft .NET 1.1 has not been installed, an error message appears explaining the RepServicesBridge.dll has not been registered. Ask your system administrator to register this DLL file
3. Click the Detail tab.4. From the Report drop-down list, select one of the reports contained in
Microsoft Reporting Services.5. From the Schedule area, select a Start Date and Start Time.6. From the Delivery area, select By e-mail or Shared directory.
E-mail is sent by MSSQL Reporting Services, not from within GoldMine.7. From the Render format area, select Excel, HTML, PDF, or XML. The
report is delivered in this format. The formats mimic those available in Microsoft Reporting Services.
364 • Reporting GoldMIne Administrators Guide

8. If you have selected Shared directory, click the Delivery tab.
NOTE: If you selected Shared directory and do not configure the Delivery settings, an error is logged in the GoldMine Process Monitor and the report is not delivered.
9. If you selected Shared directory on the Detail tab, configure the path here.10. In the File name text box, type the folder name of the shared directory.11. In the Path (UNC) text box, type the UNC path to this folder.12. Select Add a file extension when the file is created check box.13. In the File Share Credentials, type a Username and Password for this
folder. If the folder has an existing username and password, type these. 14. In the Overwrite area, select Do not overwrite, Overwrite with newer file,
or Increment file name. 15. Click OK. 16. The Scheduled Reports >>Active tab reopens.
The report you just scheduled should be listed.
GoldMine Administrators Guide Reporting • 365

Report Notes• After the report runs based on the scheduled time in Scheduled Reports,
that report is automatically removed from the Active tab and then logged in the Completed tab.
• If you want a report to run immediately, select the report and click Complete.
• To make changes to the settings in the Schedule a Report – Detail or Delivery tabs, click Edit in the Scheduled Reports dialog box.
• To delete a report from the schedule, select it in the Active tab, and click Delete.
• To delete a report from the Completed tab, select it and click Purge. Select Purge All to delete all reports.
• There is no recurrence with this feature. You must manually schedule a report to run each time.
Configuring for E-Mail Delivery Reporting Services includes an e-mail delivery extension so that you can distribute reports through an existing e-mail server. Before it can be used, you must configure the report server to make e-mail delivery available to your users. Report server e-mail delivery is implemented on Collaboration Data Objects (CDO), and requires a Simple Mail Transport Protocol (SMTP) server. The e-mail delivery extension does not provide support for digitally signing or encrypting outgoing mail messages.The configuration file is an XML document called rsreportserver.config. Below is a snip of how it should be set for the e-mail delivery:
<RSEmailDPConfiguration> <SMTPServer>mail.frontrange.com</SMTPServer> <SMTPServerPort>25</SMTPServerPort> <SMTPAccountName>cosmin</SMTPAccountName> <SMTPConnectionTimeout>30</SMTPConnectionTimeout> <SMTPServerPickupDirectory></SMTPServerPickupDirectory> <SMTPUseSSL></SMTPUseSSL> <SendUsing>2</SendUsing>
366 • Reporting GoldMIne Administrators Guide
<SMTPAuthenticate>0</SMTPAuthenticate> <From>[email protected]</From> <EmbeddedRenderFormats> <RenderingExtension>MHTML</RenderingExtension> </EmbeddedRenderFormats> <PrivilegedUserRenderFormats></PrivilegedUserRenderFormats> <ExcludedRenderFormats> <RenderingExtension>HTMLOWC</RenderingExtension> <RenderingExtension>NULL</RenderingExtension> </ExcludedRenderFormats> <SendEmailToUserAlias>True</SendEmailToUserAlias> <DefaultHostName></DefaultHostName> <PermittedHosts></PermittedHosts> </RSEmailDPConfiguration>
See the article Configuring a Report Server for E-Mail Delivery at http://msdn.microsoft.com/.
GoldMine Administrators Guide Reporting • 367
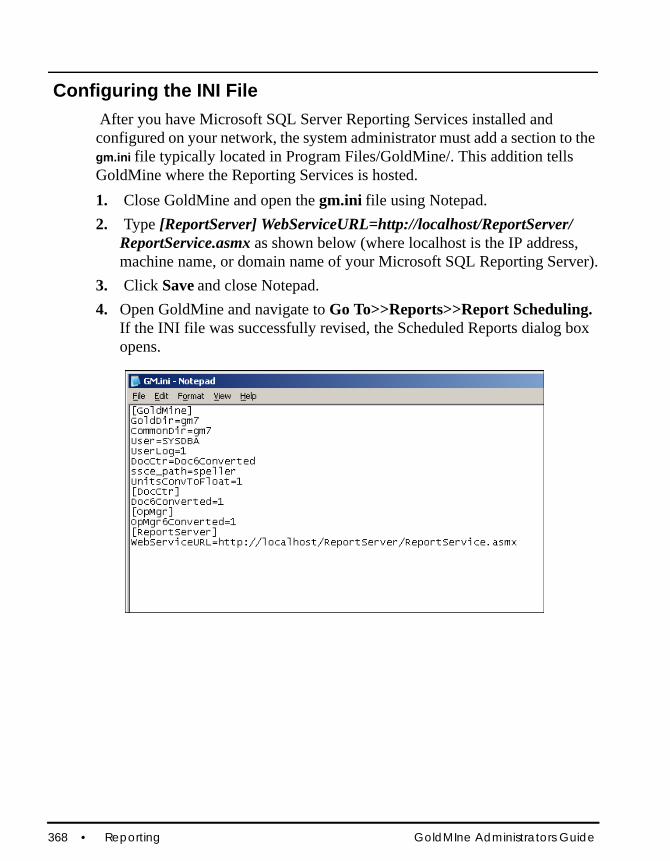
Configuring the INI File After you have Microsoft SQL Server Reporting Services installed and configured on your network, the system administrator must add a section to the gm.ini file typically located in Program Files/GoldMine/. This addition tells GoldMine where the Reporting Services is hosted.1. Close GoldMine and open the gm.ini file using Notepad.2. Type [ReportServer] WebServiceURL=http://localhost/ReportServer/
ReportService.asmx as shown below (where localhost is the IP address, machine name, or domain name of your Microsoft SQL Reporting Server).
3. Click Save and close Notepad.4. Open GoldMine and navigate to Go To>>Reports>>Report Scheduling.
If the INI file was successfully revised, the Scheduled Reports dialog box opens.
368 • Reporting GoldMIne Administrators Guide

Automated Processes
About Automated ProcessesYou can automate routine tasks by setting up a series of predefined actions to perform the tasks on Contacts in the database. These tasks include:• Administrative and tracking duties• Generating direct mail• Validating data For example, print introductory letters to new contacts whenever a Contact Record is created. After printing the letter, the Automated Process can schedule a follow-up activity (such as a call back) on the calendar or a GoldMine user.
Automated Processes ComponentsThe following is a list of the automated process components.• Processes. This is a sequence of two or more events used as the step-by-
step instructions GoldMine evaluates to perform a defined series of activities. Also known as an automated process. You can link several events to form a process.
• Events. An automated process consists of a sequence of one or more events. An event refers to the step-by-step instructions contained in an Automated Process or process GoldMine evaluates to perform a series of activities. An event consists of a trigger and an action. Events within each process perform an action when triggered by a condition.
GoldMine Administrators Guide Automated Processes • 369

• Action. Each Automated Process event has a triggered action. The trigger is evaluated and if the criteria is met, the event's action is performed.
• Trigger. Each Automated Process event is processed based on a trigger. The trigger evaluates and, if the criteria is met, performs the event's action and the processing continues to the next event.
Use the Automated Processes Center to create and edit processes and events and to execute processes. Manage tracks attached to contacts on each record with the Processes tab.Use the available menu options to Execute Processes and Manage Processes.
Designing Automated ProcessesWhen an event is created, it is assigned a preemptive or sequential number. GoldMine evaluates preemptive events first and then sequential events. When creating preemptive events you generally set the condition to eliminate the scanned record rather than confirm this process is appropriate. For example, a sales rep and territory is designated in the Sales Rep and Territory fields, then remove this process from the record; otherwise populate these two fields with the defined criteria.Preemptive events are numbered from 0 to 99. GoldMine processes all of the preemptive events of a process first before moving on to sequential events. If the Preemptive event if statements is: • True. Perform the action and go to the next event. • False. Do not perform the action but still go to the next event. Preemptive events should be numbered 5, 10, 15, and so on. Keep space between the events to insert additional events. Sequential events perform actions such as printing a letter, sending an e-mail, or scheduling a call. They are numbered from 100 to 999. Sequential events should be numbered 100, 110, 120, and so on to add other events between existing events. After completing all preemptive events, GoldMine runs the first sequential event and processes sequential events. If the statement is:• True. Perform the action and go to the next sequential event.• False. Do not perform the action and do not proceed to the next sequential
event.
370 • Automated Processes GoldMine Administrators Guide

After GoldMine completes the sequential events, it processes the next process for the Contact, or if there is no process to process, GoldMine goes to the next Contact. When creating an automated process, define the process, then allocate the events, triggers, and actions to the process. Example of the planning to do:
GoldMine Administrators Guide Automated Processes • 371

Automated Processes Center Components
ToolbarThe Automated Processes Center toolbar has the following buttons:
• New Automated Process. Creates a new automated process.• New Event. Creates a new event.• Clone New Process. Clones an automated process.• Delete. Delete the Automated Process• Properties. • Move Event Up. Moves the event up the list.• Move Event Down. Moves the event down the list.• Execute Automated Process. Executes the automated process.
Event Local Menu
• Refresh. Updates the selected Automated Process or event display.• Refresh All. Updates the display of all Automated Processes and events
for the selected User.• Expand. Displays all items contained under the selected Automated
Process.• Move Up. Moves the selected event up by one line.
372 • Automated Processes GoldMine Administrators Guide
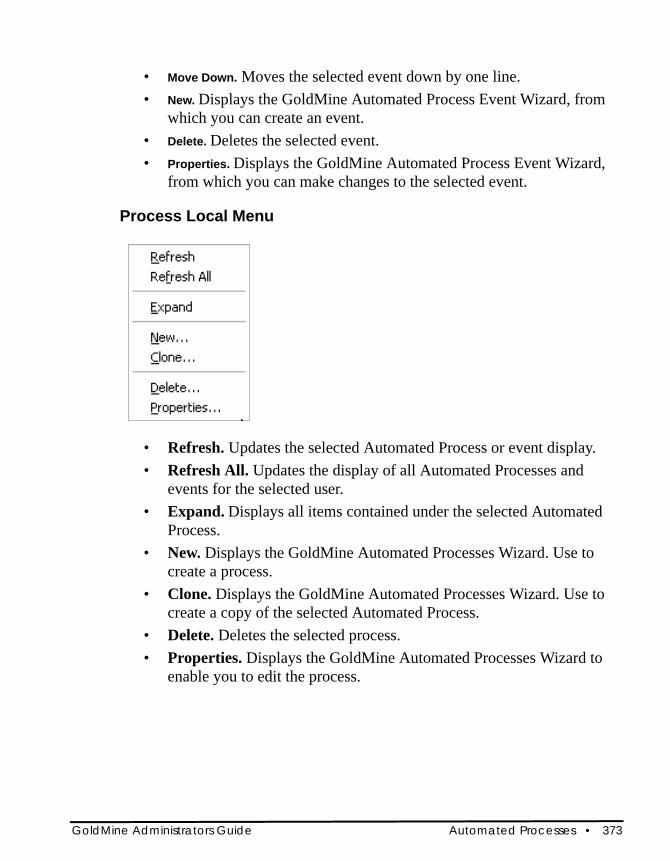
• Move Down. Moves the selected event down by one line.• New. Displays the GoldMine Automated Process Event Wizard, from
which you can create an event.• Delete. Deletes the selected event.• Properties. Displays the GoldMine Automated Process Event Wizard,
from which you can make changes to the selected event.
Process Local Menu
• Refresh. Updates the selected Automated Process or event display.• Refresh All. Updates the display of all Automated Processes and
events for the selected user.• Expand. Displays all items contained under the selected Automated
Process.• New. Displays the GoldMine Automated Processes Wizard. Use to
create a process.• Clone. Displays the GoldMine Automated Processes Wizard. Use to
create a copy of the selected Automated Process.• Delete. Deletes the selected process.• Properties. Displays the GoldMine Automated Processes Wizard to
enable you to edit the process.
GoldMine Administrators Guide Automated Processes • 373
Process Options UpdateThe Process Options allows you to determine when and how processes attach and execute.• Allow only one attachment of this process per contact. Prevents
multiple attachments of the one process to a contact’s record.• Execute this process immediately upon attachment. Starts processing
the process as soon as a user attaches the process to one or more contact records.
• Execute this process only when scanning for processes. Prevents GoldMine from executing a process attached to a single contact record. Use to restrict process execution to a specific system.
• For example, if a print action requires a special printer that is connected to one workstation, selecting this option and Execute this process immediately upon attachment prevents the printing process from running a different workstation.
• Restart this process each time that it ends. Reattaches the process when processing for the process completes.
• Allow users to attach this process. Lets other users attach the process.• Attach this process to all new contact records. Attaches the process to
each new contact record. Apply to only one Automated Process.
Creating Automated ProcessesCreate new automated processes using the Automated Process Wizard.1. Select Tools>>Automated Processes >>Manage Processes.
Click OK at the Welcome message. The Automated Processes Center opens.
374 • Automated Processes GoldMine Administrators Guide

2. Right-click on Automated Processes and select New.The Automated Processes Wizard opens.
3. Type in a name, then select a process code and then click Next.
4. Select from the following options and click Next.• Allow only one attachment of this process per contact. Prevents
multiple attachments of the one process to a contact’s record.• Execute this process immediately upon attachment. Starts
processing the process as soon as a user attaches the process to one or more contact records.
• Execute this process only when scanning for processes. Prevents GoldMine from executing a process attached to a single contact record. Use to restrict process execution to a specific system.
GoldMine Administrators Guide Automated Processes • 375
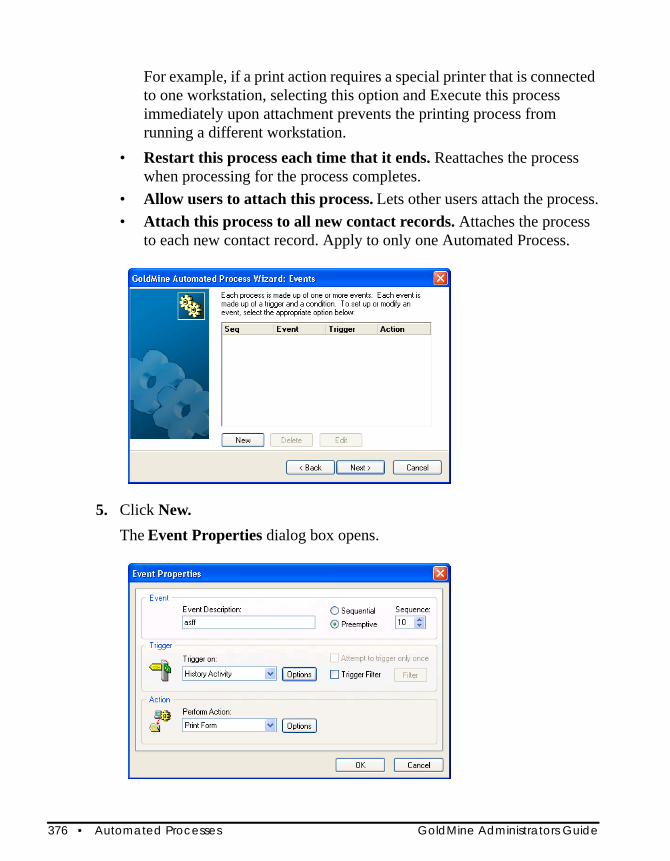
For example, if a print action requires a special printer that is connected to one workstation, selecting this option and Execute this process immediately upon attachment prevents the printing process from running a different workstation.
• Restart this process each time that it ends. Reattaches the process when processing for the process completes.
• Allow users to attach this process. Lets other users attach the process.• Attach this process to all new contact records. Attaches the process
to each new contact record. Apply to only one Automated Process.
5. Click New. The Event Properties dialog box opens.
376 • Automated Processes GoldMine Administrators Guide

6. In the Event area, type a description of the event in the Event Description field.At the radio buttons, select either:• Sequential. Numbered between 100 - 999, these events evaluate one at
a time, starting with the lowest numbered event. The next event is not processed unless the previous event's trigger evaluates as True.For example, if you create a process with multiple sequential events, where each event is numbered 100, 110, and 120, GoldMine evaluates event 100 but does not evaluate event 110 until the trigger for event 100 is fulfilled.
• Preemptive. Numbered 00 - 99, these events are evaluated individually. The next preemptive event is processed, whether or not the first event is True.
At the Sequence drop-down box, type or select the Sequence number (between 100 - 999 for Sequential; 00 - 99 for Preemptive).
7. In the Trigger area, at the Trigger On drop-down box, select a trigger.Depending on the trigger you select, a series of configuration options open.
8. In the Action area, at the Perform Action box, select an action.Click Options to configure the selected action.
9. Click Next and then click Finish.The new automated process appears in the Automated Processes Center.
GoldMine Administrators Guide Automated Processes • 377
10. Click Next. The Automated Process Event Wizard: Additional Trigger dialog box appears. Configure using:• Attempt the trigger only once. If the current event is triggered, it
executes the corresponding action, then continues to the trigger of the next event. However, if the event is not triggered, it skips the event and continues to the trigger of the next event. Example: a process includes 2 events (send a gift to contacts purchasing >$30 and print a thank-you to a contact making any purchase). Select this option to just print the thank-you letter.
• Trigger Filter. Select and then click Filter. The Expression Builder dialog box appears, which lets you specify a dBASE expression.
11. Click Next. The Automated Process Event Wizard: Action dialog box appears.
12. Click Next and click Finish.
NOTE: Trigger only once events function like a loop and are dependant on having an event that can escape from the loop. Therefore, make your trigger only once events preemptive; the process will be attached and when the Automatic Process is processed, the preemptive events are also processed.
378 • Automated Processes GoldMine Administrators Guide
Working with Automated ProcessesManage processes using these options:• Creating Processes. See “Creating Processes” on page 379• Creating Events. See “Creating Events” on page 381• Editing Processes.See “Editing Processes” on page 381• Editing Events. • Attaching Processes. See “Attaching Processes to a Contact” on page 383• Executing Processes. See “Executing Processes” on page 384• Deleting Processes or Events. See “Removing Attached Automated
Processes” on page 385
Creating ProcessesCreate, clone, or modify Automated Process processes with the GoldMine Automated Processes Wizard.
NOTE: Planning is key. Take time to determine what you want to accomplish, how the triggers and actions work together for each preemptive or sequential event, and how the series of events, the process, will fit together.
1. Select Tools>>Automated Processes>>Manage Processes. The Auto-mated Processes Center appears.
2. From the drop-down list, select the User who owns this Automated Process.
3. Right-click Automated Processes in the left pane and select New, or click the New Automated Process button. The Welcome to the Automated Process Wizard dialog box appears.
4. In the Process Name text box, type a descriptive name.5. Type or select the Process Code from the F2 Lookup list. 6. Select the Owner. By default, the user name selected in the Automated
Process Center displays.
GoldMine Administrators Guide Automated Processes • 379

7. Click Next. The GoldMine Automated Process Wizard: Options dialog box appears.
8. Select:• Allow only one attachment of this process per contact: Prevents
multiple attachment of the same process to a contact’s record.
• Execute this process immediately upon attachment: Starts processing the process as soon as a user attaches the process to one or more contact records.
• Execute this process only when scanning a group of contacts: Prevents GoldMine from executing a process attached to a single contact record. This option is useful to restrict process execution to a specific system. Example: if a print action requires a designated workstation printer, selecting this option and Execute this process immediately upon attachment prevents the printing process from running from any other workstation.
• Restart this process each time that it ends: Reattaches the process as soon as the processing of the process completes.
• Allow users to attach this process: Permits other users to select and attach the process.
• Attach this process to all new contact records: Automatically attaches the process to each new contact record. Apply only to one Automated Process (can only be applied to one Automated Process).
9. Click Next. The GoldMine Automated Process Wizard: Events dialog box appears. The dialog box displays the Seq (Sequence), Event, Trigger, and Action for each event. While creating a new process, the display is empty.
10. Select from:• New. A blank Event Properties dialog box appears. Lets you create an
event. • Delete. Deletes the selected.
NOTE: If two duplicate contact records are merged that already have automated processes attached, both processes will be attached to the merged contact record, regardless of whether the above check box was selected.
380 • Automated Processes GoldMine Administrators Guide
• Edit. The Event Properties dialog box displays the selected event's settings. Edit and save.
11. Click OK. The GoldMine Automated Process Wizard: Events dialog box opens.
12. Click New to add another event, or when you finish adding events, click Next. The Finish dialog box opens.
13. Click Finish. For the Automated Process to work, attach the process and process the process.
Editing Processes1. In the Automated Processes Center, highlight the process you are editing
and right-click. 2. Select Properties from the local menu. The Automated Process Wizard
opens.3. Use the Wizard to edit. See “Creating Processes” on page 379.4. Click Finish.
Creating EventsEvents are the triggered actions that take place in a specific order. Each Automated Process or process, can have up to 900 sequential events and 100 preemptive events. Create or edit events using:
• Automated Process Event Wizard. Available when right-clicking and select New.
• Event Properties dialog box. Available while creating or editing an Automated Process.
Using the Automated Processes Center1. Select Tools>>Automated Processes>>Manage Process. The Automated
Processes Center opens.2. Create or modify processes using tool and menu options:
• Toolbar. • Process Local Menu.
GoldMine Administrators Guide Automated Processes • 381

• Events Local Menu.
• Process Options Update. See “Process Options Update” on page 374.3. Manage processes using these options:
• Creating Processes. See “Creating Processes” on page 379• Creating Events. See “Creating Events” on page 381• Editing Processes. See “Editing Processes” on page 381• Editing Events. • Attaching Processes. See “Attaching Processes to a Contact” on page
383• Executing Processes. See “Executing Processes” on page 384• Deleting Tracks or Events. See “Removing Attached Automated
Processes” on page 385
Event Properties Dialog BoxWhen you are using the Automated Process Wizard to create a process and add events, the Event Properties dialog box opens when selecting New (or Edit) on the GoldMine Automated Process Wizard: Events dialog box.1. In the Event area, type the Event Description.2. Select either:
• Sequential: Numbered between 100 - 999, these events evaluate one at a time, starting with the lowest numbered event. The next event is not processed unless the previous event's trigger evaluates as true.
Example: If you create a process with multiple sequential events, where each event is numbered 100, 110, and 120, GoldMine evaluates event 100 but does not evaluate event 110 until the trigger for event 100 is fulfilled. • Preemptive: Numbered 00 - 99, these events are evaluated
individually. The next preemptive event is processed, regardless whether the first event is true.
3. Type or select the Sequence number (between 100 - 999 for Sequential; 00 - 99 for Preemptive).
NOTE: For information on the toolbar and local menus see “Automated Processes Components” on page 369.
382 • Automated Processes GoldMine Administrators Guide

4. Select a Trigger. Configuration options vary depending on the Trigger on option selected.
5. Select an Action. Click Options to configure the select action.6. Click OK.
Attaching Processes to a ContactBefore an Automated Process can be executed, the process must be attached to selected Contact Records. One record can have multiple processes assigned to it. GoldMine stores the attached processes on the Processes tab. Build your processes in the Automated Processes Center, then manually attach a process to a record. 1. Right-click in the Processes tab and select Attach a Process.
The Attach an Automated Process dialog box appears.2. Select the process to add from the Code and Process Name list. 3. Select Attaching User from the drop-down list.4. Click OK to attach the process and continue.
Attaching Processes to Multiple Contact Records1. Select Tools>>Automated Processes>>Execute Processes.
The Automated Processes Execution dialog box opens.2. Select one of the following:
• Scan current contact. GoldMine processes only the active contact, then returns to an idle mode.
• Scan a group of contact. Select ALL Contact Records! or a filter or group as the basis for selecting contacts. GoldMine processes the contacts in the filter or group, then returns to idle mode.
3. GoldMine scans to evaluate and execute attached processes. In the Scan Method area, select from the following: • Scan once. Executes the process as you attach it. • Scan continuously. Scans the database continuously as configured in
the Server Agents Administrator. • Do not scan. Attaches the process, but does not evaluate it for
execution (available only when selecting Attach Process to selected contacts).
GoldMine Administrators Guide Automated Processes • 383

4. Select Attach Process to selected contacts. • Select the process to be attached from the drop-down list.• Click Process. • The Process Monitor opens, processing the attachments and the events
triggered.
Executing ProcessesExecute a process for a single contact, a group of records based on a filter or group, or for all contacts. Execute a track manually whenever necessary, or set GoldMine to scan the database continuously, or use the Automated Process Server Agent. 1. Select Tools>>Automated Processes>>Execute Processes.
The Automated Processes Execution dialog box appears.2. Select one of the following:
• Scan current contact. GoldMine processes only the active contact, then returns to an idle mode.
• Scan a group of contacts. Select ALL Contact Records, or select a filter or group from the drop-down list.
3. In the Scan Method area, select one:• Scan once. GoldMine scans the contact database, or the contacts
selected by a filter or group, and processes all processes. When complete, it returns to an idle mode, unless you have the Automated Processes Server Agent running. If running, the Automated Process scans again in the time frame designated.
• Scan continuously. GoldMine scans the contact database and processes all processes, then repeats the process continuously. This allows you to set up a workstation on the network that continuously scans for triggered events and immediately performs the event actions. It can be interrupted by selecting Stop in the GoldMine Process Monitor dialog box.
NOTE: The option Do not scan is available only when you select Attach Process to selected contacts, which lets you attach processes without scanning the database for tracks to execute.
384 • Automated Processes GoldMine Administrators Guide

4. In the Options area, configure:• Max Events. Maximum number of events (up to 99,999) to be
processed during this scan.
• Max Contact. Maximum number of contact records (up to 99,999) evaluated.
• Start Time. Sets a time to start processing the track. Use this option to take advantage of periods of lower demand to run the process. To set the time using the graphical clock, press F2.
5. Click Process. The Process Monitor appears, displaying the number of contacts scanned and triggered.
Removing Attached Automated ProcessesAfter attaching a track to an individual or many Contact Records, you may need to remove the attached track. 1. Select the Processes tab. 2. Right-click the process to be removed and select Remove Process. 3. Click Yes.
TIP: To control the number of letters printed at one time, set the Max Contact to process only 25 records per day, or queue the print job to print manually or in off hours using the Print/Fax Server Agent.
GoldMine Administrators Guide Automated Processes • 385
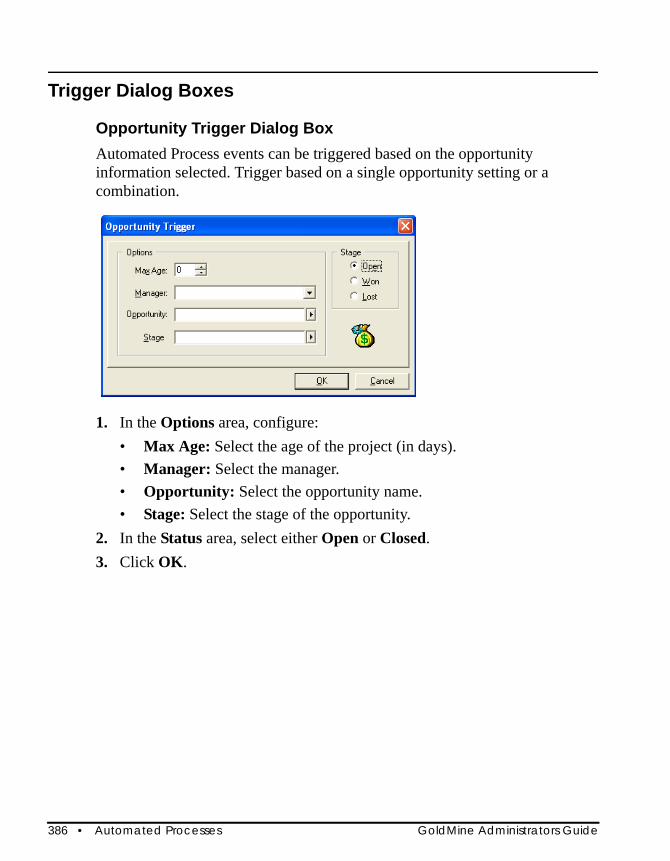
Trigger Dialog Boxes
Opportunity Trigger Dialog BoxAutomated Process events can be triggered based on the opportunity information selected. Trigger based on a single opportunity setting or a combination.
1. In the Options area, configure:• Max Age: Select the age of the project (in days).• Manager: Select the manager.• Opportunity: Select the opportunity name.• Stage: Select the stage of the opportunity.
2. In the Status area, select either Open or Closed.3. Click OK.
386 • Automated Processes GoldMine Administrators Guide
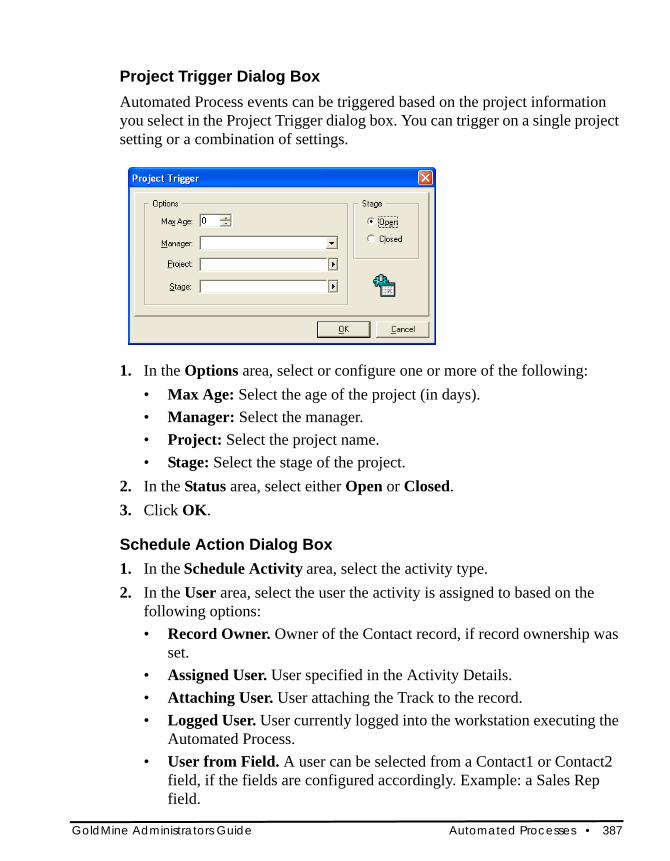
Project Trigger Dialog BoxAutomated Process events can be triggered based on the project information you select in the Project Trigger dialog box. You can trigger on a single project setting or a combination of settings.
1. In the Options area, select or configure one or more of the following:• Max Age: Select the age of the project (in days).• Manager: Select the manager.• Project: Select the project name.• Stage: Select the stage of the project.
2. In the Status area, select either Open or Closed.3. Click OK.
Schedule Action Dialog Box1. In the Schedule Activity area, select the activity type.2. In the User area, select the user the activity is assigned to based on the
following options:• Record Owner. Owner of the Contact record, if record ownership was
set.• Assigned User. User specified in the Activity Details.• Attaching User. User attaching the Track to the record.• Logged User. User currently logged into the workstation executing the
Automated Process.• User from Field. A user can be selected from a Contact1 or Contact2
field, if the fields are configured accordingly. Example: a Sales Rep field.
GoldMine Administrators Guide Automated Processes • 387

3. Click Activity Details.The related Scheduling dialog box appears. Use to specify information about the scheduled activity.
4. Specify how many days out to schedule the activity in the Schedule x days into the future text box.
5. Select one:• From Today. Starts counting days from the current date.• From Trigger Date. Starts counting days from the date the event is
triggered.6. Select Skip Weekends if you do not want to include weekend days in the
total.
NOTE: The weekends are skipped only if the process occurs on a weekend day. For example, you schedule an activity on 02.15 for nine days later on 02.24, which happens to be a Sunday. GoldMine will actually schedule it for 02.25, the following Monday. If you scheduled an activity for eight days which would be a Saturday, then GoldMine schedules for Monday as well. However if you schedule an activity for seven days later, GoldMine will schedule for Friday.
7. Click OK.
NOTE: Automated Processes do not allow you to schedule and send iCalendar meeting requests as you schedule an action.
388 • Automated Processes GoldMine Administrators Guide

Synchronization
Synchronization is a process where one GoldMine system exchanges information with another GoldMine system through a Local Area Network (LAN), Wide Area Network (WAN), or the Internet. It is useful for organizations with employees in distant offices and in the field who can link their GoldMine systems to communicate effectively and remain dynamically connected. Synchronization is also used when exchanging data between a GoldMine system and Microsoft Outlook, Palm/Treo, or Pocket PC.To synchronize, each GoldMine system must have a unique license number (see “About Licensing” on page 437). However, a user working on a GoldMine network can create a GoldMine sublicense to work on an undocked basis.It is recommended that you run the same version of GoldMine on all systems. To maintain the current version on all systems, users can update their copies via Net-Update.Synchronization involves the creation, distribution, and retrieval of transfer sets:• Stage 1. The transfer set is created based on changes to the data since the
specified date.• Stage 2. The systems connect and exchange data.• Stage 3. The retrieving system incorporates the updates into the databases.For more information see “About Transfer Sets” on page 391.
GoldMine Administrators Guide Synchronization • 389
During remote synchronization, GoldMine creates a transfer set that is a database of all the changes made to a GoldMine database during a specified time frame. The receiving GoldMine system uses data in the transfer set to update the resident GoldMine system’s database and retains only data from the transfer set that is newer than the information in its own GoldMine database.
NOTE: The transfer set does not contain every change ever made to a GoldMine database. Records go back only far enough to include changes made to the database since a specified cut-off date.
Since the transfer set contains only records from the originating GoldMine system’s database modified within a specified time frame, only those changed records are updated on the GoldMine system that retrieves the transfer set. GoldSync uses a system of unique record identifiers and time stamps to track when a record was created, when it was last successfully synchronized, and which update is the most current. During synchronization, GoldSync:• Evaluates the database to determine what records to include in the transfer
set based on Send Options and the cutoff date.• Sends the transfer set. • Evaluates the contents of the transfer set to determine what data to
retrieved based on the Retrieve Options.• Compares the date and time stamp of a field in the transfer set with the date
and time stamp of the same field in the database to determine which record is more recent and will overwrite the older data.
GoldSync uses Tlogs to keep track of changes to each field in the database and to track new records. (Tlogs is the general name for the two types of logs: ContTlog and GMTlog. They track date and time stamps for changes to fields and the synchronization of the data.) For more information on Goldsync, see “About GoldSync” on page 406.
390 • Synchronization GoldMIne Administrators Guide

Changes you make to your GoldMine data are tracked to the millisecond and stored in the Tlogs. This ensures that if two users update the same field on a record, the most recent change saves.
CAUTION: When creating a new remote site, do not copy tables from one system to another since this causes problems with synchronization. Remote sites should be set up with a fresh installation of GoldMine, and the data should be synchronized with the main GoldMine site.
Configure specialized settings in the Synchronization Settings (see “Configuring Synchronization Settings” on page 398). Use synchronization in these ways:• One-button Sync with GoldSync Server. See “Synchronizing Using
One-Button Synchronization” on page 431.• Synchronization Wizard. See “Using the Synchronization Wizard” on
page 404.• GoldSync Administration Center. See “Using the GoldSync
Administration Center” on page 414.• Synchronization with Outlook, Palm/Treo or Pocket PC. See “About
Synchronizing with Microsoft Outlook, Palm/Treo, or a Pocket PC Device” on page 394.
• Copy/Move Records. See “Using Copy/Move Records” on page 401.
About Transfer SetsTransfer sets are the containers that transport data between systems. They contain the contact and user-related information that is specified by record type, record filters, and specified date ranges. As a transfer set is built, GoldMine follows a basic protocol. It evaluates the syncstamp (Contains the time and date when the record was last successfully retrieved during synchronization.) if a particular record falls between the cutoff date and the current date and time when the transfer set is being created. If it falls within that range, the record is included in the transfer set (as long as it is not excluded by other criteria, including security settings determining whether a remote site may update the server, the server may update the site, or both
GoldMine Administrators Guide Synchronization • 391

update each other). If the cutoff date is older than the oldest Logstamp (Contains the time and date the record was last changed.) in the TLogs (The general name for the two types of logs: ContTlog and GMTlog. They track date and time stamps for changes to fields and the synchronization of the data.), GoldSync uses the RecID method to evaluate whether a record in the database was created after the cutoff date. With the RecID method, GoldSync evaluates the first seven characters of the RecID for the date and time the record was created. If the date falls between the cutoff date and the current system date, the record is included in the transfer set. If the syncstamp and Logstamp are set to dates in the future when compared to the current system date, the record will not be included in the transfer set.
NOTE: When a previously synchronized Contact Record's ownership changes, for example, the ownership changes from (public) to a specific user, the Contact Record can still be updated by another non-Master Rights user through synchronization due to the ownership of the record changing on the main site and the remote user updating a field on the same record. The remote user's ability to modify the record is not restricted until after synchronization, nor is the record security able to restrict the update during this synchronization
When the transfer set is created, it contains the data to transfer and the transfer set Tlogs. When GoldSync retrieves a transfer set, it compare the Logstamp of the records in the transfer set with the Logstamp of the records on the retrieval site. If the sending Logstamp is newer than the Logstamp for a record in the retrieval site, the record is retrieved.
Synchronization ScenarioABC Company is a medium-sized manufacturer employing about 100 people. It has departments handling sales, order processing, customer service, and support. Ideally, these departments collaborate to accomplish ABC’s goals. Whenever a prospect calls to inquire about ABC’s products, the inside sales representative adds the prospect to the database, including name, address, telephone, how the prospect heard about ABC Company, and the products in which the prospect is interested.The literature fulfillment department uses this information to send the requested product information to the prospect. They inform the outside sales representative of the date the information was sent.
392 • Synchronization GoldMIne Administrators Guide

The outside representative assigned to the prospect’s territory follows up with a call to the customer a week or so after the product information was sent from the home office. Several subsequent, qualifying sales calls are made to secure the sale of an ABC product. During this period, the salesperson is responsible for updating ABC’s sales management on sales activity including related calls and forecasts.After a sale is completed, the accounting department generates an invoice the shipping department uses to fill the customer’s order. If the customer fails to pay the invoice, the collections department sends a delinquent letter to the customer to indicate payment is due for the ABC product.Meanwhile, the customer service department records the date the merchandise was received by the customer and initiates the warranty period. Then, when the customer requires support, the customer service department determines and notes the nature of the problem for future reference. If necessary, a follow-up support call is scheduled at the customer’s location.ABC Company’s field technicians handle support calls. A field technician uses the customer information gathered by sales and customer service to locate a customer’s office and to determine the nature of the problem. When the problem has been corrected, the technician creates a support record for future reference, then prepares an invoice based on whether the product is within its warranty period.In this scenario, several employees access the same customer information at the same time, and, in some cases, these individuals work in locations that do not allow direct access to the office. The remote staff, such as the outside sales representatives and field technicians, need access to the same information available to inside ABC Company staff. To share critical account information, they must be able to transfer this contact data between the office staff and the mobile staff. With synchronization, ABC Company transfers sales leads to outside salespeople, sends support requests to service technicians, and collects follow-up reports from staff in the field. Without remote synchronization, this information would probably have to be printed, sent by facsimile to the remote location, and re-entered into GoldMine by the salesperson or service technician. Synchronization automatically sends updated information to ensure timely, accurate communications for organizations with mobile or distributed personnel.
GoldMine Administrators Guide Synchronization • 393

About Synchronizing with Microsoft Outlook, Palm/Treo, or a Pocket PC DeviceSynchronize data between GoldMine and these applications or devices:• Microsoft Outlook. See “Configuring Synchronization with Microsoft
Outlook” on page 394
• PDA (Palm™/Treo®). See “Configuring Synchronization with Palm/Treo” on page 396
• Pocket PC
Synchronize to and from GoldMine and the other applications or devices, or transfer data in one direction. Configure the synchronization process for each option using synchronization wizards.
Configuring Synchronization with Microsoft Outlook Synchronize data between GoldMine and Microsoft Outlook 2003 and 2007. After creating at least one synchronization profile, configure the Server Agents Administrator to automatically synchronize GoldMine and Outlook regularly.
NOTE: Outlook must be installed on the synchronizing workstation.
1. Select Tools>>Synchronize>>Synchronize with Outlook. The Welcome to the GoldMine - Outlook Synchronization Wizard dialog box opens.
NOTE: Outlook must be installed on the GoldMine workstation you are synchronizing.
NOTE: If using Outlook with a Palm/Treo or a Pocket PC, do not synchronize both applications with GoldMine. Separate synchronization results in duplicate data. Instead, synchronize your device with Outlook and then synchronize Outlook with GoldMine
394 • Synchronization GoldMIne Administrators Guide

2. Select either:• Start a new session. Configure settings for a new synchronization
session.• Sync using the setting of the following Profile. Select a saved profile
from the drop-down list. 3. Click Next.
• If you select Sync using the settings of the following Profile, select Finish. The GoldMine Process Monitor shows the status of the process. Edit settings by clicking Next. The Outlook Synchronization Options dialog box appears.
• If you selected Start a new session, the Outlook Synchronization Options dialog box appears.
4. Select a send and retrieve options:• Send and retrieve: To/From Outlook: Sends and retrieves data
between GoldMine and Outlook.• Send Only: To Outlook from GoldMine: Sends data from GoldMine
to Outlook, but does not retrieve data from Outlook to GoldMine.• Retrieve only: To GoldMine from Outlook: Retrieves data from
Outlook to GoldMine, but does not send data from GoldMine to Outlook.
5. Select Synchronize Contact Items to send or retrieve contact information.6. Select Synchronize Calendar Items to send or retrieve calendar
information.7. Click Advanced to define options.
The Advanced Options dialog box opens. After configuring advanced options, click OK and you return to the Outlook Synchronization Options dialog box.
8. Click Next.The dialog box appearing depends the options you selected:• Send and retrieve: To/From Outlook: The Record Selection dialog
box opens.• Send Only: To Outlook from GoldMine: The Record Selection
dialog box opens.• Retrieve only: To GoldMine from Outlook: The Ready to
Synchronize dialog box opens.
GoldMine Administrators Guide Synchronization • 395
Configuring Synchronization with Palm/TreoWithin Palm, create activities, link them to contacts, and synchronize them with GoldMine. Synchronization in multi-user environments is secured through the application of GoldMine update and deletion rules to data synchronized from the Palm device.Minimum Requirements:• HotSync software version 4.1.0 or 6.1• Palm OS3 or through OS5.2.8. Older Palm devices support only 4 custom
fields for field mapping compared to the 9 custom fields newer Palm devices support.
1. To define the Palm synchronization for a user, select Tools>>Synchronize>>Synchronize with Palm/Treo. The GoldMine Palm Synchronization Wizard appears, letting the administrator assign user permissions.
2. Click Next. The next page of the wizard appears.3. Select a user from the Selected user drop-down list. Then configure and
set that user's security settings by selecting the appropriate check boxes. 4. Clone settings from another user by selecting the Clone settings from user
check box, choosing a user from the drop-down list, and clicking Clone. 5. Click Next. The next page of the wizard appears letting you choose the
type of data to synchronize (contact information and calendar information) and the direction in which the data synchronizes between GoldMine and your Palm device (two way, to palm, or to GoldMine).
6. Click Next. The next page of the wizard appears letting you configure contact synchronization options by choosing a filter, a group of contacts, and other settings.
7. Click Next. Map up to 9 GoldMine data fields to custom Palm data fields.8. Click Next. Filter activities based on their type, Reference field value, and
other parameters.9. Click Next. Choose which activities synchronizes based on the schedule
date. 10. Click Next. Choose the type of deletions that synchronize.11. Click Next. Set purge options for previously synchronized data.12. Click Next. Limit the synchronization of Palm information to categories.
396 • Synchronization GoldMIne Administrators Guide
13. Click Next. The final wizard page appears. If satisfied with the selections, click Finish. To make changes, click Back.
Linking Palm Activities to ContactsOn you Palm Pilot, link activities and to-dos to contacts and synchronize them to GoldMine. You must use a Palm operating system of 4.0.1. In your Palm Pilot, schedule an activity.2. After activity creation, the cursor appears on the line next to the starting
time. In the graffiti section, write a forward slash (/), activating the Command entry feature.
3. In the graffiti section, write L. The Phone number lookup screen opens. 4. Select the contact to whom you are linking the activity and then select
Add. On the new activity's notes screen, Palm displays: <first name> <last name> <default phone number> <default field type>
5. To add text to the reference line, place the cursor immediately after <default field type> and type a colon (:) in the graffiti area. Any text added after the colon appears in the Reference line of the activity when you synchronize it with GoldMine; it does not affect the activities link.
NOTE: Note: If you use the incorrect format (for example ~:~) you strip the prefix from the activity.
6. Synchronize Palm with GoldMine. See “Configuring Synchronization with Palm/Treo” on page 396.
NOTE: The default field type can be W, H, F, O, E, M, or P. For example, W represents "work." For details, see your Palm documentation.
GoldMine Administrators Guide Synchronization • 397
Configuring the Advanced Synchronization Options (Outlook)Clicking the Advanced button as you are configuring the Microsoft Outlook synchronization lets you configure options for deletions, field mappings, contacts, calendars, and tasks.Select these tabs to define synchronization settings:General. Defines the range of dates from which activities are selected for synchronization, telephone extension separator, the maximum number of characters to include for notes from contact records, override retrieval from Outlook, and RSVPDeletions. Defines how deletions synchronize between GoldMine and Outlook.Field Mapping. Defines mapped fields so GoldMine can place data in the corresponding Outlook fields.Contacts. Specifies the location of the Outlook folder in which GoldMine sends and retrieves contact information.Calendar. Specifies the Outlook folder in which GoldMine sends and retrieves activity information.Task. Specifies the Outlook folder in which GoldMine sends and retrieves
Configuring Synchronization SettingsThe Synchronization Settings dialog box is available only to users with Master Rights. Define the synchronization options for instant sync, retrieving linked documents, running GoldSync as a service, and the overrides to the default time-out settings. 1. Select Tools>>Synchronize>>Synchronization Settings. The
Synchronization Settings dialog box appears. Configure the tabs:Instant Sync
• This tab is available when you retrieve a one-button synchronization profile. The Instant Sync option is included in the profile.
• If the Check for a GoldSync connection every minute option is selected, GoldMine checks for network connections 15 seconds after login and prompts the user to synchronize if a network connection and the specified IP address are reachable; however, the GoldSync server may not be listening.
398 • Synchronization GoldMIne Administrators Guide

• In the Instant Sync Connection dialog box, you can synchronize, be prompted again in one minute, or turn off the prompt for the session duration.
• Clear the Check for a GoldSync connection every minute checkbox if you do not want GoldMine to query you about synchronizing whenever it detects your GoldSync server.
Linked Documents• Configures how linked documents are handled in the synchronization
process. Configure these options in the Attempt to retrieve linked files to drop-down list:
• Select File's original drive and folder for GoldSync to place the linked documents in the original drive or location. If not found there, GoldSync searches available alternate drives. Then specify alternative drives in the text box below, telling GoldMine where to retrieve linked documents. For multiple drive entries or shares, separate each drive or share entry by a semicolon (;).For example, C;\\SERVER\DOCS;D;F;. If the linked documents are not found in the original or alternate drives, GoldSync retrieves the document into the default directory. If you did not assign a directory in default drive and folder, the default directory is the x:\SYSDIR directory\TmpLinks\; typically, the SYSDIR directory is the GoldMine directory.
• Select Specified default drive and folder for GoldMine to retrieve linked documents only to the default directory. If you did not assign a directory in the default drive and folder, the default directory is the x:\SYSDIR directory\TmpLinks\; typically, the SYSDIR directory is the GoldMine directory.
• Continue configuring the linked document settings by selecting Allow new linked documents to sync by default for new linked documents to automatically synchronize.
NOTE: If running GoldSync as a service, you must use UNC paths for the folder location. Mapped drives are not recognized properly by Windows Services.
GoldMine Administrators Guide Synchronization • 399
• Select Backup existing files prior to overwriting them during retrieval (As .BAK files) for GoldSync to place a document in a directory where there is already a file with the same name; this option instructs GoldSync to rename the existing file with an extension of.bak. After the old file is renamed, the new file is saved.
Timeouts• Configure the Internet timeout settings.• Type or select the Handshake timeout (sec). The handshake setting (t
he electronic protocol exchanged between two systems when establishing a connection) determines the number of seconds GoldMine or GoldSync waits to complete a handshake routine before disconnecting. The default value is 20 seconds.
• Type or select the Connection timeout (sec). The connection setting determines the number of seconds GoldMine or GoldSync waits after an interruption in the transmission to continue receiving status data before disconnecting. The default value is 60 seconds, or one minute.
• Click set Set Defaults to return all time-out settings to their original default settings.
GoldSync• This tab is available only when GoldSync is installed on your
computer. Configures the notification settings if GoldSync appears to fail. • Send an E-mail if a synchronization error occurred. Activates
the e-mail notification options.• E-mail error messages to this address. Type the e-mail address of
the person to notify. Use your address or the address of the Gold-Sync administrator.
GoldSync Service• When your GoldSync server is running on computer with a Windows
2003 Server, you can run GoldSync as a Service. A service is an application type that runs in the background.
• Running GoldSync as a service provides added security by eliminating the need to log onto the computer to start GoldSync. It also saves administrative time since the service can be configured to restart whenever the operating system on the computer starts, thus avoiding the task of manually starting GoldSync.
400 • Synchronization GoldMIne Administrators Guide

• Install, start, and configure the GoldSync Service from the GoldSync Administration Center toolbar, but use the GoldSync Service tab to manage the service without launching the GoldSync Administration Center.
• Set up GoldSync as Service: Installs the service. • Uninstall GoldSync Service: Removes the service.• Configure GoldSync Service: Launches the GoldSync Services
Settings dialog box where you start, stop, and automatically start the service.
2. Click OK to save the Synchronization Settings.
Using Copy/Move RecordsMove a single record or a group of contact records to another database. The Copy/Move options within GoldMine let you do this while maintaining synchronization integrity. Copy/Move is a synchronization process. To copy or move only some of the records, build the appropriate filter or group first.
NOTE: Back up your database before moving data.
For example, move contacts into an archive database, or copy records from a leads database to a customer database once the lead becomes a customer.1. Select Tools>>Data Management>>Copy/Move Records. The Copy/
Move Records Between Contact Sets dialog box appears.2. From the Select Target Contact Set drop-down list, select the destination
database. The records copy or move from the open database.3. In the Record Selection area, select either:
• Current Record. Copies or moves the active contact record.• Group of Contact Records. Copies or moves all records in the filter or
group selected from the drop-down list.4. In the Transfer Method area, select either:
• Copy Records: Creates a duplicate of the records in the target contact set. The duplicate records have the same account numbers as the original records, and all associated notes, history, additional contacts, detail, and referral records also copy.
GoldMine Administrators Guide Synchronization • 401
• Move Records: Moves records from the current Contact Set to the target file. Records delete from the original file.
5. If you selected Move Records, select Sync Deletions to mark moved records as deleted. Selecting this option marks the Tlogs for the records as deleted and GoldMine does not recognize attempts by another GoldMine system to re-synchronize the records.
6. Click Details to read a description of the Sync Deletions option.7. Click Go. The Copy/Move begins.
The Process Monitor displays progress in the process.
Using the Sync SpyWhen synchronizing records you may need to use the Sync Spy to check the records updating in the sync logs. Use Sync Spy to view the sync stamp, log stamp, field name, and user.
NOTE: With Sync Spy you determine if there is a sync stamp for the field and whether you set the cutoff date back far enough.
The Sync Spy window contains an upper and lower pane. The upper pane is summary information for the active Contact Record. The lower pane reflects the information stored in the Contact file Tlogs (ContTlog). This log file holds synchronization information for the contact set. Each contact database has its own ContTlog file. 1. Select Tools>>Synchronize>>Sync Spy. The Sync Spy window opens.2. On the Contact Record for which you are checking the updates, click the
field in question. • Database. Name of the database you are currently evaluating.
TIP: It is recommended that you use the copy feature only. Copy and verify the data in the new contact set, and delete the data in the originating data set.
402 • Synchronization GoldMIne Administrators Guide
• Sync Stamp. The date and time when the field was synchronized from the remote site and the date and time the field was modified by a user local to this system.
• Log Stamp. The date and time when the field was modified by a user local to the system the Sync Spy is run on.
• Field Name. Field modified in the selected database.
• User: User who made the modification to the field. Also shows if the modification was made by a remote or local user. If the name includes a ~ (tilde) character, it indicates the field was updated locally.
3. To select a database for the Sync Spy to display if values for the tab are stored in more than one database, select the Database in the drop-down list. For example, the Fields tab information is stored in Contact2. Select Contact2 from the drop-down list to view the values.
4. To view field values stored in another database, click the tab containing the values to view.
5. To display data in the Sync Spy for another contact, click the Contact Record and scroll through the database.
6. Use the local menu to access Find and Output options.
NOTE: On the transfer set creation side, the Sync Stamp is used with the cut-off date and time to determine if the field-level change should be included in the transfer set.
NOTE: On the retrieval system, the Log Stamp is used to compare which system has the latest change.
NOTE: Curtained fields are viewable in the Sync Spy. If this is a security concern for your organization, disable the Sync Spy option for non-Master Rights users you do not want viewing the fields. Select Tools>>User Settings. Highlight the user and click Properties. Click the Menu tab and expand Tools. Disable the Sync Spy menu option for the user.
GoldMine Administrators Guide Synchronization • 403
Sync Spy Local MenuRight-click in the upper pane or lower pane to display the Sync Spy local menu which contains:• Find. Displays the Find dialog box where you search for contacts based on
entered text.• Output to. Sends the data to the printer, Word, Excel, or the clipboard.
About the Synchronization WizardUse the GoldMine Synchronization Wizard to synchronize with another remote GoldMine system using an IP/Network connection or Internet e-mail. GoldMine can initiate or accept a connection from a remote GoldMine system and perform the synchronization by transferring data across the selected carrier. Save settings in a profile for use in future synchronization sessions. The wizard lets you specify the settings needed to synchronize with another site. Synchronize data in one direction to send new leads to a salesperson or synchronize bidirectionally to let a traveling salesperson exchange data with the home office.To use the Synchronization Wizard, you must:• Establish a TCP/IP connection between the server and remote machine.
This is the default configuration.• Have Internet e-mail configured in GoldMine if sending and retrieving
transfer sets by e-mail.
Using the Synchronization WizardDefine a variety of data and communication options to synchronize with a remote GoldMine or GoldSync system. Define the settings needed to create a transfer set or immediately start a synchronization session.1. Select Tools>>Synchronize>>Synchronization Wizard. The GoldMine
Synchronization Wizard dialog box appears. 2. Select one option:
• Start a new session. Define settings for a synchronization session. Use these settings once or save for future use.
• Sync using the settings of a Sync Profile. Synchronizes according to the settings already defined in a profile selected in the drop-down list.
404 • Synchronization GoldMIne Administrators Guide
• Sync using the settings of a GoldSync Site. Synchronizes according to the previously defined settings for the site selected in the drop-down list. The site settings are defined in the GoldSync Administration Center. GoldMine uses only the send and retrieve options for the selected site configuration.
• Use the following profile/site settings. Specifies the synchronization profile to use during the current session. This option is available only if you select Sync using the settings of a Sync Profile or Sync using the settings of a GoldSync Site.
3. If you selected Sync using the settings of a Sync Profile or the settings of a GoldSync Site, click Finish to synchronize according to existing settings. The GoldMine Process Monitor appears. See
4. To verify or change existing settings, click Next to continue to the connection method dialog box.
Configuring the Synchronization Connection MethodWhen configuring synchronization, select one connection method and click Next:
• Answer an incoming connection. Sets GoldMine to wait for an incoming connection from another GoldMine or GoldSync system. When the outside system makes contact, GoldMine accepts the connection, establishes a conversation with the remote system, and begins transferring data. The Wait for Incoming Connection dialog box appears.
• Connect to remote. Sets GoldMine to contact the remote GoldMine or GoldSync system via modem, direct Internet connection, or network. The Connect/Send E-mail to Remote dialog box appears.
Or select one unconnected method:• Send a transfer set to remote by E-mail. Sets GoldMine to send a
transfer set as an attachment to Internet e-mail. The Connect/Send E-mail to Remote dialog box appears.
NOTE: You can delete a synchronization profile selected in the drop-down list.
GoldMine Administrators Guide Synchronization • 405
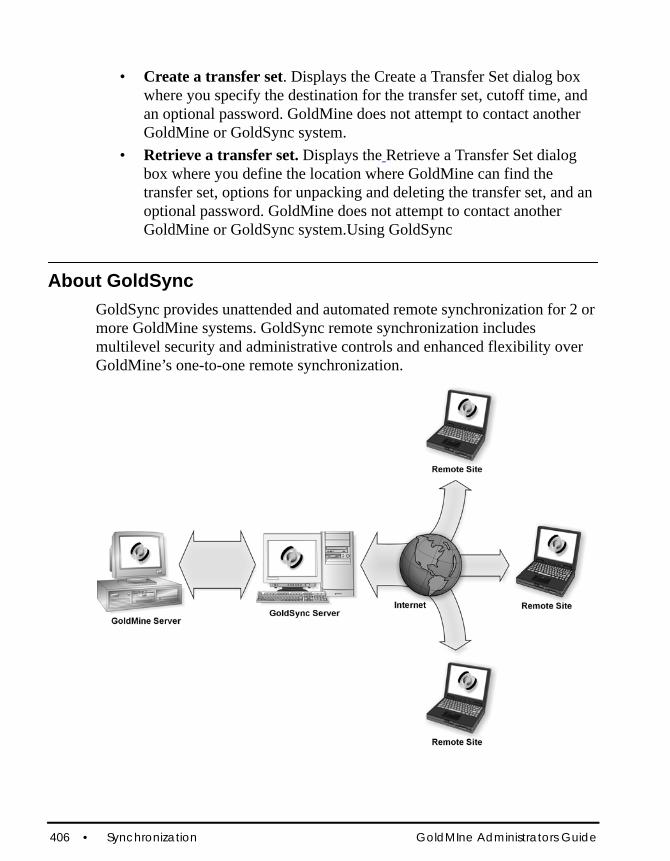
• Create a transfer set. Displays the Create a Transfer Set dialog box where you specify the destination for the transfer set, cutoff time, and an optional password. GoldMine does not attempt to contact another GoldMine or GoldSync system.
• Retrieve a transfer set. Displays the Retrieve a Transfer Set dialog box where you define the location where GoldMine can find the transfer set, options for unpacking and deleting the transfer set, and an optional password. GoldMine does not attempt to contact another GoldMine or GoldSync system.Using GoldSync
About GoldSyncGoldSync provides unattended and automated remote synchronization for 2 or more GoldMine systems. GoldSync remote synchronization includes multilevel security and administrative controls and enhanced flexibility over GoldMine’s one-to-one remote synchronization.
406 • Synchronization GoldMIne Administrators Guide

GoldSync licenses are included with GoldMine Premium Edition and can be added to your GoldMine Personal Edition D-license. Contact your Solutions Partner for details. GoldSync can simultaneously update multiple GoldMine systems with added or changed information in other GoldMine systems. Messages and Calendar updates can be sent to as many users as are configured for the synchronization. Although most users are not responsible for configuring or maintaining GoldSync, they may be required to synchronize their GoldMine with a GoldSync server. If so, they can use the GoldMine Synchronization Wizard to set up and run a GoldSync profile with settings provided by their GoldSync administrator. GoldSync administrators choose connection methods, session intervals, and the sending/retrieving data options that work best for their remote-to-host scenarios.
TIP: To maximize potential for success, we recommend that a certified GoldSync administrator perform administrative duties.
Systems using GoldSync to synchronize enjoy the added convenience of One-button Sync with GoldSync Server synchronization. Users can employ click-and-go synchronization using a profile defined by the GoldSync administrator. In some cases, users can install GoldMine and the One-button synchronization profile in one operation.
GoldSync Key Terms and ConceptsHost Site: The GoldMine system accepting incoming connections from one or more remote sites. The site running GoldSync with the Master license typically is called as the host site.Remote Site. A GoldMine system initiating a connection to the host site. A remote site typically is an undocked user or branch office with a sublicense.Site Group. A group of remote sites sharing common configuration settings. These settings define which data synchronizes, who sends/receives the data, how often the data synchronizes, and the method of data transport.Site Group Members. The individual sites belonging to a site group. While the site group members inherit properties of the site group, an individual site group member can also have its own unique settings.
GoldMine Administrators Guide Synchronization • 407
Site Code. An identifier limiting connected and initiated processes and nonconnected processes to only those sites with matching site codes. The site code is assigned to both the process and the site(s). GoldSync Server. Any network computer GoldMine is installed on and where synchronization processes run. More than one GoldSync Server on a network is allowed. A GoldSync Server is a host site or a remote site depending upon whether it accepts or initiates connections.Processes. The synchronization tasks performed on a GoldSync Server. Processes pack, send, and retrieve the data. Each process can initiate multiple tasks.Transfer Set. A file comprising all the changes made in a GoldMine database during a specified time frame, including new Contact records and updates to existing Contact Records. Transfer sets can include changes down to the field level for each type of information stored.
NOTE: The transfer set does not contain all historical changes made to a GoldMine database. It includes records starting with the most recent and spans only to include database changes since a specified cutoff date.
Contact Set. A database of Contact Records.File Code. A unique identifier used to distinguish one Contact Set from another. File Codes are defined in the main GoldMine application. (Select File>>Open Database, select the Contact File, and click Properties.) When the File Code is set, the Contact Set is available for selection in the Synchronization Wizard and the GoldSync Administration Center. The remote system must have a matching File Code.RecID. The unique identifier for every record in GoldMine. This value is compared during synchronization to determine if there is a matching record in the respective databases if it is a first-time synchronization or if there are no logs.GoldSync Administration Center: The command center where synchronization settings are configured. The GoldSync Administration Center lets you administer multiple sites and automate the processing of transfer sets and connection management.
408 • Synchronization GoldMIne Administrators Guide

After you configure GoldSync, no further operator intervention is required. the GoldSync Administration Center handles dialing, redialing, and information transfers for remote GoldMine sites. GoldSync Synchronization Wizard: The tool used by remote sites to manually define configuration settings and initiate synchronization sessions with the host site. One-button Synchronization: Lets remote users synchronize with GoldSync with a single click. The administrator sets up a one-button sync profile for the remote user in the GoldSync Administration Center.
GoldSync Implementation ConsiderationsTo understand how to make synchronization part of your business process, analyze: • The anticipated number of records in the database. • The volume of changes you expect to make to the data. • Whether the entire database or a filtered subset of data is to be
synchronized with remote sites. • The number of remote sites. • Whether the sync model is dynamic (several synchronizes per site per day)
or static (once per week for reporting and data archive purposes).• The expected future growth of the overall implementation (additional
records/databases, users, remote sites). • To understand the technology issues, consider:• Bandwidth currently available between potential remote sites and all
synchronization servers. • Future plans for enhancing bandwidth (for example, VPN, corporate
WAN, and so on).• Firewall and network security may limit synchronization options. • Personnel resources available to administer and maintain synchronization.
GoldMine Administrators Guide Synchronization • 409
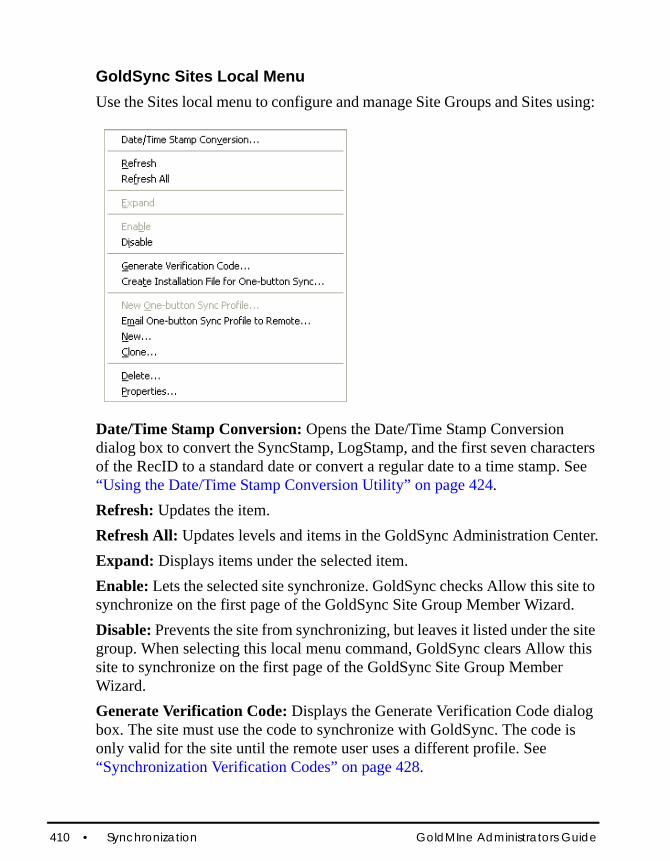
GoldSync Sites Local MenuUse the Sites local menu to configure and manage Site Groups and Sites using:
Date/Time Stamp Conversion: Opens the Date/Time Stamp Conversion dialog box to convert the SyncStamp, LogStamp, and the first seven characters of the RecID to a standard date or convert a regular date to a time stamp. See “Using the Date/Time Stamp Conversion Utility” on page 424.Refresh: Updates the item.Refresh All: Updates levels and items in the GoldSync Administration Center.Expand: Displays items under the selected item.Enable: Lets the selected site synchronize. GoldSync checks Allow this site to synchronize on the first page of the GoldSync Site Group Member Wizard. Disable: Prevents the site from synchronizing, but leaves it listed under the site group. When selecting this local menu command, GoldSync clears Allow this site to synchronize on the first page of the GoldSync Site Group Member Wizard. Generate Verification Code: Displays the Generate Verification Code dialog box. The site must use the code to synchronize with GoldSync. The code is only valid for the site until the remote user uses a different profile. See “Synchronization Verification Codes” on page 428.
410 • Synchronization GoldMIne Administrators Guide
Create Installation File for One-button Sync: Creates a GoldMine installation file according to the specifications defined in the user’s synchronization profile. Create the synchronization profile for the user before running this command and creating the installation file. When selecting this command, the Create Undocked User(s)' Installation Files appears. See “Creating Installation Files for One-button Synchronization” on page 434.One-button Sync Profile: Displays the GoldSync Site One-button Synchronization Profile Wizard to create a synchronization profile for an undocked user. This profile enables the undocked user to synchronize via One-button Sync with GoldSync Server. See “Creating One-Button Synchronization Profiles” on page 432.Email One-button Sync Profile to Remote: Sends the remote synchronization profile as an e-mail attachment to the undocked user. See “E-mailing One-Button Synchronization Profile to Remote” on page 433New: Creates a site group or site. See “Creating Site Groups” on page 419.Clone: Displays the New Site Group Member dialog box to create a site based on attributes of the selected site. See “Cloning Site Settings” on page 424.Delete: Removes the selected site group or site.Properties: Displays the Site Group Wizard to modify the selected site group or site.
Configuring Synchronization SettingsThe Synchronization Settings dialog box is available only to users with Master Rights. Define the synchronization options for instant sync, retrieving linked documents, running GoldSync as a service, and the overrides to the default time-out settings. 1. Select Tools>>Synchronize>>Synchronization Settings.
The Synchronization Settings dialog box opens.2. Configure the tabs:
Instant SyncThis tab is available when you retrieve a one-button synchronization profile. The Instant Sync option is included in the profile.
GoldMine Administrators Guide Synchronization • 411

• If the Check for a GoldSync connection every minute option is selected, GoldMine checks for network connections 15 seconds after login and prompts the user to synchronize if a network connection and the specified IP address are reachable; however, the GoldSync server may not be listening.
• In the Instant Sync Connection dialog box, you can synchronize, be prompted again in one minute, or turn off the prompt for the session duration.
• Clear the Check for a GoldSync connection every minute checkbox if you do not want GoldMine to query you about synchronizing whenever it detects your GoldSync server.
Linked Documents• Configures how linked documents are handled in the synchronization
process. Configure these options in the Attempt to retrieve linked files to drop-down list:
• Select File's original drive and folder for GoldSync to place the linked documents in the original drive or location. If not found there, GoldSync searches available alternate drives. Then specify alternative drives in the text box below, telling GoldMine where to retrieve linked documents. For multiple drive entries or shares, separate each drive or share entry by a semicolon (;). For example, C;\\SERVER\DOCS;D;F;. If the linked documents are not found in the original or alternate drives, GoldSync retrieves the document into the default directory. If you did not assign a directory in default drive and folder, the default directory is the x:\SYSDIRdirectory\TmpLinks\; typically, the SYSDIR directory is the GoldMine directory.
• Select Specified default drive and folder for GoldMine to retrieve linked documents only to the default directory. If you did not assign a directory in the default drive and folder, the default directory is the x:\SYSDIRdirectory\TmpLinks\; typically, the SYSDIR directory is the GoldMine directory.
NOTE: If running GoldSync as a service, you must use UNC paths for the folder location. Mapped drives are not recognized properly by Windows Services.
412 • Synchronization GoldMIne Administrators Guide
• Continue configuring the linked document settings by selecting Allow new linked documents to sync by default for new linked documents to automatically synchronize.
• Select Backup existing files prior to overwriting them during retrieval (As .BAK files) for GoldSync to place a document in a directory where there is already a file with the same name; this option instructs GoldSync to rename the existing file with an extension of .bak. After the old file is renamed, the new file is saved.
Timeouts• Configure the Internet timeout settings.
• Type or select the Handshake timeout (sec). The handshake (the electronic protocol exchanged between two systems when estab-lishing a connection) setting determines the number of seconds GoldMine or GoldSync waits to complete a handshake routine before disconnecting. The default value is 20 seconds.
•• Type or select the Connection timeout (sec). The connection set-
ting determines the number of seconds GoldMine or GoldSync waits after an interruption in the transmission to continue receiving status data before disconnecting. The default value is 60 seconds, or one minute.
• Click set Set Defaults to return all time-out settings to their original default settings.
GoldSync• This tab is available only when GoldSync is installed on your
computer. Configures the notification settings if GoldSync appears to fail. • Send an E-mail if a synchronization error occurred: Activates
the e-mail notification options.• E-mail error messages to this address: Type the e-mail address of
the person to notify. Use your address or the address of the Gold-Sync administrator.
GoldMine Administrators Guide Synchronization • 413

GoldSync Service• When your GoldSync server is running on computer with a Windows
2003 Server, you can run GoldSync as a Service. A service is an application type that runs in the background. Running GoldSync as a service provides added security by eliminating the need to log onto the computer to start GoldSync. It also saves administrative time since the service can be configured to restart whenever the operating system on the computer starts, thus avoiding the task of manually starting GoldSync.Install, start, and configure the GoldSync Service from the GoldSync Administration Center toolbar, but use the GoldSync Service tab to manage the service without launching the GoldSync Administration Center.• Set up GoldSync as Service: Installs the service. • Uninstall GoldSync Service: Removes the service.• Configure GoldSync Service: Launches the GoldSync Services
Settings dialog box where you start, stop, and automatically start the service.
3. Click OK to save the Synchronization Settings.
Using the GoldSync Administration CenterTo start the GoldSync Administration Center, you must have GoldMine installed, running, and licensed with the correct licenses (E-license, S- and Y-licenses, D- and G-licenses). Systems with U-licenses do not have access to the GoldSync Administration Center.
414 • Synchronization GoldMIne Administrators Guide

The GoldSync Administration Center is the point of access for the site groups, sites, servers, and processes servers perform as defined for each site group.
1. Select Tools>>Synchronize>>GoldSync Administration Center. 2. At the GoldSync Administration Center window, configure or edit these
settings using the wizards:• Site Group Wizard: Creates a site group with the connection method
and transfer set you select. See “Creating Site Groups” on page 419.• Site Group Member Wizard: Adds members to the newly created site
group. See “Creating Sites” on page 417.• Server Wizard: Adds servers synchronizing with remote sites. See
“Creating Servers” on page 423.• Process Wizard: Defines the processes performed for the site. See
“Creating Server Processes” on page 425.3. After configuring various aspects of the GoldSync Administration Center,
use the toolbar, the Site local menu, and the Servers local menu to manage and edit the functions.
GoldMine Administrators Guide Synchronization • 415

4. For synchronization to work automatically, you must start the processes. Expand Servers, the server name, and the server process. Highlight the process to start, right-click, and select Start to initiate the selected process or AutoStart On for GoldSync to run automatically during the times designated in the Server Agents Administrator.
NOTE: You must start the processes in the GoldSync Administration Center of the computer running the synchronization processes
GoldSync can be also be run as a service.
Configuring GoldSync as a ServiceYou can access GoldSync Services configurations using either of the following methods:• On the GoldSync Administration Center toolbar, click the Configure
GoldSync Service button.
The GoldSync Services Settings dialog box opens.• Select Tools>>Synchronize>>Synchronization Settings. The
Synchronization Settings dialog box opens. Click the GoldSync Services tab and Configure GoldSync Service. The GoldSync Services Settings dialog box opens.
1. Select the server running GoldSync in the Server drop-down list.2. Click Start or Stop to start or stop the service.
NOTE: After installing GoldSync as a service, but before starting the service, change the GoldSync Service logon from Local System account to This account. In the Services management window, right-click GoldSync Service and select Properties>>Log On. Select This account and configure logon information using a Windows account with full access rights on the GoldSync computer and to the shared mapped or UNC locations where linked documents are stored.
416 • Synchronization GoldMIne Administrators Guide

3. Select Automatically start as a service whenever this computer boots up to start the service.The Status box displays indicates whether the service is running.
4. Click OK to exit the dialog box.
Creating SitesSites are Site Group Members. They commonly have the same communication method and similar settings in the Site Group. Customize site send and retrieve options and filters.There are two ways to create sites in the GoldSync Administration Center: after you create the Site Group or from the local menu.1. In the GoldSync Administration Center, right-click a site group folder
and select New. 2. At the New Site Group Member dialog box, select one of these options:
• Undocked User: Select the undocked user from the drop-down list. The list includes undocked users created in the License Manager. If the undocked user does not exist, see “Creating Undocked User Licenses” on page 441.
• Sub-License: Select the site from the drop-down list. The list includes sites created in the License Manager. For more information see f the site does not exist, see “About Sub-licenses” on page 443.
• Other License: Type the license serial number in the text boxes.3. Click OK. 4. At the Welcome to the GoldSync Site Wizard dialog box, type a name for
the site.5. Select Allow this site to synchronize to make the site active for
synchronization after configuring it. and click Next.The Site Group dialog box opens.
6. To make the site belong to a different group, select the Site Group from the drop-down list. and click Next.The Cutoff Date/Time dialog box appears.
7. Select Ignore cutoff time (send all records) to send records. This option is available if you selected ALL changed contact records on the Send Contact-related Options dialog box.
GoldMine Administrators Guide Synchronization • 417

8. Select ALL contact records' cutoff date and time to include new and changed data from the cutoff date you type or select from the F2 Lookup graphical calendar and clock. This option is available if you select ALL changed contact records or All filtered records and user-scheduled activities' records on the Send Contact-related Options dialog box.
9. Select Contact records linked to Activities cutoff date and time to include new and changed data linked to activities scheduled from the cutoff date and time. This option is available if you select Contact records linked to the 'Send users' calendar list or All filtered records and user-scheduled activities' records on the Send Contact-related Options dialog box.
10. Select the Deletion-Filter from the drop-down list. This option applies the deletion filter for a single synchronization and then clears the filter selection.
NOTE: When deleting a record on the remote site through a deletion filter, the deletion is not recorded as a change in the database. This prevents the deletion from synchronizing back to the host and lets the record synchronize back to the remote, if necessary.
11. Click Next. The Override Options dialog box opens, unless configuring a shared directory site (in this case, the Next Synchronization Options dialog box opens).
Configuring the Goldsync Site Group Override OptionsUnless configured differently, each site group member synchronizes according to the settings entered for the GoldSync Site Group. However, you can modify settings for a site in the GoldSync Override Options dialog box of the GoldSync Site Group Member wizard.To configure special settings for a particular site, check the necessary options on the Override Options screen. For example, if you are creating a site where you want a number of retries before failing a sync session, at the Overrides Options window select the Number of retries before failing the sync session option. The wizard will move you to the appropriate window in which you can choose the number of retries needed.
418 • Synchronization GoldMIne Administrators Guide

1. To navigate to the Override Options window, do the following:• At the GoldSync Administration window select a Site and click
Properties.
• Click Yes at the message.The GoldSync Site Wizard opens.
2. Navigate through the wizard to the Overrides Options window and select from the list of options. Depending on the choices you make, the wizard will move you to the appropriate window on which you can make the necessary selections.
3. Click Next and then select Finish to the GoldSync Administration Center.
Creating Site GroupsUse the Site Group Wizard to set up site groups (the first step in configuring GoldSync). Configuration options you set for the group are inherited by each group member you add to the group. Using the Site Group Wizard, set the connection method, synchronization method and intervals, and the method by which transfer set data communicates between the remote site and the server and vice versa.1. Select Tools>>Synchronize>>GoldSync Administration. The GoldSync
Administration Center appears. 2. Right-click on Site Groups and select New. The Welcome to the Site
Group Wizard dialog box appears. 3. Type a descriptive name for the site group and click Next. The
Synchronization Method dialog box appears. 4. Select either:
• In the Connected Methods (IP to IP/Network) area, select an option:• Accept an incoming connection: The server accepts the initial
request for data via modem, Internet direct, or network.
GoldMine Administrators Guide Synchronization • 419

• Initiate an outgoing connection at set intervals: The server trans-fers data at a specified time. The interval is set by the user.
• In the Non-connected Methods (Internet: E-mail, Shared Directories) area, select an option. Data transfer occurs without an active connection between the GoldSync Administration Center and the remote sites, using an Internet e-mail account or shared directory to transfer information:• Send and retrieve transfer sets via E-mail: The transfer set cre-
ates in advance and transfers by e-mail. • Synchronize with another GoldSync server via shared directo-
ries: Uses defined paths to directories for depositing and retrieving transfer sets.
5. Click Next. The General Options dialog box opens.
Configuring the General Options (Site Groups)In the General Options set the send and retrieve, password, and log information.1. Select Send changed data to site group’s members to let GoldSync
accept a request from a remote site to create a transfer set.2. Select Retrieve changed data from site group’s members to let
GoldSync retrieve a transfer set from the remote site.3. Type an Optional connection password requiring remote users to enter a
password when connecting to the server.4. In the Log Options area, select from:
• Log the details of each synchronization session. Records Process Monitor information in the GoldMine system logs.
• Log the transfer set details for the records sent/retrieved. Records changes made to synchronized records.
5. Click Next.
NOTE: If information is stored for every synchronization session, the log information storage file could grow very large. Unless you are troubleshooting a sync issue, we recommend disabling log options.
420 • Synchronization GoldMIne Administrators Guide

• If you selected Accept an incoming remote connection and Send changed data, the Transfer Set Creation Method dialog box opens. See “Configuring the Transfer Set Creation Method” on page 421.
• If you selected another synchronization methods, and selected Send changed data, the Send Options dialog box opens. See “Configuring Send Options” on page 436.
• If you selected only Retrieve changed data, the Retrieve Options dialog box opens. See “Configuring the Retrieve Options” on page 421.
Configuring the Transfer Set Creation MethodUse the Transfer Set Creation Method dialog box to determine if the transfer set is created while the remote site is connected or to have the transfer set created in advance for the remote site to pick up.1. Select an option:
• Generate transfer set while site group member waits online. When the remote sites initiate synchronization, they wait online while the transfer set is built and sent to them.
• Generate transfer set in advance for site group member(s) to pick up. Your system generates the transfer set in advance and stores it in a shared directory. When the remote sites initiate synchronization, they stay online long enough for to send the transfer to them.
2. Click Next. The Send Options dialog box appears. See “Configuring Send Options” on page 436.
Configuring the Retrieve OptionsThe Retrieve Options determine what is considered for addition to the database when retrieving a transfer set from another system.If you select either Retrieve a transfer set from the second dialog box of the Synchronization Wizard or Retrieve changed data from remote from the Connect/Send E-mail to Remote or Wait for an Incoming Connection dialog boxes, GoldMine opens the Retrieve Options dialog box.1. In the Retrieve record types area, select the record types to retrieve from a
remote site. By default, all record types are selected.
NOTE: If you are a main site, clear many of the customization types unless retrieving from a remote site responsible for GoldMine customization.
GoldMine Administrators Guide Synchronization • 421

2. In the Retrieve users' calendar area, select one or more users whose calendar activities you want to retrieve. To retrieve calendar activities for all users, select (all).
NOTE: History items are treated as user calendar items, and are only synchronized between users when user calendars are synchronized.
3. Click Next. The Retrieve Contact Sets dialog box opens.
Forcing the Override of TlogsIf the administrator frequently purges the tlogs on the server, the Force overwirte of values with missing t-logs option in the Retrieve record types area must be used to update records on a computer. This option ignores any existing tlogs that might exist on the computer and forces the record updates.
WARNING: This option must be used when tlogs are purged from the server and there are computers that do not frequently connect to the server. Otherwise, the records contained on the computer might accidentally overwrite the files on the server.
NOTE: This option should be set only at the computer side, not on the server.
Configuring the Retrieve Contact Set OptionsSelect which multiple contact sets to synchronize. 1. In the Please specify which contact sets you wish to retrieve from the
remote site area, select the contact sets to retrieve.2. In the Default Contact Set area, select the Contact Set in the drop-down
list. This is the Contact Set to retrieve data into if there is no matching file code from the incoming transfer set.
3. Click Next. If you selected:• Answer an incoming connection on the connection method dialog
box, the Ready to Synchronize dialog box opens.• Connect to remote, the Connect/Send E-mail to Remote dialog box
opens.
422 • Synchronization GoldMIne Administrators Guide

Creating ServersA GoldSync Server is any computer handling the synchronization processes. It can be any computer on the network running a network copy of GoldMine. For example, your main GoldMine Server may not have a modem. Rather than installing a modem, assign another computer on the network that does have a modem as the GoldSync Server. Each GoldSync Server assumes the computer name as the server name. You can designate more than one computer on your network as a GoldSync Server. Have one server for IP/Network synchronization and one for e-mail synchronization.
NOTE: The GoldSync Server computers must have proper resources for the processes they are running.
TIP: Because GoldSync is resource-intensive, we recommend dedicating a server to executing GoldSync processes, especially when many users are synchronizing throughout the day. Creating transfers for multiple users and managing multiple connections uses a significant amount of the system's memory, processor, and hard disk capacity.
Use the following procedure to create a server.1. In the GoldSync Administration Center, right-click on Servers and
select New. The Welcome to the Server Wizard dialog box appears.2. Type or browse to the name of the server to make a GoldSync Server. 3. Click Next. The available processes dialog box appears.4. Select the processes to assign to the server.
• IP to IP/Network: Accepts incoming remote connections• IP to IP/Network: Initiates remote connections.• E-mail: Scans for incoming transfer sets.• E-mail: Sends outgoing transfer sets. • Shared Paths: Creates/retrieves transfer sets created in advance.
5. Click Next. The Finish dialog box appears. 6. Click Finish and the Welcome to the Process
GoldMine Administrators Guide Synchronization • 423

Cloning Site SettingsCloning site setting to create site group members with the same or similar settings. 1. In the GoldSync Administration Center, highlight the site you are using a
baseline, right-click and select Clone. The New Site Group Member dialog box appears.
2. Select or create the new undocked user to whom you are assigning the cloned settings.
3. Click OK. The Welcome to the GoldSync Site Wizard dialog box opens. Wizard settings are based on the source site's configuration. Keep the defaults or make necessary changes using the Override options.
Using the Date/Time Stamp Conversion UtilityYou may need to view date and time stamps in a regular date format. The utility converts the seven-character SyncStamp, LogStamp, or the first seven digits of the RecID to a standard date and time format; or it converts a standard date format to a stamp format.
TIP: Use this utility while troubleshooting synchronization issues to verify the date and time in the Tlogs of unpacked transfer sets and compare the information to that in the database.
1. Select Tools>>Synchronize>>GoldSync Administration Center. The GoldSync Administration Center window appears.
2. Right-click the Site Group and Server area and select Date/Time Stamp Conversion. The Date/Time Stamp Conversion dialog box opens.
3. In the Conversion Method area, select one:• Date and Time>>Sync Stamp: Converts the date you select from the
F2 Lookup calendar and the time from the F2 Lookup graphical clock to a date stamp format.
• Sync Stamp>> Date and Time: Converts a date stamp to a standard date and time format.
4. After selecting the date and time or typing the sync stamp, click Convert. The conversion displays in the Results area with your initial input on the
424 • Synchronization GoldMIne Administrators Guide

left and the conversion to the right of the arrow. The results box displays multiple results so you can track the time stamps you are researching.
5. Click Cancel to close the dialog box.
Creating Server ProcessesUse the Process Wizard to configure processes you are running on the GoldSync Server.1. In the GoldSync Administration Center, right-click on the server name
and select New from the local menu. The New Process dialog box appears.2. Select the Server and the Process Type from the drop-down lists. 3. Click OK. The Welcome to the Process Wizard dialog box appears.4. The Welcome to the Process Wizard dialog box displays the Server
Name and the Process Type you are configuring. (If you are continuing from the Server Wizard, you start on this dialog box.)
5. The Process Name displays the process you are configuring. Click Next. • If configuring IP to IP/Network or Shared Directories, the Number
of Connections dialog box appears. See “Configuring the Number of Connections” on page 425.
• If configuring E-mail: Scan for incoming transfer sets, the Incoming E-mail Settings dialog box opens. See “Configuring Incoming E-mail Settings” on page 426.
• If configuring E-mail: Sends outgoing transfer sets, the Outgoing E-mail Settings dialog box appears. See “Configuring Outgoing E-mail Settings” on page 426.
Configuring the Number of ConnectionsThe Number of Connections dialog box appears when configuring IP/Network and Shared Directories processes.1. Select the maximum number of concurrent connections. This option con-
trols the number of remote users who can connect at one time.
NOTE: If you have the maximum number of concurrent connections set to 5, only 5 remote users can connect at one time. The next user is refused a connection until there is an open slot. This option prevents your server from running out of resources.
GoldMine Administrators Guide Synchronization • 425
2. If necessary, type another port number in the Wait for incoming Internet connection at TCP port field.
3. Click Next. The Active Period dialog box appears.
Configuring Incoming E-mail Settings1. In The Host name of the inbound (POP3) mail server field, type the
name of the POP3 server.2. Select The Frequency period to check for e-mailed transfer sets by
clicking the browse button (...). The Synchronization Frequency dialog box appears. Select the days, hours, or minutes.
3. Type the User Name and Password for the email account retrieving the transfer sets.
4. Click Next. The Active Period dialog box opens. See “Configuring the Active Periods for Synchronization” on page 426.
Configuring Outgoing E-mail Settings1. Type The Host name of the outbound (SMTP) mail server in the text
box.2. Type The return E-mail address for the outgoing transfer set.3. Click Next. The Active Period dialog box opens. See “Configuring the
Active Periods for Synchronization” on page 426.
Configuring the Active Periods for SynchronizationThe Active Periods dialog box defines the days and hours the process is active. 1. On the Active Period dialog box, select Start this sync process automati-
cally if the GoldSync Agent detects the current time... to use the Gold-Sync Server Agent to the start the process automatically.
2. Select the active days.3. Select the active beginning and ending time using the F2 Lookup clock. 4. Click Next. The Finish dialog box opens.
426 • Synchronization GoldMIne Administrators Guide

5. If configuring an Accept incoming connection process, click Finish to complete the process construction. If configuring an Initiate remote connection process, type a Site Code in the text box.
NOTE: Assign multiple site codes to a process, separated by a space. A site can be assigned only one site code.
6. Click Finish. The process adds to the GoldSync Administration Center.
GoldMine Administrators Guide Synchronization • 427

Using the Date/Time Stamp Conversion UtilityYou may need to view date and time stamps in a regular date format. The utility converts the seven-character SyncStamp, LogStamp, or the first seven digits of the RecID to a standard date and time format; or it converts a standard date format to a stamp format.
TIP: Use this utility while troubleshooting synchronization issues to verify the date and time in the Tlogs of unpacked transfer sets and compare the information to that in the database.
1. Select Tools>>Synchronize>>GoldSync Administration Center. The GoldSync Administration Center window appears.
2. Right-click the Site Group and Server area and select Date/Time Stamp Conversion. The Date/Time Stamp Conversion dialog box opens.
3. In the Conversion Method area, select one:• Date and Time>>Sync Stamp: Converts the date you select from the
F2 Lookup calendar and the time from the F2 Lookup graphical clock to a date stamp format.
• Sync Stamp>> Date and Time: Converts a date stamp to a standard date and time format.
4. After selecting the date and time or typing the sync stamp, click Convert. The conversion displays in the Results area with your initial input on the left and the conversion to the right of the arrow. The results box displays multiple results so you can track the time stamps you are researching.
5. Click Cancel to close the dialog box.
Synchronization Verification CodesVerification codes are a security measure ensuring remote users do not change their synchronization profile without the GoldSync administrator's knowledge. If the remote user receives a message that his or her Verification Code is invalid, the GoldSync Administrator must generate another and send it to the remote user.
428 • Synchronization GoldMIne Administrators Guide
1. In the GoldSync Administration Center, select the site needing a new Verification Code and right-click. Select Generate Verification Code. The Generate Verification Code dialog box appears. The Verification Code generates.
2. Copy the number and click OK to close.3. Send the remote site the code.
The remote site types in the new verification code (the code remains valid until the remote user tries using another profile).
Running GoldSync as a ServiceWhen your GoldSync server is running on a computer with a Windows 2003 Server or Windows XP Server operating system, run GoldSync as a Service. A service runs an application in the background. Running GoldSync as a service provides added security by eliminating the need to log on to the computer to start GoldSync. Saves administrative time by configuring the service restart whenever the operating system on the computer starts.Use the GoldSync Administration Center toolbar options for installing, starting and configuring, and uninstalling the service. Also configure GoldSync as a
service in the Synchronization Settings dialog box .
1. On the GoldSync Administration Center toolbar, click the Set up Gold-
Sync as a service button.
2. A dialog box opens indicating the GoldSync Service was created successfully.
NOTE: After installing GoldSync as a service, but before starting the service, change the GoldSync Service logon from Local System account to This account. In the Services management window, right-click GoldSync Service and select Properties>>Log On. Select This account and configure the logon information using a Windows account with full access rights on the GoldSync computer and to the shared mapped or UNC locations where your linked documents are stored.
GoldMine Administrators Guide Synchronization • 429
Configuring GoldSync as a ServiceTo access GoldSync Services configurations, use either of the following methods.• On the GoldSync Administration Center toolbar, click the Configure
GoldSync service button. The GoldSync Services Settings dialog box opens.
• Select File>>Configure>>Synchronization Settings. The Synchronization Settings dialog box appears. Click the GoldSync Services tab and Configure GoldSync Service. The GoldSync Services Settings dialog box opens.
1. Select the server running GoldSync in the Server drop-down list.2. Click Start or Stop to start or stop the service.3. Select Automatically start as a service whenever this computer 'boots' up
to start the service.The Status box displays indicates whether the service is running.
4. Click OK to exit the dialog box.
Uninstalling GoldSync as a Service1. On the GoldSync Administration Center toolbar, click the Uninstall Gold-
Sync service button.2. A dialog box appears indicating the GoldSync Service was successfully
uninstalled.
NOTE: After installing GoldSync as a service, but before starting the service, change the GoldSync Service logon from Local System account to This account. In the Services management window, right-click GoldSync Service and select Properties>>Log On. Select This account and configure logon information using a Windows account with full access rights on the GoldSync computer and to the shared mapped or UNC locations where linked documents are stored
430 • Synchronization GoldMIne Administrators Guide

About One-Button SynchronizationWhen enabled on the remote GoldMine system, one-button synchronization gives the undocked, remote user a single-step synchronize process. Because the remote user cannot modify synchronization settings, the organization increases data security and enhances control of information access for each synchronizing remote system. One-button synchronization lets the GoldSync administrator:• Create one-button synchronization profiles for each remote system
running one-button synchronization. See “Creating One-Button Synchronization Profiles” on page 432.
• E-mail the one-button synchronization profiles to remote, undocked users. See “E-mailing One-Button Synchronization Profile to Remote” on page 433.
• Create an undocked installer to install GoldMine on the remote system with the one-button synchronization profile (new GoldMine user). See “Creating Installation Files for One-button Synchronization” on page 434.
Once created and sent, the remote user can:• Retrieve the one-button synchronization profile. See “Retrieving One-
Button Synchronization Profiles” on page 432.• Retrieve the undocked installer file. See “Retrieving One-Button
Synchronization Installation Files” on page 435.• Synchronize using one-button synchronization. See “Synchronizing
Using One-Button Synchronization” on page 431.
Synchronizing Using One-Button SynchronizationThe GoldSync administrator configures one-button synchronization profiles and sends them to remote users. Once installed, the profile streamlines the remote, undocked user synchronization process.1. Select Tools>>Synchronize>>One-button sync with GoldSync Server.
The One-button Synchronization dialog box opens, indicating the Gold-Sync administrator has configured your system for One-button Synchroni-zation.
2. Click Sync. The Process Monitor opens, indicating synchronization status.
GoldMine Administrators Guide Synchronization • 431

Creating One-Button Synchronization ProfilesUse the One-button Sync Profile Wizard option after creating site group members or from the GoldSync Administration Center Sites local menu. One-button synchronization profiles include the Instant Sync option (see “Configuring Synchronization Settings” on page 398.) to remind undocked users to synchronize when it detects a network connection.1. In the GoldSync Administration Center, highlight the site, right-click and
select New One-button Sync Profile. The Welcome to the GoldSync Site One-button Sync Profile Wizard dialog box appears.
2. Type the descriptive name of the profile in the text box. Click Next. The Connection Method dialog box opens.
3. Select a connection method:• Connect to remote using IP to IP/Network method.• Send a transfer set to remote by E-mail.
4. Click Next. The Connect/Send E-mail to Remote dialog box opens for:Connect to remote using IP to IP/Network. See Configuring Connect/Send E-mail to Remote (Connect to Remote)433.Send transfer set to remote by E-mail. See Configuring Connect/Send E-mail to Remote (Transfer Set by E-mail)434.
Retrieving One-Button Synchronization ProfilesWhen the GoldSync administrator creates or makes changes to your One-Button Synchronization Profile, he can e-mail you the profile. One-button synchronization profiles include the Instant Sync option (see “Configuring Synchronization Settings” on page 411)to remind undocked users to synchronize when it detects a network connection.1. In the GoldMine E-mail Center, double-click on the e-mail message with
the subject line of One-button Sync Profile.2. A GoldMine message box appears, indicating the message has a sync
profile attached. Click Yes.3. The profile installs. The One-button Sync with GoldSync Server menu
option becomes active. Use One-button Sync with the GoldSync Server.
432 • Synchronization GoldMIne Administrators Guide
E-mailing One-Button Synchronization Profile to RemoteThe GoldSync administrator can create or change a site's One-Button Synchronization Profile and e-mail it to the remote user. 1. In the GoldSync Administration Center, highlight the site, and right-
click. Select E-mail One-button Sync Profile to Remote from the local menu.
2. A confirmation dialog box opens. Click Yes to email the profile to the remote.The profile is emailed to the email address in the One-button Synchronization Profile.
Configuring Connect/Send E-mail to Remote (Connect to Remote)Set connection options when selecting Connect to remote on the connection method dialog box.1. Select Send changed data to remote to send changed data from this site to
the remote.2. Select Retrieve changed date from remote to retrieve changed date from
the remote to this site.3. In the Remote's Internet IP Address text box, type the Internet IP address
you are connecting to. If creating a one-button synchronization profile, the remote in this case is the GoldSync server the undocked computer is synchronizing with.
4. Type the TCP Port. The default TCP Port is 5993. Typically, do not change this entry; if you override the default port, you must select the same port as the remote system.
5. Click IP to add or edit alternative IP addresses. 6. Type the Optional connection password in the text box.7. Click Next. If you selected Send changed data to remote, the Send Options
dialog box appears.
GoldMine Administrators Guide Synchronization • 433
Configuring Connect/Send E-mail to Remote (Transfer Set by E-mail)When selecting Send transfer set to remote by E-mail on the connection method dialog box, you can then send the e-mail options.1. Type the Remote's E-mail address in the text box.2. Type the Optional connection password in the text box.3. Click Next. The Send Options dialog box appears. See “Configuring Send
Options” on page 436.
Creating Installation Files for One-button SynchronizationWith One-button Synchronization Profile, create an installation file containing fields and data for a new remote user.
NOTE: Create a synchronization profile for the user before creating an installation file.
1. Highlight the site in the GoldSync Administration Center and select Cre-ate Installation File for One-button Synchronization. The Create Undocked User(s') Installation Files dialog box opens.
2. Select the user or users for whom you are creating the installation files.
NOTE: Process up to five undocked sites simultaneously. If more than five sites must be processed, GoldSync queues the additional sites until resources are available.
3. Click OK. • If the gmsetup.exe is not in the default location, browse to the correct
location. If you cannot locate the .exe in the GoldMine directory, copy the file from the installation CD-ROM.
434 • Synchronization GoldMIne Administrators Guide

• If the gmsetup.exe file is in the default location of \GoldMine\Setup\GoldMine then the Process Monitor displays the status of the creation process. GoldSync creates installation files and initial transfer sets based on the profile settings.
4. The installation file is placed in the GoldMine directory, \GoldMine\Setup\Remotes\.
5. As the GoldSync administrator, distribute the file to the remote site using these methods:• Zip disk • CD-ROM • FTP • E-mail via file attachment
6. The file must be retrieved on the remote computer. It installs GoldMine based on the undocked user license for the site, copies the data, and installs the One-button Synchronization Profile.
Retrieving One-Button Synchronization Installation FilesAs a remote user, when you receive the Undocked Installer package, install GoldMine by running the installer, named username.exe for the remote/undocked user. The Undocked Installer package installs GoldMine using the undocked user license for your site, copies the data and files selected by the GoldSync administrator, and sets up the configured synchronization profile. 1. Locate the file sent to you on a zip disk or CD-ROM, using FTP, or e-
mailed as an attachment. The file is named username.exe, where username is your GoldMine user name.
2. Open the file. It extracts the necessary files to the folder defined by the system’s Windows Temp variable, usually C:\Windows\Temp.
NOTE: Creation of the initial transfer set can be time consuming. GoldSync ignores the cutoff date defined in the user's synchronization profile for these tables and includes all records.The tables are: Fields, ContUdef, Lookup, Users, InfoCenter, and Resources.
GoldMine Administrators Guide Synchronization • 435
3. After files are extracted, the Undocked Installer installs GoldMine and imports the data.
Configuring Send Options1. Use the Send Options dialog box to determine what data to include in the
transfer set (a database of all changes made to GoldMine contact records during a specified time frame that is sent to other GoldMine locations and retrieved, updating that database with the new information).
2. In the Send Record Types area, specify record types to include in the transfer set.
NOTE: Selecting a record type in the send options includes it in the transfer set; however, this does not guarantee the data will be retrieved at the retrieving site
3. In the Send users' calendar area, select one or more users whose calendar activities should be included in the transfer set. To include the calendar activities of all users, select (all).
NOTE: For the user name(s) to be made available in the drop-down list of the remote's calendar, the user names(s) must be synchronized with the Users database. Add user names in the Users Master File.NOTE: History items are treated as user calendar items, and are only synchronized between users when user calendars are synchronized.
4. Select your Encryption level in the drop-down list. All transfer sets are encrypted at 128 or 32 bits.
5. Click Next. The Send Contact-related Options dialog box opens.
436 • Synchronization GoldMIne Administrators Guide

Monitoring ProcessesThe GoldMine Process Monitor launches automatically when executing or running processes within GoldMine, including synchronization, Automated Processes, importing and exporting, or merging and purging.
NOTE: Once opened, the Process Monitor can float anywhere on the GoldMine screen, or it can be docked to any of the four sides of the GoldMine screen. The window may also be resized to maximize available workspace. For best results, dock the Process Monitor to the bottom of the GoldMine screen.
The upper pane displays processes running and general status, while the lower pane displays the status of the component tasks.Use the toolbar or the local menu to manage process options.The Process Monitor uses color codes, assigned to text or the background, to indicate process status.
Color Meaning
Black text on default background Operation normal
Blue text on default background Notice
Black text on yellow background Warning
White text on red background Error
Green text on default background Task successfully completed
About LicensingGoldMine has a fully scalable licensing structure to meet the needs of individuals and organizations. As your business matures and GoldMine expands, your organization can change the licensing configurations.
General InformationThe single, distributed Master License serves as the authentication mechanism for secure synchronization across the entire organization, and the License Manager keeps track of your licensing configurations.
GoldMine Administrators Guide Synchronization • 437

Most organizations generally buy one license—a Master License with X number of seats. These seats can then be parsed to users in various combinations of sub-licenses. For example, an organization can create Site sub-licenses for their remote office(s) and Undocked sub-licenses for individual remote (mobile) users. One seat should always be set aside for administrators.
License TypesMaster License. This is the primary license. It determines what database types are supported by the master site as well as its synchronization capabilities. It is a precursor to executing any sub-licenses which stem from it. GoldSync and Outlook Integration licenses are issued concurrent with the E or D license.The licensing serial number schema for Master licenses has been changed for the 7.0.4 release, but remains the same for sub-licenses. See License Serial Number.Sub-licenses. To issue one of these, install GoldMine with a Master License on your organization’s primary network. This ensures all sub-licenses maintain security and are authenticated properly during synchronization.The Undocked license (a special sub-license) is for remote users and can only be licensed for a single user. It can be sub-licensed from the main GoldMine system or from a Site sub-license.
438 • Synchronization GoldMIne Administrators Guide
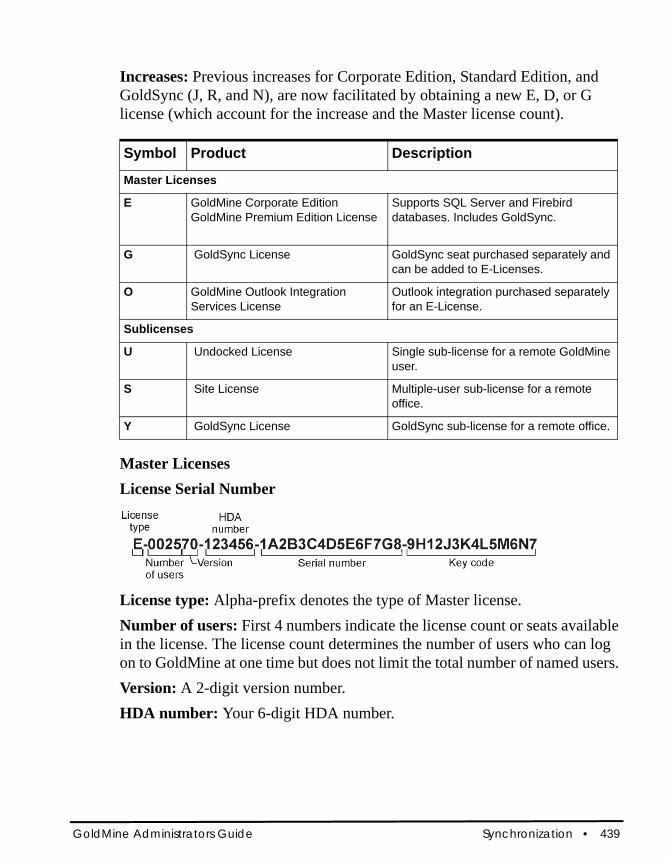
Increases: Previous increases for Corporate Edition, Standard Edition, and GoldSync (J, R, and N), are now facilitated by obtaining a new E, D, or G license (which account for the increase and the Master license count).
Symbol Product Description
Master Licenses
E GoldMine Corporate EditionGoldMine Premium Edition License
Supports SQL Server and Firebird databases. Includes GoldSync.
G GoldSync License GoldSync seat purchased separately and can be added to E-Licenses.
O GoldMine Outlook Integration Services License
Outlook integration purchased separately for an E-License.
Sublicenses
U Undocked License Single sub-license for a remote GoldMine user.
S Site License Multiple-user sub-license for a remote office.
Y GoldSync License GoldSync sub-license for a remote office.
Master LicensesLicense Serial Number
License type: Alpha-prefix denotes the type of Master license. Number of users: First 4 numbers indicate the license count or seats available in the license. The license count determines the number of users who can log on to GoldMine at one time but does not limit the total number of named users. Version: A 2-digit version number.HDA number: Your 6-digit HDA number.
GoldMine Administrators Guide Synchronization • 439

Serial number: 15-character (alphanumeric) serial number uniquely identifying the license for an organization. It is used for registration and support and identifies all sub-licenses as part of the same organization. Collected in 3 groups of 5 characters during licensing.Key code: 15-character (alphanumeric) key code is a computer-generated check used by GoldMine to verify the license’s validity. Collected in 3 groups of 5 characters during licensing.
NOTE: The key code is required during installation. Keep the license number and key code in a safe place in the event it becomes necessary to reinstall the software.
License ManagerInitial licensing information is collected during installation. Subsequent changes and related management functions are handled through the License Manager.From the GoldMine File menu, select Configure>>License Manager.The central text box lists all installed licenses and any sub-licenses created from this location. Status is displayed along the right side. Buttons along the bottom allow you to add a New License, add a New Site, add an Undocked User, Remove License, or View License.The database support of the Master License is inherited by the site sub-licenses distributed throughout the organization. GoldSync Synchronization capabilities can be distributed separately to sub-licenses.
NOTE: Licensing information is stored in the license file, License.bin, created at the time you register. This file must exist only in the GoldMine root directory of each GoldMine installation.
440 • Synchronization GoldMIne Administrators Guide

Creating Undocked User LicensesGoldMine has a sub-license for an individual user called an Undocked License (U-License). This license type is created for users who work primarily with GoldMine at a remote location on a laptop, notebook, or home office computer but who may also need to log on to the network occasionally. Before creating an undocked consider the following:• Creating an undocked user decreases the available users of the network site
(Master License or Site License) by one; however, when an undocked user logs on to the site from which they were sub-licensed, they do not take up an additional seat.
• Every user supported by the GoldMine license can have an Undocked license to work on a remote computer. For example, on a 5-user GoldMine system, 5 Undocked licenses can be created. This is in contrast to creating an “S” sub-license which requires one seat to remain available from the Master License.
• All undocked users, as well as the total number of users that make up the difference in the total number allowed by the Master License can log on to GoldMine. For example, on a 5-user GoldMine system with 3 undocked users, 3 undocked users plus 2 other users can log on to GoldMine.
• If you undock all users, only those users will be able to log in. If you have not assigned master rights to any of those undocked users, GoldMine administration cannot take place.
• When used in combination with GoldSync, administrators can synchronize security settings to undocked users including new passwords, menu items, and preferences in addition to data.
• To work on an undocked basis, users must have an Undocked license on their laptop. Create an Undocked license from the Master License or a Site license.
Use the following procedure to create an undocked user license.1. From the GoldMine main menu, select Tools>>Configure>>License
Manager. The License Manager opens.2. Click the Licenses tab and Undock Users. The Create Undocked User
Licenses dialog box opens. 3. Select the check box next to the user you want to create a sub-license for,
and click Create Undocked License. The Sub-Licenses dialog box opens.
GoldMine Administrators Guide Synchronization • 441
4. Review the information and click I Agree. The sub-license number for a remote user or an undocked user appears in the Sub-license for Remote Site [Name of Site] dialog box.
5. Write the sub-license number down or copy it to Windows Notepad. The sub-license number is needed for each remote computer installation. Send the remote site license number to the remote user who can type the license number during the GoldMine installation.
Creating Site Licenses1. Select Tools>>Configure>>License Manager.
The GoldMine License Manager dialog box opens. 2. Select the Licenses tab and click New Site.
The Create a Site License dialog box opens.3. At the Distributed License Type area, select GoldMine Site License.
Instructions for creating the GoldSync License follow.4. Type the Site Name. The name of the site should have no more than 12
characters and spaces, such as Los Angeles.5. Type the Number of Users who will need seats at the site. This will be the
total number of users included in the sublicense.6. Click Create Site Sub-License. The Sub-License for Remote Site [site
name] dialog box appears. Select I AGREE if you accept the licensing terms.
7. GoldMine displays the new sublicense for the remote site, beginning with the letter S, in the field at the bottom of the dialog box. Make a copy of this number; you need it when licensing the site. When finished, select Close.
NOTE: : A unique sublicense number is needed for each remote computer installation. Send the remote site number to the remote location. The GoldMine administrator at the remote site can then type the license number during the GoldMine installation.
8. To complete the process, click OK in the Create a Site License dialog box.
442 • Synchronization GoldMIne Administrators Guide
GoldMine adds the sublicense to the Licenses tab browse window under previously installed license(s). The first character of a site sublicense serial number is S.
9. To synchronize between the remote site and the Master License site, you need at least one GoldSync License.
About Sub-licensesWith multiple offices and users, create sub-licenses for each site or user from the Master License. A site sub-license installs that license on only one remote server. An undocked user sublicense installs that license on one remote computer. However, create multiple site licenses and undocked licenses up to the maximum permitted by the Master License.
Site LicenseA Site License is a multiple-user sub-license for a remote office and is designated with the alpha-prefix S. Have an S-license for each user at the remote site.
• When creating any sublicense, note the entire license number created by GoldMine. The sub-license includes additional information needed when typing the license number on the remote computer and displays in its entirety during the creation process.
• A GoldSync License (Y-license) is required only if you are using an S-license and want to synchronize using GoldSync. You should have one Y-license to synchronize with the Master License and additional Y-licenses for Undocked users synchronizing with your site.
• Y licenses are not entered in the Enter GoldMine Serial Number dialog box. Only S licenses are entered during registration (the GoldSync Section remains disabled). Clicking Next displays an ALERT: Suggested Action(s)! if you attempt to enter Y licenses in the Enter GoldMine Serial Number dialog box.
• If this installation of GoldMine includes its own GoldSync sites, you may enter the applicable Y-type sub-licenses to properly configure synchronization for this system.
TIP: Highlight the complete serial number in GoldMine, copy it (CTRL+C) and paste it (CTRL+V) into Notepad.
GoldMine Administrators Guide Synchronization • 443

Undocked LicenseUndocked licenses are sub-licenses created from a Master License or a Site license and are designated by the letter “U.” This license type is created for users who work with GoldMine at another location, on a laptop, or on a workstation disconnected from the server copy of GoldMine. Type the U-license, Key Code, and Site Code created in the License Manager.
444 • Synchronization GoldMIne Administrators Guide
Calendars
The Calendar works as a time management tool. Quickly determine what is scheduled and review available times for new appointments and activities. The Calendar displays day, week, month, year, planner, and outline calendars for a single user or for a group of users. You can launch the calendar and leave it running in the GoldMine work area.For procedures on using the Calendar function, please see the GoldMine 8.5 User Guide.
About Sharing Free/Busy TimesScheduling becomes more dynamic and efficient when you and your contacts share free/busy times. As a GoldMine user you can publish your free/busy time in an iCalendar recognized format, making it available to non-GoldMine users for easy scheduling and to save time when proposing and counter-proposing meeting times between participants.GoldMine users can view a contact’s published free/busy time in the GoldMine calendar when scheduling an activity.
Shared Free/Busy Times Example GoldMine's ability to publish and to read calendar data provides efficient collaboration with non-GoldMine users. Here are two scenarios where you may use the various options to improve your ability to work with outside contacts and with users who may not have immediate access to GoldMine:
GoldMine Administrators Guide Calendars • 445

GoldMine's ability to publish and to read calendar data provides efficient collaboration with non-GoldMine users. Here are some scenarios where you may use the various options to improve your ability to work with outside contacts and with users who may not have immediate access to GoldMine:Using Free/Busy Times (.ifb) You are working closely with a contact on an ongoing basis and need to stop the time-consuming process of sending emails back and forth when trying to schedule calls or appointments with each other. The contact uses Outlook to manage his time and publishes his free/busy time to his Web site so he can access it when he is out of the office. The contact indicated he would like to know your free/busy times as well and asks you where you publish them.You configure GoldMine and the contact configures Outlook so you can quickly evaluate each others available time when scheduling activities with each other.• Your contact publishes his Outlook free/busy time to a file, ftp, or http
location.• You publish your GoldMine free/busy time to a file, ftp, or http location.• Your contact configures his entry for you in his Outlook Contacts to access
the URL location to which you publish your GoldMine free/busy time.• You configure the Record Properties free/busy time to access the URL
location to which your contact publishes his free/busy time.
Using a Contact's Free/Busy Time when Scheduling in GoldMine
NOTE: For this scenario, the contact publishes her free/busy time and provides you with the published location.
1. Configure the contact's free/busy settings.2. With the contact active in GoldMine, select Schedule>>Appointment.
The Schedule an Appointment dialog box opens. 3. Configure the Detail tab. Select a date, time, and duration.4. Configure the Resource tab. Selected resources display on the Free/Busy
tab.
446 • Calendars GoldMIne Administrators Guide

5. Configure the Free/Busy tab. Click Options and select Show Contact(s) to display the contact's free/busy time on the Free/Busy tab. Change the Scan Dates and use Find Time to easily locate a compatible time for both parties without time-consuming phone calls, meeting requests, or e-mail messages. This example shows the GoldMine settings and uses Outlook as the contact's default calendaring program:
Action GoldMine Outlook
Configuring user free/busy settings
Tools>>Options>>Calendar>>More Options>>Free/Busy (.ifb)
Tools>>Options>>Calendar Options>>Free/Busy Options (.vfb)Note: See the Outlook online Help for more detailed information.
Initializing user free/busy publishing
Automatically: After the Free/Busy tab is configured, GoldMine begins publishing based on a specified time.Manually: Web>>Publish Calendar>>Publish Free/Busy Times.
Automatically: After the Free/Busy Options are configured, Outlook begins publishing based on a specified time.
Reading a contact's published free/busy time
Select contact record and then Edit>>Record Properties>>Contact Details>>Free/Busy tab (.ifb)
Select Contact and click the Details tab. Complete the Internet Free-Busy Address.
Scheduling based on free/busy times
Select Schedule>>Select activity and configure Detail, Resources, and Free/Busy. Click Options and select Show Contacts.
In Calendar, select Actions>>Select activity. Select Attendee Availability>>Invite Others. Select contact with published free/busy information.
Distributing your free/busy URL to others
Copy and paste the URL into an e-mail message to send to a contact.
Add to the Details tab of your Contact record and save as vCard (.vcf). When you send a vCard with your signature, the free/busy URL is included.
GoldMine Administrators Guide Calendars • 447

Scheduling Based on Free/Busy Times1. Select Schedule>>an <activity> and configure Detail, Resources, and
Free/Busy fields. 2. Click Options and select Show Contacts. 3. In Calendar, select Actions>>Select <activity>. 4. Select Attendee Availability>>Invite Others and select contact with
published free/busy information.
Distributing Your Free/Busy URL to others1. Copy and paste the URL into an email message to send to a contact.2. Add to the Details tab of your Contact record and save as vCard (.vcf).
When you send a vCard with your signature, the free/busy URL is included.
Setting Free/Busy Times For GoldMine to read a contact's published free/busy times, you must configure the contact's Contact Details to access the file. After setting the path, you should see the contact's free/busy times when using the Free/Busy tab while scheduling an activity.
448 • Calendars GoldMIne Administrators Guide

1. With the contact record active in GoldMine, select Edit>>Record Proper-ies>>Contact Details.
2. At the Contact Details dialog box, select the Free/Busy tab. 3. In the Contact's name drop-down list, leave the primary contact name or
select an additional contact's name.4. In the Free/Busy URL drop-down list, select file, ftp, or http. In the text
box type or browse to the location where the file is published. If you select ftp, type the Username and Password in the text boxes.The configured URLs appear in the Contact pane.
5. To add a new contact to the Contact list, click New and complete the various drop-down boxes and text boxes as needed.To remove a URL from the pane, select the contact and click Delete.
6. Click OK to close and save the URL.
NOTE: If accessing a contact's free/busy time on an http location, you must configure the Internet Information Services to accept .ifb.
GoldMine Administrators Guide Calendars • 449
Configuring IIS to Access .ifb File TypesWhen accessing a contact's free/busy times on an http location, configure your Internet Information Services (IIS) to access .ifb file types.1. Launch your system Administrative Tools and select Internet Informa-
tion Services. 2. Right-click Web Sites in the tree pane and select Properties. 3. At the Web Sites Properties dialog box, select the HTTP Headers tab and
click File Types. 4. At the File Types dialog box, click New Type. 5. At the File Type dialog box, at the Associated Extension field, type ifb.6. In the Content Type (MIME) text box, type text/calendar.7. Click OK on each dialog box to save and close.
Configuring Free/Busy URLsIf contacts publishes their free/busy time, use this dialog box to link GoldMine to the URL the contact provides. This lets GoldMine scan the contact's published schedule and helps schedule activities with the contact more efficiently.1. If the message Internet Free/Busy information is not available, click
here for help appears on the contact's schedule line, click the link and the Add Free/Busy URL dialog box opens.
2. In the Contact's Name text box, type the name.3. Select the Contact's Free/Busy URL type in the drop-down list (file, ftp,
or http).
NOTE: If accessing a contact's free/busy time on an http location, you must configure the Internet Information Services to accept .ifb.
4. In the text box following the file type, type or browse to the URL and then click OK.
450 • Calendars GoldMIne Administrators Guide

Scheduling Activities Based on Available Times1. Before scheduling a meeting for multiple participants, determine a time
when all participants are available. Before GoldMine can scan the partici-pants’ Calendars to determine their availability, specify attendees and resources.
2. In the Schedule an activity dialog box, click the Free/Busy tab.The busy time pane displays availability of selected users, resources, and the contact.
3. Click Options to specify what types of appointments are scanned and your display options.
4. If you selected Show Contacts, the contact adds to the display. If the Internet free/busy information is not configured or the contact does not publish his or her free/busy information, the contact's busy time displays the message: Internet Free/Busy information is not available, click here for help. Use the Add Free/Busy URL dialog box to can add the URL where the contact's free/busy time is published. The URL you add in the dialog box is added to the contact's Edit>>Record Properties>>Contact Details>>Free/Busy tab.
5. The Scan Settings area initially displays a Start Date, End Date, and Duration. The values in these fields default to the values specified on the Detail tab. To expand the busy time display, select new beginning and ending dates using the F2 graphical calendar and click Refresh.
6. If you have not scheduled the activity for a time compatible with all attendees, configure the Scan Settings and then locate a suitable time. In the Scan Settings area, configure:• Proposed date. Select the new proposed date from the F2 graphical
calendar. • Time. Select the new proposed starting time for the activity from the
F2 graphical clock. • Duration. Shorten or lengthen the activity duration. Shortening the
time may make it easier to find a mutually compatible meeting time.
NOTE: All potential attendees must maintain their daily schedules in GoldMine and the contact's free/busy times must be configured in GoldMine. After selecting the meeting time, GoldMine schedules the meeting and informs participants
GoldMine Administrators Guide Calendars • 451
• Refresh. If you select Refresh Only, the date and time update. If you select Reset and Refresh, select an End date for the period of time to be scanned.
7. If you are looking for a compatible time and use the Find Time scan option, select dates and the activity duration and click Find Time. Scan Settings changes to display the date being scanned and the time. GoldMine scans for a time based on the duration of the activity. The Duration defaults to the duration specified on the Detail tab but can be modified on the Free/Busy tab in order to successfully schedule an activity.
8. Select another tab or click Schedule to add the activity to the calendar.
About Scheduling from Meeting RequestsThe GoldMine Meeting Request option emails meeting request to GoldMine, Outlook, and other iCalendar-enabled applications. You can:• Be the meeting organizer or the recipient of the e-mail meeting request.
Schedule an activity from a Meeting Request received in your e-mail from a contact, whether the sender created the activity in GoldMine or another iCalendar-enabled contact management application.
• Retrieve the meeting notice as you would in other Internet e-mail. After retrieving the notice, if you accept, GoldMine records the activity in your Calendar.
• GoldMine decrypts the winmail.dat meeting requests created by Outlook and displays them to users, making it easier to work with Outlook-generated meeting requests.
452 • Calendars GoldMIne Administrators Guide

When retrieving email messages from GoldMine’s E-mail Center, the incoming messages look like the following:
Creating Meeting RequestsAs organizer of an activity, you can send a meeting request for the activity to a user or contact who has iCalendar enabled.1. Select Schedule>>an activity. The Schedule an activity dialog box
appears. 2. Complete the Details tab with the appropriate information. 3. On the Details tab, select Send a Meeting Request to the contact.4. On the Users tab, select the GoldMine users to include in the activity.5. On the Resources tab, select the resource(s) to schedule with the activity.6. On the Recurring tab, select the date span, frequency, and monthly
schedule of a recurring activity.
NOTE: Outlook is unable to resolve the Skip Weekends option in GoldMine. If you are sending a recurring meeting request to Outlook users, do not select skip weekends in GoldMine.
7. On the Group Schedule tab, select the group of contacts to send the meeting request to.
8. After configuring scheduling options, click Schedule. A meeting request is sent to all participants.
GoldMine Administrators Guide Calendars • 453

Sharing Calendar InformationGoldMine enables several calendaring options including sharing your free/busy times or publishing your entire calendar as well as accessing a contact's shared calendar.
NOTE: Users with limited access to others user calendars may not see other users’ forecasts.
1. To publish your calendar as .ics and .htm, select Tools>>Options.
2. Select the Calendar tab, then click More Options and select the Publishing Tab. • To automate with Server Agents select Tools>>Services>>Manage
Server Agents. Select the Calendar Publishing tab and adjust settings. • To manually publish, select Web>>Publish Calendar>>Publish
Calendar(s).3. To publish your free/busy time as .ifb, select Tools>>Options. 4. Select the Calendar tab, then click More Options and then select the Free/
Busy Tab. 5. To manually publish, select Web>>Publish Calendar>>Publish Free/
Busy Times; Note that .ifb is an iCalendar standard extension.6. To export your calendar as .ics, select File>>Import/Export>>Export to
an iCalendar File.
Accessing Shared Calendars• To read a contact's published .ifb, select Edit>>Record
Properties>>Contact Details>>Free/Busy tab.• To use the Contact's published .ifb in the Schedule an activity dialog box,
select Schedule>>activity>>Free/Busy tab.• To importing a contact's .isc and link to a GoldMine Contact Record
(iCalendar), select File>>Import/Export>>Import from an iCalendar File.
454 • Calendars GoldMIne Administrators Guide
Configuring Calendar Publishing in the Server Agents Administrator
Use the Server Agents Administrator to publish your calendar on the days and times specified. Use the Server Agents to publish your calendar information to the Web as HTML or in an iCalendar format. You must configure the Publishing tab in your Calendar Options dialog box.1. Select Tools>>Services>>Manage Server Agents. The Server Agents
Administrator dialog box appears.2. Click the Calendar Publishing tab.3. If allowing only one user to publish his or her calendar using the Server
Agent, select the user in the drop-down list in the User's Settings area.4. To allow other users to use the Server Agent capability, select Apply to
other users to enable the Select Users button. Click Select Users to select one or more users or user groups.
5. In the Active Period area, select the days of the week the agent will be active.
6. Type or select the active time period for each day using the right-facing arrows to access a list of times in thirty minute increments.
NOTE: Because the times are set on a daily basis, the earliest time is 12:00 A.M. and the latest is 11:59 P.M. The latest time cannot be 12:00 A.M. When setting the times, consider the full range of Server Agents you are running and what activities can take place after regular business hours. For example, configuring the Server Agent to run after regular business hours keeps other processes running smoothly.
7. Click OK.
NOTE: You must start the Server Agents to begin processing.
GoldMine Administrators Guide Calendars • 455
Publishing Calendar InformationIn addition to publishing your calendar using the Server Agents, publish your calendar on-demand using the Web menu.Publishing your calendar as iCalendar or HTML provides your schedule information to customers you work with or to non-GoldMine users. This is another part of shared calendar information options offered in GoldMine.Using GoldMine, configure and publish in an iCalendar format (.ics), an html format (.htm, .html), and free/busy times (.ifb) by configuring the GoldMine settings.
Publishing Free/Busy TimesPublish your free/busy times to a network, ftp, or html location. The publishing parameters are set in the calendar preferences: Tools>>Options>>Calendar(tab)>>More Options>>Free/Busy(tab)1. Select Web>>Publish Calendar>>Publish Free/Busy Times. 2. At the Free/Busy Publishing Settings dialog box, review the settings in
the text box. To alter the settings, click Edit Options. The Calendar Options Free/Busy tab appears. Make changes and click OK.
3. Click OK on the Free/Busy Publishing Settings dialog box and your schedule publishes to the .ifb file specified on the Free/Busy tab.
456 • Calendars GoldMIne Administrators Guide
Calendar Options Dialog Box, Free/Busy TabConfigure your free/busy times for with those working outside of GoldMine. 1. Select Tools>>Options>>Calendar. Click More Options. 2. At the Calendar Options dialog box, select the Free/Busy tab.3. To turn on the busy publishing options, select Publish Busy Time and
configure the following options.For the Filename, select the location type where you are publishing your calendar information: • file://• ftp://• http://
4. In the text box following Filename, select the file location or type the ftp or http path. Your path should conclude with the file name and the .ics extension for iCalendar and .htm or .html for the Web publishing. For example, www.myICSwebsite.com/calendars/MyCal.ics or www.myCALwebsite.com/calendars/MyCal.htm.
5. In the Date Range area, select the predefined date range in the drop-down list. Use the graphical calendars to select the From and To dates to publish.
6. Specify the update Frequency in day(s), hour(s), or minute(s).7. Select the Activity Types to publish as busy.8. Select another tab or click OK.9. After configuration, your free/busy information publishes to the designated
location and on the specified schedule. Manually publish your Free/Busy time to the specified location by selecting Tools>>Publish Calendars>>Publish Free/Busy Times.
NOTE: Username and Password are active only if you are posting to an ftp location.
GoldMine Administrators Guide Calendars • 457

Calendar Options Dialog Box, Publishing TabUse the Publishing tab to configure iCalendar and Web publishing options for your calendar.
NOTE: Configure and automatically publish you calendar using the Server Agents Administrator. Alternatively, manually publish calendar information using Tools>>Import/Export Wizard>>Publish Calendar.
1. Select Tools>>Options>>Calendar. Click More Options. The Calendar Options dialog box appears. Select the Publishing tab.
2. To activate iCalendar publishing options, select Publish the Calendar as an iCalendar file or to turn on the Web publishing options, select Publish the calendar as a Web (HTML) Page, and configure the following options. • For the Filename, select the location type where you are publishing
your calendar information: • file://• ftp://• http://
• In the text box following the Filename, select the file location or type the ftp or http path. Your path should conclude with the file name and the .ics extension for iCalendar and .htm or .html for Web publishing. For example, www.myICSwebsite.com/calendars/MyCal.ics or www.myCALwebsite.com/calendars/MyCal.htm.
3. To configure data that is published, click Options. The Publishing Options dialog box opens.
4. Use the Server Agents to publish your calendar on a regular schedule.
NOTE: Username and Password are active only if you are posting to an ftp location.
458 • Calendars GoldMIne Administrators Guide

Server Agents
Use the Server Agents Administrator to process these operations on a recurring basis: • Sending and retrieving e-mail from the Internet through GoldMine• Synchronizing with GoldSync• Synchronizing with Microsoft Outlook• Printing and faxing correspondence• Running Automated Processes• Publishing Calendar informationServer Agents are configured around a user or user group, active time periods, and frequency. They work with other configurable parts of GoldMine and must be started for the processes to work.
GoldMine Administrators Guide Server Agents • 459

Starting the Server AgentsStart the Server Agents for the settings you configured in the Server Agents Administrator to take effect.1. Select Tools>>Services>>Start Server Agents. 2. The Process Monitor appears displaying information about the Server
Agents running.
The agents continue to run until you click the stop processes button on the Process Monitor.
Configuring Sending and Retrieving Email in the Server Agents Administrator
Use the Server Agents Administrator to send queued e-mail and retrieved email from the e-mail server on the days and times specified.1. Select Tools>>Services>>Manage Server Agents. The Server Agents
Administrator dialog box opens.2. Click the Send/Retrieve E-mails tab.3. If allowing only one user to send and retrieve e-mail using the Server
Agent, select the user in the drop-down list in the User's Settings area.
460 • Server Agents GoldMine Administrators Guide

4. To allow other users to use the Server Agent capability, select Apply to other users to enable the Select Users button. Click Select Users to select one or more users or user groups.
5. In the Active Period area, select the days of the week the agent will be active.
6. Type or select the active time period for each day from the F2 graphical clock.
NOTE: Because the times are set on a daily basis, the earliest time is 12:00 A.M. and the latest is 11:59 P.M. The latest time cannot be 12:00 A.M. When setting the times, consider the full range of Server Agents you are running and what activities can take place after regular business hours. In some cases, you may need to select one scenario over another. For example, you may not want to send queued e-mail until after hours, but you do want to retrieve e-mail throughout the day.
7. In the Frequency area, type or select the number of day(s), hour(s), minute(s) GoldMine waits before initiating the operation.
NOTE: The minimum amount of time is 5 minutes
8. Click OK.
NOTE: You must start the Server Agents to begin processing. See “Starting the Server Agents” on page 460.
Configuring GoldSync in the Server Agents AdministratorUse the Server Agents Administrator to process GoldSync sites on the days and times specified.1. Select Tools>>Services>>Manage Server Agents. The Server Agents
Administrator dialog box appears.2. Click the GoldSync tab.
GoldMine Administrators Guide Server Agents • 461

3. If allowing only one user to publish his or her calendar using the Server Agent, select the user in the drop-down list in the User's Settings area.
4. To allow other users to use the Server Agent capability, select Apply to other users to enable the Select Users button. Click Select Users to select one or more users or user groups.
5. In the Active Period area, select the days of the week the agent will be active.
6. Type or select the active time period for each day using the right-facing arrows to access a list of times in thirty minute increments.
NOTE: Because the times are set on a daily basis, the earliest time is 12:00 A.M. and the latest is 11:59 P.M. The latest time cannot be 12:00 A.M. When setting the times, consider the full range of Server Agents you are running and what activities can take place after regular business hours. For example, GoldSync can draw upon many network resources and configure GoldSync to run after regular business hours to keep other processes running smoothly.
7. Click OK.
NOTE: You must start the Server Agents to begin processing.
Configuring Outlook Sync in the Server Agents AdministratorThe Server Agents Administrator allows you to synchronize data between GoldMine and Outlook at the frequency specified.1. Select Tools>>Services>>Manage Server Agents. The Server Agents
Administrator dialog box appears.2. Click the Outlook Sync tab.3. In the User's Settings area, select the user in the drop-down list.
This is the user whose Outlook account you are synchronizing to GoldMine.
462 • Server Agents GoldMine Administrators Guide
4. In the Active Period area, select the days of the week the agent will be active.
5. Type or select the active time period for each day from the F2 graphical clock.
NOTE: Because the times are set on a daily basis, the earliest time is 12:00 A.M. and the latest is 11:59 P.M. The latest time cannot be 12:00 A.M. When setting the times, consider the full range of Server Agents you are running and what activities can take place after regular business hours. For example, synchronize your Outlook with GoldMine several times during the business day.
6. Select the Profile in the drop-down list.7. In the Frequency area, type or select the number of day(s), hour(s),
minute(s) GoldMine waits before initiating the operation.
NOTE: The minimum amount of time is 5 minutes.
8. Click OK.
NOTE: You must start the Server Agents to begin processing.
Configuring Printing and Faxing in the Server Agents Administrator
Use the Server Agents Administrator to send queued print and fax jobs on the days and times specified.1. Select Tools>>Services>>Manage Server Agents. The Server Agents
Administrator dialog box appears.2. Click the Print/Fax tab.
GoldMine Administrators Guide Server Agents • 463

3. If allowing only one user to print or fax queued jobs using the Server Agent, select the user in the drop-down list in the User's Settings area.
4. To allow other users to use the Server Agent capability, select Apply to other users to enable the Select Users button. Click Select Users to select one or more users or user groups.
5. In the Active Period area, select the days of the week the agent will be active.
6. Type or select the active time period for each day from the F2 graphical clock.
NOTE: Because the times are set on a daily basis, the earliest time is 12:00 A.M. and the latest is 11:59 P.M. The latest time cannot be 12:00 A.M. When setting the times, consider the full range of Server Agents you are running and what activities can take place after regular business hours. For example, printing large mailings during regular business hours could make the printer unavailable to regular daily users. Printing large jobs before or after business hours keeps the printer free.
7. In the Frequency area, type or select the number of day(s), hour(s), minute(s) GoldMine waits before initiating the operation.
NOTE: The minimum amount of time is 5 minutes.
8. Click OK.
NOTE: You must start the Server Agents to begin processing.
464 • Server Agents GoldMine Administrators Guide

Configuring Automated Processes in the Server Agents Administrator
See the Automated Processes chapter.
Configuring Calendar Publishing in the Server Agents Administrator
See the Calendar chapter.
GoldMine Administrators Guide Server Agents • 465

466 • Server Agents GoldMine Administrators Guide

F2 Lookup Lists
Use F2 Lookup lists to standardize how users type information in some GoldMine fields. For example, limit entries in the Dear field to a few standard responses, such as Dr., Mr., Mrs., and so on. F2 Lookups also enable quick data entry into these fields. F2 Lookup values are stored in the Lookup table.The F2 options for date and time fields offer a graphical interface.
F2 Lookup BenefitsUsing the F2 Lookup lists helps:
• Force valid entry in a field.• Set up field dependency between fields• Enable the standardization of data entry by preventing similar entries,
such as Finance Director, Director of Finance, and Financial Director. • Let users unsure about field entry choose from a list.• Speed up data entry • Help prevent spelling errors. • Simplify report writing and filtration. Set security access on the F2
Lookups to prevent users from altering contents or typing void data. Each F2 Lookup has its own settings; therefore, set the security on each list one-by-one.
A right-facing arrow at the end of the field box identifies fields with F2 Lookups. Access aspects of the F2 Lookups by:
• Clicking F2 or F4• Clicking the right-facing arrow on the field• Entering text and then selecting from the auto-fill menu that displays
below the field.
GoldMine Administrators Guide F2 Lookup Lists • 467
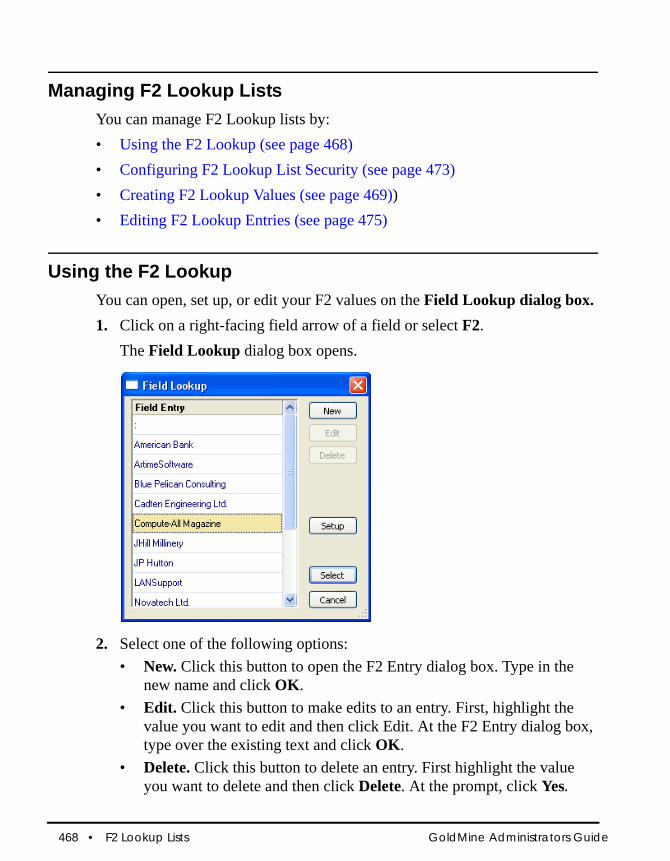
Managing F2 Lookup ListsYou can manage F2 Lookup lists by:• Using the F2 Lookup (see page 468) • Configuring F2 Lookup List Security (see page 473) • Creating F2 Lookup Values (see page 469))• Editing F2 Lookup Entries (see page 475)
Using the F2 LookupYou can open, set up, or edit your F2 values on the Field Lookup dialog box. 1. Click on a right-facing field arrow of a field or select F2.
The Field Lookup dialog box opens.
2. Select one of the following options:• New. Click this button to open the F2 Entry dialog box. Type in the
new name and click OK.• Edit. Click this button to make edits to an entry. First, highlight the
value you want to edit and then click Edit. At the F2 Entry dialog box, type over the existing text and click OK.
• Delete. Click this button to delete an entry. First highlight the value you want to delete and then click Delete. At the prompt, click Yes.
468 • F2 Lookup Lists GoldMine Administrators Guide
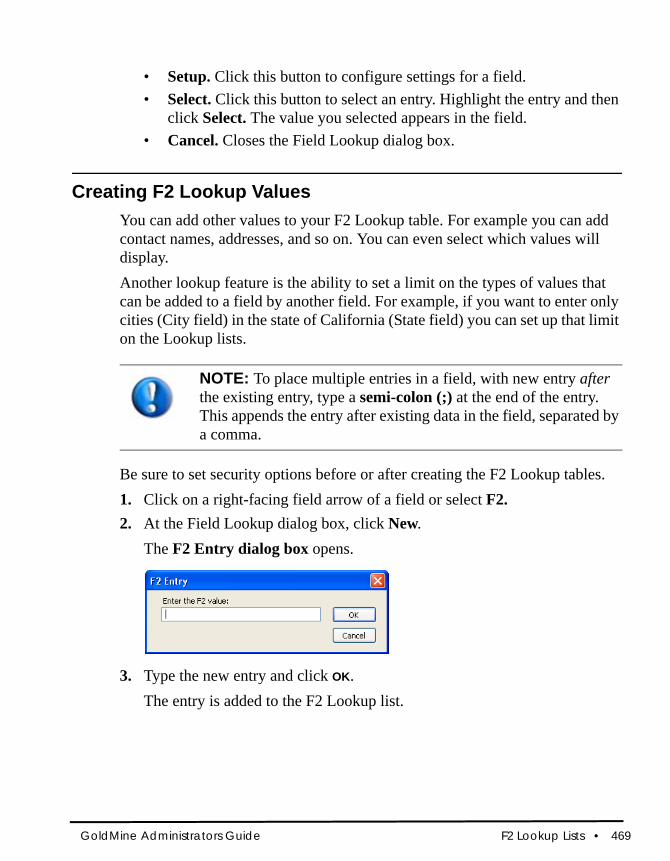
• Setup. Click this button to configure settings for a field.• Select. Click this button to select an entry. Highlight the entry and then
click Select. The value you selected appears in the field.• Cancel. Closes the Field Lookup dialog box.
Creating F2 Lookup ValuesYou can add other values to your F2 Lookup table. For example you can add contact names, addresses, and so on. You can even select which values will display.Another lookup feature is the ability to set a limit on the types of values that can be added to a field by another field. For example, if you want to enter only cities (City field) in the state of California (State field) you can set up that limit on the Lookup lists.
NOTE: To place multiple entries in a field, with new entry after the existing entry, type a semi-colon (;) at the end of the entry. This appends the entry after existing data in the field, separated by a comma.
Be sure to set security options before or after creating the F2 Lookup tables.1. Click on a right-facing field arrow of a field or select F2.2. At the Field Lookup dialog box, click New.
The F2 Entry dialog box opens.
3. Type the new entry and click OK. The entry is added to the F2 Lookup list.
GoldMine Administrators Guide F2 Lookup Lists • 469

Dependency Between Lookup ListsYou can set up lookup values that are dependent on values from other fields. Also, you can create, change, or delete necessary relationship. For example, you set up the two fields State and City. This enhancement allows you to select only cities from a corresponding state. You can set up the City F2 lookup list to depend on the State field value, then change it to key1 (record type) field. The value from the City (that is, from the field which on the field city depends) field is named as Master Value.
Setting up a DependencyTo set up a dependence, you must first configure the field setup.1. Open a F2 Lookup dialog box and click Setup.
The Setup dialog box opens; this is where you change the dependency for F2 lookup values.
2. In the Field Name area, select values.
470 • F2 Lookup Lists GoldMine Administrators Guide

3. In the Context-dependent F2 lookup list area, click on the Lookup list depends on another field checkbox.
NOTE: This checkbox must be selected. If left unchecked then the lookup values do not depend on any other fields.
4. Select the Contact (CONTACT1) button to select a master field from the Contact1 table. For example you can set an Activities result code which depends on the key 1 (record type) field in the corresponding contact. If you select this button, then the Contact1 fields appear in the Master field drop-down box. If you select other fields, fields from the corresponding table appear. For Activities it is the CAL table, for Cases it is the CASES or fields of cases.• Select GoTo>>Service Center• Click New case and create a new case• Navigate to Subject field and press F2>> setup.The CASES table is available for selection.
Available Dependency TablesThe following table shows the available dependency tables.
Contact record fields contact1 table
Use defined contact fields contact1 and contact2
Pending activity fields contact1 and cal tables
History activity fields contact1 and conthist tables
Opportunities and Projects contact1 and opmgr tables
Cases (Service Center) contact1 and cases tables
NOTE: After changing this field all lookup values will not update. Manually edit each field in the list. See "Manually Editing Dependencies" on page -6.
Fields Table
GoldMine Administrators Guide F2 Lookup Lists • 471

Manually Editing Dependencies1. Open the F2 Lookup dialog box for the dependency field and select a
value.2. Click Edit.
3. Click on the Only valid when checkbox.A valid value mean that master field has the appropriate value. In the example of city and state, the State value is CA (California) and when the Only valid when checkbox is checked, the City values returned are all cities in California.
4. At the drop-down box, select a value and then click OK.The F2 Lookup dialog box now have a Show All checkbox.
Selecting an Entry by Ignoring Dependency SettingsAfter setting up all the dependencies, you can select them from the F2 lookup lists.1. Open an F2Lookup dialog box.
472 • F2 Lookup Lists GoldMine Administrators Guide

2. Click the Show All checkbox.This shows all values independent from the Master field value. Unclick the Show All check box to show only valid values for the dependency.
Configuring F2 Lookup List SecurityTo ensure that data entries are consistent in a database, you must set security options for each F2 Lookup. Using these security options standardizes data field values. Set security options before or after you create or edit the lookup entries.
NOTE: To access the F2 Field Setup dialog box, you must have Master Rights.
1. Click on a right-facing field arrow of a field or select F2.2. At the Field Lookup dialog box, click Setup.
The F2 Field Setup dialog box opens.3. In the Field Name text box, type the name for the lookup list.
This can be the name of the field you are creating, its lookup, or a general name if you are planning to use the lookup list with more than one field. To use the lookup with more than one field if you will be importing the lookup entries, type a Field Name.
4. In the Field Settings area, select from the following:• Allow blank input. Keeps the data field blank. Selecting this
option lets GoldMine skip the field when the value is unknown.
NOTE: Selecting Allow blank input for a required field prevents you from determining whether the field was supposed to be empty. Retain more control over field entries by including a lookup value of N/A to indicate that no lookup value applies to the field.
GoldMine Administrators Guide F2 Lookup Lists • 473
• Force valid input. Requires selection of an F2 Lookup list value to update the field. GoldMine allows only entries that appear in the lookup. If an invalid entry is attempted, GoldMine displays the lookup and highlights the item closest to the actual field entry.
• Insert closest match. If an entry is typed in a field that does not match existing lookup entries, GoldMine inserts an entry that most closely matches the typed value. GoldMine changes the entry when the cursor is moved from the field. To enable this option, select Force valid input.Because GoldMine inserts the entry that appears to be the closest match, Insert closest match can place an incorrect value into a field.
• Capitalize first letter. Capitalizes the first letter of the entry.• Pop-up when selected. Displays the corresponding F2 Lookup when
the field is selected.• List existing data. Lets users look for the existing values.
• For example, there are contacts with New York, Dublin, Moscow only. So, F2 Lookup will show these cities only. This option will disable new F2 Lookup navigation (by two fields).
• Allow adding. Lets users add entries to the F2 Lookup.• Allow editing. Lets users edit the entries in the F2 Lookup.• Allow deleting. Lets users delete entries from the F2 Lookup.• Auto Fill. As the user types, GoldMine places the closest matching
entry from the lookup in the field.• Import lookup entries from another field. Select this when importing
an existing F2 Lookup list and then select the field name from the drop-down containing the information to use as entries in the lookup list. After selecting a field and closing the F2 Field Setup dialog box, entries corresponding to the selected field appear in the lookup.
• Lookup list depends on another field.When this checkbox is selected the lookup value for a field depends on the value of another field called a master. For example, if you want all entries in the City field to be in the state of California, then you would check this box and in the Field name field, you would select State.If this box is not selected, all values can be added to the Lookup list.
• Contact radio button. Allows the user to select a master field from the Contact1 table.
474 • F2 Lookup Lists GoldMine Administrators Guide
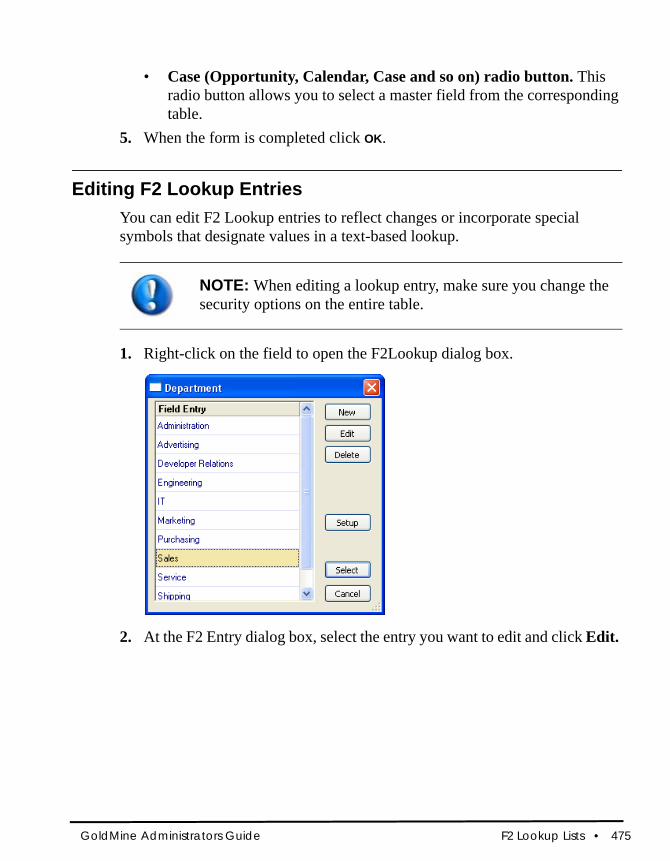
• Case (Opportunity, Calendar, Case and so on) radio button. This radio button allows you to select a master field from the corresponding table.
5. When the form is completed click OK.
Editing F2 Lookup EntriesYou can edit F2 Lookup entries to reflect changes or incorporate special symbols that designate values in a text-based lookup.
NOTE: When editing a lookup entry, make sure you change the security options on the entire table.
1. Right-click on the field to open the F2Lookup dialog box.
2. At the F2 Entry dialog box, select the entry you want to edit and click Edit.
GoldMine Administrators Guide F2 Lookup Lists • 475
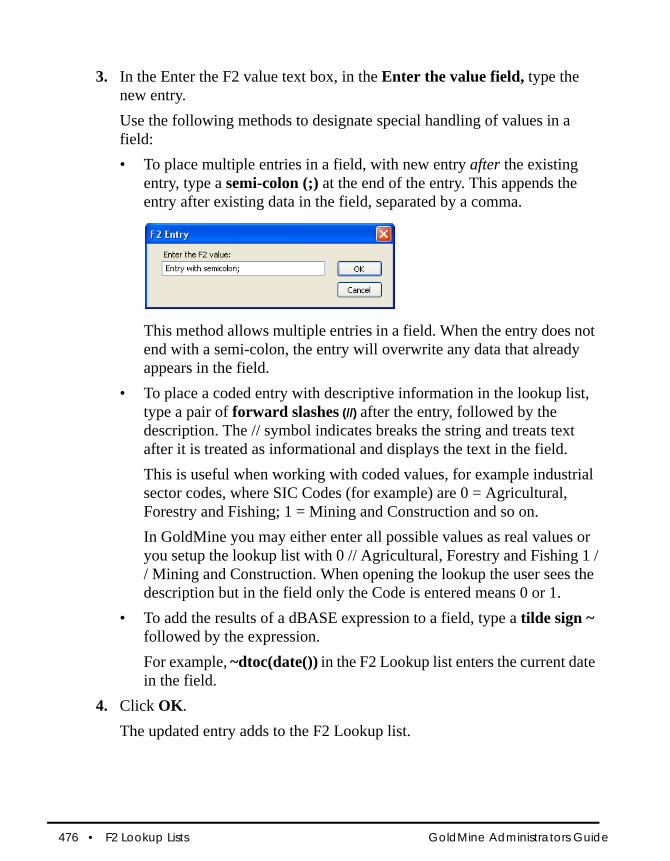
3. In the Enter the F2 value text box, in the Enter the value field, type the new entry.Use the following methods to designate special handling of values in a field:• To place multiple entries in a field, with new entry after the existing
entry, type a semi-colon (;) at the end of the entry. This appends the entry after existing data in the field, separated by a comma.
This method allows multiple entries in a field. When the entry does not end with a semi-colon, the entry will overwrite any data that already appears in the field.
• To place a coded entry with descriptive information in the lookup list, type a pair of forward slashes (//) after the entry, followed by the description. The // symbol indicates breaks the string and treats text after it is treated as informational and displays the text in the field.This is useful when working with coded values, for example industrial sector codes, where SIC Codes (for example) are 0 = Agricultural, Forestry and Fishing; 1 = Mining and Construction and so on.In GoldMine you may either enter all possible values as real values or you setup the lookup list with 0 // Agricultural, Forestry and Fishing 1 // Mining and Construction. When opening the lookup the user sees the description but in the field only the Code is entered means 0 or 1.
• To add the results of a dBASE expression to a field, type a tilde sign ~ followed by the expression.For example, ~dtoc(date()) in the F2 Lookup list enters the current date in the field.
4. Click OK. The updated entry adds to the F2 Lookup list.
476 • F2 Lookup Lists GoldMine Administrators Guide

My GoldMine
About My GoldMineMy GoldMine allows users to view current information from GoldMine and from the Internet in a customizable window. The My GoldMine desktop contains columns and sections you can personalize to display business-critical content from the Web or from within GoldMine. Personalize My GoldMine layout, content, and refresh rate. Users can:• Add and remove content from My GoldMine to optimize efficiency and
instantly access information such as stock quotes, e-mail, weather, pending activities, or other relevant information for planning and managing business.
• Add GoldMine information, including appointments, email inbox, or the day's sales.
• Also add Internet sites supporting Rich Site Summary (RSS) which is a simple XML format designed for sharing Web headlines. Sites supporting RSS are usually offering "What's New" information from their site. RSS versions 0.91-2.0 supported.
NOTE: The user’s system must be connected to the Internet to display and access Web sites. Set up the appearance, content, and refresh rate for My GoldMine to display the Web site content and GoldMine information.
GoldMine Administrators Guide My GoldMine • 477

Configuring My GoldMine1. To access the My GoldMine configuration options, select Web>>My
GoldMine. The My GoldMine window appears.2. Click the Personalize Content button at the top right of the window.
The Configure My GoldMine dialog box opens. 3. On the Layout tab, select the Page Style in the drop-down list. 4. Select a 2 or 3 column style in the Column Scheme drop-down list.
• Default• Windows• Newspaper• XP
5. For each column, select the Column Format in the drop-down list. Select Tab, which keeps the contents of the other items in the column hidden when not selected, or Box, which displays the information or hyperlink for all items.• Classic Three Columns• Even Three Columns• Even Two Columns
6. Click the Contents tab. 7. Select Column 1, 2, or 3. The information in the Items pane reflects the
active resources for the selected column. To add a resource, click Add. The Select Item to Add dialog box appears.
8. To change the display order, select the item and click Move Up or Move Down.
9. Click Remove to delete the selected item.10. Click the Settings tab. 11. Select Refresh only on startup prevents you from setting a refresh rate.
My GoldMine does not refresh while it is open. If you do not select Refresh only on startup, type or select a time in the Refresh My GoldMine Every x minutes text box.
12. Click OK to save the settings and close.
478 • My GoldMine GoldMine Administrators Guide
Using My GoldMineUse My GoldMine as a personalized resource for current information from selected GoldMine and Internet sources.1. Select Web>>My GoldMine. The My GoldMine window appears.2. Depending upon the configuration you selected, My GoldMine displays
with 2 or 3 columns, as tabs or boxes, and with default, Windows, newspaper, or XP page style. To change the setup, style, and content, select Personalize Content. The Configure My GoldMine dialog box opens.
3. To add to the content of each column, click Add Item(s) to Columns. The Select Item to Add dialog box appears.
4. To view the complete information where it is not displayed, clicking the hyperlink expands the view to include the detailed information.
NOTE: : If you selected the Tab format in the Configure My GoldMine dialog box, you may need to scroll to the bottom of the column and double-click the resource's title bar. Use the arrow to minimize the view on the tab format. The Box format keeps your resources actively displayed at the top of the column.
5. To copy information from the My GoldMine display, highlight the section and right-click. Select Copy from the local menu. Choose Select All to copy the entire My GoldMine display to the clipboard. Then paste the selected section or the entire section in your target application.
6. To refresh news feed sites manually rather than wait for the automatic refresh, click Refresh.
GoldMine Administrators Guide My GoldMine • 479

Select a Resource to Add Dialog Box in My GoldMineUse the Select a Resource to Add dialog box to add, store, and remove resources. The dialog box appears if you click Add on the Content tab of the Configure My GoldMine dialog box or if you select Add Item(s) to Columns on the My GoldMine window.1. If the GoldMine or Web-based resource is listed, select the item and click
OK. The item is added to the selected column.
2. To add a resource to the item list, click Add Resource. The Edit RSS Resource URL dialog box appears.
3. After adding the RSS resource, it appears on the item list. Select the item and click OK. The item is added to the selected column.
4. To change the name or URL of an item, select the item and click Edit Resource. The Edit RSS Resource URL dialog box appears.
5. To remove an item from the list, select the item and click Delete Resource. The item is permanently deleted from the item list.
6. Click OK to add a highlighted item or Cancel to close the dialog box.
NOTE: The Select a Resource to Add list displays only items not added to the My GoldMine display. The list is universal, not column specific. To move an item from one column to the next, you must remove it from the display by clicking the X in the title bar of the item in the My GoldMine window. The item is re-added to the Select Item to Add list and can the be added to the column of your choice.
480 • My GoldMine GoldMine Administrators Guide
Knowledge Base
The Knowledge Base provides a resource for maintaining any type of information useful to an organization or an individual. It can provide easily accessible storage for graphics, multimedia files, and/or program applications. This information can then be linked to a Contact Record (displays the record whenever you access that topic). The Knowledge Base consists of the Knowledge Base, and the Personal Base. Configure them to present newly added information to the user, control user reading and updating privileges, and search for specific entries based on user-defined criteria. Topic pages are arranged in outline format. Locate information by navigating through different sections, conducting a search, or opening a linked file.Knowledge Base material is stored in the InfoMine table.
NOTE: Users with Master Rights can set up user access to the Knowledge Base; each connected user can set up information in his or her Personal Base.
GoldMine Administrators Guide • 481

Knowledge Base Toolbar
Accessing the Knowledge BaseUse the following steps to access the Knowledge Base.1. Select Go To>>Knowledge Base, or select Knowledge Base from the
main navigation pane. The Knowledge Base window opens.2. Use the Knowledge Base toolbar to navigate and manage.3. View information by selecting a tab:
Adds a book to the Knowledge tree.
Adds a folder to the selected book
Adds a topic to the selected book or folder
Displays the Topic or Section Properties dialog box for the selected item.
Displays the Attach File tab of the Topic or Section Properties dialog box.
Deletes the selected item.
Displays a Table of Contents in the lower right pane of the selected book.
Displays the Search dialog box and allows you enter search terms.
Launches attachments, graphics, or other applications
482 • Knowledge Base GoldMine Administrators Guide
• Knowledge Base. Maintains information created by, for, and about an organization and available to multiple users.
• Personal Base. Maintains information useful to an individual user that only the user can view and update.
4. Create, edit, and search the Knowledge Base and set security and notification for users. See “Creating Knowledge Base Books, Folders, and Topics” on page 483 and “Editing Knowledge Base Books, Folders, and Topics” on page 484.
5. Create and edit topic text and linked files. See “Adding HTML Text to Knowledge Base Topics” on page 487.
6. Click X to close.
Creating Knowledge Base Books, Folders, and TopicsOrganize information in the either Knowledge Base or Personal Base by creating high level books, internal folders, and pages to address individual topics. Use the following procedure to create or Knowledge Base material.1. Select Go To>>Knowledge Base, or select Knowledge Base from the
main navigation panel. The Knowledge Base window opens.2. To create a Book, click the New Book toolbar icon. See “Knowledge Base
Toolbar” on page 482.The <new book> appears in the left pane.
3. Type a name and press Enter.
NOTE: Depending on rights, all users can potentially view all Knowledge Base topics. However, only users with Master Rights can add, edit, or delete Knowledge Base items.
NOTE: The only way to access a Personal Base is to log in to GoldMine as the user who created the Personal Base.
GoldMine Administrators Guide Knowledge Base • 483

4. Click in the right pane to add HTML text or click the Attach a file toolbar icon to add an attachment.
TIP: Adding text or attachments at the book level is possible but will interfere with a book level Table of Contents. Adding a TOC replaces the text on the book, folder, or topic.
5. To add a Folder, highlight the book to add the folder to and click the New Folder toolbar icon. See “Knowledge Base Toolbar” on page 482.• The <new folder> appears under the selected book.• Type the name of the folder.• Click in the right pane to add HTML text or click the Attach a file
toolbar icon to add an attachment. See “Adding HTML Text to Knowledge Base Topics” on page 487.
6. To add a Topic Page, highlight the book or the folder to add the topic to, and click the New Topic Page toolbar icon. See “Knowledge Base Toolbar” on page 482.• The <new page> appears under the selected book or folder.• Type the name of the topic.• Click in the right pane to add HTML text or click the Attach a file
toolbar icon to add an attachment.
Editing Knowledge Base Books, Folders, and TopicsYou can change the structure of the organizational tree, add keywords, attach files, and set security.1. Select the book or folder to edit. 2. Right-click and select Edit.
The Section Properties dialog box opens. 3. Click the Book, Attached File or Access tab.
• Book. Allows you to rename a book or add a subfolder. To rename a book, at the Book field, type the new name of the book. To add a folder, follow the directions on the screen.
• Attached File. Allows you to link existing files to your information.
484 • Knowledge Base GoldMine Administrators Guide
To attach a file, at the Attached file field, type in the file name or click the ellipse button and then select a file.To synchronize the file, check the Synchronize the file checkbox to include the attachment when the Knowledge Base information is synchronized to remote users.Note that the File Information area fields will change according to the file you enter.
• Access. Sets reading and updating security access on books, folders, and topics. See “Setting Security Access on Knowledge Base Topics” on page 486.To set the Read access, follow the directions on the screen.
4. To edit a topic, select the topic, right-click on it and then select Edit.The Topic Properties dialog box opens.• Topic. Allows you to use keywords to speed up searches and to create a
tree structure of the book.At the Topic field, select the topic.At the Keywords field, type the keywords separating each word using commas (,). See “Adding Keywords to Knowledge Base Topics” on page 486.At the Folder field, edit the tree structure of the book and folder by typing a new folder name after the book name, separated by semi-colons.
GoldMine Administrators Guide Knowledge Base • 485

Adding Keywords to Knowledge Base TopicsAt the topic level, add keywords (one or more words that succinctly describe a document's contents.) to topics to facilitate organization. Assigning a keyword to related topics makes searching more efficient.1. Select a topic, right-click, and select Edit.
The Topic Properties dialog box opens.2. In the Keyword text box, type a keyword or select a keyword from the F2
Lookup list.
NOTE: To input multiple keywords, insert commas between words. When creating F2 Lookup terms, use semi-colons after each word. When selecting multiple entries, the words display with commas between them.
3. Click OK.
Setting Security Access on Knowledge Base TopicsSet reading and updating security access on books, folders, and topics.1. Select a book, folder, or topic and right-click and select Edit. The Book,
Section, or Topic Properties dialog box opens. 2. Select the Access tab. 3. At the Read Access drop-down list, select the user or user group to grant
Read permission. If you want everyone to have access, leave as (public).
4. In the Update Access drop-down list, select the user or user group to grant Update permission. If you want everyone to have access, leave as (public).
5. Click OK.
486 • Knowledge Base GoldMine Administrators Guide
Adding HTML Text to Knowledge Base TopicsUse the capabilities of HTML to create pages in the InfoCenter.
NOTE: The information provided here is specifically for the topic level, but is applicable at the Book and Folder levels.
1. In the Knowledge Base window, click the right pane. A blinking cursor and the HTML toolbar appear.
2. Type the information into the page, or copy and paste it in from other sources.
3. Right-click the text pane and use the local menu options to format your document an add features. The HTML lets you format the text in a pleasing display and add Internet hyperlinks and graphics.
4. Click Save.
GoldMine Administrators Guide Knowledge Base • 487

488 • Knowledge Base GoldMine Administrators Guide

GoldMine Plus for Microsoft Office
About GoldMine Plus for Microsoft OfficeGoldMine Plus for Microsoft Office is a powerful add-in for GoldMine that allows seamless integration between Microsoft Office and your GoldMine environment. Create dynamically merged documents such as letters, faxes, and e-mails using your GoldMine contact data, and then leverage the powerful features in the Microsoft Office suite to produce and distribute your work. Easily move data between GoldMine and Microsoft Excel. Tools embedded directly into Excel allow flexible generation of customized invoices, reports, and more, using your GoldMine contact data.
GoldMine Plus for WordInstalling GoldMine Plus for Microsoft Office adds the following features and enhancements to GoldMine and Microsoft Word:• Complete integration between GoldMine and Microsoft Word• A GoldMine menu in Microsoft Word• Enhanced functionality for GoldMine’s document management featuresGenerate form letters, faxes, and e-mails with primary contact field information (Contact1) such as name, address, or primary phone number. Also include information from user-defined fields (Contact2). Create document templates for use with complex merges in GoldMine’s Document Management Center, and manage scheduled document production using Automated Processes. GoldMine fields used in templates remain dynamic, updating automatically to reflect changes in your database.
GoldMine Administrators Guide GoldMine Plus for Microsoft Office • 489

GoldMine Plus for Microsoft Office must be installed. Once installed, a GoldMine menu option is added to the Word main menu, and you may merge templates with groups of contacts using:• Document Management Center. See “About the Document Center” on
page 176. • Automated Processes. See “Automated Processes” on page 369You may also customize the application.
GoldMine Plus for ExcelGoldMine Plus for Microsoft Office installs a GoldMine menu in Excel for accessing integrated functions.• Insert GoldMine Fields. Provides a list of GoldMine fields and a field
macros to map to Excel cells. Field mappings remain dynamically linked to GoldMine fields, changing to reflect values in the active GoldMine Contact Record. For example, create a billing form in Excel, insert the appropriate name, address, and user-defined fields. Then use the integrated form to generate a printed bill for the current contact. See “Using GoldMine Fields in Microsoft Excel” on page 495
• Save as GoldMine Linked Document. Save a workbook or worksheet that is linked automatically to a GoldMine contact.
• Export Data to GoldMine. GoldMine Plus now offers field mapping options for exporting Excel databases into GoldMine. Map Excel fields to GoldMine fields with a simple wizard-style interface, for the fastest, easiest method yet to bring data into GoldMine.“Exporting to GoldMine From Microsoft Excel” on page 497.
GoldMine Plus for Microsoft Office must be installed. After the application is installed, create individual spreadsheets with inserted GoldMine fields or create spreadsheet templates accessed through the Document Management Center.
490 • GoldMine Plus for Microsoft Office GoldMine Administrators Guide

Installing GoldMine Plus for Microsoft OfficeGoldMine Plus for Microsoft Office is installed during the GoldMine installation process, however, options during the GoldMine installation process allow you to install GoldMine Plus at a later point in time if desired.Follow these steps to install GoldMine Plus after the main GoldMine installation.1. From your desktop, go to: Start>>Settings>>Control Panel>>Add or
Remove Programs 2. Highlight GoldMine. Click the Change button.3. The Welcome to the Installshield Wizard for GoldMine dialog box
appears. Click Next.4. Select the Modify radio button. Click Next.
The Custom Setup dialog box opens.
5. Click on the GoldMine Plus! icon, and select This feature will be installed on local hard drive. Click Next.The Installing GoldMine status screen opens.
GoldMine Administrators Guide GoldMine Plus for Microsoft Office • 491

6. When finished, the GoldMine Installation Completed dialog box appears. Click Finish to complete the installation process.
NOTE: To uninstall GoldMine Plus! components, follow the steps up to step 6, but instead select This feature will not be available. GoldMine Plus! will be uninstalled from your local hard drive.
Setting Preferences in GoldMine Plus for Microsoft OfficeUse the GoldMine Plus Preferences for Microsoft Office dialog box to configure automatic login, file location, fax method, and group merge settings. GoldMine Plus preferences are accessed from within Microsoft Word.1. Open Microsoft Word.2. From the GoldMine menu, select Setup. 3. The GoldMine Plus Preferences dialog opens.
4. Set GoldMine Plus Preferences using the following options:Automatic GoldMine Login: To login to GoldMine automatically when Microsoft Word or Excel are started:• Check the box for Please login to GoldMine with the following user
data automatically in the future.
492 • GoldMine Plus for Microsoft Office GoldMine Administrators Guide

• Enter your GoldMine User name and Password.File Location: Select an option for a default file location where GoldMine Plus documents will be saved:• Use GoldMine to determine location: The default file location for
GoldMine Plus documents will be determined from the GoldMine application.
• Use Word Default Path: GoldMine Plus documents will automatically be saved to Microsoft Word’s default file location.
• Use (Browse to file location): Manually browse to a default file location for GoldMine Plus documents.
Fax Method:• Provider: Select your fax method in the drop-down list of fax
applications:• (none)• OmniRush• WinFax• RightFax• DelFax• Zetafax
• Fax Macro: Select the Fax Number Macro specified by you fax application in the drop-down list.• &DIALFAX: The fax number from the active contact record.• &FAX: The fax number as it should be sent to an auto-dialer for
automatic fax transmission.• The Show Send Screen and Use 'Fine' Resolution options are
available in different combinations, depending on the fax application.Group Merge: Select Prompt for group merge destination (print only) to have GoldMine generate a prompt before printing.
5. Click Save to exit the GoldMine Plus Preferences dialog.
GoldMine Administrators Guide GoldMine Plus for Microsoft Office • 493

Using GoldMine Fields in Microsoft WordOnce GoldMine Plus for Microsoft Office is installed, you may add GoldMine fields to a Word document. The fields remain dynamic, meaning that when changes are made to the active GoldMine Contact Record, linked field data in Word changes as well.
NOTE: GoldMine linked fields that have changed in Microsoft Word documents will not update until the application's cache is cleared. To do this, close, then reopen Microsoft Word.
To install GoldMine fields into a Word document.
NOTE: The steps below describe the process for Microsoft Office 2003. If you are using Microsoft Office 2007, all GoldMine menu items are accessed by selecting the GoldMine Tab from Word’s main menu.
1. Launch GoldMine and select a Contact Record as a data source.2. Open Microsoft Word. 3. Select GoldMine>>Insert GoldMine Field(s). The Insert GoldMine
Fields floating toolbar appears. (To anchor the Insert GoldMine Fields toolbar, drag-and-drop the floating toolbar to the Word toolbar.)
NOTE: In Microsoft Office 2007, these fields are always located in the toolbar of the GoldMine Tab.
4. Place your cursor at the point in the document where you would like to insert the field.
5. Click the field drop-down list on the Insert GoldMine Fields toolbar, and select a field or macro. Fields are listed as TABLE->FIELDNAME (for example, CONTACT1->CONTACT). Macros are listed as &MacroName (for example, &UserFullName).
6. Continue adding desired fields to the document.
494 • GoldMine Plus for Microsoft Office GoldMine Administrators Guide

7. Complete the process by:• Saving the document for later use: Select File>>Save as from the
Word menu. Save the file as filename.doc. To reuse this file with dynamic fields, launch Word and open the saved .doc file. The dynamic fields display data from the active GoldMine Contact Record.
• Saving the document as a template: Select File>>Save as from the Word menu. Save the template as filename.dot. If you are using this file as a Word template in GoldMine, save it in the GoldMine Template folder.
For information on setting preferences in GoldMine Plus for Microsoft Office, see “Setting Preferences in GoldMine Plus for Microsoft Office” on page 492.
Using GoldMine Fields in Microsoft ExcelOnce GoldMine Plus for Microsoft Office is installed, you may add GoldMine fields to an Excel document. The fields remain dynamic, meaning that when changes are made to the active GoldMine Contact Record, linked field data in Excel changes as well.
NOTE: The steps below describe the process for Microsoft Office 2003. If you are using Microsoft Office 2007, all GoldMine menu items are accessed by selecting the GoldMine Tab from Excel’s main menu.
1. Launch GoldMine and select a Contact Record as a data source.2. Open Excel.
NOTE: If you are sending a mail merge to a group of contacts using GoldMine Plus for Microsoft Office and a required field is not populated in a contact record, an error message may appear. Ensure all required fields are populated.
GoldMine Administrators Guide GoldMine Plus for Microsoft Office • 495

3. Select GoldMine>>Insert GoldMine Field. The GoldMine Fields floating toolbar appears. (To anchor the GoldMine Fields toolbar, drag-and-drop it in the Excel toolbar.)
NOTE: In Microsoft Office 2007, the fields toolbar is always available in the GoldMine Tab.
4. Click the field drop-down list on the floating GoldMine Fields toolbar and select a field or macro. Fields list as TABLE->FIELDNAME (for example, CONTACT1->CONTACT). Macros list as &MacroName (for example, &EmailAddress).
5. Continue adding desired fields to cells.6. Finish the process by:
• Saving the spreadsheet for later use: Select File>>Save as on the Excel menu. Save the file as filename.xls. To reuse the file with dynamic fields, launch Excel and open the saved .xls document. The dynamic fields display data from the active Contact Record.
• Saving the spreadsheet as a template: Select File>>Save as on the Excel menu. Save the file as filename.xlt. If using it in GoldMine, save the new template in the GoldMine Template folder. Then add the template to the Document Management Center.
NOTE: Excel does not support multiple lines per cell, therefore, multi-line macros cannot function in Excel.
NOTE: When running Office 2007 on Microsoft Vista, GoldMine must be running in order to access GoldMine fields in Excel. When Excel attempts to access a GoldMine linked field when GoldMine is not running, the following error message appears: Remote data not accessible... Start application 'GOLDMINE.EXE'?. Select NO. Selecting YES will result in an additional error message. GoldMine must be running in order for Excel to access linked cells
496 • GoldMine Plus for Microsoft Office GoldMine Administrators Guide

Exporting to GoldMine From Microsoft ExcelOnce GoldMine Plus for Microsoft Office is installed, data can be exported from Microsoft Excel to your GoldMine database using new menu options in Excel.GoldMine Plus for Office adds an export feature to the GoldMine menu in Excel. Use this menu option to map Excel columns to GoldMine fields and initiate the export process. Be sure to back up your database before beginning
NOTE: Before proceeding with the export, verify that phone numbers are formatted consistently and make changes as needed. The format of the phone numbers in your Excel spreadsheet must be the same for the Excel ODBC to interpret the numbers correctly. If formats are inconsistent, the ODBC driver interprets all the values in the column as null and you lose phone number data during the export process. For example, you cannot have one phone number that is 1235557894 and another that is 777-555-1236. Before exporting to GoldMine, specify one format and update all phone numbers in your spreadsheet to match the selected format. When the phone number format is consistent, begin exporting to GoldMine.
.
1. Launch GoldMine.2. Open the Excel spreadsheet you are exporting to GoldMine. 3. Select the cells you are exporting to GoldMine and specify the Named
Range. In Excel, select Insert>>Name>>Define. The Define Name dialog box appears. See Excel Help for details.
NOTE: To perform this function in Microsoft Office 2007, select the cells to export to GoldMine, right-click on the selected cell range and select Name a Range from the drop-down menu. You may also select the Formulas tab, then select Define Name>>Define Name... from the Defined Names sub-menu.
GoldMine Administrators Guide GoldMine Plus for Microsoft Office • 497

4. In the Names text box, type the desired name of the range.
NOTE: The first row of the selected range must contain only header data.
5. Select either Workbook or Sheet from the Scope drop-down menu.6. Select GoldMine>>Export Data to GoldMine. The Export Data to
GoldMine dialog box appears.7. The Welcome to the GoldMine Plus for Microsoft Excel Export
Wizard! appears.8. Click Next.
The field mapping dialog box appears.9. To map columns to GoldMine fields, highlight the column in the Excel
Fields list and then highlight the GoldMine field to map the column to. Click Add Mapping. Your selection is added to the Mapped Fields list (for example, Column1<=>C1.Company).
10. Continue to map desired fields. When finished, click Next. The GoldMine is now Ready to export your Excel data! dialog box appears.
11. Click Finish. When the import process completes, a dialog box appears, indicating the number of records imported into GoldMine.
Adding Excel TemplatesA template is a spreadsheet created in Microsoft Excel and contains embedded GoldMine DDE link fields. The DDE fields link contact information to cells so the fields remain dynamic, displaying the data from the linked fields in the configured cells.
NOTE: Use the Document Management Center to link to a spreadsheet template and edit as needed; the template must exist as a file. The most common option for creating a spreadsheet document are using Microsoft Excel with GoldMine Plus for Microsoft Office installed.
498 • GoldMine Plus for Microsoft Office GoldMine Administrators Guide

1. Select Go To>>Document Templates. The Document Management Center appears.
2. Select the User from the drop-down list.3. Right-click on Spreadsheets in the Document Templates tree and select
New. The Document Template Properties dialog box appears.4. Type the Document Name in the format to appear in the Document
Management Center and in the template drop-down list on the Merge Form dialog box.
5. Select the owning user from the Document User drop-down list.6. In the Template Filename text box, type or browse to the location of the
template. 7. Click Edit to open the spreadsheet and make changes.8. In the Document Management area, select from:
• Link to Doc: Creates a linked document when the document is merged.• Save History: Creates a history record when this template is merged.• Allow Hot Link: Enables linking to this document. If clear, the Link
command is unavailable.9. In the Document Type area, select Spreadsheet.10. Click OK.
GoldMine Administrators Guide GoldMine Plus for Microsoft Office • 499

500 • GoldMine Plus for Microsoft Office GoldMine Administrators Guide

Integration
Integrating with HEATIf using GoldMine with an E-License on an SQL database, integrate with HEAT to:• Launch HEAT Call Logging from GoldMine and access the database.• View call ticket information on the Tickets tab in GoldMine (the services
and support relationship with the customer).• Transfer ticket information to the GoldMine Details tab using the Ticket
Transfer Utility to synchronize information with remote users without access to the HEAT database.
You cannot transfer data to the Details tab unless you are running GoldMine on an SQL database. GoldMine users with Master Rights can change the database and login using HEAT/HEAT PowerDesk Options. From HEAT, users can validate from GoldMine's Contact1 table and use the Customer window to view the primary contact information from the Contact Record, additional contacts, Sales-Pending, and Sales-History.See the HEAT Administrator Module online help for complete instructions.
GoldMine Administrators Guide Integration • 501
Advantages of a HEAT IntegrationPrimarily, the advantage of integrating HEAT and GoldMine Premium Edition is that a single customer record exists and is shared by both applications: • HEAT users can view and modify certain GoldMine Premium Edition
customer information: HEAT Call Logging users can view a GoldMine customer’s phone number, address, e-mail address, and so on. GoldMine can also be integrated to display a list of associated contacts for the selected Contact1 customer.
• HEAT users can view a customer’s Sales-Pending information: HEAT Call Logging users can view a list of scheduled sales activities for a GoldMine Premium Edition customer.
• HEAT users can view a customer’s Sales-History information: HEAT Call Logging users can view a list of prior sales activities for a GoldMine Premium Edition customer.
• GoldMine Premium Edition users can view Call Logging Information: GoldMine users can view call history information including information in the Detail, Journal, and Assignment tabs.
• HEAT and GoldMine Premium Edition users can send internal e-mail messages to each other: HEAT and GoldMine users can communicate about customers through e-mail.
• HEAT and GoldMine Premium Edition users can post alerts to each other: HEAT and GoldMine users can alert each other about key customer issues.
NOTE: The Ticket Transfer feature expands Call Logging information viewing in GoldMine Premium Edition by letting Call Record data transfer to the ContSupp table. From there, it can be displayed in the GoldMine Details tab and synchronized to remote, undocked users.
502 • Integration GoldMine Administrators Guide

How the HEAT Integration WorksHEAT and GoldMine Premium Edition communicate by sharing information in their database tables. When integrated, an external link is created from HEAT to two GoldMine database tables: the Contact1 table, and the ContSupp table. The external link is a two-way link used to view and modify data. This lets data flow in both directions between the databases and the applications themselves.The Contact1 TableThe Contact1 table stores information for GoldMine Premium Edition customers such as phone numbers, addresses, fax numbers, and so on. HEAT displays Contact1 table information using the Contact1 Customer Type in Call Logging. Information displays in the customer profile (often called the Customer window). Call Logging users can view customer information.
NOTE: Information about pending sales and sales history also displays in the Customer window using the Sales-Pending and Sales-History tabs. This information is read-only.
Call Record information displayed in the GoldMine Premium Edition Tickets tab is not actually stored in a GoldMine record. Rather, it is stored in the HEAT database and dynamically viewed by GoldMine Premium Edition users. In comparison, information displayed in the GoldMine Premium Edition Details tab is stored in the ContSupp table. Information is transferred here using the Sales & Marketing Ticket Transfer feature. The ContSupp TableThe ContSupp table stores information about a GoldMine Premium Edition customer’s additional contacts and e-mail addresses for all contacts. Additional contacts display in the Contact tab in the Customer window.
NOTE: The e-mail addresses that autofill in the Contact1 Profile and Subset forms in HEAT Call Logging cannot be modified.
GoldMine Administrators Guide Integration • 503

Launching HEAT from GoldMine If using GoldMine with an E-License and you configured HEAT integration, launch HEAT from GoldMine.Select File>>Login to HEAT.Call Logging appears.
Ticket Transfer Utility with HEAT IntegrationIf using GoldMine with an E-License on an SQL database and you integrate with HEAT, the processes work together as shown.
1. Data flows two-way between the databases and the applications using
ODBC between the HEAT database and the HEAT modules. It flows between the GoldMine SQL database and the GoldMine application by way of the ActiveX Data Objects (ADO).
2. Contact information is validated from the GoldMine SQL database through the Contact1 and ContSupp tables and flows to the HEAT application. This allows HEAT users to view GoldMine customer information and additional contacts.
3. Call Records created in HEAT flow to the Tickets tab in the GoldMine application by DDE and ODBC.
504 • Integration GoldMine Administrators Guide

4. View GoldMine Pending and History activities in HEAT Call Logging (read-only). Data flows from the GoldMine database to the HEAT application by ADO. • GoldMine contact information and the additional contacts (Contact1
and ContSupp tables), which are created or updated in the HEAT application, are sent to the GoldMine database using ADO to transport.
• The SPFiles table in the GoldMine database stores data that ADO can validate in the HEAT Administrator module.
• A Call Record is created and stored in the HEAT database. The Ticket Transfer Utility converts these Call Records into detail records on the GoldMine Details tab. The data flows from the HEAT database to the Ticket Transfer Utility by ODBC and then to the GoldMine database by ODBC.
• Alert data flows between GoldMine and HEAT Call Logging. Enable both HEAT and GoldMine to assign and display the other application’s alerts.
Integrating with .NETThe new API integrates with GoldMine by providing an XML-based programming interface and COM server. It is compatible with Microsoft .NET development tools (VB.NET and C#). The XML wrapper provides access to functions from the non-XML capable API available of previous GoldMine versions. Also, user-interface integration tools let developers interact. For instance, replace DDE with COM, to gain:• Implementation of current technology instead of DDE.• Compatibility with COM-capable development tools.• Compatibility with .NET applications. • Ability to grow into a full UI API.• Ability to rewrite the Excel/Word link.• Easier implementation of an XML-based interface. The COM server implements the relevant DDE functions. An application that previously used DDE can communicate to GoldMine using this interface.
GoldMine Administrators Guide Integration • 505

The description has 2 parts:• The XML API• The UI API to run The XML API and the UI API use the same basic schema to perform actions: <GMAPI call="CallName"><dataname="DataName">XXXXXX</data>...</GMAPI>
Eventually, this will evolve into a retro-written XML-schema and DTD for the full APIs.The XML API wraps the existing GM API into a simpler interface. Low-level functions performing actions needed by the non-XML API programmer are hidden. Failures are self-documented (no return messages).
506 • Integration GoldMine Administrators Guide
Glossary
#.gmb: (The file extension for a backup file created by the Back-Up Wizard)
.ics: (iCalendar file extension)
AAccountNo: (The Account Number field uniquely identifies a contact record and is the common
field value that links the Contact1 table to Contact2, Cal, ContSupp, ContHist, and OpMgr)
Action: (The Automated Process action is the activity performed when triggered)
Activities: (Activities are time-specific or event-based actions linked to contacts; for example calls, appointments, letters, or other types of activities, such as To Do tasks or events that are assigned to users)
Activity list: (A window that displays task or event information. The Activity List displays eleven categories of information in a set of tabs)
Additional Contact: (Individual associated with the primary contact, such as an administrative assistant. GoldMine stores this information in the Contacts tab of the primary contact’s record)
Alphanumeric characters: (Letters A - Z and numeric digits)
Attachment: (A file, for example, a Word document, created outside of GoldMine and attached to GoldMine as a linked document, InfoCenter attachment, or e-mail attachment)
Auto-updating: (Allows you complete or delete many activities or resources)
BBcc: (Blind Carbon Copy. A copy of a message, usually e-mail, is sent to a recipient that the main
recipients cannot see)
BDE: (Borland Database Engine. Serves as a connector between GoldMine and the databases)
Break fields: (Break fields manage the grouping of information, determining how multiple entry information, such as Details, Calendar, and History, is displayed in a report template. The break field ensures that all the details or calendar entries are grouped together before moving on to the next contact record. Break fields can only be used in Sort Headers)

CCalculated field: (Field containing a mathematical expression rather than data)
Cc: (Carbon Copy. Used in e-mail messages, memos, and letters)
Character string: (Any series of alphanumeric characters (including spaces) that are treated as a group)
Cloning: (The process of copying a user or report settings and configurations in order to quickly create a new user or report)
CommonDir: (Used in the GM.ini, the CommonDir specifies the location of your default contact files)
Contact files: (The tables storing a database's contact information. Also referred to as Common files. The CommonDir line in the GM.ini points to the default contact files)
Contact record: (Standard unit of information in GoldMine. GoldMine’s contact record incorporates standard information, such as name, company, phone, and address, and also serves as the basis for all scheduled work in GoldMine, acting as the central link between GoldMine’s Calendar and History by maintaining all past and pending events related to the individual contact records in the GoldMine database)
Contact set: (Database consisting of the contact information: Contact1, Contact2, ContSupp, ContHist, ContGrps, ContUdef, Conttlog, and sometimes Lookup. GoldMine allows you to have more than one contact set)
Contact tabs: (Set of tabs located below the main Contact Record containing information associated with the contact, including additional contacts, pending, and history information)
Contacts tab: (Additional contacts associated with the Contact Record)
Curtaining: See Record curtaining
Custodian: (The person responsible for the resource)
DDatabase: (A collection of data fields and related tables storing information that facilitates
access and retrieval)
Details tab: (Structured, user-defined information associated with each Contact Record)
Dialog field: (A field created to open a dialog box and prompt the user for parameters to include in the report)
Digital ID: (Digital signature and encryption keys sent with e-mail messages)
508 • Glossary GoldMine Administrators Guide
EEntity: (Used to refer to a single record type. Consists of a customized combination of primary
fields views, custom screens, and GM+Views)
Event: (Step-by-step instructions contained in an Automated Process, or track, that GoldMine must evaluate to perform a specified series of activities. An event consists of a trigger and an action. An Automated Process consists of a sequence of one or more events)
FF2 Lookup: (Special type of browse window that can be customized to contain frequently
used or code-specific entries. Security options can control F2 lookups to ensure user input and allow standardization of data)
Field typing: (Customizing field labels and colors using direct data or dBASE expressions)
Fields tab: (Displays user-defined fields grouped together in user-defined screens)
File code: (The unique 3-character identification assigned to each Contact Set, enabling synchronization and backing up)
Filter: (Sort condition used to select a subset of records from the entire database)
Force log out: (Forces users out at a particular time or when inactive for a period of time)
Free/busy times: (Free and busy calendar times published to file, ftp, or http locations and made available to other users)
GGM.ini: (A file located in the GoldMine directory containing commands for general GoldMine
operation. The most important are the SysDir, GoldDir, and CommonDir)
GM+View tab: (User-defined HTML template-based views)
gmb: (The .gmb file extension for a backup file created by the Back-Up Wizard)
GoldDir: (Used in the GM.ini, the GoldDir specifies the location of your GoldMine files (also called your GMBase files))
GoldMine Business Contact Manager: (An installation of GoldMine using a D-License and a dBASE database)
GoldMine Business Contact Manager Corporate Edition: (An installation of GoldMine using an E-License and an optional SQL database. Includes GoldSync)
GoldMine e-mail: (E-mail message to another GoldMine user or user group)
GoldMine Administrators Guide Glossary • 509
GoldMine files: (The tables storing other database information. Also referred to as GMBase files. The GoldDir line in the GM.ini points to the shared GoldMine files)
GoldMine link to Excel: (Creates a link between GoldMine and Excel, allowing you to add GoldMine fields to Excel or export data from Excel to GoldMine)
GoldMine link to Word: (Creates a link between GoldMine and Word, allowing you to add GoldMine fields to a Word document or template)
GoldSync Server: (A computer that handles the synchronization processes)
GoldSync Service: (Runs the GoldSync application in the background without requiring a user to launch GoldMine)
Group: (Fixed set of contact records that meet an initial set of conditions. Once selected, member records subsequently have instantaneous access to the subset. Alternate method to filters of maintaining a subset of data)
HHistory tab: (Completed activities associated with the Contact Record)
HTML: (HyperText Markup Language. The authoring language used to define the structure and layout of a Web document by using a variety of tags and attributes)
Hyperlink: (An element in an electronic document that links to another place in the same document or to an entirely different document. Click on the hyperlink to follow the link)
IIIS: (Internet Information Services)
InfoCenter: (A resource used to maintain and display any type of information useful to an organization or an individual. The InfoCenter can archive information in a variety of formats, such as graphics, multimedia files, and program applications. Any of this information can be linked to a Contact Record)
Installing locally: (Installing GoldMine .exes and .dlls on a local workstation in a network environment)
Instant sync: (Automatically reminds undocked users to synchronize whenever a connection GoldSync is detected)
Internet e-mail: (E-mail message to customers using you POP3 e-mail account)
K
510 • Glossary GoldMine Administrators Guide

Keyboard shortcuts: See Shortcut keys
Keyword: (One or more words that succinctly describe a document's contents)
KnowledgeBase: (Information created by, for, and about an organization and available to multiple users)
LLinked activities: (Scheduled activities linked to a contact record)
Links tab: (Documents, programs, and other files linked to the Contact Record)
Local menu: (Also known as a shortcut menu, the local menu provides quick access to a set of commands affecting only the current browse window, tab, or pane)
LogStamp: (Contains the time and date that the record was last changed)
MMacros: (A series of commands and/or keystrokes that launches or runs a action)
Maintaining: (Process to improve performance by regenerating indexes, packing and rebuilding tables, and sorting and verifying data. The maintenance of the database should be performed by the system administrator or manager)
Members tab: (Lists the contact Groups of which the Contact Record is a member)
Merge codes: (Three-character codes used as the basis for e-mail and document merging for mass mailings)
NNet-Update: (Process of updating GoldMine over the Internet)
Notes tab: (Free text notes associated with each Contact Record)
OODBC: (Open Database Connectivity)
Operator: (Specifies the value a field must have to be included in a record selection criteria. Examples of operators include the following: equal to, greater than, lesser than or equal to)
Opportunity: (Involves a group working as a team with multiple organizations and contacts to successfully close a complex sale)
GoldMine Administrators Guide Glossary • 511

Opptys tab: (Displays the Opportunities associated with the Contact Record)
Organization Chart: (Graphically displays contact information and organizational relationships in a tree structure)
PPacking: (The process of actually deleting records that were marked for deletion. This
process is only necessary for a dBASE database. Periodically packing the database files removes the “dead space” between records)
: (Activities scheduled for the Contact Record)
Personal Base: (Information useful to an individual user that only the logged-in user can view and update)
Primary contact: (The name of the contact on the Contact record)
Primary fields views: (Primary field views are customized views of the primary fields. Primary fields are those in the upper four panes of a Contact Record and are Contact1 fields)
Project: (Involves a group working as a team to complete a long-term project that involves multiple component tasks)
Projects tab: (Displays the Projects associated with the Contact Record)
RRebuilding: (Creates a new file structure (or table), and copies data, record-by-record, from
the old files/tables to the new ones)
Record curtaining: (A Contact record can be curtained so that a user who does not own the record cannot view the record or can view only part of the record)
Record types: (Customized combination of primary fields views, custom screens, and GM+Views. Configured in the Record Types Administration Center)
Record Types Administration Center: (Allows you to create many Record Types based on combinations of your different Primary Field Views, Custom Screens, and GM+Views and to apply them based on your user-defined Record Type Rules)
Record typing: (Customized combinations of Primary Fields Views, Custom Screens, and GM+Views)
Rectype: (A record type code identifying different types of records within the database)
Referrals tab: (Internal referrals within the Contact Set)
512 • Glossary GoldMine Administrators Guide

Rehost: (Rehosting data is the process where one database is copied or converted to a new database)
Reports Center: (Provides easy visual access to several reporting options available within GoldMine)
Required field: (A field requiring data)
Resources: (Resources that are commonly requested include conference rooms, projectors, demonstration products, company vehicles)
Rich Site Summary: (See RSS)
RSS: (Rich Site Summary -- a simple XML format designed for sharing Web Headlines)
SScreen design toolbar: (Used when you are designing your primary fields or Fields tab
screens)
Seq: (Sequence ordered number for each event in an Automated Process. The sequence number begins with either P for a Preemptive event or S for a Sequential event. Each event is processed in order based on the sequence number)
Shortcut keys: (Shortcut keys are keyboard keys or key combinations that invoke a particular command)
Shortcut menu: See Local Menu
Site code: (Matches a synchronization process to a site)
Sort Header: (A section in a report that holds the labels, filters, and break filters for the section or for the corresponding detail section)
Sort order: (The order that Contact records are displayed based on a specified field. The sort order for the database is determined by the Sort Order you select in the Contact Listing window. If a filter or group is active, the Sort Field you selected takes precedence)
Sorting: (Orders the records in the files/tables by the most-used indexes)
Summary tab: (Displays activity information about the current Contact Record)
Synchronization: (GoldMine’s remote synchronization is a process that can update one GoldMine system with new or changed information that has been entered in another GoldMine system)
SyncStamp: (Contains the time and date when the record was last successfully retrieved during synchronization)
GoldMine Administrators Guide Glossary • 513

SysDir: (Used in the GM.ini, it specifies the location of gmw6.exe)
TTask group: (A group of task items on the GoldMine Taskbar)
Task item: (An item on a taskbar that launches an action)
Taskbar: (Frequently used GoldMine Menu commands and macros, links to documents and files, and a quick step for launching applications and web sites)
Tickets tab: (Displays tickets from HEAT Call Logging when GoldMine/HEAT integration is installed)
Tlogs: (The general name for the two types of logs: ContTlog and GMTlog. They track date and time stamps for changes to fields and the synchronization of the data)
Track: (A sequence of two or more events, which are the step-by-step instructions that GoldMine evaluates to perform a defined series of activities. Also known as an Automated Process.)
Tracks tab: (Lists the Automated Process tracks attached to the Contact Record)
Transfer set: (A database of all the changes made to Contact Records during a specified time frame. The database with the changes is sent to other GoldMine locations and retrieved, updating that database with the new information)
Transformation sheet: (A language for transforming XML documents into other XML documents)
Trigger: (A predefined condition in an Automated Process event that, when the condition is true, causes GoldMine to execute an action)
UUnlinked activities: (Scheduled activities that are linked to a user but not to a contact)
URL: (Abbreviation of Uniform Resource Locator, the global address of documents and other resources on the World Wide Web)
User groups: (Users can be logically grouped according the functions that they perform)
User Preferences: (Various settings that control how GoldMine looks and acts for each user)
User Properties: (These settings define a user's security and access in GoldMine)
UserID: (Field that contains the name of the user an activity is assigned to. UserID is based on the GoldMine username)
Username: (Use this name to log into GoldMine. Identifies the user's activities)
514 • Glossary GoldMine Administrators Guide

Username.ini: (An initialization file located in the GoldMine directory that stores user's individual settings)
Username.tbi: (Stores the user's taskbar settings)
VVerifying: (Ensures that the data is readable and that all sync fields in the synchronization
records of the database file(s) are populated, and no unique fields are duplicated)
WWYSIWYG: (What You See Is What You Get. Pronounced wizzy-wig. A WYSIWYG display
allows you to see on the screen exactly what will appear when the document is printed)
XXML: (Acronym for Extensible Markup Language. XML is a universal format that uses tags for
exchanging structured documents and data on the Internet)
GoldMine Administrators Guide Glossary • 515

516 • Glossary GoldMine Administrators Guide

End User’s License Agreement
FRONTRANGE SOLUTIONS END USER’S LICENSE AGREEMENT (“EULA”)
(Rev. October 2008)
IMPORTANT - READ CAREFULLY
THIS EULA SETS FORTH THE TERMS AND CONDITIONS UNDER WHICH FRONTRANGE SOLUTIONS USA INC. (“FRONTRANGE”), GRANTS TO YOU (“YOU” OR “CUSTOMER”) THE RIGHT TO USE THE FRONTRANGE SOFTWARE AND ACCOMPANYING DOCUMENTATION ORDERED AND PAID FOR BY YOU (COLLECTIVELY “LICENSED SOFTWARE”). THIS EULA REPLACES AND SUPERCEDES ANY LICENSE AGREEMENT THAT YOU MAY BE PRESENTED WITH WHEN OPENING THE SOFTWARE PACKAGING, COMPLETING THE ACTIVATION PROCESS, DOWNLOADING, INSTALLING, ACCESSING OR UTILIZING THE LICENSED SOFTWARE OR CLICKING THE “I ACCEPT” BUTTON.1. License Grant. Subject to the terms and conditions of this EULA, FrontRange hereby grants to Customer, and
Customer fully accepts upon delivery, a nonexclusive, non-transferable and perpetual (unless terminated or limited as provided below) right to use only the executable version (not source code) of the Licensed Software for Customer’s internal business purposes.
2. Scope of Authorized Use. You may use the Licensed Software only as expressly permitted under this EULA and in accordance with the technical and other user manuals and read me files shipped with the Licensed Software (collectively, “Documentation”). FrontRange expressly reserves any rights not expressly granted to Customer. Your right to use the Licensed Software is limited to the number of server(s), user(s), assets, modules, databases etc… (collectively, “License Limits”) that You have ordered and paid for. All Licensed Software updates, upgrades, or new releases (collectively, “Updates”) are provided to You on a license exchange basis. By using an Update You voluntarily terminate Your right to use any previous version of the Licensed Software; provided, however, that You may continue to use previous versions solely to assist You in transitioning to the Update. All Updates are part of the Licensed Software. Should You exceed any of Your License Limits, You agree to pay the then applicable full list price for the excess usage, as well as the related maintenance and support fees. You agree to allow FrontRange to audit Your use of the Licensed Software to verify Your compliance with Your License Limits. Audit rights shall be subject to Your reasonable securities policies as applied to all of Your vendors, and may only be performed once every twelve (12) months.
3. Restrictions.a. Proprietary Rights. This is a license only and no title passes to You. With the exception of the license granted under this EULA, FrontRange and any Third Party Licensor retain all right title and interest to the Licensed Software and all related intellectual property and proprietary rights. You will not remove or obscure any copyright notices, logos, or other proprietary rights notices or legends in the Licensed Software. The Licensed Software contains information deemed confidential or otherwise proprietary to FrontRange and any Third Party Licensor, and You will handle the Licensed Software with at least the same degree of care employed with respect to Your own confidential or proprietary information.
GoldMine Administrators Guide End User’s License Agreement • 517

b. Derivative Works, Reverse Engineering. You may not create any derivative works to the Licensed Software except to facilitate Your authorized use of the Licensed Software, provided that Your use of such limited derivative works is subject to this EULA. You may not modify, decompile, translate, disassemble or reverse engineer the Licensed Software except if the laws of Your jurisdiction proscribe the enforcement of such prohibitions but then only to the extent actually permitted, and for the limited purposes specifically contemplated, by applicable law.c. Commercial Exploitation. You may not distribute, rent, lease or transfer the Licensed Software or any portion thereof. You may not use the Licensed Software, or any portion thereof, in a commercial hosting, application service provider or service bureau environment.d.Non Production Copies; Temporary Licenses. You may make one copy of the Licensed Software for safekeeping purposes and as permitted in the Documentation. The original copy of the Licensed Software and all copies that You may make may not leave Your control. If the Licensed Software is provided for testing or other nonproduction purposes, You may not use it in a production or live environment and Your right to use the Licensed Software is limited in accordance with the terms under which You received it. In addition, if the Licensed Software is provided on a trial, evaluation, pilot or other temporary basis, then notwithstanding anything to the contrary in Sections 1, 6 or elsewhere in this EULA, it may only be used for the time period specified by FrontRange (and if none specified, then no more than 30 days), is provided on an AS-IS basis without warranty and Your right to use it may be terminated for convenience by FrontRange. Upon termination of any temporary license You agree to return or destroy all copies of the Licensed Software.e. Subscription. If You licensed the Licensed Software on a ‘subscription’ (or limited time) basis (“Subscription Product”), then notwithstanding anything to the contrary in Section 1 or elsewhere in this EULA, you may only use the Subscription Product during the time period that you have contracted and paid for (“Subscription Term”). You agree that upon expiration of the Subscription Term, the Subscription Product may automatically cease to function and irrespective of any auto-disablement, You will return all copies of the Subscription Product (unless otherwise instructed by FrontRange). All other nonconflicting terms herein shall apply.f. Third Party Software. To the extent the Licensed Software includes software owned by third parties (collectively “Third Party Licensors”) You may only use such third party software with the Licensed Software and at all times subject to this EULA. The Third Party Licensors are intended third party beneficiaries of this EULA. Notwithstanding the foregoing, to the extent that the Documentation provides a separate license agreement for such third party software, then You agree that such separate agreement shall govern.
4. Term/Termination. This EULA will remain in effect until terminated pursuant to this Section 4. You may terminate this EULA at any time by destroying all of Your copies of the Licensed Software. FrontRange may terminate this EULA if You breach this EULA and fail to remedy such breach after a thirty (30) days notice and opportunity to cure period. Notwithstanding the preceding, FrontRange may immediately terminate this EULA if You breach Section 2, 3 or 9. Upon any termination, You agree to cease all use of the Licensed Software, remove all copies from Your computers, destroy all copies of the Licensed Software, and, upon request from FrontRange, certify in writing Your compliance herewith.
5. Payments. All licenses and rights granted under this EULA by FrontRange are subject to timely receipt by FrontRange of payment. All payments for fees, taxes and expenses must be made within thirty (30) days of invoice, unless otherwise agreed in writing by an authorized FrontRange officer. You are responsible for any and all federal, state, dominion, provincial or local sales, use, personal property, excise, or other taxes, fees or duties arising from or related to this Agreement (other than taxes based on FrontRange’s net income).
6. Warranty. FrontRange warrants that the Licensed Software will perform substantially in accordance with its Documentation for a period of ninety (90) days following delivery of the Licensed Software. This limited warranty is void if failure of the Licensed Software results from accident, abuse, modification, or misuse. FrontRange does not warrant that the Licensed Software will meet Your requirements, that the operation of the Licensed Software will be uninterrupted or error free, or that all defects will be corrected. The warranty and
518 • End User’s License Agreement GoldMine Administrators Guide
remedy set forth in this EULA are exclusive and in lieu of all other warranties and remedies, oral or written, expressed or implied.Except as provided above, FRONTRANGE AND ANY THIRD PARTY LICENSOR DISCLAIM ALL WARRANTIES, EITHER EXPRESSED OR IMPLIED, WITH RESPECT TO THE LICENSED SOFTWARE, ITS QUALITY, PERFORMANCE, NON-INFRINGEMENT, MERCHANTABILITY, OR FITNESS FOR A PARTICULAR PURPOSE.If You believe the Licensed Software does not meet this Limited Warranty, You must notify FrontRange in writing within the warranty period. FrontRange’ entire liability and Your exclusive remedy with regard to the Limited Warranty, will be, at FrontRange’ sole discretion, either repair or replacement of the Licensed Software or a refund of the amount paid to FrontRange for the Licensed Software (provided in that case that You also return the Licensed Software).
7. Indemnification. FrontRange will, at its expense, defend and pay any settlement amounts or damages awarded by a court of final jurisdiction arising out of any third party claim against You that the Licensed Software infringes any copyright, patent, trademark or trade secret owned or controlled by the third party (“Infringement Claims”); provided, however, that (i) FrontRange will be notified promptly in writing by You of any such claim; (ii) FrontRange will have sole control of the defense of any action on such claim and all negotiations for its settlement or compromise; and (iii) You will cooperate with FrontRange, at FrontRange’ expense, in a reasonable way to facilitate the settlement or defense of such claim; except that such indemnification obligation does not apply with respect to a claim of infringement if and to the extent such claim arises out of (A) Your modifications not authorized by FrontRange, (B) the combination or use of the Licensed Software with products not provided or recommended by FrontRange if the infringement would have been avoided but for such combination or use, (C) use of the Licensed Software after written notice of the claimed infringement has been received by You, (D) Your failure to use an Update if the infringement would have been avoided by the use of the Update, or (E) actions by Customer in breach of this EULA. Should the Licensed Software become, or in FrontRange’s opinion likely to become, subject to an Infringement Claim, then You will permit FrontRange, at FrontRange’s option and expense, either (a) to procure for Customer the right to continue using the Licensed Software, or (b) to replace or modify the Licensed Software so that it becomes non-infringing and performs in a substantially similar manner to the original product, or (c) upon failure of (a) or (b), despite the reasonable efforts of FrontRange, to terminate this EULA and return the license fee You paid for the Licensed Software pro-rated over a four (4) year life span. THIS SECTION SETS FORTH YOUR EXCLUSIVE REMEDY AND FRONTRANGE’S SOLE LIABILITY WITH RESPECT TO INFRINGEMENT CLAIMS.
8. Liability Limits. THE LICENSED SOFTWARE IS NOT DESIGNED OR INTENDED FOR USE IN ANY MEDICAL OR NUCLEAR SYSTEMS, OR FOR ANY OTHER MISSION CRITICAL APPLICATION IN WHICH THE FAILURE OF THE LICENSED SOFTWARE COULD CAUSE SUBSTANTIAL PROPERTY DAMAGE, PERSONAL INJURY OR DEATH. FRONTRANGE DISCLAIMS ANY LIABILITY FOR USE OF THE LICENSED SOFTWARE IN ANY SUCH APPLICATION(S).TO THE MAXIMUM EXTENT PERMITTED BY APPLICABLE LAW, AND EXCEPT FOR LIABILITY ARISING UNDER THE INDEMNIFICATION PROVIDED IN SECTION 7 ABOVE, FRONTRANGE’ AND ITS THIRD PARTY LICENSORS’ ENTIRE LIABILITY UNDER THIS EULA WILL BE LIMITED TO THE AMOUNT PAID BY YOU TO FRONTRANGE FOR THE LICENSED SOFTWARE. IN NO EVENT WILL FRONTRANGE OR ITS THIRD PARTY LICENSORS BE LIABLE FOR INDIRECT, SPECIAL, INCIDENTAL OR CONSEQUENTIAL DAMAGES ARISING OUT OF THE USE OR INABILITY TO USE THE LICENSED SOFTWARE, including without limitations damages for lost profits, loss or corruption of data, costs of procurement of substitute technology or services, even if advised of the possibility of such damages. The parties agree that the limitations and exclusions of liability and disclaimers specified in this EULA will survive and apply even if the limited remedies are found to have failed of their essential purpose.
GoldMine Administrators Guide End User’s License Agreement • 519

End-User License Agreement (EULA)520
9. Legal Compliance. You must comply with all applicable laws and regulations in Your use of the Licensed Software including without limitations any United States or foreign Export Control laws or regulations, and all applicable data protection, SPAM, privacy laws and regulations. As part of the registration process You may provide user information. Any personal information collected (1) will be used solely for registration and license limit auditing purposes and to provide You with important information about the Licensed Software, (2) will be stored in computer servers with limited access that are located in controlled facilities, (3) may be stored and processed in the United States or other country and by using the Licensed Software, You consent to any such transfer of information outside of Your country, (4) may be stored for as long as the EULA is in effect, (5) will not be shared with any government agency, private organization, or the public, except that Customer's corporate name may be used as a reference company in the context of sales presentations and marketing activities.
10. United States Government Restricted Rights. THIS SECTION APPLIES ONLY TO LICENSING OR USE BY THE FEDERAL GOVERNMENT OF THE UNITED STATES. The Licensed Software is provided with RESTRICTED RIGHTS. Use, duplication, or disclosure by the federal government is subject to restricted rights as set forth in subparagraph (c) of The Rights in Technical Data and Computer Software clause at 252.227-7014 for DOD contracts and at FAR (48 CFR 52.227-19) for civilian agency contracts or other comparable agency clauses.
11. Severability. If any provision of this EULA is unenforceable or invalid, such provision(s) shall be amended to achieve as nearly as possible the same economic effect as the original provision(s) and the remainder of the EULA shall remain in full force and effect.
12. Miscellaneous. This EULA constitutes the entire agreement between You and FrontRange relating to the license rights for the Licensed Software (and any subsequent orders of additional License Limits or new FrontRange products), and any additions to, or modifications of, this EULA will be binding upon the parties only if in a writing duly executed by You and an authorized officer of FrontRange. THE TERMS AND CONDITIONS OF ANY CUSTOMER PURCHASE ORDER ARE ONLY BINDING ON FRONTRANGE IF THEY ARE AGREED TO IN WRITING BY AN AUTHORIZED FRONTRANGE OFFICER AND IN A DOCUMENT OTHER THAN THE PURCHASE ORDER FORM. You may not transfer the Licensed Software or assign this EULA without FrontRange’ prior written consent and any attempt by You to do so will be void and without effect; except that, You may assign Your rights and obligations hereunder in connection with a merger, acquisition or sale of all or substantially all of Your assets subject to compliance with FrontRange’s administrative requirements for such assignments. If the Licensed Software is acquired through a Reseller, You agree that (i) this EULA constitutes the entire agreement between You and FrontRange regarding the Licensed Software (and the terms and conditions of any purchase order or any other agreement between You and the Reseller are not binding on FrontRange);

Index
Symbols.INI Files and Macros 82
.NET Integration 505 B
AAbout the Database Alias Manager 264About WebImporting 312ACT!
Importing versions 279Adding
Document templates 178Documents to LFC 223Excel templates 498
Adding or Editing Holidays 48Analyze leads 303Answer Wizard
Launching 362Using 362
Attaching 383Automated Processes 369
Automated Process Center 372Creating 374
Events 381Tracks 379
Designing 370Tracks 379
Attaching 383Executing 384
Using 372Automatic Maintenance 258, 262Automating Routine Tasks 369
Backing Up 257Branching Script Answer Dialog Box 229Branching Scripts Listing Dialog Box 228Branching Scripts Profile Dialog Box 228
CCalendar
Shared 454Calendars
Publishing 456, 456Campaign
Creating New Campaign Tasks 309Campaign Local Menu 305Campaign Management Center 304, 307Campaign Management Center Toolbar 306Campaigns
Cloning 309Deleting 310Renaming 309
Certification Authorities 215Changing Your Password 42Cloning
Reports 349User Settings 80
Combining Hiding and Color 125Communicating with Contacts
About 175Completing Campaign Tasks 310
GoldMine Administrators Guide Index • 521

ConfiguringMy GoldMine 478
Configuring GoldSync in the Server Agents Administrator 461
Configuring the INI File 82Contact Records 145Converting
Outlook 280Creating
Databases 236, 237One-Button Synchronization
Profile 432Opportunities 228
Creating a New Campaign Task 309Creating a Performance Report for a Case 328Creating Custom Screens 128Creating GM+View Rules 139Creating Undocked User Licenses 423Creating User Menu Templates 38Crystal Reports
Running 345Using 336, 338, 358
Customizing Data Appearance 329Customizing Field Typing 123
DDatabases
Creating 236Opening 235
default destination 176Deleting
Contact Records 294Deleting an Alias 266Deleting Campaigns 310Dependency Between Lookup Lists 470
Selecting an entry by ignoring dependency settings. 472
Setting up a dependency 470Digital IDs 215
Certification Authorities 215Digital signatures 215Keys 215Reading e-mail 220Sending
Signed 219Digital Signatures 215, 219
Document enterAbout 176
Document Management CenterAdding 178, 498Editing 181E-mail 198Printing 185
DocumentsPrinting 185Templates 178, 181
Duplicate records 289
EEdit Email Toolbar 191Editing
Documents 181, 224Literature Fulfillment Center 224, 226Reports 351
Editing an Alias 266Editing Knowledge Base Books, Folders, and
Topics 484Editing Processes 381E-mail
Encrypted 218Reading 211
Digital IDs 220Sending
Digitally signed 219Document Management Center 198Encrypted 218
Templates 211Email
Retrieving 207E-mail Center Components 188Encrypted 218, 220Event Properties Dialog Box 382Events
Creating 381Excel
Exporting 282, 497GoldMine Link 489Templates 498Using 495
Executing Tracks 384
522 • Index GoldMine Administrators Guide

Exporting 270, 273Considerations 271Excel to GoldMine 282, 497Export Wizard 273iCalendar Files 284XML 275
FFax
Correspondence 182FBclient32.dll 237Filters 171
About 153see Groups 171
Free/BusyTab 450Times 456URLs 450, 450
Fulfilling 224, 225
GGlobal Replacing 268Globally Updating Fields Using Advanced
Options 254GMLinkInstaller.exe 491GoldMine
Link 489Excel 282, 495, 497Installing
Document Management Center 491
GMLinkInstaller.exe 491Upgrading 491
Word 494Link to Microsoft Office 489
GoldMine Plus for Excel 490GoldMine Report Macros 103GoldSync
About 406Administration Center 414Implementation considerations 409Service
Configuring 429Installing 429Running 429
Setting up 429Synchronization Settings 398Uninstalling 429
Groups 171About 153see Filters 171
HHEAT Call Logging 504
Launching 504Ticket Transfer Utility 504
HEAT IntegrationHow it works 503
IiCalendar
Meeting requests 452, 453, 454Importing 270
ACT! 279Considerations 271iCalendar Files 284Import Wizard 272Outlook 280Wizards 272, 277XML 277ZIP Codes 285
InfoCenter 482Information
Managing 233Installing
GoldMine Link to Office 491GoldSync Service 429
Instant Sync 398
KKey Terms 23Knowledge Base 482
LLaunching 24
Answer Wizard 362HEAT 504
LeadsManagement Center 303, 303
LinkingDocuments
GoldMine Administrators Guide Index • 523

Synchronization Settings 398Linking Email Messages to Contacts 210Literature Fulfillment Center 221
Adding documents 223Editing documents 224Fulfilling 224Rejecting 224
Local menusCampaign 305
Logging inHEAT 504
MMacros
Creating 103Maintaining 243
Automatic Maintenance 262Backing up 257Maintenance Wizard 258
MergingTagged records 293Visible contacts 293
Merging and Purging 289Wizard 289
My GoldMine 477Configuring 478Using 479
OOmniRush 489One-Button Synchronization 431
Creating profile 432Instant sync 432Retrieving profiles 432Synchronizing 431
Opportunity Trigger Dialog Box 386Outlook 394
Converting 280Importing 280
Outlook Conversion Wizard 280
PPalm 394Personal Rolodex 232Pocket PC 394
Previewing 358Reports 358
Printing 185Correspondence 175Envelopes and labels 187Reports 358
Private Key 215Process Local Menu 373Project Trigger Dialog Box 387Public Key 215Publishing
Free/busy times 456Purging
See Merging and Purging 289
QQueued Documents
Literature Fulfillment Center 225
RRecord
Contactsee Contact Records 145
CurtainingFields 402
TypesAbout 111Record Types Administration Center 141
Recording Macros 102Rejecting 224Removing
Attached Automated Process Tracks 385Renaming Campaigns 309, 309Replying go an Activity 202Report Properties 340Report Properties, Profile Tab 341Reports
Creating 348Editing 351Previewing 358Printing 358Properties 340Saving with data 359Sorting data 360Using 338Viewing 360
524 • Index GoldMine Administrators Guide
Reports Centersee Reports 336
Restoring 257Retrieving 432Retrieving Email 208RightFax 489Running
GoldSync Service 429Tracks 384
SSaving
Reports with data 359Saving the Field Typing in Your Primary Fields
Views 126Schedule
Literature Requests 224Scheduling
Free/Busy URLs 450, 450Scripts
see Telemarketing Scripts 226, 230SDF file 270Select Go To>>Knowledge Base 482Selecting 291Sending 198, 218, 219Server
Creating 423Processes 425
Server Agentssee Server Agents Administrator 459
Server Agents Administrator 459Publishing 455Starting 460
Service 313Service Center 313Service Center Detail View 314Setting Calendar Publishing Output to XML 91Setting Digital IDs in Contact Details 63Setting Email Preview Text Amounts 91Setting Internet Preferences on the Accounts
Tab 58Setting Internet Preferences on the Advanced
Tab 68Setting Internet Preferences on the Composing
Tab 54Setting Internet Preferences on the Retrieval
Tab 56Setting Internet Preferences on the Security Tab
59Setting Keep or Clear on Tagged Records 91Setting Options for the System Tab 79Setting Preferences for the Alarms Tab 50Setting Preferences for the Calendar Tab 45Setting Preferences for the E-mail Tab 52Setting Preferences for the Lookup Tab 51Setting Preferences for the Pager Tab 71Setting Preferences for the Record Tab 42Setting Preferences for the Schedule Tab 49Setting Preferences for the Speller Tab 72Setting Preferences for the Telephony Tab 70Setting Preferences on the Personal Tab 41Setting Report Properties, Profile Tab 341Setting the User Profile 31Setting up a Dependence 470Setting Up Default Document File Names and
Folders for Document Templates 178Setting Up User Groups 33Setting up User Groups 33Setting Up User Membership 32Shared Calendars 454Site
Creating Groups 419Sites 417
SoftPhoneUsing 231
Sorting Report Data 360Spell check 203SQL
Restoring 257Starting 24, 460Sync
See Synchronizing 389Synchronization Settings 398Synchronizing 389
Copying and Moving Records 401GoldSync Administration Center 414One-button synchronization 431, 431Scenario 389Synchronization Wizard 404, 404With GoldSync 406
SystemLogs 263
GoldMine Administrators Guide Index • 525

TTagging
Merging tagged records 293Telemarketing Scripts 226, 230Templates
Creating 178Ticket Transfer Utility 504Timeouts
Synchronization Settings 398To add a Topic Page 484Tracks
Attaching 383Creating 379Executing 384
UUndocked Users
Updating 80User Groups 31User Preferences
Calendar 45Personal tab 41Record tab 42
UsersPreferences 40Properties 80, 80
UsingCampaign Management Center 307GoldSync Administration Center 414Leads Management Center 303My GoldMine 479Reports 338
Using a Contact's Free/Busy Time 446Using Digital IDs with Email Messages 60Using the Service Center Toolbar (List View)
316
VViewing the User Time Clock 39Visor 394
WWebImport 287
see WebImporting 287WebImporting 287What's New 18
WinFaxWinFaxPro 489
WizardsImport 272Maintenance 258Synchronization 404
WordGoldMine fields 494GoldMine Link 489
XXML 274
ZZetafax 489Configuring Sending and Retrieving Email in
the Server Agents Administrator 460GoldMine Tables 296Using the Database Alias Manager for Firebird
Database 26684496
Heading 2Editing Knowledge Base Books, Folders,
and Topics 484
526 • Index GoldMine Administrators Guide