glass container defects and their causes and...
TRANSCRIPT

GLASS CONTAINER DEFECTS
AND
THEIR CAUSES AND REMEDIES
The Examination of a Container
A good container is a container that will go through thecustomer’s filling line without causing any difficulty and will
carry his product to the consumer.
It is, therefore, essential that before a container is released forsale from the glass plant, it successfully passes on inspection
with standards set to meet the customer’s needs.
There are approximately one hundred defects which candevelop in the container during the production process, somebeyond the control of the operator, for example stones; but byfar the largest number occur either in the feeder or machine
operation.
It is important that all production personnel learn to recognizethe defects and understand what remedies to use in order to
eliminate them.
When a glass container fails on the customer’s filling linebecause of a manufacturing defect, the reputation of glass
suffers, which results in a loss of customer good-will. Alwaysremember; "The Price of a Quality Container is Eternal
Vigilance."
Remedies offered hopefully give you a basic understanding ofdefects and their causes. In some instances, several remedies
may be needed to correct the causes.

The Various Parts of a Container
In order to identify defects in a container, it is most useful to know all the various types and parts of the container
Types of Containers
NARROW NECK WIDE MOUTH TYPE
Parts of a Container
The FinishThis is the top of the container above the neck ring parting line. It includes: The Sealing Surface, Bore, Bead or CollarThe Sealing device is in the finish (see next section), also the bore or mouth for filling and emptying. The bead or collar is used to assist in transferring the parison into the blow mold.
The NeckThe part which extends from the parting line to the curve at the base of the neck.
The ShoulderThis extends from the base of the neck to the straight part of the body.
The Body

The main part of the container which holds the product.
The BottomThe part of the container on which it stands when upright.
Insweep
The curve between body and bottom which helps to improve glass distribution and thus strength.
Push-UpThe center of the bottom which is raised up to provide a flat surface on the outer edge of the bottom and thus provide a firm seating.
When producing a glass container, various items of mold equipment are used as follows: Blank Mold, Baffle, Plunger, Neck Ring, Blow Mold and Bottom Plate. Where these individual items join, seams are produced in the container. If the seams do not meet the standard specified, then the container is rejected. It is, therefore, essential that all mold equipment be examined in the mold shop and again in the Production Department. It must also be stored correctly and handled with care at all times.
Neck Ring Parting LineWhere the neck ring and the blank mold join, there is a seam.
Blank SeamThe blank mold is in two parts. It closes around the neck ring and then receives the hot gob of glass. Where the two halves of the blank mold join, there is a seam, which can sometimes be seen as a wavy line on the finished container.
Baffle MarkThe baffle sits on top of the blank when counterblow takes place to form the parison. If there is a bad match between blank mold and baffle, then a baffle mark or seam may be seen in the container bottom.
Mold SeamThe blow mold action is the same as the blank except that is closes around the bottom plate. Where the two halves join, there is a mold seam, which runs vertically on the whole length of the container.
Bottom Plate Parting Line

Where the blow mold and bottom plate join there is a seam.
Suggestions for Remedying Container Defects
It is essential that the machine operator be able to identify defects quickly and accurately, and to know how to remedy them. Major defects have been listed, with an accurate description and a sketch indicating the appearance of the defect and the position in the container where it ismost commonly found. The causes and remedies for each defect are also listed.
The operator should frequently examine the containers passing along the conveyor from machine to stacker. Approximately once every twenty minutes, but depending on production speed, one container from each mold should be set out and allowed to cool so that it can be handled andthus examined more closely for defects. Don’t waste these containers if they are not faulty and have not been damaged-put them into the lehr.
Before correcting a defect, always remember the following:
1. How many of the particular defects are rejects?
2. If corrected, what other types of defects may be produced as a result of the adjustment made?
3. Only make adjustments when certain it will produce a better container.
For Example:If a few checks were appearing in the finish, do not immediately reduce settle blow pressure of time, if it is known that the finish or bore will then be outside specification.

THINK BEFORE YOU ACT
Definition of Terms Used
Incorrect : Too High or Too Low
Too Much or Too Little
Too Long or Too Short
Blank : Blank Mold
Mold : Blow Mold
Parison : The Shape of hot glass as it comes from the
Blank mold.
Alphabetical List of sections –Causes and remedies
A.FeederB. Machine setup and operationC. Mold EquipmentD. ConveyorE.Stacking EquipmentF. Inspection EquipmentG. Lehr operation

FINISH DEFECTS

BULGED FINISH
A finish which is bulged out of shape, either by blowing or mechanical action.
Note: It may prevent good capping of the container, which will spoil the product.
CAUSES:
1.
Feeder
Glass too hot
Incorrect gob shape
2.
Machine Setup and Operation
Finish is not set hard enough, caused by insufficient time and/or pressure of settle blow or a dry blank, reducing the contact between glass and finish mold equipment
Plunger contact time is too short
Neck ring is too hot
Internal cooling tube too large, or too small exhaust hold
Blowhead out of alignment
Not enough counterblow
3.
Mold Equipment
Blowhead is too shallow, causing contact
Equalizing holes blocked I blowhead
Neck of mold too small for parison, causing contact between blowhead and finish
REMEDIES:
1.Machine Setup and Operation
Increase settle blow time and swab the blank
Increase the plunger contact time
Use the neck ring cooling nozzle
Use a smaller final blow tube and/or a larger exhaust hold
Realign the blowhead over the mold
Increase the counterblow
2.Feeder
Adjust gob temperature
Reshape the gob
CAUSES:
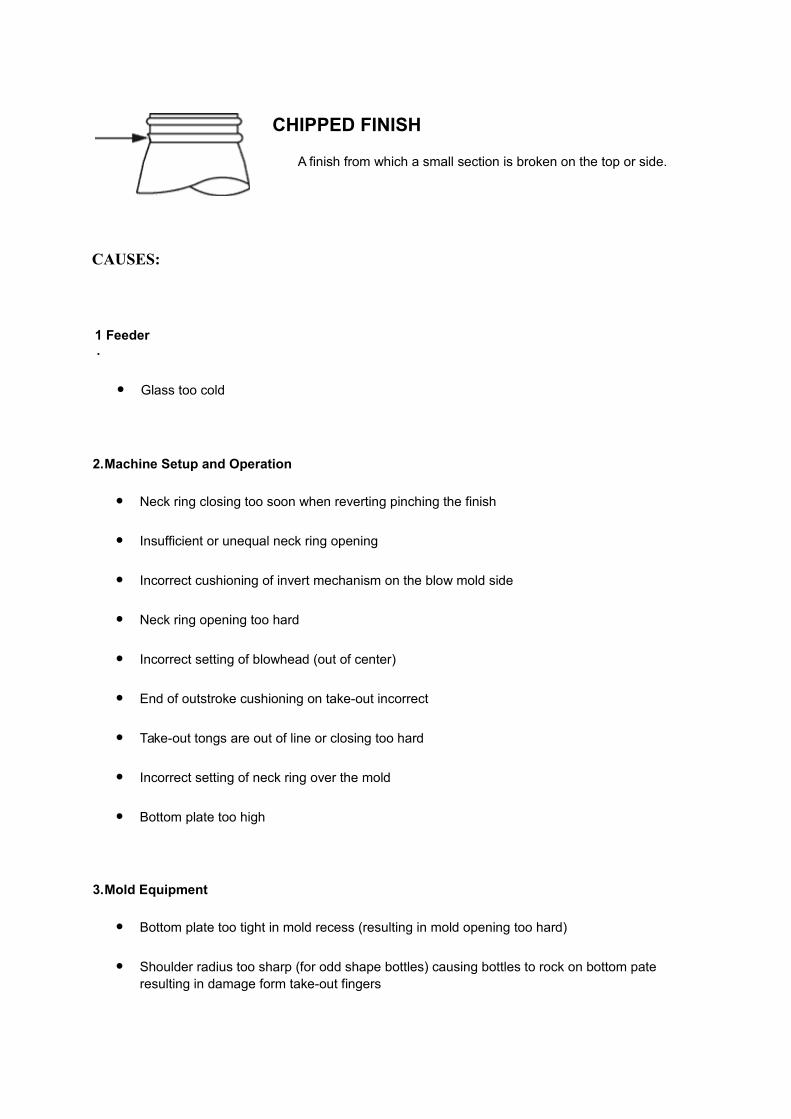
CHIPPED FINISH
A finish from which a small section is broken on the top or side.
1.
Feeder
Glass too cold
2.Machine Setup and Operation
Neck ring closing too soon when reverting pinching the finish
Insufficient or unequal neck ring opening
Incorrect cushioning of invert mechanism on the blow mold side
Neck ring opening too hard
Incorrect setting of blowhead (out of center)
End of outstroke cushioning on take-out incorrect
Take-out tongs are out of line or closing too hard
Incorrect setting of neck ring over the mold
Bottom plate too high
3.Mold Equipment
Bottom plate too tight in mold recess (resulting in mold opening too hard)
Shoulder radius too sharp (for odd shape bottles) causing bottles to rock on bottom pate resulting in damage form take-out fingers
4.Inspection Equipment
Incorrect operation of gauging equipment
REMEDIES:
1.Feeder
Adjust the feeder temperature
2.Machine Setup and Operation
Retard neck ring closing
Increase neck ring opening
Adjust cushioning of invert mechanism
Adjust neck ring opening for smoother action
Adjust blow head over blow mold
Adjust outstroke cushioning of invert mechanism
Adjust take-out tongs, allowing them to close slower
Set neck ring over blow mold to neck ring setting gauge
Correct the bottom plate mechanism setting
3.Mold Equipment
Check equipment against mold gauges
Ensure shoulder radius has some relief
4.Inspection Equipment

Correct timing of gauging equipment (cold end inspection)

NECK RING SEAM
A fin or seam of glass lying across the top or the side of the finish.
CAUSES;
1.
Feeder
Glass too hot
2.
Machine Setup and Operation
Neck ring not closing properly because of carbon accumulation or glass in ring
Finish and locking thimble not engaging correctly in the guide ring
Plunger up pressure too high (press and blow)
Blank closing pressure too low (press and blow)
Bland supporting mechanism worn
Wear on mold opening and closing mechanism linkage
Improper timing of the machine
3.
Mold Equipment
Blank mold recess for neck ring too large or neck ring diameter too small
Neck ring, finish guide ring or finish thimble worn or dirty or out of dimension
Interference between tongue and groove of neck ring

Blank volume too small for glass weight and plunger size (press and blow process)
REMEDIES:
1.
Feeder
Adjust feeder temperature
2.
Machine Setup and Operation
Change neck ring
Change thimble and/or adjust height of plunger mechanism
Reduce pressing pressure
Check blank closing pressure
Change blank supporting mechanism linkage
Change linkage on blank closing mechansim
3.
Mold Equipment
Check against gauges
Renew neck ring.
NECK DEFECTS
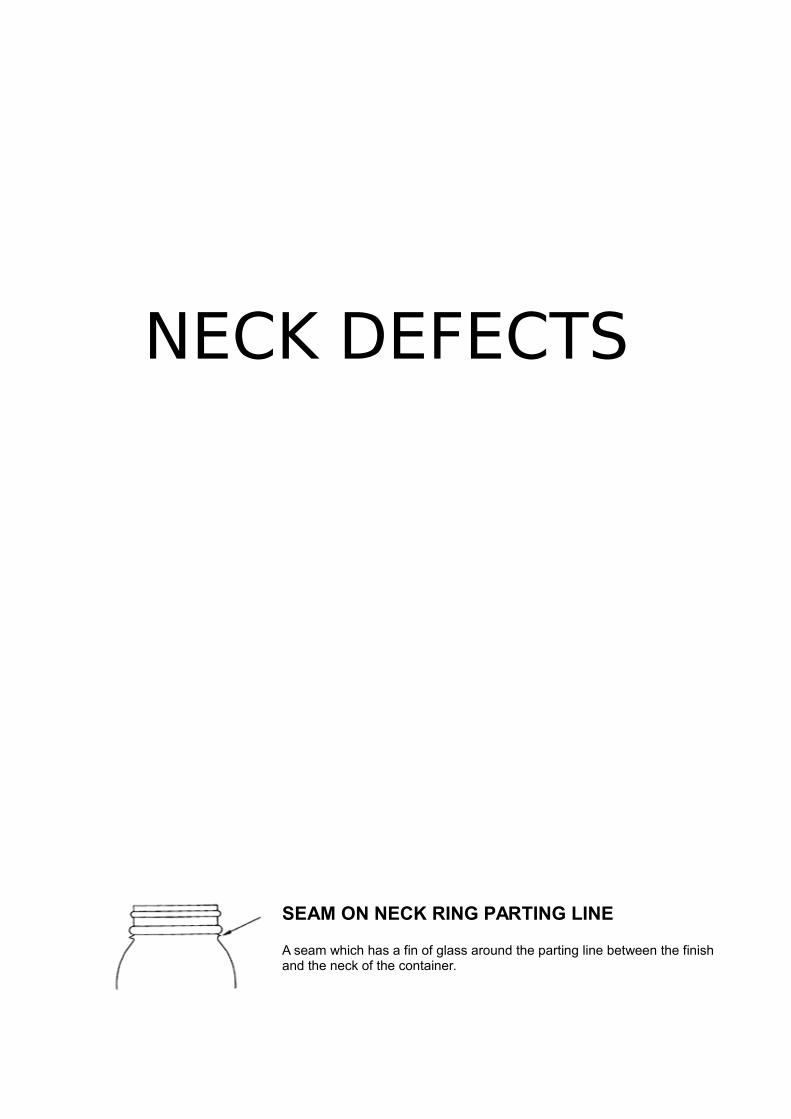
SEAM ON NECK RING PARTING LINE
A seam which has a fin of glass around the parting line between the finish and the neck of the container.
1. Machine Setup and Operation
Dirt prevents the blank mold from completely closing
Neck ring and plunger are dirty
2.
Mold Equipment
Neck ring diameter is too small for the bland mold
Blank mold dovetail too large for the neck ring
Neck rings are not correct matched
REMEDIES:
1. Machine Setup and Operation
Change the dirty mold equipment
Change all dirty neck rings and plungers
2. Mold Equipment
# Increase the neck ring diameter.
# Change neck rings for a correctly matched pair.

BENT NECK
A neck where the finish is tilted to one side.
CAUSES:
1. Feeder
Gob temperature too high
2. Machine Setup and Operation
Mold is running too hot, causing the container to be pulled to one side

Machine speed too high
Blow head not setting properly over the molds
Take-out operating too fast and swinging bottle
Incorrect counterblow pressure and time of application.
Neck rings not relieving correctly
Bottle blowing time too short
Take-out tongs are out of line
Neck ring is running hot
3. Mold Equipment
Incorrect plunger design (blow and blow)
Blow head not deep enough
Take-out tongs out of shape
REMEDIES:
1. Feeder
Adjust gob temperature
2.
Machine Setup and Operation
Increase the cooling wind
Reduce the machine speed
Adjust blow head setting on the mold
Adjust the take-out height and adjust the cushioning
Increase the counterblow time and/or pressure
Adjust blank and mold cycle
Shorten plunger contact time
Increase blank contact time
Increase reheat and mold contact time
Change to a larger exhaust hole on blow head
3.
Mold Equipment
Correct plunger design
Check the depth of the blow head cavity and correct if necessary
Replace the take-out tongs
Note: It can cause trouble on the filling line and should be corrected at once.

DIRTY NECK
A neck which has a dirty or scaly appearance.
CAUSES;
1.
Machine Setup and Operation
Too much cooling on the blank mold
Buildup of carbon on neck of the blank due to excessive swabbing
Dirty swab
Swabbing compound too thick
Swab made of incorrect material and wrong shape
Wrong grade of mold lubricant
Excessive oil on the delivery equipment
2.
Mold Equipment

Poor surface of blank cavity
REMEDIES:
1.
Machine Setup and Operation
Reduce the blank cooling
Change blank
Use a new clean swab of correct shape
Use a correct grade swabbing compound
Use a swab made form cotton
Use correct grade of mold lubricant
Fit drip plan to deflector
2.
Mold Equipment
Improve polish on mold equipment surfaces

SHOULDER DEFECTS

SHOULDER CHECKS
Surface cracks on the shoulder of the containers. They are usually wavy in appearance.
CAUSES:
1. Feeder
Incorrect glass temperature-can be either too hot or too cold.
2. Machine Setup and Operation
Bottom plate is set too high or too low, causing drag on bottle shoulder when mold is opening
Mold is running too hot, causing the bottle to stick to the mold
Mold holders are worn, causing the mold to drag on the bottom plate when opening
Too much final blow pressure blowing the bottle up too hard against the mold. (Final blow pressure should be regulated to be sufficient to keep the bottle in shape).
3. Mold Equipment
Mold not sufficiently relieved on bottom plate, causing bottle to drag on mold when mold is opened
Flat shoulder container with insufficient relief on shoulder
Incorrect positioning of parting line (add shaper containers
REMEDIES:
1. Feeder
Set feeder at correct temperature
2. Machine Setup and Operation
Lower or raise bottom plate mechanism
Apply more cooling wind to mold
Change mold holders. Check the old mold holders against repair dimensions
Reduce final blow pressure
Adjust cooling wind application
Check and adjust blow head timing
Raise the height of take-out tong heads
3. Mold Equipment
Improve relieve on bottom plate
Ensure relief on mold shoulder
Ensure correct positioning of parting line in mold
1. Feeder
Uneven gob temperature
Gob too long
2. Machine Setup and Operation
Glass is improperly loaded (off center)

Blank mold not properly swabbed
Final blow takes place too late, allowing excessive run of parison
Blank mold too hot
3. Mold Equipment
Incorrect blank design
Funnel size incorrect
REMEDIES:
1. Feeder
Adjust forehearth temperature so that gob does not curl
Shorten the gob
2. Machine Setup and Operation
Adjust deflector to center of blank-check size of deflector
Swab blanks more frequently
Advance final blow
Adjust blank cooling
3. Mold Equipment
Check for correct blank design
Check funnel size

BODY DEFECTS

BLANK AND BLOW MOLD SEAMS
Seams which are relatively large, extending from the shoulder to the bottom of the container. Blank seams tend to veer off from the mold seam.
CAUSES:
1. Feeder

Glass too cold, causing difficult pressing on '62' operation when producing lightweight ware ortall jobs like milk bottles
Glass too hot
Gob weight too heavy (62 process)
2. Machine Setup and Operation
Wear on blank and mold holders
Wear on blank and mold linkage
Incorrect blank and blow mold linkage alignment
Incomplete stroke of blank and blow mold piston in cylinder
Misalignment of plunger mechanism
Carbon deposit on blank and blow mold halves
Glass in interlocking fit or blank or blow mold
Interference between blank and/or blow mold with block lock at operation temperature
Plunger mechanism too high
Excessive plunger and counterblow pressure
Neck ring incorrectly set
Bottom plate running too hot
Blank mold too hot
Baffle too hot
3.
Mold Equipment
Recess on blank and mold for either plunger or block lock location incorrectly made or too tight fit
Interference between neck ring and blank mold neck ring diameter too large

Unsuitable pressing gate on parison design (press and blow)
Blank and molds insufficiently hollow scraped - insufficient relief or interlocking fits and for tongue and groove fits
Blank and mold warped and/or worn out
Bottom plate holding blow mold open
Incorrect selection of bottom plate size
REMEDIES:
1. Feeder
Adjust gob temperature
Check gob weight
2. Machine Setup and Operation
Change mold holders and check the old ones against repair dimensions
Check blank and mold supporting for wear
Check with mold and blank linkage aligning fixture
Realign the plunger mechanism
Change mold and blank
Clean the mold and blow out the glass
Check block lock fitting at operating temperature for tightness
Adjust plunger mechanism height
Reduce counterblow pressure
Check invert mechanism with neck ring mechanism aligning fixture
Apply cooling to bottom plate
Increase the cooling on blank
