getting to know your telstra easy smart - mobile … · getting to know your telstra easy smart ......
TRANSCRIPT
GETTING TO KNOW YOUR TELSTRA EASY SMART™
#5914 120x90 Telstra Easy Smart.indd 2 23/12/13 11:19 AM
LET’S GET THIS SHOW ON THE ROAD
This guide will help you get started as quickly and easily as possible. So you get the most out of your new Telstra Easy Smart™, set aside some time to explore and play around with all the handy features including the unique Easy UI display and widgets.
For additional information the full user guide is available for download online at zte.com.au
Also you should know SAR testing has been completed for this device in line with the Australian Radiocommunications (Electromagnetic Radiation - Human Exposure) Standard 2003. The worst case SAR result recorded for this device is 0.807 W/Kg. The limit is 2.0 W/Kg.
2
#5914 120x90 Telstra Easy Smart.indd 3 23/12/13 11:19 AM

WHAT’S INSIDE
03 Let’s get started
05 Getting connected
11 The basics
23 Easy UI
27 Contacts
29 Making calls
31 Messaging
33 Setup your email
41 Extra features
44 Extra bits you should know
2
#5914 120x90 Telstra Easy Smart.indd 4 23/12/13 11:19 AM
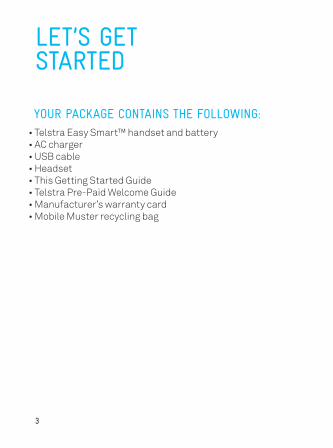
LET’S GETSTARTED
YOUR PACKAGE CONTAINS THE FOLLOWING:• Telstra Easy Smart™ handset and battery • AC charger • USB cable• Headset • This Getting Started Guide• Telstra Pre-Paid Welcome Guide • Manufacturer’s warranty card • Mobile Muster recycling bag
3 4
#5914 120x90 Telstra Easy Smart.indd 5 23/12/13 11:19 AM
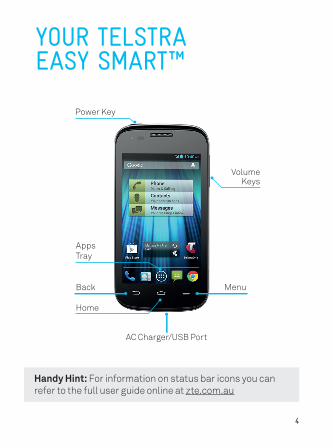
YOUR TELSTRA EASY SMART™
3 4
Handy Hint: For information on status bar icons you can refer to the full user guide online at zte.com.au
Volume Keys
Back
AppsTray
Menu
Home
AC Charger/USB Port
Power Key
#5914 120x90 Telstra Easy Smart.indd 6 23/12/13 11:19 AM
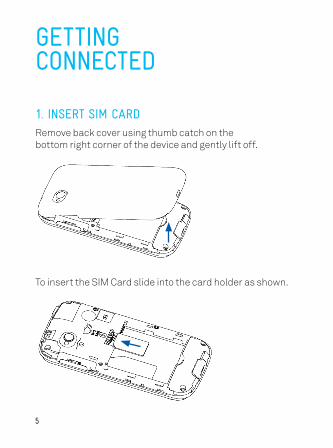
GETTINGCONNECTED
1. INSERT SIM CARDRemove back cover using thumb catch on the bottom right corner of the device and gently lift off.
To insert the SIM Card slide into the card holder as shown.
5 6
#5914 120x90 Telstra Easy Smart.indd 7 23/12/13 11:19 AM
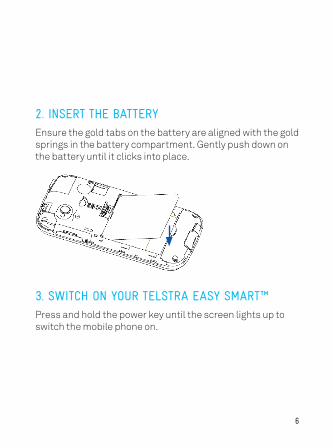
2. INSERT THE BATTERYEnsure the gold tabs on the battery are aligned with the gold springs in the battery compartment. Gently push down on the battery until it clicks into place.
3. SWITCH ON YOUR TELSTRA EASY SMART™Press and hold the power key until the screen lights up to switch the mobile phone on.
5 6
#5914 120x90 Telstra Easy Smart.indd 8 23/12/13 11:19 AM
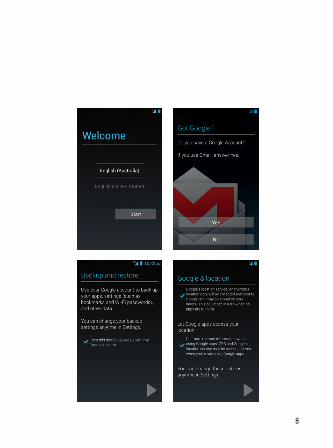
4. SETUP YOUR GOOGLE ACCOUNTUse your Google Account to make the most of your Telstra Easy Smart.™ Access apps from the Google Play™ store and back up your apps, settings and information stored on your mobile phone.
When you first power on your phone you will need to enter some settings before use:
• Touch Start to begin setup.• Select a Wi-Fi network or touch Skip to continue.• Touch Yes to create a Google Account or touch No to sign in if you have an existing account.• If you select Yes, follow the prompts to complete setup.• Ensure check boxes are ticked to Back up and Restore your account then press the arrow to continue.• Set your location settings then touch arrow to continue.• Touch Finish to complete the setup.
Handy Hint: If you skip setting up your Google Account as part of initial setup you can select the Play Store icon from your home screen or Apps Tray to setup at any time.
7 8
#5914 120x90 Telstra Easy Smart.indd 9 23/12/13 11:19 AM
7 8
#5914 120x90 Telstra Easy Smart.indd 10 23/12/13 11:19 AM

5. TAP TO ACTIVATE YOUR TELSTRA PRE-PAID• From your home screen tap on the ‘Tap to Activate’ widget
located at the bottom of the screen.• Follow the prompts to complete activation.
Refer to the Telstra Pre-Paid Welcome Guide for further details on activating your SIM card.
9 10
#5914 120x90 Telstra Easy Smart.indd 11 23/12/13 11:19 AM
9 10
#5914 120x90 Telstra Easy Smart.indd 12 23/12/13 11:19 AM
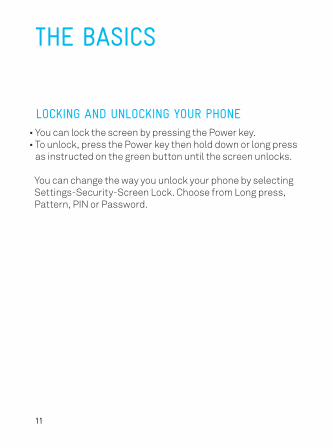
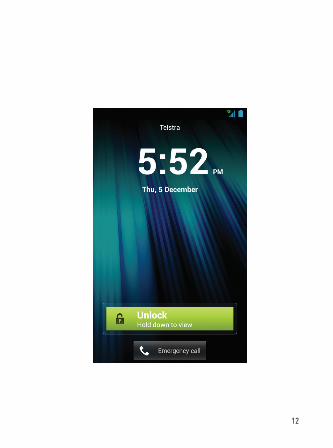
LOCKING AND UNLOCKING YOUR PHONE• You can lock the screen by pressing the Power key.• To unlock, press the Power key then hold down or long press
as instructed on the green button until the screen unlocks.
You can change the way you unlock your phone by selecting Settings-Security-Screen Lock. Choose from Long press, Pattern, PIN or Password.
THE BASICS
11 12
#5914 120x90 Telstra Easy Smart.indd 13 23/12/13 11:19 AM
11 12
#5914 120x90 Telstra Easy Smart.indd 14 23/12/13 11:19 AM
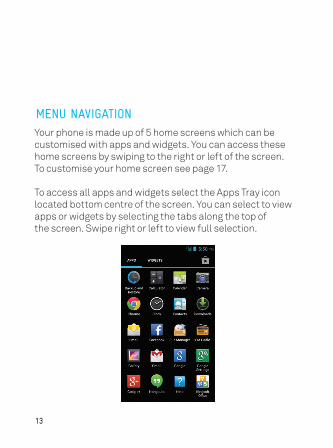
MENU NAVIGATIONYour phone is made up of 5 home screens which can becustomised with apps and widgets. You can access thesehome screens by swiping to the right or left of the screen.
To customise your home screen see page 17.
To access all apps and widgets select the Apps Tray iconlocated bottom centre of the screen. You can select to viewapps or widgets by selecting the tabs along the top ofthe screen. Swipe right or left to view full selection.
13 14
#5914 120x90 Telstra Easy Smart.indd 15 23/12/13 11:19 AM
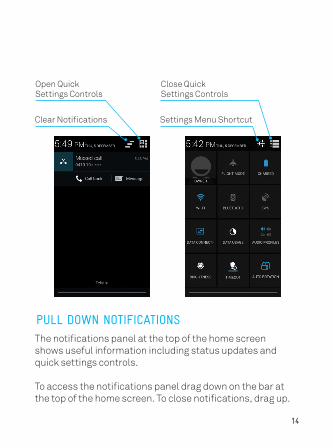
PULL DOWN NOTIFICATIONSThe notifications panel at the top of the home screenshows useful information including status updates andquick settings controls.
To access the notifications panel drag down on the bar atthe top of the home screen. To close notifications, drag up.
Clear Notifications
Open Quick Settings Controls
Settings Menu Shortcut
Close Quick Settings Controls
13 14
#5914 120x90 Telstra Easy Smart.indd 16 23/12/13 11:19 AM
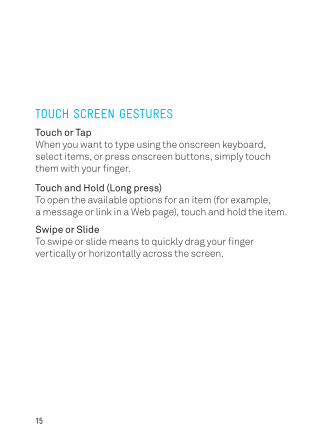
TOUCH SCREEN GESTURESTouch or TapWhen you want to type using the onscreen keyboard, select items, or press onscreen buttons, simply touch them with your finger.
Touch and Hold (Long press)To open the available options for an item (for example, a message or link in a Web page), touch and hold the item.
Swipe or SlideTo swipe or slide means to quickly drag your finger vertically or horizontally across the screen.
15 16
#5914 120x90 Telstra Easy Smart.indd 17 23/12/13 11:19 AM
DragTo drag, press and hold your finger with some pressure before you start to move your finger. While dragging, do not release your finger until you have reached the target position.
Pinch in and out ZoomIn some apps (such as Camera, Maps, Browser, and Gallery), you can zoom in and out by placing two fingers on the screen at once and pinching them together (to zoom out) or spreading them apart (to zoom in).
RotateRotate the phone to change from portrait to landscape. This feature is only available in some applications.
15 16
#5914 120x90 Telstra Easy Smart.indd 18 23/12/13 11:19 AM
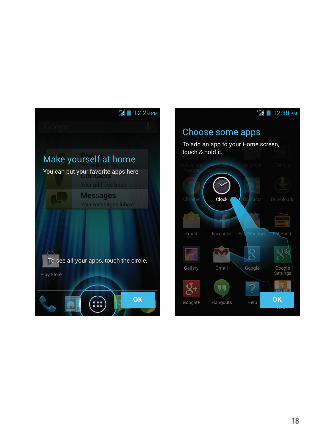
CUSTOMISE YOUR HOME SCREENS Create shortcuts to your favourite apps and widgets
by following these steps:
• From the home screen you want to customise, select the Apps Tray located at the bottom centre of the screen.
• You can select from either apps or widgets. Hold down or long press on the app or widget and move into desired location.
• Release hold to lock into place.• You can delete apps and widgets from your home screen
by holding down on the icon and then dragging toward the trash can icon.
17 18
#5914 120x90 Telstra Easy Smart.indd 19 23/12/13 11:19 AM
17 18
#5914 120x90 Telstra Easy Smart.indd 20 23/12/13 11:19 AM
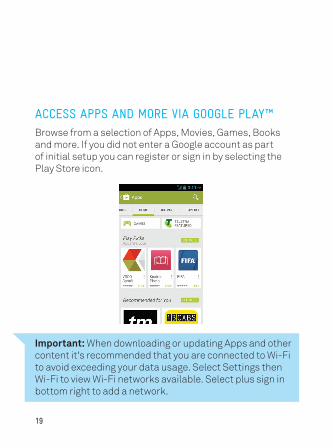
ACCESS APPS AND MORE VIA GOOGLE PLAY™ Browse from a selection of Apps, Movies, Games, Books and more. If you did not enter a Google account as part of initial setup you can register or sign in by selecting the Play Store icon.
Important: When downloading or updating Apps and other content it's recommended that you are connected to Wi-Fi to avoid exceeding your data usage. Select Settings then Wi-Fi to view Wi-Fi networks available. Select plus sign in bottom right to add a network.
19 20
#5914 120x90 Telstra Easy Smart.indd 21 23/12/13 11:19 AM
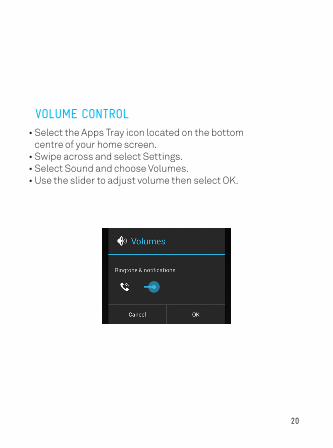
VOLUME CONTROL • Select the Apps Tray icon located on the bottom
centre of your home screen.• Swipe across and select Settings.• Select Sound and choose Volumes.• Use the slider to adjust volume then select OK.
19 20
#5914 120x90 Telstra Easy Smart.indd 22 23/12/13 11:19 AM
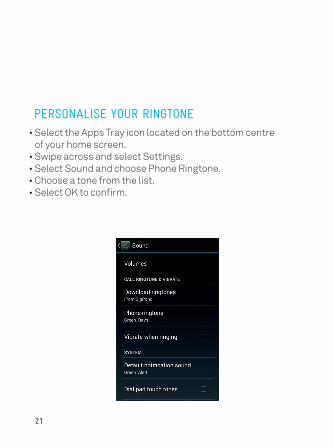
PERSONALISE YOUR RINGTONE• Select the Apps Tray icon located on the bottom centre
of your home screen.• Swipe across and select Settings.• Select Sound and choose Phone Ringtone.• Choose a tone from the list.• Select OK to confirm.
21 22
#5914 120x90 Telstra Easy Smart.indd 23 23/12/13 11:19 AM
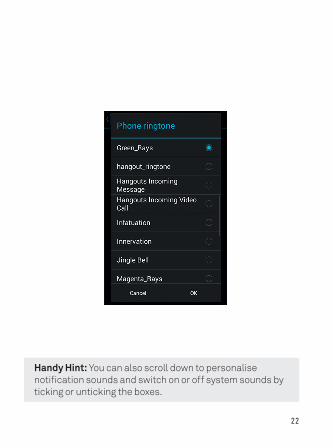
Handy Hint: You can also scroll down to personalise notification sounds and switch on or off system sounds by ticking or unticking the boxes.
21 22
#5914 120x90 Telstra Easy Smart.indd 24 23/12/13 11:19 AM
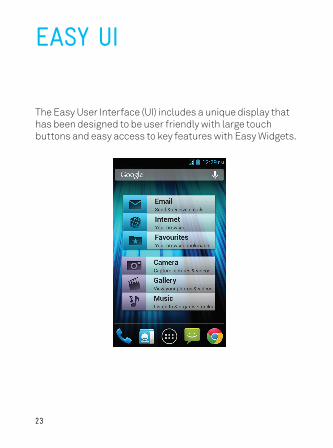
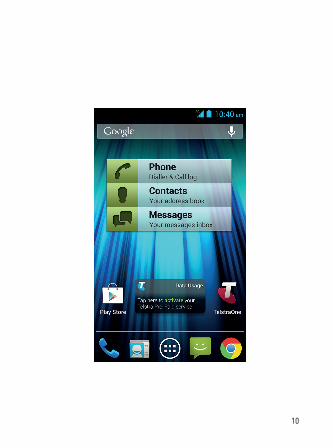
The Easy User Interface (UI) includes a unique display that has been designed to be user friendly with large touch buttons and easy access to key features with Easy Widgets.
EASY UI
23 24
#5914 120x90 Telstra Easy Smart.indd 25 23/12/13 11:19 AM
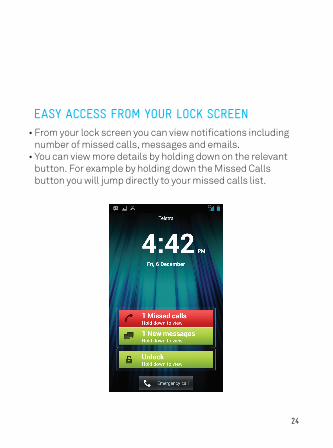
EASY ACCESS FROM YOUR LOCK SCREEN• From your lock screen you can view notifications including
number of missed calls, messages and emails.• You can view more details by holding down on the relevant
button. For example by holding down the Missed Calls button you will jump directly to your missed calls list.
23 24
#5914 120x90 Telstra Easy Smart.indd 26 23/12/13 11:19 AM
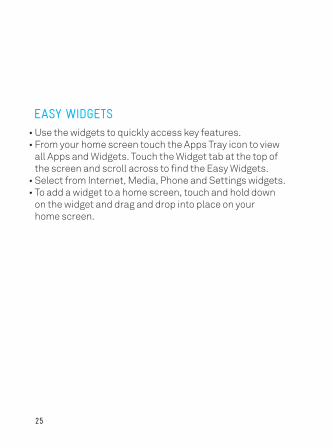
EASY WIDGETS• Use the widgets to quickly access key features.• From your home screen touch the Apps Tray icon to view
all Apps and Widgets. Touch the Widget tab at the top of the screen and scroll across to find the Easy Widgets.
• Select from Internet, Media, Phone and Settings widgets.• To add a widget to a home screen, touch and hold down
on the widget and drag and drop into place on your home screen.
25 26
#5914 120x90 Telstra Easy Smart.indd 27 23/12/13 11:19 AM
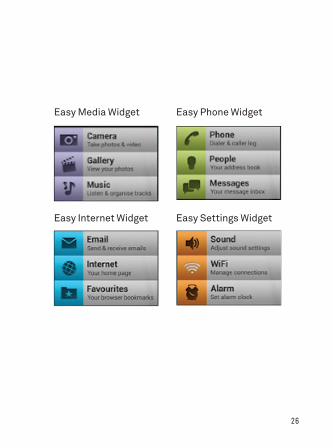
Easy Media Widget
Easy Internet Widget
Easy Phone Widget
Easy Settings Widget
25 26
#5914 120x90 Telstra Easy Smart.indd 28 23/12/13 11:19 AM
ADDING A NEW CONTACT• Select Contacts from the Easy Phone widget or
select the Contacts icon from your home screen.• Tap the icon with a plus sign located in the bottom
right hand corner.• Enter Contact details, then select Done from the top
of the screen.• Your new contact will now be stored in your
contacts directory.
COPY CONTACTS FROM SIM CARD• Select Contacts.• Select the Menu key located on the bottom left of
your handset.• Select Import/Export to import your contacts from
the SIM.• Select the contacts you wish to import and then
select Done.
Handy Hint: Before you can import your contacts to your new phone, you’ll need to make sure they’re saved to the SIM card.
CONTACTS
27 28
#5914 120x90 Telstra Easy Smart.indd 29 23/12/13 11:19 AM

SYNCING CONTACTS WITH YOUR GOOGLE ACCOUNT• Add your Google account or create a new account.
See page 7 for details.• Select Contacts from the Easy Phone widget or
select the Contacts icon from your home screen.• Select the Menu key located on the bottom right
of your handset.• Select Accounts. • Select your Google Account or other account. • You can switch off automatic sync using the check box
for each sync feature.• All sync options are displayed. Ensure the check box next
to Contacts is ticked. You can untick and tick to refresh.
27 28
#5914 120x90 Telstra Easy Smart.indd 30 23/12/13 11:19 AM
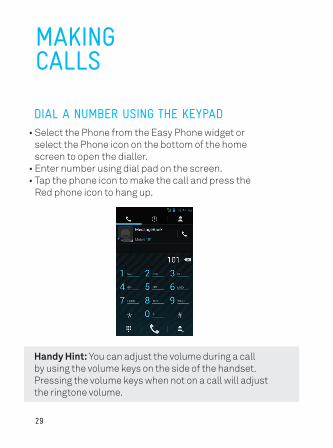
DIAL A NUMBER USING THE KEYPAD• Select the Phone from the Easy Phone widget or
select the Phone icon on the bottom of the home screen to open the dialler.
• Enter number using dial pad on the screen.• Tap the phone icon to make the call and press the
Red phone icon to hang up.
Handy Hint: You can adjust the volume during a call by using the volume keys on the side of the handset. Pressing the volume keys when not on a call will adjust the ringtone volume.
MAKINGCALLS
29 30
#5914 120x90 Telstra Easy Smart.indd 31 23/12/13 11:19 AM

CALLING A NUMBER FROM CONTACTS • Select Contacts from the Easy Phone widget or
select the Contacts icon from the home screen.• Slide up and down to scroll through contacts.• Select contact, followed by contact number.• Select the red hang up button to end the call.
29 30
#5914 120x90 Telstra Easy Smart.indd 32 23/12/13 11:19 AM
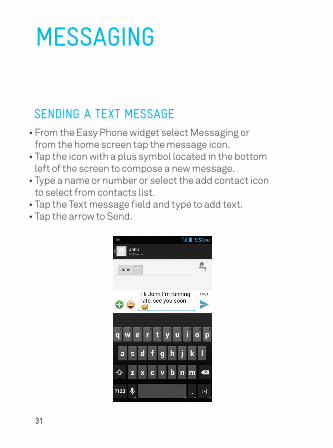
SENDING A TEXT MESSAGE• From the Easy Phone widget select Messaging or
from the home screen tap the message icon.• Tap the icon with a plus symbol located in the bottom
left of the screen to compose a new message.• Type a name or number or select the add contact icon
to select from contacts list.• Tap the Text message field and type to add text.• Tap the arrow to Send.
MESSAGING
31 32
#5914 120x90 Telstra Easy Smart.indd 33 23/12/13 11:19 AM
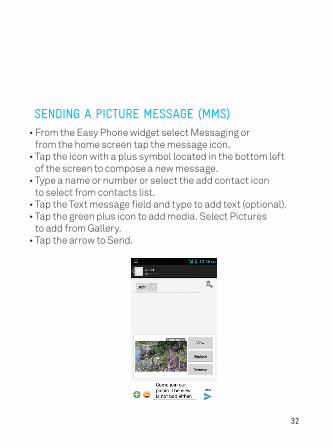
SENDING A PICTURE MESSAGE (MMS) • From the Easy Phone widget select Messaging or
from the home screen tap the message icon.• Tap the icon with a plus symbol located in the bottom left
of the screen to compose a new message.• Type a name or number or select the add contact icon
to select from contacts list.• Tap the Text message field and type to add text (optional).• Tap the green plus icon to add media. Select Pictures
to add from Gallery.• Tap the arrow to Send.
31 32
#5914 120x90 Telstra Easy Smart.indd 34 23/12/13 11:19 AM
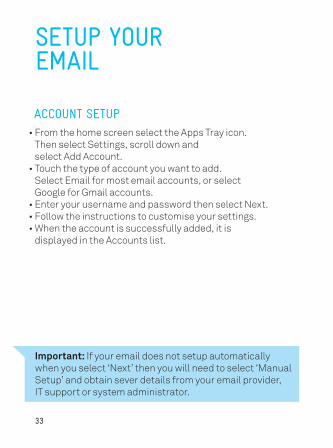
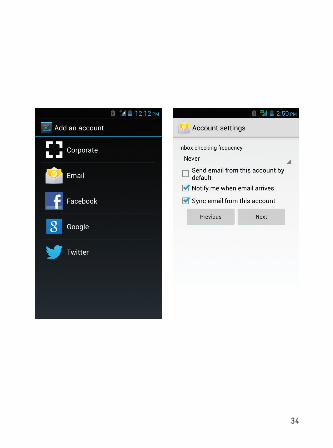
ACCOUNT SETUP• From the home screen select the Apps Tray icon.
Then select Settings, scroll down and select Add Account.
• Touch the type of account you want to add. Select Email for most email accounts, or select Google for Gmail accounts.
• Enter your username and password then select Next.• Follow the instructions to customise your settings.• When the account is successfully added, it is
displayed in the Accounts list.
SETUP YOUR EMAIL
Important: If your email does not setup automatically when you select ‘Next’ then you will need to select ‘Manual Setup’ and obtain sever details from your email provider, IT support or system administrator.
33 34
#5914 120x90 Telstra Easy Smart.indd 35 23/12/13 11:19 AM
33 34
#5914 120x90 Telstra Easy Smart.indd 36 23/12/13 11:19 AM
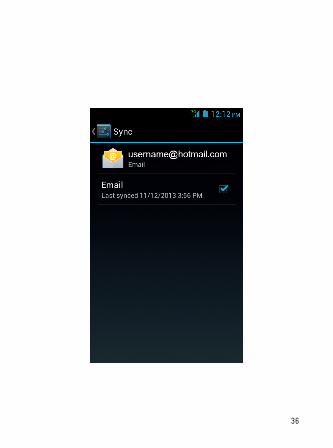
ACCOUNT SYNC• From the home screen select the Apps Tray icon.
Then select Settings and scroll down and select Account.
• The Sync icon turns green if automatic sync is enabled and grey if automatic sync is disabled.
• Touch the Sync icon to configure your sync options. • When automatic sync is turned on, changes you
make to information on your device or on the web are automatically synced with each other.
• When auto sync is turned off, you need to sync manually to collect emails, updates, or other recent information.
35 36
#5914 120x90 Telstra Easy Smart.indd 37 23/12/13 11:19 AM
35 36
#5914 120x90 Telstra Easy Smart.indd 38 23/12/13 11:19 AM
Handy Hint: For more information on setting up your BigPond email visit http://go.telstra.com.au/helpandsupport/-/email-settings
To setup your BigPond email enter your usernameand password as per the steps on the previous page,then select manual setup.
SETUP YOURBIGPOND® EMAIL
Important: If your BigPond email account was setup prior to 10th February 2012 then you will need to enter the settings on the following page. For accounts setup after 10th February 2012 refer to page 39 and 40. If you are unsure as to when your account was setup you can check by signing into your account via http://go.bigpond.com/services/email/email-online-sms/
37 38
#5914 120x90 Telstra Easy Smart.indd 39 23/12/13 11:19 AM
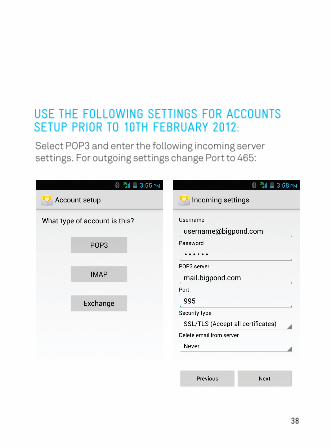
USE THE FOLLOWING SETTINGS FOR ACCOUNTS SETUP PRIOR TO 10TH FEBRUARY 2012: Select POP3 and enter the following incoming server settings. For outgoing settings change Port to 465:
37 38
#5914 120x90 Telstra Easy Smart.indd 40 23/12/13 11:19 AM
Handy Hint: For more information on setting up your BigPond email visit http://go.telstra.com.au/helpandsupport/-/email-settings
USE THE FOLLOWING SETTINGS FOR ACCOUNTS SETUP ON OR AFTER 10TH FEBRUARY 2012:
• To setup your BigPond email follow the steps on page 33, then select manual setup.
• You can choose to setup your account as either POP3 or IMAP.
POP3 accounts will download your email directly to your phone however will not download them again if you then login to a computer.
IMAP accounts store all your email on the main server so whether you view them from your phone or computer all emails will be displayed.
39 40
#5914 120x90 Telstra Easy Smart.indd 41 23/12/13 11:19 AM
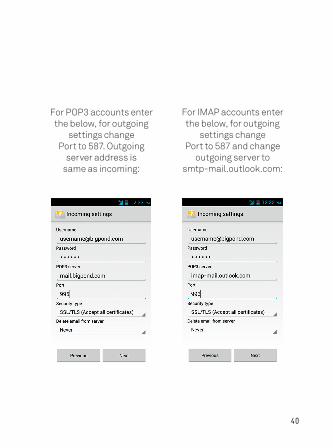
For POP3 accounts enter the below, for outgoing
settings change Port to 587. Outgoing
server address is same as incoming:
For IMAP accounts enter the below, for outgoing
settings change Port to 587 and change
outgoing server to smtp-mail.outlook.com:
39 40
#5914 120x90 Telstra Easy Smart.indd 42 23/12/13 11:19 AM
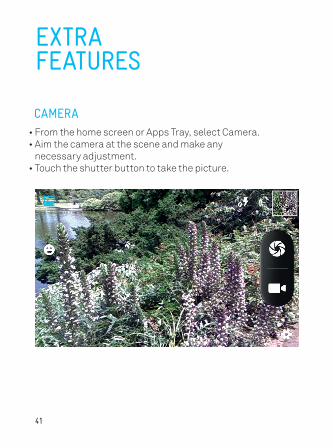
CAMERA• From the home screen or Apps Tray, select Camera.• Aim the camera at the scene and make any
necessary adjustment.• Touch the shutter button to take the picture.
EXTRAFEATURES
41 42
#5914 120x90 Telstra Easy Smart.indd 43 23/12/13 11:19 AM
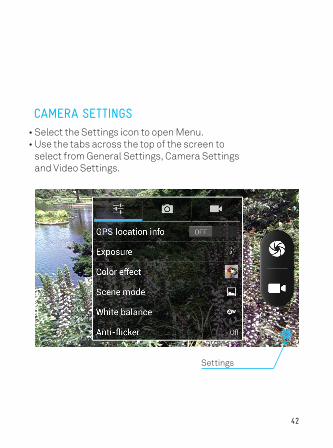
CAMERA SETTINGS • Select the Settings icon to open Menu.• Use the tabs across the top of the screen to
select from General Settings, Camera Settings and Video Settings.
Settings
41 42
#5914 120x90 Telstra Easy Smart.indd 44 23/12/13 11:19 AM
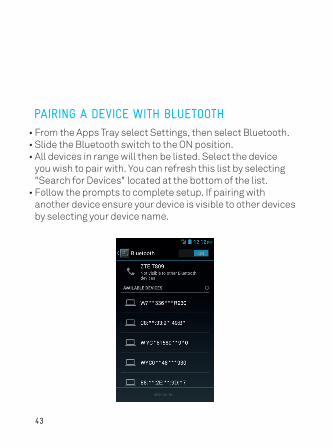
PAIRING A DEVICE WITH BLUETOOTH• From the Apps Tray select Settings, then select Bluetooth.• Slide the Bluetooth switch to the ON position.• All devices in range will then be listed. Select the device
you wish to pair with. You can refresh this list by selecting "Search for Devices" located at the bottom of the list.
• Follow the prompts to complete setup. If pairing with another device ensure your device is visible to other devices by selecting your device name.
43 44
#5914 120x90 Telstra Easy Smart.indd 45 23/12/13 11:19 AM
COVERAGECoverage depends on your location.Visit telstra.com/mobilebbcoverage for details ofcoverage locations. 4G coverage is currently available in capital CBDs, associated airports and selected regional locations and automatically switches to our fastest available 3G network speeds in other coverage areas.
ACCESS THE BUILT IN USER GUIDEFor additional information the mobile phone user guideis saved on your device so you can access it any timeif you need. Press Apps> Help to open the User Guide.Alternatively, you can download and print the user guidefrom zte.com.au
Android, Google Play, Android compatibility mark, Gmail, Google Maps and YouTube are trade marks of Google, Inc.™ and ® are trade marks and registered trade marks of Telstra Corporation Limited, ABN 33 051 775 556.
EXTRA BITSYOU SHOULD KNOW
43 44
#5914 120x90 Telstra Easy Smart.indd 46 23/12/13 11:19 AM