getting to know final cut pro x - bucknell · pdf filegetting to know final cut pro x open...
TRANSCRIPT

Getting to Know Final Cut Pro X Open Final Cut Pro X on the computers by going to the dock on the right hand side of the right monitor. Single click on Applications. Next, single click on the Final Cut Pro X folder. Inside there should be four icons. Single click on this icon:
The program should open up on the left monitor. There are a few basic terms you need to know for FCP X. “New Event” is the default name for an Event. An Event in FCP X is all of your media such as video clips, render files, audio clips, and photographs that are part of your project. The other important word is “Project.” Your Project is what you are editing in the Timeline window. A project in progress is called a “Storyline.” FCP X saves information differently than previous versions. You no longer have to set your Scratch Drives to tell the program where you want to save files. Now the program will auto save to your Home Icon on your hard drive. You will want to edit from this location. However, you will need to set your SAN location because this is where you will store your media. To set your SAN Location first make sure that you highlight the Macintosh HD icon in the Brower /Event window. Next, go to Final Cut--->File--->Add SAN Location. From the menu you want to select your folder on Oscar--->Semester Projects--->Fall 2012--->Engl 238--->(example ak033)--->Project 1. Next you want to highlight and select Project 1 - Oscar in the Browser/Event window by clicking on it once. Next go to File--->New Event. This will appear under Oscar. In the Browser window two icons will appear:
Select the icon for “Import Files” or if you have files to import from the camera select “Import from Camera.” Follow the path to find the footage you footage. For this project go to Oscar--->Semester Projects--->Fall 2012--->Engl 238--->Shared. You can select all three folders
1

here: “Slaughter Tales Footage,” “Cinematic Orchestra,” and “The Dead Zone Music.” Press Import. You have now saved a copy of these files to your Oscar server, and you are ready to begin. For now, let’s learn the basic interface.
On the upper left hand corner is the Browser/Event Library window. This is where your media will be when you import it. The upper right hand corner is the Viewer. This is where you will watch clips and your edited Storyline. The bottom window (across the whole screen) is your Timeline. This is where you will put clips together to edit and create your Project. Now, let’s get started with a New Project. In the middle of the Timeline window is an icon “Create New Project.” It will save it to the computer’s hard drive in your home folder. Click on this icon.
A window will pop up on the top of the screen.
2

You can name your project whatever you want. Then press OK. Now let’s start editing. In the Browser/Event Library there are several icons on the bottom left and right of the window. On the left it looks like this:
This will hide or show your event library information. Your clips will still appear on the right hand part of this window.
This performs a variety of task in the Browser window. Click on it for more information.
The third icon will show your clips in “filmstrip view.” The fourth will show your clips in “list view.” You can change back and forth depending on your preferences. Experiment with these features to get to know them more. On the bottom left side of the Browser window is this bar:
The “All” slider adjusts the duration of the clips shown in the Browser. The light switch icon changes the appearance of the icons in the Browser. Again, figure out which settings you like best and use them. To understand the Timeline, click on one of your clips in the Browser window. When you have selected it, it will have a yellow border around it. Grab this clip and drag it to the Timeline. Pull down several more clips so that you have formed a “Storyline” in your Timeline window. There are many different ways to manipulate footage in the timeline. I’ll label each of the buttons on this tutorial. You should investigate them by applying them to your footage in the timeline.
3

Now, here are the key tools for manipulating and editing clips in the timeline. On the left are these icons:
The first icon is called a “Connect Edit.” This connects a selected clip to the Primary Storyline. Select a clip in the Browser window and press this button. It will place the clip above your Primary Storyline, at the point where your playhead is located. One reason you would put a clip on top of another clip in FCP X is that whichever clip is on top is the one that will appear in your edit. This means that you can add a video clip like this for a clean cut-away to another image. This is commonly used during an interview with cutaways to B-roll footage. Your timeline will now have two rows of video.
The second icon is called an “Insert Edit.” This does the same thing but inserts the clip in the middle of the timeline. This clip will again land wherever the playhead is located.
The third icon is called an “Append Edit” and places the clip at the end of the Primary Storyline. The blue arrow function lets you manipulate images in the timeline in a few ways. This is its drop down menu called the “Tool Pop-up Window”:
4
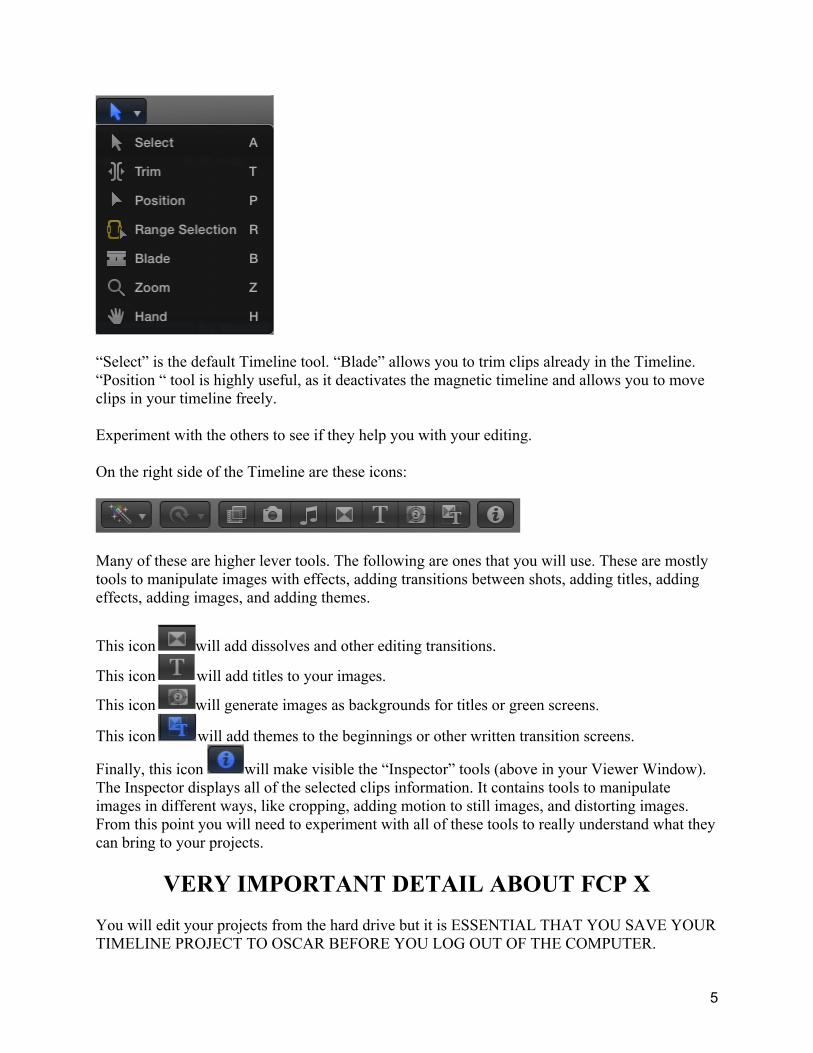
“Select” is the default Timeline tool. “Blade” allows you to trim clips already in the Timeline.“Position “ tool is highly useful, as it deactivates the magnetic timeline and allows you to move clips in your timeline freely. Experiment with the others to see if they help you with your editing. On the right side of the Timeline are these icons:
Many of these are higher lever tools. The following are ones that you will use. These are mostly tools to manipulate images with effects, adding transitions between shots, adding titles, adding effects, adding images, and adding themes.
This icon will add dissolves and other editing transitions.
This icon will add titles to your images.
This icon will generate images as backgrounds for titles or green screens.
This icon will add themes to the beginnings or other written transition screens.
Finally, this icon will make visible the “Inspector” tools (above in your Viewer Window). The Inspector displays all of the selected clips information. It contains tools to manipulate images in different ways, like cropping, adding motion to still images, and distorting images.From this point you will need to experiment with all of these tools to really understand what they can bring to your projects.
VERY IMPORTANT DETAIL ABOUT FCP X You will edit your projects from the hard drive but it is ESSENTIAL THAT YOU SAVE YOUR TIMELINE PROJECT TO OSCAR BEFORE YOU LOG OUT OF THE COMPUTER.
5
When you have finished editing (for the day, because you are leaving the computer and logging out, etc.) You need to save a copy of your project to Oscar. On the bottom left hand corner of your Timeline is this icon:
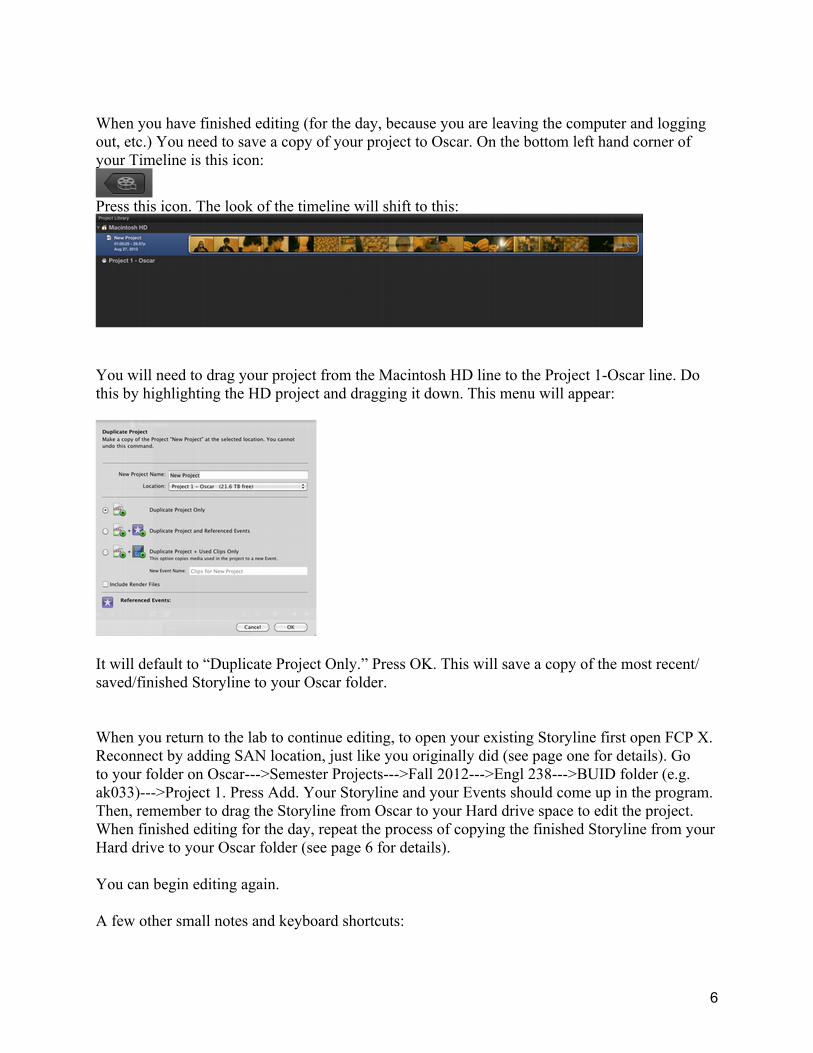
Press this icon. The look of the timeline will shift to this:
You will need to drag your project from the Macintosh HD line to the Project 1-Oscar line. Do this by highlighting the HD project and dragging it down. This menu will appear:
It will default to “Duplicate Project Only.” Press OK. This will save a copy of the most recent/saved/finished Storyline to your Oscar folder. When you return to the lab to continue editing, to open your existing Storyline first open FCP X.Reconnect by adding SAN location, just like you originally did (see page one for details). Go to your folder on Oscar--->Semester Projects--->Fall 2012--->Engl 238--->BUID folder (e.g. ak033)--->Project 1. Press Add. Your Storyline and your Events should come up in the program. Then, remember to drag the Storyline from Oscar to your Hard drive space to edit the project. When finished editing for the day, repeat the process of copying the finished Storyline from your Hard drive to your Oscar folder (see page 6 for details). You can begin editing again. A few other small notes and keyboard shortcuts:
6

Command Delete will delete just about anything. If you accidentally delete an item... Command Z is your friend. IT WILL UNDO any mistakes/unintentional edits you have made. Use the spacebar to start and stop the clips in both the Timeline and Viewer. Keyboard shortcuts: L - moves forward through the clipK - stops the clipJ - moves backwards to rewind in clip Mark “in” and “out” points for clips using the I and O keys. Use the “I” key to place an In Point. Use the “O” key to mark an Out Point. Removing In and Out points in clipsPress Option-I to clear the In Point.Press Option-O to clear the Out PointPress Option-X to clear both edit Points This icon (pictures) is Key Wording, to change the names of your clips and used as an organizational search function. Don’t do this. This button is unstable and will likely crash the program. This icon (picture) is the Audio Skimming function. In the Timeline you can use this if you are scrolling quickly through your clips and don’t want to hear the sped up audio. This icon (picture) is Skimming function. In the Timeline, this allows you to keep the playhead at a fixed point and skim/scroll through entire Timeline with ease. This icon (picture) is the Snapping Function. This will make your clips “grab” each other in the timeline. Congratulations! You have mastered editing in FCP X.
7