apple pro training series: final cut pro x advanced - pearsoncmg
TRANSCRIPT
Apple Pro Training Series
Final Cut Pro X Advanced EditingMichael Wohl / Alexis Van Hurkman / Mark Spencer
Apple Pro Training Series: Final Cut Pro X Advanced EditingMichael Wohl, Alexis Van Hurkman, Mark SpencerCopyright © 2012 by Michael Wohl, Alexis Van Hurkman, and Mark Spencer
Published by Peachpit Press. For information on Peachpit Press books, contact: Peachpit Press 1249 Eighth Street Berkeley, CA 94710 (510) 524-2178 www.peachpit.com
To report errors, please send a note to [email protected]. Peachpit Press is a division of Pearson Education. Apple Series Editor: Lisa McClainProject Editor: Nancy PetersonDevelopment Editor: Bob LindstromProduction Editor: Kim Wimpsett, Happenstance Type-O-RamaTechnical Editors: Brendan Boykin, Klark PerezCopyeditor and Proofer: Darren MeissCompositor: Chris Gillespie, Happenstance Type-O-RamaMedia Reviewer: Eric GeoffroyIndexer: Jack LewisCover Illustration: Kent OberheuCover Production: Happenstance Type-O-Rama
Notice of Rights All rights reserved. No part of this book may be reproduced or transmitted in any form by any means, electronic, mechanical, pho-tocopying, recording, or otherwise, without the prior written permission of the publisher. For information on getting permission for reprints and excerpts, contact [email protected]. Greenscreen clips used by permission of iJustine (ijustine.com). All rights reserved. Footage from The Endless Feast provided by Film Garden Entertainment. © 2010 Film Garden Entertainment. All rights reserved. Africa Footage provided by Talkingstick Pictures LLC © 2012. All rights reserved. Footage from Romantic Night and Supergirl Rocks! provided by Peachpit Press © 2012. All rights reserved.The projects and footage supplied with this book may only be used for educational purposes in association with the lessons included. Any other use, including but not limited to incorporating footage into another project, duplicating, or distributing footage, is expressly forbidden and requires explicit permission from the copyright holders listed above.Notice of Liability The information in this book is distributed on an “As Is” basis, without warranty. While every precaution has been taken in the preparation of the book, neither the authors nor Peachpit Press shall have any liability to any person or entity with respect to any loss or damage caused or alleged to be caused directly or indirectly by the instructions contained in this book or by the computer software and hardware products described in it.
Trademarks Many of the designations used by manufacturers and sellers to distinguish their products are claimed as trademarks. Where those designations appear in this book, and Peachpit was aware of a trademark claim, the designations appear as requested by the owner of the trademark. All other product names and services identified throughout this book are used in editorial fashion only and for the benefit of such companies with no intention of infringement of the trademark. No such use, or the use of any trade name, is intended to convey endorsement or other affiliation with this book.
ISBN 10: 0-321-81022-8ISBN 13: 978-0-321-81022-99 8 7 6 5 4 3 2 1Printed and bound in the United States of America
Table of Contents
i i i
Getting Started . . . . . . . . . . . . . . . . . . . . . . . . . . . . . . . . . . . . . . . . vii
Advanced Editing
Lesson 1 Organizing Your Media . . . . . . . . . . . . . . . . . . . . . . . 3Using Hands-Free Metadata . . . . . . . . . . . . . . . . . . . . . . . . . . . . . . 4Entering Metadata Manually . . . . . . . . . . . . . . . . . . . . . . . . . . . . . 15Organizing Clip-Based Metadata . . . . . . . . . . . . . . . . . . . . . . . . . 19Using Intraclip-Based Metadata . . . . . . . . . . . . . . . . . . . . . . . . . . 25Adding Markers . . . . . . . . . . . . . . . . . . . . . . . . . . . . . . . . . . . . . . . . 35Filtering Clips . . . . . . . . . . . . . . . . . . . . . . . . . . . . . . . . . . . . . . . . . 37Creating Smart Collections . . . . . . . . . . . . . . . . . . . . . . . . . . . . . . 44Renaming Clips . . . . . . . . . . . . . . . . . . . . . . . . . . . . . . . . . . . . . . . . 46Lesson Review . . . . . . . . . . . . . . . . . . . . . . . . . . . . . . . . . . . . . . . . . 50
Lesson 2 Advanced Editing Techniques . . . . . . . . . . . . . . . . . 53Reviewing Editing Basics . . . . . . . . . . . . . . . . . . . . . . . . . . . . . . . . 54Modifying Edits . . . . . . . . . . . . . . . . . . . . . . . . . . . . . . . . . . . . . . . . 61Using Secondary Storylines . . . . . . . . . . . . . . . . . . . . . . . . . . . . . . 68Understanding Compound Clips . . . . . . . . . . . . . . . . . . . . . . . . . 75Lesson Review . . . . . . . . . . . . . . . . . . . . . . . . . . . . . . . . . . . . . . . . . 82
Lesson 3 Working with Auditions . . . . . . . . . . . . . . . . . . . . . . 85Creating Auditions . . . . . . . . . . . . . . . . . . . . . . . . . . . . . . . . . . . . . 86Modifying Auditions . . . . . . . . . . . . . . . . . . . . . . . . . . . . . . . . . . . 94Using Auditions and Effects . . . . . . . . . . . . . . . . . . . . . . . . . . . . . 95Lesson Review . . . . . . . . . . . . . . . . . . . . . . . . . . . . . . . . . . . . . . . . 102
Lesson 4 Working with Sound . . . . . . . . . . . . . . . . . . . . . . . . 105Setting Sound Levels . . . . . . . . . . . . . . . . . . . . . . . . . . . . . . . . . . . 106Creating Audio Fades . . . . . . . . . . . . . . . . . . . . . . . . . . . . . . . . . . 123Panning Audio . . . . . . . . . . . . . . . . . . . . . . . . . . . . . . . . . . . . . . . . 130Managing Audio Channels . . . . . . . . . . . . . . . . . . . . . . . . . . . . . 144Lesson Review . . . . . . . . . . . . . . . . . . . . . . . . . . . . . . . . . . . . . . . . 148
Lesson 5 Using Audio Effects . . . . . . . . . . . . . . . . . . . . . . . . . 151Understanding Equalization . . . . . . . . . . . . . . . . . . . . . . . . . . . . 152Controlling Audio Effects . . . . . . . . . . . . . . . . . . . . . . . . . . . . . . 161Using Other Types of Effects . . . . . . . . . . . . . . . . . . . . . . . . . . . . 163Animating Audio Effects . . . . . . . . . . . . . . . . . . . . . . . . . . . . . . . 171Lesson Review . . . . . . . . . . . . . . . . . . . . . . . . . . . . . . . . . . . . . . . . 176
Lesson 6 Editing Multicam Clips . . . . . . . . . . . . . . . . . . . . . . 179Using Multicamera Footage . . . . . . . . . . . . . . . . . . . . . . . . . . . . . 180Creating a Multicam Clip . . . . . . . . . . . . . . . . . . . . . . . . . . . . . . 180Editing with Multicam Clips . . . . . . . . . . . . . . . . . . . . . . . . . . . . 187Customizing Multicam Clip Settings . . . . . . . . . . . . . . . . . . . . . 194Modifying a Multicam Clip . . . . . . . . . . . . . . . . . . . . . . . . . . . . . 203Adding Effects or Other Trimming . . . . . . . . . . . . . . . . . . . . . . 211Lesson Review . . . . . . . . . . . . . . . . . . . . . . . . . . . . . . . . . . . . . . . . 213
Advanced Compositing and Effects
Lesson 7 Keying and Compositing . . . . . . . . . . . . . . . . . . . . 217Laying the Groundwork . . . . . . . . . . . . . . . . . . . . . . . . . . . . . . . . 218Using Keying and Masking Effects . . . . . . . . . . . . . . . . . . . . . . . 224Using Advanced Keying Features . . . . . . . . . . . . . . . . . . . . . . . . 234Compositing Generators . . . . . . . . . . . . . . . . . . . . . . . . . . . . . . . 240Compositing Graphics . . . . . . . . . . . . . . . . . . . . . . . . . . . . . . . . . 247Lesson Review . . . . . . . . . . . . . . . . . . . . . . . . . . . . . . . . . . . . . . . . 254
Lesson 8 Transformations, Effects, and Titles . . . . . . . . . . . 257Transforming Clips . . . . . . . . . . . . . . . . . . . . . . . . . . . . . . . . . . . . 258Working with Effects . . . . . . . . . . . . . . . . . . . . . . . . . . . . . . . . . . 264Creating Titles . . . . . . . . . . . . . . . . . . . . . . . . . . . . . . . . . . . . . . . . 270Using Roles with Titles . . . . . . . . . . . . . . . . . . . . . . . . . . . . . . . . . 283Lesson Review . . . . . . . . . . . . . . . . . . . . . . . . . . . . . . . . . . . . . . . . 290
Lesson 9 Creating Animation. . . . . . . . . . . . . . . . . . . . . . . . . 293Animating Clip Position . . . . . . . . . . . . . . . . . . . . . . . . . . . . . . . 294Animating a Generator . . . . . . . . . . . . . . . . . . . . . . . . . . . . . . . . 306Creating a Travel Matte . . . . . . . . . . . . . . . . . . . . . . . . . . . . . . . . 314Animating with Transitions . . . . . . . . . . . . . . . . . . . . . . . . . . . . . 319Lesson Review . . . . . . . . . . . . . . . . . . . . . . . . . . . . . . . . . . . . . . . . 323
Finishing Techniques
Lesson 10 Color Correction Basics . . . . . . . . . . . . . . . . . . . . . 327Getting Ready . . . . . . . . . . . . . . . . . . . . . . . . . . . . . . . . . . . . . . . . 328What Is Color Correction? . . . . . . . . . . . . . . . . . . . . . . . . . . . . . 328Using an Appropriate Display . . . . . . . . . . . . . . . . . . . . . . . . . . . 330Using the Highest-Quality Media . . . . . . . . . . . . . . . . . . . . . . . . 331Learning the Color Correction Interface . . . . . . . . . . . . . . . . . . 338Using Video Scopes . . . . . . . . . . . . . . . . . . . . . . . . . . . . . . . . . . . 345Adjusting Contrast Using the Color Board . . . . . . . . . . . . . . . . 364Take 2 . . . . . . . . . . . . . . . . . . . . . . . . . . . . . . . . . . . . . . . . . . . . . . . 372Lesson Review . . . . . . . . . . . . . . . . . . . . . . . . . . . . . . . . . . . . . . . . 372
Lesson 11 Adjusting Color and Saturation . . . . . . . . . . . . . . . 375Using the Color Controls . . . . . . . . . . . . . . . . . . . . . . . . . . . . . . . 376Take 2 . . . . . . . . . . . . . . . . . . . . . . . . . . . . . . . . . . . . . . . . . . . . . . . 384Adjusting Color Temperature Creatively . . . . . . . . . . . . . . . . . . 385Take 2 . . . . . . . . . . . . . . . . . . . . . . . . . . . . . . . . . . . . . . . . . . . . . . . 389Using the Global Color Control . . . . . . . . . . . . . . . . . . . . . . . . . 389Take 2 . . . . . . . . . . . . . . . . . . . . . . . . . . . . . . . . . . . . . . . . . . . . . . . 391
vi Contents
Adjusting Saturation . . . . . . . . . . . . . . . . . . . . . . . . . . . . . . . . . . . 391Take 2 . . . . . . . . . . . . . . . . . . . . . . . . . . . . . . . . . . . . . . . . . . . . . . . 396Changing Saturation with Contrast Adjustments . . . . . . . . . . 396Dissolving Between Two Grades . . . . . . . . . . . . . . . . . . . . . . . . 397Take 2 . . . . . . . . . . . . . . . . . . . . . . . . . . . . . . . . . . . . . . . . . . . . . . . 402Lesson Review . . . . . . . . . . . . . . . . . . . . . . . . . . . . . . . . . . . . . . . . 403
Lesson 12 Color Matching . . . . . . . . . . . . . . . . . . . . . . . . . . . . 405Understanding Shot Matching . . . . . . . . . . . . . . . . . . . . . . . . . . 406Matching Clips Automatically . . . . . . . . . . . . . . . . . . . . . . . . . . . 406Take 2 . . . . . . . . . . . . . . . . . . . . . . . . . . . . . . . . . . . . . . . . . . . . . . . 410Matching Clips Manually . . . . . . . . . . . . . . . . . . . . . . . . . . . . . . . 411Take 2 . . . . . . . . . . . . . . . . . . . . . . . . . . . . . . . . . . . . . . . . . . . . . . . 428Using Additional Corrections and Effects in a Scene . . . . . . . 428Lesson Review . . . . . . . . . . . . . . . . . . . . . . . . . . . . . . . . . . . . . . . . 438
Lesson 13 Making Isolated Color Adjustments . . . . . . . . . . . 441Using Color Masks . . . . . . . . . . . . . . . . . . . . . . . . . . . . . . . . . . . . 442Using Shapes to Target Frame Regions . . . . . . . . . . . . . . . . . . . 453Combining Shapes and Masks . . . . . . . . . . . . . . . . . . . . . . . . . . 460Animating Shapes . . . . . . . . . . . . . . . . . . . . . . . . . . . . . . . . . . . . . 465Lesson Review . . . . . . . . . . . . . . . . . . . . . . . . . . . . . . . . . . . . . . . . 468
Lesson 14 Advanced Sharing and Sending to Compressor . . 471Exporting Projects and Media for Finishing . . . . . . . . . . . . . . . 472Outputting with Compressor . . . . . . . . . . . . . . . . . . . . . . . . . . . 480Understanding the Compressor Interface . . . . . . . . . . . . . . . . . 486Understanding the Compressor Workflow . . . . . . . . . . . . . . . . 489Using Advanced Compressor Features . . . . . . . . . . . . . . . . . . . 505Lesson Review . . . . . . . . . . . . . . . . . . . . . . . . . . . . . . . . . . . . . . . . 513
Appendix A Using DSLR Footage . . . . . . . . . . . . . . . . . . . . . . . . 516
Index . . . . . . . . . . . . . . . . . . . . . . . . . . . . . . . . . . . . . 524

Throughout this title you will see references to lesson or resource files on a disc. Please note that these files are available to eBook readers via high-speed download. Please click here to go to last page in this eBook for the download location and instructions.
vii
Welcome to the official Level Two Apple Pro Training course for
Final Cut Pro X.
This book is an in-depth journey into the advanced editing techniques
and effects of Final Cut Pro X. It uses diverse footage ranging from the
feature film SuperGirl Rocks to the music video One Night in Jordan
(based on a live concert performance by internationally renowned art-
ist Zade Dirani). It also explores creating promotional spots and show
bumpers to demonstrate application features and practical techniques
you’ll use daily in your editing projects.
Whether you’ve been editing for years or are just beginning to work in
film and video, this book will enhance your knowledge of Final Cut
Pro X while it enhances your editing skills. So let’s get started!
Getting Started
viii Getting Started
The MethodologyThis book takes a hands-on approach to using the software. It’s divided into projects—based on footage on the accompanying DVD—that teach you advanced techniques as you work through the lessons. Every exercise is designed to get you editing and creating effects professionally in Final Cut Pro as quickly as possible.
Each lesson builds on previous lessons to guide you through the application’s functions and capabilities. However, if you’re already familiar with Final Cut Pro, you can go directly to a specific section and focus on that topic because every lesson is self-contained.
Course StructureThis book is designed to improve your skills both as an editor and as a Final Cut Pro user. You’ll begin by learning editing techniques designed to streamline your workflow and allow you to effectively perform complex editing tasks. Then you’ll focus on sound editing and multicamera footage. Next, you’ll explore the world of effects, covering such diverse topics as compositing, filters, keyframing, compound clips, titling, and speed changes. Finally, you’ll finish your studies by learning a variety of techniques for color correcting clips, balancing scenes, and creating deliverables using Compressor.
The lessons are grouped into the following categories:
�� Advanced Editing: Lessons 1–6 �� Advanced Compositing and Effects: Lessons 7–9�� Finishing Techniques: Lessons 10–14
In addition to the exercises, some lessons include project tasks that provide an opportunity to practice what you’ve learned. Throughout the book, other valuable sections will guide you in evaluating your project before moving to the next editing stage.
Downloading Final Cut Pro XFinal Cut Pro X is available as a download from the Mac App Store. Because installation can begin immediately after purchase, you should read the Apple best practices (http://support.apple.com/kb/HT4722) prior to installation to ensure the best performance of the application. The exercises in this book are based on Final Cut Pro version 10.0.3. If you have an earlier version of Final Cut Pro X, update your software or some exercises may not work as described.
Using the DVD Book Files ix
Using the DVD Book FilesThe Apple Pro Training Series: Final Cut Pro X Advanced Editing DVDs (included with the printed book) contains the project files and media you’ll use for each lesson. After you transfer the files to your hard drive, each lesson will instruct you in the use of the project and media files.
NOTE � If you purchased this title as an eBook, you will find a URL to download the files on the “Where Are the Lesson Files” page located at the end of the eBook.
Installing the Final Cut Pro X Lesson FilesOn the DVDs, you’ll find three files: APTS FCP X ADV Part 1.sparseimage, APTS FCP X ADV Part 2.sparseimage, and APTS FCP X ADV Part 3.sparseimage. These disk image files function like virtual disks. You will use their contents for the exercises in the book. Specific instructions in the lessons will explain which disk image to load.
1 Insert the Apple Pro Training Series: Final Cut Pro X Advanced Editing, Disc One DVD into your DVD drive.
Depending on which version of OS X you’re using and the Finder preferences, you may not see the DVD on your desktop. If you don’t see the DVD, take a quick look in a Finder window to see all the mounted volumes (such as hard disks or DVDs) that are available.
2 In the Dock, click the Finder icon.
3 In the Finder window, select the APTS FCP X ADV DVD listed in the left sidebar under Devices.
4 With the DVD selected, drag the three disk images from the DVD to your desktop to copy them.
Alternatively, you may drag the disk images to any locally connected storage device such as an external hard disk. Whichever destination you choose, Final Cut Pro must have access to the disk image files, and you must have read and write privileges. In addition, the storage device must have at least 23 GB of free space available.
5 After the disk image files are copied, eject the DVD.
6 Insert the second disc, Apple Pro Training Series: Final Cut Pro X Advanced Editing, Disc Two, into your DVD drive, and repeat steps 2 through 5.
x Getting Started
Before you begin a section in this book, you must mount the corresponding disk image to give Final Cut Pro access to the necessary project and media files.
7 On your desktop (or the location you chose for the files), double-click an APTS FCP X ADV disk image file to mount the disk images.
A virtual disk labeled APTS FCP X ADV Part 1 (or Part 2 or Part 3) appears under Devices in the Finder window’s sidebar.
NOTE � Depending on which version of OS X you use and the Finder’s preferences, you may not see the APTS FCP X disk on your Desktop.
Each lesson will identify the disk image and the files to use for that lesson’s exercises. You should not alter the contents of the Final Cut Events or Final Cut Projects folders on a APTS FCP X ADV virtual disk.
Using Final Cut Pro on a PortableSome of the desktop Mac keystrokes identified in this book differ from the keystrokes used with a MacBook Pro. Specifically, you’ll sometimes need to hold down the Function key (fn) when pressing the Left and Right Arrow keys to access the Home and End keys, respectively.
About the FootageFootage from eight diverse projects is used throughout this book—ranging from a feature film and a documentary to a concert video and various broadcast promos. Together, they represent a real-world sampling of the types of projects and media formats you’ll likely encounter as a working video editor. Although the lesson exercises instruct you to edit the footage in a particular way, you can use any part of this footage to practice your own editing methods. Techniques you’ve learned using one set of clips in a lesson can be practiced using a different set of clips to create a new project.
NOTE � Due to copyright restrictions, you cannot use this footage for any purpose outside this book or upload any version of the files in this book to YouTube or any other public or private video sharing site.
Apple Pro Certification Program xi
System RequirementsBefore using Apple Pro Training Series: Final Cut Pro X Advanced Editing, you should have a working knowledge of your Macintosh and its OS X operating system. Make sure that you know how to use the mouse; standard menus and commands; and how to open, save, and close files. If you need to review these techniques, see the printed or online documentation for your system.
To review the basic system requirements for Final Cut Pro X, refer to the technical specifications at www.apple.com/finalcutpro/specs/.
About the Apple Pro Training SeriesApple Pro Training Series: Final Cut Pro X Advanced Editing is both a self-paced learning tool and the official curriculum of the Apple Pro Training and Certification Program.
Developed by experts in the field and certified by Apple, the series is used by Apple Authorized Training Centers worldwide and offers complete training in all Apple Pro products. The lessons are designed to let you learn at your own pace. Each lesson concludes with review questions and answers summarizing what you learned, which can be used to help you prepare for the Apple Certification Exam.
For a complete list of Apple Pro Training Series books, see the page at the back of this book, or visit www.peachpit.com/apts.
Apple Pro Certification ProgramThe Apple Pro Training and Certification Programs are designed to keep you at the forefront of Apple digital media technology while giving you a competitive edge in today’s ever-changing job market. Whether you’re an editor, graphic designer, sound designer, special effects artist, student, or teacher, these training tools are meant to help you expand your skills.
Upon completing the course material in this book, you can earn Apple certification. Certification is offered in all pro applications, including Aperture, Final Cut Pro, Motion, and Logic Pro. Certification gives you official recognition of your knowledge of Apple professional applications while allowing you to market yourself to employers and clients as a skilled user of Apple products.
Apple offers three levels of certification: Apple Certified Associate, Apple Certified Pro—Level One, and Apple Certified Pro—Level Two. Certification exams do not require class
xii Getting Started
attendance. Students who prefer to learn on their own or who already have the necessary skill set in the chosen application may take an exam for a fee.
Apple Certified Associate status validates entry-level skills in a specific application. Unlike an Apple Certified Pro exam, you can take Associate exams online from the comfort of your own home or office. Apple Certified Associate status is appropriate for students, for someone who is preparing for a first job out of school or a college-level program, or for anyone interested in validating entry-level credentials. Instructions on how to take the exam are included later in this book. For details on what the exam covers, please visit http://training.apple.com/certification/proapps.
An Apple Certified Pro is a user who has reached the highest skill level in the use and operation of Apple Pro Applications as attested to by Apple. Students earn certification by passing the online certification exam administered only at Apple Authorized Training Centers (AATCs). Apple Certified Pro status is appropriate for industry professionals.
For those who prefer to learn in an instructor-led setting, training courses are taught by Apple Certified Trainers at AATCs worldwide. The courses use the Apple Pro Training Series books as their curriculum and balance concepts and lectures with hands-on labs and exercises. AATCs are carefully selected to meet Apple’s highest standards in all areas, including facilities, instructors, course delivery, and infrastructure. The goal of the program is to offer Apple customers, from beginners to the most seasoned professionals, the highest-quality training experience.
For more information, please see the page at the back of this book, or to find an Authorized Training Center near you, visit training.apple.com.
ResourcesApple Pro Training Series: Final Cut Pro X Advanced Editing is not intended as a compre-hensive reference manual, nor does it replace the documentation created for the application. For comprehensive information about program features, refer to these resources:
�� Final Cut Pro Help—Accessed through the Final Cut Pro Help menu, the Reference Guide contains a complete description of all features. You can also access Help at http://help.apple.com/helplibrary/category/videoediting.
�� For a list of other resources, please visit the Apple website at www.apple.com/finalcutpro/resources/.
�� For details on the Apple Training and Certification programs, please visit http://training.apple.com.
#
Image here is FPO. Arrangements for purchase and placement of image to follow.
Bleed on all sides s/b 18pts; pages in Quark s/b staggered.
Time This lesson takes approximately 85 minutes to complete.
Goals Read and use the Audio meters
Fix overmodulated audio clips
Adjust and animate audio levels
Perform subframe audio adjustments
Apply audio fades and select fade shapes
Create audio pans in stereo and surround
Animate audio pan effects
Manage audio channels for multichannel clips
Break apart audio channels for independent editing
4
105
It cannot be said often enough: Audio is more important than video.
Audiences will tolerate shockingly poor quality video (see Paranormal
Activity, Cloverfield, or Blair Witch Project for proof), but no one will
sit through even three minutes on YouTube if the audio is hard to hear.
You can always close your eyes, but closing your ears is far more dif-
ficult. And while the images carry the basic information of a scene, the
sound invariably carries the emotional content. If seeing is believing,
then hearing is feeling.
Fortunately, Final Cut Pro X contains an impressive number of ways to
improve your video’s sound. It has tools to set the audio levels to a uni-
form, accurate volume; multiple methods to create audio fades and four
fade styles; intuitive controls for panning sound between speakers, in
both stereo and surround sound environments; and much more.
NOTE P Apple Pro Training Series: Final Cut Pro X by Diana Weynand (Peachpit Press) described the automatic audio enhancements you can apply to your clips to remove background noise, adjust levels, and remove silent audio channels. This lesson picks up where those lessons left off and delves into a more manual approach to improving your sound.
Working with SoundLesson 4
106 Working with Sound
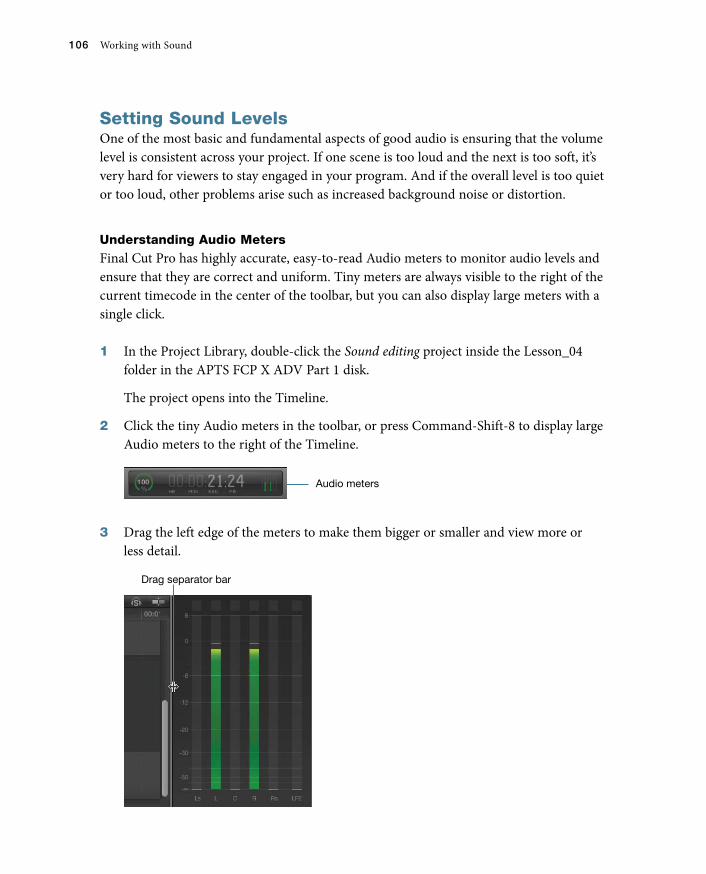
Setting Sound LevelsOne of the most basic and fundamental aspects of good audio is ensuring that the volume level is consistent across your project. If one scene is too loud and the next is too soft, it’s very hard for viewers to stay engaged in your program. And if the overall level is too quiet or too loud, other problems arise such as increased background noise or distortion.
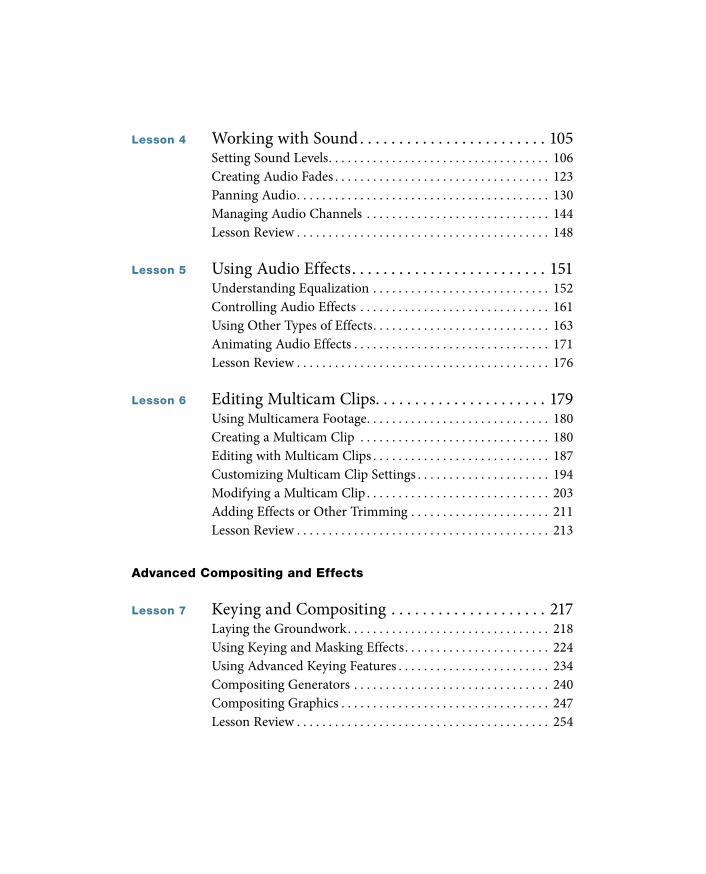
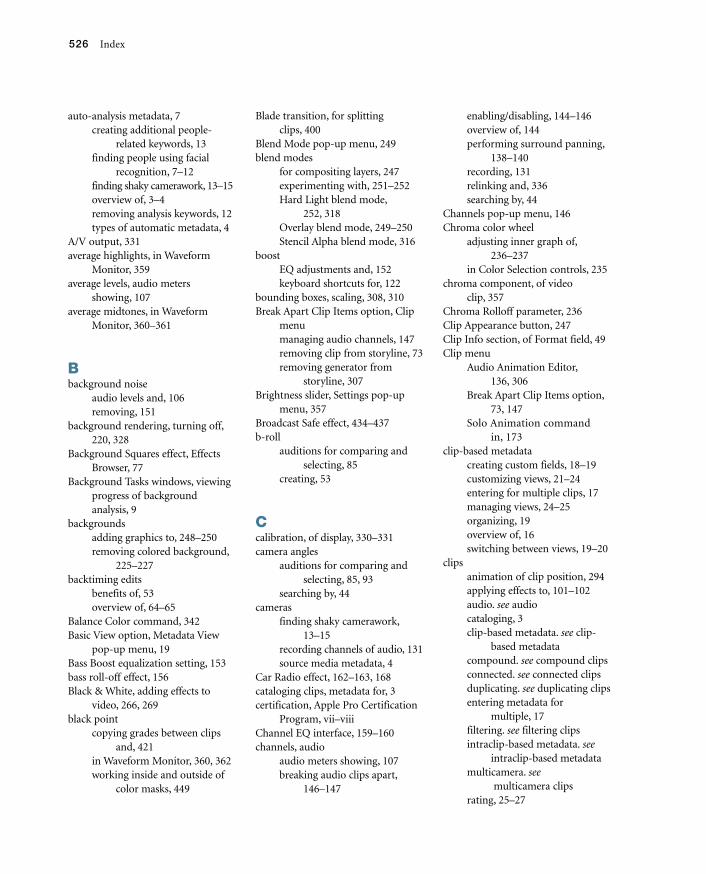
Understanding Audio MetersFinal Cut Pro has highly accurate, easy-to-read Audio meters to monitor audio levels and ensure that they are correct and uniform. Tiny meters are always visible to the right of the current timecode in the center of the toolbar, but you can also display large meters with a single click.
1 In the Project Library, double-click the Sound editing project inside the Lesson_04 folder in the APTS FCP X ADV Part 1 disk.
The project opens into the Timeline.
2 Click the tiny Audio meters in the toolbar, or press Command-Shift-8 to display large Audio meters to the right of the Timeline.
Audio meters
3 Drag the left edge of the meters to make them bigger or smaller and view more or less detail.
Drag separator bar
Setting Sound Levels 107
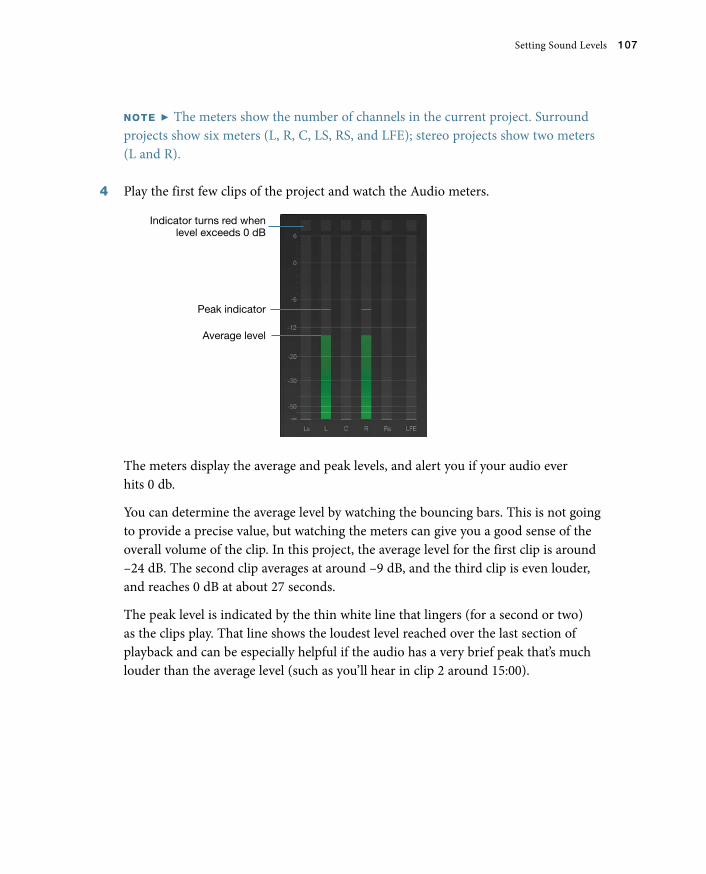
NOTE P The meters show the number of channels in the current project. Surround projects show six meters (L, R, C, LS, RS, and LFE); stereo projects show two meters (L and R).
4 Play the first few clips of the project and watch the Audio meters.
Average level
Indicator turns red when level exceeds 0 dB
Peak indicator
The meters display the average and peak levels, and alert you if your audio ever hits 0 db.
You can determine the average level by watching the bouncing bars. This is not going to provide a precise value, but watching the meters can give you a good sense of the overall volume of the clip. In this project, the average level for the first clip is around –24 dB. The second clip averages at around –9 dB, and the third clip is even louder, and reaches 0 dB at about 27 seconds.
The peak level is indicated by the thin white line that lingers (for a second or two) as the clips play. That line shows the loudest level reached over the last section of playback and can be especially helpful if the audio has a very brief peak that’s much louder than the average level (such as you’ll hear in clip 2 around 15:00).
108 Working with Sound
PHow Loud Is Too Loud?
There is no hard and fast rule about what defines a proper audio level. Whatever level you choose, your viewer can always adjust the volume of the playback device to make the overall sound louder or quieter.
However, if your levels are low, she will have to turn the playback volume up very loud, which can expose background noise and lower the overall sound quality. On the other hand, if your levels are high, your listener will have to turn the volume down, which can make quiet passages nearly inaudible. Furthermore, when sounds are too loud in a high-level clip, the sound can distort, making an unpleasant grat-ing sound and rendering the audio unintelligible, even if the volume is decreased.
High- and low-level audio problems may be exaggerated when your video is con-verted to play on other platforms. So, a project that sounds OK during editing can reveal problems when you upload the result to YouTube or burn the video to a Blu-ray disk. Also, lower-quality speakers (such as the built-in speaker on a cell phone or a consumer television) can magnify problems that aren’t apparent when monitor-ing your project on studio-quality speakers or headphones.
Because of this, a general guideline is that you want your levels as loud as possible, as long as they never touch 0 dB (at which point they overmodulate and distortion occurs).
NOTE P Never, never let the audio hit 0 dB!
Also, audio is additive, so if you play a sound effect, ambiance, and music along with your main dialogue, the volumes of each item are added together, pushing the final result ever closer to that dreaded 0 dB. Most audio mixers set the dialogue, interview, or narration to an average audio level of –12 dB, which allows plenty of room for adding sound effects, music, and other elements without risking over-modulating. This average audio level also provides a little headroom if you want to make a specific sound deliberately louder than the dialogue (such as a music swell or explosion).
To this last point, sound mixers working on theatrical films typically set the average dialogue levels even lower (–24 dB or –31 dB). The theater turns up their (high-quality) speakers so that dialogue plays at a comfortable level, and when those
Setting Sound Levels 109
explosions occur, they can be so loud they knock your socks off—without ever touching 0 dB!
However, beware of using this trick if your target platforms are computers, hand-held devices, or televisions without fancy sound systems. Those lower-quality speakers may not be able to reproduce so much dynamic range (variance between the loudest and quietest sounds), and your audio mixing artistry may come across as a muddy mess.
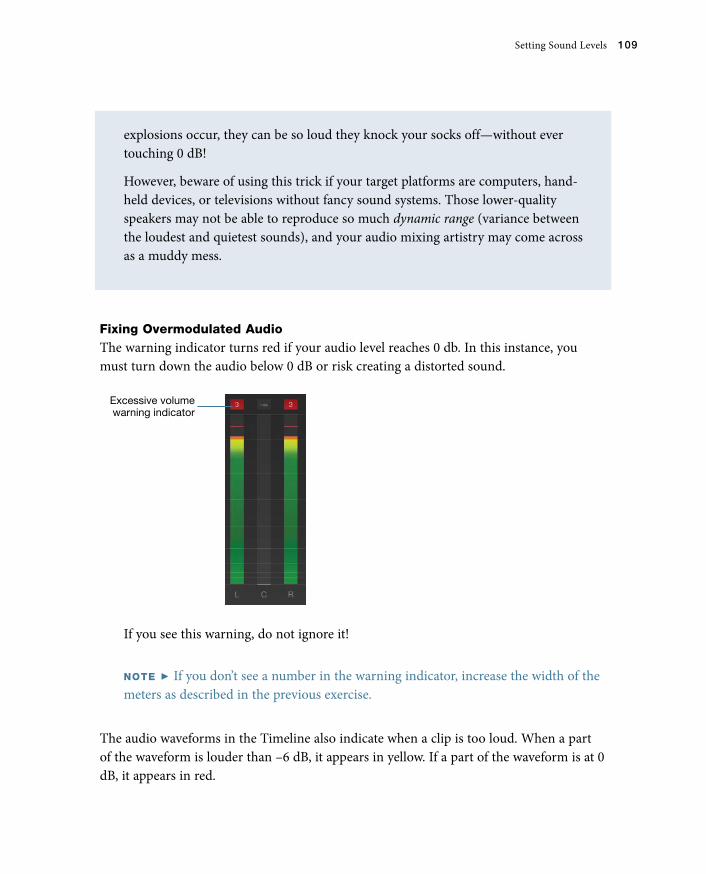
Fixing Overmodulated AudioThe warning indicator turns red if your audio level reaches 0 db. In this instance, you must turn down the audio below 0 dB or risk creating a distorted sound.
Excessive volume warning indicator
If you see this warning, do not ignore it!
NOTE P If you don’t see a number in the warning indicator, increase the width of the meters as described in the previous exercise.
The audio waveforms in the Timeline also indicate when a clip is too loud. When a part of the waveform is louder than –6 dB, it appears in yellow. If a part of the waveform is at 0 dB, it appears in red.
110 Working with Sound
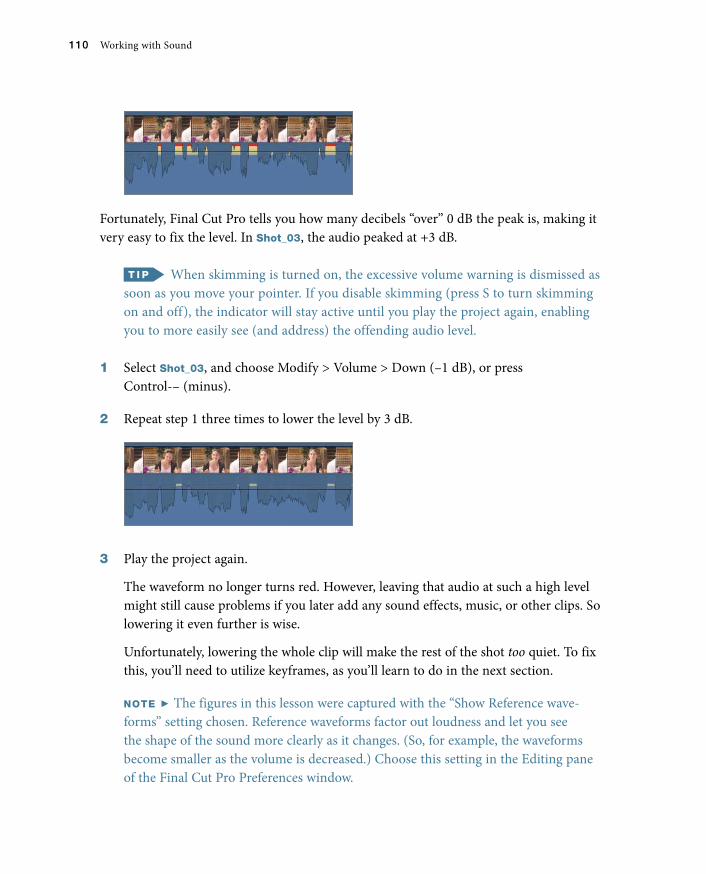
Fortunately, Final Cut Pro tells you how many decibels “over” 0 dB the peak is, making it very easy to fix the level. In Shot_03, the audio peaked at +3 dB.
When skimming is turned on, the excessive volume warning is dismissed as soon as you move your pointer. If you disable skimming (press S to turn skimming on and off), the indicator will stay active until you play the project again, enabling you to more easily see (and address) the offending audio level.
1 Select Shot_03, and choose Modify > Volume > Down (–1 dB), or press Control-– (minus).
2 Repeat step 1 three times to lower the level by 3 dB.
3 Play the project again.
The waveform no longer turns red. However, leaving that audio at such a high level might still cause problems if you later add any sound effects, music, or other clips. So lowering it even further is wise.
Unfortunately, lowering the whole clip will make the rest of the shot too quiet. To fix this, you’ll need to utilize keyframes, as you’ll learn to do in the next section.
NOTE P The figures in this lesson were captured with the “Show Reference wave-forms” setting chosen. Reference waveforms factor out loudness and let you see the shape of the sound more clearly as it changes. (So, for example, the waveforms become smaller as the volume is decreased.) Choose this setting in the Editing pane of the Final Cut Pro Preferences window.
Setting Sound Levels 111
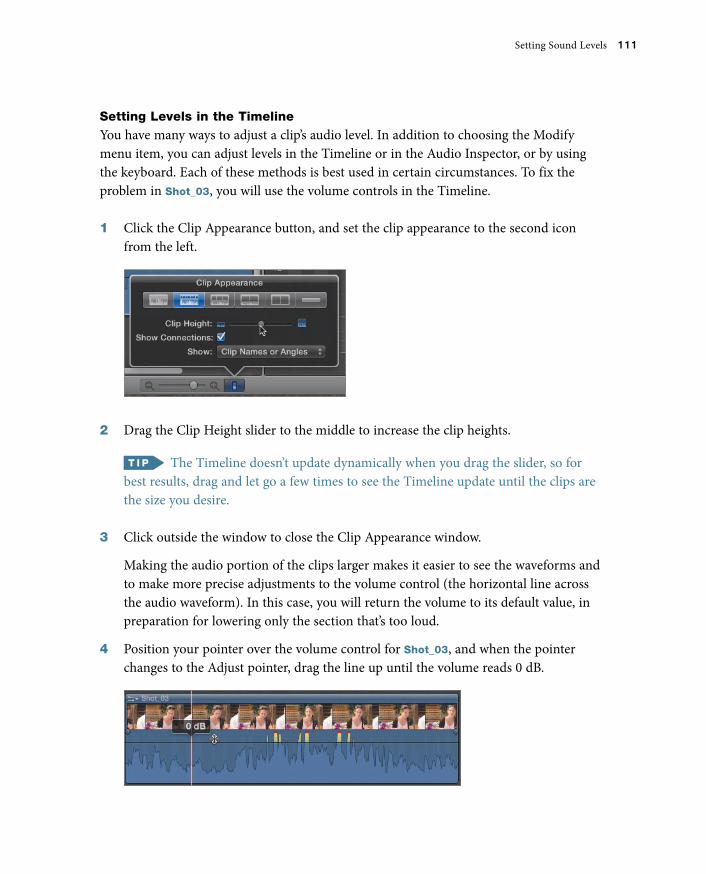
Setting Levels in the TimelineYou have many ways to adjust a clip’s audio level. In addition to choosing the Modify menu item, you can adjust levels in the Timeline or in the Audio Inspector, or by using the keyboard. Each of these methods is best used in certain circumstances. To fix the problem in Shot_03, you will use the volume controls in the Timeline.
1 Click the Clip Appearance button, and set the clip appearance to the second icon from the left.
2 Drag the Clip Height slider to the middle to increase the clip heights.
The Timeline doesn’t update dynamically when you drag the slider, so for best results, drag and let go a few times to see the Timeline update until the clips are the size you desire.
3 Click outside the window to close the Clip Appearance window.
Making the audio portion of the clips larger makes it easier to see the waveforms and to make more precise adjustments to the volume control (the horizontal line across the audio waveform). In this case, you will return the volume to its default value, in preparation for lowering only the section that’s too loud.
4 Position your pointer over the volume control for Shot_03, and when the pointer changes to the Adjust pointer, drag the line up until the volume reads 0 dB.
112 Working with Sound
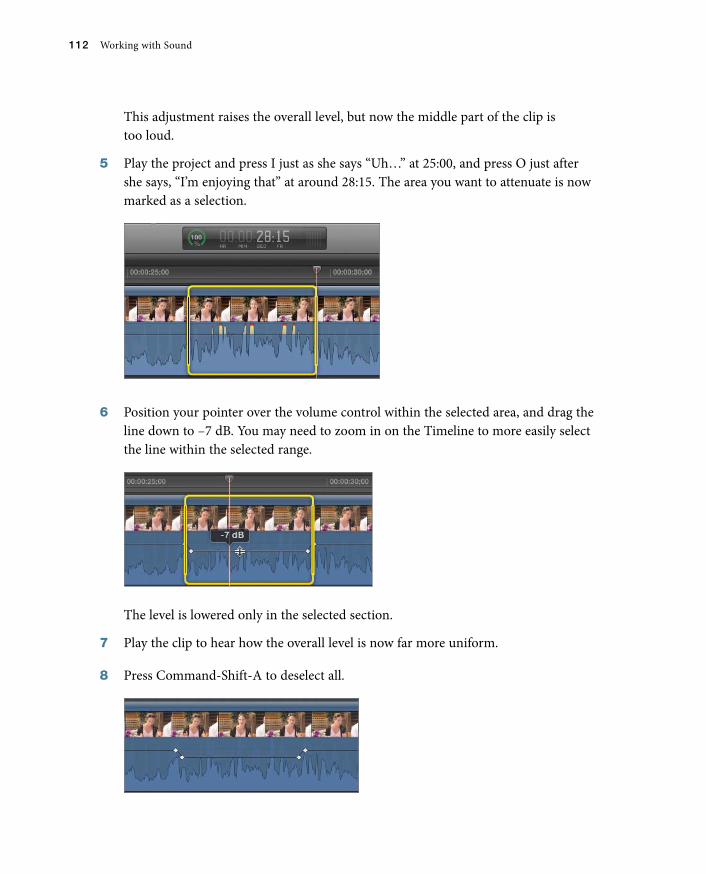
This adjustment raises the overall level, but now the middle part of the clip is too loud.
5 Play the project and press I just as she says “Uh…” at 25:00, and press O just after she says, “I’m enjoying that” at around 28:15. The area you want to attenuate is now marked as a selection.
6 Position your pointer over the volume control within the selected area, and drag the line down to –7 dB. You may need to zoom in on the Timeline to more easily select the line within the selected range.
The level is lowered only in the selected section.
7 Play the clip to hear how the overall level is now far more uniform.
8 Press Command-Shift-A to deselect all.
Setting Sound Levels 113
Deselecting allows you to more clearly see that keyframes were automatically added to limit the volume change to the selected range.
When two keyframes are set to different values, Final Cut Pro automatically interpo-lates the audio levels between the two values, thereby animating the audio level.
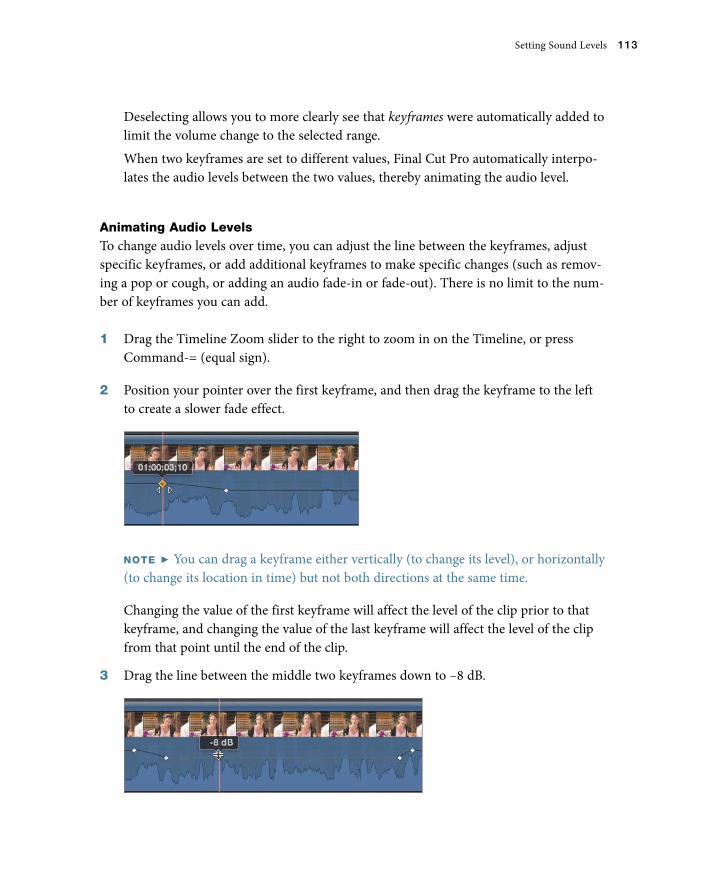
Animating Audio LevelsTo change audio levels over time, you can adjust the line between the keyframes, adjust specific keyframes, or add additional keyframes to make specific changes (such as remov-ing a pop or cough, or adding an audio fade-in or fade-out). There is no limit to the num-ber of keyframes you can add.
1 Drag the Timeline Zoom slider to the right to zoom in on the Timeline, or press Command-= (equal sign).
2 Position your pointer over the first keyframe, and then drag the keyframe to the left to create a slower fade effect.
NOTE P You can drag a keyframe either vertically (to change its level), or horizontally (to change its location in time) but not both directions at the same time.
Changing the value of the first keyframe will affect the level of the clip prior to that keyframe, and changing the value of the last keyframe will affect the level of the clip from that point until the end of the clip.
3 Drag the line between the middle two keyframes down to –8 dB.
114 Working with Sound
Both keyframes surrounding the line are moved proportionally.
4 Option-click the line twice to add new keyframes as shown in the following figure.
5 Drag the line segment between the two new keyframes up to –5 dB.
6 Play the clip to hear the results.
You may want to continue adding and adjusting keyframes to create an optimally smooth audio level.
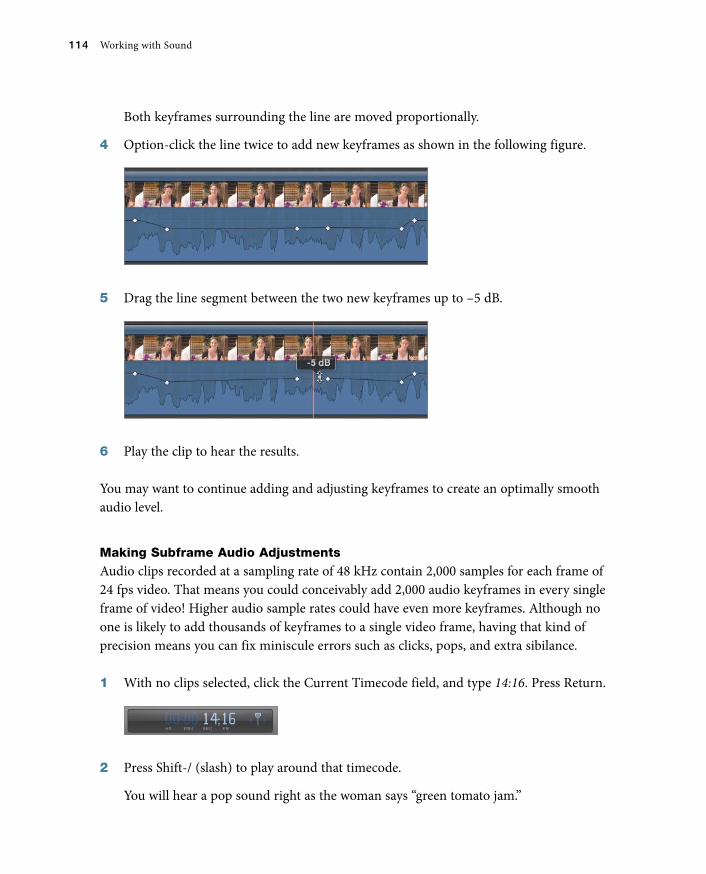
Making Subframe Audio AdjustmentsAudio clips recorded at a sampling rate of 48 kHz contain 2,000 samples for each frame of 24 fps video. That means you could conceivably add 2,000 audio keyframes in every single frame of video! Higher audio sample rates could have even more keyframes. Although no one is likely to add thousands of keyframes to a single video frame, having that kind of precision means you can fix miniscule errors such as clicks, pops, and extra sibilance.
1 With no clips selected, click the Current Timecode field, and type 14:16. Press Return.
2 Press Shift-/ (slash) to play around that timecode.
You will hear a pop sound right as the woman says “green tomato jam.”
Setting Sound Levels 115
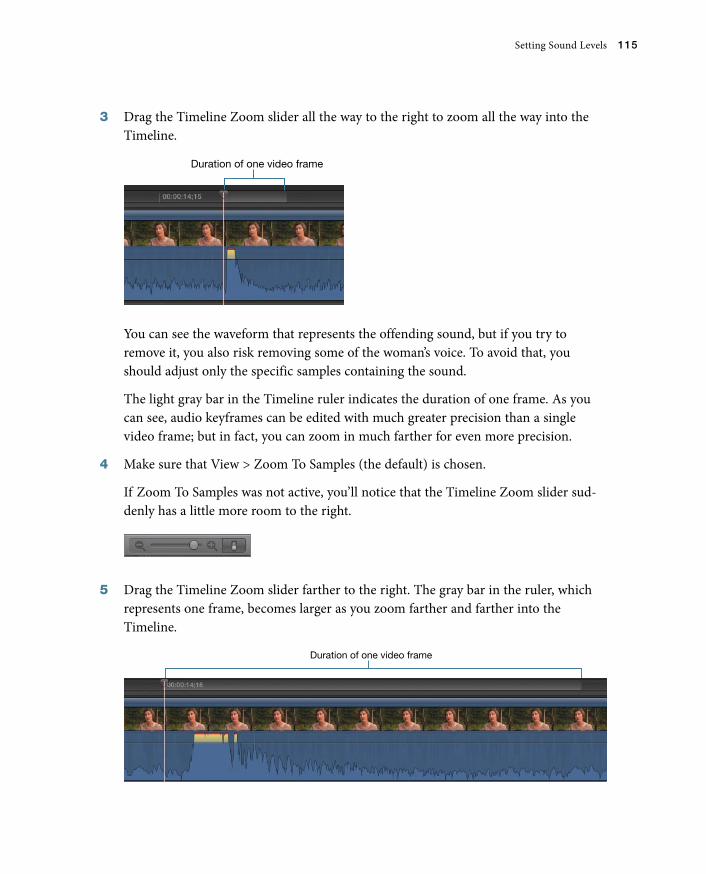
3 Drag the Timeline Zoom slider all the way to the right to zoom all the way into the Timeline.
Duration of one video frame
You can see the waveform that represents the offending sound, but if you try to remove it, you also risk removing some of the woman’s voice. To avoid that, you should adjust only the specific samples containing the sound.
The light gray bar in the Timeline ruler indicates the duration of one frame. As you can see, audio keyframes can be edited with much greater precision than a single video frame; but in fact, you can zoom in much farther for even more precision.
4 Make sure that View > Zoom To Samples (the default) is chosen.
If Zoom To Samples was not active, you’ll notice that the Timeline Zoom slider sud-denly has a little more room to the right.
5 Drag the Timeline Zoom slider farther to the right. The gray bar in the ruler, which represents one frame, becomes larger as you zoom farther and farther into the Timeline.
Duration of one video frame
116 Working with Sound
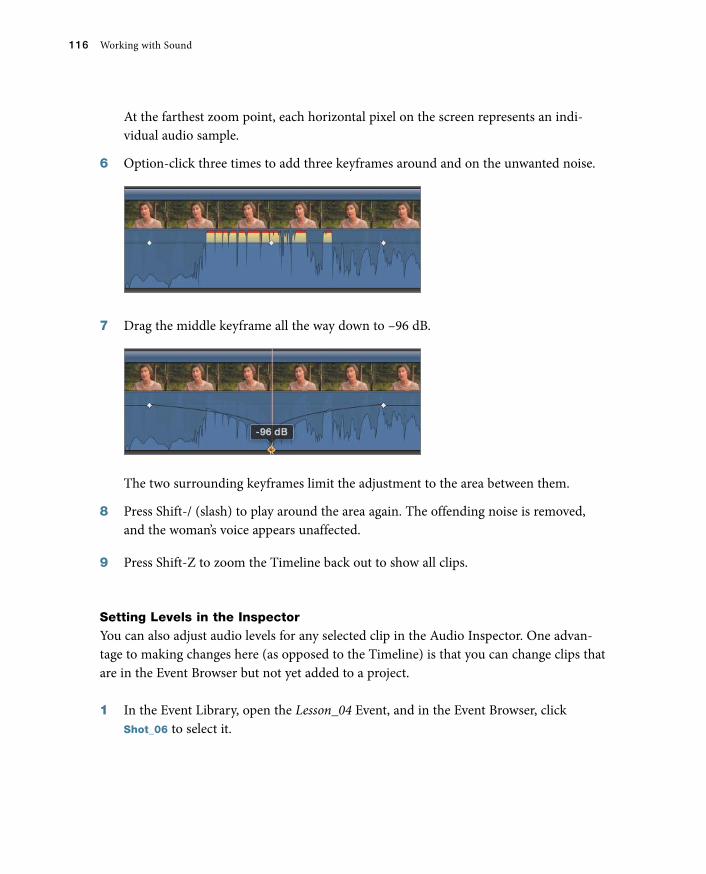
At the farthest zoom point, each horizontal pixel on the screen represents an indi-vidual audio sample.
6 Option-click three times to add three keyframes around and on the unwanted noise.
7 Drag the middle keyframe all the way down to –96 dB.
The two surrounding keyframes limit the adjustment to the area between them.
8 Press Shift-/ (slash) to play around the area again. The offending noise is removed, and the woman’s voice appears unaffected.
9 Press Shift-Z to zoom the Timeline back out to show all clips.
Setting Levels in the InspectorYou can also adjust audio levels for any selected clip in the Audio Inspector. One advan-tage to making changes here (as opposed to the Timeline) is that you can change clips that are in the Event Browser but not yet added to a project.
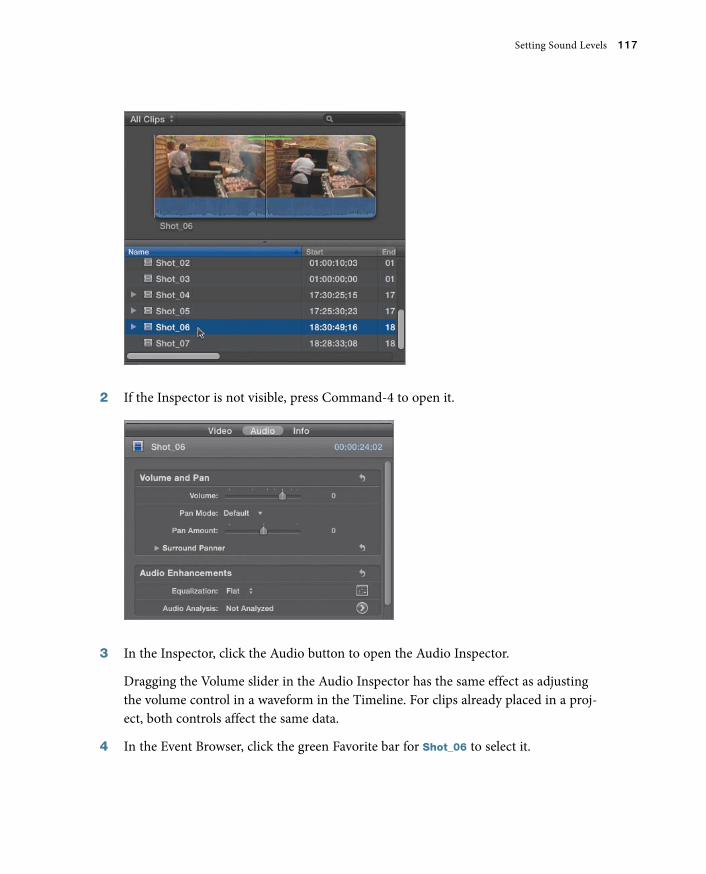
1 In the Event Library, open the Lesson_04 Event, and in the Event Browser, click Shot_06 to select it.
Setting Sound Levels 117
2 If the Inspector is not visible, press Command-4 to open it.
3 In the Inspector, click the Audio button to open the Audio Inspector.
Dragging the Volume slider in the Audio Inspector has the same effect as adjusting the volume control in a waveform in the Timeline. For clips already placed in a proj-ect, both controls affect the same data.
4 In the Event Browser, click the green Favorite bar for Shot_06 to select it.
118 Working with Sound
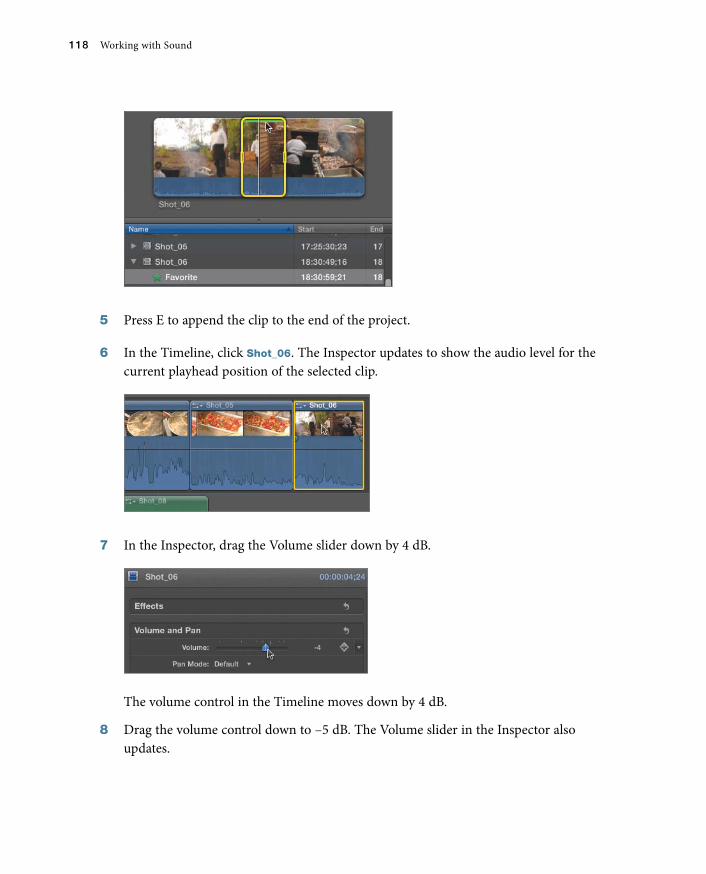
5 Press E to append the clip to the end of the project.
6 In the Timeline, click Shot_06. The Inspector updates to show the audio level for the current playhead position of the selected clip.
7 In the Inspector, drag the Volume slider down by 4 dB.
The volume control in the Timeline moves down by 4 dB.
8 Drag the volume control down to –5 dB. The Volume slider in the Inspector also updates.
Setting Sound Levels 119
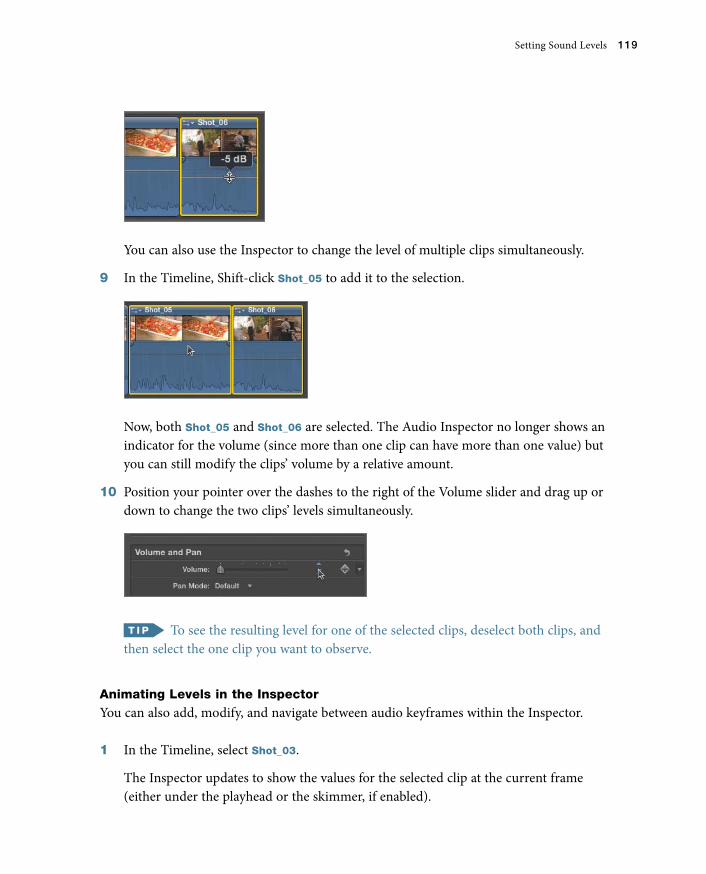
You can also use the Inspector to change the level of multiple clips simultaneously.
9 In the Timeline, Shift-click Shot_05 to add it to the selection.
Now, both Shot_05 and Shot_06 are selected. The Audio Inspector no longer shows an indicator for the volume (since more than one clip can have more than one value) but you can still modify the clips’ volume by a relative amount.
10 Position your pointer over the dashes to the right of the Volume slider and drag up or down to change the two clips’ levels simultaneously.
To see the resulting level for one of the selected clips, deselect both clips, and then select the one clip you want to observe.
Animating Levels in the InspectorYou can also add, modify, and navigate between audio keyframes within the Inspector.
1 In the Timeline, select Shot_03.
The Inspector updates to show the values for the selected clip at the current frame (either under the playhead or the skimmer, if enabled).
120 Working with Sound
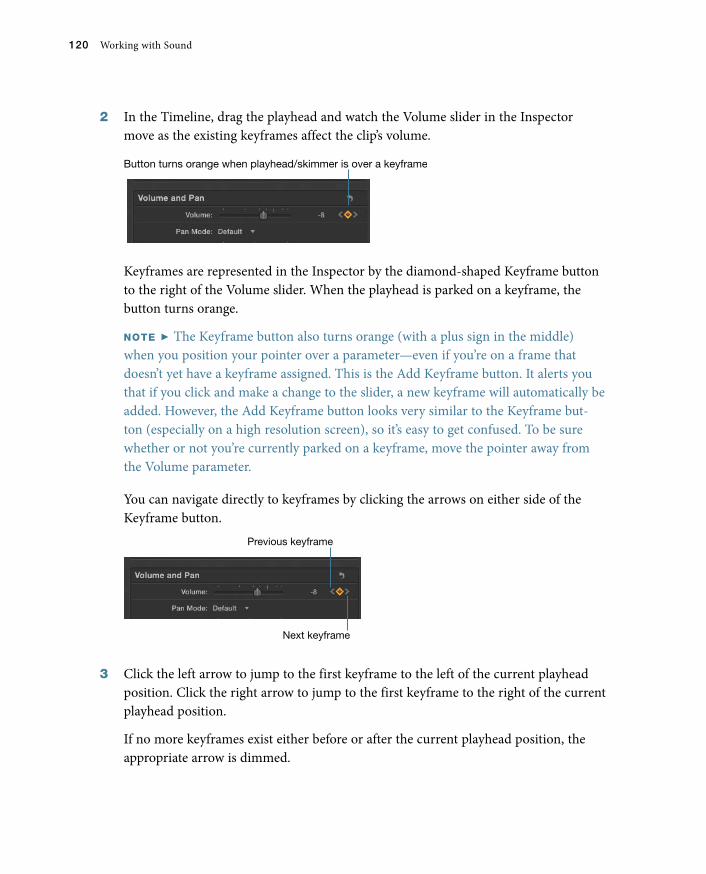
2 In the Timeline, drag the playhead and watch the Volume slider in the Inspector move as the existing keyframes affect the clip’s volume.
Button turns orange when playhead/skimmer is over a keyframe
Keyframes are represented in the Inspector by the diamond-shaped Keyframe button to the right of the Volume slider. When the playhead is parked on a keyframe, the button turns orange.
NOTE P The Keyframe button also turns orange (with a plus sign in the middle) when you position your pointer over a parameter—even if you’re on a frame that doesn’t yet have a keyframe assigned. This is the Add Keyframe button. It alerts you that if you click and make a change to the slider, a new keyframe will automatically be added. However, the Add Keyframe button looks very similar to the Keyframe but-ton (especially on a high resolution screen), so it’s easy to get confused. To be sure whether or not you’re currently parked on a keyframe, move the pointer away from the Volume parameter.
You can navigate directly to keyframes by clicking the arrows on either side of the Keyframe button.
Previous keyframe
Next keyframe
3 Click the left arrow to jump to the first keyframe to the left of the current playhead position. Click the right arrow to jump to the first keyframe to the right of the current playhead position.
If no more keyframes exist either before or after the current playhead position, the appropriate arrow is dimmed.
Setting Sound Levels 121
NOTE P Once a first keyframe is added to a clip, any changes you make to the Volume slider will automatically add a new keyframe at the current playhead position.
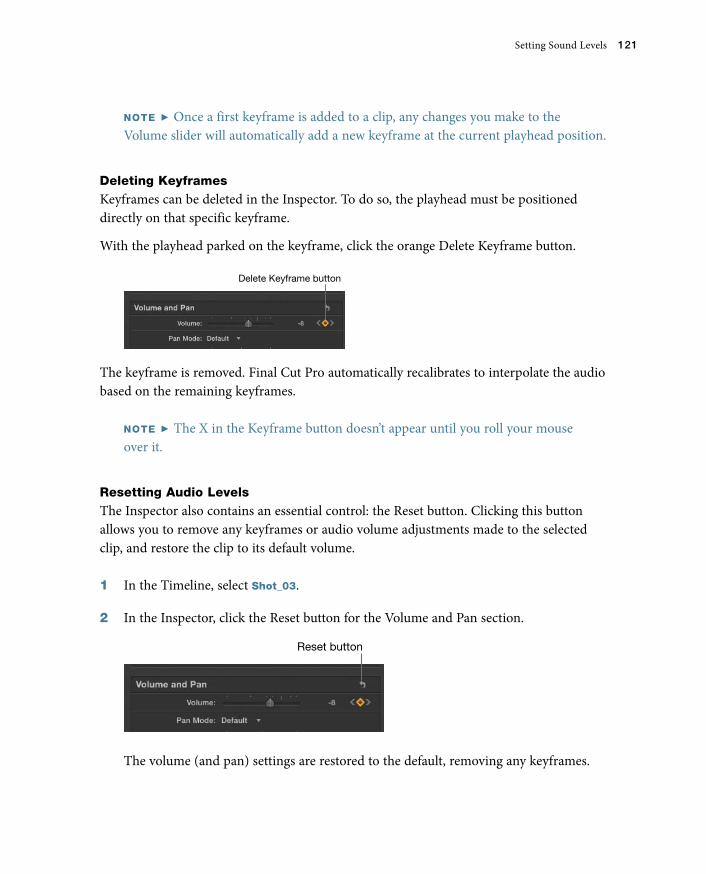
Deleting KeyframesKeyframes can be deleted in the Inspector. To do so, the playhead must be positioned directly on that specific keyframe.
With the playhead parked on the keyframe, click the orange Delete Keyframe button.
Delete Keyframe button
The keyframe is removed. Final Cut Pro automatically recalibrates to interpolate the audio based on the remaining keyframes.
NOTE P The X in the Keyframe button doesn’t appear until you roll your mouse over it.
Resetting Audio LevelsThe Inspector also contains an essential control: the Reset button. Clicking this button allows you to remove any keyframes or audio volume adjustments made to the selected clip, and restore the clip to its default volume.
1 In the Timeline, select Shot_03.
2 In the Inspector, click the Reset button for the Volume and Pan section.
Reset button
The volume (and pan) settings are restored to the default, removing any keyframes.

122 Working with Sound
Setting Levels Using Keyboard ShortcutsYou have one more way to change audio levels: Select a clip (or portion of a clip) and press a keyboard shortcut to boost (raise) or attenuate (lower) the level by 1 dB.
These keyboard shortcuts are especially useful because they allow you to change the levels of a clip while the video is playing back, which means you can hear the changes dynami-cally, creating a more organic workflow.
1 In the Timeline, select Shot_01.
2 Play the project.
3 While the first clip is playing, press Control-= (equal sign) several times.
Each time you press the keyboard command, the volume for the clip is boosted by 1 dB.
4 Press Control-– (minus sign) to lower the level by 1 dB.
Nudging Keyframes
When you have created audio keyframes, you can select an individual keyframe directly and move it up and down 1 dB at a time from the keyboard.
1 In the Timeline, Option-click the volume control for Shot_01 to add a keyframe.
2 Click the keyframe to select it. The keyframe turns orange.
Creating Audio Fades 123
3 Press Option-Up Arrow to increase or Option-Down Arrow to decrease the level of the selected keyframe.
You can also delete a selected keyframe in the Timeline by pressing the Delete key.
4 To deselect the keyframe, press Command-Shift-A or click anywhere outside the keyframe.
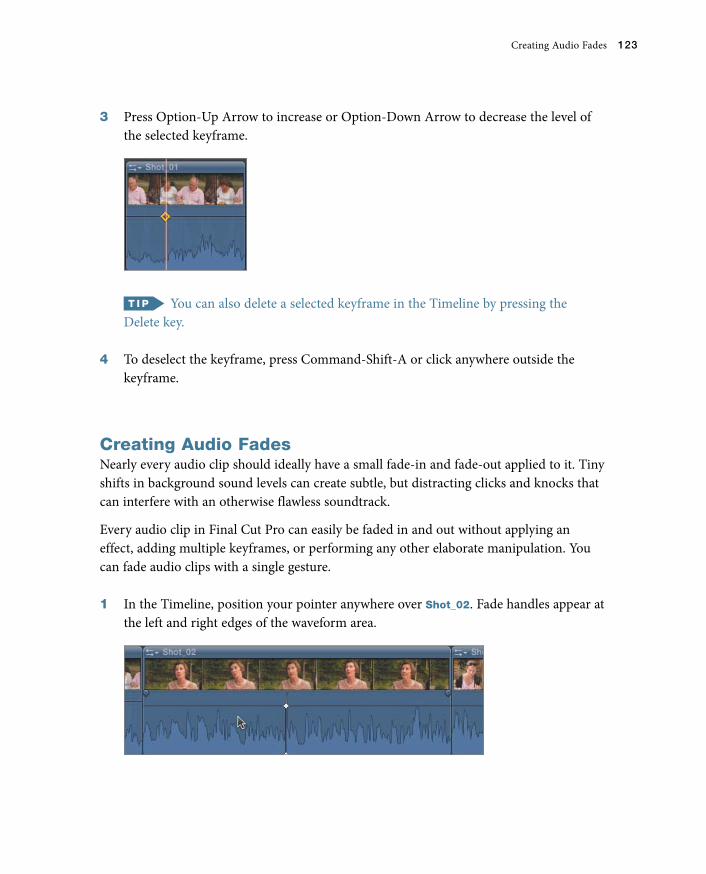
Creating Audio FadesNearly every audio clip should ideally have a small fade-in and fade-out applied to it. Tiny shifts in background sound levels can create subtle, but distracting clicks and knocks that can interfere with an otherwise flawless soundtrack.
Every audio clip in Final Cut Pro can easily be faded in and out without applying an effect, adding multiple keyframes, or performing any other elaborate manipulation. You can fade audio clips with a single gesture.
1 In the Timeline, position your pointer anywhere over Shot_02. Fade handles appear at the left and right edges of the waveform area.
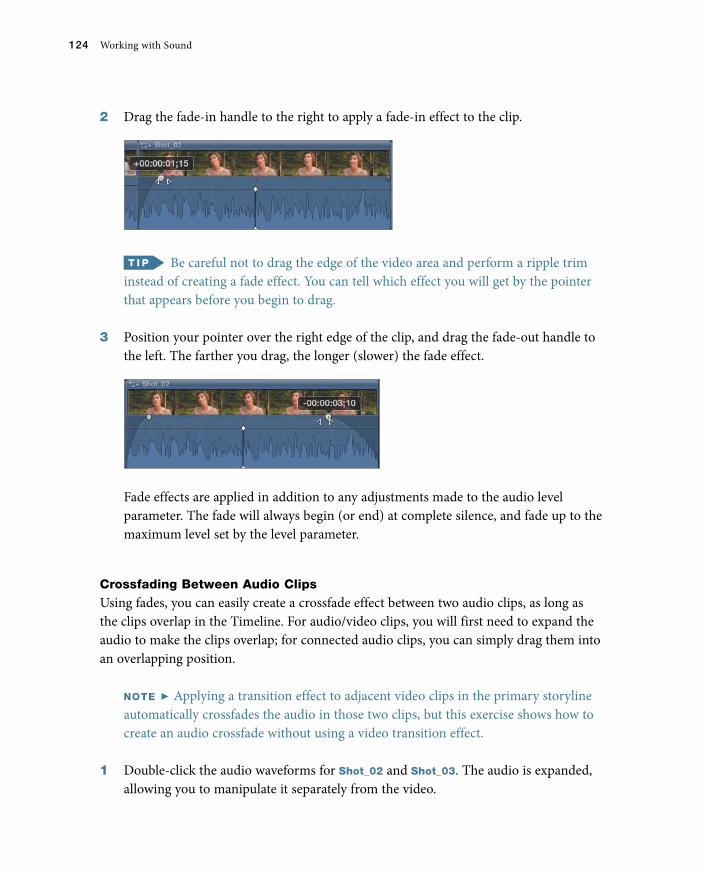
124 Working with Sound
2 Drag the fade-in handle to the right to apply a fade-in effect to the clip.
Be careful not to drag the edge of the video area and perform a ripple trim instead of creating a fade effect. You can tell which effect you will get by the pointer that appears before you begin to drag.
3 Position your pointer over the right edge of the clip, and drag the fade-out handle to the left. The farther you drag, the longer (slower) the fade effect.
Fade effects are applied in addition to any adjustments made to the audio level parameter. The fade will always begin (or end) at complete silence, and fade up to the maximum level set by the level parameter.
Crossfading Between Audio ClipsUsing fades, you can easily create a crossfade effect between two audio clips, as long as the clips overlap in the Timeline. For audio/video clips, you will first need to expand the audio to make the clips overlap; for connected audio clips, you can simply drag them into an overlapping position.
NOTE P Applying a transition effect to adjacent video clips in the primary storyline automatically crossfades the audio in those two clips, but this exercise shows how to create an audio crossfade without using a video transition effect.
1 Double-click the audio waveforms for Shot_02 and Shot_03. The audio is expanded, allowing you to manipulate it separately from the video.
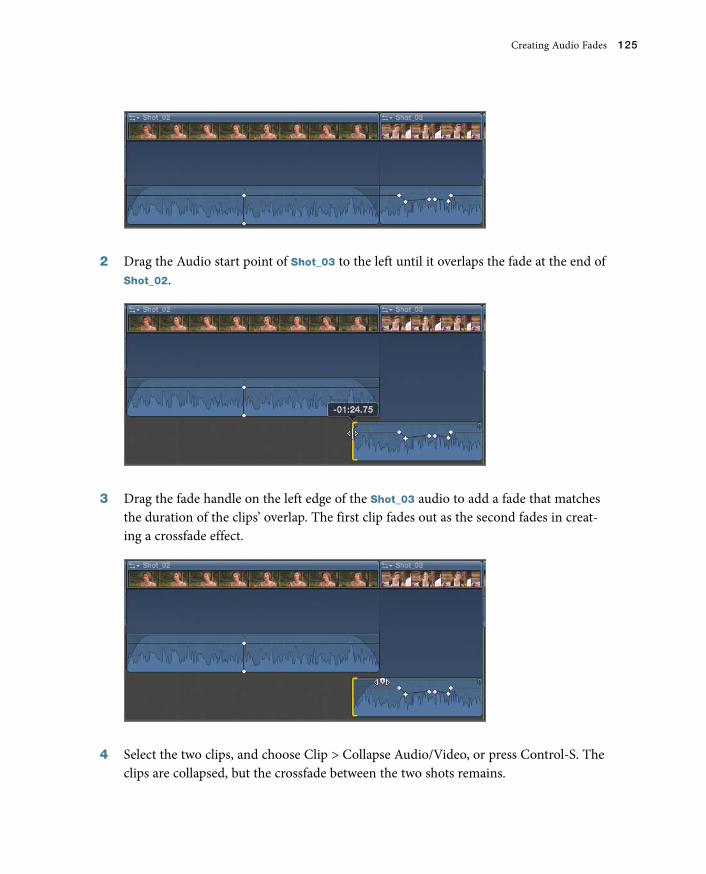
Creating Audio Fades 125
2 Drag the Audio start point of Shot_03 to the left until it overlaps the fade at the end of Shot_02.
3 Drag the fade handle on the left edge of the Shot_03 audio to add a fade that matches the duration of the clips’ overlap. The first clip fades out as the second fades in creat-ing a crossfade effect.
4 Select the two clips, and choose Clip > Collapse Audio/Video, or press Control-S. The clips are collapsed, but the crossfade between the two shots remains.
126 Working with Sound
You can also collapse clips by double-clicking the audio waveform section or the gap between the audio and video.
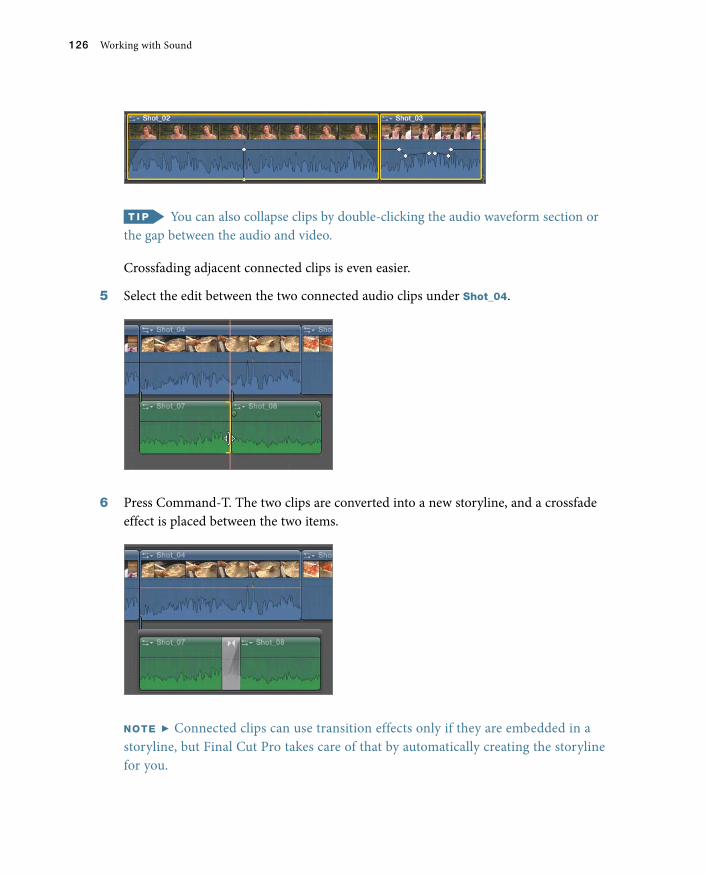
Crossfading adjacent connected clips is even easier.
5 Select the edit between the two connected audio clips under Shot_04.
6 Press Command-T. The two clips are converted into a new storyline, and a crossfade effect is placed between the two items.
NOTE P Connected clips can use transition effects only if they are embedded in a storyline, but Final Cut Pro takes care of that by automatically creating the storyline for you.
Creating Audio Fades 127
You can change the duration of the crossfade effect by dragging either edge of the gray transition icon.
7 Drag the left edge of the transition to the left to lengthen the duration of the overlap.
You could also select the transition effect, press Control-D, and type a new duration.
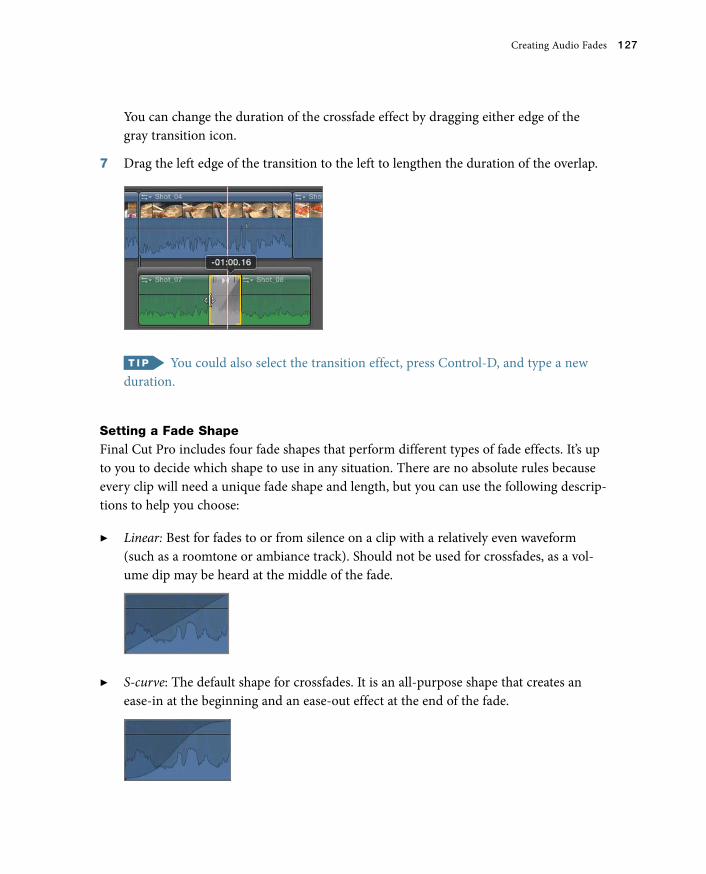
Setting a Fade ShapeFinal Cut Pro includes four fade shapes that perform different types of fade effects. It’s up to you to decide which shape to use in any situation. There are no absolute rules because every clip will need a unique fade shape and length, but you can use the following descrip-tions to help you choose:
P Linear: Best for fades to or from silence on a clip with a relatively even waveform (such as a roomtone or ambiance track). Should not be used for crossfades, as a vol-ume dip may be heard at the middle of the fade.
P S-curve: The default shape for crossfades. It is an all-purpose shape that creates an ease-in at the beginning and an ease-out effect at the end of the fade.
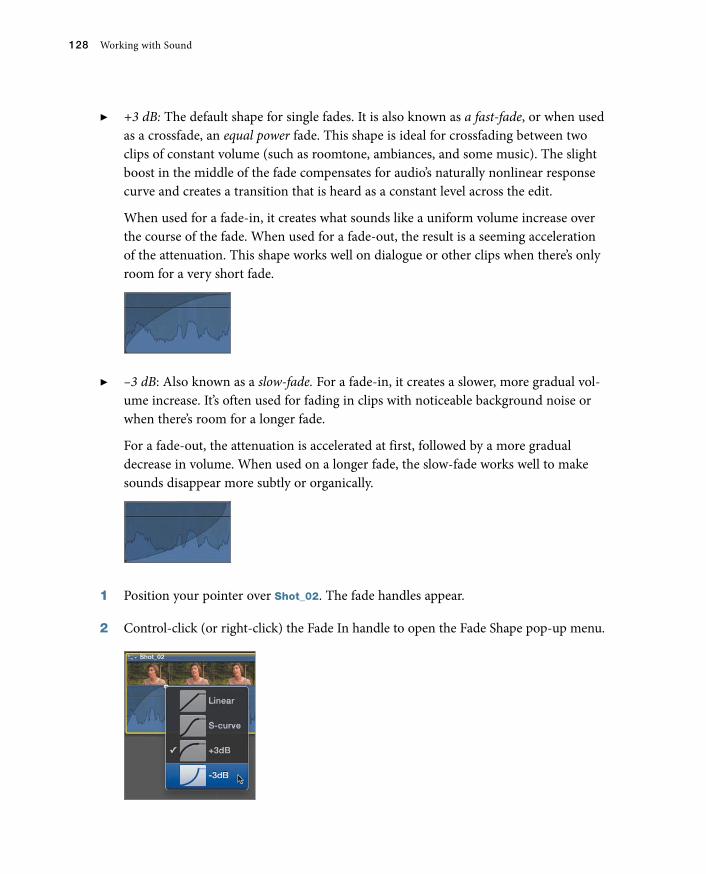
128 Working with Sound
P +3 dB: The default shape for single fades. It is also known as a fast-fade, or when used as a crossfade, an equal power fade. This shape is ideal for crossfading between two clips of constant volume (such as roomtone, ambiances, and some music). The slight boost in the middle of the fade compensates for audio’s naturally nonlinear response curve and creates a transition that is heard as a constant level across the edit.
When used for a fade-in, it creates what sounds like a uniform volume increase over the course of the fade. When used for a fade-out, the result is a seeming acceleration of the attenuation. This shape works well on dialogue or other clips when there’s only room for a very short fade.
P –3 dB: Also known as a slow-fade. For a fade-in, it creates a slower, more gradual vol-ume increase. It’s often used for fading in clips with noticeable background noise or when there’s room for a longer fade.
For a fade-out, the attenuation is accelerated at first, followed by a more gradual decrease in volume. When used on a longer fade, the slow-fade works well to make sounds disappear more subtly or organically.
1 Position your pointer over Shot_02. The fade handles appear.
2 Control-click (or right-click) the Fade In handle to open the Fade Shape pop-up menu.
Creating Audio Fades 129
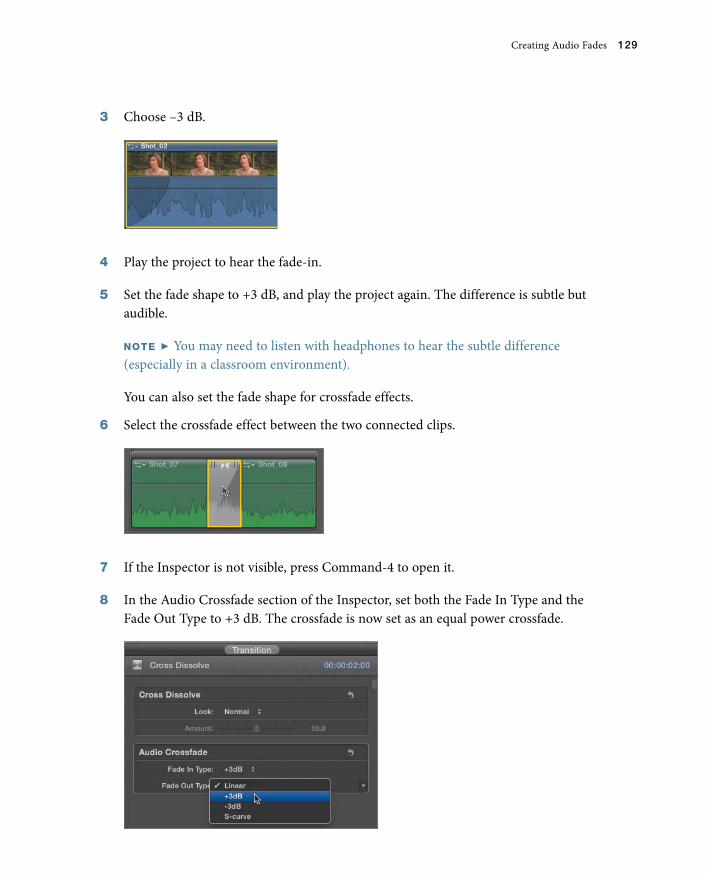
3 Choose –3 dB.
4 Play the project to hear the fade-in.
5 Set the fade shape to +3 dB, and play the project again. The difference is subtle but audible.
NOTE P You may need to listen with headphones to hear the subtle difference (especially in a classroom environment).
You can also set the fade shape for crossfade effects.
6 Select the crossfade effect between the two connected clips.
7 If the Inspector is not visible, press Command-4 to open it.
8 In the Audio Crossfade section of the Inspector, set both the Fade In Type and the Fade Out Type to +3 dB. The crossfade is now set as an equal power crossfade.
130 Working with Sound
NOTE P There’s no reason you can’t mix and match the fade types based on the spe-cific clips you’re fading.
9 Play the project and listen to the fade.
10 Experiment with the other fade types and try to hear the difference between them.
Panning AudioOne of the best ways to add dimension to your sound design is to take advantage of the fact that most audiences will be hearing your movie through multiple speakers. Surround sound enables you to spread the audio across several speakers that surround your audi-ence; but even stereo projects enable you to choose the locations of sounds. You’d be very surprised to know how many editors simply leave all their audio mixed to the center, or worse, they leave it in the sometimes haphazard arrangement determined by the original sound recording.
Exercise restraint and subtlety when panning clips. In the real world, sound reflections and reverberations cause most sounds to come from a relatively neutral point of origin. If too much of your sound comes exclusively from a single speaker, the unnatural result might pull your viewer out of the story instead of drawing him in.
Still, appropriate panning is a great tool in your sound design arsenal, and Final Cut Pro X makes it easy to craft rich sound environments in both stereo and surround sound.
Choosing a Panning EnvironmentBy default, all clips are imported with the audio placement information that was provided by the camera or audio recording device. Final Cut Pro examines such metadata and applies appropriate settings to your clips.
Although some devices record in full surround sound, they are extremely rare. Even stereo recording is not the norm, at least not on professional productions.
NOTE P Many consumer-level camcorders will record stereo or surround audio using multiple microphones; but because the mics are mounted so close together on the top of the camera, they typically record nearly identical content on all channels.
Panning Audio 131
Nearly every professional camera records (at least) two channels of audio, but those chan-nels are typically used to record two different signals, such as the signals from two sepa-rate lavaliere microphones, or a built-in camera mic and an attached shotgun microphone controlled by a boom operator.
New projects in Final Cut Pro default to surround sound, and allow you to move sounds to any of five channels (though you can also just use the left and right stereo channels and ignore the others).
NOTE P Technically, six channels are included in a five-channel surround mix: In addition to the left, center, right, left surround and right surround channels, an addi-tional channel is dedicated to low-frequency effects (LFE) such as explosions, rum-bling trains, and Barry White vocals.
If you do want to mix in surround sound, you must have a surround-monitoring envi-ronment in your editing suite, which requires third-party hardware connected via PCIe, FireWire, USB, or HDMI.
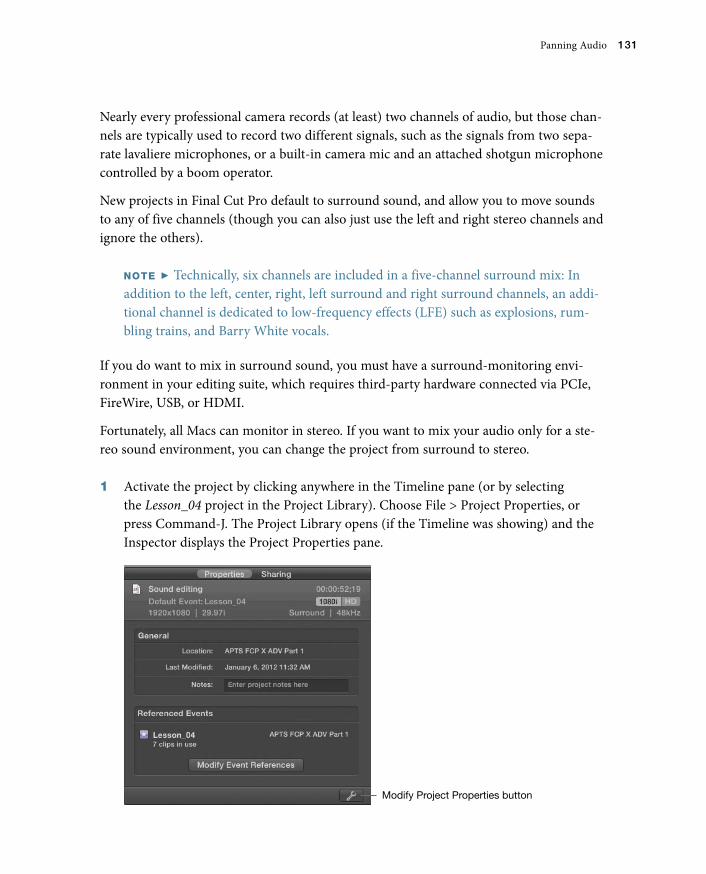
Fortunately, all Macs can monitor in stereo. If you want to mix your audio only for a ste-reo sound environment, you can change the project from surround to stereo.
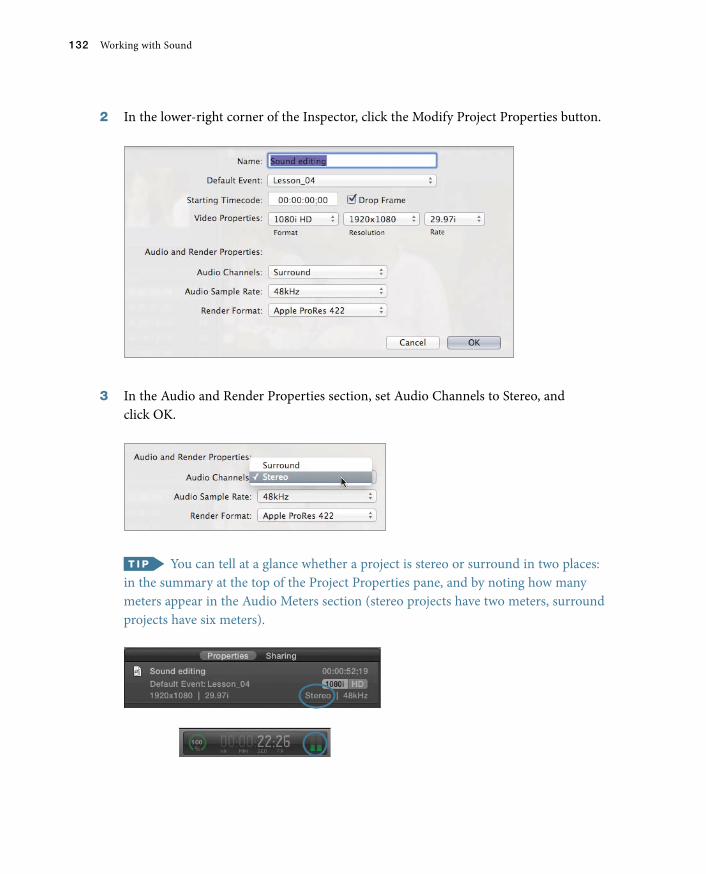
1 Activate the project by clicking anywhere in the Timeline pane (or by selecting the Lesson_04 project in the Project Library). Choose File > Project Properties, or press Command-J. The Project Library opens (if the Timeline was showing) and the Inspector displays the Project Properties pane.
Modify Project Properties button
132 Working with Sound
2 In the lower-right corner of the Inspector, click the Modify Project Properties button.
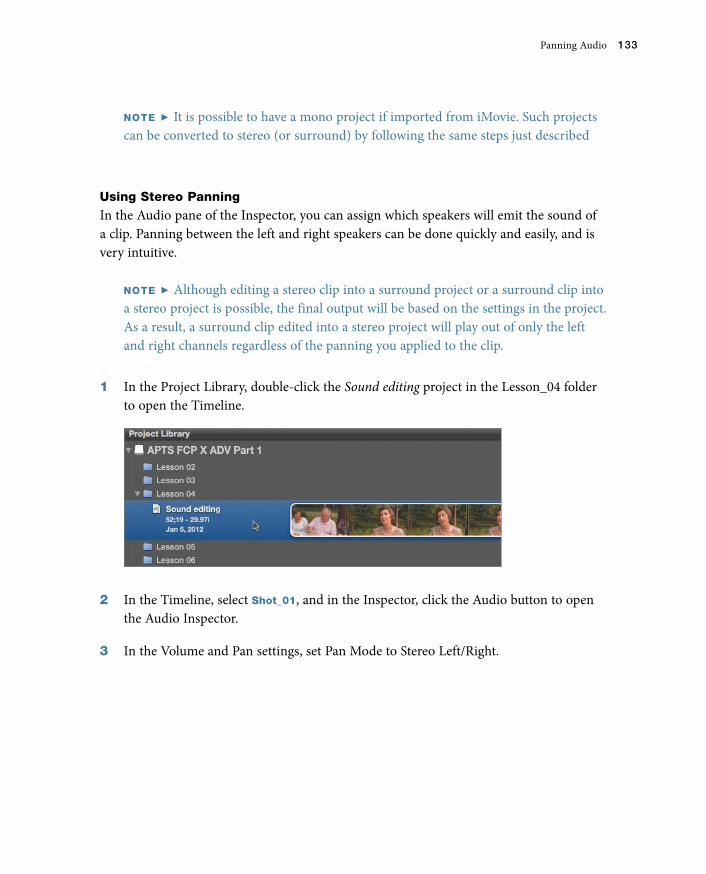
3 In the Audio and Render Properties section, set Audio Channels to Stereo, and click OK.
You can tell at a glance whether a project is stereo or surround in two places: in the summary at the top of the Project Properties pane, and by noting how many meters appear in the Audio Meters section (stereo projects have two meters, surround projects have six meters).
Panning Audio 133
NOTE P It is possible to have a mono project if imported from iMovie. Such projects can be converted to stereo (or surround) by following the same steps just described
Using Stereo PanningIn the Audio pane of the Inspector, you can assign which speakers will emit the sound of a clip. Panning between the left and right speakers can be done quickly and easily, and is very intuitive.
NOTE P Although editing a stereo clip into a surround project or a surround clip into a stereo project is possible, the final output will be based on the settings in the project. As a result, a surround clip edited into a stereo project will play out of only the left and right channels regardless of the panning you applied to the clip.
1 In the Project Library, double-click the Sound editing project in the Lesson_04 folder to open the Timeline.
2 In the Timeline, select Shot_01, and in the Inspector, click the Audio button to open the Audio Inspector.
3 In the Volume and Pan settings, set Pan Mode to Stereo Left/Right.
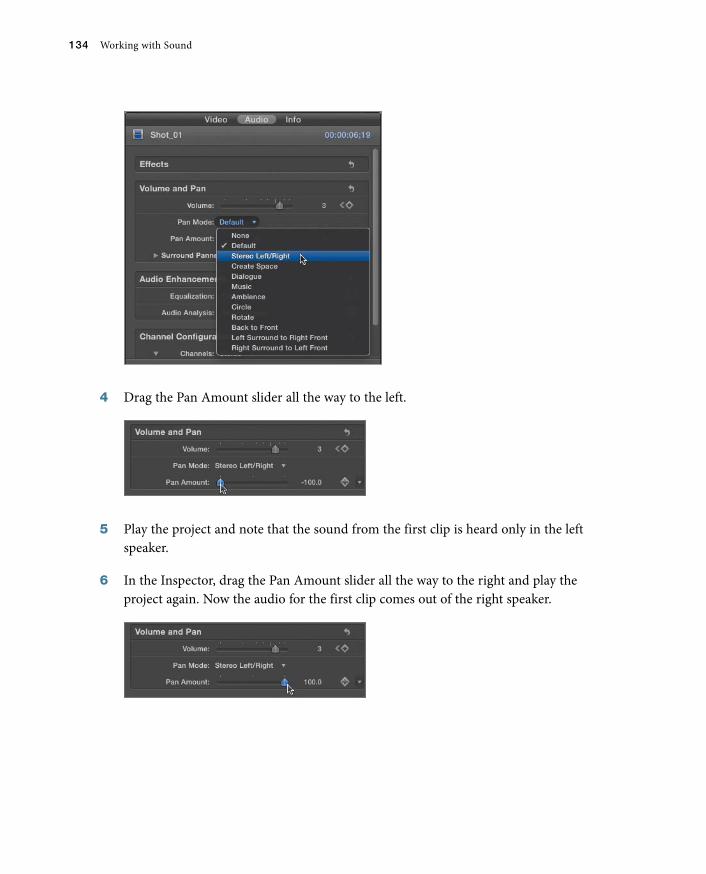
134 Working with Sound
4 Drag the Pan Amount slider all the way to the left.
5 Play the project and note that the sound from the first clip is heard only in the left speaker.
6 In the Inspector, drag the Pan Amount slider all the way to the right and play the project again. Now the audio for the first clip comes out of the right speaker.
Panning Audio 135
Animating Pan EffectsYou can use keyframes to change pan settings while a sound plays, which can be very effective to create naturalistic sounds for moving objects within a scene.
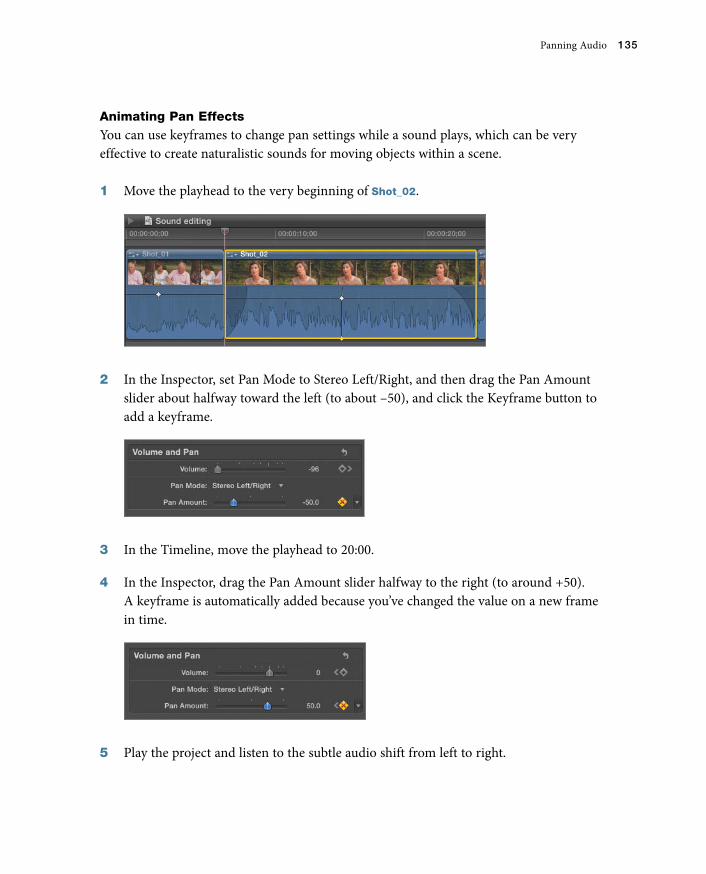
1 Move the playhead to the very beginning of Shot_02.
2 In the Inspector, set Pan Mode to Stereo Left/Right, and then drag the Pan Amount slider about halfway toward the left (to about –50), and click the Keyframe button to add a keyframe.
3 In the Timeline, move the playhead to 20:00.
4 In the Inspector, drag the Pan Amount slider halfway to the right (to around +50). A keyframe is automatically added because you’ve changed the value on a new frame in time.
5 Play the project and listen to the subtle audio shift from left to right.
136 Working with Sound
Panning in the TimelineYou can also view and modify audio pan settings in the Timeline.
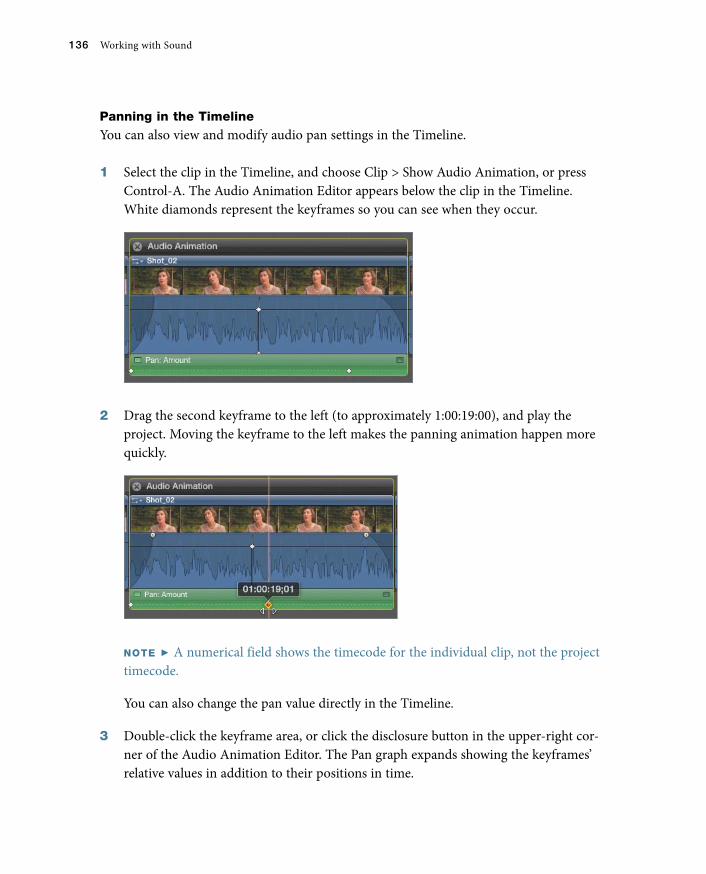
1 Select the clip in the Timeline, and choose Clip > Show Audio Animation, or press Control-A. The Audio Animation Editor appears below the clip in the Timeline. White diamonds represent the keyframes so you can see when they occur.
2 Drag the second keyframe to the left (to approximately 1:00:19:00), and play the project. Moving the keyframe to the left makes the panning animation happen more quickly.
NOTE P A numerical field shows the timecode for the individual clip, not the project timecode.
You can also change the pan value directly in the Timeline.
3 Double-click the keyframe area, or click the disclosure button in the upper-right cor-ner of the Audio Animation Editor. The Pan graph expands showing the keyframes’ relative values in addition to their positions in time.
Panning Audio 137
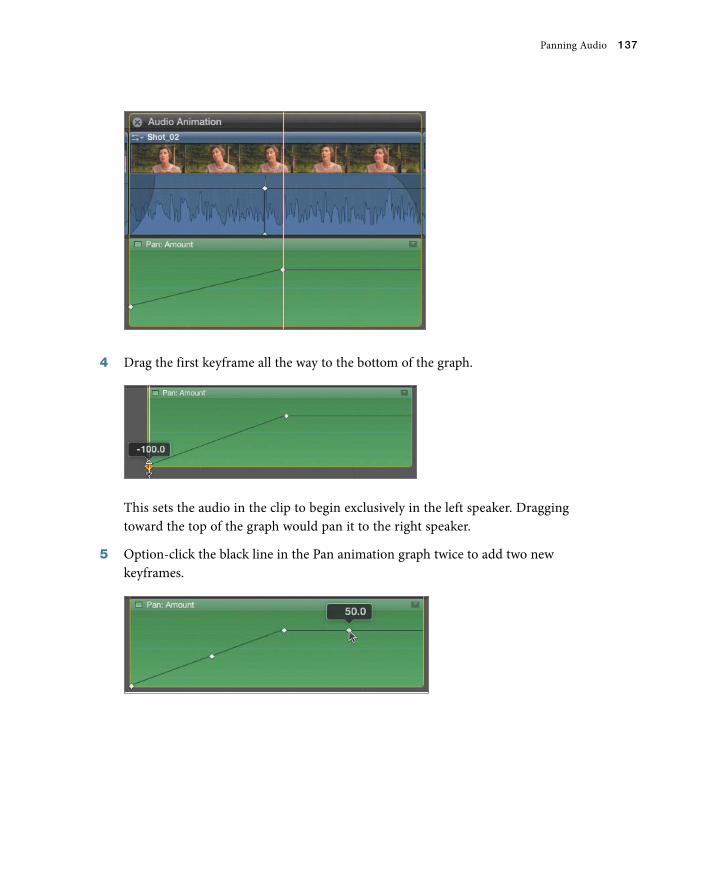
4 Drag the first keyframe all the way to the bottom of the graph.
This sets the audio in the clip to begin exclusively in the left speaker. Dragging toward the top of the graph would pan it to the right speaker.
5 Option-click the black line in the Pan animation graph twice to add two new keyframes.
138 Working with Sound
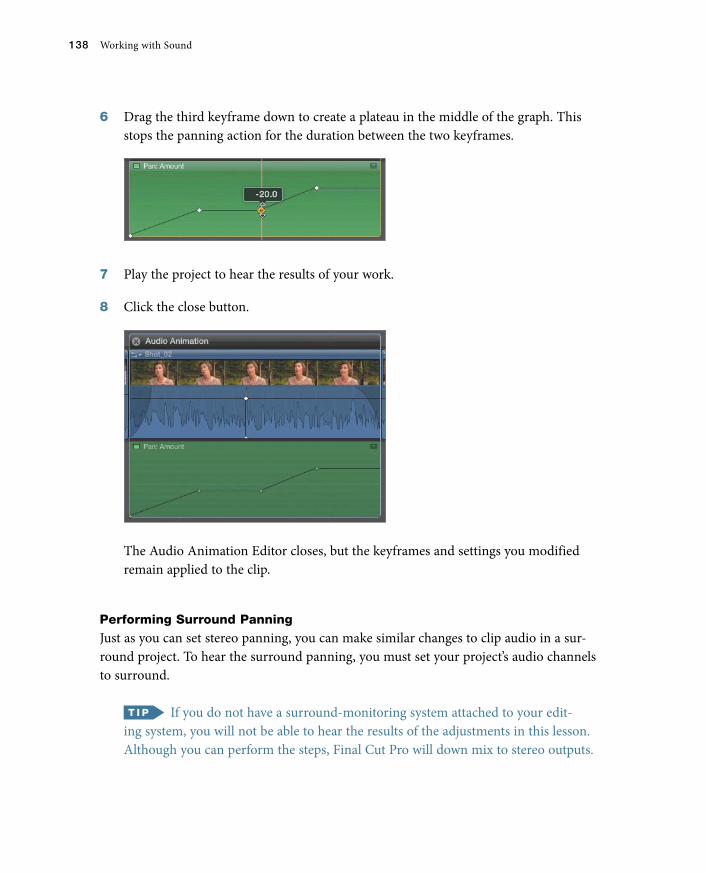
6 Drag the third keyframe down to create a plateau in the middle of the graph. This stops the panning action for the duration between the two keyframes.
7 Play the project to hear the results of your work.
8 Click the close button.
The Audio Animation Editor closes, but the keyframes and settings you modified remain applied to the clip.
Performing Surround PanningJust as you can set stereo panning, you can make similar changes to clip audio in a sur-round project. To hear the surround panning, you must set your project’s audio channels to surround.
If you do not have a surround-monitoring system attached to your edit-ing system, you will not be able to hear the results of the adjustments in this lesson. Although you can perform the steps, Final Cut Pro will down mix to stereo outputs.
Panning Audio 139
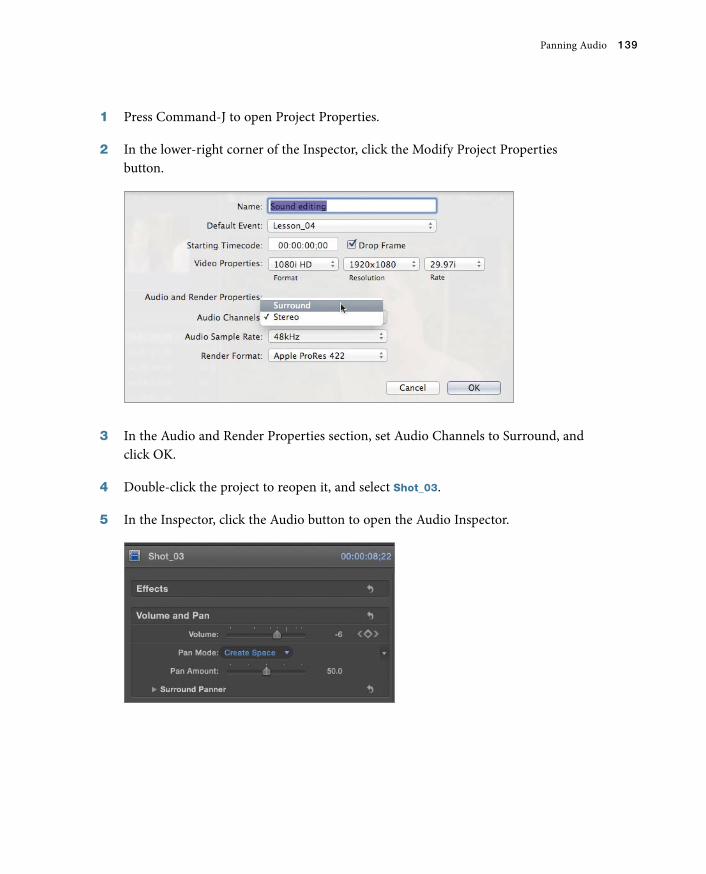
1 Press Command-J to open Project Properties.
2 In the lower-right corner of the Inspector, click the Modify Project Properties button.
3 In the Audio and Render Properties section, set Audio Channels to Surround, and click OK.
4 Double-click the project to reopen it, and select Shot_03.
5 In the Inspector, click the Audio button to open the Audio Inspector.
140 Working with Sound
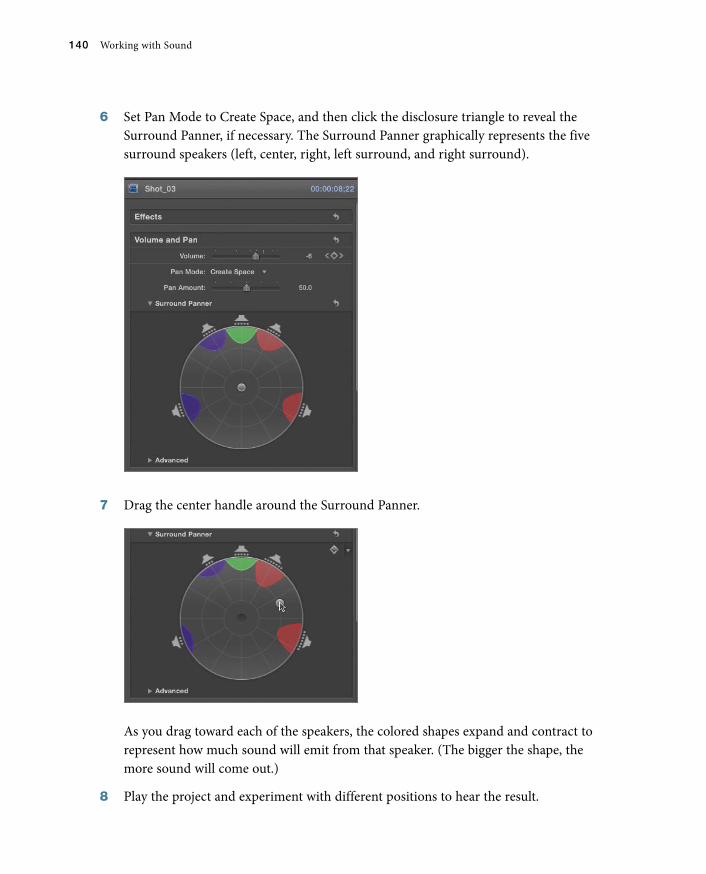
6 Set Pan Mode to Create Space, and then click the disclosure triangle to reveal the Surround Panner, if necessary. The Surround Panner graphically represents the five surround speakers (left, center, right, left surround, and right surround).
7 Drag the center handle around the Surround Panner.
As you drag toward each of the speakers, the colored shapes expand and contract to represent how much sound will emit from that speaker. (The bigger the shape, the more sound will come out.)
8 Play the project and experiment with different positions to hear the result.
Panning Audio 141
Keyframing Surround SoundYou can animate surround panning using one of two methods: by keyframing the Surround Panner itself, or by choosing one of the preset panning modes and keyframing the Pan Amount slider.
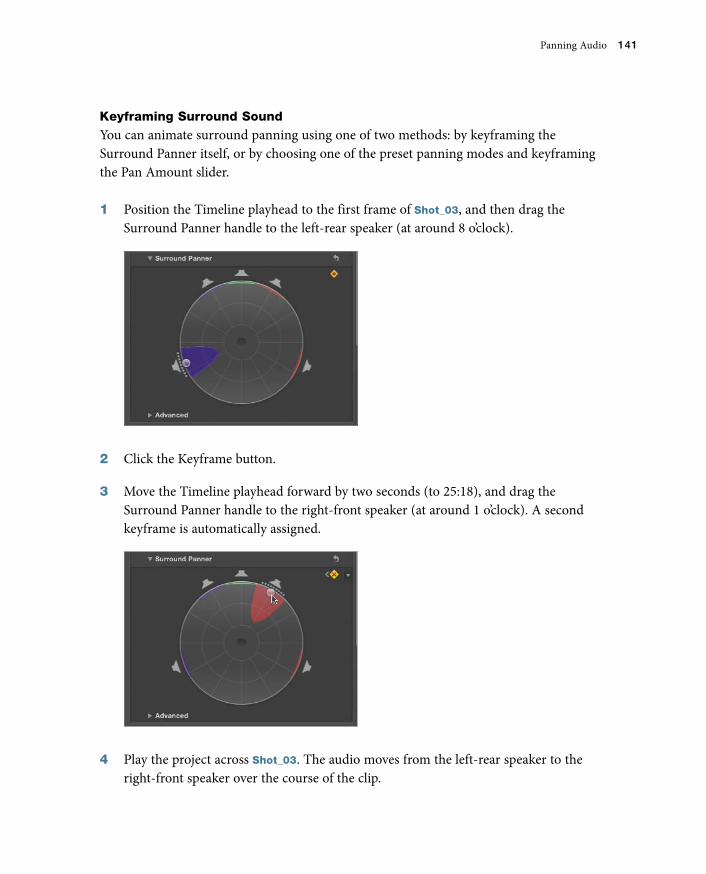
1 Position the Timeline playhead to the first frame of Shot_03, and then drag the Surround Panner handle to the left-rear speaker (at around 8 o’clock).
2 Click the Keyframe button.
3 Move the Timeline playhead forward by two seconds (to 25:18), and drag the Surround Panner handle to the right-front speaker (at around 1 o’clock). A second keyframe is automatically assigned.
4 Play the project across Shot_03. The audio moves from the left-rear speaker to the right-front speaker over the course of the clip.
142 Working with Sound
You can add as many keyframes as you like to create complex animations of your sound in the surround audio space.
Using Preset Pan MethodsYou can also employ one of the preset panning settings and keyframe the Pan Amount slider.
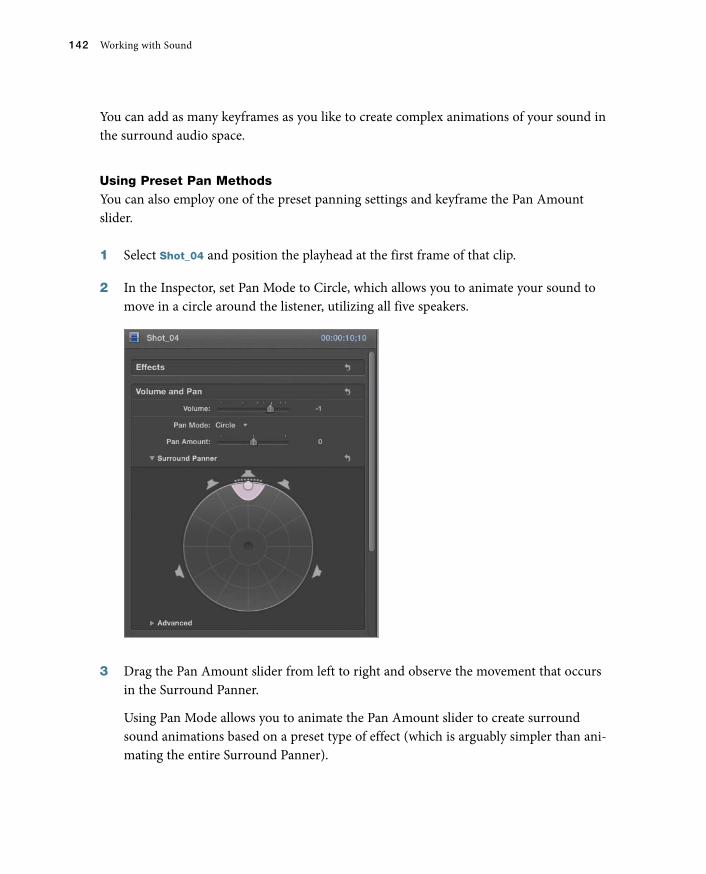
1 Select Shot_04 and position the playhead at the first frame of that clip.
2 In the Inspector, set Pan Mode to Circle, which allows you to animate your sound to move in a circle around the listener, utilizing all five speakers.
3 Drag the Pan Amount slider from left to right and observe the movement that occurs in the Surround Panner.
Using Pan Mode allows you to animate the Pan Amount slider to create surround sound animations based on a preset type of effect (which is arguably simpler than ani-mating the entire Surround Panner).
Panning Audio 143
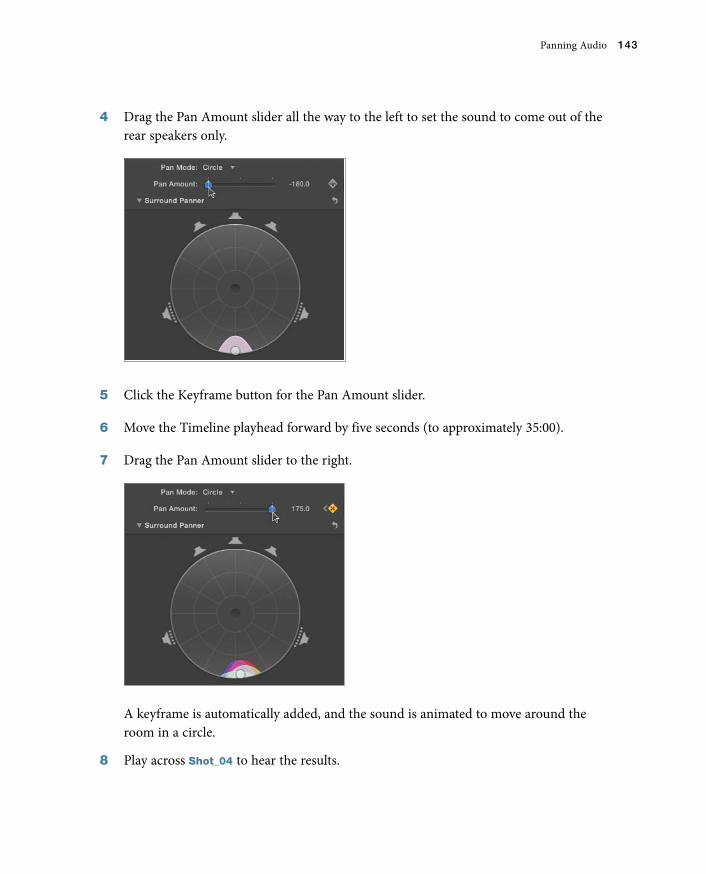
4 Drag the Pan Amount slider all the way to the left to set the sound to come out of the rear speakers only.
5 Click the Keyframe button for the Pan Amount slider.
6 Move the Timeline playhead forward by five seconds (to approximately 35:00).
7 Drag the Pan Amount slider to the right.
A keyframe is automatically added, and the sound is animated to move around the room in a circle.
8 Play across Shot_04 to hear the results.
144 Working with Sound
Alternatively, rather than creating a circle effect, you could select one of the other pan modes.
9 Set Pan Mode to Back to Front.
NOTE P Changing the pan mode automatically erases any keyframes assigned to the Pan Amount slider.
10 Move the Timeline playhead to the beginning of Shot_04 and repeat steps 5 through 9 as you observe the difference in the movement of the sound.
Managing Audio ChannelsMost clips include multiple audio channels. This could be two discrete mono tracks recorded in the camera, a stereo track in which the left and right channels are intended to pan in a specific way, or a multitrack clip with many audio channels that actively need to be managed. One common example of this is footage in which audio was recorded on a device separate from the video and the two signals were joined inside Final Cut Pro using the Synchronize Clips function as described in Appendix A.
Regardless of the number of tracks, you can manage which audio channels are active and which are ignored when you play a particular clip.
NOTE P You can change the active channels at any point in the editing process—either in the Event Browser before the clip is used, or after an instance of a clip has been added to a project.
Furthermore, active channels can be displayed in the Timeline collapsed into a single bar combined with the video, expanded into a separate audio-only bar, or broken apart so that each individual channel can be seen and modified independently.
Enabling and Disabling ChannelsYou manage audio channels in the Audio Inspector for the selected clip. There, you can skim the individual channels to identify the contents of each channel. You can also enable or disable individual channels, and select the audio format (stereo, surround, and so on). This latter setting instructs Final Cut Pro how to pan the individual channels by default.
1 In the Timeline, select Shot_05.
Managing Audio Channels 145
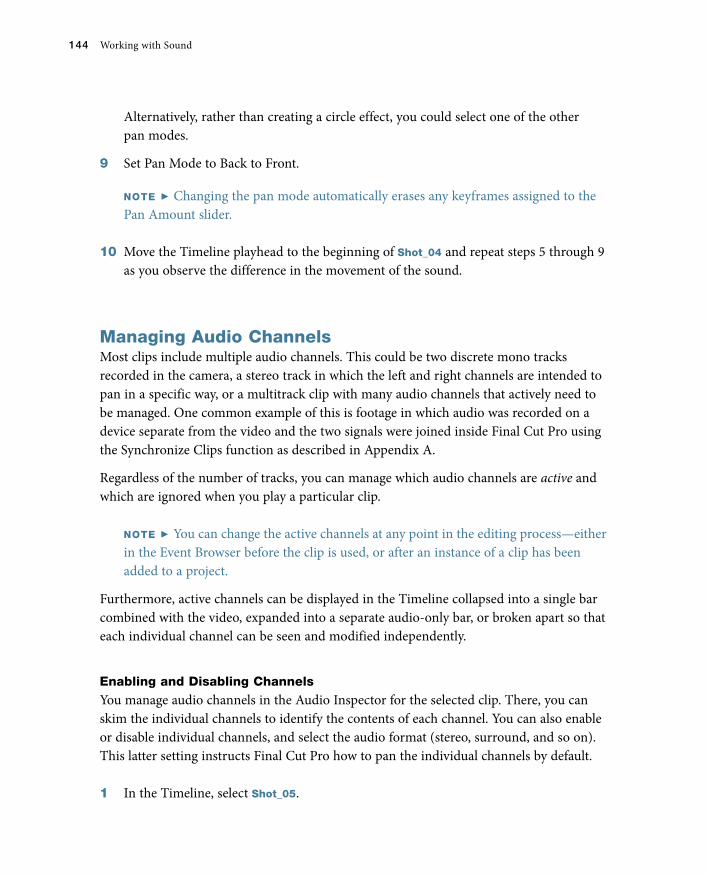
2 In the Audio Inspector, scroll down to view the Channel Configuration section. This clip contains two audio channels, marked as stereo. Because they are a stereo pair, they are represented by a single bar.
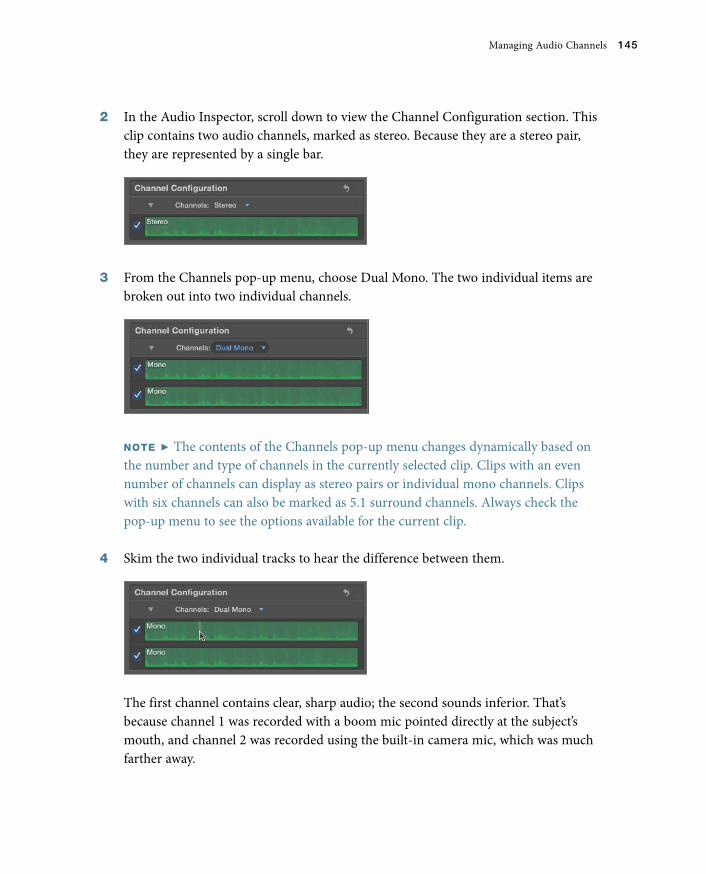
3 From the Channels pop-up menu, choose Dual Mono. The two individual items are broken out into two individual channels.
NOTE P The contents of the Channels pop-up menu changes dynamically based on the number and type of channels in the currently selected clip. Clips with an even number of channels can display as stereo pairs or individual mono channels. Clips with six channels can also be marked as 5.1 surround channels. Always check the pop-up menu to see the options available for the current clip.
4 Skim the two individual tracks to hear the difference between them.
The first channel contains clear, sharp audio; the second sounds inferior. That’s because channel 1 was recorded with a boom mic pointed directly at the subject’s mouth, and channel 2 was recorded using the built-in camera mic, which was much farther away.
146 Working with Sound
5 Deselect the checkbox to the left of the second channel to disable it. Now, the clip in the Timeline will play only the higher-quality channel 1 audio.
Breaking Apart Audio ClipsWhen you have more than one audio channel, you can expose each of the components as separate bars in the Timeline. This allows you to independently keyframe the volume, pan, and effects settings for each channel.
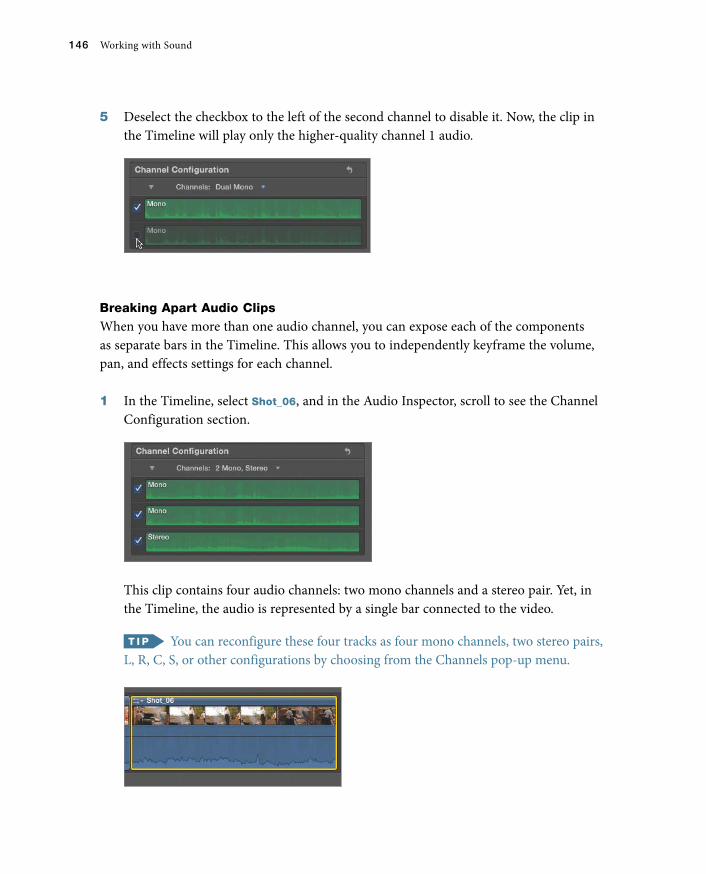
1 In the Timeline, select Shot_06, and in the Audio Inspector, scroll to see the Channel Configuration section.
This clip contains four audio channels: two mono channels and a stereo pair. Yet, in the Timeline, the audio is represented by a single bar connected to the video.
You can reconfigure these four tracks as four mono channels, two stereo pairs, L, R, C, S, or other configurations by choosing from the Channels pop-up menu.
Managing Audio Channels 147
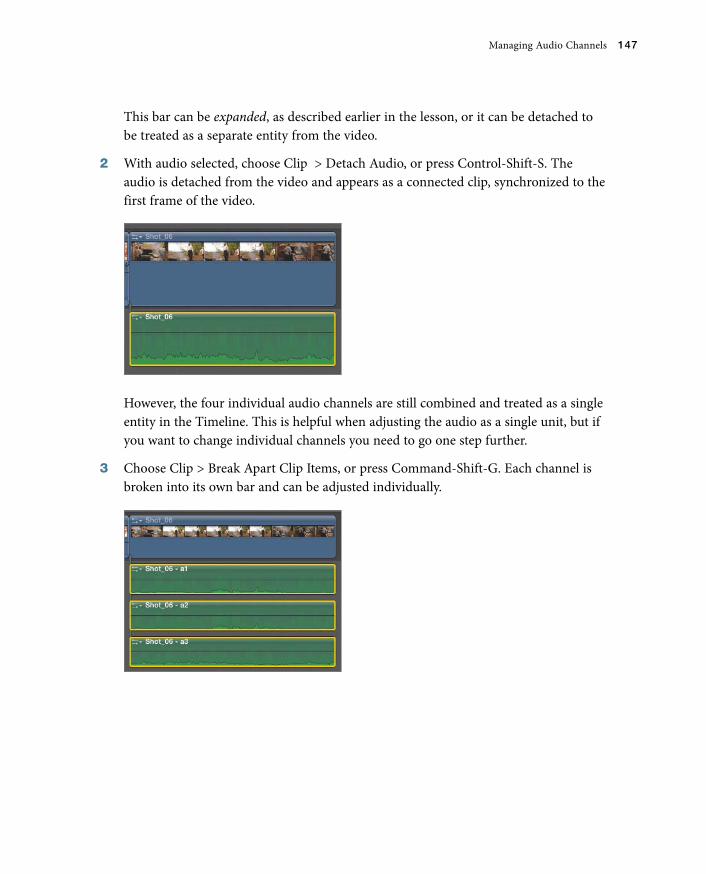
This bar can be expanded, as described earlier in the lesson, or it can be detached to be treated as a separate entity from the video.
2 With audio selected, choose Clip > Detach Audio, or press Control-Shift-S. The audio is detached from the video and appears as a connected clip, synchronized to the first frame of the video.
However, the four individual audio channels are still combined and treated as a single entity in the Timeline. This is helpful when adjusting the audio as a single unit, but if you want to change individual channels you need to go one step further.
3 Choose Clip > Break Apart Clip Items, or press Command-Shift-G. Each channel is broken into its own bar and can be adjusted individually.
148 Working with Sound
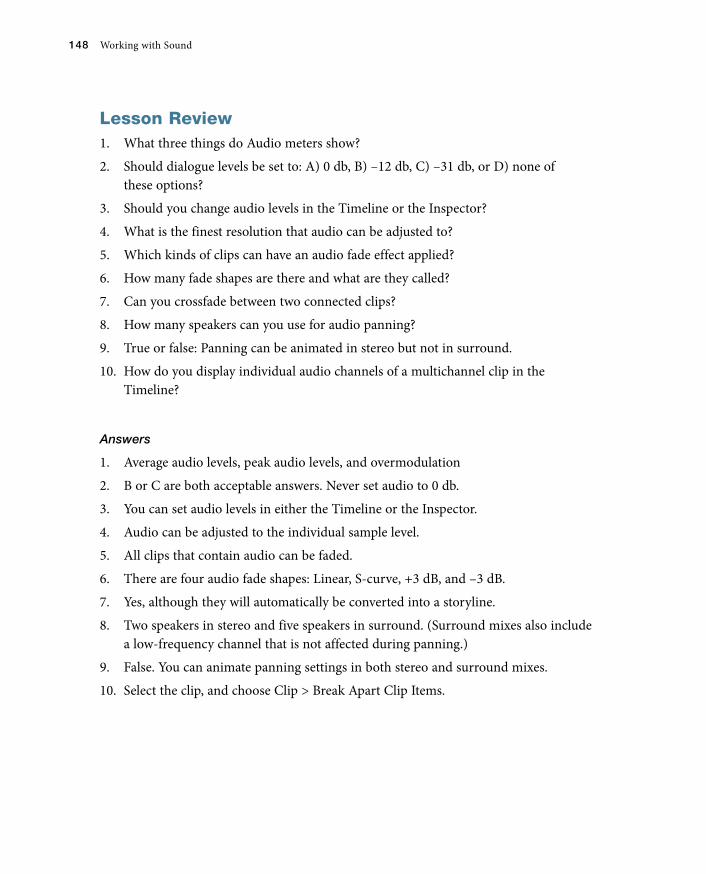
Lesson Review1. What three things do Audio meters show?
2. Should dialogue levels be set to: A) 0 db, B) –12 db, C) –31 db, or D) none of these options?
3. Should you change audio levels in the Timeline or the Inspector?
4. What is the finest resolution that audio can be adjusted to?
5. Which kinds of clips can have an audio fade effect applied?
6. How many fade shapes are there and what are they called?
7. Can you crossfade between two connected clips?
8. How many speakers can you use for audio panning?
9. True or false: Panning can be animated in stereo but not in surround.
10. How do you display individual audio channels of a multichannel clip in the Timeline?
Answers
1. Average audio levels, peak audio levels, and overmodulation
2. B or C are both acceptable answers. Never set audio to 0 db.
3. You can set audio levels in either the Timeline or the Inspector.
4. Audio can be adjusted to the individual sample level.
5. All clips that contain audio can be faded.
6. There are four audio fade shapes: Linear, S-curve, +3 dB, and –3 dB.
7. Yes, although they will automatically be converted into a storyline.
8. Two speakers in stereo and five speakers in surround. (Surround mixes also include a low-frequency channel that is not affected during panning.)
9. False. You can animate panning settings in both stereo and surround mixes.
10. Select the clip, and choose Clip > Break Apart Clip Items.
Lesson Review 149
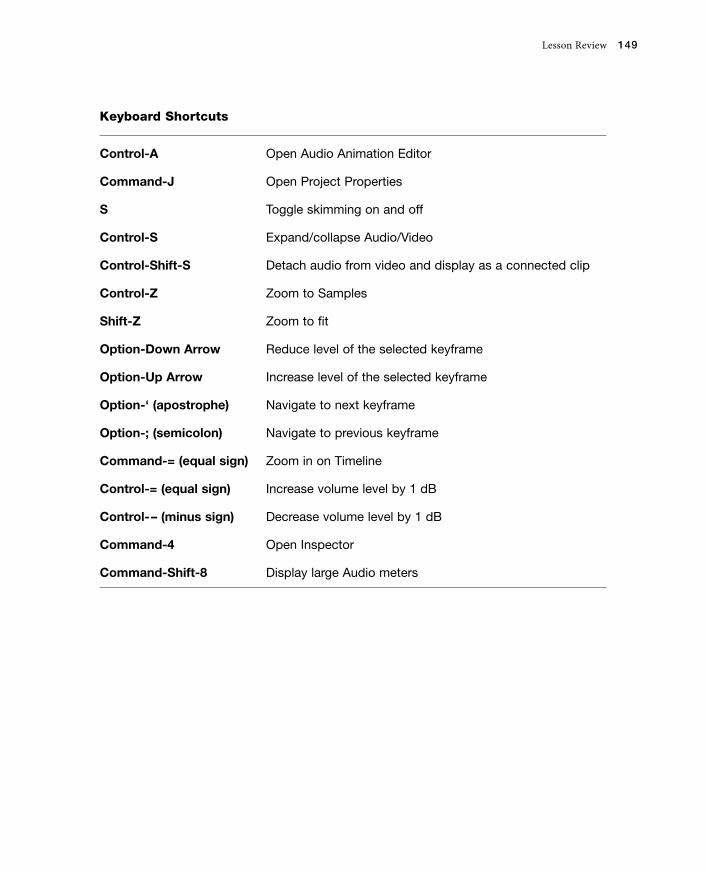
Keyboard Shortcuts
Control-A Open Audio Animation Editor
Command-J Open Project Properties
S Toggle skimming on and off
Control-S Expand/collapse Audio/Video
Control-Shift-S Detach audio from video and display as a connected clip
Control-Z Zoom to Samples
Shift-Z Zoom to fit
Option-Down Arrow Reduce level of the selected keyframe
Option-Up Arrow Increase level of the selected keyframe
Option-‘ (apostrophe) Navigate to next keyframe
Option-; (semicolon) Navigate to previous keyframe
Command-= (equal sign) Zoom in on Timeline
Control-= (equal sign) Increase volume level by 1 dB
Control-– (minus sign) Decrease volume level by 1 dB
Command-4 Open Inspector
Command-Shift-8 Display large Audio meters
Numbers+3 dB (fast-fade), 128–129-3 dB (slow-fade), 128–129720p HD, 201–2021080p HD, 201–202
AA (Select tool) shortcut key, 83Action pop-up menu
Apply Custom Name, 46–47Color Board, 431Event Library, 5managing metadata views
and, 24–25Active Video Angle pop-up
menu, 192Add (+) button, creating new
naming scheme, 48Add Custom Metadata Field, Event
Browser option, 18–19Add Keyframes button, in Viewer,
295, 297Add Rule (+) button, adding filter
criteria to searches, 40–43Add to Audition option, 93Adjustments pop-up menu, 467Aged Paper effect, adding to
multicamera clips, 213alignment, font, 278All Clips option (Control-C),
filtering clips, 28alternates, in auditions
Add to Audition option, 93changing picks, 87–89overview of, 86playing in context, 90removing, 94–95
Amount slider, Video Inspectorincreasing effect visibility, 97modifying and combining
effects, 267
analysis keywordsoverview of, 9removing, 12
Analyze and Fixfinding people, 7–8finding shaky camerawork,
14–15anchor parameter, transforming
clips, 295–296Anchor Points, transforming
clips, 261Angle Assembly setting,
196–197Angle Clip Ordering setting, 197Angle Editor
changing order of angles in Angle Viewer, 207–210
effects, 212–213fixing sync errors, 204–207modifying multicamera clips,
203–204syncing new or added clip,
210–211Angle Synchronization setting,
198–200Angle Viewer
changing order of angles in, 207–210
changing visible angles, 182–186
cutting between angles, 188–189
editing multicamera clips and, 187
settings, 202switching angles, 191–192video-only cuts when editing
multicamera clips, 189–190
viewing multicamera clips, 181–182
angles, of multicamera clipsAngle Assembly setting,
196–197Angle Clip Ordering
setting, 197Angle Synchronization
setting, 198–200changing order of angles in
Angle Viewer, 207–210changing the Angle Viewer,
182–186cuts between, 188–189displaying angle names, 191number of angles
possible, 180switching angles, 191–192
animationadding effects to video, 265audio effects and, 171–175of audio levels, 113–114,
119–121of clip position, 294creating a travel matte,
314–318of generators, 306–313in Inspector, 299–301keyboard shortcuts, 324overview of, 293–294of pan effects, 135of panning audio, 136–138review, 323–324of shape masks, 465–468of surround sound, 141–142of titles, 279–283transitions creating, 318–323in Video Animation Editor,
301–306in Viewer, 294–299
append editsadding clips to projects,
54–56
Index 525
editing multicamera clips and, 187
limiting source media while editing, 65
Apple Delay effect, Echo effects, 166Apple Pro Certification Program,
vii–viiiApple Pro Training Series: Final Cut
Pro X Advanced Editingabout the training services, viiresources, vii
Apple Pro Training Series: Final Cut Pro X (Weynand), 105
Apple Pro Training Services, about, vii
Apply Color Correction commands, 422–423
assembly, adding clips to projects, 54attenuation
EQ adjustments and, 152, 155keyboard shortcuts, 122
audioadding metadata to clips, 20animating audio levels, 113–114animating audio levels in Audio
Inspector, 119–121animating pan effects, 135audio meters, 106–108breaking clips apart, 146–147choosing panning environment,
130–133crossfade effects, 124–127custom settings, 220deleting keyframes, 121detaching video from, 147disabling, 319editing separately from video
portion of multicam clip, 189–190
enabling/disabling audio channels, 144–146
fade shapes, 127–130fades, 123–124fixing overmodulated audio,
109–110how loud is too loud, 108–109keyboard shortcuts, 149keyframing surround sound,
141–142mixers, 108–109
nudging keyframes, 122–123overview of, 105panning, 130panning in Timeline, 136–138preset pan methods, 142–144resetting levels, 121review, 148roles for tagging audio
clips, 283searching by sampling rates, 44searching by tracks, 44setting levels generally, 106setting levels in Timeline,
111–113setting levels with Inspector,
116–119setting levels with keyboard
shortcuts, 122stereo panning, 133–134subframe adjustments to,
114–116surround panning, 138–140for synchronization of
multicamera clips, 200, 202
Audio Animation Editorin Clip menu, 306panning in Timeline, 136–138
audio effectsanimating, 171–173applying equalization effects,
156–161controlling, 161distortion presets, 168–169equalization and, 152–156keyboard shortcuts, 177Levels effects, 163–164modifying animations, 174–175overview of, 151pitch shifting and voice effects,
169–170removing, 162Reverb and Echo effects,
164–167review, 176toggling, 161–162transferring between clips,
162–163Audio Enhancements
in Audio Inspector, 153
automatic, 151Loudness setting in, 163
Audio Inspectoranimating audio levels, 119–121Audio Enhancements, 153breaking audio clips apart,
146–147deleting keyframes, 121Less Bass effect, 157–158managing audio channels,
144–146pre-EQ and post-EQ results,
160–161removing clip effects, 162resetting audio levels, 121setting audio levels, 116–119Space Designer, 166toggling clip effects, 161–162viewing effect of Channel EQ,
159–160audio meters
understanding, 106–108viewing project panning
environment, 132Audio Only option, Source Media
pop-up menu, 66Audio View option, Metadata View
pop-up menu, 20Audition window, 87–88, 90auditions
applying effects to all picks, 101applying effects to other clips,
101–102changing picks, 87–88creating in Event Browser, 86–87creating in Timeline, 91–94duplicating clips from original,
98–100duplicating clips to create
alternate, 96–98duplicating clips without
adding effects, 100editing with, 88–90finalizing, 95keyboard shortcuts, 103modifying, 94–95navigating clips in, 93overview of, 85previewing, 90–91review, 102–103
526 Index
auto-analysis metadata, 7creating additional people-
related keywords, 13finding people using facial
recognition, 7–12finding shaky camerawork, 13–15overview of, 3–4removing analysis keywords, 12types of automatic metadata, 4
A/V output, 331average highlights, in Waveform
Monitor, 359average levels, audio meters
showing, 107average midtones, in Waveform
Monitor, 360–361
Bbackground noise
audio levels and, 106removing, 151
background rendering, turning off, 220, 328
Background Squares effect, Effects Browser, 77
Background Tasks windows, viewing progress of background analysis, 9
backgroundsadding graphics to, 248–250removing colored background,
225–227backtiming edits
benefits of, 53overview of, 64–65
Balance Color command, 342Basic View option, Metadata View
pop-up menu, 19Bass Boost equalization setting, 153bass roll-off effect, 156Black & White, adding effects to
video, 266, 269black point
copying grades between clips and, 421
in Waveform Monitor, 360, 362working inside and outside of
color masks, 449
Blade transition, for splitting clips, 400
Blend Mode pop-up menu, 249blend modes
for compositing layers, 247experimenting with, 251–252Hard Light blend mode,
252, 318Overlay blend mode, 249–250Stencil Alpha blend mode, 316
boostEQ adjustments and, 152keyboard shortcuts for, 122
bounding boxes, scaling, 308, 310Break Apart Clip Items option, Clip
menumanaging audio channels, 147removing clip from storyline, 73removing generator from
storyline, 307Brightness slider, Settings pop-up
menu, 357Broadcast Safe effect, 434–437b-roll
auditions for comparing and selecting, 85
creating, 53
Ccalibration, of display, 330–331camera angles
auditions for comparing and selecting, 85, 93
searching by, 44cameras
finding shaky camerawork, 13–15
recording channels of audio, 131source media metadata, 4
Car Radio effect, 162–163, 168cataloging clips, metadata for, 3certification, Apple Pro Certification
Program, vii–viiiChannel EQ interface, 159–160channels, audio
audio meters showing, 107breaking audio clips apart,
146–147
enabling/disabling, 144–146overview of, 144performing surround panning,
138–140recording, 131relinking and, 336searching by, 44
Channels pop-up menu, 146Chroma color wheel
adjusting inner graph of, 236–237
in Color Selection controls, 235chroma component, of video
clip, 357Chroma Rolloff parameter, 236Clip Appearance button, 247Clip Info section, of Format field, 49Clip menu
Audio Animation Editor, 136, 306
Break Apart Clip Items option, 73, 147
Solo Animation command in, 173
clip-based metadatacreating custom fields, 18–19customizing views, 21–24entering for multiple clips, 17managing views, 24–25organizing, 19overview of, 16switching between views, 19–20
clipsanimation of clip position, 294applying effects to, 101–102audio. see audiocataloging, 3clip-based metadata. see clip-
based metadatacompound. see compound clipsconnected. see connected clipsduplicating. see duplicating clipsentering metadata for
multiple, 17filtering. see filtering clipsintraclip-based metadata. see
intraclip-based metadatamulticamera. see
multicamera clipsrating, 25–27
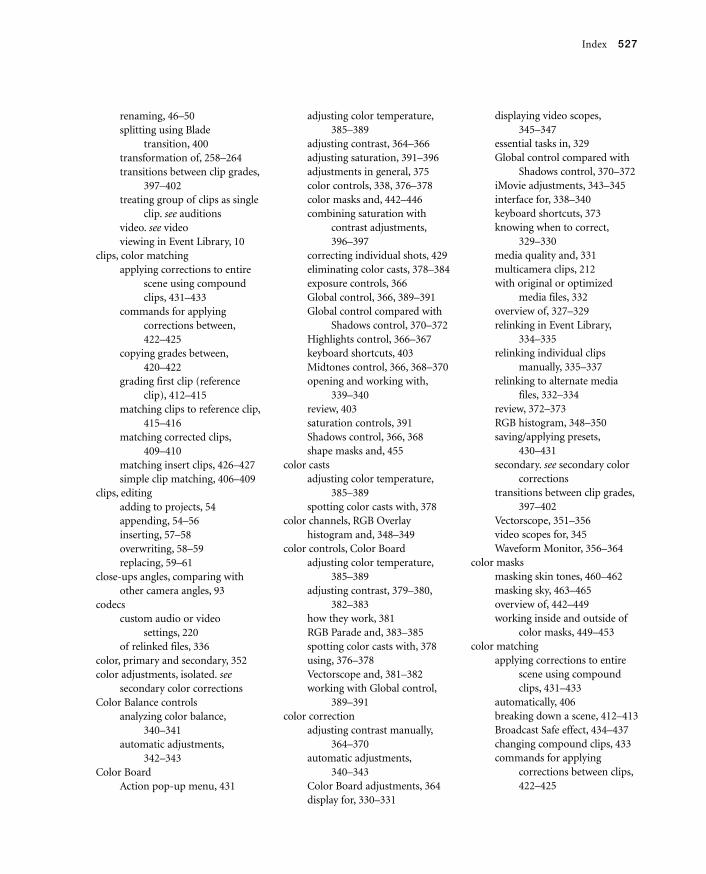
Index 527
renaming, 46–50splitting using Blade
transition, 400transformation of, 258–264transitions between clip grades,
397–402treating group of clips as single
clip. see auditionsvideo. see videoviewing in Event Library, 10
clips, color matchingapplying corrections to entire
scene using compound clips, 431–433
commands for applying corrections between, 422–425
copying grades between, 420–422
grading first clip (reference clip), 412–415
matching clips to reference clip, 415–416
matching corrected clips, 409–410
matching insert clips, 426–427simple clip matching, 406–409
clips, editingadding to projects, 54appending, 54–56inserting, 57–58overwriting, 58–59replacing, 59–61
close-ups angles, comparing with other camera angles, 93
codecscustom audio or video
settings, 220of relinked files, 336
color, primary and secondary, 352color adjustments, isolated. see
secondary color correctionsColor Balance controls
analyzing color balance, 340–341
automatic adjustments, 342–343
Color BoardAction pop-up menu, 431
adjusting color temperature, 385–389
adjusting contrast, 364–366adjusting saturation, 391–396adjustments in general, 375color controls, 338, 376–378color masks and, 442–446combining saturation with
contrast adjustments, 396–397
correcting individual shots, 429eliminating color casts, 378–384exposure controls, 366Global control, 366, 389–391Global control compared with
Shadows control, 370–372Highlights control, 366–367keyboard shortcuts, 403Midtones control, 366, 368–370opening and working with,
339–340review, 403saturation controls, 391Shadows control, 366, 368shape masks and, 455
color castsadjusting color temperature,
385–389spotting color casts with, 378
color channels, RGB Overlay histogram and, 348–349
color controls, Color Boardadjusting color temperature,
385–389adjusting contrast, 379–380,
382–383how they work, 381RGB Parade and, 383–385spotting color casts with, 378using, 376–378Vectorscope and, 381–382working with Global control,
389–391color correction
adjusting contrast manually, 364–370
automatic adjustments, 340–343
Color Board adjustments, 364display for, 330–331
displaying video scopes, 345–347
essential tasks in, 329Global control compared with
Shadows control, 370–372iMovie adjustments, 343–345interface for, 338–340keyboard shortcuts, 373knowing when to correct,
329–330media quality and, 331multicamera clips, 212with original or optimized
media files, 332overview of, 327–329relinking in Event Library,
334–335relinking individual clips
manually, 335–337relinking to alternate media
files, 332–334review, 372–373RGB histogram, 348–350saving/applying presets,
430–431secondary. see secondary color
correctionstransitions between clip grades,
397–402Vectorscope, 351–356video scopes for, 345Waveform Monitor, 356–364
color masksmasking skin tones, 460–462masking sky, 463–465overview of, 442–449working inside and outside of
color masks, 449–453color matching
applying corrections to entire scene using compound clips, 431–433
automatically, 406breaking down a scene, 412–413Broadcast Safe effect, 434–437changing compound clips, 433commands for applying
corrections between clips, 422–425
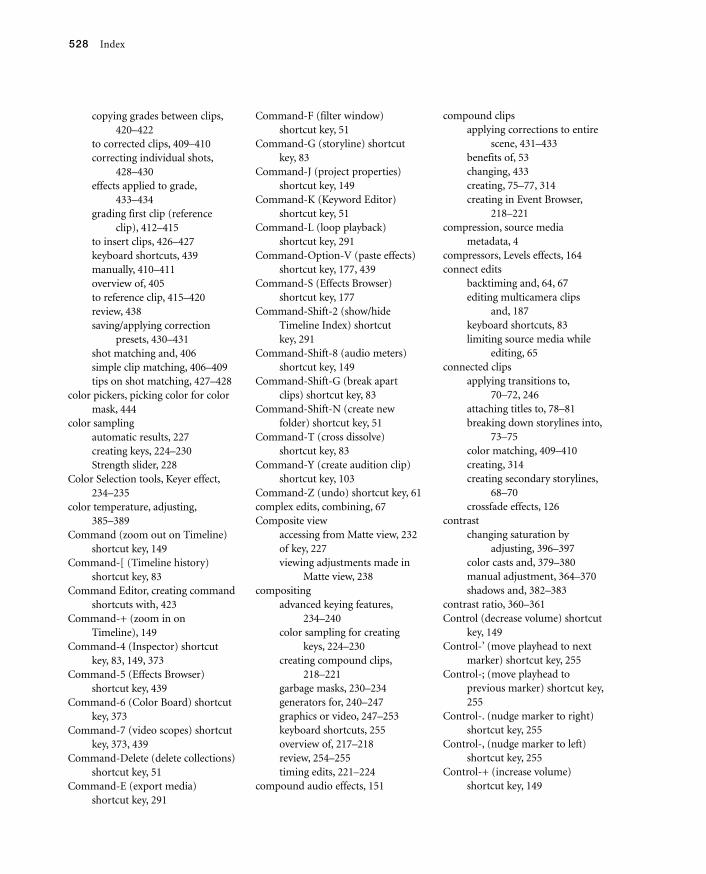
528 Index
copying grades between clips, 420–422
to corrected clips, 409–410correcting individual shots,
428–430effects applied to grade,
433–434grading first clip (reference
clip), 412–415to insert clips, 426–427keyboard shortcuts, 439manually, 410–411overview of, 405to reference clip, 415–420review, 438saving/applying correction
presets, 430–431shot matching and, 406simple clip matching, 406–409tips on shot matching, 427–428
color pickers, picking color for color mask, 444
color samplingautomatic results, 227creating keys, 224–230Strength slider, 228
Color Selection tools, Keyer effect, 234–235
color temperature, adjusting, 385–389
Command (zoom out on Timeline) shortcut key, 149
Command-[ (Timeline history) shortcut key, 83
Command Editor, creating command shortcuts with, 423
Command-+ (zoom in on Timeline), 149
Command-4 (Inspector) shortcut key, 83, 149, 373
Command-5 (Effects Browser) shortcut key, 439
Command-6 (Color Board) shortcut key, 373
Command-7 (video scopes) shortcut key, 373, 439
Command-Delete (delete collections) shortcut key, 51
Command-E (export media) shortcut key, 291
Command-F (filter window) shortcut key, 51
Command-G (storyline) shortcut key, 83
Command-J (project properties) shortcut key, 149
Command-K (Keyword Editor) shortcut key, 51
Command-L (loop playback) shortcut key, 291
Command-Option-V (paste effects) shortcut key, 177, 439
Command-S (Effects Browser) shortcut key, 177
Command-Shift-2 (show/hide Timeline Index) shortcut key, 291
Command-Shift-8 (audio meters) shortcut key, 149
Command-Shift-G (break apart clips) shortcut key, 83
Command-Shift-N (create new folder) shortcut key, 51
Command-T (cross dissolve) shortcut key, 83
Command-Y (create audition clip) shortcut key, 103
Command-Z (undo) shortcut key, 61complex edits, combining, 67Composite view
accessing from Matte view, 232of key, 227viewing adjustments made in
Matte view, 238compositing
advanced keying features, 234–240
color sampling for creating keys, 224–230
creating compound clips, 218–221
garbage masks, 230–234generators for, 240–247graphics or video, 247–253keyboard shortcuts, 255overview of, 217–218review, 254–255timing edits, 221–224
compound audio effects, 151
compound clipsapplying corrections to entire
scene, 431–433benefits of, 53changing, 433creating, 75–77, 314creating in Event Browser,
218–221compression, source media
metadata, 4compressors, Levels effects, 164connect edits
backtiming and, 64, 67editing multicamera clips
and, 187keyboard shortcuts, 83limiting source media while
editing, 65connected clips
applying transitions to, 70–72, 246
attaching titles to, 78–81breaking down storylines into,
73–75color matching, 409–410creating, 314creating secondary storylines,
68–70crossfade effects, 126
contrastchanging saturation by
adjusting, 396–397color casts and, 379–380manual adjustment, 364–370shadows and, 382–383
contrast ratio, 360–361Control (decrease volume) shortcut
key, 149Control-’ (move playhead to next
marker) shortcut key, 255Control-; (move playhead to
previous marker) shortcut key, 255
Control-. (nudge marker to right) shortcut key, 255
Control-, (nudge marker to left) shortcut key, 255
Control-+ (increase volume) shortcut key, 149
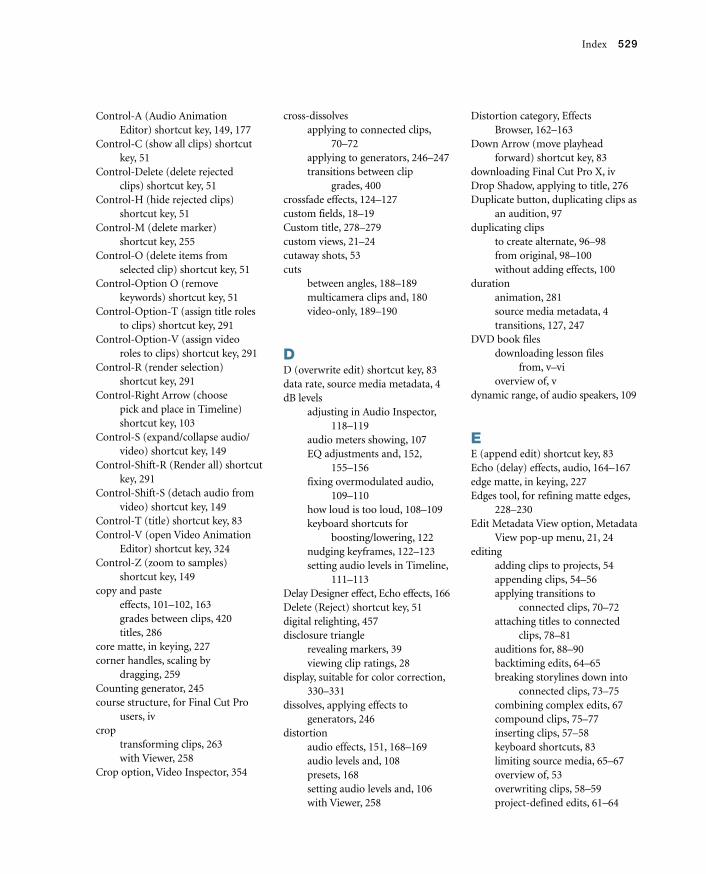
Index 529
Control-A (Audio Animation Editor) shortcut key, 149, 177
Control-C (show all clips) shortcut key, 51
Control-Delete (delete rejected clips) shortcut key, 51
Control-H (hide rejected clips) shortcut key, 51
Control-M (delete marker) shortcut key, 255
Control-O (delete items from selected clip) shortcut key, 51
Control-Option O (remove keywords) shortcut key, 51
Control-Option-T (assign title roles to clips) shortcut key, 291
Control-Option-V (assign video roles to clips) shortcut key, 291
Control-R (render selection) shortcut key, 291
Control-Right Arrow (choose pick and place in Timeline) shortcut key, 103
Control-S (expand/collapse audio/video) shortcut key, 149
Control-Shift-R (Render all) shortcut key, 291
Control-Shift-S (detach audio from video) shortcut key, 149
Control-T (title) shortcut key, 83Control-V (open Video Animation
Editor) shortcut key, 324Control-Z (zoom to samples)
shortcut key, 149copy and paste
effects, 101–102, 163grades between clips, 420titles, 286
core matte, in keying, 227corner handles, scaling by
dragging, 259Counting generator, 245course structure, for Final Cut Pro
users, ivcrop
transforming clips, 263with Viewer, 258
Crop option, Video Inspector, 354
cross-dissolvesapplying to connected clips,
70–72applying to generators, 246–247transitions between clip
grades, 400crossfade effects, 124–127custom fields, 18–19Custom title, 278–279custom views, 21–24cutaway shots, 53cuts
between angles, 188–189multicamera clips and, 180video-only, 189–190
DD (overwrite edit) shortcut key, 83data rate, source media metadata, 4dB levels
adjusting in Audio Inspector, 118–119
audio meters showing, 107EQ adjustments and, 152,
155–156fixing overmodulated audio,
109–110how loud is too loud, 108–109keyboard shortcuts for
boosting/lowering, 122nudging keyframes, 122–123setting audio levels in Timeline,
111–113Delay Designer effect, Echo effects, 166Delete (Reject) shortcut key, 51digital relighting, 457disclosure triangle
revealing markers, 39viewing clip ratings, 28
display, suitable for color correction, 330–331
dissolves, applying effects to generators, 246
distortionaudio effects, 151, 168–169audio levels and, 108presets, 168setting audio levels and, 106with Viewer, 258
Distortion category, Effects Browser, 162–163
Down Arrow (move playhead forward) shortcut key, 83
downloading Final Cut Pro X, ivDrop Shadow, applying to title, 276Duplicate button, duplicating clips as
an audition, 97duplicating clips
to create alternate, 96–98from original, 98–100without adding effects, 100
durationanimation, 281source media metadata, 4transitions, 127, 247
DVD book filesdownloading lesson files
from, v–vioverview of, v
dynamic range, of audio speakers, 109
EE (append edit) shortcut key, 83Echo (delay) effects, audio, 164–167edge matte, in keying, 227Edges tool, for refining matte edges,
228–230Edit Metadata View option, Metadata
View pop-up menu, 21, 24editing
adding clips to projects, 54appending clips, 54–56applying transitions to
connected clips, 70–72attaching titles to connected
clips, 78–81auditions for, 88–90backtiming edits, 64–65breaking storylines down into
connected clips, 73–75combining complex edits, 67compound clips, 75–77inserting clips, 57–58keyboard shortcuts, 83limiting source media, 65–67overview of, 53overwriting clips, 58–59project-defined edits, 61–64
530 Index
replacing clips, 59–61review, 82secondary storylines, 68–70timing edits with markers and
Hold segments, 221–224effects
animating with sliders, 294applying to all picks, 101applying to generators, 243–246applying to grate, 433–434applying to other clips, 101–102audio. see audio effectsauditions for sampling, 95–96browsing, previewing, and
applying, 264–267complex, 157duplicating clips without
adding effects, 100modifying and combining,
267–270multicamera clips, 212–213review, 290–291
Effects Browserapplying effects to
generators, 244Background Squares effect, 77Broadcast Safe effect, 435Cathedral effect, 171–173Distortion category, 162–163EQ category, 157–158Glory effect, 100Light category, 268Memory effect, 98–99multicamera clips and, 212opening, 224–225Remove High Frequencies
effect, 159Romantic effect, 96Spaces category, 165Stylize category, 101, 265,
433–434ending points, editing clips and, 64equalization (EQ)
applying effects, 156–161overview of, 152–156
Equalization pop-up menu, 153–154Event Browser
Add Custom Metadata Field option, 18–19
Analyze and Fix option, 7–8, 10
creating auditions, 86–87creating compound clips,
218–221Filter pop-up menu, 28List View option, 11playing multicamera clip in, 182Shift-click for selecting multiple
clips, 17Synchronize Clips command, 76video scopes and, 347
Event LibraryAction pop-up menu, 5Keyword Collection in, 30organizing keywords, 33–34relinking media in, 334–336viewing clips in, 10
eventsautomatic metadata added to, 4searching for metadata related
to, 39EXIF View option, Metadata View
pop-up menu, 19–20expanders, Levels effects, 164exporting titles, 288exposure controls, Color Board
adjusting contrast, 379, 382–383animating shape masks, 466applying corrections between
clips, 424correcting individual shots, 429creating first clip (reference
clip) and, 414–415Global control, 366Highlights control, 366–367masking skin tones, 462matching clips to reference clip
and, 417–418Midtones control, 366, 368–370overview of, 366Shadows control, 366, 368shape masks and, 455transitions between clip
grades, 401Extended View option, Metadata
View pop-up menu, 6, 16eyedropper
color masks and, 445–446, 448–449
masking skin tones, 461
FF (favorites) shortcut key, 51facial recognition
finding people, 7–12types of auto-analysis, 7
fadesanimating audio levels in
Timeline, 113applying to connected clips, 72audio effects, 123–124crossfade effects, 124–127keyframing in Video Animation
Editor and, 304setting fade shapes, 127–130
Fat EQ parameter, 158Favorite rating
append edits, 56creating compound clips
and, 219marking clip as, 44–45selecting clips as, 25–27
Feathering, softening matte edges, 232
fieldscreating custom, 18–19deleting, 25viewing using Inspector, 6
Fill, applying solid color, 316Filter pop-up menu
filtering clips, 28hiding rejected clips, 220selecting favorite clips, 219
Filter windowclosing, 45–46New Smart Collection option,
44–45opening, 40
filtering clipsclearing filters, 46overview of, 37by ratings, 28searching for metadata, 39–44searching for text, 37–39by text, 22
filtersapplying equalization effects,
156–161auditions for comparing and
selecting, 85distortion, 168
Index 531
finishingcolor correction. see color
correctiondefined, 327
folders, creating new, 34fonts
changing size of, 285presets, 278sizing, 274–275types of, 275
Format field, 48–49formats
custom audio or video settings, 220
multicamera clip settings, 201–202
text, 276frame rate
custom audio or video settings, 220
relinking and, 336rendering projects at full frame
rate, 283searching by, 44of source media metadata, 4
frame sizesearching by, 44of source media metadata, 4
frames, dropping frames during playback, 183–184
Ggarbage masks, 230–234gates, Levels effects, 164General View option, Metadata
View pop-up menu, 21–22Generator Inspector, 316generators
animating, 306–313applying effects to, 243–244examples of types of, 245–246previewing, 241replacing in Timeline, 243selecting and connecting to
storyline, 241–242Type options, Tint Color, and
Tint Amount, 242Generators Browser, 241Global color control, 389–391
Global exposure controlColor Board, 366color masks and, 442compared with Shadows
control, 370–372Global saturation control, 392–394Glory effect, Effects Browser, 100Glow effect, adding to video, 268gradient
black to white, 376Spill Contrast gradient, 239
gradingcommands for applying
corrections between clips, 422–425
copying grades between clips, 420–422
creating first clip (reference clip), 412–415
effects applied to, 433–434matching clips to reference clip,
415–420Graphic Equalizer, 154–156graphics. see also video
adding effects to video, 265–266adding layered graphics files to
projects, 253compositing, 247–252keyframing in Video Animation
Editor, 303–306titles. see titles
Grunge generator, 241–243
Hhard drive, monitoring performance
of, 183–184Hard Light blend mode, 252, 318headroom, mixing audio and, 108Helvetica font, sizing, 275Hide Rejected option (Control-H),
filtering clips, 28high-contrast ratio, 360highlights
Protect Highlights parameter, 267–268
rebalancing, 378–379in Waveform Monitor, 359, 361
Highlights color controladjusting color, 383–384
adjusting color temperature, 387
correcting individual shots, 429masking sky, 464matching corrected clips, 409matching insert clips, 427rebalancing highlights, 378–379transitions between clip
grades, 398working inside and outside of
color masks, 451Highlights exposure control
animating shape masks, 466applying corrections between
clips, 424Broadcast Safe effect, 435Color Board, 366–367creating first clip (reference
clip) and, 414–415masking skin tones, 462matching reference clips, 417shape masks and, 455transitions between clip
grades, 401working inside and outside of
color masks, 450Highlights saturation control
changing saturation with contrast adjustments, 396–397
matching reference clips, 419overview of, 395
histogramsmatching corrected clips,
409–410RGB Overlay histogram, 348–350
Hold segmentsextending clip duration to
marker, 221–223keyboard shortcuts, 255placing playhead at start of, 270timing edits with, 221–224
Home shortcut key, 51Hue/Saturation effect, 266–267, 269hum, audio effect for removing, 151
II (start point) shortcut key, 51, 55illuminant (dominant light), quality
of, 452

532 Index
iMovie, color correction adjustments, 343–345
import, analyzing color balance during, 343
Includes pop-up menu, filtering clips and, 40–43
Info Inspectorviewing data fields, 6viewing field descriptions,
18–19viewing source media
metadata, 4inner graph, of Chroma wheel,
236–237insert clips, color matching, 426–427insert edits
adding clips to projects, 57–58editing multicamera clips
and, 187limiting source media while
editing, 65Inside Mask, 446, 449–453Inspector
adjusting keyframes in, 313keyframing in, 299–301
InspectorsAudio Inspector. see Audio
InspectorGenerator Inspector, 316Info Inspector, 4, 6, 18–19Text Inspector, 79, 276, 284Title Inspector, 276, 279–280Video Inspector. see Video
Inspectorinterface, for color correction,
338–340interpolation, of values between
keyframes, 294intraclip-based metadata
adding keywords, 28–33filtering by ratings, 28organizing keywords, 33–35overview of, 25rating clips, 25–27
Kkeyboard shortcuts
animation, 324audio, 149
audio effects, 177audio levels, 122auditions, 103color matching, 439compositing and keying, 255editing, 91metadata-related, 51on portable Mac vs. desktop
Mac, viswitching angles, 192titles, 291
Keyer effectadvanced features, 234–240determining color sampling
amount, 228garbage masks, 230–234removing colored background,
225–227stacking order of, 233as travel matte, 314
keyframesaudio effects, 171–175audio levels, 113–114, 119–121creating and manipulating, 294creating animation with, 293deleting, 121in Inspector, 299–301multicamera clips, 212nudging, 122–123Pan Amount slider, 142–144pan effects, 135panning audio in Timeline,
136–138for Position and Scale
parameters, 307–308shape masks, 466–467subframe adjustments to audio,
114–116surround sound, 141–142in Video Animation Editor,
301–306in Viewer, 294–299
keyingadvanced features, 234–240determining color sampling
amount, 228garbage masks, 230–234keyboard shortcuts, 255Keying category of Effects
Browser, 225
overview of, 217–218, 224refining matte edges, 228–229removing colored background,
225–227softening matte edges, 232
Keying category, of Effects Browser, 225
Keyword Collectionin Event Library, 30organizing keywords, 33–35
Keyword Editoradding keywords, 30–33opening, 30overview of, 25
keywordsadding, 28–33analysis keywords, 9creating people-related
keywords, 13organizing, 33–35removing analysis keywords, 12
LL (play clip) shortcut key, 51LCD displays, 330Less Bass effect, 157Levels effects, 163–164Light category, Effects Browser, 268Light Wrap feature, adjusting matte
detail, 240limiters, Levels effects, 164linear
fade shapes, 127keyframing in Video Animation
Editor, 306list view, icon for multicamera
clips, 181List View option, Event Browser, 11logs/logging, clip-based metadata, 16Looks section, Effects Browser, 96,
264–265looping playback
disabling, 319previewing video clips, 219starting/stopping, 91titles and, 272
low-contrast ratio, Waveform Monitor and, 360
Lower third titles, 272
Index 533
lumaadjusting contrast, 379–380,
382–383color masks and, 442copying grades between
clips, 421creating first clip (reference
clip), 414–415histogram and, 349matching clips to reference clip,
415–416video clips broken down
into luma and chroma components, 357
waveform of, 362Luma curve, in Chroma wheel, 236Luma Keyer effect, 247, 250–251Luma option, Setting pop-up
menu, 365Luma Rolloff parameter, 236Luma Rolloff slider, 251
MM (markers) shortcut key,
51, 255, 439markers
adding, 35–37clicking on disclosure triangle
to reveal, 39copying grades between clips
and, 421keyboard shortcuts, 51, 255, 439matching clips to reference clip,
415–416searching for marker text, 37setting for audio clip, 221–222timing edits with, 221–224
Mask effectstacking order of, 233in Video Inspector, 231
masks. see mattesmaster shots, overwriting, 58Match Color tool. see also color
matchinglimitations of, 411–412overview of, 406simple clip matching, 406–409
Matte Tools, 238
Matte viewaccessing from Composite
view, 232of a key, 227viewing adjustments made
in, 238mattes
color masks. see color maskscreating a travel matte, 314–318edge mattes in keying, 227garbage masks, 230–234Matte view of a key, 227refining edges of, 228–230shape masks. see shape masksviewing impact of Chroma
wheel adjustments, 235media
adding media type to search terms, 42
color correction and, 331limiting source media while
editing, 65–67organizing. see metadataoriginal or optimized media
files, 332relinking to alternate media
files, 332–334Media Type pop-up menu, 42Memory effect, Effects Browser,
98–99metadata
adding keywords, 28–33adding markers, 35–37auto-analysis metadata, 7clip-based metadata, 16creating custom fields, 18–19creating people-related
keywords, 13creating Smart Collections,
44–46customizing views, 21–24entering for multiple clips, 17entering manually, 15filtering by ratings, 28filtering clips by, 37finding people using facial
recognition, 7–12finding shaky camerawork,
13–15intraclip-based metadata, 25
managing views, 24–25organizing clip-based
metadata, 19organizing keywords, 33–35overview of, 3–4rating clips, 25–27removing analysis keywords, 12renaming clips, 46–50review, 50–51searching for metadata, 39–44searching for text, 37–39source media metadata, 4–6switching between views, 19–20types of automatic, 4
Metadata View pop-up menuAudio View option, 20Basic View option, 19Edit Metadata View option,
21, 24EXIF View option, 19–20Extended View option, 6, 16Save As, 24
microphones, recording stereo or surround sound and, 130–131
midtonesaverage midtones, 360tonal range and, 348
Midtones color controlcolor masks and, 446–448matching corrected clips,
409–410rebalancing highlights, 378working inside and outside of
color masks, 452Midtones exposure control
applying corrections between clips, 424
combining shape masks, 458correcting individual shots, 429creating first clip (reference
clip), 414matching clips to reference
clip, 417overview of, 366, 368–370transitions between clip grades,
398, 401Midtones saturation control
correcting individual shots, 429matching clips to reference
clip, 419
534 Index
overview of, 394–395working inside and outside
of color masks, 452Modify menu, setting audio levels
in Timeline, 111modulation
audio effects, 151audio levels and, 108fixing overmodulated audio, 109
motion path, keyframes creating, 298Motion projects
effects, transitions, and generators as, 274
published to FCP, 243Movements category, in Transitions
Browser, 319multicamera clips
adding to projects, 187Angle Assembly setting,
196–197Angle Clip Ordering setting, 197Angle Synchronization setting,
198–200audio used for
synchronization, 200changing order of angles in
Angle Viewer, 207–210changing the Angle Viewer,
182–186creating, 180–181customizing settings, 194–195cutting between angles, 188–189displaying angle names, 191editing audio and video
in multicamera clips separately, 189–190
effects, 212–213fixing sync errors, 204–207modifying, 203–204overview of, 179property and timecode settings,
200–202review, 214rolling edits, 193–194switching angles, 191–192syncing new or added clip,
210–211trimming, 192–193using footage, 180viewing, 181–182
NN (snapping) shortcut key, 83names
Naming Presets windows, 47renaming clips, 46–50
Naming Presets windows, 47New Smart Collection option, Filter
window, 44–45nondestructive editing, 46Notes field, searching for text, 37NTSC SD format, for multicamera
clips, 201–202
OO (create end point) shortcut key, 51offline media
relinking to, 333–334using high-quality media for
color correction, 331Old World effect, 345OLED displays, 330onscreen controls (OSC)
shape masks and, 454–457for use with garbage mask, 231in Viewer, 231
opacitymodifying blend modes, 252titles and, 280
Option-’ (navigate to next keyframe), 149
Option-; (navigate to previous keyframe), 149
Option-Down Arrow (reduce keyframe audio level), 149
Option-G (compound clip) shortcut key, 83, 439
Option-M (create new marker) shortcut key, 51
Option-Up Arrow (increase keyframe audio level), 149
Option-V (paste connected clip), 255OSC. see onscreen controls (OSC)Outside Mask, color masks and, 446,
449–453Overlay blend mode, 249–250overmodulation, of audio, 109–110overshoots, Waveform Monitor
and, 357
overwrite editsadding audition to project, 89adding clips to projects, 58–59backtiming and, 64editing multicamera clips
and, 187limiting source media while
editing, 65project-defined edits, 64
PP (Position tool) shortcut key, 83Pan Amount slider, 142–144panning audio
choosing panning environment, 130–133
overview of, 130panning in Timeline, 135performing surround panning,
138–140preset pan methods, 142–144resetting audio levels, 121stereo panning, 133–134in Timeline, 136–138
peak highlights, in Waveform Monitor, 359
peak levels, in audio meter, 107people, finding using facial
recognition, 7–12picks, in auditions
applying effects to all picks, 101changing, 87–88finalizing auditions, 95next pick or new pick, 90overview of, 86selecting new, 91
pitch shifting, audio effects, 169–170Placeholder generator, 245plasma screens, 330playhead
keyboard shortcuts for moving, 83, 255
moving using Up or Down Arrows, 57
placing playhead at start of Hold segment, 270
positionanimating Position parameter of
Shapes generator, 307–308
Index 535
animation of clip position, 294keyframing in Video Animation
Editor, 303titles and, 280transform parameters, 295–296transforming clips, 261–263
Position tool, 74preferences, video, 331presets
Color Board, 431pan methods, 142–144
previewingauditions, 90–91effects, 226, 264–267generators, 241opacity settings, 251titles, 271
primary colors, 352Project Browser, 68Project Library, 88project-defined edits, 53, 61–64projects
adding clips to, 54adding multicamera clips to, 187opening, 68rendering at full frame rate, 283
properties, multicamera clips, 200–202Properties menu, Selected Properties
option, 23Protect Highlights parameter, 267–268Protect Skin parameter, 267proxy media, low quality of, 332
QQ (connect edit) shortcut key, 83QC (quality control), 437QuickTime movie, exporting titles as
tracks of, 288
Rratings
adding rating to search terms, 40–41
creating compound clips and, 219
filtering clips by, 28overview of, 25selecting clips as favorites or
rejecting, 25–27
Reel pop-up menu, 44reels, searching by, 44reference clip
in color matching, 412–415matching clips to, 415–420
rejects, selecting clips as favorites or rejecting, 25–27
Relink Media command, 334relinking media
to alternate media files, 332–334in Event Library, 334–335individual clips manually,
335–337Remove (–) button, removing filter
criteria from searches, 42–43Remove High Frequencies effect,
Effects Browser, 159rendering
custom settings, 220projects at full frame rate, 283turning off background
rendering, 328replace edits
editing multicamera clips and, 187
limiting source media while editing, 65
replacing clips, 59–61Reset button (X)
clearing search field, 38resetting audio levels, 121restoring video clip to original
settings, 260resolution
custom audio or video settings, 220
display quality and, 330of relinked files, 336zoom levels and, 259
Retime Editor, 223–224, 270Retime pop-up menu, 170retiming
editor for, 223–224, 270multicamera clips, 212preserving pitch, 170
Retro generatorapplying Tint effect to, 244replacing generators in
Timeline, 243Reverb (spaces) effects, audio effects,
164–167
RGB Overlayhistogram, 348–350matching corrected clips,
409–410RGB Parade scope
adjusting color, 383–385adjusting color temperature,
387applying corrections between
clips, 424creating first clip (reference
clip) and, 414matching clips to reference clip,
417–418, 420Setting pop-up menu, 350, 362spotting color casts with, 378using with Global control, 389Vectorscope compared
with, 385rippling, trimming multicamera
clips, 193–194Role Editor, 286roles
assigning, 287–288exporting title subroles,
288–289overview of, 283subroles, 286–287using with titles in different
languages, 286rolling edits, trimming multicamera
clips, 193–194rolling shutter artifacts, finding shaky
camerawork, 13–15Romantic effect, 96rotation
properties, 261–262titles and, 280transforming clips, 295–296
Roundness, softening matte edges, 232
SS (skimming) shortcut key, 149sampling
color samples used to create keys, 224–230
enabling automatic sampling, 233
masks and, 453
536 Index
sampling ratesmaking subframe adjustments
to audio, 114searching audio by, 44
saturationadjusting matte detail, 239applying corrections between
clips, 424creating first clip (reference
clip) and, 414Hue/Saturation effect,
266–267, 269matching corrected clips,
409–410saturation controls, Color Board
changing saturation with contrast adjustments, 396–397
correcting individual shots, 429Global control, 392–394Highlights control, 395matching clips to reference clip
and, 419Midtones control, 394–395overview of, 391Shadows control, 395transitions between clip
grades, 399Saturation parameter, 239Save As option, Metadata View
pop-up menu, 24scale
animating Scale parameter of Shapes generator, 307–308, 310
titles and, 280transforming clips, 260–262,
295–296scene balancing. see also color
matchingbreaking down a scene, 412–413as iterative process, 427overview of, 406useful commands, 422
Scene fields, 46–47scenes, searching by, 44scene-to-scene correction, 406. see
also color matchingS-curve, fade shapes, 127
searchesfor metadata, 39–44for text, 37–39
secondary color correctionsanimating shapes, 465–468color masks, 442–449combining masks with
shapes, 460combining shapes, 457–460masking corrections to sky,
463–465masking skin tones, 460–462overview of, 441review, 468shapes used to create vignette,
454–457shapes used to target frame
regions, 453–454working inside and outside of
color masks, 449–453secondary colors, 352Select tool
rolling edits with, 193–194in Tools pop-up menu, 75
selection triangle, Viewer, 228selections
select all, 81Shift-click for selecting multiple
clips, 17Setting pop-up menu
Brightness slider, 357Luma option, 365Millivolts, 362RGB Overlay, 363–364RGB Parade, 350, 362Vectorscope, 351–353Waveform, 356
settings, multicamera clipsAngle Assembly setting,
196–197Angle Clip Ordering
setting, 197Angle Synchronization setting,
198–200overview of, 194–195property and timecode settings,
200–202Shadows color control
adjusting color, 384
adjusting color temperature, 387–388
rebalancing highlights, 377Shadows exposure control
adjusting contrast, 383applying corrections between
clips, 424copying grades between clips
and, 421Global control compared with,
370–372masking skin tones, 462matching clips to reference clip
and, 417–418overview of, 366, 368transitions between clip
grades, 398working inside and outside of
color masks, 449Shadows saturation control
correcting individual shots, 429–430
overview of, 395shape masks
animating, 465–468combining with masks, 460combining with other shapes,
457–460for creating vignettes, 454–457for targeting frame regions,
453–454Shapes generator
animating, 306–307animating Position and Scale
parameters, 307overview of, 245–246
Shift-3 (audio source media) shortcut key, 83
Shift-D (backtimed overwrite edits) shortcut key, 83
Shift-H (create Hold segment) shortcut key, 255
Shift-Q (backtimed connect edit) shortcut key, 83
Shift-Z (zoom to fit) shortcut key, 149
shot matching. see also color matchingoverview of, 406tips on, 427–428
Index 537
Show Angle Viewer option, Viewer Options pop-up menu, 181
Show Retime Editor command, 223Show Video Animation, Adjustments
pop-up menu, 467Show/Hide Timeline Index, 286skimming
audio levels and, 110turning off, 347
Skin Tone Indicatorapplying corrections between
clips, 424in Vectorscope, 353–355, 380
skin tonescolor correction and, 353–355color masks and, 460–462Protect Skin parameter, 267
slash (/), playing clips, 59Slide transition, animating with,
319–323Smart Collections
creating, 44–46creating after analysis, 8–9grouping, 34keyword-related clips
automatically added to, 12of multicamera clips, 181selecting, 10
Smooth option, for motion path, 298snapping
edit point to a marker, 222enabling, 71
Softness slider, color masks and, 446Solo Animation command, in Clip
menu, 173sound. see audiosource media, limiting while editing,
65–67source media metadata
extent and flexibility of, 3types of automatic metadata, 4viewing, 4–6
Source Media pop-up menu, 66Spacebar shortcut key, for playing
clips, 83spaces (Reverb) effects, audio effects,
164–167speakers
audio quality and, 108–109EQ adjustments and, 152
panning audio and, 130using stereo panning, 133–134
Spill Contrast gradient, adjusting matte detail, 239
Spill Level slider, refining edges of a matte, 229–230
Spill Suppression, viewing composite images and, 239
starting points, editing clips and, 64Stencil Alpha blend mode, 316stereo sound
choosing panning environment, 131
panning audio, 130viewing project panning
environment, 132Stills option, Media Type pop-up
menu, 42storylines
breaking down into connected clips, 73–75
connecting generators to, 241–242
creating secondary, 68–70incorporating clips from into
compound clips, 80–81multiple, 53removing generator from
storyline before animating, 307
transition effects and, 126Strength slider, enabling automatic
sampling, 233Style pop-up menu, 277–278styles, text styles, 277–278Stylize category, Effects Browser, 101,
265, 433–434stylized design, color correction
for, 329subframe adjustments, to audio,
114–116surround sound
choosing panning environment, 131
panning audio, 130performing surround panning,
138–140viewing project panning
environment, 132
synchronization, of multicamera clipsAngle Synchronization setting,
198–200fixing sync errors, 204–207syncing new or added clip,
210–211Synchronize Clips command,
Event Browser, 76system requirements, vii
TTake fields, renaming clips, 46–47takes
auditions for comparing and selecting, 85
searching by, 44Teal & Orange effect, Looks effects,
265, 267–268Telephone, distortion presets, 168Television, distortion presets, 168text
applying styles to titles, 277–278attaching titles to connected
clips, 78–81filtering clips by, 22font size, 274–275formats and styles, 276–277searches for, 37–39
text entry mode, creating titles, 273Text Inspector
managing text size and color, 79text attributes in, 276Text box for working with
text, 284textures, adding effects to video, 265Themes Browser, title and transition
options, 271through edits, trimming multicamera
clips, 192thumbnails
icon for multicamera clips, 181Keyer thumbnail, 226previewing generators, 241previewing titles, 271selecting picks in Audition
window, 91
538 Index
timecodedisplaying settings by angle, 185multicamera clip settings,
200–202setting for audio clip, 221
Timecode generator, 245Timeline
adding clips to projects, 54adding effects to multicamera
clips, 213adding titles to projects, 272creating auditions, 91–94creating compound clips, 76–77inserting clips, 57keyframing in Video Animation
Editor, 301–302opening projects, 68panning audio, 136–138relinking clips, 335–336setting audio levels, 111–113Show/Hide Timeline Index, 286trimming multicamera
clips, 193video scopes and, 347Zoom slider, 113, 115–116
Tint effect, applying to Retro generator, 244
Tint parameter, adjusting matte detail, 239
Title InspectorPublished Parameters in,
279–280text attributes in, 276
titlesanimating, 279–283attaching to connected clips,
78–81Custom title option, 278–279exporting, 288keyboard shortcuts, 291modifying, 270–277overview of, 270review, 290–291roles used with, 283–290text styles, 277–278
Titles BrowserCustom title, 278–279title styles in, 270
Titles pop-up menu, 289
toggling audio effects on/off, 161–162
tonal rangecolor controls and, 377of images, 348
Tools pop-up menuPosition tool, 74Select tool, 75
Transcoding and Analysis, viewing progress of background analysis, 9
transformationsof clips with Inspector, 261of clips with Viewer, 258–261enabling Transform effect, 295lining up rectangle corners in
Shapes generator, 307overview of, 257–258parameters, 295–296review, 290–291scale, position, rotation, and
crop, 260–263transitions
animating with, 319–323applying to connected clips,
70–72applying to multicamera
clips, 212between clip grades, 397–402connected clips and storylines
and, 126creating animation with, 294,
318–319crossfade effects, 124duration of, 127options in Transition Browser,
246Transitions Browser, 246, 319transparency
opacity settings and, 252travel matte changing over
time, 314travel matte, creating, 314–318Treble Boost equalization setting,
153–154trimming
effects and, 212–213multicamera clips, 192–193relinking and, 336
Uundershoots, Waveform Monitor
and, 357Underwater, distortion presets, 168Up Arrow (move playhead backward)
shortcut key, 83
VVectorscope
applying corrections between clips, 424
changing saturation with contrast adjustments, 397
color masks and, 443, 447making color cast adjustments,
381–382matching corrected clips,
409–410matching insert clips, 426matching reference clips,
418–419overview of, 351primary and secondary c
olor, 352RGB Parade compared
with, 385Skin Tone Indicator,
353–355, 380spotting color casts with, 378using with Saturation controls,
392–393working inside and outside of
color masks, 450video
animating clip position, 294browsing, previewing, and
applying effects, 264–267
compositing, 247–253crossfade effects, 124custom settings, 220detaching audio from, 147editing audio and video
in multicamera clips separately, 189–190
Index 539
Hold segment used with, 222–223
keyframing in Inspector, 299–301
keyframing in Video Animation Editor, 301–306
keyframing in Viewer, 294–299preferences, 331selecting favorite clips, 219timing edits with markers and
Hold segments, 221–224titles. see titlestransformation of, 258–264
Video Animation Editoradjusting keyframes in, 313animating shape masks, 467closing, 306keyframing in, 301–306revealing, 307
Video InspectorAmount slider, 97Blend Mode pop-up menu,
249, 316color correction controls in, 338Crop, 354Exposure option, 379iMovie effect, 344Luma Keyer, 250–251Mask effect in, 231stabilizing shaky shots, 15viewing matte with, 227
Video Only option, Source Media pop-up menu, 66
video scopesdisplaying, 345–347overview of, 345RGB histogram, 348–350Vectorscope, 351–356Waveform Monitor, 356–364
View controlsComposite view. see
Composite viewMatte view. see Matte view
Vieweradjusting keyframes in, 313changing parameters of single
line of text, 277keyframing in, 294–299Match Color tool and, 407–408onscreen controls, 231previewing effects, 226previewing generators, 241previewing opacity settings, 251selection triangle, 228transform, crop, and distort
effects, 258transformation of clips in, 257video scopes and, 346–347working with text in, 284zoom levels, 236, 240
Viewer Options pop-up menu, Show Angle Viewer option, 181
views, metadatacustomizing, 21–24managing, 24–25switching between, 19–20
vignettesdigital relighting, 457shape masks used to create,
454–457Vintage Radio, distortion presets,
168–169voice effects, audio effects, 169–170volume
audio effect for adjusting loudness, 151
controls in Timeline, 111dB levels, 107EQ adjustments and, 152fixing overmodulated audio,
109–110how loud is too loud, 108–109Levels effects, 163–164resetting audio levels, 121
Volume slider, in Audio Inspector, 117–119
WW (insert edit) shortcut key, 83Walkie Talkie, distortion presets, 168Waveform Monitor
adjusting contrast, 379–380Broadcast Safe effect, 435copying grades between clips
and, 421luma, 362overshoots and undershoots
and, 357overview of, 356rebalancing RGB, 376–377RGB Parade and RGB Overlay
and, 362–364video clips broken down
into luma and chroma components, 357
white points, black point, contrast, and midtones, 359–362
waveformscolor masks and, 442creating first clip (reference
clip) and, 414fixing overmodulated audio,
109–110matching clips to reference clip
and, 415–416white point, in Waveform Monitor,
359, 361–362
YY (open audition) shortcut key, 103
Zzoom levels
resolution and, 259in Viewer, 236, 240
Zoom slider, in Timeline, 113, 115–116