getting started with nitros-9 getting started with nitros-9 the nitros-9 project
TRANSCRIPT

1
Getting Started With NitrOS-9
The NitrOS-9 Project http://www.nitros9.org

2
Revision History: Revision Date Comment 0.1 June 22, 2004 Created 0.2 July 26, 2004 Added documentation on
bootfile creation script and disk structure, fixed errors.
0.3 January 8, 2005 Fixed several misspellings. 0.4 April 11, 2007 Fixed a few referential mistakes
and graphic alignment issues. 0.5 February 6, 2007 Fixed typos and mistakes.
Acknowledgements: Input and Typesetting: Bob Emery and Boisy Pitre.

3
Table Of Contents Getting Started With NitrOS-9 ..............................................................1 Chapter 1. What is an Operating System? ........................................6
Instructing Your Operating System...................................................6 Using Applications and Computer Languages .................................7 Using Peripherals .............................................................................8 Why Use NitrOS-9? ..........................................................................9 How Much Do I Need to Know About NitrOS-9?............................10
Chapter 2. How to Start and Exit Your System................................12 Booting NitrOS-9.............................................................................12 Rebooting NitrOS-9 ........................................................................14 Exiting NitrOS-9 ..............................................................................14 Upper- and Lowercase Characters ................................................15 NitrOS-9 Error Messages ...............................................................16
Chapter 3. What You Need to Know To Use Floppy Drives............18 Disk Drive Names ...........................................................................20 Making Copies of Diskettes ............................................................20
Formatting With One Disk Drive .................................................20 Formatting With Two Disk Drives ...............................................21
Using the Backup Command..........................................................22 Making Copies With One Disk Drive...........................................23 Making Copies With Two Disk Drives.........................................25
Chapter 4. Files and Directories ......................................................28 About Files ......................................................................................28 About Directories ............................................................................28
Multiple Directories......................................................................30 About File and Directory Names.....................................................31 Examples of Filenames ..................................................................31 About Pathlists................................................................................32 Anonymous Directory Names.........................................................32 About Device Names ......................................................................33
Chapter 5. Commands and Keys.....................................................34 Typing Commands..........................................................................34 Editing Commands .........................................................................34 Command Parameters....................................................................35
Using Options..............................................................................36
4
Using Commands ...........................................................................36 Accessing Commands....................................................................37 Commands from Disk .....................................................................38 Changing the Execution Directory ..................................................39 Changing the Data Directory ..........................................................39 Changing System Diskettes ...........................................................40 Video Display and Keyboard Functions .........................................40 Special Keys ...................................................................................41
Chapter 6. The NitrOS-9 Toolkit.......................................................46 Viewing Directories .........................................................................46 Creating Directories ........................................................................46 Deleting Directories ........................................................................47 Displaying Current Directories........................................................48 Copying Files ..................................................................................48 Deleting Files ..................................................................................49 Renaming Files ...............................................................................50 Looking Inside Files ........................................................................50 Loading Command Modules into Memory......................................51 Listing the Command Modules in Memory.....................................51 Deleting Modules from Memory......................................................51 Using Other Commands .................................................................52
Chapter 7. The System and Modules Disk Structure.......................54 The System Master Disk.................................................................54 The Modules Disk ...........................................................................55 The MODULES Directory in Depth.................................................56
Chapter 8. Customizing Your System..............................................57 Creating a New System Diskette....................................................57
Step 1: Verify that you are running Shell+ ..................................57 Step 2: Select the proper disk.....................................................58 Step 3: Locate the scripts directory ............................................58 Step 4: Run the script..................................................................58
Customizing Your Boot ...................................................................59 Making Your Own Script .............................................................60
Monitor Types under Level 2 ..........................................................60 Using Level 2 Windows ..................................................................61
Establishing a Window................................................................62 Changing Window Colors ...........................................................64 Eliminating a Window..................................................................65

5
Using Startup To Establish A Window........................................66

6
Chapter 1. What is an Operating System?
NitrOS-9 is a disk Operating System (that's what OS stands for). An operating system is a group of programs acting as a message center and an interpreter. Using your instructions, an operating system manages the computer's working circuits. In fact, thinking of NitrOS-9 as your computer manager is helpful. The boss (that's you) gives orders. NitrOS-9 (the manager) sees that they get done. To operate NitrOS-9 you need at least one floppy disk drive attached to your computer. NitrOS-9 is originally configured to recognize two floppy disk drives. Later, this handbook describes how to let NitrOS-9 know if you have more than two floppy disk drives, or if you have other hardware (printers, modems, hard disks, and so on) you want it to recognize.
Instructing Your Operating System You give your commands to NitrOS-9 by typing them. Because NitrOS-9 does exactly (and only) what you tell it, your entries must be precise and have perfect syntax (spelling and form). You must also be sure to give NitrOS-9 every detail it needs to perform a task. For instance, if you told your office manager to, "Make a phone call," what can the manager do? Obviously, not much that is helpful to you. The manager must know who to call, the phone number, and what to say. NitrOS-9 is the same. It must have all the details before it can carry out your commands properly. To show you how to instruct your operating system, the handbook asks you to type characters, words, and lines on your keyboard. When you do, you are issuing commands to NitrOS-9. Technically, a command is only one word that describes the action you want NitrOS-9 to perform. A command line is a command with all of its qualifiers.

7
In this manual, command lines usually contain words in boxes, such as ENTER . These indicate keys that you press. The manual also asks you to press key sequences. For instance, when asked to press CTRL C, hold down the key marked CTRL, and while holding down CTRL, press C. Characters that are not in boxes are typed individually. For instance, if you are asked to type the command line format /d0 ENTER, press each key individually F O R M A T SPACE / D 0 ENTER If you make a mistake while typing, use ← to move back to the error. Then retype that portion of the line.
Using Applications and Computer Languages
A computer application is a program designed to accomplish specific tasks. There are applications to help you write letters or documents (word processors), keep a mailing list (data managers), and keep financial records (accounting packages). There are also applications to help you study for a test, play a game, play music, draw a picture, and much more. Such applications usually require that you use NitrOS-9 to start your computer. A few applications will let you start directly from the application diskette because the authors obtained permission to include a bootable NitrOS-9 core. In some cases, this application diskette can be used to boot an abbreviated but working version of NitrOS-9. Different programs can require different procedures, and you should check your application program's documentation for specific instructions. Applications have special screen displays and menus to instruct you, or that require you to perform a particular action, such as press a key. When you are operating from an application program, that program passes your instructions to NitrOS-9. NitrOS-9 manages the computer's operations in the background, and its functions are invisible to you.
8
You can also use computer languages to write your own applications. BASIC is a language. If you read the Color Computer Disk System manual, you already know a bit about it. There are languages you can purchase to use with NitrOS-9 to create programs, such as assembly language, Pascal, C, and Basic09. Like applications, each language has its own startup method. The manuals that come with the languages tell you how to get them running on your Color Computer.
Using Peripherals NitrOS-9 lets you control much more than your computer's operations. It also gives you control over other hardware devices such as disk drives, a printer, modems, windows, other terminals, and so on. Each device has a "System Name," an abbreviation preceded by a slash (/). NitrOS-9 can only recognize a device if you type its name exactly as shown below. See Chapter 7, "Customizing Your System" for information on how to tell NitrOS-9 what devices you want it to handle. System Name Description
/P A printer connected through your computer's RS-232 port. The RS-232 port is a serial port, and you must have a printer with a serial connection.
/T1 A data terminal or another computer acting as a terminal, connected through the RS-232 port of your computer. If you are using another computer as a terminal, it must run a terminal program that makes it perform as a terminal.
/T2, /T3 Another data terminal or another computer acting as a terminal, connected to the optional RS-232 communications pak in a Multi-Pak Interface. If you are using another computer as a terminal, it must run a terminal program that makes it perform as a terminal.

9
/M1, /M2 A modem using an optional 300-baud modem pak in the optional Multi-Pak Interface. A modem allows you to communicate with other computers either directly or over phone lines.
/D0, D1, etc. Floppy disk drives.
/W, /W1, /W2, /W3, /W4, /W5, /W6, /W7, etc.
Windows that you can establish on your NitrOS-9 Level 2 system. You use CLEAR to page among windows you create. See "Using Level 2 Windows" in Chapter 8 and also read the NitrOS-9 Level 2 Windowing System for information on creating windows.
Why Use NitrOS-9? NitrOS-9 stands out for several reasons. Some of its strong points are:
• File managing capabilities. • Multi-user features. With NitrOS-9, more than one person
can use the same computer at the same time. • Multi-tasking. NitrOS-9 can handle several jobs at the same
time. • Window functions that let you divide your display screens
into sections in which you can have one or more operations running, all at the same time.
• Input/Output capabilities. NitrOS-9 can communicate with TVs and monitors, disk drives, printers, and other computers.
• A sophisticated repertoire of commands. • Sophisticated programming languages.
If you are not familiar with such terms as files, multi-user, multitasking, and commands, don't worry. The handbook explains these terms and more. Programmers like NitrOS-9 because of its powerful features. It lets them show off all of their skills. As a result, another NitrOS-9 feature

10
is the wide range of excellent programs that you can use with the system.
How Much Do I Need to Know About NitrOS-9? You might wonder how much you really need to know to start using NitrOS-9. The answer varies with your needs, and with the applications you intend to use. However, regardless of how you intend to use your computer, there are some NitrOS-9 procedures you must know. For instance, you must know how to load NitrOS-9, how to prepare diskettes to store data, and how to make copies of data or entire diskettes. This part of your handbook makes these jobs easy. Regardless of how careful you are, there are times when things go wrong. When this happens, NitrOS-9 displays an error message on the screen. This part of the handbook also helps you to understand error messages and what to do about them.


12
Chapter 2. How to Start and Exit Your System
Starting your computer and initializing an operating system is called booting. In a sense, the computer is pulling itself up by its bootstraps. To run NitrOS-9, you must have a Color Computer with at least one floppy disk drive. Your NitrOS-9 system diskette includes modules to support the following TRS-80/Tandy Color Computer hardware:
• Up to 64K RAM for Level 1 on any TRS-80/Radio Shack/Tandy Color Computer, Up to 2MB of RAM for Level 2 on a Tandy Color Computer 3
• The Color Computer Keyboard • An Alphanumeric Video Display • A Color Graphics Display • Floppy Disk Drives (one or two) • Joysticks (one or two) • A Serial Printer • An RS-232C Communications Port • If you connect a Multi-Pak Interface to your Color Computer,
NitrOS-9 can support the following devices: o Multiple external RS-232 communications cards and
modem paks o SCSI and IDE hard drive interfaces
Note: The Multi-Pak Interface has four cartridge slots. A floppy disk controller must be in Slot 4. You can put modem paks, hard disk controllers, or RS-232 paks in Slots 1, 2, or 3. Consult your hardwareʼs manual for more specific information.
Booting NitrOS-9 Use the instructions in the Color Computer Disk System manual to turn on your computer system. After you do, the video screen displays a copyright message followed by the letters, OK. This is Disk
13
Extended Color BASIC's way of telling you that it is ready to get to work. It is waiting for your commands. To load NitrOS-9, follow these steps:
1. Insert the NitrOS-9 System Master diskette into Drive 0. At the OK prompt, type:
DOS ENTER .
NitrOS-9 starts. If the DOS command returns a syntax error (?SN ERROR), be sure you entered the command correctly. If DOS still returns the error, check to make sure you have installed your disk cartridge properly.
2. After NitrOS-9 displays its startup message, this prompt
appears:
yyyy/mm/dd hh:mm:ss Time?
Type the year, month, date, hours, minutes, and seconds in the format requested; then press ENTER. For instance, if the date and time is September 3, 2004, 1:22 p.m., type:
2008/02/06 13:22 ENTER
Note that the time is entered in 24-hour notation and that the seconds (: SS) are optional. You can bypass this time and date prompt by only pressing ENTER. However, if you do, NitrOS-9 cannot provide the correct date when you create and save data on disk. Also, it cannot provide the correct date and time for applications that require them.

14
3. After you enter the date and time, the NitrOS-9 shell prompt appears and NitrOS-9 is now in control and ready to accept a command.
You should always keep the NitrOS-9 System diskette in Drive 0 (/D0) while running NitrOS-9 unless you have a hard disk containing your system files. A NitrOS-9 System diskette is a backup copy of the NitrOS-9 System Master diskette. The instructions for making copies are in the next chapter.
Rebooting NitrOS-9 If you need to reboot NitrOS-9 after the initial startup, press your computer's reset button (located at the right rear of the computer). Pressing the reset button one time causes the NitrOS-9 boot message to reappear. The system then loads as it did originally. Be sure the System Master diskette is in Drive /D0 when you reboot. Pressing the reset button twice returns the computer to Disk BASIC.
Exiting NitrOS-9 In the same manner that you use NitrOS-9 to start operations, you should use NitrOS-9 to exit or close operations. For instance, if you are in the middle of a process, it is unwise to suddenly turn off your computer. Doing so can destroy files or garble disks. You can usually terminate an operation by pressing BREAK or CTRL
E. In some instances, you must let an operation complete its function before you can regain control of NitrOS-9. If you are using an application program, that program's manual tells you how to exit the program to the NitrOS-9 command level. You should always be at the NitrOS-9 command level to turn off your computer. Then follow these steps:
1. Be sure the NitrOS-9 system prompt and cursor are displayed. (Note: You can turn off the NitrOS-9 cursor. If you or an application program has done so, the cursor does not display at the command level.)

15
2. Take out any floppy diskettes from the disk drives, put them back in their protective envelopes, and store them in a safe place.
3. Turn off all the equipment attached to your computer such as a printer or disk drive(s); then turn off your TV or monitor. Last of all, turn off your computer and Multi-Pak Interface (if you have one). If you plug your equipment into a power strip, you can use the power strip switch to turn off all equipment at one time.
Upper- and Lowercase Characters NitrOS-9 can display both upper- and lowercase letters. However, you can tell it you want to use only uppercase. To do this, type:
tmode upc=1 ENTER
If you do this, you cannot type lowercase letters, and the system displays all uppercase letters. To switch back to both uppercase and lowercase, type:
tmode upc=0 ENTER
Even when you are in the upper-/lowercase mode, you can switch to typing all uppercase by pressing CTRL 0. Everything you type is now uppercase, but the computer can display both upper- and lowercase. Press CTRL 0 to switch back to upper-/lowercase. If you want to type only one uppercase letter, hold down SHIFT while you press that letter. It does not matter to NitrOS-9 whether you type in uppercase or lowercase letters, or any combination of upper- and lowercase letters. For instance, instead of typing TMODE UPC=1, you can type tmode upc=1 or Tmode UPC=1. NitrOS-9 Level 1 Users: If you are using NitrOS-9 Level 1 on a Color Computer 3 or a Color Computer 2 with true lowercase, the following

16
commands will make true lowercase appear on the 32x16 VDG screen:
tmode upc=0 par=1 display e
If your Color Computer supports true lowercase, then the output of commands will show true lowercase instead of inverse uppercase characters.
NitrOS-9 Error Messages Everyone makes a mistake now and then when typing commands. If you type something the operating system doesn't recognize, or if you ask it to do something it cannot do, it displays an error message. This message is a number that refers to the type of problem that NitrOS-9 has encountered. For instance, if you type xxxx ENTER (which is nonsense to NitrOS-9), the system displays:
Error #216 If you don't know the meaning of the system error number you have two options: (1) you can look up the reference in NitrOS-9 Commands under Appendix A, "Error Codes" or, (2) you can type:
error 216 ENTER
Either method shows you that Error #216 means "Path Name Not Found." NitrOS-9 thought you wanted it to execute a command but it could not find one named xxxx. Other NitrOS-9 error messages tell you if you have used all of a disk's storage space, if the computer's memory is full, if you try to create two files with the same name, and so on.

18
Chapter 3. What You Need to Know To Use Floppy Drives
Floppy diskettes require careful handling. You might already be familiar with how to take care of diskettes from reading your Color Computer Disk System manual. If not, or as a reminder, review the following points:
• Always make copies of important diskettes. The price of a diskette is small compared to the time it can take to replace destroyed data.
• Copy data you are working with regularly. If you experience a
power failure while using your computer, the data on any diskettes you have in a drive can be destroyed. Other accidents can happen as well.
• For 5.25” floppies, always keep the protective paper or
cardboard envelope on the diskette when it is not in use.
• Your drive accesses a diskette through the oblong slot in the diskette's jacket or covering. Never touch the diskette through this hole. The oil from even the cleanest hand can destroy data, making the diskette useless.
• Do not bend diskettes.
• Store diskettes away from excessive heat, dust, and any
magnetic source. Even components in disk drives, video displays, TVs, and electric motors can garble the data on diskettes.
• If you must write on a diskette label after placing it on the
diskette, use only a soft felt pen, such as a Sharpie®.

19
• Do not switch your computer, disk drives, or Multi-Pak interface on or off while you have a diskette in a disk drive.
Figure 1 – 5.25” and 3.5” diskettes One important feature of diskettes that you should be aware of is the write protect tab. The write protect tab denies the disk driveʼs ability to write to the disk, thereby preventing inadvertent writes or formats which could modify or erase the contents of a diskette. Usually, the write protect tab is engaged on diskettes where important data is saved. Most 5.25” diskettes have a square notch cut from one corner, which can be covered with an adhesive label (usually supplied with the diskette). For 3.5” diskettes, there is a slider tab at the upper right hand corner that can be moved into an open or closed position. If the hole is closed, then the diskette is write protected; if the hole is exposed, the disk is not write protected, and can be written or formatted. If you attempt to write or format a write protected diskette, NitrOS-9 will return an error 242 - E$WP (Write Protected).
Write Protect Tab

20
Disk Drive Names NitrOS-9 has its own method of referring to your disk drives. What your Color Computer Disk System manual calls Drive 0, NitrOS-9 calls Drive /D0. This is your first drive if you have more than one floppy disk drive connected to your system. Subsequent drives are named /Dl, /D2, and so on. If you have a hard disk attached to your system, NitrOS-9 refers to it as Drive /H0. A second hard disk drive is named /H1.
Making Copies of Diskettes Before you can store information on a diskette, you must format it. Formatting is the process of magnetically arranging a disk's surface so that NitrOS-9 can store and locate information. The following steps tell you how to format a diskette. Format at least two diskettes at this time to use in making backups (copies) of your two NitrOS-9 system diskettes. If you have other important diskettes to backup, format as many diskettes as you require.
Formatting With One Disk Drive
If you have not already done so, place a write-protect tab on your System Master diskette. Then, turn on and boot your computer as described in Chapter 2. With the NitrOS-9 System Master diskette in your drive, type:
load format ENTER Select a diskette that does not contain data or that contains data you do not want to keep. Make sure it does not have a foil tab covering the write-protect notch. Put it in your disk drive (Drive /D0) in place of your NitrOS-9 System Master diskette and type:
format /d0 ENTER Format outputs information about the diskette, and the final prompt appears:

21
Ready?
Press Y to begin formatting. NitrOS-9 asks you for a Disk Name: . Type any name, using a maximum of 32 characters. For example, you can type s ENTER to name the diskette "s." Next NitrOS-9 verifies that the diskette is formatted properly. The screen shows each track number in hexadecimal notation during verification. A track is a concentric ring around the diskette on which information is stored. When formatting is complete, NitrOS-9 shows you the Number of good sectors. This number depends on the type of disk drive you are using. For a 40 track, double-sided drive, the number should be $0005A0 (hexadecimal 5A0 sectors). The NitrOS-9 shell prompt and cursor reappear. Remove the newly formatted diskette from the drive, and store it in a safe place until you are ready to use it. Format as many diskettes as you need by following Steps 3 through 6.
Formatting With Two Disk Drives
If your computer is off, turn it on, and boot NitrOS-9 as outlined in Chapter 2. At the shell prompt, type: format /d1 ENTER. Format outputs information about the diskette, and the final prompt appears:
Ready?
Insert a blank disk, or one which does not contain data you want to keep, into Drive /D1, and close the latch. Be sure the diskette does not have a foil tab covering the write-protect notch. Press Y.
22
NitrOS-9 formats the diskette; then asks you for a Disk Name: . Type any name, using a maximum of 32 characters. For example, you can type s ENTER to name the diskette "s." Next NitrOS-9 verifies that the diskette is formatted properly. The screen shows each track number in hexadecimal notation during verification. A track is a concentric ring around the diskette on which information is stored. When formatting finishes, NitrOS-9 shows you the Number of good sectors. This number depends on the type of disk drive you are using. For a 40-track, double-sided drive, the number should be $0005A0 (hexadecimal 5A0 sectors). The shell prompt and cursor reappear. Remove the newly formatted diskette from the drive, and store it in a safe place until you are ready to use it. Format as many diskettes as you need by following the same procedure.
Using the Backup Command BACKUP is one NitrOS-9 command that you can expect to use frequently. It is the command you use to make copies of your diskettes. We strongly recommend that you now use the following instructions to make copies of your NitrOS-9 system diskettes. You can only copy diskettes that are created in the same type of disk drive you are using. Your NitrOS-9 system diskettes are 40 track, double sided for 5.25” drives, and 80 track, double sided for 3.5” drives. BACKUP uses two terms you need to understand. They are source and destination. A source diskette is the diskette that contains the program, file or data that you want to backup. The destination diskette is the blank formatted diskette you prepared to receive the copied data. Note: Some applications you buy do not let you make copies of their diskettes. Check the program manual for information on protecting the data on these diskettes.

23
Making Copies With One Disk Drive
If your computer is off, turn it on, NitrOS-9 as outlined at the beginning of Chapter 2. At the shell prompt, type:
backup /d0 #16K ENTER This tells NitrOS-9 to make a backup of the diskette in Drive /D0. The screen displays the following prompt:
Ready to backup from /d0 to /d0 ?:
Leave the System Master diskette in Drive /D0 to make a backup of it. To back up one of your other diskettes, for example the Modules diskette, remove the System Master diskette and replace it with the diskette you want to copy. Press Y when you are ready to continue. The screen displays:
Ready destination, hit a key Replace the source diskette with the destination diskette. Then, press the space bar to continue BACKUP. When you back up one diskette to another, any data previously existing on the destination diskette is overwritten (destroyed). NitrOS-9 gives you a chance to make sure you have inserted the proper destination diskette by displaying the message:
DISK NAME is being scratched Ok ?:
"Scratched" means that NitrOS-9 is going to replace any data on the diskette with new data from the source diskette. BACKUP also gives

24
the destination diskette the same name as the source diskette-the destination becomes a duplicate of the source. Press Y to keep going. The screen asks you to:
Ready Source, hit a key: Remove the formatted diskette from Drive /D0, and replace it with the source diskette that contains the data you want to copy. Press the space bar. In a moment, a prompt asks you to:
Ready Destination, hit a key: Remove the source diskette and replace it with the destination diskette. Press the space bar. Continue switching diskettes as the screen instructs you until you see:
Sectors copied: $0276 Verify pass
Followed in a moment by:
Sectors verified: $0276 The diskette now in your drive, the destination diskette, is a duplicate of the source diskette. If you copied the System Master or the Modules diskette, store it in a safe place, and use the copy as your working diskette. Reserve the original diskette for making future backups. Note: For a Color Computer 3 running NitrOS-9 Level 2 with 512K of memory, you can backup your diskette faster if your replace #16K in the instructions above with #56K.

25
Making Copies With Two Disk Drives
If your computer is off, turn it on, and boot NitrOS-9 as outlined at the beginning of Chapter 2. At the system prompt, type:
backup /d0 /d1 #16K ENTER This tells NitrOS-9 to make a backup of the diskette in Drive /D0. The screen displays the following prompt:
Ready to backup from /d0 to /d1 Leave the System Master diskette in Drive /D0 to make a backup of it. To back up one of your other diskettes, for example the Modules diskette, remove the System Master diskette and replace it with the diskette you want to copy. Press Y when you are ready to continue. When you back up one diskette to another, the process overwrites or destroys any data previously existing on the destination diskette. NitrOS-9 gives you a chance to make sure you have inserted the proper destination diskette by displaying the message:
DISK NAME is being scratched Ok ?:
"Scratched" means that NitrOS-9 replaces any data on the destination diskette with new data from the source diskette. As well, BACKUP gives the destination diskette the same name as the source diskette -- the destination becomes an exact duplicate of the source. Press Y to keep going. Copying continues. When the procedure ends, you see:

26
Sectors copied: $0276 Verify pass
Followed in a moment by:
Sectors verified: $0276 The diskette in Drive /D1 is now a duplicate of the source diskette. If you copied the System Master or the Modules diskette, store it in a safe place, and use the copy as your working diskette. Reserve the original diskette for making future backups. Note: For a Color Computer 3 running NitrOS-9 Level 2 with 512K of memory, you can backup your diskette faster if your replace #16K in the instructions above with #56K.


28
Chapter 4. Files and Directories
Before you can use NitrOS-9 extensively, you need to know how the system organizes and stores data on disk. The information in this section is true for both floppy diskettes and hard disks. However, because of the greater storage capacity of a hard disk, it is of particular importance to hard disk users.
About Files Consider the information stored on disks to be of two basic types, programs and data. A program is code that causes your computer to execute a task. Data is information that a program uses or that a program creates. All the information that NitrOS-9 stores on disks, whether program or data, is stored in units called files. Whenever a program creates a file, NitrOS-9 defines a portion of your disk to store it. It keeps the location of the file in a special list (called a directory), also located on the disk, so that it knows where to find your program or data the next time you want it.
About Directories A directory is a storage space for filenames, other directory names, or both. After you format a disk, it contains one directory called the ROOT directory. However, a disk can have many directories. For instance, besides the ROOT directory, your System Master diskette contains the CMDS and SYS directories. The ROOT and CMDS directories are especially important to you. When you boot NitrOS-9, you automatically begin operation from these two directories. The ROOT directory becomes your current data directory and the CMDS directory becomes your current execution directory.

29
Whenever you ask NitrOS-9 to store a file on a diskette, it automatically stores it in the current data directory (the ROOT directory), unless you tell it otherwise. If you ask NitrOS-9 to execute a command or program, it automatically looks for that command or program in the execution directory (the CMDS directory), unless you tell it otherwise. Every NitrOS-9 directory can also contain other directories, called subdirectories. For instance, SYS, and CMDS are established as subdirectories of the ROOT directory. Put in chart form, your ROOT directory with its subdirectories looks like this:
Figure 2 But there are also files in the ROOT directory, OS9Boot and Startup are two. The full ROOT directory might look like this:
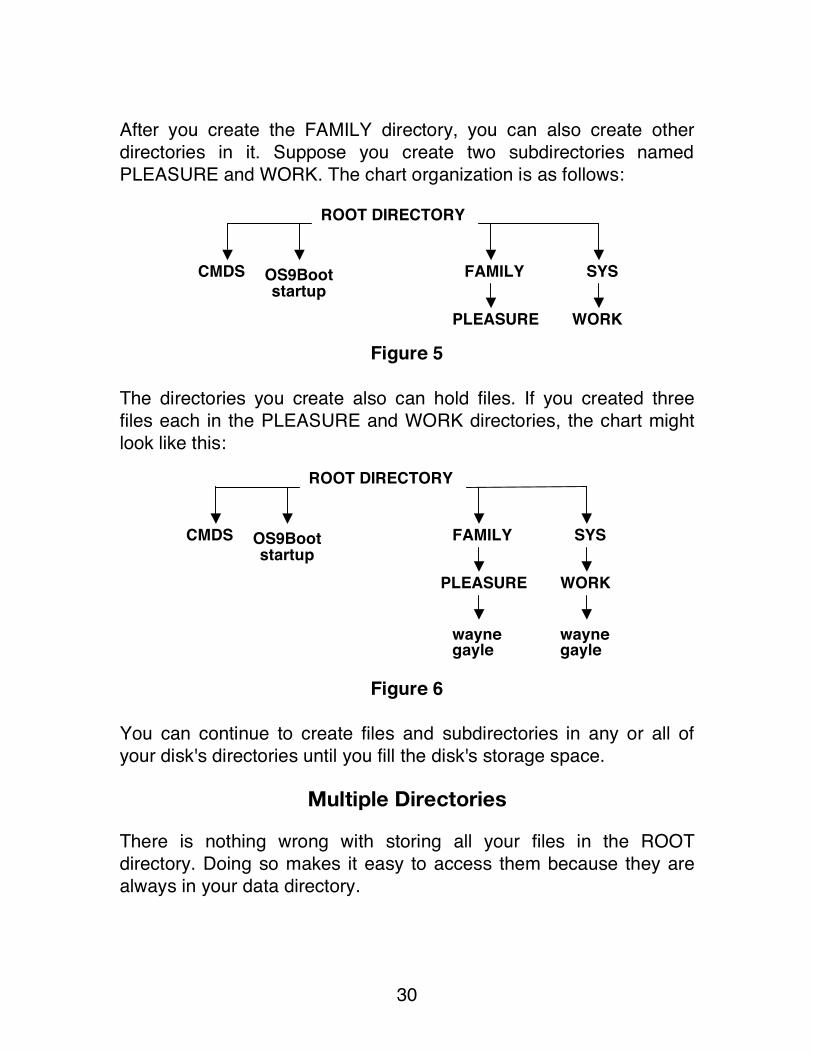
Figure 3 You can create another subdirectory of the ROOT directory if you want. For instance, if you created a directory named FAMILY, the chart of the ROOT directory looks like this:
Figure 4
ROOT DIRECTORY
CMDS FAMILY SYS OS9Boot startup
ROOT DIRECTORY
CMDS SYS OS9Boot startup
ROOT DIRECTORY
CMDS SYS
30
After you create the FAMILY directory, you can also create other directories in it. Suppose you create two subdirectories named PLEASURE and WORK. The chart organization is as follows:
Figure 5 The directories you create also can hold files. If you created three files each in the PLEASURE and WORK directories, the chart might look like this:
Figure 6
You can continue to create files and subdirectories in any or all of your disk's directories until you fill the disk's storage space.
Multiple Directories
There is nothing wrong with storing all your files in the ROOT directory. Doing so makes it easy to access them because they are always in your data directory.
ROOT DIRECTORY
CMDS FAMILY SYS OS9Boot startup
PLEASURE WORK
wayne gayle
wayne gayle
ROOT DIRECTORY
CMDS FAMILY SYS OS9Boot startup
PLEASURE WORK

31
However, creating multiple directories makes it easy to keep your data organized when you have many files, or if more than one person is using the same disk. Such a multiple-directory organization is especially helpful when using hard disks, which can store hundreds of individual files. Also, when you have multiple directories, you can store files having the same name in different directories without conflict, such as in the PLEASURE and the WORK directories of Figure 5.
About File and Directory Names The file and directory names shown so far consist only of letters of the alphabet, but you can use other characters and symbols in a file or directory name as long as each name begins with a letter. The following is a complete list of acceptable characters:
• Uppercase letters: (A-Z) • Lowercase letters: (a-z) • Decimal digits: (0-9) • The underscore character (-) and the period (.)
You can include as many as 29 characters in a file or directory name.
Examples of Filenames The following are samples of filenames that NitrOS-9 can recognize:
mydata samfile mydatal Dollar-gifts records.srt help.file XXX.xx file#l.txt progl.bas program.sourcecode prog2.bas program.opcode
Examples of invalid filenames are: his*hers because * is not a valid character for filenames .DATA because the name begins with a dot

32
COST+INT because + is not a valid character for names
About Pathlists Because you can organize NitrOS-9 disks into multiple levels, you need a way to tell the system where to find directories and files. The directions you give are called pathlists. A pathlist is exactly what its name implies a path (or route) to the device, directory, or file you want to access. For instance, if you are in the ROOT directory and want to look at the contents of a file in the WORK directory, you must tell NitrOS-9 how to get there. The pathlist from the ROOT directory to the wayne file is family/work/wayne. NitrOS-9 expects you to separate the junctions of pathlists with slashes. To look at the contents of wayne, you type:
list family/work/wayne ENTER Because you are accessing a file on the current disk, you do not need to specify a drive name. Because every disk contains a ROOT directory, and all other directories and files branch from it, ROOT is always implied in a pathlist. If Figure 6 represented the diskette in Drive /D1, the pathname to the wayne file would be /dl/family/work/wayne. Depending on the location of the directory or file you want to access, a full pathlist need not contain any more than the name of a drive, the name of a directory, or the name of a file. For instance, the complete pathlist from the ROOT directory of the above example to the Startup file is startup. To look at the contents of startup, type:
list startup ENTER
Anonymous Directory Names To save time, or if you do not know a full pathlist, you can refer to the current directory, or to a higher-level directory, using an anonymous name, or name substitute, as follows:

33
• One period (.) refers to the current directory • Two periods (..) refer to the parent of the current directory (the
next highest-level directory). • Three periods (...) refer to the directory two levels up, and so
on. You can use an anonymous directory name in place of a pathlist or as the first name in a pathlist. Some examples are:
dir .. ENTER lists names in the current data directory's parent directory.
del ../temp ENTER deletes the file called Temp from the current data directory's parent directory.
Anonymous names can refer to either execution or data directories, depending on the context in which you use them.
About Device Names In the same manner that NitrOS-9 has names for its commands, it also has names for its devices. These names are abbreviations of actual device names. For instance, instead of typing Disk Drive 0 to refer to your first disk drive, you only need to type /D0. To refer to your printer, type /P. NitrOS-9 Level 2 windows are named /W through /W7. All of NitOS-9's device names are preceded by a slash this is how NitrOS-9 can tell you are referring to a device rather than a directory or file. The NitrOS-9 System Master diskette is configured to recognize two disk drives, a printer, and one terminal port. For information on how to configure your system to recognize other devices, see Chapter 7.

34
Chapter 5. Commands and Keys
You already put NitrOS-9 to work with commands such as FORMAT and BACKUP. In these cases the manual told you exactly what to do to accomplish a very specific task. If you want to strike out on your own, you should know some additional background information.
Typing Commands As explained earlier, some NitrOS-9 files are programs. You tell NitrOS-9 to execute these programs by typing the program (file) name and pressing ENTER. You are then issuing a command to NitrOS-9. That's all a command is, the name of a program for the system to execute. The following are some rules about commands: You can enter a command whenever the screen displays the shell prompt. A command consists of one word, the command name. A command line consists of one or more command names and their associated parameters and modifiers. Parameters and modifiers are special information you include with a command that provide necessary data for the command to operate, or that affect the command's operation. A command line can have a maximum of 198 characters including any combination of upper- or lowercase letters. To execute a command, press ENTER For example, to clear the screen, type:
display 0c ENTER
Editing Commands NitrOS-9 is very particular about the commands you type. If you make any mistake, NitrOS-9 either does not understand (and tells you so with an error message) or does the wrong thing. If you see that you made a mistake before you press ENTER, you have two choices: (1) use ← or CTRL H to move the cursor to the

35
mistake, and retype that portion of the line, or (2) press CTRL X or SHIFT ← to erase the line you are typing, and start over.
Command Parameters You can follow a command name with one or more parameters that give NitrOS-9 more specific instructions. For example, in the command line:
list file1 ENTER LIST is the name of the command that displays the contents of a text file. file1, the specified parameter, is the name of the file that you want displayed. Note: In a command line, always use spaces to separate parameters from their command, and from each other. Parameters cannot contain spaces. Chapter 6 discusses parameters for each NitrOS-9 command. Some commands have more than one parameter. For instance, COPY requires two parameters: the name of the file being copied, and the name of the new file you want COPY to create. If you want to copy a file called Startup, and call the copy Newstartup, your command line reads: copy startup newstartup ENTER
COPY, the command name
The name of the file to copy
The name of the copy
You press ENTER to cause the command line to execute.

36
Using Options
Command lines can also contain another type of parameter, called an option. An option changes the way a command performs. For instance, the command DIR, without parameters, shows the name of all files in the current data directory. However, if you add the -E option as a parameter to the command, like this:
dir -e ENTER the output includes not only the names of the files, but also complete statistics about each file-the date and time created, size, security codes, and so forth. To display complete information about each file in SYS, type:
dir sys -e ENTER
Using Commands As described earlier, NitrOS-9 acts in much the same manner as an office manager. It looks after the operation of your computer and equipment. Because NitrOS-9 is only a manager, it expects you to make the necessary decisions. For example, suppose you have an important file named hotstuff that you want to copy. Before giving it to your office manager (NitrOS-9), you must make executive decisions, such as:
• Do you want the copy on disk, paper, or the computer screen? • If you want the copy on disk, which disk? • If you want the copy on the same disk, what name do you want
to give the second copy so NitrOS-9 is not confused? • If you want the copy on the computer screen, do you want the
display to pause when it fills the screen?

37
You make the decisions, NitrOS-9 manages the job. For instance, if your decision is to copy hotstuff from one diskette to another, you might type the following command line:
copy /d0/hotstuff /d1/hotcopy ENTER This is how NitrOS-9 sees your command: copy /d0/hotstuff /d1/hotcopy This command line tells NitrOS-9 to copy a file named hotstuff from your floppy disk Drive /D0 to a second floppy Drive /D1. The file copy is given the new name, hotcopy. You only need to know the name of the file you want to copy, on which disk it is located, and the disk on which you want the new copy. NitrOS-9 manages the operation for you.
Accessing Commands NitrOS-9 has two ways to access commands. Some commands reside on a disk. When you type the command name and press ENTER, NitrOS-9 must look on the disk, load the program into the computer's memory, and then execute it. Other commands are loaded into your computer's memory at startup, or you can load them into memory later. When you call a command that is in memory, it is executed immediately. There is no delay while NitrOS-9 finds it on disk.
The name of the command
The disk drive containing the file to be copied
The name of the file to copy
The disk drive that is to receive the new file The name of the copy

38
Commands from Disk When you give NitrOS-9 a command that it cannot find in memory, it looks for the command in the current execution directory. If it cannot find it there, it checks the current data directory. If it still cannot find it, the system issues Error Message #216, Path Name Not Found. If the command you want executed is in a directory other than the current directory, you must tell NitrOS-9 where to find it. Remember, when initialized, NitrOS-9 sets the CMDS directory of the system disk to be the execution directory. For instance, suppose you booted your system using a diskette configured like the example we used in Chapter 4:
Figure 7 When the system starts, the ROOT directory is the data directory, and the CMDS directory is the execution directory. Now, suppose you had a program named expenses in the FAMILY directory:
Figure 8
ROOT DIRECTORY
CMDS FAMILY SYS OS9Boot startup
PLEASURE WORK
wayne gayle
wayne gayle
ROOT DIRECTORY
CMDS FAMILY SYS OS9Boot startup
PLEASURE WORK
wayne gayle
wayne gayle
expenses

39
(Remember that a program and a command are really the same thing.) You can now access (use) the expenses program in two ways. One way is to specify a pathlist from the ROOT directory to execute expenses, such as:
/d0/family/expenses ENTER Another way is to change the execution directory.
Changing the Execution Directory To change the execution directory to the FAMILY directory, type:
chx /d0/family ENTER Or specify a pathlist relative to the current execution directory, such as:
chx ../family ENTER To execute the expenses program, you now only need to type expenses ENTER. However, after you change the execution directory, to use a command in the COMMANDS directory, you must tell NitrOS-9 where to find it. For example, to format a new diskette in Drive /D1, type:
/d0/cmds/format /d1
Changing the Data Directory Suppose that the expenses program keeps track of work and pleasure expenses for Wayne and Gayle. Unless you tell NitrOS-9 otherwise, it looks for data files in the current data directory, the ROOT directory. To tell NitrOS-9 to look for data files in the PLEASURE directory, type:

40
chd family/pleasure The slash between FAMILY and PLEASURE tells the system that PLEASURE is a branch of FAMILY. Subordinate directories and files are always separated from their parent in this way. Now, when expenses needs data, it knows to look in the PLEASURE directory.
Changing System Diskettes Although it is preferable to leave the system diskette in place while the system is running, particularly with multiuser systems, there might be times when you need to use another diskette. Only remove the current diskette when the screen displays the shell prompt, followed by the cursor. If you do remove the system diskette and begin to use another one, use the CHD and CHX commands to tell NitrOS-9 where you want to be located on the new diskette. (For directions, see Chapters 2 and 6.) Those commands set both directory pointers, data and execution, for the new diskette. While using a program or command, do not remove a diskette and insert another unless the program or command asks you to. You can lose data, or entire files, if you do.
Video Display and Keyboard Functions NitrOS-9 has many features that expand the capability of the Color Computer's video display and keyboard. The video display has upper-/lowercase, screen pause, graphics functions, and under NitrOS-9 Level 2 for the Color Computer 3, 80 column displays if you have a monitor connected. The ALT key on the Color Computer 3 keyboard (or the @ key on Color Computer 1/2 keyboard) provides an alternate key function. Holding down this key while pressing another key sets the high order bit of the character pressed. That is, it adds 128 to the normal ASCII value produced by that key. Holding down ALT/@ while pressing any other key produces a graphics character on the standard VDG

41
screen. If you are using NitrOS-9 Level 2 windows, ALT lets you produce international characters. (See The NitrOS-9 Level 2 Windowing System for more information). The keyboard has an auto-repeat function. Holding down a key causes the character to repeat until you release the key. This function operates properly only when the disk drives are not in use by a program. You can deal with the video display and keyboard together as though they are a file. You can receive input from the keyboard and send output to the video screen using the device name /TERM.
Special Keys The following keys and key sequences have special significance to NitrOS-9. NitrOS-9 Level 1 users: replace ALT with @ and CTRL with CLEAR.
ALT Produces graphic characters on a standard VDG screen or international characters with windows. Press ALT char where char is a keyboard character.
CTRL A control key.
BREAK or CTRL E Stops the current program execution.
← or CTRL H Moves the cursor to the left one space.
CTRL - Generates an underscore character. The underscore displays as a left arrow on VDG screens.
CTRL , Generates a left brace ( { ).
CTRL . Generates a right brace ( } ).

42
CTRL 3 Generates a tilde ( ~ ).
CTRL / Generates a backslash ( \ ).
CTRL BREAK or CTRL C
Performs an ESCAPE function, and sends an end-of-file message to a program receiving keyboard input. To be recognized, CTRL BREAK must be the first thing typed on a line.
SHIFT BREAK Performs a CONTROL C function by interrupting the video display of a program. The program runs as a background task.
CLEAR Selects the next video window (NitrOS-9 Level 2 only).
SHIFT CLEAR Selects the previous video window (NitrOS-9 Level 2 only).
CTRL CLEAR Toggles the keyboard mouse on and off. The keyboard mouse uses the arrow keys and the two function keys (F1 and F2) to simulate an external mouse. When keyboard mouse is on, the normal functions for the arrow and function keys are suspended (NitrOS-9 Level 2 only).
SHIFT ← or CTRL X
Deletes the current line.
CTRL 0 Activates or deactivates the SHIFT lock function.
CTRL 1 Generates a vertical bar ( | ).
CTRL 7 Generates a caret ( ^ ).
43
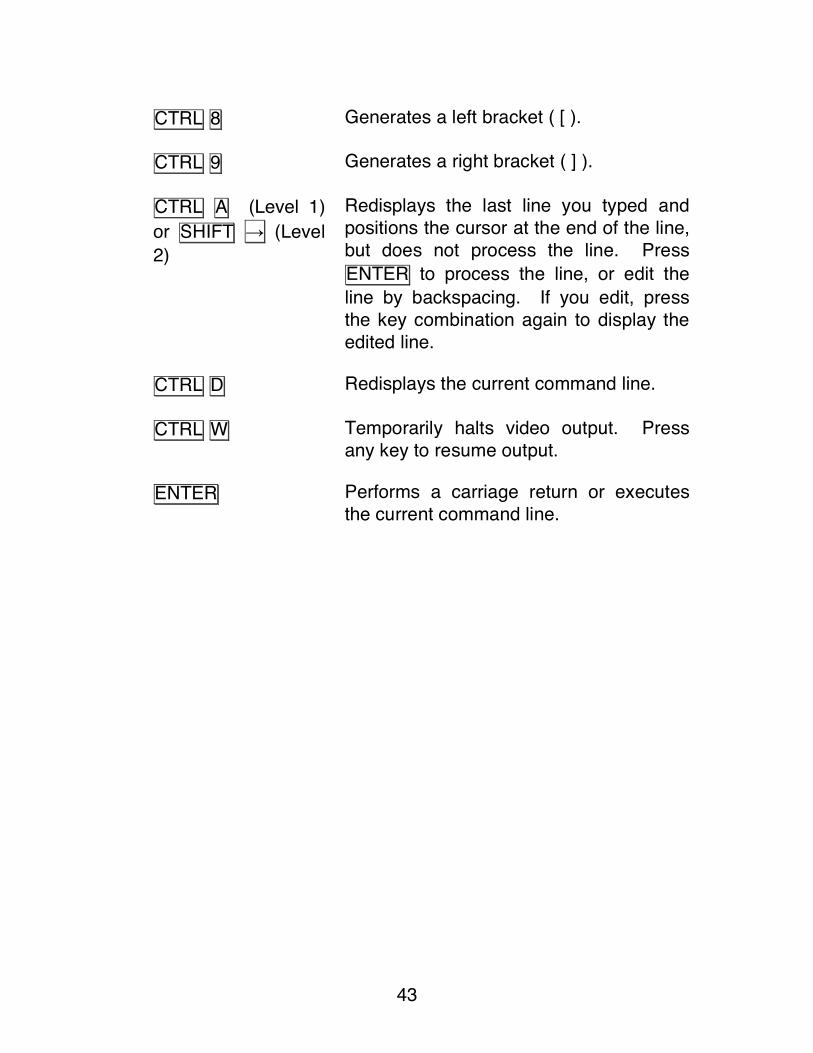
CTRL 8 Generates a left bracket ( [ ).
CTRL 9 Generates a right bracket ( ] ).
CTRL A (Level 1) or SHIFT → (Level 2)
Redisplays the last line you typed and positions the cursor at the end of the line, but does not process the line. Press ENTER to process the line, or edit the line by backspacing. If you edit, press the key combination again to display the edited line.
CTRL D Redisplays the current command line.
CTRL W Temporarily halts video output. Press any key to resume output.
ENTER Performs a carriage return or executes the current command line.

44
Chapter 6. The NitrOS-9 Toolkit
You now know about a number of NitrOS-9 commands that can help you set up and use your computer system. There are many more commands available. This chapter contains information about a few of the most helpful commands. Becoming acquainted with these makes it easy for you to use other commands and functions. NitrOS-9 Commands Reference contains more information and a complete reference to all NitrOS-9 commands (including those we have already discussed).
Viewing Directories To look at your disk directories use the DIR command. For example, to view the contents of the current data directory, type: dir ENTER If your data directory contains more filenames than can display on the screen at one time, the display pauses. Press the space bar to cause additional files to scroll onto the screen. You can also view your execution directory in a similar manner. This time you must include the command option, -x. Type:
dir –x ENTER If you want to look at a directory on a disk drive other than the current drive, specify a complete path for NitrOS-9 to follow, including the disk drive name. For example:
dir /d0/FAMILY/WORK
Creating Directories

45
Before you can store data in a directory other than the ROOT directory, you must create that directory with MAKDIR. For instance, to create a FAMILY directory on your Drive- /D0 diskette, type:
makdir /d0/FAMILY ENTER
Deleting Directories You can also delete directories you create. When you delete a directory you also delete any files or subdirectories it contains; so use this command with caution. To delete a directory, follow these steps.
1. Use DIR to view the contents of the target directory and any of its subdirectories.
2. Copy any files you want to keep into a directory outside of the
directory you want to delete. Type:
deldir dirname ENTER
where dirname is the name of the directory you want to delete.
The screen shows: Deleting directory file. List directory, delete directory, or quit ? (l/d/q) You now have three options:
1. To again confirm the contents of the directory before you delete it, press l ENTER.
2. To initiate the deletion process, press d ENTER. 3. To quit the process and leave the directory intact, press q
ENTER.

46
If you try to delete directories other than the ones you create, NitrOS-9 might display Error #214, No Permission (you do not own the directory or have write permission for it): For information on handling such directories, see the ATTR command in NitrOS-9 Commands Reference.
Displaying Current Directories There are times when you need to know the names of your current data and execution directories. The PWD and PXD commands make this possible. To determine your current data directory, type:
pwd ENTER The command displays the path from the ROOT directory to the current data directory. For instance, using an earlier example, if your current data directory is PLEASURE the display is:
/D0/FAMILY/PLEASURE To discover your current execution directory, type:
pxd ENTER The screen might display:
/D0/CMDS A standard convention of NitrOS-9 is to capitalize directory names. If you follow this convention when creating directories, you can always tell which files are directories at a glance.
Copying Files COPY, like BACKUP, provides file security. If something happens to one file, you can use a copy. Also, you might want to copy a command or program to use in more than one directory, or you might want to use the same data on more than one computer.

47
Continuing with the earlier example, suppose you are in the PLEASURE directory of the diskette. Your execution directory is the FAMILY directory, where you are using the Expenses program. Because the FAMILY directory does not contain any NitrOS-9 commands, you have to change the execution directories whenever you want to use them. You can make your work easier by copying the expenses program to the CMDS directory. To do this, first make the CMDS directory your data directory by typing:
chd /d0/CMDS ENTER Then copy the Expenses file to the CMDS directory by typing:
copy /d0/FAMILY/expenses expenses ENTER Now, expenses is in the CMDS directory, and you do not need to change the execution directory to FAMILY to use it. Likewise, if the ROOT directory is your data directory, and you want to copy the gayle file from the WORK directory to the ROOT directory, type:
copy family/work/gayle gayle ENTER You can copy any file between directories and between disks. To do so, you must provide the COPY command with a pathlist for the location of the original file and for the destination of its copy.
Deleting Files You can delete files in any directory using the DEL command, such as:
del myfile ENTER

48
You can delete a file in the current execution directory by using the - x parameter. For instance, to delete myprogram from the current execution directory, type:
del -x myprogram ENTER If the file you want to delete is in a directory other than the current data directory or the current execution directory, you must specify the full pathlist to the file. For instance, suppose you are in the ROOT directory of a diskette configured as Figure 3. To delete the Wayne file in the WORK directory, type:
del family/work/wayne ENTER If the file you want to delete is on a drive other than your current drive, include the drive name in your pathlist, such as:
del /d1/family/work/wayne ENTER If you attempt to delete a file you did not create, NitrOS-9 might display Error #214, No Permission. For information on deleting such files see the ATTR command in NitrOS-9 Commands.
Renaming Files NitrOS-9 lets you change the names of files. Suppose Wayne leaves home, and you now want to keep track of expenses for Pat. To change the name of the Wayne file to Pat, type:
rename family/pleasure/wayne pat ENTER
Looking Inside Files LIST is a command that lets you examine files that consist of text characters. For instance, to view the gayle file from the WORK directory, you might type:
list family/work/gayle ENTER

49
The contents of the file appears on the screen. If you use LIST to display a file that is not a text file, it produces a meaningless display.
Loading Command Modules into Memory When using NitrOS-9, you might notice that some commands begin execution immediately, while others require access to the disk drive before they execute. The NitrOS-9 commands you need most often load into memory at startup, so they are available for immediate use. If you plan to frequently use a command that is not in memory, you can load it. For instance the DSAVE command lets you copy an entire directory from one disk to another. To place the DSAVE module into your computer's memory, first be sure your execution directory is the CMDS directory, then type:
load dsave ENTER Now you can use DSAVE as many times as you want, without waiting for NitrOS-9 to find it on disk.
Listing the Command Modules in Memory At startup, NitrOS-9 loads into memory the commands you use most often. If you are not sure whether a command already resides in memory, you can check using the MDIR command. To display a directory of the modules in your computer's memory, type:
mdir ENTER A list of all the modules in your computer's memory appear on the screen. The names you see are of modules NitrOS-9 uses to boot and handle system operations and the commands it loads into memory when you boot the system.
Deleting Modules from Memory

50
After you load a module into memory, you can also delete it. The process is called unlinking. To remove the DSAVE command from memory, type:
unlink dsave ENTER Do not attempt to unlink modules that you did not install in memory with the LOAD command.
Using Other Commands NitrOS-9 has numerous commands and functions. This chapter has mentioned only a few. Not only are there other commands available through NitrOS-9, several of the commands presented here have additional options. The guidelines you learned in this handbook provide the background you need to make use of NitrOS-9's many other capabilities. By referring to NitrOS-9 Commands you can learn how to create procedure files to accomplish complicated tasks, send information to your printer, transfer data between devices, execute more than one task at the same time, and much more.


52
Chapter 7. The System and Modules Disk Structure
NitrOS-9 is distributed on either two 5.25” 360K floppy diskettes or one 3.5” 720K floppy diskette. If you are using two 5.25” diskettes, then the first diskette is the System Master and the second diskette is the Modules disk. The System Master is the diskette with which you boot NitrOS-9. It also contains all of the standard commands as well as some additional system and definition files. The Modules disk contains all of the pieces that can be used to build a NitrOS-9 boot disk for various system configurations. It also contains a minimal commands directory that can be used when building a boot disk. The directory structure on these disks is designed to be highly organizational and to provide consistency between distributions. This chapter explains what to expect when exploring the directories on the distribution diskettes and their purpose. If you are using NitrOS-9 on a 3.5” 720K floppy diskette, then it contains the contents of both the System Master and the Modules disks. This is because the 3.5” disk can hold twice the amount of the 5.25” diskette.
The System Master Disk As discussed in a previous chapter, the root directory is the top level directory on a diskette formatted for use under NitrOS-9. The NitrOS-9 System Master diskette contains the following directories:
CMDS – contains executable commands and utilities SYS – contains help and error message files as well as the
password file. Under NitrOS-9 Level 2, this directory also contains graphic buffer files for fonts, pointers and patterns
DEFS – contains the definition files necessary for assembly language development.

53
The Modules Disk The Modules disk is organized into various directories and subdirectories. The main directory is NITROS9. It is in this directory that all supported distributions are contained. Depending upon your distribution, you will see one of three directories:
6809L1 – Files and modules for NitrOS-9/6809 Level 1 6809L2 – Files and modules for NitrOS-9/6809 Level 2 6309L2 – Files and modules for NitrOS-9/6309 Level 2
These are considered distribution directories, as their contents reflect files for that particular distribution of NitrOS-9. As other distributions come into existence, additional directories may appear. An immediate benefit of having separate distribution directories is that on a system with a large capacity disk or hard drive, multiple distributions can reside under the NITROS9 directory without conflicts. Boot disks for those distributions can be easily built, no matter which distribution of NitrOS-9 is actually running. This means that you can build a NitrOS-9/6309 Level 2 boot disk while running NitrOS-9/6809 Level 1, or vice versa. Underneath each distribution directory is a set of operational directories which are the same for all distributions. They are:
CMDS MODULES BOOTLISTS SCRIPTS
The CMDS directory at this level contains commands for creating boot disks. Though all distributions have the same commands, the actual executables may not be the same. For example, the grfdrv module in NITROS9/6809L2/CMDS is not the same binary as the module of the same name in NITROS9/6309L2/CMDS. Because of this, you should NEVER mix commands between distributions.

54
The MODULES directory contains modules for the distribution, and those modules are used for creating boot disks, as we will see shortly. The BOOTLISTS directory contains one or more text files that end in .bl. This is short for bootlist. Bootlist file are used by the os9gen command when building boot disks, and are part of the automated boot disk creation process discussed in a following chapter. The SCRIPTS directory contains shell scripts that are used in creating boot disks. The commands in these scripts are executed in series, and rely on the bootlist files in the BOOTLISTS directory to complete the creation of a boot disk.
The MODULES Directory in Depth The MODULES directory contains sub-directories which organize the multitude of module files that compose a potential NitrOS-9 boot disk. They are:
BOOTTRACK – Files and modules which are used to create custom boot tracks
KERNEL – The core kernel files that make up the NitrOS-9 operating system
SYSMODS – Modules that arenʼt classed in other directories CLOCKS – All clock modules, both software and real-time clocks RBF – The disk file manager, drivers and descriptors for a number
of different devices SCF – The character file manager, drivers and descriptors for
those devices PIPE – The pipe file manager and its driver and descriptor
These additional sub-directories provide some order to chaos by allowing modules in related groups to exist in their own directory. This reduces screen clutter and emphasizes their association and place in the NitrOS-9 system.

55
Chapter 8. Customizing Your System
Your NitrOS-9 operating system is originally configured in a certain way. For instance, it is set up to recognize two floppy disk drives, but no hard drives. Using scripts located in the NITROS9 directory on the Modules diskette, you can create system diskettes that match the computer system you have. Before proceeding further, be sure you have a working copy of the NitrOS-9 Modules diskette and a blank, formatted diskette. You can use the instructions in “Making Copies of Diskettes” in Chapter 3 to create a working copy of the NitrOS-9 Modules diskette and to create a blank, formatted diskette.
Creating a New System Diskette The following instructions will assist you in creating a new system diskette. You will need a two-drive system in order to follow these steps. To create your new system diskette, make sure you have a newly formatted diskette on hand, then follow these steps:
Step 1: Verify that you are running Shell+
NitrOS-9 Level 2 users already have Shell+ as their default shell. NitrOS-9 Level 1 users, however, do not. In order to run the boot creation script, Shell+ must be used. NitrOS-9 Level 1 users: insert your NitrOS-9 system diskette into drive 0 and boot up to the shell, then type the following commands:
rename cmds/shell shellorg ENTER rename cmds/shellplus shell ENTER

56
Once the commands have completed, press RESET on your Color Computer to reboot into NitrOS-9. Shell+ will now be your default shell.
Step 2: Select the proper disk
The NitrOS-9 Modules diskette is required to create a system diskette. If you are using 3.5” 720K system disks, then simply boot into NitrOS-9 and go to the next step. If you are using the 5.25” NitrOS-9 diskettes, use the NitrOS-9 System Disk to boot into the operating system, then insert the NitrOS-9 Modules diskette into drive 0, and type:
chx /d0/cmds ENTER chd /d0 ENTER
Step 3: Locate the scripts directory
Navigate to the scripts directory by typing:
chd /d0/nitros9/6809l2/scripts ENTER (This example presumes that NitrOS-9/6809 Level 2 is being used. Be sure to substitute the ʻ6809l2ʼ string if you are using a different distribution). Use the dir command to show the contents of this directory, and you will see a single file: mb (short for make boot). This is the script file that is used to build a fresh system disk.
Step 4: Run the script
Start the script by typing:
mb ENTER

57
The script will prompt you for the destination drive. This contains the disk that you want to make bootable. After supplying the device name, the disk in the device is formatted, and the script will continue to display what it is doing through a series of discrete steps. If no errors occurred, the script will notify you when it is finished. At that point, you have a newly created boot disk in the destination drive that you can now boot from. You will realize quickly, however, that there are no utilities on the disk. It only contains enough of the operating system to boot up and provide a shell.
Customizing Your Boot While the above steps allow you to create a bootable disk, it doesn't provide you with the information on how to actually make a custom boot disk. The customization comes in by editing one or more bootlist files, found in the nitros9/6809l2/bootlists directory. A single text file resides there: standard.bl. The file contains a list of all modules necessary to build a bootfile, one per line. Most lines are commented out with an asterisk as the first character, and by default, only the modules absolutely necessary for booting are made available. Using an editor such as edit, you can either uncomment lines for modules that you want to include, or add modules at the end of the file. Either way, editing this file is the key to getting your bootfile customized the way you want to. You will notice that there are a lot of modules in the list covering a number of hardware devices, so be sure to search for your driver or module of choice before adding it. Once you have edited standard.bl to your liking, save it and return to the nitros9/6809l2/scripts directory. Once there, re-run the mb script. If the modules you selected are indeed available, your new bootfile will contain them. Please be aware that typos or references to missing modules in the standard.bl file can cause the script process to prematurely abort and you will not have a bootable disk.

58
Making Your Own Script If you find the script a bit limiting, you may want to edit it or use it as a template for a new script. With a new script you can reference another bootlist file instead of standard.bl, format the disk to a different capacity, build a different kernel track, etc. It's a flexible way to set up a customized boot disk with all the utilities and modules you want. The remaining sections in this chapter deal with NitrOS-9 Level 2 for the Tandy Color Computer 3. If you are running NitrOS-9 Level 1, you can skip the remainder of this chapter.
Monitor Types under Level 2 NitrOS-9 Level 2 lets you set your Color Computer 3 for different monitor types. The monitor options are for an RGB color monitor, a composite color monitor or TV, or a monochrome monitor or TV. To set your system for a particular monitor type, enter one of the following commands, or add it to your systemʼs startup file:
Monitor Type Command RGB montype r Composite montype c Monochrome montype m
Therefore, to set your system for a composite monitor, type:
montype c ENTER To save typing the command each time you start NitrOS-9, put it in the startup file in the ROOT directory of your system diskette. If your system disk does not have an existing startup file: Create one by typing:
build startup ENTER ? montype r ENTER

59
? ENTER If your system disk already has a startup file: First, rename the startup file by typing:
rename startup oldstart ENTER Then create a file that contains the new command, such as:
build newstart ENTER ? montype r ENTER ? ENTER
Now, combine the two files into a new startup file:
merge oldstart newstart >startup ENTER Use DEL to delete oldstart, newstart, or both, or leave them on your disk for future use.
Using Level 2 Windows If the window descriptors (W, W1, W2, W3, W4, W5, W6, W7) and the graphics interface and driver, GrfInt/Windlnt and GrfDrv, are in memory, NitrOS-9 lets you set up windows on your display screen. Note: GrfInt/WindInt and the window descriptors must be loaded as part of the boot operation. Your System Master diskette does this. Once you have initialized windows, you can then move among them, initiating different tasks in each. You can even have different processes showing on different portions of your display screen at the same time. Another advantage of using windows is that you can choose windows that give you displays of 40 or 80 columns across the screen.

60
However, unless you have a monitor connected to your computer, rather than a television, you might be unable to read the screen.
Establishing a Window
You can establish one or more windows after booting NitrOS-9, or you can include the window creation process in NitrOS-9's startup file. startup is a file containing commands you want your system to execute during startup. To establish a window from the shell prompt, type:
iniz wnumber ENTER shell i=/wnumber& ENTER
In this example, number represents the window number to initialize. After you type these commands, you can select the window by pressing CLEAR. To return to the original screen, press CLEAR again. The default values for the window descriptors /W1 through /W7 are: Window device name
Text size in columns
Window start: Window size:
/W1 40 0,0 27,11 /W2 40 28,0 12,11 /W3 40 0,12 40,12 /W4 80 0,0 60,11 /W5 80 60,0 19,11 /W6 80 80,0 80,12 /W7 80 0,0 80,24 Note: To initialize Windows /W2 and /W3, you must be operating from Window /W 1. To create Windows /W5 and /W6, you must be operating from Window /W4.

61
The "Window start" column, indicates the position on the screen of the top left corner of the window. On the screen grid, coordinates 0,0 are located at the top left corner. The "Window size:" column indicates the number of characters across each window and the number of character lines in each window. Therefore, Window 1 displays 40 column text, begins in the top left corner of the screen, extends right for 27 characters and down for 11 lines. Window 5 displays 80 column text, begins at the top of the screen, 60 columns from the left, extends 19 columns to the right and 11 lines down. Note that the coordinates for each window are based on the text size of the screen. Therefore, Window 1 (based on 40 column text) ends at column 27, while Window 5 (based on 80 column text) begins at column 60. Using the information in the previous chart, you can now establish any, or all, of the seven windows. Note: You cannot establish all of the windows unless your computer has 512 kilobytes of memory. For instance, to set up a full screen, 80-column window, type:
shell i=/w7& ENTER After a short pause, the screen displays a message, such as: &004 This means that NitrOS-9 has opened a path to your new window and started a shell on the window with the process identifier of 004. To move to the window, press CLEAR. Your 32-column screen vanishes and you are now in Window 7. You can type commands or run programs from here in the same manner as before.

62
To set up three windows on the same screen, type these commands, then use CLEAR to move among the windows:
iniz w1 w2 w3 ENTER shell i=/w1& ENTER shell i=/w2& ENTER shell i=/w3& ENTER
If you want, and your computer has enough memory, you can run different processes in all of the windows.
Changing Window Colors
Perhaps you don't like the color of the screen in one or more of your windows. You can change it using the display command. The following charts show you all of the colors available for the screen background, text, and border. 00 or 08 White 01 or 09 Blue 02 or 0A Black 03 or 0B Green 04 or 0C Red 05 or 0D Yellow 06 or 0E Magenta 07 or 0F Cyan 10 or greater Black
Table 1 - Color Codes To change a color, type display 1b, followed by the background, text, border, or foreground code followed by a color code. Then, press ENTER. For instance, if you are in Window 7, you can change the background color to red, by typing:
63
display 1b 33 04 ENTER
Change the text color to black by typing:
display 1b 32 02 ENTER To put a white border around the screen, type:
display 1b 34 00 ENTER You can also type all the codes on one line, like this:
display 1b 33 04 1b 32 00 1b 34 00 ENTER Pick the colors you want for each window, and change them using DISPLAY.
Eliminating a Window
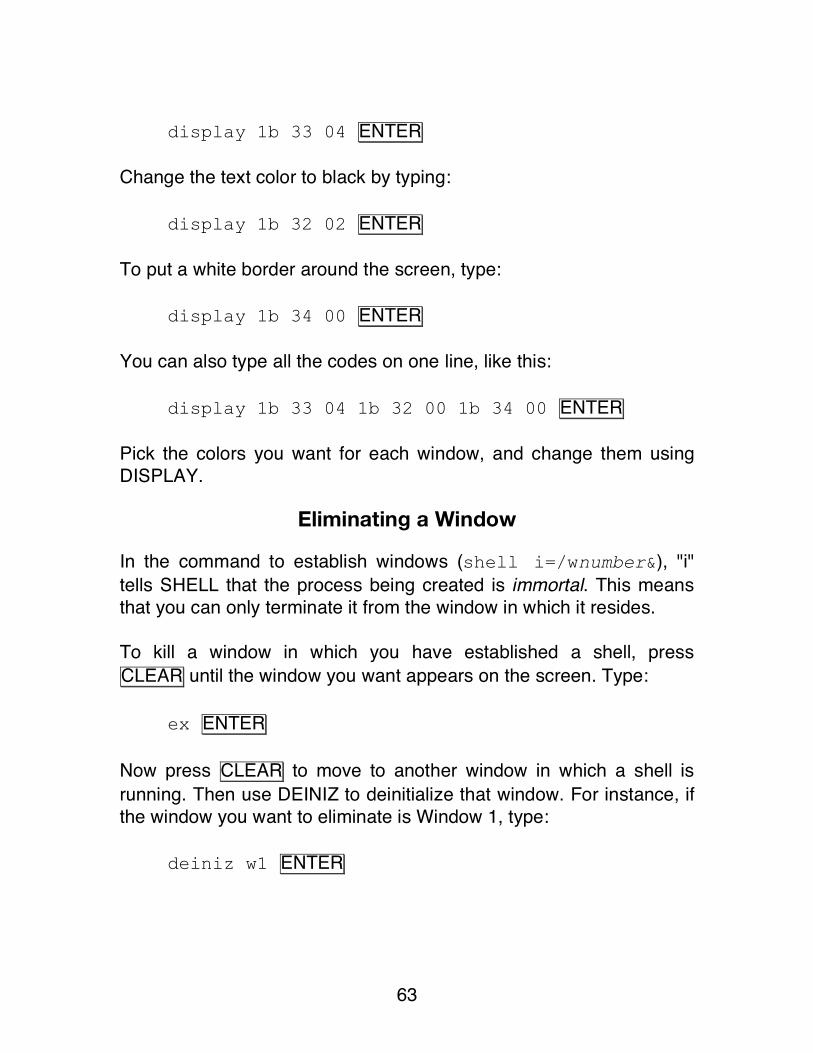
In the command to establish windows (shell i=/wnumber&), "i" tells SHELL that the process being created is immortal. This means that you can only terminate it from the window in which it resides. To kill a window in which you have established a shell, press CLEAR until the window you want appears on the screen. Type:
ex ENTER Now press CLEAR to move to another window in which a shell is running. Then use DEINIZ to deinitialize that window. For instance, if the window you want to eliminate is Window 1, type:
deiniz w1 ENTER

64
Using Startup To Establish A Window
If you intend to use a window whenever you start NitrOS-9, for instance if you want to use an 80 column screen; put the appropriate commands in the startup file. This file must be located in the ROOT directory of your system disk. If your system diskette already has a startup file: First rename the existing startup file, such as:
rename startup oldstart ENTER Then put your new commands into a temporary file. To initialize window Number 7 (80 columns, full screen) with white text on a black background, type:
build tempstart ENTER ? iniz w7 ENTER ? display 1b 32 00 1b 33 02 1b 34 02 0c>/w7
ENTER ? shell i=/w7& ENTER ? ENTER
Now combine your new commands with the original startup file by typing:
merge oldstart tempstart >startup ENTER You can remove the tempstart file by typing del tempstart ENTER, or you can leave it in your ROOT directory for future use. If startup does not already exist: Create it by typing:
build startup ENTER ? iniz w7 ENTER

65
? display 1b 32 00 1b 33 02 1b 34 02 0c >/w7 ENTER
? shell i=/w7& ENTER ? ENTER
Now, after you boot NitrOS-9, press CLEAR to operate in an 80 column, black and white screen.

66
67
Index
Backup, 22 BASIC, 8, 13, 14 Basic09, 8 build, 60, 61, 66 C, 7, 8, 42 chd, 40, 49, 58 copy, 14, 22, 23, 24, 25, 26, 35,
36, 37, 48, 49, 51, 57 del, 33, 49, 50, 66 display, 9, 14, 15, 34, 36, 43,
46, 48, 50, 51, 61, 64, 65, 66, 67
format, 7, 13, 19, 20, 21, 28, 39 Formatting, 20, 21 GrfInt, 61 iniz, 62, 64, 66 international characters, 41 modifiers, 34
montype, 60, 61 Multi-Pak, 8, 9, 12, 15, 19 Multi-tasking, 9 parameters, 34, 35, 36 Pascal, 8 Pathlists, 32 printer, 8, 15, 33, 52 RS-232, 8, 12 shell, 14, 21, 22, 23, 34, 40, 62,
63, 64, 65, 66, 67 startup, 8, 13, 14, 32, 35, 37,
51, 60, 61, 62, 66 subdirectories, 29, 30, 47 tmode, 15. See tmode. See
tmode video display, 40, 41, 42 Windlnt, 61 write protect, 19