getting started with a2billing
TRANSCRIPT

7/31/2019 Getting Started With A2Billing
http://slidepdf.com/reader/full/getting-started-with-a2billing 1/21
Getting started with A2Billing – Part 1 Setting upa trunk In this series of articles I’m going to run through how to get up your a2billing systemup and running. A2billing is an opensource billing application for Asterisk and can beused in many different ways – I’ll be documenting just some examples
Some of this setup will depend how you have your main configuration file(/etc/asterisk/a2billing.conf) configured. I will not be discussing that here. Also someof the setup may rely on FreePBX and A2billing being setup to work together.
All of this documentation was created on a sysadminman Asterisk/FreePBX/A2billingVPS. See here for details – http://sysadminman.net/uk-voip-vps.html
Setting up a trunk
We need to setup a trunk to be used for our outbound calls. Obviously you can setupmore than one trunk and route calls to different destinations via different trunks.
I will be using the trunk that I configured in FreePBX here – http://sysadminman.net/blog/archives/335 . As the main settings for the trunk have
been setup in FreePBX we can just call the trunk by it’s name in A2Billing. This trunkis with a provider called callwithus.
To setup a trunk -
Click on TRUNK on the left hand main menu

7/31/2019 Getting Started With A2Billing
http://slidepdf.com/reader/full/getting-started-with-a2billing 2/21
The next thing I’m going to do is create a “Trunk Provider”. This is not essential (wecan create a trunk with out creating a “provider”) but will be useful when we have
many trunks and want to group them together)
So, click on “Create Provider” and give your provider a name and description – I’musing callwithus. The click Confirm Data
Now I’m going to setup the actual trunk. So click on “Add Trunk”
VOIP-PROVIDER is the one we just created
LABEL is just a text label identifying the trunk

7/31/2019 Getting Started With A2Billing
http://slidepdf.com/reader/full/getting-started-with-a2billing 3/21
PROVIDER TECHNOLOGY is sip (although it’s also possible to use IAX2 with callwithus Iused SIP)
PROVIDER IP is the name of the trunk that I created in FreePBX here. It’s not essentialto use a precreated trunk I just like all my trunks created in a single place – FreePBX
and the click Confirm Data
And that’s it. Our trunk is ready to use. We can see this by click on List Trunk

7/31/2019 Getting Started With A2Billing
http://slidepdf.com/reader/full/getting-started-with-a2billing 4/21
Getting started with A2Billing – Part 2 Ratecardsand Call Plans After we’ve created a trunk we need to create a ratecard and assign it to a call plan.This is the main part of the billing application and also the most complicated!
Initially I’m just going to create a ratecard that allows calls Leicester in the UK. Thedialling code for Leicester is 0116 so the international prefix would be 44116 (44being for the UK)
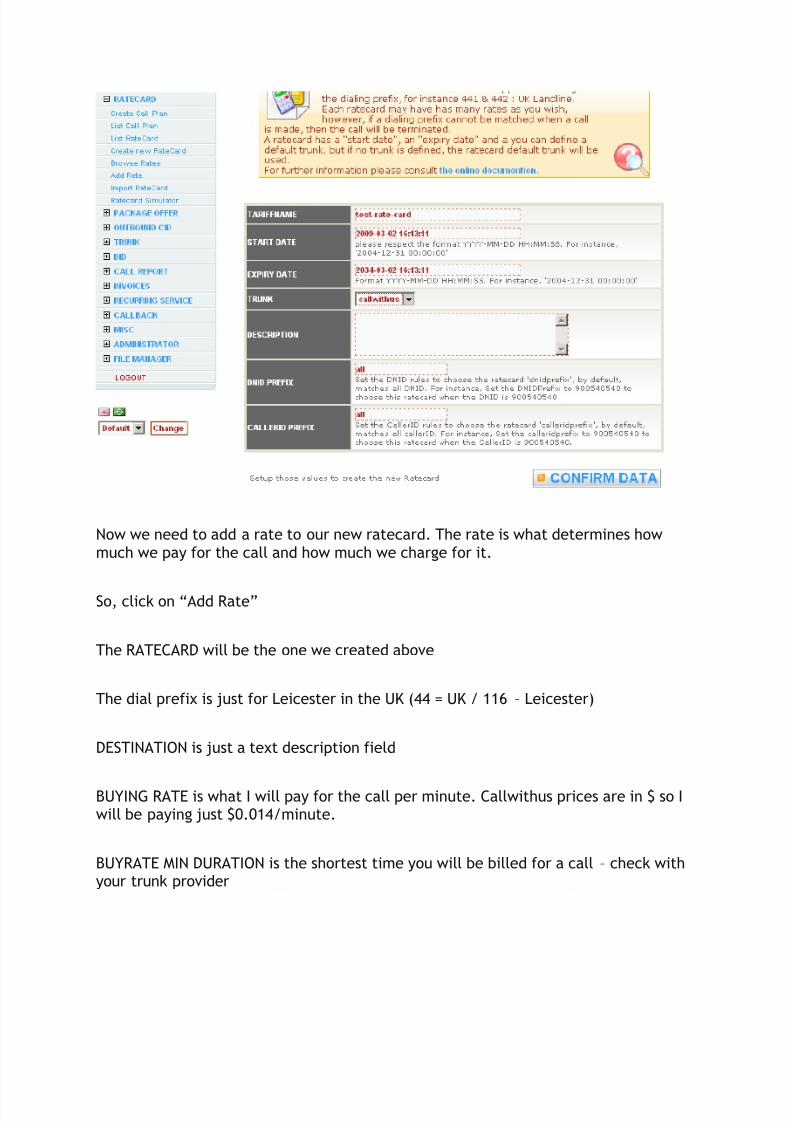
Creating a Ratecard
First click on the RATECARD menu on the left hand side of the screen
Then give your ratecard a name. I called mine “test-rate-card”
Assign the ratecard to use the trunk we created here
And click on CONFIRM DATA
7/31/2019 Getting Started With A2Billing
http://slidepdf.com/reader/full/getting-started-with-a2billing 5/21
Now we need to add a rate to our new ratecard. The rate is what determines howmuch we pay for the call and how much we charge for it.
So, click on “Add Rate”
The RATECARD will be the one we created above
The dial prefix is just for Leicester in the UK (44 = UK / 116 – Leicester)
DESTINATION is just a text description field
BUYING RATE is what I will pay for the call per minute. Callwithus prices are in $ so Iwill be paying just $0.014/minute.
BUYRATE MIN DURATION is the shortest time you will be billed for a call – check withyour trunk provider

7/31/2019 Getting Started With A2Billing
http://slidepdf.com/reader/full/getting-started-with-a2billing 6/21
BUYRATE BILLING BLOCK is the time increment you will be billed for a call – checkwith your trunk provider
SELLING RATE – this is how much you will charge per minute for the call. So I have a$0.006/minute markup on my calls to Leicester
SELLRATE MIN DURATION is the shortest time you will charge for a call
SELLRATE BILLING BLOCK is the time increment you will charge for a call
And that’s all we need to change so click CONFIRM DATA

7/31/2019 Getting Started With A2Billing
http://slidepdf.com/reader/full/getting-started-with-a2billing 7/21
Creating a Call Plan
A callplan is a collection of rate cards. You might have many different rate cards withrates from many different providers and you bundle them up into a call plan and thenassign the call plan to your customers.
Click on Create Call Plan
Give your call plan a name – I called mine “test-call-plan”
REMOVE INTER PREFIX has been changed to Yes. I need this because, in my rate card,my rate only has 44116 (and not the international code 00 or 011 in front of it) so ifthe customer dials the international access code I need to remove it.
Click on CONFIRM DATA

7/31/2019 Getting Started With A2Billing
http://slidepdf.com/reader/full/getting-started-with-a2billing 8/21
Now we need to go in and assign the rate card to our call plan
Click on EDIT to the right of the call plan we created
Scroll down to the bottom of the page and you can see the rate cards assigned to thecallplan. At this point there won’t be any.
So click on the “test-rate-card” we created and then ADD RATECARD
Now click CONFIRM DATA

7/31/2019 Getting Started With A2Billing
http://slidepdf.com/reader/full/getting-started-with-a2billing 9/21

7/31/2019 Getting Started With A2Billing
http://slidepdf.com/reader/full/getting-started-with-a2billing 10/21
In FreePBX click on Inbound Routes on the left hand main menu
Then select “ipkall” (the DID we created here)
Scroll down to the bottom of the page and change the Destination to “Custom Destinations –
a2billing” then click Submit
Don’t forget to click on “Apply Configuration Changes”
Now if we dial our IPKall DID we should be asked by a2billing to “Please enter yourcomplete PIN number”

7/31/2019 Getting Started With A2Billing
http://slidepdf.com/reader/full/getting-started-with-a2billing 11/21
Getting started with A2Billing – Part 4 Creating acustomer and making a call So we’ve created a trunk to make calls through here, we’ve created a ratecard andcall plan here and we’ve created an access phone number here so we’re finally readyto create a customer!
Creating a calling card customer
Click on CUSTOMERS on the left hand menu
Click Create Customers
We get a big list of options but the only things we need to set are -
BALANCE – set the inital balance for the customer
CALL PLAN – ensure the call plan is set to the one we created here
LASTNAME & FIRSTNAME – not required but definitely useful!
Then click on CONFIRM DATA

7/31/2019 Getting Started With A2Billing
http://slidepdf.com/reader/full/getting-started-with-a2billing 12/21

7/31/2019 Getting Started With A2Billing
http://slidepdf.com/reader/full/getting-started-with-a2billing 13/21
There are obviously a lot more settings I can use when configuring a customer but if I click on
List Customers I can see my customer is setup

7/31/2019 Getting Started With A2Billing
http://slidepdf.com/reader/full/getting-started-with-a2billing 14/21
So, lets give it a go!
I ring my access number 12532433498 (configured here)
and it asks for my PIN number so I enter 1137742329 (my card number created above)
I now get the message “Please enter the number you wish to call and then enter thepound key” so I dial 011441162572850# (remember I can only dial numbers inLeicester in the UK for now as that is the only rate we created here) and my call ismade! Now, a couple of things have also happened.
If I click on CALL REPORT and then CDR Report I can see that a record has been madeof the call plus the call charges -
and also if I click on CUSTOMER, List Customers and then click on EDIT next to my customer –

7/31/2019 Getting Started With A2Billing
http://slidepdf.com/reader/full/getting-started-with-a2billing 15/21
and then scroll down to the bottom I can see that my CLID has been added to mycustomer record (this is becuase cid_enable and cid_auto_assign_card_to_cid havebeen enabled in a2billing.conf). This means that next time I call the system from myphone it will know who I am and I will not need to enter my pin number again.
Getting started with A2Billing – Part 5 Importinga ratecard When I setup my ratecard here I only created 1 rate to Leicester in the UK. Ok for testing but
not much use in the real world! So how are we going to enter all of the rates we need – the
answer is to import them. Many ITSP (Internet Telephony Service Providers) publish a rate file
that you can download. I’m going to use the callwithus (my provider) rate file that you can
download from here.
then I’ve extracted the zip file and saved it to my C drive -

7/31/2019 Getting Started With A2Billing
http://slidepdf.com/reader/full/getting-started-with-a2billing 16/21
I have also rename the file to .txt instead of .csv as there can be problems with itcalled .csv
Now I go to RATECARD, Create new Rate Card
Give your ratecard a name and a description. I like to include the date I am creatingthe ratecard
and click CONFIRM DATA
Now select the Import RateCard menu
Ensure the “Choose the ratecard to import” is set to the rate card you just created

7/31/2019 Getting Started With A2Billing
http://slidepdf.com/reader/full/getting-started-with-a2billing 17/21
Also the callwithus import file includes “BUYRATE MIN DURATION” and “BUYRATEBILLING BLOCK” information so I have moved those 2 fields over to the “SelectedFields” box
Click on Browse to select your import file then click “Import Ratecard”
helpfully a2billing shows us an example of what it’s going to import. This is the firstrecord in the file.
Click “Continue to Import the Ratecard” if the example looks good

7/31/2019 Getting Started With A2Billing
http://slidepdf.com/reader/full/getting-started-with-a2billing 18/21
a2billing should now tell you how many rates have been imported
Unfortunately if we now go and look at one of these rates we’ll see that thecallwithus file wasn’t particularly well formatted to be imported into a2billing as-is.
The buy rate is zero, the selling rate is our buying cost and “SELLRATE MIN DURATION/ SELLRATE BILLING BLOCK” are both zero!

7/31/2019 Getting Started With A2Billing
http://slidepdf.com/reader/full/getting-started-with-a2billing 19/21
So we need to sort this out. What we could have done was edit the file in somethinglike Excel before we imported it to get everything in the correct layout. This isprobably the easiest option, however I’m going to edit my ratecard using SQL in thedatabase. Be sure you know what you’re doing if you choose this option!
First I need to log into mysql. The default database name is mya2billing – yours maydiffer.
# mysql -u asteriskuser -p mya2billing
Enter password:
Welcome TO the MySQL monitor. Commands END WITH ; OR \g.
Your MySQL connection id IS 10748
Server version: 5.0.45 SOURCE distribution
TYPE 'help;' OR '\h' FOR help. TYPE '\c' TO clear the buffer.
mysql>
Next I need to find out the ID of the tarifplan I want to edit
mysql> SELECT id,tariffname FROM cc_tariffplan;
+----+---------------------+

7/31/2019 Getting Started With A2Billing
http://slidepdf.com/reader/full/getting-started-with-a2billing 20/21
| id | tariffname |
+----+---------------------+
| 1 | test-rate-card |
| 2 | callwithus 03-02-09 |
+----+---------------------+ 2 ROWS IN SET (0.00 sec)
Now I’m going to set the buy rate to be the sell rate that was loaded from the importfile -
mysql> UPDATE cc_ratecard SET buyrate = rateinitial WHERE idtariffplan = 2
;
Query OK, 9344 ROWS affected (0.11 sec)
ROWS matched: 9345 Changed: 9344 Warnings: 0
Now I’m going to add 20% on to my sell rate -
mysql> UPDATE cc_ratecard SET rateinitial = (rateinitial*1.2) WHERE idtari
ffplan = 2;
Query OK, 9344 ROWS affected (0.12 sec)
ROWS matched: 9345 Changed: 9344 Warnings: 0
Now to set the “SELLRATE MIN DURATION” to the “BUYRATE MIN DURATION” that wasloaded from the import file -
mysql> UPDATE cc_ratecard SET initblock = buyrateinitblock WHERE idtariffp
lan = 2;
Query OK, 9345 ROWS affected (0.11 sec)
ROWS matched: 9345 Changed: 9345 Warnings: 0
and finally to set “SELLRATE BILLING BLOCK” to the “BUYRATE BILLING BLOCK” thatwas loaded from the import file -
mysql> UPDATE cc_ratecard SET billingblock = buyrateincrement WHERE idtari
ffplan = 2;

7/31/2019 Getting Started With A2Billing
http://slidepdf.com/reader/full/getting-started-with-a2billing 21/21
Query OK, 9345 ROWS affected (0.12 sec)
ROWS matched: 9345 Changed: 9345 Warnings: 0
Now if we go and look at the rate we were looking at before it looks much better. The
billing increments are all the same and my sell rate it 20% more than my buy rate!
Now I just need to go to my call plan and remove the test rate card created earlier and add
my new callwithus rate card