gb-5713211661:layout 1 - appliances online · a b a2 a1 a3 a4 a5 a18 a13 a12 a20 a14 a17 a16 a15...
TRANSCRIPT
EBA63810XEBA64510X
S Bruksanvisning
DK Brugervejledning
N Instruksjonsveiledningveiledning
SF Käyttöopas
GB Instructions
DE Bedienungsanleitung
FR Mode d’emploi
I T Istruzioni per l’uso
NL Gebruiksaanwijzingen
ES Instrucciones para el uso
PT Instruções de utilização
GR Οδηγίες χρήσης
CZ Návod k použití
PL Instrukcja obsługi
HU Használati kézikönyv
SK Návod na použitie
SI UporUporabniški priročnik
HR Priručnik sa uputstvima
RS Priručnik sa uputstvima
RO Manual instrucţiuni
LV Instrukciju rokasgrāmata
LT Naudotojo vadovas
EE Kasutusjuhend
TR Kullanım talimatları
BG Наръчник с инструкции
RU Инструкции по эксплуатации
A
B
A1A2
A3 A4 A5
A12A13A18
A20
A14
A17A16
A15 A19
A21
A22
A23
A24
A10
B1B2 B3 B4 B5
B6 B7 B8 B9 B14
B10 B11 B12 B13
A8 A9A7 A6
A11
A25
A26
A27

1 4
5 6 7 8
9 10 11 12
13 14 16
2
15
3
2
1

17 18
22
19 20
24
27
21
2825 26
23
1 2
3129 30
121234567891011121

6
GBCONTENTSINTRODUCTION .........................7
Symbols used in these instructions ..........7Letters in brackets .....................................7Troubleshooting and repairs ......................7
SAFETY ...................................7Fundamental safety warnings.....................7Designated use...........................................8Instructions ...............................................8
DESCRIPTION............................8Description of the appliance .....................8Description of the control panel .................8
PRELIMINARY CHECKS ................9Controls after transport .............................9Installing the appliance...............................9Connecting the appliance ...........................9
DISPOSAL................................9BUILT-IN INSTALLATION .............10USING THE APPLIANCE FOR THEFIRST TIME ............................12
Installing the filter ...................................12Replacing the filter ..................................13Removing the filter ..................................13
TURNING ON AND HEATING UP ...13MAKING COFFEE USING COFFEEBEANS ..................................14CHANGING THE QUANTITY OFCOFFEE IN THE CUP .................15ADJUSTING THE COFFEE MILL ....15MAKING ESPRESSO COFFEE WITHPRE-GROUND COFFEE (INSTEAD OFBEANS) ................................15DELIVERING HOT WATER ............16CHANGING THE QUANTITY OF HOTWATER .................................16MAKING CAPPUCCINO (USING THESTEAM FUNCTION) ...................16
MAKING A NUMBER OF CUPS OFCOFFEE WITH THE JUG FUNCTION 17CHANGING JUG FUNCTIONPARAMETERS .........................18CLEANING ..............................18
Cleaning the coffee maker .......................18Cleaning the waste coffee container .........18Cleaning the drip tray ...............................19Cleaning the water tank ...........................19Cleaning the spouts .................................19Cleaning the pre-ground coffee funnel .....19Cleaning the inside of the coffee maker....19Cleaning the brewing unit ........................19Cleaning the coffee jug .............................20
CHANGING AND SETTING MENU PA-RAMETERS .............................20
Setting the language ................................20Rinsing ....................................................21Changing the length of time the applianceremains on ..............................................21Setting the clock ......................................21Setting auto-start time .............................21Changing coffee temperature ...................21Setting water hardness ............................21Programming coffee ...............................22Programming the jug ..............................22Programming water .................................22Descaling .................................................22Resetting default values (reset) ...............23Statistics ..................................................23Buzzer .....................................................23Adjusting contrast ....................................23Water filter ..............................................23
TURNING THE APPLIANCE OFF ....23TECHNICAL SPECIFICATION .........24DISPLAYED MESSAGES .............25TROUBLESHOOTING ..................27
INTRODUCTIONSymbols used in theseinstructionsImportant warnings are identified by these sym-bols. Failure to observe the instructions could re-sult in electric shock, serious injury, burns, fireor damage to the appliance.
Danger!Failure to observe the warning could result inpossibly life threatening injury from electricshock.
Important!Failure to observe the warning could result in in-jury or damage to the appliance.
Danger of burns!Failure to observe the warning could result inscalds or burns.
N.B.!Important information for the user
Letters in bracketsThe letters in brackets refer to the legend in theDescription of the Appliance on page 3.
Troubleshooting and repairsIn the event of problems, follow the informationgiven in the sections "Displayed messages" and"Troubleshooting". If this does not resolve the problem, you shouldconsult Customer Services. For repairs, contact Customer Services only.
SAFETYFundamental safety warnings
Important! This is an household ap-pliance only. It is not intended to be used in: • staff kitchen areas in shops, offices and other
working environments; • farm houses; • by clients in hotels, motels and other resi-
dential type environments; • bed and breakfast type environments.
Danger! This is an electrical appliance,it is therefore important to respect the followingsafety warnings:• Never touch the appliance with damp hands. • Never touch the plug with damp hands. • Make sure the socket used is freely accessi-
ble at all times, enabling the appliance to beunplugged when necessary.
• If the appliance is faulty, do not attempt to re-pair. Turn it off using the main switch (A23), un-plug from the mains socket and contact Cu-stomer Services.
Important! Keep all packaging (plasticbags, polystyrene foam) away from children.
Important! The appliance is not intendedfor use by persons (including children) with redu-ced physical, sensory or mental capabilities, or lackof experience and knowledge, unless they havebeen given supervision or instruction concerninguse of the appliance by a person responsible fortheir safety. Children must be supervised to ensure they do notplay with the appliance.
Danger of burns! This appliance produ-ces hot water and steam may form while it is inoperation. Avoid contact with splashes of water or hotsteam. Use knobs and handles.
Important! Do not grasp the coffee makerwhen it is out of the cabinet. Do not rest reci-pients containing liquids or inflammable or cor-rosive materials on top of the appliance. Place theaccessories required to make the coffee (themeasure for example) in the special holder. Donot rest large objects which could obstruct mo-vement or unstable objects on the appliance.
7
GB
8
Amportant! Do not use the appliancewhen extracted. Make sure the appliance is inac-tive before extracting it. The only exception is ad-justing the coffee mill which must be done withthe machine out (see the section "Adjusting thecoffee mill").
N.B.! Use original or manufacturer re-commended accessories and spare parts only.
Designated useThis appliance is designed and made to preparecoffee and heat drinks. All other use is considered improper. This appliance is not suitable for commercial use. The manufacturer is not liable for damage deri-ving from improper use of the appliance. This appliance can be installed over a built-inoven if the latter is fitted with a cooling fan at therear (maximum microwave power: 3 kW).
InstructionsRead these instructions carefully before using theappliance.• Keep these instructions• Failure to respect these instructions may re-
sult in burns or damage to the appliance.The manufacturer is not liable for damagederiving from failure to respect these in-structions.
N.B.! The appliance has a cooling fan.This comes on whenever coffee, steam or hotwater is delivered. After several minutes, the fangoes off automatically.
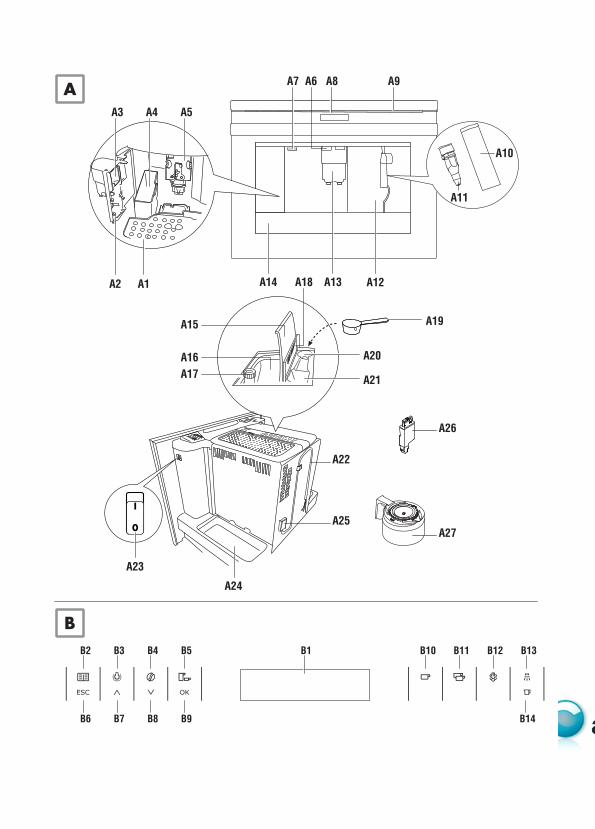
DESCRIPTIONDescription of the appliance(page 3 - A)A1. Cup trayA2. Service door A3. Coffee guideA4. Waste coffee container A5. Brewing unit
A6. Cup tray lightsA7. On/OFF/stand-by button A8. Control panel A9. Control panel lightA10. Cappuccino maker (removable)A11. Cappuccino maker nozzleA12. Water tank A13. Coffee spout (adjustable height)A14. Drip trayA15. Bean container lidA16. Bean containerA17. Grinding adjustment knobA18. Pre-ground coffee funnel doorA19. MeasureA20. Compartment for measureA21. Pre-ground coffee funnelA22. Power cableA23. Main switchA24. TrayA25. Terminal boardA26. Water softener filterA27. Jug
Description of the control panel(page 3 - B)
N.B.! Only the icons relating to the con-trols enabled for the particular function currentlybeing used will be lit on the touch screen.
N.B.! A light touch is enough to activatethe icon.B1. Display: guides the user in using the ap-
pliance.B2. icon to activate or deactivate menu
parameter setting modeB3. icon to turn lights A6 and A9 on and
offB4. icon to select the coffee tasteB5. icon to select the type of coffee
(espresso, small cup, medium cup, largecup, mug)
B6. ESC icon to exit the selected mode B7-B8. icons to scroll forwards or
backwards through the menu and displaythe various modes
GB
9
B9. OK icon to confirm the selected functionB10. icon to deliver a cup of coffeeB11. icon to deliver two cups of coffeeB12. icon to deliver steamB13. icon to deliver hot waterB14. "jug" icon to make a number of cups
of coffee directly in the jug (provided)
PRELIMINARY CHECKSControls after transportAfter removing the packaging, make sure the pro-duct is complete and undamaged and that all ac-cessories are present.Do not use the appliance if it is visibly damaged. Contact Customer Services.
Installing the appliance
Important!• Installation must be performed by a qualified
professional in compliance with legislation inforce in the country of installation (see Built-in installation).
• The packing elements (plastic bags, polysty-rene foam, etc.) should be kept out of reachof children.
• Do not install the appliance in rooms wherethe temperature may drop to 0°C or lower.
• Customise the water hardness as soon aspossible following the instructions in the"Setting water hardness" section.
Connecting the appliance
Danger! Check that the mains powersupply voltage corresponds to the value indicatedon the rating plate on the bottom of the ap-pliance.Connect the appliance to an efficiently earthedand correctly installed socket with a minimumcurrent rating of 10A only.If the power socket does not match the plug onthe appliance, have the socket replaced with asuitable type by a qualified professional.To comply with safety directives, an omnipolar
switch with a minimum contact distance of 3 mmmust be installed. Do not use multiple sockets or extensions.
Important! Safety cutout devices must beincluded in the mains power supply in compliancewith the installation regulations in the country con-cerned.
DISPOSALElectrical appliances must not be dispo-sed of as household waste. Appliances with this symbol are coveredby European Directive 2002/96/EC.
All unused electric and electronic appliancesmust be disposed of separately from householdwaste by taking them to state authorised specialcentres. Disposing of the unused appliance correctlyavoids damage to the environment and a risk tohealth. For more information on disposing of the unu-sed appliance, contact the local administration,the waste disposal department or the shop wherethe appliance was bought. .
GB

10
GB
378
mm
594 mm
20 mm
398 mm
45 mm
45 mm
45 mm
45 mm
380
+ 2
mm
850
mm
Min
500 mm
545 mm Min.
200 cm2
560 + 8 mm
45 mm
45 mm
450
+ 2
mm
Min
560 + 8 mm
500 mm
545 mm Min.
361 mm528 mm
372
mm
15 mmBUILT-IN INSTALLATIONVerify the minimum measurements required forcorrect installation of the appliance. The coffee maker must be installed in a columnand the column must be firmly fixed to the wallwith commercially available brackets.
Important:• Important: all installation or maintenance
operations must be performed with the ap-pliance disconnected from the mains electri-city supply.
• Kitchen furniture in direct contact with theappliance must be heat resistant (65°C min).
• To guarantee correct ventilation, leave a gapat the bottom of the cabinet (see measure-ments in figure).
460
mm
594 mm
20 mm
398 mm
45 mm
45 mm
45 mm
45 mm
450
+ 2
mm
850
mm
Min
500 mm
545 mm Min.
200 cm2
560 + 8 mm
h 460 mm
h 378 mm
11
GB
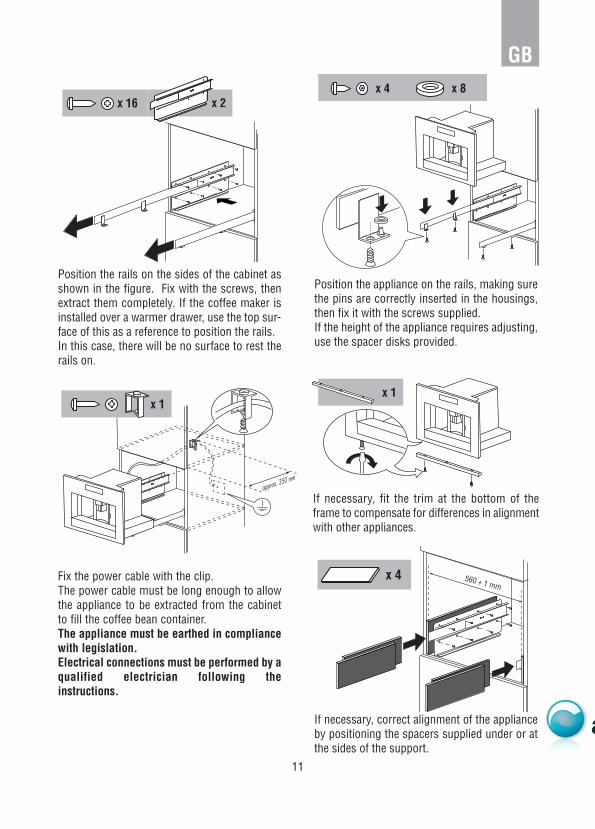
Fix the power cable with the clip. The power cable must be long enough to allowthe appliance to be extracted from the cabinetto fill the coffee bean container. The appliance must be earthed in compliancewith legislation. Electrical connections must be performed by aqualified electrician following theinstructions.
Position the appliance on the rails, making surethe pins are correctly inserted in the housings,then fix it with the screws supplied. If the height of the appliance requires adjusting,use the spacer disks provided.
If necessary, correct alignment of the applianceby positioning the spacers supplied under or atthe sides of the support.
x 16 x 2
Position the rails on the sides of the cabinet asshown in the figure. Fix with the screws, thenextract them completely. If the coffee maker isinstalled over a warmer drawer, use the top sur-face of this as a reference to position the rails. In this case, there will be no surface to rest therails on.
approx. 350 mm
x 1
x 4 x 8
x 4 560 + 1 mm
x 1
If necessary, fit the trim at the bottom of theframe to compensate for differences in alignmentwith other appliances.

12
USING THE APPLIANCEFOR THE FIRST TIME• Coffee has been used to factory test the ap-
pliance and it is therefore completely normalfor there to be traces of coffee in the mill.
• Customise water hardness as soon as pos-sible following the instructions in the "Settingwater hardness" section.
1. Connect the appliance to the mains supply.Set the required language.
2. To set the language, use the icons (B7and B8) to choose the required language (fig.2). When the message "PRESS OK TOCHOOSE ENGLISH" is displayed, press theOK icon (B9) (fig. 3) for 3 seconds until "EN-GLISH INSTALLED" is displayed. If you setthe wrong language, follow the instructionsin the "Setting the language" section. If yourlanguage is not available, select one fromthose displayed. The instructions refer to theEnglish version. Then follow the instructionsdisplayed:
3. After 5 seconds, the appliance displays "FILLTANK". Extract the water tank (fig. 4), rinseand fill with fresh water without exceedingthe MAX line. Replace and push as far as itwill go. A water softener filter can be instal-led in the tank (fig. 29).
4. Place a cup under the cappuccino maker (fig.5). The appliance displays: "HOT WATERPRESS OK". Press the OK icon (B9) (fig. 3)and after a few seconds a little water comesout of the cappuccino maker.
5. The machine now displays "TURNING OFF...PLEASE WAIT" and goes off.
6. Extract the appliance by pulling it out usingthe handles (fig. 6). Open the lid and fill thecontainer with coffee beans, then close thelid and push the appliance in.
The coffee maker is now ready for normal use.
Important! Never introduce pre-groundcoffee, freeze dried coffee, caramelised beans oranything else which could damage the appliance.
N.B.! When using the appliance for the
first time, you need to make 4-5 cups of coffeeand 4-5 cappuccinos before the appliance givessatisfactory results.
N.B.! Each time you turn the coffee makeron by the ON/OFF switch (A23), it performs aSELF-DIAGNOSIS cycle and then goes off. Toturn it on again, press the ON/OFF button (A7)(fig. 1)
Installing the filterSome models are fitted with a water softener fil-ter to improve the quality of the water used andextend the working life of the appliance. To install, proceed as follows:1. Remove the filter from the packaging;2. Slide the date indicator pointer (see fig. 29)
until the months of use are displayed.
N.B.! The filter lasts about two months ifthe appliance is used normally. If the coffeemaker is left unused with the filter installed,it will last a maximum of three weeks.
3. Fill the tank with a little water up to the levelshown in the figure:
4. Insert the filter in the water tank and press ituntil it touches the bottom of the tank (seefig. 29);
5. Fill the water tank and insert in the coffeemaker;
6. Place a container underneath the cappuccinomaker (min. capacity: 100 ml).
7. Press the icon (B2) to enter the menu;8. Press the icons (B7) and (B8) until "IN-
STALL FILTER" is displayed;9. Press the OK icon (B9);10. The message "INSTALL FILTER PLEASE
CONFIRM" is displayed.11. Press the OK ICON (B9) to confirm the se-
lection (or ESC (B6) to cancel). "HOT WATERPRESS OK" is displayed.
GB
13
12. Press the OK icon (B9) again. The appliancebegins delivering hot water and the message"PLEASE WAIT... " is displayed. When delivery stops, the appliance automa-tically displays the basic modes set again.
N.B.! The appliance may request the ope-ration to be repeated a number of times until theair is completely elminated from the hydraulic cir-cuit.
Replacing the filter ("FILTERRESET")When "REPLACE FILTER" is displayed or after 2months of use (see date indicator), the filter mustbe replaced:1. Remove the exhausted filter;2. Remove the new filter from the packaging.3. Slide the pointer of the date indicator (see fig.
29) until the months of use are displayed (thefilter lasts about 2 months);
4. Insert the filter in the water tank and press ituntil it touches the bottom of the tank (seefig. 29);
5. Fill the water tank and insert in the coffeemaker;
6. Turn the cappuccino maker outwards andplace a container underneath (min. capacity100 ml).
7. Press the icon (B2) to enter the menu;8. Press the icons (B7) and (B8) until "FIL-
TER RESET" is displayed;9. Press the OK icon (B9);10. The message "FILTER RESET CONFIRM" is
displayed.11. Press the OK icon (B9) to confirm the selec-
tion (or ESC (B6) to cancel). "HOT WATERPRESS OK" is displayed.
12. Press the OK icon (B9) again. The appliancebegins delivering hot water and the message"PLEASE WAIT..." is displayed. When delivery stops, the appliance automa-tically displays the basic modes set again.
Removing the filterTo use the appliance without a filter, you must re-
move it and notify the appliance of its removal asfollows:1. Press the icon (B2) to enter the menu;2. Press the icons (B7) and (B8) until "IN-
STALL FILTER" is displayed;3. Press the OK icon (B9);4. The message "INSTALL FILTER* CONFIRM" is
displayed.5. Press the ESC icon (B6).6. When the asterisk has disappeared from the top
right of the display, press ESC (B6) to exit themenu.
Nota Bene! Use the filters recommendedby the manufacturer only. Use of unsuitable fil-ters could damage the appliance.
TURNING ON AND HEATINGUP Each time the appliance is turned on, it performsan automatic preheat and rinse cycle which can-not be interrupted. The appliance is ready for use only after comple-tion of this cycle.
Danger of burns! During rinsing, a littlehot water flows from the coffee spouts.
To turn the appliance on, press theON/OFF/stand-by button (A7) (fig. 1). The mes-sage "HEATING UP... PLEASE WAIT" is displayed.When heating is complete, the message changesto "RINSING"; The appliance is at temperature when the mes-sage "MEDIUM CUP NORMAL TASTE" is displa-yed. If no icon is pressed within about 2 minutes, thetime (if set, see the "Setting the clock" section) isdisplayed. If the time has not been set, the appliance di-splays the last functions set.When any icon is pressed, "MEDIUM CUP NOR-MAL TASTE" is displayed again. The appliance isready to make coffee again.
GB
14
MAKING COFFEE USINGCOFFEE BEANS1. The appliance is preset to make coffee with a
normal taste. You can also choose coffee with an extra-mild, mild, strong or extra-strong taste.There is also a pre-ground coffee option. To choose the required taste, press the icon (B4) (fig. 7). The required coffee taste isdisplayed.
2. Place 1 cup under the spouts to make 1 cof-fee (fig. 8) or 2 cups for 2 coffees (fig. 9). Lower the spouts as near as possible to thecup for a creamier coffee (fig. 10).
3. Press the icon (B5) (fig. 11) to select thetype of coffee: espresso, small cup, mediumcup, large cup, mug.Now press the icon (B10) (fig. 12) if youwant to make a coffee and the icon (B11)(fig. 13) if you want to make 2 coffees. The appliance now grinds the beans andstarts delivering the coffee into the cup.Once the set amount of coffee has been deli-vered, the machine stops delivery automati-cally and expels the exhausted waste coffeeinto the waste coffee container.
4. After a few seconds, the appliance is readyfor use again.
5. To turn the appliance off, press theON/OFF/stand-by button (A7) (fig. 1). (Before going off, the appliance performs anautomatic rinse cycle. Take care to avoidscalds).
NOTE 1: If the coffee is delivered a drop at a timeor not at all, see the "Adjusting the coffee mill"section.NOTE 2: If the coffee is delivered too fast and thecream is not satisfactory, see the "Adjusting thecoffee mill" section.NOTE 3: Tips for a hotter coffee: • Proceed as described in the section "Chan-
ging and setting menu parameters", "Rinse"function.
• Unless preheated, do not use excessivelythick cups as they will absorb too much heat.
• Preheat the cups by rinsing them with hot
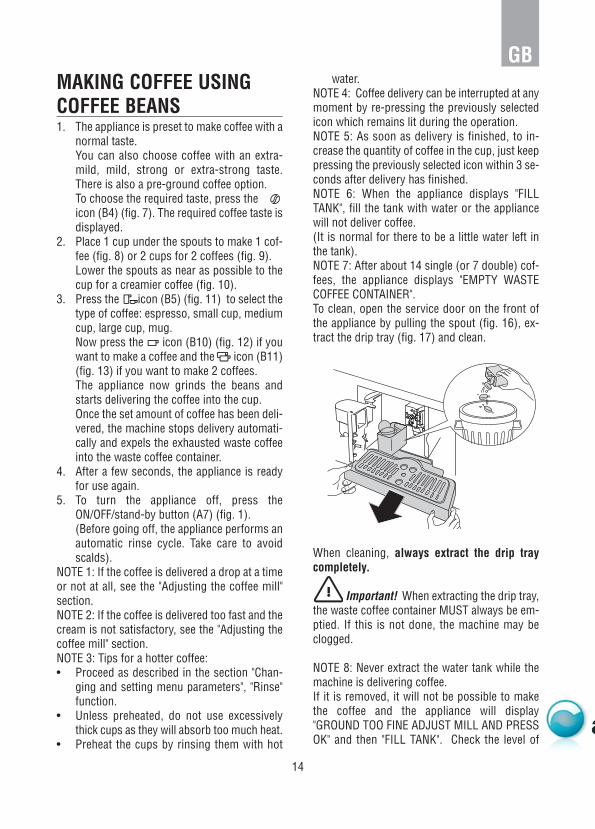
water. NOTE 4: Coffee delivery can be interrupted at anymoment by re-pressing the previously selectedicon which remains lit during the operation. NOTE 5: As soon as delivery is finished, to in-crease the quantity of coffee in the cup, just keeppressing the previously selected icon within 3 se-conds after delivery has finished. NOTE 6: When the appliance displays "FILLTANK", fill the tank with water or the appliancewill not deliver coffee. (It is normal for there to be a little water left inthe tank).NOTE 7: After about 14 single (or 7 double) cof-fees, the appliance displays "EMPTY WASTECOFFEE CONTAINER".To clean, open the service door on the front ofthe appliance by pulling the spout (fig. 16), ex-tract the drip tray (fig. 17) and clean.
When cleaning, always extract the drip traycompletely.
Important! When extracting the drip tray,the waste coffee container MUST always be em-ptied. If this is not done, the machine may beclogged.
NOTE 8: Never extract the water tank while themachine is delivering coffee. If it is removed, it will not be possible to makethe coffee and the appliance will display"GROUND TOO FINE ADJUST MILL AND PRESSOK" and then "FILL TANK". Check the level of
GB
15
water in the tank and replace in the appliance.To turn the machine on again, press the OK icon(B9). "HOT WATER PRESS OK" is displayed. Press the OK icon (B9) within a few seconds anddeliver water from the cappuccino maker forabout 30 seconds. When delivery stops, thebasic modes are displayed again.
N.B.: The coffee maker may request theoperation to be repeated a number of times untilthe air is completely elminated from the hydrau-lic circuit.
N.B.: if this operation is not performedcorrectly or if the machine is turned off, the basicmodes may be displayed, although the problemis in fact still present.
CHANGING THE QUANTITYOF COFFEE IN THE CUP The appliance is set by default to automaticallymake the following types of coffee:• espresso• small cup• medium cup• large cup• mug
To change the quantity, proceed as follows:• Press the icon (B2) to enter the menu
(fig. 15). Press the icons (B7) and (B8)(fig. 2) until "PROGRAM COFFEE" is displa-yed.
• Press the OK icon (B9).• Select the type of coffee you want to change
by pressing the icons (B7) and (B8). • Press the OK icon (B9) to confirm the type of
coffee you want to make. • Use the icons (B7) and (B8) to change
the quantity of coffee. The progress bar shows the quantity of cof-fee selected.
• Press the OK icon (B9) again to confirm (orthe ESC icon (B6) to cancel the operation).
• Press the ESC icon (B6) (fig. 18) twice to exit
the menu.The appliance is now reprogrammed with thenew settings and is ready.
ADJUSTING THE COFFEEMILLThe coffee mill is preset in the factory and shouldnot require adjusting. However, if after makingthe first few coffees you find that delivery is eithertoo fast or too slow (a drop at a time), this can becorrected by adjusting the grinding adjustmentknob (fig. 14).
Important! The grinding adjustment knobmust only be turned when the coffee mill is inoperation. For slower delivery and creamier coffee, turn oneclick anticlockwise (finer pre-ground coffee).For faster delivery (not a drop at a time), turn oneclick clockwise (coarser pre-ground coffee).
MAKING COFFEE USINGPRE-GROUND COFFEE• Press the icon (B4) (fig. 7) and select the
pre-ground coffee function. • Extract the machine by pulling it outwards
using the handles. • Lift the central lid, place one measure of pre-
ground coffee in the funnel (fig. 19), push theappliance in then proceed as described in thesection "Making coffee using coffee beans". N.B.: You can make just one coffee at a timeby pressing the icon (B10) (fig. 12).
• After using the machine with pre-ground cof-fee, to go back to making coffee using beans,deactivate the pre-ground coffee function bypressing the icon (B4) (fig. 7).
NOTE 1: Never introduce pre-ground coffee whenthe machine is off or it could spread through theinside of the appliance. NOTE 2: Never add more than 1 measure, other-wise the appliance will not make the coffee.NOTE 3: Use the measure provided only.
GB

NOTE 4: Introduce onlypre-ground coffee forespresso coffee machinesinto the funnel.NOTE 5: If more than onemeasure of pre-groundcoffee is used and the fun-nel clogs, push the coffeedown with a knife (fig. 21)then remove and clean thebrewing unit and machineas described in the "Clea-
ning the brewing unit" section.
DELIVERING HOT WATER• Always make sure the appliance is ready.• Turn the cappuccino maker outwards and
place a container underneath (fig. 5).• Press the icon (B13) (fig. 20).
The appliance displays: "HOT WATER PRESSOK". Press the OK icon (B9) again and hot water isdelivered from the cappuccino maker into thecontainer underneath. You should not deliver hot water for morethan 2 minutes at a time.To interrupt, press the icon (B13) or theESC icon (B6). The appliance stops delivery once the setquantity is reached.
CHANGING THE QUANTITYOF HOT WATERThe machine is set by default to automatically de-livery 200 ml of hot water. To change these quantities, proceed as follows:• Place a container underneath the cappuccino
maker (fig. 3).• Press the icon (B2) to enter the menu
(fig. 15) or press the icons (B7) and(B8) (fig. 2) until "PROGRAM HOT WATER"is displayed.
• Press the OK icon (B9) to confirm.• Select the required quantity of water by pres-
sing the icons (B7) and (B8). The progress bar shows the quantity of waterselected.
• Press the OK icon (B9) to confirm (or theESC icon (B6) to cancel the operation.
• Press the ESC icon (B6) (fig. 18) twice to exitthe menu.
• The appliance is now reprogrammed with thenew settings and is ready.
MAKING CAPPUCCINO(USING THE STEAMFUNCTION)• Turn the cappuccino maker towards the centre
(fig. 5).• Take a container, fill it with about 100 g of milk
for each cappuccino to be made and place itunder the cappuccino maker. In choosing thesize of the recipient, bear in mind that the milkdoubles or triples in volume. You are recom-mended to use partially skimmed milk at refri-gerator temperature.
• Press the icon (B12) (fig. 22). "STEAMPRESS OK" is displayed.
• Press the OK icon (B9).• To interrupt steam delivery, press the icon
(B12) again or the ESC icon (B6).• Immerse the cappuccino maker in the milk con-
tainer (fig. 23), taking care not to immerse it formore than half its length. Press the icon (B12) (take care to avoidscalds) and press the OK icon (B9). Steam comes out of the cappuccino maker. For a creamier froth, immerse the cappuccinomaker in the milk and move the container withslow upward movements.You should not deliver steam for more than 2minutes at a time.
• When the required temperature is reached, in-terrupt steam delivery by pressing the icon(B12) again or the ESC icon (B6).
• Make the coffee as described above using suf-ficiently large cups, then fill them with the fro-thed milk prepared previously.
16
GB
17
IMPORTANT: always clean the cappuccino sy-stem immediately after use. Proceed as follows:
• Press the icon (B12) and then press the OKbutton (B9) to discharge a small amount ofsteam for a few seconds. This empties the steam spout of all traces ofmilk. IMPORTANT: to ensure the hygiene of the ap-pliance, you are recommended to carry out thisprocedure each time you make cappuccino toavoid stale milk remaining in the circuit.
• Wait for the cappuccino maker to cool down,then holding the cappuccino maker lever firmlyin one hand, unscrew the cappuccino maker it-self with the other, turning it anticlockwise andremoving it downwards (fig. 24).
• Remove the cappuccino maker nozzle by pul-ling it downwards.
• Wash the cappuccino maker and nozzle tho-roughly in hot water.
• Make sure the two holes shown in figure 25 arenot blocked. If necessary, clean with a pin.
• Replace the nozzle by inserting it upwards intothe cappuccino maker.
• Replace the cappuccino maker by pushing itupwards and rotating it clockwise.
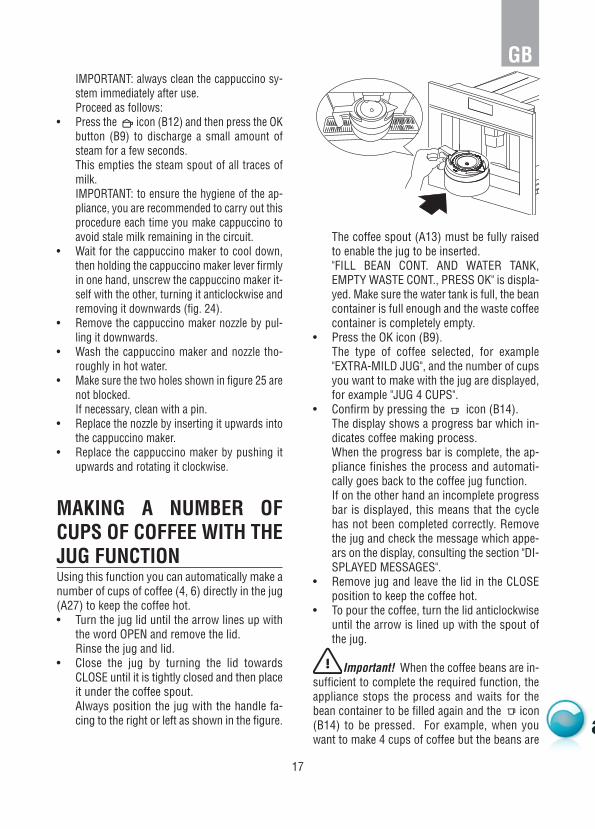
MAKING A NUMBER OFCUPS OF COFFEE WITH THEJUG FUNCTIONUsing this function you can automatically make anumber of cups of coffee (4, 6) directly in the jug(A27) to keep the coffee hot. • Turn the jug lid until the arrow lines up with
the word OPEN and remove the lid. Rinse the jug and lid.
• Close the jug by turning the lid towardsCLOSE until it is tightly closed and then placeit under the coffee spout. Always position the jug with the handle fa-cing to the right or left as shown in the figure.
The coffee spout (A13) must be fully raisedto enable the jug to be inserted. "FILL BEAN CONT. AND WATER TANK,EMPTY WASTE CONT., PRESS OK" is displa-yed. Make sure the water tank is full, the beancontainer is full enough and the waste coffeecontainer is completely empty.
• Press the OK icon (B9). The type of coffee selected, for example"EXTRA-MILD JUG", and the number of cupsyou want to make with the jug are displayed,for example "JUG 4 CUPS".
• Confirm by pressing the icon (B14). The display shows a progress bar which in-dicates coffee making process. When the progress bar is complete, the ap-pliance finishes the process and automati-cally goes back to the coffee jug function. If on the other hand an incomplete progressbar is displayed, this means that the cyclehas not been completed correctly. Removethe jug and check the message which appe-ars on the display, consulting the section "DI-SPLAYED MESSAGES".
• Remove jug and leave the lid in the CLOSEposition to keep the coffee hot.
• To pour the coffee, turn the lid anticlockwiseuntil the arrow is lined up with the spout ofthe jug.
Important! When the coffee beans are in-sufficient to complete the required function, theappliance stops the process and waits for thebean container to be filled again and the icon(B14) to be pressed. For example, when youwant to make 4 cups of coffee but the beans are
GB

insufficient, the appliance makes 2 cups thenstops making coffee. Fill the bean container andpress the icon (B14). Once the container hasbeen filled, the appliance makes the 2 remainingcups only to reach the required number of 4cups. If there is not enough water in the tank tocomplete the required function or the waste cof-fee container is full, the appliance interrupts theprocess. To fill the water tank or empty the wastecoffee container, you must remove the jug. Thisinterrupts the programme. After rectifying theproblem, the programme must be started again.In this case, you must take the amount of coffeealready delivered into account to avoid the jugoverflowing.
CHANGING JUG FUNCTIONPARAMETERSThe jug programme is factory set with default va-lues. These can be modified to suit your personal tasteand saved. You can select 5 different types of coffee fromextra-mild to extra-strong and, with the aid of agraphic bar, 10 quantities of coffee. To make these adjustments, proceed as follows:• Press the button (B2) to enter the menu.
Press the icons (B7) and (B8) until"PROGRAM JUG" is displayed.
• Press the OK icon (B9) and then the icons (B7) and (B8) until "JUG COFFEETASTE" is displayed.
• Press the OK icon (B9).• Press the icons (B7) and (B8) to select
a different coffee taste from extra-mild toextra-strong.
• Confirm the required taste by pressing theOK icon (B9).
• To change the quantity of coffee, press the icons (B7) and (B8) until "JUG LEVEL"
is displayed. • Press the OK icon (B9) to confirm.• A bar representing the quantity of coffee de-
livered for each cup is displayed and can bemade shorter or longer.
A completely full bar corresponds to the ma-ximum quantity of coffee per cup.
• When the bar indicates the quantity of coffeerequired, press the OK icon (B9) to confirm.
• To change the quantity of cups, press the icons (B7) and (B8) until "NR OF CUPS
IN JUG" is displayed. • Select the OK icon (B9) and then press the
icons (B7) and (B8) to select the num-ber of cups required (4, 6). “JUG 4 CUPS” or“JUG 6 CUPS” is displayed.
• Press the OK icon (B9) to confirm.• Press the ESC icon (B6) to exit the program-
ming menu.
CLEANINGCleaning the coffee makerDo not use solvents or abrasive detergents toclean the coffee maker. A soft damp cloth will suf-fice. Never wash any of the components of the coffeemaker in the dishwasher. The following parts of the machine must be clea-ned regularly:• Waste coffee container (A4).• Drip tray (A14).• Water tank (A12).• Coffee (A13), hot water (A11) and cappuc-
cino maker spouts (A10).• Pre-ground coffee funnel (A21). • Inside of the machine, accessible after ope-
ning the service door (A2).• Brewing unit (A5).• Coffee jug.
Cleaning the waste coffeecontainerWhen "EMPTY WASTE COFFEE CONTAINER" isdisplayed, the waste coffee container must beemptied and cleaned. To clean:• open the service door on the front of the ap-
pliance (fig. 16), extract the drip tray (fig. 17)and clean.
• Clean the waste coffee container thoroughly.
18
GB

19
Important! When extracting the drip tray,the waste coffee container must always be em-ptied.
Cleaning the drip tray
Important! If the drip tray is not emptiedthe water might overflow. This could damage themachine. The drip tray is fitted with a level indi-cator (red) showing the level of water it contains(fig. 27). Before the indicator protrudes from thecup tray, the drip tray must be emptied and clea-ned. To remove the tray:1. Open the service door (fig. 16).2. Remove the drip tray and the waste coffee
container (fig. 17).3. Clean the drip tray and waste coffee container
(A4).4. Replace the drip tray and waste coffee con-
tainer (A4).5. Close the service door.
Cleaning the water tank1. Clean the water tank (A12) regularly (about
once a month) with a damp cloth and a littlemild washing up liquid.
2. Remove all traces of washing up liquid.
Cleaning the spouts1. Clean the nozzles periodically using a sponge
(fig. 28).2. Check regularly that the holes in the coffee
spout are not blocked. If necessary, remove coffee deposits with atoothpick (fig. 26).
Cleaning the pre-ground coffeefunnel• Check regularly (about once a month) that
the pre-ground coffee funnel is not blocked(fig. 21).
Danger! Before performing any cleaningoperations, the machine must be turned off bypressing the main switch (A23) and unplugged
from the mains power supply. Never immerse thecoffee maker in water.
Cleaning the inside of the coffeemaker1. Check regularly (about once a week) that the
inside of the appliance is not dirty. If necessary, remove coffee deposits with asponge.
2. Remove the residues with a vacuum cleaner(fig. 30).
Cleaning the brewing unitThe brewing unit must be cleaned at least once amonth.
Important! The brewing unit (A5) mustnot be removed when the appliance is on. Do notuse force to remove the brewing unit.
1. Make sure the machine is correctly turned off(see "Turning the appliance off").
2. Open the service door (fig. 16).3. Remove the drip tray and waste coffee con-
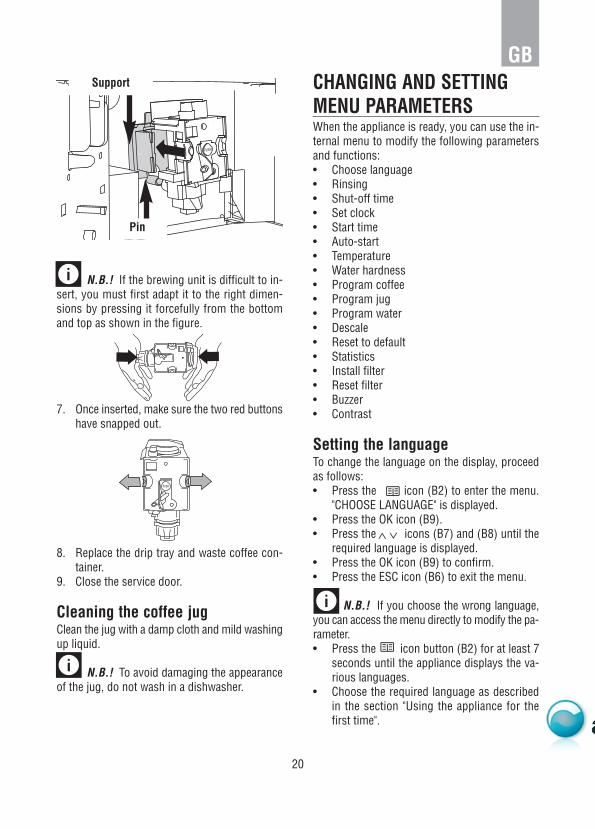
tainer (fig. 17);4. Press the two red release buttons inwards
and at the same time pull the brewing unitoutwards (fig. 31).
Important! Do not use washing up liquidto clean the brewing unit. It would remove the lu-bricant applied to the inside of the piston.
5. Soak the brewing unit in water for about 5minutes, then rinse.
6. After cleaning, replace the brewing unit (A5)by sliding it onto the internal support and pinat the bottom, then push the PUSH symbolfully in until it clicks into place.
GB
20
N.B.! If the brewing unit is difficult to in-sert, you must first adapt it to the right dimen-sions by pressing it forcefully from the bottomand top as shown in the figure.
7. Once inserted, make sure the two red buttonshave snapped out.
8. Replace the drip tray and waste coffee con-tainer.
9. Close the service door.
Cleaning the coffee jugClean the jug with a damp cloth and mild washingup liquid.
N.B.! To avoid damaging the appearanceof the jug, do not wash in a dishwasher.
CHANGING AND SETTINGMENU PARAMETERSWhen the appliance is ready, you can use the in-ternal menu to modify the following parametersand functions:• Choose language• Rinsing• Shut-off time• Set clock• Start time• Auto-start • Temperature• Water hardness• Program coffee• Program jug• Program water• Descale• Reset to default• Statistics• Install filter• Reset filter• Buzzer• Contrast
Setting the language To change the language on the display, proceedas follows:• Press the icon (B2) to enter the menu.
"CHOOSE LANGUAGE" is displayed. • Press the OK icon (B9).• Press the icons (B7) and (B8) until the
required language is displayed. • Press the OK icon (B9) to confirm.• Press the ESC icon (B6) to exit the menu.
N.B.! If you choose the wrong language,you can access the menu directly to modify the pa-rameter. • Press the icon button (B2) for at least 7
seconds until the appliance displays the va-rious languages.
• Choose the required language as describedin the section "Using the appliance for thefirst time".
GB
Pin
Support
21
RinsingThis function enables you to obtain hotter coffee. Proceed as follows:• When you turn the appliance on, if you want
to make a small cup of coffee (less than 60cc), preheat the cup by rinsing it with hotwater.
• If on the other hand more than 2/3 minuteshave passed since the last coffee was made,before requesting another coffee, you mustpreheat the brewing unit by first pressing the
icon (B2) to enter the menu then the icons (B7) and (B8) to select the "RIN-
SING" function. Press the OK icon (B9). "RINSING... PLEASECONFIRM" is displayed.Press the OK icon (B9) again. Deliver the water into the underlying drip trayor alternatively use this water to fill (and thenempty) the cup to be used for the coffee topreheat it.
Changing the length of time theappliance remains onThe appliance is set by default to go off automa-tically 30 minutes after the last coffee has beenmade. To change this interval (max. 120 min), proceedas follows:• Press the icon (B2) to enter the menu
and then the icons (B7) and (B8) until"SHUT-OFF TIME" is displayed.
• Press the OK icon (B9) to confirm.• Press the icons (B7) and (B8) to set the
time after which the appliance will go off(after 1/2 hour, 1 hour, 2 hours).
• Press the OK icon (B9) to confirm.• Press the ESC icon (B6) to exit.
Setting the clock• Press the icon (B2) to enter the menu
and then the icons (B7) and (B8) until"SET CLOCK" is displayed.
• Press the OK icon (B9).• Use the icons (B7) and (B8) to set the
hour, then press the OK icon (B9) to confirm.
• Use the icons (B7) and (B8) to set theminutes, then press the OK icon (B9) to con-firm.
• Press the ESC icon (B6) to exit the menu.
Setting auto-start timeThis function programmes the time the machinewill come on automatically. • Make sure the clock on the appliance has
been set.• Press the icon (B2) to enter the menu
and then the icons (B7) and (B8) until"START TIME" is displayed.
• Press the OK icon (B9).• Use the icons (B7) and (B8) to set the
auto-start time, then press the OK icon (B9)to confirm.
• Use the icons (B7) and (B8) to set theminutes, then press the OK icon (B9) to con-firm.
• Press the icons (B7) and (B8) to acti-vate the auto-start function until "AUTOSTART" is displayed.
• Press the OK icon (B9) to confirm.The symbol appears on the display.
• Press the ESC icon (B6) to exit the menu.
Changing coffee temperatureTo change coffee temperature, proceed as fol-
lows:• Press the icon (B2) to enter the menu
and then the icons (B7) and (B8) until"TEMPERATURE" is displayed.
• Press the OK icon (B9).• Press the icons (B7) and (B8) to select
the required coffee temperature from low,medium and high.
• Press the OK button (B9) to confirm the tem-perature selected.
• Press the ESC icon (B6) to exit the menu.
Setting water hardnessThe operating period can be extended if required,making descaling less frequent by programmingthe machine on the basis of the real lime contentin the water used.
GB

22
Proceed as follows:• remove the "Total Hardness Test" strip (atta-
ched to page 2) from its packaging then dipit fully in the water for a few seconds, Then remove and wait about 30 seconds(until it changes colour and forms red squa-res).
• turn the appliance on by pressing theON/OFF/stand-by button (A7).
• Press the icon (B2) to enter the menuand then the icons (B7) and (B8) until"WATER HARDNESS" is displayed.
• Press the OK icon (B9).• Press the icons (B7) and (B8) until the
number coincides with the number of redsquares on the test strip (for example, if thereare 3 red squares on the test strip, select themessage "WATER HARDNESS 3" .
• Press the OK icon (B9) to confirm. The coffee maker is now programmed to pro-vide the descale warning when actually ne-cessary.
Programming coffeeFor instructions on programming coffee, see the"CHANGING THE QUANTITY OF COFFEE IN THECUP" section.
Programming the jugFor instructions on programming the jug, see thesection " CHANGING JUG FUNCTION PARAME-TERS".
Programming waterFor instructions, see the "CHANGING THE QUAN-TITY OF HOT WATER" section.
Descaling
Important! Descaler contains acids. Re-spect the safety warnings provided by the manu-facturer and given on the descaler pack.
N.B.! Use the descaler recommended bythe manufacturer only. Use of other descalers in-validates the guarantee. Failure to descale the ap-
pliance as described also invalidates the guaran-tee.
Important! Before descaling, make surethe water softener filter has been removed.
When "PLEASE DESCALE !" is displayed, the ma-chine requires descaling. Proceed as follows:• Make sure the machine is ready;• Press the icon (B2) to enter the menu
and then the icons (B7) and (B8) until"DESCALE" is displayed.
• Press the OK icon (B9) and the appliance di-splays "DESCALE PLEASE CONFIRM".
• Press the OK icon (B9). The message "ADDDESCALER PLEASE CONFIRM" is displayed.
• Empty the tank of water, pour the contents ofthe descaler bottle into the tank respectingthe instructions given on the descaler pack,then add water up to the MAX level markedon the water tank. Position a container with a capacity of about2 litres under the hot water spout.
• Press the OK icon (B9). Descaler flows outof the hot water spout into the containerbelow.The appliance displays: "DESCALING".
• The descale programme automatically per-forms a series of deliveries and pauses.
• After about 30 minutes "DESCALE COM-PLETE PLEASE CONFIRM" is displayed.
• Press the OK icon (B9). "RINSING PLEASECONFIRM" is displayed.
• Empty the water tank, rinse to eliminate de-scaler residues, then fill with clean water.
• Replace the tank full of clean water. "RINSINGPLEASE CONFIRM" is displayed again.
• Press the OK icon (B9) again. Hot waterflows out of the spout into the containerbelow and "RINSING" is displayed.
• Wait until "RINSING COMPLETE PLEASECONFIRM" is displayed.
• Press the OK icon (B9). "DESCALE COM-PLETE" is displayed, then "FILL TANK". Fill thetank again with clean water.
• The descale programme is now terminated
GB

23
and the appliance is ready to make coffeeagain.NOTE: If descaling is interrupted before com-pletion, the process must be begun againfrom the beginning.
Important! FAILURE TO DESCALE THEAPPLIANCE REGULARLY INVALIDATES THEGUARANTEE.
Resetting default values (reset)E’ possibile ritornare alle impostazioni originalidella macchina (anche dopo che l’utente le hamodificate) procedendo nel seguente modo:• Press the icon (B2) to enter the menu
and then the icons (B7) and (B8) until"RESET TO DEFAULT" is displayed.
• Press the OK icon (B9) and the appliance di-splays "RESET TO DEFAULT PLEASE CON-FIRM".
• press the OK button (B9) to reset the defaultvalues;
StatisticsThis displays statistics relating to the machine. To display, proceed as follows:• Press the icon (B2) to enter the menu
and then the icons (B7) and (B8) until"STATISTICS" is displayed.
• Press the OK icon (B9).• Press the icons (B7) and (B8) to verify:- How many coffees have been made.- How many times the machine has been de-
scaled.- The total number of litres of water delivered.• Press the ESC icon (B6) once to exit the fun-
ction or twice to exit the menu.
BuzzerThis activates or deactivates the buzzer emittedby the machine each time an icon is pressed oran accessory is inserted/removed.
N.B.! The buzzer is active by default.
• Press the icon (B2) to enter the menu
and then the icons (B7) and (B8) until"BUZZER" is displayed.
• Press the OK icon (B9). "BUZZER PLEASECONFIRM" is displayed.
• Press the ESC icon (B6) to disable or the OKicon (B9) to enable the buzzer.
• Press the ESC icon (B6) to exit the menu.
Adjusting contrastTo increase or reduce the contrast of the display,proceed as follows:• Press the icon (B2) to enter the menu
and then the icons (B7) and (B8) until"CONTRAST" is displayed.
• Press the OK icon (B9).• Press the icons (B7) and (B8) until
the required display contrast is reached. Theprogressive bar indicates the level of contrastselected.
• Press the OK icon (B9) to confirm.• Press the ESC icon (B6) once to exit the fun-
ction or twice to exit the menu.
Water filterFor instructions on the water softener filter, see thesection "INSTALLING THE FILTER".
TURNING THE APPLIANCEOFF Each time the appliance is turned off, it performsan automatic rinse cycle which cannot be inter-rupted.
Danger of burns! During rinsing, a littlehot water flows from the coffee spouts. Avoid contact with splashes of water. To turn the appliance off, press the ON/OFF but-ton (A7). The appliance performs the rinse cycle then goesoff.
N.B.! If the appliance is not used for anextended period, place the main switch on theback of the appliance in the 0 position (A23).
GB

24
TECHNICAL SPECIFICATIONVoltage: 220-240 V~ 50/60 Hz max. 10AAbsorbed power: 1350 W Pressure: 15 barsWater tank capacity: 1.8 litresSize LxHxD: 594x 378/460x398 mmWeight: 23/24 kg
The appliance complies with the follo-wing EC directives:
• Low Voltage Directive 2006/95/EC and sub-sequent amendments;
• EMC Directive 2004/108/EC and subsequentamendments
Materials and accessories coming into contactwith food conform to European regulation (EC)no. 1935/2004.
ELECTRICAL CONNECTION(UK ONLY)A) If your appliance comes fitted with a plug, it will
incorporate a 13 Amp fuse. If it does not fit yoursocket, the plug should be cut off from the mainslead, and an appropriate plug fitted, as below.WARNING: Very carefully dispose of the cutoff plug after removing the fuse: do not in-sert in a 13 Amp socket elsewhere in thehouse as this could cause a shock hazard.With alternative plugs not incorporating afuse, the circuit must be protected by a 15Amp fuse. If the plug is a moulded-on type,the fuse cover must be re-fitted when chan-ging the fuse using a 13 Amp Asta approvedfuse to BS 1362. In the event of losing thefuse cover, the plug must NOT be used until areplacement fuse cover can be obtained fromyour nearest electrical dealer. The colour ofthe correct replacement fuse cover is that asmarked on the base of the plug.
B) If your appliance is not fitted with a plug,please follow the instructins provided below:
WARNING - THIS APPLIANCE MUST BE EAR-THEDIMPORTANTThe wires in the mains lead are coloured in ac-cordance with the following code:
Green and yellow: EarthBlue: NeutralBrown: Live
As the colours of the wires in the mains lead maynot correspond with the coloured markings iden-tifying the terminals in your plug, proceed as fol-lows:The green and yellow wire must be connected tothe terminal in the plug marked with the letter Eor the earth symbol or coloured green orgreen and yellow.The blue wire must be connected to the terminalmarked with the letter N or coloured black.The brown wire must be connected to the termi-nal marked with the letter L or coloured red.
GB

DISPLAYED MESSAGES
DISPLAYED MESSAGE POSSIBLE CAUSE REMEDY
FILL TANK • The water tank is empty orpositioned incorrectly.
• Fill the tank with waterand/or insert it correctly,pushing it as far as it willgo.
GROUND TOO FINE ADJUSTMILL AND (alternating with)PRESS OK
• The grinding is too fineand the coffee is deliveredtoo slowly.
• The machine cannot makecoffee as there is air in thehydraulic circuitPossible cause: the filterhas not been installed cor-rectly.
• Turn the grinding adju-stment knob one clickclockwise towards "7".
• Make sure the filter (A26)is propertly installed andthat the installation hasbeen carried out correctly.
EMPTY WASTE COFFEECONTAINER
• The waste coffee contai-ner (A4) is too full ormore than 3 days havepassed since you lastmade coffee (this guaran-tees correct hygiene of themachine).
• Empty the waste coffeecontainer and clean, thenreplace. Important: when remo-ving the drip tray, thewaste coffee containerMUST be emptied, even ifit is not completely full.If this is not done, whenyou make the next cof-fees, the waste coffeecontainer may fill up morethan expected and clogthe machine.
GROUND TOO FINE ADJUSTMILL AND (alternating with) PRESS OK (then) FILL TANK
• The tank has been remo-ved during delivery.
• Insert the tank and pressthe OK icon (B9). "HOTWATER PRESS OK" is di-splayed.
INSERT WASTE COFFEECONTAINER
• After cleaning, the wastecoffee container has notbeen replaced.
• Open the service door andinsert the waste coffeecontainer.
25
GB

INSERT BREWING UNIT • The brewing unit has notbeen replaced after clea-ning.
• Insert the brewing unit asdescribed in the section"Cleaning the brewingunit".
DISPLAYED MESSAGE POSSIBLE CAUSE REMEDY
CLOSE DOOR • The service door is open • Close the service door.
FILL BEAN CONTAINER • The coffee beans have runout.
• Fill bean container
GENERAL ALARM! • The inside of the ap-pliance is very dirty.
• Clean the inside of the ap-pliance thoroughly, as de-scribed in the section"Cleaning and mainte-nance". If the message isstill displayed after clea-ning, contact a customerservices.
PLEASE DESCALE! • The machine must be de-scaled.
• The descaling proceduredescribed in the "Desca-ling" section needs to beperformed as soon aspossible.
LESS COFFEE • Too much coffee has beenused.
• Select a milder taste or re-duce the quantity of pre-ground coffee, then makethe coffee again.
REPLACE FILTER! • The water softener filter(A26) must be replaced.
• You must immediately re-place the filter followingthe instructions in thesection "Replacing the fil-ter".
ADD PRE-GROUND COFFEE • The "pre-ground coffee"function has been selec-ted without placing anypre-ground coffee in thefunnel.
• The funnel (A21) is bloc-ked.
• Extract the appliance andplace pre-ground coffee inthe funnel.
• Empty the funnel with thehelp of a knife as descri-bed in the section "Clea-ning the pre-groundcoffee funnel".
26
GB

PROBLEM POSSIBLE CAUSE REMEDY
TROUBLESHOOTINGBelow is a list of some of the possible malfunctions. If the problem cannot be resolved as described, contact Customer Services.
The coffee is not hot • The cups were not pre-heated.
• The brewing unit has coo-led down because 2/3 mi-nutes have elapsed sincethe last coffee was made.
• The temperature set is toolow.
• Warm the cups by rinsingthem with hot water.
• Before making coffee,preheat the brewing unitby selecting the RINSINGfunction in the menu.
• Change the set tempera-ture (see paragraph"Changing coffee tempe-rature").
The coffee is not creamyenough
• The coffee is ground toocoarsely.
• Wrong type of coffee
• Turn the grinding adju-stment knob one click an-ticlockwise towards "1"while the coffee mill is inoperation (fig. 11).
• Use a type of coffee forespresso coffee makers.
The coffee is delivered tooslowly or a drop at a time.
• The coffee is ground toofinely.
• Turn the grinding adju-stment knob one clickclockwise towards "7"while the coffee mill is inoperation (fig. 11). Continue one click at atime until coffee deliveryis satisfactory. The effect is only visibleafter delivering two cof-fees.
27
GB
28
PROBLEM POSSIBLE CAUSE REMEDY
The coffee is delivered tooquickly.
• The coffee is ground toocoarsely.
• Turn the grinding adju-stment knob one click an-ticlockwise towards "1"while the coffee mill is inoperation (fig. 11). Avoid turning the grindingadjustment knob excessi-vely otherwise when youselect 2 cups, the coffeemay be delivered a drop ata time.The effect is only visibleafter delivering two cof-fees.
Coffee does not come out ofone of the spouts.
• The spouts are blocked • Clean the spouts with atoothpick (fig. 23).
The coffee does not comeout of the spouts, but fromaround the service door (A2).
• The holes in the spoutsare clogged with dry cof-fee dust.
• The coffee guide (A3) in-side the service door isblocked and cannotswing.
• If necessary, remove cof-fee deposits with a too-thpick, sponge or stiffbristled kitchen brush (fig.23).
• Thoroughly clean the cof-fee guide (A3), particu-larly near the hinges.
Water comes out of thespouts instead of coffee
• The pre-ground coffeemay be blocked in the fun-nel (A21).
• Clean the funnel (A21)with a wooden or plasticfork, clean the inside ofthe machine.
GB

www.electrolux.com
5713211661/09.09
10