gateway p6 eppm data migration guide - oraclegateway p6 eppm data migration guide 8 setting up p6...
TRANSCRIPT
GGaatteewwaayy PP66 EEPPPPMM DDaattaa MMiiggrraattiioonn GGuuiiddeeVVeerrssiioonn 1177
AApprriill 22001188

3
Contents
Overview ........................................................................................................................................... 5
Setting Up P6 - P6 Data Migration .................................................................................................... 7
Setting Up P6 Data Migration for Cloud ................................................................................................ 7
Setting Up P6 Data Migration for On-Premises .................................................................................... 8
Configuring Gateway Domain for P6 Event Notification for On-Premises ................................ 8
Enabling Encryption Between Gateway and P6 Web Services ................................................ 11
Adding or Editing a P6 Deployment Connection....................................................................... 12
Configuring Applications for Integration ......................................................................................... 15
Configuring P6 EPPM ........................................................................................................................... 15
Configuring Gateway User Interface Settings ..................................................................................... 15
Migrating P6 Master Data .............................................................................................................. 17
Supported Business Objects and Field Mapping Templates ............................................................. 17
Setting P6 Provider Application Parameters for Master Data Flow .................................................. 18
Migrating P6 Project Data ............................................................................................................... 21
Supported Business Objects and Field Mapping Templates ............................................................. 21
Setting P6 Provider Application Parameters for Project Data ........................................................... 22
Appendix A: About Flow Steps ........................................................................................................ 25
Define the Flow Steps in a Flow .......................................................................................................... 25
Flow Sequence When Using Master Data ................................................................................ 26
Flow Sequence When Using Project Data ................................................................................. 26
Flow Sequence When Using the Compare Step ....................................................................... 27
Flow Sequence When Using External Custom Step ................................................................. 29
Appendix B: Fields Supported in Mapping Templates .................................................................... 31
Supported Master Data Field Mapping Templates ............................................................................ 31
ActivityCode Field Mappings ...................................................................................................... 31
ActivityCodeType Field Mappings .............................................................................................. 31
BaselineType from Stage to Production ................................................................................... 32
Calendar field mappings ............................................................................................................ 32
CostAccount from Stage to Production ..................................................................................... 32
Currency from Stage to Production ........................................................................................... 33
EPS from Stage to Production ................................................................................................... 33
ExpenseCategory from Stage to Production ............................................................................. 33
FinancialPeriod from Stage to Production ................................................................................ 34
Location from Stage to Production ........................................................................................... 34
NotebookTopic from Stage to Production ................................................................................. 34
P6 ResourceCurve Fields ........................................................................................................... 35
P6 ResourceRole Fields ............................................................................................................. 35
Gateway P6 EPPM Data Migration Guide
4
P6 RoleLimit Fields .................................................................................................................... 36
P6 UnitOfMeasure Fields ........................................................................................................... 36
ProjectCode from Stage to Production ..................................................................................... 36
ProjectCodeType from Stage to Production .............................................................................. 36
Resource from Stage to Production .......................................................................................... 37
ResourceCode Field Mappings .................................................................................................. 37
ResourceCodeType Field Mappings .......................................................................................... 38
ResourceRate from Stage to Production .................................................................................. 38
Role from Stage to Production .................................................................................................. 38
RoleRate from Stage to Production .......................................................................................... 38
UDFType Fields from Stage to Production ................................................................................ 39
WBSCategory Fields from Stage to Production ........................................................................ 39
Supported Project Data Field Mapping Templates ............................................................................ 39
ActivityCode Field Mappings ...................................................................................................... 39
ActivityCodeType Field Mappings .............................................................................................. 40
ActivityRisk field mappings ........................................................................................................ 40
Calendar field mappings ............................................................................................................ 40
CBS Field Mappings ................................................................................................................... 41
P6 Activity Expense Fields ......................................................................................................... 41
P6 Activity Mapping .................................................................................................................... 41
P6 Activity Relationship Fields .................................................................................................. 42
P6 Assignment Mapping ............................................................................................................ 42
P6 Project Field Mapping ........................................................................................................... 43
P6 Project Resource Fields ........................................................................................................ 43
P6 WBS Field Mapping .............................................................................................................. 44
Resource from Stage to Production .......................................................................................... 44
Risk field mappings .................................................................................................................... 45
RiskImpact field mappings ........................................................................................................ 45
RiskMatrix field mappings ......................................................................................................... 45
RiskMatrixScore field mappings ................................................................................................ 46
RiskMatrixThreshold field mappings ......................................................................................... 47
RiskResponseAction field mappings ......................................................................................... 47
RiskResponseActionImpact field mappings ............................................................................. 47
RiskResponsePlan field mappings ............................................................................................ 48
RiskThreshold field mappings ................................................................................................... 48
RiskThresholdLevel field mappings .......................................................................................... 48
Role from Stage to Production .................................................................................................. 49
Legal Notices .................................................................................................................................. 50
5
Overview
Organizations can use Primavera Gateway to migrate P6 data between different environments of the P6 EPPM application. For example, transfer data from non-production environments for purposes of testing and training, in addition to their final production environments.
Within our documentation, some content might be specific for cloud deployments while other content is relevant for on-premises deployments. Any content that applies to only one of these deployments is labeled accordingly.
The P6 Data Migration Guide describes how to transfer data between two P6 deployments using Primavera Gateway.


7
Setting Up P6 - P6 Data Migration
To set up an P6 - P6 integration, see the following sections of the guide:
For Cloud
See Setting Up P6 Data Migration for Cloud (on page 7)
For On-Premises
See Setting Up P6 Data Migration for On-Premises (on page 8)
In This Section
Setting Up P6 Data Migration for Cloud ..................................................................... 7 Setting Up P6 Data Migration for On-Premises ......................................................... 8
Setting Up P6 Data Migration for Cloud
To set up a P6 - P6 data integration for cloud, contact Oracle with your service request to install:
P6 EPPM associated with at least two separate databases
Primavera Gateway selecting P6 provider and add at least two P6 deployments to use as the source and destination for data transfers
P6 Web Services for the source and destination P6 deployments respectively
Note: P6 Web Services supports SAML 2.0 authentication. If you choose to use SAML 2.0 authentication between the P6 provider in Gateway and P6 EPPM, then SAML authentication must be enabled in P6 EPPM and Primavera Gateway applications. The server administrator must download the SAML token XML file on the Gateway server machine where the P6 deployment is to be created.
(Optional) P6 and Gateway to support eventing
If you choose to use P6 event provider in Gateway, then event notification must be enabled using JMS Queues for messaging in P6 and Gateway.
To enable event notifications in P6, see P6 EPPM Business Object Events Guide in the P6 EPPM documentation library.
To use event notification in Gateway, configure the Gateway domain.
Upon receiving access to P6 EPPM, configure Gateway settings in the P6 EPPM application.
For more details, see Configuring P6 EPPM (on page 15).
Upon receiving access to Primavera Gateway, configure settings in the Gateway application.
For more details, see Configuring Gateway User Interface Settings (on page 15)
Gateway P6 EPPM Data Migration Guide
8
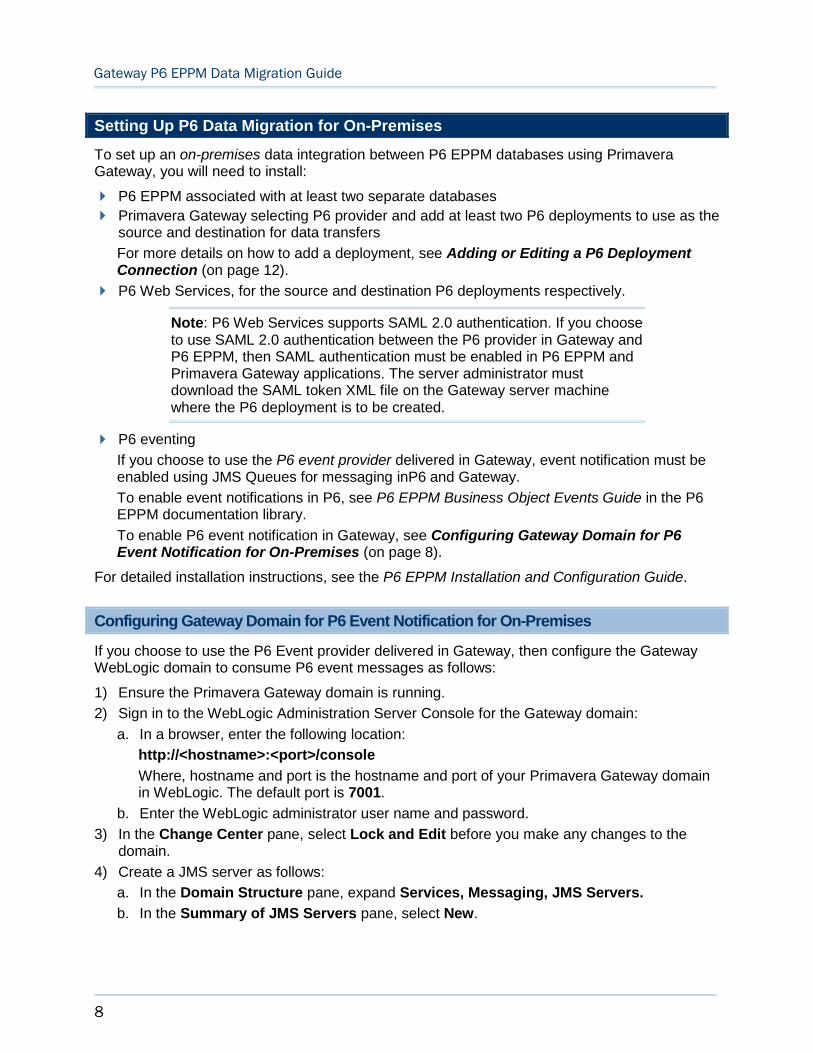
Setting Up P6 Data Migration for On-Premises
To set up an on-premises data integration between P6 EPPM databases using Primavera Gateway, you will need to install:
P6 EPPM associated with at least two separate databases
Primavera Gateway selecting P6 provider and add at least two P6 deployments to use as the source and destination for data transfers
For more details on how to add a deployment, see Adding or Editing a P6 Deployment Connection (on page 12).
P6 Web Services, for the source and destination P6 deployments respectively.
Note: P6 Web Services supports SAML 2.0 authentication. If you choose to use SAML 2.0 authentication between the P6 provider in Gateway and P6 EPPM, then SAML authentication must be enabled in P6 EPPM and Primavera Gateway applications. The server administrator must download the SAML token XML file on the Gateway server machine where the P6 deployment is to be created.
P6 eventing
If you choose to use the P6 event provider delivered in Gateway, event notification must be enabled using JMS Queues for messaging inP6 and Gateway.
To enable event notifications in P6, see P6 EPPM Business Object Events Guide in the P6 EPPM documentation library.
To enable P6 event notification in Gateway, see Configuring Gateway Domain for P6 Event Notification for On-Premises (on page 8).
For detailed installation instructions, see the P6 EPPM Installation and Configuration Guide.
Configuring Gateway Domain for P6 Event Notification for On-Premises
If you choose to use the P6 Event provider delivered in Gateway, then configure the Gateway WebLogic domain to consume P6 event messages as follows:
1) Ensure the Primavera Gateway domain is running.
2) Sign in to the WebLogic Administration Server Console for the Gateway domain:
a. In a browser, enter the following location:
http://<hostname>:<port>/console
Where, hostname and port is the hostname and port of your Primavera Gateway domain in WebLogic. The default port is 7001.
b. Enter the WebLogic administrator user name and password.
3) In the Change Center pane, select Lock and Edit before you make any changes to the domain.
4) Create a JMS server as follows:
a. In the Domain Structure pane, expand Services, Messaging, JMS Servers.
b. In the Summary of JMS Servers pane, select New.

Setting Up P6 - P6 Data Migration
9
Note: Select Next on each screen to advance to the next step.
1. Enter a Name for the JMS Server. For example, Gateway JMS Server.
2. Select Create a New Store.
3. In the Type list, select File Store.
4. Enter a Name for the File Store.
5. Select the Target for the file store:
For Admin server, select AdminServer.
For Managed server, select GatewayCluster.
6. Enter the Directory of the physical location of the file store. For example, c:\JMSFilestore.
7. Select OK.
8. Select Finish.
5) Create a JMS module as follows:
a. In the Domain Structure pane, expand Services, Messaging, and JMS Modules
b. In the Summary of JMS Modules pane, select New.
1. Enter a Name for the JMS module.
2. Depending on your configuration, select the Target for the file store, as AdminServer,or GatewayCluster for a managed server.
3. Select Finish.
6) Create a Foreign Server in the JMS module as follows:
a. In the Domain Structure pane, expand Services, Messaging, and JMS Modules.
b. Select the JMS module created in step 5.
c. On the Configuration tab of the Settings for <JMS Module> pane, select New.
d. Select Foreign Server.
e. Enter a Name for the foreign server.
f. Depending on the configuration, select the Target as AdminServer, or gatewayCluster for a Managed server.
g. Select Advanced Targeting and then select Create a New SubDeployment.
h. Enter a name for the subdeployment and then select OK.
i. In the subdeployment list, select the created subdeployment.
j. Depending on your configuration, select the Target as AdminServer, or gatewayCluster for a Managed server, and the JMS server created in step 4.
k. Select Finish.
l. Select Save to save the foreign server with a subdeployment.
7) Enter configuration settings for the foreign server created as follows:
a. Select the foreign server created in step 6.
b. In the Settings for <Foreign Server Name> pane, select the Configuration tab, and then the General tab.
c. Select the new foreign server created and enter values for the following configuration settings:
Gateway P6 EPPM Data Migration Guide
10
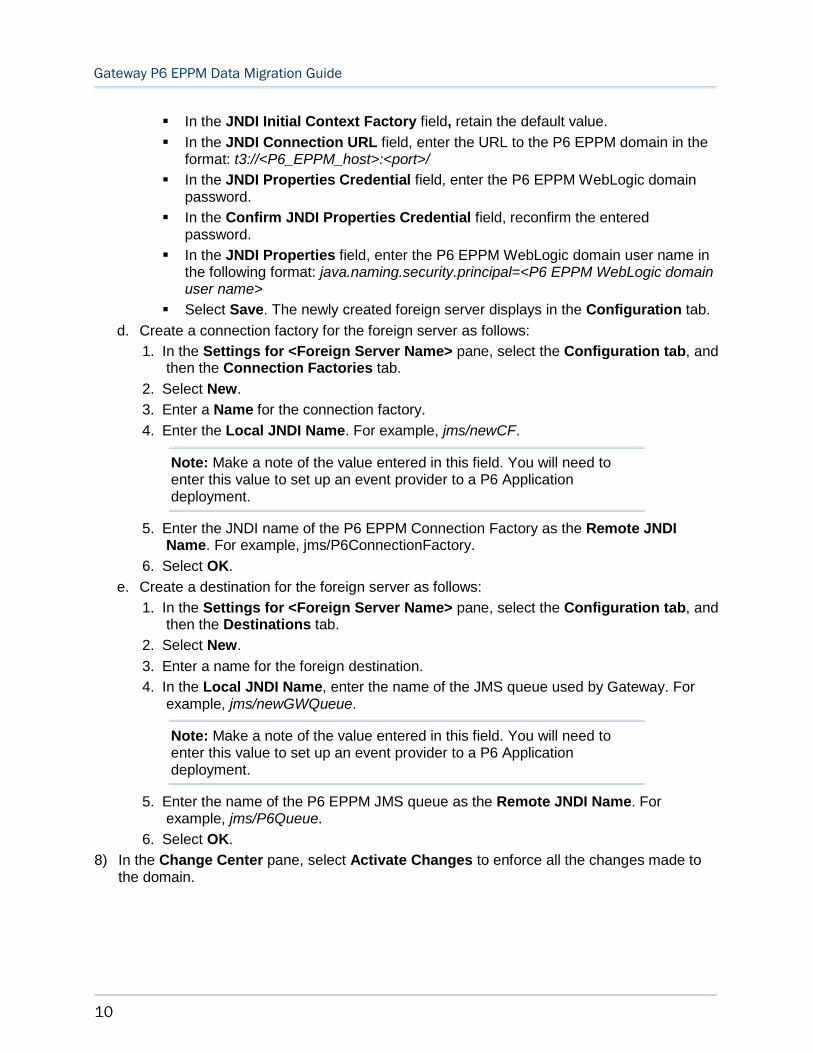
In the JNDI Initial Context Factory field, retain the default value.
In the JNDI Connection URL field, enter the URL to the P6 EPPM domain in the format: t3://<P6_EPPM_host>:<port>/
In the JNDI Properties Credential field, enter the P6 EPPM WebLogic domain password.
In the Confirm JNDI Properties Credential field, reconfirm the entered password.
In the JNDI Properties field, enter the P6 EPPM WebLogic domain user name in the following format: java.naming.security.principal=<P6 EPPM WebLogic domain user name>
Select Save. The newly created foreign server displays in the Configuration tab.
d. Create a connection factory for the foreign server as follows:
1. In the Settings for <Foreign Server Name> pane, select the Configuration tab, and then the Connection Factories tab.
2. Select New.
3. Enter a Name for the connection factory.
4. Enter the Local JNDI Name. For example, jms/newCF.
Note: Make a note of the value entered in this field. You will need to enter this value to set up an event provider to a P6 Application deployment.
5. Enter the JNDI name of the P6 EPPM Connection Factory as the Remote JNDI Name. For example, jms/P6ConnectionFactory.
6. Select OK.
e. Create a destination for the foreign server as follows:
1. In the Settings for <Foreign Server Name> pane, select the Configuration tab, and then the Destinations tab.
2. Select New.
3. Enter a name for the foreign destination.
4. In the Local JNDI Name, enter the name of the JMS queue used by Gateway. For example, jms/newGWQueue.
Note: Make a note of the value entered in this field. You will need to enter this value to set up an event provider to a P6 Application deployment.
5. Enter the name of the P6 EPPM JMS queue as the Remote JNDI Name. For example, jms/P6Queue.
6. Select OK.
8) In the Change Center pane, select Activate Changes to enforce all the changes made to the domain.
Setting Up P6 - P6 Data Migration
11
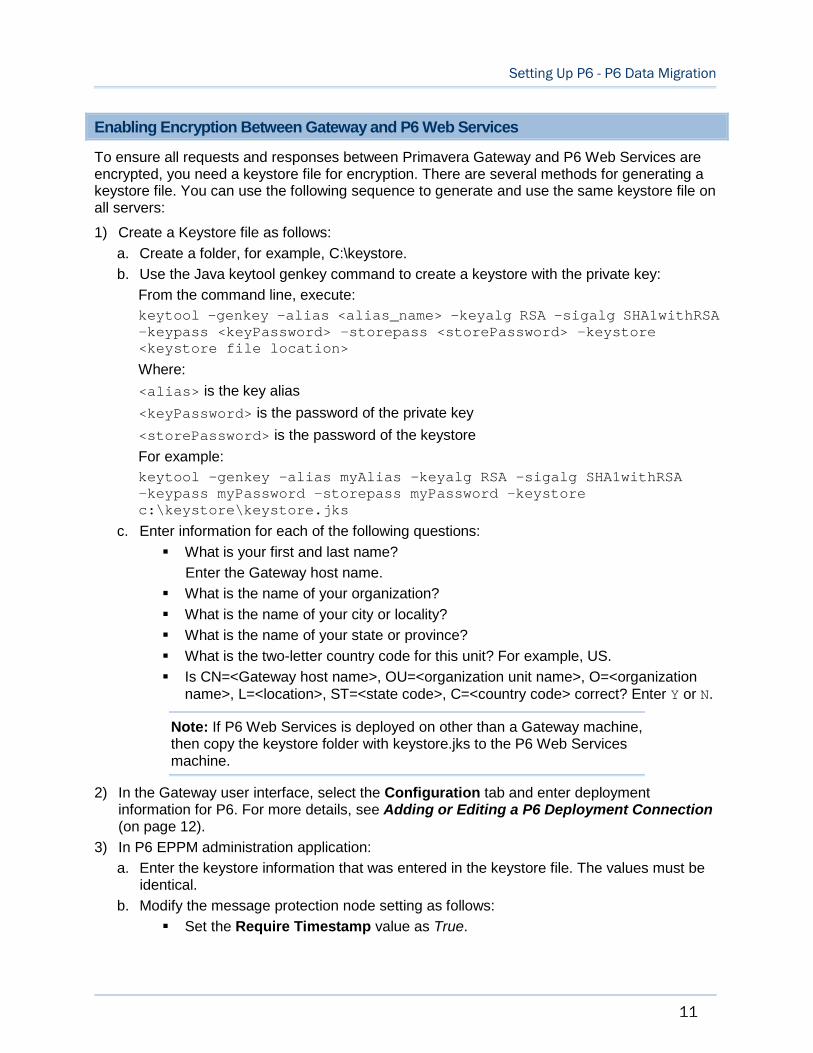
Enabling Encryption Between Gateway and P6 Web Services
To ensure all requests and responses between Primavera Gateway and P6 Web Services are encrypted, you need a keystore file for encryption. There are several methods for generating a keystore file. You can use the following sequence to generate and use the same keystore file on all servers:
1) Create a Keystore file as follows:
a. Create a folder, for example, C:\keystore.
b. Use the Java keytool genkey command to create a keystore with the private key:
From the command line, execute:
keytool -genkey -alias <alias_name> -keyalg RSA -sigalg SHA1withRSA -keypass <keyPassword> -storepass <storePassword> -keystore <keystore file location>
Where:
<alias> is the key alias
<keyPassword> is the password of the private key
<storePassword> is the password of the keystore
For example:
keytool -genkey -alias myAlias -keyalg RSA -sigalg SHA1withRSA -keypass myPassword -storepass myPassword -keystore c:\keystore\keystore.jks
c. Enter information for each of the following questions:
What is your first and last name?
Enter the Gateway host name.
What is the name of your organization?
What is the name of your city or locality?
What is the name of your state or province?
What is the two-letter country code for this unit? For example, US.
Is CN=<Gateway host name>, OU=<organization unit name>, O=<organization name>, L=<location>, ST=<state code>, C=<country code> correct? Enter Y or N.
Note: If P6 Web Services is deployed on other than a Gateway machine, then copy the keystore folder with keystore.jks to the P6 Web Services machine.
2) In the Gateway user interface, select the Configuration tab and enter deployment information for P6. For more details, see Adding or Editing a P6 Deployment Connection(on page 12).
3) In P6 EPPM administration application:
a. Enter the keystore information that was entered in the keystore file. The values must be identical.
b. Modify the message protection node setting as follows:
Set the Require Timestamp value as True.

Gateway P6 EPPM Data Migration Guide
12
Set the Require Digital Signature for Incoming Messages value as True.
Set the Require Encryption for Incoming Messages value as True.
In the KeyStore Type field, enter JKS.
In the File Location field, enter the location of the .jks file. For example, c:\keystore\keystore.jks
In the KeyStore Password field, enter the password for the keystore file provided in keytool command.
In the Private Key Alias field, enter the alias name provided in keytool command.
In the Private Key Password field, enter the private key password for the keystore file provided in the keytool command.
Set the Encrypt Response value as True.
If the encryption is on in Primavera Gateway, then NONCE and CREATED are included in the header for UserName Token authentication. To enable this:
Set the NONCE value as True.
Set the CREATED value as True.
4) After encryption is set, restart P6 Web Services.
Adding or Editing a P6 Deployment Connection
To move data between applications, Primavera Gateway needs to know where to get and send information. Set this up by adding application deployment connections by specifying an Endpoint URL for each application.
Add or edit a P6 deployment connection as follows:
1) Enter the Primavera Gateway URL in the format:
http://<host name>:<port>/gateway
Where, <host name> and <port> should match those of your Primavera Gateway domain.
2) Sign in to Primavera Gateway with administration credentials.
3) In the sidebar, select Configuration.
4) Select the Deployments tab.
5) Select Add... or Edit....
The Deployment wizard displays.
6) In the General step, select P6 Provider, and name the deployment.
Note: Select Next on each screen to advance to the next step.
7) In the Deployment step, set up P6 connectivity from Gateway as follows:
Authentication Type: Select SAML 2.0 or Username Token from the list.
SAML 2.0 Token File: If you chose SAML 2.0 authentication, then browse or enter the location of the downloaded SAML 2.0 token XML file that is used by the P6 Web Services for authentication.
Username: Enter the name of the P6 administrator.
Password: Enter the case-sensitive password of the P6 administrator.

Setting Up P6 - P6 Data Migration
13
Endpoint URL: Enter the URL to connect with P6 Web Services in the format, http:<host name>:<port>/p6ws/services/SyncServiceV1
P6 Database Instance ID: Enter the database instance ID associated with the P6 application.
Enable Encryption: Select this option if you want to enable encryption when using P6 web services.
Keystore File: Enter or Browse... to the keystore file.
For more details on how to generate a keystore file and keystore password, see Enabling Encryption Between Gateway and P6 Web Services (on page 11).
Keystore Password: Enter the password for the keystore file.
Certificate Alias: Enter the certificate alias used for authentication.
P6 Currency: Enter the base currency for the P6 deployment.
8) (Optional) If you choose to synchronize P6 events on the web using the delivered P6 Event provider, enter the following information in the Event Provider tab:
In the JMS Connection Factory field, enter the local JNDI name from the Connection Factory object created in Configuring Gateway Domain for P6 Event Notification for On-Premises (on page 8). The connection factory contains a set of configuration parameters to connect with the P6 event provider. (on premises only)
In the JMS Queue field, enter the local JNDI name of the JMS Queue used to send and receive messages on P6 events from the destination setup created in Configuring Gateway Domain for P6 Event Notification for On-Premises (on page 8).
9) Select Test Connection to ensure connectivity with P6 is established.
10) Select Save.
Tips
You can also edit a deployment and select Save in any step to exit the wizard.

15
Configuring Applications for Integration
Complete the following tasks to configure Primavera Gateway and the distinct P6 deployments that will be used as the source and destination environments for data exchange:
Configuring Gateway User Interface Settings (on page 15)
Adding or Editing a P6 Deployment Connection (on page 12)
In This Section
Configuring P6 EPPM .............................................................................................. 15 Configuring Gateway User Interface Settings .......................................................... 15
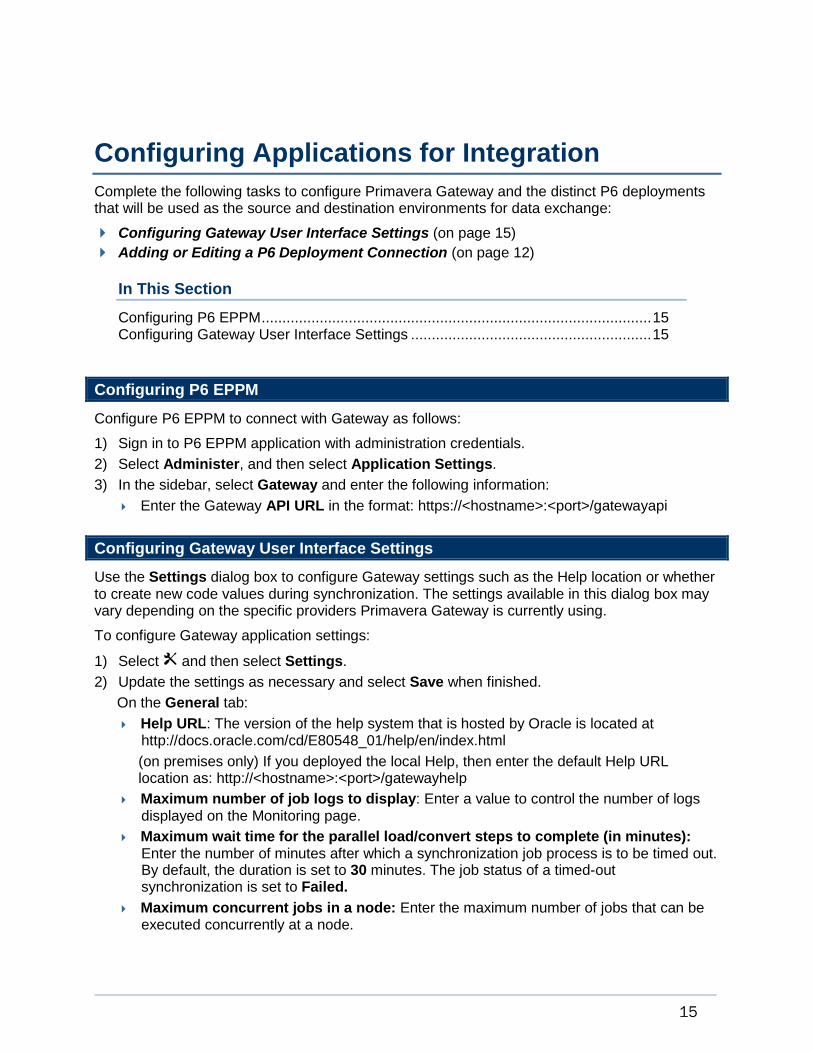
Configuring P6 EPPM
Configure P6 EPPM to connect with Gateway as follows:
1) Sign in to P6 EPPM application with administration credentials.
2) Select Administer, and then select Application Settings.
3) In the sidebar, select Gateway and enter the following information:
Enter the Gateway API URL in the format: https://<hostname>:<port>/gatewayapi
Configuring Gateway User Interface Settings
Use the Settings dialog box to configure Gateway settings such as the Help location or whether to create new code values during synchronization. The settings available in this dialog box may vary depending on the specific providers Primavera Gateway is currently using.
To configure Gateway application settings:
1) Select and then select Settings.
2) Update the settings as necessary and select Save when finished.
On the General tab:
Help URL: The version of the help system that is hosted by Oracle is located at http://docs.oracle.com/cd/E80548_01/help/en/index.html
(on premises only) If you deployed the local Help, then enter the default Help URL location as: http://<hostname>:<port>/gatewayhelp
Maximum number of job logs to display: Enter a value to control the number of logs displayed on the Monitoring page.
Maximum wait time for the parallel load/convert steps to complete (in minutes):Enter the number of minutes after which a synchronization job process is to be timed out. By default, the duration is set to 30 minutes. The job status of a timed-out synchronization is set to Failed.
Maximum concurrent jobs in a node: Enter the maximum number of jobs that can be executed concurrently at a node.

Gateway P6 EPPM Data Migration Guide
16
Job Polling Interval (in seconds): Enter the wait time interval in seconds to check the database if there are new jobs to run.
Maximum File Size Limit (in MB): Enter the maximum file size limit for uploading files from Gateway user interface or from external applications. The file size limit applies to all providers and all supported file formats: CSV, XML, XLS, and XLSX.
If you choose to integrate with P6, enter the following information on the P6 tab:
Create new resource code values during synchronization to P6: Select this option to enable the creation of new resource code values in the P6 EPPM resource code dictionary if these values do not already exist.
Create new project code values during synchronization to P6: Select this option to enable the creation of new project code values in the P6 EPPM project code dictionary if these values do not already exist.
Create new activity code values during synchronization to P6: Select this option to enable the creation of new global activity code values in the P6 EPPM activity code dictionary if these values do not already exist.
Include time zone when exporting from P6: Select this option to export P6 server time zone information along with P6 date and time fields. By default, this option is notselected, except for spread interval data in P6.
Note: This time zone setting applies only for a P6 - Prime integration.
Update activity resource assignments when assigned UDF values match: Enter the UDF code value that is assigned to resource assignments which you want to update during a synchronization. Use this to update the resource assignment with the matching UDF value when the assignment exists multiple times on an activity.
Maximum wait time for the summarizer to complete (in seconds): Enter the amount of time in seconds to wait for the summarizer to complete before a warning is given.
On the Mail Configuration tab:
SMTP Server: Enter the SMTP server address of your email server.
Port Number: Enter the port number of your email server.
Email Security: Select the applicable email security type. Choices include, SSL, TLS, and None.
Email Address: Enter the email address for the user who set up Primavera Gateway.
Authorized User: Enter the user name for this email account.
Password: Enter the password for the authorized user.
Bounce Email Address: Enter an alternate email address to be used if mail fails to be delivered to the first email address.
17
Migrating P6 Master Data
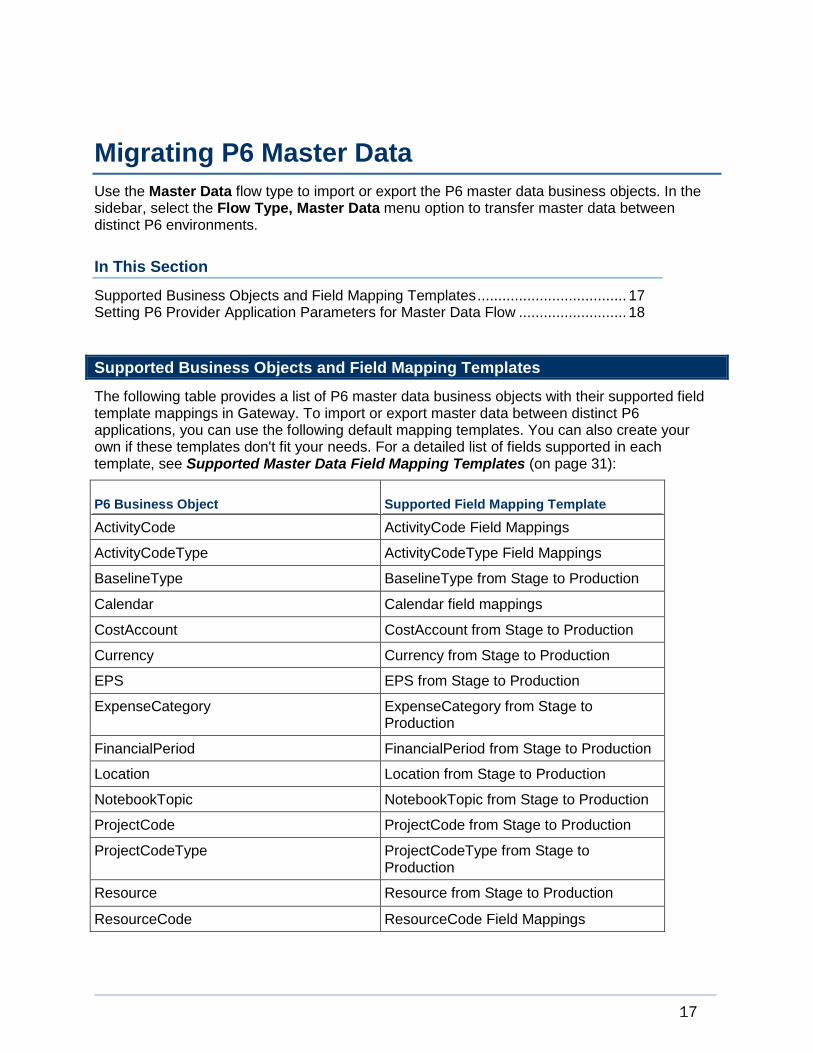
Use the Master Data flow type to import or export the P6 master data business objects. In the sidebar, select the Flow Type, Master Data menu option to transfer master data between distinct P6 environments.
In This Section
Supported Business Objects and Field Mapping Templates .................................... 17 Setting P6 Provider Application Parameters for Master Data Flow .......................... 18
Supported Business Objects and Field Mapping Templates
The following table provides a list of P6 master data business objects with their supported field template mappings in Gateway. To import or export master data between distinct P6 applications, you can use the following default mapping templates. You can also create your own if these templates don't fit your needs. For a detailed list of fields supported in each template, see Supported Master Data Field Mapping Templates (on page 31):
P6 Business Object Supported Field Mapping Template
ActivityCode ActivityCode Field Mappings
ActivityCodeType ActivityCodeType Field Mappings
BaselineType BaselineType from Stage to Production
Calendar Calendar field mappings
CostAccount CostAccount from Stage to Production
Currency Currency from Stage to Production
EPS EPS from Stage to Production
ExpenseCategory ExpenseCategory from Stage to Production
FinancialPeriod FinancialPeriod from Stage to Production
Location Location from Stage to Production
NotebookTopic NotebookTopic from Stage to Production
ProjectCode ProjectCode from Stage to Production
ProjectCodeType ProjectCodeType from Stage to Production
Resource Resource from Stage to Production
ResourceCode ResourceCode Field Mappings
Gateway P6 EPPM Data Migration Guide
18
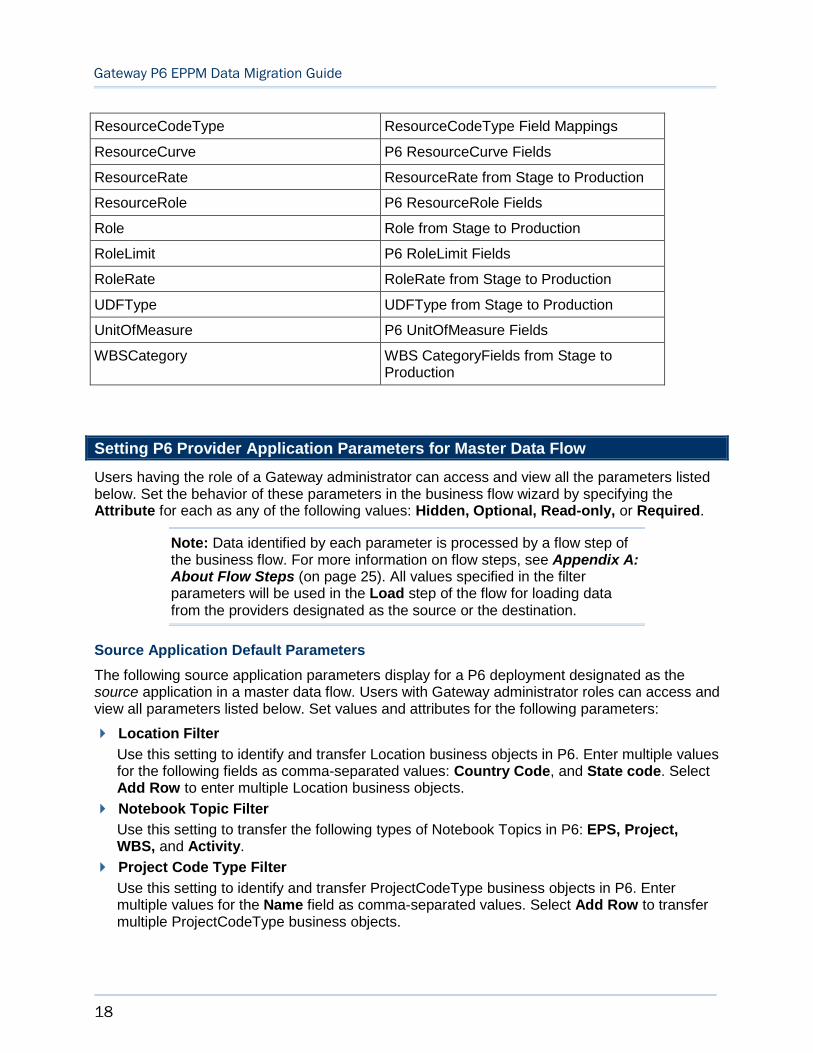
ResourceCodeType ResourceCodeType Field Mappings
ResourceCurve P6 ResourceCurve Fields
ResourceRate ResourceRate from Stage to Production
ResourceRole P6 ResourceRole Fields
Role Role from Stage to Production
RoleLimit P6 RoleLimit Fields
RoleRate RoleRate from Stage to Production
UDFType UDFType from Stage to Production
UnitOfMeasure P6 UnitOfMeasure Fields
WBSCategory WBS CategoryFields from Stage to Production
Setting P6 Provider Application Parameters for Master Data Flow
Users having the role of a Gateway administrator can access and view all the parameters listed below. Set the behavior of these parameters in the business flow wizard by specifying the Attribute for each as any of the following values: Hidden, Optional, Read-only, or Required.
Note: Data identified by each parameter is processed by a flow step of the business flow. For more information on flow steps, see Appendix A: About Flow Steps (on page 25). All values specified in the filter parameters will be used in the Load step of the flow for loading data from the providers designated as the source or the destination.
Source Application Default Parameters
The following source application parameters display for a P6 deployment designated as the source application in a master data flow. Users with Gateway administrator roles can access and view all parameters listed below. Set values and attributes for the following parameters:
Location Filter
Use this setting to identify and transfer Location business objects in P6. Enter multiple values for the following fields as comma-separated values: Country Code, and State code. Select Add Row to enter multiple Location business objects.
Notebook Topic Filter
Use this setting to transfer the following types of Notebook Topics in P6: EPS, Project, WBS, and Activity.
Project Code Type Filter
Use this setting to identify and transfer ProjectCodeType business objects in P6. Enter multiple values for the Name field as comma-separated values. Select Add Row to transfer multiple ProjectCodeType business objects.

Migrating P6 Master Data
19
Resource Code Type Filter
Use this setting to identify and transfer ResourceCodeType business objects in P6. Enter multiple values for the Name field as comma-separated values. Select Add Row to transfer multiple ResourceCodeType business objects.
Activity Code Type Filter
Use this setting to identify and transfer ActivityCodeType business objects in P6. Enter multiple values for the Name field as comma-separated values. Select Add Row to transfer multiple ActivityCodeType business objects.
Resource Filter
Use this setting to identify and transfer Resource business objects in P6. Enter multiple values for the following fields as comma-separated values: Resource Ids, and Resource Code. Select Add Row to add multiple Resource business objects.
Include Resource Hierarchy
Select this option to include the P6 resource hierarchy with the Resource objects. This information is used in the Load step of the flow.
Role Filter
Use this setting to identify and transfer Role business objects in P6. Enter multiple values for the Role Ids field as comma-separated values. Select Add Row to transfer multiple Role business objects.
Include Role Hierarchy
Select this option to include the P6 role hierarchy with the Role objects in the data transfer. This information is used in the Load step of the flow.
Calendar Filter
Use this setting to identify and transfer Global Calendar or Resource Calendar business objects in P6. Enter multiple values for the Name field as comma-separated values. Select Add Row to transfer multiple Global Calendar and Resource Calendar business objects.
P6 UDF Type filter
Use this setting to select and transfer the following UDF Types: Activity, Activity Expense, Project, Resource, Resource Assignment, and WBS.
EPS Filter
Use this setting to identify and transfer EPS business objects in P6. Enter multiple values for the EPS Ids field as comma-separated values. Select Add Row to transfer multiple EPS business objects.
ExpenseCategory Filter
Use this setting to identify and transfer ExpenseCategory business objects in P6. Enter multiple values for the ExpenseCategory Names field as comma-separated values. Select Add Row to transfer multiple ExpenseCategory business objects.
WBSCategory Filter
Use this setting to identify and transfer WBSCategory business objects in P6. Enter multiple values for the WBSCategory Names field as comma-separated values. Select Add Row to transfer multiple WBSCategory business objects.
Gateway P6 EPPM Data Migration Guide
20
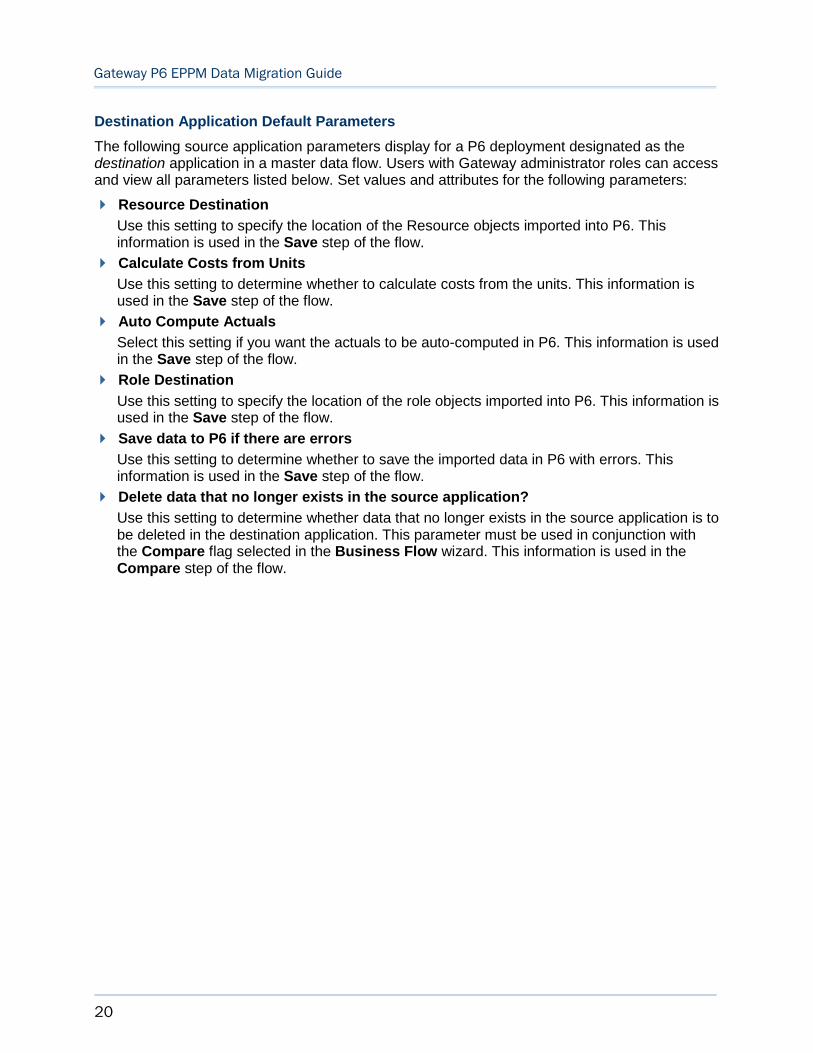
Destination Application Default Parameters
The following source application parameters display for a P6 deployment designated as the destination application in a master data flow. Users with Gateway administrator roles can access and view all parameters listed below. Set values and attributes for the following parameters:
Resource Destination
Use this setting to specify the location of the Resource objects imported into P6. This information is used in the Save step of the flow.
Calculate Costs from Units
Use this setting to determine whether to calculate costs from the units. This information is used in the Save step of the flow.
Auto Compute Actuals
Select this setting if you want the actuals to be auto-computed in P6. This information is used in the Save step of the flow.
Role Destination
Use this setting to specify the location of the role objects imported into P6. This information is used in the Save step of the flow.
Save data to P6 if there are errors
Use this setting to determine whether to save the imported data in P6 with errors. This information is used in the Save step of the flow.
Delete data that no longer exists in the source application?
Use this setting to determine whether data that no longer exists in the source application is to be deleted in the destination application. This parameter must be used in conjunction with the Compare flag selected in the Business Flow wizard. This information is used in the Compare step of the flow.
21
Migrating P6 Project Data
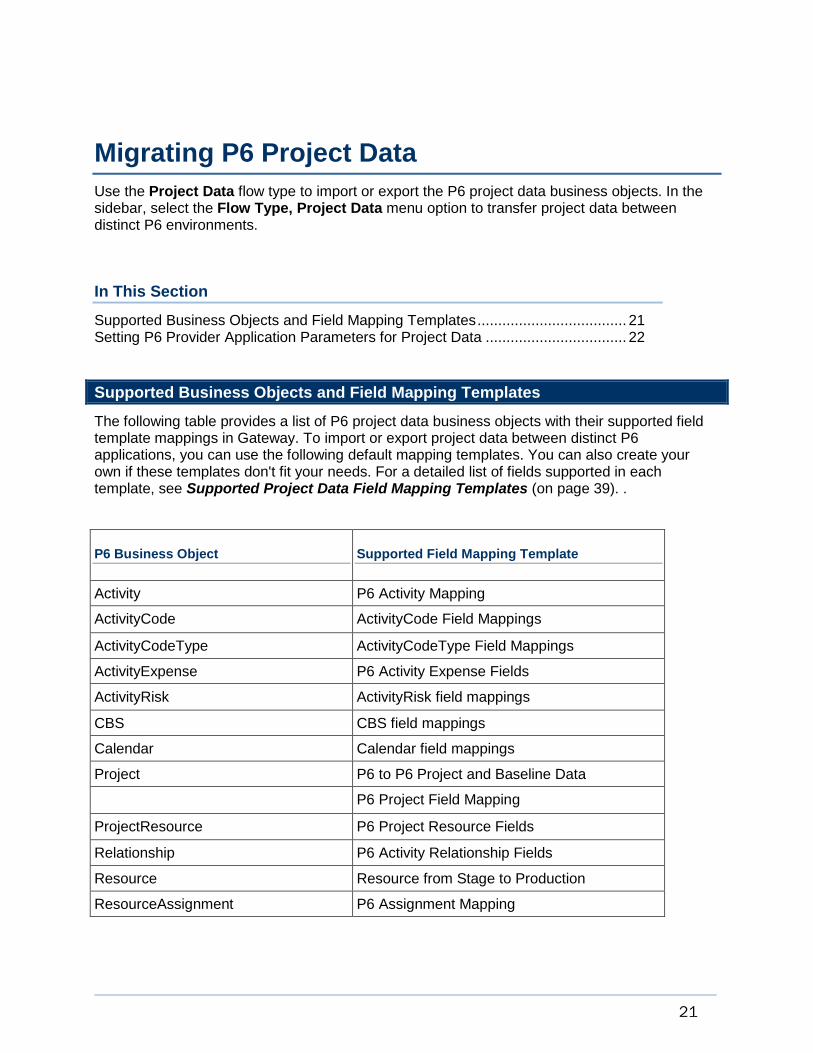
Use the Project Data flow type to import or export the P6 project data business objects. In the sidebar, select the Flow Type, Project Data menu option to transfer project data between distinct P6 environments.
In This Section
Supported Business Objects and Field Mapping Templates .................................... 21 Setting P6 Provider Application Parameters for Project Data .................................. 22
Supported Business Objects and Field Mapping Templates
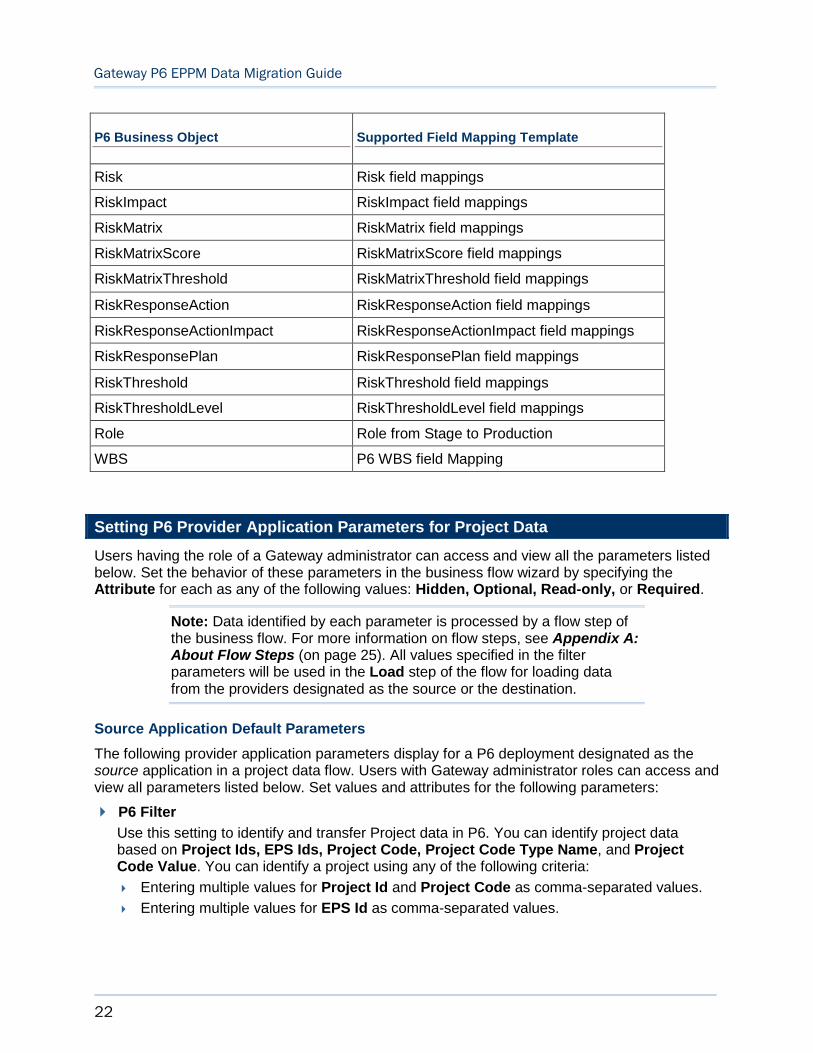
The following table provides a list of P6 project data business objects with their supported field template mappings in Gateway. To import or export project data between distinct P6 applications, you can use the following default mapping templates. You can also create your own if these templates don't fit your needs. For a detailed list of fields supported in each template, see Supported Project Data Field Mapping Templates (on page 39). .
P6 Business Object Supported Field Mapping Template
Activity P6 Activity Mapping
ActivityCode ActivityCode Field Mappings
ActivityCodeType ActivityCodeType Field Mappings
ActivityExpense P6 Activity Expense Fields
ActivityRisk ActivityRisk field mappings
CBS CBS field mappings
Calendar Calendar field mappings
Project P6 to P6 Project and Baseline Data
P6 Project Field Mapping
ProjectResource P6 Project Resource Fields
Relationship P6 Activity Relationship Fields
Resource Resource from Stage to Production
ResourceAssignment P6 Assignment Mapping
Gateway P6 EPPM Data Migration Guide
22
P6 Business Object Supported Field Mapping Template
Risk Risk field mappings
RiskImpact RiskImpact field mappings
RiskMatrix RiskMatrix field mappings
RiskMatrixScore RiskMatrixScore field mappings
RiskMatrixThreshold RiskMatrixThreshold field mappings
RiskResponseAction RiskResponseAction field mappings
RiskResponseActionImpact RiskResponseActionImpact field mappings
RiskResponsePlan RiskResponsePlan field mappings
RiskThreshold RiskThreshold field mappings
RiskThresholdLevel RiskThresholdLevel field mappings
Role Role from Stage to Production
WBS P6 WBS field Mapping
Setting P6 Provider Application Parameters for Project Data
Users having the role of a Gateway administrator can access and view all the parameters listed below. Set the behavior of these parameters in the business flow wizard by specifying the Attribute for each as any of the following values: Hidden, Optional, Read-only, or Required.
Note: Data identified by each parameter is processed by a flow step of the business flow. For more information on flow steps, see Appendix A: About Flow Steps (on page 25). All values specified in the filter parameters will be used in the Load step of the flow for loading data from the providers designated as the source or the destination.
Source Application Default Parameters
The following provider application parameters display for a P6 deployment designated as the source application in a project data flow. Users with Gateway administrator roles can access and view all parameters listed below. Set values and attributes for the following parameters:
P6 Filter
Use this setting to identify and transfer Project data in P6. You can identify project data based on Project Ids, EPS Ids, Project Code, Project Code Type Name, and Project Code Value. You can identify a project using any of the following criteria:
Entering multiple values for Project Id and Project Code as comma-separated values.
Entering multiple values for EPS Id as comma-separated values.

Migrating P6 Project Data
23
Entering multiple Project Codes with values in the following format:Type Name = Value Name
For example:
a. In the Fields list, select Project Code.
b. In the Value list, enter: Integrate to P6 = Yes
c. Select Add Row.
To specify a second condition for the Project Code:
d. In the Fields list, select Project Code.
e. In the Value list, enter: Sales Country Code = DE
Select Add Row.
Baseline
Use this setting to select the type of baseline to be created in Unifier. Options include: No Baseline, Baseline Names, Project Baseline, and All Baseline. This parameter is specific to a Unifier - P6 integration only. This information is used in the Load step of the flow.
Activity Filter
Use this setting to identify and transfer Project business objects in P6. Enter multiple values for the following fields as comma-separated values: Activity Ids, Activity Status, Activity Type, and Activity Code. Select Add row to enter multiple Activity business objects.
Resource Assignment Filter
Use this setting to identify and transfer ResourceAssignments business objects in P6. Enter multiple values for the following fields as comma-separated values: Resource Ids and Resource Type. Select Add Row to enter multiple ResourceAssignment objects.
Summarize project(s) before synchronization?
Use this setting to determine whether to summarize projects before a synchronization. This information is used in the Load step of the flow.
Spread Period type
Use this setting to select the default spread period type in P6 EPPM. Options include: Week, Month, Day, and Financial Period. This information is used in the Load step of the flow.
Synchronize WBS Hierarchy
Use this setting to determine to what extent you would like to synchronize the WBS hierarchy in P6. Options include: Complete, Partial, or Levels. The P6 WBS setting in P6 will override the Gateway setting.
Destination Application Default Parameters
The following provider application parameters display for a P6 deployment designated as the destination application in a project data flow. Users with Gateway administrator roles can access and view all parameters listed below. Set values and attributes for the following parameters:
Note: Unless specified in parentheses, all parameters listed below are hidden from a non-administration user.
EPS Location
Gateway P6 EPPM Data Migration Guide
24
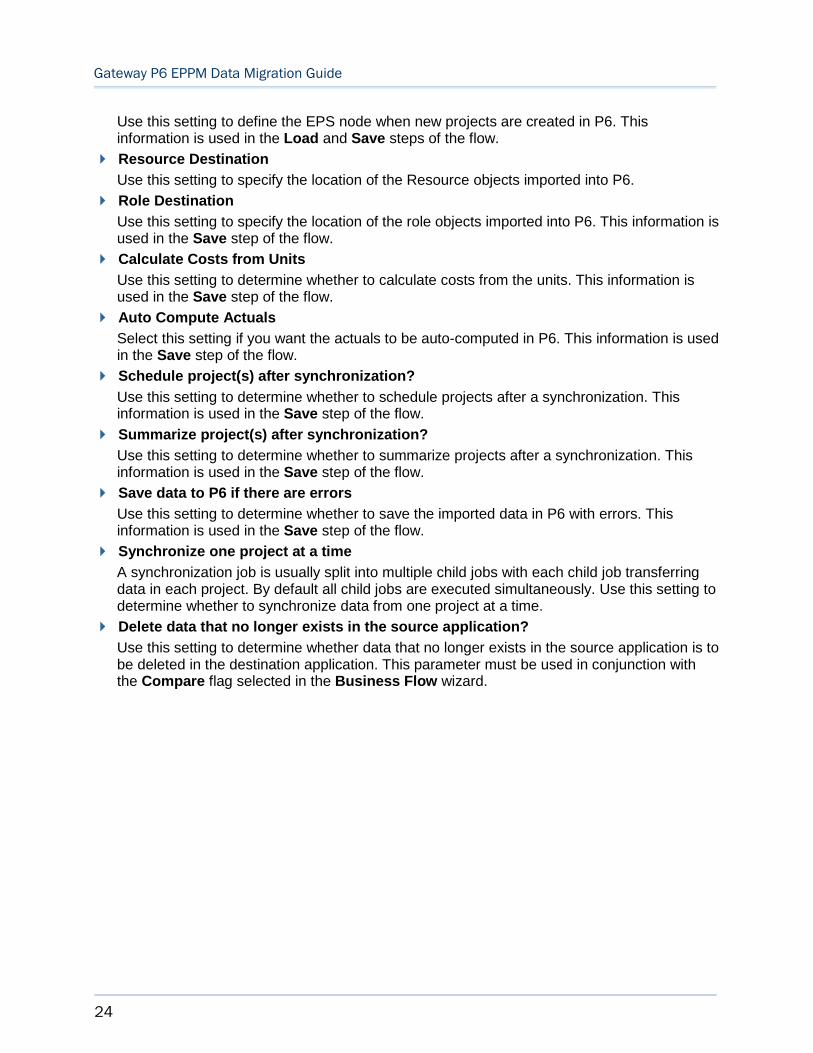
Use this setting to define the EPS node when new projects are created in P6. This information is used in the Load and Save steps of the flow.
Resource Destination
Use this setting to specify the location of the Resource objects imported into P6.
Role Destination
Use this setting to specify the location of the role objects imported into P6. This information is used in the Save step of the flow.
Calculate Costs from Units
Use this setting to determine whether to calculate costs from the units. This information is used in the Save step of the flow.
Auto Compute Actuals
Select this setting if you want the actuals to be auto-computed in P6. This information is used in the Save step of the flow.
Schedule project(s) after synchronization?
Use this setting to determine whether to schedule projects after a synchronization. This information is used in the Save step of the flow.
Summarize project(s) after synchronization?
Use this setting to determine whether to summarize projects after a synchronization. This information is used in the Save step of the flow.
Save data to P6 if there are errors
Use this setting to determine whether to save the imported data in P6 with errors. This information is used in the Save step of the flow.
Synchronize one project at a time
A synchronization job is usually split into multiple child jobs with each child job transferring data in each project. By default all child jobs are executed simultaneously. Use this setting to determine whether to synchronize data from one project at a time.
Delete data that no longer exists in the source application?
Use this setting to determine whether data that no longer exists in the source application is to be deleted in the destination application. This parameter must be used in conjunction with the Compare flag selected in the Business Flow wizard.

25
Appendix A: About Flow Steps
In This Section
Define the Flow Steps in a Flow .............................................................................. 25
Define the Flow Steps in a Flow
Flows contain one or more flow steps. Each flow is a distinct sequence of the types of flow steps listed below:
Load
This step loads the source data and passes it on to the next step.
Convert
This step converts the source data to the Gateway data structure and the destination data structure.
Compare
This step compares the source and destination data and identifies changed, deleted, and added objects so that the system can synchronize the data efficiently.
To ensure that the data that follows the same structure when it is compared, both the source and the destination data must be converted to the Gateway format before it can be compared. When identifying objects that are deleted in the source data, the compare step uses the cross reference table to determine whether the data has been synchronized in the past, the presence of the data in the cross reference table indicates that the data has been synchronized in the past. During the Compare step, the system marks objects that have been deleted in the source data for deletion in the destination system only if the record is in the cross reference table and a delete parameter is associated with the flow.
This step compares the source and destination data and identifies the delta or differences for the next step.
Review
(Optional) This step enables you to review the source data before updating the data in the destination application.
Update
This step saves the data into the destination system.
(Optional) External Custom Step
This step loads the external custom step if defined for a data flow specific to an integration. The external custom step can be added anywhere in the above flow sequence.
Gateway P6 EPPM Data Migration Guide
26
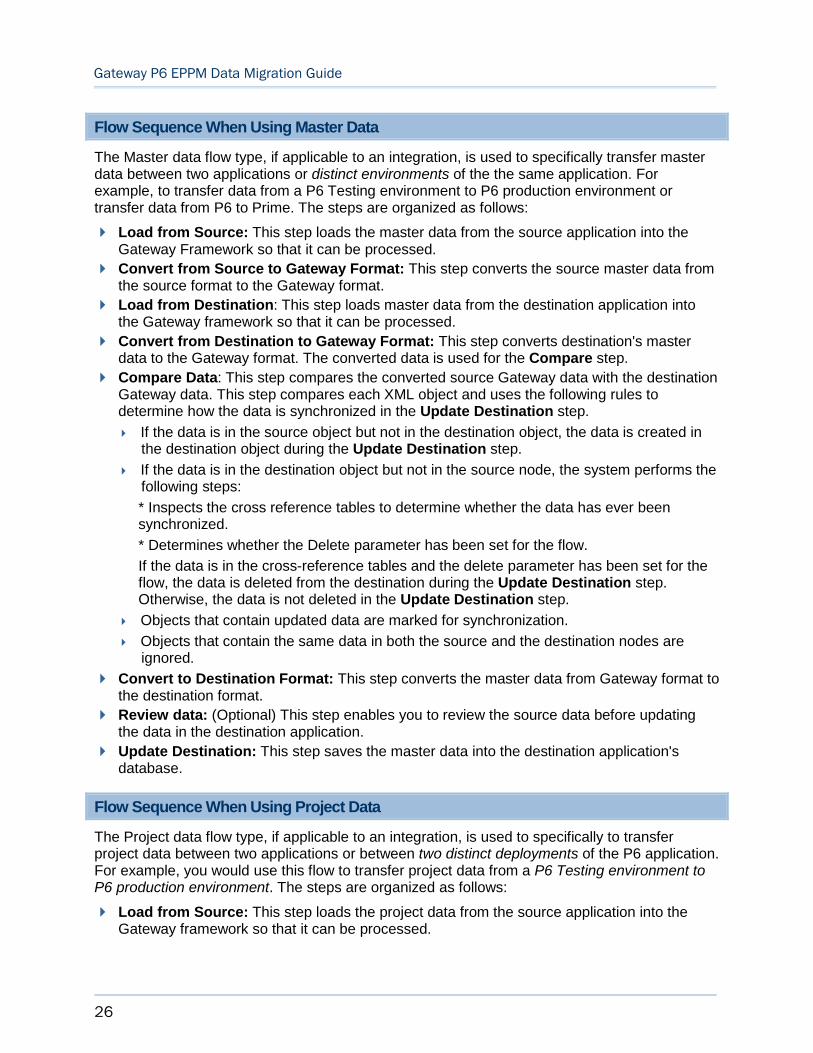
Flow Sequence When Using Master Data
The Master data flow type, if applicable to an integration, is used to specifically transfer master data between two applications or distinct environments of the the same application. For example, to transfer data from a P6 Testing environment to P6 production environment or transfer data from P6 to Prime. The steps are organized as follows:
Load from Source: This step loads the master data from the source application into the Gateway Framework so that it can be processed.
Convert from Source to Gateway Format: This step converts the source master data from the source format to the Gateway format.
Load from Destination: This step loads master data from the destination application into the Gateway framework so that it can be processed.
Convert from Destination to Gateway Format: This step converts destination's master data to the Gateway format. The converted data is used for the Compare step.
Compare Data: This step compares the converted source Gateway data with the destination Gateway data. This step compares each XML object and uses the following rules to determine how the data is synchronized in the Update Destination step.
If the data is in the source object but not in the destination object, the data is created in the destination object during the Update Destination step.
If the data is in the destination object but not in the source node, the system performs the following steps:
* Inspects the cross reference tables to determine whether the data has ever been synchronized.
* Determines whether the Delete parameter has been set for the flow.
If the data is in the cross-reference tables and the delete parameter has been set for the flow, the data is deleted from the destination during the Update Destination step. Otherwise, the data is not deleted in the Update Destination step.
Objects that contain updated data are marked for synchronization.
Objects that contain the same data in both the source and the destination nodes are ignored.
Convert to Destination Format: This step converts the master data from Gateway format to the destination format.
Review data: (Optional) This step enables you to review the source data before updating the data in the destination application.
Update Destination: This step saves the master data into the destination application's database.
Flow Sequence When Using Project Data
The Project data flow type, if applicable to an integration, is used to specifically to transfer project data between two applications or between two distinct deployments of the P6 application. For example, you would use this flow to transfer project data from a P6 Testing environment to P6 production environment. The steps are organized as follows:
Load from Source: This step loads the project data from the source application into the Gateway framework so that it can be processed.

Appendix A: About Flow Steps
27
Convert from Source to Gateway Format: This step converts the source project data from the source format to the Gateway format.
Load from Destination: This step loads the project data from the destination application into the Gateway framework so that it can be processed.
Convert from Destination to Gateway Format: This step converts the destination project data to the Gateway format.
Compare Project Data: This steps compares the source data with the destination data in the current Gateway format.
Convert to Destination Format: This step converts the project data from Gateway format to the destination format.
Review data: (Optional) This step enables you to review the source data before updating the data in the destination application.
Update Destination: This step saves the project data into the destination application's database.
Flow Sequence When Using the Compare Step
A flow that supports a Compare step loads the project from both sides, determines the delta between each side, and uses only the difference to synchronize the data during the final update.
Unlike the normal flow that consists of four steps (load, convert to Gateway, convert from Gateway, and Update Destination), a flow that supports the Compare step includes the following additional steps:
Load data from the other application
Convert the data to the Gateway format
Compare
The Compare step is supported by the Gateway framework code; providers do not have to implement it. Providers will need to implement the extra load and convert steps as these must be implemented by the the provider of the destination application. The destination provider must ask for the key of the project that is being loaded to the source side of the implementation when supporting the compare functionality.
Source Provider
In the Project Data flow, the source provider needs to communicate to the destination side which project it is loading when the Primavera Gateway loads the initial project data from the source side. To do that, the source provider must implement the getProjectKeyForCompare method in the FlowProvider interface.
Normally, a provider will determine which project it is to load from the filter or the parameters that users set in the Gateway user interface. The implementation of the method needs to return a Gateway side value of this project key.
The following is a sample code snippet from the Project Data flow in SampleProvider.java:
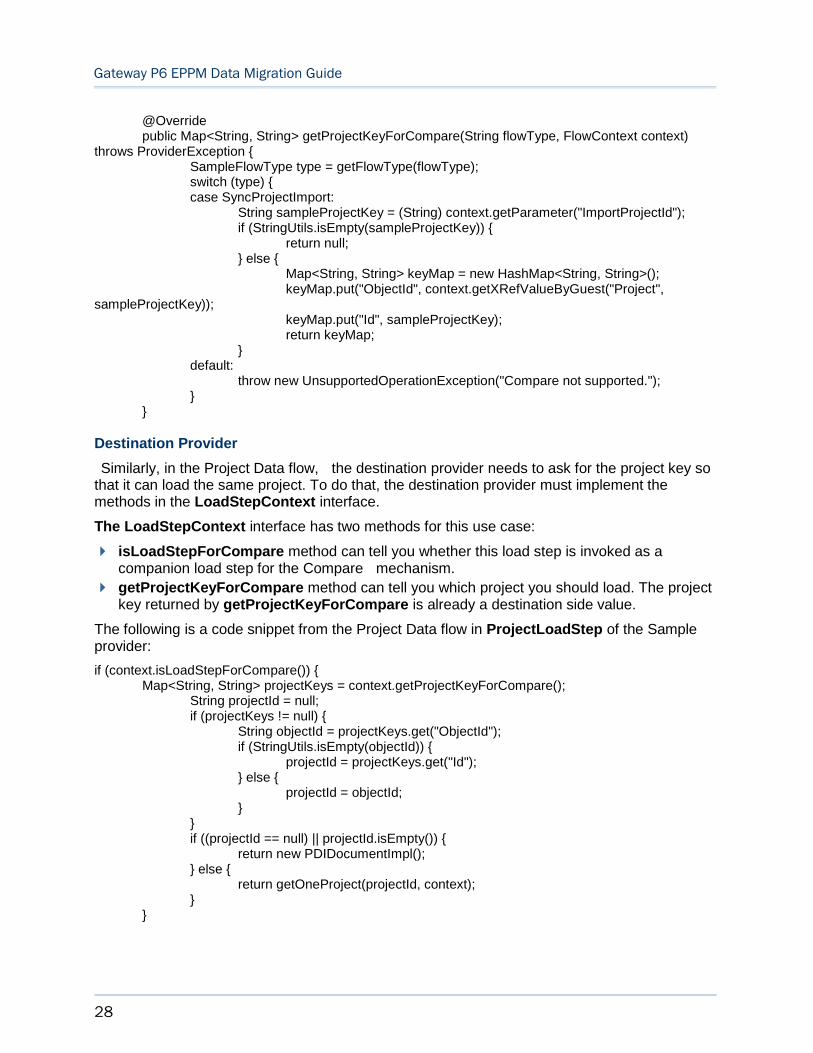
Gateway P6 EPPM Data Migration Guide
28
@Override public Map<String, String> getProjectKeyForCompare(String flowType, FlowContext context)
throws ProviderException { SampleFlowType type = getFlowType(flowType); switch (type) { case SyncProjectImport:
String sampleProjectKey = (String) context.getParameter("ImportProjectId"); if (StringUtils.isEmpty(sampleProjectKey)) {
return null; } else {
Map<String, String> keyMap = new HashMap<String, String>(); keyMap.put("ObjectId", context.getXRefValueByGuest("Project",
sampleProjectKey)); keyMap.put("Id", sampleProjectKey); return keyMap;
} default:
throw new UnsupportedOperationException("Compare not supported."); }
}
Destination Provider
Similarly, in the Project Data flow, the destination provider needs to ask for the project key so that it can load the same project. To do that, the destination provider must implement the methods in the LoadStepContext interface.
The LoadStepContext interface has two methods for this use case:
isLoadStepForCompare method can tell you whether this load step is invoked as a companion load step for the Compare mechanism.
getProjectKeyForCompare method can tell you which project you should load. The project key returned by getProjectKeyForCompare is already a destination side value.
The following is a code snippet from the Project Data flow in ProjectLoadStep of the Sample provider:
if (context.isLoadStepForCompare()) { Map<String, String> projectKeys = context.getProjectKeyForCompare();
String projectId = null; if (projectKeys != null) {
String objectId = projectKeys.get("ObjectId"); if (StringUtils.isEmpty(objectId)) {
projectId = projectKeys.get("Id"); } else {
projectId = objectId; }
} if ((projectId == null) || projectId.isEmpty()) {
return new PDIDocumentImpl(); } else {
return getOneProject(projectId, context); }
}

Appendix A: About Flow Steps
29
Flow Sequence When Using External Custom Step
An external custom step can be used in a project data or master data flow, and can be limited to an integration between specific provider applications. For example, you would use a project data flow with an external custom step to transfer project data from a Sample to File integration. The steps are organized as follows:
Load from Source: This step loads the project data from the source application into the Gateway framework so that it can be processed.
(Optional) <External Custom Step Name>: This step can be used anywhere in the flow sequence. In this case, this step loads the external custom step to the source data.
For more details on how to create an external custom step, download the External Custom Step SDK from the Help menu in Gateway.
Convert from Source to Gateway Format: This step converts the source data to the Gateway format.
Convert to Destination Format: This step converts the project data from Gateway format to the destination format.
(Optional) <External Custom Step Name>: This step can be used anywhere in the flow sequence. In this case, this step loads the external custom step to the destination data.
Update Destination: This step saves the project data into the destination application's database.
(Optional) <External Custom Step Name>: This step can be used anywhere in the flow sequence. In this case, this step loads the external custom step to the destination data.


31
Appendix B: Fields Supported in Mapping Templates
Primavera Gateway delivers a set of field-mapping templates that you can use to transfer data using business objects. This Appendix describes each mapping template and the fields supported in each template. These templates are meant to be used as a quick-start to work with Gateway.
Note: You are not limited to using only the delivered templates. If these templates don't fit your needs, you can create additional new templates in Primavera Gateway.
In This Section
Supported Master Data Field Mapping Templates ................................................... 31 Supported Project Data Field Mapping Templates ................................................... 39
Supported Master Data Field Mapping Templates
The following field-mapping templates are delivered out-of-the-box in Primavera Gateway to transfer master data business objects between distinct P6 deployments.
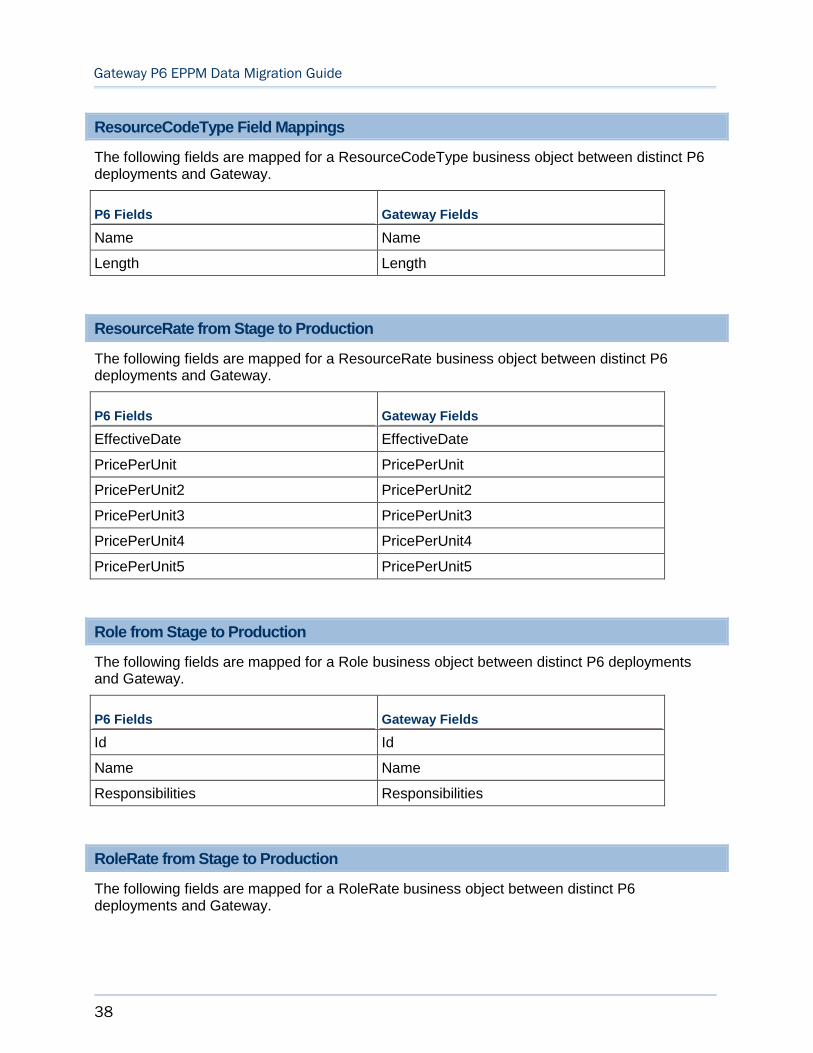
ActivityCode Field Mappings
The following fields are mapped for an ActivityCode business object between distinct P6 deployments and Gateway.
P6 Field Gateway Field
CodeTypeName CodeTypeName
CodeValue CodeValue
Color Color
Description Description
ActivityCodeType Field Mappings
The following fields are mapped for an ActivityCodeType business object between distinct P6 deployments and Gateway.
Gateway P6 EPPM Data Migration Guide
32
P6 Field Gateway Field
EPSObjectId EPSObjectId
Length Length
Name Name
ProjectObjectId ProjectObjectId
Scope Scope
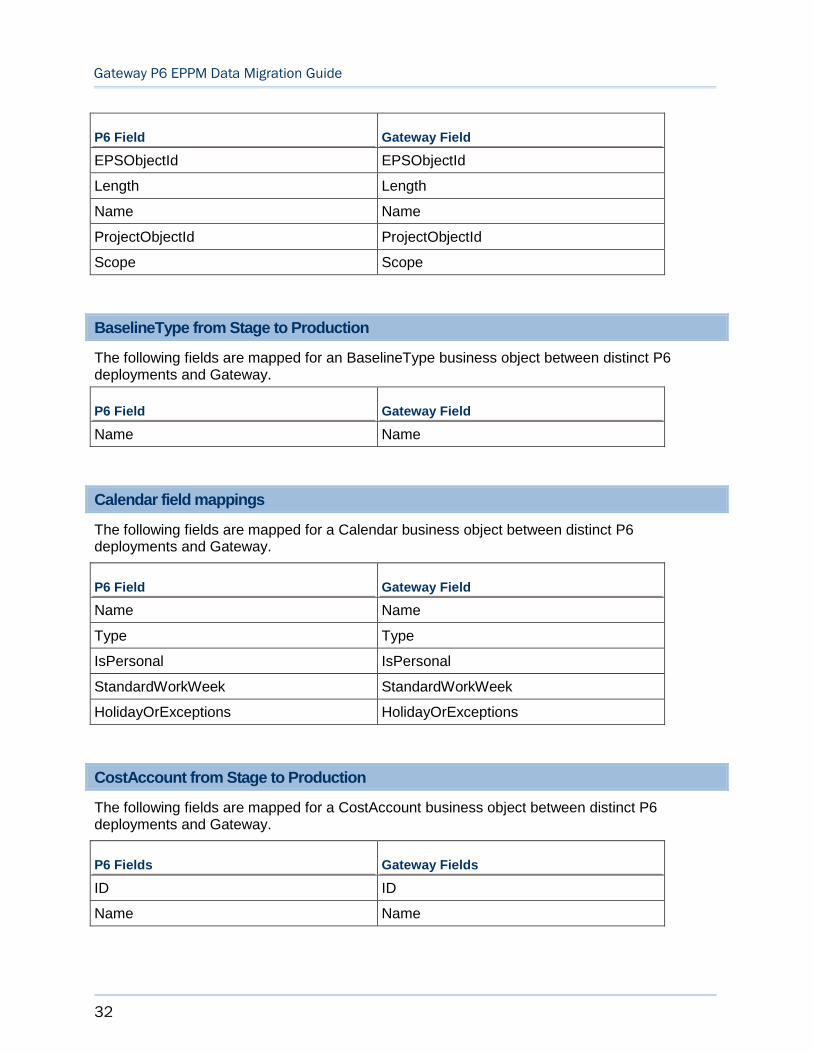
BaselineType from Stage to Production
The following fields are mapped for an BaselineType business object between distinct P6 deployments and Gateway.
P6 Field Gateway Field
Name Name
Calendar field mappings
The following fields are mapped for a Calendar business object between distinct P6 deployments and Gateway.
P6 Field Gateway Field
Name Name
Type Type
IsPersonal IsPersonal
StandardWorkWeek StandardWorkWeek
HolidayOrExceptions HolidayOrExceptions
CostAccount from Stage to Production
The following fields are mapped for a CostAccount business object between distinct P6 deployments and Gateway.
P6 Fields Gateway Fields
ID ID
Name Name
Appendix B: Fields Supported in Mapping Templates
33
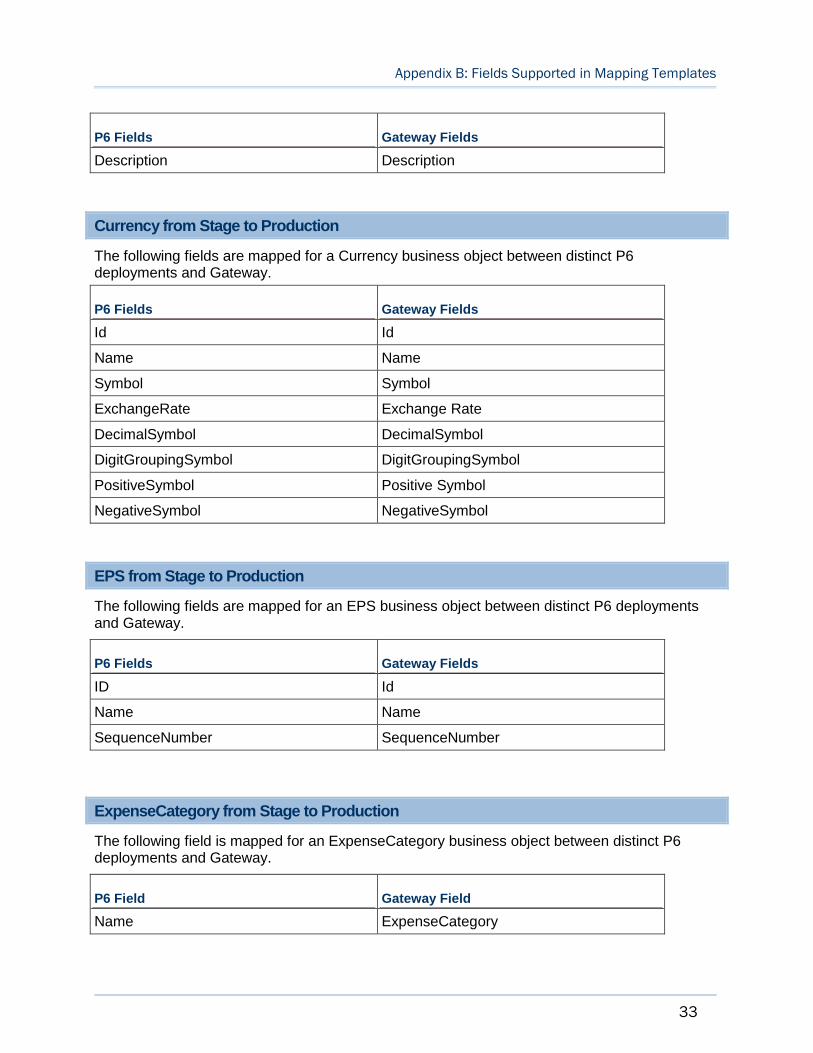
P6 Fields Gateway Fields
Description Description
Currency from Stage to Production
The following fields are mapped for a Currency business object between distinct P6 deployments and Gateway.
P6 Fields Gateway Fields
Id Id
Name Name
Symbol Symbol
ExchangeRate Exchange Rate
DecimalSymbol DecimalSymbol
DigitGroupingSymbol DigitGroupingSymbol
PositiveSymbol Positive Symbol
NegativeSymbol NegativeSymbol
EPS from Stage to Production
The following fields are mapped for an EPS business object between distinct P6 deployments and Gateway.
P6 Fields Gateway Fields
ID Id
Name Name
SequenceNumber SequenceNumber
ExpenseCategory from Stage to Production
The following field is mapped for an ExpenseCategory business object between distinct P6 deployments and Gateway.
P6 Field Gateway Field
Name ExpenseCategory

Gateway P6 EPPM Data Migration Guide
34
FinancialPeriod from Stage to Production
The following fields are mapped for a FinancialPeriod business object between distinct P6 deployments and Gateway.
P6 Fields Gateway Fields
EndDate EndDate
Name Name
StartDate StartDate
Location from Stage to Production
The following fields are mapped for a Location business object between distinct P6 deployments and Gateway.
P6 Fields Gateway Fields
Name Name
Latitude Latitude
Longitude Longitude
AddressLine1 AddressLine1
AddressLine2 AddressLine2
City City
Municipality Municipality
State State
StateCode StateCode
Country Country
CountryCode CountryCode
PostalCode PostalCode
NotebookTopic from Stage to Production
The following fields are mapped for a NotebookTopic business object between distinct P6 deployments and Gateway.
Appendix B: Fields Supported in Mapping Templates
35
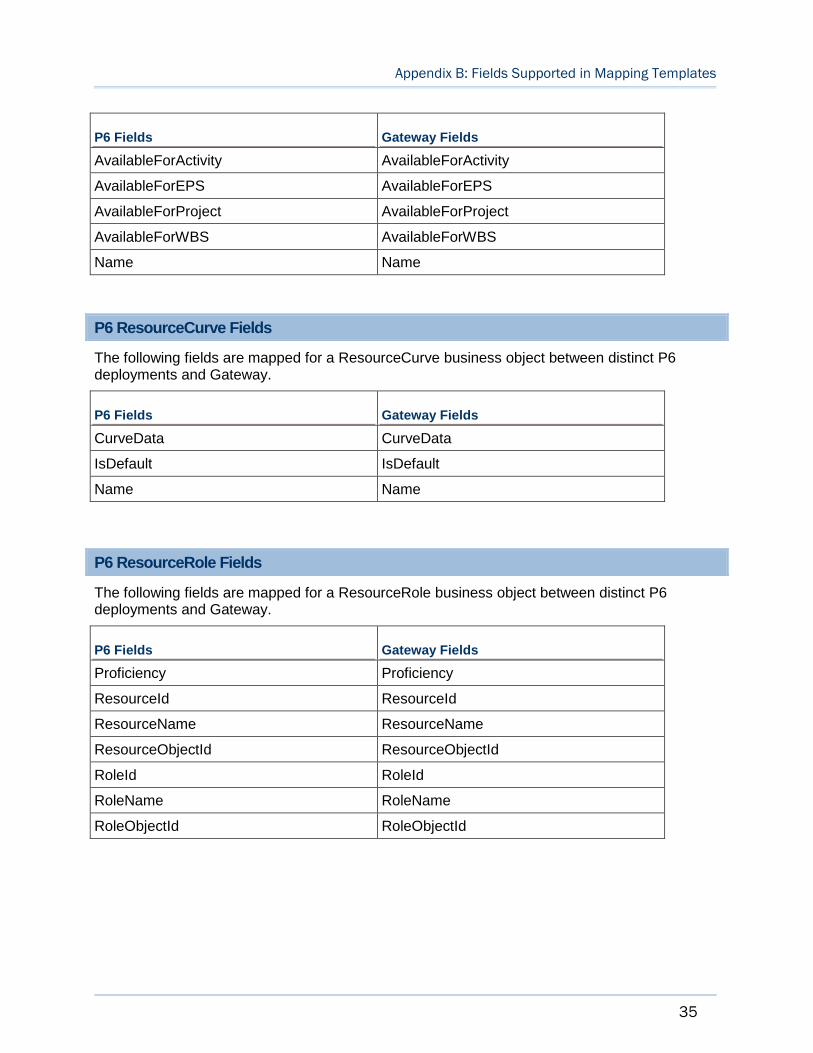
P6 Fields Gateway Fields
AvailableForActivity AvailableForActivity
AvailableForEPS AvailableForEPS
AvailableForProject AvailableForProject
AvailableForWBS AvailableForWBS
Name Name
P6 ResourceCurve Fields
The following fields are mapped for a ResourceCurve business object between distinct P6 deployments and Gateway.
P6 Fields Gateway Fields
CurveData CurveData
IsDefault IsDefault
Name Name
P6 ResourceRole Fields
The following fields are mapped for a ResourceRole business object between distinct P6 deployments and Gateway.
P6 Fields Gateway Fields
Proficiency Proficiency
ResourceId ResourceId
ResourceName ResourceName
ResourceObjectId ResourceObjectId
RoleId RoleId
RoleName RoleName
RoleObjectId RoleObjectId

Gateway P6 EPPM Data Migration Guide
36
P6 RoleLimit Fields
The following fields are mapped for a RoleLimit business object between distinct P6 deployments and Gateway.
P6 Fields Gateway Fields
EffectiveDate EffectiveDate
MaxUnitsPerTime MaxUnitsPerTime
RoleObjectId RoleObjectId
P6 UnitOfMeasure Fields
The following fields are mapped for a UnitOfMeasure business object between distinct P6 deployments and Gateway.
P6 Fields Gateway Fields
Abbreviation Abbreviation
Name Name
SequenceNumber SequenceNumber
ProjectCode from Stage to Production
The following fields are mapped for a ProjectCode business object between distinct P6 deployments and Gateway.
P6 Fields Gateway Fields
CodeTypeName CodeTypeName
CodeValue CodeValue
Description Description
Weight Weight
ProjectCodeType from Stage to Production
The following fields are mapped for a ProjectCodeType business object between distinct P6 deployments and Gateway.
Appendix B: Fields Supported in Mapping Templates
37
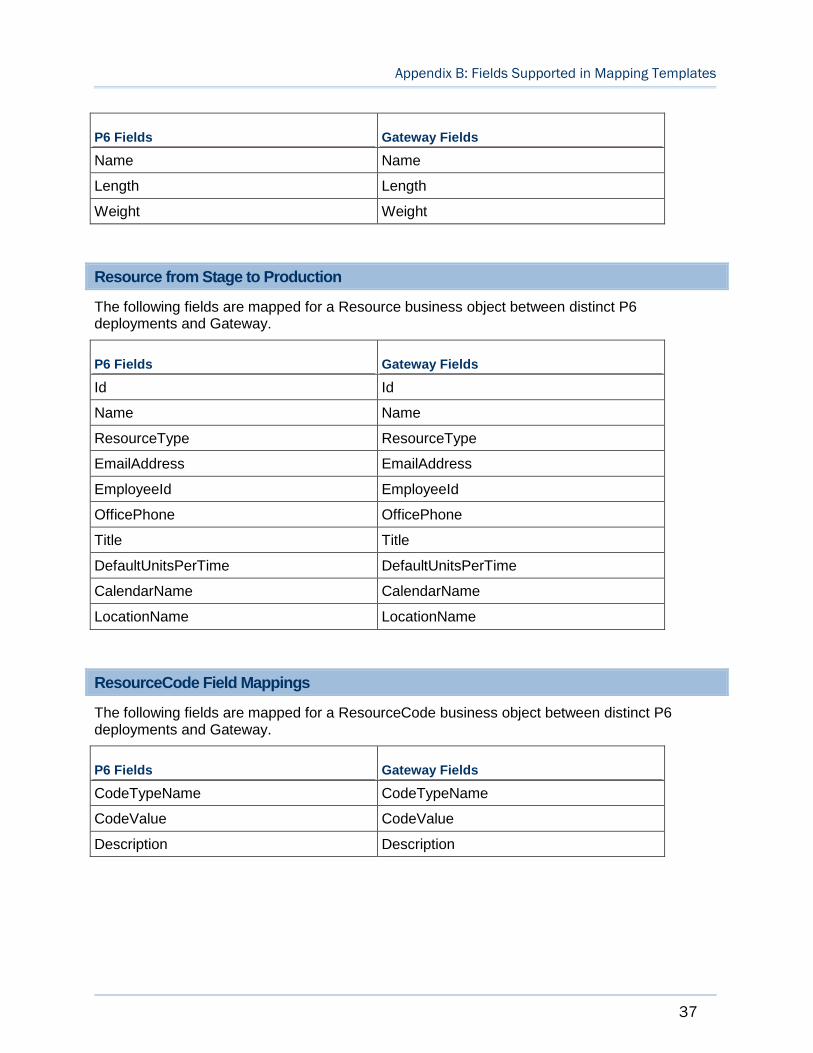
P6 Fields Gateway Fields
Name Name
Length Length
Weight Weight
Resource from Stage to Production
The following fields are mapped for a Resource business object between distinct P6 deployments and Gateway.
P6 Fields Gateway Fields
Id Id
Name Name
ResourceType ResourceType
EmailAddress EmailAddress
EmployeeId EmployeeId
OfficePhone OfficePhone
Title Title
DefaultUnitsPerTime DefaultUnitsPerTime
CalendarName CalendarName
LocationName LocationName
ResourceCode Field Mappings
The following fields are mapped for a ResourceCode business object between distinct P6 deployments and Gateway.
P6 Fields Gateway Fields
CodeTypeName CodeTypeName
CodeValue CodeValue
Description Description
Gateway P6 EPPM Data Migration Guide
38
ResourceCodeType Field Mappings
The following fields are mapped for a ResourceCodeType business object between distinct P6 deployments and Gateway.
P6 Fields Gateway Fields
Name Name
Length Length
ResourceRate from Stage to Production
The following fields are mapped for a ResourceRate business object between distinct P6 deployments and Gateway.
P6 Fields Gateway Fields
EffectiveDate EffectiveDate
PricePerUnit PricePerUnit
PricePerUnit2 PricePerUnit2
PricePerUnit3 PricePerUnit3
PricePerUnit4 PricePerUnit4
PricePerUnit5 PricePerUnit5
Role from Stage to Production
The following fields are mapped for a Role business object between distinct P6 deployments and Gateway.
P6 Fields Gateway Fields
Id Id
Name Name
Responsibilities Responsibilities
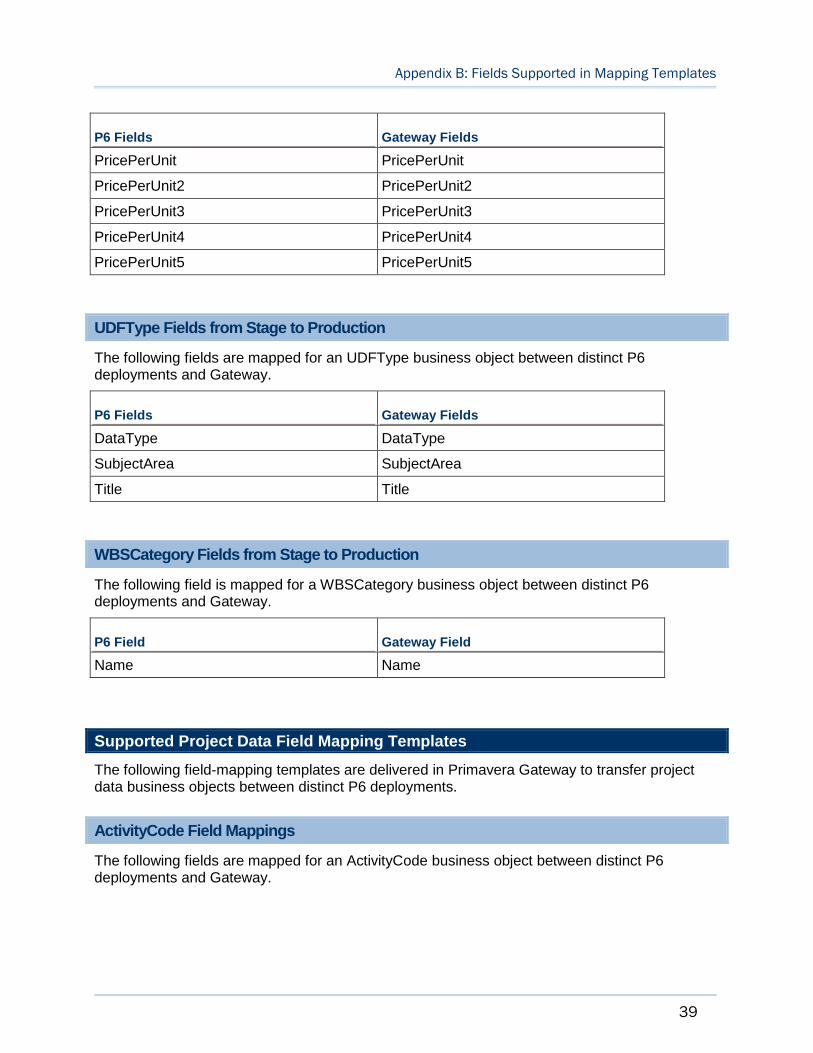
RoleRate from Stage to Production
The following fields are mapped for a RoleRate business object between distinct P6 deployments and Gateway.
Appendix B: Fields Supported in Mapping Templates
39
P6 Fields Gateway Fields
PricePerUnit PricePerUnit
PricePerUnit2 PricePerUnit2
PricePerUnit3 PricePerUnit3
PricePerUnit4 PricePerUnit4
PricePerUnit5 PricePerUnit5
UDFType Fields from Stage to Production
The following fields are mapped for an UDFType business object between distinct P6 deployments and Gateway.
P6 Fields Gateway Fields
DataType DataType
SubjectArea SubjectArea
Title Title
WBSCategory Fields from Stage to Production
The following field is mapped for a WBSCategory business object between distinct P6 deployments and Gateway.
P6 Field Gateway Field
Name Name
Supported Project Data Field Mapping Templates
The following field-mapping templates are delivered in Primavera Gateway to transfer project data business objects between distinct P6 deployments.
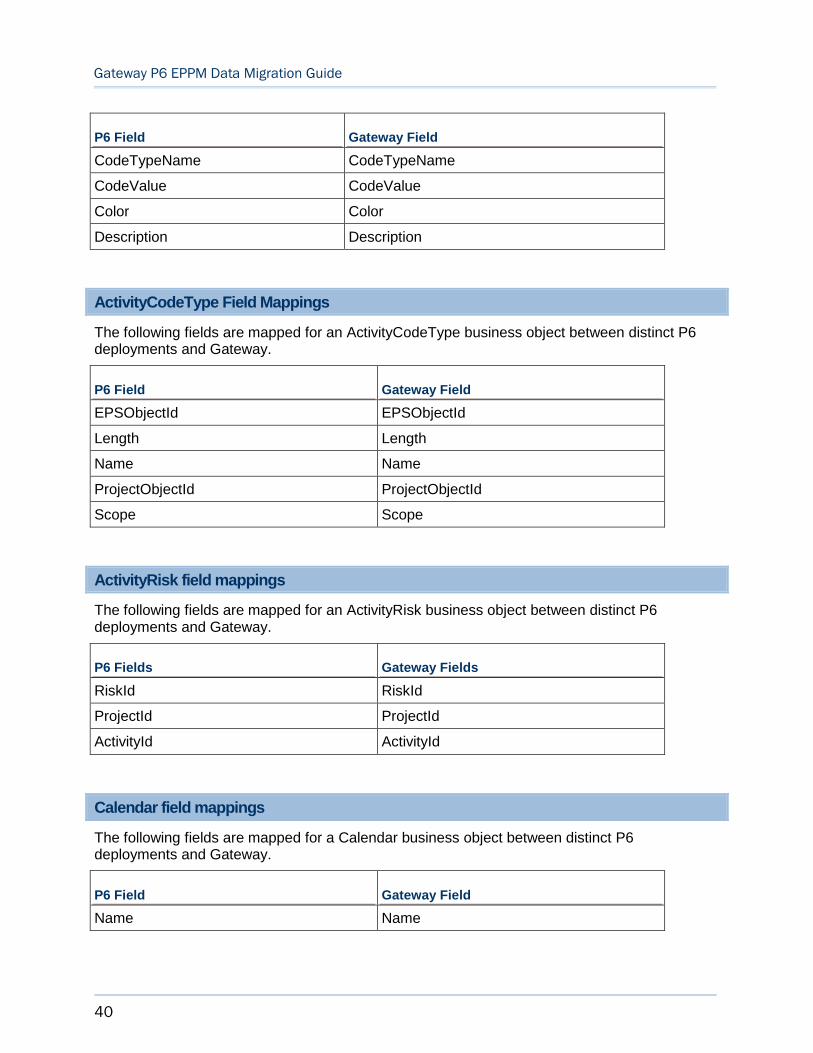
ActivityCode Field Mappings
The following fields are mapped for an ActivityCode business object between distinct P6 deployments and Gateway.
Gateway P6 EPPM Data Migration Guide
40
P6 Field Gateway Field
CodeTypeName CodeTypeName
CodeValue CodeValue
Color Color
Description Description
ActivityCodeType Field Mappings
The following fields are mapped for an ActivityCodeType business object between distinct P6 deployments and Gateway.
P6 Field Gateway Field
EPSObjectId EPSObjectId
Length Length
Name Name
ProjectObjectId ProjectObjectId
Scope Scope
ActivityRisk field mappings
The following fields are mapped for an ActivityRisk business object between distinct P6 deployments and Gateway.
P6 Fields Gateway Fields
RiskId RiskId
ProjectId ProjectId
ActivityId ActivityId
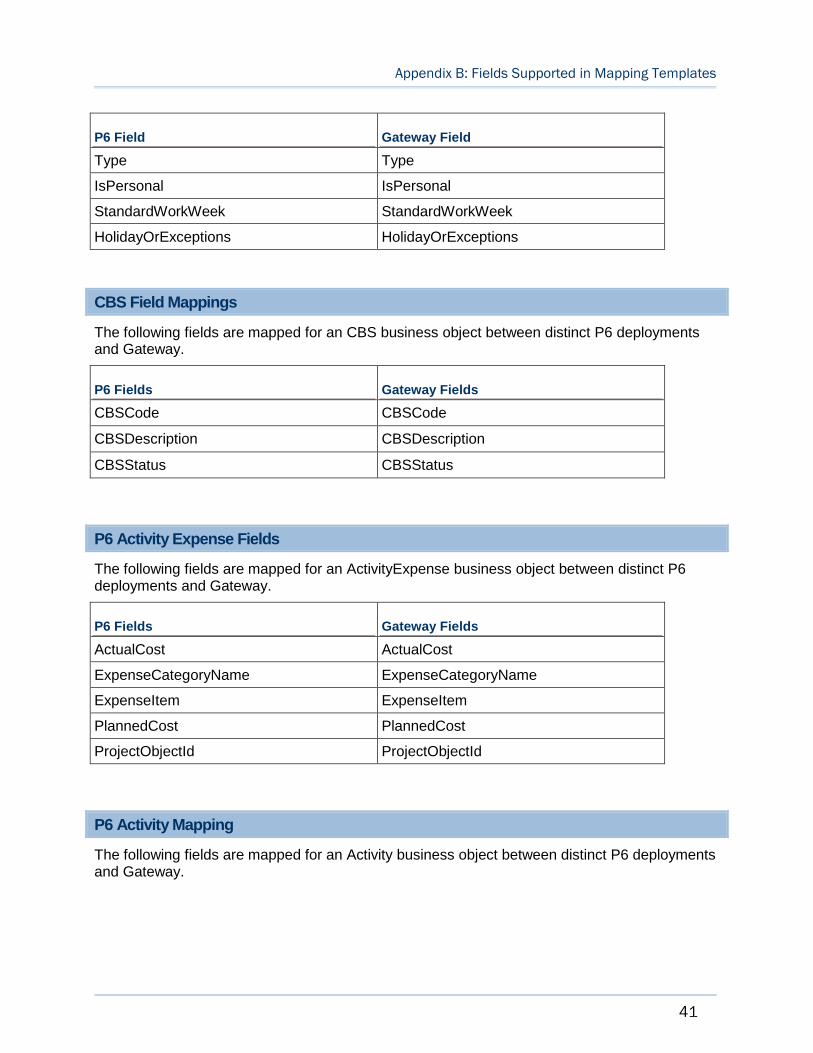
Calendar field mappings
The following fields are mapped for a Calendar business object between distinct P6 deployments and Gateway.
P6 Field Gateway Field
Name Name
Appendix B: Fields Supported in Mapping Templates
41
P6 Field Gateway Field
Type Type
IsPersonal IsPersonal
StandardWorkWeek StandardWorkWeek
HolidayOrExceptions HolidayOrExceptions
CBS Field Mappings
The following fields are mapped for an CBS business object between distinct P6 deployments and Gateway.
P6 Fields Gateway Fields
CBSCode CBSCode
CBSDescription CBSDescription
CBSStatus CBSStatus
P6 Activity Expense Fields
The following fields are mapped for an ActivityExpense business object between distinct P6 deployments and Gateway.
P6 Fields Gateway Fields
ActualCost ActualCost
ExpenseCategoryName ExpenseCategoryName
ExpenseItem ExpenseItem
PlannedCost PlannedCost
ProjectObjectId ProjectObjectId
P6 Activity Mapping
The following fields are mapped for an Activity business object between distinct P6 deployments and Gateway.

Gateway P6 EPPM Data Migration Guide
42
P6 Fields Gateway Fields
Id Id
PlannedDuration PlannedDuration
ActualStartDate ActualStartDate
ActualFinishDate ActualFinishDate
FinishDate FinishDate
Name Name
PrimaryConstraintDate PrimaryConstraintDate
PrimaryConstraintType PrimaryConstraintType
StartDate StartDate
Type Type
CalendarName CalendarName
LocationName LocationName
IsStarred IsStarred
MaximumDuration MaximumDuration
MinimumDuration MinimumDuration
MostLikelyDuration MostLikelyDuration
P6 Activity Relationship Fields
The following fields are mapped for a Relationship business object between distinct P6 deployments and Gateway.
P6 Fields Gateway Fields
Type Type
Lag Lag
PredecessorProjectObjectId PredecessorProjectObjectId
SuccessorProjectObjectId SuccessorProjectObjectId
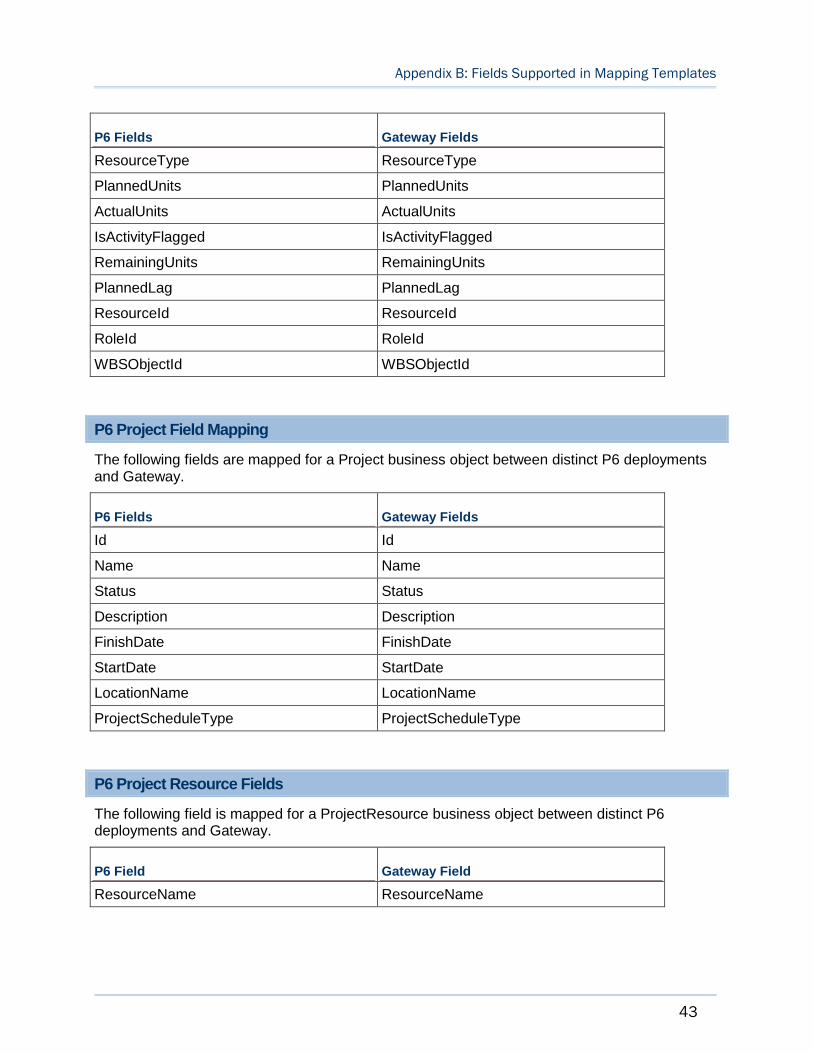
P6 Assignment Mapping
The following fields are mapped for a ResourceAssignment business object between distinct P6 deployments and Gateway.
Appendix B: Fields Supported in Mapping Templates
43
P6 Fields Gateway Fields
ResourceType ResourceType
PlannedUnits PlannedUnits
ActualUnits ActualUnits
IsActivityFlagged IsActivityFlagged
RemainingUnits RemainingUnits
PlannedLag PlannedLag
ResourceId ResourceId
RoleId RoleId
WBSObjectId WBSObjectId
P6 Project Field Mapping
The following fields are mapped for a Project business object between distinct P6 deployments and Gateway.
P6 Fields Gateway Fields
Id Id
Name Name
Status Status
Description Description
FinishDate FinishDate
StartDate StartDate
LocationName LocationName
ProjectScheduleType ProjectScheduleType
P6 Project Resource Fields
The following field is mapped for a ProjectResource business object between distinct P6 deployments and Gateway.
P6 Field Gateway Field
ResourceName ResourceName
Gateway P6 EPPM Data Migration Guide
44
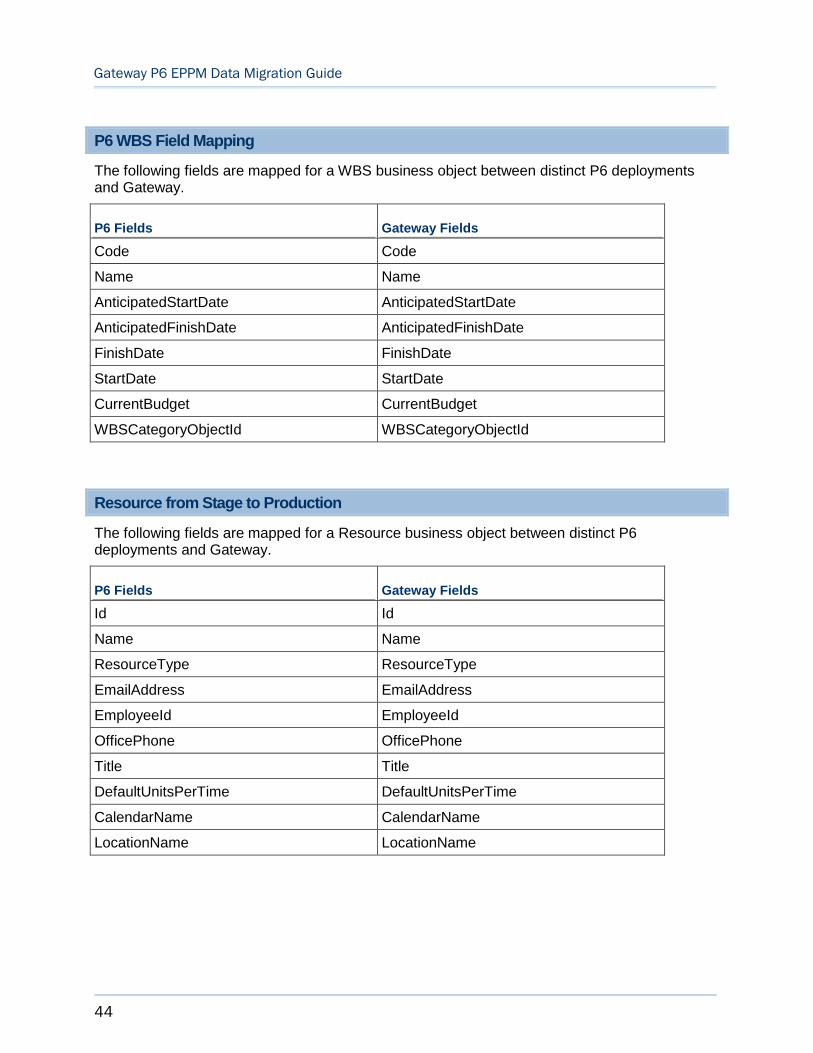
P6 WBS Field Mapping
The following fields are mapped for a WBS business object between distinct P6 deployments and Gateway.
P6 Fields Gateway Fields
Code Code
Name Name
AnticipatedStartDate AnticipatedStartDate
AnticipatedFinishDate AnticipatedFinishDate
FinishDate FinishDate
StartDate StartDate
CurrentBudget CurrentBudget
WBSCategoryObjectId WBSCategoryObjectId
Resource from Stage to Production
The following fields are mapped for a Resource business object between distinct P6 deployments and Gateway.
P6 Fields Gateway Fields
Id Id
Name Name
ResourceType ResourceType
EmailAddress EmailAddress
EmployeeId EmployeeId
OfficePhone OfficePhone
Title Title
DefaultUnitsPerTime DefaultUnitsPerTime
CalendarName CalendarName
LocationName LocationName

Appendix B: Fields Supported in Mapping Templates
45
Risk field mappings
The following fields are mapped for a Risk business object between distinct P6 deployments and Gateway.
P6 Fields Gateway Fields
Id Id
ProjectId ProjectId
Name Name
Type Type
Status Status
Description Description
Effect Effect
Cause Cause
IdentifiedDate IdentifiedDate
ResponseTotalCost ResponseTotalCost
RiskImpact field mappings
The following fields are mapped for a RiskImpact business object between distinct P6 deployments and Gateway.
P6 Fields Gateway Fields
ProjectId ProjectId
RiskId RiskId
RiskThresholdName RiskThresholdName
RiskThresholdLevelCode RiskThresholdLevelCode
RiskMatrix field mappings
The following fields are mapped for a RiskMatrix business object between distinct P6 deployments and Gateway.
P6 Fields Gateway Fields
Name Name
Description Description
Gateway P6 EPPM Data Migration Guide
46
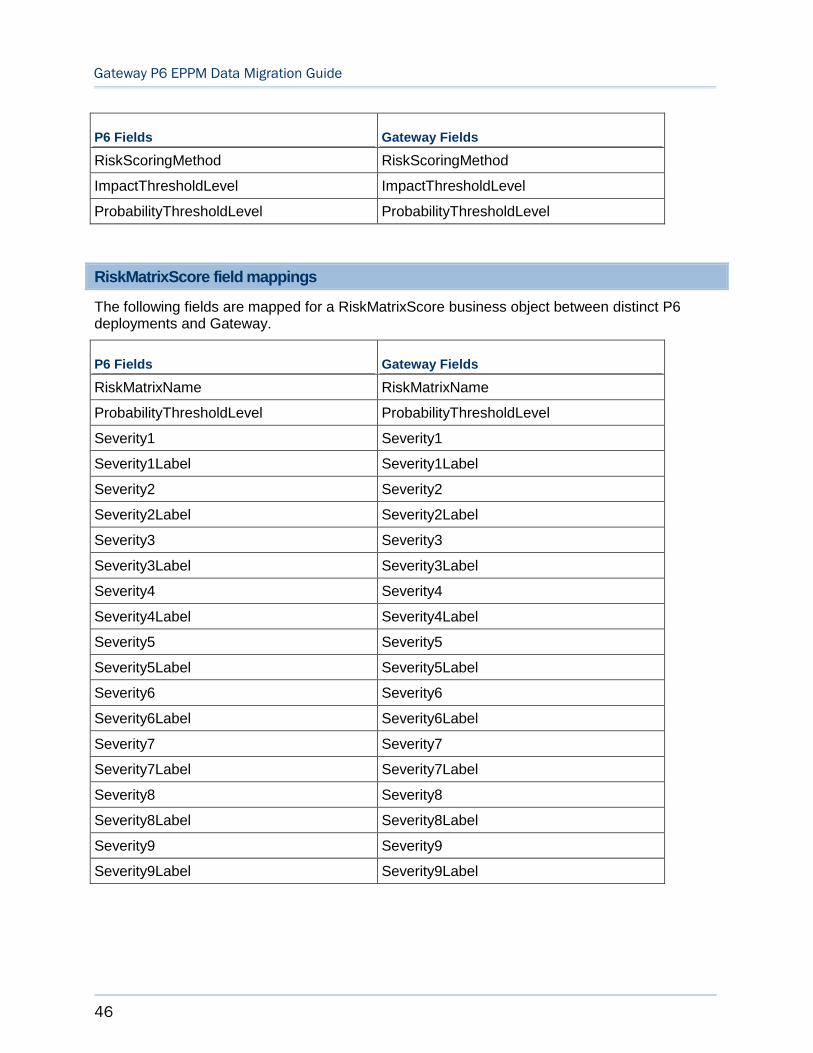
P6 Fields Gateway Fields
RiskScoringMethod RiskScoringMethod
ImpactThresholdLevel ImpactThresholdLevel
ProbabilityThresholdLevel ProbabilityThresholdLevel
RiskMatrixScore field mappings
The following fields are mapped for a RiskMatrixScore business object between distinct P6 deployments and Gateway.
P6 Fields Gateway Fields
RiskMatrixName RiskMatrixName
ProbabilityThresholdLevel ProbabilityThresholdLevel
Severity1 Severity1
Severity1Label Severity1Label
Severity2 Severity2
Severity2Label Severity2Label
Severity3 Severity3
Severity3Label Severity3Label
Severity4 Severity4
Severity4Label Severity4Label
Severity5 Severity5
Severity5Label Severity5Label
Severity6 Severity6
Severity6Label Severity6Label
Severity7 Severity7
Severity7Label Severity7Label
Severity8 Severity8
Severity8Label Severity8Label
Severity9 Severity9
Severity9Label Severity9Label
Appendix B: Fields Supported in Mapping Templates
47
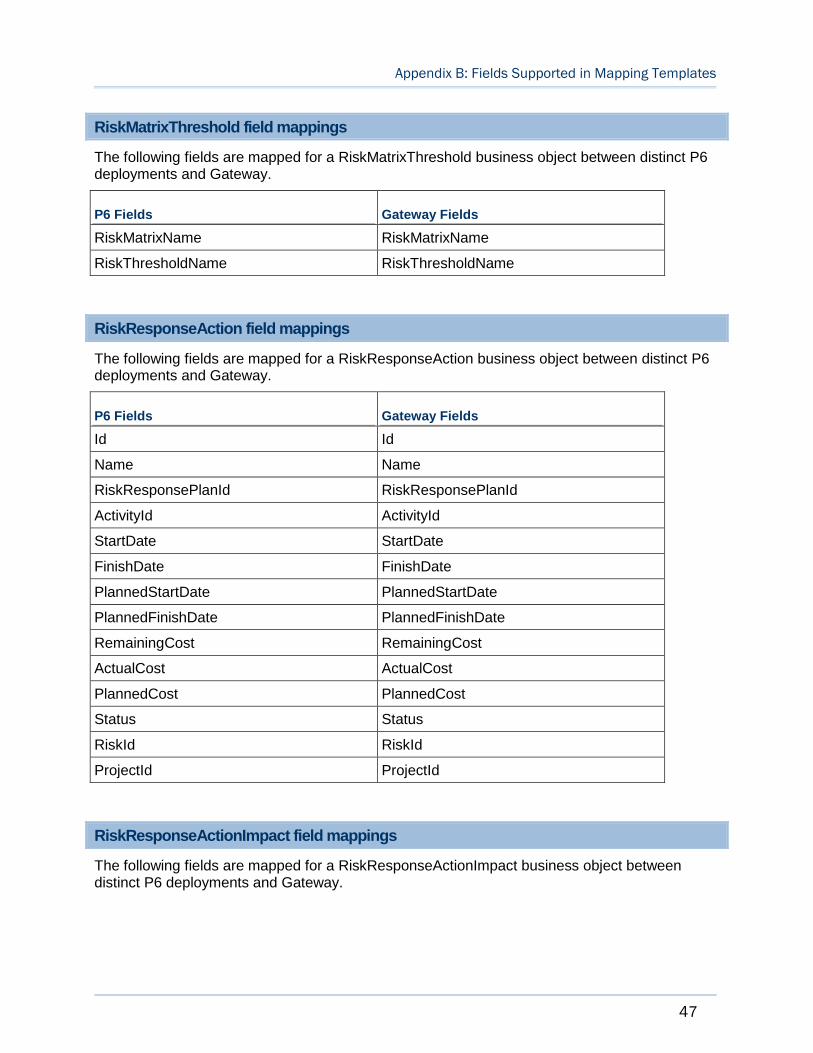
RiskMatrixThreshold field mappings
The following fields are mapped for a RiskMatrixThreshold business object between distinct P6 deployments and Gateway.
P6 Fields Gateway Fields
RiskMatrixName RiskMatrixName
RiskThresholdName RiskThresholdName
RiskResponseAction field mappings
The following fields are mapped for a RiskResponseAction business object between distinct P6 deployments and Gateway.
P6 Fields Gateway Fields
Id Id
Name Name
RiskResponsePlanId RiskResponsePlanId
ActivityId ActivityId
StartDate StartDate
FinishDate FinishDate
PlannedStartDate PlannedStartDate
PlannedFinishDate PlannedFinishDate
RemainingCost RemainingCost
ActualCost ActualCost
PlannedCost PlannedCost
Status Status
RiskId RiskId
ProjectId ProjectId
RiskResponseActionImpact field mappings
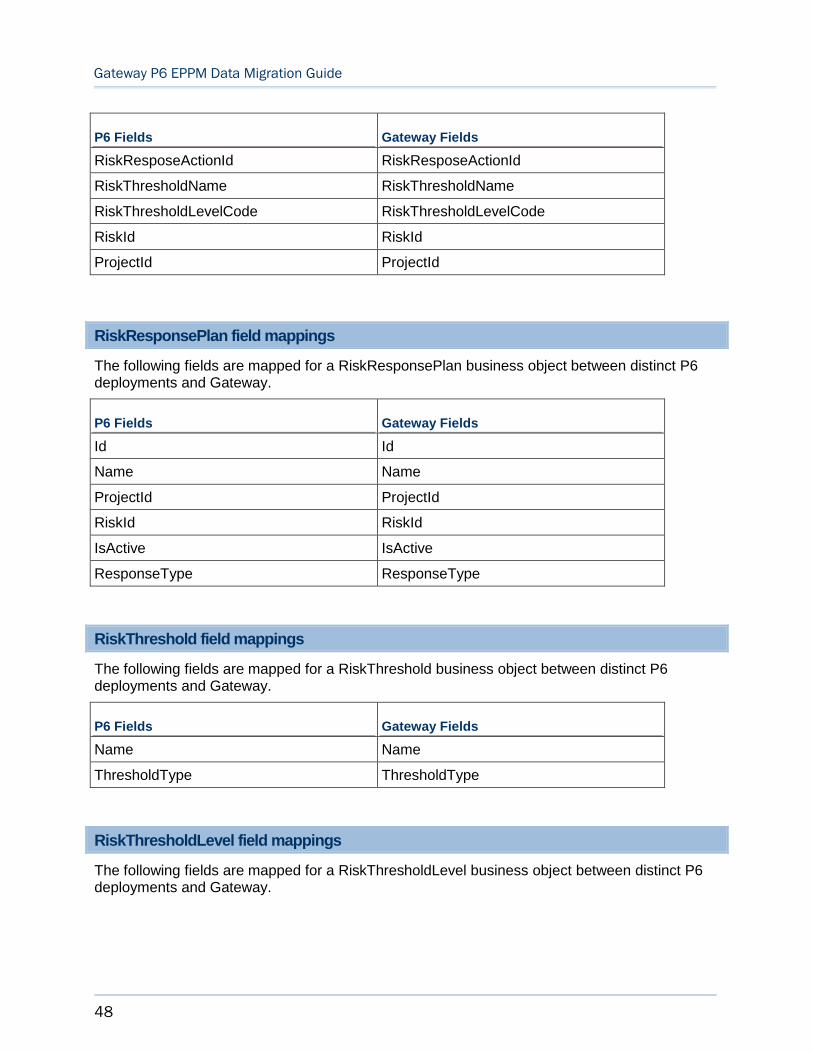
The following fields are mapped for a RiskResponseActionImpact business object between distinct P6 deployments and Gateway.
Gateway P6 EPPM Data Migration Guide
48
P6 Fields Gateway Fields
RiskResposeActionId RiskResposeActionId
RiskThresholdName RiskThresholdName
RiskThresholdLevelCode RiskThresholdLevelCode
RiskId RiskId
ProjectId ProjectId
RiskResponsePlan field mappings
The following fields are mapped for a RiskResponsePlan business object between distinct P6 deployments and Gateway.
P6 Fields Gateway Fields
Id Id
Name Name
ProjectId ProjectId
RiskId RiskId
IsActive IsActive
ResponseType ResponseType
RiskThreshold field mappings
The following fields are mapped for a RiskThreshold business object between distinct P6 deployments and Gateway.
P6 Fields Gateway Fields
Name Name
ThresholdType ThresholdType
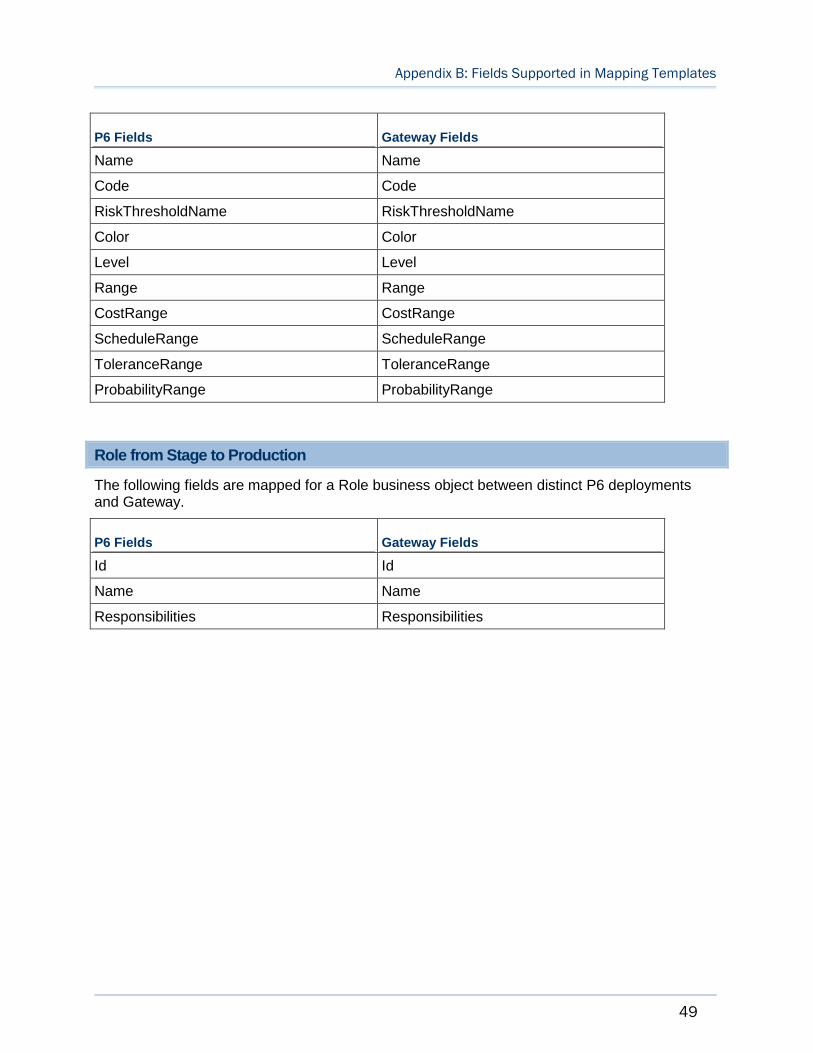
RiskThresholdLevel field mappings
The following fields are mapped for a RiskThresholdLevel business object between distinct P6 deployments and Gateway.
Appendix B: Fields Supported in Mapping Templates
49
P6 Fields Gateway Fields
Name Name
Code Code
RiskThresholdName RiskThresholdName
Color Color
Level Level
Range Range
CostRange CostRange
ScheduleRange ScheduleRange
ToleranceRange ToleranceRange
ProbabilityRange ProbabilityRange
Role from Stage to Production
The following fields are mapped for a Role business object between distinct P6 deployments and Gateway.
P6 Fields Gateway Fields
Id Id
Name Name
Responsibilities Responsibilities
50
Oracle Primavera Gateway P6 EPPM Data Migration Guide
Copyright © 2013, 2017, Oracle and/or its affiliates. All rights reserved. Oracle and Java are registered trademarks of Oracle and/or its affiliates. Other names may be trademarks of their respective owners.
Intel and Intel Xeon are trademarks or registered trademarks of Intel Corporation. All SPARC trademarks are used under license and are trademarks or registered trademarks of SPARC International, Inc. AMD, Opteron, the AMD logo, and the AMD Opteron logo are trademarks or registered trademarks of Advanced Micro Devices. UNIX is a registered trademark of The Open Group.
This software and related documentation are provided under a license agreement containing restrictions on use and disclosure and are protected by intellectual property laws. Except as expressly permitted in your license agreement or allowed by law, you may not use, copy, reproduce, translate, broadcast, modify, license, transmit, distribute, exhibit, perform, publish or display any part, in any form, or by any means. Reverse engineering, disassembly, or decompilation of this software, unless required by law for interoperability, is prohibited.
The information contained herein is subject to change without notice and is not warranted to be error-free. If you find any errors, please report them to us in writing.
If this is software or related documentation that is delivered to the U.S. Government or anyone licensing it on behalf of the U.S. Government, the following notice is applicable:
U.S. GOVERNMENT END USERS: Oracle programs, including any operating system, integrated software, any programs installed on the hardware, and/or documentation, delivered to U.S. Government end users are “commercial computer software" pursuant to the applicable Federal Acquisition Regulation and agency-specific supplemental regulations. As such, use, duplication, disclosure, modification, and adaptation of the programs, including any operating system, integrated software, any programs installed on the hardware, and/or documentation, shall be subject to license terms and license restrictions applicable to the programs. No other rights are granted to the U.S. Government.
This software or hardware is developed for general use in a variety of information management applications. It is not developed or intended for use in any inherently dangerous applications, including applications that may create a risk of personal injury. If you use this software or hardware in dangerous applications, then you shall be responsible to take all appropriate failsafe, backup, redundancy, and other measures to ensure its safe use. Oracle Corporation and its affiliates disclaim any liability for any damages caused by use of this software or hardware in dangerous applications.
This software or hardware and documentation may provide access to or information on content, products and services from third-parties. Oracle Corporation and its affiliates are not responsible for and expressly disclaim all warranties of any kind with respect to third-party content, products, and services. Oracle Corporation and its affiliates will not be responsible for any loss, costs, or damages incurred due to your access to or use of third-party content, products, or services.
Legal Notices