fw1281 workshopsolutions download 2 - fine woodworking · pdf file44 fine woodworking photos:...
TRANSCRIPT
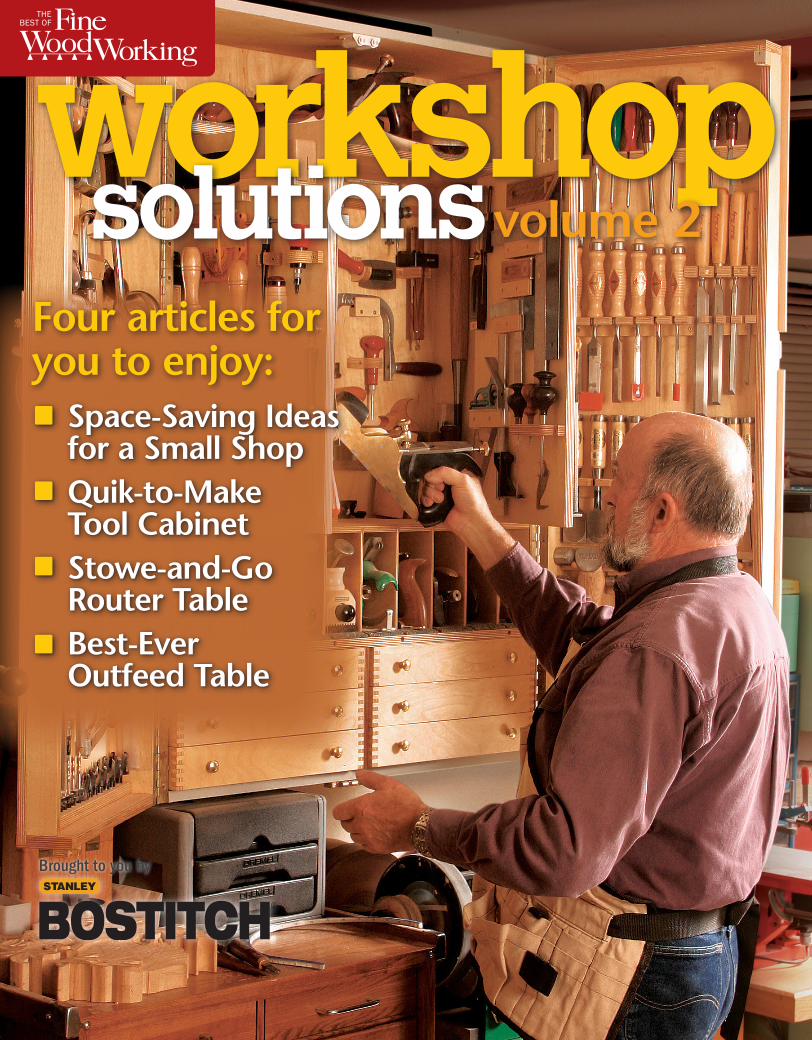
Space-Saving Ideas for a Small ShopQuik-to-Make Tool CabinetStowe-and-Go Router TableBest-Ever Outfeed Table
wTHE
BEST OF
Brought to you by
Four articles for you to enjoy:
workshopsolutionsvolume 2
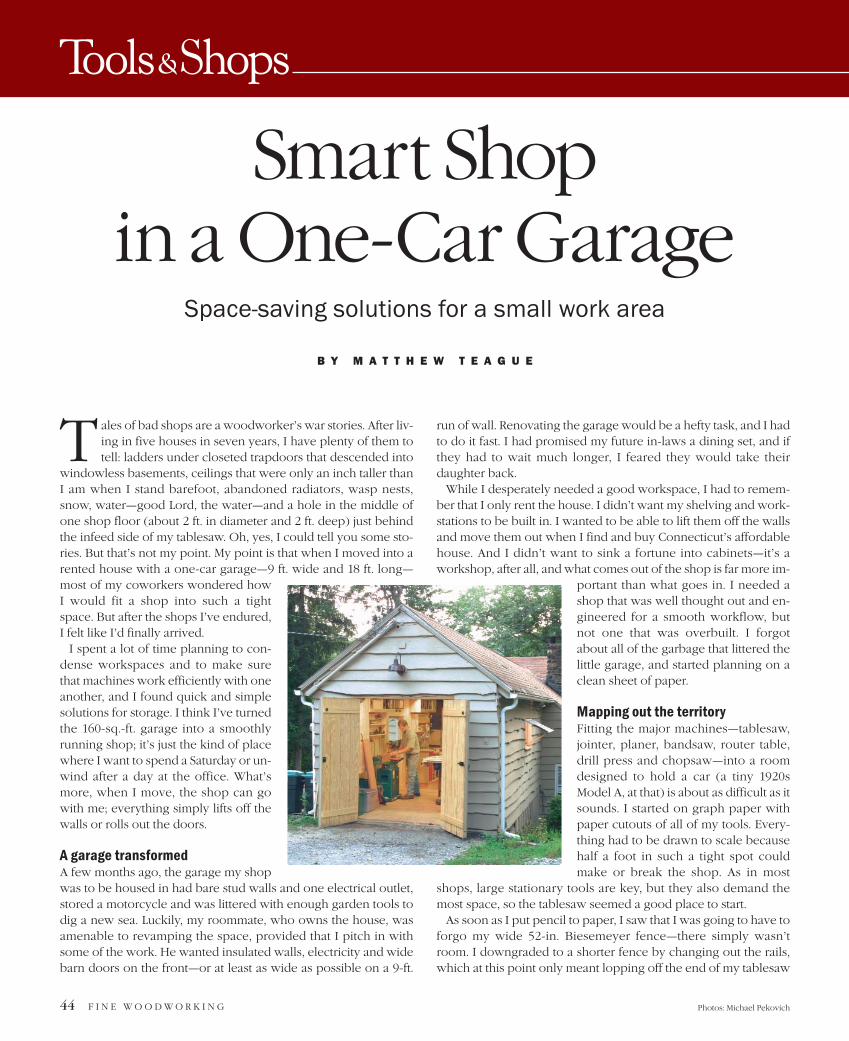
44 F I N E W O O D W O R K I N G Photos: Michael Pekovich
ales of bad shops are a woodworker’s war stories. After liv-ing in five houses in seven years, I have plenty of them totell: ladders under closeted trapdoors that descended into
windowless basements, ceilings that were only an inch taller thanI am when I stand barefoot, abandoned radiators, wasp nests,snow, water—good Lord, the water—and a hole in the middle ofone shop floor (about 2 ft. in diameter and 2 ft. deep) just behindthe infeed side of my tablesaw. Oh, yes, I could tell you some sto-ries. But that’s not my point. My point is that when I moved into arented house with a one-car garage—9 ft. wide and 18 ft. long—most of my coworkers wondered howI would fit a shop into such a tightspace. But after the shops I’ve endured,I felt like I’d finally arrived.
I spent a lot of time planning to con-dense workspaces and to make surethat machines work efficiently with oneanother, and I found quick and simplesolutions for storage. I think I’ve turnedthe 160-sq.-ft. garage into a smoothlyrunning shop; it’s just the kind of placewhere I want to spend a Saturday or un-wind after a day at the office. What’smore, when I move, the shop can gowith me; everything simply lifts off thewalls or rolls out the doors.
A garage transformedA few months ago, the garage my shopwas to be housed in had bare stud walls and one electrical outlet,stored a motorcycle and was littered with enough garden tools todig a new sea. Luckily, my roommate, who owns the house, wasamenable to revamping the space, provided that I pitch in withsome of the work. He wanted insulated walls, electricity and widebarn doors on the front—or at least as wide as possible on a 9-ft.
run of wall. Renovating the garage would be a hefty task, and I hadto do it fast. I had promised my future in-laws a dining set, and ifthey had to wait much longer, I feared they would take theirdaughter back.
While I desperately needed a good workspace, I had to remem-ber that I only rent the house. I didn’t want my shelving and work-stations to be built in. I wanted to be able to lift them off the wallsand move them out when I find and buy Connecticut’s affordablehouse. And I didn’t want to sink a fortune into cabinets—it’s aworkshop, after all, and what comes out of the shop is far more im-
portant than what goes in. I needed ashop that was well thought out and en-gineered for a smooth workflow, butnot one that was overbuilt. I forgotabout all of the garbage that littered thelittle garage, and started planning on aclean sheet of paper.
Mapping out the territoryFitting the major machines—tablesaw,jointer, planer, bandsaw, router table,drill press and chopsaw—into a roomdesigned to hold a car (a tiny 1920sModel A, at that) is about as difficult as itsounds. I started on graph paper withpaper cutouts of all of my tools. Every-thing had to be drawn to scale becausehalf a foot in such a tight spot couldmake or break the shop. As in most
shops, large stationary tools are key, but they also demand themost space, so the tablesaw seemed a good place to start.
As soon as I put pencil to paper, I saw that I was going to have toforgo my wide 52-in. Biesemeyer fence—there simply wasn’troom. I downgraded to a shorter fence by changing out the rails,which at this point only meant lopping off the end of my tablesaw
Smart Shop in a One-Car Garage
Space-saving solutions for a small work area
B Y M A T T H E W T E A G U E
T
TS
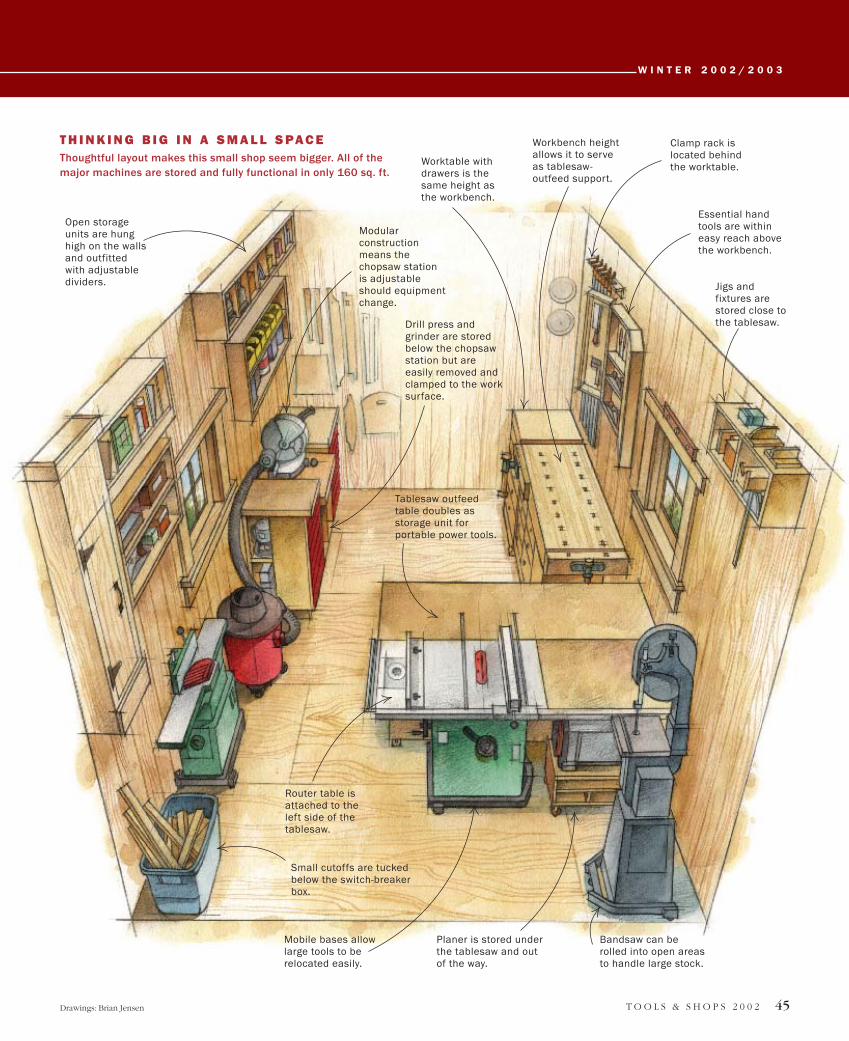
T O O L S & S H O P S 2 0 0 2 45
W I N T E R 2 0 0 2 / 2 0 0 3
Drawings: Brian Jensen
Open storageunits are hunghigh on the wallsand outfittedwith adjustabledividers.
Worktable withdrawers is thesame height asthe workbench.
Clamp rack islocated behindthe worktable.
Essential hand tools are within easy reach abovethe workbench.
Jigs andfixtures arestored close tothe tablesaw.
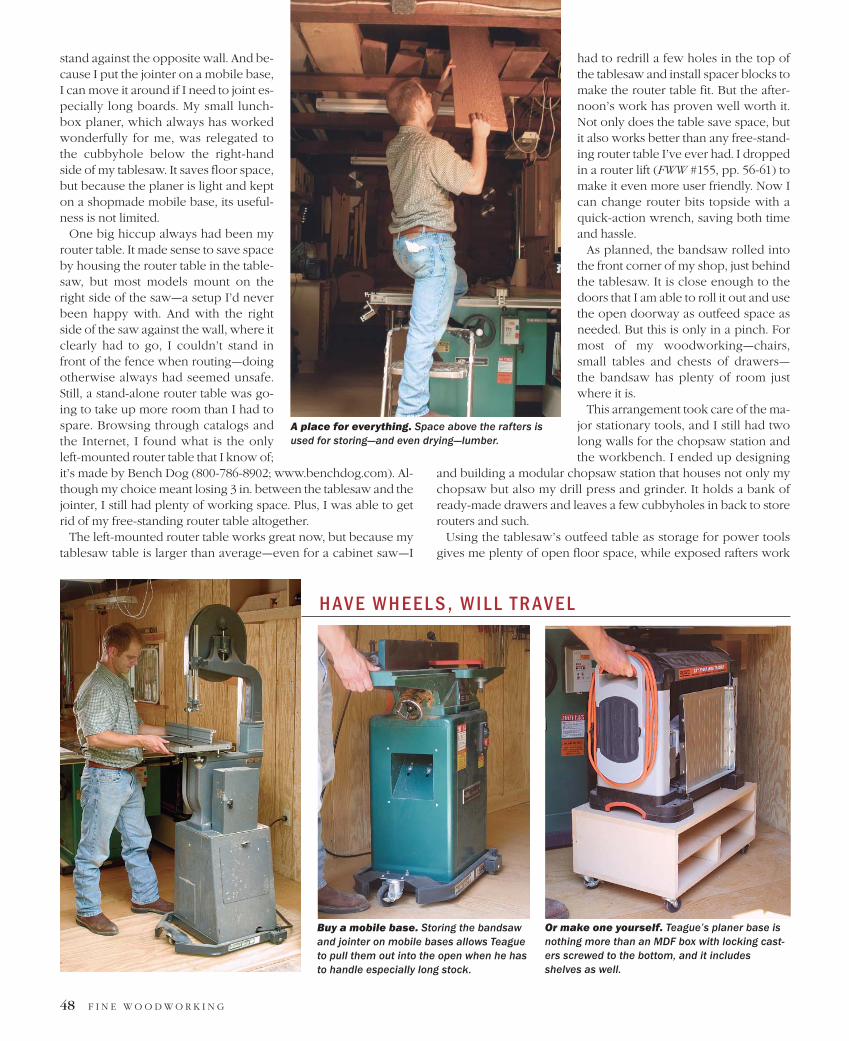
Modularconstructionmeans thechopsaw stationis adjustableshould equipmentchange.
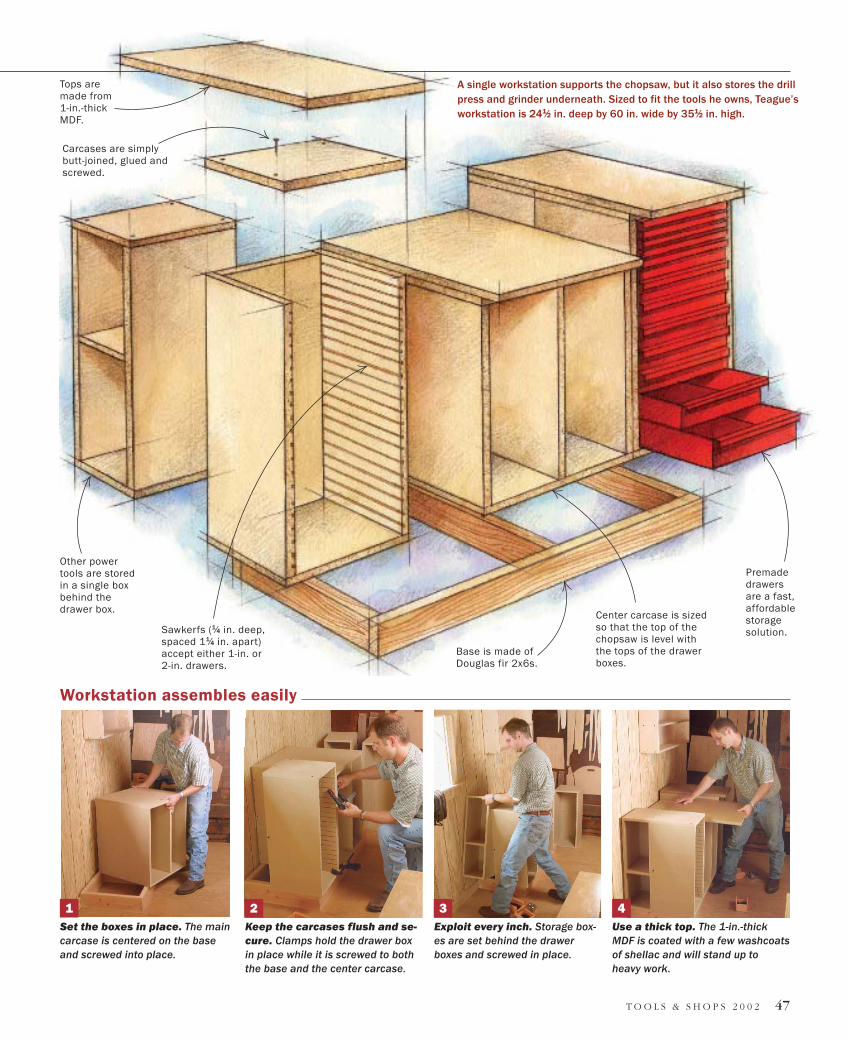
Drill press andgrinder are storedbelow the chopsawstation but areeasily removed andclamped to the worksurface.
Tablesaw outfeedtable doubles asstorage unit forportable power tools.
Router table isattached to theleft side of thetablesaw.
Small cutoffs are tuckedbelow the switch-breakerbox.
Mobile bases allowlarge tools to berelocated easily.
Planer is stored underthe tablesaw and outof the way.
Workbench heightallows it to serveas tablesaw-outfeed support.
T H I N K I N G B I G I N A S M A L L S PA C EThoughtful layout makes this small shop seem bigger. All of themajor machines are stored and fully functional in only 160 sq. ft.
Bandsaw can berolled into open areasto handle large stock.
46 F I N E W O O D W O R K I N G
cutout with scissors. I soon saw that large tools had to be mobile;if I left open floor space, any tool could be pulled out easily andput to use. There still were a few wrinkles—like where my routertable would go and how I could consolidate my grinder, chopsawand drill press into one smooth-running workstation—but after alittle thinking and shopping around, I solved those problems, too.
I also kept an eye on the horizontal arrangement of tools andworkstations, making sure that the outfeed from certain tools—likemy tablesaw and jointer—wouldn’t be hindered by workbenchesor tabletops. After a few more hours of moving around the cutoutsand positioning the major machines, I started thinking about stor-age space and drawing quick sketches of the outfeed situation. Inthe end, I came up with an arrangement that housed the majortools in just about 80 sq. ft—about half the square footage of theentire space. It was time to run electricity and build the walls.
After cleaning the garage of all its old tools and odds and ends,my roommate and I hired an electrician pal to wire the space. Wepositioned all of the outlets 44 in. up from the floor—just above
bench height—and ran them every 4 ft. We also dropped in four 220-volt outlets conveniently located to reach the beefier machines.
We insulated the walls and hung T-111 siding, which is strongerthan drywall and does a better job of holding tool cabinets. Thelight color of the siding opened up the space, and the rough woodsurfaces gave the shop a warm, inviting feel. We then built and hungthe barn doors, which took only a weekend to accomplish.
The existing wood floor in the garage would have been nice on the feet, but it was too old and uneven to allow my heavy mobile tools to move easily. We laid down plywood flooring overthe existing wood floor and covered it with a few coats of water-based polyurethane.
I have to admit I was shocked that everything worked just as ithad on paper. Now I was ready to roll in the machines.
Large tools rest on mobile basesMy tablesaw sits approximately 4 ft. inside the barn doors, leav-ing enough space on the left side of the saw for my jointer to
A well-thought-out corner of the shop. The chopsaw station not onlyprovides good outfeed support for the saw, but it also stores the grinderand the drill press and houses two banks of drawers.
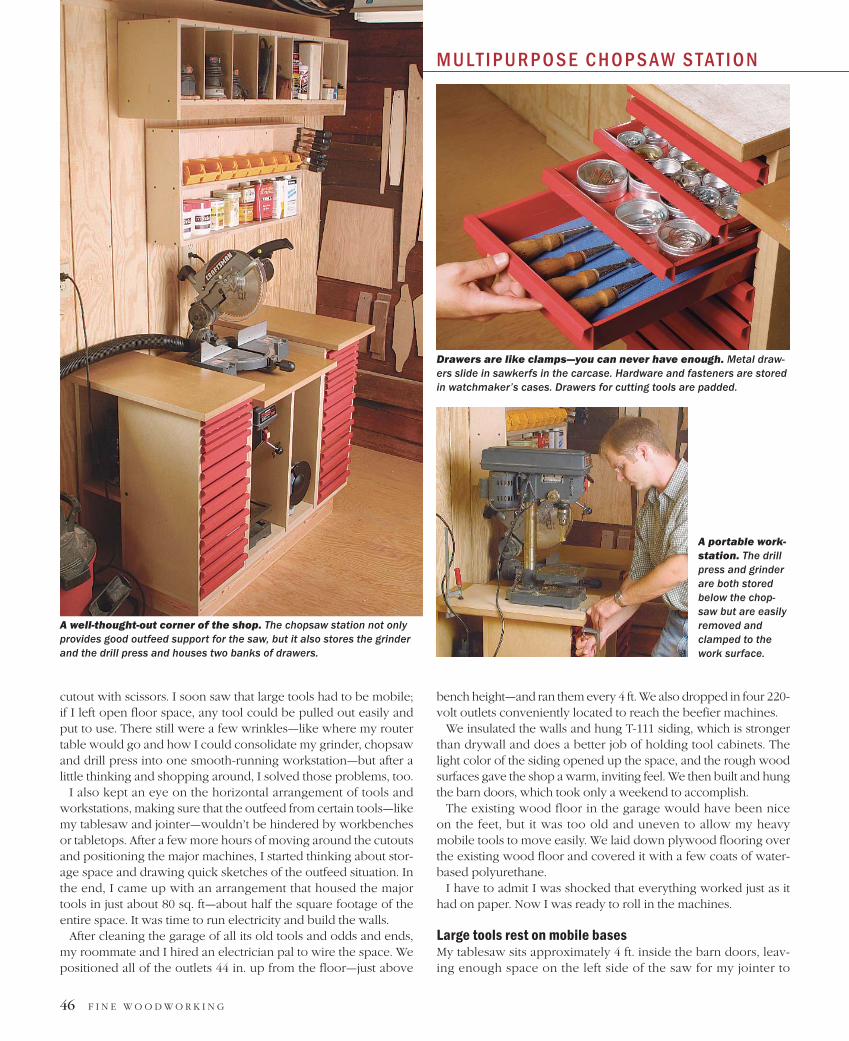
Drawers are like clamps—you can never have enough. Metal draw-ers slide in sawkerfs in the carcase. Hardware and fasteners are storedin watchmaker’s cases. Drawers for cutting tools are padded.
A portable work-station. The drillpress and grinderare both storedbelow the chop-saw but are easilyremoved andclamped to thework surface.
M U LT I P U R P O S E C H O P S A W S TAT I O N
T O O L S & S H O P S 2 0 0 2 47
Set the boxes in place. The maincarcase is centered on the baseand screwed into place.
Keep the carcases flush and se-cure. Clamps hold the drawer boxin place while it is screwed to boththe base and the center carcase.
Exploit every inch. Storage box-es are set behind the drawer boxes and screwed in place.
Use a thick top. The 1-in.-thickMDF is coated with a few washcoatsof shellac and will stand up to heavy work.
1 2 3 4
A single workstation supports the chopsaw, but it also stores the drill press and grinder underneath. Sized to fit the tools he owns, Teague’sworkstation is 241⁄2 in. deep by 60 in. wide by 351⁄2 in. high.
Tops are made from 1-in.-thick MDF.
Carcases are simplybutt-joined, glued andscrewed.
Sawkerfs (1⁄4 in. deep,spaced 11⁄4 in. apart)accept either 1-in. or 2-in. drawers.
Premadedrawersare a fast,affordablestoragesolution.
Base is made ofDouglas fir 2x6s.
Other powertools are storedin a single boxbehind thedrawer box. Center carcase is sized
so that the top of thechopsaw is level withthe tops of the drawerboxes.
Workstation assembles easily
48 F I N E W O O D W O R K I N G
stand against the opposite wall. And be-cause I put the jointer on a mobile base,I can move it around if I need to joint es-pecially long boards. My small lunch-box planer, which always has workedwonderfully for me, was relegated tothe cubbyhole below the right-handside of my tablesaw. It saves floor space,but because the planer is light and kepton a shopmade mobile base, its useful-ness is not limited.
One big hiccup always had been myrouter table. It made sense to save spaceby housing the router table in the table-saw, but most models mount on theright side of the saw—a setup I’d neverbeen happy with. And with the rightside of the saw against the wall, where itclearly had to go, I couldn’t stand infront of the fence when routing—doingotherwise always had seemed unsafe.Still, a stand-alone router table was go-ing to take up more room than I had tospare. Browsing through catalogs andthe Internet, I found what is the onlyleft-mounted router table that I know of;it’s made by Bench Dog (800-786-8902; www.benchdog.com). Al-though my choice meant losing 3 in. between the tablesaw and thejointer, I still had plenty of working space. Plus, I was able to getrid of my free-standing router table altogether.
The left-mounted router table works great now, but because mytablesaw table is larger than average—even for a cabinet saw—I
had to redrill a few holes in the top ofthe tablesaw and install spacer blocks tomake the router table fit. But the after-noon’s work has proven well worth it.Not only does the table save space, butit also works better than any free-stand-ing router table I’ve ever had. I droppedin a router lift (FWW #155, pp. 56-61) tomake it even more user friendly. Now Ican change router bits topside with aquick-action wrench, saving both timeand hassle.
As planned, the bandsaw rolled intothe front corner of my shop, just behindthe tablesaw. It is close enough to thedoors that I am able to roll it out and usethe open doorway as outfeed space asneeded. But this is only in a pinch. Formost of my woodworking—chairs,small tables and chests of drawers—the bandsaw has plenty of room justwhere it is.
This arrangement took care of the ma-jor stationary tools, and I still had twolong walls for the chopsaw station andthe workbench. I ended up designing
and building a modular chopsaw station that houses not only mychopsaw but also my drill press and grinder. It holds a bank ofready-made drawers and leaves a few cubbyholes in back to storerouters and such.
Using the tablesaw’s outfeed table as storage for power toolsgives me plenty of open floor space, while exposed rafters work
Buy a mobile base. Storing the bandsawand jointer on mobile bases allows Teagueto pull them out into the open when he hasto handle especially long stock.
Or make one yourself. Teague’s planer base isnothing more than an MDF box with locking cast-ers screwed to the bottom, and it includesshelves as well.
H AV E W H E E L S , W I L L T R AV E L
A place for everything. Space above the rafters isused for storing—and even drying—lumber.
well as lumber racks. Once the major machines were in place, therest of the shop almost designed itself.
Condensed work areasOne key to working in a small shop is to condense your work-spaces for both economy and ease. I wound up building units outof medium-density fiberboard (MDF) to handle tablesaw outfeed,as well as my chopsaw, grinder and drill press.
While I would have loved a nice, long tablesaw-outfeed tablethat could handle large sheet goods, there was hardly room. Whenworking with plywood or MDF, I cut the sheets to rough size witha circular saw in my driveway, then trim them at the tablesaw.Ninety-nine percent of the time, the 2-ft.-wide outfeed table pro-vides all of the support I need for the tablesaw. And if I’m cuttinglarge sheet goods, the workbench is positioned to serve as outfeedsupport. But I had to get more out of the outfeed table than justoutfeed support—I needed a place to store handheld power toolsand to serve as another work surface for assembly and other tasks.
The outfeed table is a heavy setup, but I needed the heft to makeit sturdy. I assembled the table with knockdown fasteners so thatthe whole workstation could be disassembled for easy transportwhen I move. I installed a 1-in.-thick MDF top and covered it witha few coats of shellac—not only does the shellac provide a mois-ture barrier, but it also makes the MDF less prone to scratches.Four 4-in. lag bolts serve as levelers, making it easy to bring theoutfeed table flush to the tablesaw.
It would have been nice to have a sliding compound-miter saw,a floor-standing drill press and a permanent grinding station thatwas always ready to go, but working in a small shop meant I hadto accept some sacrifices. And because I was working on a bud-get, I couldn’t upgrade all of my tools—not to mention that mytools had always worked well for me.
After a bit of head scratching, I devised a way to combine mychopsaw, drill press and grinder into one workstation that takes uponly a small footprint and works smoothly. I didn’t work out all ofthe dimensions ahead of time; I just built it box by box, sized to fiteach tool. Almost accidentally, it worked out better than I’d hoped.Because it’s built as a modular unit, the workstation is extremelyflexible. Should I replace any of my current tools, I simply canchange out one of the units and replace it with a new and correct-ly proportioned carcase.
Well-organized storageThe bank of drawers on my chopsaw station provides more than30 sq. ft. of storage space. I ordered premade metal drawers(around $4 apiece) from Lee Valley (800-267-8735; www.leevalley.com). Installation was simple. All I had to do was build a box andrun sawkerfs every 11⁄4 in.; the 1-in. and 2-in.-deep drawers slide in-to place and can be rearranged however I like. The drawer-boxcarcase became the basis around which I built my chopsaw stand.
One of the best parts of working for this magazine is that I get tovisit the best workshops in the world, and the good ideas I see are
O N E TA B L E , M A N Y U S E SThe outfeed table not only provides supportfor the tablesaw, but it also stores powertools and other materials. The shop vacuumcan be used for dust collection at thetablesaw. The 1-in.-thick MDF top alsoserves as a sturdy work surface forassembly. Lag bolts in the base make iteasy to level the table.
Condense workspaces. A router table thatmounts on the left side of the tablesaw savesvaluable floor space and still leaves plenty ofroom for moving around.
T O O L S & S H O P S 2 0 0 2 49

50 F I N E W O O D W O R K I N G
abundant. While visiting Tony O’Malley, a woodworker in Em-maus, Pa., I was struck by the efficiency and cleverness of his stor-age space. He had built storage units all around the top of his shopwall similar to the MDF units I had installed above my bandsaw,jointer and chopsaw station.
I built them using an ultralight MDF ratherthan the weightier MDF of my outfeedtable—the weight helps in that situation, but it isn’t necessary on the wall. The light stuff is also much more pleasant to use. As O’Malley did on his shelves, I ran dadoes inthe top and bottom to make the storage units adjustable and adapt-able: By rearranging the 1⁄4-in.-thick dividers, I can design separatecubbyholes for each tool.
Above both the chopsaw station and jointer, I screwed simpleplywood shelves to the wall. The shelves hold screws, router anddrill bits and help keep everything organized. Staying organized is
key to working in any shop—I hatefloundering around a sloppy spacetrying to locate a bit or a tool. And forspace reasons, organization is evenmore important in a small shop. Iused watchmaker’s cases from LeeValley to hold screws and other hard-ware (see the top right photo on p. 46). With just a glance, I can findwhat I’m looking for.
Where MDF falls shortI was bent on using quick methodsand economical materials, but when itcame to my workbench, it was hard toaccept compromise. I recently inher-ited an old workbench top from afriend, who had inherited it from an-other friend, who’d been given thebench by a boatbuilding pal manyyears ago. It is exactly the kind ofworkbench that makes you want tobe a woodworker—an end vise, afront vise, a tail vise and a heavy
maple top scarred with history. I built a maple base for it and in-stalled the same drawer boxes I’d used on an earlier bench. I don’tthink I could sleep at night if I stored my favorite chisels andplanes in an MDF box above the bench. Instead, I made a simplecherry wall unit with two box doors. I picked my favorite and most
necessary hand tools and outfitted the boxwith custom tool holders. It was quickwork, but the unit serves all of my needs.
Though the garage required a fair amountof renovation, the shop came togetherquickly and works better than I ever would
have imagined. A good workshop should be simple and sensiblebut designed with an eye toward efficiency. A sensible shop makesyou work better and smarter. The best part is that when I move,the shop can be disassembled to move with me. �
Matthew Teague is managing editor.
Watch it on the webFor a shop tour and more storage ideas,
go to www.finewoodworking.com.
Making it work. A well-planned space—even if it’ssmall—allows plenty ofroom for building furniture.Here, Teague works on aset of cherry dining chairs.
COPYRIGHT 2006 by The Taunton Press, Inc. Copying and distribution of this article is not permitted.
Credit Here
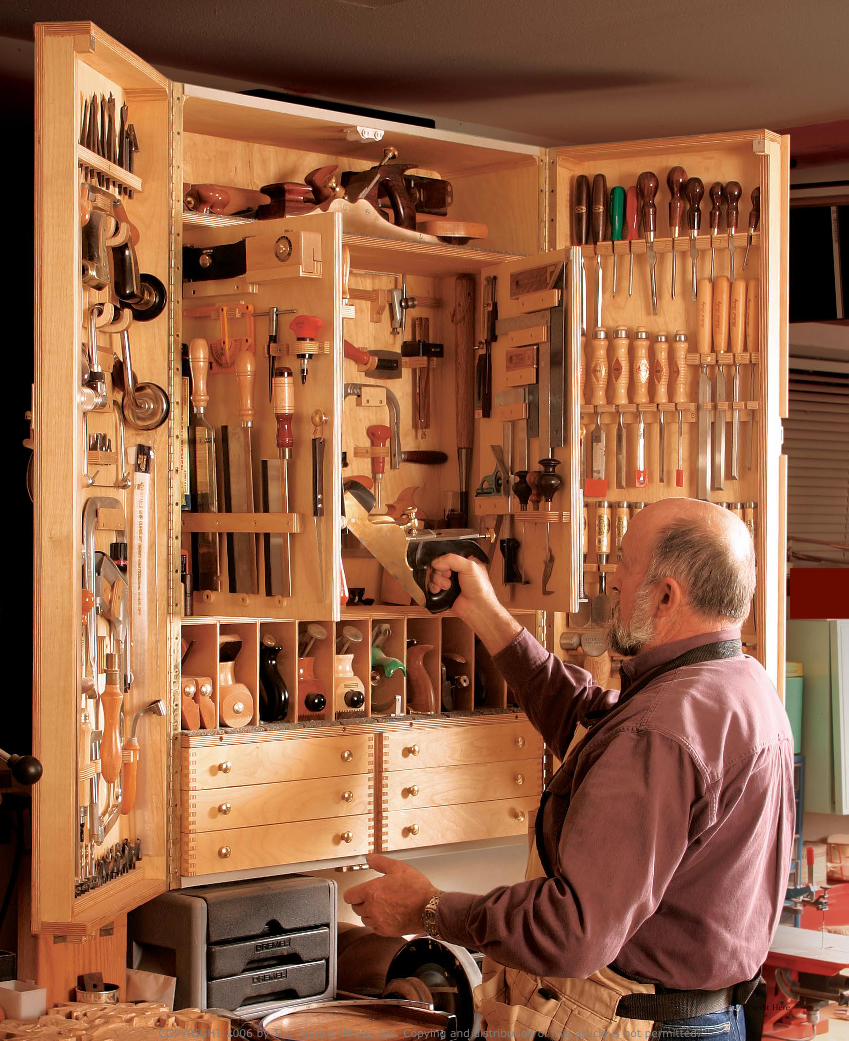
After a career of 35 years I had col-lected a substantial number of woodworking tools and I finally
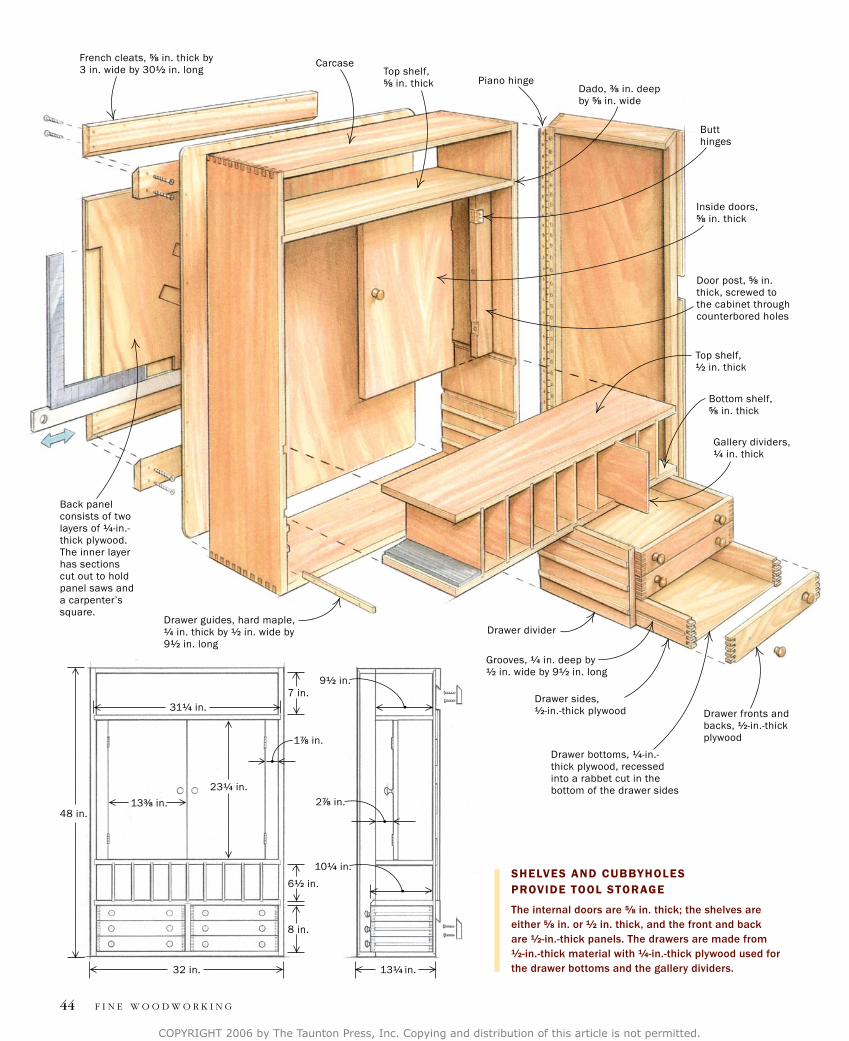
decided that they deserved a proper home. I set out to create a cabinet capable of holding my tools in a relatively small but accessible area. The result is home to well over 300 tools, yet covers only about 12 sq. ft. of wall.
I deliberately dedicated this cabinet to hand tools to keep them apart from dusty power tools, but the design can be modi-fied easily to accommodate small power
tools as well. Think twice before making the cabinet smaller; even if your tool col-lection would look lost in a cabinet of this size, it’s nice to have space to grow into.
No wasted spaceThe inside surfaces of the main doors hold thin tools such as chisels and screwdrivers. Inside the cabinet, working down from the top, the upper shelf seats larger hand-planes; the middle section has a pair of internal doors that support tools on both sides (increasing the hanging area by 40%)
and that open to reveal additional space for saws and marking tools. The lower area is divided into cubbyholes for smoothing planes and other specialty planes, while six small drawers in the bottom hold smaller tools such as block planes, drill bits, and router bits.
The cabinet hangs on upper and lower pairs of French cleats. Behind the cabi-net, in the space between the cleats, is a place to hold a carpenter’s square on one side, and three panel saws, held securely by means of the friction of their teeth, on
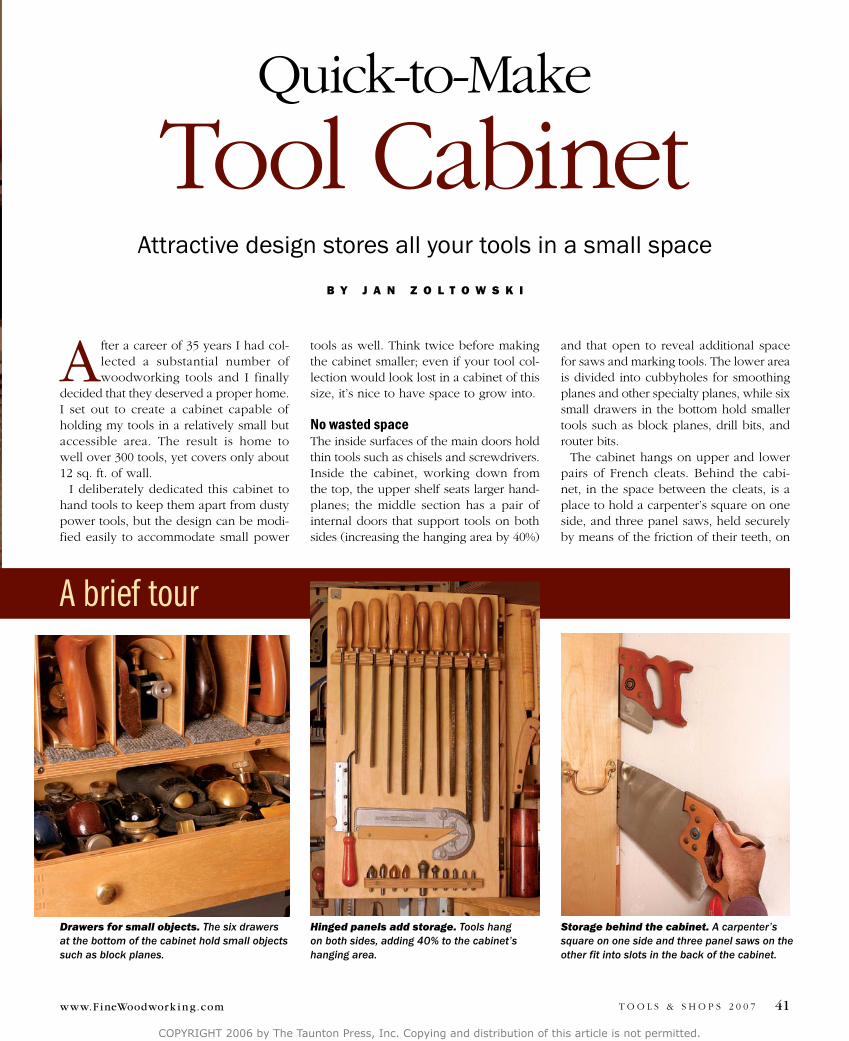
Quick-to-Make
Tool CabinetAttractive design stores all your tools in a small space
B y J a n Z o l t o w s k i
Storage behind the cabinet. A carpenter’s square on one side and three panel saws on the other fit into slots in the back of the cabinet.
Drawers for small objects. The six drawers at the bottom of the cabinet hold small objects such as block planes.
Hinged panels add storage. Tools hang on both sides, adding 40% to the cabinet’s hanging area.
A brief tour
COPYRIGHT 2006 by The Taunton Press, Inc. Copying and distribution of this article is not permitted.
T O O L S & S H O P S 2 0 0 7www.F ineWoodwork i n g.com 41
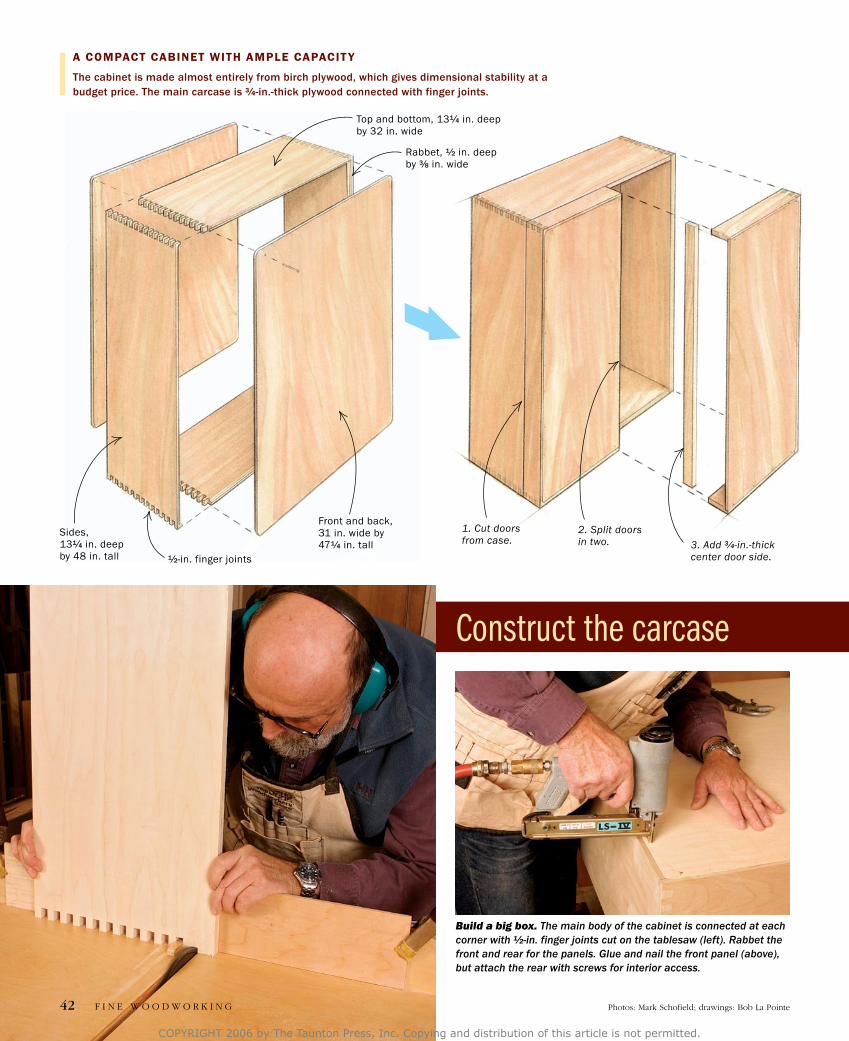
Construct the carcase
Build a big box. The main body of the cabinet is connected at each corner with 1⁄2-in. finger joints cut on the tablesaw (left). Rabbet the front and rear for the panels. Glue and nail the front panel (above), but attach the rear with screws for interior access.
Top and bottom, 131⁄4 in. deep by 32 in. wide
Sides, 131⁄4 in. deep by 48 in. tall
Front and back, 31 in. wide by 471⁄4 in. tall
Rabbet, 1⁄2 in. deep by 3⁄8 in. wide
1⁄2-in. finger joints
1. Cut doors from case.
2. Split doors in two. 3. Add 3⁄4-in.-thick
center door side.
A compAct cAbinet with Ample cApAcit y
The cabinet is made almost entirely from birch plywood, which gives dimensional stability at a budget price. The main carcase is 3⁄4-in.-thick plywood connected with finger joints.
COPYRIGHT 2006 by The Taunton Press, Inc. Copying and distribution of this article is not permitted.
F I N E w O O d w O r k I N g42 Photos: Mark Schofield; drawings: Bob La Pointe
the other. The cabinet holds all these tools within easy reach, and every blade and tooth stays sharp and protected.
Construction starts with a single boxI built my cabinet out of Baltic-birch ply-wood. Not only is it more economical than solid lumber, but it eliminates problems such as stuck drawers from dimensional changes caused by the high humidity in the Northwest. The body of the cabinet starts out as one large box with the sides made from 3⁄4-in.-thick plywood. Join the corners with 1⁄2-in. finger or box joints (for more on this method, see “A Lesson in Box Joints,” FWW #181, p. 84, or “Box Joints on the Tablesaw,” FWW #148, pp. 60-63).
rout a 1⁄2-in.-deep by 3⁄8-in.-wide rabbet around the inside front and back edges to accept panels of 1⁄2-in.-thick plywood. The front of the cabinet is attached with glue and nails, but the back is attached with screws only to allow access during later construction.
Next, cut off approximately the front third of the box to form what will become the main doors. On the tablesaw, using the rip fence as a guide, cut through both ends of the box. Attach a thin piece of scrap plywood to each end by nailing it on both sides of the cut. This is to keep the two parts of the box attached while cutting through the long sides on the tablesaw.
while at the saw, cut the newly removed front section of the cabinet in half to form the two main doors. when this is done, at-tach pieces of 3⁄4-in.-thick plywood to form the center side of each door. don’t worry about the exposed edges of the plywood sides; these will be covered by banding.
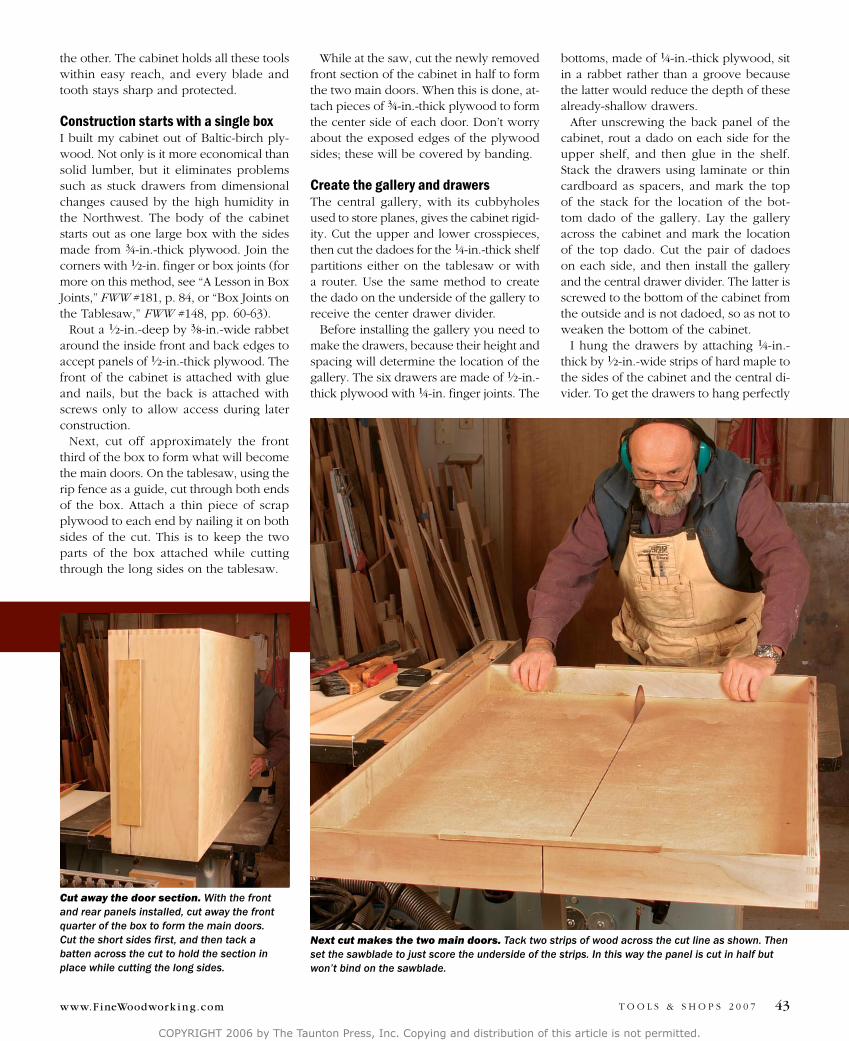
Create the gallery and drawersThe central gallery, with its cubbyholes used to store planes, gives the cabinet rigid-ity. Cut the upper and lower crosspieces, then cut the dadoes for the 1⁄4-in.-thick shelf partitions either on the tablesaw or with a router. Use the same method to create the dado on the underside of the gallery to receive the center drawer divider.
Before installing the gallery you need to make the drawers, because their height and spacing will determine the location of the gallery. The six drawers are made of 1⁄2-in.-thick plywood with 1⁄4-in. finger joints. The
bottoms, made of 1⁄4-in.-thick plywood, sit in a rabbet rather than a groove because the latter would reduce the depth of these already-shallow drawers.
After unscrewing the back panel of the cabinet, rout a dado on each side for the upper shelf, and then glue in the shelf. Stack the drawers using laminate or thin cardboard as spacers, and mark the top of the stack for the location of the bot-tom dado of the gallery. Lay the gallery across the cabinet and mark the location of the top dado. Cut the pair of dadoes on each side, and then install the gallery and the central drawer divider. The latter is screwed to the bottom of the cabinet from the outside and is not dadoed, so as not to weaken the bottom of the cabinet.
I hung the drawers by attaching 1⁄4-in.-thick by 1⁄2-in.-wide strips of hard maple to the sides of the cabinet and the central di-vider. To get the drawers to hang perfectly
Cut away the door section. With the front and rear panels installed, cut away the front quarter of the box to form the main doors. Cut the short sides first, and then tack a batten across the cut to hold the section in place while cutting the long sides.
Next cut makes the two main doors. Tack two strips of wood across the cut line as shown. Then set the sawblade to just score the underside of the strips. In this way the panel is cut in half but won’t bind on the sawblade.
COPYRIGHT 2006 by The Taunton Press, Inc. Copying and distribution of this article is not permitted.
T O O L S & S H O P S 2 0 0 7 43www.F ineWoodwork i n g.com
ShelVeS AnD cUbbyholeS pRoViDe tool StoRAGe
The internal doors are 5⁄8 in. thick; the shelves are either 5⁄8 in. or 1⁄2 in. thick, and the front and back are 1⁄2-in.-thick panels. The drawers are made from 1⁄2-in.-thick material with 1⁄4-in.-thick plywood used for the drawer bottoms and the gallery dividers.
Back panel consists of two layers of 1⁄4-in.-thick plywood. The inner layer has sections cut out to hold panel saws and a carpenter’s square.
French cleats, 5⁄8 in. thick by 3 in. wide by 301⁄2 in. long
27⁄8 in.
32 in. 131⁄4 in.
48 in.
Butt hinges
Door post, 5⁄8 in. thick, screwed to the cabinet through counterbored holes
Inside doors, 5⁄8 in. thick
Dado, 3⁄8 in. deep by 5⁄8 in. wide
Top shelf, 5⁄8 in. thick
Top shelf, 1⁄2 in. thick
Bottom shelf, 5⁄8 in. thick
Gallery dividers, 1⁄4 in. thick
61⁄2 in.
Drawer guides, hard maple, 1⁄4 in. thick by 1⁄2 in. wide by 91⁄2 in. long
Drawer fronts and backs, 1⁄2-in.-thick plywood
Drawer sides, 1⁄2-in.-thick plywood
91⁄2 in.
8 in.
101⁄4 in.
Drawer divider
Drawer bottoms, 1⁄4-in.-thick plywood, recessed into a rabbet cut in the bottom of the drawer sides
Grooves, 1⁄4 in. deep by 1⁄2 in. wide by 91⁄2 in. long
7 in.
17⁄8 in.
231⁄4 in.
133⁄8 in.
311⁄4 in.
Carcase
Piano hinge
COPYRIGHT 2006 by The Taunton Press, Inc. Copying and distribution of this article is not permitted.
F I N E w O O d w O r k I N g44

parallel, I used the same spacers when cut-ting rabbets in the drawer sides and when attaching the strips to the cabinet.
On a router table, create a guide channel the same width as the drawer sides com-prising two outer guide strips, two center strips of wood the width of the straight-cut router bit, and two equal spacers to go above and below the bit that center the drawer side over the router bit. Clamp the outer strips to the table, remove the spacers and the center strips, raise the bit to 1⁄4 in., and cut a groove until just before the fin-ger joints at the front of the drawer.
when all the grooves have been cut, use the spacer strips from the router table and the laminate spacers used earlier when stacking the drawers to establish the loca-tion for each maple drawer runner. Screw the runners to the sides, and the central divider and the drawers are hung.
The two inner doors and their posts are made from 5⁄8-in.-thick plywood. Cut matching recesses on each door and post for a pair of hinges, and then screw each post to the sides of the cabinet between the top of the torsion box and the upper shelf. Hang the doors on these posts.
The separate unit at the back of the cab-inet is built of two layers of 1⁄4-in.-thick plywood and should be designed to ac-commodate carpenter’s squares and panel saws. Screw this unit to the back of the cabinet between the French cleats.
The outer doors are hung using piano hinges and magnetic catches; ball catches give a positive latch to the doors. After hanging the front doors, conceal the ex-posed rabbet joint around the front panel with a 3⁄16-in.-thick by 3⁄4-in.-wide strip of solid maple, rounded slightly (as all ex-posed corners should be).
with the main cabinet construction com-plete, make and attach custom hangers for each tool using scraps of plywood.
I finished my cabinet with two coats of oil-based sealer that were sanded with P320-grit sandpaper. Then I wiped on a couple of coats of tung oil.
The cubbyholes and the bottoms of the drawers were covered with industrial rubber- backed floor covering, available from home centers. It comes in many colors and gives excellent protection to edge tools. The final step was to attach pulls to the drawers and doors, and stout handles to the outside of the cabinet. These are a great help when you and a friend lift the cabinet onto the wall-mounted part of the cleats. Install all of the tools and then start putting them to use.
Jan Zoltowski is a professional antique and art restorer who lives near Seattle, Wash.
Assemble the interior
Install the upper shelf and gallery. Cut a dado on both sides of the cabinet and install the upper shelf. This gives the carcase extra rigidity. After routing the dadoes for the upper and lower shelves, test-fit the gallery and then glue it in.
Attach the inner doors. Stretching from the top of the gallery to the bottom of the upper shelf, each inner door is hung from a post screwed to the cabinet.
Storage behind the cabinet. An inner layer of 1⁄4-in.-thick plywood is cut to receive panel saws and a carpenter’s square, then covered by a solid outer piece of plywood.
COPYRIGHT 2006 by The Taunton Press, Inc. Copying and distribution of this article is not permitted.
T O O L S & S H O P S 2 0 0 7 45www.F ineWoodwork i n g.com
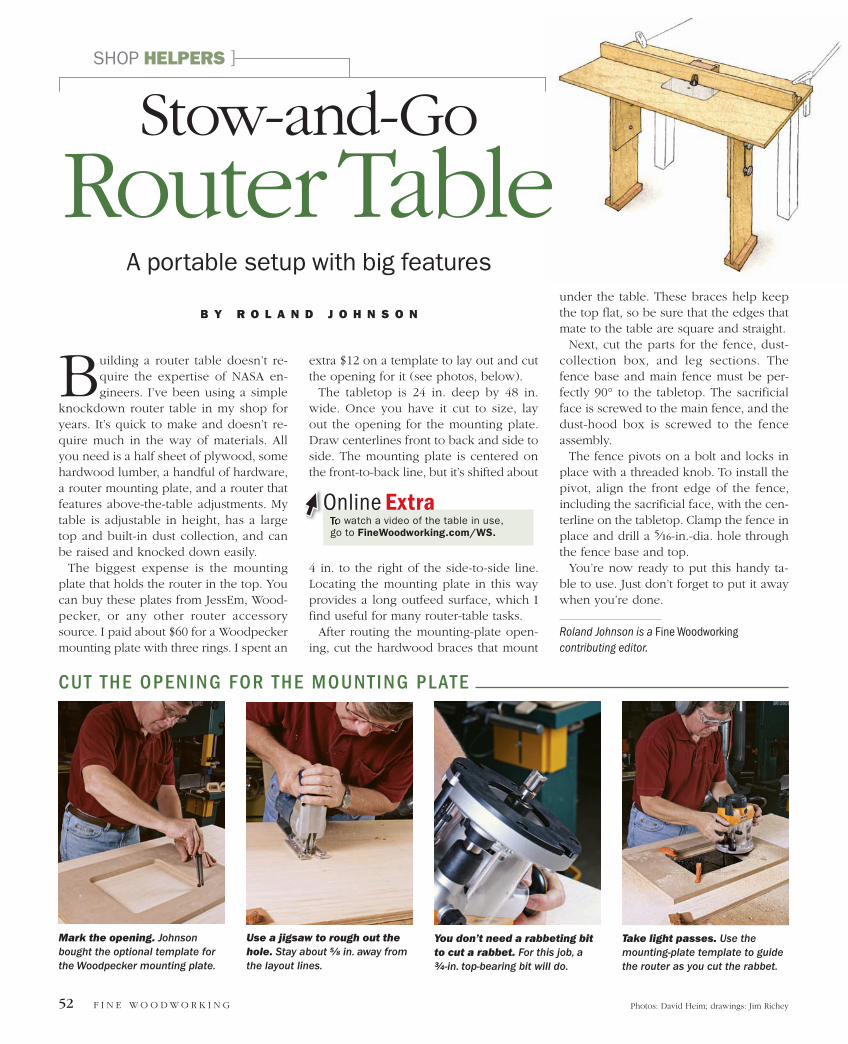
Building a router table doesn’t re-quire the expertise of NASA en-gineers. I’ve been using a simple
knockdown router table in my shop for years. It’s quick to make and doesn’t re-quire much in the way of materials. All you need is a half sheet of plywood, some hardwood lumber, a handful of hardware, a router mounting plate, and a router that features above-the-table adjustments. My table is adjustable in height, has a large top and built-in dust collection, and can be raised and knocked down easily.
The biggest expense is the mounting plate that holds the router in the top. You can buy these plates from JessEm, Wood-pecker, or any other router accessory source. I paid about $60 for a Woodpecker mounting plate with three rings. I spent an
extra $12 on a template to lay out and cut the opening for it (see photos, below).
The tabletop is 24 in. deep by 48 in. wide. Once you have it cut to size, lay out the opening for the mounting plate. Draw center lines front to back and side to side. The mounting plate is centered on the front-to-back line, but it’s shifted about
4 in. to the right of the side-to-side line. Locating the mounting plate in this way provides a long outfeed surface, which I find useful for many router-table tasks.
After routing the mounting-plate open-ing, cut the hardwood braces that mount
Stow-and-Go
Mark the opening. Johnson bought the optional template for the Woodpecker mounting plate.
under the table. These braces help keep the top flat, so be sure that the edges that mate to the table are square and straight.
Next, cut the parts for the fence, dust-collection box, and leg sections. The fence base and main fence must be per-fectly 90° to the tabletop. The sacrificial face is screwed to the main fence, and the dust-hood box is screwed to the fence assembly.
The fence pivots on a bolt and locks in place with a threaded knob. To install the pivot, align the front edge of the fence, including the sacrificial face, with the cen-terline on the tabletop. Clamp the fence in place and drill a 5⁄16-in.-dia. hole through the fence base and top.
You’re now ready to put this handy ta-ble to use. Just don’t forget to put it away when you’re done.
Roland Johnson is a Fine Woodworkingcontributing editor.
A portable setup with big features
B Y R O L A N D J O H N S O N
SHOP HELPERS ]
Router Table
Use a jigsaw to rough out the hole. Stay about 5⁄8 in. away from the layout lines.
Take light passes. Use the mounting-plate template to guide the router as you cut the rabbet.
You don’t need a rabbeting bit to cut a rabbet. For this job, a ¾ -in. top-bearing bit will do.
CUT THE OPENING FOR THE MOUNTING PLATE
To watch a video of the table in use, go to FineWoodworking.com/WS.To watch a video of the table in use, go to
Online Extra
F I N E W O O D W O R K I N G52 Photos: David Heim; drawings: Jim Richey
FWSIP09WS_SG.indd 52 2/21/08 1:55:22 PM

Sacrificial face, ¾ in. thick by 4 in. wide by 48 in. long, screwed to main fence
Main fence, ¾ in. thick by 3½ in. wide by 48 in. long
Fence base, ¾ in. thick by 3½ in. wide by 48 in. long
Dust hood sides, ¾ in. thick by 2½ in. wide by 3½ in. longDust hood top,
¼ in. thick by 2 in. wide by 5½ in. long
Dust hood back, ¾ in. thick by 2½ in. wide by 4 in. long; with 2¼ -in.-dia. hole for hose
Opening for mounting plate (size varies by model), offset 4 in. to right to increase outfeed support
Clamp to workbench or machine tabletop. Bolt for fence pivot,
5⁄16 in. dia. by 2 in., centered in table depth
Lower legs, ¾ in. thick by 6½ in. wide by 29¼ in. long
Side braces, 7⁄8 in. thick by 15⁄8 in. wide by 12 in. long, glued and screwed to top
Front brace, 7⁄8 in. thick by 2½ in. wide by 48 in. long; taper to 15⁄8 in. at ends
Upper legs, ¾ in. thick by 6½ in. wide by 18 in. long
Rear brace, 7⁄8 in. thick by 3½ in. wide by 31 in. long; taper to 15⁄8 in. at ends
Slot in lower legs, 5⁄16 in. wide by 111⁄2 in. long; centered on width
Feet (milled from scrap 2x4), 1¾ in. thick by 3½ in. wide by 6½ in. long
Bolts, 5⁄16 in. dia. by 2 in.
Knobs, threaded for 5⁄16-in.-dia. bolts
Groove, ¾ in. wide by ¾ in. deep, centered
TABLE NEEDS SOLID SUPPORT
To make this router table sturdy and safe, its back edge must be clamped to a heavy, stable surface, such as a tablesaw extension or workbench. The legs can be individually adjusted in height, so they can help support the table even on floors that are not level.
Tabletop, ¾ in. thick by 24 in. deep by 48 in. wide
Removable legs fit between side braces and support front of table.
Rabbet for plate, 5⁄8 in. wide by 3⁄8 in. deep
W O R K S H O P S O L U T I O N S 2 0 0 8 53www.finewoodwork ing.com
FWSIP09WS_SG.indd 53 2/25/08 12:29:07 PM
Versatile workstation stores all your tablesaw gear
and then some
B Y J O H N W H I T E
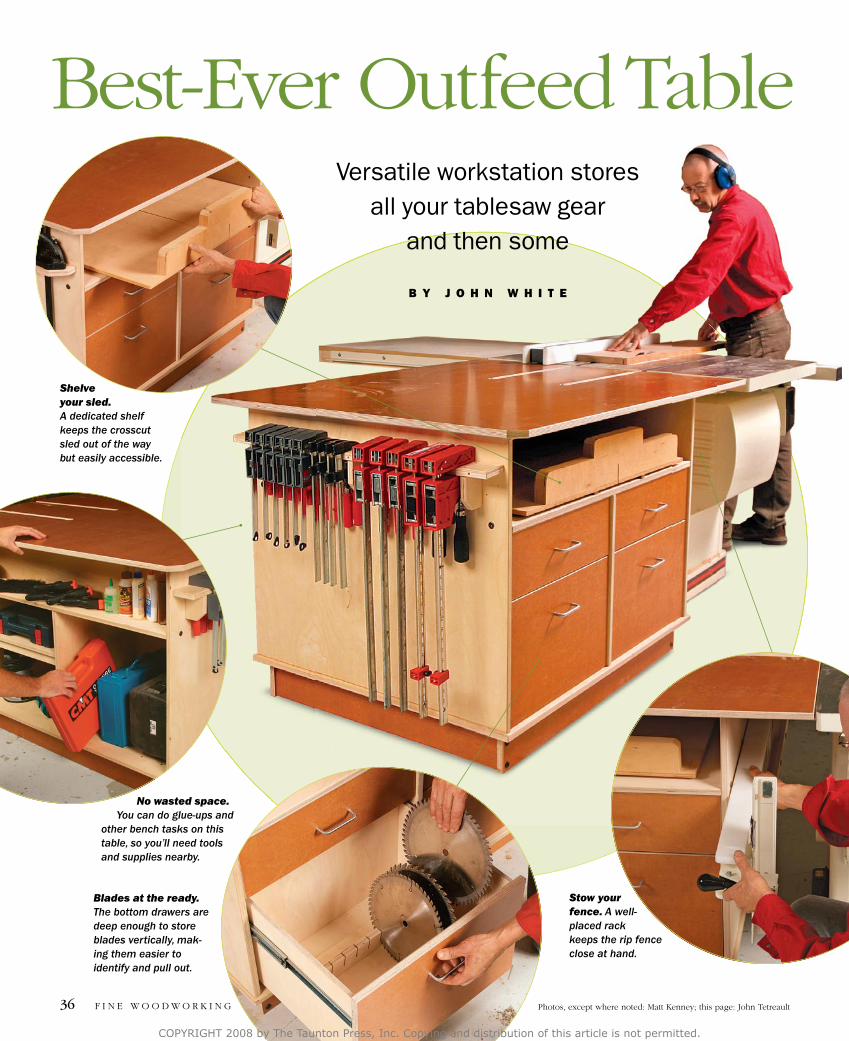
Best-Ever outfeed Table
Blades at the ready. The bottom drawers are deep enough to store blades vertically, mak-ing them easier to identify and pull out.
Stow your fence. A well-placed rack keeps the rip fence close at hand.
Shelve your sled. A dedicated shelf keeps the crosscut sled out of the way but easily accessible.
No wasted space. You can do glue-ups and
other bench tasks on this table, so you’ll need tools and supplies nearby.
F I N E W o o D W o R K I N G36 photos, except where noted: Matt Kenney; this page: John Tetreault
COPYRIGHT 2008 by The Taunton Press, Inc. Copying and distribution of this article is not permitted.
Agood outfeed table is essential for safe woodworking, because it al-lows you to control the work-
piece as it moves past the blade and off the back of the tablesaw.
Without it, you’ll have to push down hard on the back of long boards, which makes it difficult to guide them safely past the blade. An outfeed table also naturally doubles as a work surface for assembly and finishing. But the space beneath the table often lies unused, a wasted opportunity for efficient storage.
This outfeed table has a cabinet below that takes advantage of that space, with dedicated storage ar-eas for the rip fence, miter gauge, crosscut sled, blades, and several big drawers for jigs. And there’s plenty of shelf space for general storage, as well as room on the end panels for clamps. The large phenolic-plywood top is great because it’s so slick that materials almost float across it. And because the surface resists stains and glue, it’s perfect for assembly and finishing. I let the top overhang the base for easier clamping.
It’s easy to adjust the table’s height and level it, too. so if you move to a new shop, you won’t need a new table.
Best of all, this outfeed table is not difficult to build. The hardest part may be dealing with the large sheets of plywood, but I’ll offer tips that make breaking down and squar-ing the material easier. All of the joinery is simple. The cabinet itself is joined by butt
joints held together by screws (I’ll of-fer pointers on assembling the joints
accurately). The drawers are joined by a rabbet-and-groove joint that requires only two tablesaw setups.
Materials improve function and ease constructionThis cabinet is built entirely of sheet goods, except for two Douglas-fir runners. The top, drawer fronts, and kick plates come from a single 4x8 sheet of phe-nolic plywood. The cabinet is 3⁄4-in.-thick Baltic-birch plywood and the drawers are 1⁄2-in.-thick Baltic-
birch plywood.The entire table can be made more economically
from medium-density fiberboard (MDF) or ordinary ply-wood, but you’ll have to use connecting bolts with barrel
nuts to make strong joints in the softer MDF. With plywood, you can use screws. And you’ll need to apply a finish to the
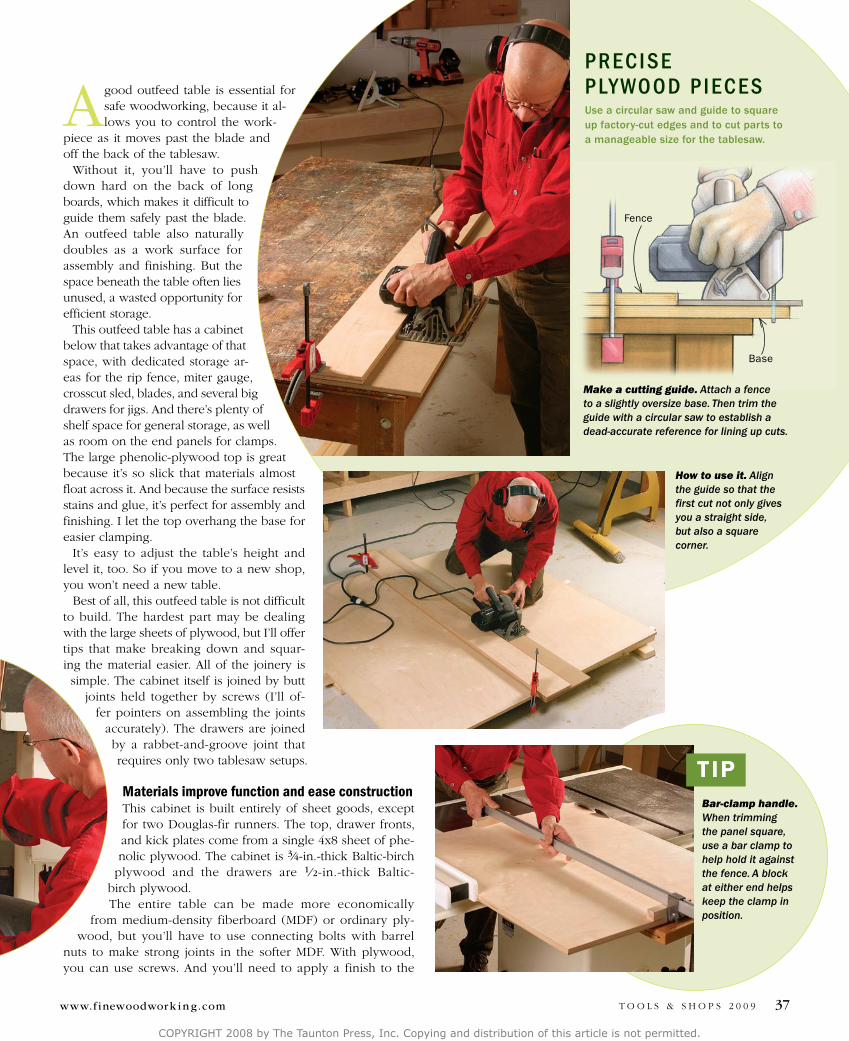
precise plyWood piecesUse a circular saw and guide to square up factory-cut edges and to cut parts to a manageable size for the tablesaw.
Make a cutting guide. Attach a fence to a slightly oversize base. Then trim the guide with a circular saw to establish a dead-accurate reference for lining up cuts.
Fence
Base
Bar-clamp handle.When trimming the panel square, use a bar clamp to help hold it against the fence. A block at either end helps keep the clamp in position.
TIP
How to use it. Align the guide so that the first cut not only gives you a straight side, but also a square corner.
37www.finewoodwork ing.com T o o l s & s h o p s 2 0 0 9
COPYRIGHT 2008 by The Taunton Press, Inc. Copying and distribution of this article is not permitted.
53 in.423⁄16 in.
8 in.
63⁄4 in.
12½ in.
195⁄8 in.
7¾ in.
2¼ in.42¼ in.35¼ in.
28 in.
40 in.36 in.
5 in.
17¼ in.
Lag bolt, ½ in. dia. by 3 in. long
SIDE VIEWEND VIEW
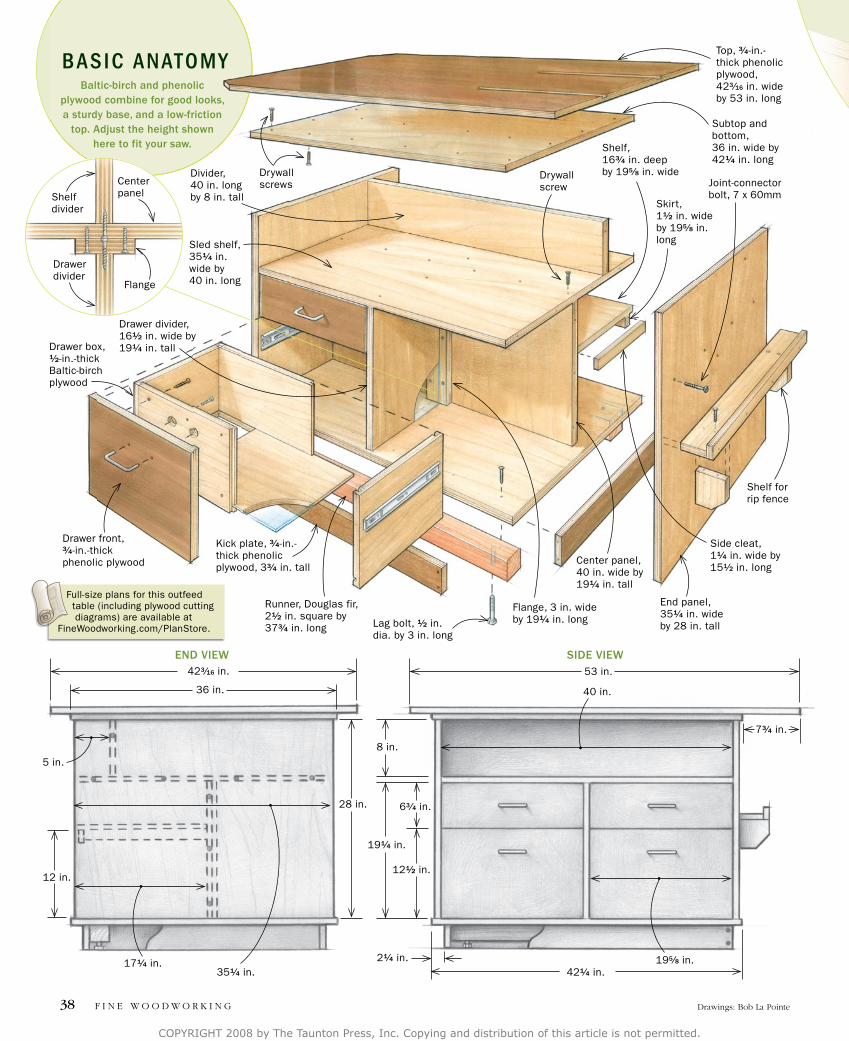
Top, ¾ -in.-thick phenolic plywood, 423⁄16 in. wide by 53 in. long
Subtop and bottom, 36 in. wide by 42¼ in. long
End panel,35¼ in. wide by 28 in. tall
Drawer box, ½ -in.-thick Baltic-birch plywood
Runner, Douglas fir, 2½ in. square by 37¾ in. long
Kick plate, ¾ -in.-thick phenolic plywood, 3¾ in. tall
Drawer front, ¾ -in.-thick phenolic plywood
Divider, 40 in. long by 8 in. tall
Center panel, 40 in. wide by 19¼ in. tall
Shelf for rip fence
basic aNatomy
Shelf divider
Center panel
Flange
Drawer divider
Side cleat, 1¼ in. wide by 151⁄2 in. long
Shelf, 16¾ in. deep by 195⁄8 in. wide
Drawer divider, 16½ in. wide by 19¼ in. tall
Skirt, 1½ in. wide by 195⁄8 in. long
Flange, 3 in. wide by 19¼ in. long
12 in.
19¼ in.
Full-size plans for this outfeed table (including plywood cutting diagrams) are available at FineWoodworking.com/PlanStore.
Full-size plans for this outfeed table (including plywood cutting diagrams) are available at
Drywall screws
Drywall screw Joint-connector
bolt, 7 x 60mm
Sled shelf, 35¼ in. wide by 40 in. long
Baltic-birch and phenolic plywood combine for good looks, a sturdy base, and a low-friction
top. Adjust the height shown here to fit your saw.
F I N E W o o D W o R K I N G38 Drawings: Bob la pointe
COPYRIGHT 2008 by The Taunton Press, Inc. Copying and distribution of this article is not permitted.
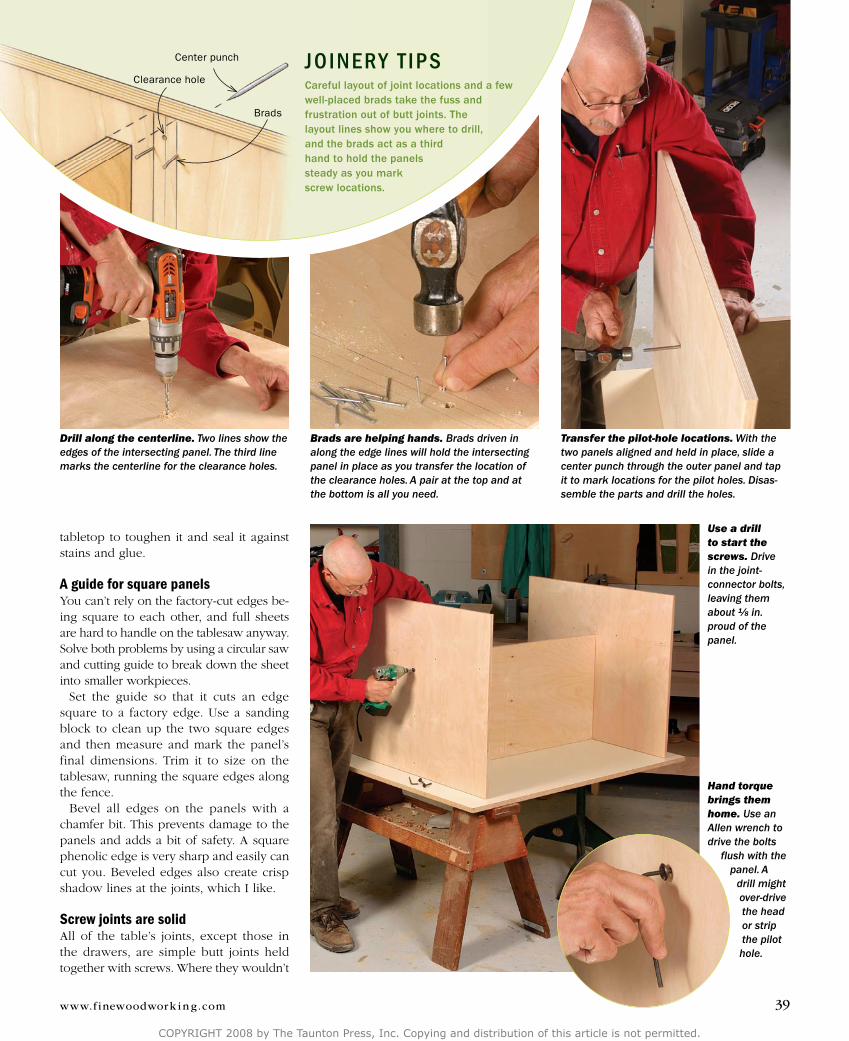
Drill along the centerline. Two lines show the edges of the intersecting panel. The third line marks the centerline for the clearance holes.
Brads are helping hands. Brads driven in along the edge lines will hold the intersecting panel in place as you transfer the location of the clearance holes. A pair at the top and at the bottom is all you need.
Transfer the pilot-hole locations. With the two panels aligned and held in place, slide a center punch through the outer panel and tap it to mark locations for the pilot holes. Disas-semble the parts and drill the holes.
tabletop to toughen it and seal it against stains and glue.
A guide for square panelsYou can’t rely on the factory-cut edges be-ing square to each other, and full sheets are hard to handle on the tablesaw anyway. solve both problems by using a circular saw and cutting guide to break down the sheet into smaller workpieces.
set the guide so that it cuts an edge square to a factory edge. Use a sanding block to clean up the two square edges and then measure and mark the panel’s final dimensions. Trim it to size on the tablesaw, running the square edges along the fence.
Bevel all edges on the panels with a chamfer bit. This prevents damage to the panels and adds a bit of safety. A square phenolic edge is very sharp and easily can cut you. Beveled edges also create crisp shadow lines at the joints, which I like.
Screw joints are solidAll of the table’s joints, except those in the drawers, are simple butt joints held together with screws. Where they wouldn’t
Use a drill to start the screws. Drive in the joint-connector bolts, leaving them about 1⁄8 in. proud of the panel.
Hand torque brings them home. Use an Allen wrench to drive the bolts
flush with the panel. A
drill might over-drive the head or strip the pilot hole.
joiNery t ipsCareful layout of joint locations and a few well-placed brads take the fuss and frustration out of butt joints. The layout lines show you where to drill, and the brads act as a third hand to hold the panels steady as you mark screw locations.
Center punch
Clearance hole
Brads
39www.finewoodwork ing.com
COPYRIGHT 2008 by The Taunton Press, Inc. Copying and distribution of this article is not permitted.
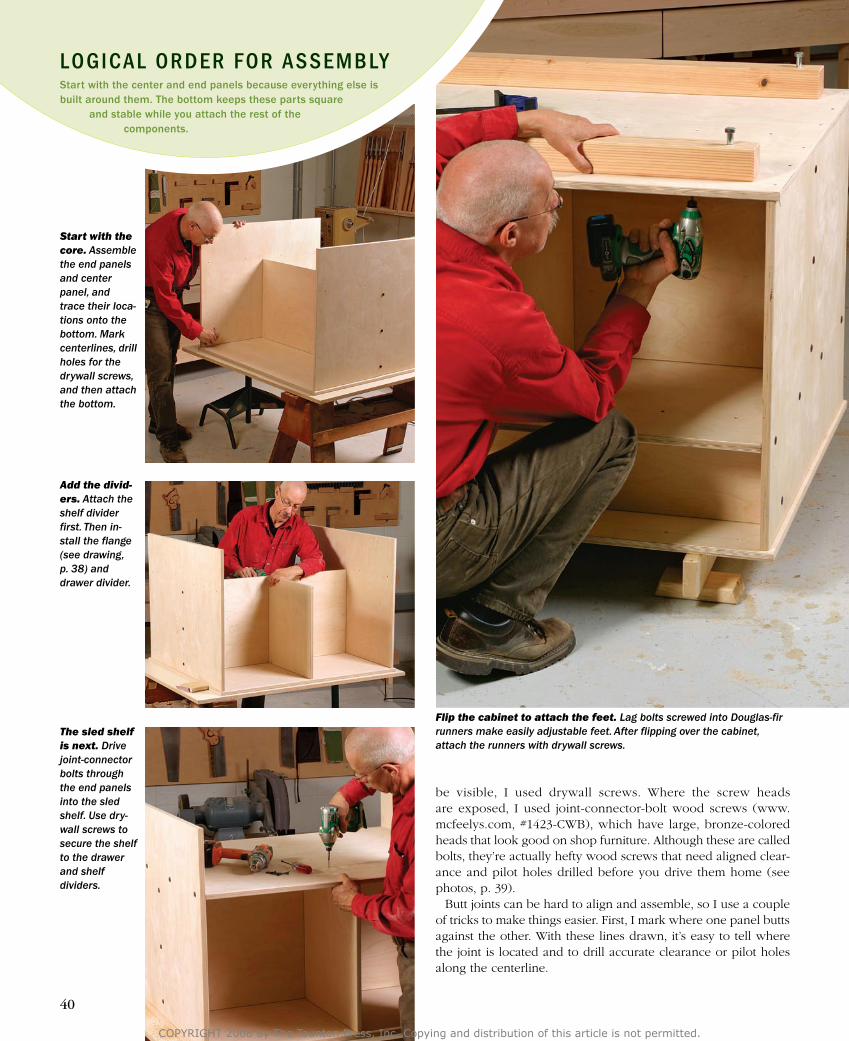
Flip the cabinet to attach the feet. Lag bolts screwed into Douglas-fir runners make easily adjustable feet. After flipping over the cabinet, attach the runners with drywall screws.
Start with the core. Assemble the end panels and center panel, and trace their loca-tions onto the bottom. Mark centerlines, drill holes for the drywall screws, and then attach the bottom.
be visible, I used drywall screws. Where the screw heads are exposed, I used joint-connector-bolt wood screws (www.mcfeelys.com, #1423-CWB), which have large, bronze-colored heads that look good on shop furniture. Although these are called bolts, they’re actually hefty wood screws that need aligned clear-ance and pilot holes drilled before you drive them home (see photos, p. 39).
Butt joints can be hard to align and assemble, so I use a couple of tricks to make things easier. First, I mark where one panel butts against the other. With these lines drawn, it’s easy to tell where the joint is located and to drill accurate clearance or pilot holes along the centerline.
logical order for assembly
Add the divid-ers. Attach the shelf divider first. Then in-stall the flange (see drawing, p. 38) and drawer divider.
The sled shelf is next. Drive joint-connector bolts through the end panels into the sled shelf. Use dry-wall screws to secure the shelf to the drawer and shelf dividers.
Start with the center and end panels because everything else is built around them. The bottom keeps these parts square
and stable while you attach the rest of the components.
40
COPYRIGHT 2008 by The Taunton Press, Inc. Copying and distribution of this article is not permitted.
Make way for the miter gauge. Put the outfeed table in place—leveled and adjusted to the right height—and use the saw’s miter gauge to locate the clearance slots.
once the clearance holes are drilled, you need to transfer their centers onto the edge of the intersecting panel so that you can drill pilot holes. But it’s not easy to hold everything in alignment when you do that, so I drive a few brads into the edge lines drawn earlier to trap the panel and hold it steady while I transfer the centers. I pull out the brads with a claw hammer when the joint is together. The layout lines and small nail holes left behind are hidden inside the case.
Assemble the table in stagesI built my table in stages to avoid accumulated errors, but some parts should be cut in groups for uniformity. The cabinet’s center panel can be cut at the same time as the drawer and shelf dividers because they need to be the same height.
Begin by assembling the end panels and the center panel. once they’re joined and square to one another, get the dimensions for the bottom and subtop by measuring the assembly and adding 3⁄4 in. to its width and length. The bottom and subtop overhang the core assembly by 3⁄8 in. on all four sides, which makes it easier to fit them because the alignment of the edges won’t need to be exact. Attach the bottom, but not the subtop.
The drawer and shelf dividers are next. The shelf divider is sim-ply screwed to the center panel. The back of the drawer divider, however, has a strip of plywood attached to it. screws are then driven through the resulting flange to attach the drawer divider to the center panel (see detail, p. 38). This is necessary, because once the shelf divider is installed, you won’t be able to drill through the center panel to attach the drawer divider.
After the dividers are in place, install the large shelf that provides storage for the sled. When you screw it down, keep the drawer and shelf dividers square to the center panel. Next, add the divider that serves as a back to the shelf.
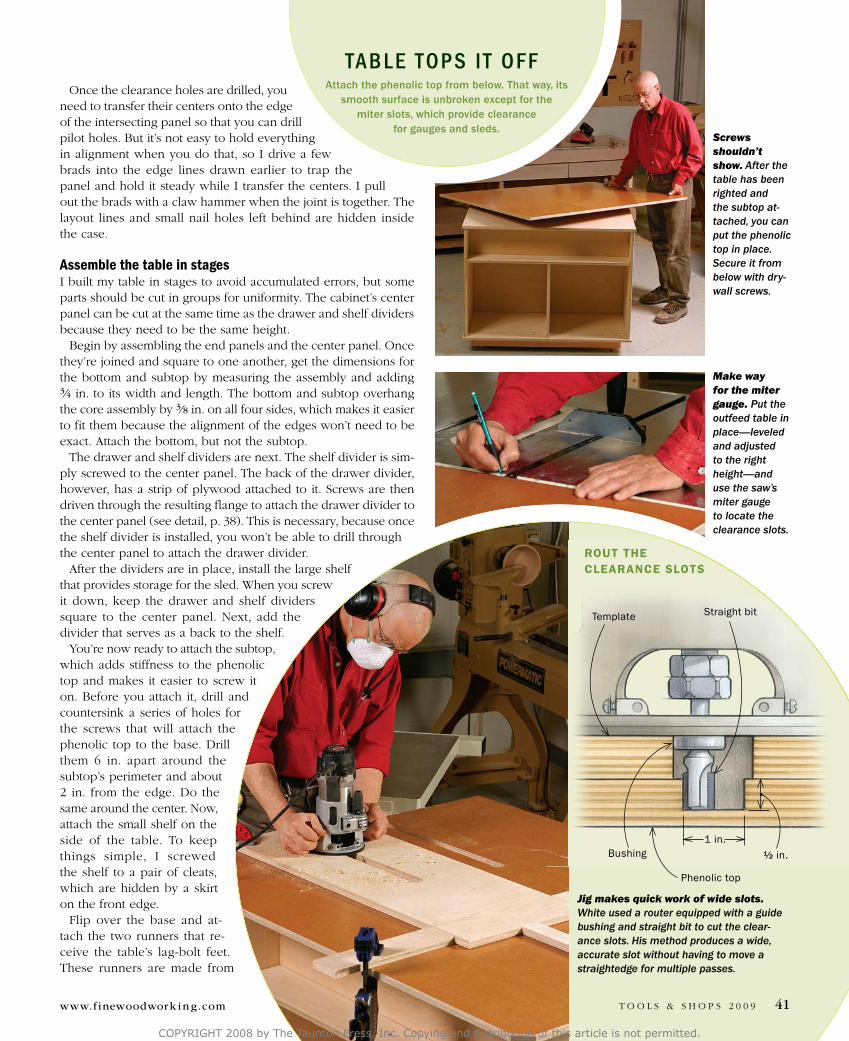
You’re now ready to attach the subtop, which adds stiffness to the phenolic top and makes it easier to screw it on. Before you attach it, drill and countersink a series of holes for the screws that will attach the phenolic top to the base. Drill them 6 in. apart around the subtop’s perimeter and about 2 in. from the edge. Do the same around the center. Now, attach the small shelf on the side of the table. To keep things simple, I screwed the shelf to a pair of cleats, which are hidden by a skirt on the front edge.
Flip over the base and at-tach the two runners that re-ceive the table’s lag-bolt feet. These runners are made from
Screws shouldn’t show. After the table has been righted and the subtop at-tached, you can put the phenolic top in place. Secure it from below with dry-wall screws.
ROUT THE CLEARANCE SLOTS
Template Straight bit
Bushing
Phenolic top
1 in.
½ in.
Jig makes quick work of wide slots. White used a router equipped with a guide bushing and straight bit to cut the clear-ance slots. His method produces a wide, accurate slot without having to move a straightedge for multiple passes.
Attach the phenolic top from below. That way, its smooth surface is unbroken except for the
miter slots, which provide clearance for gauges and sleds.
table tops it off
T o o l s & s h o p s 2 0 0 9 41www.finewoodwork ing.com
COPYRIGHT 2008 by The Taunton Press, Inc. Copying and distribution of this article is not permitted.
Rabbet the bottom panels. All four sides of the bottom panels are rabbeted to fit into the grooves running around the bot-tom of the drawer box.
Douglas-fir 4x4s trimmed to 21⁄2 in. square. Drill pilot holes for the lag-bolt feet and screw them in, leaving them about 1 in. proud of the runners. The lag bolts allow you to adjust the table’s height and to level it. Attach them 21⁄4 in. from the edge of the bottom.
Flip the base back over and attach the phenolic top. In addition to beveling the edges of the panel, I trimmed the two corners opposite the saw at 45º, which is easier to do with the top attached.
Next, level the cabinet and bring the top in line with the saw’s table. Then transfer the location of the miter slots directly from the saw table and mark them out on the top. Mine are 1⁄2 in. deep by 1 in. wide by 205⁄8 in. long. To cut the channels, you only need a router, a straight bit, and a straightedge, but I made a template and used an offset guide bushing, which al-lowed me to rout the entire channel with-out having to adjust a straightedge to get the full width.
For dust clearance, I drilled a 3⁄4-in.-dia. hole about 6 in. from the end of each channel. The dust falls into the gap
Grooves for the bottoms. Run the bot-tom of the sides, fronts, and backs against the fence to cut the groove for the bottom panel.
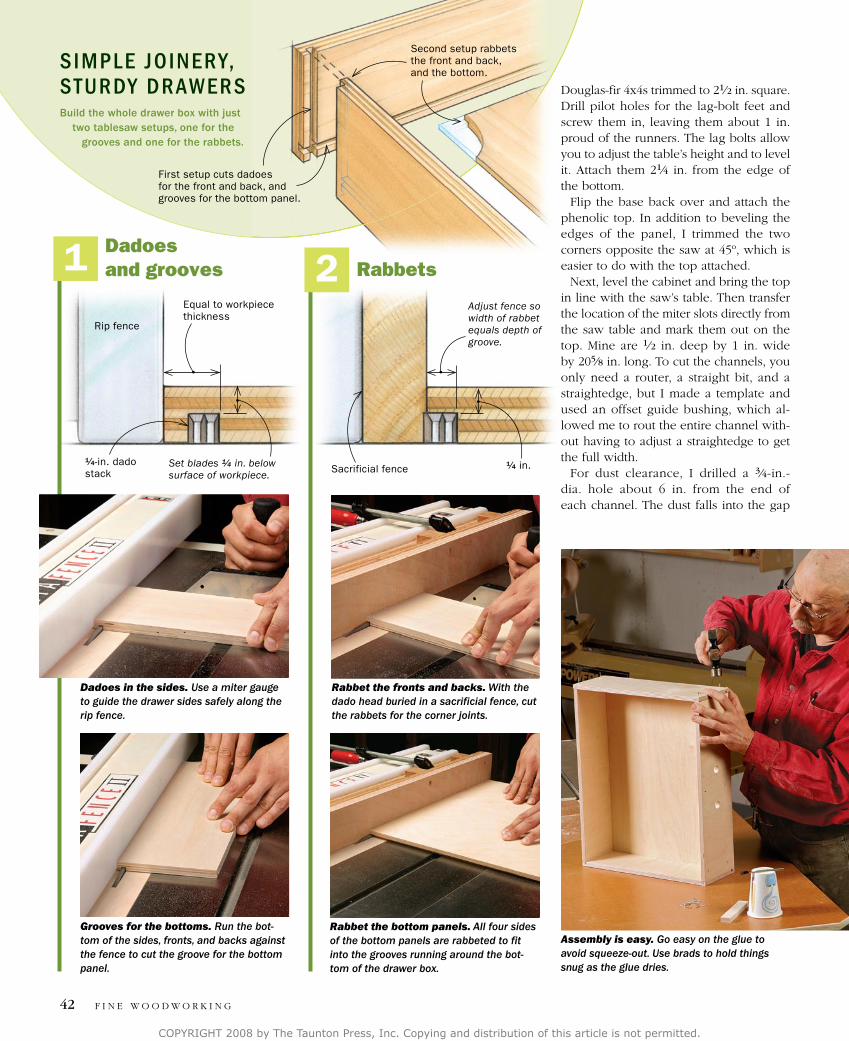
Dadoes in the sides. Use a miter gauge to guide the drawer sides safely along the rip fence.
simple joiNery, sturdy draWersBuild the whole drawer box with just two tablesaw setups, one for the grooves and one for the rabbets.
Assembly is easy. Go easy on the glue to avoid squeeze-out. Use brads to hold things snug as the glue dries.
Equal to workpiece thickness
Set blades ¼ in. below surface of workpiece.
¼ in.
Adjust fence so width of rabbet equals depth of groove.
Sacrificial fence
Rabbet the fronts and backs. With the dado head buried in a sacrificial fence, cut the rabbets for the corner joints.
RabbetsDadoes and grooves
Second setup rabbets the front and back, and the bottom.
First setup cuts dadoes for the front and back, and grooves for the bottom panel.
21
Rip fence
¼ -in. dado stack
F I N E W o o D W o R K I N G42
COPYRIGHT 2008 by The Taunton Press, Inc. Copying and distribution of this article is not permitted.
between the back of the saw and the outfeed table.
A fast drawer joint that lastsYou can build the drawer boxes in a variety of ways, but I recommend a rabbet-and-groove joint that requires only two setups on the tablesaw. These drawers are quite strong and can be made in short order.
The drawer boxes are made from Baltic-birch plywood that’s just a hair under 1⁄2 in. thick, but that doesn’t mean the joint is harder to cut. You’ll cut all of the dadoes and grooves with the first setup, and all of the rabbets with the second (see photos, facing page). The dadoes, grooves and rabbets are cut with a 1⁄4-in. dado stack set at the same height, so you’ll only need to reset the fence between setups.
The easiest way to assemble the drawers is to brush a small amount of glue on the rabbets (you want to avoid squeeze-out) and tack the joints together with two or three small brads. The brads will hold the joint snug as the glue dries. Clamping is time-consuming, and the weight and pres-sure of the clamps can throw the drawer out of square.
I used standard ball-bearing, full-exten-sion slides from a home center to mount the drawers in the outfeed table.
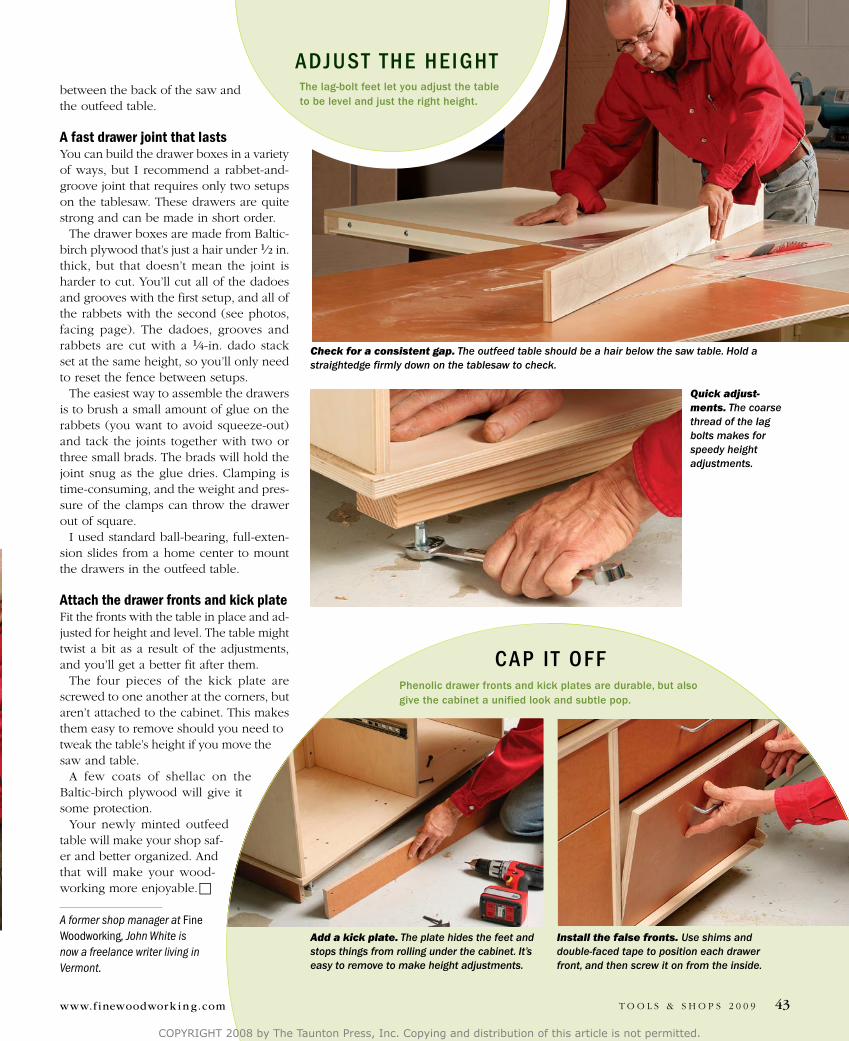
Attach the drawer fronts and kick plateFit the fronts with the table in place and ad-justed for height and level. The table might twist a bit as a result of the adjustments, and you’ll get a better fit after them.
The four pieces of the kick plate are screwed to one another at the corners, but aren’t attached to the cabinet. This makes them easy to remove should you need to tweak the table’s height if you move the saw and table.
A few coats of shellac on the Baltic-birch plywood will give it some protection.
Your newly minted outfeed table will make your shop saf-er and better organized. And that will make your wood-working more enjoyable.�•
A former shop manager at Fine Woodworking, John White is now a freelance writer living in Vermont.
Quick adjust-ments. The coarse thread of the lag bolts makes for speedy height adjustments.
Check for a consistent gap. The outfeed table should be a hair below the saw table. Hold a straightedge firmly down on the tablesaw to check.
Install the false fronts. Use shims and double-faced tape to position each drawer front, and then screw it on from the inside.
The lag-bolt feet let you adjust the table to be level and just the right height.
Add a kick plate. The plate hides the feet and stops things from rolling under the cabinet. It’s easy to remove to make height adjustments.
adjust the height
Phenolic drawer fronts and kick plates are durable, but also give the cabinet a unified look and subtle pop.
cap it off
T o o l s & s h o p s 2 0 0 9 43www.finewoodwork ing.com
COPYRIGHT 2008 by The Taunton Press, Inc. Copying and distribution of this article is not permitted.