from flstudio 12.3 and onwards
TRANSCRIPT
Sytrus
Synths
Creation
Manual From FLStudio 12.3 and onwards
Sytrus Synth Manual 2nd Edition by Jens Malmgren Page 2
Table of Contents Foreword ................................................................................................................................................. 6
Sytrus Synth Creation .............................................................................................................................. 7
1. Basic waveforms, Chorus .................................................................................................................... 9
Sine .................................................................................................................................................... 10
Saw .................................................................................................................................................... 10
Triangle ............................................................................................................................................. 10
Square ............................................................................................................................................... 10
Bent Saw ........................................................................................................................................... 10
Tempered Square .............................................................................................................................. 11
Saw Sine ............................................................................................................................................ 11
Square Saw ........................................................................................................................................ 11
Waveform sliders: Shape, Tension, Skew, Sine Shaper, Pre-filter and Noise ................................... 11
Shape, SH ...................................................................................................................................... 11
Tension, TN ................................................................................................................................... 11
Skew, SK ........................................................................................................................................ 11
Sine Shaper, SN ............................................................................................................................. 12
Pre-filter, FL ................................................................................................................................... 12
Noise, NS ....................................................................................................................................... 12
We make: Simplicity .......................................................................................................................... 12
Chorus effect ..................................................................................................................................... 13
Depth, DP ...................................................................................................................................... 14
Speed, SP ....................................................................................................................................... 14
Delay, DL ....................................................................................................................................... 15
Spread, SR ..................................................................................................................................... 15
Cross, CR ........................................................................................................................................ 15
Volume, VL .................................................................................................................................... 15
More chorus options ..................................................................................................................... 15
Delay ................................................................................................................................................. 18
Feedback Level, FB ........................................................................................................................ 18
Time, TM ....................................................................................................................................... 18
Stereo Offset, SO ........................................................................................................................... 18
Sytrus Synth Manual 2nd Edition by Jens Malmgren Page 3
Volume, VL .................................................................................................................................... 18
Reverb ............................................................................................................................................... 19
2. Synth creation basics ........................................................................................................................ 21
We make: Watery Pluck Synth .......................................................................................................... 21
Chorus Settings ............................................................................................................................. 21
Operator settings .............................................................................................................................. 24
Center ............................................................................................................................................ 24
Declick ........................................................................................................................................... 24
Band Limit ..................................................................................................................................... 24
Pluck .............................................................................................................................................. 24
Phase ............................................................................................................................................. 25
Phase cancellation ........................................................................................................................ 25
Finish the synth ............................................................................................................................. 26
We make: Warp Pluck ....................................................................................................................... 27
Flat ................................................................................................................................................ 30
Wave Shaper ..................................................................................................................................... 31
Key mapping .................................................................................................................................. 32
3. Main Panel ........................................................................................................................................ 34
Master volume, Master LFO and Master Pitch ................................................................................. 34
Master ADSR lengths ........................................................................................................................ 34
Equalizer ............................................................................................................................................ 34
X/Y Controller .................................................................................................................................... 35
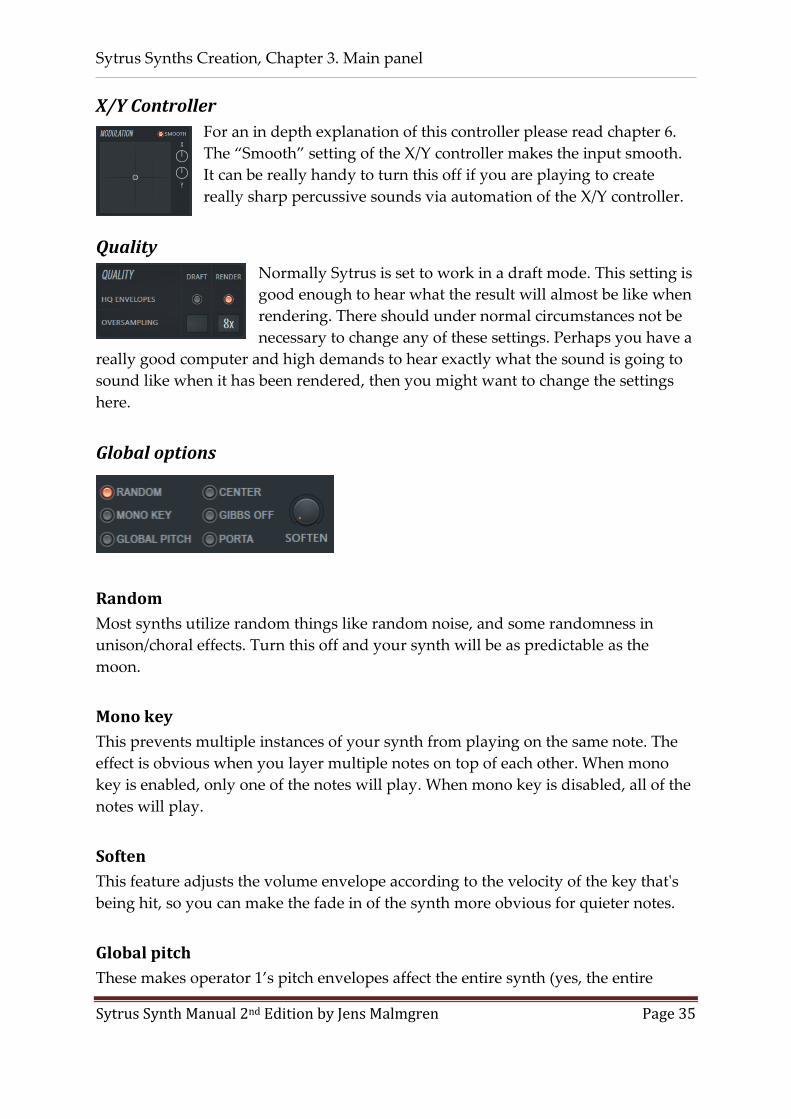
Quality ............................................................................................................................................... 35
Global options ................................................................................................................................... 35
Random ......................................................................................................................................... 35
Mono key ...................................................................................................................................... 35
Soften ............................................................................................................................................ 35
Global pitch ................................................................................................................................... 35
Center ............................................................................................................................................ 36
Gibbs off ........................................................................................................................................ 36
Porta .............................................................................................................................................. 36
Unison ............................................................................................................................................... 36
Panning, PN ................................................................................................................................... 37

Sytrus Synth Manual 2nd Edition by Jens Malmgren Page 4
Volume, VL .................................................................................................................................... 37
Pitch, PT ........................................................................................................................................ 37
Sub-level, SB .................................................................................................................................. 37
Phase, PH ...................................................................................................................................... 37
Envelope Variation, EV .................................................................................................................. 37
Unison visualized .......................................................................................................................... 38
Real Unison, the lower green graph ......................................................................................... 38
Unison created with two Sytrus, the blue upper graph ............................................................ 39
Main Menu ........................................................................................................................................ 40
The preset information panel ........................................................................................................... 40
4. Synthesis ........................................................................................................................................... 41
Frequency Modulation ...................................................................................................................... 41
Ring Modulation................................................................................................................................ 44
We make: BagpipeSynth ................................................................................................................... 44
My Unison Settings ....................................................................................................................... 46
My Chorus Settings ....................................................................................................................... 46
My Reverb Settings ....................................................................................................................... 46
Sine Harmonics ................................................................................................................................. 47
We make: Three bands saw .............................................................................................................. 49
My Unison Settings ....................................................................................................................... 49
We make: Smooth that curve ........................................................................................................... 50
Pitch Envelope Automation. We make: RockBagpipeSynth ............................................................. 51
We make: Noise pluck....................................................................................................................... 52
Pluck Mode ................................................................................................................................... 52
Chorus Settings ............................................................................................................................. 53
Oscillator ........................................................................................................................................... 53
5. Filter types ........................................................................................................................................ 55
Chocolate State Variable, SVF ........................................................................................................... 55
Lime High Pass, HP ............................................................................................................................ 55
Vanilla Low Pass, LP2 ........................................................................................................................ 55
Vanilla Band Pass, BP ........................................................................................................................ 55
Vanilla Notch, NOT ............................................................................................................................ 56
Vanilla High Pass, HP2 ....................................................................................................................... 56

Sytrus Synth Manual 2nd Edition by Jens Malmgren Page 5
Vanilla All Pass, AP ............................................................................................................................ 56
Vanilla Low Shelf, LS .......................................................................................................................... 56
Vanilla Peaking, PK ............................................................................................................................ 56
Vanilla High Shelf, HS ........................................................................................................................ 57
Mango Low Pass, LP3 ........................................................................................................................ 57
Cherry Phaser, PHS ........................................................................................................................... 57
6. X/Y Controller .................................................................................................................................... 58
7. Unison Mapping ................................................................................................................................ 61
Pluck mode damp ............................................................................................................................. 63
We make: Super Saw ........................................................................................................................ 63
8. Reshape the sound ............................................................................................................................ 66
We make: OneOnOne ....................................................................................................................... 66
Chorus and Delay Settings ............................................................................................................ 67
Unison Settings ............................................................................................................................. 68
9. Sequence ........................................................................................................................................... 71
We make: TutSeqOne ....................................................................................................................... 71
Reverb ........................................................................................................................................... 74
Chorus Settings ............................................................................................................................. 75
Unison Settings ............................................................................................................................. 75
10. Arpeggiator ..................................................................................................................................... 78
11.Portamento ...................................................................................................................................... 83
Index...................................................................................................................................................... 85
Sytrus Synth Manual 2nd Edition by Jens Malmgren Page 6
Foreword This text is based on the Sytrus Synths Creation manual first published 2008 at this
location by Erik McClure:
blackhole12.deviantart.com/art/Sytrus-Synth-Creation-Part-1-75704794
Erik published his manual as JPG images. I tried to find other written tutorials but
the manual by Erik worked the best for me, except the images. I tried to read the
help by Image-Line but it was too challenging for me as beginner and I could not
easily put it on a reading device or print it. Most of the time I came back to Eriks
manual.
In early 2013 I chatted with Erik about the manual. He told me that he had given up
on converting the manual to PDF. He was all fine with that I would convert the text,
after all, his manual was published under Creatives Common v3. In February 2013
the first version of the PDF was published.
In August 2016 Image-Line released FLStudio 12.3 and with it came a new look of
Sytrus. I started reworking the text from Erik McClure to match the new version.
This time I decided to edit the text as well, considerably:
The “young language” is removed. No “slapping on”, “plunging into” and
“crazy”.
The text is not biased anymore. I believe that the reason Erik included
opinions about features was because when the subject reached the end of
Eriks scope of interest instead of upfront defining the scope the text became
biased. My scope is wider and deeper so I further explored and explained
these topics.
I reworked the structure. The different exercises got names so that different
parts of the text can refer to earlier exercises. With improved structure it is
easier to navigate the text.
Eriks chapter 5 is deleted. In there he listed his own synths. I did not see any
educational value in just listing the settings for synths without any
explanation for how something is done or why. All chapters are renumbered
and there are new chapters introduced.
If you got this book sent to you but you don’t know where it came from then please
check out my own server for the latest version of this book on this location:
www.malmgren.nl/Sytrus.pdf
I am not affiliated with Image-Line other than that I bought a license for FL Studio.

Sytrus Synths Creation, Chapter 1. Basic waveforms and the chorus effect
Sytrus Synth Manual 2nd Edition by Jens Malmgren Page 7
Sytrus Synth Creation
This tutorial covers the
creation of synths using the
FL studio Sytrus plugin. The
version used here is Sytrus
from FLStudio 12.3 and
onwards.
When we are creating
synths to use in a song, we
must keep in mind that a synth is merely the creation and modification of a
waveform. It is possible to read the text without doing the exercises but the text is
written as if you do, but that is up to you.
Before we begin we need to set up a new project that will help us understand Sytrus.
In the main menu bar go to File −> New from template −> Minimal −> Empty and
then follow the steps on the next page.
Presets menu with scrollbar!

Sytrus Synths Creation, Chapter 1. Basic waveforms and the chorus effect
Sytrus Synth Manual 2nd Edition by Jens Malmgren Page 8
1. In the channel rack click the plus button. Select the Sytrus plugin.
2. Set the channel to output to mixer track one.
3. Open the piano roll and place one note B4 one bar long.
4. Set the Default preset inside Sytrus. In the upper left corner of the Sytrus
window you find a drop down menu. Expand Presets and select “Default”.
5. Lower the frequency ratio to 1.000. In various synths throughout we will have
different values on the frequency ratio.
6. Insert a Wave Candy effect in effect slot 1 of mixer track one. When mixer
track one has a green slider button then it is selected, then hover over the
effect slots of mixer track one. When the tooltip window displays “FX slot 1
options”.
Left click slot 1 and a menu will be
displayed. Select WaveCandy.
7. In the WaveCandy window select the Oscilloscope tab.
8. Set Update to 19 ms.
9. Set Window to 10 ms. A larger window displays more waveform cycles.
10. From here when we play sound, the WaveCandy window will display a
graph. That graph is really useful for understanding what is going on in
Sytrus.

Sytrus Synths Creation, Chapter 1. Basic waveforms and the chorus effect
Sytrus Synth Manual 2nd Edition by Jens Malmgren Page 9
If you are creating a complex synth and you by accident
switch to another preset before you saved it then it will be
lost. To avoid this, you can save the entire project and also
configure FLStudio to auto save every 5 min. Go to options
−> File Settings and set auto save in the backup section, go
to the manual for help of finding the backups in case you need them. With a project
saved you can just hit Ctrl-S to save your progress on the synth without risking
hitting the wrong button or if you forgot to save it is saved for you. All right, we are
ready to start investigating Sytrus!
1. Basic waveforms, Chorus In this chapter we will discuss the basic waveforms that you can see in the operator
tabs of Sytrus. We will use our visualization project to experiment with the
waveform to see the output in the oscilloscope view of WaveCandy. Set the default
preset in Sytrus and let’s begin!
Here above you can see a couple of things marked with blue rectangles etc. That are
the things we will discuss in the text below.
On the top of Sytrus you will see a row of tabs. Select the tab labeled "OP 1. Use the
keyboard at the bottom, play a few notes. You can also use keys on your computer
keyboard or (if you have a music keyboard connected you can play a few notes on
it). In the upper left corner, you can see a window showing the current waveform
Sytrus Synths Creation, Chapter 1. Basic waveforms and the chorus effect
Sytrus Synth Manual 2nd Edition by Jens Malmgren Page 10
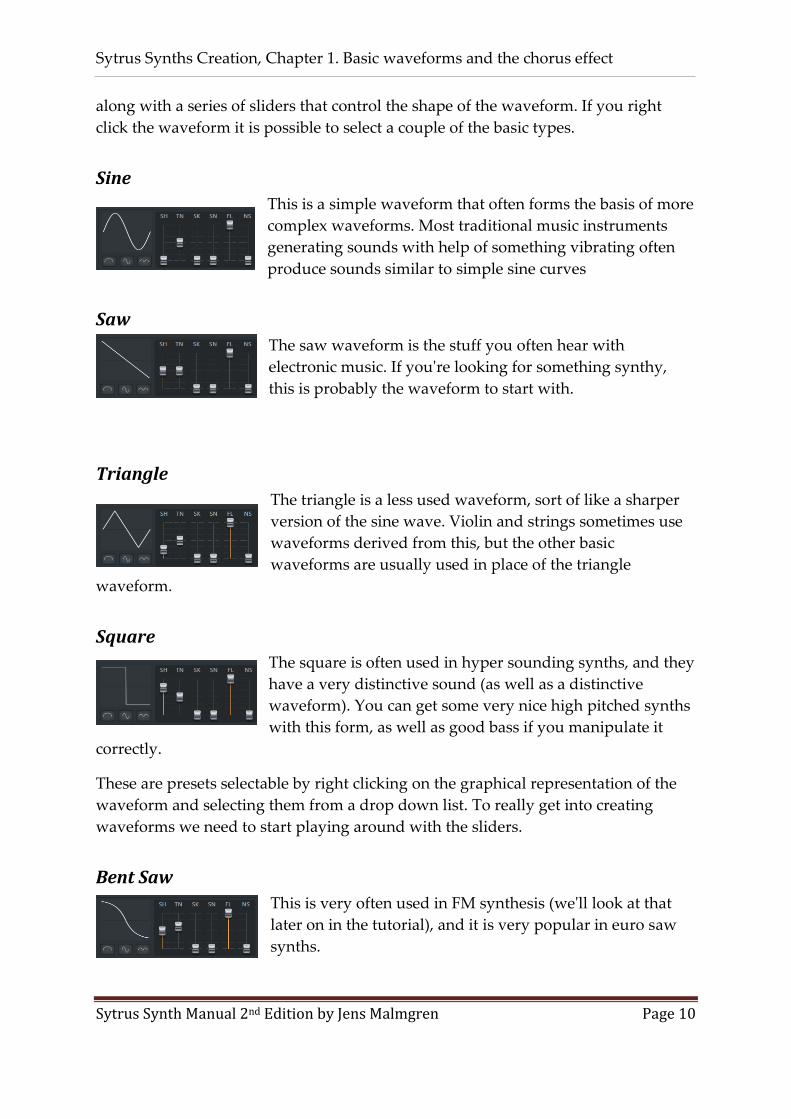
along with a series of sliders that control the shape of the waveform. If you right
click the waveform it is possible to select a couple of the basic types.
Sine
This is a simple waveform that often forms the basis of more
complex waveforms. Most traditional music instruments
generating sounds with help of something vibrating often
produce sounds similar to simple sine curves
Saw
The saw waveform is the stuff you often hear with
electronic music. If you're looking for something synthy,
this is probably the waveform to start with.
Triangle
The triangle is a less used waveform, sort of like a sharper
version of the sine wave. Violin and strings sometimes use
waveforms derived from this, but the other basic
waveforms are usually used in place of the triangle
waveform.
Square
The square is often used in hyper sounding synths, and they
have a very distinctive sound (as well as a distinctive
waveform). You can get some very nice high pitched synths
with this form, as well as good bass if you manipulate it
correctly.
These are presets selectable by right clicking on the graphical representation of the
waveform and selecting them from a drop down list. To really get into creating
waveforms we need to start playing around with the sliders.
Bent Saw
This is very often used in FM synthesis (we'll look at that
later on in the tutorial), and it is very popular in euro saw
synths.

Sytrus Synths Creation, Chapter 1. Basic waveforms and the chorus effect
Sytrus Synth Manual 2nd Edition by Jens Malmgren Page 11
Tempered Square
A sine wave with an extreme amount of tension, this is a
softer version of the square synth, with a slightly softer tone
to it.
Saw Sine
This is an incredibly useful for string synthesis. With a
proper filter, this waveform can create long, flowing notes.
Square Saw
A harsher synth form, this is a very versatile waveform to
work with.
Waveform sliders: Shape, Tension, Skew, Sine Shaper, Pre-filter and Noise
There are six waveform sliders.
Shape, SH
The more you raise this slider, the closer the waveform will get to a Square synth. It
begins at 0% (A sine wave), passes through 25% (a triangle wave), then 50% (Saw
wave), 75% (Square wave), and finally 100% (pulse wave)
Tension, TN
This increases or decreases the severity of the wave. If you drag this down to 0%,
you will notice that most of the wave will now be silence, with only the very high
points still visible. If you drag this up to 100%, you will notice that almost the entire
wave has been pushed to the top or bottom, and that only the very nearly silent
portions of the wave still remain that way. If done on a sine wave, pushing the
tension to 100% results in something very similar to a square, and if you check the
values on the 'Tempered Square" waveform as detailed above, you will notice that is
exactly how it was created. The "Bent Saw" was also made this way.
Skew, SK
The best description of this slider is that it squishes the waveform into the center.
The "Saw Sine" uses this.

Sytrus Synths Creation, Chapter 1. Basic waveforms and the chorus effect
Sytrus Synth Manual 2nd Edition by Jens Malmgren Page 12
Sine Shaper, SN
The best way to figure out what it does is to try using it on a sine wave. Two
additional sine waves will appear in the upper left corner and bottom right corner.
This is useful for things like bell synths, usually left at 0%.
Pre-filter, FL
The pre-filter is used to reduce the number of points making up the waveform
graph. This technique results in smoother waveforms and is commonly used in
organs or woodwinds. In any other synth, it is usually left at 100%.
Noise, NS
The percentage of noise does exactly that - replaces that % of your wave with
random noise. At 100%, you will no longer be able to hear your waveform at all, as it
will be noise. This is used for wind and air effects, and is used in a synth we will be
making later on. This is usually left at 0%.
While you are having fun with the sliders, try pressing some of the buttons that are
below the waveform graph. The button on the left cuts the
waveform in half, only using the first half.
The middle button inserts a band of silence - use it on the basic wave shapes to see
its effect. The button on the right takes the absolute value of the wave, so it will all be
above the middle line. On a sine wave, this will result in two small humps, while on
a saw wave it will result in something resembling a seesaw. These are not often
used, but we will be covering some synths that do use them.
In addition, there are several other parameters and tweaks in this top section of the
operator, but for now we will ignore most of them.
We make: Simplicity
Now we will start creating our own new synth preset. It is going to be called
Simplicity. In case you changed things here and there you can reset Sytrus by setting
the Default preset.
On operator 1 let's set the oscillator to the saw
waveform. Now, if we play a note using this
waveform, it’s going to sound very unrefined, and
that’s because we need to add some choral effects.

Sytrus Synths Creation, Chapter 1. Basic waveforms and the chorus effect
Sytrus Synth Manual 2nd Edition by Jens Malmgren Page 13
Chorus effect
Now we activate the FX tab and in there we can make changes so that our saw wave
will run through
various effects. One
really useful effect
is Chorus.
The chorus effect is
achieved by mixing
the sound with one
or more delayed,
pitch-modulated
copies of the
sound. The pitch of
the added sounds
is typically
modulated by an
LFO, low frequency oscillator.
Chorus is an easy way to add depth and texture to your synth, and it is used in lots
and lots of synths.
You can see from the settings, that
we have an order of 4 on our choral
effect, as well as the default settings
for the tabs. Thus the chorus is
using 4 copies of the original sound.
The order of the chorus can range
from 0 (turning off the chorus effect
entirely, sometimes you want to do
that too) to 9. An order of 1 greatly
exaggerates the "wahwah" of a
chorus effect. As you increase the
order, the panning will start to take
effect, and the effect is less obvious.
Most choral effects are on an order
of 4 or 7, sometimes 2 and occasionally 1 (A chorus of 1, however, is difficult to work
with, and usually ends up sounding bad. Avoid 1 and 9 if you can).
Before we edit our chorus settings, we need to make some adjustments to our synth
output. If you look at the matrix on the right side of the window, you can see that it
has rows corresponding to the tabs. 1, 2, 3 etc. for OP 1, OP 2. OP 3, as well as Pan,
Avoid The Extremes
A good rule of thumb in synth creation is
to never go to the extremes. The
synthesizer is designed to have reasonable
limits set on its sliders, but even with
those limits, pushing sliders to their
absolute extreme is more than likely to
result in bleeding ears than a cool synth.
This doesn’t apply to everything though.
Things like mixing and other volume
related things are almost always set to
100%
Sytrus Synths Creation, Chapter 1. Basic waveforms and the chorus effect
Sytrus Synth Manual 2nd Edition by Jens Malmgren Page 14
FX, Out, and the 3 filters. Ignoring the filters for now, we need to know exactly how
FX and Out works. Currently, your synth is routing 100% of its volume directly into
the Out channel, with no filter processing whatsoever. We want to change this so
that it also puts 100% of its volume into the FX channel. To do this, we click the
corresponding dial and move it all the way to the right by dragging our mouse up.
In the upper left hand corner of the screen (the tooltip area under the menu) it
should say "100%".
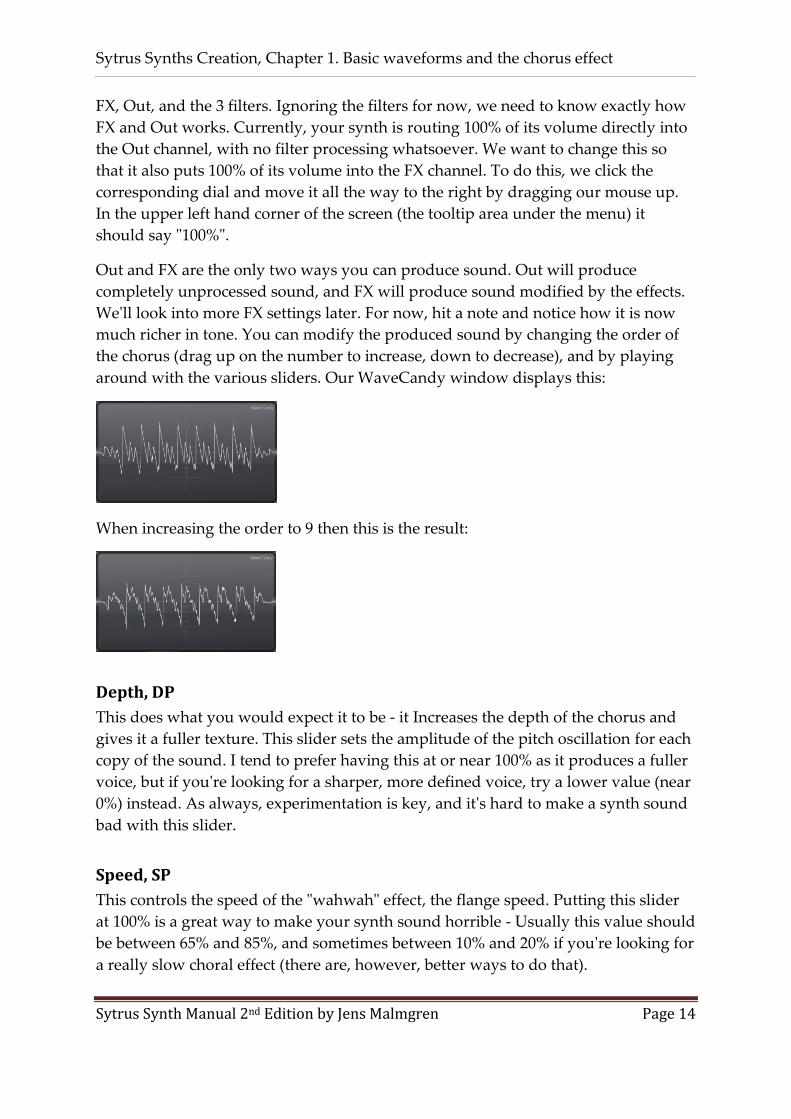
Out and FX are the only two ways you can produce sound. Out will produce
completely unprocessed sound, and FX will produce sound modified by the effects.
We'll look into more FX settings later. For now, hit a note and notice how it is now
much richer in tone. You can modify the produced sound by changing the order of
the chorus (drag up on the number to increase, down to decrease), and by playing
around with the various sliders. Our WaveCandy window displays this:
When increasing the order to 9 then this is the result:
Depth, DP
This does what you would expect it to be - it Increases the depth of the chorus and
gives it a fuller texture. This slider sets the amplitude of the pitch oscillation for each
copy of the sound. I tend to prefer having this at or near 100% as it produces a fuller
voice, but if you're looking for a sharper, more defined voice, try a lower value (near
0%) instead. As always, experimentation is key, and it's hard to make a synth sound
bad with this slider.
Speed, SP
This controls the speed of the "wahwah" effect, the flange speed. Putting this slider
at 100% is a great way to make your synth sound horrible - Usually this value should
be between 65% and 85%, and sometimes between 10% and 20% if you're looking for
a really slow choral effect (there are, however, better ways to do that).

Sytrus Synths Creation, Chapter 1. Basic waveforms and the chorus effect
Sytrus Synth Manual 2nd Edition by Jens Malmgren Page 15
Delay, DL
This is the amount of time it takes for the chorus effect to come to full strength.
When dealing with plucked or extremely short synths, it is recommended to keep
this setting near 0% and probably no higher than 25%. 5% and 10% are good values
as it gives the synth a bit of subtle lead in and helps create a refined feel.
Spread, SR
This is how obvious your "wahwah" effect is going to be if you have this at 100%
which is what I usually prefer, your choral effect will be spread among the number
of copies of the sound. Keep this at 100% if you're looking for a synth that has a
constant sound, putting this at 0% produces an immediately identifiable effect.
Cross, CR
This slider determines the arrangement of the sub-voices and how they interact. The
effect of this is that a high positive value will result in the synth appearing to come
from in front of you. while a high negative value will result in the synth appearing to
come from behind you (if you happen to be
wearing headphones, at least). Creative use
of this effect can help when you're separating
instrument locations to avoid blurriness.
Volume, VL
This controls the mix of the choral effect
sound and the original sound. When the
slider is at 0% it is the same as setting the
order to 0 i.e. turning off the effect.
More chorus options
In the options menu there are more options
for chorus. These options contain pre-
programmed settings of the chorus sliders.
For our synth, set the
values to be the something like the image to the left but you can
set them to whatever you like. Now we have a cool sounding
synth with only a basic saw wave routed through a chorus
effect!

Sytrus Synths Creation, Chapter 1. Basic waveforms and the chorus effect
Sytrus Synth Manual 2nd Edition by Jens Malmgren Page 16
Now we're going to reroute the sound through
a filter to process it, and then output it through
to the chorus effect. To do this, we must reduce
OP 1's FX and output percentages to 0%. Put
the cursor on the FX and out operator knobs
and click on the mouse wheel to turn off both of them.
Throughout this manual we will talk about the matrix many
times but before we continue I would like to point out that you
could also think of Sytrus as a “6xOsc synth”. In the picture to
the right you can see how to set the knobs for doing just that. In
Sytrus it is called operator (and not oscillator) because an
operator makes it possible to change so much more than that
just the waveform. With this setup you can achieve really many
sounds but Sytrus got a lot more power than just mixing 6 oscillators so let’s
continue with our synthesizer, but first make sure all knobs in the matrix are turned
off.
At the row F1 in the column 1 (for operator 1) increase the knob to
100%. Then, if we're going to hear anything, we need to have Filter
1 output to FX and output, again 100% each. To the left you can see
how the matrix now should look like. Now the sound from
operator 1 is routed through filter one and then through the chorus
effect. Now if you play a note, you will notice the range of
frequencies has been reduced greatly.
Go to filter 1. This
is where you
choose the type of
filter and tweak its
parameters to
your liking. Currently, we are using the default Chocolate State Variable filter and its
default parameters. The state variable filter is rather complicated, so we're going to
choose a different filter for our saw synth. Right click the panel that says "SVF' in it
and choose the item labeled "Lime Low Pass" (Alternatively you can just click and
drag up until the letters "LP" appear).

Sytrus Synths Creation, Chapter 1. Basic waveforms and the chorus effect
Sytrus Synth Manual 2nd Edition by Jens Malmgren Page 17
A low pass filter is very well described by a graph in
Fruity Parametric EQ2. It is configured to let
frequencies below the cutoff point to pass through.
The cutoff point frequencies can be amplified. That
peak is called the resonance effect. When the peek is
higher the effect is more pronounced. Chapter 5
talks more about different filters.
The filter icon is exactly the graph here above!
This filter has 3 parameters: Envelope amount, Cutoff frequency and Resonance. We
don't care about Envelope amount right now, but we do care about the cutoff
frequency. Because this is a low pass, the lower the value on the cutoff frequency
knob, the less sound will get through the filter, because you're cutting off the
waveform at a lower and lower frequency. On the flipside, if you turn the cutoff
frequency all the way up, the filter won't cut off any sound - Try different settings
and play different notes to get a feel for it.
For our purposes, we don't want to slice off any sound (yet), so set the cutoff
frequency to 100%. For now, a 30% resonance value is good for our filter.
Now that we have our filter set up, let's go back to the FX tab to take a look at some
of the other things we can do, the Pan knob on the upper left lets you adjust the
center location of the chorus, panning it to the left or the right. I usually avoid
panning just one single effect on a synth as it tends to make the synth lopsided. If
you programmed for example two effects, then you could pan the two to left and
right etc.
In the center, marked Send, it possible to reroute the effect sound to a separate mixer
track if that is what you want. This can be useful if you for example create a bass
sound but you want the effects of the bass to be mixed differently than the bass itself.
For example, you might want to apply ducking on the effect. Ducking is that the
sound is lowered in volume to leave room for other sounds in the mix.
On the right hand side, we have a set of 4 tabs - 3 delay banks and a reverb control.
Let's start by clicking on the first delay bank D1.
Sytrus Synths Creation, Chapter 1. Basic waveforms and the chorus effect
Sytrus Synth Manual 2nd Edition by Jens Malmgren Page 18
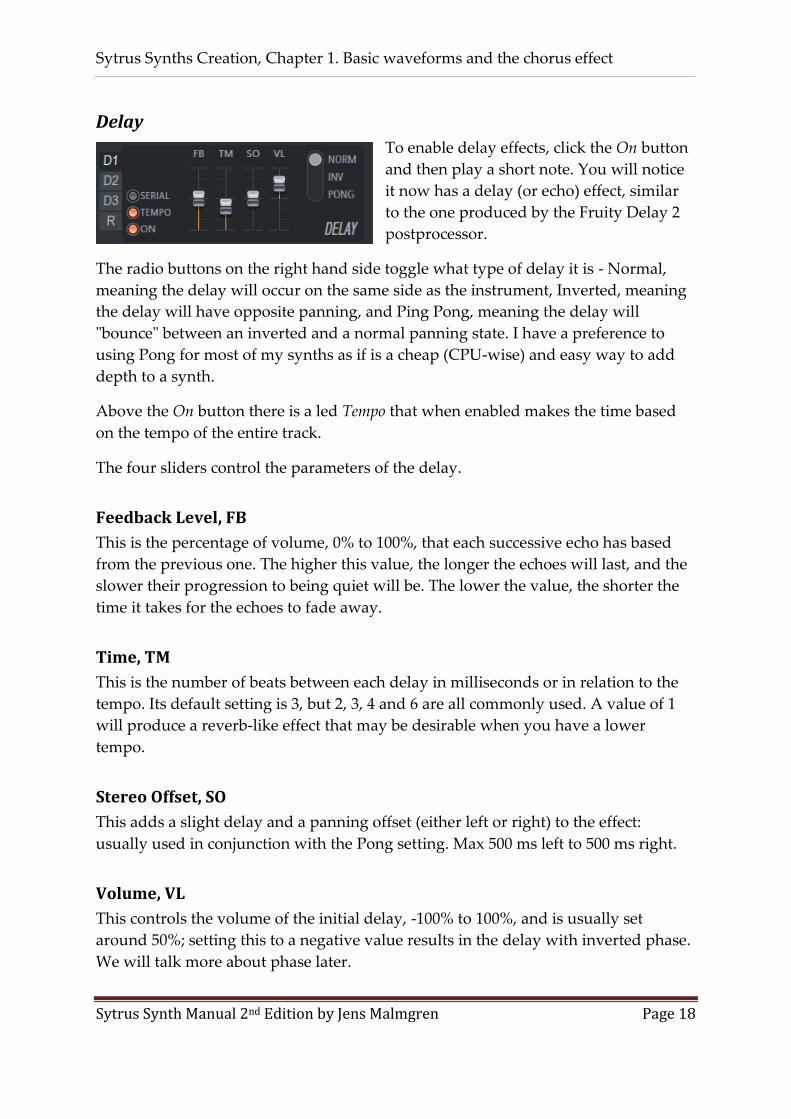
Delay
To enable delay effects, click the On button
and then play a short note. You will notice
it now has a delay (or echo) effect, similar
to the one produced by the Fruity Delay 2
postprocessor.
The radio buttons on the right hand side toggle what type of delay it is - Normal,
meaning the delay will occur on the same side as the instrument, Inverted, meaning
the delay will have opposite panning, and Ping Pong, meaning the delay will
"bounce" between an inverted and a normal panning state. I have a preference to
using Pong for most of my synths as if is a cheap (CPU-wise) and easy way to add
depth to a synth.
Above the On button there is a led Tempo that when enabled makes the time based
on the tempo of the entire track.
The four sliders control the parameters of the delay.
Feedback Level, FB
This is the percentage of volume, 0% to 100%, that each successive echo has based
from the previous one. The higher this value, the longer the echoes will last, and the
slower their progression to being quiet will be. The lower the value, the shorter the
time it takes for the echoes to fade away.
Time, TM
This is the number of beats between each delay in milliseconds or in relation to the
tempo. Its default setting is 3, but 2, 3, 4 and 6 are all commonly used. A value of 1
will produce a reverb-like effect that may be desirable when you have a lower
tempo.
Stereo Offset, SO
This adds a slight delay and a panning offset (either left or right) to the effect:
usually used in conjunction with the Pong setting. Max 500 ms left to 500 ms right.
Volume, VL
This controls the volume of the initial delay, -100% to 100%, and is usually set
around 50%; setting this to a negative value results in the delay with inverted phase.
We will talk more about phase later.

Sytrus Synths Creation, Chapter 1. Basic waveforms and the chorus effect
Sytrus Synth Manual 2nd Edition by Jens Malmgren Page 19
Delay 2 and Delay 3 are the exact same as Delay and allows you to layer on multiple
echoing effects. A combination echo of time 3 and time 4 often sounds nice. Now,
let's look at the reverb tab.
Reverb
The reverb gives a feeling to the sound as if it is played in a room.
To enable reverb, click the On button. To make the time tempo based enable Tempo.
Above tempo you find the color setting of the reverb, here above set to “F”. The
color sets the decay time of the bass frequencies. The options are: Warmer (W+),
Warm (W), Flat (F), Brighter (B), Bright (B+). A bright room has a low bass response
while a warm room has high bass response. A flat coloring has not influence on the
bass response. There are eight other parameters to specify the reverb:
Low Cut, LC. Makes it possible to remove low frequency sound before adding
reverb.
High Cut, HC. Makes it possible to remove high frequencies before adding
reverb.
Pre-delay, PD. The time before the effects starts working. Is specified by the
current time mode set by the time button.
Room Size, RS. Experiment with this!
Diffusion, DF. Sets how the walls bounce the sound. Hard flat walls or soft
irregular walls.
Decay, DE. Sets the decay time of the reverb, the time it takes to decay the
sound to -60 dB.
High Damping, HD. This sets how much of the sound in the room should be
absorbed and muffled by the room. Max value turns this off.
Wet Volume, VL. Sets how much of the original signal should be mixed with
the reverb effect.
There we have it; a simplistic, yet nice sounding saw synth. Next, we will explore the
use of envelopes and how they can add lots to a synth, along with some more

Sytrus Synths Creation, Chapter 1. Basic waveforms and the chorus effect
Sytrus Synth Manual 2nd Edition by Jens Malmgren Page 20
complex concepts.
Before we do that we should save this preset. In the upper left corner open the drop
down menu.
Select “Save preset as…”. Give the preset the name “Simplicity”. If you by accident
hover over the Presets menu-item, then the already available presets are displayed.
Then press escape to close that menu and go on with saving the preset. Don’t select
another preset before you saved this preset!
Sytrus Synths Creation, Chapter 2. Synth creation basics
Sytrus Synth Manual 2nd Edition by Jens Malmgren Page 21
2. Synth creation basics In this section we will take a look at how to edit envelopes and the basics
of synth creation.
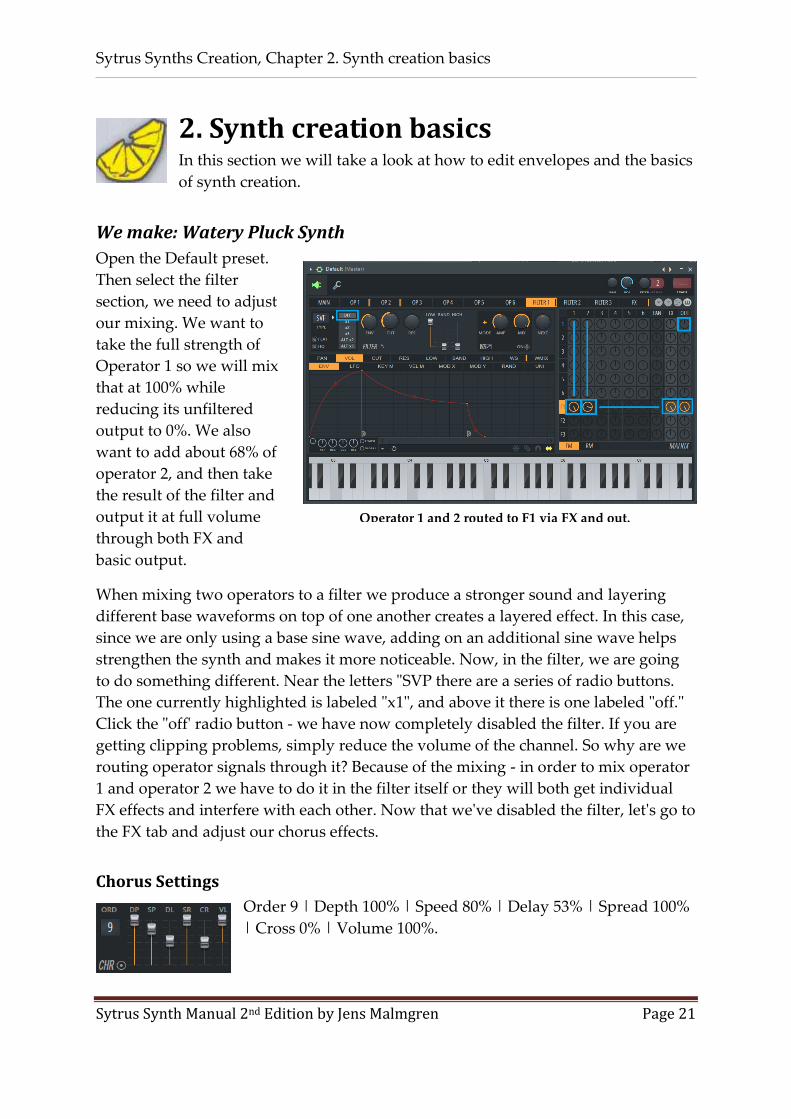
We make: Watery Pluck Synth
Open the Default preset.
Then select the filter
section, we need to adjust
our mixing. We want to
take the full strength of
Operator 1 so we will mix
that at 100% while
reducing its unfiltered
output to 0%. We also
want to add about 68% of
operator 2, and then take
the result of the filter and
output it at full volume
through both FX and
basic output.
When mixing two operators to a filter we produce a stronger sound and layering
different base waveforms on top of one another creates a layered effect. In this case,
since we are only using a base sine wave, adding on an additional sine wave helps
strengthen the synth and makes it more noticeable. Now, in the filter, we are going
to do something different. Near the letters "SVP there are a series of radio buttons.
The one currently highlighted is labeled "x1", and above it there is one labeled "off."
Click the "off' radio button - we have now completely disabled the filter. If you are
getting clipping problems, simply reduce the volume of the channel. So why are we
routing operator signals through it? Because of the mixing - in order to mix operator
1 and operator 2 we have to do it in the filter itself or they will both get individual
FX effects and interfere with each other. Now that we've disabled the filter, let's go to
the FX tab and adjust our chorus effects.
Chorus Settings
Order 9 | Depth 100% | Speed 80% | Delay 53% | Spread 100%
| Cross 0% | Volume 100%.
Operator 1 and 2 routed to F1 via FX and out.

Sytrus Synths Creation, Chapter 2. Synth creation basics
Sytrus Synth Manual 2nd Edition by Jens Malmgren Page 22
This synth uses a 9 order chorus for a reason. If you reduce the chorus to 7 you can
hear slight aliasing problems. Now that we have our
chorus set up, we can play around with our Delay
banks. Select the first delay bank and turn it on - we
will be using its default settings. Play a short note -
we have an echo on our synth now, but it's rather
plain. To solve this, open up the second delay bank,
enable it, and change its time value to 4:00. Now if
you play a short note, the dual echoes enhance each
other and create a rich texture.
Our effects are now set up, and we can get to the real part of this - a pitch envelope.
Navigate to the Operator 1 tab, choose the "pitch" tab, and make sure "ENV" is
selected.
Here is the envelope editor. While this type of editor also controls
LFO, keyboard mapping, etc., the actual editing controls are the
same for all of them. By default, the editor is in Slide mode (Yellow arrow icon).
Snap (Green magnet) will snap the points to the grid, and slide slides the rest of the
points after the one you selected. Step (Pen) is an alternate mode of editing that can
sometimes be useful, but should largely be left alone. Freeze (Snowflake icon) locks
all editing.
In slide mode when we want to erase right click a
point and click "delete" on the popup menu that
appears. Do this for all the points, except the first
point, which is known as the origin and cannot
be deleted.
At the left side below the envelope there is a
checkbox you need to set to enable the envelope.
The two delay banks
Make sure the pitch is enabled.
Starting with a clean slate
The default envelope shape
only works for some synths,
and you may find yourself
deleting it many, many
times. To speed up this
process, enable "step" editing
mode, right click on the right
side of the editing window
and drag the mouse across to
the left side. This will delete
all the points except for the
origin, giving you a clean
slate.

Sytrus Synths Creation, Chapter 2. Synth creation basics
Sytrus Synth Manual 2nd Edition by Jens Malmgren Page 23
Now we will make our
first envelope and it will
be simple. Add a point to
the editor, wherever you
want, by right clicking
somewhere in the
window. A line should
now connect the origin
with your new point. Left
click your new point and
move it so that your editor looks something like figure 6.
The line connecting the
two dots is our entire
envelope, and we can
adjust the amount of
curve it has by clicking
the handle in its center
and dragging up or
down. We want a very
extreme curve, so click
and drag up as far as you possibly can, until you match figure 7.
There is one last thing to do with the envelope. Near the middle, there are two
buttons, "tempo" and "global." I will explain global later, but what we want to do is
click the "tempo" button. When you do, the lines in the editor will change, and your
point will no longer be aligned to the grid. To fix this, just click and drag your point
around so that it snaps to the new grid size.
Why was a new grid size created? If you scroll to the right (Or if you zoom out by
moving the scroll wheel down), you will see a highlighted vertical bar on the grid -
this represents a measure, and you can probably figure out how the other bars
correspond to this in terms of beats. We have set our pitch to last for exactly 1/16th of
a measure, so if you adjust the BPM, the effect will get shorter or longer in response.
Enabling Tempo Mode
When you click the tempo button and the envelope hasn't been enabled, it is
automatically enabled. Thus, you can save yourself a mouse click by clicking the
tempo button instead of the enable button.
Figure 6: Putting down the first point
Figure 7: Creating the curve

Sytrus Synths Creation, Chapter 2. Synth creation basics
Sytrus Synth Manual 2nd Edition by Jens Malmgren Page 24
Operator settings
Now, we have a few last things to do if we're going to finish off this synth. Navigate
back to the OP 1 tab and notice the four toggle buttons on the right side of the
waveform sliders.
Center
Sometimes a waveform will, for whatever reason, be biased to the top or bottom of
the spectrum, Center will center an operator's waveform so that it stays in the
middle of the spectrum. It's usually pretty obvious when a waveform isn't centered,
as your oscillator viewing window (by the volume level) will show a waveform
that's either really low or really high.
Declick
A waveform, such as A in the graph to the left,
that start the oscillation from silence, a volume
0% and then from there oscillates, that type of
sound is free from any clicking. A waveform
such as B starting from a bit into the oscillation,
for such sound the beginning may come so
abruptly that a clicking sound occurs.
What de-clicking does is that it creates a super-fast increase of volume from 0% to
the starting point of the oscillation, marked with red in oscillation B. This quick but
yet gradual start of playing the waveform eliminates any clicking.
Band Limit
This band limits the waveform, which helps in aliasing problems; if your wave has
extreme amplitudes (or is just loud in general). It doesn't hurt to enable this.
Pluck
This changes the operator synthesis mode to Pluck. We will cover this in chapter 4.
Using Tempo Mode
The tempo mode is useful not only for keeping your synth effects in time with the
beat, but also for timing the envelopes in general. When tempo mode is enabled,
the bars let you know exactly how long your envelope is going to last, 1/4th of a
measure, 1/2 of a measure, etc.

Sytrus Synths Creation, Chapter 2. Synth creation basics
Sytrus Synth Manual 2nd Edition by Jens Malmgren Page 25
Phase
Often when waveforms have a changed phase, “the starting point of the oscillation”,
that might result in clicking. Our current synth is clicking right now.
If you want to change the starting point of a waveform
manually then it is the phase button you need to change. The
manual, the tooltip window and the forums at Image-Line are
all saying that this button changes the starting point of the
oscillation. What I found is that the phase button changes the start position for how
far into the oscillation Sytrus is playing the oscillation waveform.
If you play a waveform and view it in the WaveCandy oscilloscope then you
understand why higher phase values makes the oscillation waveform move to the
left, it plays earlier and earlier because the starting point of playing it is further and
further into the oscillation. With the official explanation you would think that with
higher phase values the oscillation waveform would play later and later and shift to
the right.
Next to the Phase knob there is a checkbox (led) that when turned on sync all phases
on all operators.
Phase cancellation
When mixing sounds, you will come across a phenomenon
called phase cancellation. The phase can be altered
manually “manually” with for example the phase knob on
the operator tab. Change of phase can also happen as a
result of the Unison effect etc.
A regular waveform has a positive and
negative value. When we send such sound
to a speaker the speaker cone moves out
and in. When we mix together two
identical waveforms of opposite phase
they are cancelling each other.
Sytrus Synths Creation, Chapter 2. Synth creation basics
Sytrus Synth Manual 2nd Edition by Jens Malmgren Page 26
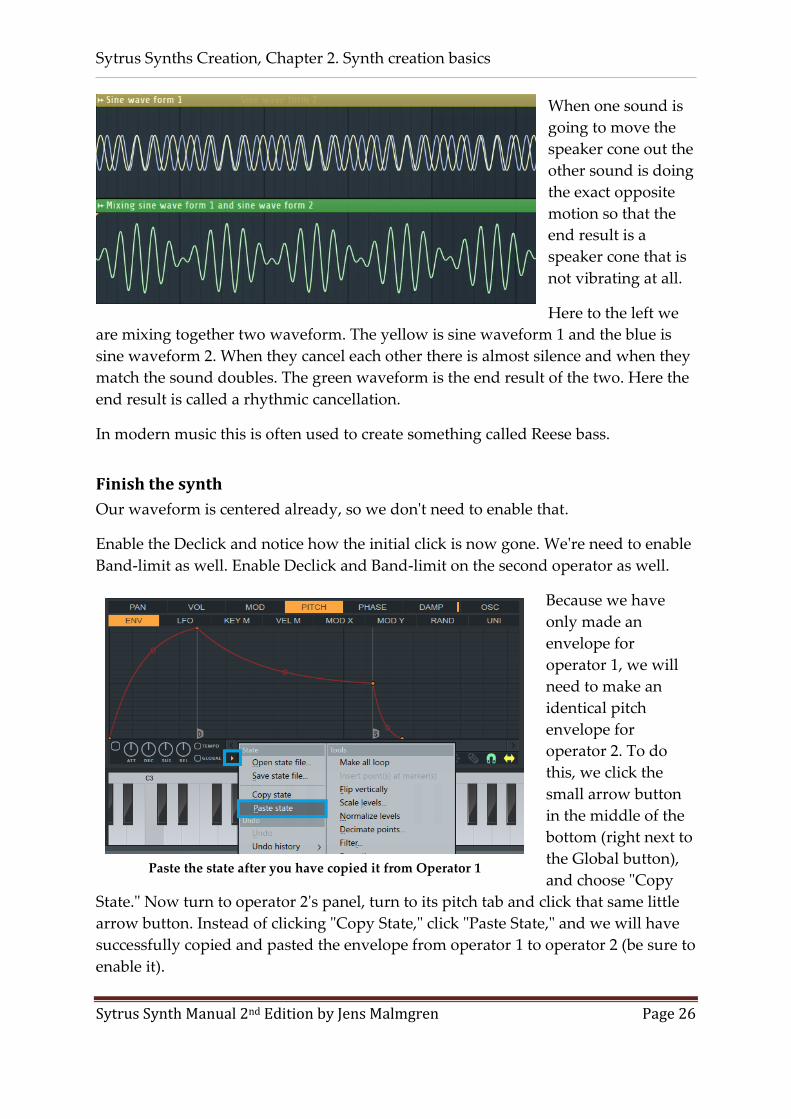
When one sound is
going to move the
speaker cone out the
other sound is doing
the exact opposite
motion so that the
end result is a
speaker cone that is
not vibrating at all.
Here to the left we
are mixing together two waveform. The yellow is sine waveform 1 and the blue is
sine waveform 2. When they cancel each other there is almost silence and when they
match the sound doubles. The green waveform is the end result of the two. Here the
end result is called a rhythmic cancellation.
In modern music this is often used to create something called Reese bass.
Finish the synth
Our waveform is centered already, so we don't need to enable that.
Enable the Declick and notice how the initial click is now gone. We're need to enable
Band-limit as well. Enable Declick and Band-limit on the second operator as well.
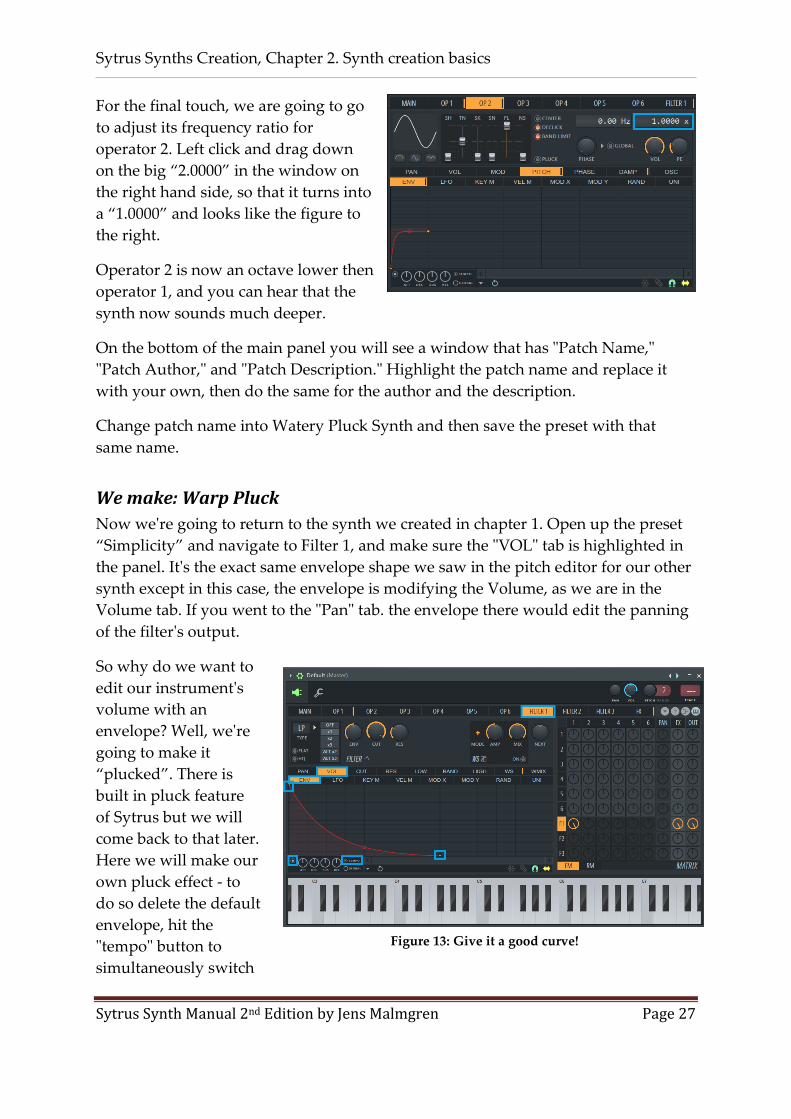
Because we have
only made an
envelope for
operator 1, we will
need to make an
identical pitch
envelope for
operator 2. To do
this, we click the
small arrow button
in the middle of the
bottom (right next to
the Global button),
and choose "Copy
State." Now turn to operator 2's panel, turn to its pitch tab and click that same little
arrow button. Instead of clicking "Copy State," click "Paste State," and we will have
successfully copied and pasted the envelope from operator 1 to operator 2 (be sure to
enable it).
Paste the state after you have copied it from Operator 1
Sytrus Synths Creation, Chapter 2. Synth creation basics
Sytrus Synth Manual 2nd Edition by Jens Malmgren Page 27
For the final touch, we are going to go
to adjust its frequency ratio for
operator 2. Left click and drag down
on the big “2.0000” in the window on
the right hand side, so that it turns into
a “1.0000” and looks like the figure to
the right.
Operator 2 is now an octave lower then
operator 1, and you can hear that the
synth now sounds much deeper.
On the bottom of the main panel you will see a window that has "Patch Name,"
"Patch Author," and "Patch Description." Highlight the patch name and replace it
with your own, then do the same for the author and the description.
Change patch name into Watery Pluck Synth and then save the preset with that
same name.
We make: Warp Pluck
Now we're going to return to the synth we created in chapter 1. Open up the preset
“Simplicity” and navigate to Filter 1, and make sure the "VOL" tab is highlighted in
the panel. It's the exact same envelope shape we saw in the pitch editor for our other
synth except in this case, the envelope is modifying the Volume, as we are in the
Volume tab. If you went to the "Pan" tab. the envelope there would edit the panning
of the filter's output.
So why do we want to
edit our instrument's
volume with an
envelope? Well, we're
going to make it
“plucked”. There is
built in pluck feature
of Sytrus but we will
come back to that later.
Here we will make our
own pluck effect - to
do so delete the default
envelope, hit the
"tempo" button to
simultaneously switch
Figure 13: Give it a good curve!

Sytrus Synths Creation, Chapter 2. Synth creation basics
Sytrus Synth Manual 2nd Edition by Jens Malmgren Page 28
us to tempo mode and to enable the envelope, then left click and drag the origin
point to the top. Once you have done that, add another point approximately 2 beats
to the right, on the bottom, and give it a good curve (Figure 13). Now play a note.
You will notice that it no longer matters how long you hold down the key - this is
because our envelope has no defined areas. The volume is being reduced until the
envelope stops, and at that point the volume is at 0 so no matter how long you hold
down the note, you will not hear it. Likewise, if you play the note for only a short
period of time, because the envelope has not been configured to stop, the envelope
continues to function until it reaches its end. If you want to stop it from doing that,
right click the point you added and select "Sustain/Loop End." Now when you play a
note, it stops when it is supposed to. Raise the point up halfway, and add another
point.
Now try playing a short and a long note.
Notice how the envelope portion after
the sustain loop end point always plays
when you release the note, but the
portion of the envelope before the
sustain loop end point will only play
while you are holding down the note.
We will discuss this more later; for now,
we only need a pluck, so revert your envelope back to Figure 13.
Now it’s time to have some fun with our filter, click on the tab labeled "CUT". This
corresponds to the filter's cutoff frequency knob that you should currently have set
to 100%. Likewise, VOL affects volume, PAN affects panning, RES affects the
resonance, and LOW/BAND/HIGH does not affect anything because the filter we
have chosen does not have those parameters (only the state variable filter does). This
time, however, instead of forming an envelope, we are going to use one of the other
methods.
Next to the ENV tab you
will see a tab labeled
LFO. Highlight it, and
you will find yourself at
the controls of an LFO.
An LFO is basically a
waveform that is applied
to any given attribute on
a synth, which loops
over and over.
Sytrus allows you to do advanced things with the LFO, but we only really want a
Use the SPD knob to change the LFO
The "S" denotes a sustain loop end point.

Sytrus Synths Creation, Chapter 2. Synth creation basics
Sytrus Synth Manual 2nd Edition by Jens Malmgren Page 29
basic one. To get rid of all the points, wipe the slate clean. You will be left with the
origin point - notice how in the LFO, it is in the center, not the bottom. This is
because the LFO functions in both positive and negative directions. If you raise the
origin point up, the LFO will begin going positive and increasing the attribute it is
linked to (cutoff frequency, in this case), then go down below the line and decrease
the attribute it is linked to by the same amount.
For our
purposes, we're
just going to put
the origin at the
bottom to give
the LFO a full
range. Once you
have done that,
click the "tempo"
button to both
enable the synth
and switch to tempo mode. At the bottom of the LFO editor you will see four knobs.
We only really care about the "speed" knob right now, as it determines how fast our
LFO wave oscillates. Since we are in tempo mode, Sytrus will automatically snap to
tempo-based settings. Set your LFO so that it looks like Figure 16.
Now, play a note. You will notice the cutoff filter is now going down at the start of
each note, following the curve of the LFO. However, like an envelope, the LFO is
being retriggered each time a note is played. We're going to toggle the "Global"
option. Now, if you play many notes, you will notice that instead of being
retriggered on each note, the LFO is constantly operative, affecting all the notes at
once. It is now a global LFO, and this same concept can apply to looping Envelopes,
which we will explore later. To really get a feel for what this LFO is doing, use the
new synth on a motif in the piano roll.
You will notice how the LFO is affecting the cutoff ratio based on the tempo time
and how it corresponds to the wave. However, the LFO only appears to be affecting
the cutoff ratio when it is going down - when it is positive, there is no audible effect,
making it seem like its only working half the time. The reason for this is that we've
set our cutoff frequency at the highest possible value. When our LFO is in the
positive range, it can't increase the cutoff frequency anymore because it's already
maxed out. To fix this, reduce the cutoff frequency to 85%.
In chapter 6 we will talk more about the relation between the cutoff frequency and
the envelope of for example LFO.
Figure 16. Click the button labeled "Global"

Sytrus Synths Creation, Chapter 2. Synth creation basics
Sytrus Synth Manual 2nd Edition by Jens Malmgren Page 30
The LFO will now have a more pronounced effect. Actually, its effect will be too
pronounced! We can barely hear the synth now! To fix this problem, we must turn to
the Envelope knob on our filter.
The envelope knob is what is controlling the peaks of our LFO and
envelope. Currently it is set at 50%, which means our LFO is
alternating between subtracting 50% from our cutoff frequency and
adding 50%. We can reduce this to 0% or raise it to 100%, but for this
synth we want it at around 35%. Now the synth sounds a bit better,
but the high part of it seems a bit short, so let's raise our cutoff
frequency to 85%. There we go!
We're going to use an envelope to
modify our resonance, causing it
to peak at the beginning of the
note and then falloff to nothing,
which should further enforce the
plucked nature of the synth.
Remember to enable tempo mode
before creating the envelope! Now
try playing that pattern sequence
again. The resonance effect is
immediately noticeable.
If we want our synth to be even more obvious, we can utilize the controls at the side
of the filter selector: 1x, 2x, 3x, alt 2x, and alt 3x. Click around on them and compare
the sounds. Higher values (3x) tend to produce more refined sounding synths by
exaggerating the effects of the filter and any envelopes/LFOs you have made.
Flat
The HQ button renders the filter with high quality. You can use it in
a draft, or it is usually automatically enabled when you are
rendering (that's what the "enable HQ for all plug-ins" setting on the
main panel does on export). Flat provides an alternative algorithm
for the resonance effect.
ENV 35% |
CUT 85% |
RES 30%.
The resonance envelope.

Sytrus Synths Creation, Chapter 2. Synth creation basics
Sytrus Synth Manual 2nd Edition by Jens Malmgren Page 31
Wave Shaper
As a final exercise, we will look at
the controls on the right side of the
filter, denoted with the initials "WS."
WS stands for Wave Shaper. You
can use it to create distortion. Click
the On button and you will instantly
hear a richer, thicker texture on your
synth. In the WS panel you see an
envelope describing how the input
signal waveform along the horizontal axis is mapped to the output signal waveform
on the vertical axis.
An input signal of a sinus curve that looks like this:
Looke like this when it has been modified by the default wave shape envelope.
To get a feel for how WS functions you could create
a curve like the image to the right. It changes the
sound into an amplified electric guitar. I'm keeping
my wave shaper as a curve dragged all the way
down, but you can do whatever you feel like doing.
If you would like the shape to be different between the upper and lower part, then
you should enable the plus “unipolar/bipolar mode”.

Sytrus Synths Creation, Chapter 2. Synth creation basics
Sytrus Synth Manual 2nd Edition by Jens Malmgren Page 32
My Amp and Mix Values:
Amp 116% | Mix 66%.
There are two knobs in the WS section, AMP and MIX. AMP controls the amplitude,
or strength, of the wave shaping. Mix controls how much of the wave shape mix is
used in place of the normal voice. If this is reduced to 50%, half of the sound
produced will be from the filter, and the other half will have been processed with the
wave shaper.
Key mapping
Go to the PAN tab of filter 1, and as you will recall, the PAN tab controls the
panning of the filter's output. Note that it only controls this filter - if we had multiple
filters, the other filters would be unaffected by this. Instead of simply creating a pan
envelop, however, we're going to use one of the other methods available to us. So
far, we've used an Envelope and an LFO. In addition to these, there are KEY M (Key
mapping), which allows you to change an attribute based on which key is being
pressed. VEL M (Velocity Mapping), which allows you to change an attribute based
on the volume of the note played, RAND (Random), which allows you to change an
attribute completely randomly, and MOD X, MOD Y, and UNI, which will all be
covered later.
If you hover over
the grid in the
envelope editor
and look at the
tooltip window
you will notice
what key the
cursor is pointing
at. Here the arrow
is pointing to C5. Lower the first point to the bottom and raise the second point to
the top. Now the lower notes are panned to the left speaker, and the higher notes are
panned to the right speaker. If, however, we want to exaggerate this effect, we need
to do something special to our curve.
Sytrus Synths Creation, Chapter 2. Synth creation basics
Sytrus Synth Manual 2nd Edition by Jens Malmgren Page 33
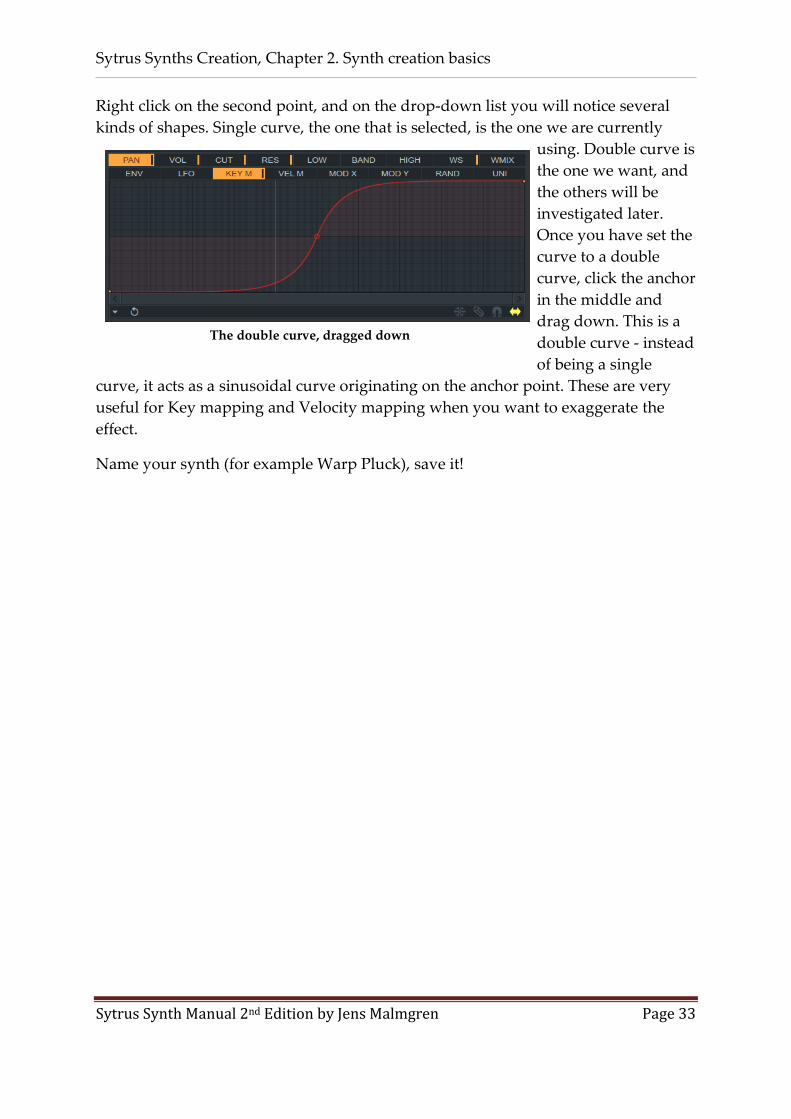
Right click on the second point, and on the drop-down list you will notice several
kinds of shapes. Single curve, the one that is selected, is the one we are currently
using. Double curve is
the one we want, and
the others will be
investigated later.
Once you have set the
curve to a double
curve, click the anchor
in the middle and
drag down. This is a
double curve - instead
of being a single
curve, it acts as a sinusoidal curve originating on the anchor point. These are very
useful for Key mapping and Velocity mapping when you want to exaggerate the
effect.
Name your synth (for example Warp Pluck), save it!
The double curve, dragged down
Sytrus Synths Creation, Chapter 3. Main panel
Sytrus Synth Manual 2nd Edition by Jens Malmgren Page 34
3. Main Panel
Master volume, Master LFO and Master Pitch
At the upper left corner of Sytrus you find the main volume, the LFO
volume and the master pitch. The master volume makes it possible to
increase or decrease the master volume. The master LFO level makes it
possible to reduce the volume of LFO globally. Pitch makes it possible
to change the pitch. Suppose you set the Default preset of Sytrus to play a C4 in the
piano roll and the frequency ratio of operator 1 is set to 1.000 then the tone produced
is indeed C4. If you then increase the frequency ratio to 2.000 the tone produced will
be one octave higher, a C5. If we then decrease the master pitch with 12 semitones,
then although the frequency ratio is still at 2.000 the tone produced will be C4.
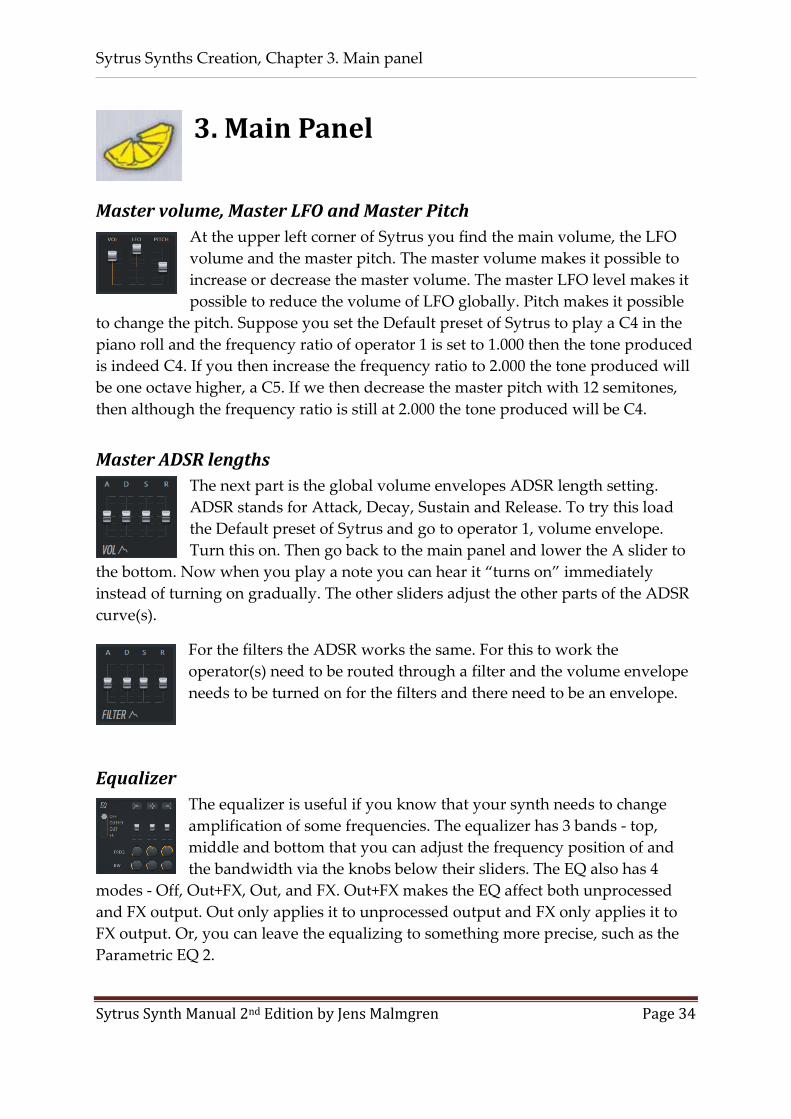
Master ADSR lengths
The next part is the global volume envelopes ADSR length setting.
ADSR stands for Attack, Decay, Sustain and Release. To try this load
the Default preset of Sytrus and go to operator 1, volume envelope.
Turn this on. Then go back to the main panel and lower the A slider to
the bottom. Now when you play a note you can hear it “turns on” immediately
instead of turning on gradually. The other sliders adjust the other parts of the ADSR
curve(s).
For the filters the ADSR works the same. For this to work the
operator(s) need to be routed through a filter and the volume envelope
needs to be turned on for the filters and there need to be an envelope.
Equalizer
The equalizer is useful if you know that your synth needs to change
amplification of some frequencies. The equalizer has 3 bands - top,
middle and bottom that you can adjust the frequency position of and
the bandwidth via the knobs below their sliders. The EQ also has 4
modes - Off, Out+FX, Out, and FX. Out+FX makes the EQ affect both unprocessed
and FX output. Out only applies it to unprocessed output and FX only applies it to
FX output. Or, you can leave the equalizing to something more precise, such as the
Parametric EQ 2.
Sytrus Synths Creation, Chapter 3. Main panel
Sytrus Synth Manual 2nd Edition by Jens Malmgren Page 35
X/Y Controller
For an in depth explanation of this controller please read chapter 6.
The “Smooth” setting of the X/Y controller makes the input smooth.
It can be really handy to turn this off if you are playing to create
really sharp percussive sounds via automation of the X/Y controller.
Quality
Normally Sytrus is set to work in a draft mode. This setting is
good enough to hear what the result will almost be like when
rendering. There should under normal circumstances not be
necessary to change any of these settings. Perhaps you have a
really good computer and high demands to hear exactly what the sound is going to
sound like when it has been rendered, then you might want to change the settings
here.
Global options
Random
Most synths utilize random things like random noise, and some randomness in
unison/choral effects. Turn this off and your synth will be as predictable as the
moon.
Mono key
This prevents multiple instances of your synth from playing on the same note. The
effect is obvious when you layer multiple notes on top of each other. When mono
key is enabled, only one of the notes will play. When mono key is disabled, all of the
notes will play.
Soften
This feature adjusts the volume envelope according to the velocity of the key that's
being hit, so you can make the fade in of the synth more obvious for quieter notes.
Global pitch
These makes operator 1’s pitch envelopes affect the entire synth (yes, the entire

Sytrus Synths Creation, Chapter 3. Main panel
Sytrus Synth Manual 2nd Edition by Jens Malmgren Page 36
synth, no exceptions).
Center
This centers the waveform, similar to the center option on an operator, except for the
total output of the synth.
Gibbs off
This is a method to get rid of the Gibbs phenomenon when oversampling is set to
something lower than 2x. Above 2x this should not be necessary.
Porta
This feature is explained in chapter 11.
Unison
Next we will talk about the Unison effect. Unison is an effect created by generating
several copies of the synth and then introducing differences between each sub voice.
This is similar to how Chorus works. What is the difference between the Unison and
the Chorus effect?
Unison essentially lets the synth play all the sub voices at the same time and
then insert differences in phase and pitch (etc) to make the overall sound
bigger together. Unison applies the effects based on the original sound.
Chorus works by taking an audio signal that is pitch shifted, panned and
delayed etc and then sent on to the next step of modification up until the
order of the effect one after another. Finally, the signal is mixed with the dry
signal. The LFO controls the pitch shift.
Unison is turned off when set to 1.

Sytrus Synths Creation, Chapter 3. Main panel
Sytrus Synth Manual 2nd Edition by Jens Malmgren Page 37
Now we will experiment with Unison by clicking
the box next to its sliders, marked with a blue
rectangle, and dragging up until the number 2
appears, as shown in figure 11.
Panning, PN
This controls the panning variation between the
sub voices. At 100%, the full stereo spectrum will
be utilized. At 50% the maximum panning will only be at 50%, At 0%, there is no
panning done at all. Be mindful that you will be completely unable to do panning
effects when this is set at 100%. If you want your instrument to go from one speaker
to another, set this very low, or consider not using Unison at all.
Volume, VL
This controls the volume level variation between the sub voices.
Pitch, PT
This is the pitch variations on the individual sub voices. With too much of pitch
variation the synth will sound detuned.
Sub-level, SB
This generates an additional set of instrument sub voices at an octave lower than the
current one, and mixes them according to the percentage. If this is at 50%, 50% of the
sound produced will be one octave lower than normal, and 50% will be generated on
the normal octave. Note that usage of this doubles the CPU usage but for bass
sounds it is really nice!
Phase, PH
This is the phase variation put on the sub voices, and is used to widen the sound.
Like the starting phase dial, the sounds produced by different values of this depend
completely on the synth in question, so experiment with it.
Envelope Variation, EV
When you have a volume envelope set up (or any other envelope, for that matter),
this is how much the envelope points are scattered. An interesting effect of this when
using a pluck volume envelope is that higher values tend to exaggerate the pluck
effect. We talk about the real pluck effect in chapter 4.
Figure 11: Setting up Unison

Sytrus Synths Creation, Chapter 3. Main panel
Sytrus Synth Manual 2nd Edition by Jens Malmgren Page 38
Play around with these settings until you've found one that you like. Remember that
Unison is your friend - it can very quickly make a synth sound cool. Unison makes
almost anything sound cool. Seriously!
Unison visualized
I failed many times to understand how
Unison works. That is why I decided to
recreate Unison without using Unison.
Then I would match my sound with that
produced with real Unison and if I could
get the two to look the same in a graph
and sound the same then I would have
proven to myself that I had understood
Unison! Perhaps if you
read how I did this you
can better understand
Unison as well. If you
already got it then you
can skip this and jump
to the next section.
As you can see in the
graph I succeded!
For this experiment I start with a new fresh empty project of
FLStudio, after I first saved my current work obviously. To channel
one I added a Sytrus that I would use for the real Unison. For
channel two and three I added a Sytrus each for simulating Unison
of order two. In the mixer for track two and three I redirected the
sound to mixer track four only. In the effect slot of mixer track four I added a
WaveCandy that I made blue. That is the upper graph here above.
Real Unison, the lower green graph
In mixer track one I added a WaveCandy at effect slot one. That WaveCandy became
green, the lower graph here above.
In Sytrus one I loaded the Default preset. In the main tab I
made Unison into these settings as you see here to the right.
Pan was 100% | Volume 0% | Pitch 86% | Sub level 0% | Phase
100% | Envelope Variation 0%. This is an admittedly simple
kind of Unison effect. If renders really well in the WaveCandy though.
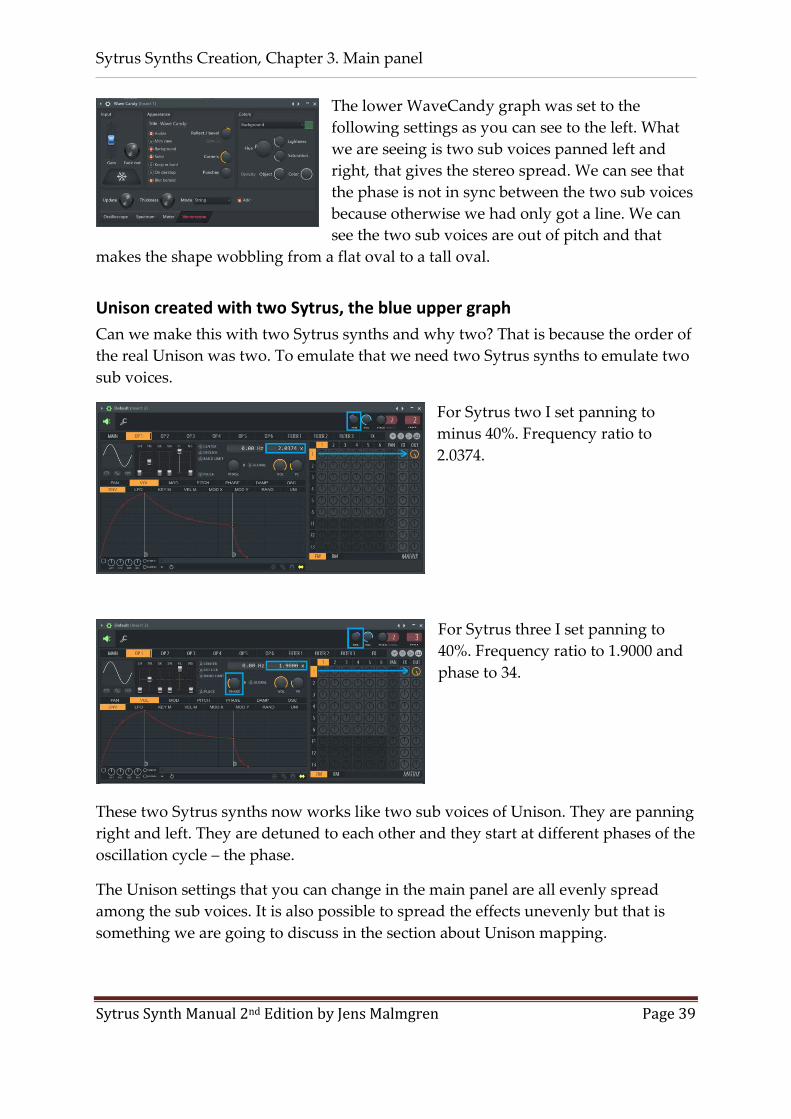
Sytrus Synths Creation, Chapter 3. Main panel
Sytrus Synth Manual 2nd Edition by Jens Malmgren Page 39
The lower WaveCandy graph was set to the
following settings as you can see to the left. What
we are seeing is two sub voices panned left and
right, that gives the stereo spread. We can see that
the phase is not in sync between the two sub voices
because otherwise we had only got a line. We can
see the two sub voices are out of pitch and that
makes the shape wobbling from a flat oval to a tall oval.
Unison created with two Sytrus, the blue upper graph
Can we make this with two Sytrus synths and why two? That is because the order of
the real Unison was two. To emulate that we need two Sytrus synths to emulate two
sub voices.
For Sytrus two I set panning to
minus 40%. Frequency ratio to
2.0374.
For Sytrus three I set panning to
40%. Frequency ratio to 1.9000 and
phase to 34.
These two Sytrus synths now works like two sub voices of Unison. They are panning
right and left. They are detuned to each other and they start at different phases of the
oscillation cycle – the phase.
The Unison settings that you can change in the main panel are all evenly spread
among the sub voices. It is also possible to spread the effects unevenly but that is
something we are going to discuss in the section about Unison mapping.

Sytrus Synths Creation, Chapter 3. Main panel
Sytrus Synth Manual 2nd Edition by Jens Malmgren Page 40
Main Menu
Since we're on the chapter about the main panel, let’s talk about the
Sytrus Main Menu. Here you can copy/paste an entire preset or an
oscillator, as well as randomizing and resetting
waveforms. You can also morph oscillators 1
through 5.
What this does is best demonstrated. Create a
new Default synth, change operator 1 to a saw
synth and operator 6 to a Square synth. Click on
"Morph Oscillators 1 through 5" and you will
notice that oscillators 2-5 are now intermediate
steps necessary to transform operator 1 into
operator 6.
There are also convenient presets for Unison in
the main menu.
The preset information panel
On the main panel you also find a window with information about the preset. If you
share a preset with someone else, it is helpful if you give a brief explanation about
the preset in the information panel.

Sytrus Synths Creation, Chapter 4. Synthesis
Sytrus Synth Manual v2 by Jens Malmgren Page 41
4. Synthesis
It's time to go back to Operators and really dig into some waveform synthesis. If you
look at the bottom of the matrix, you will notice two buttons, "FM" which stands for
Frequency Modulation. “RM” stands for Ring Modulation and it modulates volume.
This is more a modulation of the type “what you see is what you get”. We talk about
RM at the end of this chapter.
Frequency Modulation
With FM we are automating the pitch of an oscillator with
help of another oscillator. The angle of the slope of the
controlling waveform tells how fast the controlled waveform
is going to play. A horizontal angle on the controlling
waveform gives no change in speed. When the controlling
waveform has an upwards angle the speed is increasing on the
controlled waveform oscillation and when the angle of the
controlling waveform oscillation is pointing downwards the speed is decreasing.
The steeper the curve the faster.
Decreasing with what? When both waveforms have a frequency ratio specified then
the change in speed is relative.
We will make sounds that perhaps don’t sounds so well but they make it easy to see
what is happens with the waveforms. I made blue arrows in my images of the
matrix, there is the target the controlled waveform and the origin of the arrows are
the controlling waveform.
Suppose we change operator one and two to
these two waveforms here below. Then we
frequency modulate from 2 to 1 by 100%.
Please note that operator two has a starting
phase of 18%.
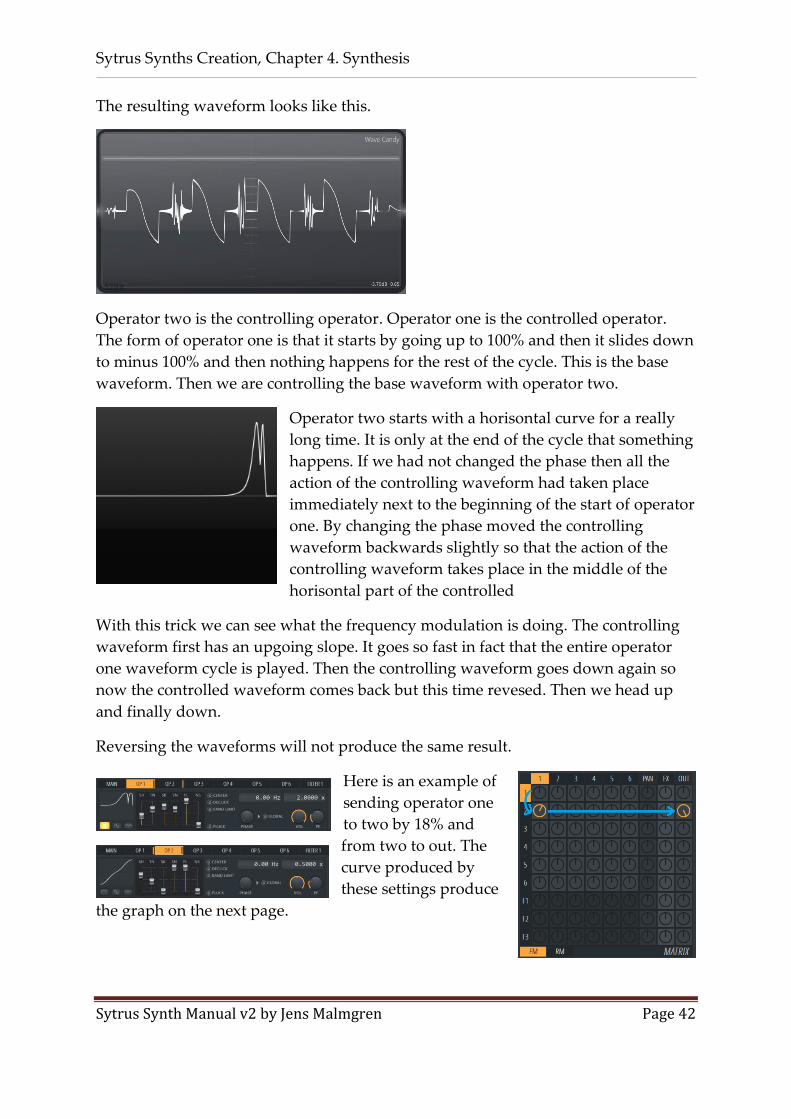
Sytrus Synths Creation, Chapter 4. Synthesis
Sytrus Synth Manual v2 by Jens Malmgren Page 42
The resulting waveform looks like this.
Operator two is the controlling operator. Operator one is the controlled operator.
The form of operator one is that it starts by going up to 100% and then it slides down
to minus 100% and then nothing happens for the rest of the cycle. This is the base
waveform. Then we are controlling the base waveform with operator two.
Operator two starts with a horisontal curve for a really
long time. It is only at the end of the cycle that something
happens. If we had not changed the phase then all the
action of the controlling waveform had taken place
immediately next to the beginning of the start of operator
one. By changing the phase moved the controlling
waveform backwards slightly so that the action of the
controlling waveform takes place in the middle of the
horisontal part of the controlled
With this trick we can see what the frequency modulation is doing. The controlling
waveform first has an upgoing slope. It goes so fast in fact that the entire operator
one waveform cycle is played. Then the controlling waveform goes down again so
now the controlled waveform comes back but this time revesed. Then we head up
and finally down.
Reversing the waveforms will not produce the same result.
Here is an example of
sending operator one
to two by 18% and
from two to out. The
curve produced by
these settings produce
the graph on the next page.

Sytrus Synths Creation, Chapter 4. Synthesis
Sytrus Synth Manual v2 by Jens Malmgren Page 43
It is as if the waveform of operator one is rippling up the surface of the waveform
produced by operator two. The possibilities are endless. It is of-course so that 18% is
not so much. It is barely noticeble.
We could also send the two waveforms separatly to
out. That produces almost the same curve but more
evenly shaped. The uneven result of the previous
curve is because the controlling operator has a slight
curve so the control speed is not constant.
This is what you would call a 2xOsc synth.
When we send operator 1 to 2 by -18% then this curve
is produced. See how the shape of operator one is
reversed.

Sytrus Synths Creation, Chapter 4. Synthesis
Sytrus Synth Manual v2 by Jens Malmgren Page 44
Ring Modulation
Ring Modulation makes it possible to modulate the volume. It is called ring
modulation because the original hardware that produced this kind of sound is
shaped as a ring.
We can illustrate this by making a sound with operator two with a high frequency.
Then operator one is a rather slow frequency.
When operator two is sent to one then this is the result.
We make: BagpipeSynth
Now we will start create something that not only looks interesting but also sounds
useful. We will call this synth “BagpipeSynth”. Load the default preset.
Let's set operator 1’s shape to
100% - we don't need to
change anything else. Notice
that a raw waveform rarely
sounds good.
Open up operator 2 and set Shape to about 60% and turn on the even button that
looks like a little sine wave. Go to the Frequency Ratio of operator 2 and change it to
1.0000.

Sytrus Synths Creation, Chapter 4. Synthesis
Sytrus Synth Manual v2 by Jens Malmgren Page 45
Then, go to the matrix, and modulate operator 2 to
1 with 5%, as shown in the figure to the right.
The base waveform in operator 1 is being
modified by the waveform in operator 2, in this
case, by 5%. This, in essence, mixes the waveforms
together to form a single, new
waveform. If you mixed
together a saw and a square, for
example, you would get a wave
that looked a little like a saw
and a little like a square.
Because operator 2 has a
frequency ratio of 2.0000 and operator 1 has a frequency ratio of 1.0000, operator two
is only about half as long as operator one, which makes it about an octave higher.
Change the frequency ratio of operator 2 to match operator 1. Now operator 2 has
the same frequency ratio as 1 and is on the same octave. For more fun, let’s enable
the "Even" button on the waveform for operator 2 as silence, its functional part is
actually about an octave higher, but its only modulating half of operator 1’s
waveform. That means that for the silent part of operator 2, operator 1 has no change
in its waveform. For the preset that we create in this section we want operator 2 at a
frequency ratio of 1.0000 and operator 1 at 2.0000.
The window, marked with blue, to the left of the
frequency ratio is the frequency offset, and you can use it
to make very minor changes to the wave frequency: this
is useful for low frequency modulation or minor tweaks
to the wave frequency, but we'll just ignore it for now. Below the frequency ratio
there are two dials. One is the volume, which controls the amplitude of the wave,
and the other is the pitch envelope amount. I suggest leaving the pitch envelope
amount well-enough alone. The volume however just reduces how loud the wave is.
Mixing waveforms of op1 and op2

Sytrus Synths Creation, Chapter 4. Synthesis
Sytrus Synth Manual v2 by Jens Malmgren Page 46
My Unison Settings
Order 2 | Panning 100% | Volume 100% | Pitch 25% | Sub-level 27%
| Phase 70% | Envelope Variation 0%.
Now that we've played around with
Unison, let's put in some Choral
effects. Choral effects are a very easy
way to make your synth sound good,
because, like unison, they'll make
almost anything that's got a decent
base waveform sound good. Just
increase the FX output for operator 1
to 100%.
My Chorus Settings
Order 5 | Depth 30% | Speed 80% | Delay 0% | Spread 100% |
Cross -100% | Volume 100%.
My Reverb Settings
Color Brighter | Low-cut 45 Hz | High-cut Off | Pre-
delay 75 ms | Room size 76 | Diffusion 100 | Decay 2.7
seconds | High Damping 7.4 kHz | Volume 38%.
To give our synth some depth, turn on Reverb and Delay.
Delay makes almost anything sound better - however, there
is the danger of making your synth blurred or cluttering up
your song, so keep that in mind. For my delay bank, I'm
using the default settings, but I made a custom reverb
setting. What we created here perhaps could be called a
futuristic bagpipe? Save this preset as “BagpipeSynth”.
Use That Chorus!
Chorus is excellent. Use it unless you're
looking for a very distinctive tone on
your synth. If you are just looking for a
nice sounding synth, Chorus will give it
to you. Use Chorus.
Only FX Output

Sytrus Synths Creation, Chapter 4. Synthesis
Sytrus Synth Manual v2 by Jens Malmgren Page 47
Sine Harmonics
Please load the
BagpipeSynth preset if
not already loaded.
Enable the OSC sub tab
marked with a blue
rectangle. This panel
displays vertical bands. I
changed the width of the
scrollbar so that my
vertical bands are
zoomed in. The upper part of the first band is entirely set. Look at the tooltip while
hovering over the bands. The first band says “Harmonic 1 magnitude 100%”. When
you hover with the cursor below the dashed line at the first band then the tooltip
says “Harmonic 1 phase: 0%”.
There are in total 255 of these bands. Each band describes a sinus curve harmonic. Its
magnitude and its phase, the starting time into the cycle. When hovering over the
bands you also notice at the right side of the tooltip window that the octaves are
indicated. The octaves are also given by darker bands.
When mixing together more sine curves with various phase in clever ways it is
possible to create any waveform imaginable. This is key sentences that you could
easily miss but I would like to point out that if you missed the previous sentence
then you could read it again, and again. Thanks.
You can manipulate the bands to change the
sounds. It is as if the waveform window has a
“predefined curves mode” making it possible to
manipulate the curve with the bands. Then when
selecting
“Convert
shape to sine
harmonics”
the sliders are reset and the sine harmonics
window is then displaying the underlying sine
harmonics that builds the sound.
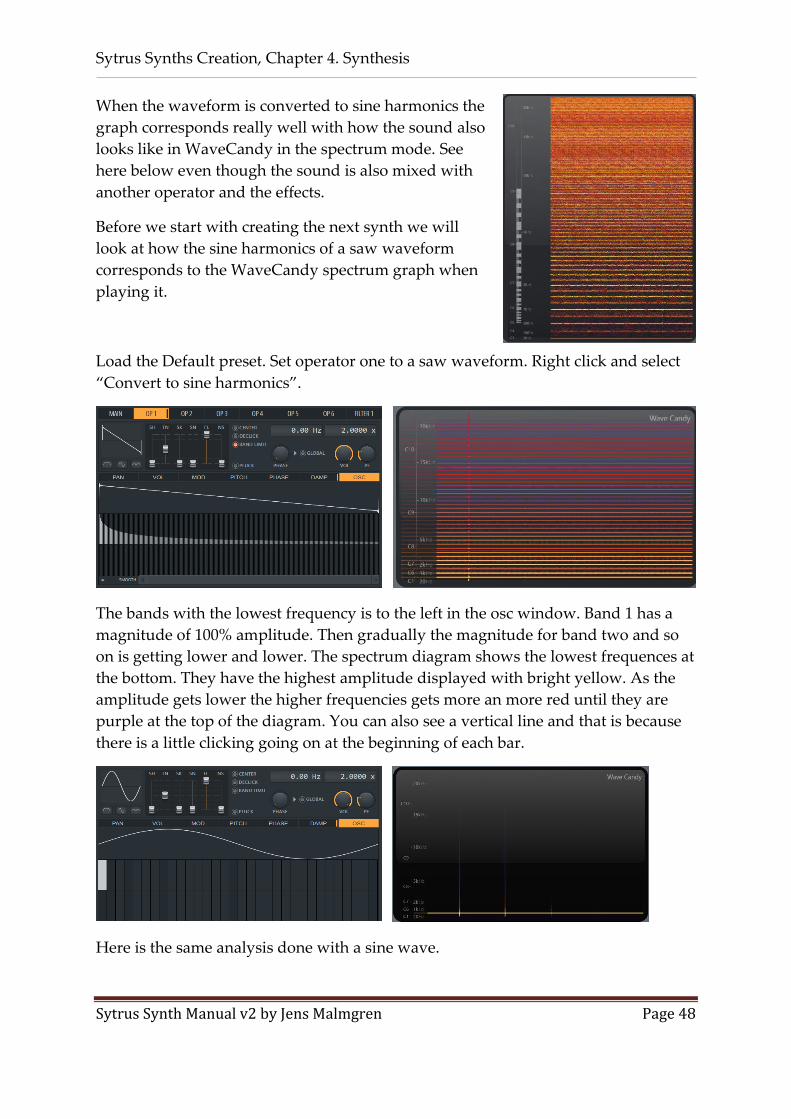
Sytrus Synths Creation, Chapter 4. Synthesis
Sytrus Synth Manual v2 by Jens Malmgren Page 48
When the waveform is converted to sine harmonics the
graph corresponds really well with how the sound also
looks like in WaveCandy in the spectrum mode. See
here below even though the sound is also mixed with
another operator and the effects.
Before we start with creating the next synth we will
look at how the sine harmonics of a saw waveform
corresponds to the WaveCandy spectrum graph when
playing it.
Load the Default preset. Set operator one to a saw waveform. Right click and select
“Convert to sine harmonics”.
The bands with the lowest frequency is to the left in the osc window. Band 1 has a
magnitude of 100% amplitude. Then gradually the magnitude for band two and so
on is getting lower and lower. The spectrum diagram shows the lowest frequences at
the bottom. They have the highest amplitude displayed with bright yellow. As the
amplitude gets lower the higher frequencies gets more an more red until they are
purple at the top of the diagram. You can also see a vertical line and that is because
there is a little clicking going on at the beginning of each bar.
Here is the same analysis done with a sine wave.

Sytrus Synths Creation, Chapter 4. Synthesis
Sytrus Synth Manual v2 by Jens Malmgren Page 49
As you can see the sine harmonics of a sine wave converts to one band and when
listening to it the frequency spectrum light up one line with yellow.
We make: Three bands saw
Now we will create a new synth based on a saw
wave. We will call this synth “three bands saw”.
Load the Default preset into Sytrus. Set the
waveform of operator 1 to a saw wave. Then set
harmonic of band 1 to 100%, harmonic of band 2 to
75% and finally harmonic of band 4 to 51%.
Now we have a very rich saw
synth. Eliminate Operator 1 's
output and route Operator 1
into the first filter, choose a
Lime Low Pass filter and set the
cutoff frequency to 100%, and
the resonance to 60%, then give
filter 1 both FX and basic output.
Now we're going to switch to the FX tab and remove the chorus by setting its order
to 0, then enabling a default delay bank plus default reverb. Then we add a bit of
unison, the parameters I used are shown below.
My Unison Settings
Order 2 | Panning 100% | Volume 100% | Pitch ~ 34% | Sub-level
0% | Phase ~ 50% | Envelope Variation 0%.
By not using chorus, but using unison, we have produced a very distinct sound, one
that can sound pretty cool in the correct circumstances.
Sustained Synths
Plucked synths or synths that do not last very long are relatively easy to make.
Delay and reverb can make almost anything that's very short sound good.
Things start getting trickier when you want a synth that can be played for long
periods of time, in which case harsh waveforms (like the saw and square) need
to have filters and choral effects to soften their impact.

Sytrus Synths Creation, Chapter 4. Synthesis
Sytrus Synth Manual v2 by Jens Malmgren Page 50
Now we can save this synth and name the preset “Three bands saw”.
We make: Smooth that curve
The next synth that we will create will be
called “Smooth that curve”. Open a new
Default preset, navigate to Operator 1's
oscillator editor, then click and drag your left
mouse button so you get a curve that looks
like here to the right. Be sure to zoom out by
clicking and dragging down on the scrollbar at the bottom right corner.
This may look like a complicated wave that won't sound good, but the Oscillator
Editor has a feature that will help us out. In the bottom left corner there is a button
called "Smooth". Click this repeatedly with your mouse and watch as the curve you
drew with your mouse is magically smoothed out. After you've smoothed it, reset
the first bar to 100% and play a few notes. Because the harmonics are set in a
smoothed curve, the resulting wave is relatively pleasant to listen to, and relatively
pleasant is all we need to make it sound good.
Add some chorus to that, and you will notice that
unlike our simpler waves, this thickened wave has
a lot more depth, and an increased "fullness" to it.
By using the oscillator to create full sounds like this,
they come in very handy when dealing with drawn
string synths, background synths, or other synths
that need what is called a "rich spectrum". Noise
can also provide this rich spectrum, as is
demonstrated by the Pluck mode. Before we look at
pluck mode, feel free to play around with that
synth - add some reverb, some echo, try out the
unison, and in general just have fun with it. I'll leave it to you to come up with a
motif to entertain yourself with. Save that synth though, because we're going to
come back to it later and filter it. I will refer to it as “Smooth that curve”.

Sytrus Synths Creation, Chapter 4. Synthesis
Sytrus Synth Manual v2 by Jens Malmgren Page 51
Pitch Envelope Automation. We make: RockBagpipeSynth
It is possible to change a synth
into a primitive sequence
synth with the pitch envelope.
Load for example
“BagpipeSynth”. Go to
Operator 1's pitch value ENV
panel and wipe it clean after
enabling tempo mode.Then
move the origin to the center
of the window and create a
new point 2 as shown to the
left.
Next, right click on the point and choose "Hold."
This should give you something that looks like
the image to the left. The hold shape, as you can
see, is a square, and is useful when you need to
suddenly switch from one value to another value without
sliding. Right click on a third point at the the position 001:002:000 at 0% on level with
the origin and 1 beat away so you get something that looks like the image to the
right.
There are 13 curve shapes in
total. The hold curve is the only
of the curve modes that comes
without a tension control in the middle. All the other
curve modes will make it possible to change the shape
of the curve by holding down the mouse on the tension
control and then dragging up or
down.
Most of the time this system
works intuitively and it is fun to play with. The thing
that can be tricky at times is to find the tension control
at the center of Pulse and Wave when they are so dense that the red little circle is
obscured by all the curve lines. Just keep searching, the point is in there somewhere.
When you found it the cursor changes to an up down arrow and then it is time to
press the mouse button and drag.
In addition to the delete command there are 3 loop related commands. Loop start,
Sustain/Loop End, and Decay. Decay does not actually change anything - it is only a

Sytrus Synths Creation, Chapter 4. Synthesis
Sytrus Synth Manual v2 by Jens Malmgren Page 52
marker to tell Sytrus where the decay of an envelope begins. Loop Start marks the
beginning of a loop, and Sustain/Loop End marks the end of a loop. When the
envelope reaches Sustain/Loop End, provided that the note is still being sustained, it
will return to the Loop Start point, and continue looping until the
note is released.
Once the note is released, any envelope that is located after the
Sustain/Loop End point will play. Let’s create a loop by setting our
second point as the end loop point and our origin as the loop
beginning, see image to the right.
Now, play and hold a note. It rocks back and forth from an octave below. Just like
our loop specified (the pitch screen, by default, moves the instrument up to 12
semitones up and 12 semitones down, or an octave up and an octave down).
Our pitch envelope rocks the synth back and forth while it's on the long, sustained
note, preventing it from sounding repetitive.
In the menu you also notice arpeggio breaks. We will talk about these in chaptor 10.
You can save this synth as “RockBagpipeSynth”.
We make: Noise pluck
Pluck Mode
Now, let's set the Default preset
again for creation of a new synth
and open the oscillator of operator
1. This time, we're going to do
something that normally would
not be recommended. Randomly
click around the bars like in the
image here to the right.
Loop Point Behavior
It is worth mentioning that the behavior of the end loop point is different if
there is no loop start point. If there is no loop start point, the envelope will
simply freeze at the end loop point until it is released. Once it is released, any
envelope after the end loop point is played. If you do not specify an end loop
point at all, however, the envelope will keep on playing no matter what
happens!
Totally random sine harmonics.

Sytrus Synths Creation, Chapter 4. Synthesis
Sytrus Synth Manual v2 by Jens Malmgren Page 53
Go ahead and turn on pluck mode for operator 1 and play a note. If you have
something that looks like my wave, it will probably sound like a bell of sorts. It will
also sound nice - which is rather unexpected with our ad-hoc oscillator editing. That
is because the Pluck mode is dependent on only one thing - the richness of the
harmonics. You will notice that while in pluck mode you cannot modulate the
operator with any other operator. Keep this in mind before using it. Now, let's try
something else. While the oscillator editor lets us create rich harmonics, random
noise works too. Increase the noise slider for operator 1 up to 100% and play a few
notes.
It sounds like a guitar! Well, that's what plucked mode is used for - plucked strings.
This is very useful for synthesizing things like banjos, guitars, and whatnot, but it's
almost impossible to use for anything that's sustained. In the case of noise, since we
have random noise set at 100%, no matter what we do to our waveform (you can go
ahead and erase it completely if you want), it will produce the exact same tone. To
get unique tones, take a base waveform and then add on about 50-70% noise, which
will give you both a unique sound and a good, rich pluck. Chorus works on plucked
things too. Set operator 1's FX output to 100% to hear it. It sounds a bit weird
because of the choral effect, but there is a little trick we can do to create a cool effect.
Chorus Settings
Order 9 | Depth 100% | Speed 80% | Delay 100% | Spread 50%
| Cross -100% | Volume 80%.
Strings are very susceptible to chorus delay, depth, and spread. The effect usually
only works well with a very high order, but it can sound cool even if it's a bit CPU-
hungry. You can produce a wide range of effects using only chorus and pluck. Try
adding on a bit of echo too; though this doesn't sound quite as good as if the synth
had a filter on to take off some of its sharpness. Save this preset as “Noice pluck”.
Oscillator
The Oscillator has a few more interesting tricks you
that you get access to via the menu next to the global
checkbox.
With this menu you can export waveforms and load waveforms.

Sytrus Synths Creation, Chapter 4. Synthesis
Sytrus Synth Manual v2 by Jens Malmgren Page 54
You can also record sounds with Edison and select a section
of the recorded sound and drag this to the waveform
window with the drag button in Edison, see the image to the
right.
You can also use the menu to lock various harmonic channels. The "Lock Harmonic"
menu option gives you 5 different ways of locking harmonic channels - you can lock
all the channels, the even channels, the odd channels, any inactive (unused)
channels, or you can invert whatever is currently being locked. This is useful for
editing when you need to edit only the even or only the odd channels, or don't want
to accidentally activate a harmonic channel while editing.
There are a number of other handy editing functions on the menu, and most are self-
explanatory (just experiment with them a little). The Gibbs phenomenon is, well, the
only thing you need to know is that it makes synths sound bad so the
attenuate/remove Gibbs phenomenon options are extremely handy if your synth
isn't sounding too good and you're not entirely sure why. Unfortunately, these
options can also ruin your waveform, so keep that in mind.
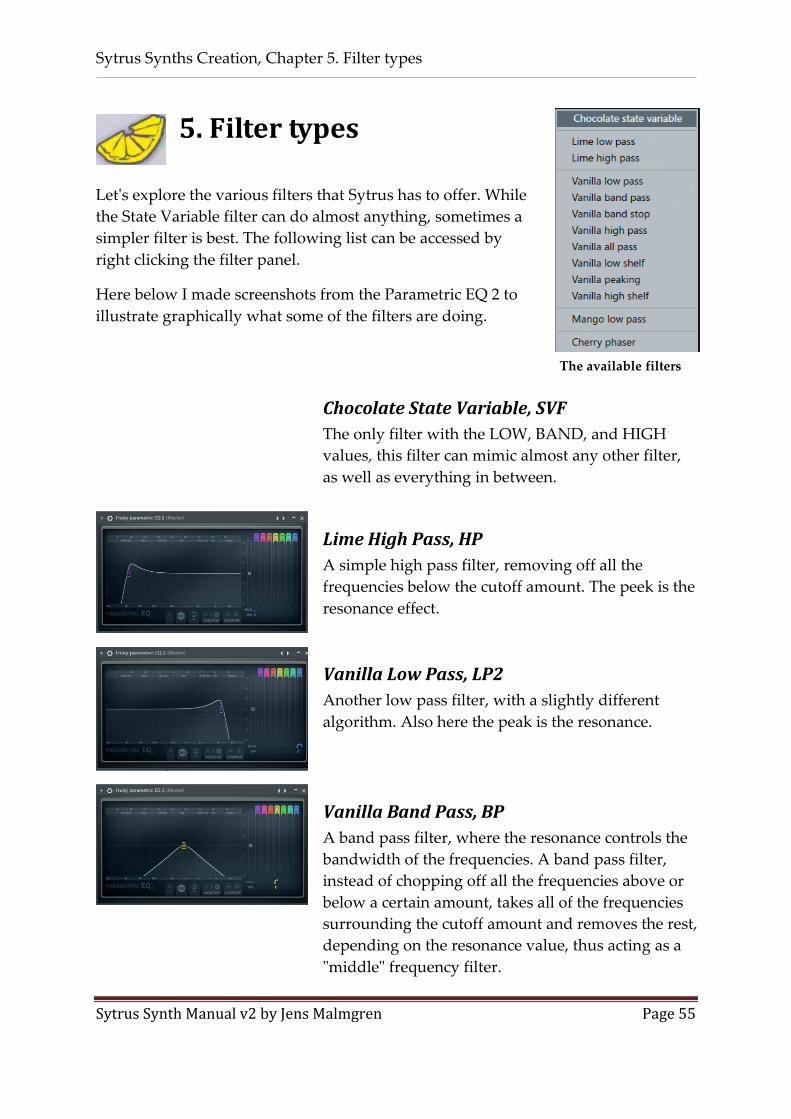
Sytrus Synths Creation, Chapter 5. Filter types
Sytrus Synth Manual v2 by Jens Malmgren Page 55
5. Filter types
Let's explore the various filters that Sytrus has to offer. While
the State Variable filter can do almost anything, sometimes a
simpler filter is best. The following list can be accessed by
right clicking the filter panel.
Here below I made screenshots from the Parametric EQ 2 to
illustrate graphically what some of the filters are doing.
Chocolate State Variable, SVF
The only filter with the LOW, BAND, and HIGH
values, this filter can mimic almost any other filter,
as well as everything in between.
Lime High Pass, HP
A simple high pass filter, removing off all the
frequencies below the cutoff amount. The peek is the
resonance effect.
Vanilla Low Pass, LP2
Another low pass filter, with a slightly different
algorithm. Also here the peak is the resonance.
Vanilla Band Pass, BP
A band pass filter, where the resonance controls the
bandwidth of the frequencies. A band pass filter,
instead of chopping off all the frequencies above or
below a certain amount, takes all of the frequencies
surrounding the cutoff amount and removes the rest,
depending on the resonance value, thus acting as a
"middle" frequency filter.
The available filters
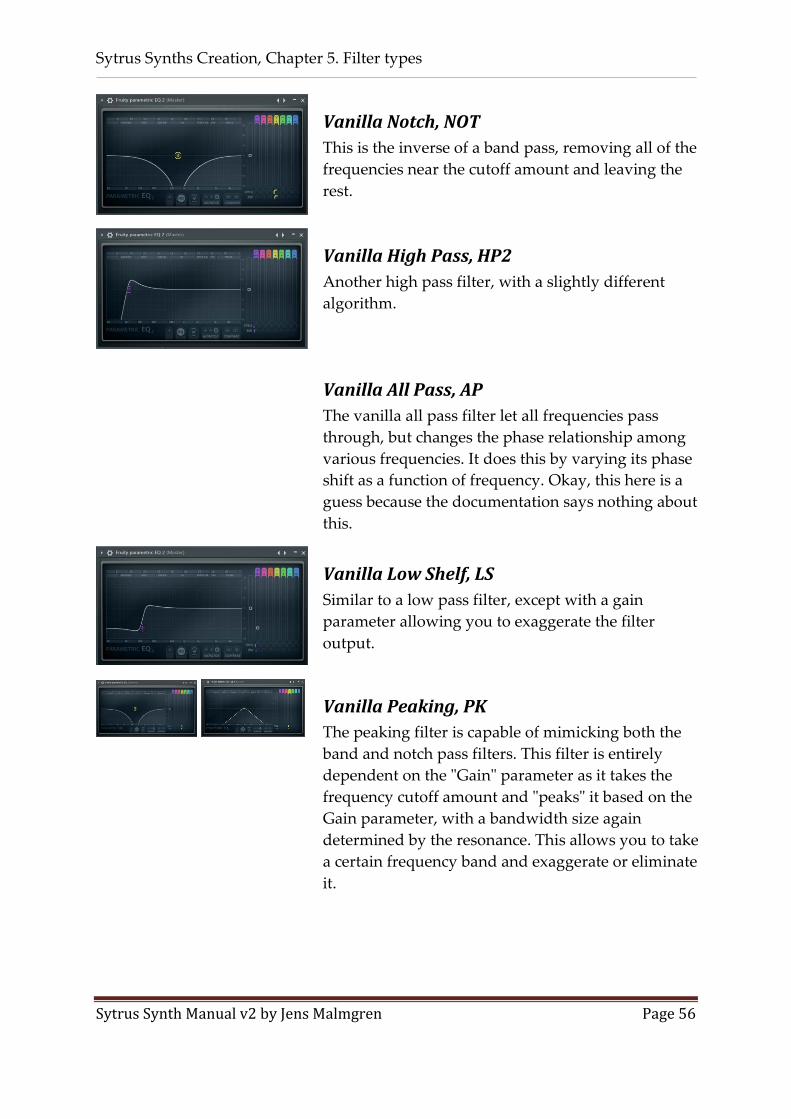
Sytrus Synths Creation, Chapter 5. Filter types
Sytrus Synth Manual v2 by Jens Malmgren Page 56
Vanilla Notch, NOT
This is the inverse of a band pass, removing all of the
frequencies near the cutoff amount and leaving the
rest.
Vanilla High Pass, HP2
Another high pass filter, with a slightly different
algorithm.
Vanilla All Pass, AP
The vanilla all pass filter let all frequencies pass
through, but changes the phase relationship among
various frequencies. It does this by varying its phase
shift as a function of frequency. Okay, this here is a
guess because the documentation says nothing about
this.
Vanilla Low Shelf, LS
Similar to a low pass filter, except with a gain
parameter allowing you to exaggerate the filter
output.
Vanilla Peaking, PK
The peaking filter is capable of mimicking both the
band and notch pass filters. This filter is entirely
dependent on the "Gain" parameter as it takes the
frequency cutoff amount and "peaks" it based on the
Gain parameter, with a bandwidth size again
determined by the resonance. This allows you to take
a certain frequency band and exaggerate or eliminate
it.

Sytrus Synths Creation, Chapter 5. Filter types
Sytrus Synth Manual v2 by Jens Malmgren Page 57
Vanilla High Shelf, HS
Similar to a low pass filter, except with a gain
parameter allowing you to exaggerate the filter
output.
Mango Low Pass, LP3
This is a low pass filter with a "drive" component,
allowing you to achieve an effect similar to a very
harsh wave shaper.
Cherry Phaser, PHS
This is a phaser filter that lets you adjust the
properties of the phaser through the cutoff amount
and the resonance.
All filters got an ENV value. This sets how efficient the cutoff is above the
cutoff point. It is possible to arrange the ENV value so that the filter is
leaking frequencies above the cutoff point.
Filters are a huge part of making synths, especially realistic synths. Because realistic
synths are almost always based of a sine wave, they depend entirely on FM
modulation and filters to create their sound. The reason realistic synths are always
sine-based is because real-life instruments are always sine based. Trust me; the
waveform produced by a violin is not going to look like a saw tooth wave. You can
also use the knob in the upper right hand corner to feed the output of one filter into
the next, allowing you to apply up to 3 filters to the same signal (alternatively, you
can apply 3 filters to 3 different signals and have them all output at once).
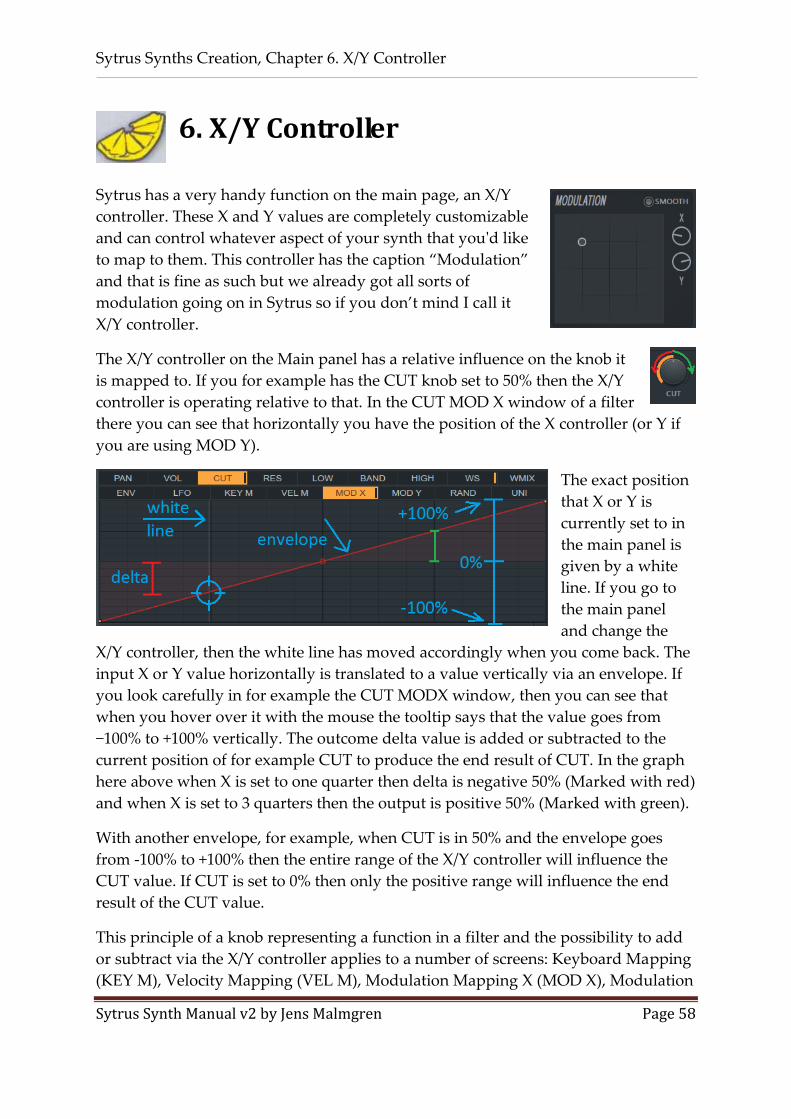
Sytrus Synths Creation, Chapter 6. X/Y Controller
Sytrus Synth Manual v2 by Jens Malmgren Page 58
6. X/Y Controller
Sytrus has a very handy function on the main page, an X/Y
controller. These X and Y values are completely customizable
and can control whatever aspect of your synth that you'd like
to map to them. This controller has the caption “Modulation”
and that is fine as such but we already got all sorts of
modulation going on in Sytrus so if you don’t mind I call it
X/Y controller.
The X/Y controller on the Main panel has a relative influence on the knob it
is mapped to. If you for example has the CUT knob set to 50% then the X/Y
controller is operating relative to that. In the CUT MOD X window of a filter
there you can see that horizontally you have the position of the X controller (or Y if
you are using MOD Y).
The exact position
that X or Y is
currently set to in
the main panel is
given by a white
line. If you go to
the main panel
and change the
X/Y controller, then the white line has moved accordingly when you come back. The
input X or Y value horizontally is translated to a value vertically via an envelope. If
you look carefully in for example the CUT MODX window, then you can see that
when you hover over it with the mouse the tooltip says that the value goes from
−100% to +100% vertically. The outcome delta value is added or subtracted to the
current position of for example CUT to produce the end result of CUT. In the graph
here above when X is set to one quarter then delta is negative 50% (Marked with red)
and when X is set to 3 quarters then the output is positive 50% (Marked with green).
With another envelope, for example, when CUT is in 50% and the envelope goes
from -100% to +100% then the entire range of the X/Y controller will influence the
CUT value. If CUT is set to 0% then only the positive range will influence the end
result of the CUT value.
This principle of a knob representing a function in a filter and the possibility to add
or subtract via the X/Y controller applies to a number of screens: Keyboard Mapping
(KEY M), Velocity Mapping (VEL M), Modulation Mapping X (MOD X), Modulation

Sytrus Synths Creation, Chapter 6. X/Y Controller
Sytrus Synth Manual v2 by Jens Malmgren Page 59
Mapping Y (MOD Y) etc. If you start to look around where you notice the -100 to
+100 range, there the same principle applies. When the range is 0 to 100 there the
influence is absolute, Operator MOD – MOD X for example.
Next we will test this in practice so we are going to return to one of our older synths
“Smooth that curve”.
Let's reroute operator 1
of so that it goes
through filter 1 with the
settings shown to the
right.
The state variable filter
SVF is a filter that can
act as many different
kinds of filters, because
it not only has a cutoff
frequency and resonance, but also low, band and high pass. By manipulating the
low, band and high pass parameters, you can change what kind of filter it is, and
thus change what the cutoff frequency actually does. The low pass can be thought of
as cutting off the lower frequencies, the band pass as cutting out the middle
frequencies, and the high pass as cutting out the high frequencies. However, the
band pass changes its behavior as the high pass changes, so be aware of that.
In our filter, we have the following settings: SVF x3 (HQ) | ENV 50% | CUT 50% |
RES 50% | Low 100% | Band 100% | High 0% | WS On | WSamp 150% | WSMix
66%. We preserve the low and middle portions of the frequency but eliminate all the
high frequencies, essentially creating a kind of combo low pass and band pass filter.
The wave shaper gives us a nice, unique tone to our synth, and becomes
instrumental later on when we warp it.
Let's map the cutoff ratio to the X axis. To do this, go into cut, and then MOD X, and
you will see an envelope. The far left of the envelope represents the far left of the X
axis, and vice versa.

Sytrus Synths Creation, Chapter 6. X/Y Controller
Sytrus Synth Manual v2 by Jens Malmgren Page 60
Manipulate the
envelope so it looks like
Figure 3. Now, head
back to the main screen
of Sytrus and look at
the Modulation panel.
You can either click or
drag around the target point, or you
can use the X axis knob located on the
right side of the panel. Both will change
the filter, and you can achieve a cool sounding effect by dragging the X value from
the left to the right.
Next, let's map something to the Y axis.
Since we're using a state variable filter, we
can now utilize the LOW, BAND, and
HIGH panels, and map any of them to the
Y axis just like we did with CUT. Or, we
can also map the WMIX value to the Y
axis so that the amount of wave shaping
effect is given by the Y axis. Let's try that
(Figure 5). Observe in the WaveCandy
spectrum graph how the sound looks like
while manipulating the modulation.
Here to the left I played one note and dragged the x axis from left to the right three
times. Then keeping x in the middle I
dragged y axis from top to bottom a
couple of times. The WMIX value
corresponds to the MIX dial in the wave
shaper, but it has a different design than
CUT, RES and PAN. The setting of
WMIX/ LOW/ BAND/ HIGH all use a
method similar to VOL, that is, they only
reduce, they do not increase. When Y is
maxed out, the WMIX value will be 66% because that is its current value. When it is
bottomed out, the value will be 0%. Therefore, when mapping these values to the X
and Y axis, we have to set them to their highest possible values, not their optimal
ones, and then manually choose the best setting with the modulation panel.
Since we mapped X and Y to the CUT and WMIX values, respectively, we can switch
to any filter we like and still have valid mappings, since all filters have cutoff and the
wave shaper is independent of the filters.
Figure 3: Mapping the X axis to the CUT value
Modulation
panel
Figure 5: Mapping the WMIX value
to the Y axis

Sytrus Synths Creation, Chapter 7. Unison Mapping
Sytrus Synth Manual v2 by Jens Malmgren Page 61
7. Unison Mapping
In regular Unison all modifications to the sounds are spread evenly among all sub
voices. With Unison mapping it is possible to specify special cases for the effects for
each sub voice. Here we will continue to work on the “Smooth that curve” preset we
worked on in the previous section. Before experimenting with Unison I turned off
Chorus in the FX tab so that I could better listen to how Unison mapping works.
The unison mapping feature depends on the number of sub voices being used
(order) for the Unison effect as it is specified in the main panel. Before we change the
Unison mapping it is best to set order and then leave it because changing it will clear
the custom Unison mapping envelopes.
Each operator and all three filters and the effects tab all got their own Unison
Mapping tabs. The Unison mapping tabs of the operators influence the production of
the effect for each sub voice. Then if you send your sound to a filter and the effect
then it is possible to specify specific filter or effect parameters for each sub voice.
If we in the main panel specify 5 sub voices, then
that creates sort of five different “channels” that
can have their own filters and effects applied to
them when going through Sytrus on the way to
out. Here we will work with Panning PN, Volume
VL, Pitch PT and Phase PH.
In operator one the sound is created. In
the picture to the right I marked the
“poles” representing each sub voice of
Unison with thick vertical lines. The thin
horizontal line represents the “home
pitch” of the synth. When placing a voice
below the home pitch that voice is
lowered an amount given by the PE value
at the right. In my graph I made sub voice
1 and 5 bass voices. The third is unchanged. Voice 2 and 4 are slightly higher. I
cannot say this sound fantastic but it serves the purpose of explaining Unison
mapping.

Sytrus Synths Creation, Chapter 7. Unison Mapping
Sytrus Synth Manual v2 by Jens Malmgren Page 62
With the panning panel I distributed
the voices in the room. The bass voices,
one and five are placed to the left and
to the right. Voice 3 in the center.
The volume is set so that the two bass
sounds has slightly lower volume. The
center sound has the highest volume.
While working with these settings it
was convenient to give only one sub
voice a volume to figure out what it
was doing and then one by one listen
to the different sub voices.
Phase was distributed among the
different sub voices.
In Filter one I gave the first, third and
fifth sub voice different CUT off
values.

Sytrus Synths Creation, Chapter 7. Unison Mapping
Sytrus Synth Manual v2 by Jens Malmgren Page 63
Finally, I modified the
volume of the effects so
that the first sub voice got
less volume compared to
the center and the right
side got much less effects.
As you can see with
Unison you get a number
Sytrus synths next to each
other and the mapping
makes it possible to
influence how these
synths are related. The
Unison MOD panel is a
great example of this. The envelopes here control how much the waveform is
modulated at different percent’s. Most of the time we don’t change operator one’s
mod knob because that is operator one modifying itself. However, if we were
specifying Unison mappings for operator two then we could individually per voice
tell how much per sub voice operator two should modulate operator one. Now you
can save the “Smooth that curve” preset.
Pluck mode damp
The DAMP parameter is exclusive to pluck mode, and it controls how much the
pluck is damped. This curve is set for all instruments by default, and for traditional
plucks is best left alone. However, should you want to adjust it, you can.
We make: Super Saw
Time to make a new synth. This preset will be named “Super Saw”. Actually this
synth will be made without any modulation. At first we will repeat many of the
things we already learned and then at the end of this section we will get to pitch
envelope automation. We will make a super saw synth with phase cancellation in
mind.
Open up a new Default preset in Sytrus. On the main tab the only
thing we will be changing is Unison. Set it to order 9 | Panning
100% | Volume 75% | Pitch 92% | Sub Level 0% | Phase 84% |
Variation 25%. Essentially this gives us nine sub voices of Sytrus.
We set all operators to saw waves. That gives us plenty of sine harmonics.

Sytrus Synths Creation, Chapter 7. Unison Mapping
Sytrus Synth Manual v2 by Jens Malmgren Page 64
For operator 1 we set
frequency ratio to 0.4997 and
phase to 0%.
For operator 2 we set
frequency ratio to 0.4998 and
the phase is set to 22%.
For operator 3 we set the
frequency ratio to 0.4999 and
the phase is set to 42%.
For operator 4 we set the
frequency ratio to 0.5000 and
phase is set to 50%
For operator 5 we set the
Frequency ratio to 0.5001 and
phase is set to 68%.
For operator 6 we set the
frequency ratio to 0.5002 and
the phase is set to 85%
So for every sub voice of Unison we have 6 operators playing at various frequencies
and phases.
These operators we program as you can see to the right.
There is no need to be precise on the knobs.
Unfortunately, we don’t have 6 filters so here we bring
together two operators to use one filter. For the sake of
it we mix them with opposite phase just because I
could.
Now let’s talk about the filters. There came a lot of high
frequencies from the operators so to manage that I set
all filters to low pass filters.
Turn on LowPass x2. Set Cut to
50% and Res to 60%.

Sytrus Synths Creation, Chapter 7. Unison Mapping
Sytrus Synth Manual v2 by Jens Malmgren Page 65
Turn on LowPass x2. Set Cut to
40% and Res to 50%.
Turn on LowPass x2. Set Cut to
30% and Res to 30%.
Change to the WS tab and increase the wave shape envelope a bit on all filters.
Chorus settings: Order 7 | Depth 19% | Speed 24% | Delay 33% | Spread 100% |
Cross 0% | Volume 100%
Reverb settings: On | Warmer W+ | Rewerb Lowcut Off | Rewerb Highcut 11kHz |
Predelay 140ms | Roomsize 40 | Roomsize diffusion 100 | Reverb decay 1sec |
Reverb High Damping 4.0kHz | Reverb wet volume 20%
Now let's give the synth the name “Super Saw”.
There is another plugin by Image-Line that can make better Super Saw synths and
that is Harmor because it can randomize the initial phase but that is an entirely
different story.

Sytrus Synths Creation, Chapter 8. Reshape the sound
Sytrus Synth Manual v2 by Jens Malmgren Page 66
8. Reshape the sound
In this chapter we will practice many of the things we already learned. There are a
few new things such as using the equalizer. For the rest we will deepen the
knowledge we already got and put it into practice.
We make: OneOnOne
The idea with this synth is that will modulate operator 1 with itself. Then from there
we will do different things to shape the sound at different keys, etc.
Open up the default preset. On
operator 1 you lower the frequency
ratio to 1.0000. Change the
modulation grid so that operator 1
is modulating itself by 100%.
What do we get when modulating
a sine waveform with itself? You
can see that to the left. What does that mean when an
operator is operating itself? The controlling waveform
shape speed up the controlled waveform shape, when
the slope points upwards, as we are used to, but the controlling and the controlled
shape looks the same. However, if we make operator one and two to both be sine
waveforms of 1.000 frequency ratio then we do not get the
same effect as making operator 1 operate on itself so we
can make the conclusion that the controlled waveform and
the controlling waveform is in fact the same so that the
operator is really operating itself while calculating the
waveform. When the original sine waveform points
upwards the result is a that the oscillation is speeding up. The base shape of what is
speeding up is always going to be a sine waveform. At some point the original
waveform will slow down and so will the generated waveform.
It appears as if the pure sine wave is the only wave that can be modulated with itself
100% and producing something useful. The result is something similar to a soft saw
wave.
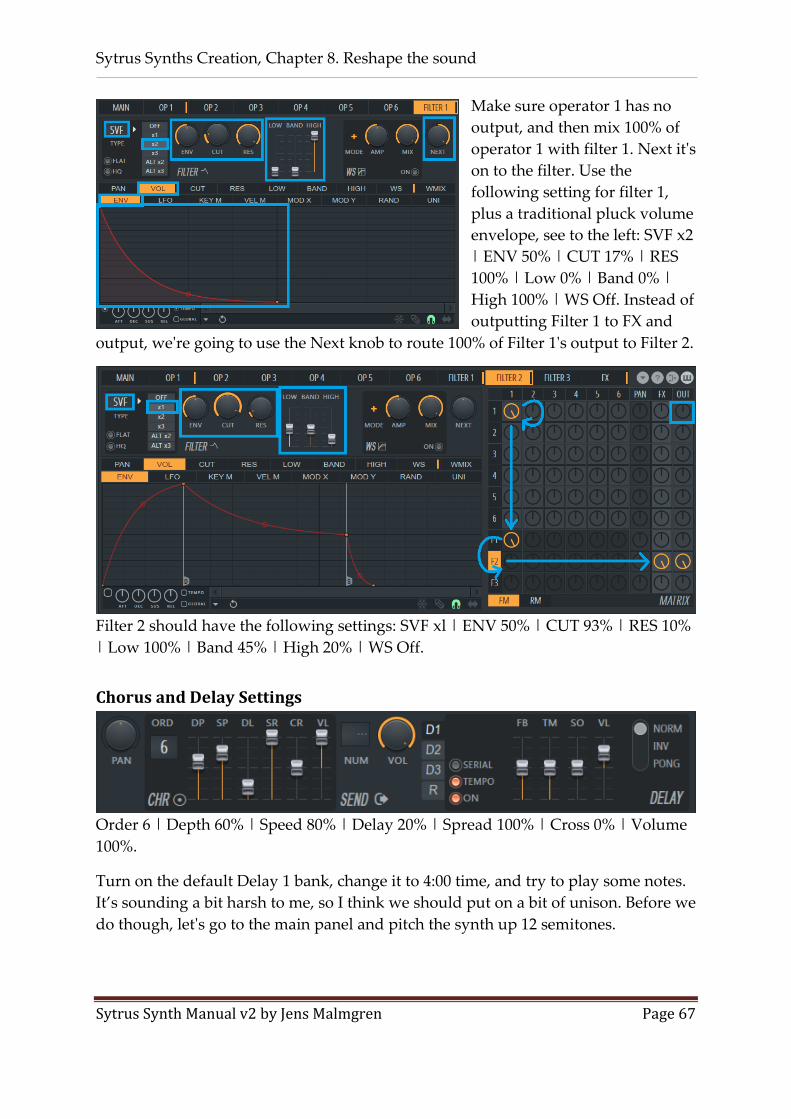
Sytrus Synths Creation, Chapter 8. Reshape the sound
Sytrus Synth Manual v2 by Jens Malmgren Page 67
Make sure operator 1 has no
output, and then mix 100% of
operator 1 with filter 1. Next it's
on to the filter. Use the
following setting for filter 1,
plus a traditional pluck volume
envelope, see to the left: SVF x2
| ENV 50% | CUT 17% | RES
100% | Low 0% | Band 0% |
High 100% | WS Off. Instead of
outputting Filter 1 to FX and
output, we're going to use the Next knob to route 100% of Filter 1's output to Filter 2.
Filter 2 should have the following settings: SVF xl | ENV 50% | CUT 93% | RES 10%
| Low 100% | Band 45% | High 20% | WS Off.
Chorus and Delay Settings
Order 6 | Depth 60% | Speed 80% | Delay 20% | Spread 100% | Cross 0% | Volume
100%.
Turn on the default Delay 1 bank, change it to 4:00 time, and try to play some notes.
It’s sounding a bit harsh to me, so I think we should put on a bit of unison. Before we
do though, let's go to the main panel and pitch the synth up 12 semitones.

Sytrus Synths Creation, Chapter 8. Reshape the sound
Sytrus Synth Manual v2 by Jens Malmgren Page 68
Unison Settings
Order 4 | Panning 100% | Volume 100% | Pitch 50% | Sub-
level 0% | Phase 73% | Envelope 0%.
There are a number of
problems with our current
synth. Currently there are
some high pitch sounds
generated. We can see these
if we play notes with
WaveCandy in spectrum
mode. Here I point to the
lowest key of the on screen
keyboard and dragged with
the mouse to the highest notes. The higher we come the more really high frequencies
are emerging.
We can fix this in several ways. For example, turning on the 3 band equalizer on the
main panel. It is worth noting that you can switch between low shelf, peeking and
high shelf modes for each band. The icon above the third band is the icon for low
shelf. You need to know that because the tooltip will not tell you that. Another thing
you need to know is that even though you set the equalizer to filter the sounds there
will always “leak” a bit anyway. This is not a blocking kind of band type. I set
frequency to 15000Hz and the width to 0.06. If this was not a Sytrus tutorial I had
suggested, you would use Parametric EQ 2 and block off the high frequencies.
To reduce high frequencies, we can also use key mapping to adjust our cutoff
frequency of filter 2. The origin at 62% and point 2 at 0%. Like so.

Sytrus Synths Creation, Chapter 8. Reshape the sound
Sytrus Synth Manual v2 by Jens Malmgren Page 69
Copy the state of Cut – Key M and paste it into Res – Key M as well.
Now the high frequencies are less pronounced. There were still plenty of
high frequencies but I noticed that if I lowered the high band on filter 1
then things improved to acceptable levels.
That's one problem solved, but our
middle notes have too many low
frequencies on them. To solve this
problem, we'll go to filter 1's cutoff
frequency key mapping, and put in
an envelope like in the image to the
left. Now our synth is relatively
stable and sounds pretty good.
There is still more
we can do,
however. Let's try
mapping the X-
axis modulation to
the frequency
modulation of
Operator 1. To do
this, simply create
an envelope like
the one you see in
the figure to the
right, in OP1
MOD x-axis
mapping. Since this is a full power mapping (ranges from 100% - 0% only), you will
hear the modulation reduced to 50% after you create the envelope, because by
default the X axis modulation is set to the center. Go to the synth main page and
reduce the X axis modulation to 0%. Now we have a sort of dreamy pluck sound,
with massive clicking problems. To fix those annoying clicks, go to Operator 1 and

Sytrus Synths Creation, Chapter 8. Reshape the sound
Sytrus Synth Manual v2 by Jens Malmgren Page 70
turn on Declick. Much better! As you can see, the X/Y controller can completely
change a synth's tone. But we're not done yet!
Go to operator 2, turn on Band limit, and reduce its frequency ratio to 0.5000 and
change its starting phase to 50%. Now modulate operator 1 with operator 2 by 100%.
Provided you kept the X-axis modulation at 0, you shouldn't hear much of a
difference, but gradually move the x-axis modulation up and a stark change will
become evident in the synth. Unfortunately, this change doesn't sound good for very
long - by the time you've reached 50% on the x-axis, the synth starts to break down.
Operator 2 simply can't be modulating operator 1 at full power and still sound good.
How can we fix this? If we reduce the volume of Operator 2, we can reduce its
influence on operator 1, therefore preserving the sound of the synth. We will need to
inversely map operator 2's volume with the x-axis modulation, see below.
Move the x-axis around and you will be rewarded with a synth that can sound like 4.
The power of mapping modulation points and adjusting the volume of operators
that are modulating other operators cannot be emphasized enough. Now lower
notes take on the properties of a smoother synth and higher notes take on the
properties of a harsher one. All this, and we haven't even mapped the Y-axis
modulation to anything yet! Just remember that if you aren't modulating an operator
with anything, the modulation attribute will have no effect.
Our synth is now finished, so give it a name OneOnOne, explain what the X-axis
does (I would explain it as "changes the voice of the synth"), and whatever you made
the Y axis do, if anything. Before you save it, you might want to enable the "Gibbs
Off' option - this should help with those slight pitch warbles happening on the really
high notes. Another button near the "Gibbs Off' option is an option called "Global
Pitch." This is useful if you want to change the pitch of all the operators all at once -
by enabling it, the pitch envelope in operator 1 acts on the entire synth instead of just
operator 1. However, we don't use pitch envelopes in this synth, so enabling this
option wouldn't change anything.

Sytrus Synths Creation, Chapter 9. Sequence
Sytrus Synth Manual v2 by Jens Malmgren Page 71
9. Sequence
In this chapter we will focus on programming a sequence of “actions” into the synth.
We make: TutSeqOne
Sequence synths can be made really complex so they incorporate rhythm, bass line,
lead synth sound etc. Your fantasy is the limit.
The sequence synth we will be making is going to rock back and forth between the
tonic and subtonic chords with a variety of instruments playing different patterns.
We start by setting the Default preset. We will create our first voice, which is going
to be on Operator 1. Right-click OP1's waveform and choose a Saw waveform, then
lower its frequency ratio to 1.000. Route 100% of it into only Filter 1, and then change
filter 1 to the following: LP x3 | ENV 50% | CUT 100% | RES 34%, then stick in a
volume envelope as shown above.
This voice is going to serve as our long, sustained background voice. Sustained
voices usually need some sort of volume variation if they are to sound good.
Always try to put in volume envelopes to make the instruments either fade in and
out or simply pluck, otherwise you'll muck up the output. We could have also stuck
this volume envelope in the operator itself, but we didn't. It really doesn't make a
difference for this synth.
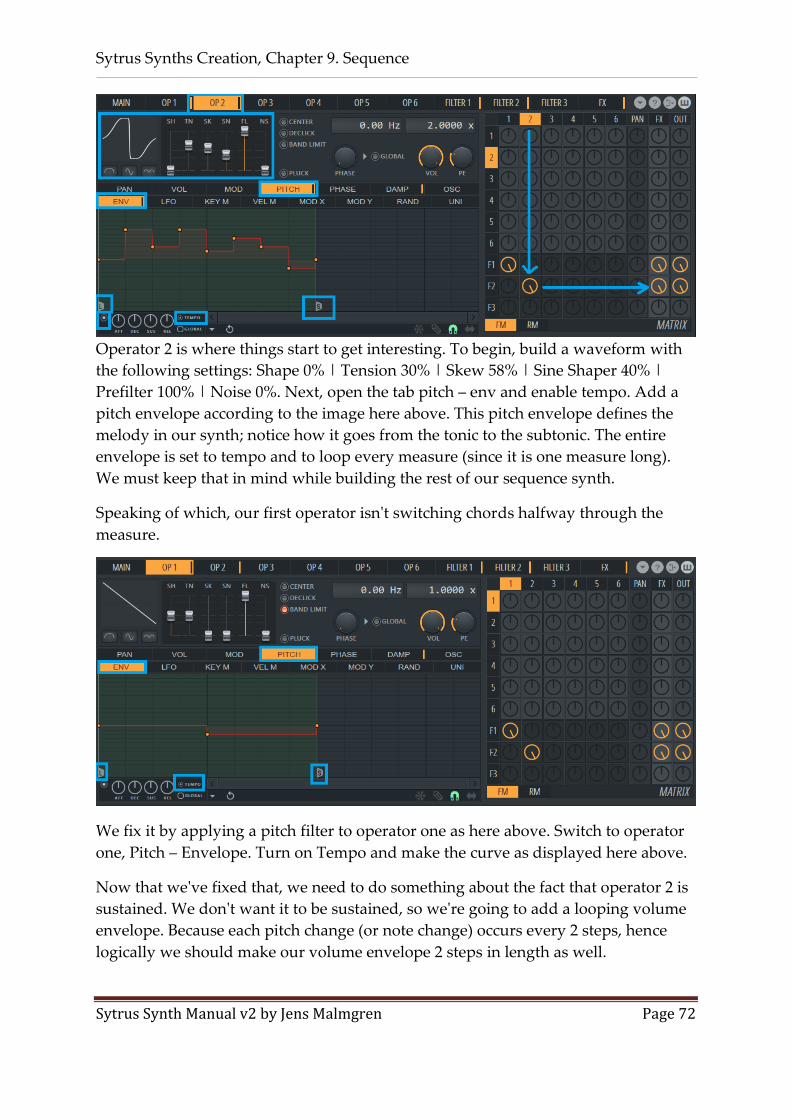
Sytrus Synths Creation, Chapter 9. Sequence
Sytrus Synth Manual v2 by Jens Malmgren Page 72
Operator 2 is where things start to get interesting. To begin, build a waveform with
the following settings: Shape 0% | Tension 30% | Skew 58% | Sine Shaper 40% |
Prefilter 100% | Noise 0%. Next, open the tab pitch – env and enable tempo. Add a
pitch envelope according to the image here above. This pitch envelope defines the
melody in our synth; notice how it goes from the tonic to the subtonic. The entire
envelope is set to tempo and to loop every measure (since it is one measure long).
We must keep that in mind while building the rest of our sequence synth.
Speaking of which, our first operator isn't switching chords halfway through the
measure.
We fix it by applying a pitch filter to operator one as here above. Switch to operator
one, Pitch – Envelope. Turn on Tempo and make the curve as displayed here above.
Now that we've fixed that, we need to do something about the fact that operator 2 is
sustained. We don't want it to be sustained, so we're going to add a looping volume
envelope. Because each pitch change (or note change) occurs every 2 steps, hence
logically we should make our volume envelope 2 steps in length as well.

Sytrus Synths Creation, Chapter 9. Sequence
Sytrus Synth Manual v2 by Jens Malmgren Page 73
Turn on tempo and then make the envelope as shown here above. Mix 100% of
operator 2 to Filter 2 then output 84% of Filter 1 to FX, 52% of filter 1 to Out. -68% of
filter 2 to FX, and 100% of Filter 2 to Out. Try the synth.
Before this is going to sound good,
we need to setup the second filter:
SVF xl | ENV 50% | CUT 50% | RES
50% | LOW 50% | BAND 100% |
HIGH 85%.
Now, it's starting to shape up, but we really need another layer so open up Operator
3 and right click and set it to a saw. Set the frequency ratio to 1.000 then mix 100% of
Operator 3 into filter 3 and route filter 3 to FX and out.
Open tab pitch – env and turn on tempo. Add a pitch envelope according to the
figure here above.
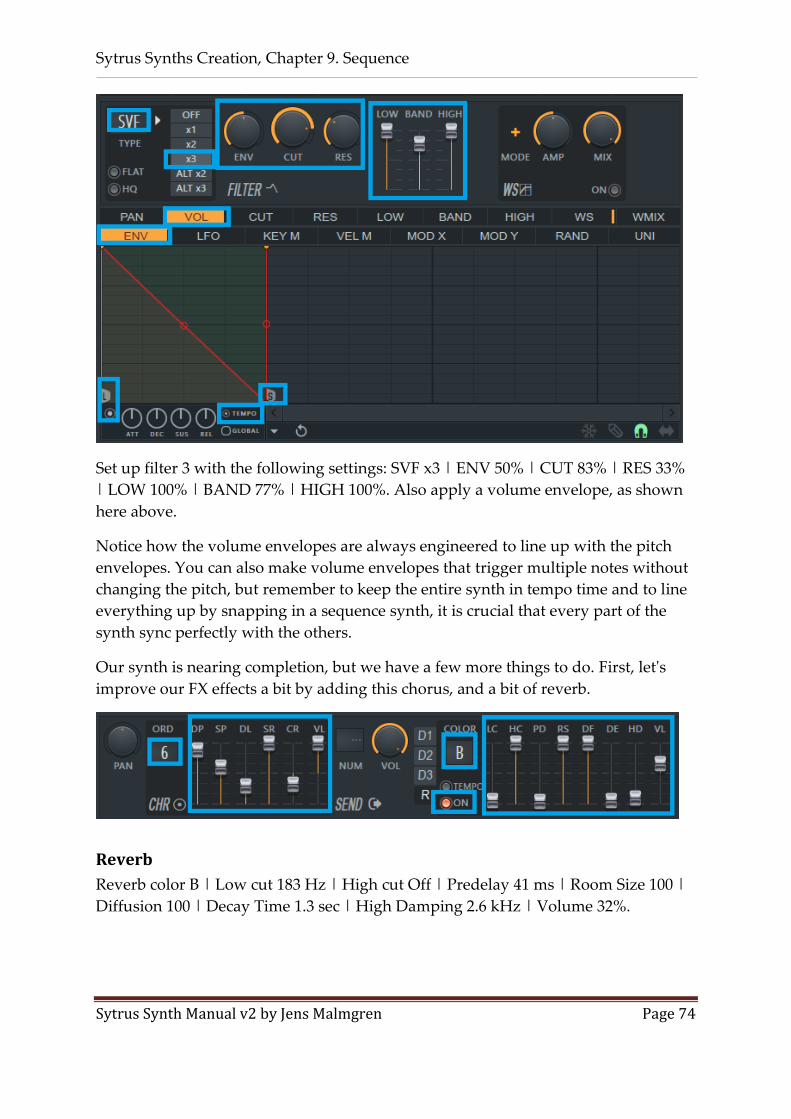
Sytrus Synths Creation, Chapter 9. Sequence
Sytrus Synth Manual v2 by Jens Malmgren Page 74
Set up filter 3 with the following settings: SVF x3 | ENV 50% | CUT 83% | RES 33%
| LOW 100% | BAND 77% | HIGH 100%. Also apply a volume envelope, as shown
here above.
Notice how the volume envelopes are always engineered to line up with the pitch
envelopes. You can also make volume envelopes that trigger multiple notes without
changing the pitch, but remember to keep the entire synth in tempo time and to line
everything up by snapping in a sequence synth, it is crucial that every part of the
synth sync perfectly with the others.
Our synth is nearing completion, but we have a few more things to do. First, let's
improve our FX effects a bit by adding this chorus, and a bit of reverb.
Reverb
Reverb color B | Low cut 183 Hz | High cut Off | Predelay 41 ms | Room Size 100 |
Diffusion 100 | Decay Time 1.3 sec | High Damping 2.6 kHz | Volume 32%.

Sytrus Synths Creation, Chapter 9. Sequence
Sytrus Synth Manual v2 by Jens Malmgren Page 75
Chorus Settings
Order 6 | Depth 89% | Speed 60% | Delay 30% | Spread 100% | Cross -34% |
Volume 100%.
This synth isn't going to have any delay echo effects on it. Instead we go to the main
page and turn on unison. This time, however, we're going to enable oscillator-only
unison, which applies the unison affect to the oscillators without applying it to the
entire synth. This gives us a really cool effect, especially with how our sequence
synth is set up.
Unison Settings
Order 3 | Panning 100% | Volume 100% | Pitch 64% | Sublevel
0% | Phase 74% | Envelope 0%.
Now it's time to add the final operator to our synth; a square-based one. Open the
tab for Operator 4 and input the
following parameters for its
waveform: Shape 50% | Tension
80% | Skew 0% | Sine Shaper 0%
| Pre filter 100% | Noise 0%.
Make sure you enable Band
Limit as well. Then go to tab
pitch – envelope of operator 1
and copy that envelope. Go back
to operator 4 and its pitch –
envelope tab and paste it there. It
should now look like the image here to the right.

Sytrus Synths Creation, Chapter 9. Sequence
Sytrus Synth Manual v2 by Jens Malmgren Page 76
Create the volume envelope as here above.
This envelope does not correspond with the pitch changes, but it is synced with the
beats. This creates an echo effect where one note is played, echoed, and then another
note is played on the subtonic and echoed. Route operator 4 to FX 100% and -70% of
it to Out.
Now we will program the X/Y controller for this synth. Because this is a sequence
synth, we're going to map MOD X and MOD Y to multiple attributes.
Filter 1 Cut – Mod x:
Filter 1 Res – Mod y:

Sytrus Synths Creation, Chapter 9. Sequence
Sytrus Synth Manual v2 by Jens Malmgren Page 77
Filter 2 Band – Mod y:
Filter 3 Band – Mod y:
There we go, our synth is complete! Now, like any finished synth, we should give it
a name, explain what the X/Y modulation does, adjust our X/Y modulation to the
optimum value, and save it as a preset.
I decided to call this synth “TutSeqOne; Mod X adjusts the cutoff frequency; Mod Y
adjusts the middle strength.”
Congratulations! You have made your first sequence synth. Feel free to edit this one,
either by taking out its chord change, adding in additional variation, or changing its
melody.
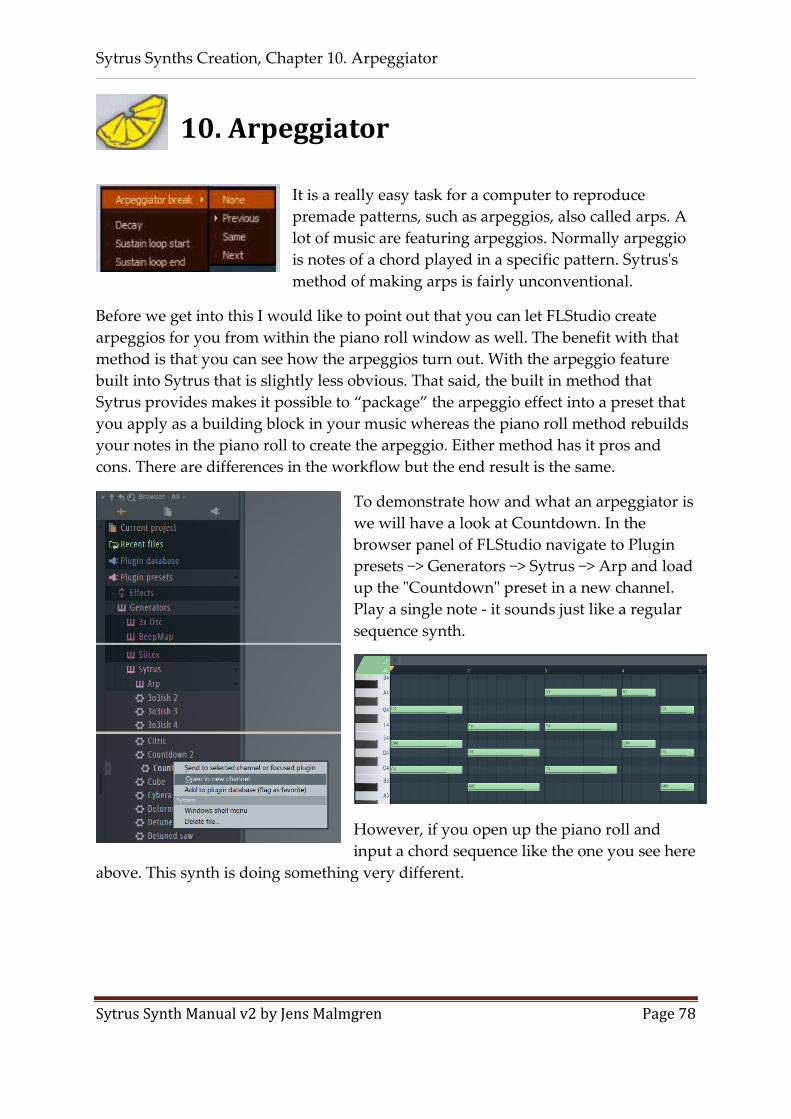
Sytrus Synths Creation, Chapter 10. Arpeggiator
Sytrus Synth Manual v2 by Jens Malmgren Page 78
10. Arpeggiator
It is a really easy task for a computer to reproduce
premade patterns, such as arpeggios, also called arps. A
lot of music are featuring arpeggios. Normally arpeggio
is notes of a chord played in a specific pattern. Sytrus's
method of making arps is fairly unconventional.
Before we get into this I would like to point out that you can let FLStudio create
arpeggios for you from within the piano roll window as well. The benefit with that
method is that you can see how the arpeggios turn out. With the arpeggio feature
built into Sytrus that is slightly less obvious. That said, the built in method that
Sytrus provides makes it possible to “package” the arpeggio effect into a preset that
you apply as a building block in your music whereas the piano roll method rebuilds
your notes in the piano roll to create the arpeggio. Either method has it pros and
cons. There are differences in the workflow but the end result is the same.
To demonstrate how and what an arpeggiator is
we will have a look at Countdown. In the
browser panel of FLStudio navigate to Plugin
presets −> Generators −> Sytrus −> Arp and load
up the "Countdown" preset in a new channel.
Play a single note - it sounds just like a regular
sequence synth.
However, if you open up the piano roll and
input a chord sequence like the one you see here
above. This synth is doing something very different.

Sytrus Synths Creation, Chapter 10. Arpeggiator
Sytrus Synth Manual v2 by Jens Malmgren Page 79
The Countdown synth is hopping around the notes you gave in the piano roll
instead of playing them all at once – this is due to the arpeggiation. Why is it doing
this? To find out, we need to look at Countdown's Operator 1 Volume Envelope.
At what time are things happening inside the window to
the right? The tooltip just gives some numbers divided
by colon so what are these numbers? They are
Bar:Beat:Tick. The tick is specifid by the general settings
of the project. Go to the main menu and open Options −> Project general settings.
The setting at Timebase (PPQ) gives how many ticks per beat there is in the project.
If you set yours to 120 then there are 120 ticks per beat.
When you are hovering over the notes in the piano roll and
look at the tooltip we do not necessary get the time
represented with “B:B:T” but with “B:S:T” Bar-Step-Tick. To
be able to understanding the arpeggiator we need to set the
song position panel to Bar–Beat–Tick as well. Right click the
song position panel and set the options like the image here
to the left.
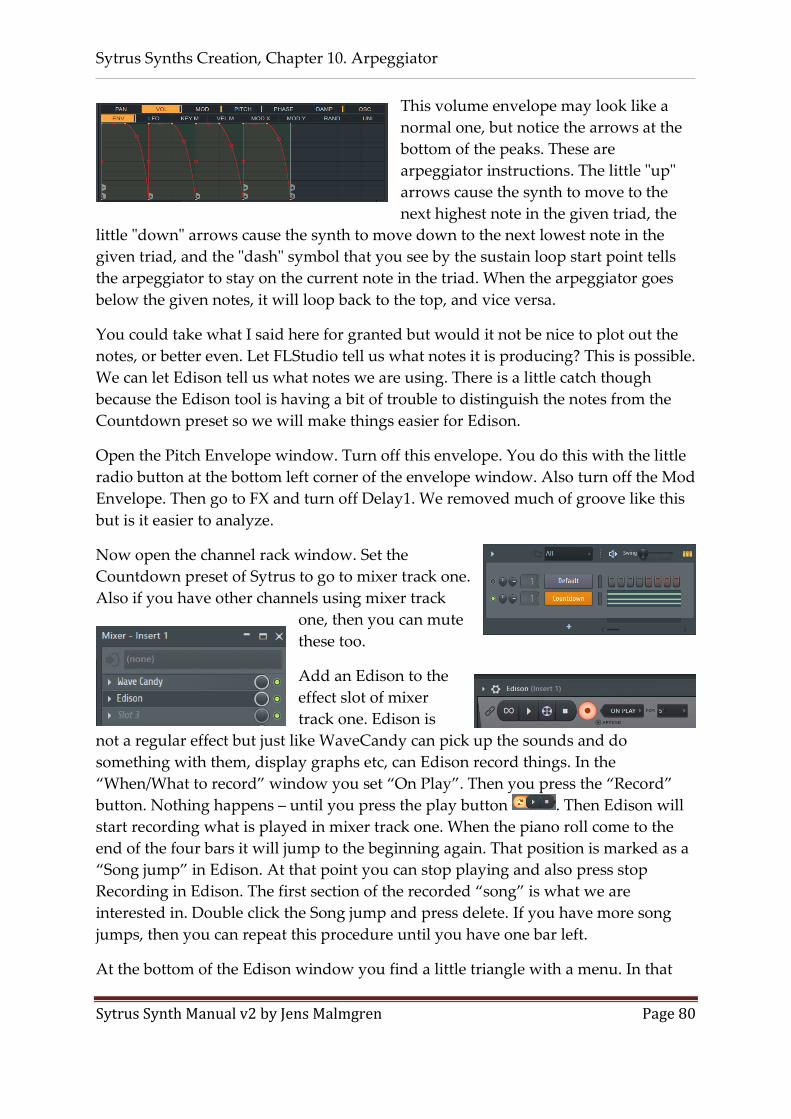
Sytrus Synths Creation, Chapter 10. Arpeggiator
Sytrus Synth Manual v2 by Jens Malmgren Page 80
This volume envelope may look like a
normal one, but notice the arrows at the
bottom of the peaks. These are
arpeggiator instructions. The little "up"
arrows cause the synth to move to the
next highest note in the given triad, the
little "down" arrows cause the synth to move down to the next lowest note in the
given triad, and the "dash" symbol that you see by the sustain loop start point tells
the arpeggiator to stay on the current note in the triad. When the arpeggiator goes
below the given notes, it will loop back to the top, and vice versa.
You could take what I said here for granted but would it not be nice to plot out the
notes, or better even. Let FLStudio tell us what notes it is producing? This is possible.
We can let Edison tell us what notes we are using. There is a little catch though
because the Edison tool is having a bit of trouble to distinguish the notes from the
Countdown preset so we will make things easier for Edison.
Open the Pitch Envelope window. Turn off this envelope. You do this with the little
radio button at the bottom left corner of the envelope window. Also turn off the Mod
Envelope. Then go to FX and turn off Delay1. We removed much of groove like this
but is it easier to analyze.
Now open the channel rack window. Set the
Countdown preset of Sytrus to go to mixer track one.
Also if you have other channels using mixer track
one, then you can mute
these too.
Add an Edison to the
effect slot of mixer
track one. Edison is
not a regular effect but just like WaveCandy can pick up the sounds and do
something with them, display graphs etc, can Edison record things. In the
“When/What to record” window you set “On Play”. Then you press the “Record”
button. Nothing happens – until you press the play button . Then Edison will
start recording what is played in mixer track one. When the piano roll come to the
end of the four bars it will jump to the beginning again. That position is marked as a
“Song jump” in Edison. At that point you can stop playing and also press stop
Recording in Edison. The first section of the recorded “song” is what we are
interested in. Double click the Song jump and press delete. If you have more song
jumps, then you can repeat this procedure until you have one bar left.
At the bottom of the Edison window you find a little triangle with a menu. In that

Sytrus Synths Creation, Chapter 10. Arpeggiator
Sytrus Synth Manual v2 by Jens Malmgren Page 81
menu select View −> Time format −> Bar : Beat : Tick. Theoretically Edison would
now line up the time representation nicely but it looks like a bug in the time
representation. Anyway we got an almost perfect Sytrus compatible time format.
Next select Regions −> Detect pitch regions. After some lining up of the windows I
could create this view of the first bar of the tune.
This way FLStudio explains the arpeggio for us!
If you right click one of the points and
hover over "Arpeggiator Break" in the drop-
down list, you can see that either Previous,
Same, or Next has been chosen for that
point.

Sytrus Synths Creation, Chapter 10. Arpeggiator
Sytrus Synth Manual v2 by Jens Malmgren Page 82
Let’s restore the Countdown preset to its original. This synth is made up of 3
envelopes - Volume, Modulation, and Pitch, plus effects.
The modulation envelope is a pluck-based
envelope that causes the synth to have a
plucky feel to it. Modulation envelopes can
often be used when a synth needs a plucky
sound to it. You may also notice that the
modulation envelope has arpeggiator
breaks on it as well. This is not
recommended, as it is completely pointless. If you remove these redundant
arpeggiator breaks, the synth will sound exactly the same. Because almost all arp
synths will be using a volume envelope to create multiple notes, it's a matter of
common sense to put the arp breaks on the volume envelope. Usually it is the
volume envelope of the Operator, but they can also go to the filters.
The pitch envelope on
Countdown is interesting.
At first glance, it looks
like it could never work -
going up 3 semitones?
But if you take a closer
look, you will notice that
the Pitch envelope knob
has been turned all the
way up to +4800 cents.
This is four times the
default amount of +1200,
which means that while
the default had 24 semitones from top to bottom, this pitch envelope has 96.
Likewise, even though an octave in the default pitch envelope is 12 grid steps,
because the range has been multiplied by 4, the number of grid steps has been
divided by 4. 12 divided by 4 = 3. 3 steps, one octave. So what our pitch envelope
here is really doing is going up and down approximately 4 octaves. That is all this
synth is doing; running around the octaves with an arpeggiator.
The Modulation Envelope
The Pitch Envelope

Sytrus Synths Creation, Chapter 11. Portamento
Sytrus Synth Manual v2 by Jens Malmgren Page 83
11.Portamento Portamento is an effect that when a note is played, it is automatically
pitch shifted from whatever the previous note was. This effect blends
the notes together and is often used in bass line saw synths. How to get this to work
however, is a bit more complicated.
To try this set the Defaut preset. Turn on Portamento by clicking the "porta" button
on the main panel. Next, we
need to go to the pitch envelope
of the first operator. and create
an envelope that looks like figure
to the right.
There are two things we need in
this envelope, a decay point and
a sustain loop end point. You
cannot assign those to the same point, so we basically have a trailing portion of our
pitch envelope. The portamento effect only cares about the distance between the
origin and the decay point. Unfortunately, we can hear portamento a little too clearly
when we're going down almost an octave. We can solve this by sticking in silent
notes that trigger the portamento silently, thus ensuring that the portamento effect
has nothing to pitch bend when the note is hit.
There are other ways in FLStudio to program portamento. I think it is fair to say that
portamento implemented from the piano roll or from within Harmor provide better
portamento options, but that is another story.
Sytrus Synths Creation, Chapter 11. Portamento
Sytrus Synth Manual v2 by Jens Malmgren Page 84
All content contained in this tutorial are copyrighted under the Creative Commons
3.0 license, Including synths, melodies, and text.
FL Studio and Sytrus are proprietary software programs owned by Image-line Studios.
This tutorial and Its Images may be freely
distributed under the terms of the Creative
Commons 3.0 License.
Copyright © 2008 Erik McClure
Converted into a PDF by Jens Malmgren 2013
Entire revision to Sytrus 2.0 of FLStudio 12.3 august 2016
Copyright @ 2013 – 2016 Jens Malmgren

Sytrus Synths Creation, Index
Sytrus Synth Manual v2 by Jens Malmgren Page 85
Index AMP, 32
Band Limit, 24
Bent Saw, 10
Center, 24
Cherry Phaser, PHS, 57
Chocolate State
Variable, SVF, 55
Chorus, 13
CPU, 53
CPU usage, 37
CPU-wise, 18
Cross, CR, 15
DAMP, 63
delay, 18
Delay, DL, 15
Depth, DP, 14
echo, 18
Envelope Variation,
EV, 37
Even, 45
Feedback Level, FB, 18
Gibbs phenomenon, 36,
54
Global, 29
KEY M, 32
LFO, 28
Lime High Pass, HP, 55
Loop Start, 51
Mango Low Pass, LP3,
57
MIX, 32
Morph Oscillators, 40
Noise, NS, 12
OSC, 47
Panning, PN, 37
Phase, PH, 37
Pitch, PT, 37
pluck, 37, 63
Pluck, 24
Pluck Mode, 52
Portamento, 83
Pre-filter, FL, 12
Reverb, 19
Ring Modulation, 41
Saw, 10
Saw Sine, 11
Shape, SH, 11
Sine, 10
Sine Shaper, SN, 12
Skew, SK, 11
Smooth, 50
Speed, SP, 14
Spread, SR, 15
Square, 10
Square Saw, 11
Stereo Offset, SO, 18
Sub-level, SB, 37
Sustain/Loop End, 28,
51
Tempered Square, 11
tempo, 23
Tension, TN, 11
Time, TM, 18
Triangle, 10
Vanilla All Pass, AP, 56
Vanilla Band Pass, BP,
55
Vanilla High Pass,
HP2, 56
Vanilla High Shelf, HS,
57
Vanilla Low Pass, LP2,
55
Vanilla Low Shelf, LS,
56
Vanilla Notch, NOT, 56
Vanilla Peaking, PK, 56

Sytrus Synths Creation, Index
Sytrus Synth Manual v2 by Jens Malmgren Page 86
VEL M, 32
Violin, 10
Volume, VL, 15, 18, 37
Wave Shaper, 31
WMIX, 60