from bugs to barcodes: using molecular tools to study ... workshop, bellevue... · from bugs to...
TRANSCRIPT
From Bugs to Barcodes: Using Molecular Tools to Study Biodiversity Introduction DNA barcoding is a way to integrate authentic research into the curriculum. Students learn about the process of doing science while generating novel data that they can share with the research community. Barcoding requires an understanding of several different biological areas such as ecology, taxonomy, genetics, molecular biology, and bioinformatics. Students are engaged by the chance to contribute useful data to an issue critical to society – the “biodiversity knowledge gap.” Current estimates of the total number of eukaryote species on Earth range from 5 – 10 million (May, 2010). But, despite 250 years of modern taxonomy, less than 2 million species have been named or described, and this lack of information is not distributed evenly among taxa. Although groups such as mammals and birds are fairly well known, it is estimated that 70% of arthropod species have yet to be discovered (Hamilton et al., 2010). This is particularly troubling at a time when human activities are impacting virtually every organism on the planet. How can we conserve what we don’t know we have? DNA barcoding is a method that uses a specific region in an organism’s DNA as a genetic marker to identify its species. The goal of the international Consortium for the Barcode of Life (CBOL) is to compile DNA barcodes of known and newly discovered plant and animal species and to establish a public library of sequences. Students at any academic institution can join this barcoding project and contribute novel sequence to the CBOL database. When many students are involved in this process we will begin to address the critical lack of biodiversity data that hinders all conservation efforts. This workshop will guide participants through all of the steps from sample collection to DNA sequence analysis. We will grind up insect legs, extract DNA from the insect samples, and amplify the DNA barcoding region using Polymerase Chain Reaction (PCR). Participants will purify the PCR product from agarose gels and analyze sample DNA sequences using several bioinformatics programs. We will identify the insect species and also compare insect sequences, noting any DNA polymorphisms within species. The methods are all straightforward and require only basic molecular biology lab equipment. References Hamilton, et al. 2010. Quantifying uncertainty in estimation of tropical arthropod species richness. The American Naturalist 176: 90-95. May, R.M. 2010. Tropical arthropod species, more or less? Science 329: 41-42.
Notes for instructors: Biodiversity: Although the term biodiversity can refer to the genetic diversity or habitat diversity of an area, it is usually used to describe the diversity of species. However defined, biodiversity is important because it supports ecosystem services such as purification of air, climate control, water purification, food production, pollination, and erosion prevention. Aesthetic and ethical concerns are legitimate considerations as well. Habitat destruction is probably the most serious threat to biodiversity, although overexploitation of natural resources and invasive species play a role, and climate change will become increasingly important in the future. But we cannot assess the impact of any of these threats if we don’t know what is being threatened. Despite 250 years of modern taxonomy most of the 5-10 million species on Earth have never been named or described. This is particularly true for small things – it is estimated that 70% of all insect species are unknown. This knowledge gap is a huge obstacle for conservation efforts. It is critical that we develop a better understanding of what organisms exist if we want to conserve species, or even know the effect of our conservation strategies. With DNA barcoding, students can help. Species have long been identified by their morphology. This works fairly well for large organisms such as birds or mammals, but is much more problematic for smaller things, such as most invertebrate animals. Morphological differences are almost always so subtle it takes an expert to distinguish species. And sometimes, as is the case with cryptic species, there may not be any morphological differences even when the genetic evidence suggests that the organisms do not interbreed, and thus by definition are different species. Molecular taxonomists proposed using a specific DNA sequence called the barcode as an identifier for species. There has been debate about reliability of the barcode sequence to detect taxonomic subtleties, but many taxonomists have embraced the use of barcodes sequences as an additional tool. The Consortium for the Barcode of Life (CBOL) is an international collaboration of experts in genomics, taxonomy, and computer science whose mission is to create a reference library of DNA barcodes in the form of a form of the Barcode of Life database (BOLD, http://www.barcodeoflife.org/). DNA Barcoding: In order to barcode an organism, the DNA is first extracted and then the barcode sequence is amplified using PCR. The PCR product is then cleaned up and sent for sequencing. Various bioinformatics tools can then be used to determine if the barcode sequence is in public databases and to look for genetic diversity within and among species. Because we want to be able to just amplify the DNA and sequence it without having to clone it, it is important to use a haploid gene. Mitochondrial DNA is only inherited from the mother, and thus all the genes on the mitochondrial DNA are haploid. Mitochondrial genes also have a low level of intraspecies diversity and a high level of interspecies diversity, which is useful in terms of differentiating species based on their DNA sequence. Also, there are many copies of DNA per mitochondria, and there are many mitochondria per cell so the copy number of mitochondrial genes is higher than nuclear genes. We will be amplifying DNA using part of the cytochrome c oxidase (CO1) gene located on mitochondrial DNA. This gene has been accepted by scientists as the standard gene to be used for all animal barcoding studies (Herbert, 2003).

For the barcode PCR, we used what are known as “universal primers” which are designed to recognize conserved areas in the CO1 gene in many species. However, these sequences will not be an exact match in all invertebrate specie and thus the PCR reaction is performed at a low annealing temperature so that even if the primers are not an exact match, they will still anneal well enough to form a stable duplex for the PCR reaction. Because of this, we do often see non-specific bands in the PCR product indicating that there are other sites in the genomic and/or mitochondrial DNA where the primers have annealed. We only want to sequence the specific product we are interested in which is about 660 bp of the CO1 gene. In order to get around this problem, we gel purify our PCR product. To do this, we run the PCR products on a gel, and cut out the band containing DNA of the expected size for the CO1 gene. We then use a gel to dissolve the gel and extract the DNA away from the agarose. The gel-purified DNA is then sent for sequencing, and the sequencing results are analyzed using various free bioinformatics programs and databases. Hebert et al., 2003 Biological identifications through DNA barcodes. Proc. R. Soc. Lond. 270: 313-321
Background on organism classification: The major designations used to classify organisms in order of increasing specificity, include:
domain (empire/super-kingdom) kingdom phylum class order family genus species
(Various mnemonics exist to help you remember these designations from kingdom through species. For example: Darn Kids Picking Cacti On Fridays Get Stuck) Summary of steps in barcoding experiment: 1. Collect insect specimens 2. Extract DNA from insect legs. 3. Set up PCR reactions. 4. Run gel to verify that PCR worked and to purify PCR product if using gel purification method. (It is also possible to just do a PCR cleanup if bands are clear.) 5. Send purified PCR product for sequencing. 6. Analyze sequence and determine identify of insect from which you isolated DNA. 7. Compare insect sequences to one another and look for polymorphisms within species. 1. Collecting insects for barcoding Insects and other arthropods are virtually everywhere and can be collected a number of ways. Insects are easiest to find in the warmer months so this activity is best in early in fall semester or late in spring semester. You can collect without any special equipment beyond glass jars or Tupperware, but a few inexpensive items will help. Most importantly, think about where you might find insects. Here are a few ideas to get you started: a. Places to find insects

Flowers – pollinators (bees, etc.) are very common at flowers. Tap a flower over a white tray, white paper plate, or white pad of paper to find thrips, spiders, and other species that lurk therein. Leaves – look on the underside of leaves for plant sucking insects. Look for evidence of leaf chewing which suggests that herbivorous insects might be active. Galls are oddly shaped plant growths caused by the immature insect developing inside. Break open the gall to see if the insect is still there. Underneath logs – turn over any object that creates damp, protected conditions - stones, logs, old lumber, or trash. You will be sure to find earwigs and other moisture-loving insects. Ants, termites, roaches, beetles, and bristletails are common. Lights – lots of insects are attracted to lights at night, especially moths and lacewings. Look around your porch light at night. Water – look under stones in running streams for immature mayflies, stoneflies and the cases of caddisflies. Water striders are common walking on water, and look in the shallows along the edges of ponds for various aquatic beetles and immature dragonflies, midges, and mosquitoes. Basements – look in old books and newspapers for silverfish and booklice which are primarily feeding on the mold that grows in humid conditions. Beating sheet – put a white sheet underneath a bush or tree and shake or beat the foliage and see what falls out onto the sheet. Traps – put out fruit, rotting or otherwise, as baits to attract insects. Try meat, cookies, or a soda. Create habitat by putting out pieces of wood. Pitfall traps – are used to catch ground dwelling insects. Sink any sort of vial into the dirt so that the top is level with the ground. Fill with a preservative, such as 70% ethanol and leave overnight. Ants, bristletails, beetles, and others will be trapped. Bee bowls – fill any sort of small disposable cup or bowl with soapy water (one squirt per gallon of water, Dawn dish soap is usually used). The soap breaks the surface tension of the water so that the insects sink. Paint the cups bright yellow or blue, or try just white. (We use Solo brand 3 ¼ oz white plastic soufflé cups, item P325W-0007). Place the cups in the open. Wherever you can see them easily, the bees can too. The day must be sunny and warm for bees to be active. When conditions are right, you will get bees within seconds. Some species of bees are attracted to bee bowls, other are not. b. Techniques and equipment to capture insects Nets – use insect nets to catch flying insects. No special technique is required – just do whatever works! Fold the net over the rim to prevent escape. Use nets to “sweep” soft vegetation, like long grass. An amazing number of small insects will be caught. Transferring insects from the net to the kill jar is the trickiest part. Again, do whatever works but be aware that most insects will fly upwards if allowed - so hold the net upside down to work your kill jar inside Kill jars – insects are most easily killed by simply putting them in a freezer for 24 hours. But if you want to collect a lot in the field, a kill jar is useful. Use any wide-mouthed glass jar (12-16

oz) with a tight-fitting lid. Pour a thick mixture of plaster of Paris into the bottom, enough for about 1-2 inches. When the plaster of Paris is completely dry, add ethyl acetate which acts as a fumigant to kill the insects. Use enough to saturate the plaster of Paris but not so much that there is standing liquid. As the ethyl acetate evaporates you will need to re-charge your jar (after several hours of collecting). Aspirators – these are plastic vials with a cork and 2 tubes. One tube has a screen on the end, the other does not. You suck through the tube with the screen (to create suction without inhaling the specimen) and use the other tube to capture the insect. This works extremely well with smaller specimens. Aquarium nets – the type of small nets you buy for your home fish tank work well to catch aquatic insects in the shallows at the edge of a pond. Fine paint brushes – are useful for moving very small insects around. Wet the tip with alcohol and the insects will stick. Forceps and blank labels – forceps are handy for manipulating the dead specimens, labels are needed to identify the date, location, and collector for each individual specimen. Berlese funnels – are used to extract insects and other arthropods from soil or leaf litter. Insects that live in these environments avoid heat and light. The Berlese funnel is made of a piece of screen or hardware cloth on which you place your soil sample, a light bulb that hangs overhead, a funnel below, and a jar or preservative, such as 70% ethanol at the bottom. As the insects move away from the light, they fall through the funnel and into the beaker. You will catch many Collembola this way, as well as other arthropods not commonly seen. Soil rich in organic matter works best.
c. Labeling and preserving insects Hard-bodied adult insects are usually preserved on a pin. Soft bodied insects, immature insects, and most other invertebrates are stored in 70% - 90% alcohol. The most important aspect of collecting insects is labeling – a specimen is worthless if it is not labeled with the location, date, and collector. Each specimen or each vial needs a label. Please use a small piece of paper (about 1 cm x 2 cm) inside the vial or on the pin for your label. DO NOT use tape (it falls off). For alcohol specimens pencil is the most permanent thing to write with. Note: for BOLD, the latitude and longitude is required.
Bellevue, WA 27 April 2013 H.J. Henter

d. Identifying insects Identifying insects to species is really tough. Identifying to order is pretty easy, and is enough information for BOLD. There may be published field guides to your area but there are also here are numerous websites that are very useful. Here are my favorites: http://www.cals.ncsu.edu/course/ent425/ (go to Resource Library, then Spot ID) http://bugguide.net/node/view/15740 http://tolweb.org/Insecta http://biokeys.berkeley.edu (key to orders, including wingless specimens) e. Photographs To create a record of the specimen, take a photo. Students can use any digital camera – even the camera on their phone. It is a good idea to photograph the specimen before preserving it in ethanol. A photo is required if you want to upload your specimen in BOLD, but it is also useful to create an inventory of species at your collection site. f. Where to buy collecting equipment (https://www.bioquip.com) insect nets (Bioquip 7612NA) $13.75 each aspirators (Bioquip 1135A) $7.45 each extra plastic aspirator vials (Bioquip 8909) $2.35/12-pack forceps, straight point #4 Swiss style (Bioquip 4531) $5.25 each blank labels, 1 pack = 20 sheets (Bioquip 1213, 11/16 x 5/16”) $1.50/pack insect pins #2 (Bioquip 1208B2) $4.76/pack insect boxes (Bioquip 1009) $14.60 each pro tem block (Bioquip 1030) $1.80 each Any glass or plastic vials or microcentrifuge tubes are useful to store individual specimens. I find a combination of 2 dram glass vials (any style) and 2.0 ml microcentrifuge tubes (with screw caps) fit all the arthropod specimens we collect. I avoid tubes smaller than 2.0 mL because it is impossible to fit labels inside the tube. The most complete reference book for collecting and preserving insects is: Bland, Roger G. and H.E. Jaques. 2010. How to know the Insects 3rd edition, Waveland Press 2. DNA isolation There are several different kits that can be used to do the DNA isolation. The easiest is the prepGem Insect kit from ZyGEM (http://www.zygem.com/Products/Products-‐PG-‐Insect.html), which only takes about 20 minutes. However, the DNA obtained is not very clean and does not seem to store well. If you want to keep the DNA, a better option is the Qiagen DNeasy Blood and Tissue kit, and the directions for that kit are below. (For a review of methods, see Ball and Armstrong Rapid One Step DNA Extraction for Insect Pest Identification by Using DNA Barcodes, Molecular Entomology Vol 101pp 523-532 (2008) and Protocols for High Volume DNA Barcode Analysis http://barcoding.si.edu/PDF/Protocols_for_High_Volume_DNA_Barcode_Analysis.pdf) We find that both ethanol preserved and dry tissue work equally well. With large insects, we take just one leg; with small insects, we may use two or three legs, or even the whole insect. Although we will grind up the legs before digesting the tissues today, this is not really necessary – you can skip the grinding step and just incubate the tissue overnight in the ATL buffer and proteinase K solution. If you have a small organism and want to save it for vouchering
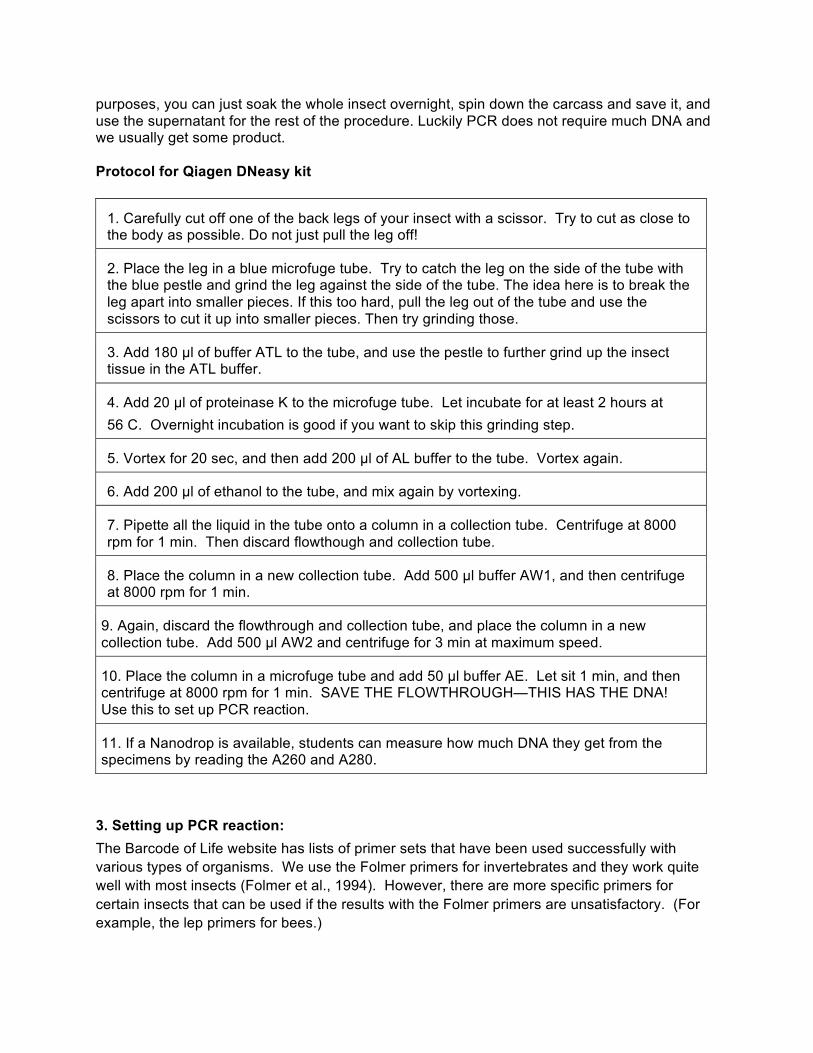
purposes, you can just soak the whole insect overnight, spin down the carcass and save it, and use the supernatant for the rest of the procedure. Luckily PCR does not require much DNA and we usually get some product. Protocol for Qiagen DNeasy kit
1. Carefully cut off one of the back legs of your insect with a scissor. Try to cut as close to the body as possible. Do not just pull the leg off!
2. Place the leg in a blue microfuge tube. Try to catch the leg on the side of the tube with the blue pestle and grind the leg against the side of the tube. The idea here is to break the leg apart into smaller pieces. If this too hard, pull the leg out of the tube and use the scissors to cut it up into smaller pieces. Then try grinding those.
3. Add 180 µl of buffer ATL to the tube, and use the pestle to further grind up the insect tissue in the ATL buffer.
4. Add 20 µl of proteinase K to the microfuge tube. Let incubate for at least 2 hours at 56 C. Overnight incubation is good if you want to skip this grinding step.
5. Vortex for 20 sec, and then add 200 µl of AL buffer to the tube. Vortex again.
6. Add 200 µl of ethanol to the tube, and mix again by vortexing.
7. Pipette all the liquid in the tube onto a column in a collection tube. Centrifuge at 8000 rpm for 1 min. Then discard flowthough and collection tube.
8. Place the column in a new collection tube. Add 500 µl buffer AW1, and then centrifuge at 8000 rpm for 1 min.
9. Again, discard the flowthrough and collection tube, and place the column in a new collection tube. Add 500 µl AW2 and centrifuge for 3 min at maximum speed.
10. Place the column in a microfuge tube and add 50 µl buffer AE. Let sit 1 min, and then centrifuge at 8000 rpm for 1 min. SAVE THE FLOWTHROUGH—THIS HAS THE DNA! Use this to set up PCR reaction.
11. If a Nanodrop is available, students can measure how much DNA they get from the specimens by reading the A260 and A280.
3. Setting up PCR reaction: The Barcode of Life website has lists of primer sets that have been used successfully with various types of organisms. We use the Folmer primers for invertebrates and they work quite well with most insects (Folmer et al., 1994). However, there are more specific primers for certain insects that can be used if the results with the Folmer primers are unsatisfactory. (For example, the lep primers for bees.)

We order the primers from IDT (http://www.idtdna.com/site) and then store the stocks in TE at 100 uM. For the PCR reaction, we use 2X GoTaq Green mix from Promega. It is relatively inexpensive and already has a gel loading dye in the master mix. Folmer Primer Set The primer set LCO1490 and HCO2198 amplify a 658 bp fragment of the COI gene in a wide range of invertebrate taxa LCO1490: 5'-GGTCAACAAATCATAAAGATATTGG-3' HCO2198: 5'-TAAACTTCAGGGTGACCAAAAAATCA-3' Folmer, O., Black, M., Hoeh, W., Lutz, R. & Vrijenhoek, R. 1994. DNA primers for amplification of mitochondrial cytochrome c oxidase subunit I from diverse metazoan invertebrates. Mol. Mar. Biol. Biotechnol. 3, 294-297. Mastermix for 1 reaction total volume 50 µl 25 µl GoTaq green 2.5 µl for primer (10 µM) put 47.5 µl mastermix in each tube add 2.5 µl DNA 2.5 µl rev primer (10 µM) 17.5 µl water PCR conditions for Folmer primers (for use with all invertebrates) Initial denaturation at 94°C for three minutes, followed by 35 cycles of 95°C for 45 seconds, 42°C for 45 seconds, and one minute at72°C, followed by a final extension step at 72°C for seven minutes. Protocol for PCR set up: Have students place 2.5 µl of the purified insect DNA into a PCR tube. Label it with the specimen number. Make up the mastermix for the entire class and add 47.5 of the appropriate PCR mastermix with the primers into each tube and start the PCR reaction.
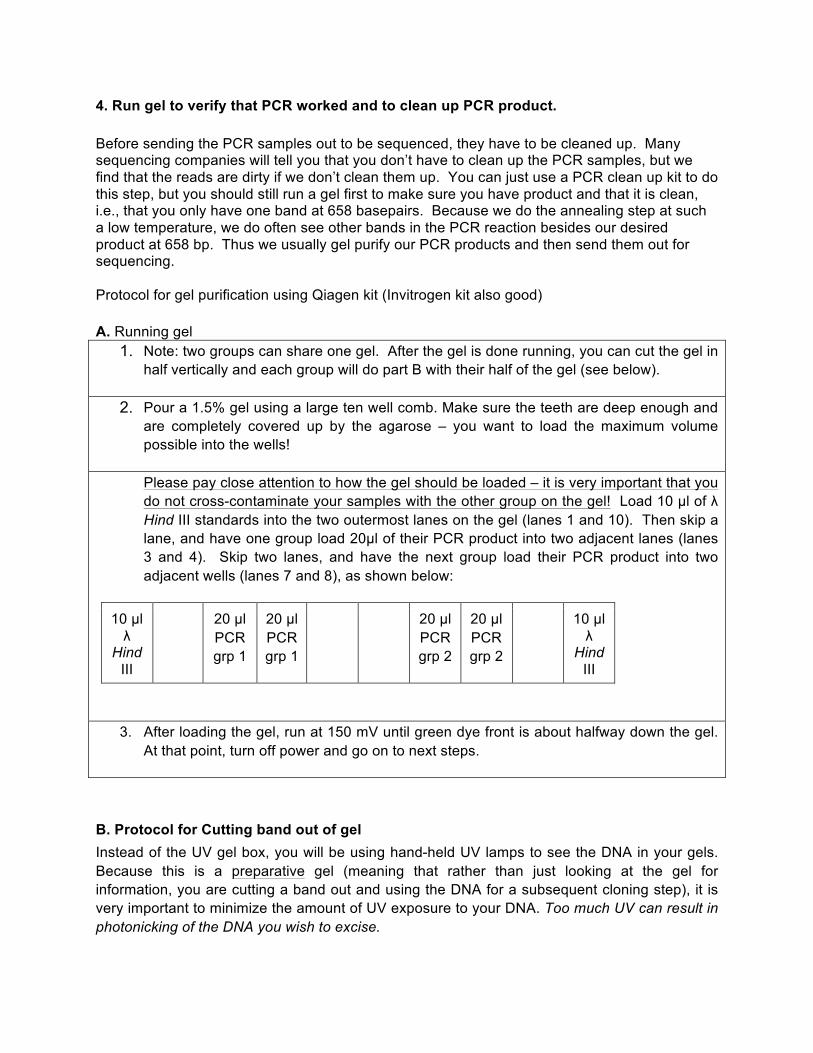
4. Run gel to verify that PCR worked and to clean up PCR product. Before sending the PCR samples out to be sequenced, they have to be cleaned up. Many sequencing companies will tell you that you don’t have to clean up the PCR samples, but we find that the reads are dirty if we don’t clean them up. You can just use a PCR clean up kit to do this step, but you should still run a gel first to make sure you have product and that it is clean, i.e., that you only have one band at 658 basepairs. Because we do the annealing step at such a low temperature, we do often see other bands in the PCR reaction besides our desired product at 658 bp. Thus we usually gel purify our PCR products and then send them out for sequencing. Protocol for gel purification using Qiagen kit (Invitrogen kit also good) A. Running gel
1. Note: two groups can share one gel. After the gel is done running, you can cut the gel in half vertically and each group will do part B with their half of the gel (see below).
2. Pour a 1.5% gel using a large ten well comb. Make sure the teeth are deep enough and are completely covered up by the agarose – you want to load the maximum volume possible into the wells! Please pay close attention to how the gel should be loaded – it is very important that you do not cross-contaminate your samples with the other group on the gel! Load 10 µl of λ Hind III standards into the two outermost lanes on the gel (lanes 1 and 10). Then skip a lane, and have one group load 20µl of their PCR product into two adjacent lanes (lanes 3 and 4). Skip two lanes, and have the next group load their PCR product into two adjacent wells (lanes 7 and 8), as shown below:
10 µl λ
Hind III
20 µl PCR grp 1
20 µl PCR grp 1
20 µl PCR grp 2
20 µl PCR grp 2
10 µl λ
Hind III
3. After loading the gel, run at 150 mV until green dye front is about halfway down the gel. At that point, turn off power and go on to next steps.
B. Protocol for Cutting band out of gel Instead of the UV gel box, you will be using hand-held UV lamps to see the DNA in your gels. Because this is a preparative gel (meaning that rather than just looking at the gel for information, you are cutting a band out and using the DNA for a subsequent cloning step), it is very important to minimize the amount of UV exposure to your DNA. Too much UV can result in photonicking of the DNA you wish to excise.

Remember to wear UV protective goggles whenever any UV lamp is on!! 1. Weigh an Eppendorf tube and record the weight. Make sure the balance is reading in grams not ounces or dry weight when you weigh your tube! 2. Cut the gel down the middle, and slide your half of the gel onto a glass plate. 3. One person in your group will cut both of the desired PCR bands out with a razor blade and the other person will hold the UV lamp. Make sure lamp is set to short wave. 4. Once you are set, turn off the room lights expose the gel to the UV light. From the cut edge of the gel, quickly make a cut just above the major band at 658 bp in both wells with the PCR sample in them (use the 564 bp band in the lambda Hindlll ladder to check that you have the right band). Then make a cut along the bottom of the band, and finally make a cut along the edges so that each major band in both lanes has a rectangle of cuts around it. Try to minimize the amount of agarose you cut out of the gel. 5. Turn the room lights back on. With a tweezer or yellow tip, lift the rectangular gel cube containing the DNA band you want in both lanes away from the rest of the gel and place it into the Eppendorf tube that you previously weighed. 6. Weigh the tube again and calculate the weight of the gel in mg. The weight of the gel fragment should be less than 400 mg. Assume that the weight in mg is equal to the volume in µl for subsequent calculations.
C. Protocol for gel purification of DNA using Qiagen MinElute kit 1.
1. Add 3 volumes of Buffer QC to 1 volume gel (so for example add 300 µl Buffer QG to 100 mg gel). Heat in a 50° water bath for 10 minutes. Mix occasionally by vortexing during the incubation. Continue the incubation until the gel slice completely disappears (you can tell by holding the tube up to the light). 2. After the gel is dissolved, make sure the color of the mixture is yellow. Note: If the color of the mixture is orange or violet, add 10 �l of 3 M sodium acetate, pH 5.0, and mix. The color of the mixture will turn to yellow. 3. Add one 1 gel volume of isopropanol to the mixture (so if the original gel volume was 100 mg, add 100 µl of isopropanol). Mix well by inverting the tube several times. 4. Place a MinElute column inside a collection tube. Transfer the dissolved gel mixture onto the center of the column, and centrifuge for 1 minute at maximum speed. (If you have more than

about 800 µl total volume, you will have to do this step twice. Add about half of the total volume and centrifuge. Discard the flow-through, and repeat the step with the other half. ) 4. Discard the flow through, and replace column in the collection tube. Add 500 µl of Buffer QC to the column and centrifuge for 1 min. 5. Discard the flow through, and replace column in the collection tube. Add 750 µl of Buffer PE and centrifuge again for 1 minute. 6. Discard the flow through, and centrifuge column for 1 minute to dry. 7. Transfer the column to a clean 1.5 ml microcentrifuge tube. Discard the collection tube. 8. To elute DNA, add 10 µl of Elution Buffer EB in the middle of the column, let it sit for 1 minute, and centrifuge for 1 min. Note: we usually elute in 20 µl if there appeared to be a strong band on the gel. Most sequencing companies want the cleaned up PCR concentration in the 5 to 35 ng/ µl. You may want to run another gel to quantitate the amount in your sample before you send it for sequencing. 9. Discard column, and send the eluted DNA for sequencing.
5. Sending DNA samples for sequencing
Since we want as long a read as possible for analysis, Sanger sequencing is still the best method to use for barcoding work. We send our samples out to a company to do the sequencing.
We use Eton (http://www.etonbio.com/) because we have negotiated an educational discount with them – they charge us $5 a sample –and they actually pick up samples from our campus. (Genewiz http://www.genewiz.com/ is the company used by the Urban Barcode Project, and supposedly they have low rates for academic purposes as well.)
When you send out the samples, you must also include your forward primer at 5 µM – they need this to start the sequencing reaction! If you want to also sequence in the reverse direction, you must also send the reverse primer (see below).
Once the sequences come back from Eton, we go through them see which have worked and which haven’t. For those that work, we then ask Eton to sequence the DNA using the reverse primer – this is required of BOLD in order to submit samples, but it is not necessary if you are just doing the barcoding for class projects.
6. Bioinformatics analysis
We are going to analyze barcode sequences using a variety of bioinformatics tools. First, we are going to assume you are doing the barcoding as an in class project and do not want to submit the sequences to BOLD, which requires more work.

There are lots of novel you can ask in doing barcoding projects. For example, one semester we analyzed beach worms from different intertidal zones in order to find out whether they were members of different species or the same species. Another semester we looked at the degree of intraspecies diversity in the honeybee Apis mellifera which have a number of subspecies. Neither of these required reverse sequencing or submitting sequences to BOLD. Several articles have been published about students who have done barcoding to detect whether fish being sold in stores are the real thing – see Scientific American articles in Resources.
Part 1: Assessing the quality of the sequence and doing a Blast
1. The first thing students must do is look at their sequence chromatogram and determine if it is good enough to use in the subsequent analyses. Although most of the time we get PCR product, it may or may not have sequenced well.
2. First find the “good_ sequence_Apis.AB1” file containing a chromatogram of a sequencing reaction. Open the chromatogram in the program Finch TV. The chromatogram should look like the one below in Finch TV:
Note how the first 25 peaks or so do not look very sharp, but from about peak 25 on, the peaks are well resolved, and there is no background. This is a good sequencing reaction. You can also use the gray bars above each base to tell how good the sequence is at that particular point. You can see there is a horizontal green dotted line and then perpendicular gray bars above each base. The higher the bar, the more certain the computer program was about “calling” or identifying that base. For a good sequence, the height of all the grey bars after the first 20 or so should be above the dotted line.
Now open the “Bad_sequence.AB1” file and look at the chromatogram. Note how the peaks all overlap and very few of the gray bars are above the dotted gree line:

This sequence would not be usuable for the subsequenct bioinformatics analyses.
3. As mentioned above, even in a good sequencing run, the first 25 to 50 basecalls are unreliable, and you need to delete that sequence from your analysis. First, open the “Good_sequence_Apis” file again in Finch TV. In order to make sure that everone’s sequence is trimmed the same, please find the sequence GGATC around position 40, and highlight all the sequence to the left of the C (do not include the C) just as shown in the figure below. Then under the edit menu, select delete. The actual peaks won’t disappear but all the letters above the peaks will:
Now do the same for the end of the sequence. Look for the sequence TGATTTTT and highlight the sequence to the left of the T(do not include the T) just like as ashown in the figure below. Delete this sequence.

4. Once the sequence has been cleaned up, you are going to export the sequence. Go to File on the toolbar, and then select “Export – DNA sequence Fasta” in Finch TV. Save that file to your desktop, but also keep the chromatogram open. Then open the file, using Notepad, Textedit, or Word. The sequence should look something like this:
>Good_sequence_Apis CATCAATGAGACTTATTATTCGAATAGAATTAAGATCCCCAGGATCATGA ATTAATAATGATCAAATTTATAATACAATTGTTACTAGCCATGCATTCCT AATAATTTTTTTTATAGTTATACCATTTTTAATTGGAGGATTTGGAAATT GGCTTATTCCTTTAATACTAGGATCACCTGATATAGCATTTCCCCGAATA AATAATATTAGATTTTGATTACTTCCTCCCTCATTATTTACACTTTTATT AAGAAATTTATTTTACCCAAGACCAGGAACTGGATGAACAGTATATCCAC CATTATCAGCATATTTATATCATTCTTCACCTTCAGTAGATTTTGCAATT TTTTCTCTTCATATATCAGGAATTTCCTCAATTATAGGATCATTAAACTT AATAGTTACAATTATAATAATAAAAAATTTTTCTATAAATTATGACCAAA TTTCATTATTTCCATGATCAGTTTTTATTACAGCAATTTTATTAATTATA TCACTACCTGTATTAGCTGGAGCAATTACTATACTATTATTTGATCGAAA TTTTAATACATCATTTTTCGATCCTATAGGAGGTGGAGATCCAATTTTAT ATCAACATTTATTT
This is known as a Fasta file – note how the sequence is preceded name and by a “>”. Many bioinformatics programs require this type of file format.
5. Next we are going to see if there are any similar sequences to ours in the Genbank database. We will do this by using the NCBI Blast tool.
Go to NCBI Blast (http://blast.ncbi.nlm.nih.gov/Blast.cgi0 and select “nucleotide blast”. Then under “Chose Search Set”, use the pull down menu to select “nucleotide collection” (note that the default is for Human sequence). Paste your Fasta sequence into the entry box, and then click on the Blast button.

6. When you do the Blast, you will get a list of entries in Genbank that are closest in match to your sequence, with the most similar match at the top of the list. Scroll through the list and look at the names – often there are several entries for the same Genus and species. Note that for this exercise, we used a barcode sequence from the honeybee, Apis mellifera, which has been well studied so there are lots of entries in Genbank for this species.
Now scroll down below the list to see the actual alignment of your sequence to the top match in NCBI - it should look something like this:
Apis mellifera voucher BIOUG:TDWG-0140 cytochrome oxidase subunit 1 (COI) gene, partial cds; mitochondrial Sequence ID: gb|HQ978595.1|Length: 658 Number of Matches: 1
Alignment statistics for match #1 Score Expect Identities Gaps Strand 1090 bits(590) 0.0 606/614(99%) 0/614(0%) Plus/Plus Query 1 CATCAATGAGACTTATTATTCGAATAGAATTAAGATCCCCAGGATCATGAATTAATAATG 60 ||||||||||||||||||||||||||||||||||||||||||||||||||||||| |||| Sbjct 45 CATCAATGAGACTTATTATTCGAATAGAATTAAGATCCCCAGGATCATGAATTAACAATG 104 Query 61 ATCAAATTTATAATACAATTGTTACTAGCCATGCATTCCTAATAAttttttttATAGTTA 120 |||||||||||||||||||||||||||| ||||||||||||||||||||||||||||||| Sbjct 105 ATCAAATTTATAATACAATTGTTACTAGTCATGCATTCCTAATAATTTTTTTTATAGTTA 164 Query 121 TACCATTTTTAATTGGAGGATTTGGAAATTGGCTTATTCCTTTAATACTAGGATCACCTG 180 |||||||||||||||||||||||||||||||||||||||||||||||||||||||||||| Sbjct 165 TACCATTTTTAATTGGAGGATTTGGAAATTGGCTTATTCCTTTAATACTAGGATCACCTG 224 Query 181 ATATAGCATTTCCCCGAATAAATAATATTAGATTTTGATTACTTCCTCCCTCATTATTTA 240 |||||||||| ||||||||||||||||||||||||||||||||||||||||||||||||| Sbjct 225 ATATAGCATTCCCCCGAATAAATAATATTAGATTTTGATTACTTCCTCCCTCATTATTTA 284 …..
The Query sequence is the sequence you submitted to Genbank. The Subject sequence is the sequence of the closest match to your sequence in Genbank. Look first at the “max identities” value – this tells you how similar your sequence is to the sequence in Genbank. In this case, the sequence was 99% identical to an entry for Apis mellifera. The first two numbers tell you how many nucleotides were the same. So in the blast results above, the numbers “604/613” tell you that 604 out of 613 bases were the same in the submitted sequence and the top match found in Genbank. The value in parentheses (99%) tells you how similar this is on a percentage basis.
Note that “Query coverage is a totally different parameter. This number tells you the percent of the query sequence that overlaps the subject sequence). The Expect value (e-value) of the hit is defined by NCBI as follows:

“The Expect value (E) is a parameter that describes the number of hits one can ‘expect’ to see by chance when searching a database of a particular size. It decreases exponentially as the Score (S) of the match increases. Essentially, the E value describes the random background noise. For example, an E value of 1 assigned to a hit can be interpreted as meaning that in a database of the current size one might expect to see 1 match with a similar score simply by chance. The lower the E-value, or the closer it is to zero, the more ‘significant’ the match is.”
7. For now, we are most interested in the identities value. Although there is no hard and fast number, assume for this exercise that any match that is 97% similar or above is probably the correct match for your specimen - that is, assume your specimen is the same as the species identified in Genbank. If you’re the closest match to your sequence is less than 97% similar to any entry in Genbank, the barcode sequence for your specimen is probably not in Genbank.
To illustrate this, open the file “Good_sequence_Spider” file. Go through the directions above, trimming the sequence and saving the Fasts file, and then doing a Blast.
What was the Identities value for your top match in Genbank with this sequence? If it is not 100%, do you think it is because of bad quality sequence at the positions where the sequences do not match? (You will need to look at your chromatogram to answer this question.) Or do you think the species of the specimen is different than that of your top match in Genbank?
In this case, the sequence of the specimen we sequenced was not in Genbank. With a 92% match, though, we could reasonably guess that it is in the same genus.
Part 2. Using Clustal to align sequences and look for polymorphisms
Barcoding sequences can be used to illustrate the concept of polymorphisms, and in particular, synonymous and non-synonymous SNPs. It is necessary to sequence several specimens in the same species so that we can do this type of analysis. It also illustrates why the CO1 gene is used for barcoding studies. 1. Go to the file called “Apis file for ClustalW”. This file the barcode sequences for four different Apis mellifera specimens. They were generated from trimming four chromatograms just as you did above. Copy all the files.
2. Now go to http://www.genome.jp/tools/clustalw/. This brings you to the Clustal W alignment tool. Clustal W can be used to align several sequences in order to compare the sequences to each other.
3. Paste the Apis sequences into the entry box. Hen make sure to click DNA (protein is the default), and then click on “Execute multiple alignment”.
4. You should get something that looks like this, only longer and with four entries instead of just two:
Bee81 GATGAACAGTATATCCACCATTATCAGCATATTTATATCATTCTTCACCTTCAGTAGATT Bee82 GATGAACAGTATATCCACCATTATCAGCATATTTATATCATTCTTCACCTTCAGTAGATT ************************************************************ Bee81 TTGCAATTTTTTCTCTTCATATATCAGGAATTTCCTCAATTATAGGATCATTAAACTTAA Bee82 TTGCAATTTTTTCTCTTCATATATCAGGAATTTCCTCAATTATAGGATCATTAAACTTAA ************************************************************

Bee81 TAGTTACAATTATAATAATAAAAAATTTTTCTATAAATTATGACCAAATTTCATTATTTC Bee82 TAGTTACAATTATAATAATAAAAAATTTTTCTATAAATTATGATCAAATTTCATTATTTC ******************************************* ****************
Note that wherever the sequences match exactly, an asterisk appears at the bottom of the alignment at that position in the sequence. If there is a space, the sequences differ at that point.
5. How many places in the Apis barcode sequences are there differences among the sequences? In this example, all the polymorphisms are SNPs, or single nucleotide polymorphisms. But are the SNPs transitions or transversions (Transitions are interchanges of two-ring purines (A G) or of one-ring pyrimidines (C T): they therefore involve bases of similar shape. Transversions are interchanges of purine for pyrimidine bases, which therefore involve exchange of one-ring and two-ring structures. The most common mutations are reportedly C-T transition – does this data support that?
(You can also have students calculate how much sequence diversity there is by using a program like Mega http://www.megasoftware.net/)
If you want you can use this data to determine which SNPs are synonymous and which are non-synonymous, you can have students translate the sequence and then do an protein alignment – this takes a while so we have put the instructions in a see Appendix B so you can try this at home. (The answer is that three of the SNPs are synonymous and one is non-synonymous.)
6. ClustalW can also be used to align sequences from different species and build trees. To try this, open the “Spider file for clustal W” and copy and paste the sequences into Clustal W. These are sequences from different species of spiders, and you can see that there are lots of sequence differences among them. Again, one of the reason the CO1 gene is used is because the level of intraspecies sequence diversity is low, and the interspecies diversity is high!
You can also use ClustalW to draw trees. To try this function, go to the top of the page, and select “Rooted tree with branch length”.
Part 3. The BOLD Database
1. As mentioned above, the BOLD database is a database specifically for barcode sequences, and anyone can access published barcode data. There are two aspects of the BOLD database we want to illustrate. First you can just use BOLD to compare your sequence against the BOLD database and to view entries for specimens that are the same species or similar to yours. You can also use the BOLD student portal to create a site to store your students work. This requires signing up for an account and registering your course, as will be described below.
2. To simply compare your sequences to those in the BOLD database, go to the BOLD student portal http://www.boldsystems.org/index.php/SDP_Home. Then select the “Identification” tab on the upper toolbar.

3. Copy and paste the “Good_sequence_Spider” Fast sequence you saved in step 7 in Part 1, and enter it into the search box. Hit submit. Make sure you click “All barcode records” for your search!
4. Remember the Blast results for this sequence? The top match was 92% similar. In BOLD, there are sequences that are 99% similar – but the submitters knew only the order of the spider, Araneae, and in one case, the genus, Cheiracanthium. This is because BOLD allows investigators to submit sequences for organisms even if the genus and species is unknown. Note that the next closest match is for 96% - this is probably a different species.
5. Click on the little blue arrow mark next to the Published note, and it will bring you to the record page in BOLD for the top match. It shows a picture of the spider from which the barcode was obtained. Note that the page contains a lot of info about the spider that was sequenced – where it was collected, by who, when, and a picture of the actual specimen. So although BOLD could not help us identify the exact spider species, at least the student in our class who collected and sequenced it could compare the picture of their specimen and see if it looked the same as the entry in BOLD, etc..
6. In order to use BOLD as a place to store and analyze student work, you must register for an account, and then register your course. (All of this work will not be available to the public, unless you ask BOLD to import it into their public database.) You can then upload your students’ names and emails, and they will be sent a login code. If the data your students collect is complete and of high quality and you voucher the specimen, you can also submit your work into the BOLD database. This is all explained on the BOLD site, under Quick Start Guide, Instructor Interface and User Guidelines. 7. For now, we are going to run though what students can do on the site, using some examples. Again, go to http://www.boldsystems.org/index.php/SDP_Home Select the “Students” box, and log on using the following information: Username: Class-01 Password: KZQ72
You should now see the student console.
8. Open the “BOLD portal samples” folder, and open the “Sample1_newspecimenData” file. Click on the new specimen block in the student console, and start entering the information in the file. You need to make up a sample identifier – use your initials and your school initials or something like that. (Just keep track of the identifier you make up.)
Then start entering the data from the Excel file – but note, you do not have to enter all of it! Do however make sure you enter the latitude and longitude.
9. Once you are done, select a student from the pull down menu on the right, and hit submit. On the next page, hit view specimen.

BOLD has created a page for that specimen. As students enter more data (photos, sequence, etc.,) this info will be added to the page (see next).
10. Now return to the main console, and hit the “Upload Images” box. Again, you enter the sample ID you just made up and then upload the JPEG file from the sample folder and hit submit. Note that you can add comments, like side view, or whatever you choose.
Now go back to the specimen, page, and you will see that the image has been added to the page.
11. Go back to the main console, and now select the “Upload Traces” box. Again, enter the identifier and select the primers you used from the pull down menu. (If you use primers other than those in the BOLD system, you can just e-mail them and they will add your primers to the list.) Select FishF2 for the forward primer and FishR2 for the reverse.
12. Now, go to attach Trace Files and select sequencing primers. For the Forward, select FishF2 again and leave the reverse. Now on this page choose view sequence. You can see that the trace files have been uploaded – but it takes 24 hours for the sequences to be evaluated by BOLD. So we will look at a set of sequences that were uploaded previously and then analyzed.
13. Go to “View class records”, and click on the Allosmerus elongates sample ID. This opens a page to an entry that was submitted by a student at the Coastal Marine Labs. You can see the collection info and a picture of the fish. Close the window, and now click on the process ID for the same specimen. Now you can see the sequence that was submitted for that entry. The Fasta file is there, as well as links to the two sequences that were submitted. If you click the boxes next to the sequences, and then view traces, you can see the actual chromatograms. Note also that BOLD has evaluated the chromatograms as “high” quality. There is an intermediate step between loading the sequence files and creating a Fasta file that you can do in BOLD rather than using Finch TV – you do this all through the “Add Sequence” tab on the console.
14. Go over to the Full DB tab underneath the nucleotide sequence on the left. BOLD will now take that sequence and compare it to all the other sequences in BOLD.

V. Materials for 25 students (13 groups of 2?) For 1st step of DNA extraction:
• 13 disposable blue microfuge tubes with pestles (we can bring these) • 13 small scissors and tweezers • 4 dissecting scopes (magnifying glasses would also be OK if necessary)
Agarose gel purification
• 6-7 agarose gel rigs • 500 ml 1.5% Agarose and 75 µl Sybr Safe • 7 sets of pipetteman • 4 microfuge centrifuges • 70 µl DNA ladder – lambda Hindlll is good • 13 Razor blades • 13 Eppendorf tubes • Balance to weigh Eppendorf tubes • 4 to 6 handheld UV lights • 7 Glass plates • 13 Safety glasses • 55oC water bath • Gel extraction kit for 13 samples (both Invitrogen and Fermentas work well) • (Nanodrop? Totally optional but we could measure how much DNA they get from gel
extraction if we had one) Sequence analysis
• Computers with Finch TV or other chromatogram-viewing software like 4 Peaks or Chromas Lite (all are free)
• Internet connection

Resources:
Good background papers:
Hebert PDN, Gregory TR. (2005) The promise of DNA barcoding for taxonomy. Syst Biol 54(5):852-859.
Stoeckle MY, Hebert PDN. (2008) Bar Code of Life: DNA Tags Help Classify Animals. Scientific American 299(4): 66-71.
Websites:
BOLD student portal http://www.boldsystems.org/index.php/SDP_Home
Coastal Marine Biolabs site – protocols, Powerpoint slides, etc
http://studentdnabarcoding.org/resources/teacher-tools-and-support.html
Cold Spring Harbor
http://www.dnabarcoding101.org/planning_prep.html
http://www.urbanbarcodeproject.org/
Outreach materials:
http://www.barcodeoflife.org/content/resources/outreach-materials
http://www.barcodeoflife.org/sites/default/files/materials/TenReasonsBarcoding.pdf

Appendix A Using Clustal W to find synonymous versus non-synonymous SNPS
Open same Clustal W Apis file you used for the nucleotide alignment in Clustal W.
a) First, you need to translate each of the DNA sequences into amino acid sequence. Do this by going to http://insilico.ehu.es/translate/. Copy and paste one of the sequences into the box making sure that you use only the DNA sequence and not the header. Select invertebrate mitochondrial DNA, and click on Translate to protein.
On the new page, click on the longest blue arrow.
.
Note that the translated amino acid sequence should be about 219 amino acids long.
Copy the amino acid sequence into a new word file, adding back the “>”and a file name in the line immediately above the amino acid sequence.
Repeat for the three other sequences, and paste into the same file leaving no spaces in between the sequences. (So it should look like the Apis file you first opened but with amino acid sequence instead of DNA.)
d. Now go back and do a Clustal W alignment of the amino sequences. Were any of the SNPs non-synonymous?