free plans jem watercraft - canoe plans, kayak plans ... · free plans – jem watercraft laker...
TRANSCRIPT

Free Plans – JEM Watercraft
Free Plans – JEM Watercraft
Free Plans – JEM Watercraft
Free Plans – JEM Watercraft
Free Plans – JEM Watercraft
Free Plans – JEM Watercraft
Free Plans – JEM Watercraft

Free Plans – JEM Watercraft
Free Plans – JEM Watercraft
Free Plans – JEM Watercraft
Free Plans – JEM Watercraft
Free Plans – JEM Watercraft
Free Plans – JEM Watercraft
Free Plans – JEM Watercraft

Free Plans – JEM Watercraft
Free Plans – JEM Watercraft
Free Plans – JEM Watercraft
Free Plans – JEM Watercraft
Free Plans – JEM Watercraft
Free Plans – JEM Watercraft
Free Plans – JEM Watercraft
Free Plans – JEM Watercraft
Free Plans – JEM Watercraft
Free Plans – JEM Watercraft
Free Plans – JEM Watercraft
Free Plans – JEM Watercraft
Free Plans – JEM Watercraft
Free Plans – JEM Watercraft
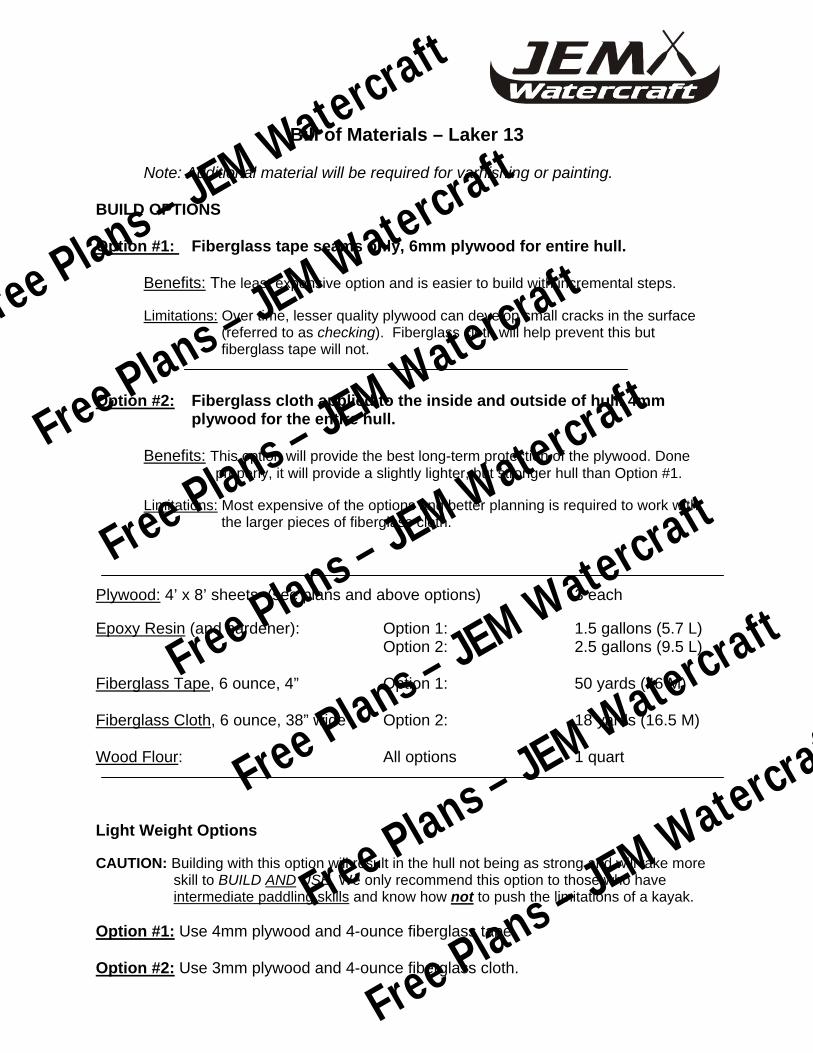
Bill of Materials – Laker 13
Note: Additional material will be required for varnishing or painting.
BUILD OPTIONS Option #1: Fiberglass tape seams only, 6mm plywood for entire hull.
Benefits: The least expensive option and is easier to build with incremental steps. Limitations: Over time, lesser quality plywood can develop small cracks in the surface
(referred to as checking). Fiberglass cloth will help prevent this but fiberglass tape will not.
Option #2: Fiberglass cloth applied to the inside and outside of hull. 4mm plywood for the entire hull.
Benefits: This option will provide the best long-term protection of the plywood. Done properly, it will provide a slightly lighter, but stronger hull than Option #1.
Limitations: Most expensive of the options and better planning is required to work with
the larger pieces of fiberglass cloth. Plywood: 4’ x 8’ sheets (see plans and above options) 3 each Epoxy Resin (and hardener): Option 1: 1.5 gallons (5.7 L) Option 2: 2.5 gallons (9.5 L) Fiberglass Tape, 6 ounce, 4” Option 1: 50 yards (46 M) Fiberglass Cloth, 6 ounce, 38” wide Option 2: 18 yards (16.5 M) Wood Flour: All options 1 quart Light Weight Options CAUTION: Building with this option will result in the hull not being as strong and will take more
skill to BUILD AND USE. We only recommend this option to those who have intermediate paddling skills and know how not to push the limitations of a kayak.
Option #1: Use 4mm plywood and 4-ounce fiberglass tape. Option #2: Use 3mm plywood and 4-ounce fiberglass cloth.

Free Plans – JEM Watercraft
Free Plans – JEM Watercraft
Free Plans – JEM Watercraft
Free Plans – JEM Watercraft
Free Plans – JEM Watercraft
Free Plans – JEM Watercraft
Free Plans – JEM Watercraft
Laker Kayak (free version) Build Instructions Rev 00 – 06/25//07
JEM Watercraft
1 of 32
These instructions and its concepts may not be used, resold, reproduced, or distributed except as specifically directed by JEM Watercraft.
Hello and welcome to the wonderful world of boat building! Building your own boat can become quite a fun and addicting hobby. We hope you enjoy these free plans.
See our other kayak plans for other designs. Included in that selection is a more refined version of our Laker 13 kayak. This version has several features that the free version does not have. Features such as:
Hull Design
• A rounded bow and stern entry/exit that will be able to take sliding into rocks and logs better than the free version.
• A refined cockpit coaming shape that will accept a spray skirt and has a more rounded, attractive shape.
Printed Plans
• Drawings printed out on 11” x 17” [28 x 43] paper.
• Bill of Materials and Assembly Instructions printed on 8.5” x 11” [21.6 x 28]
• Full scale patterns for parts that would be more difficult to draw.
• 15+ additional pages of details and tips on hull assembly including: • Constructing and using a simple drill jig for perfect hole spacing. • Using a spacer method for perfectly aligned hull panels. • Constructing and installing deck hatches. • Installing accessories such as pad eyes, foot braces, etc. • Assembling an integrated seat inside the hull. • End pours for installing a bowline. • Creating neat and effective fillets • Installing thigh braces for better hull control.
Extras • JEM Watercraft decals.

Free Plans – JEM Watercraft
Free Plans – JEM Watercraft
Free Plans – JEM Watercraft
Free Plans – JEM Watercraft
Free Plans – JEM Watercraft
Free Plans – JEM Watercraft
Free Plans – JEM Watercraft
Laker Kayak (free version) Build Instructions Rev 00 – 06/25//07
JEM Watercraft
2 of 32
These instructions and its concepts may not be used, resold, reproduced, or distributed except as specifically directed by JEM Watercraft.
Disclaimer and waiver of liability: By building these plans, you, the builder, assume all risk and responsibility for the safety of you and anyone else who uses your boat. It is the responsibility of you, the builder, to build this boat in a manner to provide for safe and responsible use on the water.
Like all other recreational watercraft, if used improperly, serious injury or even death could be the result. It is the builder’s responsibility to build the boat properly and to acquire the necessary skills for safe recreational paddling. In other words: Be smart, wear your PFD, use good judgment, and have fun! If you need further clarification of how to perform the steps below, go to http://www.jemwatercraft.com/forum/. Visit the tutorial section and see the different techniques used to build a stitch and glue boat. If you’re still not clear, post your question in the forum. Read these instructions start to finish at least once before you draw or cut anything to ensure you’re familiar with the entire process. Random Notes/Tips:
• READ THE EPOXY LITERATURE PROVIDED BY YOUR EPOXY VENDOR. • Some people develop sensitivity to epoxy. Severity depends on the chemical make-up of
the epoxy brand used and the individual person. Common symptoms are light skin reaction or tingling sensation. Some people experience more severe reactions. Most people experience no symptoms. Use every effort not to get epoxy on your skin.
• When still wet, epoxy can be cleaned up with acetone or vinegar. Some builders try to extend the life of brushes and other tools by soaking in solvents. It’s our opinion it is not worth the time, effort, or risks from acetone or other solvents. Better to plan ahead and do neat work than to work sloppy and try to clean it up later.
• Epoxy is not as toxic as polyester or vinylester resin, but still has an odor that can contribute to the above mentioned sensitivity. Work in a ventilated area with fresh air supply. A room with a window open and a box fan set on low is usually more than enough circulation.
• Epoxy sticks to almost EVERYTHING except plastic. If it gets on your skin and hardens, it’ll take hair off when you try to remove it.
• If it gets on you clothes, floor, carpet, etc, plan on it never coming off. Wear old clothes and use a drop cloth.
• Amine Blush: Epoxies, especially in humid conditions, can produce a wax-like film after about 72 hours of cure. As a general guideline, if the epoxy surface you’re working with has cured more than 48 hours, scrub with a soapy (regular dish soap) and wet Scotch-Brite pad or lightly sand to remove the amine blush before attempting to paint or cover with more epoxy. Refer to your epoxy literature or epoxy vendor for specific application advice. Acetone is also and effective solvent to use but is highly flammable. Please read and follow all safety precautions listed for any solvent.
• Epoxy breaks down when exposed to direct UV rays from the sun over long periods of time. The epoxy surface needs to be covered with varnish or paint. Regardless of some manufacturers’ claims, there is no such thing as “UV inhibitors” that can be added to epoxy that will allow you not to paint or varnish the hull and still have UV protection.

Free Plans – JEM Watercraft
Free Plans – JEM Watercraft
Free Plans – JEM Watercraft
Free Plans – JEM Watercraft
Free Plans – JEM Watercraft
Free Plans – JEM Watercraft
Free Plans – JEM Watercraft
Laker Kayak (free version) Build Instructions Rev 00 – 06/25//07
JEM Watercraft
3 of 32
These instructions and its concepts may not be used, resold, reproduced, or distributed except as specifically directed by JEM Watercraft.
• When using metered pumps to dispense resin from bottle, loosen the cap or poke a small hole in the top of the bottle to let air in. This will keep your pumps from “burping” and giving inaccurate amounts.
Basic Tools Needed • Work Space: This can be an indoor or outdoor area. Ideally, the space should be well lit
and about 1.5 times the length of your hull. Space should be covered to protect from the elements.
• Work Bench: This can be a formal workbench or simple flat surface. Saw horses with an aluminum ladder spanned across works very well. Do your best to make the surface flat and level. Constructing a strongback is an option, but not required.
• Measuring: A tape measure can be enough, but drywall squares 48” long (found at any home improvement store) are inexpensive and make drawing very easy.
• Saw: A handsaw will work. An electric jig saw works nicely for cutting curves. A small circular saw helps make long cuts smooth. Whichever you choose, get a blade with a high tooth-per-inch count. This will cut the plywood with less splintering.
• Pencil: Ink from a pen will soak into the wood grain and be harder to remove. • Drill: A manual or electric hand drill is acceptable. • Sanding: Manual hand sanding or electric sanding is acceptable. Manual sanding if you
really enjoy sanding or want a good workout for your arms. But we strongly recommend a random orbit sander.
• Gloves: Vinyl gloves are the best. Latex is porous and will let resin soak through. Epoxy also sticks to latex more than vinyl.
• Brushes: Use inexpensive and disposable paint brushes called “chip brushes”. Foam detail brushes also work well.
• Foam Roller • Plastic Spatula or wide putty knife – Like the kind used for auto body repair. • Paper Towels • Scissors: A pair of good quality and sharp scissors will cut fiberglass easily. You do not
needs the special sheers liked used to cut Kevlar®. • Clamps: Small c-clamps, spring type clamps, or homemade clamps.
Free Plans – JEM Watercraft
Free Plans – JEM Watercraft
Free Plans – JEM Watercraft
Free Plans – JEM Watercraft
Free Plans – JEM Watercraft
Free Plans – JEM Watercraft
Free Plans – JEM Watercraft
Laker Kayak (free version) Build Instructions Rev 00 – 06/25//07
JEM Watercraft
4 of 32
These instructions and its concepts may not be used, resold, reproduced, or distributed except as specifically directed by JEM Watercraft.
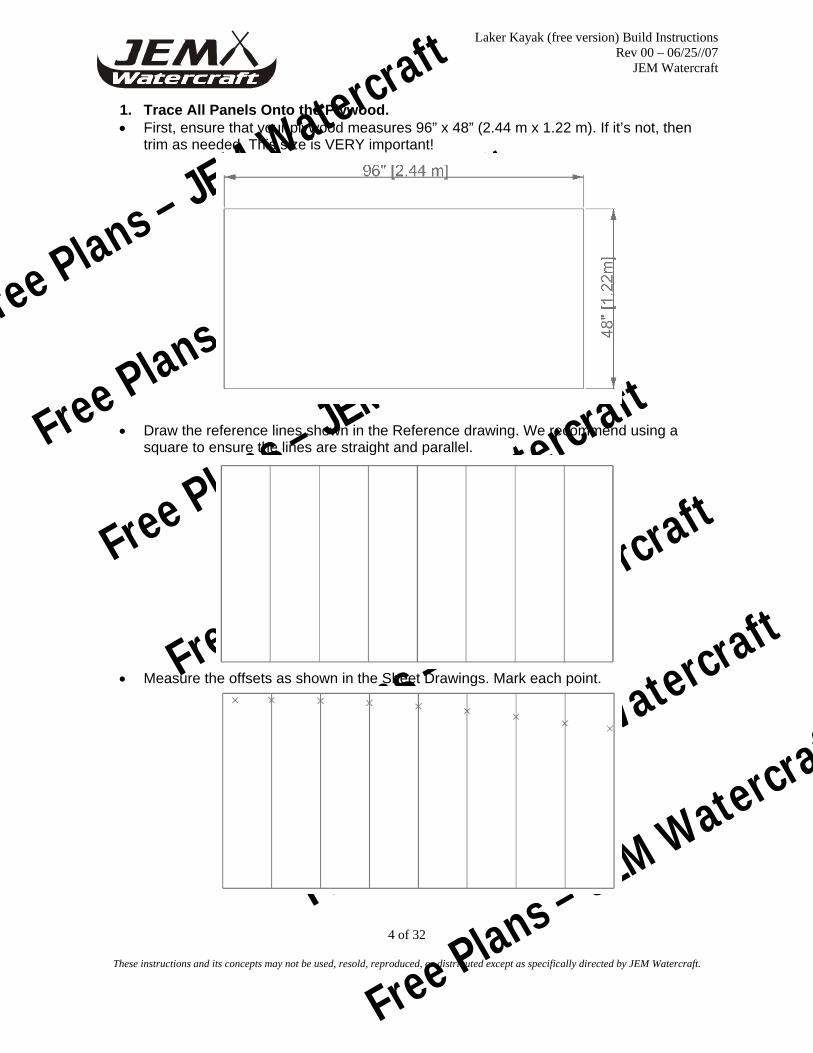
1. Trace All Panels Onto the Plywood. • First, ensure that your plywood measures 96” x 48” (2.44 m x 1.22 m). If it’s not, then
trim as needed. This size is VERY important!
• Draw the reference lines shown in the Reference drawing. We recommend using a square to ensure the lines are straight and parallel.
• Measure the offsets as shown in the Sheet Drawings. Mark each point.

Free Plans – JEM Watercraft
Free Plans – JEM Watercraft
Free Plans – JEM Watercraft
Free Plans – JEM Watercraft
Free Plans – JEM Watercraft
Free Plans – JEM Watercraft
Free Plans – JEM Watercraft
Laker Kayak (free version) Build Instructions Rev 00 – 06/25//07
JEM Watercraft
5 of 32
These instructions and its concepts may not be used, resold, reproduced, or distributed except as specifically directed by JEM Watercraft.
• A batten (a batten is a strip of wood or other material used for building purposes) will be
use to form the curves. Drive a finishing nail at the offsets marks draw.
• Alternatively, you could use weight to the hold the batten in place.
• Construct the arcs and curves by clamping a piece of semi-flexible batten to the nails. A piece of woodworking trim works very well for this application. Trace the curve and you’re done. Remove the nails before cutting.
BEFORE YOU CUT Use the QA1 Drawing to ensure each part was drawn correctly.
2. Cut the panels.
• Sand the panels to clean up the surfaces and remove any lines. Use the 1st copy of the panels as templates for the remaining copies.
• Be sure to read through the entire plans before cutting. The excess wood will be used for other items so you don’t want to cut down the middle of open areas on the plywood.

Free Plans – JEM Watercraft
Free Plans – JEM Watercraft
Free Plans – JEM Watercraft
Free Plans – JEM Watercraft
Free Plans – JEM Watercraft
Free Plans – JEM Watercraft
Free Plans – JEM Watercraft
Laker Kayak (free version) Build Instructions Rev 00 – 06/25//07
JEM Watercraft
6 of 32
These instructions and its concepts may not be used, resold, reproduced, or distributed except as specifically directed by JEM Watercraft.
• After cutting, stack up like pieces and sand the edges so all pieces are the same size. Sand/trim as needed. You shouldn’t have to trim any more than 1/8” [3mm]. This doesn’t include any allowance for wavy cuts from a handsaw.
• On the frames, apply clear packaging tape around the lowers edges on both sides of the frames and at the deck peak.

Free Plans – JEM Watercraft
Free Plans – JEM Watercraft
Free Plans – JEM Watercraft
Free Plans – JEM Watercraft
Free Plans – JEM Watercraft
Free Plans – JEM Watercraft
Free Plans – JEM Watercraft
Laker Kayak (free version) Build Instructions Rev 00 – 06/25//07
JEM Watercraft
7 of 32
These instructions and its concepts may not be used, resold, reproduced, or distributed except as specifically directed by JEM Watercraft.
BEFORE DETAILING ASSEMBLING THE PANELS, THE CONCEPT OF MIRRORED COPIES MUST BE EXPLAINED. Mirrored Copies
• 2 copies of each panel are required. They are to be MIRRORED COPIES of each other. 1 for the left half of the hull and one for the right half.
• Establish which side of the panels will face the outside or inside of the boat. Mark them so you don’t get confused. This is especially important if using wooden butt blocks. You do NOT want the wooden butt blocks on the outside of the hull!
• After completing the splicing of the 1st of the two copies, you may use it as an
alignment tool for the second copy. This will make panel alignment easier (more info on panel alignment shortly).
• Be sure to place some plastic between the panels when performing any gluing tasks so you don’t glue the panels to each other while stacked up.
BACK TO PANEL ASSEMBLY…
3. Assemble the long panels with wooden butt blocks or fiberglass splices. (Review our online tutorial in our Customer Service Forum for color pictures of how to perform this step) • Perform this step on a flat surface. • Place some plastic under the areas where the seams will be epoxy-glued. • Line up the panels. • Using the QA2 Drawing, lay a string from tip to tip of each panel and adjust the panels
to the specified measurement.

Free Plans – JEM Watercraft
Free Plans – JEM Watercraft
Free Plans – JEM Watercraft
Free Plans – JEM Watercraft
Free Plans – JEM Watercraft
Free Plans – JEM Watercraft
Free Plans – JEM Watercraft
Laker Kayak (free version) Build Instructions Rev 00 – 06/25//07
JEM Watercraft
8 of 32
These instructions and its concepts may not be used, resold, reproduced, or distributed except as specifically directed by JEM Watercraft.
• Make some epoxy-glue. Epoxy glue is made by dispensing a small amount of epoxy and mixing it. Then mix in some woodflour filler until reach a ketchup-like consistency.
• In this particular step, you may want to make the mixture a little thicker, like the consistency of peanut butter.
• Carefully place a bead of epoxy-glue between the panel ends. Reposition your panels per the QA2 Drawing as needed
• To ensure the panel ends remain flat, place a piece of plastic on top of the seam area
and weigh down with books. Weights, etc.
• NOTE: you only need enough weight to hold the pieces flat in relation to each other. High clamping pressure is not needed and is actually not a good idea.
• Repeat this process for all your panels. Let cure overnight. • After cure, inspect the seam. Move the panels very carefully. The joint is weak at this
point. Sand down any excess material. Fill in voids with epoxy-glue. The panels can be finished with a wooden butt block or fiberglass splice.
• Wooden butt blocks will help add stiffness to the hull but can make applying fiberglass to the hull interior more difficult. They do not look as “clean” as fiberglass splices.
• Fiberglass splices make applying fiberglass cloth later on easy but are slightly more time consuming to install. They do not offer the stiffness of wooden butt blocks but offer more than enough strength to make the hull safe.

Free Plans – JEM Watercraft
Free Plans – JEM Watercraft
Free Plans – JEM Watercraft
Free Plans – JEM Watercraft
Free Plans – JEM Watercraft
Free Plans – JEM Watercraft
Free Plans – JEM Watercraft
Laker Kayak (free version) Build Instructions Rev 00 – 06/25//07
JEM Watercraft
9 of 32
These instructions and its concepts may not be used, resold, reproduced, or distributed except as specifically directed by JEM Watercraft.
Option #1: Wooden Butt Blocks • Cut the butt block so it matches the height of each panel. The length of the butt block
should be a total of 8” (20 cm).
• Locate the butt block so 4” (10 cm) extends over each side of the seam.
• Sand/grind a 45-degree bevel to each edge of the butt block.

Free Plans – JEM Watercraft
Free Plans – JEM Watercraft
Free Plans – JEM Watercraft
Free Plans – JEM Watercraft
Free Plans – JEM Watercraft
Free Plans – JEM Watercraft
Free Plans – JEM Watercraft
Laker Kayak (free version) Build Instructions Rev 00 – 06/25//07
JEM Watercraft
10 of 32
These instructions and its concepts may not be used, resold, reproduced, or distributed except as specifically directed by JEM Watercraft.
• For the Side panels, trim back just enough of the butt block to allow room for the sheer clamp (read ahead for details about the sheer clamp).
• Coat the side of the Butt Block that will bond to the hull panels with epoxy-glue and
install into place. Hold in place with weights, books, etc.
• Wipe up any excess glue that oozes out as best as you can. Cleaning up now is easier than when the glue cures and hardens.
• Note: High clamping pressure is NOT required when using epoxy-glue. Moderate pressure…only enough to hold the pieces in place…is all that is required.
• Ensure you align the center of the butt block to the seam formed by the panels.
• After cure, inspect the other side of the panel seam (the side that will be the outside
of the hull) to ensure the seam gap is completely filled in. Apply more epoxy-glue if needed.

Free Plans – JEM Watercraft
Free Plans – JEM Watercraft
Free Plans – JEM Watercraft
Free Plans – JEM Watercraft
Free Plans – JEM Watercraft
Free Plans – JEM Watercraft
Free Plans – JEM Watercraft
Laker Kayak (free version) Build Instructions Rev 00 – 06/25//07
JEM Watercraft
11 of 32
These instructions and its concepts may not be used, resold, reproduced, or distributed except as specifically directed by JEM Watercraft.
Option #2: Fiberglass Splices
• Follow the same procedure to align and join the panels. • Fill in any voids in the seams, sand smooth any excess cured material. • Measure and cut a fiberglass patch that is a total of 10” (25.4 cm). The patch will be
centered over the panel seam. You may wish to cut the patch a little over sized to allow for the woven fiberglass strands to unravel on the edges.
• You can apply resin to the splice area and place the fiberglass patch (Or you can
place the fiberglass cloth and work the resin into it). • Place the fiberglass over the seam. Flatten out the tape and allow 1-2 minutes for the
fiberglass to soak up the resin. Apply additional resin where the fiberglass did not completely wet out. o Caution: Only apply enough resin to wet out the fiberglass and make it turn clear.
DO NOT use excess epoxy.
• Remove all air bubbles and excess resin from the seam. Having excess resin in the fiberglass will not add strength to the hull.
• Allow to cure. Repeat for both sides of the panel. YOU MUST APPLY THE FIBERGLASS SPLICE TO BOTH SIDES OF ALL PANEL SEAMS.
4. Draw the Frame Reference Lines
• Draw the reference lines as show on the Frame Reference drawing.

Free Plans – JEM Watercraft
Free Plans – JEM Watercraft
Free Plans – JEM Watercraft
Free Plans – JEM Watercraft
Free Plans – JEM Watercraft
Free Plans – JEM Watercraft
Free Plans – JEM Watercraft
Laker Kayak (free version) Build Instructions Rev 00 – 06/25//07
JEM Watercraft
12 of 32
These instructions and its concepts may not be used, resold, reproduced, or distributed except as specifically directed by JEM Watercraft.
5. Sheer Clamps • A sheer clamp is simply a strip of wood installed along the sheer line (sheer line is the
top edge of the side panels) to add stiffness to the hull and aid in installing the deck. • You will construct the sheer clamp from left over plywood. • The sheer clamps have to be drawn and cut out now because you need the Side panels
to trace them. • Place the side panels on the remnants of the plywood sheets so you can maximize the
available length of the plywood.
• The sheer clamp will have to be assembled in a few pieces on each side. To provide strength, the sheer clamp should be one solid piece for as much as the center of the hull as possible. Keep this in mind when tracing the sheer clamp shape from the Side panel.

Free Plans – JEM Watercraft
Free Plans – JEM Watercraft
Free Plans – JEM Watercraft
Free Plans – JEM Watercraft
Free Plans – JEM Watercraft
Free Plans – JEM Watercraft
Free Plans – JEM Watercraft
Laker Kayak (free version) Build Instructions Rev 00 – 06/25//07
JEM Watercraft
13 of 32
These instructions and its concepts may not be used, resold, reproduced, or distributed except as specifically directed by JEM Watercraft.
• Trace the line and then offset the line so it is 1” [2.5cm] tall. Trace another line.
• Cut out and use as a pattern for the remaining sheer clamp pieces.
6. Drill the bottom Floor panels.
• Select a drill bit size to create holes that are just large enough to fit the stitches through. To avoid splinters, only apply light pressure while drilling. Let the drill bit do the work.
• Lay the panels on top of each other and drill stitch holes every 6”-10” (15-25 cm) along the edge of the panels that will form the floor seam. Drill both panels at once. Drill so the outside edges of the holes are about ¼” (6 mm) away from the edge of the plywood.
• Drill the inner and outer edges of the bottom panels.
Drilling can be aided by making a drill jig.

Free Plans – JEM Watercraft
Free Plans – JEM Watercraft
Free Plans – JEM Watercraft
Free Plans – JEM Watercraft
Free Plans – JEM Watercraft
Free Plans – JEM Watercraft
Free Plans – JEM Watercraft
Laker Kayak (free version) Build Instructions Rev 00 – 06/25//07
JEM Watercraft
14 of 32
These instructions and its concepts may not be used, resold, reproduced, or distributed except as specifically directed by JEM Watercraft.
7. Drill Stitch Holes in the Bottom panel for the Frames • Position the drill bit about ½” [12mm] away from the Frame Reference Line and drill the
hole. Space and position the holes as shown above. Precise positioning is not required. But do keep the holes consistent.
• On each side of each Frame Reference Line, drill 2 stitch holes.
8. Stitch the Bottom Panels • Use plastic wire ties (zip ties) or strands of copper wire. • Stitch down the centerline of the hull. When installing the stitches, you only need to pull
them snug. Do not apply too much pressure or you will rip the panels. 9. Stitch the Frames into place.
• The frames may flop around a bit but things will stiffen up quickly in the next couple steps.
Free Plans – JEM Watercraft
Free Plans – JEM Watercraft
Free Plans – JEM Watercraft
Free Plans – JEM Watercraft
Free Plans – JEM Watercraft
Free Plans – JEM Watercraft
Free Plans – JEM Watercraft
Laker Kayak (free version) Build Instructions Rev 00 – 06/25//07
JEM Watercraft
15 of 32
These instructions and its concepts may not be used, resold, reproduced, or distributed except as specifically directed by JEM Watercraft.
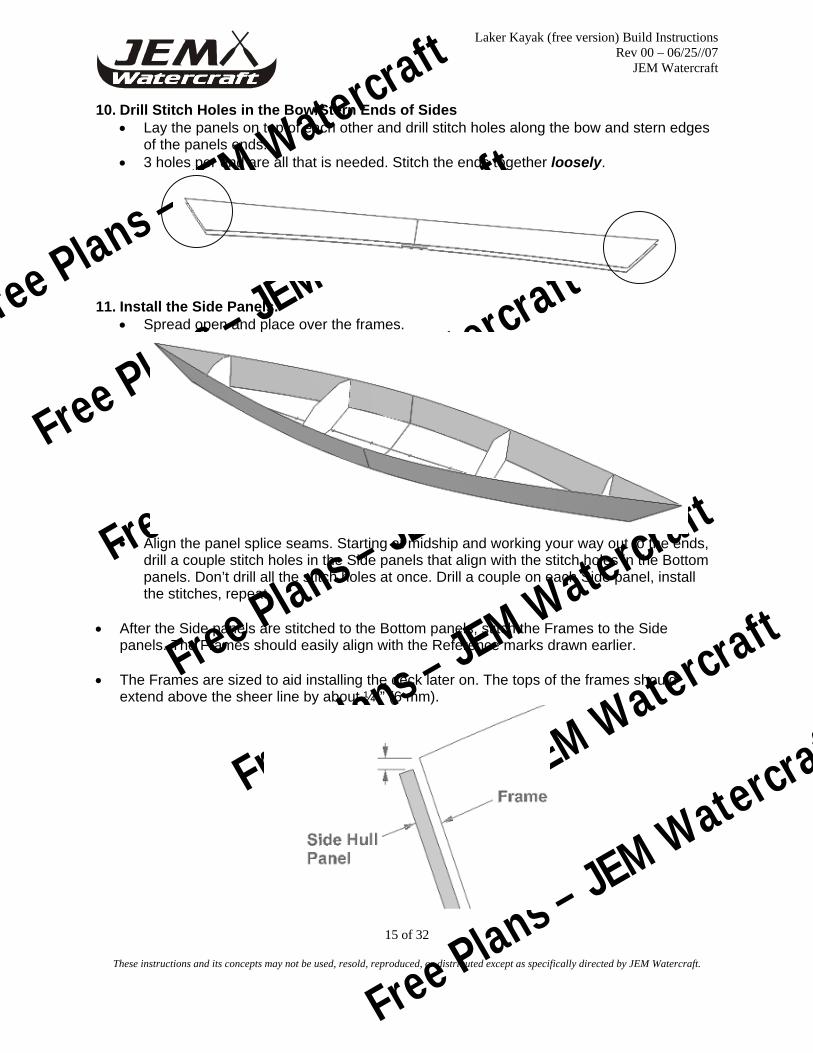
10. Drill Stitch Holes in the Bow/Stern Ends of Sides • Lay the panels on top of each other and drill stitch holes along the bow and stern edges
of the panels ends. • 3 holes per end are all that is needed. Stitch the ends together loosely.
11. Install the Side Panels. • Spread open and place over the frames.
• Align the panel splice seams. Starting at midship and working your way out to the ends,
drill a couple stitch holes in the Side panels that align with the stitch holes in the Bottom panels. Don’t drill all the stitch holes at once. Drill a couple on each Side panel, install the stitches, repeat.
• After the Side panels are stitched to the Bottom panels, stitch the Frames to the Side
panels. The Frames should easily align with the Reference marks drawn earlier. • The Frames are sized to aid installing the deck later on. The tops of the frames should
extend above the sheer line by about ¼ ” (6 mm).

Free Plans – JEM Watercraft
Free Plans – JEM Watercraft
Free Plans – JEM Watercraft
Free Plans – JEM Watercraft
Free Plans – JEM Watercraft
Free Plans – JEM Watercraft
Free Plans – JEM Watercraft
Laker Kayak (free version) Build Instructions Rev 00 – 06/25//07
JEM Watercraft
16 of 32
These instructions and its concepts may not be used, resold, reproduced, or distributed except as specifically directed by JEM Watercraft.
12. Check Alignment • To help ensure you have a square and true hull, measure the diagonal distances
between the frames. The corresponding diagonal distance should be within ¼” [6mm] of each other. Make adjustments as needed and pull stitches a little tighter.
• Optional: Stitch some diagonal battens in place to hold the alignment. But be sure to read ahead and not install the battens so the interfere with the alignment check.
13. Apply Masking Tape to the Hull Interior Seams
• Apply masking tape on the interior seam gaps between all stitches. • The masking tape will help keep the tack-welding material in place. • The blue painters tape works very well for this application.
14. Set up Sawhorses
• Set up 2 saw horses. The saw horses need to be level is relationship to each other. THIS IS VERY IMPORTANT!
• They don’t necessarily have to be the same height. • If sawhorses are not available to you, you could also set up some lumber pieces span
across some blocks or buckets. • Carfeully flip the hull assembly over and onto the sawhorses.

Free Plans – JEM Watercraft
Free Plans – JEM Watercraft
Free Plans – JEM Watercraft
Free Plans – JEM Watercraft
Free Plans – JEM Watercraft
Free Plans – JEM Watercraft
Free Plans – JEM Watercraft
Laker Kayak (free version) Build Instructions Rev 00 – 06/25//07
JEM Watercraft
17 of 32
These instructions and its concepts may not be used, resold, reproduced, or distributed except as specifically directed by JEM Watercraft.
15. Check for Hull Twist • Ensure the Hull Side Panels are touching the sawhorses. If the sawhorses are level in
relationship to each other, then the hull will have no twist. • Apply downward pressure with weights or straps if needed.
• Review your work from different angles and distances. Make adjustments as required.
It’s helpful to have someone else look to review your work as a fresh set of eyes.
16. Tack Welding. (Review our online tutorial) • The wood grain will absorb some of the filleting material (tack welding material) as the
material cures (dries). The result is depicted in this cut-away (cross sectional) image of a seam:
• As you can see, the filleting material is no longer smooth and flush with the wood
surface. How much materials gets absorbed will vary depending on the wood type, temperature, resin brand, and other factors. This is unacceptable. To address this, either precoat the wood grain of the edges with resin and let cure to seal the wood grain or apply additional filleting material after the initial filleting material has cured. Be mindful of amine blush.

Free Plans – JEM Watercraft
Free Plans – JEM Watercraft
Free Plans – JEM Watercraft
Free Plans – JEM Watercraft
Free Plans – JEM Watercraft
Free Plans – JEM Watercraft
Free Plans – JEM Watercraft
Laker Kayak (free version) Build Instructions Rev 00 – 06/25//07
JEM Watercraft
18 of 32
These instructions and its concepts may not be used, resold, reproduced, or distributed except as specifically directed by JEM Watercraft.
1. Mix the resin. After the resin is thoroughly mixed, add wood flour until it is the consistency of peanut butter. This is known as “Filleting Material”.
2. Place a small amount of filleting material in the seam gaps between your stitches. You can apply material right over the corner of the frames since they were masked off earlier.
• You can apply the filleting material many different ways. Check out our forums and ask
what other builders prefer to use and why. o Gloved finger (Can get sloppy. Keep a good supply of paper towels near by.) o Back of a spoon (Fillets can be made as the filleting material is applied) o Craft stick (use the end curve to shape the fillet) o Bakers Frosting Bag: Mix some filleting material and place into a plastic bag.
Snip a corner of the bag. Squeeze the bag to dispense the material into the seam. (This method is the neatest but you’ll waste the most epoxy).
o Use a large syringe and inject the filleting material. (Very neat but a little more time consuming to keep filling the syringe and cleaning up after).
• Fill as much of the gap as possible between the stitches. DO NOT get the material on the stitches. Let fully cure.
• Note: Work neatly and clean up excess material and drips while still
uncured. It will be much easier to take the time to do this now rather than sanding it off later. Please take this advice! You’ll be glad you did.
• Allow to fully cure. When cured, remove the stitches and fill in the remaining gaps from
the hull exterior. The Frames might fall out of place with the stitches removed. This is acceptable but don’t go out of your way to remove them.
o Note: If you have to flip the hull to get some of the stitches out, do so with a helper and proceed very carefully.
Note: For filleting and fiberglassing seams, there is a technique known as “wet-on-wet”. This consists of applying fiberglass to a seam fillet that has not completely cured. It allows you to shape the fillet as the glass is being laid over it. This helps reduce the chance of air bubbles getting into your seams. To do this, simply apply the fillet, allow the material to cure until it reaches a chewed bubblegum like consistency, and then apply the fiberglass.
This technique is best used when working with the seams on the interior hull. It is not very effective on seams of the hull exterior. However, if you have to fill in a small void in a seam from the hull exterior, you can apply fiberglass over it before it is fully cured.

Free Plans – JEM Watercraft
Free Plans – JEM Watercraft
Free Plans – JEM Watercraft
Free Plans – JEM Watercraft
Free Plans – JEM Watercraft
Free Plans – JEM Watercraft
Free Plans – JEM Watercraft
Laker Kayak (free version) Build Instructions Rev 00 – 06/25//07
JEM Watercraft
19 of 32
These instructions and its concepts may not be used, resold, reproduced, or distributed except as specifically directed by JEM Watercraft.
17. Round off the Exterior Seams • In order for the hull to have sufficient strength and for the fiberglass to be easily installed,
the seams need to have the proper shape. This shape is achieved by sanding the seams so they have a rounded edge.
• The general rule is that each seam must have smooth, tangent radius equal to the thickest panel of wood on the interior hull seam. The exterior seams will have a larger radius.
(This image and its dimensions for reference only)
• Fill in any voids or gaps with filleting material.
o Note: The bow/stern seams might be a little troublesome getting the seam to stay completely filled in after sanding. This is not a big issue. Just go back and fill in any open gaps with more tack welding (filleting) material.
• Give all exterior surfaces a light sanding to remove any dirt or imperfections. • Wipe the hull with a damp, but not dripping wet, lint-free cloth to remove dust.
Interior Exterior

Free Plans – JEM Watercraft
Free Plans – JEM Watercraft
Free Plans – JEM Watercraft
Free Plans – JEM Watercraft
Free Plans – JEM Watercraft
Free Plans – JEM Watercraft
Free Plans – JEM Watercraft
Laker Kayak (free version) Build Instructions Rev 00 – 06/25//07
JEM Watercraft
20 of 32
These instructions and its concepts may not be used, resold, reproduced, or distributed except as specifically directed by JEM Watercraft.
18. BOM Option #1: Apply Fiberglass Tape to the Hull Exterior Chines • “Fiberglass Tape” is simply fiberglass cloth in a narrow strip and usually has the edges
woven to prevent the edge of the fiberglass weave from unraveling. • A “chine” is a name for the angle created when to hull panels meet. • Select one chine to work with and lay the fiberglass tape over it. The fiberglass tape
weave is stretchable so work it with your hands to get it to conform to the shape of the hull. You can hold it in place with small pieces of masking tape just along the edges.
• You can lay overlapping sections of tape but if you’re a new builder, we recommend working with one chine at a time, letting cure, then working with another chines.
• Lay the tape over the hull (dry) and smooth out and wrinkles. You’ll be able to work
the weave so it bends around curves and corners. Run yours hands over the cloth several times to get it to conform to the shape of the hull.
• Minor slits can be made if the cloth is not behaving. But try to “pet” the fiberglass into place before resorting to slitting.
• Mix the resin and apply from the center of the fiberglass cloth area to the outer edges.
The resin can be spread with a squeegee, brush, or a foam paint roller (our preferred method).
• Be sure work out any small air bubbles that get trapped under the fiberglass. Usually these can be removed by rolling over the fiberglass back and forth a few times with a little extra pressure. For stubborn air pocket, use a gloved finger to “squish out” the air pocket.
TIP: If it appears you have excess resin in your cloth, after glass is fully wet-out, gently squeegee off excess resin and resin runs. This will help ensure a consistent thickness of resin and reduce sanding later on. An automotive body filler applicator or wind-washing squeegee works well. Treat your squeegee like the precision instrument it is. Use it gently working from the centerline along the boats length, and working in overlapping wipes out to the edges and down the sides. After each successive coat of resin, repeat the process of squeegeeing off excess resin and runs. After each use, carefully clean the blade and place where it will not be damaged.

Free Plans – JEM Watercraft
Free Plans – JEM Watercraft
Free Plans – JEM Watercraft
Free Plans – JEM Watercraft
Free Plans – JEM Watercraft
Free Plans – JEM Watercraft
Free Plans – JEM Watercraft
Laker Kayak (free version) Build Instructions Rev 00 – 06/25//07
JEM Watercraft
21 of 32
These instructions and its concepts may not be used, resold, reproduced, or distributed except as specifically directed by JEM Watercraft.
• After cure, inspect your work looking for areas that did not wet out and are not transparent. Small spots are acceptable. Sand these out and remove any dry cloth.
• Any spots that did not wet out larger than the width of your thumb will need a fiberglass patch applied. If you’re not sure if a small patch is required, error on the side of caution.
• Be mindful of amine blush issues. If you apply additional coats of resin with 48 hours of the previous coats, you should have no amine blush issues. The quality of epoxy used will dictate these results.
• To ensure against amine blush, you may scrub the surface lightly with acetone. Follow all required safety guidelines when working with solvents.
19. BOM Option #2: Apply Fiberglass Cloth to the Hull Exterior
• This is build Option #2 in the BOM • Applying fiberglass cloth can be tricky if you’re a first time builder. We recommend
you work with a partner or in sections rather than trying to do the entire hull at once by yourself.
• Lay the cloth over the hull (dry) and smooth out and wrinkles. You’ll be able to work the weave so it bends around curves and corners.
o To get the cloth to conform to some edges and curves, especially the bow,
some “slotting” or ”slitting” maybe be needed as shown:
o Shown is an exaggerated example. Typically only minor slits are needed to
get the cloth to fit properly. o To install the cloth, you will have to work somewhat quickly to wet it out with
epoxy. With a partner is preferred. You may find it easier to apply the cloth in smaller sections. This is acceptable as long as the sections of cloth have about a 1” (2.54 cm) overlap to ensure strength. We recommend this method when fiberglassing the bow/sterns areas.
o Perform a dry-run with the fiberglass before mixing any epoxy.

Free Plans – JEM Watercraft
Free Plans – JEM Watercraft
Free Plans – JEM Watercraft
Free Plans – JEM Watercraft
Free Plans – JEM Watercraft
Free Plans – JEM Watercraft
Free Plans – JEM Watercraft
Laker Kayak (free version) Build Instructions Rev 00 – 06/25//07
JEM Watercraft
22 of 32
These instructions and its concepts may not be used, resold, reproduced, or distributed except as specifically directed by JEM Watercraft.
• Mix the resin and apply from the center of the cloth area to the outer edges. The resin can be spread with a squeegee, brush, or a foam paint roller (our preferred method).
• Be sure work out any small air bubbles that get trapped under the cloth. Usually these can be removed by rolling over the cloth back and forth a few times with a little extra pressure. For stubborn air pocket, use a gloved finger to “squish out” the air pocket.
• After cure, inspect your work looking for areas that did not wet out and are dry. Small spots are acceptable. Sand these out and remove any dry cloth.
• Cut off any excess cloth by simply sanding the edge of the sheer line. • Any spots that did not wet out larger than the width of your thumb will need a fiberglass
patch applied. If you’re not sure if a small patch is required, error on the side of caution. • Be mindful of amine blush issues. If you apply additional coats of resin with 48 hours of
the previous coats, you should have no amine blush issues. The quality of epoxy used will dictate these results.
• To ensure against amine blush, you may scrub the surface lightly with acetone. Follow all required safety guidelines when working with solvents.
20. Weave Fill Coats
Note: If you used fiberglass tape, you should feather the edges of the tape to make a smooth transition to the wood surface. You can do this with a sander or a cabinet scraper. Careful not to remove too much of the fiberglass. A small edge or lip just big enough to catch your fingernail is fine. The epoxy will fill that in. Coat all wood surfaces as you fill in the weave of the fiberglass.
• Here we see an example of a cross section of fiberglass. Note how the fibers are
woven.
• With the first coat of epoxy, the bottom of our weave example gets filled in because it
is bordered by the plywood. The top of the weave gets filled in a little with the first wet out coat of epoxy. Many ridges and bumps remain.

Free Plans – JEM Watercraft
Free Plans – JEM Watercraft
Free Plans – JEM Watercraft
Free Plans – JEM Watercraft
Free Plans – JEM Watercraft
Free Plans – JEM Watercraft
Free Plans – JEM Watercraft
Laker Kayak (free version) Build Instructions Rev 00 – 06/25//07
JEM Watercraft
23 of 32
These instructions and its concepts may not be used, resold, reproduced, or distributed except as specifically directed by JEM Watercraft.
• After the epoxy has fully cured, perform a LIGHT sanding over all fiberglass surfaces. Repeating: a LIGHT sanding. Do NOT apply too much pressure to your sander or sanding block. This is just to knock down any tall bumps left by the wet out coat. You’ll be removing just the very top of the epoxy that is on the fiberglass weave. DO NOT perform more than a light sanding at this stage or you’ll cut through the epoxy and into the fiberglass which will weaken your hull.
• If amine blush is a concern, scrub the fiberglass lightly with soapy water or scrub with acetone between coats.
• Apply another coat of epoxy and sand after the second coat has cured. Note how
more of the weave is filled in.
• Repeat the process until you have a surface finished you are satisfied with. NOTE: If using the fiberglass specified in the Bill of Materials, it should not take more than 4-5 coats of epoxy to get a smooth surface. Usually 3-4 coats are enough.
• This same concept of applying epoxy is thin layers apply to covering bare wood with
epoxy. Do not try and apply heavy coats. Multi thin coats work much better.

Free Plans – JEM Watercraft
Free Plans – JEM Watercraft
Free Plans – JEM Watercraft
Free Plans – JEM Watercraft
Free Plans – JEM Watercraft
Free Plans – JEM Watercraft
Free Plans – JEM Watercraft
Laker Kayak (free version) Build Instructions Rev 00 – 06/25//07
JEM Watercraft
24 of 32
These instructions and its concepts may not be used, resold, reproduced, or distributed except as specifically directed by JEM Watercraft.
21. Assemble Deck • Stitch together the primary deck panels.
• On the underside of the deck, mask off the seams with masking tape. • Place the deck assembly on the hull and check for fit. • If the deck extends over the hull sides slightly, it can be trimmed later. The key thing you
are checking for is that the deck covers the entire sheer line.
• Stitch the coaming pieces to the deck.
• Reminder: thee will be a small gap between the side panels and deck panels.

Free Plans – JEM Watercraft
Free Plans – JEM Watercraft
Free Plans – JEM Watercraft
Free Plans – JEM Watercraft
Free Plans – JEM Watercraft
Free Plans – JEM Watercraft
Free Plans – JEM Watercraft
Laker Kayak (free version) Build Instructions Rev 00 – 06/25//07
JEM Watercraft
25 of 32
These instructions and its concepts may not be used, resold, reproduced, or distributed except as specifically directed by JEM Watercraft.
• If the coaming does not want to remain vertical, stitch a simple batten in place.
• Tack weld the deck and coaming seams. DO NOT tack weld the deck to the hull. • After cure, remove stitches, and complete the seams. • Remove the deck and apply fiberglass to the underside of the deck (just the seams or
the entire surface as desired). • Apply at least one additional weave fill coat. You do not need to fill the weave completely
but it is an option if you so choose. Set aside deck until later in the process. 22. Interior Hull Seams
• We won’t lie to you. Applying fiberglass to the interior is a pain. And that’s putting it nicely. But by applying fiberglass to the hull exterior, you now have a good feel for what it takes to work with the cloth.
• Remove all Frames and masking tape. If the frames are stuck/glued in a couple small places to the hull, a firm tap in the areas they are stuck with a hammer will break them free. If any excess cured epoxy-glue/filleting material present, chip loose any big pieces with a chisel. Sand any small bumps.
• Perform a light sanding of the areas that were covered with masking tape to remove and residual adhesive.

Free Plans – JEM Watercraft
Free Plans – JEM Watercraft
Free Plans – JEM Watercraft
Free Plans – JEM Watercraft
Free Plans – JEM Watercraft
Free Plans – JEM Watercraft
Free Plans – JEM Watercraft
Laker Kayak (free version) Build Instructions Rev 00 – 06/25//07
JEM Watercraft
26 of 32
These instructions and its concepts may not be used, resold, reproduced, or distributed except as specifically directed by JEM Watercraft.
o Reminder: The general rule is that each seam must have smooth, tangent radius equal to the thickest panel of wood. Review the section about working “wet-on-wet”.
(this image and its dimensions for reference only)
• To achieve this radius on the interior hull seams, apply filleting material and run the tip
of a plastic spoon (see the tutorial in our Forum) over the seam. • Getting a nice looking and smooth interior fillet is more difficult because you can’t easily
just run a sander over any minor mistakes.
• If you used wooden butt blocks, apply a fillet to where the butt block and hull panels intersect. Apply a fillet to where the butt block and hull panels intersect so the fiberglass can be easily applied over the seam.
• Note: The bow/stern ends will be the most difficult because of the sharp angle the panels meet at. Extra filleting material will need to be push into that seam. Keep adding material until you are able to smooth it out with the tip of a plastic spoon (or which ever tool you choose to use).
Interior Exterior
Free Plans – JEM Watercraft
Free Plans – JEM Watercraft
Free Plans – JEM Watercraft
Free Plans – JEM Watercraft
Free Plans – JEM Watercraft
Free Plans – JEM Watercraft
Free Plans – JEM Watercraft
Laker Kayak (free version) Build Instructions Rev 00 – 06/25//07
JEM Watercraft
27 of 32
These instructions and its concepts may not be used, resold, reproduced, or distributed except as specifically directed by JEM Watercraft.
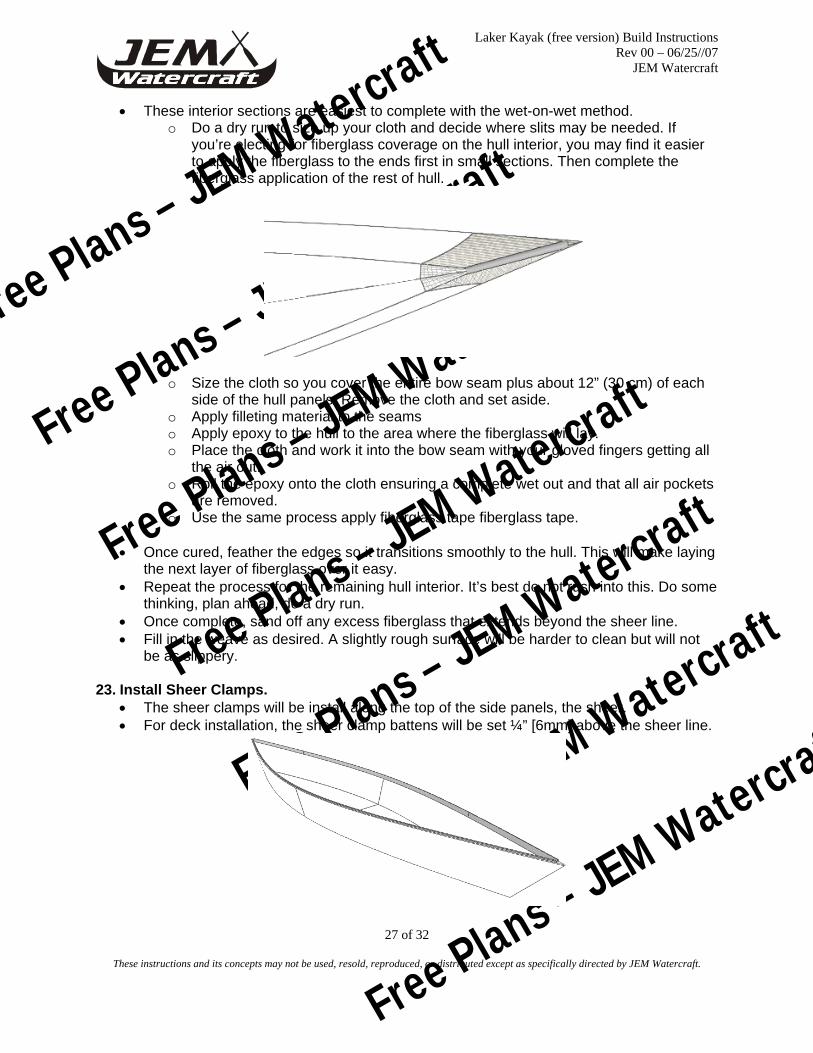
• These interior sections are easiest to complete with the wet-on-wet method. o Do a dry run to size up your cloth and decide where slits may be needed. If
you’re electing for fiberglass coverage on the hull interior, you may find it easier to apply the fiberglass to the ends first in small sections. Then complete the fiberglass application of the rest of hull.
o Size the cloth so you cover the entire bow seam plus about 12” (30 cm) of each side of the hull panels. Remove the cloth and set aside.
o Apply filleting material to the seams o Apply epoxy to the hull to the area where the fiberglass will lay. o Place the cloth and work it into the bow seam with your gloved fingers getting all
the air out. o Roll the epoxy onto the cloth ensuring a complete wet out and that all air pockets
are removed. o Use the same process apply fiberglass tape fiberglass tape.
• Once cured, feather the edges so it transitions smoothly to the hull. This will make laying the next layer of fiberglass over it easy.
• Repeat the process for the remaining hull interior. It’s best do not rush into this. Do some thinking, plan ahead, do a dry run.
• Once complete, sand off any excess fiberglass that extends beyond the sheer line. • Fill in the weave as desired. A slightly rough surface will be harder to clean but will not
be as slippery. 23. Install Sheer Clamps.
• The sheer clamps will be install along the top of the side panels, the sheer. • For deck installation, the sheer clamp battens will be set ¼” [6mm] above the sheer line.

Free Plans – JEM Watercraft
Free Plans – JEM Watercraft
Free Plans – JEM Watercraft
Free Plans – JEM Watercraft
Free Plans – JEM Watercraft
Free Plans – JEM Watercraft
Free Plans – JEM Watercraft
Laker Kayak (free version) Build Instructions Rev 00 – 06/25//07
JEM Watercraft
28 of 32
These instructions and its concepts may not be used, resold, reproduced, or distributed except as specifically directed by JEM Watercraft.
• An easy way to check this measurement is with a scrap piece of plywood and use it as a gauge.
• Get the clamps as close to the bow ends as possible. Sand the sheer clamp battens
smooth and glue into place. 24. Option #1: Installing Frames as Solid Bulkheads.
• A builder may elect to install Frames #2 and #3 as solid bulkheads for dry storage. o Notes: Be aware of some precautions of solid bulkheads. If you get into a
situation where you tip over and water fills just one end/chamber formed by the bulkheads, the end filled with water will sink into the water and cause the opposite end to stick up in the air. This will make for difficult recovery and re-entry.
• All frames will need to be securely attached to the hull. • Attaching to the hull can be done with fillet and fiberglass tape or by gluing sections of
woodworking trim, usually sold in 8’ lengths. Minimum width of 3/8” [9mm]. • Square strips or ¼-round will work nicely. • The following images are from our kayak design, Freedom. The same principles apply to
this design.

Free Plans – JEM Watercraft
Free Plans – JEM Watercraft
Free Plans – JEM Watercraft
Free Plans – JEM Watercraft
Free Plans – JEM Watercraft
Free Plans – JEM Watercraft
Free Plans – JEM Watercraft
Laker Kayak (free version) Build Instructions Rev 00 – 06/25//07
JEM Watercraft
29 of 32
These instructions and its concepts may not be used, resold, reproduced, or distributed except as specifically directed by JEM Watercraft.
• We recommend sizing all strips before attempting to install. Be sure to install some strips on the top edges of the frames/bulkheads.
Install Hatches • If you choose to install bulkheads, you’ll also need to install some hatches to have
access to the sealed off areas.
25. Option #2: Install Deck Supports. • The deck requires some bracing to ensuring a strong hull. To create the bracing,
measure an offset of 1.5” [4cm] of the top edge of frames #2 and #3. • The following images are from our kayak design, Freedom. The same principles apply to
this design.
• Note the slot cut out for the sheer clamp. Do your best to size this cut out just large
enough to fit the sheer clamp. If you cut oversize, any gaps can be filled in with filleting material.
Slot for sheer clamp

Free Plans – JEM Watercraft
Free Plans – JEM Watercraft
Free Plans – JEM Watercraft
Free Plans – JEM Watercraft
Free Plans – JEM Watercraft
Free Plans – JEM Watercraft
Free Plans – JEM Watercraft
Laker Kayak (free version) Build Instructions Rev 00 – 06/25//07
JEM Watercraft
30 of 32
These instructions and its concepts may not be used, resold, reproduced, or distributed except as specifically directed by JEM Watercraft.
• Trim the lower portion of the frame. Use the remaining piece as a pattern and make 2 additional copies for a total of 3 pieces. Laminate these pieces together with glue and let cure. Do this for frame #2 and #3.
• Glue the braces to hull in the same position the frames were at. Fill in any gaps with filleting material, fillet and tape the braces to the hull.
26. Interior Fairing • Ensure all wood surfaces have had 3 coats of epoxy (the epoxy used in applying the
fiberglass counts as one) • Fill in the weave to your satisfaction. • Use caution when sanding fiberglass. You should only sand enough to remove slight
bumps from the surface. Removing more will degrade the strength of the fiberglass. • Even though the inside of the kayak will not get much sunlight (UV rays) it is still good
practice to cover the epoxy to prevent long term breakdown from UV rays. Paint or varnish is the prefer coverage material.
• Paint or varnish the hull interior now before the deck gets installed.

Free Plans – JEM Watercraft
Free Plans – JEM Watercraft
Free Plans – JEM Watercraft
Free Plans – JEM Watercraft
Free Plans – JEM Watercraft
Free Plans – JEM Watercraft
Free Plans – JEM Watercraft
Laker Kayak (free version) Build Instructions Rev 00 – 06/25//07
JEM Watercraft
31 of 32
These instructions and its concepts may not be used, resold, reproduced, or distributed except as specifically directed by JEM Watercraft.
• Paint or varnish the underside of the deck now. Be sure to mask off the areas where the deck sheer clamp and Deck Supports (or Bulkheads) will be located.
27. Install Deck
• Place the deck and confirm the fit. Look inside the cockpit opening and confirm the deck is resting on the Bulkheads (or Deck Supports). Small gaps up to 1/8” [3mm] are acceptable. If you have gaps larger than that, you may have to push down on the deck to force into place.
• Set up weights or straps as needed to hold the deck. Take note of how you did it. • Remove the deck and apply a small bead of thick glue on top of the Bulkheads/Deck
Supports. Place the deck and reinstall your weights or straps. You can wait until the glue on top of the Bulkheads/Deck Supports cures or proceed to the next step.
• The sheer clamp, deck, and hull work together to form a small channel.
• Thickened glue in this gap all the way around the hull. If you’re using straps, apply the glue over a couple days so you don’t glue the straps to the hull.

Free Plans – JEM Watercraft
Free Plans – JEM Watercraft
Free Plans – JEM Watercraft
Free Plans – JEM Watercraft
Free Plans – JEM Watercraft
Free Plans – JEM Watercraft
Free Plans – JEM Watercraft
Laker Kayak (free version) Build Instructions Rev 00 – 06/25//07
JEM Watercraft
32 of 32
These instructions and its concepts may not be used, resold, reproduced, or distributed except as specifically directed by JEM Watercraft.
28. Sand, fair, and paint (varnish). • Fairing is the process of sanding down the peaks and filling in the valleys made from
applying fiberglass and epoxy. • At a minimum, you should knock down any bumps because these will create wear spots
on the hull. • Typical minimal faring is feathering any edges of fiberglass glass to make a smooth
transition to the wood surface. This can go quickly or be very time consuming depending on how cleanly you built the hull.
• How much of a smooth surface you want is up to you. Some builders prefer a museum quality finish while others prefer only a reasonably good finish that will touched up at times because they intend to use the hull a lot.
• Use caution when sanding fiberglass. You should only sand enough to remove slight bumps from the surface. Removing more will degrade the strength of the fiberglass.
• There are many fillers that can be added to epoxy to aid in the fairing process. Most of these change the color of the hull so if you plan on having a natural wood finish, chose you fairing materials wisely.
• Note: Epoxy will become cloudy and begin to break down when exposed long-term to U.V. rays from the sun. Paint or varnish is required over all surfaces. This breakdown will take weeks of direct sunlight for it to become a real problem. So if you want to paddle it a few times before the final finishing is complete, that’s ok. Try and store out of direct sunlight.
• Follow the manufacturers’ instructions when applying paint or varnish. • Check our forum for more specific information regarding faring. Post any questions you
have. • Be sure to check out our “Tips and Tricks” section for ideas like applying graphite to the
hull bottom to make it more abrasion resistant.
29. ALWAYS use good judgment and wear your PFD.
30. GET PADDLING!