free bee pattern from nancy murty e fiquiltpatterns.s3.amazonaws.com/00014201206120903361594.pdf ·...
TRANSCRIPT

FREEBEE PATTERN FROM Nancy Murty
www.beecreativestudio.com© 2011 Nancy Murty
www.beecreativestudio.com
sentiments quiltFREEBEE PATTERN FROM Nancy Murty

© 2011 Nancy Murty. All rights reserved.
Skill level: Experienced Beginner
Quilt finishes 41" x 53"
Add borders to an adorable printed panel and you’llhave that baby shower gift done in an afternoon. esweet animals and fresh colors are sure to please thenew mom in your life.
fabric requirements/cutting: All borders are cut crosswise and pieced. Measure-ments for borders are the exact lengths required. WOFdesignates the width of fabric from selvedge toselvedge (approximately 42" wide).
2/3 yards center panel (5375-M)• Cut 1 rectangle 20 1/2" x 32 1/2" = A,refer to ”Cutting the Panel”
1/4 yards inner border (5377-P)• Cut right inner border 2 1/2" x 32 1/2" = B• Cut top inner border 2 1/2" x 24 1/2" = C1/4 yards inner border (5376-B)• Cut left inner border 2 1/2" x 32 1/2" = D• Cut bottom inner brdr 2 1/2" x 24 1/2" = E3/4 yards pieced border, binding (5377-T)• Cut 20 squares 3 7/8" x 3 7/8" = F• Cut 5 strips 3" x wof for binding1/4 yards pieced border (5378-M)• Cut 5 squares 7 1/4" x 7 1/4" = G
1/8 yards corners-pieced border (5376-E)• Cut 4 squares 3 1/2" x 3 1/2" = H
5/8 yards outer border (5376-G)• Cut right outer border 6" x 42 1/2" = I• Cut top outer border 6" x 41 1/2" = J5/8 yards outer border (5377-G)• Cut left outer border 6" x 42 1/2" = K• Cut bottom outer border 6" x 41 1/2" = L
• 2 3/4 yards for backing fabric
• 48" x 60" low loft batting
cutting the panel to size: Cutting the large Sentiments panel to size can be alittle intimidating. The panel can also be slightly dis-torted due to the process of wrapping the fabric on tothe bolt. Here is the process I use to cut the panel tothe required size of 20 1/2" x 32 1/2". DO NOT PRE-WASH THE PANEL FABRIC.
1. Using a clear acrylic ruler, measure 1" from the edgeof the chicken, sheep and lion boxes (red dotted line)along the right side of the panel. Using a rotary cutter,trim along acrylic ruler, indicated by solid red line in illus-tration. Slide ruler along as necessary to trim entire sideof the panel.
sentiments quilt
1" 1"
1 3/4"
1 3/4"
1
The directions of this FreeBee are written with the assumption that the quilter has a basic knowledge of quiltmaking. Thereare many great books and talented teachers available at local shops, quilt guilds or among our fellow quilting friends. Andthere is nothing as good as hands on help, so you may want to look to one of these sources for additional help if needed.
Be sure to visit www.beecreativestudio.com to see the great patterns available and fabrics designed by Nancy Murty. You can connect further with NancyMurty on Twitter and join Bee Creative Studio on Facebook. For a sneak peek intothe studio, visit nancymurty.typepad.com to read Nancy’s blog.
© 2011 Nancy Murty. All rights reserved.
2. Repeat for the left side of the panel, cutting 1" from the chicken, bear and bunny boxes.
3. Measure 1 3/4" from the top of the bear box and trim.Measure 1 3/4" from the bottom of the lion box and trim.
Note: Panel may not be a true rectangle but can beeased into the inner border and will become the correct shape in the final quilt.
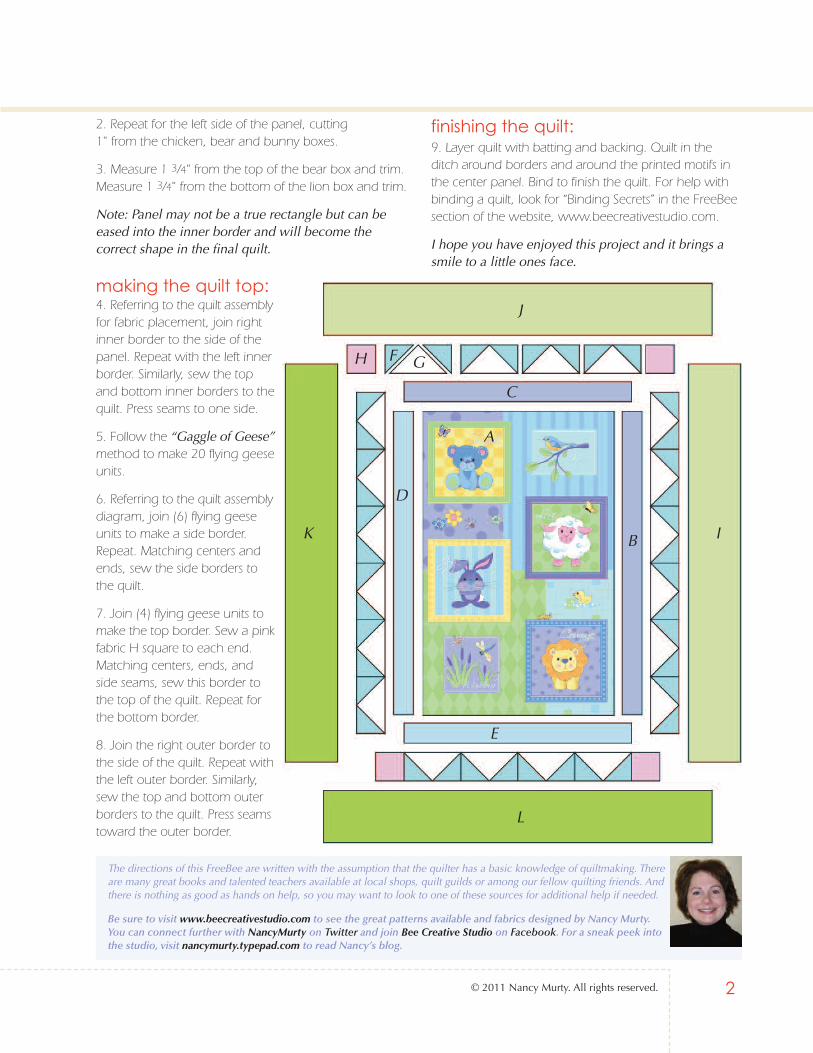
making the quilt top: 4. Referring to the quilt assemblyfor fabric placement, join rightinner border to the side of thepanel. Repeat with the left innerborder. Similarly, sew the topand bottom inner borders to thequilt. Press seams to one side.
5. Follow the “Gaggle of Geese”method to make 20 flying geeseunits.
6. Referring to the quilt assemblydiagram, join (6) flying geeseunits to make a side border. Repeat. Matching centers andends, sew the side borders tothe quilt.
7. Join (4) flying geese units tomake the top border. Sew a pinkfabric H square to each end.Matching centers, ends, andside seams, sew this border tothe top of the quilt. Repeat forthe bottom border.
8. Join the right outer border tothe side of the quilt. Repeat withthe left outer border. Similarly,sew the top and bottom outerborders to the quilt. Press seamstoward the outer border.
finishing the quilt:9. Layer quilt with batting and backing. Quilt in theditch around borders and around the printed motifs inthe center panel. Bind to finish the quilt. For help withbinding a quilt, look for “Binding Secrets” in the FreeBeesection of the website, www.beecreativestudio.com.
I hope you have enjoyed this project and it brings asmile to a little ones face.
A
D
F GH
I
L
K
J
B
C
E
2

Gather together 4 smallsquares and 1 large square,mechanical pencil and QuickQuarter II tool.
1. Position the Quick Quartertool diagonally across thewrong side of the smallersquares, lining up the cornersof the square with the center-line of the bar.
2. Using a mechanical pencil,lightly draw a line next toeach side of Quick Quarterbar as well as in the slottedopenings along the centerof the tool. Mark remainingsmall squares.
3. With right sides together,pair up the large square with2 marked small squares. Settwo small squares at oppositecorners of the large square.The drawn lines should lineup between the two squares.
4. Sew on the two outsidedrawn lines. Separate by cutting along center dashedline. Press seams toward thesmall triangles.
5. With right sides together,place a small marked squareon each of the units createdin the previous step.
6. Sew on outside drawnlines. The sewing should bein line with the “V” createdby the unit and small square,indicated by red arrows inthe picture.
7. Cut along dashed lines toseparate. Press seams towardthe small triangle.
8. Trim away the “dog ears”or the little points that extendbeyond the rectangularshape of the goose unit.Trim even with the gooserectangle.
You should have 4 flyinggeese units. Repeat steps foradditional flying geese.
© 2011 Nancy Murty. All rights reserved.
Skill level: Experienced Beginner
I just love this method for making flying geese. Smallsquares are cut 7/8" larger then the height of the finishedgoose. The large square is cut 1 1/4" larger then thelength of the goose. So if a finished goose measures 3" x 6" cut 4 squares 3 7/8" and 1 square 7 1/4" for every4 flying geese units needed in the project. Do NOT cutthe squares in half diagonally!
helpful tools: • Quick Quarter II tool • Mechanical Pencil• Scissors • Sewing Machine• Thread • Sewing Machine Needles
gaggle of geese
3

SentimentsDESIGNED BYNancy Murty 1384 Broadway
New York, NY 10018(800) 223-5678
www.andoverfabrics.com
4965-P5376-B*5377-G*
4968-T5377-T*5376-G*
5375-L (panel)
5377-P*4965-B4968-G4968-Y5378-M*5376-E*
5378-P5378-B5378-G5378-Y4965-O5378-E
5375-M * (panel)
* Indicates fabric used in quilt pattern. Compainion fabrics are shown 70% of actual size, panels are shown 15% of actual size.