floriani embroidery project halloween trapunto treat bag · • halloween images to print (see...
TRANSCRIPT

Floriani Embroidery ProjectHalloween Trapunto Treat Bag

Supplies Needed:
• 4 sheets inkjet printable fabric • Halloween images to print (see sources
below)• �” yard bag fabric, 45” wide, for pocket
linings, sides, and base• �” yard lining fabric, 45” wide, for lining
and lining base• 2 yards 5∕8” wide Halloween ribbon• Glow-in-the-dark thread• Floriani No Show Mesh stabilizer• Floriani Dream Weave Fusible• Polyester fiberfill• Sewing thread• 2-4-6-8 Pocket Bag Collection (see
sources below)
Floriani Embroidery ProjectHalloween Trapunto Treat Bag
Presented by RNK Distributing
1. Begin by preparing the images for print-ing. You will need four pictures 7” square (including �” seam allowance) and four 2” squares for finishing the drawstrings. The seam allowances can be either part of the print or white fabric around an exact-size printed square.
2. The images used in our project were originally rectangular. We used the tools in a graphics-editing program (Paint Shop, for example) to reshape the images. To do this, be sure the option to “maintain aspect ratio” is NOT checked, then click
and drag the image perimeter to make a square shape. The process distorts the images, so it’s not advisable to make large changes in the image shape.
Floriani...The Name That Means Beautiful Embroidery!Floriani...The Name That Means Beautiful Embroidery!Floriani...The Name That Means Beautiful Embroidery!2

6. Inkjet printable fabric is available from several sources. Each brand comes with specific instructions for printing, rinsing, and using the fabric sheets. Print your images onto fabric following the instructions that accompany the printable fabric you are using.
7. When the printed images are dry, roughly cut each pocket square outside its final 7” edges.
8. Back a printed square with Floriani No Show Mesh stabilizer. Pin or baste the edges.
9. Thread the machine with glow-in-the-dark thread. Use regular sewing thread or embroidery bobbin thread in the bobbin.
10.Following the outlines of the printed shapes, stitch the fabric and stabilizer together. Choose just a few parts of the design to outline. Keep the stitched shapes simple, and make sure they are closed shapes.
3. Another factor to consider when sizing images for your project: the printable fabric may relax when it’s removed from the paper backing and rinsed, so the finished size is less than the size specified in the software. Sometimes the relaxation is greater in one dimension than the other, so the final image is no longer square. Make a test print on the fabric you will use to determine whether relaxation occurs, and compensate for it in the computer software.
4. Use the software to arrange images to fit an 8�” x 11” sheet. A single 7” pocket image and several small squares will fit on one sheet. Fill any empty area with other images, if you like, and save them for later projects. Keep in mind that many printers will leave an unprinted margin around the page edges. This unavoidable white space can be incorporated into seam allowances, if necessary.
5. Before printing your images on fabric, run a test on plain paper. Use the printer’s draft mode to save ink. Check to be sure no part of the image is cut off by the printer’s margin settings.
Floriani...The Name That Means Beautiful Embroidery!Floriani...The Name That Means Beautiful Embroidery!Floriani...The Name That Means Beautiful Embroidery!3
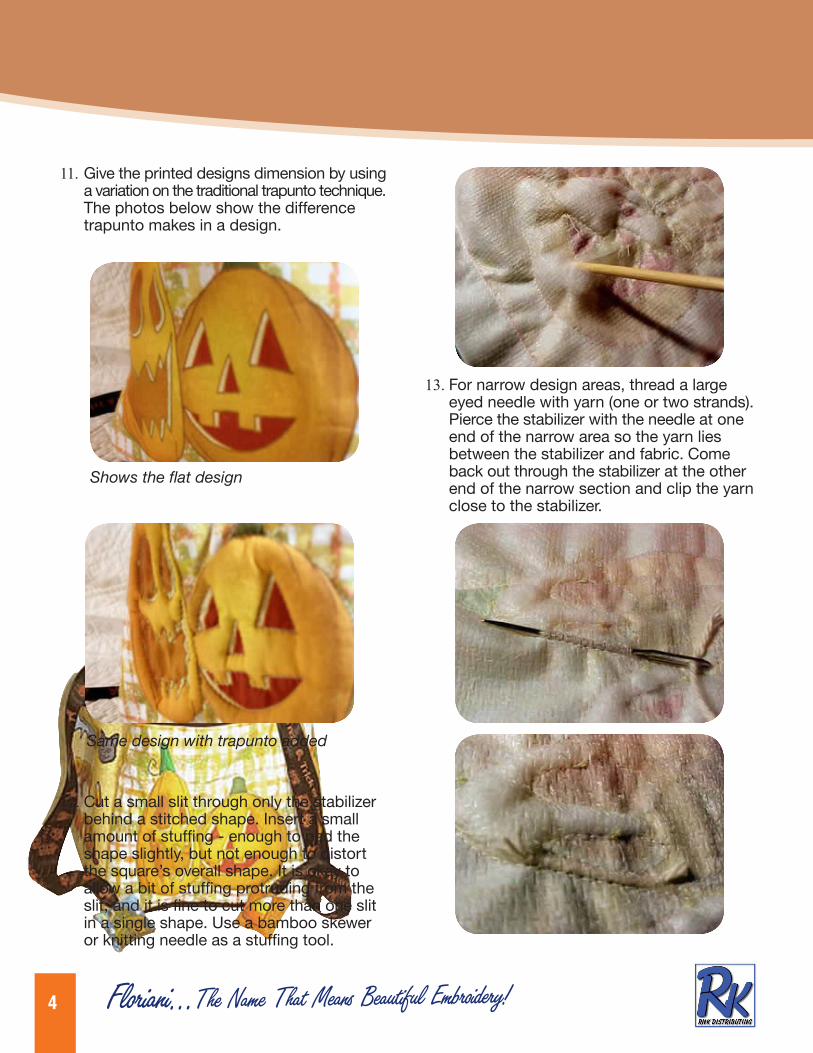
13.For narrow design areas, thread a large eyed needle with yarn (one or two strands). Pierce the stabilizer with the needle at one end of the narrow area so the yarn lies between the stabilizer and fabric. Come back out through the stabilizer at the other end of the narrow section and clip the yarn close to the stabilizer.
12.Cut a small slit through only the stabilizer behind a stitched shape. Insert a small amount of stuffing - enough to pad the shape slightly, but not enough to distort the square’s overall shape. It is okay to allow a bit of stuffing protruding from the slit, and it is fine to cut more than one slit in a single shape. Use a bamboo skewer or knitting needle as a stuffing tool.
11.Give the printed designs dimension by using a variation on the traditional trapunto technique. The photos below show the difference trapunto makes in a design.
Shows the flat design
Same design with trapunto added
Floriani...The Name That Means Beautiful Embroidery!Floriani...The Name That Means Beautiful Embroidery!Floriani...The Name That Means Beautiful Embroidery!4

18.Finish assembling the bag as directed in the pattern. Use the Pocket Variation technique for constructing the pockets. A size 90/14 needle may be necessary for stitching through multiple thicknesses of printed and plain fabrics.
19.To finish each drawstring: a. Trim two smaller images to 2” squares. b. Stitch right sides together with a �” seam, leaving an opening for turning and stuffing in the top edge. c. Trim the corners and turn the squares right side out. Stuff with fiberfill. d. Tuck the two ends of one drawstring ribbon into the opening. Close with hand stitches, catching the drawstring as you sew. e. Repeat for the other drawstring.
14.Continue slitting and stuffing until all the desired shapes are padded.
Tip: If your printed image does not have good shapes for stuffing, substitute accent stitching or meandering lines of quilting in the background to incorporate the glow-in-the-dark thread.
15.Cut an 8” square of Floriani Dream Weave Fusible. Pin the trapunto square to the ironing surface, face down, pulling it taut. Fuse the Dream Weave over the stuffed square to close the slits and keep the stuffing in place. Apply steam and heat but no pressure to the stuffed areas to avoid flattening them.
16.Trim the pockets to 7” squares.
17.To give the bag a sturdier bottom: a. Cut a 6�” square of Floriani Stitch N Shape and an additional base square (7”). b. Place the Stitch N Shape between the two base squares, right sides out, and baste within the seam allowance. c. Treat this sandwich as a single unit when constructing the bag.
RNK DistributingPhone: (865) 549-5115
Fax: (865) 549-5116Toll Free (877) 331-0034
Designed by Rebecca Kemp Brent for RNK Distributing
Sources2-4-6-8 Pocket Bag Collection available from Laura's Sewing Studio Printable images available from Scrap SmartHooked on Halloween Home and Hooked on Halloween Fashions CDs
Floriani...The Name That Means Beautiful Embroidery!Floriani...The Name That Means Beautiful Embroidery!Floriani...The Name That Means Beautiful Embroidery!5