flooring collection g e n e r a l - fortune.com.vn dan lap san.pdfcác tấm đựơc lắp đặt...
TRANSCRIPT

15 mm. thickness - Flooring Board 1600 1000 900 850 500 400 20018 mm. thickness - Flooring Board 1700 1100 950 900 550 425 22510 mm. thickness - Underlay Board 500 350 300 250 150 100 50
xflooring collection
g e n e r a lBảng 1 Bảng chịu lực của tấm FlooringBoard và Tấm lót
Grid Support Spacing (m m .)
Uniform Distribution Load (kg./m2)
300 x 300 300 x 400 400 x 400 300 x 600 400 x 600 600 x 600 600 x 1200
Remarks : Safety factor used for load table calculation is 2.5
Bảng 2 Bảng chịu lực của tấm Dec’floor Bảng 3Bảng chịu lực tấm Dec”floor với lớplót Shera 10m m
One - W ay Joist Span Spacing (m m .) 300 400 One - W ay Joist Span Spacing (m m .) 300 400 600
Uniform Distribution Load (kg./m2) 2000 1125 Uniform Distribution Load (kg./m2) 2800 1500 700
Point Load (kg.) Point Load (kg)
200 mm. width - dec' floor250 mm. width - dec' floor300 mm. width - dec' floor
120150180
n/a110130
100 mm. width - dec' floor150 mm. width - dec' floor200 mm. width - dec' floor250 mm. width - dec' floor300 mm. width - dec' floor
100130180200250
n/a100130150190
n/an/an/a100120
Remarks : - Safety factor used for load table calculation is 2.5- SHERA dec' floor smaller than 200 mm. in width is not recommended for
used as structural floor. They should only be laid on solid floor as a decorativematerial.
Remarks : - Safety factor used for load table calculation is 2.5- This load table is applicable when using SHERA dec' floor with 10 mm. thickness.
SHERA Underlay Board only.

flooring collection
K h u n g x ư ơ n g t h é p h o ặ c g ỗ M ối nối
Minimum flange width of stud at sheet joint must be 38 mm. Square tubesteel frame is recommended at the sheet joint to avoid bending of studflange.
38 mm. (min)
Butt JointButt joint can be used in dry flooring area and where an exposed jointappearnce is acceptable.
Polyurethane Joint
38 mm. (min)
For wet area or movement joint, polyurethane based sealant such asSHERA PU 25 should be used to seal the joint between two sheets. Seefigure 5 for details. Jointing gap between the edges of shees should notbe less than 3 mm.
3 mm. (min)SHERA PU 25
3 mm. (min)SHERA PU 25
H ì n h 3 H ì n h 5
Bề rộng tối thiểu của khung xương liên kết là 38mm Mối nối đấu đầu:
Được sử dụng ở diện tích mặt sàn khô nơi mà bề mặt liên kết hởra là có thể chấp nhận được .
Chất sử lí mối nối:
Đối với khu vực ẩm ướt hoặc khe co giãn thì chất sử lí mối cơ bảnlà được làm từ chất nhựa dẻo như Shera PU 25 . Chi tiết hình 5.
Khoảng cách giữa các tấm tối thiểu là 3 mm

flooring collection
S ử lý m ố i nố iBefore applying sealant into the gap between the sheets, cover the edge of boardor dec’floor with easily removable masking tape. Fill the gap with sealantin an upward motion until it was completedly full. Immediately removethe masking tape after completing sealant application. Refer to figure 6 forapplication method.
SHERA PU 25
Masking tapeFloor Board, Dec' floor &
Underlay Board
SHERA Flooringproducts
F lo o r in g B o a rdD e c ' f lo o r
U n d e r la y B o a rd
F igu re 6 : Po lyu re than e Sea lan t App l ica t ion
Trước khi phun keo Pu vào mối nối giữa 2 tấm nên dán băng dínhvào các mép cạnh mối nối giữa hai tấm. Ngay lập tức tháo bỏbăng dính sau khi phun đầy mối nối . Xem hình 6
Hình 6
flooring collection
Floor Board & deflooring collection
D ec’floor BoardGeneralFor general information on framing, fixing, and jointing please refer topage 11-20 For other special installation details and work instruction,see page 33-39.
FixingFasteners must locate at more than 12 mm. from board edges and 50mm. from board corners. Maximum fastener spacing is 300 mm. Seefigure 7 for fixing details.
F
X
F
X
F i g u r e 7 : S H E R A f l o o r i n g b o a r d f i x i n g d e t a i l s .
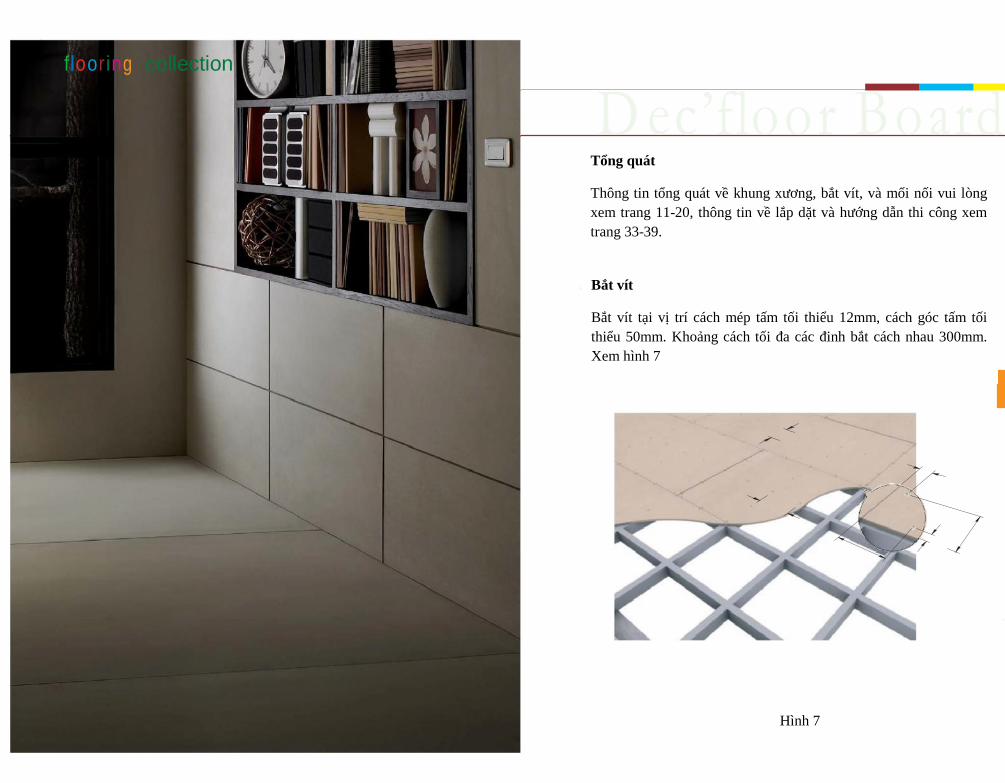
Tổng quát
Thông tin tổng quát về khung xương, bắt vít, và mối nối vui lòngxem trang 11-20, thông tin về lắp dặt và hướng dẫn thi công xemtrang 33-39.
Bắt vít
Bắt vít tại vị trí cách mép tấm tối thiểu 12mm, cách góc tấm tốithiểu 50mm. Khoảng cách tối đa các đinh bắt cách nhau 300mm.Xem hình 7
Hình 7
X
X
flooring collection
Sheet LayoutSheet should be laid in staggered pattern (brick pattern). However,ensure that edges of board must always lie on the supporting grid joist.See figure 8 for layout details.
GeneralFor general information on framing, fixing, and jointing please refer topage 11-20 For other special installation details and work instruction,see page 33-39.
SHERA dec' Floor
SHERA Flooring Board F
F F
X X
F FX
F X
F X
F X
F X
F
X
F i g u r e 8 : S H E R A f l o o r i n g B o a r d f i x i n g o n g r i d j o i s t
Fixing
F i g u r e 9 : S H E R A d e c ’ f l o o r f i x i n g d e t a i l s
JointFor flooring application, all sheets except at movement joint should bebutted closely together. For the movement jointing details, please refertopage 35-38 Fasteners must locate at more than 12 mm. from dec’ floor
20 mm. from dec’ floor corners. Fasteners shall be fixed on both sides
of the plank and at spacing equal to joist spacing. See figure 9 for fixingdetails.
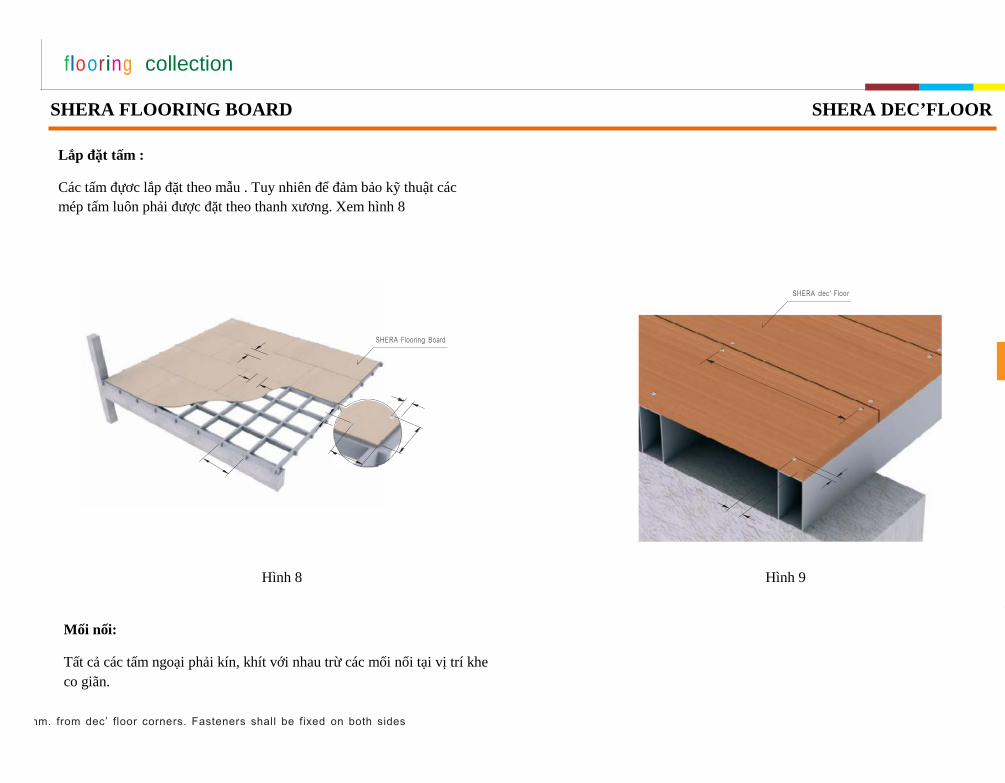
Lắp đặt tấm :
Các tấm đựơc lắp đặt theo mẫu . Tuy nhiên để đảm bảo kỹ thuật cácmép tấm luôn phải được đặt theo thanh xương. Xem hình 8
Mối nối:
Tất cả các tấm ngoại phải kín, khít với nhau trừ các mối nối tại vị trí kheco giãn.
SHERA FLOORING BOARD
Hình 8 Hình 9
SHERA DEC’FLOOR
flooring collection
Floor Board & dec’ f loor T ile daStructural Floor InstallationSHERA dec’ floor can be fixed on both timber and steel joist. Checktable 2 in page 14 for load bearing capacity of dec’ floor at different joistspacing.
When load bearing capacity of dec’ floor does not meet the buildingrequirement, especially for smaller width plank, SHERA 10 mm. thick-ness underlay board is recommended for used as an underlay. Pleaserefer to load bearing capacity of SHERA dec’ floor with SHERA 10 mm.underlay board. in table 3 , page 15
SHERA dec' FloorSHERA Underlay Board
SHERA dec' floor
F
X
F
X
F igu re 10 : SHERA dec ’ f loo r f ix in g on one -wa y jo is t . F igu re 11 : SHERA dec ’ f loo r f ix in g on unde r la y boa rd and one -w ay jo is t
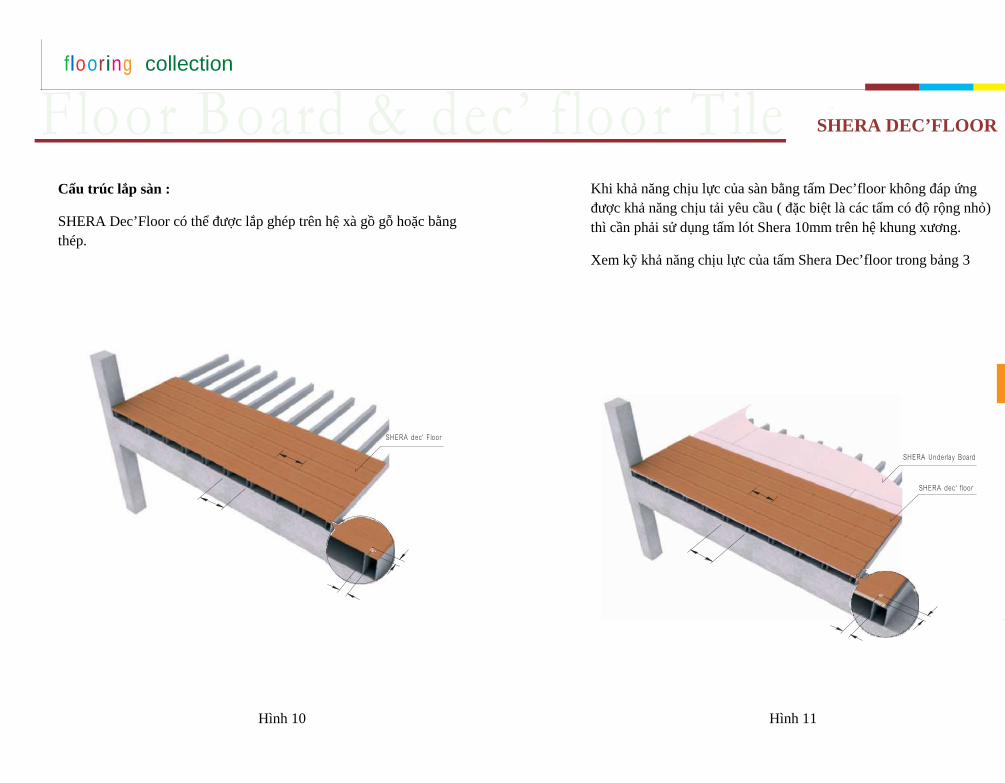
Cấu trúc lắp sàn :
SHERA Dec’Floor có thể được lắp ghép trên hệ xà gồ gỗ hoặc bằngthép.
Khi khả năng chịu lực của sàn bằng tấm Dec’floor không đáp ứngđược khả năng chịu tải yêu cầu ( đặc biệt là các tấm có độ rộng nhỏ)thì cần phải sử dụng tấm lót Shera 10mm trên hệ khung xương.
Xem kỹ khả năng chịu lực của tấm Shera Dec’floor trong bảng 3
SHERA DEC’FLOOR
Hình 11Hình 10
flooring collection
Floor Board & dec’ f loor T ile aWhen higher load bearing capacity is required, 300 mm. width dec’ floorinstalled on 300 mm. spacing grid joist is recommended for usage. Inthis case, load bearing capacity will equal to 330 kg. for point load and3,500 kg./m2 for uniform distributed load
Insta l le r shou ld ensure tha t edges of dec’ f loor must alway l ie onthe supporting grid joist
Decorative Floor Installationdec’ floor can be installed directly on the top of existing solid structuralfloor as long as the substrate was proved to have enough degree ofleveling and enough load bearing capacity for additional dead load.
Solid structural FloorSHERA dec' floor
SHERA dec' floor
F
X
F
X
F i g u r e 1 3 : S H E R A d e c ’ f l o o r f i x i n g o n s o l i d f l o o r
F i g u r e 1 2 : S H E R A d e c ’ f l o o r f i x i n g o n g r i d j o i s t
JointFor internal area, all sheets except at movement joint should be buttedclosely together. For the movement jointing details, please refer topage 35-38
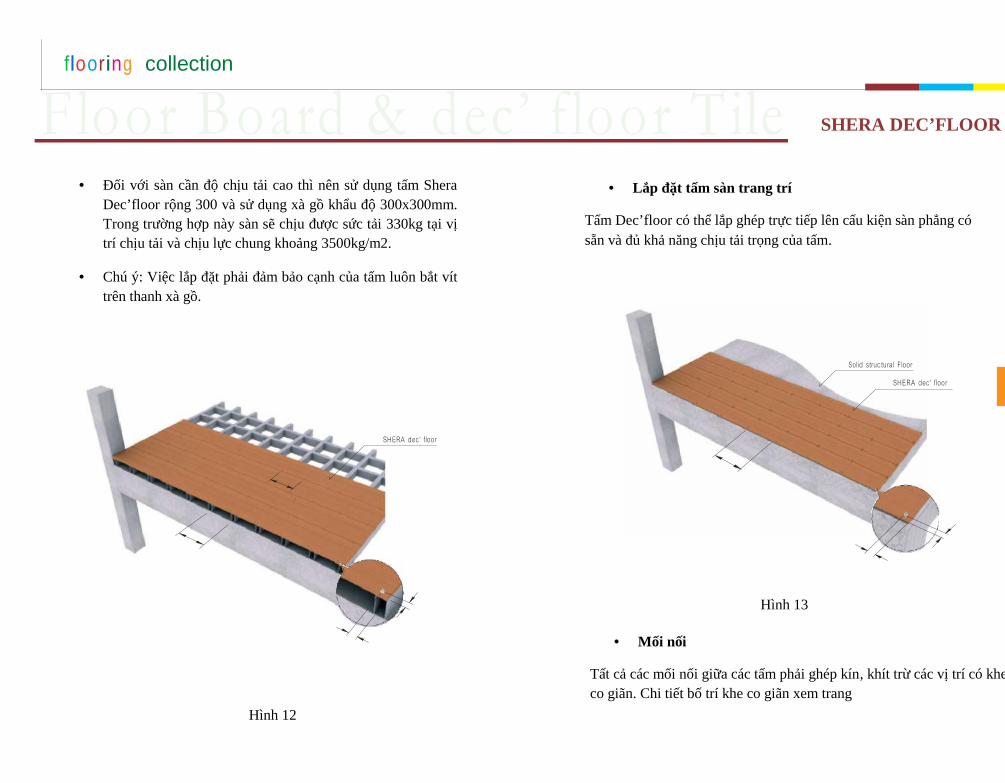
Đối với sàn cần độ chịu tải cao thì nên sử dụng tấm SheraDec’floor rộng 300 và sử dụng xà gồ khẩu độ 300x300mm.Trong trường hợp này sàn sẽ chịu được sức tải 330kg tại vịtrí chịu tải và chịu lực chung khoảng 3500kg/m2.
Chú ý: Việc lắp đặt phải đảm bảo cạnh của tấm luôn bắt víttrên thanh xà gồ.
Lắp đặt tấm sàn trang trí
Tấm Dec’floor có thể lắp ghép trực tiếp lên cấu kiện sàn phẳng cósẵn và đủ khả năng chịu tải trọng của tấm.
Mối nối
Tất cả các mối nối giữa các tấm phải ghép kín, khít trừ các vị trí có kheco giãn. Chi tiết bố trí khe co giãn xem trang
SHERA DEC’FLOOR
Hình 13
Hình 12
flooring collection
Floor Board & dec’ f loor T illeGeneralFor general information on framing, fixing, and jointing please refer topage 11-20 For other special installation details and work instruction,see page 33-39.
FixingFasteners must locate at more than 12 mm. from board edges and 50mm. from board corners. Maximum fastener spacing is 300 mm. Seefigure 14 for fixing details.
Sheet LayoutSheet should be laid in staggered pattern (Brick Pattern). See figure 15for layout details.
SHERA Flooring Board
F
X
F X
F
X
F
X
F i g u r e 1 4 : S H E R A U n d e r l a y b o a r d f i x i n g d e t a i l s F i g u r e 1 5 : S h e e t l a y o u t f o r u n d e r l a y m e n t
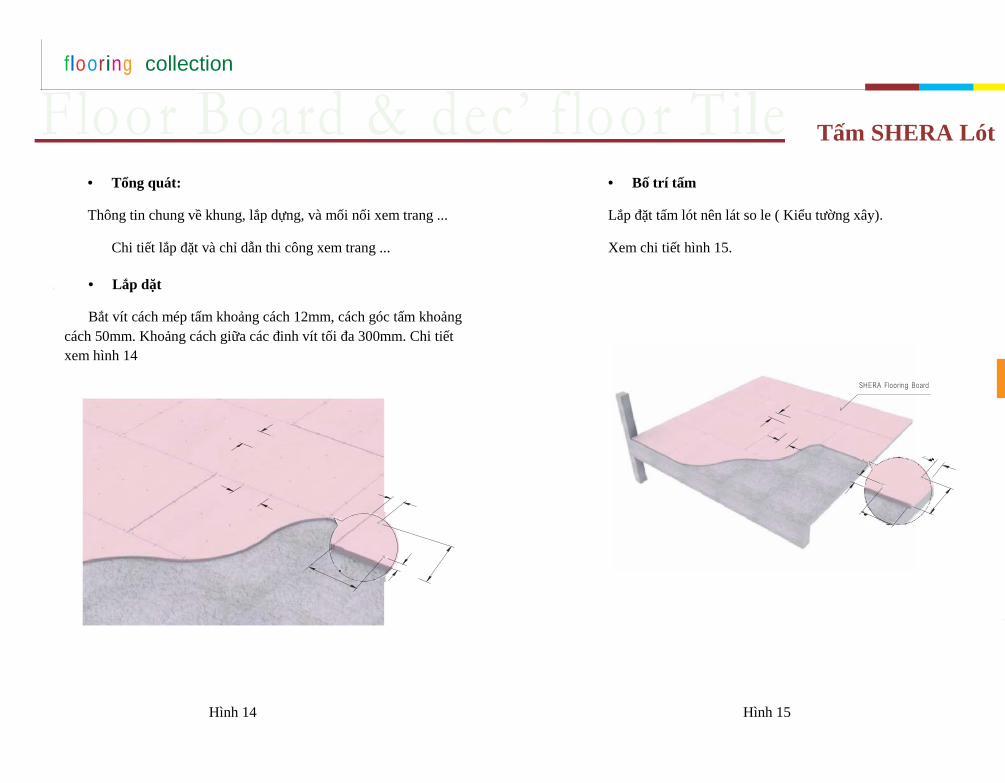
Tổng quát:
Thông tin chung về khung, lắp dựng, và mối nối xem trang ...
Chi tiết lắp đặt và chỉ dẫn thi công xem trang ...
Lắp dặt
Bắt vít cách mép tấm khoảng cách 12mm, cách góc tấm khoảngcách 50mm. Khoảng cách giữa các đinh vít tối đa 300mm. Chi tiếtxem hình 14
Bố trí tấm
Lắp đặt tấm lót nên lát so le ( Kiểu tường xây).
Xem chi tiết hình 15.
Tấm SHERA Lót
Hình 14 Hình 15

c’ f loor T ile U nderla
Floor
Bo
ard,
De
c’
floor&Underlay
Board
flooring collection
FcelroamoicrorBvionyal urndder&lay deUnderlay board can be used as ceramic tile, vinyl, parquet or carpetbacking / leveling board. Those materials can be fixed by using normaladhesive with concrete floor. Please contact your local manufacturer ofadhesive for more information.
Surface finishing
SHERA Flooring Board
S p e c i a l I n s t a l l a t i o n D e t a i l sF
X
F X
M o v e m e n t J o in tS u r fa c e F in is h in g
F i g u r e 1 6 : C e r a m i c T i l e U n d e r l a y
Tấm lót dưới sàn có thể sử dụng gạch lát nền Ceramic, nhựa PVC, vángỗ hoặc bằng thảm. Những vật liệu này có thể được gắn bằng keo dángạch lên sàn bê tông.
Các dạng tấm lót
Hình 16

flooring collectionflooring collection
K h e c o g i ã n
Movement joint must be provided where there are existing structuraljoints in floor, periphery of the floor next on the wall. Gap between theedges of sheets at movement joint should not be less than 6 mm. andshould be sealed with SHERA sealant PU 25. Please see the followingpictures for more details.
6 mm. (mim.)SHERA sealant PU25 SHERA Flooring Product
Independent frame member
SHERA sealant PU256 mm. (mim.)
SHERA Flooring Product
Supporting frame
F i g u r e 1 7 : M o v e m e n t j o i n t d e t a i l s
Khe co giãn cần được tạo ra tại những vị trí theo yêu cầu kỹ thuật như:ngắt sàn ( chiều rộng của sàn lớn),khe tiếp giáp với tường, vách ngăn.Khoảng cách khe co giãn tối thiểu là 6mm và được trám kín bằng keochuyên dụng. Xem hình dưới để biết thêm chi tiết.
Hình 17

flooring collection
Movement joint must also be provided where floor length or widthexceed 5.0 meter. Joints should be located at around the center of the floor.Please see figure 18 for more details
Movement joint must also be provided where changes of floor directionoccur; i.e. doorways, L or T shape room, and etc. Please see figure 19for more details.
Movement JointSHERA Flooring board
Movement Joint Movement Joint
SHERA Flooring board
Movement Joint
F i g u r e 1 8 : M o v e m e n t j o i n t ( e x a m p l e 1 ) F i g u r e 1 9 : M o v e m e n t j o i n t ( e x a m p l e 2 )
Khe co giãn được áp dụng với sàn có kích thước chiều dài hoặcchiều rộng vượt quá 5m. Mối nối được đặt ở giữa sàn. Xem hình 18
Khe co giãn cũng được tạo ra khi có sự đổi hướng trên mặt sàn như:
- Lối ra cửa
- Hình dạng của căn phòng là chữ L hoặc chữ T.
- Xem hình 19 để biết thêm chi tiết.
Hình 19Hình 18

flooring collection
K h e c o g iã n L ớ p h o à n t h i ệ n b ề m ặ tWhen SHERA flooring product is to be furnished by tile parquet or vinyl,make sure that movement joints be carried through the top of the floorsurface. See figure 20 for details.
SHERA flooring collection can be furnished with either water based acrylicpaint, carpet, parquet, viny l or ceramic t i les. Please contact yourf inishing materia l manufacturers for more detai ls about applicationrecommendat ion.
SHERA PU256 mm. (mm.) Ceramic tile
Adhesive
Backing ROD
SHERA Flooring Board orSHERA Underlay Board
Independent frame member
Carpet
Ceramic tiles
Parquet
Vinyl
F i g u r e 2 0 : M o v e m e n t j o i n t D e t a i l s F i g u r e 2 1 : S u r f a c e F i n i s h i n g
Chú ý khi hoàn thiện lớp mặt bằng vật liệu khác như gạch hoặcnhựa...tại vị trí khe co giãn lớp bề mặt phải tạo khe trùng với vị tríđó. Xem hình 20
Bộ sản phẩm SHERA có thể trang trí thêm với sơn acrylic gốcnước, thảm, ván gỗ, nhựa PVC, đá lát đất nung. Xin vui lòng liên hệnhà máy sản xuất thành phẩm của chúng tôi để biết thêm chi tiết vềbản hướng dẫn.
Hình 21Hình 20
Gạch Ceramic Sàn nhựa
Sàn gỗTrải thảm

flooring collection
P ro d u c t Fe a tu r e
SoundInsulation
SHERA board has been tested for sound insulationprope rtie s accord in g to ASTM E90-99 s tandard.Optimum STC value obta ined by SHERA ensures thesa tis facto r y leve l o f sound preven tio n in SHERABoard cladded wall & ceiling systems.
TermiteResistance
SHERA product s are unaffecte d by te rm ite s andinsects. C u t t in g to o ls
H o l e F o r m in g
Wo r k I n s t r u c t i o n
LowShrinkage
SHERA's Autoclave 's Technolog y has enhancedproduct's dimensiona l stability . This property makesSHERA products suitable for a wide range of applicationsincluding exteriors , underlayment , and etc.

flooring collectionflooring collection
cutting toolsGeneralSHERA sheet can be easily cut and prepare on site by using proper toolsand methods
Hand Saw
Hand Guillotine
F i g u r e 2 2 : H a n d S a w
F i g u r e 2 3 : H a n d G u i l l o t i n e
Tổng quát
Tấm SHERA có thể cắt và chuẩn bị bằng các phương pháp và dụngcụ thông thường 1 cách dễ dàng.
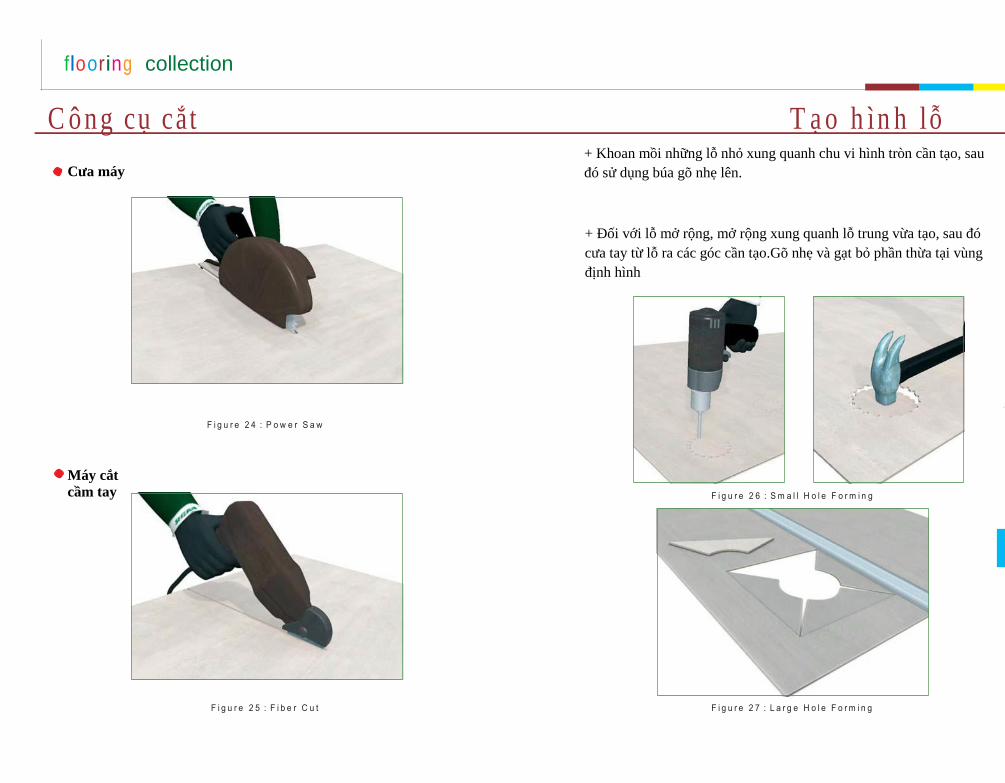
flooring collection
C ô n g cụ cắt T ạ o h ìn h lỗCưa máy Pre-drilling series of small hole around the perimeter of the holes, then
using the hammer to tap out the circle piece from the sheet
For a large hole opening, open small hole around the center and thensaw-cut from that hole towards corners of the opening. Score and snapaway the rest of desired opening area.
F i g u r e 2 4 : P o w e r S a w
Máy cắtcầm tay F i g u r e 2 6 : S m a l l H o l e F o r m i n g
F i g u r e 2 5 : F i b e r C u t F i g u r e 2 7 : L a r g e H o l e F o rm i n g
+ Khoan mồi những lỗ nhỏ xung quanh chu vi hình tròn cần tạo, sauđó sử dụng búa gõ nhẹ lên.
+ Đối với lỗ mở rộng, mở rộng xung quanh lỗ trung vừa tạo, sau đócưa tay từ lỗ ra các góc cần tạo.Gõ nhẹ và gạt bỏ phần thừa tại vùngđịnh hình

flooring collection
Vâ ̣n chuyển Lưu khoSHERA products should be handled at both ends, at around 50 cm.from the ends. They should always be lifted by letting the width of productsperpendicular to the floor.
F igu re 28 : Boa rd H and l in g
F ig u re 29 : P la n k H and l in g
SHERA should be handled and stacked carefully to avoid damages tothe edges and corners. The maximum height of stack should not behigher than 1 meter and it should be supported by timber bearers at50 cm. spacing.
SEREA flooring should be stacked on dry and leveled ground. It isalways recommended to store SHERA under cover in order to ensurethat thay will be in equilibrium moisture content condition prior to fixingand finishing. lnstalling SHERA when they are in wet or saturated condi-tion may result in shrinkage or crack at joint or fitting
F i g u r e 3 0 : B o a r d S t o r a g e
+ SHERA nên vận chuyển bằng tay và cẩn thận tránh gây hư hại tạicác cạnh và các góc. Các tấm xếp trồng lên nhau trên kệ gỗ với độcao tối đa la 1m, khoảng cách các đóng là 50 cm.
+ Tấm SHERA phải được đặt nơi khô ráo và cách đất. SHERA đượcphủ bạt
+ Sản phẩm SHERA nên vận chuyển bằng 2 người , vận chuyểnbằng tay khoảng cách tay là 50 cm. Nhất tấm lên khỏi mặt sàn và dichuyển theo phương thẳng đứng.
Hình 28: Vận chuyển tấm lớn
Hình 29: Vận chuyển tấm dài
Hình 30: Xếp kho tấm lớn
Hình 31: Xếp kho tấm dài

flooring collection
T hông số kỹ thuậtBảng 4 Technical Data Sheet
Tiêuchuẩn
Đơnvị
SHERAdec' floor
SHERAFlooring Board
SHERAUnderlay Board
Thông số vật liệu
Dung sai độ dày
Mật độ
MOR
MOE
Độ hút nước
Chịu ẩm
Chống thấm
Độ PH
Khả năng ch ống lửa
Bắt lửa
Truyền nhiệt
Lửa cháy bề mặt Vật liệu
Tính bền của vật liệu
Môi trường lạnh giá
Môi trường nước ấm
Chịu nắng mưa
Ngâm trong nước
ASTM C 1185
ASTM C 1185
ASTM C 1185
ASTM C 1185
ASTM C 1185
ASTM C 1185
BS 476 Part 5
BS 476 Part 6
BS 476 Part 7
ASTM C 1185
ASTM C 1185
ASTM C 1185
ISO : 8336 Part (E)
mm.
kg. / m.3
MPa
MPa
%
1.5
1300 50
> 10.60 (EMC)
3100 450 (WET)
35 %
12 %
Pass
7 - 8
P
I = 0
Class 1
Pass
Pass
Pass
Pass
1.5
1300 50
> 10.00 (EMC)
4500 500 (WET)
35 %
12 %
Pass
7 - 8
P
I = 0
Class 1
Pass
Pass
Pass
Pass
0.5
1250 50
> 10.00 (EMC)
6500 500 (EMC)
35 %
12 %
Pass
7 - 8
P
I = 0
Class 1
Pass
Pass
Pass