flashconsign consignor guide - online consignment …€¦ · 2 your member account when you apply...
TRANSCRIPT

Consignor Guide
Version 1.1

FlashConsign.com Consignor Guide Page 2 of 26
TABLE OF CONTENTS 1 Welcome to FlashConsign.com..................................................................................................................3 2 Your Member Account...............................................................................................................................4
2.1 Logging In ..........................................................................................................................................4 2.2 The Member Home Page....................................................................................................................4
2.2.1 Current Consignment Sale..........................................................................................................4 2.3 Your Member Profile .........................................................................................................................5
2.3.1 Change Member Email Address.................................................................................................5 2.3.2 Change Member Login Password ..............................................................................................5 2.3.3 Change Member Name...............................................................................................................6 2.3.4 Change Member Address ...........................................................................................................6 2.3.5 Change Member Phone Number ................................................................................................6
3 Managing Your Inventory ..........................................................................................................................7 3.1 Adding Items ......................................................................................................................................8
3.1.1 Field Help ...................................................................................................................................9 3.1.2 Submitting the Add Items Form..................................................................................................9 3.1.3 Adding Multiple Items .............................................................................................................10 3.1.4 Adding Subsequent Items.........................................................................................................10
3.2 Viewing Your Items .........................................................................................................................12 3.2.1 Selecting Items in the Inventory Table.....................................................................................12 3.2.2 Sorting the Inventory Table......................................................................................................14 3.2.3 Filtering Your Inventory Table ................................................................................................15
3.3 Printing Tags ....................................................................................................................................16 3.3.1 Selecting Items to Print Tags....................................................................................................16 3.3.2 The Print Tags Dialog Box ......................................................................................................17 3.3.3 Generating Printable Tags ........................................................................................................19
4 Working at a Consignment Sale ...............................................................................................................22 4.1 Signing Up for a Job.........................................................................................................................22
4.1.1 Selecting a Consignment Sale Job............................................................................................23 4.1.2 Signing Up for a Consignment Sale Job...................................................................................23
4.2 Viewing Assigned Job(s)..................................................................................................................24 4.3 Releasing a Job .................................................................................................................................25
5 Getting Additional Help ...........................................................................................................................26
FlashConsign.com Consignor Guide Page 3 of 26
1 Welcome to FlashConsign.com Welcome, and thanks for using FlashConsign.com. This guide will help you as a Consignor who will be using FlashConsign to sell items at a consignment sale. Specifically, you will need to add Items to your inventory, print Tags that you will attach to those items and then view your summary of the consignment sale after it is held. In addition, this guide will help you to find and sign up to work one or more Jobs at the consignment sale, if applicable. Let’s get started.
2 Your Member Account When you apply for your first consignment sale, you are also creating your FlashConsign member account. This free account allows you to track your inventory of Items over time and lets you join consignment sales to sell those items.
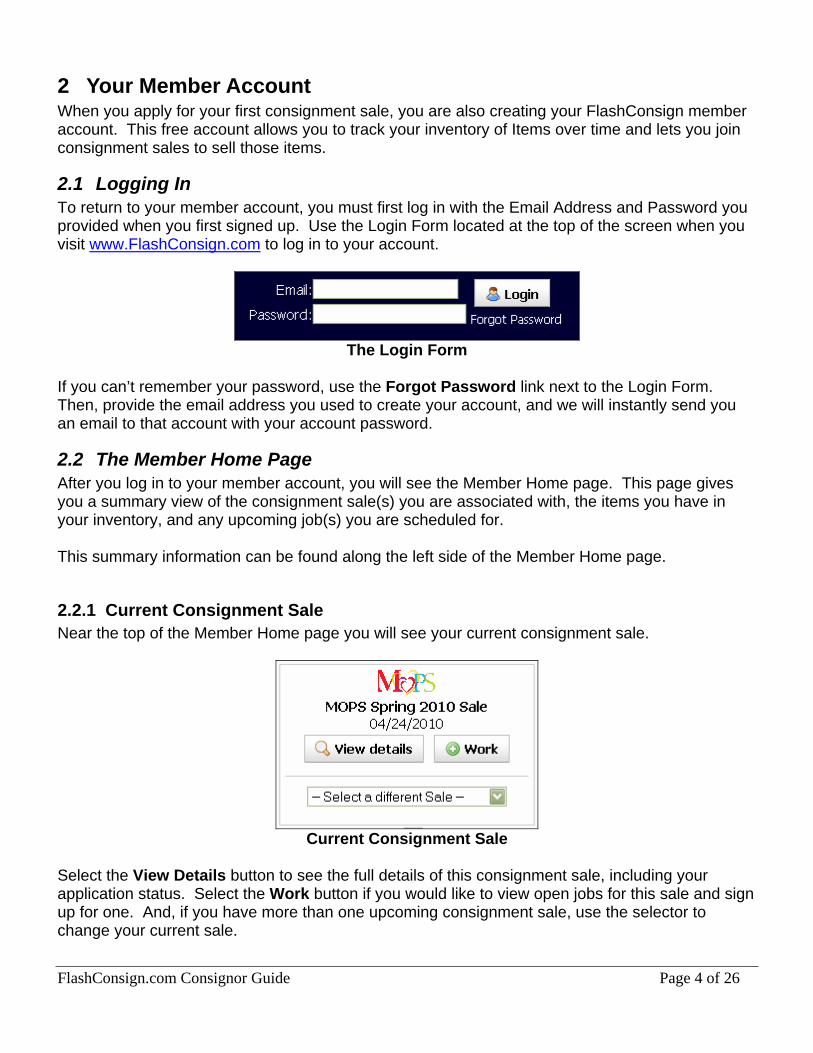
2.1 Logging In To return to your member account, you must first log in with the Email Address and Password you provided when you first signed up. Use the Login Form located at the top of the screen when you visit www.FlashConsign.com to log in to your account.
The Login Form
If you can’t remember your password, use the Forgot Password link next to the Login Form. Then, provide the email address you used to create your account, and we will instantly send you an email to that account with your account password.
2.2 The Member Home Page After you log in to your member account, you will see the Member Home page. This page gives you a summary view of the consignment sale(s) you are associated with, the items you have in your inventory, and any upcoming job(s) you are scheduled for. This summary information can be found along the left side of the Member Home page.
2.2.1 Current Consignment Sale Near the top of the Member Home page you will see your current consignment sale.
Current Consignment Sale
Select the View Details button to see the full details of this consignment sale, including your application status. Select the Work button if you would like to view open jobs for this sale and sign up for one. And, if you have more than one upcoming consignment sale, use the selector to change your current sale.
FlashConsign.com Consignor Guide Page 4 of 26
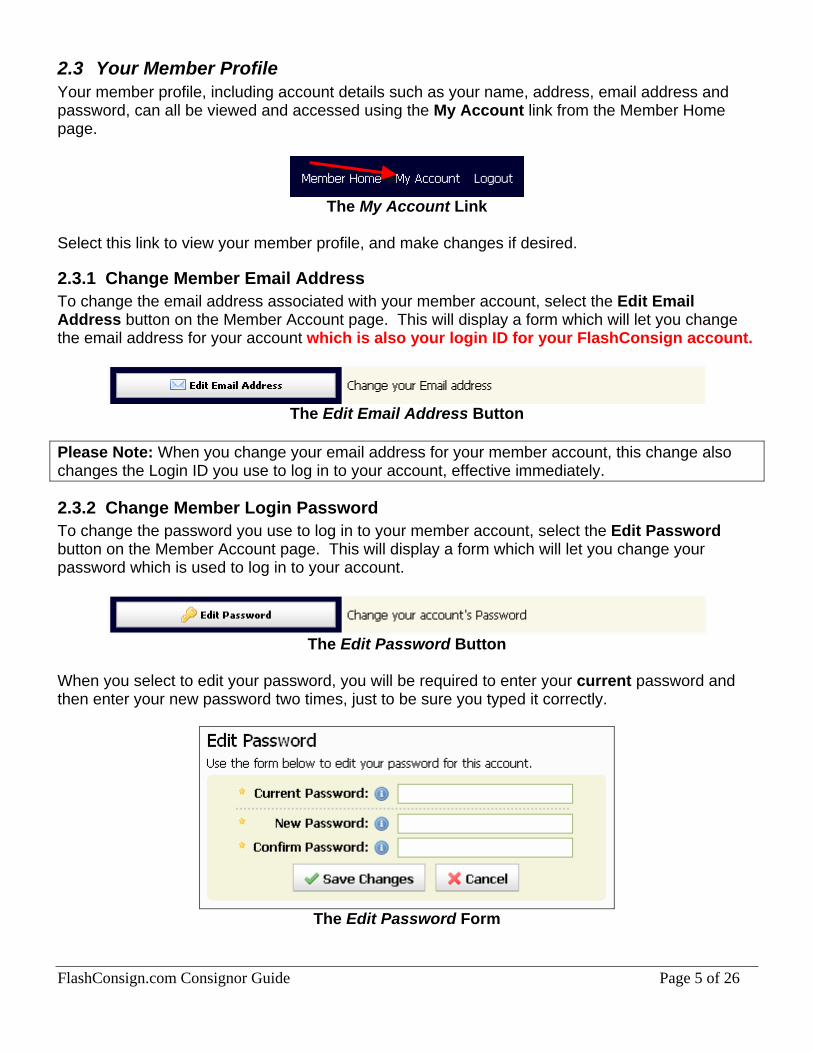
2.3 Your Member Profile Your member profile, including account details such as your name, address, email address and password, can all be viewed and accessed using the My Account link from the Member Home page.
The My Account Link
Select this link to view your member profile, and make changes if desired.
2.3.1 Change Member Email Address To change the email address associated with your member account, select the Edit Email Address button on the Member Account page. This will display a form which will let you change the email address for your account which is also your login ID for your FlashConsign account.
The Edit Email Address Button
Please Note: When you change your email address for your member account, this change also changes the Login ID you use to log in to your account, effective immediately.
2.3.2 Change Member Login Password To change the password you use to log in to your member account, select the Edit Password button on the Member Account page. This will display a form which will let you change your password which is used to log in to your account.
The Edit Password Button
When you select to edit your password, you will be required to enter your current password and then enter your new password two times, just to be sure you typed it correctly.
The Edit Password Form
FlashConsign.com Consignor Guide Page 5 of 26
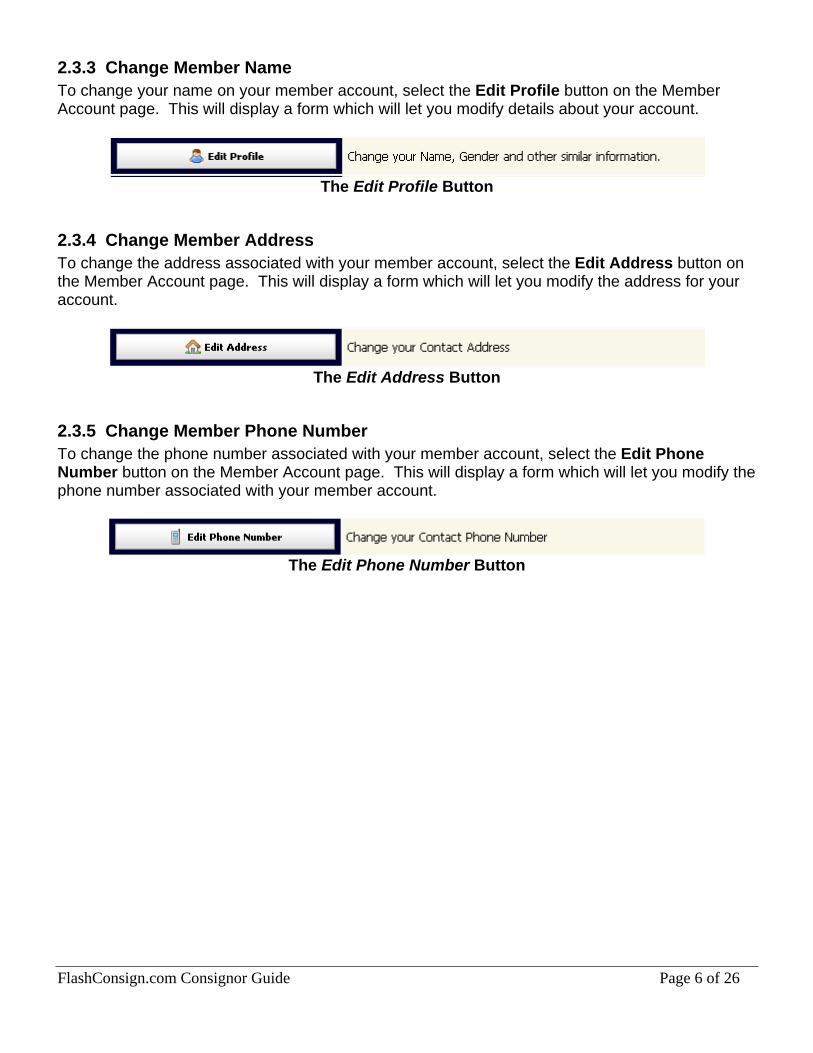
2.3.3 Change Member Name To change your name on your member account, select the Edit Profile button on the Member Account page. This will display a form which will let you modify details about your account.
The Edit Profile Button
2.3.4 Change Member Address To change the address associated with your member account, select the Edit Address button on the Member Account page. This will display a form which will let you modify the address for your account.
The Edit Address Button
2.3.5 Change Member Phone Number To change the phone number associated with your member account, select the Edit Phone Number button on the Member Account page. This will display a form which will let you modify the phone number associated with your member account.
The Edit Phone Number Button
FlashConsign.com Consignor Guide Page 6 of 26
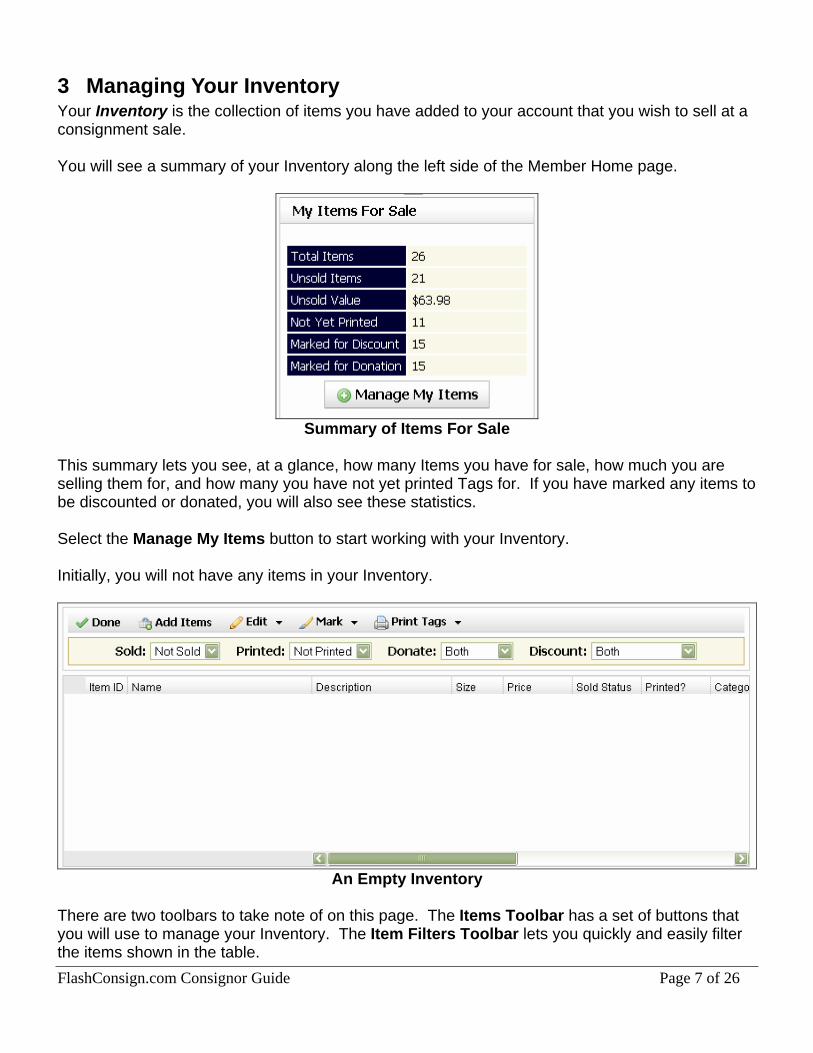
3 Managing Your Inventory Your Inventory is the collection of items you have added to your account that you wish to sell at a consignment sale. You will see a summary of your Inventory along the left side of the Member Home page.
Summary of Items For Sale
This summary lets you see, at a glance, how many Items you have for sale, how much you are selling them for, and how many you have not yet printed Tags for. If you have marked any items to be discounted or donated, you will also see these statistics. Select the Manage My Items button to start working with your Inventory. Initially, you will not have any items in your Inventory.
An Empty Inventory
There are two toolbars to take note of on this page. The Items Toolbar has a set of buttons that you will use to manage your Inventory. The Item Filters Toolbar lets you quickly and easily filter the items shown in the table. FlashConsign.com Consignor Guide Page 7 of 26
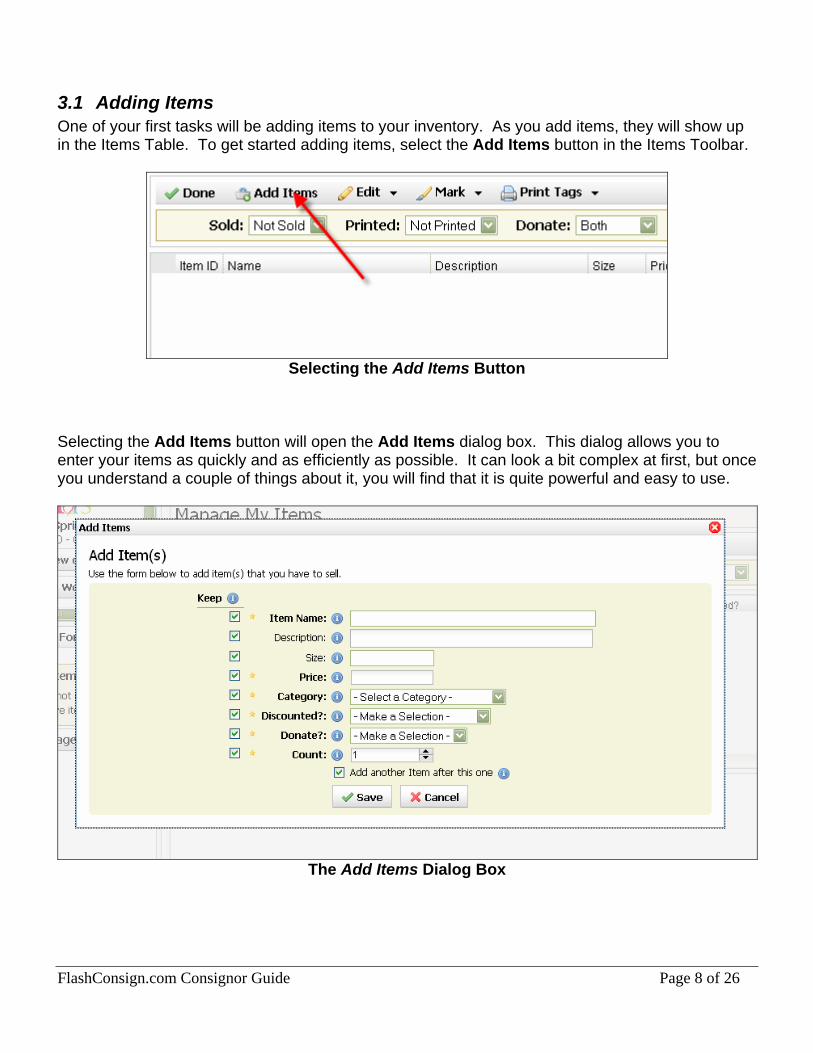
3.1 Adding Items One of your first tasks will be adding items to your inventory. As you add items, they will show up in the Items Table. To get started adding items, select the Add Items button in the Items Toolbar.
Selecting the Add Items Button
Selecting the Add Items button will open the Add Items dialog box. This dialog allows you to enter your items as quickly and as efficiently as possible. It can look a bit complex at first, but once you understand a couple of things about it, you will find that it is quite powerful and easy to use.
The Add Items Dialog Box
FlashConsign.com Consignor Guide Page 8 of 26
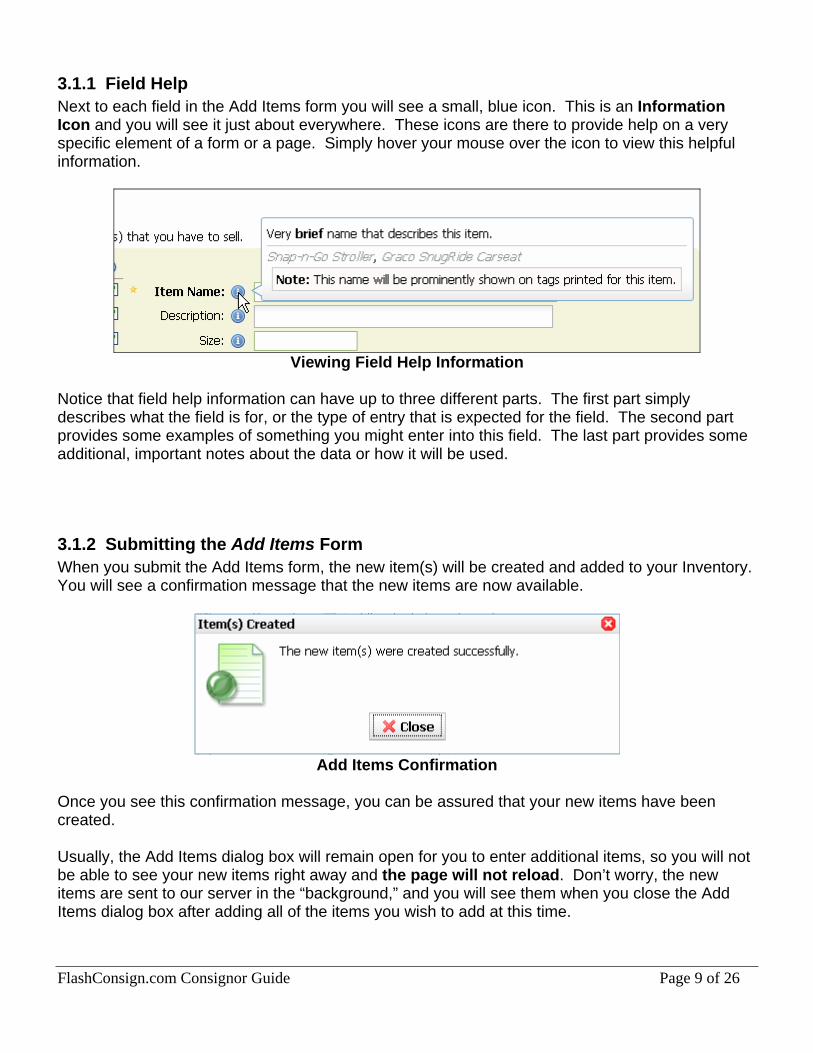
3.1.1 Field Help Next to each field in the Add Items form you will see a small, blue icon. This is an Information Icon and you will see it just about everywhere. These icons are there to provide help on a very specific element of a form or a page. Simply hover your mouse over the icon to view this helpful information.
Viewing Field Help Information
Notice that field help information can have up to three different parts. The first part simply describes what the field is for, or the type of entry that is expected for the field. The second part provides some examples of something you might enter into this field. The last part provides some additional, important notes about the data or how it will be used.
3.1.2 Submitting the Add Items Form When you submit the Add Items form, the new item(s) will be created and added to your Inventory. You will see a confirmation message that the new items are now available.
Add Items Confirmation
Once you see this confirmation message, you can be assured that your new items have been created. Usually, the Add Items dialog box will remain open for you to enter additional items, so you will not be able to see your new items right away and the page will not reload. Don’t worry, the new items are sent to our server in the “background,” and you will see them when you close the Add Items dialog box after adding all of the items you wish to add at this time.
FlashConsign.com Consignor Guide Page 9 of 26
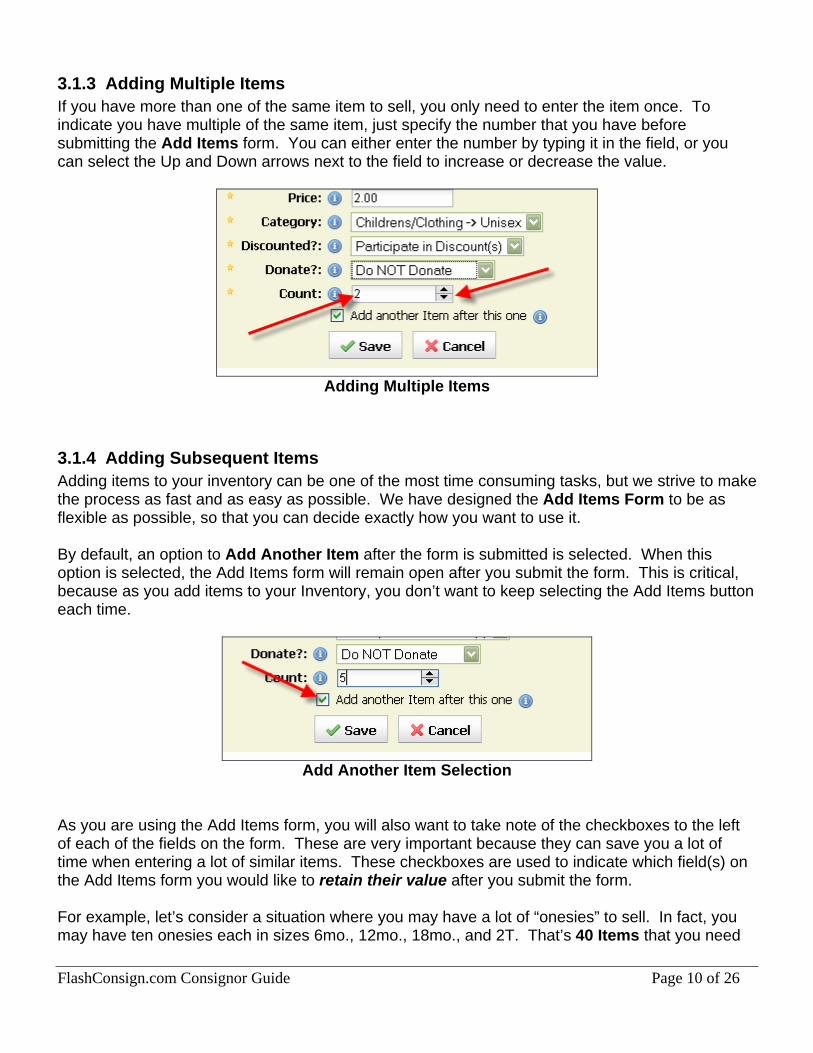
3.1.3 Adding Multiple Items If you have more than one of the same item to sell, you only need to enter the item once. To indicate you have multiple of the same item, just specify the number that you have before submitting the Add Items form. You can either enter the number by typing it in the field, or you can select the Up and Down arrows next to the field to increase or decrease the value.
Adding Multiple Items
3.1.4 Adding Subsequent Items Adding items to your inventory can be one of the most time consuming tasks, but we strive to make the process as fast and as easy as possible. We have designed the Add Items Form to be as flexible as possible, so that you can decide exactly how you want to use it. By default, an option to Add Another Item after the form is submitted is selected. When this option is selected, the Add Items form will remain open after you submit the form. This is critical, because as you add items to your Inventory, you don’t want to keep selecting the Add Items button each time.
Add Another Item Selection
As you are using the Add Items form, you will also want to take note of the checkboxes to the left of each of the fields on the form. These are very important because they can save you a lot of time when entering a lot of similar items. These checkboxes are used to indicate which field(s) on the Add Items form you would like to retain their value after you submit the form. For example, let’s consider a situation where you may have a lot of “onesies” to sell. In fact, you may have ten onesies each in sizes 6mo., 12mo., 18mo., and 2T. That’s 40 Items that you need
FlashConsign.com Consignor Guide Page 10 of 26
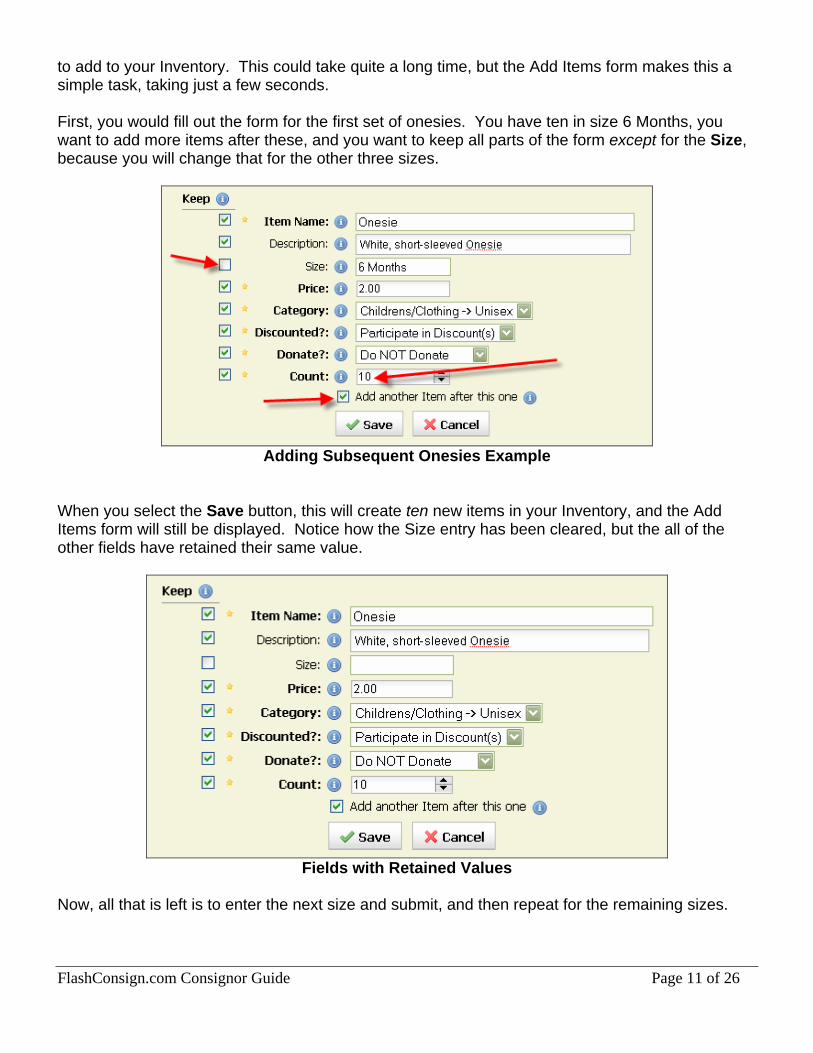
to add to your Inventory. This could take quite a long time, but the Add Items form makes this a simple task, taking just a few seconds. First, you would fill out the form for the first set of onesies. You have ten in size 6 Months, you want to add more items after these, and you want to keep all parts of the form except for the Size, because you will change that for the other three sizes.
Adding Subsequent Onesies Example
When you select the Save button, this will create ten new items in your Inventory, and the Add Items form will still be displayed. Notice how the Size entry has been cleared, but the all of the other fields have retained their same value.
Fields with Retained Values
Now, all that is left is to enter the next size and submit, and then repeat for the remaining sizes.
FlashConsign.com Consignor Guide Page 11 of 26
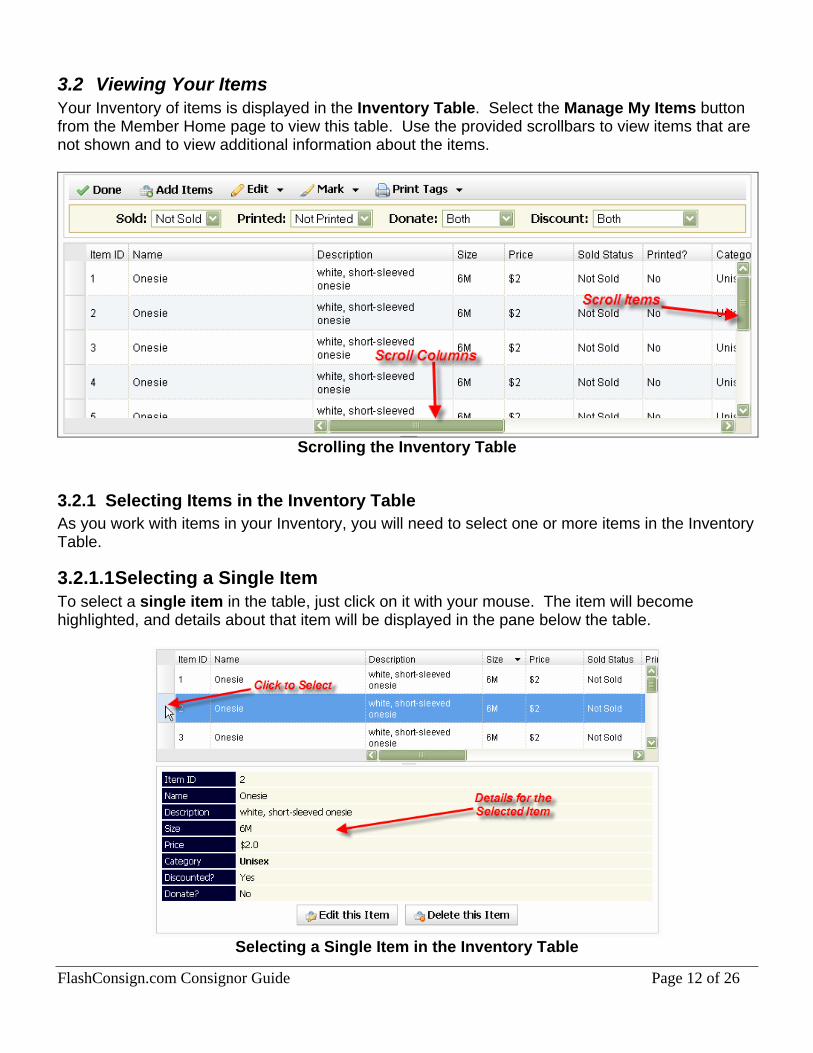
3.2 Viewing Your Items Your Inventory of items is displayed in the Inventory Table. Select the Manage My Items button from the Member Home page to view this table. Use the provided scrollbars to view items that are not shown and to view additional information about the items.
Scrolling the Inventory Table
3.2.1 Selecting Items in the Inventory Table As you work with items in your Inventory, you will need to select one or more items in the Inventory Table.
3.2.1.1 Selecting a Single Item To select a single item in the table, just click on it with your mouse. The item will become highlighted, and details about that item will be displayed in the pane below the table.
Selecting a Single Item in the Inventory Table
FlashConsign.com Consignor Guide Page 12 of 26
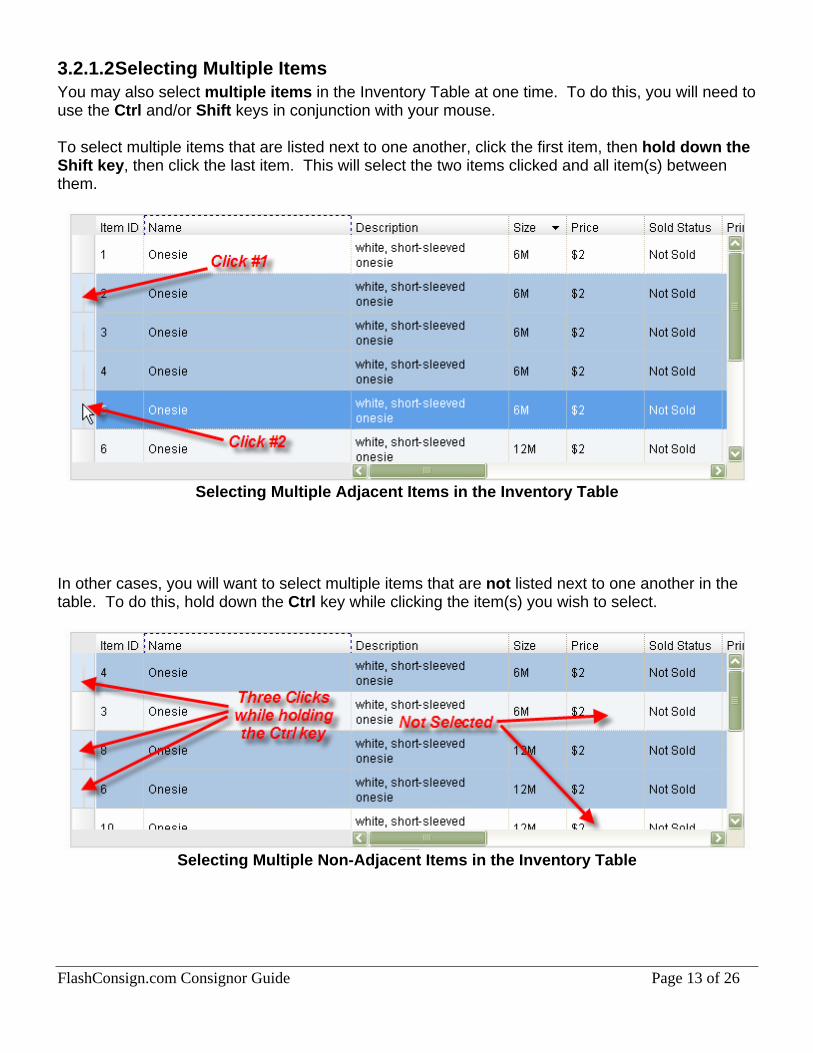
3.2.1.2 Selecting Multiple Items You may also select multiple items in the Inventory Table at one time. To do this, you will need to use the Ctrl and/or Shift keys in conjunction with your mouse. To select multiple items that are listed next to one another, click the first item, then hold down the Shift key, then click the last item. This will select the two items clicked and all item(s) between them.
Selecting Multiple Adjacent Items in the Inventory Table
In other cases, you will want to select multiple items that are not listed next to one another in the table. To do this, hold down the Ctrl key while clicking the item(s) you wish to select.
Selecting Multiple Non-Adjacent Items in the Inventory Table
FlashConsign.com Consignor Guide Page 13 of 26
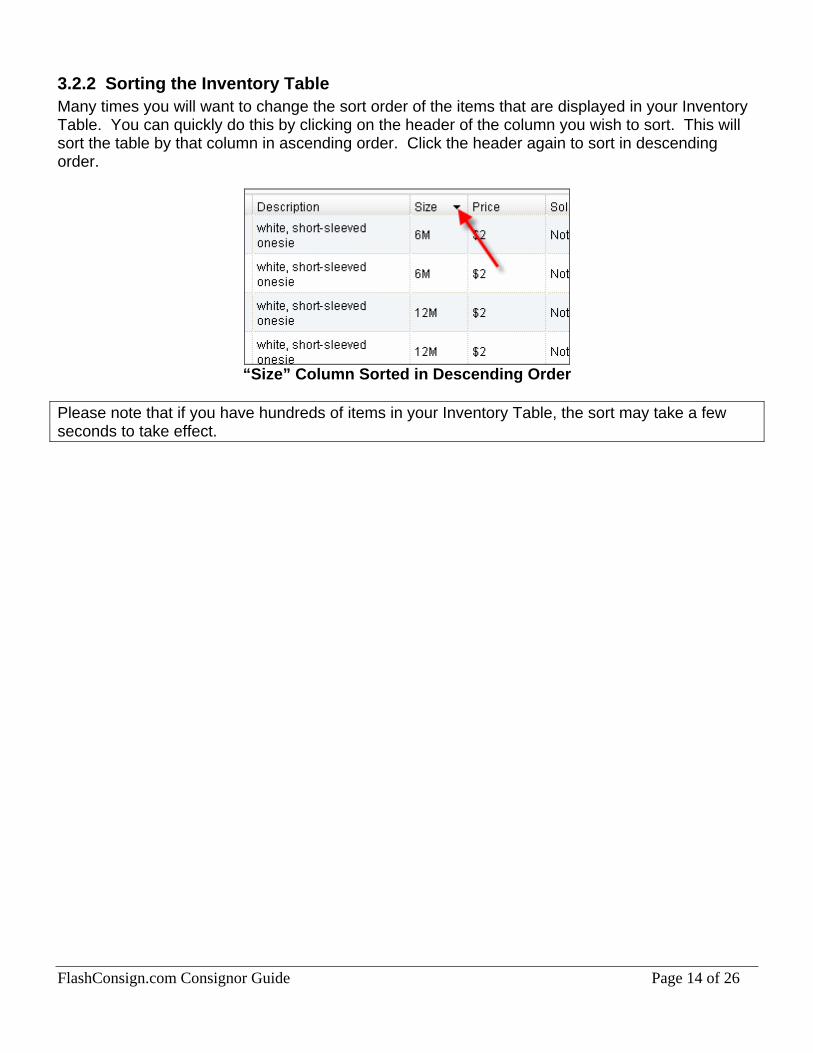
3.2.2 Sorting the Inventory Table Many times you will want to change the sort order of the items that are displayed in your Inventory Table. You can quickly do this by clicking on the header of the column you wish to sort. This will sort the table by that column in ascending order. Click the header again to sort in descending order.
“Size” Column Sorted in Descending Order
Please note that if you have hundreds of items in your Inventory Table, the sort may take a few seconds to take effect.
FlashConsign.com Consignor Guide Page 14 of 26
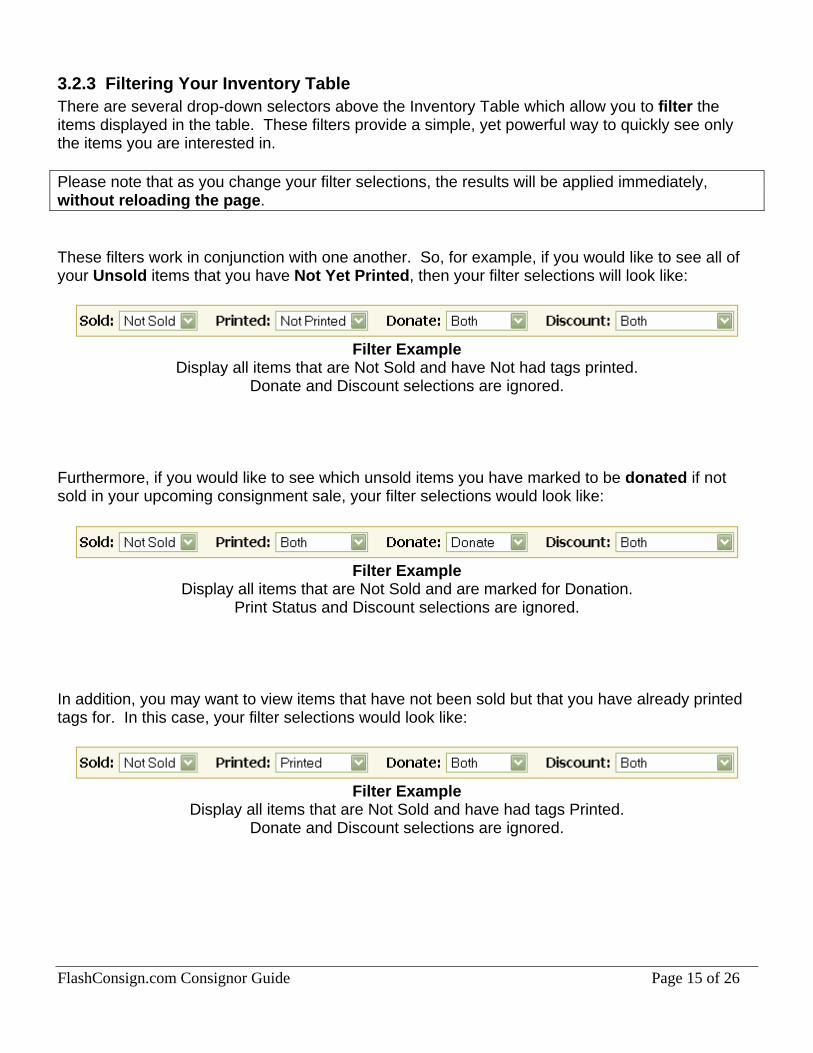
3.2.3 Filtering Your Inventory Table There are several drop-down selectors above the Inventory Table which allow you to filter the items displayed in the table. These filters provide a simple, yet powerful way to quickly see only the items you are interested in. Please note that as you change your filter selections, the results will be applied immediately, without reloading the page. These filters work in conjunction with one another. So, for example, if you would like to see all of your Unsold items that you have Not Yet Printed, then your filter selections will look like:
Filter Example
Display all items that are Not Sold and have Not had tags printed. Donate and Discount selections are ignored.
Furthermore, if you would like to see which unsold items you have marked to be donated if not sold in your upcoming consignment sale, your filter selections would look like:
Filter Example
Display all items that are Not Sold and are marked for Donation. Print Status and Discount selections are ignored.
In addition, you may want to view items that have not been sold but that you have already printed tags for. In this case, your filter selections would look like:
Filter Example
Display all items that are Not Sold and have had tags Printed. Donate and Discount selections are ignored.
FlashConsign.com Consignor Guide Page 15 of 26
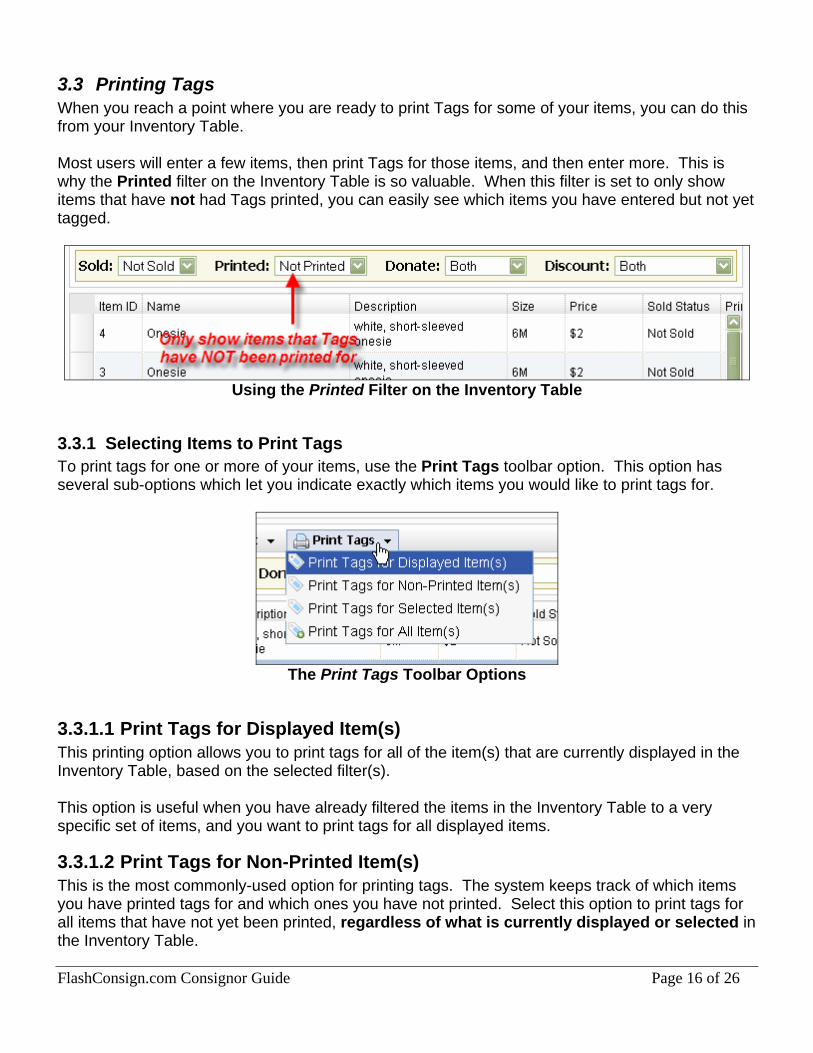
3.3 Printing Tags When you reach a point where you are ready to print Tags for some of your items, you can do this from your Inventory Table. Most users will enter a few items, then print Tags for those items, and then enter more. This is why the Printed filter on the Inventory Table is so valuable. When this filter is set to only show items that have not had Tags printed, you can easily see which items you have entered but not yet tagged.
Using the Printed Filter on the Inventory Table
3.3.1 Selecting Items to Print Tags To print tags for one or more of your items, use the Print Tags toolbar option. This option has several sub-options which let you indicate exactly which items you would like to print tags for.
The Print Tags Toolbar Options
3.3.1.1 Print Tags for Displayed Item(s) This printing option allows you to print tags for all of the item(s) that are currently displayed in the Inventory Table, based on the selected filter(s). This option is useful when you have already filtered the items in the Inventory Table to a very specific set of items, and you want to print tags for all displayed items.
3.3.1.2 Print Tags for Non-Printed Item(s) This is the most commonly-used option for printing tags. The system keeps track of which items you have printed tags for and which ones you have not printed. Select this option to print tags for all items that have not yet been printed, regardless of what is currently displayed or selected in the Inventory Table.
FlashConsign.com Consignor Guide Page 16 of 26
3.3.1.3 Print Tags for Selected Item(s) If there are one or more items that you would like to selectively print tags for, this option will let you do just that. Simple select one or more item(s) in the Inventory Table and then select this option. Only those item(s) selected will be printed.
3.3.1.4 Print Tags for All Item(s) This is the least-used tag-printing option, simply because it is too broad in the scope of items included. This option will print tags for All Items in your Inventory. This option can be useful if you have printed all of your tags and then lost them and you need to re-print them all.
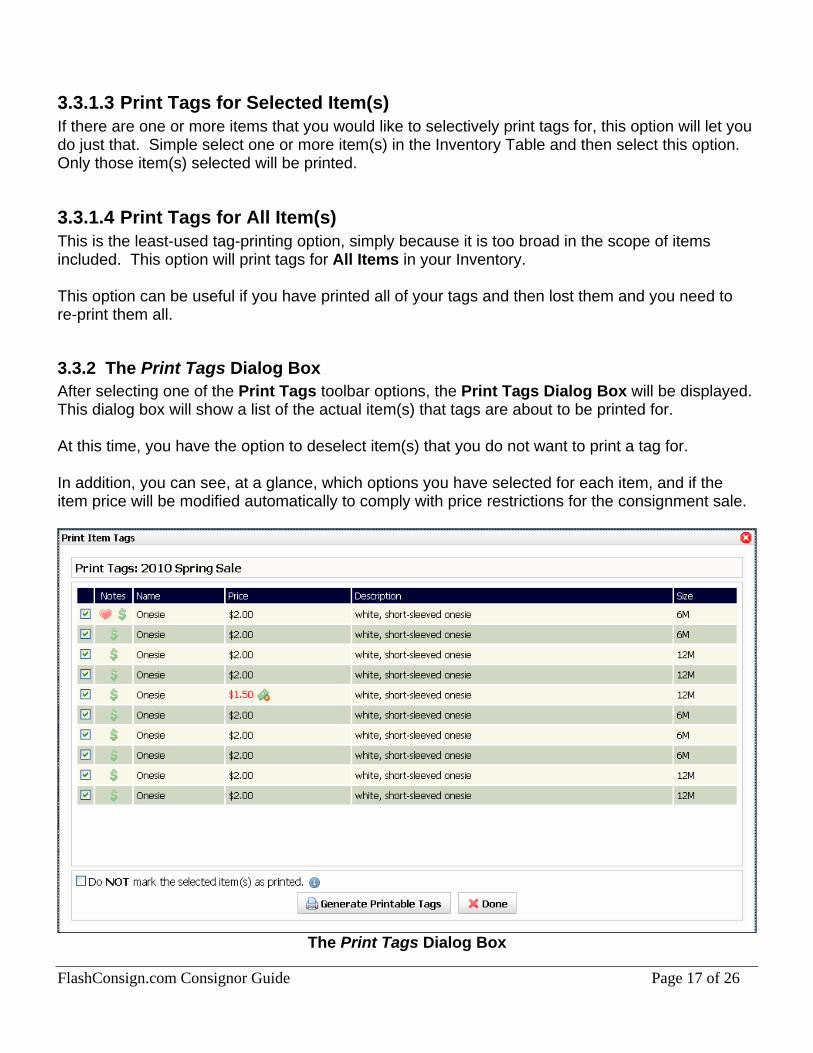
3.3.2 The Print Tags Dialog Box After selecting one of the Print Tags toolbar options, the Print Tags Dialog Box will be displayed. This dialog box will show a list of the actual item(s) that tags are about to be printed for. At this time, you have the option to deselect item(s) that you do not want to print a tag for. In addition, you can see, at a glance, which options you have selected for each item, and if the item price will be modified automatically to comply with price restrictions for the consignment sale.
The Print Tags Dialog Box
FlashConsign.com Consignor Guide Page 17 of 26
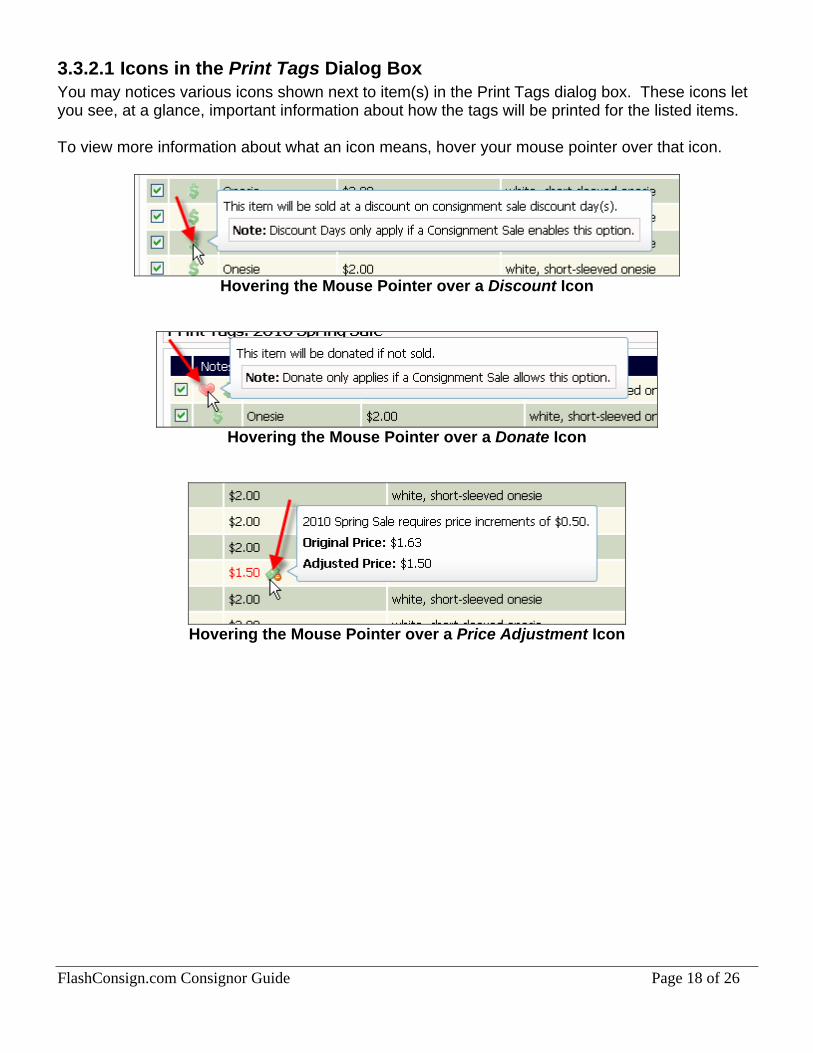
3.3.2.1 Icons in the Print Tags Dialog Box You may notices various icons shown next to item(s) in the Print Tags dialog box. These icons let you see, at a glance, important information about how the tags will be printed for the listed items. To view more information about what an icon means, hover your mouse pointer over that icon.
Hovering the Mouse Pointer over a Discount Icon
Hovering the Mouse Pointer over a Donate Icon
Hovering the Mouse Pointer over a Price Adjustment Icon
FlashConsign.com Consignor Guide Page 18 of 26
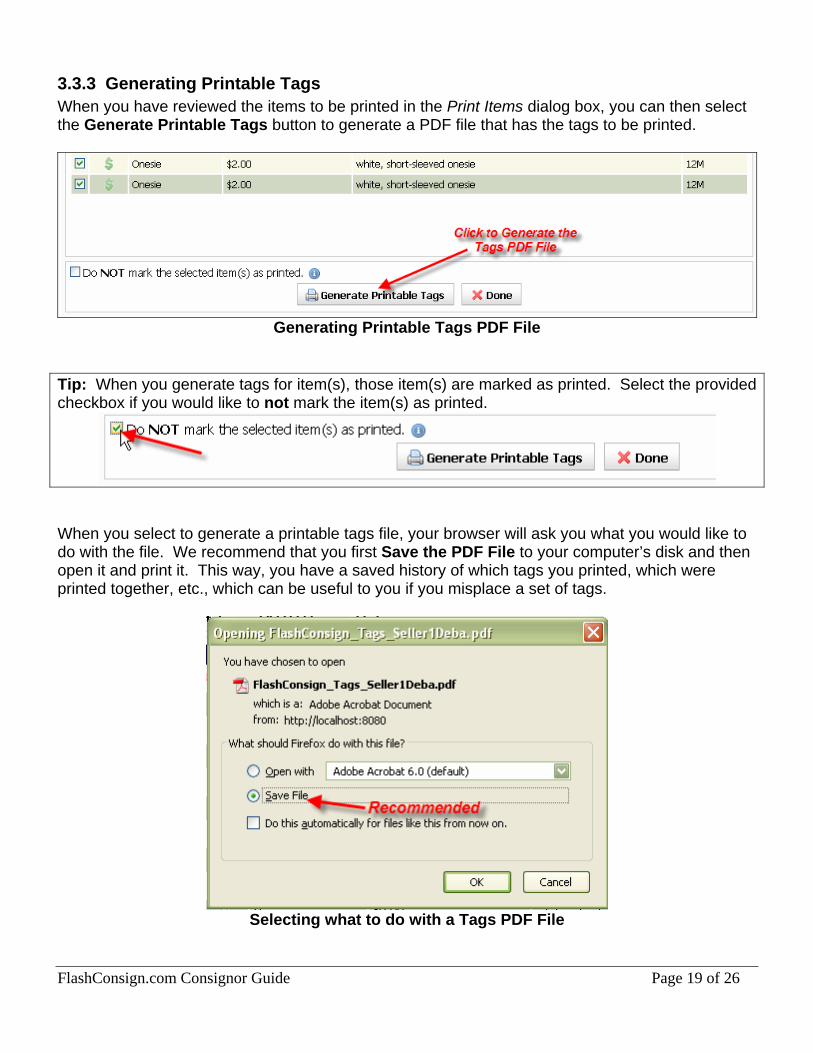
3.3.3 Generating Printable Tags When you have reviewed the items to be printed in the Print Items dialog box, you can then select the Generate Printable Tags button to generate a PDF file that has the tags to be printed.
Generating Printable Tags PDF File
Tip: When you generate tags for item(s), those item(s) are marked as printed. Select the provided checkbox if you would like to not mark the item(s) as printed.
When you select to generate a printable tags file, your browser will ask you what you would like to do with the file. We recommend that you first Save the PDF File to your computer’s disk and then open it and print it. This way, you have a saved history of which tags you printed, which were printed together, etc., which can be useful to you if you misplace a set of tags.
Selecting what to do with a Tags PDF File
FlashConsign.com Consignor Guide Page 19 of 26
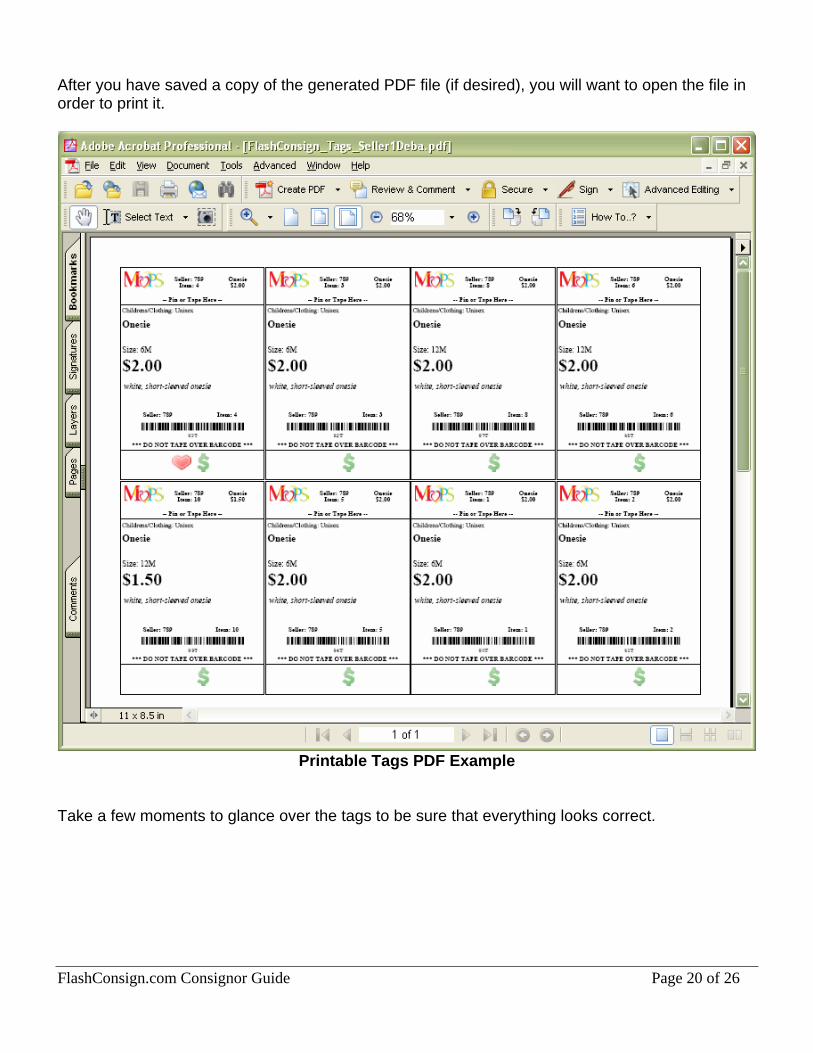
After you have saved a copy of the generated PDF file (if desired), you will want to open the file in order to print it.
Printable Tags PDF Example
Take a few moments to glance over the tags to be sure that everything looks correct.
FlashConsign.com Consignor Guide Page 20 of 26
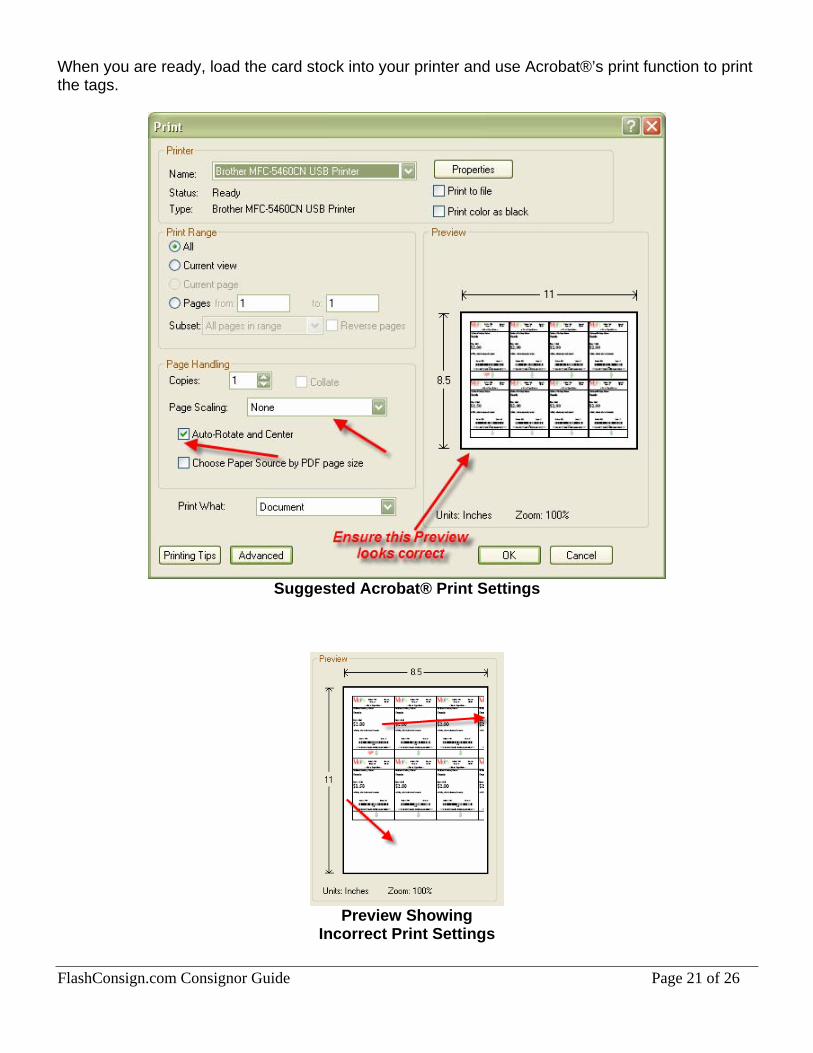
When you are ready, load the card stock into your printer and use Acrobat®’s print function to print the tags.
Suggested Acrobat® Print Settings
Preview Showing
Incorrect Print Settings
FlashConsign.com Consignor Guide Page 21 of 26
4 Working at a Consignment Sale If the consignment sale you would like to work at manages jobs using FlashConsign, you can find and sign up for one or more jobs.
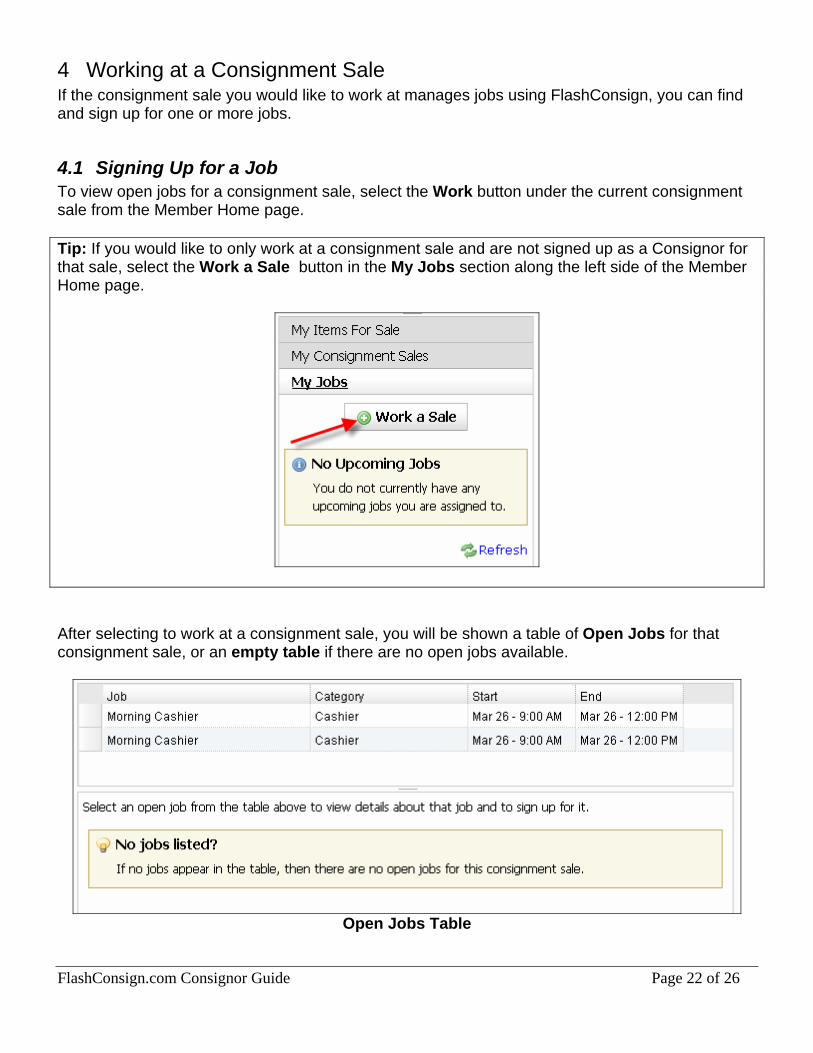
4.1 Signing Up for a Job To view open jobs for a consignment sale, select the Work button under the current consignment sale from the Member Home page. Tip: If you would like to only work at a consignment sale and are not signed up as a Consignor for that sale, select the Work a Sale button in the My Jobs section along the left side of the Member Home page.
After selecting to work at a consignment sale, you will be shown a table of Open Jobs for that consignment sale, or an empty table if there are no open jobs available.
Open Jobs Table
FlashConsign.com Consignor Guide Page 22 of 26
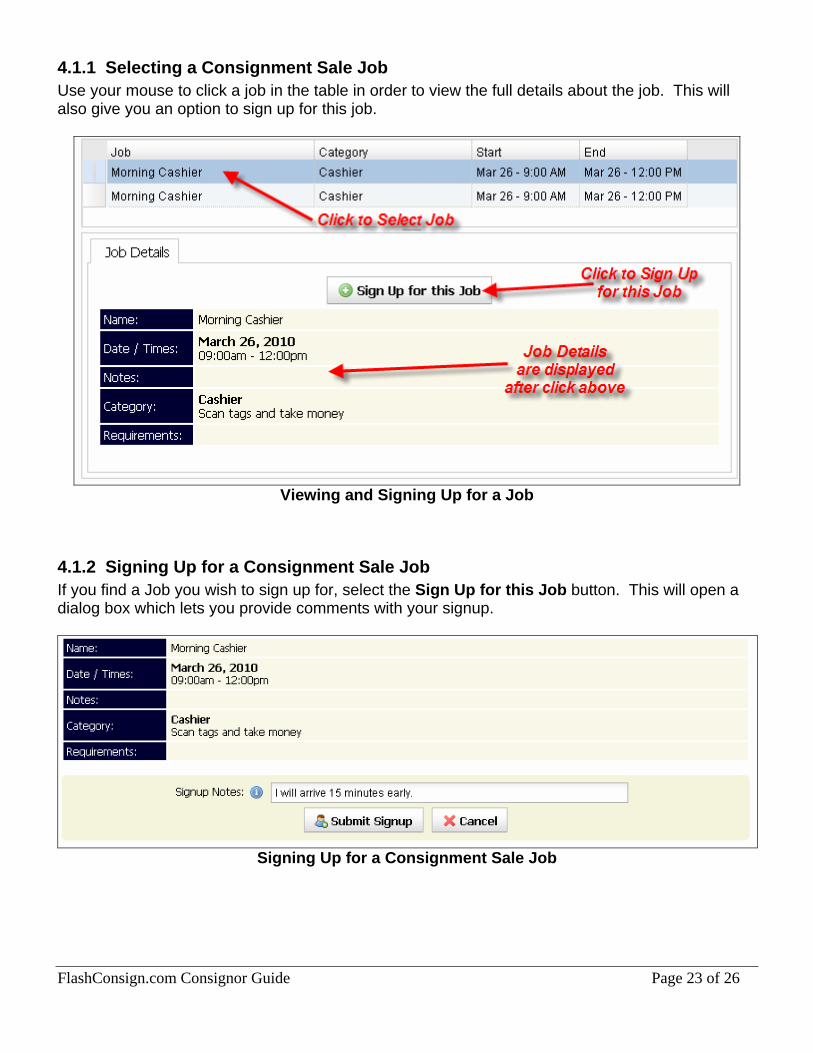
4.1.1 Selecting a Consignment Sale Job Use your mouse to click a job in the table in order to view the full details about the job. This will also give you an option to sign up for this job.
Viewing and Signing Up for a Job
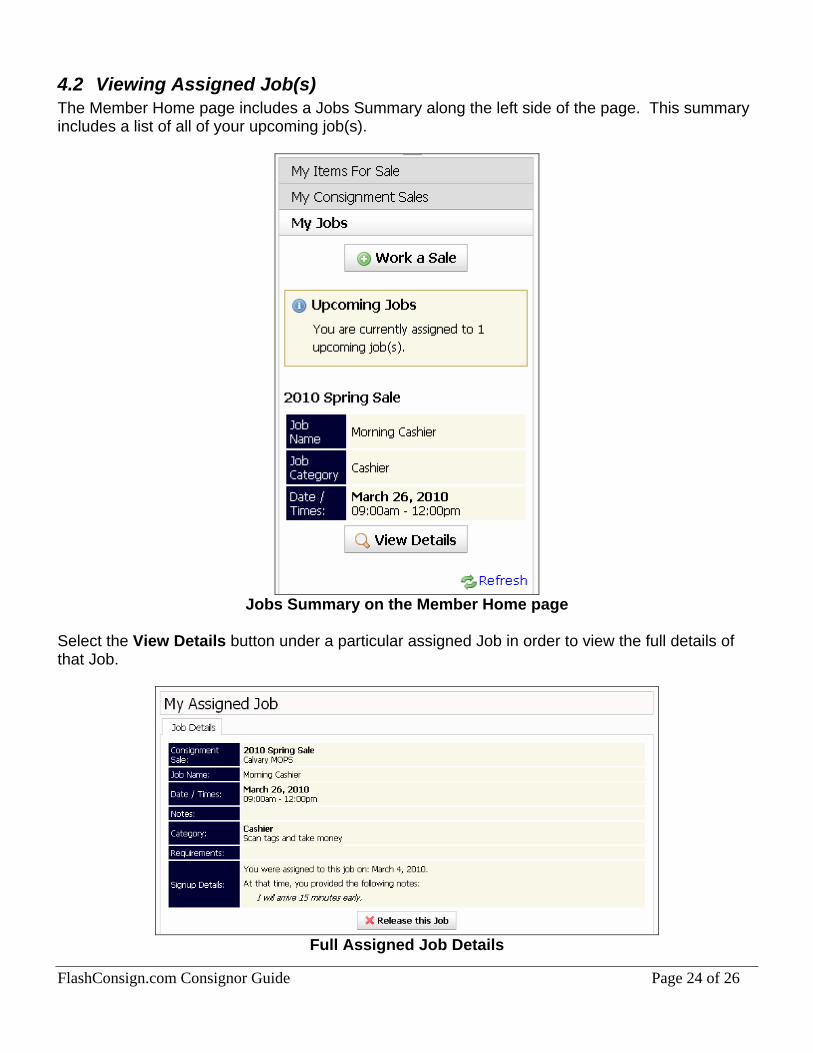
4.1.2 Signing Up for a Consignment Sale Job If you find a Job you wish to sign up for, select the Sign Up for this Job button. This will open a dialog box which lets you provide comments with your signup.
Signing Up for a Consignment Sale Job
FlashConsign.com Consignor Guide Page 23 of 26
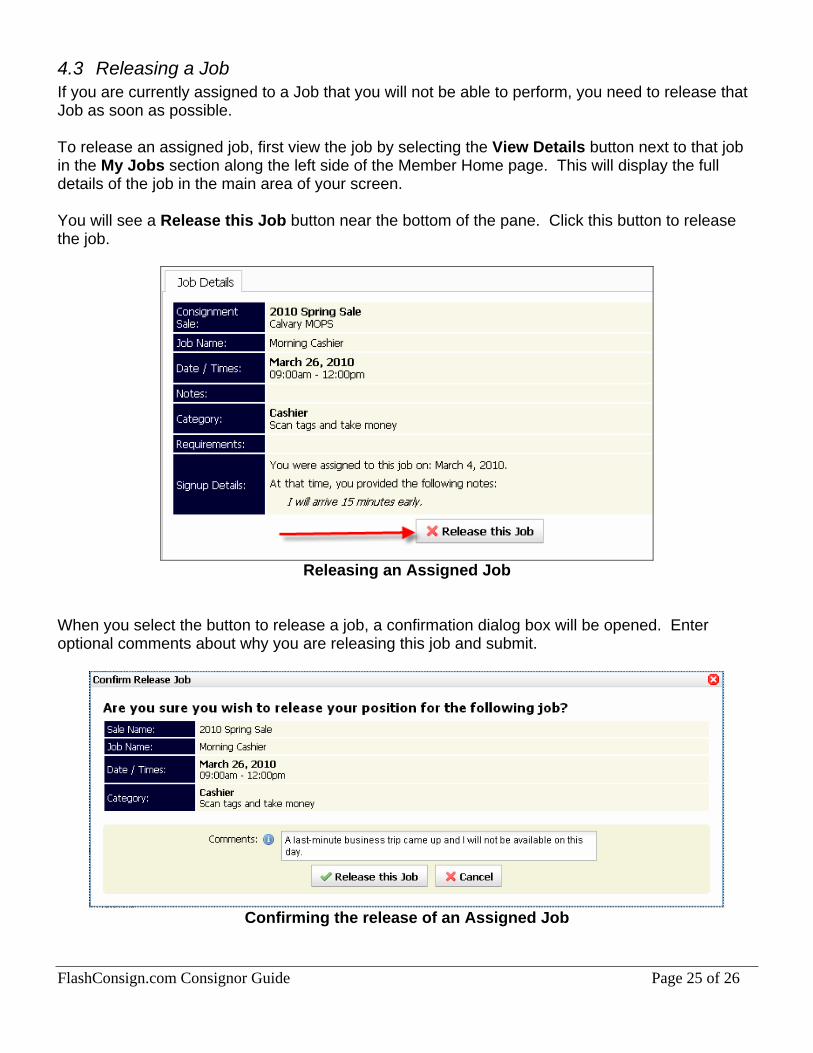
4.2 Viewing Assigned Job(s) The Member Home page includes a Jobs Summary along the left side of the page. This summary includes a list of all of your upcoming job(s).
Jobs Summary on the Member Home page
Select the View Details button under a particular assigned Job in order to view the full details of that Job.
Full Assigned Job Details
FlashConsign.com Consignor Guide Page 24 of 26
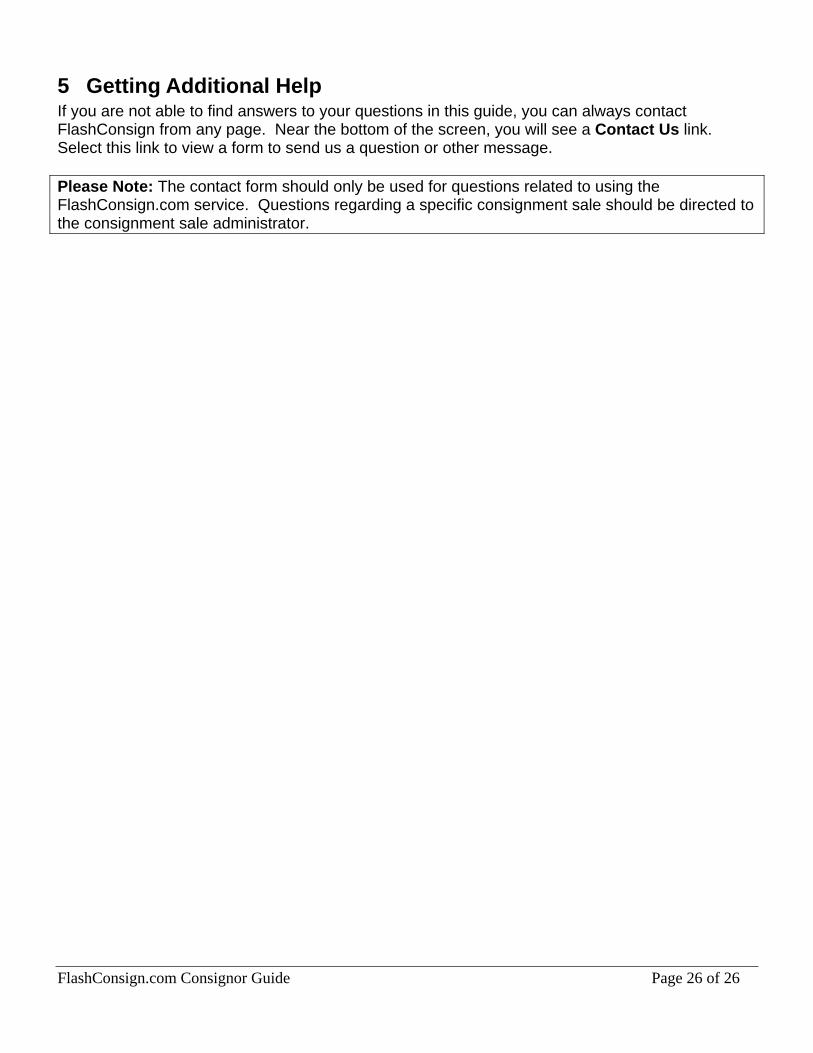
4.3 Releasing a Job If you are currently assigned to a Job that you will not be able to perform, you need to release that Job as soon as possible. To release an assigned job, first view the job by selecting the View Details button next to that job in the My Jobs section along the left side of the Member Home page. This will display the full details of the job in the main area of your screen. You will see a Release this Job button near the bottom of the pane. Click this button to release the job.
Releasing an Assigned Job
When you select the button to release a job, a confirmation dialog box will be opened. Enter optional comments about why you are releasing this job and submit.
Confirming the release of an Assigned Job
FlashConsign.com Consignor Guide Page 25 of 26
FlashConsign.com Consignor Guide Page 26 of 26
5 Getting Additional Help If you are not able to find answers to your questions in this guide, you can always contact FlashConsign from any page. Near the bottom of the screen, you will see a Contact Us link. Select this link to view a form to send us a question or other message. Please Note: The contact form should only be used for questions related to using the FlashConsign.com service. Questions regarding a specific consignment sale should be directed to the consignment sale administrator.