flames in particle flow - clint diclementitutorials.render-test.com/pdfs/flames in pflow.pdf ·...
TRANSCRIPT
Flames in Particle Flow
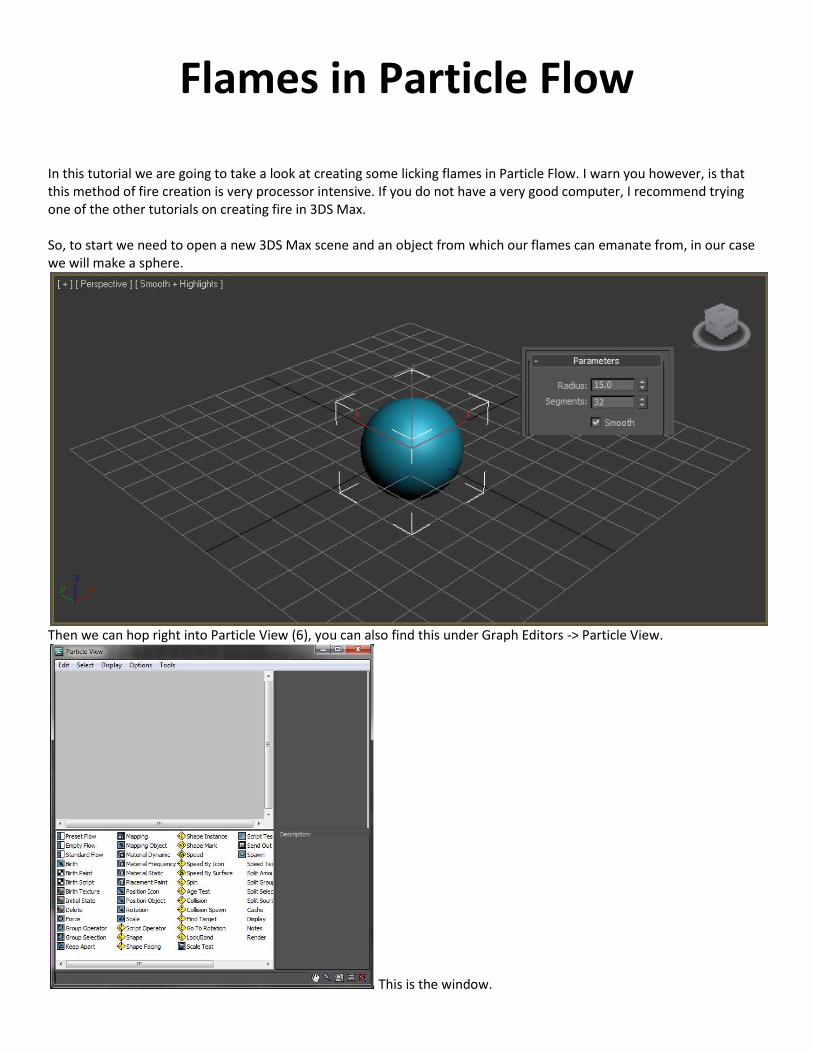
In this tutorial we are going to take a look at creating some licking flames in Particle Flow. I warn you however, is that this method of fire creation is very processor intensive. If you do not have a very good computer, I recommend trying one of the other tutorials on creating fire in 3DS Max. So, to start we need to open a new 3DS Max scene and an object from which our flames can emanate from, in our case we will make a sphere.
Then we can hop right into Particle View (6), you can also find this under Graph Editors -> Particle View.
This is the window.
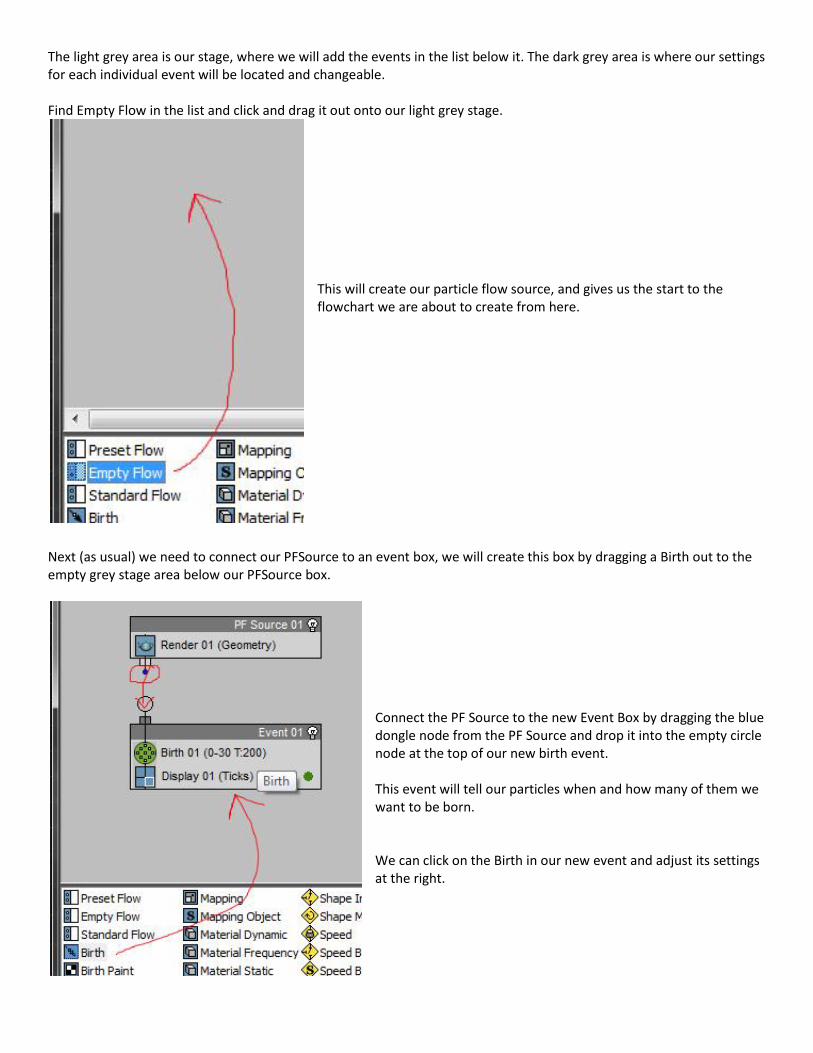
The light grey area is our stage, where we will add the events in the list below it. The dark grey area is where our settings for each individual event will be located and changeable. Find Empty Flow in the list and click and drag it out onto our light grey stage.
This will create our particle flow source, and gives us the start to the flowchart we are about to create from here.
Next (as usual) we need to connect our PFSource to an event box, we will create this box by dragging a Birth out to the empty grey stage area below our PFSource box.
Connect the PF Source to the new Event Box by dragging the blue dongle node from the PF Source and drop it into the empty circle node at the top of our new birth event. This event will tell our particles when and how many of them we want to be born. We can click on the Birth in our new event and adjust its settings at the right.

I have set the start and stop times at 0 so that all our particles are present from the very first frame of the animation. If you want the fire to start up as part of your imagination then changes these as to when you want them to start (Emit Start) and when you want all particles shown (Emit Stop). I have started myself out with 90 initial particles, this may not sound like many, but we are going to be spawning trails more from these initial particles.
Next we need to tell the particles where they are going to be born, we are going to light our sphere on fire, so we will drag a Position Object from the list and drop it below the Birth in our Event01 box. A blue line like below lets you know you are putting the next event below or inbetween current existing events, if the line shows red you are about to replace something, make sure it shows blue just below the Birth before you let go of the mouse click, like this:
This will be how we are going to add most of our new events to the particle system. Select the Position Object you just added, and adjust its settings to the right. Click on the By List button to add our Sphere to the Emitter Objects list.
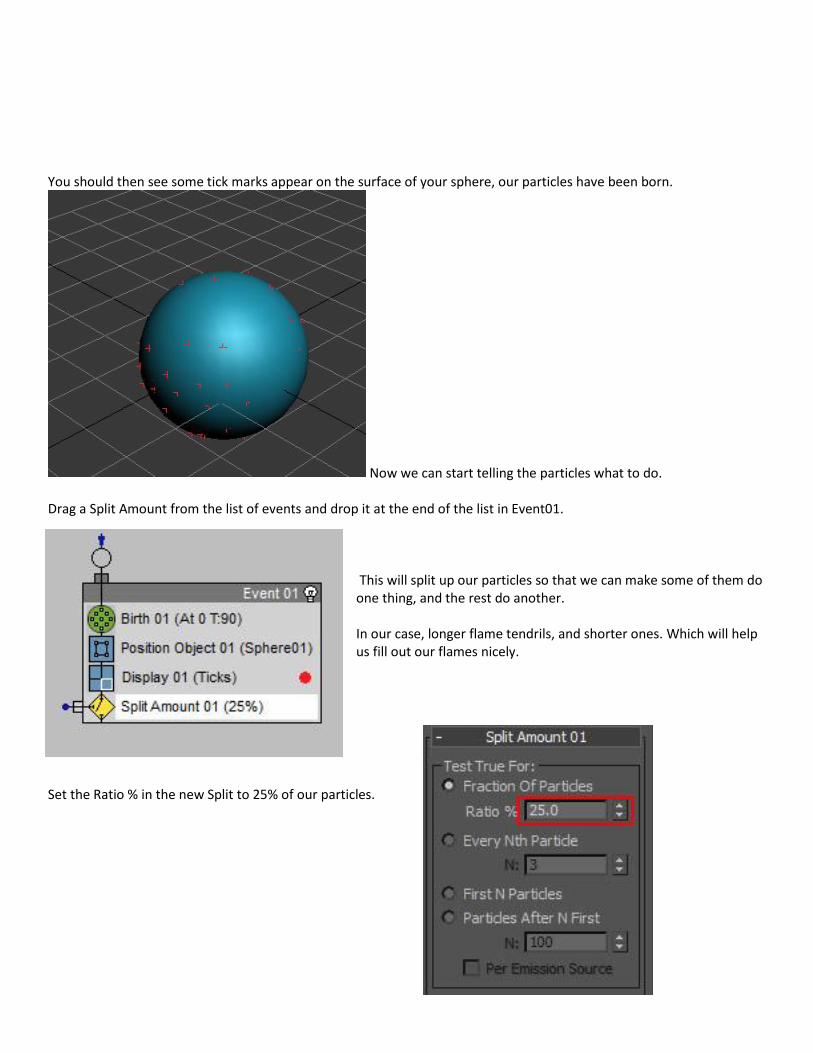
You should then see some tick marks appear on the surface of your sphere, our particles have been born.
Now we can start telling the particles what to do. Drag a Split Amount from the list of events and drop it at the end of the list in Event01.
This will split up our particles so that we can make some of them do one thing, and the rest do another. In our case, longer flame tendrils, and shorter ones. Which will help us fill out our flames nicely.
Set the Ratio % in the new Split to 25% of our particles.
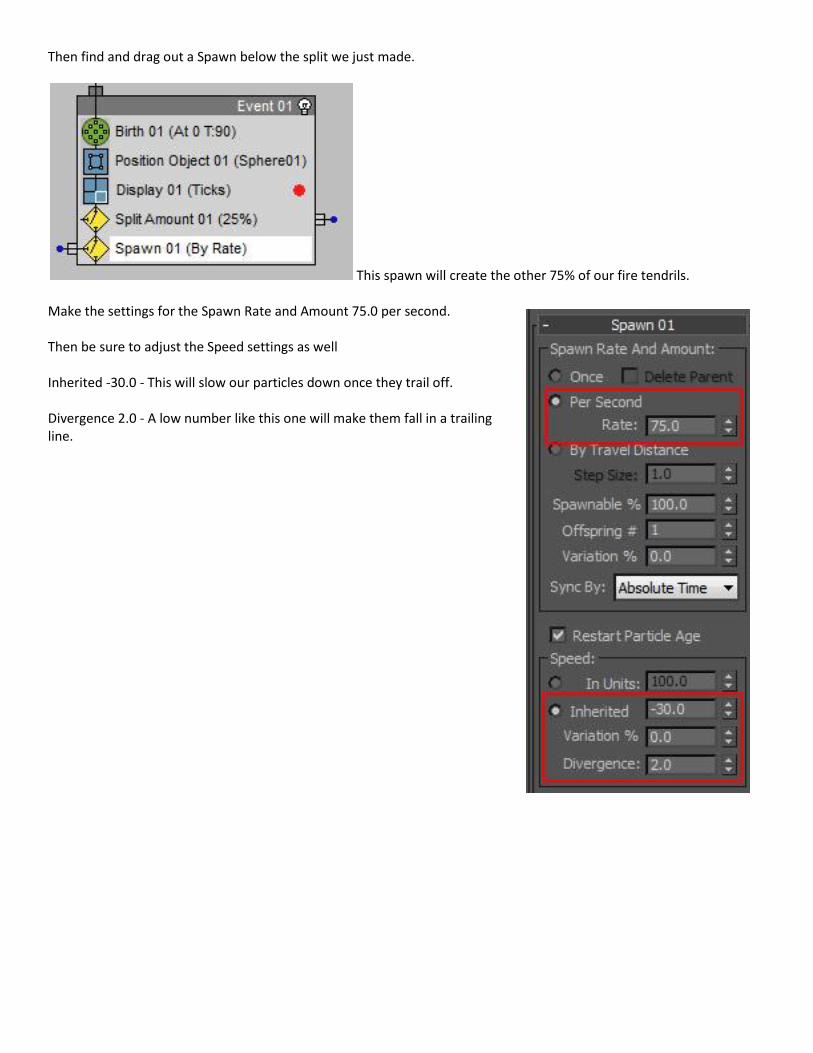
Then find and drag out a Spawn below the split we just made.
This spawn will create the other 75% of our fire tendrils. Make the settings for the Spawn Rate and Amount 75.0 per second. Then be sure to adjust the Speed settings as well Inherited -30.0 - This will slow our particles down once they trail off. Divergence 2.0 - A low number like this one will make them fall in a trailing line.
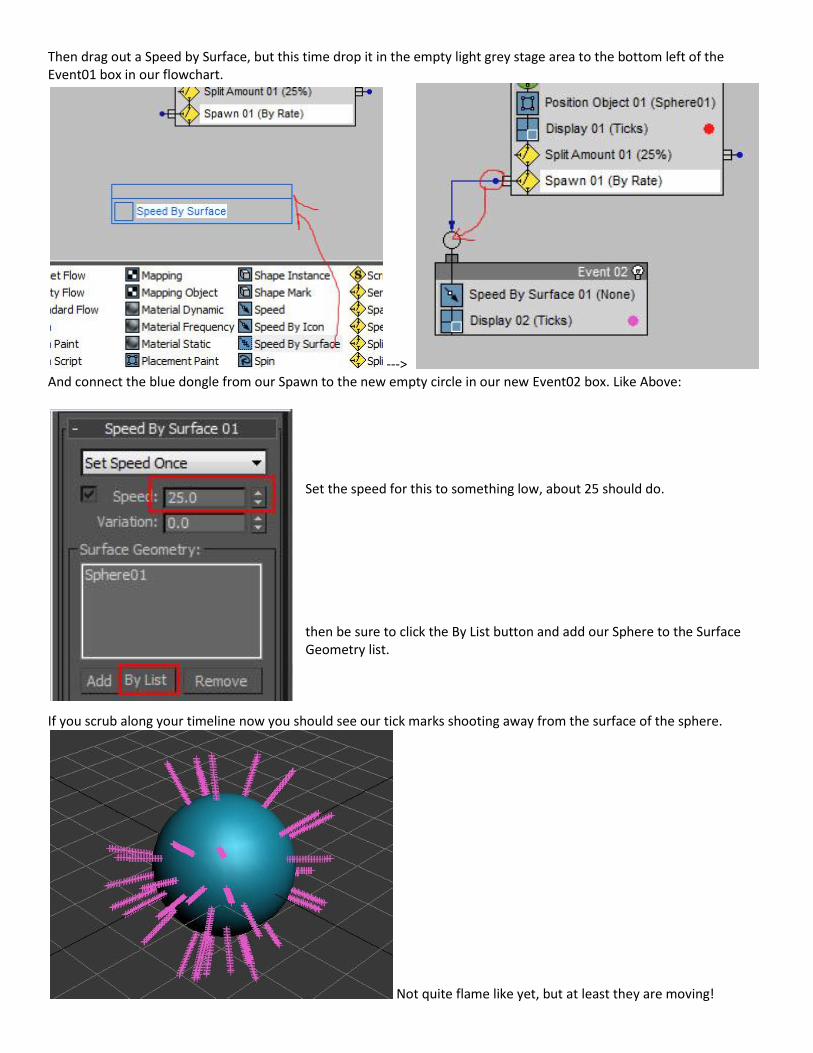
Then drag out a Speed by Surface, but this time drop it in the empty light grey stage area to the bottom left of the Event01 box in our flowchart.
---> And connect the blue dongle from our Spawn to the new empty circle in our new Event02 box. Like Above:
Set the speed for this to something low, about 25 should do. then be sure to click the By List button and add our Sphere to the Surface Geometry list.
If you scrub along your timeline now you should see our tick marks shooting away from the surface of the sphere.
Not quite flame like yet, but at least they are moving!
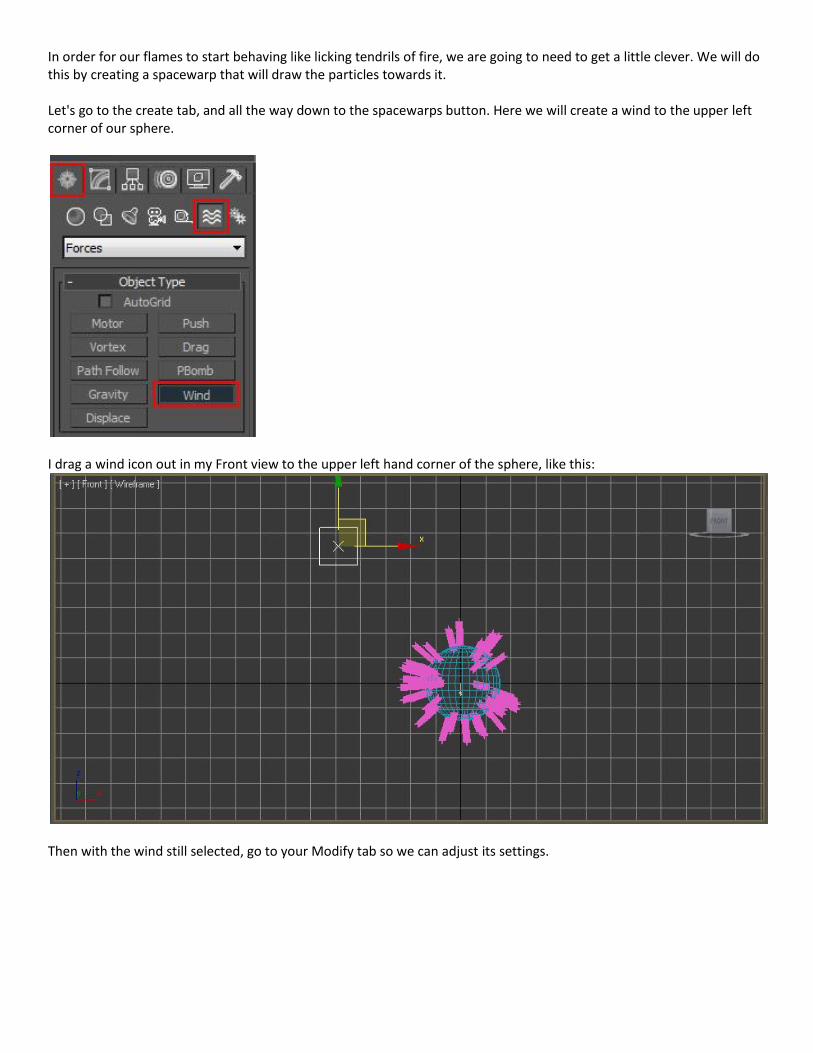
In order for our flames to start behaving like licking tendrils of fire, we are going to need to get a little clever. We will do this by creating a spacewarp that will draw the particles towards it. Let's go to the create tab, and all the way down to the spacewarps button. Here we will create a wind to the upper left corner of our sphere.
I drag a wind icon out in my Front view to the upper left hand corner of the sphere, like this:
Then with the wind still selected, go to your Modify tab so we can adjust its settings.
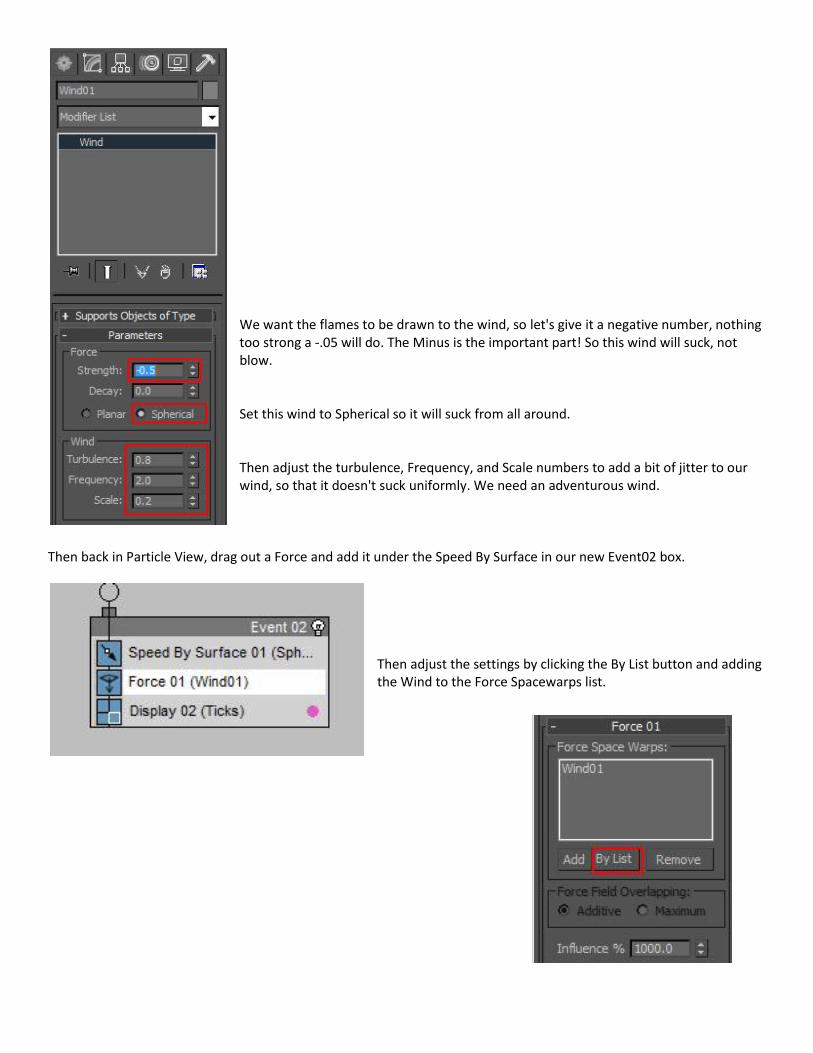
We want the flames to be drawn to the wind, so let's give it a negative number, nothing too strong a -.05 will do. The Minus is the important part! So this wind will suck, not blow. Set this wind to Spherical so it will suck from all around. Then adjust the turbulence, Frequency, and Scale numbers to add a bit of jitter to our wind, so that it doesn't suck uniformly. We need an adventurous wind.
Then back in Particle View, drag out a Force and add it under the Speed By Surface in our new Event02 box.
Then adjust the settings by clicking the By List button and adding the Wind to the Force Spacewarps list.

Your tick marks in the perspective view should immediately change direction and move towards your wind. Be careful as we have not added anything to tame the particles just yet, and scrolling too far might crash your system.
It is looking much better now though! Let's get to taming those particles a bit, find and add a Delete event to the list in Event02.
---> Set the Delete to work By Particle Age, and give them a life and variation that is roughly small, I made mine 8 for both. Like above: Now your tick marks should die off shortly after reaching the wind, instead of going wild and crashing your computer. Next we will give the particles a shape, Find and drag Shape from the list and add it to the bottom of Event02.
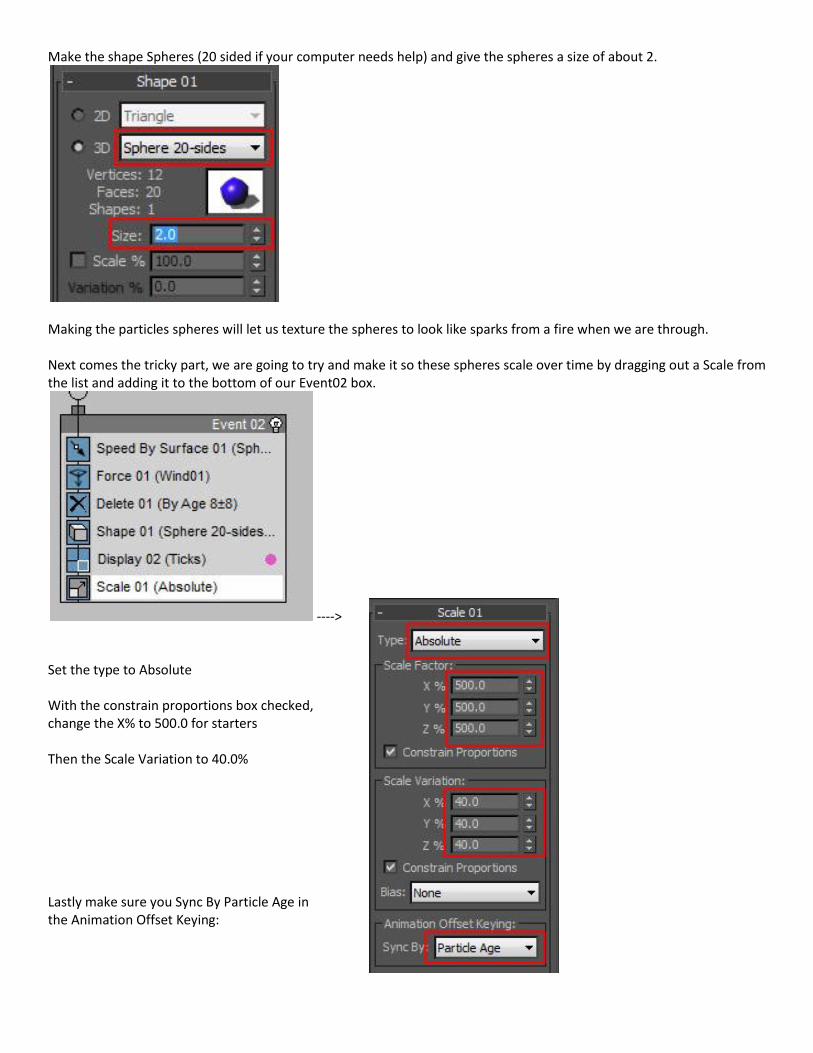
Make the shape Spheres (20 sided if your computer needs help) and give the spheres a size of about 2.
Making the particles spheres will let us texture the spheres to look like sparks from a fire when we are through. Next comes the tricky part, we are going to try and make it so these spheres scale over time by dragging out a Scale from the list and adding it to the bottom of our Event02 box.
----> Set the type to Absolute With the constrain proportions box checked, change the X% to 500.0 for starters Then the Scale Variation to 40.0% Lastly make sure you Sync By Particle Age in the Animation Offset Keying:

Now we are going to animate these settings. Turn on your Auto Key below your timeline. Your window should become red trimmed letting you know you are in animation mode.
Move your scrubber to keyframe number 7 or so, and then change the scale factor% number in Particle View.
A red bracket should surround the scroll keys, letting you know that this setting has been animated. In the first 7 frames of our particles life they will go from the initial 500 scale, to 350. Now move your timeline down to keyframe 15 or so and make another adjustment, down to 100.
---> Now move all the way to the end of your animation. (Feel free to give yourself some extra keyframes, I have given myself 200) At frame 200, I will change the scale one last time, to about 200.
--->

Now turn Autokey off before going any further! This will help our tendrils to change their shape a bit more, growing and shrinking volumetrically by the age of the particles. We are now done with the outer longer tendrils of fire, let's move back up the list to our first Event01, notice that we have a blue dongle from the Split Amount that is not attached to anything. We will create that next event now. Drag a Spawn from the list and drop it in the empty grey stage area to the right of the Event01 box.
Adjust the new Spawn settings to the right like the ones below:
Make the rate around 80, something close to the initial spawn from event01. Give it a negative 30 for Inherited Speed, and a Divergence of only 1.0. This will make the tendrils that remain close to the body of the object and let it burn a little hotter at the center.

Now in order to save us some time and headache we are simply going to copy all the work we did on the outer tendrils and then modify it slightly to fit our purposes for the new tendrils. Hold Shift and hover your mouse over the Event02 label on the box in our Flow Chart until you see a + sign appear next to your mouse cursor. Continue to hold shift and click and drag the box, over a little ways until it is underneath the Even03 box we just made with our second spawn in it, and then let go. From the pop-up box, select Copy and hit ok.
It will then make a complete copy of our second event (the outer tendrils) for us, without having to do each step all over again. Connect the blue dongle from the last Spawn we made, to the new copied event.
Now all we have to do is go through and vary our settings slightly in Event04.

Start by selecting the Speed By Surface and changing the settings to the right: Let's change the speed to 12, and the variation this time to 25%. This will differ our new tendrils from the first ones. Also, add a divergence of 90.0 to this one so they can appear in more places nearby.
Then select the new Force and adjust its settings: Reduce this Force's influence to only 500.0% meaning the wind will only have half the effect on these new tendrils as it did on our first ones. Keeping things closer to the sphere for this set. Everything else in our new Event can stay the same as the first one, I do recommend changing the color of the new Display ticks, so that you can see the differences.
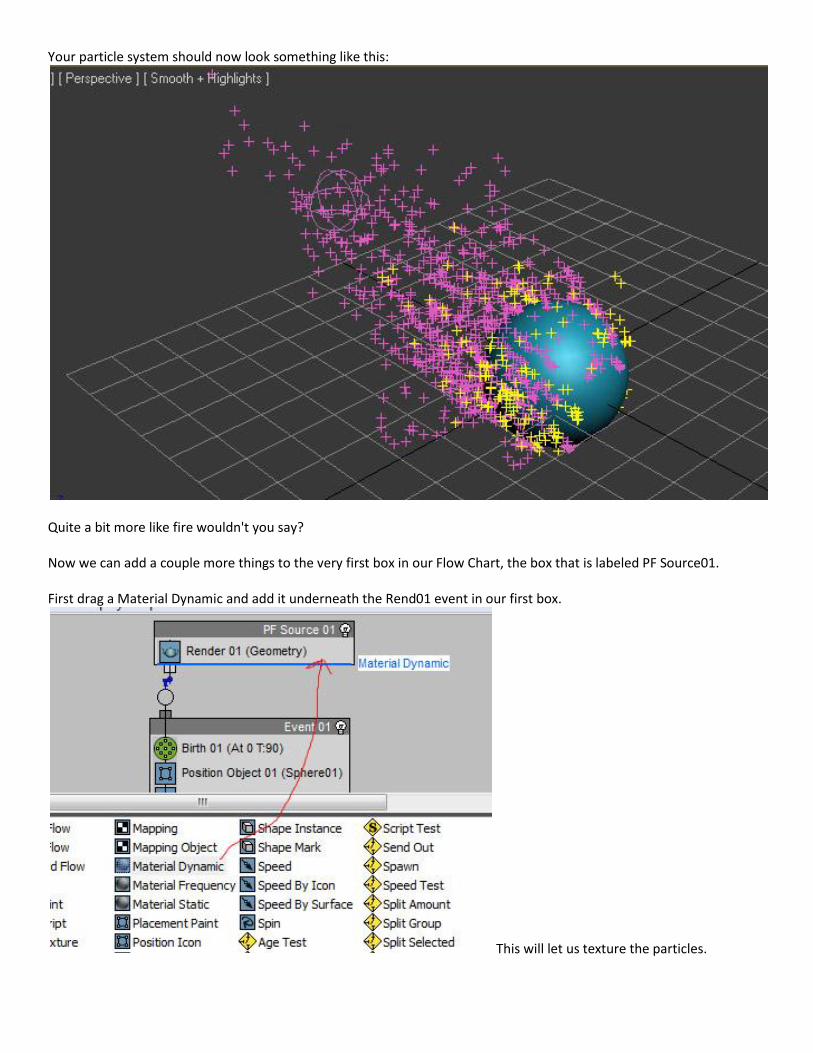
Your particle system should now look something like this:
Quite a bit more like fire wouldn't you say? Now we can add a couple more things to the very first box in our Flow Chart, the box that is labeled PF Source01. First drag a Material Dynamic and add it underneath the Rend01 event in our first box.
This will let us texture the particles.

Then add a Cache below that.
This will help your computer handle the particles a bit easier by recording the animation, instead of recalculating it every time you use your timeline scrubber or play button. Now we have to make a material for our flames! Open the Material Editor (M), and select an empty material. In the diffuse channel, add a Particle Age texture.
---> Then change the colors of each color swatch like below:
Once you have changed the colors to match mine, click the go back to parent button to return to the main menu of our texture.

Modify the Specular color, and the Specular Highlights and Opacity to the ones below.
This will make your texture shiny, orange, and the only thing visible will be the specular highlight, tricking the human eye into seeing sparks from a fire instead of bubbly spheres. (The next time you watch a movie with CG fire, look closely ... I bet you can see bubbles now) Next, click and drag the M next to the diffuse color channel, over to the empty channel box in the Self Illumination area. Select Copy in the Popup menu.
And change the amount to 50. Then click on the new M in the Self Illumination Channel to go in and modify the colors of the Particle Age copy.
Modify the colors, then click the Go to Parent button.

Next open the Extended Parameters rollout, and change the filter color to a very light grey.
This will help blend the slightly visible parts of the fire texture into a softer glow closer to the body of the flame. When you are done, your texture should look something like this:
This will make up our fire, now all we have to do is open up Particle View again, select the Material Dynamic from the list and click and drag this texture to the None button in the settings.
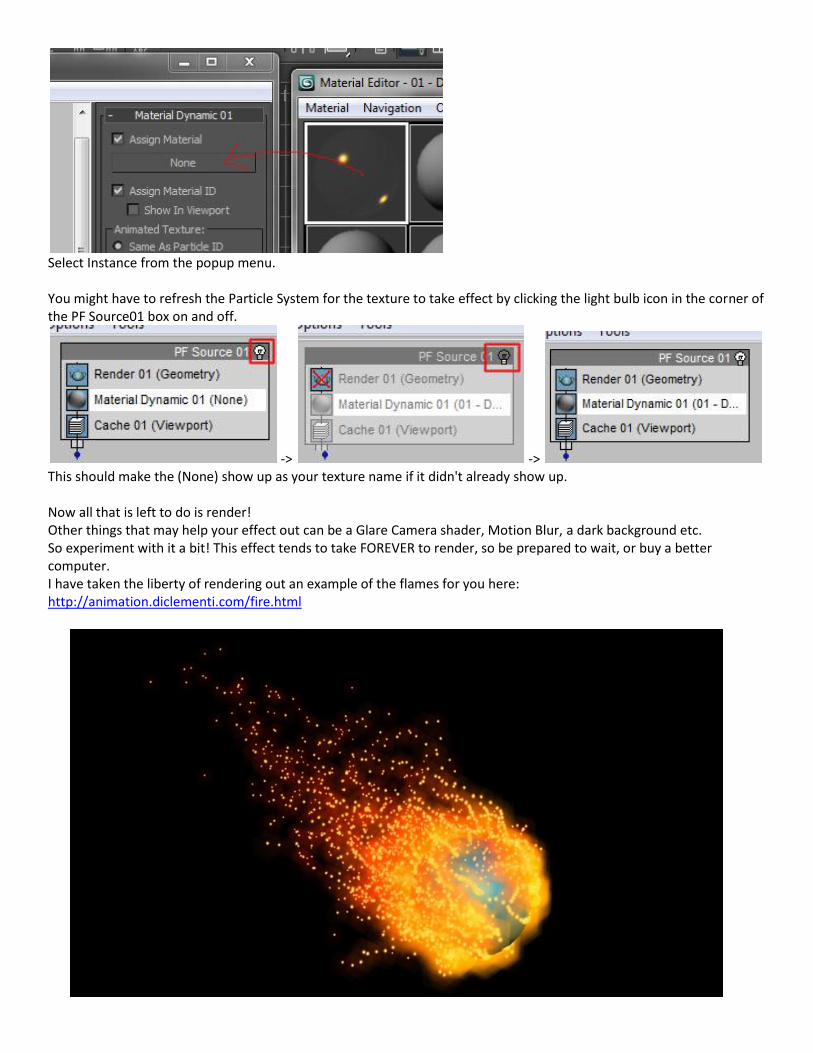
Select Instance from the popup menu. You might have to refresh the Particle System for the texture to take effect by clicking the light bulb icon in the corner of the PF Source01 box on and off.
-> -> This should make the (None) show up as your texture name if it didn't already show up. Now all that is left to do is render! Other things that may help your effect out can be a Glare Camera shader, Motion Blur, a dark background etc. So experiment with it a bit! This effect tends to take FOREVER to render, so be prepared to wait, or buy a better computer. I have taken the liberty of rendering out an example of the flames for you here: http://animation.diclementi.com/fire.html