fixing guide cedral click
TRANSCRIPT

maintenance-free
free from painting
easy to install
www.cedralsidings.com
Fixing GuideCedral Click
Step by step guide to installing your Cedral Click façade
Required materials and tools
1. Prepare wall(s)
2. Install horizontal battens
3. Install vertical battens
4. Installprofiles
5. Install Cedral cladding
6. Windowfinishing
7. Thefinishingtouch
8. Finish the façade
9. Vertical installation
10. Cedral Click system components & required quantities
Notes
3
4
6
7
8
10
12
14
16
18
19
20
22
CONTENT
CEDRAL CLICK FIXING GUIDE 3
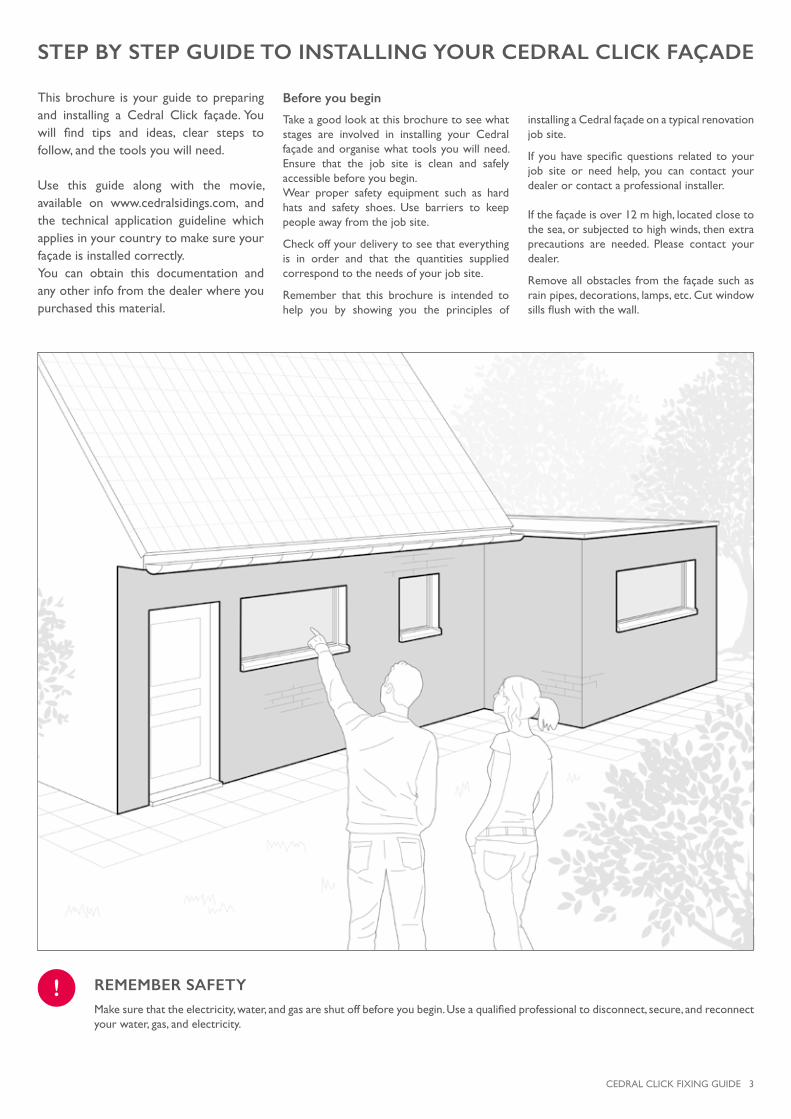
STEP BY STEP GUIDE TO INSTALLING YOUR CEDRAL CLICK FAÇADE
This brochure is your guide to preparing and installing a Cedral Click façade. You will find tips and ideas, clear steps tofollow,andthetoolsyouwillneed.
Use this guide along with the movie,available on www.cedralsidings.com, andthe technical application guideline which applies in your country to make sure your façade is installed correctly.You can obtain this documentation and any other info from the dealer where you purchased this material.
Take a good look at this brochure to see what stages are involved in installing your Cedral façade and organise what tools you will need. Ensure that the job site is clean and safely accessible before you begin.Wear proper safety equipment such as hard hats and safety shoes. Use barriers to keep people away from the job site.
Check off your delivery to see that everything is in order and that the quantities supplied correspond to the needs of your job site.
Remember that this brochure is intended to help you by showing you the principles of
installing a Cedral façade on a typical renovation job site.
If youhave specificquestions related toyourjob site or need help, you can contact yourdealer or contact a professional installer.
Ifthefaçadeisover12mhigh,locatedclosetothesea,orsubjectedtohighwinds,thenextraprecautions are needed. Please contact your dealer.
Remove all obstacles from the façade such as rainpipes,decorations,lamps,etc.Cutwindowsillsflushwiththewall.
REMEMBER SAFETY!Makesurethattheelectricity,water,andgasareshutoffbeforeyoubegin.Useaqualifiedprofessionaltodisconnect,secure,andreconnectyourwater,gas,andelectricity.
Before you begin

4 CEDRAL CLICK FIXING GUIDE
MATERIALS AND TOOLS YOU’LL NEED
1. Draw a diagram of each wall you want to clad. You do not have to draw it to scale. Justmarkallthemeasurementsonit,includingwindowsanddoors. 2. Take your diagram along with to your Cedral supplier. They will help you work out how many Cedral strips, lengths of profiles, and quantities of accessories you will need. The drawing at the end of this booklet is designed to help you.
ThetoolsyouwillneeddependonhowmuchCedralcladdingyouplantoinstall.Remembertowearsafetyshoes,safetyglasses,earprotection,adustmask,gloves,andanyothersafetyequipment.
Pencil Knife
Measuring tape Chalk line
Metal snips
HammerBeveloranglefinder
Microfibrecloth
Spirit level
Hack saw
Square
Circular hand sawWith diamond tipped blade
Stapler
Jigsaw with blade forfibrecement
Cordless screwdriver/drill Vacuum extraction with anappropriatedustfilter
Basic
Required tools
Measuring up for ordering materials
CEDRAL CLICK FIXING GUIDE 5
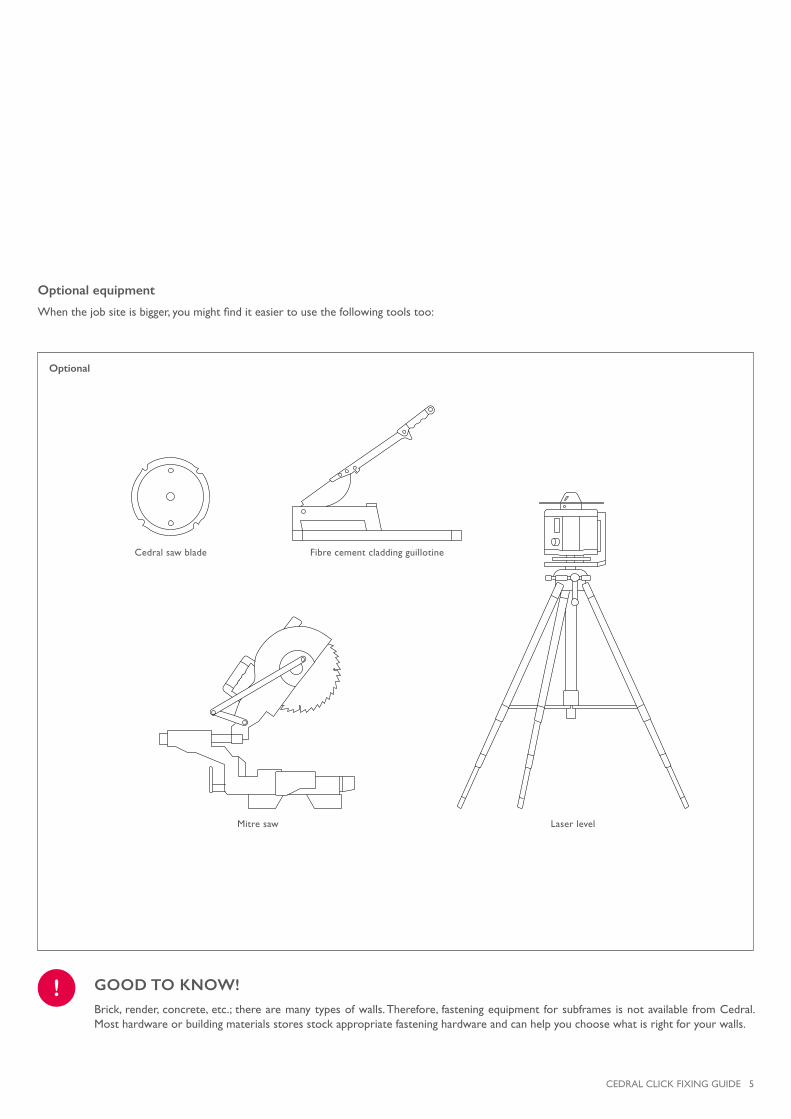
Whenthejobsiteisbigger,youmightfinditeasiertousethefollowingtoolstoo:
GOOD TO KNOW!!Brick,render,concrete,etc.;therearemanytypesofwalls.Therefore, fasteningequipmentforsubframesisnotavailablefromCedral. Most hardware or building materials stores stock appropriate fastening hardware and can help you choose what is right for your walls.
Mitre saw Laser level
Fibre cement cladding guillotineCedral saw blade
Optional
Optional equipment

6 CEDRAL CLICK FIXING GUIDE
PREPARE WALL(S)1
Forthebaseline,measureatleast15cmabovethehighestpointofthegroundandmarkitonthewall,thenchalkastraightbaselineacrossthefaçade,ensuringitislevel.
Use the chalk line to divide the wall into even sections of max. 60 cm.
Once all obstacles are removed from the façade, you are ready to prepare yourwalls by making sure that your walls and the fastenings you will use are suitable for supporting the subframe and the Cedral Click cladding. This is crucial to ensure the success of the following steps.
Drawthe layoutofthesubframedirectlyonthewall.Startbymarkingthehorizontalbaseline,thehorizontalbattens,andpossiblywheretheverticalbattensofthesubframewillbeattached.Remember to provide additional vertical battens on places where things will be attached to the façade(hinges,flowerpots,etc.)later.
Mark subframe
Max. 60 cm distance between horizontal battens

CEDRAL CLICK FIXING GUIDE 7
INSTALL HORIZONTAL BATTENS2Thecladdingcanbehungdirectlyonasupport frameintheCedral installationsystem.Inourexamplebelow,thesubframeisacombinationofhorizontal and vertical battens. This is easy to install and allows space for insulation. It is important to make sure the support frame is straight and level,andtosecureitwiththerightscrewtypeforyourwall.
Attach the insulation by using insulation fastenings. Ensure that the insulation is pressed tightly against the wall and that there are no gaps.
Fasten battens to the wall using the appropriate fastening material.
Whenusing horizontal battens as explained above,the horizontal batten size will determine the thickness of the insulation.
Ifthewallisuneven,useshimsbetweenthewallandthe batten to ensure that the batten is level.
Install insulation in a staggered pattern between the horizontal battens andflushwith the timber.Avoidany potential gaps.
INSTALLATION TIP!Othersolutionsareavailabletomakeinstallationeasierinsomeapplications:
If more insulation is needed or the wall is very uneven, then adjustable brackets can be used.Askyour dealer for details.
Ifthewallisflatandifnoinsulationisneeded,thenhorizontal battens are not needed either (see next step).

8 CEDRAL CLICK FIXING GUIDE
INSTALL VERTICAL BATTENS3Nowtheverticalbattens,towhichtheCedralcladdingwillbeattached,canbeinstalled.Todothis,dividethewallintoeven,verticalsectionsofmax.60cm,whichiswherethebattenswillbeattached.Reduceverticalbattenspacinginareaswithveryhighwindloads.Contactyourdealerfortheguidelines applicable in your area.
The battens must overlap at window and door revealsby1cmormore,dependingonthewindowframe and the desired insulation.
Now protect all the battens from top to bottom by stapling a plastic strip (PE or EPDM) to them.
Order the window sill from your dealer. Measure the window sills so that they are wide enoughtoaccommodatetheCedralcladding,cavity,battens,andatleast40mmofoverhang.
Nowattachtheverticalbattenstothebrackets,startingattheouteredgeandworkinginwards.
Makesurethebattensmeetatthecorners,sincetheywillprovidesupportfortheprofilestobeinstalledlater.
3
3
2
2
1
1

CEDRAL CLICK FIXING GUIDE 9
Whenverticalbattensareinstalled,checkoncemoretoensurethatairflowisunobstructedeverywhere.
Inparticular,checkthewindowsanddoorstomakesuretheverticalbattensareontopofthehorizontalbattens everywhere.
Youdeservedabreak!Nowthatyoursupportframeismounted,youarereadyforthenextinstallationsteps.
Foragoodresult,ensurethatthesillhasatleasta5°slope,hasraisededgesalongeachsideofatleast15mm,andadripedgeatthefront.Thedepthofthesillmustaccommodatethecavity,batten,andatleast40mmofoverhang.
10 CEDRAL CLICK FIXING GUIDE
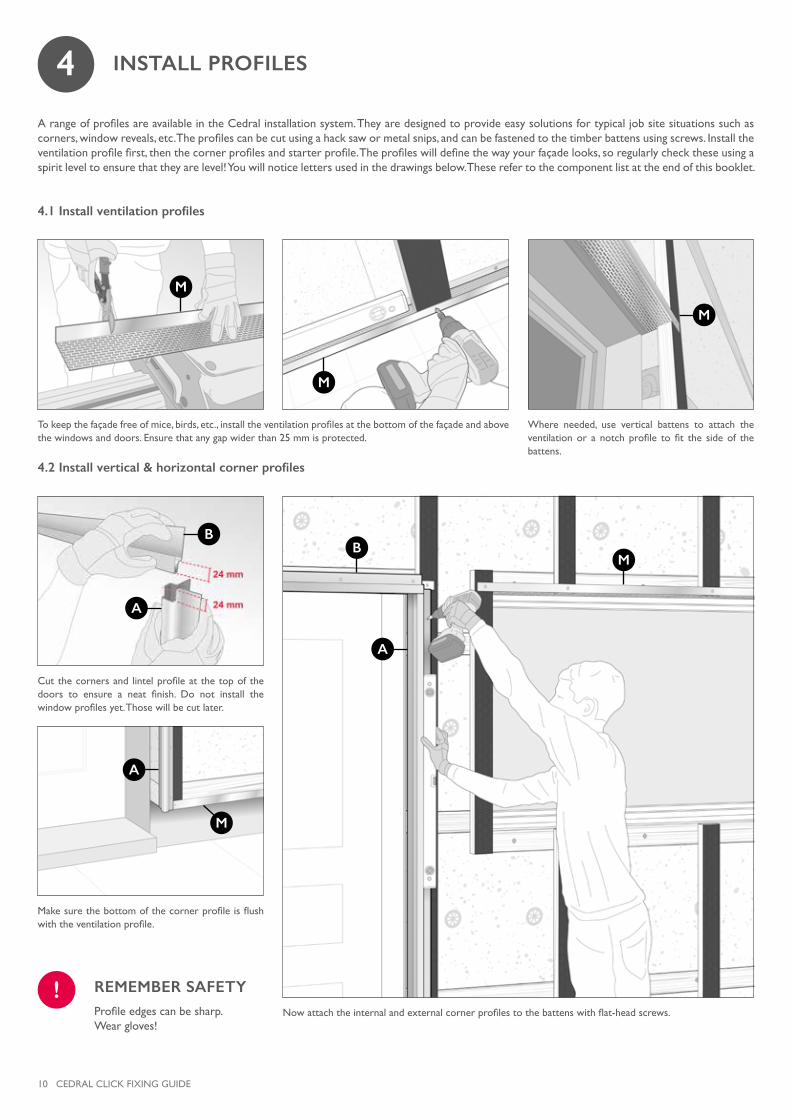
INSTALL PROFILES4ArangeofprofilesareavailableintheCedralinstallationsystem.Theyaredesignedtoprovideeasysolutionsfortypicaljobsitesituationssuchascorners,windowreveals,etc.Theprofilescanbecutusingahacksawormetalsnips,andcanbefastenedtothetimberbattensusingscrews.Installtheventilationprofilefirst,thenthecornerprofilesandstarterprofile.Theprofileswilldefinethewayyourfaçadelooks,soregularlychecktheseusingaspirit level to ensure that they are level! You will notice letters used in the drawings below. These refer to the component list at the end of this booklet.
4.1 Install ventilation profiles
4.2 Install vertical & horizontal corner profiles
Where needed, use vertical battens to attach theventilationor anotchprofile tofit the sideof thebattens.
Tokeepthefaçadefreeofmice,birds,etc.,installtheventilationprofilesatthebottomofthefaçadeandabovethe windows and doors. Ensure that any gap wider than 25 mm is protected.
Cutthecornersandlintelprofileatthetopofthedoors to ensure a neat finish. Do not install thewindowprofilesyet.Thosewillbecutlater.
Makesurethebottomofthecornerprofileisflushwiththeventilationprofile.
Nowattachtheinternalandexternalcornerprofilestothebattenswithflat-headscrews.
B
M
M
M
A
M
A
BM
A
REMEMBER SAFETY!Profileedgescanbesharp. Wear gloves!

CEDRAL CLICK FIXING GUIDE 11
4.3 Install starter profile
Now that your vertical battens aremountedandyourprofilesareinplace,youhavecompletedyour façade preparation stage!
Congratulations!
Use stainless steel screws to attach the profile.Ensureallscrewsareflushwiththeprofilesurface.
Removetheprotectivefilmfromtheprofilesbeforeinstallation.The arrows on the protective film areirrelevant when installing Cedral cladding.
UseCedralembossedprofilestoensurequalityandpaint durability.
BeforeinstallingtheCedralcladding,doublecheckthatthestarterprofileislevelandthatitstartsatthesameheighteverywhere.Alsodouble-checktoensurethattheverticalairflowremainsunobstructed.
Nowinstallthestarterprofileacrossthebottomofthe façade and at the same height. It is very important thatthestarterprofileisperfectlylevel.
The starter profile is installed over the ventilationprofileandnexttothecornerprofile.
A
M
12 CEDRAL CLICK FIXING GUIDE
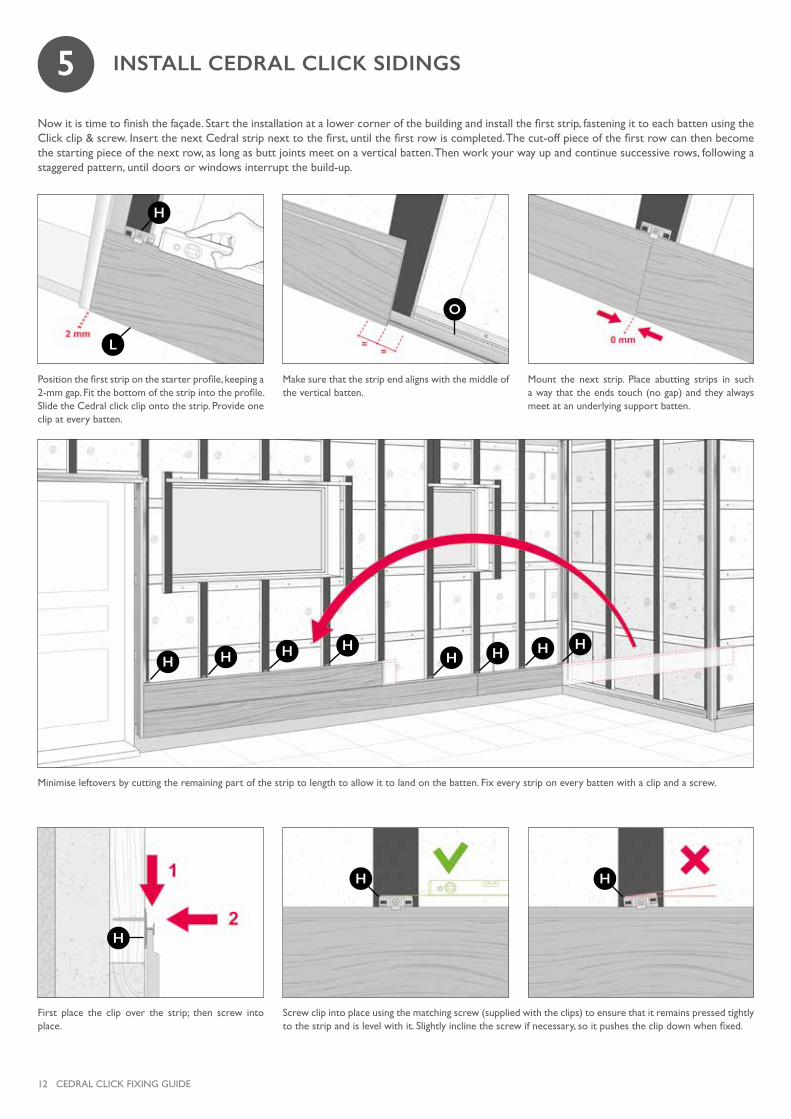
INSTALL CEDRAL CLICK SIDINGS5Nowitistimetofinishthefaçade.Starttheinstallationatalowercornerofthebuildingandinstallthefirststrip,fasteningittoeachbattenusingtheClickclip&screw.InsertthenextCedralstripnexttothefirst,untilthefirstrowiscompleted.Thecut-offpieceofthefirstrowcanthenbecomethestartingpieceofthenextrow,aslongasbuttjointsmeetonaverticalbatten.Thenworkyourwayupandcontinuesuccessiverows,followingastaggeredpattern,untildoorsorwindowsinterruptthebuild-up.
Mount the next strip. Place abutting strips in such a way that the ends touch (no gap) and they always meet at an underlying support batten.
Positionthefirststriponthestarterprofile,keepinga2-mmgap.Fitthebottomofthestripintotheprofile.Slide the Cedral click clip onto the strip. Provide one clip at every batten.
Make sure that the strip end aligns with the middle of the vertical batten.
First place the clip over the strip; then screw intoplace.
Screw clip into place using the matching screw (supplied with the clips) to ensure that it remains pressed tightly tothestripandislevelwithit.Slightlyinclinethescrewifnecessary,soitpushestheclipdownwhenfixed.
Minimise leftovers by cutting the remaining part of the strip to length to allow it to land on the batten. Fix every strip on every batten with a clip and a screw.
H H
H
O
L
H
H H H HH H H H
CEDRAL CLICK FIXING GUIDE 13
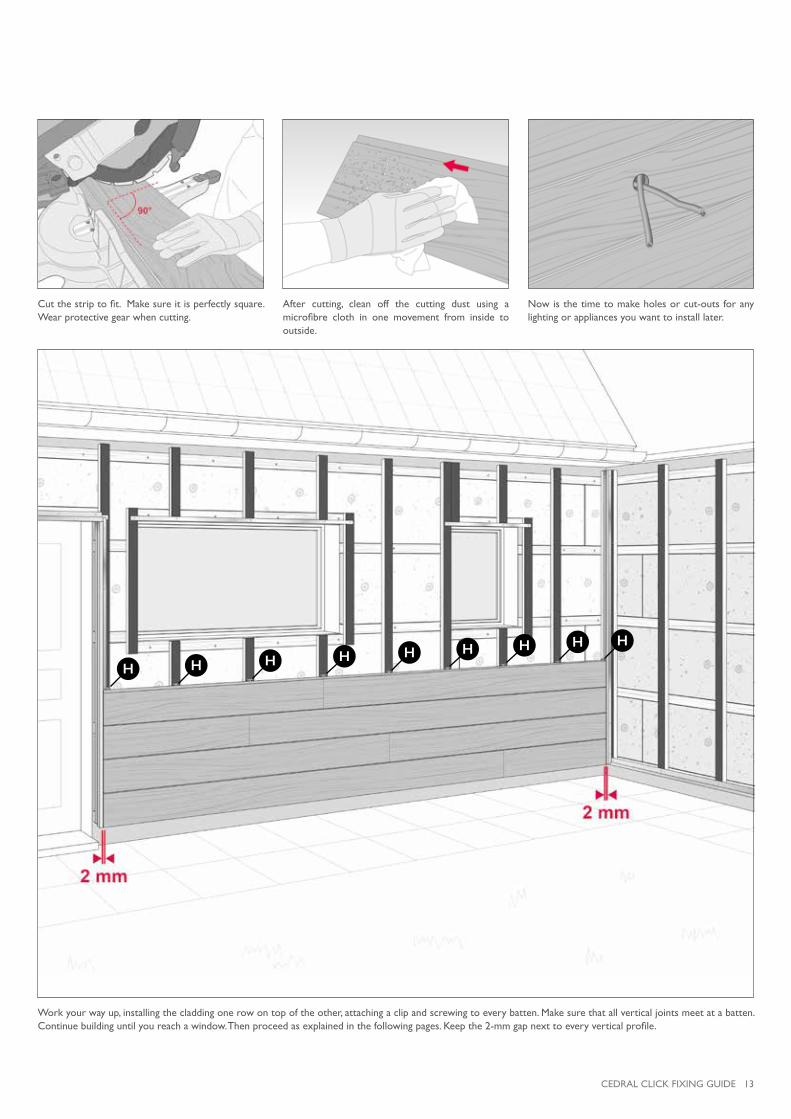
Nowisthetimetomakeholesorcut-outsforanylighting or appliances you want to install later.
Cutthestriptofit.Makesureitisperfectlysquare.Wear protective gear when cutting.
After cutting, clean off the cutting dust using amicrofibre cloth in one movement from inside tooutside.
Workyourwayup,installingthecladdingonerowontopoftheother,attachingaclipandscrewingtoeverybatten.Makesurethatallverticaljointsmeetatabatten.Continuebuildinguntilyoureachawindow.Thenproceedasexplainedinthefollowingpages.Keepthe2-mmgapnexttoeveryverticalprofile.
H H H H H H H H H

14 CEDRAL CLICK FIXING GUIDE
WINDOW FINISHING6You will encounter a window at some point when installing the cladding. We explain below how to successfully complete such window installations.
Use a jigsaw to cut out the space you marked on the backof the strip toaccommodate thewindow, sill,and ventilation.
Withthelaststripfinishedbelowyourwindow,youcanputthesillinplace(withoutattachingit)andmarkthelocation of the sill on the next strip. Turn the strip over and trace the outline of the sill on the back of the strip. Provide a 10 mm gap between the sill and the strip for ventilation.
With the cill in place, you can nowdetermine thelengthofthecornerprofile,makingsureto leaveagap (10 mm) to the cill.
Installthecut-outstrip,whichnowmatchesthewindowandsill.Justbecarefulnottobreakthestripwheretheedgeshavebeencutout.
1
1
CEDRAL CLICK FIXING GUIDE 15
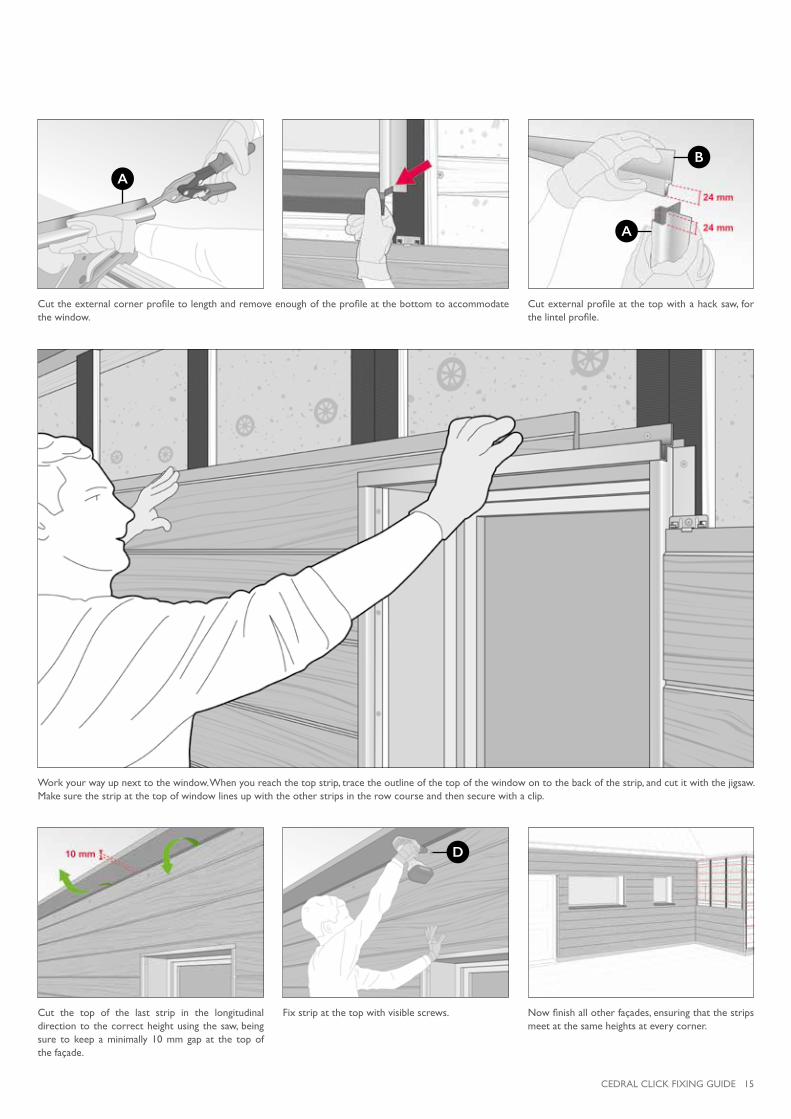
Cuttheexternalcornerprofiletolengthandremoveenoughoftheprofileatthebottomtoaccommodatethe window.
Cutexternalprofileatthetopwithahacksaw,forthelintelprofile.
Nowfinishallotherfaçades,ensuringthatthestripsmeet at the same heights at every corner.
Fix strip at the top with visible screws.Cut the top of the last strip in the longitudinal directiontothecorrectheightusingthesaw,beingsure to keep a minimally 10 mm gap at the top of the façade.
Workyourwayupnexttothewindow.Whenyoureachthetopstrip,tracetheoutlineofthetopofthewindowontothebackofthestrip,andcutitwiththejigsaw.Make sure the strip at the top of window lines up with the other strips in the row course and then secure with a clip.
B
D
A
A

16 CEDRAL CLICK FIXING GUIDE
THE FINISHING TOUCH7Nowthatyourfaçadeisnearlycomplete,itistimetofinishoffthewindowrevealsandothersmalldetails.
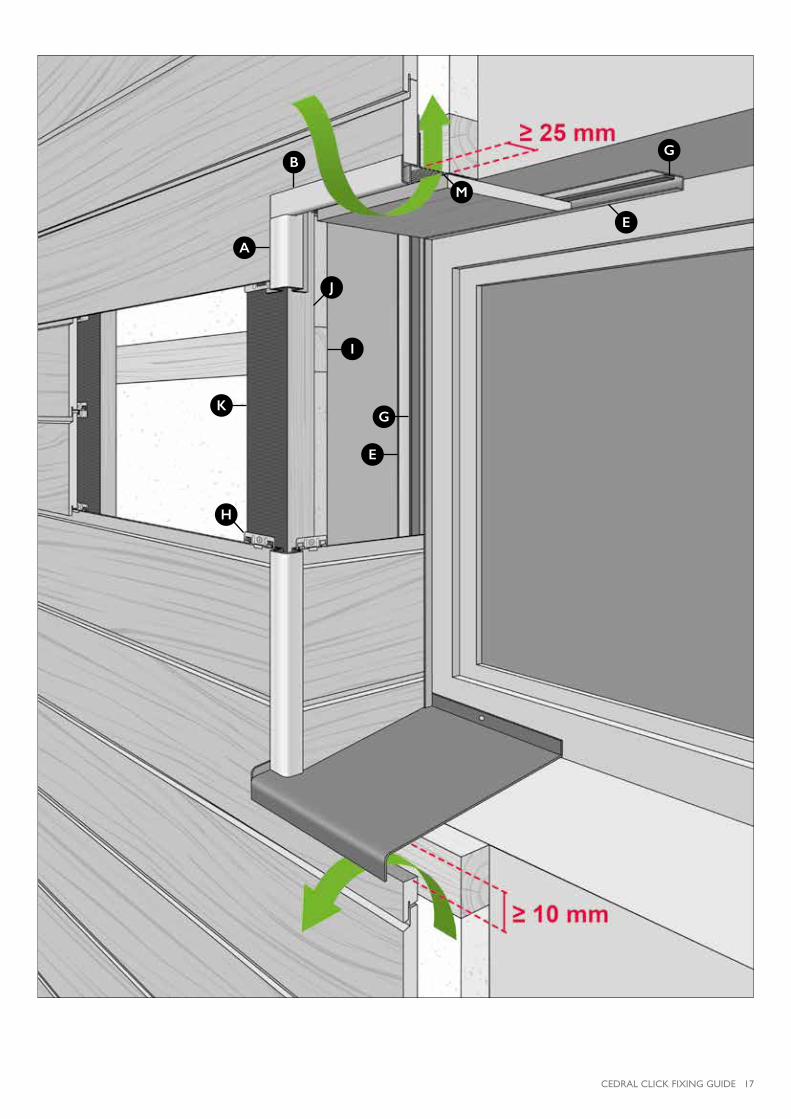
Measure the angle of the cill.
Work your way up to the top of the window reveal.
Slidethestripintotheconnectorprofileandfastenthis to the horizontal batten using coloured Cedral screws.
Oncecut,applyafoamstriptothefrontoftheconnectorprofileandalineofpolyurethanegluealongthesideoftheprofile.Applytheprofile(withglue)tothewindowframe,ensuringitlinesupwiththecornerprofileperfectly and it doesn’t prevent the window from opening.
Tracetostripandcut.Note:cutthestripwiththeback facing up to ensure a clean cut.
Nowmeasure,cut,andinstalltheconnectorprofilewith the foam strip at the top of the window reveal as explained above.
Slide (1) strip into the connector profile and pullback(2)tocornerprofile.
Measure the depth of the window reveal, takinga 25-mm gap into account, for ventilation to theconnectorprofileandcutastripinthelongitudinaldirectiontofitx.Ifthedepthrequires,multiplestripscan be used here.
E
EG
MB
E
G
G
E A
CEDRAL CLICK FIXING GUIDE 17
G
E
G
E
A
B
K
H
J
I
M

18 CEDRAL CLICK FIXING GUIDE
FINISH THE FAÇADE8
Use touch up paint to correct any damage that might have occurred during installation to ensure a neat finish.Gentlytapandsmoothoutpaintforthebestresults.
Order a made-to-measure parapet if you have aflat roof,which allows for sufficient ventilation andcoverage.
UseanaluminiumprofileoraCedralstriptocoverthe cavity and strips along the sides.
Make sure that ventilation stays open always - e.g.leaves, snow, and/or soil accumulations must beremoved.
Alternatively, a power washer can be used at amaximum of 80 bar at least 20 cm away from the cladding. Water is to be sprayed flat and wide;rotating,dirt-cuttingspraysarenotsuitable.
The strips can be cleaned by using water, a milddetergent,andasponge.
You’redone!Enjoy!Timetositbackandadmireyournewfaçade.Ifyoufollowourcareadvice,yourfaçadewillcontinuetolookitsbestformanyyearstocome!
CARE ADVICE!
P
CEDRAL CLICK FIXING GUIDE 19
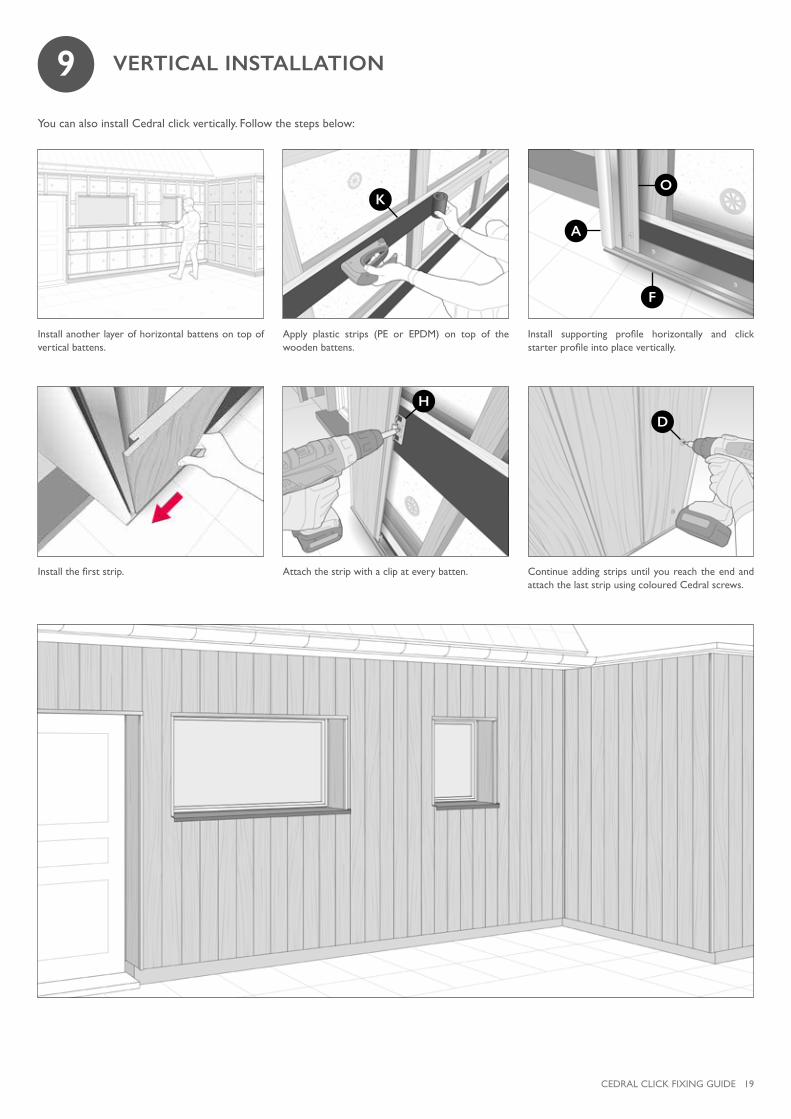
Install supporting profile horizontally and clickstarterprofileintoplacevertically.
Install another layer of horizontal battens on top of vertical battens.
Apply plastic strips (PE or EPDM) on top of the wooden battens.
Continue adding strips until you reach the end and attach the last strip using coloured Cedral screws.
Attach the strip with a clip at every batten.Installthefirststrip.
VERTICAL INSTALLATION9YoucanalsoinstallCedralclickvertically.Followthestepsbelow:
F
K
A
O
HD
20 CEDRAL CLICK FIXING GUIDE
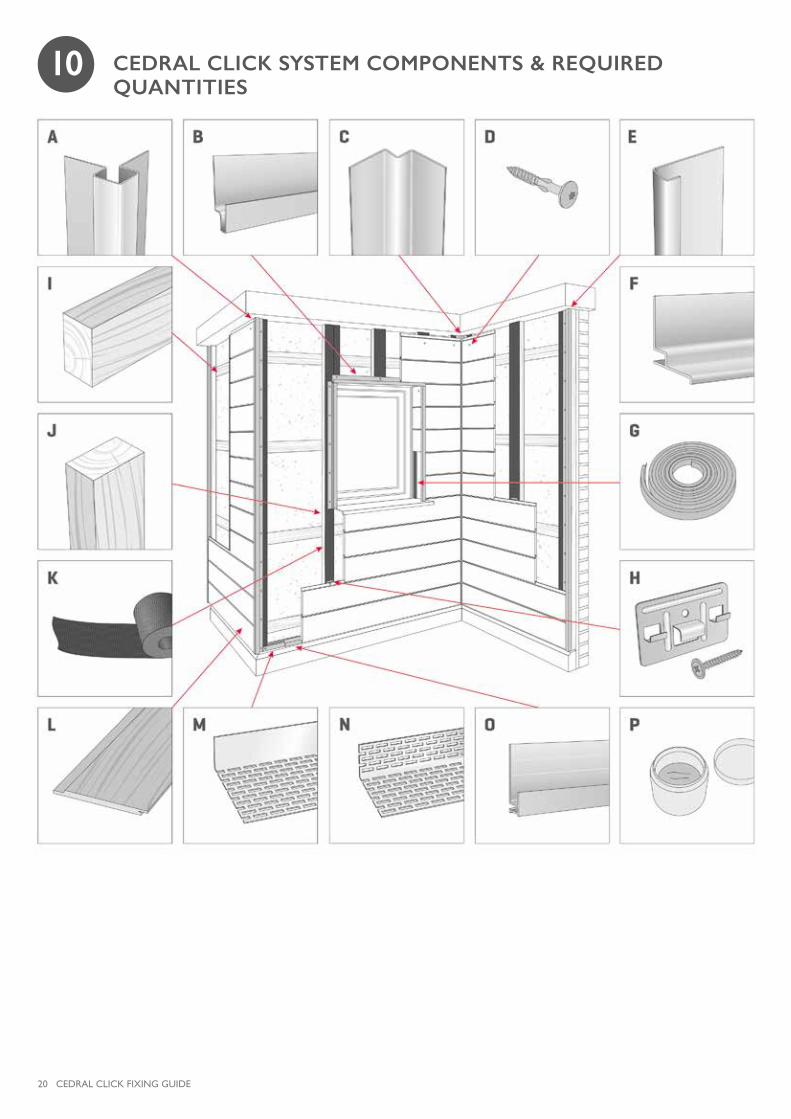
10 CEDRAL CLICK SYSTEM COMPONENTS & REQUIRED QUANTITIES
CEDRAL CLICK FIXING GUIDE 21
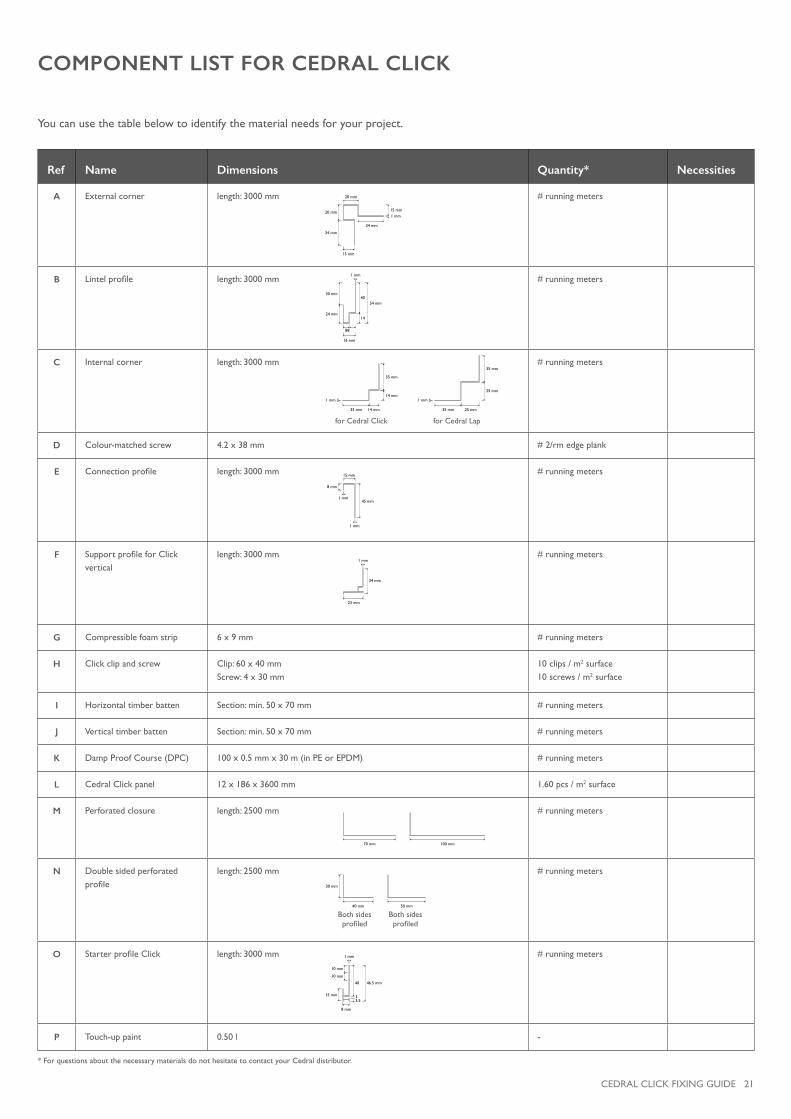
Ref Name Dimensions Quantity* Necessities
A External corner length:3000mm # running meters
B Lintelprofile length:3000mm # running meters
C Internal corner length:3000mm # running meters
D Colour-matchedscrew 4.2 x 38 mm # 2/rm edge plank
E Connectionprofile length:3000mm # running meters
F SupportprofileforClickvertical
length:3000mm # running meters
G Compressible foam strip 6 x 9 mm # running meters
H Click clip and screw Clip:60x40mmScrew:4x30mm
10 clips / m2 surface10 screws / m2 surface
I Horizontal timber batten Section:min.50x70mm # running meters
J Vertical timber batten Section:min.50x70mm # running meters
K Damp Proof Course (DPC) 100 x 0.5 mm x 30 m (in PE or EPDM) # running meters
L Cedral Click panel 12 x 186 x 3600 mm 1.60 pcs / m2 surface
M Perforated closure length:2500mm # running meters
N Double sided perforated profile
length:2500mm # running meters
O StarterprofileClick length:3000mm # running meters
P Touch-uppaint 0.50 l -
* For questions about the necessary materials do not hesitate to contact your Cedral distributor.
COMPONENT LIST FOR CEDRAL CLICK
20 mm
20 mm
34 mm
15 mm1 mm
34 mm
15 mm
88
16 mm
24 mm
30 mm
54 mm40
14
1 mm
14 mm35 mm
35 mm
14 mm1 mm
for Cedral Click
Both sides profiled
Both sides profiled
for Cedral Lap
25 mm35 mm
35 mm
25 mm
1 mm
1 mm
1 mm
8 mm
45 mm
15 mm
70 mm 100 mm
30 mm
40 mm 50 mm
8 mm
15 mm
10 mm
10 mm
40
33.5
46.5 mm
1 mm
23 mm
34 mm
1 mm
You can use the table below to identify the material needs for your project.

22 CEDRAL CLICK FIXING GUIDE
NOTES

CEDRAL CLICK FIXING GUIDE 23

EditionOctober2017-EN