first data mobile pay plus android app guide · pdf...
TRANSCRIPT

Mobile Pay PlusAndroid App Guide
Document Version 1.0July 2015

TABLE OF CONTENTS1 Welcome 1
2 Supported Devices 2
3 Log into the App 3
4 Mobile Pay Plus Menu 5
5 Mobile Pay Plus Settings 6
5.1 Taxes 8
5.2 Processing Options 12
5.3 Tips and Gratuities 13
6 Processing Sales 15
6.1 Process Credit Card Sales 16
6.2 Process Manual Credit Card Sales 23
6.3 Process Debit Sales 31
6.4 Process Cash Sales 38
6.5 Process cheque sales 45
7 Processing Pre-Authorizations 51
7.1 Step 1 - Process Pre-Authorizations with iCMP device 52
7.2 Step 1 - Keyed Pre-Authorization (No Device) 56
7.3 Step 2 - Process Pre-Authorization Completion 62
8 Transaction Troubleshooting 64
9 Process Refunds 65
10 View Transaction History 70

- 1 -
1 WELCOMECongratulations on choosing First Data's Mobile Pay Plus app for processingsales. This document provides information on how to use the Mobile Pay Plus appon your Android phone with your iCMP device:
1 Welcome

- 2 -
2 SUPPORTED DEVICESMobile Pay Plus EMV Chip and Pin processing is compatible with:
Android Phones
The Ingenico PIN pad is compatible with Android phones with 4.1.x (JellyBean), 5.x.x (Lollipop) operating systems and higher.
Ingenico iCMP PIN pad Device
The user guide you received with your PIN pad provides you with a basicintroduction to the device. For online support information, go to iCMP-Overview.
iCMP PIN pad Updates
Occasionally you will be notified that an update is required to thesoftware on your PIN pad. It will only take about two minutes tocomplete.
1. Make sure you have Internet access and your PIN pad isconnected by Bluetooth.
2. Click Update PIN pad.3. Process a sales transaction to complete the update.
2 Supported Devices

- 3 -
3 LOG INTO THE APPThe first time you log in, the menu opens on the left. It will stay open until youswipe to the left to close it. After that when you log in, the Sale screen opens. Justswipe from the left to open the menu.
When you signed up for First Data Mobile Pay Plus processing, as the accountadministrator, you were sent an email with a login name and password to accessthe system.
Log in
1. On your mobile device, sign in with your Company Name, Username,and Password. The logins are case-sensitive, so make sure you typethem exactly as they are in the welcome email.
3 Log into the App

- 4 -
Note: If you try your password more than three times, you will be locked outof your account. You must wait 30 minutes before trying again.
2. Tap Sign In. The First Data Mobile Pay Plus main screen opens.If this is the first time you are signing into the First Data Mobile Pay Plus app,the navigation menu opens. Swipe to the left to close the menu.
3. To log out, swipe from the left and tap Logout.
Troubleshooting
If you have difficulty with the app, try these steps:
l Power cycle your device and log back in to the app.
l Delete the app from your device and reinstall it from the Apps store.
l Perform a Force Quit to close and reopen the app.
3 Log into the App

- 5 -
4 MOBILE PAY PLUSMENUWhen you log into the Mobile Pay Plus app for the first time, the menu opens.Thereafter, to open the menu, go to the main Sale screen and swipe from the left.
Sale – Tap to Process a Sale.
History – Tap to issue a Refund or view Transaction History.
Pre-Auth Complete – Shows only if you have submitted Pre-Authorized credit card transactions.
Settings – Adjust Settings for Accounts & Currencies, ProcessingOptions, Taxes, and Language.
Help & Support – Open the Online Help, Open the PIN pad GettingStarted Pairing Guide, Phone Mobile Pay Plus support.
Logout – Tap to log out of theMobile Pay Plus app.
PIN pad: Open theGetting Started Guide to learn how to pair the PIN pad withyour Android device.
Help & Support: Links to get help or tell a friend.
4 Mobile Pay Plus Menu
- 6 -
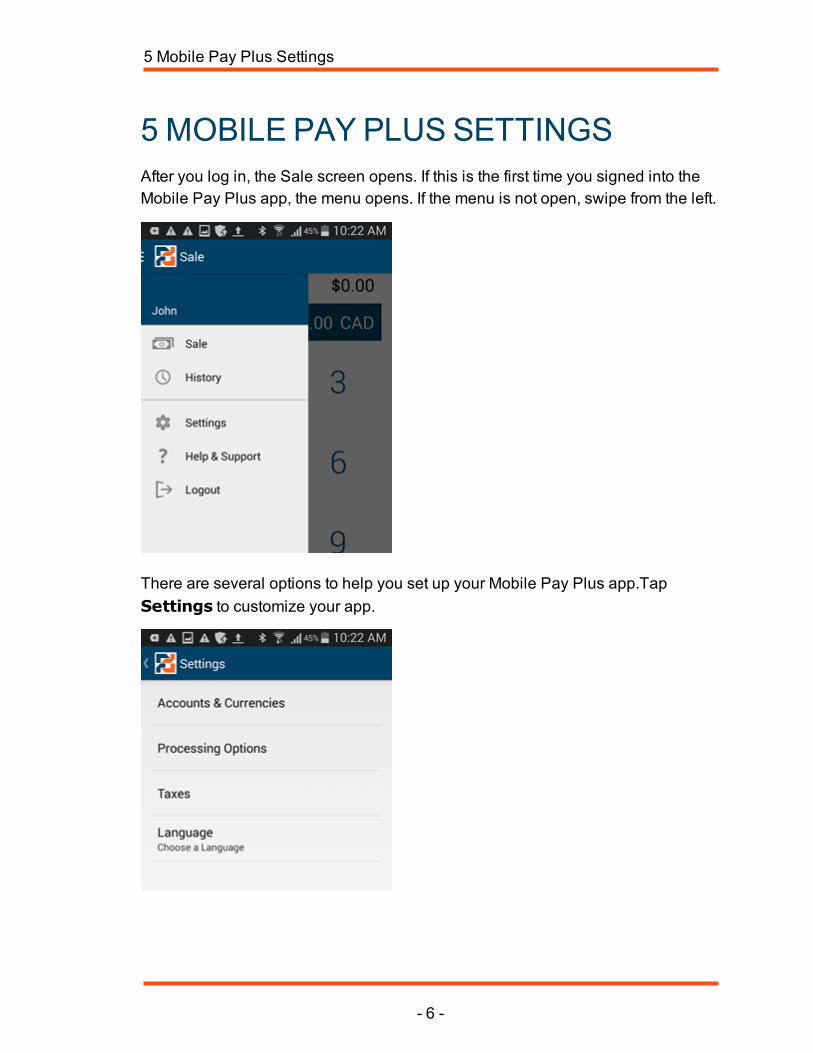
5 MOBILE PAY PLUS SETTINGSAfter you log in, the Sale screen opens. If this is the first time you signed into theMobile Pay Plus app, the menu opens. If the menu is not open, swipe from the left.
There are several options to help you set up your Mobile Pay Plus app.TapSettings to customize your app.
5 Mobile Pay Plus Settings

- 7 -
Accounts & Currencies: This is applicable if you signed up to processtransactions in more than one currency, or if you have more than one user set upin the online member area. After your currency settings are stored, you can switchbetween currencies:
Remember Me – Tap the check box to save your credentials—noneed to log on when you reopen the app.
Add Account – Tap to add another account. Enter the CompanyName, Username, and Password.
Account Details – Tap an account to view detailed information,including the ID, user, and address.
Processing Options: Turn on options for the order number, pre-authorizations,and tips. See Processing Options.
Taxes: Specify up to two tax rates. If required for provincial or state taxes, youhave the option to apply tax2 to tax1. See Taxes.
Language: Select Canadian or American English.
5 Mobile Pay Plus Settings

- 8 -
5.1 TAXESTaxes are calculated automatically with each sale, based on the options youselect. You can apply two different tax rates to transactions. To accommodateprovincial and state taxes, you also have the option to apply tax2 to tax1 ifrequired.
Set Taxes
1. Open the app, swipe from the left to open the menu, and then tap Settings.2. Tap Taxes.
3. Tap the check box to enable Tax 1.
5 Mobile Pay Plus Settings

- 9 -
4. Tap Tax 1 Name.
5. Enter a Name for Tax 1 and tap OK.
5 Mobile Pay Plus Settings
- 10 -
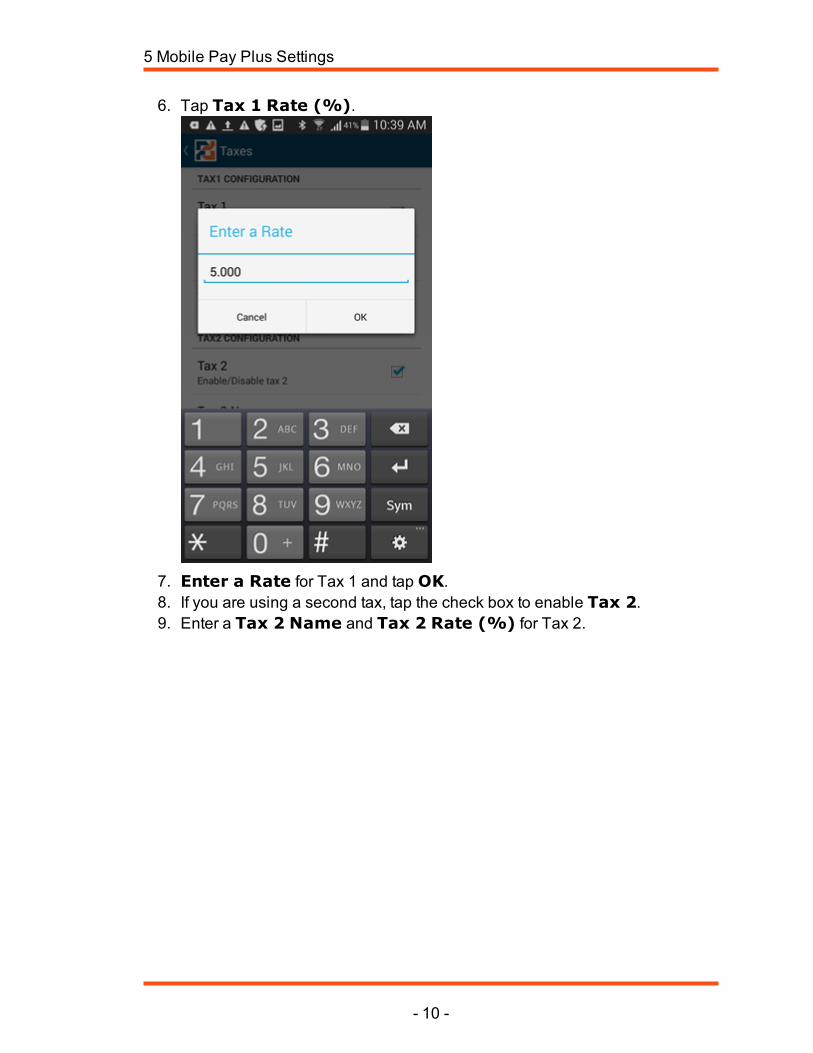
6. Tap Tax 1 Rate (%).
7. Enter a Rate for Tax 1 and tap OK.8. If you are using a second tax, tap the check box to enable Tax 2.9. Enter a Tax 2 Name and Tax 2 Rate (%) for Tax 2.
5 Mobile Pay Plus Settings

- 11 -
10. If you use both taxes, you have the option to Apply Tax 2 to Tax 1. Tapthe check box to turn it on.
5 Mobile Pay Plus Settings

- 12 -
5.2 PROCESSING OPTIONSAfter you log in, the Sale screen opens. If this is the first time you signed into theMobile Pay Plus app, the menu opens. If the menu is not open, swipe from the left.
1. Tap Settings.2. Tap Processing Options.
3. On the Settings screen, tap Processing Options. You can select whichtransaction details are collected for each sale.
Order Number: Tap the check box to turn On. Thisgives you the option to record the Order Number as part of
the transaction. On the Sale screen, tap to enter theOrder Number.
Pre-Authorization: SelectOn to allow pre-authorization transaction processing—this button displays
on the Sales screen .
Tip: Allows your customer the option to leave a tip withtheir purchase. See Tips and Gratuities.
5 Mobile Pay Plus Settings
- 13 -
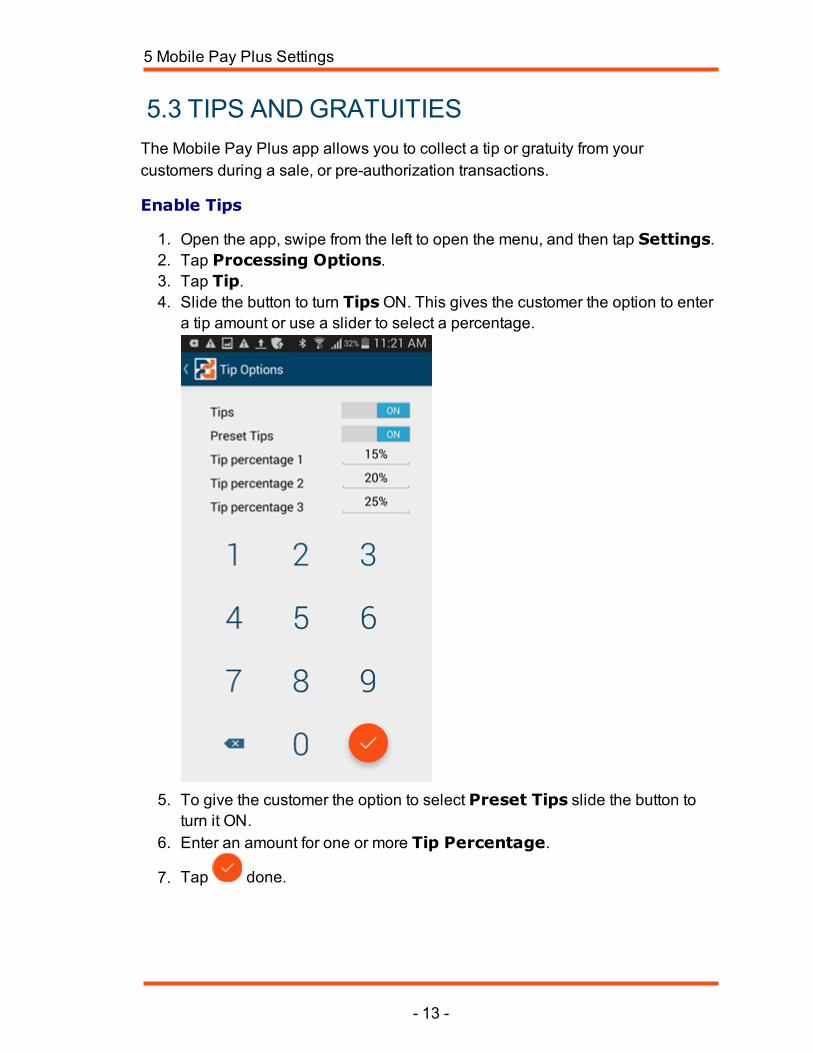
5.3 TIPS ANDGRATUITIESThe Mobile Pay Plus app allows you to collect a tip or gratuity from yourcustomers during a sale, or pre-authorization transactions.
Enable Tips
1. Open the app, swipe from the left to open the menu, and then tap Settings.2. Tap Processing Options.3. Tap Tip.4. Slide the button to turn TipsON. This gives the customer the option to enter
a tip amount or use a slider to select a percentage.
5. To give the customer the option to select Preset Tips slide the button toturn it ON.
6. Enter an amount for one or more Tip Percentage.
7. Tap done.
5 Mobile Pay Plus Settings

- 14 -
Add a Tip during a transaction
The customer can add a tip on the Confirm Sale screen.
1. Tap Add Tip.
2. There are three ways a customer can leave a tip:l Enter a $ amount. The slider moves and the Tip shows as a
percentage.
l Move the slider. The amount changes and the Tip shows as a
percentage.
l Tap one of the preset tip percentages.
3. Tap done.
5 Mobile Pay Plus Settings

- 15 -
6 PROCESSING SALESIn the Mobile Pay Plus app, there are several options to process a sale.
Processing Credit Card Sales
Processing Manual (keyed) Credit Card Sales
Processing Debit Sales
Processing Cash Sales
Processing Cheque Sales
6 Processing Sales

- 16 -
6.1 PROCESS CREDIT CARD SALESMake sure you are connected to the PIN pad before processing a credit card sale.
1. Open the app. The Sale screen opens.2. Enter the Sale Amount.
3. You can tap to add a Note orOrder Number (must be enabled inSettings> Processing Options). Tap Sale to exit the screen.
4. If this transaction is a pre-authorization, tap Auth. ( onlyshows if enabled in Settings> Processing Options).
6 Processing Sales

- 17 -
5. Tap Continue.
6 Processing Sales

- 18 -
6. Tap Credit.
7. Hand the device to customer so they can tap Add Tip (shows if enabled inSettings> Processing Options).
6 Processing Sales
- 19 -
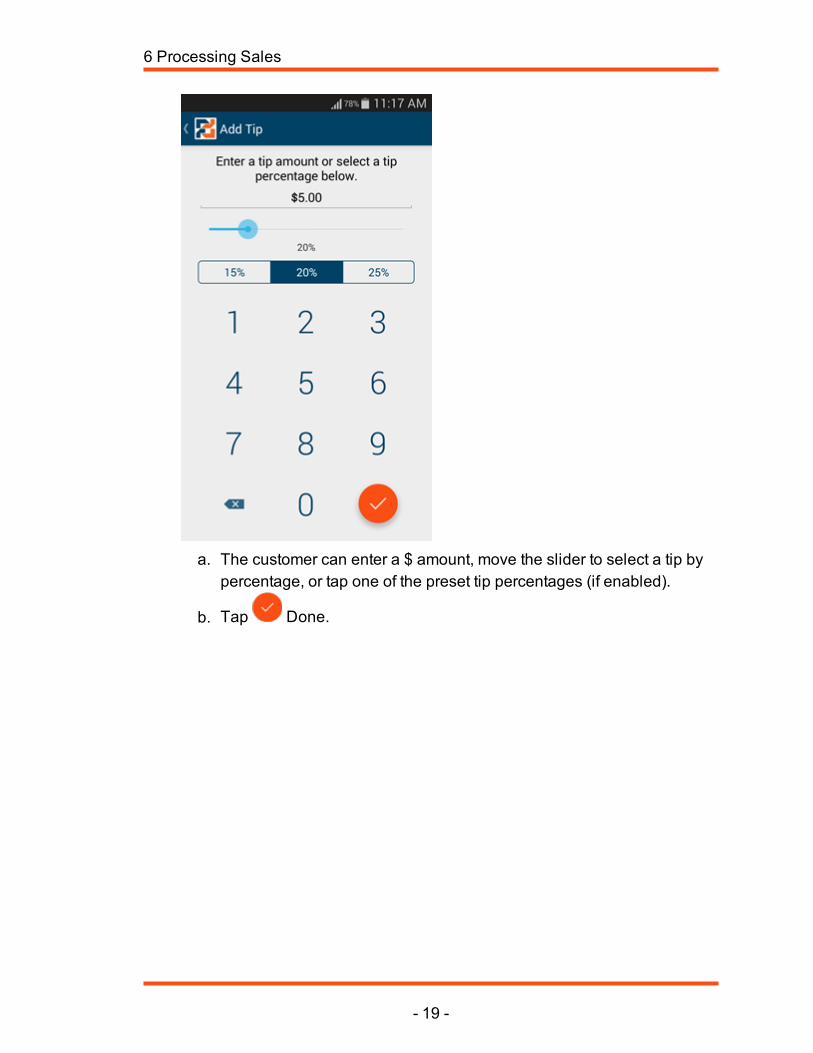
a. The customer can enter a $ amount, move the slider to select a tip bypercentage, or tap one of the preset tip percentages (if enabled).
b. Tap Done.
6 Processing Sales

- 20 -
8. Tap Confirm.
6 Processing Sales
- 21 -
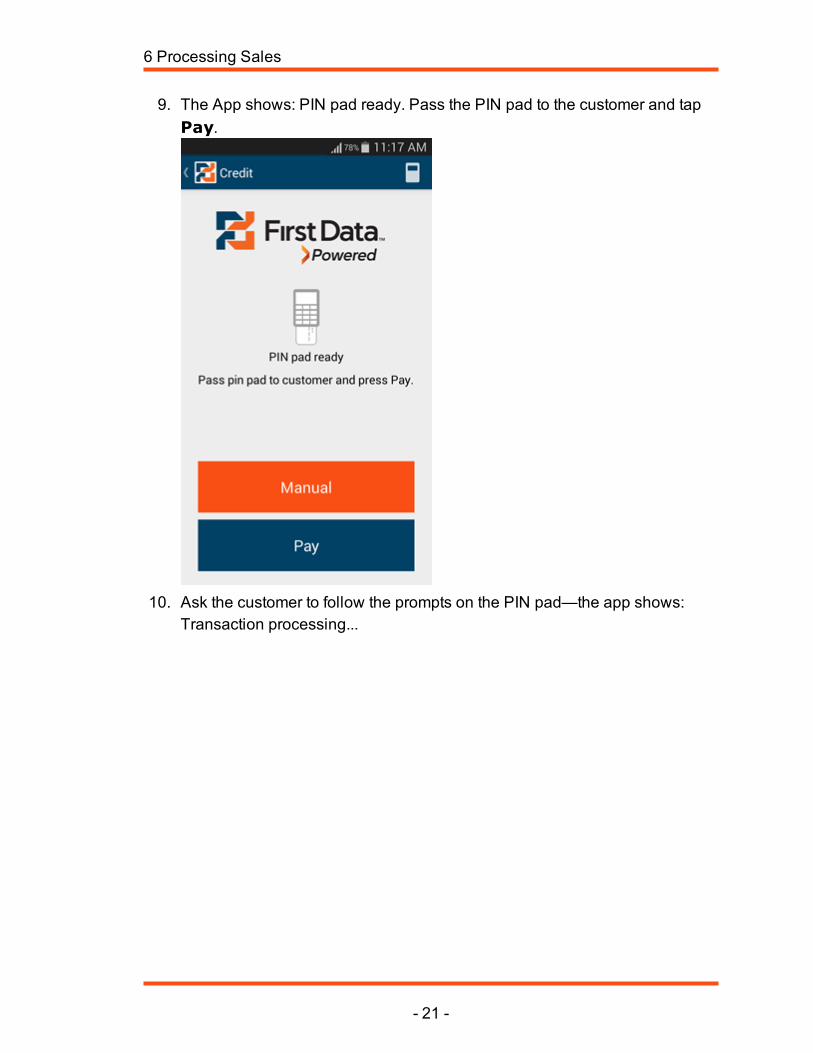
9. The App shows: PIN pad ready. Pass the PIN pad to the customer and tapPay.
10. Ask the customer to follow the prompts on the PIN pad—the app shows:Transaction processing...
6 Processing Sales

- 22 -
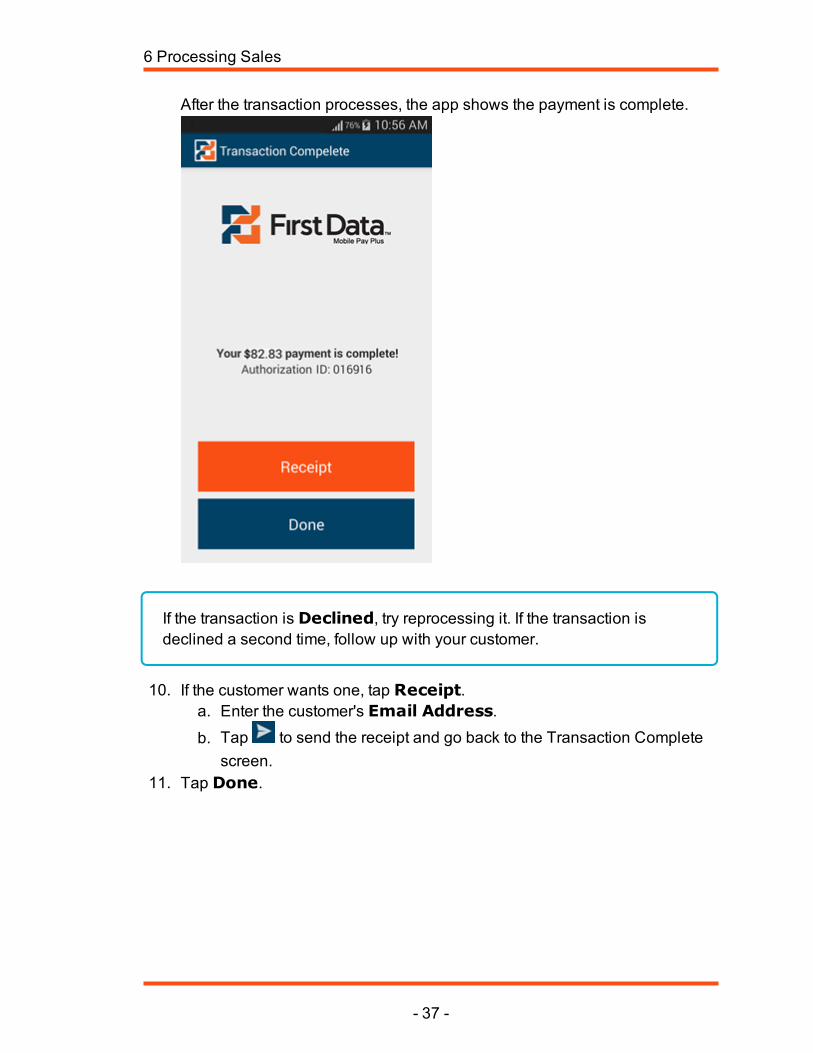
After the transaction processes, the app shows the payment is complete.
If the transaction is Declined, try reprocessing it. If the transaction isdeclined a second time, follow up with your customer.
11. If the customer wants one, tap Receipt.a. Enter the customer's Email Address.b. Tap to send the receipt and go back to the Transaction Complete
screen.12. Tap Done.
6 Processing Sales

- 23 -
6.2 PROCESS MANUAL CREDIT CARD SALESMake sure you are connected to the PIN pad before processing a credit card sale.
1. Open the app and tap Sale.2. Enter the Sale Amount.
3. You can tap to add a Note orOrder Number (must be enabled inSettings> Processing Options). Tap Sale to exit the screen.
4. If this transaction is a pre-authorization, tap Auth. ( onlyshows if enabled in Settings> Processing Options).
6 Processing Sales

- 24 -
5. Tap Continue.
6 Processing Sales

- 25 -
6. Tap Credit.
7. Hand device to customer so they can tap Add Tip (shows if enabled inSettings> Processing Options).
6 Processing Sales

- 26 -
a. The customer can enter a $ amount, move the slider to select a tip bypercentage, or tap one of the preset tip percentages.
b. Tap Done.
6 Processing Sales

- 27 -
8. Tap Confirm.
6 Processing Sales

- 28 -
9. The App shows: PIN pad ready. TapManual.
10. Pass the PIN pad to the customer and tap Pay.11. Ask the customer to follow the prompts on the PIN pad. They need to enter
their Card Number and Expiry Date (MMYY).
6 Processing Sales

- 29 -
12. The phone displays the signature panel. Ask the customer to use their finger
to sign. To erase the signature, tap .
13. Ask the customer to tap to agree to the credit card charge.
6 Processing Sales

- 30 -
14. After the transaction processes, the App shows the payment is complete.
If the transaction is Declined, try reprocessing it. If the transaction isdeclined a second time, follow up with your customer.
15. If the customer wants one, tap Receipt.a. Enter the customer's Email Address.b. Tap to send the receipt and go back to the Transaction Complete
screen.16. Tap Done.
6 Processing Sales

- 31 -
6.3 PROCESS DEBIT SALESMake sure you are connected to the PIN pad before processing a debit card sale.
1. Open the app and tap Sale.2. Enter the Sale Amount.
3. You can tap to add a Note orOrder Number (must be enabled inSettings> Processing Options). Tap Order Details to exit the screen.
6 Processing Sales

- 32 -
4. Tap Continue.
6 Processing Sales
- 33 -
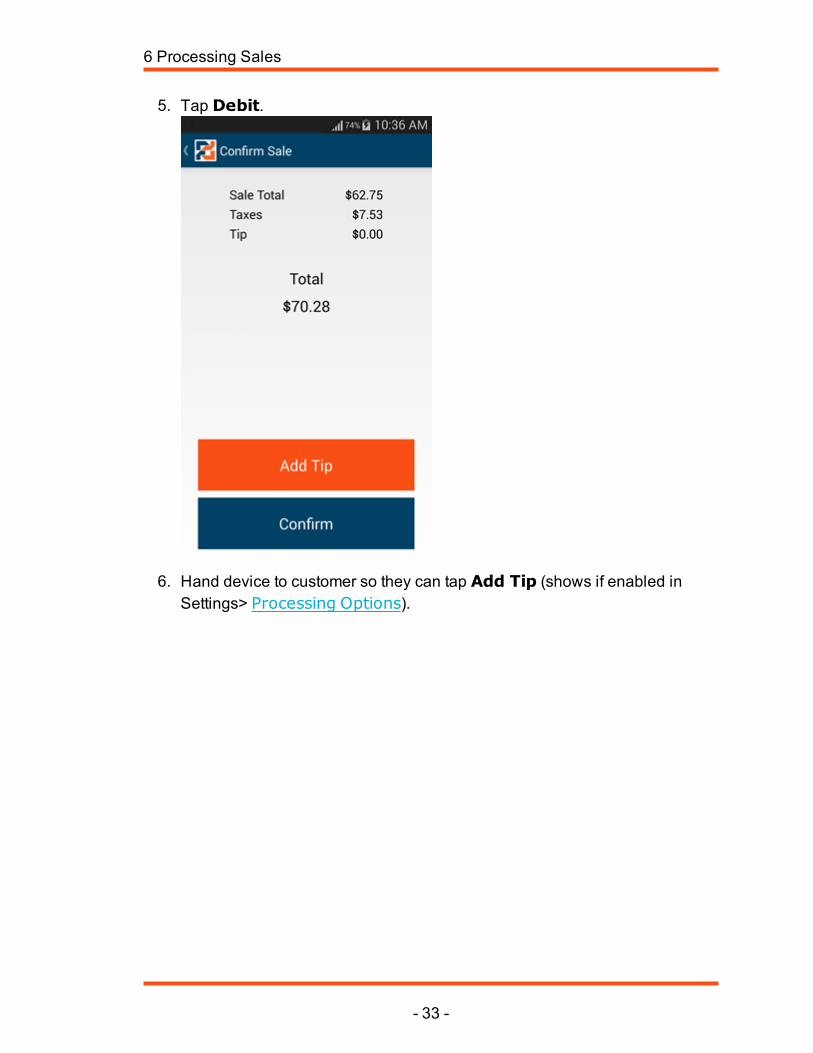
5. Tap Debit.
6. Hand device to customer so they can tap Add Tip (shows if enabled inSettings> Processing Options).
6 Processing Sales

- 34 -
a. The customer can enter a $ amount, move the slider to select a tip bypercentage, or tap one of the preset tip percentages.
b. Tap Done.
6 Processing Sales

- 35 -
7. Tap Confirm.
6 Processing Sales

- 36 -
8. The App shows: Pin pad ready. Pass the PIN pad to customer and tap Pay.
9. Ask the customer to follow the prompts on the PIN pad—the app shows:Transaction processing...
6 Processing Sales
- 37 -
After the transaction processes, the app shows the payment is complete.
If the transaction is Declined, try reprocessing it. If the transaction isdeclined a second time, follow up with your customer.
10. If the customer wants one, tap Receipt.a. Enter the customer's Email Address.b. Tap to send the receipt and go back to the Transaction Complete
screen.11. Tap Done.
6 Processing Sales

- 38 -
6.4 PROCESS CASH SALES1. Open the app and enter the Sale Amount.
2. You can tap to add a Note orOrder Number (must be enabled inSettings> Processing Options). Tap Order Details to go back to theSale screen.
6 Processing Sales

- 39 -
3. Tap continue .
4. Tap Cash.
6 Processing Sales

- 40 -
5. Hand the phone to the customer so they can tap Add Tip (shows if enabledin Settings> Processing Options).
6 Processing Sales

- 41 -
a. The customer can enter a $ amount, move the slider to select a tip bypercentage, or tap one of the preset tip percentages.
b. Tap Done .
6 Processing Sales
- 42 -
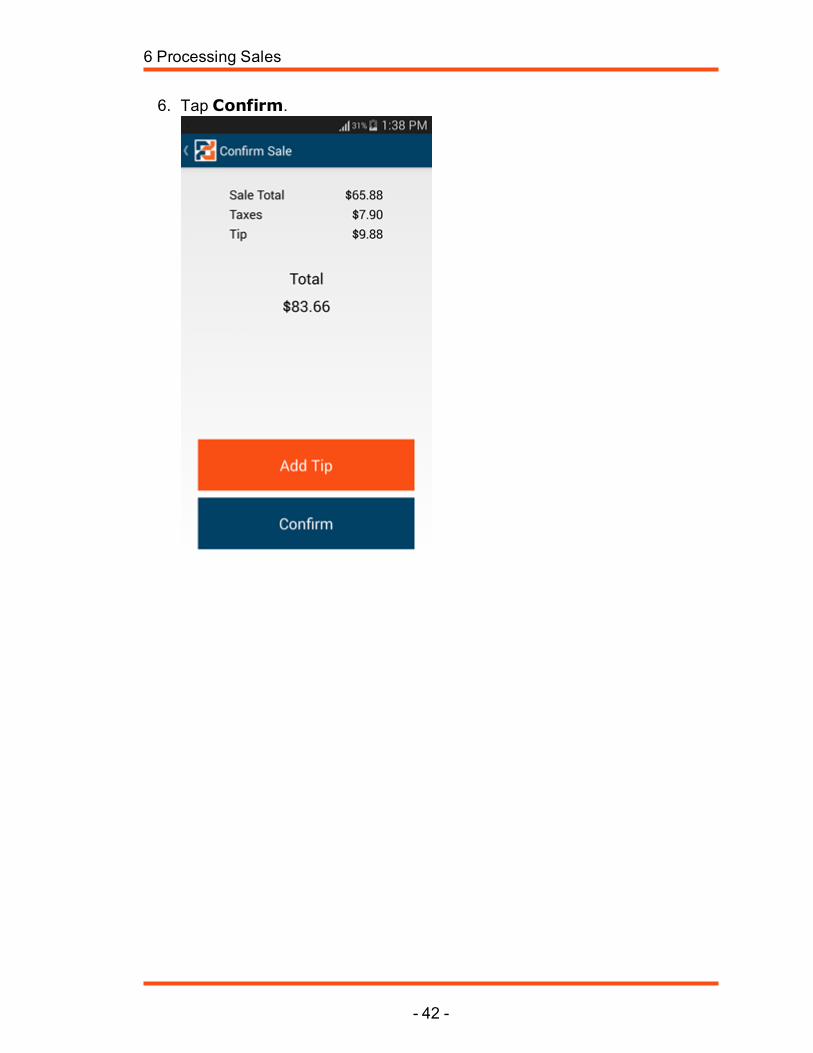
6. Tap Confirm.
6 Processing Sales
- 43 -
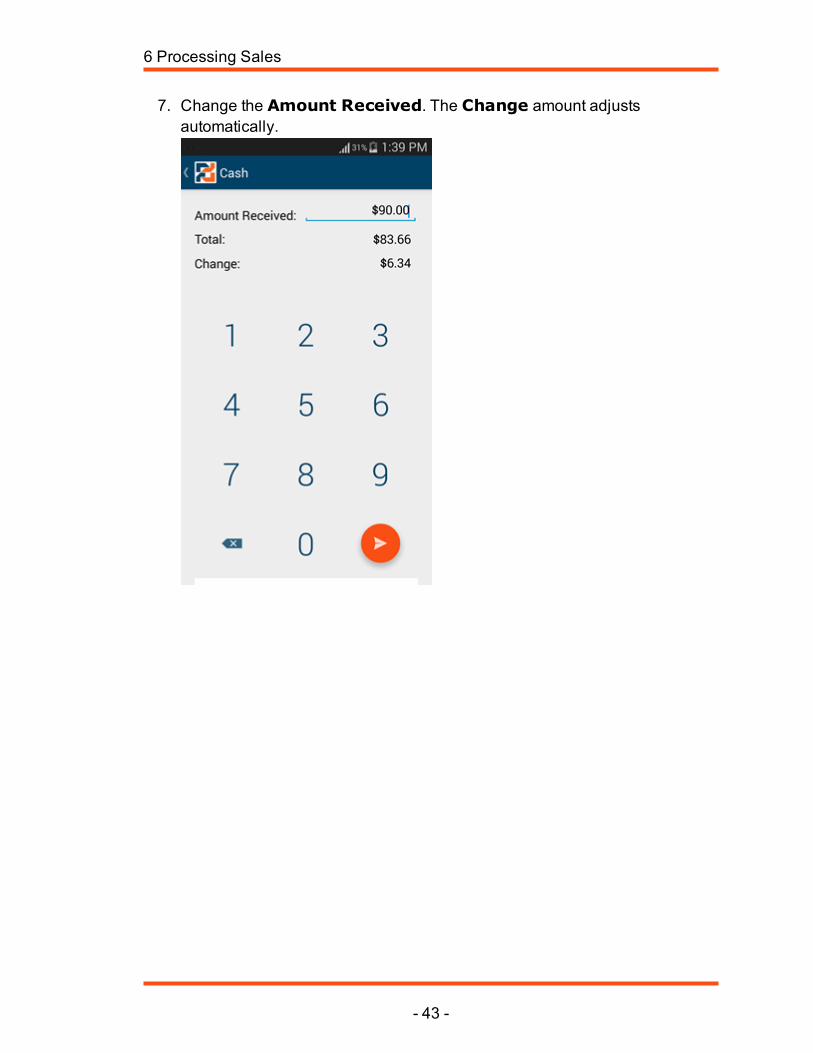
7. Change the Amount Received. The Change amount adjustsautomatically.
6 Processing Sales
- 44 -
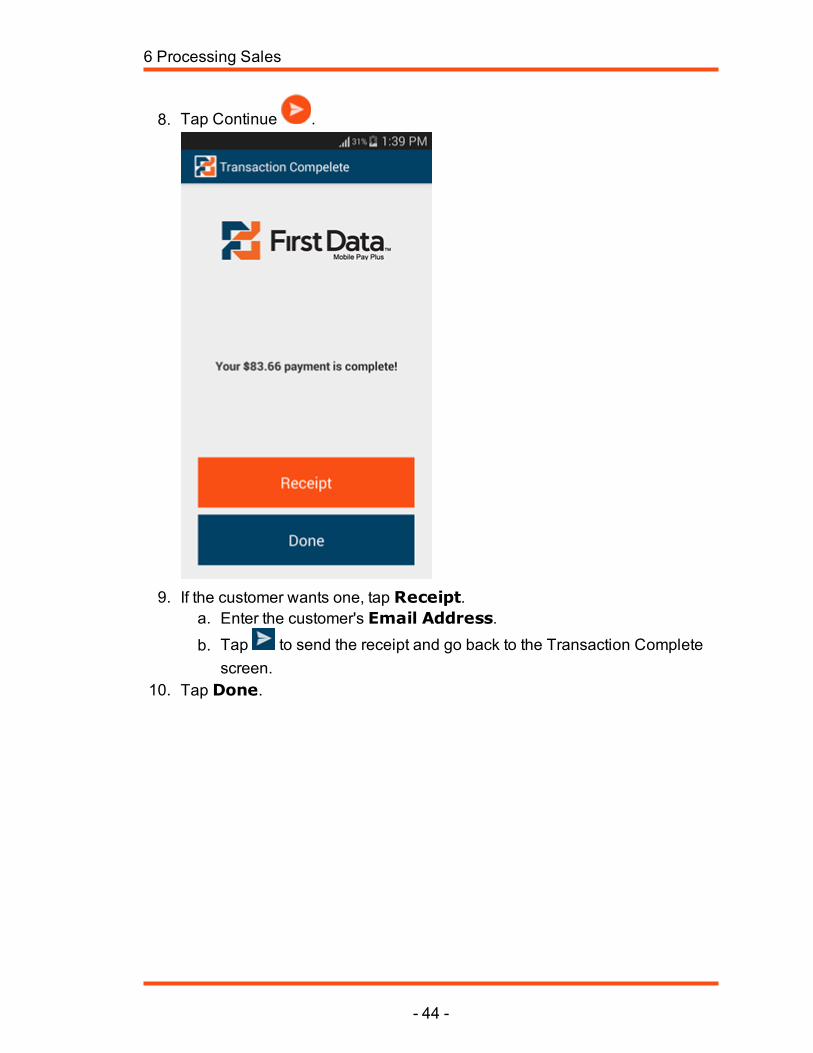
8. Tap Continue .
9. If the customer wants one, tap Receipt.a. Enter the customer's Email Address.b. Tap to send the receipt and go back to the Transaction Complete
screen.10. Tap Done.
6 Processing Sales
- 45 -
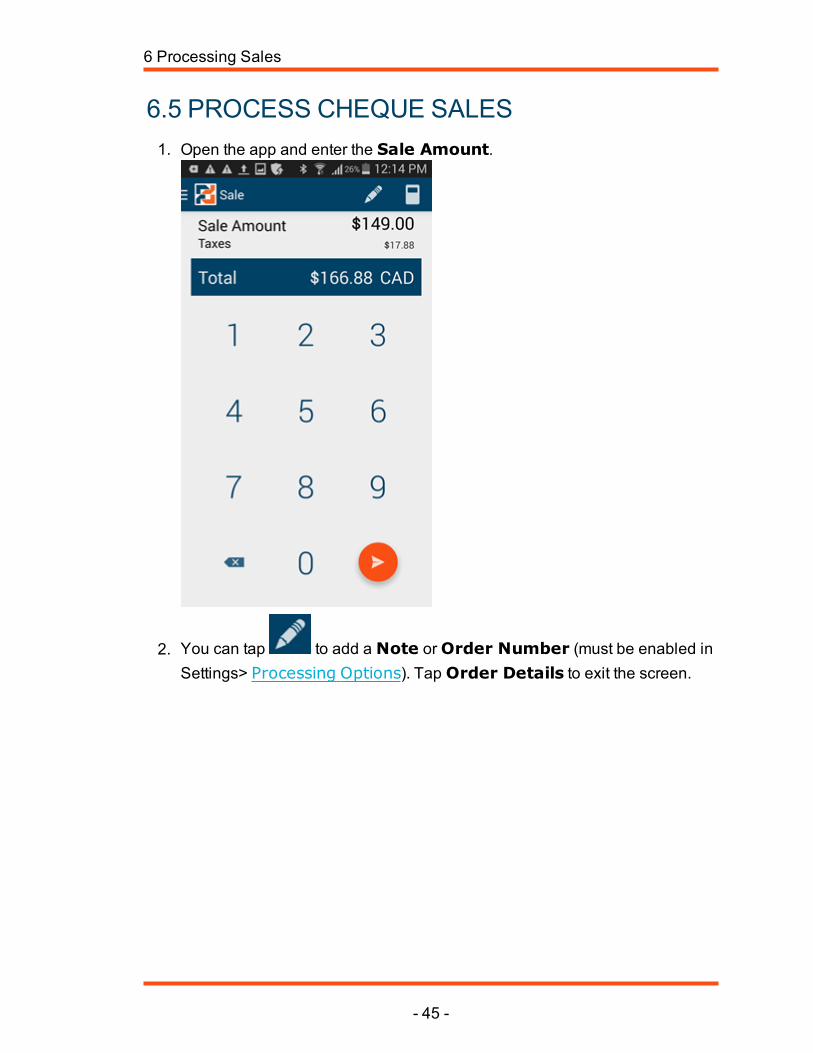
6.5 PROCESS CHEQUE SALES1. Open the app and enter the Sale Amount.
2. You can tap to add a Note orOrder Number (must be enabled inSettings> Processing Options). Tap Order Details to exit the screen.
6 Processing Sales
- 46 -
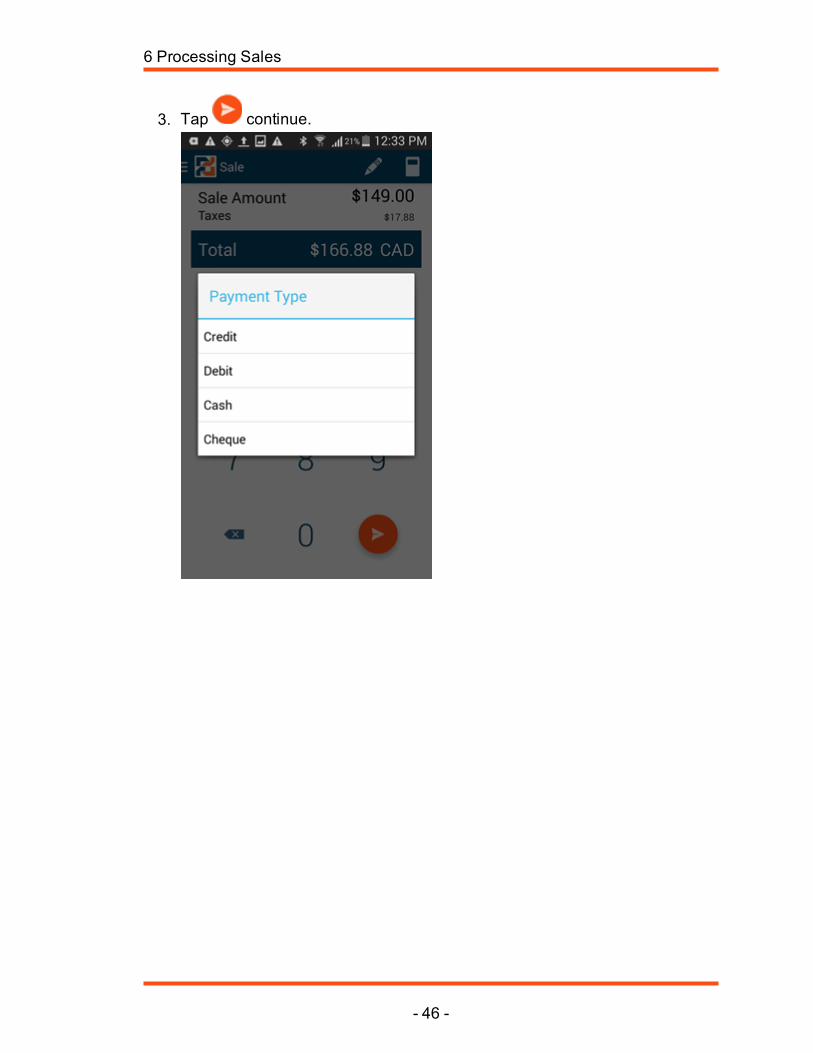
3. Tap continue.
6 Processing Sales
- 47 -
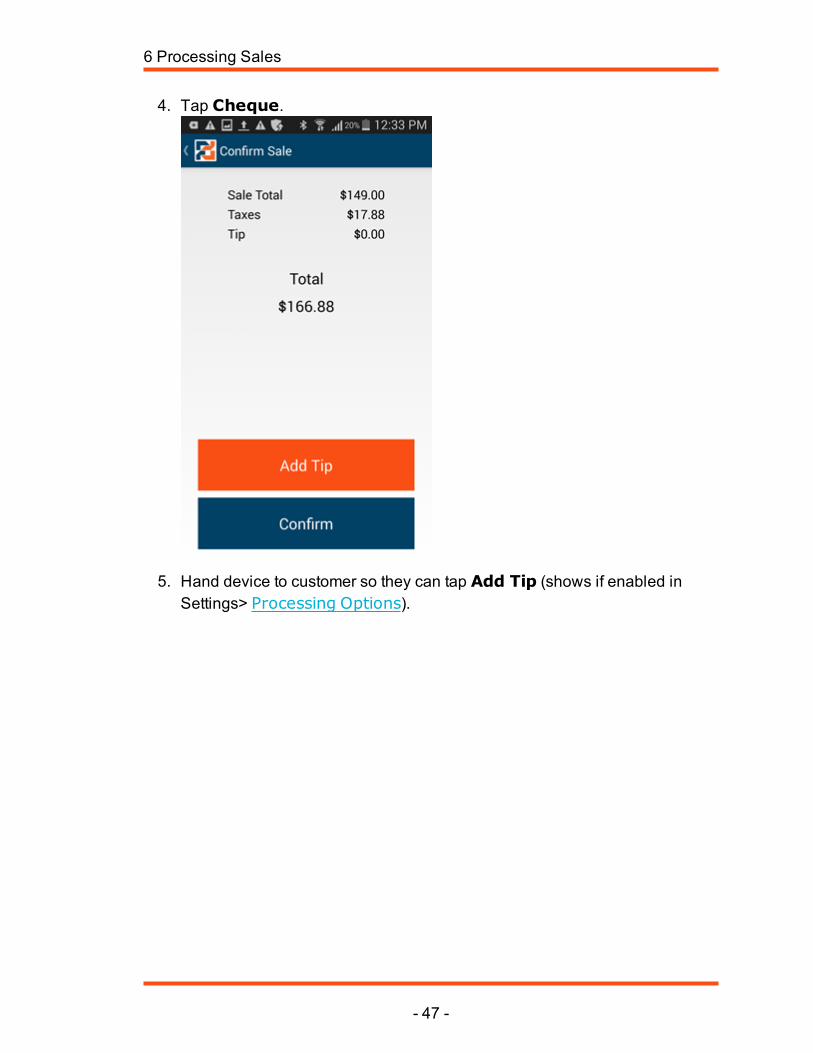
4. Tap Cheque.
5. Hand device to customer so they can tap Add Tip (shows if enabled inSettings> Processing Options).
6 Processing Sales

- 48 -
a. The customer can enter a $ amount, move the slider to select a tip bypercentage, or tap one of the preset tip percentages.
b. Tap Done.6. Tap Confirm.
6 Processing Sales

- 49 -
7. Enter the Account Holders Name and Cheque Number.
6 Processing Sales

- 50 -
8. Tap continue . The Transaction Complete screen opens.
9. If the customer wants one, tap Receipt.a. Enter the customer's Email Address.b. Tap to send the receipt and go back to the Transaction Complete
screen.10. Tap Done.
6 Processing Sales

- 51 -
7 PROCESSING PRE-AUTHORIZATIONSWith Mobile Pay Plus processing, you can only process a credit card pre-authorization completion for the full amount of the pre-authorization hold, not aportion.
There are two steps for pre-authorizations. The first is the actual pre-authorizationtransaction, where the purchase amount is applied to the customer’s credit card asa hold. There are two options to process a pre-authorization:
l Step 1 - Processing Pre-Authorizations with iCMP – Complete a pre-
authorization using the app and the iCMP device.
l Step 1 - Keyed Pre-Authorization (No Device) – Complete the first step
of a pre-authorization by keying in the card details. This step is best if you
have the app, but no iCMP device.
You must complete the second step within a few days. Card associations haveestablished protocols for this process, preventing the holding of customer’s moneybeyond a reasonable time. This transaction completes the pre-authorization byremoving the held funds from the customer’s credit card.
l Step 2 - Pre-Auth Completion
7 Processing Pre-Authorizations
- 52 -
7.1 STEP 1 - PROCESS PRE-AUTHORIZATIONSWITH ICMP DEVICE
The button only shows if Pre-Authorizations are enabled inSettings> Processing Options.
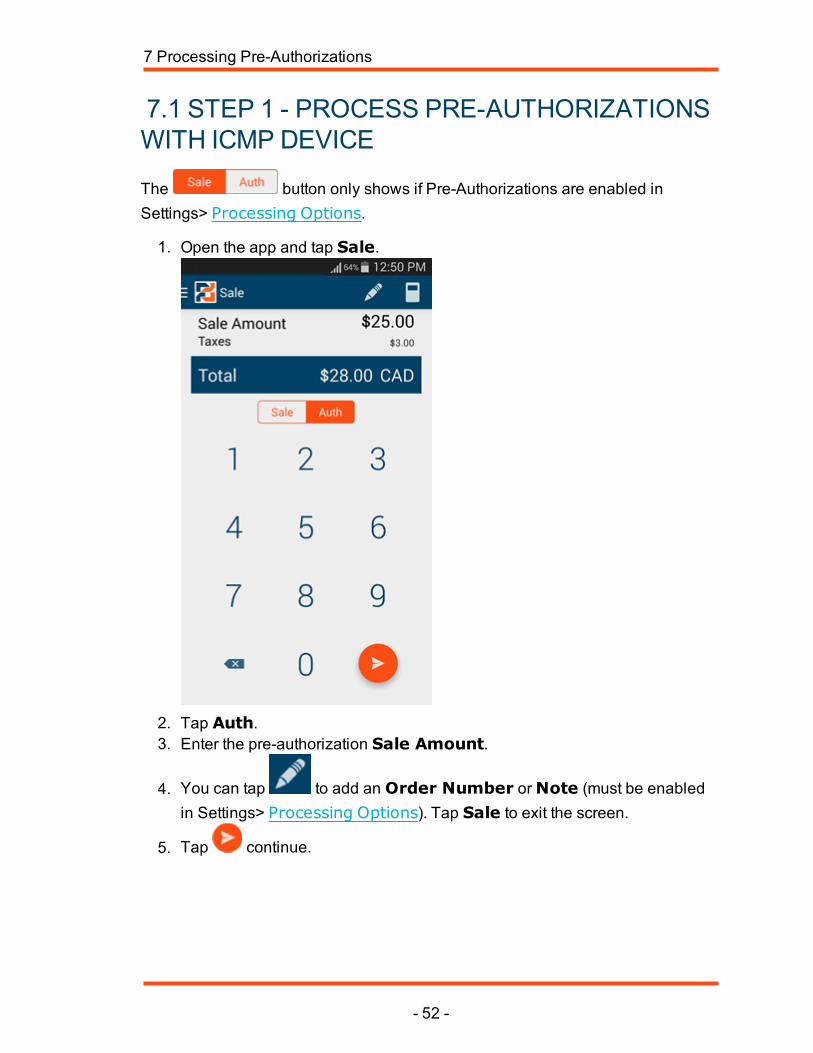
1. Open the app and tap Sale.
2. Tap Auth.3. Enter the pre-authorization Sale Amount.
4. You can tap to add an Order Number orNote (must be enabledin Settings> Processing Options). Tap Sale to exit the screen.
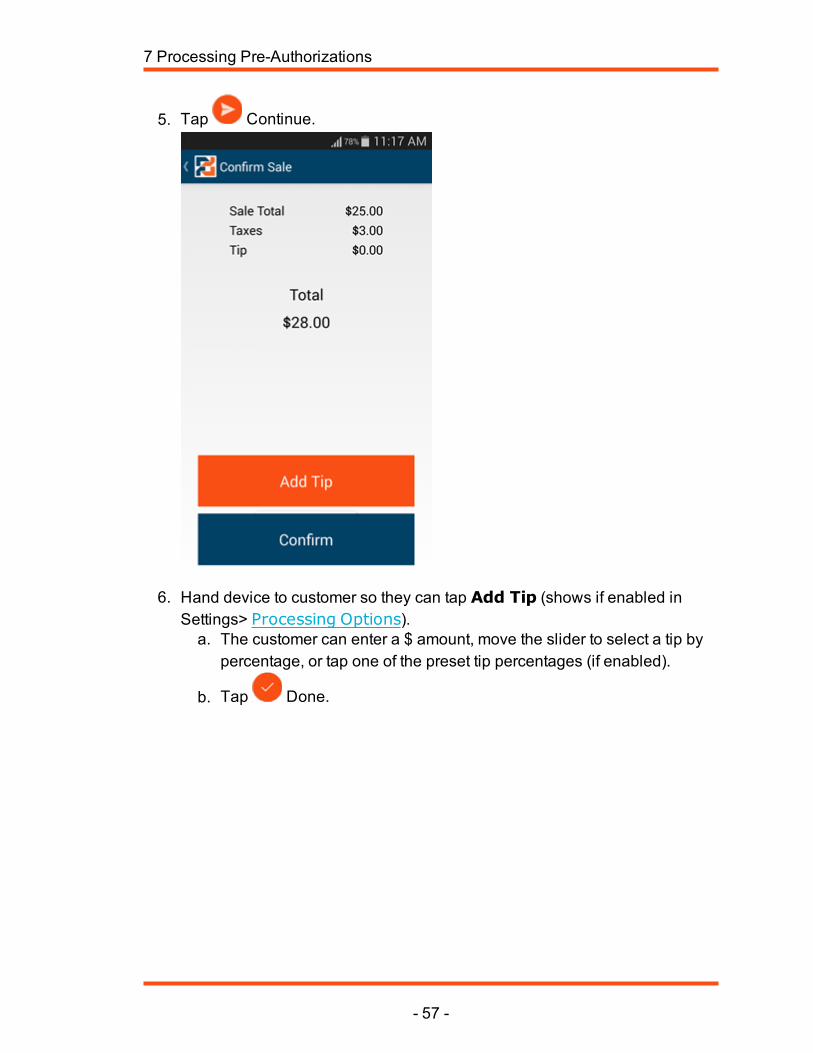
5. Tap continue.
7 Processing Pre-Authorizations
- 53 -
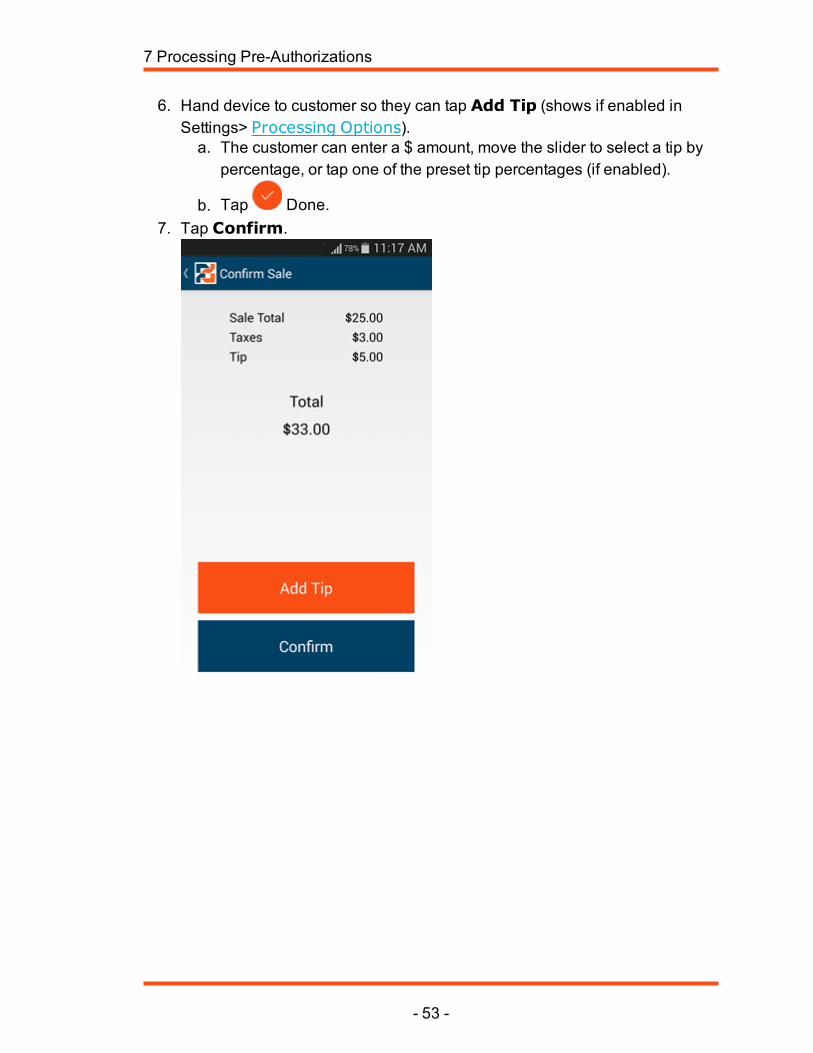
6. Hand device to customer so they can tap Add Tip (shows if enabled inSettings> Processing Options).a. The customer can enter a $ amount, move the slider to select a tip by
percentage, or tap one of the preset tip percentages (if enabled).
b. Tap Done.7. Tap Confirm.
7 Processing Pre-Authorizations

- 54 -
8. The App show: PIN pad ready. Pass the PIN pad to the customer and tapPay.
9. Ask the customer to follow the prompts on the PIN pad—the app shows:Transaction processing...
7 Processing Pre-Authorizations

- 55 -
After the transaction processes, the App show the payment is complete.
10. If the customer wants one, tap Receipt.
a. Enter the customer's Email Address.
b. Tap to send the receipt and go back to the Transaction Completescreen.
11. Tap Done.
7 Processing Pre-Authorizations

- 56 -
7.2 STEP 1 - KEYED PRE-AUTHORIZATION (NODEVICE)
The button only shows if Pre-Authorizations are enabled inSettings> Processing Options.
1. Open the app and tap Sale.
2. Tap Auth.3. Enter the pre-authorization Sale Amount.
4. You can tap to add an Order Number orNote (must be enabledin Settings> Processing Options). Tap Sale to exit the screen.
7 Processing Pre-Authorizations
- 57 -
5. Tap Continue.
6. Hand device to customer so they can tap Add Tip (shows if enabled inSettings> Processing Options).a. The customer can enter a $ amount, move the slider to select a tip by
percentage, or tap one of the preset tip percentages (if enabled).
b. Tap Done.
7 Processing Pre-Authorizations

- 58 -
7. Tap Confirm.
7 Processing Pre-Authorizations

- 59 -
8. The App shows: PIN pad ready. TapManual.
9. Pass the PIN pad to the customer and tap Pay.10. Ask the customer to follow the prompts on the PIN pad. They need to enter
their Card Number and Expiry Date (MMYY). After the transactionprocessed, the App shows the payment is complete.
7 Processing Pre-Authorizations

- 60 -
11. The phone displays the signature panel. Ask the customer to use their finger
to sign. To erase the signature, tap .
12. Ask the customer to tap to agree to the credit card charge.
7 Processing Pre-Authorizations

- 61 -
13. After the transaction processes, the App shows the payment is complete.
14. If the customer wants one, tap Receipt.a. Enter the customer's Email Address.b. Tap to send the receipt and go back to the Transaction Complete
screen.15. Tap Done.
7 Processing Pre-Authorizations

- 62 -
7.3 STEP 2 - PROCESS PRE-AUTHORIZATIONCOMPLETIONTo meet credit card association protocols, the pre-authorization completion mustbe processed within a few days of the first pre-authorization step (of holdingcustomer funds.
1. Go to the Mobile Pay Plus Home screen, swipe from the left to open themenu, and tap Pre-Auth Complete.
7 Processing Pre-Authorizations

- 63 -
2. In the Complete Pre-Auths list, tap the transaction you want tocomplete.
3. In the Complete Pre-Auth window, tap Yes, Complete.
4. When the Transaction Statusmessage opens, tap OK.5. At the top, tap Complete Pre-Auths to go back to the Sale screen.
7 Processing Pre-Authorizations
- 64 -
8 TRANSACTIONTROUBLESHOOTINGThese are some of the situations you may come across when using the MobilePay Plus app.
Invalid XML format (Code(null)) error
If you get the Invalid XML format (Code(null)) error after submitting a transaction,there may be special characters in one of the input fields—Notes, Order Number,Name, Cheque Number, Amount Received, and so on. Remove any specialcharacters from these fields.
I cannot complete a transaction
Usually, a simple on-screen message should explain why you cannot complete atransaction. This occurs if the customer has an invalid card or if you have a keyedentry error. However, if you consistently cannot process transactions, you may beexperiencing a system setup or configuration issue.
For assistance, please message Client Support Services or call 1.888.472.0811
What if I receive a call during a transaction?
The Mobile Pay Plus app is designed to suspend and allow you to take to calls.After the call is completed, the app takes you back to where you were.
Why is there no map on my receipt?
1. Open Settings on your device.2. Find and tap the Mobile Pay Plus app.3. Tap Location.4. TapWhile using the app.
8 Transaction Troubleshooting
- 65 -
9 PROCESSREFUNDSYou can process Refunds for credit card, cash, and cheque transactions. Refundsfor debit transactions are processed as a cash refund. Refunds are doneautomatically, you do not need to use the PIN pad.
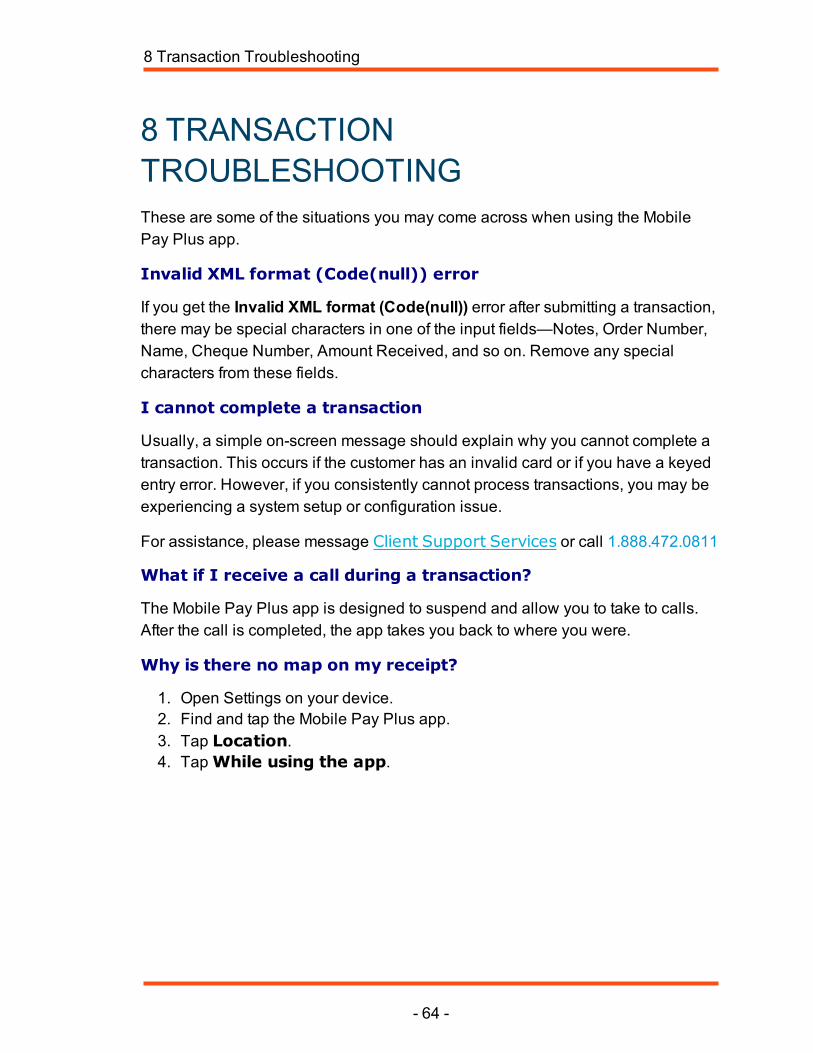
1. Open the app, slide from the left to open the menu, and tap History. TheFind Transaction screen opens.
2. Tap 30 Days, 60 Days, or 90 Days, or enter search criteria for one ofthese options:
l Last 4 digits (of the card)
l Start Date
l End Date
9 Process Refunds
- 66 -
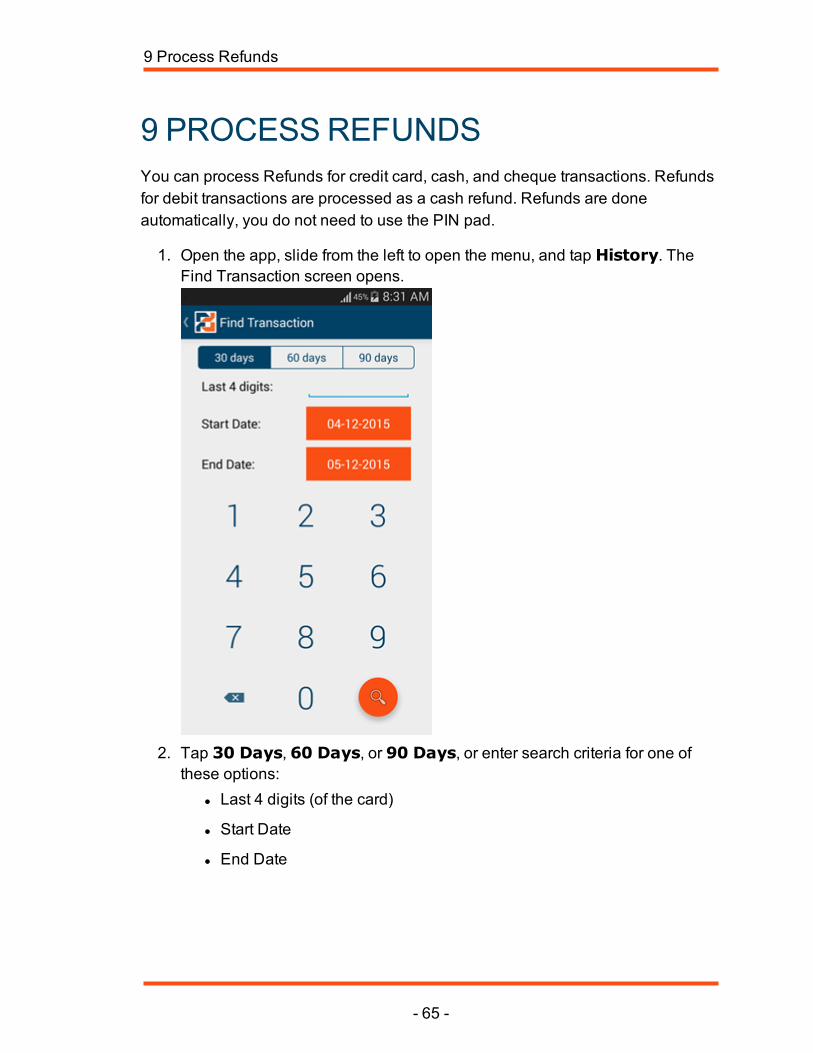
3. Tap Search.
4. You can refine your transaction search by tapping:
lTap , then tap Date Ascending, Date Descending, Amount
Ascending, or Amount Descending.
lTap and enter search criteria, for example the date, transaction
number, or amount.
9 Process Refunds
- 67 -
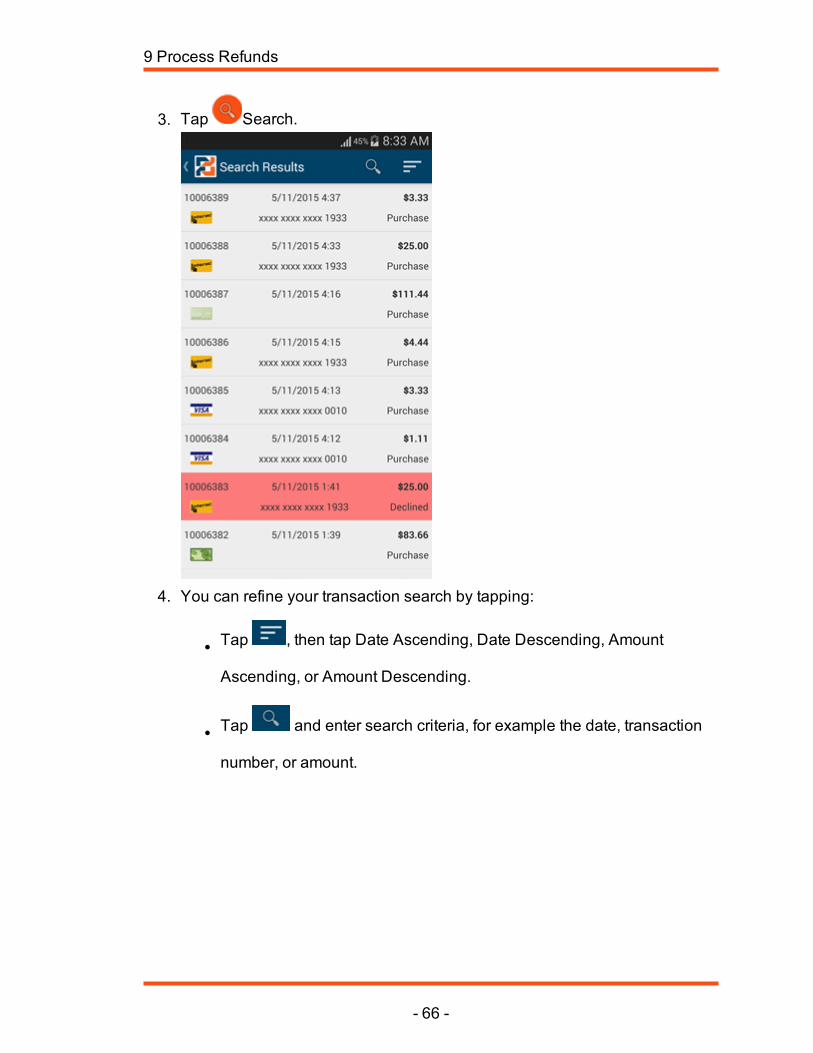
5. Tap a transaction. The Transaction Detail screen opens.
9 Process Refunds
- 68 -
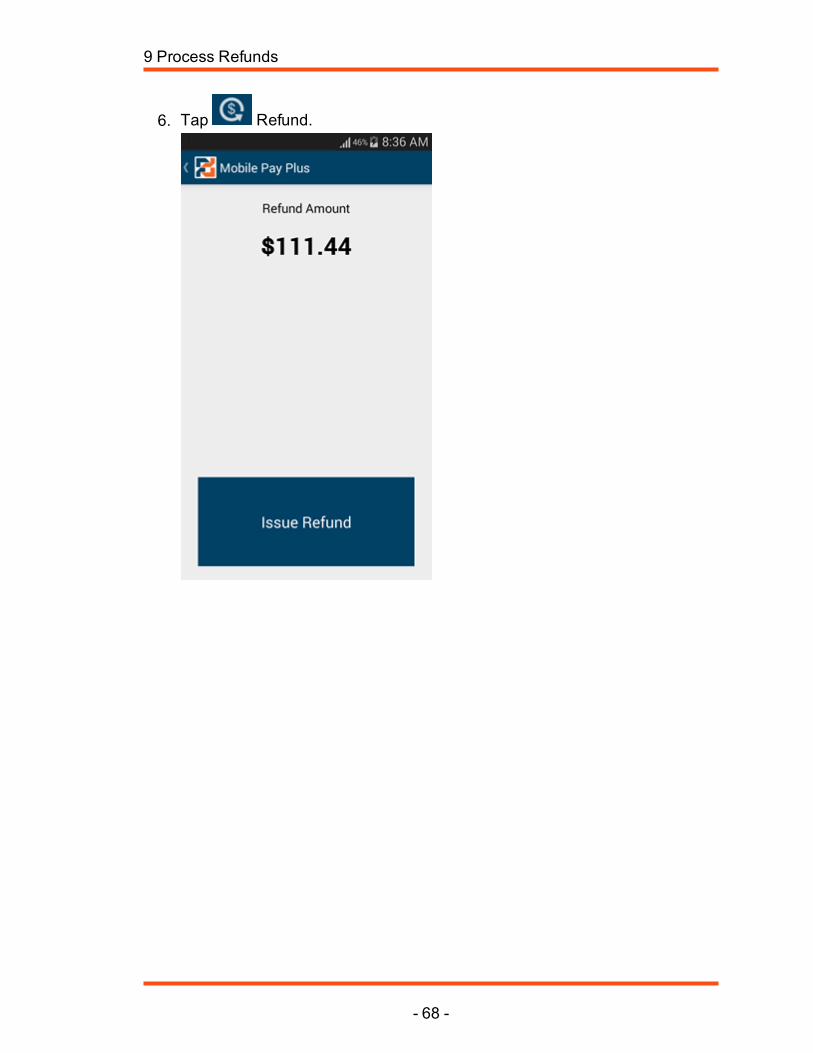
6. Tap Refund.
9 Process Refunds

- 69 -
7. Tap Issue Refund.
8. If the customer wants one, tap Receipt.a. Enter the customer's Email Address.b. Tap to send the receipt and go back to the Transaction Complete
screen.9. Tap Done.
9 Process Refunds

- 70 -
10 VIEW TRANSACTION HISTORYOn your Android phone
1. Open the app, slide from the left to open the menu, and then tap History.The Find Transaction screen opens.
2. Tap 30 Days, 60 Days, or 90 Days, or enter search criteria for one ofthese options:
l Last 4 digits (of the card)
l Start Date
l End Date
10 View Transaction History

- 71 -
3. Tap Search.
4. You can refine your transaction search in a couple of ways:
lTap , then tap Date Ascending, Date Descending, Amount
Ascending, or Amount Descending.
lTap and enter search criteria. For example, the date, the
transaction number, or the amount.5. Tap a transaction. The Transaction Details screen opens.6. You have the option to Refund a transaction.
Through the Online Member Area
1. Log in to the First Data Online Member Area2. On the menu, click reporting/analysis> transaction report.
10 View Transaction History
- 72 -
3. Use the search and sort fields at the top of the screen to select report criteriaand then click Refresh (bottom of screen). The list opens with basic
transaction details, including the credit card transaction (CC) approval
or decline .4. To download the transaction report, click Download. The file is in .csv
format so you can open it as an Excel, Word, or custom file format.5. To view transaction details, click a line item.
You can also go to reporting/analysis> transaction search in the left menu toview or download transaction details.
10 View Transaction History