first claim ideas
TRANSCRIPT

First Claim Activity Ideas
For playworkers who want to provide great
play environments and experiences for
children
This booklet provides examples of
activities and games that link to the
‘playwork curriculum’.
Part of the First Claim Pilot
Childcare Development 2010
1

Activity ideas for each part of the curriculum
Fire
BBQ’s, enamelling, cooking, kiln, candlemaking, fire-pit/bin, burning rubbish
1. Why not toast marshmallows? - Make a bonfire within a circular shape of rocks. Use twigs and dried grass to get started. Then, place larger logs to keep the fire burning. Be sure to stay in control of the fire and not let it get too large. Find a good, thin long stick. You want to be able to reach the marshmallow over the fire without burning your hand. Place the marshmallow on the end of the stick and poke it through until it is on the stick securely.
Is the idea of an open fire all too much, why not have a fire pit that is a little more controlled. For an example risk assessment for this activity see separate page. Don’t fancy marshmallows? Try toasting some bread the old fashioned way. Or just burn sticks.
Charlton After School Club
2. Campfire Popcorn - You’ll need: Tin foil, Popcorn Kernels, Oil, Butter and salt for seasoning. Tear off an 18 inch square of tin foil. In centre of each square add 1 teaspoon oil and 1 tablespoon popcorn. Bring corners together and tie with a string. Place on hot coals and shake with a long stick until popcorn is popped. Season if desired.
3. Campfire Corn on the Cob - Place an ear of corn on top of a sheet of tin foil. Add dots of butter and wrap up tightly. Cook in the coals about 15 minutes.
4. Apple Pie on a Stick - You’ll need: Red or Green apple, Cinnamon, SugarPush a stick through a green apple and turn the stick over the coals of a campfire. (as you would when roasting a marshmallow). When the apple peel starts to loosen carefully peel off. In a bowl mix together cinnamon and sugar then roll your apple around the mixture until evenly coated on all sides. Roast over fire for a few more minutes and let cool.
2

5. Chocolate Fondue - You’ll need: a soup can, tea light and small foil tart tin per person. Take the tin can and using a bottle opener open 3 holes around the top and the bottom of the tin. Start the tea light, then place in tin can. Put the tart tin in the top. Add mini chocolate chips. Let the chips melt. Then use the skewer to dip strawberries, grapes etc.
6. Foil Apple Cobbler - Let each child create his or her own foil food, so that each one can get in on the fun. Or have a big foil wrap for everyone. Take sheet of foil and spray. Place several diced apples inside, and add granola. Fold it closed and roast for 20-30 minutes
Remember healthy eating – perhaps they can take home their goodies!
7. Melting Candles
Recently in our club I impulsively went out, bought three packs of different coloured candles and a box of matches. What did we want to do? Play with fire!
First we needed to talk, so we all sat down together inside (10 children and a couple of adults at the time) and talked about what we were going to be doing, and how we could be safe doing it. This was very important because we had a wide age range of children; year sixes right down to reception!
Once we were done we all ventured out onto the playground, equipped with bowls of water and extra water to put used matches in.One by one we lit everyone’s candles and all of the children sat carefully with their bowls making all sorts of wax creations. Some enjoyed making patterns, whilst others enjoyed the texture of the cooled wax in the water. Some were fascinated by the long sticks of melted wax created by holding their candle still for a long time.
This activity was brilliant because it was a perfect opportunity to talk about how to be safe and why to be safe. The children had a chance to experiment with the flames, feeling the heat from them and the effect it had on the wax. All in all we had the children thoroughly entertained (and quiet!) for over 40 minutes.... the parents were delighted!
Wolvercote After School Club in Oxford
3

8. Jam jar night light - You will need; a jam jar (any shape), pva glue, water, tissue paper and anything else you might like to decorate it with (leaves, glitter etc) and a night light candle. Simply glue on scraps of coloured paper with diluted pva. Don’t put on too many layers or you won’t see the light through it. You could make a design and cut our shapes and glue them on or just do different colours. Pop the night light in and enjoy.
9. Bike wheel chandelier
4
10. Go to a forest –Take a walk or a trip into the country, Visit Hill End (www.oxfordshire.gov.uk/hillend) and collect things to build a fire – remember fire safety outside and make sure there is no damage to the environment. Challenge the group to leave no trace of a fire. Visit http://www.direct.gov.uk/en/HomeAndCommunity/InYourHome/Escapingandrecoveringfromafire/index.htm to learn more about outside fire safety.
11. Storm Kettles Storm Kettle are portable devices for boiling water outdoors using twigs and other small combustible materials; these devices consist of a water jacket surrounding a fire chamber which creates an upward chimney draft ensuring efficient and rapid boiling even in windy or wet weather. Sound complicated? they are not, its very easy and a fun way of introducing fire. Why not boil up some lovely hot chocolate, wrap up warm and tell stories. They range from £30 - £45 and are easily available online. Do a google search for ‘Storm Kettle’. Or visit http://www.wildconnections.co.uk/html/kettles_and_cooking_equipment.html
13. Fire lanterns - Launch Sky Lanterns into the world!
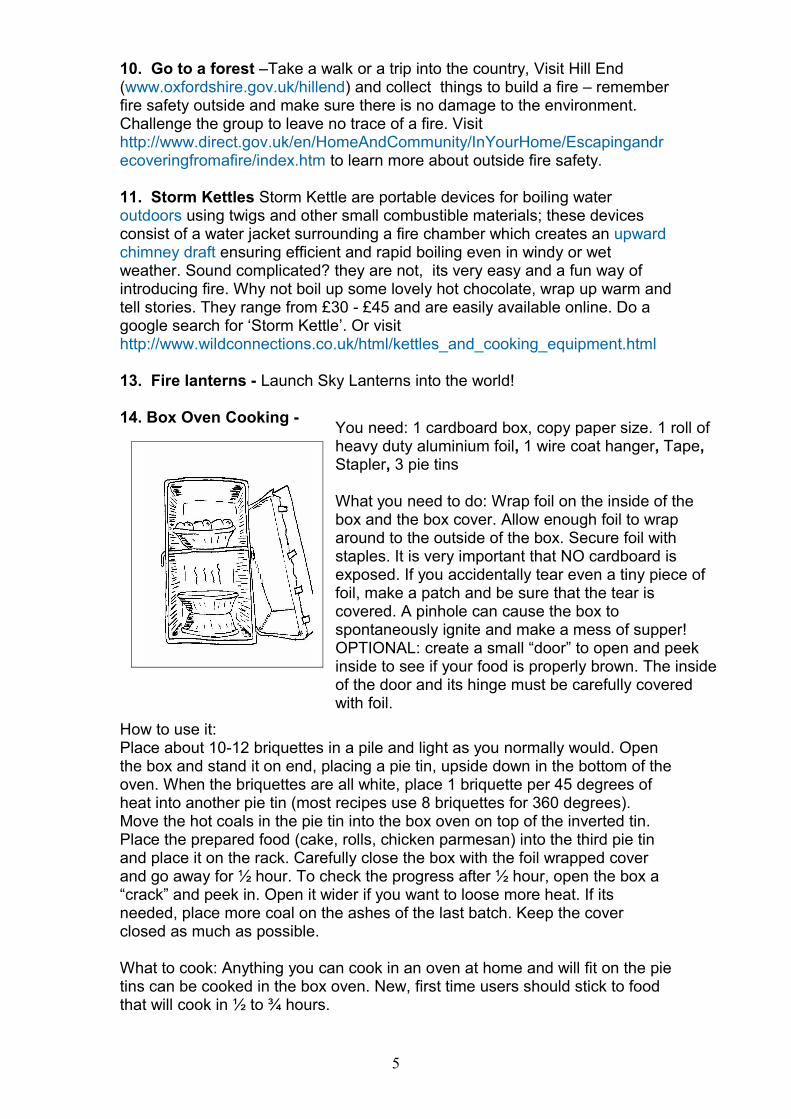
14. Box Oven Cooking -
How to use it:Place about 10-12 briquettes in a pile and light as you normally would. Open the box and stand it on end, placing a pie tin, upside down in the bottom of the oven. When the briquettes are all white, place 1 briquette per 45 degrees of heat into another pie tin (most recipes use 8 briquettes for 360 degrees). Move the hot coals in the pie tin into the box oven on top of the inverted tin.Place the prepared food (cake, rolls, chicken parmesan) into the third pie tin and place it on the rack. Carefully close the box with the foil wrapped cover and go away for ½ hour. To check the progress after ½ hour, open the box a “crack” and peek in. Open it wider if you want to loose more heat. If its needed, place more coal on the ashes of the last batch. Keep the cover closed as much as possible.
What to cook: Anything you can cook in an oven at home and will fit on the pie tins can be cooked in the box oven. New, first time users should stick to food that will cook in ½ to ¾ hours.
5
You need: 1 cardboard box, copy paper size. 1 roll of heavy duty aluminium foil, 1 wire coat hanger, Tape, Stapler, 3 pie tins
What you need to do: Wrap foil on the inside of the box and the box cover. Allow enough foil to wrap around to the outside of the box. Secure foil with staples. It is very important that NO cardboard is exposed. If you accidentally tear even a tiny piece of foil, make a patch and be sure that the tear is covered. A pinhole can cause the box to spontaneously ignite and make a mess of supper! OPTIONAL: create a small “door” to open and peek inside to see if your food is properly brown. The inside of the door and its hinge must be carefully covered with foil.

15. Playing with waxYou will need A large bowl (preferably clear), Water, Candle (~10cm diameter and up to 20cm tall), Matches, Tapers / wooden skewers, Towel(s) You could also have food colouring for the water, stones, herbs and items todecorate the candle. It all depends on what people want!
Carefully heat the bottom of the candle to secure candle in the bowl, Add the water around the candle (about 5cm deep), Light the candle and allow all to play. At a training event this activity kept about 15 adults engrossed for about 20 minutes as the candle was: “Decorated” with twigs etc. pushed into thecandle. “Prodded”. As the wax around the flame softens it will bend towards the flame and melt, usually helped by fingers. (Just to make sure it all meltsproperly). “Modified”, using the tapers/skewers which can be lit from the candle (holes and sculptures appear as these are used to melt the exterior ofthe candle). “Played with”, as the candle burns, the wax melts and runs down / drops into to the water; it can be modelled into new forms of all sorts. Eventually the candle will collapse down and be put out by the water in the bowl.
6
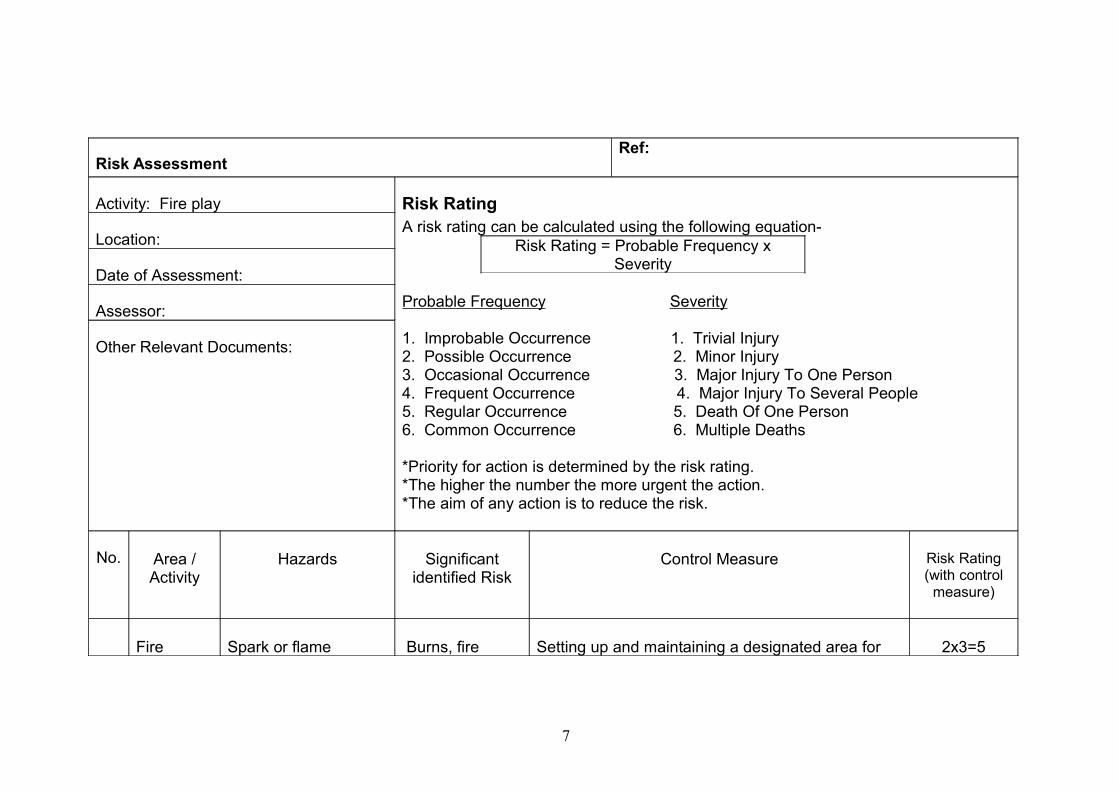
Risk AssessmentRef:
Activity: Fire play Risk RatingA risk rating can be calculated using the following equation-
Risk Rating = Probable Frequency x Severity
Probable Frequency Severity
1. Improbable Occurrence 1. Trivial Injury2. Possible Occurrence 2. Minor Injury3. Occasional Occurrence 3. Major Injury To One Person4. Frequent Occurrence 4. Major Injury To Several People5. Regular Occurrence 5. Death Of One Person6. Common Occurrence 6. Multiple Deaths
*Priority for action is determined by the risk rating.*The higher the number the more urgent the action.*The aim of any action is to reduce the risk.
Location:
Date of Assessment:
Assessor:
Other Relevant Documents:
No. Area / Activity
Hazards Significant identified Risk
Control Measure Risk Rating (with control
measure)
Fire Spark or flame Burns, fire Setting up and maintaining a designated area for 2x3=5
7
catching dry debris nearby causing fire
fire play free from debrisWater container always present
Clothes/Hair catching fire
Physical Hazards (e.g. extremeweather conditions, burns,smoke inhalation, contact withburning objects, flammableclothing etc)
Burns, Scalds
.
Hair tied back no clothes loose all children to be supervised only three children at a time 1-1 observation
All fires must be under directsupervision of competent worker with [depending on numbers] additional adult help.Only designated adult[s]will fuel or stoke the fire.A nominated First Aider should be in attendance.Filled water containers should be in close proximity to the area.A mobile phone must be available for emergencies.The fire must not be left un-attended andit is the responsibility of the worker in charge to ensure that the fire is damped down .3 play ranger staff all first aid trained3 play ranger staff trained to deliver fire play activity.
2x3=5
8

WaterPolythene slide, fights, hose, filling bins/pool, watering plants/veg, water
bombs, swimming,, sailing boats, tie&dye, making/diverting streams, pools and waterfalls, imaginary pubs, trips to rivers/beach, using pipes/guttering etc.
to create waterways…
1. Plate of Bubbles – You need a small plate, a plastic drinking straw, dish washing liquid and tap water. Place two drops (that's all you need!) of dish washing liquid in the centre of a plate. Carefully run tap water onto plate, pointing water over the dish soap to create some foam or bubbles. Carefully place the plate on a flat, sturdy surface, and the children point the straw into the water. To create bubbles, blow gently and slowly into the sudsy water. Not too fast, it won't work! Slow and steady will create huge bubbles
2. Freeze water balloons in the freezer overnight. Take them out the next day, tare off the balloon and discarded. You then have ice balls to play with.
3. Cooling-off version of Duck, Duck, Goose. Have players in a circle. The first person to be "it" walks around the circle with a cup, pitcher, or watering can, dribbling a few drops on each person's head—until they choose a victim to be drenched with all the water from the container. Then the wet player chases ‘It’ around the circle while ‘It’ tries to claim his victim's empty spot in the circle.
4. Dolphin relay in the pool - Divide into teams. The first player from each team will race down and back the length /width of the pool while pushing the ball with their noses and forehead. If they touch the ball with their hands or any other part of their body they must go back to where that took place and start again. The next player will do the same until one team is the winner.
5. Water Skipping - Give each child a plastic or paper cup full of water. While two players twirl a large skipping rope, jumpers one by one attempt three consecutive jumps. They are to do this while holding onto their cup of water and trying to do let any water spill. The child that has the most water left is the winner.
6. Water bomb targets - Hang up targets on trees or playground equipment. Targets can be made out of cardboard, paper plates, aluminium cans or anything creative. Assign different points to each target depending on position and distance. Throw a water bomb at the target. You can keep points by teams or individuals. When a target is hit they receive points for assigned target.
7. Alternative to balloons - Open zip lock bags into buckets of clean water, then seal. Use these to toss back and forth instead of balloons. If they fall and open up, refill in containers again. This is a lot easier and quicker than balloons. Any one that has latex allergies can participate.
9

8. Summer Snowballs
10

9. Water painting
10. Create a miniature pond in a suitable area – use plants and natural water creatures or toy sea creatures.
11. Relay races – use buckets, sponges or cups to transfer water
12. Musical instruments – filling bottles/containers to different levels
13. Hook a hose sprinkler up high
14. Washing up! Washing dolls and dolls clothes, wash bikes and trikes
15. Sand and water – make a channel, floating/sinking concept
16. Junk boats – construct boats out of discarded household items
17. Stone skimming
18. Pooh sticks
19. Colour water – using natural berries etc as dyes
11
Air
Windsocks, paper planes, kites, balloons, helicopter/dandelion seeds, frisbees, flags, banners, windmills, zipline, weather vane, windchimes,
pumping tyres/balls, jumping off high places, earthballs…
1. Paper Butterflies - Fold paper in half. Draw two circles, one smaller than the other. Both should overlap the fold line and each other. Cut out different types of decorations for your paper butterflies. The decorations could be circles, lines, triangles. Glue them on the butterfly's wings in patterns. Cut a thin piece of paper for each antennae. Scrap scissors along the paper to curl it.
2. Balloon volleyball
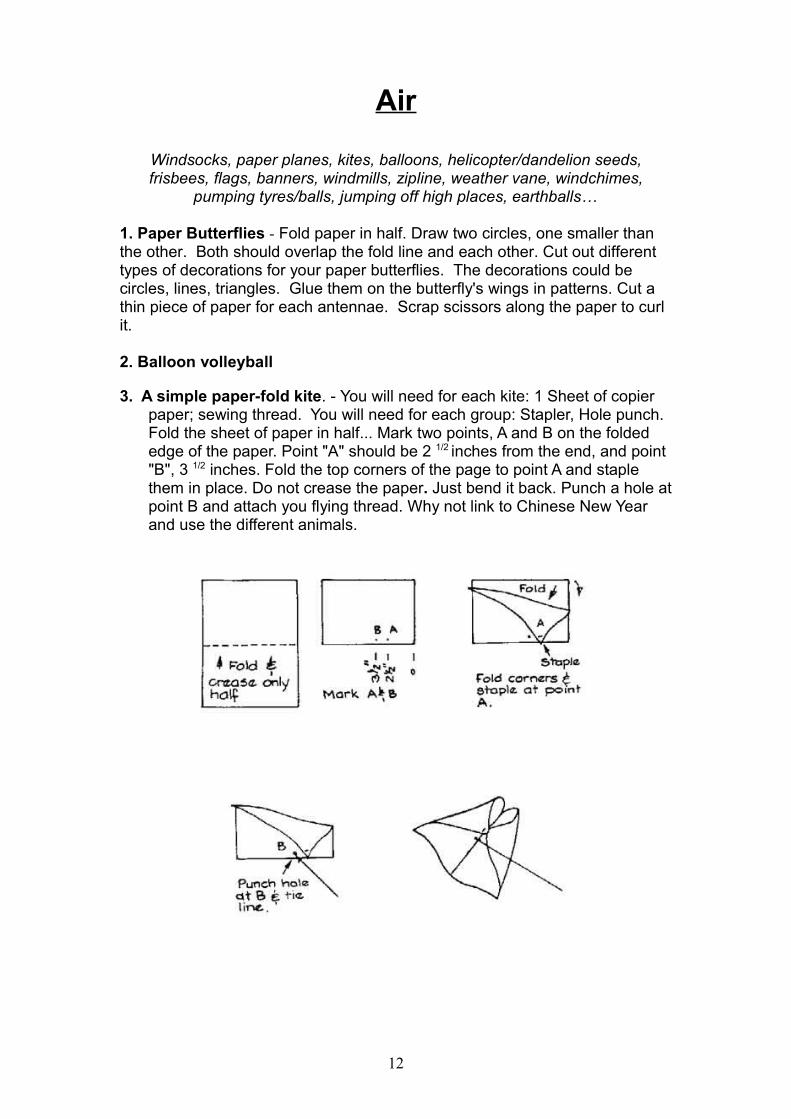
3. A simple paper-fold kite. - You will need for each kite: 1 Sheet of copier paper; sewing thread. You will need for each group: Stapler, Hole punch. Fold the sheet of paper in half... Mark two points, A and B on the folded edge of the paper. Point "A" should be 2 1/2 inches from the end, and point "B", 3 1/2 inches. Fold the top corners of the page to point A and staple them in place. Do not crease the paper. Just bend it back. Punch a hole at point B and attach you flying thread. Why not link to Chinese New Year and use the different animals.
12

4. Flying Birds – giant mobiles
5. Using pumps to create air to move things.
6. Going for walks on really windy days
7. Playing with balloons, playing with them and letting them
loose.
8. Bubbles
9. Fans, large ones, small ones, floating feathers
10. Hair dryers – sensory
11. Helicopter seeds
12. Parachutes – making small ones, using large ones
13. Planted grasses etc when the wind blows = noises
14. Blow football
15. Filling different sizes of bags with air
16. Blowing across different sizes of bottles with different
contents
17. Paint with water = evaporation
18. Washing, drying
19. Marble in paint and blow to make a trail
20. Ice cube painting. Air dries water
21. Blowing through tubes
13
EarthClay, gardening, pot-planting, growing veg/plants, digging holes,
sandpit, mud pies, mud fights, bug hunting, ant farm, making tunnels…
1. Worm farm – put soil into a clear container and observe the little wrigglers!
2. Real worms - Put fresh soil and live earthworms in a table! Add small bowls for the children to put the worms into. Some of the children get squeamish, and others grab fistfuls! Afterwards worms can be placed in the garden and recover from their travels. If you'd like to feed your earthworms, mix some cornmeal into the soil. Remember to have conversations with children about treating animals with respect and consideration.
3. Have a digging patch – just for digging or burying treasure!
4. Willow domes and structures - Use willow rods to create a series oftunnels, domes, hiding places and play spaces on open ground or sides.
Create tunnels through existing shrubs.
5. Puddles - Many children enjoy splashing in puddles with their wellies, or throwing sticks and stones in standing water. It’s even better when puddles freeze in cold weather and children can have fun skidding or smashing through the ice.
6. Make a nature mask – Explore outside and fill a tray with things that you find. Chose a piece of card and make a mask shape. Cut out some eyes so that you’ll be able to see. Use all the things you’ve collected to make a mask. sellotape a short stick to the bottom or use some string to tie it around tour head.
7. Make a nature bracelet – With a friend put a piece of sellotape around your wrist with the sticky side facing out (make sure it’s not too tight). Stick the ends together and tear off. Go on a walk and collect small things and stick them on your bracelet. Or you could use a piece of string to thread things on.
8. Tree heroes - Collect leaves of different colours. Lay out black sacks. Make mixture of pva glue and water. Paint a body shape, tear leaves, stick on top, cover with lots of pva mixture, wait for it to dry, peel off.
9. Mud pies and painting - Materials: plastic basin / table, plastic potato mashers, plastic tablecloth or drop cloth, shovels, scoops, plastic spoons, containers, water, several bags of soil, aluminium tart tins, smocks or old shirts Place several bags of soil into an empty table or basin. Fill a plastic container with water. Invite a child to pour the water onto the soil and mix. Provide the children with scoops and plastic containers and encourage them to play with the mud. Children could fill a tart tin with mud to make a mud pie.
14

When they're done, invite them to place their mud pie on a sunny shelf or in a sunny area on the playground.
10. Mud drawing/writing - Collect mud in pots, add water, find stick – fray at ends, make mud pictures – inside or out Or use sturdy paper plates, paintbrushes, plastic cups, several bowls or cups of mud, plastic spoons to paint the pictures.
11. Mud Sculptures - Use mud to make mud sculptures in teams or pairs or alone – could be related to theme – decorate with materials from outside.
12. Mud Splatters - You will need: Small water balloons, Mud (consistency of paint), Large sheet of white butcher's paper Instructions: Attach the large sheet of white butcher’s paper to a wall or fence with masking tape. Fill the small balloons with the mud and tie up with knots. Stand back from the paper, aim and fire! See the amazing effects on the paper as the mud splatters.
13. Build an ant farm (in a fish tank) - Put sand in the tank. In order to have a better view, use sand for dark coloured ants. To prevent the tunnels made by the ants from collapsing, make sure you dampen the sand once you have placed it in your tank. Now start collecting ants. You can acquire ants by capturing them or even by placing bait (usually sugar water). You can also purchase ant colonies at pet stores. To prevent the ants from escaping, make sure you place a lid on top. You will need to take the lid off for a few minutes every 2-3 days to make sure your ants get enough air. It is very important that ants stay properly nourished and get enough food. The best food for ants typically consists of small pieces of fresh fruit and vegetables, breadcrumbs and dry pet food. Make sure you put a few drops of water in your ant farm every day to keep your ants properly hydrated. For more information on ant farms see http://www.essortment.com/family/antfarmhowkee_skzx.htm
14. Check out mini beast activities at: http://www.naturedetectives.org.uk/download/minibeast_pack.htm
15

17
16
IdentityFacepainting, make-up, hairstyling, dressing up, making outfits, masks, taking
photos, making video/film, marking cultural festivals, role-play, mirrors, montages, using skintone paints/fabrics
1. Panorama view - First stand on a spot where you can see the whole view. Start from the farthest point on the left and take the first photograph. Keep the camera level and the horizon at the same height as you move the camera to the right. Make sure you have about a third of your first picture in the viewfinder before you take the next photo. Keep taking overlapping photographs until the whole scene has been shot. Can you take a panoramic view of the play setting in action. Get the pictures blown up and put on the wall, perhaps even write in comments or use it like a graffiti wall.
2. Start a photo diary containing pictures of people you meet, places you visit, friends, etc. Stick each picture in the book and write underneath all the information about the picture you can think of. Perhaps create a club diary where play is captured and commented on.
3. The sun shines on … Ask everyone to get into a circle. Ask players to change places with another person if they think the statement is true. Start with a statement which means lots of people will move, e.g. ‘The sun shines on you if you are wearing black shoes’. Keep an eye out for people who haven’t moved. It’s a good way of helping people realise they have things in common. You can also look at useful questions like ‘The sun shines on anyone who knows more than three people in the room’.
4. Name claps In a circle the group claps and leaves a ‘space’ for the name of child. Clap, clap, Maria, clap, clap, Kiran, clap, clap, John etc. First time round each child says his or her own name in the space, and the group repeats clap, clap, Maria. There are several variations of this, e.g. clapping followed by word association (peaches, cream, dream, nightmare, horse etc).
5. Hello game There are lots of variations around, a simple version is with everyone in the circle being asked to turn to the person standing next to them and practice greeting people according to the traditions of different countries. Now call out the countries and ask everyone to greet their neighbours – increasing the physical contact:England - handshakeFrance - kissing both cheeks and saying ‘Bonjour’India - hold hands together, bow and say ‘Namaste’Innuit - rub nosesRussia - bear hug
There are lots of other ones you may like to add. It is possible to develop this game so that small groups of children walk around the group and say ‘hello’ to
17
each other choosing a country themselves to start off with and then taking on the greeting of the group they meet. It provides opportunities to find out about cultural differences.
ConceptsConversations on war, birth, death, democracy, justice, peace, crime,
punishment, culture, time, space, marriage, religion. Creative play or role-play on any of these using loose parts/props etc. Animals - alive… and
dead…
1. Obstacle courses – the concepts of under over etc
2. Making Volcanoes - Materials: Baking soda, vinegar, red food colouring, play sand or dirt. Description: Introduce the concept of volcanoes at a group gathering. Have the kids form a volcano with sand or dirt, leaving a hole in the top for the materials. Then add about 2 tablespoons of baking soda and 1/2 cup of vinegar (depending on the size of the volcano). For best results, add red food colouring to the vinegar before you pour it. Get carried away with building villages and see where it take you.
3. Life, death, marriage, divorce – Be prepared to have conversations or stand back and see how role play / children’s games pan out. Sometimes there will be play or questions that might not all be jolly but they are equally important. Children explore these concepts in many ways – sometimes its amusing to us as observers, sometimes it can be upsetting and its helpful to be able to share these with your team members so you support one another.
4. Democracy – How involved in the elections are you? This could be at various levels depending on the children and where they take the play. Did they want to question local councillors on what their views are – maybe there school councillors?
5. Parachute Games – Under over having things on hand eg make their own props.
6. Bring in newspaper articles – Media, start conversations.
7. Dressing up – Cargo nets/camouflage stuff, let things play out, role play, eg, military, hospital play
9. Animals – having pets in clubs can give lots of experiences (cleaning, playing, caring for, talking to etc). It can add a new concept particularly for children that do not have pets at home.
10. Different cultures
11. Humans vs. Zombies is a game of tag. A group of human players attempt to survive a "zombie outbreak" by outsmarting a growing group of zombie players. Great to get the actions of what aliens and zombies do!
18
The SensesMusic – all types. Blindfold/trust games. Herbs, spices, flowers,
Interesting and aesthetic sights & sounds & shapes. Perfumes/smells. Making colours, collage. Food-tasting, cooking.. Varieties of natural textures
& colours. Types of lighting, darkness..
1. Feely Box - Use any box that closes or has a lid, a shoebox is ideal. Cut a hole in the side of the box large enough for a child's hand to fit inside. Place an object inside the box and see if they can guess what it is. If they can't guess right away, let them ask questions or provide them with clues until they figure it out.
2. Name That Tune - Hum tunes from popular songs and see who can guess it first. Whoever guesses correctly becomes the next "hummer".
3. Smells - Children like extremes, so plant huge flowers, like sunflowers, and small vegetable plants, like cherry tomatoes. Plant fragrant flowers or herbs like peonies, lavender, and chocolate or pineapple mint. Show them how to rub the herbs between their fingers to get a really good whiff.
4. Fairy Play Doh 1 cup flour 1 tablespoon vegetable oil 1 cup water ½ cup salt 2 teaspoons cream of tartar, Food colouring gel, Glitter. Mix all ingredients with the exception of the glitter in a sauce pan well heat stirring until it forms a ball remove at once. Add the glitter and knead until smooth.
5. A great dry activity for the sensory area is shredded paper. Most businesses are willing to give it away. The children love to hide toys in it and most of all, wear it on their heads.
6. Clean Mud: Mix 1 roll white toilet paper, 1 bar grated Dove Soap (grate with a cheese grater), and warm water (make the water warm enough to melt the soap). Children tear up the toilet paper into small pieces. Put into big bowl with grated soap. Pour in water in small amounts while mixing paper and soap with hands. Enough water has been added when the mixture is the consistency of thick cool whip. The more you work it the softer it becomes.
7. Playing with shaving cream
8. Squeeze In a circle holding hands. Squeeze the hand of the person on your right, who passes the squeeze on. Practice it going round the circle. Then speed it up and add sound eg ‘Ooohh’. Now send the squeeze in the opposite direction as well with another sound like ‘Aaahh’. Can you have
19
more than one squeeze and sound going round the circle in different directions at once?
9. Sensory Painting With A Scent - Materials: Paper (prefer stiff), Several flavours of Kool-Aid, Paint brushes. Description: Mix each flavour in a separate container with about half a cup of water. Allow the children to paint on the paper with the brushes after dipping them in the flavoured water. The painting looks just like watercolour paints and it smells so good. Actually the whole art area smells great! The children love dipping their brushes in and smelling them before they paint, they try to guess what flavour it is. After the painting has dried the children can scratch their painting with their finger and smell the paint on their picture. Just like scratch and sniff stickers. You could use essential oils too – or have essential oils burning safely in the background whilst painting / playing generally.
10. Grass Heads - Materials: Old pair of nylon legs, grass seed, soil, small plastic containers (,jar or cleaned cat food tins), elastic bands, googlie eyes (the ones you sew on), pipe cleaners and a spray bottle. Description: 1. Cut nylon at the knee 2. Scoop in 1 tbsp. grass seed 3. Scoop in preferred amount of soil / compacted (size of a tennis ball). Work the soil down to foot of nylon into shape of a head. 4. Tie the open end of the nylon tight (snip excess nylon and leave about 3 inches dangling). 5. Have the children pinch the soil through the nylon to make it easy to tie elastic around for ears and nose. 6. Sew on googlie eyes. 7. Make glasses out of pipe cleaners 8. Place grass head on top of small container (have excess 3 inch nylon dangling into the container 9. Pour in 1/2 inch of water in bottom of the container every couple of days. 10. Spray water gently over grass seeds on top 2 times each day. Watch the grass grow and watch the children enjoy creating there own hairdo's.
11. Hand and Foot Printing - You will need: Sheets of paper, Fine mud and water (mixed to consistency of paint), Paintbrush, Cotton buds. Dip the brush in the mud and paint the palm of your hand. Press your hand down firmly onto a sheet of paper. Slowly lift it off to reveal your hand imprint. Add more handprints and footprints. Decorate around your hand and footprints with dots made from dipping a cotton bud into mud and dotting the paper.
12. Have a glow in the dark party.
13. Sound Charades - Write something that makes a sound on each of 10 or more blank cards, such as horse, violin, drum, doorbell, clock, heartbeat, popcorn. Divide into two teams, even if there's only one of you on each "team." Everyone picks a card and teammates guess the sound you're acting out. If there are only two of you, you each guess the other's sound.
14. Torch Limbo - Play this to music in a nearly dark room. Two people holding torches stand a few feet apart. Point the lit torches at each other so that they form a single level beam of light for a third person to limbo under.
20

15. Torch tag - Go outside and play laser tag but with torch beams, try to hunt and shoot down the opposing team.
21
A Varied LandscapeStructures and structure building, different heights/levels, hills, mounds,
trees, platforms, bridges, pits, swings, garden, aerial runway, ditches, tunnels, quieter areas, places to sit, to hide… Open and natural spaces…
1. Collages - Save old magazines and catalogues and store them in a cabinet just for this purpose. Have the kids cut out pictures and paste them onto a piece of cardboard or construction paper. You can let them cut out whatever they want, or assign each child a letter of the alphabet or a theme to go by for a more challenging project. Keep a trash can close by for the scraps and be sure to keep a stock of glue sticks on hand!
2. Shadowboxes - Paint the inside of a shoebox with black or dark blue poster or acrylic paint. If you don't have any paint handy, you can glue black construction paper inside the box. Using white crayons or stickers, create a night time scene with stars and the moon on the black background. You can use small plastic toys to create a scene inside your shadowbox, or make your own with construction paper and glue. Cut out small pictures from colouring books and colour and adhere to your scene. Hang a spaceship or shooting star with a piece of string and glue.
3. In your outside area - Make a secret place in the garden for your kids. Leave a space between the stalks of easy-to-grow sunflowers or bean poles so they can crawl "inside." Make a chicken wire animal and train ivy around: instant topiary!
4. Tree Spirits Lump of clay – squash onto a tree to stick – decorate with outdoor things – twigs, leaves, etc – make face out of it OR little animals or ….let the imaginations go!
5. Banks and Slopes - Children love to run down, slide or roll down slopes. And best of all when it snows!
22
Materials
Sports equipment, kiln, TV, computers, oven, BBQ, video, games consoles, pots/pans, tools, soft toys, parachute, inflatables, props galore…
1. Cookie Cutter Glitters - Pull out the construction paper, glue, glitter, stickers and cookie cutters. Kids can trace around the cookie cutter shapes, spread glue over the shape and decorate with glitter and stickers. This can be a messy craft, so be prepared with a disposable table cloth and garbage can for scraps. Using a vacuum with a hose attachment is a much easier method of cleaning up glitter than a broom.
2. Colouring Pasta - Place a handful of dry, uncooked pasta, such as ziti, rotini or farfelle, into a plastic zipper bag. Add a tablespoon of white vinegar and 2-3 drops of food colouring. Close the bag and have the kids shake the bag until the pasta is completely coloured. Spread out onto a paper plate or paper towel and allow to dry. Use several baggies to create different colours. Once the pasta is dry, kids can use yarn to string together pieces to make necklaces and bracelets, or glue them to paper plates or construction paper to create a work of art.
3. Googala Monster - This game requires at least two people, but a bigger group is always more fun. One player is selected to be the googala monster, and that person must wear a blanket over her head. The blanket should be fairly large so that more than one person will be able to fit underneath it. When the game begins, all the players will try and sneak around in the dark and avoid the googala monster. When the monster catches someone, that person gets under the blanket to make the googala monster harder to coordinate and a little bit bigger. The game is won by the last person who is left uncaptured by the googala monster.
23
BuildingDen-making, sand play, structure-building, camps, fence-making,designing areas, model-making, taking electrical equipment/bikes
apart, go-kart/trolley building, float-building for carnival
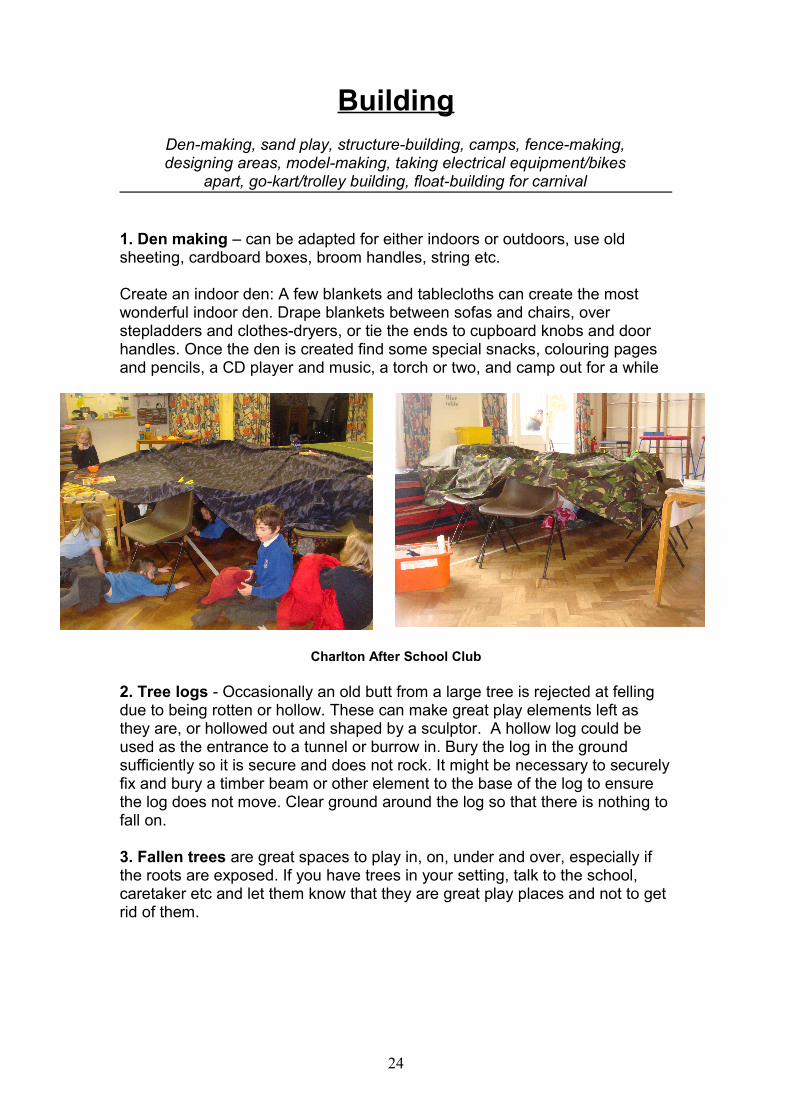
1. Den making – can be adapted for either indoors or outdoors, use old sheeting, cardboard boxes, broom handles, string etc.
Create an indoor den: A few blankets and tablecloths can create the most wonderful indoor den. Drape blankets between sofas and chairs, over stepladders and clothes-dryers, or tie the ends to cupboard knobs and door handles. Once the den is created find some special snacks, colouring pages and pencils, a CD player and music, a torch or two, and camp out for a while
Charlton After School Club
2. Tree logs - Occasionally an old butt from a large tree is rejected at felling due to being rotten or hollow. These can make great play elements left as they are, or hollowed out and shaped by a sculptor. A hollow log could be used as the entrance to a tunnel or burrow in. Bury the log in the ground sufficiently so it is secure and does not rock. It might be necessary to securely fix and bury a timber beam or other element to the base of the log to ensure the log does not move. Clear ground around the log so that there is nothing to fall on.
3. Fallen trees are great spaces to play in, on, under and over, especially if the roots are exposed. If you have trees in your setting, talk to the school, caretaker etc and let them know that they are great play places and not to get rid of them.
24

4. Making a Cane Den You will need: 25 garden-type bamboo canes (1.5 m) canes are ideal but you can use longer or shorter), 50 giant (77mm) paper clips, gaffer tape, string cut into 40cm lengths.
Preparation:Fix a paper clip to both ends of every cane, with gaffer tape, so that it creates a short ‘loop’.
1 Put 3 canes on the floor and make a triangle.
2 • Cut 3 pieces of string 40cm long.• Tie the paperclip loops together; make a
tight knot at each corner.
3 • Do this until you have 5 triangles
4 • Lay the 5 triangles on the floor to make an inner pentagon shape (5 sided shape).
• Knot the corners of each triangle together where they touch.
5 • Take another 5 canes
• Stand each triangle up, lean out slightly from the base and tie 1 end of the cane to the tip of the triangle, tie the other end to the next tip of the next triangle.
• Do this until all the triangles are joined together. It should stand up by itself -just.
6 • Take another 5 canes and a piece of string.• Put the string through the paperclip loops
and tie a tight knot.
7 • Get a tall person to stand inside the triangles and hold the bunch of canes open like an umbrella.
• Now tie the loose end of each cane to the top of each triangle.
25

ChangeDesigning of areas/structures, redecorating, murals, pavement art,
pond-digging, stream re-routing, digging tunnels…
1. Back Yard Weather Station - Ever think of building a backyard weather station with your kids? It's fun, easy, and makes a great family project! Your kids will learn the basics of scientific observation and record-keeping while satisfying their natural curiosity about weather. A weather station is a set of devices for measuring elements like temperature, rainfall, wind speed, and pressure. You can buy these devices in your local hardware store, or you can make them from scratch using common materials found around the house.
2. Outside murals - Materials: Long strip of clear plastic (sheet), paints paint brushes, wire to hold up the plastic sheet, and a fence. Let the children help in attaching the plastic to the fence. Let the children to paint the 'canvas' with any images they like. These murals are an amazing addition to any outside play area. Why not use different consistencies of mud and water rather than paint.
3. Sheet painting - Materials: Spray bottles, water, liquid paint and a old sheet. Description: Fill a spray bottle with half water and half paint. For creative outdoor fun, hang an old sheet on a fence or create a clothesline and have the children spray paint it.
4. Changing an outside space but not permanently! - Materials: A spray bottle for each child, watercolours, water, large wall or fence. Description: Fill each water bottle with a different colour watercolour, mixed with water. Outdoor, on a large wall or fence, let children spray and watch what happens as colours mix. Dries quickly and washes off easily.
5. Make the environment different by making it dark – Playing games in the dark is very exciting for children. Not only do they get the fun of playing a game but they also get the adrenaline rush of playing in the dark.
Put board / paper up on the widows and replace light bulls with colour ones or glitter lamps. Give the children torches to play by / find things in. Play Torch light Hunt - When it's fully dark, hide a few items around the room. Give children a torch and then tell them what to hunt for: a particular toy, object, a basket of fruit etc- Hide a ticking clock somewhere and set the children loose to locate it.
6. Take a Night Walk - Choose a night when there's light from at least a quarter moon. Tell your child it takes about 20 minutes for our eyes to adapt to the dark. The light from torches affects your adaptation to the dark, so cover their lenses with red socks or red cellophane. Ask your child to identify night time light sources: stars, the Moon, nearby houses, lampposts, distant stores. Can he detect light being reflected off water, metal or glass? Observe the silhouettes of trees against the sky. Does the night smell differently than the day?
26

FocusesTheme teams/days, BBQ/campfire, inflatables, special events/open days, visiting specialists (arts, dance, circus skills…) New and wacky or unusual
resources (eg coloured lights, luminous paint, unicycles, didgeridoo…
27
ChoicesSuggestion box/board,, consultations, conversations… Wide range of
possible options with free access by all…
Effective consultation of children is not something that you can simply “bolt on. Where adults value and respect children as individuals, where children are listened to, and where equal opportunities are actively promoted, children are likely to have the confidence and the motivation to take part in consultation and to say what they think. In such a setting, formal consultation is just one element in a constant stream of feedback. Where these qualities are lacking, children are likely to feel their opinions are not really valued, and hence they may be unwilling to take part in a meaningless consultation: there will be little feedback of any kind.
1. Observe the free play of the children you work with. Record and discuss with colleagues what you see and hear. This will teach you a lot about what is important to the children.
2. Encourage children to talk to you by paying attention to what they say!
3. Use games. Under-fives may enjoy pretending that a soft toy is a new child and “introducing” it to the project – who’s who, good points, bad points, what the rules are and so on. Primary age children may enjoy cooperative games such as Simon Says or parachute games, where the actions are based on options or questions – “Everyone who wants to go the park this afternoon stand on one leg”. Older children may enjoy dramatic role-play about scenarios in the play setting or about play issues in their neighbourhood.
4. Use art and craft. Children can draw, paint and model their favourite activities or ideal play spaces, their ideal playworkers or other aspects of the setting. You may need to talk with the children to find out what the images mean.
5. Use photography. This is an excellent way of getting children’s views about an environment or neighbourhood – go on an expedition and record the good and bad of what you see. Depending on what you can afford, Polaroid, disposable or digital cameras can all be used to good effect by children, and they can make up commentaries to go with the photo display or slide show. Or you can go one better and make a video!
6. Use songs, poems and stories. Individually or in groups, children can express in performance their feelings about the play setting.
7. Use pictures to help select favourite activities. This works well for younger children and those with communication difficulties. Photos of different attractions at the project, or pictures from catalogues etc, can be laminated and mounted. Children can select favourite activities by sticking dots on the pictures or dropping beans in a jar.
28

8. Use tape recorders. Children may enjoy interviewing one another about likes and dislikes concerning the project. Be prepared for plenty of showing off on tape, but you can still gain some useful information.
9. Use a graffiti board. You may need to have some ground rules to prevent personally abusive messages.
10. Making a suggestion box is an excellent way to gather feedback. A suggestion box doesn't have to be a complicated task. The box should stand out and sit in an obvious location where people can see it and participate. Use a shoe box to crate a suggestion box. You can either use wrapping paper or craft paper to wrap the box. Wrap the bottom and the top separately so that you can take off the top to gather the suggestions. This type of suggestion box will make it easy for anyone to access the contents, so use this type of suggestion box in an easy-to-see place so that you can monitor its safety. Create a slot in the top of the box using a pair of scissors or a box cutter. An old mailbox makes for a great suggestion box. Older mailboxes come with a slot in the top and have a key lock on the front to prevent people from accessing the contents. Decorate the mailbox to match your decor. You can spray paint it a solid colour, or you can hand paint it for a unique and specific look.
11. Agree / Disagree - Place four signs around the room. The signs read “agree”, “disagree”, “strongly agree” and “strongly disagree”. Read out statements or questions and the children or young people have to run to a label that best reflects how they feel.
12. Balloons Children and young people can draw their ideas on balloons and then decide as a group whether they release or pop an idea.
13. Postcards - Children and young people write their ideas on post cards (free ones from bars) and put them in a suggestion box.
14. Bead Boxes - Children and young people vote by placing a bead in a pot.Ideal / Worst Draw around two volunteers on giant sheets of paper. One is the“World’s worst...” the other “World best...” They then write and draw their ideas all over the sheets of paper.
15. Speech Bubbles - Put up a picture to represent what you want feedback on. The children and young people can draw their thoughts and ideas in speech bubbles on the display.
16. OHPs - Design OHPs reflecting the group’s ideas on a subject and project it large scale onto the wall.
17. Avalanche - Set a topic for discussion and ask for suggestions. As people call out their ideas write them up on the flip chart. Once the avalanche of ideas is over you can discuss which ideas are most practical, whether any areimpossible and which should be discussed further.
29
18. Post-it Ideas Storm - Divide into groups and give each one some post-it notes and a pen. Write the question to be discussed up on a flip chart. Ask the group to write their ideas onto post-it note (one idea per post-it). Collect thenotes and stick them on the flip chart, clumping similar ideas together for discussion.
19. Dot Voting - Create a list of possible answers in response to a question or statement on a flip chart - for example, things children and young people do in their spare time. Leave space next to each answer. Give every one three sticky dots and ask them to place their dots next to three activities they do most often. You can all see immediately which activities are the most popular.
20. Freeze Frame - Get into small groups of about 5 to 7 people and challenge them to pose in a freeze frame of a scene. Give them a theme such as, “Young people enjoy themselves”. They should use their imaginations to decide as a group what they are trying to depict and then devise a way to represent it as a freeze frame.
21. Arty Mural - Set a topic or theme for the mural, for example “What children and young people in the area do in their spare time” or “the bestplayground ever”. Then encourage people to express their views on thattopic by drawing picture or creating a collage.
22. Diamond Ranking - Set a question and have nine ideas for people to prioritise. Write each idea on a post it note and ask each group to arrange their nine ideas in a diamond shape with their priority at the top, two in second place, three in third place and two in fourth place and lowest priority idea at the bottom. They need to get a consensus as a group and can move the ideas around until they reach an order with which they all agree.
23. Snot Fair - Draw a large picture of a miserable face, with a cold. The children and young people write what is not fair about a given subject on green snot shaped pieces of paper then stick these all over the miserable face.
24. Pop Quiz - A quiz in the style of those used in magazines is devised relating to the consultation topic, i.e. for each question the child or young person is given a scenario and three options A, B or C.
24. Board Game - A board game is designed to match the chosen topic. Players roll a dice to move along squares and when they land on a particular square a card is taken. Cards contain questions relating to the consultation topic (open-ended, unfinished sentences and agree/disagree statements).Prize for the first past the finish line!
25. Making A Rap Children and young people produce a simple rap talking about their views, experiences and suggestions.
30

Alternatives
Trips off-site, residentials, dance classes, sleepovers, sleep-outs, outdoor pursuits…
1. Create an environment which will be a real contrast to the children’s day to day lives and experiences, maybe create an inland seaside with sand deck chairs etc.
31

ToolsHammers, screwdrivers, saws, nails/screws, drills, chisels, craft knives cutters, staplers, forks/spades, pliers, hoe/rake, shovels, crowbar, axe,
brushes, needles, nuts/bolts, clips/pegs, sieves, measures, spirit level…
1. Gardening - Start small. Window boxes or containers, because of their small size, can actually turn out to be rather luxurious gardens. Recycle clean bleach and milk containers. Cut off the tops and use them as planters.Get some child-sized tools from a local nursery or garden centre. Try to find tools that look genuine so the kids will feel like real gardeners. Can't afford it? Plastic spoons and shovels work well in window boxes.
32

Loose Parts
Tyres, wood, ropes, tubs, barrels, sheets, blankets, bricks, breeze blocks, pallets, boxes, vessels, wheels, trolleys, mats, crates, cushions, ladders,
poles, sticks, tape, pegs…,
Loose Parts – refers to anything that can be moved around, carried, rolled, lifted, piled on top of the other or combined to create interesting and novel structures and experiences.
Magpies After School Club33
Risk
Zipline, rope-swing, fire, sharp tools, high structures… climbing, balancing, biking, wrestling, jumping…
1. Can Stilts - Turn 2 cans upside down. Poke a hole on each both sides of each can using a screwdriver (parental supervision is recommended). Use rope, bailing twine, or several strands of yarn braided together for strength and thread through one hole. Thread the other end of the rope through the hole on the other side and tie off inside the can. Be sure that the rope is long enough so that when your child stands on the cans, the rope is high enough for them to hold in their hands comfortably without hunching over.
2. Visit a tree top adventure park
3. Tree climbing - We all remember those special trees with large lower limbs that we climbed, swung and bounced on. Ensure that the ground surrounding popular climbing trees is free from sharp-edged stumps, large rocks or other potentially dangerous materials such as posts or metal. l Inspect popular climbing trees for weak branches, ‘V’ shaped neck traps 1.2 m above the ground, eye hazards and potential for falling onto lower branches
4. See real worms or building an ant farm activity – this might be risky for some!
34