final cartridge iii manual -...
TRANSCRIPT

Final Cartridge III manual TABLE OF CONTENTS COPYRIGHT .................................... i PREFACE ...................................... ii CONNECTING THE FINAL CARTRIDGE III ........... 1.0 WINDOWS & MENUS .............................. 2.0 INTRODUCTION GENERAL TERMS AND TECHNIQUES ............... 2. 1 USING THE POINTER .......................... 2.1.1 CLICKING AND SELECTING ..................... 2.1.2 MENUS ...................................... 2. 2 INTRODUCTION ............................... 2.2.1 COMMANDS AND OPTIONS ....................... 2.2.2 WINDOWS .................................... 2. 3 INTRODUCTION WINDOWS ....................... 2.3.1 GADGETS .................................... 2.3.2 SELECTING GADGETS DRAGGING WINDOWS ........................... 2.3.3 MOVING WINDOWS IN FRONT OF OTHER WINDOWS ... 2.3.4 CLOSING WINDOWS ............................ 2.3.5 TALKING TO WINDOWS ......................... 2.3.6 REQUESTERS ................................. 2.3.7 DESKTOP ...................................... 3.0 INTRODUCTION ................................. 3. 1 OPENING AND CLOSING THE DESKTOP .............. 3. 2 USING THE DESKTOP ............................ 3. 3 INFO ......................................... 3.3.1 DESKTOP VERSION SYSTEM ....................................... 3.3.2 BASIC FINAL KILL FREEZER REDRAW PROJECT ...................................... 3.3.3 NOTEPAD DLINK TLINK UTILITIES .................................... 3.3.4 CLOCK ........................................ 3.3.5 TIME ALARM SETTINGS CHANGING THE TIME AND THE ALARM CHANGING THE TIME MODE TOOLS ........................................ 4.0 CALCULATOR ................................... 4. 1 INTRODUCTION ................................. 4.1.1

OPENING AND CLOSING THE CALCULATOR ........... 4.1.2 USING THE CALCULATOR ......................... 4.1.3 THE STANDARD FUNCTIONS THE MEMORY ................................... 4.1.4 PREFERENCES .................................. 4. 2 INTRODUCTION ................................. 4.2.1 OPENING AND CLOSING PREFERENCES .............. 4.2.2 FUNCTIONS .................................... 4.2.3 POINTER SCREEN DRIVER VELOCITY ACCELERATION DEFAULT VIEW OK CANCEL DISK OPERATIONS .............................. 5.0 INTRODUCTION ................................. 5. 1 OPENING AND CLOSING DISK-OPERATIONS .......... 5. 2 FUNCTION SUMMARY ............................. 5.2.1 OPENING A DIRECTORY WINDOW ................... 5.2.2 BROWSING THROUGH THE DIRECTORY ............... 5.2.3 SELECTING A PROGRAM .......................... 5.2.4 SORTING A DIRECTORY .......................... 5.2.5 READING THE ERROR-CHANNEL .................... 5.2.6 RUNNING A PROGRAM ............................ 5.2.7 VALIDATING A DISK ............................ 5.2.8 SCRATCHING A PROGRAM ......................... 5.2.9 INITIALIZING A DISK .......................... 5.2.10 FAST FORMATTING A DISK ....................... 5.2.11 EMPTYING A DISK .............................. 5.2.12 RENAMING A PROGRAM ........................... 5.2.13 RENAMING A DISK .............................. 5.2.14 SEVERAL DIRECTORY WINDOWS AT THE SAME TIME ATTENTION .................................... 5.2.15 TAPE ......................................... 6.0 INTRODUCTION ................................. 6. 1 OPENING AND CLOSING TAPE ..................... 6. 2 USING TAPE ................................... 6. 3 BASIC PREFERENCES ............................ 7.0 INTRODUCTION ................................. 7. 1 OPENING AND CLOSING BASIC PREFERENCES ........ 7. 2 USING BASIC PREFERENCES ...................... 7. 3 PRINTER ...................................... 8.0 INTRODUCTION ................................. 8. 1 OPENING AND CLOSING THE PRINT WINDOW ......... 8. 2 FUNCTION SUMMARY ............................. 8. 3 PRINTERS TESTED .............................. 8. 4 PRINTER CABLES ............................... 8. 5

NOTEPAD ........................................ 9. 0 INTRODUCTION ................................... 9.1 OPENING AND CLOSING NOTEPAD .................... 9.2 USING THE NOTEPAD COMMANDS ..................... 9.3 PROJECT ....................................... . 9.3.1 NEW ......................................... ... 9.3.1.1 LOAD ........................................ ... 9.3.1.2 TLOAD ....................................... ... 9.3.1.3 SAVE ........................................ ... 9.3.1.4 TSAVE ....................................... ... 9.3.1.5 PRINT ....................................... ... 9.3.1.6 RECOVER ..................................... ... 9.3.1.7 QUIT ........................................ ... 9.3.1.8 FILE .......................................... . 9.3.2 TOP OF FILE ................................. ... 9.3.2.1 REDRAW ...................................... ... 9.3.2.2 FREEZER ..................................... ... 9.3.2.3 SCREEN ........................................ . 9.3.3 WORDWRAP .................................... ... 9.3.3.1 BOLD ........................................ ... 9.3.3.2 LINE .......................................... . 9.3.4 SPACEX ...................................... ... 9.3.4.1 CHARACTER ..................................... . 9.3.5 SPACEX ENTERING TEXT .................................. 9.4 EDIT FUNCTIONS BASIC .......................................... 10 .0 INTRODUCTION ................................... 10.1 ENTERING AND LEAVING THE BASIC MODE ............ 10.2 EXTENSIONS OF BASIC ............................ 10.3 SCROLLING ..................................... . 10.3.1 EDIT FUNCTIONS ................................ . 10.3.2 PRINTER INTERFACE ............................. . 10.3.3 LOW-RESOLUTION SCREENDUMP ..................... . 10.3.4 TAPE TURBO .................................... . 10.3.5 DISK TURBO .................................... . 10.3.6 PULL-DOWN MENUS ............................... . 10.3.7 EXTRA BASIC COMMANDS .......................... . 10.3.8 FREEZER ........................................ 11 .0 INTRODUCTION ................................... 11.1 HOW TO START AND STOP THE FREEZER .............. 11.2 USING THE FREEZER .............................. 11.3 SUMMARY FREEZER COMMANDS ....................... 11.4 BACKUP ........................................ . 11.4.1 GAME .......................................... . 11.4.2 COLORS ........................................ . 11.4.3 PRINT ......................................... . 11.4.4 RESET ......................................... . 11.4.5 EXIT .......................................... . 11.4.6 THE MONITOR .................................... 12 .0

INTRODUCTION ................................... 12.1 HOW TO START AND LEAVE THE MONITOR ............. 12.2 GENERAL TERMS AND TECHNIQUES ................... 12.3 PROMPT ........................................ . 12.3.1 MEMORY REPRESENTATION ......................... . 12.3.2 SCROLLING ..................................... . 12.3.3 CHANGING ...................................... . 12.3.4 BANK SWITCHING ................................ . 12.3.5 MODES ......................................... . 12.3.6 SWITCHING BETWEEN MODES KINDS OF COMMAND .............................. . 12.3.7 FUNCTION KEYS ................................. . 12.3.8 SUMMARY MONITOR INSTRUCTIONS ................... 12.4 REMARKS ........................................ 13 .0 INTRODUCTION ................................... 13.1 REMARKS ON THE FREEZER ......................... 13.2 BACKUP ........................................ . 13.2.1 PRINT ......................................... . 13.2.2 GAME .......................................... . 13.2.3 REMARKS ON THE DESKTOP ......................... 13.3 REMARKS ON THE RESET ........................... 13.4 REMARKS ON BASIC ............................... 13.5 PACKER REMARKS ON MICE ................................ 13.6 REMARKS ON THE DISK TURBO ...................... 13.7 COPYRIGHT [i] The Final Cartridge III is a product of Riska B.V. Home & Personal Computers. Copyright: E. Th. van de Enden. All rights reserved. No part of the Final Cartridge III or this manual m ay be reproduced, stored in a retrieval system, or transmitted in any form or by any means, electronic, mechanical, photocopying, record ing and/or otherwise, without the prior written permission of Risks B.V. Home & Personal Computers. Riska B.V. Home & Personal Computers will not be he ld responsible for any damage caused to any equipment due to misuse of their products. Every care should be taken to ensure that the the F inalCartridge III and any associated hardware (i.e., Centronics print er cable) are used correctly. The information in this manual has been reviewed an d is believed to be reliable. No responsibility, however, is assumed f or inaccuracies. The material in this manual is for information purp oses only, and is subject change without notice. Riska B.V. Home & Personal Computers reserve the ri ght to make any modifications to this manual and/or the Final Cartr idge III. Idea & realization Wil Sparreboom

Desktop and menus: Gerard van Assem Marc Derksen Tools, freezer, fastloader and printer interface: Uwe Stahl Supporting Software: Wil Sparreboom Board design and logic by: Ton Peters Jacques van Schajik Manual by: Patrik Mast .----------------------------------------. | DESKTOP V1.0 | | | | Software: | | Gerard van Assem Marc Derksen | | Wil Sparreboom | | | | Hardware: | | T. Peters J. van Schajik | | .----------. | | Developed in 1987 | CONTINUE | | | All Rights Reserved `----------' | `----------------------------------------' PREFACE [ii] The Final Cartridge III is a development of Riska B .V. Home & Personal Computers. The Final Cartridge III which consists of 64K bytes in machine-code, offers many additional features apart from the DESK TOP, for example: 1. Many useful toolkit commands. 2. Easy to use disk commands. 3. 24K bytes extra memory in BASIC. 4. A tape turbo which loads and saves TEN TIMES f aster. 5. A disk turbo which loads FIFTEEN TIMES faster, and saves SEVEN TIMES faster. 6. A built-in machine language monitor. 7. A disk monitor. 8. A Centronics printer interface to produce list ings and high- resolution graphic screen dumps. 9. A built-in sprite killer. 10. A reset switch, which will enable you to regai n control of your computer at any time, and an OLD command, whic h restores your BASIC program back after a reset or NEW. 11. A freezer facility which: - will dump programs to tape or disk. - allows you to pause a program. - allows you to make screen dumps, including e ven sprites. 12. A built-in Notepad, enabling you to keep notes or create short documents. The user interface, the windows and pull-down menus are based on ideas applied in the Apple Macintosh and the Commodore Am iga. [ Two screen shots of windows omitted, each with mu ltiple overlapping windows. Left contains menu system with UTILITIES menu open; TAPE,

Preferences, and Basic Preferences requesters; al so Calculator. Right has MENU bar; Disk Operations and TAPE requesters ; three disk directory windows: VIZAWRITE 1, OXFORD PASCAL, SU PERBASE. ] CONNECTING THE FINAL CARTRIDGE III [1.0] !!! ATTENTION !!! Be sure you always turn off the computer before con necting or disconnecting the Final Cartridge III. COMMODORE 64 Plug in the Final Cartridge III into the cartridge port of your computer (right hand side as you look from the fron t) with the LABEL UP. Turn on the computer and other peripherals as normal. COMMODORE 128 Plug the Final Cartridge III into the cartridge por t of your computer (right hand side as you look from the front) with t he LABEL UP. Turn on the computer and other peripherals as normal. Y our Commodore 128 will now boot up on Commodore 64 mode. By pressing the reset button on the Final Cartridge III you enter the Commodore 64 mode. If you press the reset button o n the Commodore 128, you enter the Commodore 128 mode. So it's not necessary to remove the Final Cartridge III if you want to use t he Commodore 128 mode or CP/M mode. If you turn on the computer with the Final Cartridg e III inserted, it will go to desktop. This is described in DESKTOP. If you want to work directly in BASIC, just hold do wn the <RUN/STOP> button while you turn on your computer. If you don't get any message, and after pressing th e reset button you still see nothing, then the Final Cartridge Ill is probably not correctly connected with the computer. With older types of computers it Is sometimes neces sary to press the reset button (perhaps with the <RUN/STOP> or the <C=> key down) on the cartridge to start the Final Cartridge III. !!! ALSO SEE THE CHAPTER REMARKS !!! WINDOWS & MENUS [2.0] INTRODUCTION Most facilities of the Final Cartridge III are supp orted by Windows & Menus. As not everybody will know everything about these subjects, we

first explain some general things. Those who are n ot familiar with these subjects shoud read this chapter first. GENERAL TERMS AND TECHNIQUES [2.1] USING THE POINTER [2.1.1] You use the pointer, the small arrow on the display , to point at subjects you want to select. Moving the joystick/m ouse moves pointer. It is also possible to simulate the joystick with t he using the keyboard (<Fl> : up; <F3> : down; <F5> : left; <F7> : right <C=> : fire button) Although the Final Cartridge III suppo rts joystickports, we suggest you use joystickport 2. Unfortunately we can't do anything about the fact that some mice lock the keyboard Thi s is a hardware failure of the mouse), so it's sometimes necessary disconnect the mouse. If the pointer doesn't move the way you want or doe sn't have thee you like, you can always change these settings using th e Preferences tool. This is explained in Tools. CLICKING AND SELECTING [2.1.2] Most commands of the FinalCartridge III are chosen by pointing at it on the screen and pushing the fire button of the jo ystick or the mouse This is called clicking. Choosing a command by pointing at it and clicking i s called selecting. MENUS [2.2] INTRODUCTION [2.2.1] For most tools, there are menus that list choices y ou can make. At the top of the screen you can find this menu bar : .-------------------------------------------------- ------------. | INFO SYSTEM PROJECT UTILITIES CLOCK D ESKTOP V1.0 | `-------------------------------------------------- ------------' In this menu bar are titles of menus, which you can choose at this moment. To browse through the menus, just hold down the fir e button while move the pointer down along the menu bar. Without choos ing an item, you get a look at the menu items that are available. In some menus. not all menu items are available at all times. Menu items that you cannot choose appear as ghost items. To choose one of the items you have to point at it (while keeping the fire button down). When the item you want to choos e is highlighted you release the fire button.

COMMANDS AND OPTIONS [2.2.2] In menus, there are two kinds of items. Commands a re items that you choose to perform an action. One example of a comm and is the calculator item in the utilities menu. You choose calculator to perform some calculations. Options are choices that persist until you choose o ther, mutually exclusive, options. An example of an option is TIM E in the clock menu (As long as TIME remains selected, the time is disp layed in the menu bar). Options you've chosen are indicated by check marks to the right of the menu items. WINDOWS [2.3] INTRODUCTION WINDOWS [2.3.1] A window is a small screen that appears within the screen (a newly opened window appears in front of any other windows with which it overlaps). You even have the possibility to open several windo ws. But while all the windows in the screen can display information, only one window can accept information from you at a time. This window is called the selected window. To select a window, point anywher e within the window and click the fire button. You can recognize the s elected window, because it is the upper window. [ Screen shot of multiple overlapping windows omitt ed. DESKTOP with menu bar; Preferences, Basic Preferences, TAPE, C lock Settings, and Disk Operations requesters; also Calculator. ] GADGETS [2.3.2] You move windows, close windows, etcetera with wind ows with the help of gadgets. You also use gadgets to communicate wi th the utilities. Here are some common gadgets found in windows: Close gadget To close a window To-back gadget To move windows behind other wi ndows String gadget To enter text Toggle gadget To select options You can find several of these gadgets in this pictu re. [ calculator diagram with close-window gadget in up per-left corner and to-back gadget in upper-right corner omitted. See section 4.1 for an ascii-art rendition. ] Windows can contain all, some, or none of these gad gets. In addition, windows can contain other gadgets needed for a part icular utility. For example, in the calculator window, each of the calc ulator's "buttons" is a gadget.
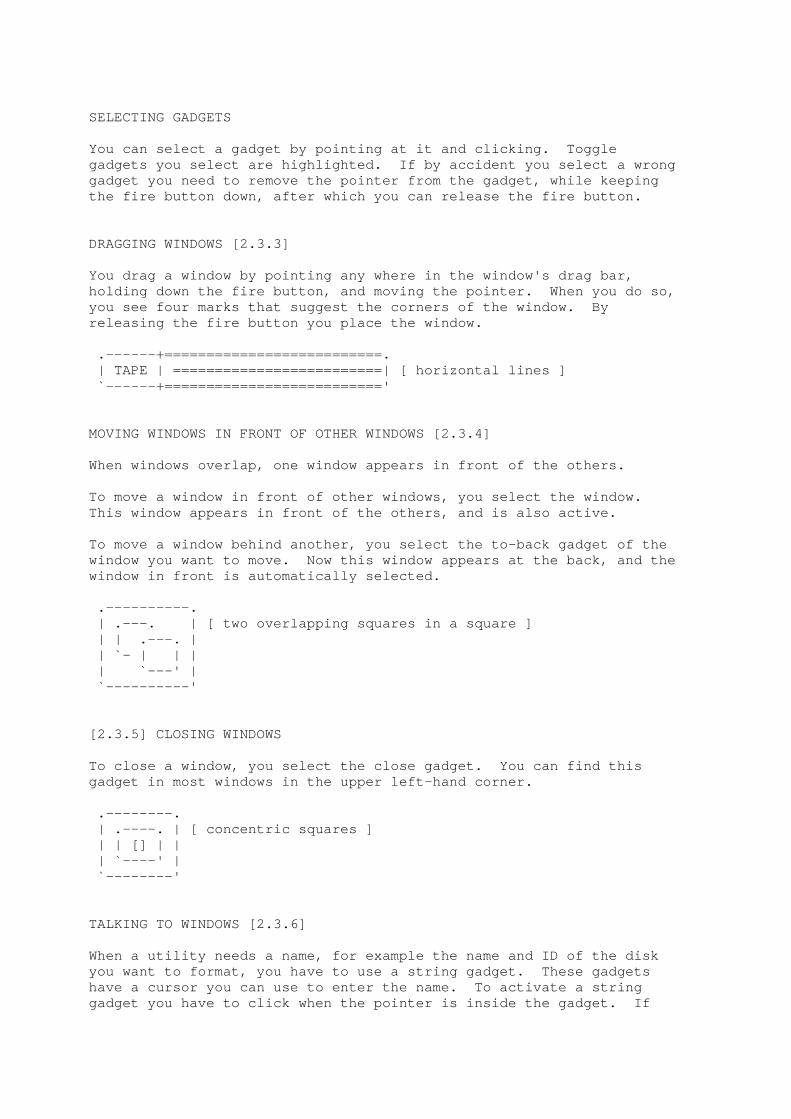
SELECTING GADGETS You can select a gadget by pointing at it and click ing. Toggle gadgets you select are highlighted. If by accident you select a wrong gadget you need to remove the pointer from the gadg et, while keeping the fire button down, after which you can release t he fire button. DRAGGING WINDOWS [2.3.3] You drag a window by pointing any where in the wind ow's drag bar, holding down the fire button, and moving the pointe r. When you do so, you see four marks that suggest the corners of the window. By releasing the fire button you place the window. .------+==========================. | TAPE | =========================| [ horizontal l ines ] `------+==========================' MOVING WINDOWS IN FRONT OF OTHER WINDOWS [2.3.4] When windows overlap, one window appears in front o f the others. To move a window in front of other windows, you sel ect the window. This window appears in front of the others, and is also active. To move a window behind another, you select the to- back gadget of the window you want to move. Now this window appears a t the back, and the window in front is automatically selected. .----------. | .---. | [ two overlapping squares in a square ] | | .---. | | `- | | | | `---' | `----------' [2.3.5] CLOSING WINDOWS To close a window, you select the close gadget. Yo u can find this gadget in most windows in the upper left-hand corne r. .--------. | .----. | [ concentric squares ] | | [] | | | `----' | `--------' TALKING TO WINDOWS [2.3.6] When a utility needs a name, for example the name a nd ID of the disk you want to format, you have to use a string gadget . These gadgets have a cursor you can use to enter the name. To ac tivate a string gadget you have to click when the pointer is inside the gadget. If

you click outside the gadget the cursor disappears, and the gadget is no longer selected. To select the gadget again, po int at it and click. REQUESTERS [2.3.7] Sometimes it is necessary to make some inputs or to perform an important operation. This is done with requesters. For example, if you want to format a disk, a requester appears with options to continue or cancel the format command. You can see such a requester here: .-------------------------------------. | W A R N I N G: | [ overlapp ed window omitted ] | This command destroys | | all information on the disk | | .-------------. .-------------. | | | F O R M A T | | C A N C E L | | | `-------------' `-------------' | `-------------------------------------' Just after you respond to a requester, it disappear s and the computer performs its operation. To respond to a requester, use the gadget or gadgets it provides. Mostly there is a gadget to c ontinue the action, and a gadget to cancel the action. .-------------------------------------. | W A R N I N G: | | You are now leaving | | the DESKTOP | | .-------------. .-------------. | | | B A S I C | | C A N C E L | | | `-------------' `-------------' | `-------------------------------------' DESKTOP [3.0] INTRODUCTION [3.1] Desktop is the most important part of the Final Car tridge III desktop you can exit to BASIC, the freezer, etc. OPENING AND CLOSING THE DESKTOP [3.2] There are five ways to open the desktop: 1. Just turn on the computer with the Final Cartrid ge III inserted (always). 2. Select the Item desktop from the system menu in BASIC. 3. In BASIC you can type the command DESKTOP. 4. From BASIC you reset the computer while holding down the <C=> 5. Select the item DESKTOP in the exit menu of the freezer. To reset the desktop, press the keys <CTRL> & <SHIF T> & <SHIFT> simultaneously.

You can leave the desktop by going to BASIC, the fr eezer, etc. USING THE DESKTOP [3.3] The commands in the desktop are chosen by pull-down menus. You can this menu bar in desktop: .-------------------------------------------------- ------------. | INFO SYSTEM PROJECT UTILITIES CLOCK D ESKTOP V1.0 | `-------------------------------------------------- ------------' We discuss all the commands in the way they are dis played in the menus. INFO [3.3.1] In this menu are commands that will show some infor mation about the Final Cartridge III. DESKTOP This command will open a requester that will show t he names of the designers of the Final Cartridge III. VERSION This command will open a requester that will show t he version number various parts of the Final Cartridge III. SYSTEM [3.3.2] In this menu you can find some system commands. BASIC This command will close the desktop and go to BASIC , after you have responded to a requester. All BASIC extensions are described in chapter BASIC. FINAL KILL This command will disable the Final Cartridge III. You can see that by the LED on the cartridge being turned off. FREEZER This command will activate the freezer From there y ou can, among other things, make screendumps. You can continue Desktop by leaving the freezer with the Exit Run command. All freezer com mands are described in the chapter FREEZER. REDRAW This command will redraw the screen, so that you ca n see all the windows that are displayed. PROJECT [3.3.3] In this menu you can find some projects you can sta rt.

NOTEPAD This command will open the notepad. The notepad is described in the chapter TOOLS. DLINK This command will start future extentions from disk ette. TLINK This command will start future extensions from cass ette. UTILITIES [3.3.4] In this menu you can find several utilities. The u tilities are described in the chapter TOOLS. CLOCK [3.3.5] In this menu you can find some commands in order to use the clock. TIME This option will display the time in the menu bar. If you select the option again, the time disappears. ALARM With this option you can set the alarm on and off. If the alarm is on, at the time you have set, it stays on until you turn it off. To stop the alarm from ringing you have to press any k ey. SETTINGS This command will open the clock settings window. This window, shown below, is divided into two parts: the left one is f or the time, the right one is for the alarm. CHANGING THE TIME AND ALARM You can change the time and the alarm in exactly th e same way. You first select the two digits you want to change, the first two for the hours and the last two for the minutes, and then yo u select the up or down gadgets. If you want to use the new time, sel ect the use gadget. CHANGING THE TIME MODE You can also change the time mode. By selecting th e time mode gadget, just behind the minutes, you can choose between 12 or 24 hours mode. TOOLS [4.0] In this part we will discuss the following tools: CALCULATOR PREFERENCES DISK OPERATIONS TAPE OPERATIONS BASIC PREFERENCES PRINTER SETTINGS NOTEPAD

CALCULATOR [4.1] .---+---------------------------+---. | | Calculator GX 2.0i ===== | | +---+---------------------------+---+ | 0 | +-----+-----+-----+-----+-----+-----+ | | 7 | 8 | 9 | / | MC | | +-----+-----+-----+-----+-----+ | | 4 | 5 | 6 | X | MR | +-----+-----+-----+-----+-----+-----+ | C | 1 | 2 | 3 | - | ME | +-----+-----+-----+-----+-----+-----+ | AC | 0 | . | = | + | `-----+-----+-----+-----+-----+-----' INTRODUCTION [4.1.1] The calculator is a standard four-function calculat or you can use to add, subtract, multiply, and divide numbers. It al so has a memory. You can enter the data using the pointer or the key board. OPENING AND CLOSING THE CALCULATOR [4.1.2] You can open the calculator by selecting calculator from the utilities menu. When you do, a window for the calculator app ears. You can close the calculator window by selecting th e close gadget in the upper left-hand corner of the calculator window . USING THE CALCULATOR [4.1.3] In the calculator window, each of the calculator's "buttons" is a gadget. When the calculator window is selecte d, there are two ways in which you can "press a button": 1. Select the gadget. 2. Type the characters shown in the gadget. These are the characters you have to type: Key Gadget Function + + Addition - - Subtraction / :- Divide * X Multiply = or <RETURN> = Calculate E ME Memory Enter c MC Memory Clear R MR Memory Recall <CLR/HOME> C Clear <SHIFT> & <CLR/HOME> <INSERT/DEL> AC All Clear . or , . Decimal Point THE STANDARD FUNCTIONS To get to know the standard functions, you can type the following examples:

Enter: Screen: AC 0 4 4 + 4 96 96 = 100 AC 0 999 999 : 999 3 3 = 333 AC 0 1000 1000 + 1000 - 1000 750 750 = 250 THE MEMORY [4.1.4] To get acquainted with the use of the memory, you c an type the following example: Enter: Screen: AC 0 MC 0 7.25 7.25 + 7.25 6.25 6.25 + 13.5 8.5 8.5 = 22 ME M 22 : M 22 4 M 4 = M 5.5 MR M 22 : M 22 3 M 3 = M 7.33333334 PREFERENCES [4.2] INTRODUCTION [4.2.1] Preferences is a utility that allows you to see and change many of the settings of your Final Cartridge Ill. OPENING AND CLOSING PREFERENCES [4.2.2] You can open preferences by selecting it in the uti lities menu. You can close preferences by selecting the OK or ca ncel gadget.

FUNCTIONS [4.2.3] Using preferences you can change: The screen colors The pointer colors The pointer speed The pointer acceleration The driver port The driver POINTER You can change the colors of the pointer by selecti ng the up or down gadgets at COLOR 1 (for the inside color of the poi nter) or at COLOR 2 (for the outside color of the pointer). You can cha nge the colors by ascending or descending. SCREEN You can change the colors of the screen in exactly the same way as described at pointer. COLOR 1 is the foreground co lor, COLOR 2 is the background color. DRIVER You can change the joystick port, by selecting the corresponding gadget. You can also choose between a joystick or a mouse driver by selecting its corresponding gadget. VELOCITY The three settings for VELOCITY allow you to change the velocity of the pointer. ACCELERATION The three settings for ACCELERATION allow you to ch ange the acceleration of the pointer. DEFAULT If you want to see the default settings, select DEF AULT. VIEW To examine your settings you select VIEW. The new settings will be active until you release the fire button. OK If you like the new settings just select OK to acce pt them. The preferences window is automatically closed. CANCEL If you want to return to the old settings, just sel ect CANCEL. The preferences window is automatically closed. DISK OPERATIONS [5.0] INTRODUCTION [5.1] The disk-operations window offers you the possibili ty to execute several commands on your disk, such as scratching a program or renaming it.

OPENING AND CLOSING DISK-OPERATIONS [5.2] You can open disk-operations by selecting disk from the utilities menu. You can close disk-operations by selecting the clos e gadget in the upper left-hand corner of the disk-operations windo w. FUNCTION SUMMARY [5.2.1] The disk-operations window offers you the possibili ty to: Rename a program Run a program Rename a disk Fast format a disk Empty a disk Initialize a disk Validate a disk Scratch aprogram View directories (up to three at the same time! ) OPENING A DIRECTORY WINDOW [5.2.2] You can examine the directory by selecting one of t he three DIR gadgets. (If you own two disk-drives, first select the right device number before you select the DIR gadget.) By choosi ng the DIR gadget from the disk-operations window, you open a window for the directory. At first the name of the new window is LOADING DIRE CTORY, but after the directory has been loaded the name of the disk will appear as the name of the window. To read a new directory in an already opened window , select the read gadget in the right bottom corner of a directory wi ndow. .---+--------------------------+---. | | Disk Operations ======== | | +---+---+-------+-------+------+---+ | DIR 1 | DIR 2 | DIR 3 | READ | | 8 | 9 | 8 | 9 | 8 | 9 | STATUS | +-----+-+-------++------+--+-------+ | RUN | VALIDATE | SCRATCH | | +-----+------+---+---------+ D O | | INITIALIZE | FAST FORMAT | | +-------+----+---+---------+-------+ | EMPTY | RENAME | CHANGE DISKNAME | +-------+-+------+-----------------+ | STATUS: | 00.OK.00.00 | +---------+------------------------+ | FROM: | | +---------+------------------------+ | TO: | | `---------+------------------------' .---+--------------------------+---. | | WORLD CLASS | | +---+--------------------------+---+ | 1 WORLD CLASS | | 37 S | | 5 RNG | | 7 DMO |

| 51 LCODE | | 1 VCODE | | 7 PRNT | | 49 E | | 46 EDITOR | | 2 ML | +----------------------------------+ | .-------. .-------. | | | v | D I R 1 | ^ | | | `-------' `-------' | `----------------------------------' BROWSING THROUGH THE DIRECTORY [5.2.3] If the directory is larger than the window can show , you can browse through the directory by selecting the up or down g adgets. SELECTING A PROGRAM [5.2.4] You select a program by pointing to it and clicking . This program is also highlighted. SORTING A DIRECTORY [5.2.5] With the Final Cartridge III it is possible to sort a directory. You can do this by following the next steps: open a dir ectory window (1) in which you select the sort gadget. If you now sel ect a program (2) you can by using the up or down gadgets move the pr ogram to another place. If it's on the place you like (3), select an other program to move until all programs are placed in the way you l ike. You can even add an empty line in the directory. This is done b y selecting the program directly above where you want to insert the line (4,5). After the whole directory is sorted you select again the sort gadget, after which a requester is opened to ask if you're sure t o place the new directory on the disk (6). If you are, the directo ry is written on the disk (7). READING THE ERROR-CHANNEL [5.2.6] If you select the toggle gadget READ STATUS, the st atus of the disk- drive will be displayed after all the disk-operatio ns you perform. RUNNING A PROGRAM [5.2.7] You can run a program by using the following steps. First you select the program you'd like to run. Now you select the RUN gadget, and then you select the DO gadget, to execute the comma nd. After you respond to the opened requester, the program is loa ded using the disk turbo and run automatically. VALIDATING A DISK [5.2.8] You select the right disk-drive on the active DIR g adget. Now you select the VALIDATE gadget, and then you select the DO gadget to execute the command. If there's no active DIR gadget, drive 8 is chosen. SCRATCHING A PROGRAM [5.2.9] You select the program you want to scratch. Now yo u select the SCRATCH gadget, and then you select the DO gadget to execut e the command. INITIALIZING A DISK [5.2.10] You select the INITIALIZE gadget, and then you sele ct the DO gadget to

execute the command. If there's no active DIR gadget, drive 8 is chosen. FAST FORMATTING A DISK [5.2.11] You put the disk to be formatted into your disk-dri ve. Now select the FAST FORMAT gadget. Then select the FROM string gad get to enter the name and ID of the diskette. Finally select the DO gadget to execute the command. EMPTYING A DISK [5.2.12] Put the disk you want to empty into your disk-drive . Now select the EMPTY gadget. Then select the FROM string gadget t o enter the name of the diskette. Finally select the DO gadget to exec ute the command. RENAMING A PROGRAM [5.2.13] First select the program you want to rename. Now s elect the gadget called RENAME, and the name of the program appears in the string gadget FROM. In the FROM gadget you can see the na me of the program as it is called now. By selecting the TO gadget you c an change the name. Finally you have to select the DO gadget to execute the command. RENAMING A DISK [5.2.14] Put the disk to be renamed into your disk-drive. N ow select the RENAME DISK gadget, after which the name of the dis k appears in the gadget. In the FROM gadget you can see the name of the disk as called now. By selecting the TO gadget you can change the name. Finally you have to select the DO gadget to execute the command . SEVERAL DIRECTORY WINDOWS AT THE SAME TIME The possibility to open several directory windows a t the same time made for the following application: by opening seve ral directory windows at the same time, you can examine and compa re directories of different disks. If you want more directory windows on the screen, select another DIR gadget to open the corresponding directory window. ATTENTION [5.2.15] If you work with more directories, you can only per form commands on the directory indicated by the active DIR gadget. To read a new directory in a window already opened, select the DIR gadget every directory window has. TAPE [6.0] INTRODUCTION [6.1] Using this window, you can load a program from tape . OPENING AND CLOSING TAPE [6.2] You can open tape by selecting tape from the utilit ies menu. .---+------------------+---. | | T A P E ======== | | +---+------------------+---+ | .------. .------. | | | SLOW | LOAD | FAST | |

| `------' `------' | `--------------------------' You can close tape by selecting the close gadget in the upper left- corner of the tape window. USING TAPE [6.3] The tape window offers you two gadgets to load tape programs: SLOW to load a tape program at normal speed; FAST to load a program using the built-in turbo. BASIC PREFERENCES [7.0] INTRODUCTION [7.1] In this window you can change settings that are use ful in BASIC, such as key repeat. These settings are only active in B ASIC. OPENING AND CLOSING BASIC PREFERENCES [7.2] You can open basic preferences by selecting basic p references from the utilities menu. You can close basic preferences by selecting the cl ose gadget in the upper left-hand corner of the basic preferences win dow. USING BASIC PREFERENCES [7.3] Basic preferences offers you several gadgets to cha nge the following settings: KEYBOARD CLICK By selecting this option, every time you press a ke y you will hear a click. KEY REPEAT This option will make all keys repeat. CURSOR BLINK Selecting this option you disable the cursor blink. DEFAULT DEVICE Here you can choose your default device number. BORDER COLOR Here you can choose the border color you want. NUMERIC KEYPAD If you disable this option, you can't use the numer ic keypad of the Commodore 128. PRINTER [8.0] INTRODUCTION [8.1] Uing the printer window, you have the ability to ma ke screendumps. Before you make a screendump, you can change the ty pe of the printer, interface, print direction, etc. All these possibi lities are offered

by the print window. OPENING AND CLOSING THE PRINT WINDOW [8.2] You can open the print window by selecting Settings in the Print menu of the freezer. .------------------------------------------------- --------------. | DESKTOP PRINTER SELECTIONS RUN STOP=A BORT PRINTING | | .-------------. .-----+----. | | INTERFACE | Commodore | | YES | NO | COLORS | | | Centronics | +-----+----+-. | | | RS-232 | | SIDEWAYS | PRINTING | | `-------------' +------------+ | | .------------------. | INVERT | PICTURE | | TYPE | CBM Compatible | +-------------------. | | | EPSON Compatible | | 1 2 3 4 5 6 7 8 9 | HORIZONTAL/ | | | NEC P Series | | 1 2 3 4 5 6 7 8 9 | VERTICAL SIZE | | `------------------' `-------------------' | | GRAPHICS MODE | | .-------------------+---------------- -. | | 8 PINS | Single Density | Single Density | | | | Double Density | Double Density | | | | High Speed, DD | | | | .--------. | Quadruple Density | CRT Graphics II | .--------. | | | PRINT | | CRT Graphics | | | EXIT | | | `--------' | CRT Graphics II | Triple Density | `--------' | `------------+-------------------+---------------- -+------------' You close the print window by selecting the exit ga dget. FUNCTION SUMMARY [8.3] Using the print window, you can change the followin g settings: INTERFACE ........................... 8.3.1 TYPE ................................ 8.3.2 PICTURE ............................. 8.3.3 COLORS .............................. 8.3.4 PRINTING ............................ 8.3.5 HORIZONTAL / VERTICAL SIZE .......... 8.3.6 GRAPHICS MODES 8/24 PINS ............ 8.3.7 EXIT ................................ 8.3.8 PRINT ............................... 8.3.9 !!ABORT PRINTING!! .................. 8.3.10 SPECIAL ............................. 8.3.11 Using these settings you can adjust the Final Cartr idge III to your printer. We already examined some printers, which are listed below. INTERFACE [8.3.1] Using the gadgets you can choose between: Commodore The screendump is transmitted using the serial cable to the printer. Centronics The screendump is transmitted using a parallel cable to a Centronics printer. RS-232 The screendump is transmitted using a parallel cable to a serial printer. See the chapter remarks!

TYPE [8.3.2] Using the gadgets you can choose between: CBM Compatible The screendump is made usin g Commodore control codes. EPSON Compatible The screendump is made usin g EPSON control codes. NEC P Series The screendump is made usin g special NEC control codes. PICTURE [8.3.3] By selecting the inverse gadget you can print the s creendump inverse. COLORS [8.3.4] Using this gadget you can choose if you want the sc reendump in black & white or in colors on your color-printer. PRINTING [8.3.5] Using this gadget you can print a screendump in the normal horizontal way or sideways. You can choose this option if your screendump would n't fit on the paper in the normal way. HORIZONTAL / VERTICAL SIZE [8.3.6] Using these gadgets you can change the horizontal a nd vertical size of the screendump. This way you can make small and la rge screendumps. The numbers are proportions, so if you use 2 instea d of 1 your screendump will be twice as big. Attention!!! Sele cting between different graphics modes also changes the size of t he screendump. If your screendump is too large for normal printing , then you have to choose printing sideways. GRAPHICS MODES 8/24 PINS [8.3.7] Using these gadgets you can choose the graphics mod e of your printer. The left column is for 8-pin printers, and the righ t one is for 24-pin printers. Not every printer has all the modes; if y ou want to see which modes your printer has, you can verify this i n our printer manual. There you can also find a detailed descript ion of the graphics modes. Using different graphics modes you can change the d ensity of your printer. Density is usually expressed in dots/inch . The greater density you want, the longer the printing will take . The different modes supported by the Final Cartridg e III are: Single Density This uses 60 dpi, 8 or 24 pin s. Double Density This uses 120 dpi, 8 or 24 pi ns. Triple Density This uses 180 dpi, 24 pins. Quadruple Density This uses 240 dpi, 8 pins. High Speed, DD This uses 120 dpi, but at nor mal speed (they skip

half of the dots). CRT Graphics This uses 80 dpil 8 pins. CRT Graphics II This uses 90 dpi, 8 or 24 pin s. EXIT [8.3.8] Using this gadget you will leave the print window a nd return to the desktop. PRINT [8.3.9] Using this gadget, you give the command to print us ing your settings. You can continue after the printing has stopped. !!ABORT PRINTING!! [8.3.10] You can abort the printing process by pressing the <RUN/STOP> button on your Commodore. This will stop the output of da ta to your printer. However, printers which have a buffer may continue for some time. SPECIAL PRINTER FUNCTIONS [8.3.11] Normally spoken you can control the printer from th e printer window, but by Poking some values in memory location $DC0C (hexadecimal) several special functions can be used. Of course y ou have to type these values before you load the program where you want to make a screendump from. If you don't want to use these spe cial functions, you don't have to POKE. The values that perform the spe cial functions are described below. POKE $DC0C,$FF No Centronics check. Normally spoken the Final Cartridge III always look s for a Centronics printer, but by Poking $FF into $DC0C you disable t hat check. POKE $DC0C,$FE RS-232 Printing. By Poking the value $FE into $DC0C the screendump i s sent using the user port to a RS-232 printer. PRINTERS TESTED [8.4] The following printers have been tested with the Fi nal Cartridge using these settings. Printer Interface Type Star NL-10 (CBM) Commodore EPSON Compatible Star NL-10 (IBM) Centronics EPSON Compatible Star NL-10 (Cent) Centronics EPSON Compatible Epson EX-800 Centronics EPSON Compatible Brother M 1509 Centronics EPSON Compatible Brother M 1709 Centronics EPSON Compatible NEC P6 Centronics NEC P Series OLIVETTI DM 105 Centronics EPSON Compatible PANASONIC X-P1081 Centronics EPSON Compatible You can expand the list of tested printers with the Commodore MCS 801 color printer. You choose Commodore as interface, C BM compatible as type, and select YES at COLORS. PRINTER CABLES [8.5] If you want to connect a Centronics or RS-232 print er to your Commodore you need a special cable. This cable is available through

your dealer. NOTEPAD [9.0] INTRODUCTION [9.1] With the Notepad tool, you can keep notes or create short documents. OPENING AND CLOSING NOTE PAD [9.2] You can open the Notepad by selecting the notepad i tem in the PROJECT of the desktop. You can close the Notepad by selecting quit in the project menu. USING THE NOTEPAD COMMANDS [9.3] You can choose the notepad commands from pull down menus. At the top of the screen you will find a menu bar. We will discuss the commands in the order in which they are display the menus. PROJECT [9.3.1] In this menu are commands to load, save or print th e notes. NEW With this command you can empty the notepad. LOAD With this command you can load a document from disk . You enter the name of the document using the string gadget of the requester. TLOAD With this command you can load a document from tape in exactly the same way as described in LOAD. After you have type d the name you have to press PLAY on tape. SAVE With this command you can save your document to dis k. You enter the name of the document using the string gadget of the requester. TSAVE With this command you can save a document to tape i n exactly the same way as described in SAVE. After you typed the name you have to press RECORD & PLAY on tape. PRINT With this command you can print your document. RECOVER After QUIT, NEW or LOAD your text is lost, but by u sing this command you can get it back. QUIT With this command you close the notepad and return to the desktop.

FILE [9.3.2] TOP OF FILE With this command you can directly go to the top of your document. You can also do this by pressing <CLR/HOME>. REDRAW This command will redraw the screen. FREEZER This command will activate the freezer. The only w ay to return from the freezer is to select the Exit Run command of th e freezer. SCREEN [9.3.3] In this menu are several commands to change the way in which the text is displayed. WORDWRAP This option activates the wordwrap. BOLD This option will display the whole text in bold typ e. PROPORTIONAL This option makes it possibly to choose between pro portional or normal characters. To work with columns you should disabl e proportional. LINE [9.3.4] In this menu are several commands that change the d istance between the lines. SPACEX By selecting a different space command, you change the distance between the lines. ENTERING TEXT [9.4] You can enter the text in the usual way. EDIT FUNCTIONS With the cursor-control keys you can move the curso r in the usual way: One character left or right. One line up or down. The <INST/DEL> key removes the character left of th e cursor. It is also possible to move the cursor with the poi nter. You point at the place you want the cursor and click. SPECIAL FUNCTIONS It is possible to use a special function in your te xt. For the time being we implemented the printer function Form Feed . You can enter this function by typing the < > (left arrow) key. T his character will also be shown on the screen, but while printing you r text a Form Feed is given at this place. The text following the left arrow will be

printed on a new page. .-------------------------------------------------- ---------. | PROJECT FILE SCREEN LINE CHARACTER DESK TOP V1.0 | +--------+----------------------------------------- ---------+ | NEW | | | LOAD | | | SAVE | | | TLOAD | | | TSAVE | | | PRINT | | | QUIT | | +--------' | | | | Dit is een stuk tekst dat als demo | | dient voor in de handleiding van de | | Final Cartridge III | | | | | `-------------------------------------------------- ---------' BASIC [10.0] INTRODUCTION [10.1] In the BASIC mode you can make a program in BASIC a s you are used to. In this mode the computer works as it does without the Final Cartridge III. The Final Cartridge III does offer you some extensi ons, however, such as: 1. Scrolling BASIC programs 2. A printer interface 3. Screendumping 4. A tape/disk turbo 5. The use of pull-down menus 6. The use of almost 30 extra BASIC commands ENTERING AND LEAVING THE BASIC MODE [10.2] You can enter the BASIC mode by: 1. Holding down the <RUN/STOP> key while you tur n on or reset your computer. 2. Selecting the BASIC item in the SYSTEM menu f rom the desktop. 3. Selecting the BASIC item from the freezer. You can stop the BASIC mode and select another opti on by: 1. Selecting DESKTOP in the SYSTEM menu to go to the DESKTOP. 2. Typing DESKTOP to go to the DESKTOP. 3. Resetting the computer while holding down the <C=> key. This will bring you to the DESKTOP. 4. Pushing the freeze button to go to the FREEZE R. 5. Selecting FINAL KILL to turn the Final Cartri dge III off, and go to the original computer.

6. Typing KILL to turn the Final Cartridge III o ff, and go to the original computer. EXTENSIONS OF BASIC [10.3] SCROLLING [10.3.1] Just like with the monitor, you have the possibilit y to scroll your BASIC programs. This is done by pressing the curso r keys. You can scroll a program after you have listed a small part of it, by pressing the cursor-up key if the cursor is at the top of th e screen, or the cursor-down key if the cursor is at the bottom of t he screen. You will notice that the preceding or following part of your program is automatically displayed. EDIT FUNCTIONS [10.3.2] The Final Cartridge III offers you several extra ed it functions, which make editing a program a lot easier. To make scrolling down much easier, you can (by pre ssing the <CTRL> & <CLR/HOME> simultaneously) move the cursor directly the left bottom corner of the screen. By pressing the keys <CTRL> & <DEL>, you delete the characters a the cursor to the end of the line. By pressing the <C=> key, you freeze the output to the screen. This is very useful to stop the list command. PRINTER INTERFACE [10.3.3] Using the Final Cartridge III you can also print on non-Commodore printers. The Final Cartridge III is provided with a Centronics printer interface. To connect a Centronics printer you need a special cable which is available through your local dealer. You can use the Centronics interface from BASIC by using the extend ed OPEN command. LOW-RESOLUTION SCREENDUMP [10.3.4] It is possibly to make a low-resolution screendump directly from BASIC. This is done by pressing the keys <CTRL> & <RETURN> simultaneously. TAPE TURBO [10.3.5] The Final Cartridge III is provided with a tape tur bo, which loads and saves programs 10 times faster. This turbo is full y compatible with most commonly used turbos. You also have the possi bility to load and save at normal speed. The tape commands are: LOAD "name" load at normal speed SAVE "name" save at normal speed LOAD "name",7 load using the turbo (10 times f aster) SAVE "name",7 save using the turbo (10 times f aster) DISK TURBO [10.3.6] The Final Cartridge III is also provided with a dis k turbo. The turbo loads programs 15 times faster, and the turbo saves programs 7 times

faster. The usual commands already use the turbo, but by us ing the new disk commands, you don't have to type ",8". New diskcommands: DLOAD DSAVE DAPPEND DVERIFY All these commands are discussed in Extra B Commands. PULL-DOWN MENUS [10.3.7] From BASIC it is possible to use pull-down menus. I n these menus you can find all the extra BASIC commands. To use the pull-down menus in BASIC you have to press the fire button (this is th e only difference between the pull-down menus in desktop and BASIC), after which the menu bar will appear. You will find detailed descriptions of the commands further on. Attention! FINAL KILL = KILL EXTRA BASIC COMMANDS [10.3.8] With the Final Cartridge III inserted in your compu ter, you can use almost 30 extra BASIC commands. You can use these commands in two ways: - You can type them - You can use them in your programs. Of all the commands we give - the name of the command - the syntax of the command The first line shows the full command. The second line shows the abbreviation. You can type the lower case characters in the usual way, but you have to pres s the <SHIFT> key to enter the upper case characters. [ ] Square brackets indicate optional parts of t he command. Do not type the brackets. < > Angle brackets enclose information that you must provide, such as the name of a program. etc. Do not type the brackets. This sign indicates that you must choose bet ween various possibilities. - the function of the command - an example of the command - some remarks on the command APPEND ............ 10.3.8.1 ARRAY ............. 10.3.8.2 AUTO .............. 10.3.8.3 BAR ............... 10.3.8.4 DAPPEND ........... 10.3.8.5 DEL ............... 10.3.8.6 DESKTOP ........... 10.3.8.7

DLOAD ............. 10.3.8.8 DOS ............... 10.3.8.9 DOS"$ ............. 10.3.8.10 DSAVE ............. 10.3.8.11 DUMP .............. 10.3.8.12 DVERIFY ........... 10.3.8.13 FIND .............. 10.3.8.14 KILL .............. 10.3.8.15 LIST .............. 10.3.8.16 MEM ............... 10.3.8.17 MON ............... 10.3.8.18 MREAD ............. 10.3.8.19 MWRITE ............ 10.3.8.20 OFF ............... 10.3.8.21 OLD ............... 10.3.8.22 OPEN .............. 10.3.8.23 ORDER ............. 10.3.8.24 PACK .............. 10.3.8.25 PDIR .............. 10.3.8.26 PLIST ............. 10.3.8.27 RENUM ............. 10.3.8.28 REPLACE ........... 10.3.8.29 TRACE ............. 10.3.8.30 UNPACK ............ 10.3.8.31 $ ................. 10.3.8.32 APPEND [10.3.8.1] Syntax: APPEND ["<file-name>"] [,<device>] aP ["<file-name">] [,<device>] This command offers you the possibility to add subr outines you have on tape or disk, to a program that's already in memory . Example: APPEND "file-name" for tape APPEND "file-name",8 for disk Remarks: Because the original line numbers are unchanged, you may have to renumber the new program. ARRAY [10.3.8.2] Syntax: ARRAY aR This command will list the contents of the arrays y ou are using in your program. Example: ARRAY Screen: ARRAY A$(I) = "HALLO" A$(2) = "TEST"

AUTO [10.3.8.3] Syntax: AUTO [<linenumber> [,<increment>]] aU [<linenumber> [,<increment>]] This command will automatically number your program , making the typing in of programs much faster and easier. Example: AUTO 10,5 The computer starts at lin e 10, and as soon as you press <RETURN> the computer gives the next line number: 10 + 5 = 15. AUTO This is the same as AUTO 100, 10 AUTO 200 This is the same as AUTO 200, 10 Remarks: To stop the AUTO command Just press <RE TURN> without entering a command. If you have a program that ends at line 1000, you can use AUTO 1010,10 to add lines to the program. You can also use this command to insert lines. BAR [10.3.8.4] Syntax: BAR [OFF] bA [oF] This command will disable or enable the possibility to call the pull-down menus. Example: BAR enables the pull-down menus BAR OFF disables the pull-down menus Remarks: This command is built in to make the Final Cartridge III also compatible with other programs from BAS IC. If a program doesn't work, try it again after you used the BAR OFF command. DAPPEND [10.3.8.5] Syntax: DAPPEND ["<file-name>"] dA ["<file-name>"] This command is the same as APPEND "file-name",8. Example: DAPPEND "part2" adds "part2" to the program in memory DAPPEND adds the first program on disk to memory Remarks: By using this command you don't have t o use the addition ",8".

DEL [10.3.8.6] Syntax: DEL [<first-line>] - [<last-line>] dE [<first-line>] - [<last-line>] This command will delete parts of your program Example: DEL 100-200 will delete the lines from 100 up to 200 DEL 250- will delete the lines from 250 DEL -100 will delete the lines up to 100 DEL - will delete the program Remarks: DEL is short for DELETE. DESKTOP [10.3.8.7] Syntax: DESKTOP deS This command will leave BASIC and return to the DES KTOP. Example: DESKTOP this will return to DESKTOP Scveen: DESKTOP ARE YOU SURE (Y/N)? Remarks: Before you go to desktop be sure you h ave saved your program or the DESKTOP will wipe out what is in the BASIC memory. That's why the computer first asks yo u "ARE YOU SURE (Y/N)?". You enter your choice by pressi ng <Y> or the button to leave BASIC or <N> to continue. DLOAD [10.3.8.8] Syntax: DLOAD ["<file-name>"] dL ["<file-name>"] This command will load a program from disk using th e built-in turbo. In this way programs are loaded 15 times faster tha n normal. Example: DLOAD "test" loads the program "test" from disk DLOAD loads the first program from di sk Remarks: By using this command you don't have t o use the additional ",8". DLOAD "name" is the same as LOAD "name",8,1 If you are not using this command in a progra ms you can press <F5>, which has the same effect as typi ng DLOAD.

DOS [10.3.8.9] syntax: DOS"<diskcommand>] / [<devicenumber>] dO"[<diskcommand>] / [<devicenumber>] This command will let you find out what kind of err or has occurred when red light an your disk is flashing. You can al so use this command to give diskcommands or change to the other disk. Example: DOS" will read the ERROR-c hannel DOS"$ will display the di rectory of the disk DOS"N0:name,id" will format a disk DOS"V will validate a disk DOS"9 now all the diskcommands wil l go to the drive using devicenumber 9 Remarks: DOS"N:RISKA,BV" is the same as the fol lowing sequence of commands: OPEN 15,8,15 <RETURN> PRINT#15,"N:RISKA,BV" <RETURN> The diskcommands are described in your disk m anual. If you are not using this command in a program, you can also press <F8>, which has the same effect as typi ng DOS". DOS"$ [10.3.8.10] Syntax: DOS"$ dO This command will display a directory of the disk o n the screen WITHOUT wiping out the program currently in memory. Example: DOS"$ this shows the contents of your disk Remarks: If you are not using this command in a program, you can also press <F7>, which has the same effect. By using the function key <F7> with this comm and you first clear the screen. DSAVE [10.3.8.11] Syntax: DSAVE "<file-name>" Ds "<file-name>" This command will write a program to disk using the built-in turbo. In this way programs are saved 7 times faster than nor mal. Example: DSAVE "test" writes the program "test" to disk Remarks: By using this command you don't have t o use the addition ",8".

If you are not using this command in a progra m you can also press <F6>, which has the same effect as typing DSAVE". DUMP [10.3.8.12] Syntax: DUMP dU This command will show you a list of all the normal variables and their present values. Example: DUMP will dump all the normal variable s Remarks: To dump the arrays, use the command AR RAY. DVERIFY [10.3.8.13] Syntax: DVERIFY ["<file-name>"] dV ["<file-name>"] This command will compare the program on disk named "file-name" with the one currently in memory. If the two programs a re the same then the computer returns with the usual 'READY' prompt, but if there are any differences then a 'VERIFY ERROR' is given. Example: DVERIFY "test" will compare the program "testfl on disk with the one in memory DVERIFY will comparse the first program on disk with the one in memory Remarks: DVERIFY is the same as VERIFY "file-na me",8. But by using this command you don't have to use the additi on ",8". FIND [10.3.8.14] Syntax: FIND ["<text>"]/[<BASIC command>]/[<va riable>] fI ["<text>"]/[<BASIC command>]/[<variable>] This command will search the whole program for a st ring, word or command and list every line in which it occurs. Example: FIND "test" will list every line containing the string "test" FIND POKE 53280 will list every line co ntaining the command POKE 53280 FIND Z will list every line co ntaining the variables Z, Z%, Z$, indexed or not FIND Z$ will list every line co ntaining the variable Z$, indexed or not FIND Z% will list every line co ntaining the

variable Z%, indexed or not FIND 9 will list every line co ntaining a 9 such as: POKE 19, 0; POKE 12,191; z = 0. 192 etc. FIND will list all lines KILL [10.3.8.15] Syntax: KILL kI This command will disable the Final Cartridge III. Only the freezer still works, but you will return to the standard Co mmodore 64 unless you leave the freezer through the monitor. LIST [10.3.8.16] Syntax: LIST [[first-linel-[last-line]] lI [[first-line]-[last-line]] This command will list your BASIC program, but has now been improved so that any list protections which may be included in a BASIC program will be overruled. MEM [10.3.8.17] Syntax: MEM mE This command will display the memory categories of the BASIC memory. Example: MEM will list the memory category Scveen: MEM BASIC 38911 BYTES PROGRAM 2 BYTES VARIABLES 0 BYTES ARRAYS 0 BYTES STRINGS 0 BYTES FREE 38909 BYTES MON [10.3.8.18] Syntax: MON mO This command will activate the machine-language mon itor which is built

into the Final Cartridge III. Full details on how to use this excellent feature are given in the chapter MONITOR. MREAD [10.3.8.19] Syntax: MREAD <memory location> mR <memory location> This command will read 192 bytes of memory from the given memory location onwards. Using the MWRITE command you can transfer these bytes to the 24K of RAM which normally lies "under" the ROMS. Example: FOR I = 0 TO 4 MREAD $0400 + I * 192 MWRITE $A000 + I * 192 NEXT I This will transfer the screen to the extra RAM. Remarks: It is possible to transfer to all memo ry locations, but commands are intended to use the 24K of RAM w hich normally "under" the ROMS. This extra memory can be used as a storage medium for large amounts of information, such as variables, text and grap hics screens, reference tables etc. The 24K of ex tra RAM is located at: $A000-$BFFF = 8K BASIC interpreter $C000-$CFFF = 4K free RAM $D000-$DFFF = 4K VIC, SID and I/O $E000-$FFFF = 8K kernel To transfer the 192 bytes the Final Cartridge III uses the tape-buffer. MWRITE [10.3.8.20] Syntax: MWRITE <memory location> mW <Memory location> This command writes the 192 bytes you read with the MREAD command on the given location. Example: FOR I = 0 TO 4 MREAD $A000 + I * 192 MWRITE $0400 + I * 192 NEXT I This will restore the screen. Remarks: See MREAD. OFF [10.3.8.21] Syntax: OFF

oF This command makes it possible to disable the extra BASIC commands, without disabling the Final Cartridge III itself. The disk & tape turbos, and the printer-interface still work. Remarks: You have to choose this command to work with TOOLKIT programs or programs who define their own char acterset. OLD [10.3.8.22] Syntax: OLD oL This command will restore a BASIC program after a r eset or NEW. Remark: This command works as long as you have n't started to type in a new program or to load one. OPEN [10.3.8.23] Syntax: OPEN <file-num>, [device] [,<address>] oP <file-num>, [device] [,<address>] This command opens a channel for input and/or outpu t to a peripheral device, but is extended by the Final Cartridge III for Centronics printers. Example: OPEN 1,4,2 This secondary address al lows you to use all normal ASCII codes. OPEN 1,4,3 This allows you to use all ASCII codes, as well as the control codes used by your printer. OPEN 1,4,9 This allows you to print all Com modore graphics and control codes. OPEN 1,4,10 This does the same as OPEN 1,4,9 but in reversed print. Remarks: To list a program to a printer, you ca n use: OPEN 1,4,9: CMD 1: LIST (After printing you s hould close your printer channel again with PRINT#1: CLOS E1) You can also use the new PLIST command. ORDER [10.3.8.24] Syntax: ORDER oR This command will order your BASIC program. It's p ossible that after a (D)APPEND command the line numbering isn't correc t. By using this command all lines are Inserted at the proper place.

Remarks: You can use this command after an APPE ND, DAPPEND or RENUM command. PACK [10.3.8.25] Syntax: PACK pA This command will pack the program in memory. Afte r you packed the program you can save it. You can run a packed prog ram in the normal way. Remarks: The program you want to pack should st art at 0801 (hex). A lot of programs are already packed, so if y ou use it on those programs they will only become bigger. Also see UNPACK. PDIR [10.3.8.26] Syntax: PDIR pD This command will print the directory. Example: PDIR this will print your director y Remarks: This command does the same as the foll owing sequence of commands: LOAD "$",8 OPEN 1,4: CMD 1: LIST PRINT#1 CLOSE1 PLIST [10.3.8.27] Syntax: PLIST pL This command displays the listing on the printer. Example: PLIST Remarks: This command does the same as the foll owing sequence of commands: OPEN 1,4: CMD 1: LIST PRINT#1 CLOSE1

RENUM [10.3.8.28] Syntax: RENUM [<linenumber> [,<increment>]] rE [<linenumber> [,<increment>]] This command will renumber the lines of a BASIC pro gram. Using this command you can create room to insert lines, or you can renumber a program after an APPEND command. Example: RENUM 10,5 will renumber a program , starting with line 10 using an increment of 5. RENUM is the same as RENUM 100,10 RENUM 300 is the same as RENUM 300,10 Remarks: This command also takes care of any GO TOs and GOSUBS, and is very useful when you are writing your own programs as it allows you to tidy up the line numbers. REPLACE [10.3.8.29] Syntax: REPLACE <command1>,<command2> / "text1 ","text2" reP <commmand1>,<command2> / "text1","text2" This command makes it possible to replace a text or a BASIC command in whole your program. Example: REPLACE PRINT#1, PRINT This replaces the PRINT#1 statements by norma l PRINT statements. REPLACE "FC3","Final Cartridge III" This replaces the text FC3 by Final Cartridge III. TRACE [10.3.8.30] Syntax: TRACE [OFF] tR [OFF] This command will display each line of your BASIC p rogram while it is being executed when you run the program. It will c ontinue tracing until you use the command TRACE OFF. Example: TRACE will trace your BASIC progra m TRACE OFF will stop traelng your BASIC progra m. UNPACK [10.3.8.31] Syntax: UNPACK uN This command will unpack a program which was packed by the Final Cartridge III.

Remarks: See also PACK. $ [10.3.8.32] Syntax: $<hexadecimal number> This command allows you to use hexadeclmal numbers in your programs, just as you would use decimal numbers. To tell the computer that a particular number is in hexadecimal it should be pr eceded by a $ symbol. Example: A=$0F Variable A gets the va lue 15 POKE $D020,A The border becomes grey SYS $FCE2 This resets the computer. FREEZER [11.0] INTRODUCTION [11.1] The LEFT button at the back of the Final Cartridge III is the freeze button. Pressing this button will freeze all progr ams. After you press the FREEZE button the Final Cartrid ge III allows you to execute several special commands such as making a backup copy of your tape or disk program. Also see the chapter rem arks! HOW TO START AND STOP THE FREEZER [11.2] You can start the freezer in the following three wa ys: 1. Select the freezer item in the desktop system me nu. 2. Select the freezer item in the BASIC system pull -down menu. 3. Press the freeze button on the back of the Final Cartridge III. You can leave the freezer in the following two ways : 1. You select one of the exit commands. 2. You select one of the reset commands. USING THE FREEZER [11.3] After you started the freezer a menu bar will appea r. In this menu you don't use a pointer. You can browse through th ese pull-down menus in the following two ways: 1. Using the Joystick. Going left or right, you ca n browse through different menus. Going up or down you browse t hrough the menu items. Pressing the fire-button selects a comma nd. 2. Using the keyboard. With the cursor keys (only together with the shift key on the right if necessary) you can mo ve in the same way as described above. Pressing the <F7> key you select a command. SUMMARY FREEZER COMMANDS [11.4] These are all the options that are available in the freezer:

BackUp Disk ......................... 11.4.1 BackUp Tape BackUp FDisk BackUp FTape Game Sprite I ....................... 11.4.2 Game Sprite II Game Joyswap Game Autofire Colors BackGnd ...................... 11.4.3 Colors ForeGnd Colors Border Print Settings ...................... 11.4.4 Print View Print View Border Print View Foreground Print View BColor0 Print View BColor1 Print View BColor2 Print View BColor3 Print View Exit Print Set Reset Kill .......................... 11.4.5 Reset Zero Fill Reset CBM64 Exit Run ............................ 11.4.6 Exit Monitor Exit Desktop BackUp [11.4.1] The Final Cartridge III has a built-in facility to allow you to make backup copies of your tape and disk programs. Plea se note that this facility is only for your own personal backups, and is not designed to allow you to copy programs illegally The backups you make can be loaded even without a F inal Cartridge III. But if you want to load a backup without a Final Ca rtridge III, be sure that you didn't make a backup after you activa ted the sprite killer, the joystick port changer or the autofire ( these special facilities need a Final Cartridge III). BackUp Disk This command will make a backup copy of your softwa re to disk at normal speed. BackUp Tape This command will make a backup copy of your softwa re to tape at normal speed. Backup FDisk This command will make a backup copy of your softwa re to disk at high speed. Backup FTape This command will make a backup copy of your softwa re to disk at high speed.

GAME [11.4.2] This menu is built in to make it easier to play gam es. If offers you a sprite killer, a joystick port changer and an auto fire. About twenty seconds after you activated a command the program c ontinues. Unfortunately it is possible that the software disa bles a Game command; in that case then you have to select that command again. Game Sprite I This command will disable the Sprite to sprite dete ction. Please remember that not all games use sprites or sprite d etection registers, so don't be surprised if you still get killed. If a game doesn't use the sprite detection registers, there's nothing we can do to disable the sprite killing. Game Sprite II This command will disable the sprite to background detection. Game Joyswap This command will select the other joystick port. By using this command, you don't have to change the joystick from port one to port two (or vice versa) if a game uses the other joysti ck port. Game Autofire This command will transform a normal joystick to an expensive auto fire joystick. This is very useful for Invader gam es. Every time you hold down the fire button, it automatically keeps o n firing. Colors [11.4.3] This menu is built in to change the colors of the s creen. Colors BackGnd This command will change the background color. Colors ForeGnd This command will change the foreground color. Colors Border This command will change the border color. Print [11.4.4] This menu is built in to make screendumps, watch th e frozen screen, and reactivate the Centronics printer-interface. Print Settings This command will open the print window to allow yo u to make screendumps. This window is described in the chapt er TOOLS. Print View This command will make it possible to see the scree n you're going to print. After you have chosen this command you can use the joystick or the cursor keys to scroll the screen up or down, th en a new menu bar

appears. This new menu bar offers you the possibility to cha nge the colors of the screen. The commands are: Print View Border This command changes the border color (It increment s register 53280 (D020 Hex)). Print View ForeGround This command changes the foreground color (It incre ments the left nibble of the color memory; in hires it increments the right nibble of the screen memory). Print View BColor0 This command changes the background color 0 (It inc rements register 53281 (D021 Hex)). Print View BColor1 This command changes the background color 1 (It inc rements register 53282 (D022 Hex)). Print View BColor2 This command changes the background colors 2 (It in crements register 53283 (D023 Hex)). Print View BColor3 This command changes the background color 3 (It inc rements register 53284 (D024 Hex)). Print View Exit This command exits View; you return to the freezer pull-down menus. Print Set This command reactivates the Centronics printer int erface. It resets the printer vectors just in case a program overwrit es the Centronics driver. Reset [11.4.5] This menu is built in to reset the computer and sta rt it up in a special way. Reset Kill This command will reset the computer and start it u p as the standard Commodore. (It will leave the Final Cartridge III o ff). Reset Zero Fill This command will reset the computer and clean the memory before it starts up. It leaves the Final Cartridge III on. Using the start up will save memory in a backup. Reset CBM64 This command will reset the computer and start it u p as the standard Commodore. (It will leave the Final Cartridge III o n)

Exit [11.4.6] This menu is built in to exit the freezer. Exit Run This command will continue the frozen program. Exit Monitor This command will start the monitor. Exit Desktop This command will leave the freezer and start the d esktop. THE MONITOR [12.0] INTRODUCTION [12.1] The monitor of the Final Cartridge III is quite uni que, as it has four functions: machine language monitor, disk monitor, character monitor, sprite monitor. Using the machine language monitor we can communica te directly with the computer in machine language. The great advant age of machine language is that it is much faster than BASIC. The machine language monitor provides you with seve ral extra commands which greatly simplify machine language programming . Some function keys can also be used while you're working with the machine language monitor. For example, using the disk monitor you can examine or change the memory of the disk-drive. Using the character monitor you can examine and cha nge characters. In this way you can design your own characters. Using the sprite monitor you can examine and change sprites. In this way you can design your own sprites. HOW TO START AND LEAVE THE MONITOR [12.2] You can start the monitor in four different ways: 1. In BASIC you type the command MON. 2. In BASIC you press the function key F2 (<SHIFT>+ <F1>). 3. In BASIC you select monitor in the system pull-d own menu. 4. In the FREEZER you select MONITOR. After that you will be shown a display of the vario us registers, looking like this, for example: C* PC IRQ BK AC XR YR SP NV#BDIZC .;AB20 EA31 07 85 FF 06 F9 *.**...* You can leave the monitor simply by typing X (from Exit) and pressing <RETURN>.

GENERAL TERMS AND TECHNIQUES [12.3] PROMPT [12.3.1] The monitor uses a prompt. The prompt is the point on the screen after which you can type all your commands. MEMORY REPRESENTATION [12.3.2] Memory can be filled with various data. The data m ay be numbers, texts, programs, characters and sprites. The Final Cartridge III offers you the possibility to see the memory of all those different kinds. To explain what we mean, we will show you t he same memory in different representations: .:2000 48 41 4C 4C 4F 20 44 49 HALLO DI Value Repr esentation .'2000 HALLO DIT IS EEN TEST V/D FC III Text Repre sentation .]2000 .*..*....*.....*.*..**.. Sprite Rep resentation .[2000 .*..*... Character Representation .,2000 48 PHA Program Re presentation SCROLLING [12.3.3] In every kind of representation you have the possib ility to scroll the memory. By scrolling upwards if the cursor is at t he top of the screen, or downwards if the cursor is at the bottom of the screen, you can examine the other memory locations in the same representation. Using this technique it's easy to examine a large p art of memory. You only need to ask for a small part of the memory you want to examine, and by using the scrolling technique you can examin e the other parts. CHANGING [12.3.4] With the Final Cartridge III, it is easy to change data in the memory. You only need to type the new data over the existin g data, and after you have pressed <RETURN> the new data is accepted. In the following lines the underlined data could be changed: .:2000 48 41 4C 4C 4F 20 44 49 HALLO DI Value Repr esentation ----------------------- .'2000 HALLO DIT IS EEN TEST V/D FC III Text Repre sentation -------------------------------- .]2000 .*..*....*.....*.*..**.. Sprite Rep resentation ------------------------ .[2000 .*..*... Character Representation -------- .,2000 48 PHA Program Re presentation -- BANK SWITCHING [12.3.5] Your Commodore is provided with several ROMS. Usin g the bank switch command, the letter O, you can turn the ROMs on and off. This is called bank switching because you switch between se veral banks of memory. In the register display you can see what b ank you're in at that moment. For more details you should read the explanation of the O command. MODES [12.3.6]

If you have a disk-drive, you can work with two kin ds of memory: the memory of your computer, and the memory of the disk -drive. That's why there are two modes: the computer-mode (mode 1), an d the disk-mode (mode 2). SWITCHING BETWEEN MODES The monitor automatically switches to mode 1. All c ommands that work with memory use the memory of the computer. You can recognize this mode because in the register display the current bank is displayed. To switch to the memory of the disk, you use the OD command. All commands that work with memory, now use the memory of the disk-drive. You can recognize the disk-mode because in the regi ster display the letters DS indicate the selected bank. To return to the computer mode, you can use the O c ommand (or O followed by the number of the bank you want to work in). KINDS OF COMMAND [12.3.7] To make clear whether a command works with the memo ry of the computer or with the memory of the disk-drive, we will speak about Computer commands and Disk-drive commands. To distinguish them you will find a C for Computer command or D for Disk-drive command in the descriptions below. If t hey can be used with either memory, both letters are given. FUNCTION KEYS [12.3.8] When using the monitor, the following function keys are active: F3 Scrolling upwards F5 Scrolling downwards F7 Displaying directory SUMMARY MONITOR INSTRUCTIONS [12.4] Here follows a summary of all the commands that are available in the monitor. Each command is described below. A Assemble ......................... [12.4.1] C Compare Memory ................... [12.4.2] D Disassemble ...................... [12.4.3] EC Edit Character ................... [12.4.4] ES Edit sprites ..................... [12.4.5] F Fill memory ...................... [12.4.6] G Go ............................... [12.4.7] H Hunt memory ...................... [12.4.8] I Interrogate ...................... [12.4.9] L Load ............................. [12.4.10] M Memory display ................... [12.4.11] O Bank switching ................... [12.4.12] OD Disk monitor ..................... [12.4.13] P Print memory ..................... [12.4.14] R Registers display ................ [12.4.15] S Save memory ...................... [12.4.16]

T Transfer memory .................. [12.4.17] X Exit ............................. [12.4.18] # ................................... [12.4.19] $ ................................... [12.4.20] @ ................................... [12.4.21] *R Read Block ....................... [12.4.22] *W Write Block ...................... [12.4.23] All the addresses and numbers are given in hexadeci mal. If we speak about decimal numbers, we say so. [12.4.1] A Assemble Assembling machine lang uage programs Syntax: Axxxx mnemo [operand] xxxx = the start address mnemo = the machine-language instruction operand = the operand for the instruction This command will allow you to write your own machi ne-language programs. Example: AC000 LDA #$00 This will put the comma nd LDA #$00 in memory location C000 Remarks: If you are writing more than one line, you only have to give this command once. The computer calcula tes the next memory location for the next instruction, so you only need to type the instruction (followed by the operand). When you have finished just press <RETURN>. N ow the monitor accepts all the other commands again. Kind: C,D. [12.4.2] C Compare Memory Comparing blocks of memory Syntax: C xxxx yyyy zzzz xxxx = the start address of the first block yyyy = the end address of the first block zzzz = the start address of the second block This command will compare one block of memory with another, and inform you of the differences, if any. The numbers being displayed are the memory locations which are not the same. So if you were to compare two blocks of memory that are identical then nothin g would be displayed on the screen. Example: C 1000 1FFF 4000 This will compare th e block from 1000 to IFFF with the block from 4000 to 4FFF. Remarks: You need not give the ending address o f the second block, as the computer will calculate this for you.

Kind: C,D. [12.4.3] D Disassemble Disassembling machin e language programs Syntax: D xxxx yyyy xxxx = the start address yyyy = the end address This command will disassemble a machine language pr ogram (or, in o words, will convert it from a hard-to-understand li s numbers into a more readable list of commands) . Example: D 3000 300A This will disassemble a p rogram startin memory location 3000 and ending at 300A. Screen: .D 3000 300A ., A9 00 LDA #$OO ., 8D 20 DO STA $DO20 ., A9 00 LDA #$OO ., 8D 21 DO STA $DO21 ., 00 BRK Remarks: To start disassembling a long program , you may just type D followed by the start location. This will disassemble one command only, and to continue you use th e scrollling technique. Kind: C,D. [12.4.4] EC Edit Character Syntax: EC xxxx yyyy xxxx = the start address yyyy = the end address This command will show you the memory as a characte r. You have possibility to change the character by typing "*" i f you want to set a bit, or "." to clear a bit. Example: EC 2000 2008 This will show the memory from 2000 to 2008 character. Screen: .EC 2000 2008 .[2000 ..****.. .[2001 .**..**. .[2002 .**.***. .[2003 .**.***. .[2004 .**..... .[2005 .**..... .[2006 ..****.. .[2007 ........

Kind: C,D. [12.4.5] ES Edit sprites Syntax: ES xxxx yyyy xxxx = the start address YYYY = the end address This command will show you the memory as a sprite. You have the possibility to change the sprite by typing "*" if y ou want to set a bit, or "." to clear a bit. Example: ES 2000 2008 This will show the memo ry from 2000 to 2008 as a sprite. Screen: .ES 2000 2008 .[2000 ************..**..**..** .[2003 ************..**..**..** .[2006 ****..........**..**..** .[2009 ********......**..**..** .[200C ********......**..**..** .[200F ****..........**..**..** .[2012 ****..........**..**..** .[2015 ****..........**..**..** .[2018 ****..........**..**..** Kind: C,D. [12.4.6] F Fill memory Filling an area o f memory Syntax: F xxxx yyyy zz xxxx = the start address yyyy = the end address zz = the value you want to fill the memory with This command will quickly fill an area of memory wi th a number. Example: F 3000 4000 00 This will fill the me mory locations 3000 to 4000 with the value 00. Remarks: This command is often useful to quickl y fill an area of memory you want to use for programming. Now you can easily locate your program. Kind: C,D. [12.4.7] G Go Running machine langu age programs Syntax: G xxxx

xxxx = the start address This command will begin to execute a machine-langua ge program starting at the memory location given. Example: G 3000 This will start a program a t location 3000. Kind: CID. [12.4.8] H Hunt memory Hunting for numbers o r strings Syntax: H xxxx yyyy z1 z2 z3/"<text>" xxxx = the start address yyyy = the end address zn = the values you're looking for text = the string you're looking for This command will search through a block of memory for a number, a group of numbers or a text string. All the memory locations in which the number, numbers or string occur, will be displa yed. Example: H 1000 8000 A9 00 This will search from 1000 to 8000 for the values A9 00 H 2000 F000 "FINAL" This will search from 20 00 to F000 for the string "FINAL" Remarks: This command allows you to search for a particular part of a program. By entering the values A9 00, it will search for the instruction LDA #$00. Kind: C,D. [12.4.9] I Interrogate Syntax: I xxxx yyyy xxxx = the start address yyyy = the end address This command will show the memory as text. Now you can also change the memory by typing the text you want. Example: I 2000 203F Screen: .I 2000 203F .'2000 HALLO THIS IS A TEST OF FC III Remarks: This command allows you simply to ente r text in your own machine language programs. [ Kind is missing from original. ]

[12.4.10] L Load Loading machine langu age programs Syntax: L "<file-name>",x [,yyyy] x = the device number 01 for tape 08 for disk yyyy = the start address This command will load a program. Example: L "test",01 This will load the pr ogram called test from tape Example: L "test",08 The same for disk L "test",08,2000 The same for disk, but reloc ated, so now starting at location $2000. Remarks: By giving a start address you can relo cate a program in memory. This is very useful to connect severa l small machine language subroutines to each other. N ow, you can also examine auto-boot programs by relocating them. A relocated load is only possible if you are using a disk- drive. Kind: C. [12.4.11] M Memory display Looking at the memory Syntax: M xxxx yyyy xxxx = the start address yyyy = the end address This command will display the contents of a block o f memory, both in hexadecimal format and, where possible, as a charac ter (i.e., a letter, number, or graphic symbol) . The contents o f these locations will then be displayed on the screen. The first nu mber on each line (which is a four-digit number) is the memory addres s in hexadecimal. The eight two-digit numbers are the contents of tha t memory location and the seven memory locations following it. At th e end of each line is a series of eight characters. The eight two-dig it numbers are the ASCII codes of these characters. Example: M 2000 2010 Screen: .M 2000 201F .:2000 48 41 4C 4C 4F 20 44 49 HALLO DI .:2008 54 20 49 53 20 45 45 4E T IS EEN .:2010 20 54 45 53 54 20 56 2F TEST V/ .:2018 44 20 46 43 20 49 49 49 D FC III Remarks: To start looking at a large part of th e memory, you may just type M followed by the start location. This will display only the contents of this location, a nd of the seven memory locations following it. To cont inue you can

scroll. Now you can also change the contents by chang ing the values displayed. Kind: C,D. [12.4.12] O Bank switching Syntax: Ox (The letter O followed by a value) x = is a value from 1 to 7 This command will switch on and off the ROMs of the Commodore. In this way it will be possible to use all of the 64K. You can also use this command to return from the di sk monitor. The different values will switch the following ROMS. Va $0000-$7FFF $8000-$9FFF $A000-$BFFF $C000-$CFFF $D000-$DFFF $E000-$FFFF 1. 0-32767 32768-40959 40960-49151 49152-53247 53248-57343 57344-65535 --------------------------------------------------- ----------------------- 00 RAM RAM RAM RAM RAM RAM 01 RAM RAM RAM RAM RAM RAM 02 RAM RAM BASIC RAM CHAR-ROM KERNEL 03 RAM RAM BASIC RAM CHAR-ROM KERNEL 04 RAM RAM RAM RAM RAM RAM 05 RAM RAM RAM RAM I/O-REG RAM 06 RAM RAM BASIC RAM I/O-REG KERNEL 07 RAM RAM BASIC RAM I/O-REG KERNEL Explanations: CHAR-ROM Character ROM I/O-REG Input/Output-Register and Timer (CIA #1 and CIA#2) KERNEL The Operating System (kernel) [12.4.13] OD Disk monitor Syntax: OD This command will switch to the disk monitor. Now all the commands that memory, use the memory of the disk-drive. Remarks: To return to the memory of the compute r, you only have to O. [12.4.14]

P Print memory Printing machine language Syntax: P This command will change the output to the printer when you use commands like D 1000 10A0 or EC 2000 2030. To chan ge the output to the screen again, type another P. Kind: C. [12.4.15] R Registers display Looking at the re gisters Syntax: R This command will give a display of the various reg isters. The status register is even displayed bit by bit. You also ha ve the possibility to change the values. Example: R Screen: .R .PC IRQ BK AC XR YR SP NV#BDIZC .C000 EA31 07 06 56 EA FC *.**.*.* Remarks: These registers are: PC = Program Counter IRQ = Interrupt ReQuest BK = The current bank AC = Accumulator XR = X Register YR = Y Register SP = Stack Pointer N = The Negative Flag of the Status Regist er V = The Overflow Flag of the Status Regist er # = (Not used) B = The Break Command Flag of the Status R egister D = The Decimal Mode Flag of the Status Re gister I = The Interrupt Disable Flag of the Stat us Register Z = The Zero Flag of the Status Register C = The Carry Flag of the Status Register If you're writing your own interrupt routine, you only have to change the address of the current int errupt routine in the register display. In this way , you need not write a little program that changes the i nterrupt vector. [12.4.16] S Save memory Saving machine la nguage programs Syntax: S "<file-name>",xx,yyyy,zzzz xx = device number 01 for tape 08 for disk

yyyy = the start location of the program zzzz = the end location of the program + 1 This command will save your machine language progra m to either tape or disk. Example: S "test",01,1000,2000 This will save t he memory from 1000 to 1FFF as a program called "test" on tape. S "test",01,1000,2000 The same for disk. Remarks: Note that you have to give the end add ress plus 1. Kind: C [12.4.17] T Transfer memory Transferring bloc ks of memory Syntax: T xxxx yyyy zzzz xxxx = the start address of the block yyyy = the end address of the block zzzz = the start address where it should go t o This command will copy a block of memory from one p lace to another. Example: T 2000 3000 9000 This will copy the b lock from 2000 to 3000 to 9000 - A000 Remarks: The computer calculates the end addres s. Please note that you cannot transfer a block of memory within itself. Kind: C,D [12.4.18] X Exit Leaving the monit or Syntax: X This command will leave the monitor. [12.4.19] # Converting decima l to hexadecimal Syntax: # < number> number = the decimal number you want to conve rt. This command will convert the decimal number given, to hexadecimal. Example: # 53281 This will convert 53281, and w ill display $D021

[12.4.20] $ Converting hexade cimal to decimal. Syntax: $ xxxx xxxx = the hexadecimal number you want to con vert. This command will convert the hexadecimal number gi ven, to decimal. Example: $ D021 This will convert D020, and wil l display 53281 (decimal). [12.4.21] @ Disk commands Syntax: @[<diskcommand>] This command will display the ERROR channel, or giv e a disk command. Example: @ this will read the ERROR- channel @$ this will show the directory @N:name,id this will format a disk Remarks: This command does the same as the BASI C command DOS [12.4.22] *R Read Block Syntax: *R xx yy zz xx = the track number of the block yy = the sector number of the block zz = the location in memory where the block h as to start (zz is equal to zz00) This command will read a block from the diskette an d place it in the computer's memory. There you can examine and chang e it. Example: *R 12 00 CE this will read the first block of the directory and place it in memory starting at location CE00 *R 12 00 this will read the first b lock of the directory and place it in memory starting at location CF00 (now it uses the default memory locations) Remarks: If no memory location is given, it is placed at $CF00 (52992 decimal). Kind: C. [12.4.23]

*W Write Block Syntax: *W xx yy zz xx = the track number of the block yy = the sector number of the block zz = the location in memory to get the block from (zz is equal to zz00) This command will write a block (back) to the diske tte. Example: *W 12 00 CE this will write the block from CE00 to CEFF to disk as the first block of the directory *W 12 00 this will write the block from CF00 to CEFF to disk as the first block of the directory (now it uses the default memory locations) Remarks: If no memory location is given, the bl ock is supposed to be at $CF00. Kind: C. REMARKS [13.0] INTRODUCTION [13.1] In this chapter you can find several remarks on the Final Cartridge III. You will see why certain features do not alwa ys work so that you will have a fuller understanding of the Final Cartr idge III's capabilities. REMARKS ON THE FREEZER [13.2] It sometimes takes a while before the freezer menu is displayed. Never freeze while the disk-drive is running. As far as we are aware, the freezer will make backu p copies of any program. However, with the new protection methods being developed we cannot guarantee this will always be the case. BACKUP [13.2.1] Always start from a 'clean' machine. Since program s are saved in a compacted form, this will make sure that nothing un necessary is saved. Use the Reset Zero Fill from the freezer before you load the programs you want to backup. Frozen programs will always be saved in two parts u nder the name FC and -FC (this is done to make the backup copies com patible with the Cartridge II). You can, of course, rename your prog ram if it was saved on disk but you must rename both parts. It is impo rtant to rename second part with a - before the name and both parts MUST have the name. Backup copies you make of the Final Cartridge III d on't work. Tape backup copies must be loaded using the built-i n turbo, or a

comparable turbo in order to be loaded without the Final Cartridge III. To make sure that the backup copies also work witho ut the Final Cartridge III, it is recommended that you freeze th ose programs with the cartridge turned off (by the kill command). Sometimes it may be necessary to reset the disk-dri ve before you make a backup. PRINT [13.2.2] Unfortunately we were not able to intercept all ras ter interrupts, so that it is possible that some screens aren't printe d correctly. GAMES [13.2.3] If you activated the autofire, and you freezed agai n, you can only leave the freezer by Autofire and not by Exit Run. REMARKS ON THE DESKTOP [13.3] Although the Final Cartridge III uses none of the c omputer's memory, the desktop does. That's why you're warned before you leave the desktop. REMARKS ON THE RESET [13.4] The reset switch will allow you to recover control of your computer at any time. If you press the Commodore <C=> key while you reset , you go to desktop. If you press the <RUN/STOP> key while you reset, yo u go to BASIC. By pressing reset, you go to the current mode (BASI C or DESKTOP). REMARKS ON BASIC [13.5] PACKER A lot of programs are already packed, so if you use it on those programs they only become bigger. REMARKS ON MICE [13.6] Unfortunately we can't do anything about the fact t hat some mice lock the keyboard (this is a hardware failure of the mou se), so sometimes it's necessary to disconnect the mouse. We recommend that, if it's possible, you use the mo use in joystick mode. A mouse doesn't work in the freezer. REMARKS ON THE DISK TURBO [13.7] In order to prevent problems with older disk-drives and bad diskettes, we reduced the disk turbo to 15 times normal speed. The time

difference is minimum, and it avoids a lot of annoy ance. Many commercial disk-based programs are protected a nd have special loading routines. It is impossible to over-ride th ese loading routines, and so the Final Cartridge III will not a ttempt to do so. This means that the Final Cartridge III will load a s much as possible at 15 times normal speed, and then allow the loader to take over loading at normal speed. However, this problem can be overcome by re-saving the program using the freeze facility. It seemed that the first version of the Final Cartr idge III didn't work well with SPEEDDOS computers. We corrected th is in later versions. ********* End of the Project 64 etext of the Final Cartridge III manual. ********* The Project 64 etext of the FC3 manual supplement. [#1] ********* FINAL CARTRIDGE III !!! READ THIS FIRST !!! In this box you will find the Final Cartridge III, the manual and a binder for the manual. Below you will find a description how you can fix t he manual. 1 Open the top and bottom of the box. 2 Cut the top and bottom slaps off. 3 Remove the right side of the box. 4 Now you have the cover of the manual (the front, left-side and back of the box). 5 In the binder, you stick in the cover, you can fa sten the manual. Below you find a plate that fits over the function keys of your Commodore 64. On the plate are the functions the k eys have in the various modes of the Final Cartridge III. You can cut it out and place it over the keys. .----------------------------. | FINAL CARTRIDGE III | | .----------. | | LIST | | MON | | UP | | | | | CUT | | | RUN | | OLD | | DOWN | | UP | | | | | | | THIS | | | DLOAD | | DSAVE" | | LEFT | | DOWN |

| | | | | | PART | | | DOS"$ | | DOS" | | RIGHT | | DIR | | `----------' | | Fx SHIFT Fx | | DESKTOP MONITOR | | | | (c) 1987 Patrick Marst | `----------------------------' Final Cartridge III Manual Supplement (C) 1988 Riska B.V. Before we discuss the last functions, we have to ex plain something about EPSON control codes to print screendumps. Th ere are two kinds of control codes to print screendumps, There are co ntrol codes like <ESC>"*" CHR$(x) n1 n2 m1 m2 ..., in which the valu e of x is different for different graphic modes. But also control code s like <ESC> "X" n1 n2 m1 m2 ..., in which capital X is one of the foll owing capitals: K, L, Y, Z to suggest several graphic modes. With the Final Cartridge III we use the control codes like <ESC> "X" n1 n2 m 1 m2 ..., because almost all printers support these control codes (mo st printers even support both control codes). Unfortunately there ar e several printers that only support the other control codes, and that 's why we made it possible by Poking the values $30 to $36 in memory location $DC0C to use the other control codes. The meaning of these values and other information about EPSON control codes is found in t he manual of your printer. POKE $DC0C,$30 Printing in Single Density. POKE $DC0C,$31 Printing in Double Density. POKE $DC0C,$32 Printing in High Speed, Double De nsity. POKE $DC0C,$33 Printing in Quadruple Density. POFE $DC0C,$34 Printing in CRT graphics. POKE $DC0C,$35 Printing in Plotter graphics. POKE $DC0C,$36 Printing in CRT graphics II. PAGE 25 At the foot of the paragraph PRINT there wi ll be a new paragraph called RECOVER. RECOVER After QUIT, NEW or LOAD your text is lost, but by u sing this command you can get it back. PAGE 26 At the foot of the paragraph BOLD there wil l be a new paragraph called PROPORTIONAL.

PROPORTIONAL This option makes it possibly to choose between pro portional or normal characters. To work with columns you should disabl e proportional. PAGE 26 At the foot of the paragraph EDIT FUNCTIONS there will be a new paragraph called SPECIAL FUNCTIONS. SPECIAL FUNCTIONS It is possible to use a special function in your te xt. For the time being we implemented the printer function Form Feed . You can enter this function by typing the < > (left arrow) key. T his character will also be shown on the screen, but while printing you r text a Form Feed is given at this place. The text following the left arrow will be printed on a new page. PAGE 36 Between the BASIC commands MWRITE and OLD. This is a new command. OFF Syntax: OFF oF This command makes it possible to disable the extra BASIC commands, without disabling the Final Cartridge III itself. The disk & tape turbos, and the printer-interface still work. Remarks: You have to choose this command to work with TOOLKIT programs or programs who define their own char acterset. PAGE 38 Between the BASIC commands RENUM and TRACE. This is a new command. REPLACE Syntax: REPLACE <command1>,<command2> / "text1 ","text2" reP <commmand1>,<command2> / "text1","text2" This command makes it possible to replace a text or a BASIC command in whole your program. Example: REPLACE PRINT#1, PRINT This replaces the PRINT#1 statements by norma l PRINT statements. REPLACE "FC3","Final Cartridge III" This replaces the text FC3 by Final Cartridge III. PAGE 58 At the foot of the paragraph REMARKS ON THE DISK TURBO. This

is new. It seemed that the first version of the Final Cartr idge III didn't work well with SPEEDDOS computers. We corrected th is in later versions. ********* End of the Project 64 etext of the FC3 manual suppl ement. [#1] ********* The Project 64 etext of the FC3 manual supplement. [#2] ********* On these pages you find supplements of the Final Ca rtridge III's manual. There are also some new commands which wer e not implemented during the first printing of the manual. PAGE 19 At the foot of the paragraph OPENING A DIRE CTORY WINDOW, This is a supplement. To read a new directory in an already opened window , select the read gadget in the right bottom corner of a directory wi ndow. PAGE 19 Between the paragraphs SELECTING A PROGRAM and READING THE ERROR-CHANNEL. This is a new paragraph. SORTING A DIRECTORY With the Final Cartridge III it is possible to sort a directory. You can do this by following the next steps: open a dir ectory window (1) in which you select the sort gadget. If you now sel ect a program (2) you can by using the up or down gadgets move the pr ogram to another place. If it's on the place you like (3), select an other program to move until all programs are placed in the way you l ike. You can even add an empty line in the directory. This is done b y selecting the program directly above where you want to insert the line (4,5). After the whole directory is sorted you select again the sort gadget, after which a requester is opened to ask if you're sure t o place the new directory on the disk (6). If you are, the directo ry is written on the disk (7). PAGE 24 At the foot of the paragraph TESTED PRINTER S. This is new. You can expand the list of tested printers with the Commodore MCS 801 color printer. You choose Commodore as interface, C BM compatible as type, and select YES at COLORS. PAGE 24 At the foot of the paragraph !! ABORT PRINT ING !! there will

be a new paragraph. SPECIAL PRINTER FUNCTIONS Normally spoken you can control the printer from th e printer window, but by Poking some values in memory location $DC0C (hexadecimal) several special functions can be used. Of course y ou have to type these values before you load the program where you want to make a screendump from. If you don't want to use these spe cial functions, you don't have to POKE. The values that perform the spe cial functions are described below. POKE $DC0C,$FF No Centronics check. Normally spoken the Final Cartridge III always look s for a Centronics printer, but by Poking $FF into $DC0C you disable t hat check. POKE $DC0C,$FE RS-232 Printing. By Poking the value $FE into $DC0C the screendump i s sent using the user port to a RS-232 printer. PAGE 26 At the foot of the paragraph TESTED PRINTER S. This is new. You can expand the list of tested printers with the Commodore MCS 801 color printer. You choose Commodore as interface, CBM compatible as type, and select YES at COLORS. PAGE 28 At the foot of the paragraph BOLD there wil l be a new paragraph called PROPORTIONAL. PROPORTIONAL This option makes it possibly to choose between pro portional or normal characters. To work with columns you should disabl e proportional. PAGE 29 At the foot of the paragraph EDIT FUNCTIONS there will be a new paragraph called SPECIAL FUNCTIONS. SPECIAL FUNCTIONS It is possible to use a special function in your te xt. For the time being we implemented the printer function Form Feed . You can enter this function by typing the < > (left arrow) key. T his character will also be shown on the screen, but while printing you r text a Form Feed is given at this place. The text following the left arrow will be printed on a new page. PAGE 39 Between the BASIC commands MWRITE and OLD. This is a new command. OFF Syntax: OFF oF

This command makes it possible to disable the extra BASIC commands without disabling the Final Cartridge III itself. T he disk & tape turbos, and the printer-interface still work. Remarks: You have to choose this command to work with TOOLKIT programs or programs who define their own char acterset. PAGE 42 Between the BASIC commands RENUM and TRACE, This is a new command. REPLACE Syntax: REPLACE <command1>,<command2> / "text1 ","text2" reP <command1>,<command2> / "text1","text2" This command makes it possible to replace a text or a BASIC command in whole your program. Example: REPLACE PRINT#1,PRINT This replaces the PRINT#1 statements by norma l PRINT statements. REPLACE "FC3","Final Cartridge III" This replaces the text FC3 by Final Cartridge III. PAGE 63 At the foot of the paragraph REMARKS ON THE DISK TURBO. This is new. It seemed that the first version of the Final Cartr idge III didn't work well with SPEEDDOS computers. We corrected this in later versions.